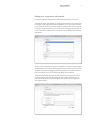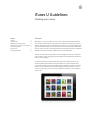
1
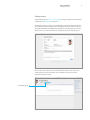
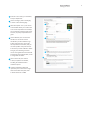
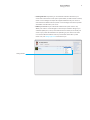
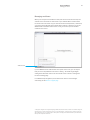
iTunes U Guidelines Creating your course Contents Overview 1 Getting started 2 Editing and organizing content 4 Adding posts, assignments, and materials 6 Course management 7 Best practices 7 Managing enrollment 10 Overview With iTunes U, it’s easy to create your own custom courses for iPad and teach them in your classroom. And the iTunes U app puts all the materials you create for your course— syllabus, videos, apps, books, class assignments, and more—all in one place. Right in the app, your students can play video or audio lectures, read books, and view presentations. They can also see a list of course assignments, then check them off as they’re completed. And when you create a new post, students receive a push notification. Anyone can create courses using iTunes U Course Manager, an easy-to-use web-based tool. To create a course, simply gather all the materials you need and follow the steps in iTunes U Course Manager. Courses can include your syllabus, handouts, assignments, and other items. You can include content from the iBooks Store and the App Store, as well as web links. And you can link to materials from over 600,000 selections available on iTunes U, including audio and video content from the world’s leading education institutions. Once your course is ready, it’s easy to share it with your students or publish it to your institution’s iTunes U site. iTunes U Guidelines Creating your course 2 Getting started To get started, sign in to iTunes U Course Manager using your Apple ID. If you don’t have an Apple ID, visit My Apple ID to create one. The first time you log in to iTunes U Course Manager, you’ll be prompted to enter information about yourself, including your bio and photo as well as your primary institution. This profile information will automatically populate the Instructor page of your courses. All the courses you create will reference your profile, which you can edit at any time. After you save your profile, you’ll see your dashboard. To create a new course, click Create New Course. You’ll see the New Course Settings screen where you enter information about your course. Create New Course iTunes U Guidelines Creating your course 1 Enter the course name, your institution, and your department. 2 Choose a category and a subcategory, as well as a level and language. 1 3 Add a description—this is your chance to tell students about your content and to set course expectations. For example, you can include a summary of the course structure, or perhaps expectations and goals. 6 2 4 Choose whether your course will be Self-Paced or In-Session. Choose Self-Paced if you want students to go at their own speed. You can include the expected course duration, and you can make updates at any time. Choose In-Session if you want students to follow along as you’re teaching. In-Session courses are organized around a calendar and include a start and stop date, as well as assignment due dates. 5 Select a license for your content. A variety of options are available, including the standard Creative Commons options. 6 Upload a compelling image that represents your course. Use an image that’s at least 600 x 600 pixels, with a maximum file size of 10MB. 3 4 5 3 iTunes U Guidelines Creating your course 4 When you finish entering the information in New Course Settings, click Save and you’ll see your dashboard again. All the courses you create appear in this dashboard. You can see at-a-glance information about each course, as well as how much storage you have. Select the course you want to edit to add posts, assignments, and materials. Amount of content you’ve added to your course. Number of students enrolled in your course. Editing and organizing content You’ll build your course using the Overview, Instructor, and Outline pages. The Overview page contains the information you already added from your course settings, including the course description, your institution, level, and so on. You can edit your course information at any time. The Instructor page contains your profile information. You can edit this at any time. The Outline page is where you enter your course syllabus. All your posts and assignments will be associated with topics in your outline. You can enter your outline directly into iTunes U Course Manager and include up to two sub-levels, or you can paste a plain-text outline into this field. iTunes U Guidelines Creating your course 5 Overview page Instructor page Outline page Add new page If you have topics that don’t fit under Overview or Instructor pages, you can add new pages. Examples of new pages could be course policies, prerequisites, learning outcomes, or anything you think would be useful for students taking the course. iTunes U Guidelines Creating your course 1 6 Adding posts, assignments, and materials Use posts, assignments, and materials to add content and context to your course. Communicate directly with students by creating posts that relate to your outline topics. For example, a post might be instructions, explanations, or a lecture summary. To enter a post, choose a topic from your outline, create a post title, and then write the body of the post. For self-paced courses, you can reorder posts by dragging a selected post to a new location in the outline. Posts for in-session courses are ordered by the date they 3 were posted. 1 You can create an assignment on any post. An assignment is a task or to-do that students should complete. You can enter as many assignments as you want for each post, and you can reorder assignments by dragging a selected assignment to a new location within a post. For in-session courses, you can select a due date for each assignment. Assignments can include many types of materials that are part of your course, such as videos, audio files, web links, apps, books, documents, and presentations. You can add content from the App Store and the iBooks Store, and you can even upload your own original materials. iTunes U Guidelines Creating your course 7 Course management • Duplicate your course. You can make a copy of your course by clicking Duplicate in the dashboard next to the appropriate course. You can edit the copy of your course however you like, such as changing it from in-session to self-paced. • Invite Course Contributors. You can invite up to five Course Contributors to your course. Course Contributors can contribute to your course by adding posts, assignments, and materials; they can also manage enrollment. Add Course Contributors in Settings. • Send a copy. You can now send a complete copy of your course (including the outline, posts, assignments, and materials) to another instructor. The instructor receiving the course can start using that course immediately with their own students or edit it as they wish. Best practices • Description. Include a list of learning objectives in your course description. This will help students quickly determine if the course will meet their learning needs, especially for public courses. • Active learning pathway. Tell a story of the learning your students will do with your outline, posts, and assignments. • Display titles. Use short titles for posts and assignments so students see the most important information at a glance. • Posts. Use posts to add meaning and context to learning materials. Connect the current activities to what they’ve already learned and how this new content will be important in future units. • Assignments. Begin your assignments with action verbs. Assignments will form a to-do list for your students. • Diverse learning materials. You can add materials to your course from the Posts tab or the Materials tab. Incorporate materials that support diverse learning styles; aim for a healthy mix of text, video, apps, books, and so on. The App Store features over 100,000 education apps that cover a wide range of subjects for every grade level and learning style. iBooks has a large selection of books for your courses, including biographies, reference guides, and iBooks Textbooks from major education publishers. And the iTunes U catalog of educational content is filled with countless learning resources like lectures and videos to use in your courses. • All Materials. You can also add materials using the All Materials feature. Use your All Materials list to add materials if you’re teaching several courses that use the same materials. You can also use it to keep a wish list of items for use in future courses. iTunes U Guidelines Creating your course 8 Posts tab Materials tab All Materials • Deep linking. Link to a particular start and stop point in a video or to a particular chapter in a book, so students can go directly to the content you’ve assigned. • Upload original materials. You can upload original materials, such as presentations, worksheets, videos, and books, so everything students need to complete your course is one tap away. • Take advantage of note taking. Use text in ePub or iBooks formats whenever possible. This allows your students to take notes within the book and aggregate them in the Notes tab of the course. Consider converting your PDF, Word, or Pages documents to ePub or iBooks Author formats. • Leverage mobility and built-in tools. Craft activities that take advantage of the mobile platform; collect data or create content outside the classroom, on your campus, during field trips, or in your community. Take advantage of the built-in camera, microphone, and video recorder on iPad to build new kinds of activities. • Announcements. If you’re teaching an in-session course, you can send announcements to your students at any time; these announcements are not connected to a topic in your outline. Announcements might be administrative notices to students, such as a canceled class or a change to a test date. • Preview your course. Preview your course on an iPad, iPhone, or iPod touch before sharing it with your students so you’re certain it appears and functions the way you intended it to. To preview your course, click the Settings button and select Enroll Code from the menu. From the Enroll Code window, copy the shortcut link to your course and send the link to your iOS device using Messages or Mail. Then tap the shortcut link on your iOS device to preview your course. iTunes U Guidelines Creating your course 9 • Including RSS feeds. If you’d like, you can add audio and video materials to your course from an RSS feed or lecture capture system. When you add a feed as a material, iTunes U Course Manager will import the supported materials into your course. As new materials are added to the feed, iTunes U Course Manager will check for updates and add the new materials to your course. • Affiliate your account. If your educational institution has a public iTunes U site, affiliate your iTunes U Course Manager account with your institution. This gives you unlimited upload space, courses, and enrollment. This also allows you to submit your course to your public site administrator for publishing on your iTunes U site where it can reach students around the world. If your institution doesn’t have a public iTunes U site, visit eduapp.apple.com to learn how to join. Settings button iTunes U Guidelines Creating your course 10 Managing enrollment When you’re ready to invite students to enroll, click Share Course from the roster, and send the course enroll code or shortcut link to your students. When a student enters the enroll code in the iTunes U app or clicks the link from an iPad, iPhone, or iPod touch, you’ll receive the enrollment request and be able to approve or block it. If you are not affiliated with an institution with an iTunes U site, you can have up to 50 students enrolled in each course. Share Course If you’re affiliated with an institution that has a public iTunes U site, you can request that your course be published in the iTunes U catalog—the world’s largest digital catalog of free education content. Just click “Submit Course to iTunes U Catalog” from the Course Settings page. For additional help and guidance, and to browse the iTunes U Course Manager community, visit the iTunes U Support page. © 2013 Apple Inc. All rights reserved. Apple, the Apple logo, iBooks, iPad, iPhone, iPod touch, and iTunes U are trademarks of Apple Inc., registered in the U.S. and other countries. iTunes Store is a service mark of Apple Inc., registered in the U.S. and other countries. App Store and iBooks Store are service marks of Apple Inc. Other product and company names mentioned herein may be trademarks of their respective companies. November 2013