1
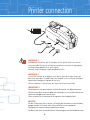
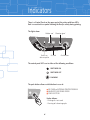
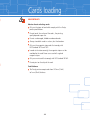
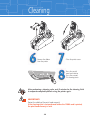
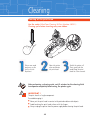
Welcome
To The World of Evolis Card Printer Products!
Congratulations on making the Dualys printer your choice!
Please read carefully this Operating Guide before installing your printer.
It is a quick guide to help you to use your Dualys Card Printer.
July 2003 © Evolis Card Printer. All rights reserved.
No part of this document may be reproduced by any method, either mechanical, electronic,
photographic, or otherwise without prior written permission from Evolis Card Printer.
All information contained in this document is subject to changes without prior notification.
Rev.1.0
1
Summary table
Printer description
. . . . . . . . . . . . . . . . . . . . . . . . . . . . . . . . . . . . . . . . . . . . . . . . . . .
3
Printer connection
. . . . . . . . . . . . . . . . . . . . . . . . . . . . . . . . . . . . . . . . . . . . . . . . . . . .
4
Driver installation
. . . . . . . . . . . . . . . . . . . . . . . . . . . . . . . . . . . . . . . . . . . . . . . . . . . .
5
Indicators
. . . . . . . . . . . . . . . . . . . . . . . . . . . . . . . . . . . . . . . . . . . . . . . . . . . . . . . . . . . . . .
6
Cards loading
Card feeder
. . . . . . . . . . . . . . . . . . . . . . . . . . . . . . . . . . . . . . . . . . . . . . . . . . . . . . . . .
9
. . . . . . . . . . . . . . . . . . . . . . . . . . . . . . . . . . . . . . . . . . . . . . . . . . . . . . . . . . . . .
9
Card thickness adjustment
Card output hopper
Reject card box
. . . . . . . . . . . . . . . . . . . . . . . . . . . . . . . . . . . . . . . . . . . .
10
. . . . . . . . . . . . . . . . . . . . . . . . . . . . . . . . . . . . . . . . . . . . . . . . . . . . . . .
10
Ribbon loading
Cleaning
. . . . . . . . . . . . . . . . . . . . . . . . . . . . . . . . . . . . . . . . . . . . . . . . . . . . .
12
. . . . . . . . . . . . . . . . . . . . . . . . . . . . . . . . . . . . . . . . . . . . . . . . . . . . . . . . . . . . .
13
Cleaning of the printer interior
Cleaning of the print head
. . . . . . . . . . . . . . . . . . . . . . . . . . . . . . . . . . . . . .
13
. . . . . . . . . . . . . . . . . . . . . . . . . . . . . . . . . . . . . . . . . .
15
Maintenance of the cleaning rollers
9
. . . . . . . . . . . . . . . . . . . . . . . . . . . . . . . . . . . . . . . . . . . . . . . . . .
Help & Support
. . . . . . . . . . . . . . . . . . . . . . . . . . . . . . . .
16
. . . . . . . . . . . . . . . . . . . . . . . . . . . . . . . . . . . . . . . . . . . . . . . . . . . . .
17
2
Printer description
N
C
E
M
B
D
L
K
J
I
F
G
H
A
M
Card Output Hopper
Cover Lever
Card Feeder
Control Panel
Flip Over Module
Reject Card Box
Identification Label
Switch
Electrical Connector
Parallel Port (standard)
USB Port (standard)
Serial Port (optional)
Cleaning Rollers
N
Thermal Transfer Print Head
A
B
C
D
E
F
G
H
I
J
K
L
Collects the cards ejected from printer
Allows the printer cover to be opened and closed
Holds the cards before printing
Shows the printer activity
Rotates the card 180°
Collects the faulty cards
Gives the printer model and serial number
On/Off switch
For connecting the printer to the power supply
Enables data to be received and sent from and to the computer
Enables data to be received and sent from and to the computer
Enables data to be received and sent from and to the computer or
Remove dust before printing the cards
connection to an external smart card reader/encoder
For printing cards
IMPORTANT !
The printer must be placed on a flat surface, in a dust free environment.
It is essential to be able to access the printer from all sides for its installation.
3
Printer connection
IMPORTANT !
To disconnect the printer, pull the plug out of the socket which must remain
easily accessible.The printer must be connected to an electrical wiring properly
installed and equipped with an earth socket.
Use only the printer power supply provided by Evolis.
IMPORTANT !
La mise hors tension de ce produit se fait par le retrait de la fiche secteur qui
doit rester accessible. Ce produit doit être raccordé à une installation électrique
correctement protégée et équipée d’une terre.
Utiliser uniquement l’alimentation de l’imprimante fournie par Evolis.
IMPORTANTE !
Para desconectar este aparato quite el enchufe del conector, éste debe permanecer
fácilmente accesible. Este aparato debe estar conectado a una instalación eléctrica correctamente protegida y con toma de tierra.
Utilizar unicamente la alimentación de la impresora suministrado por Evolis.
WICHTIG !
Um den Drucker vom Netz zu trennen, soll einfach der Netzstecker aus der Steckdose
gezogen werden. Der Drucker selbst soll ausschließlich an einer geeigneten
Stromquelle mit korrekter Erdung angeschlossen werden.
Nur die mit dem Evolis Drucker belieferten Stromversorgung und Stromkabel benutzen.
4
Driver installation
Before using the Dualys printer, you must install its driver.
The Dualys operates under Windows 2000, NT 4.0 or Xp.
The enclosed CD-Rom includes a utility which automates the installation of the
printer driver. This utility installs the suitable driver for your computer configuration.
To install the Dualys Windows Drivers, please proceed as described below:
Insert the CD-Rom in your
computer CD drive.
The program runs
automatically.
Click on the menu
“Driver Installation”.
The driver installation runs
automatically.
NOTE !
For further information or if the installation program does not run automatically,
refer to the User’s Guide supplied on the CD-Rom.
5
Indicators
There is a Control Panel on the upper part of the printer with four LED’s.
Each is associated to a symbol showing the Dualys activity during printing.
The lights show:
Ribbon end
Cleaning signal
Switch on,
No card
data reception
Push button
The control panel LED’s are in either of the following conditions:
SWITCHED ON
SWITCHED OFF
FLASHING
max.
The push button allows re-initialization in case of:
NO CARD or INTERNAL PRINTER PROBLEM
MAGNETIC ENCODING ERROR
CARD EJECTION
It also allows:
- Printing of a test card
- Running of a cleaning cycle
6
Indicators
Refer to the following conditions to determine the status or current activity of
your printer.
The printer is ready to process
The printer is receiving data.
PRINTER READY
PROCESSING
There is no ribbon inside the printer.
The ribbon is finished.
The ribbon has been incorrectly installed.
The ribbon has cut.
Printing will start again after the ribbon has
been checked out.
END OF RIBBON
There is no card in the feeder.
The card thickness is not properly set.
The cards are bulging.
The cards are stuck together.
Press the push button for one second.
Printing will start again after the feeder
has been checked out.
NO CARD
7
Indicators
A cleaning cycle is required.
See Cleaning section for more information.
PRINTER CLEANING ALERT
A card is jammed inside the printer.
A mechanical part is defective inside the
printer.
Press one second on the push button. If the problem
still occur, call for technical assistance.
MECHANICAL PROBLEM
The magnetic stripe card orientation in the
feeder is incorrect.
The type of encoding is incorrectly set
(HICO or LOCO).
The encoding data does not comply with
ISO 7811 Norms.
Press one second on the push button. The current
magnetic encoding job will start again. If the problem
still occur, call for technical assistance.
The printer cover is open.
MAGNETIC ENCODING ERROR
OR PRINTER COVER OPEN
The print head system is cooling down.
Note: the printer stops. The pending printing job
starts again automatically after a few seconds.
COOL DOWN MODE
8
Cards loading
Card feeder
max.
max.
max.
Remove the feeder
from the printer
as shown.
Press the spring system down
inside the feeder and insert
the cards as shown (100
cards max. 0.76mm-30mil).
Note: The side to be printed
must be facing down.
Replace the feeder
in the printer.
Card thickness adjustment
Move up or down the handle
as shown to adjust the card
thickness.
Note: factory setting for card
thickness is 0.76mm (30mil).
9
Cards loading
Card output hopper
Locate the door of
the output hopper.
Open the door as
shown and remove
the printed cards.
Close the door.
Reject card box
Locate the reject card box and
remove the faulty or/and used
cleaning cards.
10
Cards loading
IMPORTANT !
Advice about selecting cards
Only use the types of card which comply with the Dualys
printer specifications.
Do not touch the surface of the cards ; the printing
quality depends upon this.
Do not use damaged, folded or embossed cards.
Always store blank cards in a clean, dust free location.
Only use the magnetic stripe cards that comply with
ISO Standard 7810 and 7811.
In order to function correctly, the magnetic stripe must be
moulded to the card. Never use a card with a glued
magnetic stripe.
Only use smart cards that comply with ISO Standard 7816-2.
Do not print on the chip of the card.
Card thickness
The Dualys printer accepts cards from 0.25mm (10mil)
to 1mm (40mil) thickness.
11
Ribbon loading
Open the printer cover
by pressing on the lever,
then pivoting it.
Install the ribbon in
the printer as shown.
Close the
printer cover.
IMPORTANT !
The type of the ribbon is selectable through the printer driver in the “Main” tab.
The ribbon must be correctly installed for the printer to function. Only use Evolis
ribbons. Evolis accepts no responsibility if the printer is damaged following the
use of an unapproved ribbon.
The ribbon is automatically positioned each time the cover is closed.
12
Cleaning
Cleaning of the printer interior
Use the Pre-Saturated Cards (UltraClean Cleaning Kit Part Number: A5011).
Cleaning cycle: every 1000 cards.
The Dualys printer is fitted with a cleaning alert, which is activated every 1000
inserted cards. The cleaning alert LED’s switches on.
If you do not clean the printer while this LED is switched on, it will start flashing
after another 200 cards has been inserted.
max.
Remove the feeder from
the printer as shown.
Remove the
cards present
in the feeder.
Check that the card
thickness is set to
0.76mm (30mil).
13
Take a new
pre-saturated cleaning
card and insert it
in the feeder as shown.
Replace the feeder
in the printer.
max.
Cleaning
max.
Remove the ribbon
from the printer.
Close the printer cover.
Press the control
panel push button
for a few seconds.
The cleaning starts.
After performing a cleaning cycle, wait 2 minutes for the cleaning fluid
to evaporate completely before using the printer again.
IMPORTANT !
Protect the validity of the print head warranty!
If the cleaning cycle is not performed before the 1200th card is printed,
the print head warranty is void.
14
Cleaning
Cleaning of the print head
Use the swabs (UltraClean Cleaning Kit Part Number: A5011).
Cleaning cycle: before inserting every new ribbon.
Take a new swab
and press on the
stick to let the
liquid out.
Open the printer
cover and locate
the print head.
Switch the printer off.
Then, gently rub the
swab along the print
head for a few seconds.
After performing a cleaning cycle, wait 2 minutes for the cleaning fluid
to evaporate completely before using the printer again.
IMPORTANT !
The print head is a fragile component.
To avoid damaging it:
Never put the print head in contact with pointed and/or metal objects.
Avoid touching the print head surface with the fingers.
Always unplug the printer from the power supply before cleaning the print head.
15
m
Cleaning
Maintenance of the cleaning rollers
Use the cleaning cloths (UltraClean Cleaning Kit Part Number A5011).
Cleaning cycle: before inserting every new ribbon.
max.
Open the printer
cover. Remove the
ribbon if present
and remove the
two cleaning rollers.
Remove dust by
rubbing gently
with the cloth
over the whole
roller surface.
Once dry, replace
the two rollers in the
printer, then close
the printer cover.
After performing a cleaning cycle, wait 2 minutes for the cleaning fluid
to evaporate completely before using the printer again.
16
Help & Support
evolis.com
If you need some help, the Evolis Web Site will offer you some technical
information in the Support & Services section.
This section provides drivers, firmware, software downloads, instruction
manuals, and gives answers to frequently asked questions (F.A.Q.).
The information below will help you to solve possible problems that can
occur when using your printer and help you to solve printing quality
issues.
A blank card is ejected from the printer
1. Check the ribbon
• Check that the ribbon is not finished or cut. Replace or reinstall the ribbon,
if necessary.
2. Check the printer cleanliness.
• Clean the print head.
3. Check the printer interface cable
• Check the connection to the computer and to the printer.
• Test with another cable of the same type.
4. Elements of the print head may be damaged.
• Print a test card
If the test card does not print, contact an Evolis Reseller for a replacement print
head.
17
Help & Support
The print quality is not satisfactory
1. Check the printer cleanliness.
• Clean the print head.
2. The contrast settings must be modified
• Increase the contrast settings in the printer driver configuration.
3. The type of card used may be inappropriate
• Check if the type of card used has the required specifications.
• The texture of the card is rough or not perfectly flat.
• Print test with another type of card.
Partial or incorrect printing
1. Check the settings defined for the printing
• Check that no element of your page setup is outside the print margins
• Check the orientation of the selected document in the printer driver configuration (Landscape or Portrait)
2. Check the printer interface cable
• If unusual characters print, check that you are using the interface cable
appropriate to your printer.
• Check the connection to the computer and to the printer.
• Test with another cable of the same type.
3. Check the printer cleanliness
• Clean the inside of the printer, the cleaning roller and the print head if necessary.
4. Check the cards cleanliness
• Check that the cards are stored in a dust-free location.
5. Check the print head cleanliness
• See the procedure for cleaning the print head in the “ Cleaning ” section.
6. Check the ribbon
• Its location in the printer
• Its correct winding path
7. Check the print head
• If white horizontal lines appear on the card, some print head elements may
be clogged or damaged.
• Clean the print head
• If the problem is not solved after cleaning, contact an Evolis Reseller for a
replacement print head.
18
Help & Support
Contacting an Evolis Reseller
If the suggestions given in the previous section do not enable the
problem(s) to be solved, contact your local Evolis Reseller.
When you call an Evolis Reseller, you must be near your
computer and be ready to supply the following information:
The type and the serial number of your printer
The type of configuration and the operating system you are using
A description of the incident that occurred
A description of the steps you have taken to solve the problem
For further information about the Dualys printer, the supplied CD-Rom
contains a User’s Guide as a PDF format. You can display this guide or
print it.
19
20