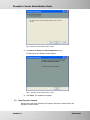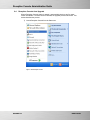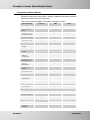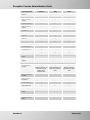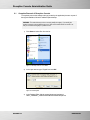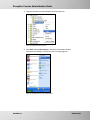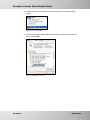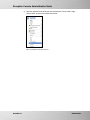
1
RECEPTION CONSOLE
ADMINISTRATION GUIDE
August 2009
Version 6.0
WWW..COM
PAGE 1 OF 35
Reception Console Administration Guide
Trademarks
BroadSoft® and BroadWorks® are registered trademarks of BroadSoft, Inc.
Microsoft, MSN, Windows, and the Windows logo are registered trademarks of Microsoft
Corporation. Other product names mentioned in this manual may be trademarks or
registered trademarks of their respective companies and are hereby acknowledged.
This document is printed in the United States of America.
RELEASE 6.0
PAGE 2 OF 35
Reception Console Administration Guide
Table of Contents
1
Document Changes ......................................................................................................................... 5
2
Summary of Changes ...................................................................................................................... 6
2.1
3
Changes for Release 6.0............................................................................................................. 6
Introduction ....................................................................................................................................... 7
3.1
About This Guide ......................................................................................................................... 7
3.2
Overview....................................................................................................................................... 7
3.3
Audience....................................................................................................................................... 7
4
Reception Console Overview......................................................................................................... 8
5
Hardware and Software Requirements ...................................................................................... 12
6
5.1
Operating System ...................................................................................................................... 12
5.2
Hardware Requirements ........................................................................................................... 12
5.3
Software Requirements............................................................................................................. 12
5.4
Platform Requirements.............................................................................................................. 12
5.5
Interoperable Phones ................................................................................................................ 13
Installation ....................................................................................................................................... 14
6.1
Operating System Installation ................................................................................................... 14
6.2
Install Reception Console.......................................................................................................... 14
6.3
Start Reception Console............................................................................................................ 16
6.4
Reception Console Auto Upgrade ............................................................................................ 17
7
Reception Console Editions......................................................................................................... 20
8
Service Provisioning...................................................................................................................... 23
9
8.1
License ....................................................................................................................................... 23
8.2
Service Configuration ................................................................................................................ 24
8.3
Configure Queues (Enterprise Edition)..................................................................................... 26
Uninstallation .................................................................................................................................. 28
9.1
10
Complete Removal of Reception Console ............................................................................... 30
Operational Scenarios ................................................................................................................... 34
RELEASE 6.0
PAGE 3 OF 35
Reception Console Administration Guide
Table of Figures
Figure 1 Reception Console Installation Wizard – Page 1 ..................................................................... 14
Figure 2 Reception Console Installation Wizard – Page 2 ..................................................................... 15
Figure 3 Reception Console Installation Wizard – Page 3 ..................................................................... 15
Figure 4 Reception Console Installation Wizard – Page 4 ..................................................................... 16
Figure 5 Reception Console Installation Wizard – Page 5 ..................................................................... 16
Figure 6 Start Reception Console............................................................................................................ 17
Figure 7 Reception Console Check for Updates..................................................................................... 18
Figure 8 Reception Console Start Update Download............................................................................. 18
Figure 9 Reception Console Download Complete.................................................................................. 19
Figure 10 Reception Console Java Check.............................................................................................. 19
Figure 11 User – Assign Services............................................................................................................ 23
Figure 12 User – Reception Console – Enterprise ................................................................................. 24
Figure 13 User – Reception Console –SMB ........................................................................................... 25
Figure 14 User – Reception Console – Admin........................................................................................ 25
Figure 15 Group – Call Center ................................................................................................................. 26
Figure 16 Call Center – Assign Client Call Control Service.................................................................... 27
Figure 17 Start Drop-down List – Control Panel Button.......................................................................... 28
Figure 18 Add or Remove Programs Button........................................................................................... 28
Figure 19 Remove Reception Console.................................................................................................... 29
Figure 20 Add or Remove Programs Dialog Box.................................................................................... 29
Figure 21 Start Drop-down List – Run Button ......................................................................................... 30
Figure 22 Run Dialog Box ........................................................................................................................ 30
Figure 23 Registry Editor Drop-down List................................................................................................ 31
Figure 24 Start Drop-down List – My Computer Button.......................................................................... 31
Figure 25 Tools – Folder Options............................................................................................................. 32
Figure 26 Folder Options – View Tab ...................................................................................................... 32
Figure 27 Reception Console Drop-down List ........................................................................................ 33
RELEASE 6.0
PAGE 4 OF 35
Reception Console Administration Guide
1
Document Changes
August 10, 2009 – Initial document created.
RELEASE 6.0
PAGE 5 OF 35
Reception Console Administration Guide
2
Summary of Changes
This section describes the changes to this document for each release and document
version.
2.1
Changes for Release 6.0
This version of the document includes the following changes:
Added information about Directory Views in section 7 Reception Console Editions for
EV 89928.
Updated the note in section 8.1 License.
This version of the document includes the following changes made in response to
EV 67940:
RELEASE 6.0
Added information about the Reception Console Enterprise, SMB, and
Admin editions.
Added a comparison of the Reception Console editions in a tabular form.
Updated the guide to clearly identify the functionality available in each
edition.
PAGE 6 OF 35
Reception Console Administration Guide
3
3.1
Introduction
About This Guide
This guide is designed to provide information about planning, installing and configuring the
Reception Console. This document is not intended to supplement or replace the
hardware manufacturer’s instructions for equipment installation, maintenance and support.
This document assumes that Reception Console customers have a clear understanding of
the underlying operating system and associated hardware. Customers should also have a
working knowledge of the purchased access and network devices of our partner
companies.
Reception Console exists in three editions: Enterprise, SMB and Admin. This guide
applies to all three editions.
Hardware and software requirements (as well as installation and uninstallation) are
common to all three editions. However, service provisioning differs from one edition to the
next. Provisioning steps that apply to a particular edition are identified with the edition
name. For example, the section describing queue configuration is tagged as follows:
6.5 Configure Queues (Enterprise Edition)
3.2
Overview
Reception Console software is usually deployed from the service provider’s website to the
end user’s desktop.
3.3
Audience
This document is intended for anyone responsible for the deployment and management of
Reception Console software. This document is intended for network administrators and
systems integrators who install Reception Console software for end-user activities on the
softswitch.
RELEASE 6.0
PAGE 7 OF 35
Reception Console Administration Guide
4
Reception Console Overview
Reception Console is a carrier class IP Telephony attendant console for Receptionists or
telephone attendants who screen inbound calls for enterprises.
Reception Console delivers the following real benefits to users:
An ergonomic design that follows the natural work “flow” of a call from the top to the
bottom of the screen.
Improved business processes as only valid options are presented to the attendant.
Professional call handling as critical information is available in “real time”.
Accurate delivery of messages via a one step process when people are unavailable.
Integration with SIP based softswitch.
Reception Console is an intuitive attendant console that manages high volume call
distribution for front-desk operators through remote control of their desk phone. In
addition, to integrated contact status, it has many other features that include call statistics
and integration into enterprise-level repositories and services.
Reception Console is available in three editions: Enterprise, SMB, and Admin. Each is
tailored to the specific needs of its targeted sector. Each edition also requires a separate
license. Section 7 Reception Console Auto Upgrade
When a Reception Console session is started, it automatically checks to see if a newer
version is available. If a newer version is detected, the upgrade process is launched. This
section describes the process.
1) Launch Reception Console from the Start menu.
RELEASE 6.0
PAGE 8 OF 35
Reception Console Administration Guide
Figure 6 Start Reception Console
RELEASE 6.0
PAGE 9 OF 35
Reception Console Administration Guide
2) If a newer version exists, a wizard is launched to locate and download the
application. Click Next to start the process.
Figure 7 Reception Console Check for Updates
3) Click Next to begin downloading the new application. Once the download
completes, the new version installer is automatically started and an upgrade
process takes place.
Figure 8 Reception Console Start Update Download
RELEASE 6.0
PAGE 10 OF 35
Reception Console Administration Guide
4) When the download is complete, click Finish to start the installation process. The
installation will then proceed as described in section 6.2 above.
Figure 9 Reception Console Download Complete
5) To verify the installation, start Reception Console. Upon start up, the application
checks the Java Runtime Environment version running on the PC for
compatibility. If the version is incompatible, the following window appears.
Figure 10 Reception Console Java Check
6) Click OK. A browser window pointing to Java.com will appear, with a Free Java
Download prompt. Click on the prompt and follow the instructions. After
download and installation, Reception Console should run properly. Start the
application again to verify.
Reception Console Editions specifies the functionality of each edition.
RELEASE 6.0
PAGE 11 OF 35
Reception Console Administration Guide
5
Hardware and Software Requirements
The requirements listed here are the minimum requirements for proper Reception Console
behavior. It is strongly recommended that computer systems intending to run Reception
Console have capabilities that exceed these.
5.1
Operating System
Reception Console is deployed on the Microsoft Windows platform.
5.2
Hardware Requirements
Microsoft Windows Platform
The hardware requirements for Microsoft Windows platform include:
5.3
1.2 GHz or higher, Pentium 3, or compatible CPU
512 MB of RAM recommended minimum (more memory generally improves
performance)
60 MB available hard disk space
Video Graphics Card with minimum of 8 MB RAM
Super VGA Monitor (15" or larger)
800 x 600 screen resolution minimum (1024 x 768 is recommended)
TCP/IP connectivity to the softswitch as designated by service provider (default port is
2208):
Software Requirements
The software requirements include:
Windows 2000 with SP4 (or higher), Windows XP or Windows Vista
Windows Installer 2.0
Sun Microsystems Java 2 Standard Edition (J2SE) Runtime Edition Versions:
−
Java 5 Update 11 (or higher maintenance releases) or Java 6 Update 2 (or higher
maintenance releases)
Internet Explorer 6.x or Internet Explorer 7.x (not compatible with IE 8.x)
IMPORTANT NOTE: Reception Console is not compatible with
Internet Explorer 8.0 or higher.
5.4
Platform Requirements
The platform requirements include:
For installation, a Windows user account with administrative rights.
For post installation, a Windows user account with the following rights are required:
−
RELEASE 6.0
Registry HKEY_LOCAL_MACHINE hive
PAGE 12 OF 35
Reception Console Administration Guide
−
−
Read
−
Enumerate
−
Query
Registry HKEY_CURRENT_USER hive
−
5.5
Full Access
−
Reception Console install Directory
(Default C:\Program Files\Reception Console\)
−
Write
−
Read
−
Execute
Interoperable Phones
rd
Support of 3 Party Call Control (3PCC) techniques is required for support of Computer
Telephony Integration (CTI) functionality. Thus, it is critical that phones comply with the
Advanced Call Control (ACC) specification. Ensure the phone model and firmware used
is supported by the service provider.
Phone Model
RELEASE 6.0
Advanced
Call Control
Support
Call Appearances
Linksys 942/962
X
4
Polycom 301/501/550
X
2
Polycom 601/650/670
X
6
PAGE 13 OF 35
Reception Console Administration Guide
6
6.1
Installation
Operating System Installation
As previously mentioned, Reception Console is supported on Windows XP/Vista. In
Addition, Reception Console may work with Windows 2000 and Windows 2003 editions
(32-bit or 64-bit). However, Reception Console has not been tested or certified for use on
Windows 2000 or Windows 2003 editions. For information on the operating system, see
section 5 Hardware and Software Requirements.
6.2
Install Reception Console
A typical installation of Reception Console is depicted in the following diagrams. This
illustrates a standard windowed installer (non-silent) wizard:
1) Double-click on the Reception Console Installation executable.
The first page of the Installation Wizard appears.
Figure 1 Reception Console Installation Wizard – Page 1
RELEASE 6.0
PAGE 14 OF 35
Reception Console Administration Guide
2) Click Next.
The second page of the Installation Wizard appears.
Figure 2 Reception Console Installation Wizard – Page 2
3) Click Next to accept default value at the Destination Folder screen.
The third page of the Installation Wizard appears.
Figure 3 Reception Console Installation Wizard – Page 3
4) Verify the Complete installation type is selected and click Next.
The fourth page of the Installation Wizard appears.
RELEASE 6.0
PAGE 15 OF 35
Reception Console Administration Guide
Figure 4 Reception Console Installation Wizard – Page 4
5) Click Next at the Ready to Install the Application screen.
The fifth page of the Installation Wizard appears.
Figure 5 Reception Console Installation Wizard – Page 5
6) Click Finish. The installation is complete.
6.3
Start Reception Console
Navigate to the Start menu followed by All Programs, Reception Console and click the
Reception Console shortcut.
RELEASE 6.0
PAGE 16 OF 35
Reception Console Administration Guide
6.4
Reception Console Auto Upgrade
When a Reception Console session is started, it automatically checks to see if a newer
version is available. If a newer version is detected, the upgrade process is launched. This
section describes the process.
7) Launch Reception Console from the Start menu.
Figure 6 Start Reception Console
RELEASE 6.0
PAGE 17 OF 35
Reception Console Administration Guide
8) If a newer version exists, a wizard is launched to locate and download the
application. Click Next to start the process.
Figure 7 Reception Console Check for Updates
9) Click Next to begin downloading the new application. Once the download
completes, the new version installer is automatically started and an upgrade
process takes place.
Figure 8 Reception Console Start Update Download
RELEASE 6.0
PAGE 18 OF 35
Reception Console Administration Guide
10) When the download is complete, click Finish to start the installation process. The
installation will then proceed as described in section 6.2 above.
Figure 9 Reception Console Download Complete
11) To verify the installation, start Reception Console. Upon start up, the application
checks the Java Runtime Environment version running on the PC for
compatibility. If the version is incompatible, the following window appears.
Figure 10 Reception Console Java Check
12) Click OK. A browser window pointing to Java.com will appear, with a Free Java
Download prompt. Click on the prompt and follow the instructions. After
download and installation, Reception Console should run properly. Start the
application again to verify.
RELEASE 6.0
PAGE 19 OF 35
Reception Console Administration Guide
7
Reception Console Editions
Reception Console exists in three editions: Enterprise, SMB and Admin (with each edition
tailored to the specific needs of its target users).
Table 1 lists the features available in each edition of Reception Console.
Feature/Capability
Enterprise
SMB
Admin
Call Control – Dial
Other
Call Control – Dial
Directories/Call Logs
Call Control – Accept
Call Control – Hold
Call Control – End
Call Control – Blind
Transfer
Call Control – Consult
Transfer
Call Control – ThreeWay Call
Conferencing
Call Control – Voice
Mail Dial/Transfer
Multi-Call
Management
Last Redirected
Support
Directed Call Pickup
Group Call Park
Busy Camp On
(Client-based)
Recall Identification
Operator Barge-in
Day/Night Mode
Call Routing
Queuing
RELEASE 6.0
Queue Join/Unjoin
Queue Monitoring
Queue Manipulation
Queue Distribution
Queue Logs
Call Center
Integration
PAGE 20 OF 35
Reception Console Administration Guide
Feature/Capability
Enterprise
SMB
Admin
Auto Network Sensing
Auto Connect on
Startup
Hibernation Support
Multiple Instance
Support
Keep Alive
Caller ID
Callee ID
Switchboard
Drag and Drop
Company Notes
Company Profile
Keyboard Shortcuts
Customizable Panel
Sizes
Touch Screen
Support
Network
Usability
Repositories
(Monitoring limited to 200
static and up to 100
dynamic users1
enterprise-wide)
(Monitoring limited to 30
static users enterprisewide)
(Monitoring limited to
eight static users groupwide)
Monitored Contacts
Directory
Custom Contact
Directories
Personal Directory
Speed Dial 8/100
Outlook Integration
Call History (with
delete)
Contact Notes
Enhanced Contact
Status
Group/Enterprise
Directory
RELEASE 6.0
PAGE 21 OF 35
Reception Console Administration Guide
Feature/Capability
Large Repository
Support (40,000
contacts)
Enterprise
SMB
Admin
Directory View
List
Details
(+Switching between
views)
Integration
Windows
Softswitch Integration
Themes
Pre-bundled
Languages (7)
Localization Support
Feature Restrictions
Auto Update Checks
Requires Java
Runtime
ToolTips
Customization
Deployment
Table 1 Reception Console Features
RELEASE 6.0
PAGE 22 OF 35
Reception Console Administration Guide
8
8.1
Service Provisioning
License
Reception Console is licensed based on a per-user license. It has three editions, and
each has a separate license (Enterprise, SMB and Admin).
Before running Reception Console, log into the web portal and assign the necessary
services to the appropriate user requiring Reception Console access.
To provision Reception Console:
1)
Log into the web portal using a service provider administrator or group
administrator.
2)
Assign the following required services to the appropriate user depending on the
Reception Console license you have.
Reception Console License
User Service
Reception Console –
Enterprise
Receptionist - Enterprise
Reception Console – SMB
Receptionist - Small Business
Reception Console – Admin
Receptionist - Office
NOTE: There are adjunct licenses that may need to be assigned to provide full Reception
Console functionality. Furthermore the Call Park and Call Center group services are required for
the Enterprise Edition. For more information on Call Center queue integration see section 8.3
Configure Queues (Enterprise Edition).
Figure 11 User – Assign Services
RELEASE 6.0
PAGE 23 OF 35
Reception Console Administration Guide
8.2
Service Configuration
Each Reception Console license varies in its support for contact monitoring. The following
table describes the capabilities:
License
Contact Directory
Scope
Static Monitored
Users
Dynamic
Monitored Users
Reception Console –
Enterprise
Enterprise
Maximum 200
(configurable up to
1,000)
Maximum 100
Reception Console – SMB
Enterprise
Maximum 30
Not applicable
Group
Maximum 8
Not applicable
Reception Console –
Admin
The default monitoring style in Reception Console uses dynamic monitoring. However, if
you wish to constantly monitor the status of a particular set of users (static monitoring);
you must make sure that all contacts you wish the operator to monitor are in the Monitored
Users list box with respect to the licensing limitations described in the table above.
Following are examples of each license page:
Figure 12 User – Reception Console – Enterprise
RELEASE 6.0
PAGE 24 OF 35
Reception Console Administration Guide
Figure 13 User – Reception Console –SMB
Figure 14 User – Reception Console – Admin
Make sure that all contacts you wish the operator to monitor are in the Monitored Users list
box. All other contacts that are in the Unassigned Users list box have their monitoring
status handled dynamically in Reception Console.
RELEASE 6.0
PAGE 25 OF 35
Reception Console Administration Guide
8.3
Configure Queues (Enterprise Edition)
NOTE: Queues are configured at the group level but are accessible only to users with
Reception Console Enterprise edition.
1)
To access queues from Reception Console, assign the Call Center service to
your group.
2)
If the Call Center service is assigned, navigate to the Group – Call Center Profile
page.
Figure 15 Group – Call Center
RELEASE 6.0
−
Make sure that each of the Call Centers has a check mark in the Allow agent
logon/logoff check box (repeat this step for each Call Center).
−
Assign the users to be members of this Call Center (these are the Reception
Console licensees).
PAGE 26 OF 35
Reception Console Administration Guide
3)
Navigate to the Call Center – Assign Services page.
Figure 16 Call Center – Assign Client Call Control Service
Assign Client Call Control service (and any other services you want the Call Center to
have, such as Voice Messaging User service).
NOTE: The previous step is necessary for queue monitoring information to be sent to Reception
Console.
4)
To save your changes and display the previous page, click OK.
5)
To exit without saving, select another page or click Cancel to display the previous
page.
NOTE: The appropriate services in Step 3 must be assigned to the operator; otherwise,
Reception Console cannot be used.
RELEASE 6.0
PAGE 27 OF 35
Reception Console Administration Guide
9
Uninstallation
The following figures show a typical uninstallation of Reception Console.
1)
Click Start. Navigate to Control Panel from the list and select Control Panel.
Figure 17 Start Drop-down List – Control Panel Button
2)
In the dialog box, click Add or Remove Programs.
Figure 18 Add or Remove Programs Button
3)
RELEASE 6.0
Scroll down the list until Reception Console is visible.
PAGE 28 OF 35
Reception Console Administration Guide
4)
Click Remove.
Figure 19 Remove Reception Console
5)
A dialog box appears to confirm that you want to remove the program.
6)
Click Yes.
Figure 20 Add or Remove Programs Dialog Box
NOTE: Reception Console only uninstalls items that are known to the installer. Anything
created independently of the installer post installation is not removed. User-defined settings
such as logs and Hive Key Current User (HKCU) information remain on your computer. This is
because administrative privileges are required for uninstalling and may not correlate to the
logged in user. In addition, it is desirable to retain certain user settings during upgrades.
Therefore, some settings remain after removal if Reception Console is reinstalled.
RELEASE 6.0
PAGE 29 OF 35
Reception Console Administration Guide
9.1
Complete Removal of Reception Console
To completely remove the settings and logs (created by the application) that are not part of
the original installation, follow the additional optional steps:
WARNING: This method shows you how to correctly modify the registry. If you modify the
registry incorrectly, serious problems cam occur. Back up the registry before you modify it, so
that you can restore the registry if a problem occurs.
1)
Click Start and select Run from the list.
Figure 21 Start Drop-down List – Run Button
2)
In the Open text box type “Regedit” and click OK.
Figure 22 Run Dialog Box
3)
RELEASE 6.0
In the Registry Editor click the expand button and navigate to
HKEY_CURRENT_USER\Software\BroadSoft\BW Receptionist.
PAGE 30 OF 35
Reception Console Administration Guide
4)
Right-click the folder and select Delete from the drop-down list.
Figure 23 Registry Editor Drop-down List
5)
Click Start, and then My Computer. Select the C Drive folder, and then
Documents and Settings. Click the user who is currently logged on.
Figure 24 Start Drop-down List – My Computer Button
RELEASE 6.0
PAGE 31 OF 35
Reception Console Administration Guide
6)
If hidden folders are not visible, from the top menu select Tools, and then Folder
options.
Figure 25 Tools – Folder Options
7)
Click on the View tab. Under Hidden files and folders, click Show hidden files and
folders, and then OK.
Figure 26 Folder Options – View Tab
RELEASE 6.0
PAGE 32 OF 35
Reception Console Administration Guide
8)
Open the Application Data folder and click the Reception Console folder. Rightclick the folder, and then select Delete from the list.
Figure 27 Reception Console Drop-down List
RELEASE 6.0
PAGE 33 OF 35
Reception Console Administration Guide
10 Operational Scenarios
You can use Reception Console in a number of different operational scenarios. Additional
services need to be assigned and configured to support these scenarios and provide a
strategy that would complement the usage category and still provide a level of freedom
between the softswitch and the Reception Console software. Common operational
scenarios and recommended configurations include:
RELEASE 6.0
Scenario
Description
Solution
After Hours
Allows operators to automate
switching from day/night mode
and also configure options such
as Call Forwarding and Voice
Mail after business hours.
Use the day/night mode in the
Options tab to select night mode
options. Reception Console
automatically handles context
switching between day and night
operational modes during
login/logoff.
High Traffic
More than one attendant Console
managing multiple dedicated
mainline numbers.
For each mainline dedicated number,
configure a Hunt Group consisting of
all Reception Console users (or
operator numbers). This allows
incoming calls to be directed to the
next available Reception Console in
high volume overflow situations.
Hot-Desk
(Hoteling)
Allow multiple part-time operators
to share a single logon in
sequence when they change
shifts. (Note that licensing does
not support simultaneous logons.)
Operators can log in according to the
sequence based on rosters from
single or geographically disbursed
locations, using the same login
credentials. Concurrent logons
simply logoff current sessions.
Low Traffic
Single Reception Console
answering one or more dedicated
mainline numbers.
Configure all dedicated mainline
numbers to Call Forward All to the
Reception Console user (or operator
numbers). Additionally you may
setup Call Forward Busy and Call
Forward No Answer to redirect calls
to an alternative destination to cover
an overflow situation.
Multi-Tenanted or
Executive Offices
One or more operators answering
calls on behalf of different
organizations. Typically there is a
dedicated mainline number for
each organization and the
operator greets the caller based
on the number.
Create a mainline (or several
mainline) Direct Inward Dialing
(DIDs) for each organization and set
each line to use the Call Forward
Always service, redirecting the
mainline DID to the number set for
the Reception Console user (or
operator numbers). The Call To field
now displays each organization’s
mainline number for inbound calls.
Network Attendant
Console
Geographically dispersed
operators supporting each other
in an enterprise configuration.
Calls that cannot be handled at
one location for any reason are
answered at the other.
Use a combination of the Hunt
Group, Call Forwarding Busy, and
Call Forwarding No Answer services
to either handle overflow or simply
redirect calls from one Reception
Console user (or operator numbers)
to another.
PAGE 34 OF 35
Reception Console Administration Guide
RELEASE 6.0
Scenario
Description
Solution
Queued Reception
Console (Agent)
Pool
Alternative high traffic solution
that allows maximum flexibility by
integrating fully with Call Center
service.
Use a combination of Auto Attendant
and Call Center(s), to front end traffic
to a Reception Console pool acting
as agents for inbound traffic
distribution. Additional services
maybe assigned to Call Center to
handle overflow such as Voice
Messaging User.
Optional Voice Mail
User
Operator has the added ability to
transfer calls to voice mail for
contacts in a group/enterprise that
are busy or unavailable.
The Voice Messaging User service
must be set assigned for any user in
a group so the Voice Mail Call option
is enabled in Reception Console.
PAGE 35 OF 35