1
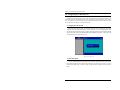
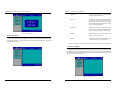
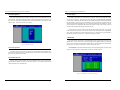
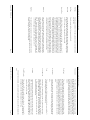
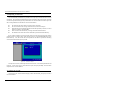
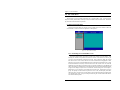
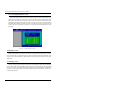
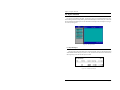
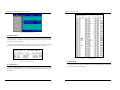
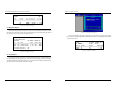
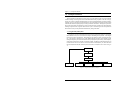
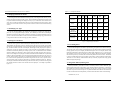
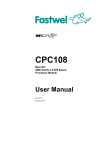
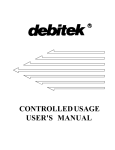
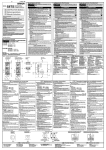
Unattended Payroll
Deduction System
User Manual
Contents
1.0 Introduction
1.1 System Features
1.2 System Requirements
1.3 Terms and Conventions
1.3.1 Terms
1.3.2 Conventions
1.3.3 Screen Area Definitions
2.0 Installation
2.1 Installing the Hardware
2.2 Connecting the DCT and Receipt Printer
2.3 Connecting the Remote Value Stations
2.4 Configuring the Remote Value Stations
2.5 Configuring the Local Card Reader
2.6 Installing the UPDS Software
4.3 Editing an Account
4.4 Importing Account Lists
4.5 Viewing an Account
5.0 The Card Menu
5.1 The Format Card Menu
5.1.1 Formatting an Account Holder's Card
5.1.2 Formatting Dispenser Cards
5.2 Reading a Card
5.3 Zeroing a Card
6.0 Report Functions
6.1
6.2
6.3
6.4
6.5
6.6
Payroll Report
Inquiry Report
System Report
Roster Report
Dispenser Report
Cycle Report
7.0 A Sample Installation
3.0 Configuring the UPDS Software
3.1 Logging In to the System
3.2 The Main Menu
3.3 The Setup Menu
3.4 The System Menu
3.5 PIN Creation
3.6 DCT and QVTS Port Data
3.7 Remote Type
3.8 Operators
3.8.1 Create Operator
3.8.2 Edit Operator
3.8.3 View Operator
3.8.4 Delete Operator
3.9 User Types
3.10 Defaults
3.11 Headings
4.0 Account Handling Procedures
4.1 Creating an Account
4.2 Selecting an Account
4.2.1 Selecting an Account by Name
4.2.2 Selecting an Account by Account ID
4.2.3 Selecting an Account by Card ID
7.1 A Typical Payroll System
7.2 Bringing UPDS Into the Picture
7.3 Identifying User Types
7.4 Setting User Parameters
7.5 Accounting Issues
7.6 Integration With Payroll Programs
Chapter 1 - Introduction to the Unattended Payroll Deduction System
1.0 Introduction
The Unattended Payroll Deduction System allows a company to offer their employees a method of
adding value to their cash value card, which will be deducted from their paycheck at the end of each pay
period. Payroll deductions may be performed at the PC running the software, or at one of up to eight
Remote Value Stations. Flexible payroll schedules are supported, as well as groupwide and individual
limits on funds available for transfer.
1.1 System Features
The Unattended Payroll Deduction System contains the following features to provide the maximum benefits from the program:
®
®
®
®
®
®
®
®
Up to eight Remote Revalue Stations
9 Digit Alphanumeric ID Numbers
Available PIN Security
Operator Password and Shift Schedule Access Security
Detailed System Reporting
Flexible Payroll Schedules
Group and Individual Funds Availability Limits
System Data Importable into many Database/Payroll Packages
1.2 System Requirements
The following requirements must be met by a computer system intended to run the UPDS
software package:
®
1
®
®
®
®
®
®
®
®
1
1
1
1
1
1
1
1
PC Compatible Computer with 1 Meg RAM or more with
80386 SX CPU or better
RS-232 Serial Port Configured as COM1
RS485 board (SeaLevel SIO-485 strongly recommended)
Parallel Printer Port
40 Meg Hard Drive or larger (200 Meg recommended)
1.44 Meg 3.5" Floppy Drive
CGA color graphics system or better
80 Column Parallel Report Printer - Epson Compatible
Parallel Printer Cable
Debitek DOC 970116 Rev A
Page 1
Chapter 1 - Introduction to the Unattended Payroll Deduction System
Unattended Payroll Deduction System Users Manual
1.3 Terms and Conventions
1.3.3 Screen Area Definitions
The following terms and conventions are used throughout this manual.
There are four areas of the screen that are used to provide information and data input to the
operator. These areas are as defined in Figure 1.1 below.
1.3.1 Terms
Menu Name
UPDS
Unattended Payroll Deduction System
Remote Revalue Station
A device that is connected to the UPDS computer
system that is capable of making a payroll deduction and adding value to the user's card.
ADM
A Remote Value Station that allows the user to
select an amount to be added to their cash value
card
QVTS (Quick Value Transfer Station)
A Remote Value Station that automatically transfers the maximum available amount to the user's
card.
DCT (Debit Card Terminal)
The local card reader attached to the UPDS computer. This is used for operator assisted payroll
deductions, formatting cards, and reading card balances.
PIN (Personal Identification Number)
A number assigned by the UPDS system to validate a user who accesses a Remote Value Station.
The PIN is generated by the DES algorithm, the
same algorithm used by North American credit card
companies.
Workspace
Menu
Commands
Message Prompts
Figure 1.1 - Location of Screen Areas
The Menu Command area is where the commands available in each menu are listed. The
letter to press to select the command will be white, while the rest of the command name will be
black. This area will be empty during data entry in the Workspace area.
The Workspace area is used for data entry and for displaying data and error messages. Windows will appear in the workspace area with data descriptions and either the data (for display
fields) or an edit box (for data entry).
1.3.2 Conventions
Items shown surrounded by square braces, as in [ENTER], indicate a key to be pressed.
Items shown surrounded in quotation marks, as in "Select Function", indicate messages
displayed on the screen.
Debitek DOC 970116 Rev A
Page 2
The Message Prompts area is used to display special instructions to the operator. Example
include "Insert Card" and "Enter Lost Card Code". In certain portions of the program, a list of
valid key presses will appear in this area.
The Menu Name area displays the name of the current menu or data entry screen. Also
included in this area is the current date and time. Time is shown in 24 hour (military) format.
Debitek DOC 970116 Rev A
Page 3
Unattended Payroll Deduction System Users Manual
Debitek DOC 970116 Rev A
Page 4
Chapter 2 - Installation
2.0 Installation
The installation and setup of the Unattended Payroll Deduction System involves four activities:
Installing the PC Hardware, Installing the Remote Value Stations, Installing the Software, and Configuring the Software. The following sections explain the first three of these activities. Chapter 3 will
cover the setup of the UPDS software.
2.1 Installing the Hardware
The most difficult portion of the hardware installation is the installation of the RS-485 board.
This is the board that allows the PC running the UPDS software to communicate with the Remote
Value Stations. It is assumed that the rest of the PC computer system was already setup and configured by your computer vendor. The recommended RS-485 board is the SeaLevel SIO-485. The
remainder of this section assumes this board is being used. If another board is being used, consult
the documentation that came with your board for the equivalent setup instructions.
The SIO-485 should be set to appear to the PC as COM2. If your PC already has a COM2
defined, please consult your PC system documentation for information concerning how to disable
this port. For some systems, this will involve locating a jumper and removing it. If you do not know
how to disable an existing COM2 port, please consult your PC vendor. To set the SIO-485 to
COM2, set switch 7 of S1 to the closed position, with all other S1 switches in the open position.
Place the E1 jumper on the two leftmost pins. Make sure the E2 jumper is installed (the default
setting) and the E3 jumper is removed. For more details on configuring the SIO-485, please consult
the SIO-485 User Manual.
Now that the SIO-485 is configured, you need to install it into the PC. Remove the cover of the
PC. Select an empty slot and remove the screw holding the blank plate in place. Insert the card into
the slot, pressing it firmly down. Make sure the card is completely seated in the slot. Use the blank
plate screw just removed to secure the card. Replace the cover of the PC.
2.2 Connecting the DCT and Receipt Printer
The DCT connects to the PC's COM1 port. The location of this port varies between PC manufacturers. Please refer to your PC documentation for the location of this port. Once the port is
located, determine whether it is a 9 pin or 25 pin port. If it is a 9 pin port, use HAR-DCT-PC-09. If
it is a 25 pin port, use HAR-DCT-PC-25. Connect the cable from the COM1 port to the 25 pin
connector on the back of the DCT.
The Receipt Printer connects to the 9 pin connector on the back of the DCT. Connect the 9 pin
end of the cable AYS-137023 to the 9 pin port on the DCT. Connect the 25 pin end of this cable to
the 25 pin connector on the back of the receipt printer.
Debitek DOC 970116 Rev A
Page 5
Chapter 2 - Installation
Unattended Payroll Deduction System Users Manual
2.3 Connecting the Remote Value Stations
2.5 Configuring the Local Card Reader
The Remote Value Stations are connected to the SIO-485 card. Install the Remote Value Stations according to the instruction found in the installation manual "ADM/Cash to Card Installation
Manual", Debitek DOC-970060. QVTS are not mentioned specifically in this manual, but they use
the same mounting methods. After the Remote Value Stations have been installed, the wiring between each of them and the PC must be installed. Refer to the wiring diagram in Figure 2.1 for
details on how to connect the wiring from the Remote Value Stations back to the PC.
Green
Red
The Local Card Reader may need to be programmed before it may be used with the UPDS
system. Refer to the included programming reference sheet "Configuration and Programming for an
EDCT-232" for details.
2.6 Installing the UPDS Software
To install the UPDS software, first insert the program diskette into the 3.5" floppy drive of the
PC. It is assumed that this is the A: drive on the PC. If not, substitute B: for A: in the following
instructions. Switch to the floppy drive by typing A: and pressing [ENTER]. Then type INSTALL
A: C: to install the UPDS software onto the hard drive. The PC will be left at the prompt "C:\UPDS>".
Type UPDS to start the program.
Wall Plate
Cable
Protection Device
Cable
Adapter
QVTS
ADM
PC Running UPDS
Figure 2 - Remote Value Station Wiring Diagram
2.4 Configuring the Remote Value Stations
The remote value stations need to be programmed in order to function with UPDS. Please refer
to the addendum sheet entitled "Configuration and Programming for an Automatic Debit Machine"
if using an ADM, or "Configuration and Programming for a Quick Value Transfer Station" if using
QVTS.
Debitek DOC 970116 Rev A
Page 6
Debitek DOC 970116 Rev A
Page 7
Unattended Payroll Deduction System Users Manual
Debitek DOC 970116 Rev A
Page 8
Chapter 3 - Configuring the UPDS Software
3.0 Configuring the UPDS Software
Configuring the UPDS software involves setting parameters for the controlling the hardware, customizing the software, and defining the user types. The following sections will cover each of these
areas. For a general overview of the setup process, and how each user type parameters interact to define
the system, please see Chapter 7, A Sample Installation.
3.1 Logging In to the System
When the UPDS software loads, the workspace area will show a window with the prompts
"Operator Name" and "Operator Password", as shown in Figure 3.1. This is the default login screen
that will appear each time the program is loaded. When the program is first installed, the default
operator name and password will be DEBITEK and PASSWORD, respectively. These values will
be changed later in the configuration process.
Figure 3.1 - Login Screen
3.2 The Main Menu
After successfully logging into the UPDS system, the menu command area will contain a list of
the available commands. The workspace area will show a copyright notice. See Figure 3.2 for an
example of the Main Menu. In order to begin configuration of the UPDS system, select [S] for
Setup.
Debitek DOC 970116 Rev A
Page 9
Chapter 3 - Configuring the UPDS Software
Unattended Payroll Deduction System Users Manual
Figure 3.2 - The Main Menu
Operators
This allows the assignment of personnel who are
allowed to operate the UPDS.
User Types
This allows the manager to define the different account types that the system will support. Examples
include hourly employees who are paid weekly,
salaried employees who are paid biweekly, and executives who are paid monthly.
User Defaults
This allows the manager to assign default values
for each user type that determine the Period Limit,
Daily Limit, Payroll Cycle, and Card Maximum.
Headings
This allows the manager to assign headings to be
printed on receipts and reports.
System
This brings up another menu that allows the hardware aspects of the system to be defined.
3.3 The Setup Menu
The system setup menu provides the options required to customize each site’s information and
operating characteristics. A short description of each of the options is presented below. More detail
is provided in later sections.
In order to define the hardware used in the installation, select [S] to access the System Menu.
3.4 The System Menu
The System Menu contains menu selections for parameters that are rarely changed after installation, namely the hardware aspects of the UPDS system. Options including specifying whether Remote Value Stations have pinpads attached, the port locations of the communications adapters, and
the types of remote devices attached.
Figure 3.3 - The Setup Menu
Figure 3.4 - The System Menu
Debitek DOC 970116 Rev A
Page 10
Debitek DOC 970116 Rev A
Page 11
Chapter 3 - Configuring the UPDS Software
Unattended Payroll Deduction System Users Manual
3.5 PIN Creation
The ADM and QVTS remote devices can use an optional pinpad for additional security. Whenever an account holder attempts to access payroll funds, the device will first prompt them to enter a
Personal Identification Number (PIN) before they are allowed to proceed. PINs are assigned by the
UPDS whenever an account is created, and they are based on DES encryption (the same method
used for credit card PINs) of the card ID. By setting this parameter to "Yes", each time a card is
formatted a receipt will be printed containing the PIN for that card. This is the only way for an
account holder's PIN to be produced.
3.6 DCT and QVTS Port Data
Due to the wide variety of system configurations available, it is sometimes necessary to use data
characteristics, I/O ports and IRQ’s that are different from the default values. By changing these
items, conflicts with other hardware devices and differences in communications parameters may be
resolved. The communications parameters rarely need to modified, especially for the DCT, but in
some circumstances, such as when a remote device is too far away for a reliable 9600 baud connection, a slower baud rate may be used to increase the distance. Note that all of the remote devices will
have to be set to these values, and that performance will be decreased.
Baud Rate - This is the speed of the communications link to the local DCT or the remote device(s).
Generally the default of 9600 will be used. Do not change this unless directed to do so by a member
of Debitek Customer Service.
Data Bits - Do not change from 8 unless directed to do so by a member of Debitek Customer
Service.
Parity - Do not change from N unless directed to do so by a member of Debitek Customer
Service.
Stop Bits - Do not change from 1 unless directed to do so by a member of Debitek Customer
Service.
Interrupt - This is the PC interrupt line that signals the computer of an event that occurs with the
communications channel being used for the DCT or remote device. Only one device may use each
interrupt number. Do not change this parameter unless you are sure of what you are doing or
directed to do so by a member of Debitek Customer Service. Changing to some values will result in
the PC system locking up whenever the program is run, which will prevent you from being able to
correct the problem.
3.7 Remote Type
The UPDS supports up to eight remote devices used by account holders to make payroll deductions. Each of these devices may be either a QVTS (Quick Value Transfer Station) or an ADM
(Automatic Debit Machine). Each of these devices has a unique terminal ID that is assigned at
installation. The terminal ID can range from 0 to 7, and corresponds to the "Remote 0" to "Remote
7" menu selections. For each remote device to be installed, use the appropriate menu selection to
choose whether the remote device is a "QVTS" or "ADM". All other remote devices should be set
to "NONE". Failure to do so will result in a slower response time at the remote devices.
A QVTS is a remote device that will add up to the daily limit of the account holder when the user
inserts their card. The amount added to the card depends on the Daily Balance, Card Max and Card
Value. If the card has not been used before during the day, the system will first assume that the
amount to be added is the Daily Balance. If this value plus the Card Value is greater than the Card
Max, the value to be added is adjusted to the difference between Card Max and Card Value. Then
the value is added to the card, a receipt is printed, and the card is ejected.
An ADM is a remote device that allows an account holder to add a selected value to their card.
The maximum value that may be added is determined in the same way as for the QVTS. After the
account holder inserts the card, the ADM will alternate its display between the ADM Increment
value and the message “INCREASE? ACCEPT?”. A button is located below each of these words.
When the button below “INCREASE?” is pressed, the value displayed will increase by the ADM
Increment. If the total value is increased beyond the maximum value that may be added, it will wrap
back around to the original ADM Increment. When the desired amount is displayed, the account
holder may press the button under “ACCEPT?” to add that amount to the card. If the ADM is
equipped with an optional printer, a receipt will be printed.
Base Address - This is the I/O location of the communications board inside the PC. Only one
board is allowed to occupy an I/O location. If the I/O location of the port needed is not the same as
the default shown here, it may be changed. Do not change this parameter unless you are sure of
what you are doing or are directed to do so by a member of Debitek Customer Service. Changing to
some values will result in the PC system locking up whenever the program is run, which will prevent
you from being able to correct the problem.
Debitek DOC 970116 Rev A
Page 12
Debitek DOC 970116 Rev A
Page 13
Chapter 3 - Configuring the UPDS Software
Unattended Payroll Deduction System Users Manual
The security fields allow the manager to limit access to different features of the system to
different operators. These features include the following:
3.8 Operators
Each operator has an operator name and password, as well as a range of times when they may
access the system. Any attempt to log in outside of this range will be denied. Each operator may
have access to different portions of the system. If an operator is to be restricted from a function,
they will not see its menu entry. At least one operator must have the ability to change other operator
access levels. It is important to store this operator's name and password information in a secure
location, because setup information cannot be changed without it.
Figure 3.5 - Operator Menu
o Allow Attended Deduct
If this option is set to yes, the operator will be
allowed to perform manual payroll deductions from
the UPDS computer system.
o Allow Account Edit
This option determines whether the operator may
edit a cardholder's account.
o Allow Account Create
This option determines whether an operator is allowed to create a new account.
o Allow Card Format
If this option is set to Yes, the operator will be
allowed to create a new card for an account holder.
o Allow Zero Card
This option determines whether an operator is allowed to remove the balance of an account holder's
card. The balance removed will be subtracted from
the total payroll deductions of the account holder
for the current period.
o Edit User Defaults
If set to Yes, the operator will be allowed to change
the defaults for different user types. Generally,
this option should be set to No for all operators
but the manager. Note that changing the defaults
should not be performed after accounts using them
have been created.
o Change Headings
This option determines whether the operator may
change the headings that appear at the top of reports and receipts.
o Access System Menu
This option determines whether the operator may
access the System Menu. By setting this to Yes,
the operator may change the Pin Creation selection, the port options, and the Remote Types.
o Allow Program Exit
By setting this to Yes, the operator is allowed to
exit the UPDS software.
o Allow Operator Edit
By setting this to Yes, the operator will be allowed
to change other operators access.
3.8.1 Create Operator
The Create menu entry allows the operator name, password, shift, and security flags to be
set. Use the cursor keys [éêçè] to move to the different fields. The time fields are entered
in military time. To toggle a security feature on or off, press [SPACE]. When the operator has
been entered, press [F10] to save. To abort the entry, press [ESC].
Figure 3.6 - Operator Creation
Debitek DOC 970116 Rev A
Page 14
Debitek DOC 970116 Rev A
Page 15
Chapter 3 - Configuring the UPDS Software
Unattended Payroll Deduction System Users Manual
3.8.2 Edit Operator
3.9 User Types
Each of the configuration items used when creating an operator may be edited later using the
Edit command. After selecting Edit, the operator will be presented with a list of operators. Use
the cursor keys and [Page Up] and [Page Down] to select the operator to edit, and press [ENTER] to begin. To abort the selection, press [ESC].
The UPDS system allows up to 32 different user categories. Each account holder must belong
to one of the 32 categories. These categories allow the system to respond differently to different
account holders. Specifically for UPDS, the user type identifies which employees fall under different
payroll schedules. Each user type is associated with a group code that is programmed into the
vending and other Debitek equipment at a site. Because associating the code number to a specific
group of employees may be difficult, UPDS allows the manager to assign a name to each group, and
uses this name throughout the program instead of the code.
Use the cursor keys to move to each group code that will be used in the system. All 32 group
codes will typically not be used. Leave any unused group codes unchanged. When the highlighted
area is on the group desired, type in the name for that user type. When all user types needed have
been edited, press [F10] to save them. To abandon changes, press [ESC].
3.10 Defaults
This section allows the manager to place default data into the system based on the user types
defined earlier. Use the cursor keys as well as the [Page Up] and [Page Down] keys to select the
user type to use, and press [Enter] to edit the defaults shown. After the defaults have been entered,
press [F10] to save them, or press [ESC] to return to the original values.
Figure 3.7 - Operator Selection
3.8.3 View Operator
The Period Limit is the maximum amount of money that can be drawn against payroll in a single
pay period. This value may be changed when an account is created or edited.
An operator entry may be viewed by selecting the view command from the operator menu.
Each of the configuration items for a selected operator will be shown. When finished, press
[ESC] to return to the Operator Menu.
3.8.4 Delete Operator
Operators may be removed entirely by using the Delete function. Note that at least one
operator must be defined with access to edit other operators. An attempt to delete the last
operator with this access will be denied.
Figure 3.8 - Default Screen with Cyclic Period Type
Debitek DOC 970116 Rev A
Page 16
Debitek DOC 970116 Rev A
Page 17
Chapter 3 - Configuring the UPDS Software
Unattended Payroll Deduction System Users Manual
The Daily Limit is the maximum amount of money that can be drawn against payroll in a single
day. This value may be changed when an account is created or edited.
The Period Type identifies whether this group of employees is paid on a cycle or on fixed days.
A cyclic period type is one in which employees are paid every x number of days, for instance every
Friday, which is every seven days. A fixed period type is one in which employees are paid on a fixed
day or days of the month, such as on the 1st and 15th of each month.
The Period Length is the number of days in a cyclic period type. For example, an employee
group that is payed biweekly would have a period length of 14. See Figure 3.4 for an example of a
Default screen using a cyclic period type.
Fixed Days identifies the number of times a month an employee is payed in a fixed period type.
For example, if the end of the pay periods fall on the 1st and 15th of each month, there are two fixed
days. See Figure 3.9 for an example of a default screen using a fixed period type.
The Card Maximum is the largest value that an account holder’s card can have. Any attempts
to write a card with a value greater than this will be denied. Also, the amount that can be transferred
to the card via a Remote Value Station will be limited based on this amount.
3.11 Headings
Reports printed by UPDS can have a customized report heading containing the site’s name or
any other information desired. Change the Report Title Heading to whatever text is desired.
Receipts printed by the local receipt printer and QVTS remotes will have the Receipt Printer
Heading located at the top. ADM receipts, however, will print a heading that is programmed into
the ADM at installation.
Fixed Day 1 through (up to) Fixed Day 4 (depends on the Fixed Days setting) are the day of the
month that each pay period ends.
Figure 3.10 - Receipt and Report Headings
Figure 3.9 - Default Screen with Fixed Period Type
The Base Date is used to mark the start of the user type’s payroll cycle. In general, it is best to
use the first day of the previous pay period for this type of an account. Cycles are based on the
period type and the base date. For instance, the days between the base date and the period length
beyond the base date are in cycle one for a cyclic period type. For the next period length of days, it
will be cycle two. The User Type and the cycle number are used for the filename for the payroll data
files. See the Section 7.6, Integration With Payroll Programs for more information on the payroll
file.
Debitek DOC 970116 Rev A
Page 18
Debitek DOC 970116 Rev A
Page 19
Unattended Payroll Deduction System Users Manual
Debitek DOC 970116 Rev A
Page 20
Chapter 4 - Account Handling Procedures
4.0 Account Handling Procedures
This menu allows the operator to create and maintain system accounts. There are four menu items
available: Create, Edit, View and Exit. There is no Delete option available. If an account is to be
discontinued, use the Edit option to change the stop date to the last date the account is to be in service.
After this has been done, access to payroll deductions will be denied for this account, and any operator
access to the account will show the account data in gray.
Figure 4.1 - The Account Menu
4.1 Creating an Account
Use the Create selection from the Account menu to create a new account. The following information is entered from the keyboard:
Figure 4.2 - Create Account Screen
Debitek DOC 970116 Rev A
Page 21
Start Date
Account Type
Account ID
Last Name
First Name
The start date is used the lower bound of the dates for which the account
holder may access the system. The account holder will only be considered
active in the payroll deduction plan when the current date is between the
Start Date and the Stop date. Outside of this range, all payroll deduction
attempts will be denied. Also, please note that the date is entered in DD/
MM/YY format with only two digits available for years. The program will
assume that any year less than 90 means that the year is in the 21st century,
i.e.: 4/10/15 would mean April 10, 2015, not April 10, 1915.
This field is filled by a selection box that will allow a choice of up to 32
different account types. The account type will determine the payroll cycle for
the account holder. For instance, if hourly employees are paid on a weekly
basis, and salaried employees are paid on a bi-weekly basis, then they would
have different account types. Each account type also corresponds to a group
code that will be programmed into the various vending equipment on a site.
Different account types are entitled to different discount levels, and access to
certain machines may be limited to account holders with specific account
types. Please refer to the “Debitek System Manual” for more details on the
use of group codes. Also, when the account type is selected, the default
values for Period Limit, Daily Limit, and Card Max will be automatically
entered, and the Cycle field will show the value assigned for this type.
This is the alphanumeric identification for the account holder. If possible, use
the employee ID from the payroll package that will import the files generated
by UPDS, so that cross referencing will not be required.
Enter the account holder’s last name into this field.
Enter the account holder’s first name, and middle name or initial if desired
into this field.
Unattended Payroll Deduction System Users Manual
Stop Date
Page 22
This date signifies the last date on which the account holder will be allowed
to access the system. Once the current date passes this date, the account
holder will no longer be able to access the system.
Debitek DOC 970116 Rev A
Card Max
Lost Card Code
Cycle
Grand Total
Daily Limit
Period Limit
This field contains the maximum value that a card can be written to by the
UPDS. This will limit the account holders loss if a card is lost or stolen. This
value must also be less than or equal to the Card Maximum that is programmed
into the vending units. Otherwise, the UPDS could create cards that are
unusable in the rest of the system.
This field stores a code that tells the system if a card used for payroll deduction is valid. If the account holder loses a card, then a new one should be
issued with a different lost card code. If someone finds the old card and tries
to use it, the UPDS system will know that it is a lost card and will invalidate
it. When creating an account, you may set this to any value you wish, but
leaving it at zero is recommended.
This shows the number of the last processed cycle for the account holder. It
cannot be changed and is shown for reference only.
This shows the amount of money that the account holder has drawn against
payroll in the current cycle. It is reset to zero at the beginning of each new
cycle.
This is the maximum amount of money that the account holder may draw
against payroll on a given day. A default value is placed in this field when the
account type is selected, but it may be changed on an individual basis. The
Balance field to the right of this field indicates the remaining funds that the
account holder may access and will show as zero as the account is created,
but will be changed to indicate the Daily Limit as soon as the account is
saved.
This is the maximum amount of money that the account holder may draw
against payroll in a given cycle. A default value is placed in this field when
the account type is selected, but it may be changed on an individual basis.
The Balance field to the right of this field indicates the remaining funds that
the account holder may access and will show as zero as the account is created, but will be changed to indicate the Period Limit as soon as the account
is saved.
Chapter 4 - Account Handling Procedures
Card ID Number
This is the card ID that is actually written to the card. It is automatically
generated by the system, and cannot be changed. Use this number when
correlating data with other Debitek products such as TLog.
Page 23
After each field is complete, save the account by pressing [F10], or press [ESC] to abandon the
data.
Debitek DOC 970116 Rev A
Chapter 4 - Account Handling Procedures
Unattended Payroll Deduction System Users Manual
4.2 Selecting an Account
Operations on account entries first require than an account be selected. There are three methods
of selecting account; by Name, by Account ID, and by Card ID. When a function is selected that
requires selecting an account, the operator will be prompted for the account using the last type of
search selected. Options will appear in the prompt area for selecting a different type of search. Each
search method is discussed in the following sections.
4.2.1 Selecting an Account by Name
To select an account using the name, type the first few letters of the account holder’s last
name and press [ENTER]. A list of all of the close matches will be presented. If the name is not
known, press [F8] to select the account using the Card ID, or press [F9] to select the account
using the Account ID.
Figure 4.4 - User Account List
4.2.2 Selecting an Account by Account ID
To select an Account using the account ID, type the complete ID and press [ENTER]. If
the Account ID is not known, press [F8] to select the account using the Name, or press [F9] to
select the account using the Card ID.
4.2.3 Selecting an Account by Card ID
To select an account using the Card ID, type the complete ID and press [ENTER]. Leading zeroes do not need to be entered. For example, if the Card ID is "000000123", then all
that must be entered is "123". If the Card ID is not known, press [F8] to select the account
using the Name, or press [F9] to select the account using the Account ID.
4.3 Editing an Account
Figure 4.3 - Selecting an Account by User Name
After entering the name desired, a list will appear with the first close match to the name,
followed by other account names close to the entry. Use the cursor keys [é] and [ê] to select
the correct name, and press [ENTER].
Debitek DOC 970116 Rev A
Page 24
Most of the data for an account may be edited. The fields which cannot be changed are those
that are shown for information only, as described in the "Creating an Account" section, and the User
Type. Use the cursor key to select the field to be edited, and type in the new value. Press [F10] to
save the changes, or press [ESC] to abandon them.
Debitek DOC 970116 Rev A
Page 25
Unattended Payroll Deduction System Users Manual
4.4 Importing Account Lists
The Unattended Payroll Deduction System allows the importing of a limited amount of account
information. This information includes the First Name, Last Name, and the Account ID. This data
can often be exported from the payroll system database. In order for UPDS to be able to import this
data, certain guidelines must be followed. These are listed below:
l
l
l
l
l
The First and Last Names must be no longer than 25 characters.
The Account ID must be no longer than 9 characters, and must be unique.
Each field must be surrounded by quotation marks and separated by commas, as in "First
Name","Last Name","ACCOUNTID".
Each record must be terminated by a carriage return/line feed combination.
The filename must end in the extension .IMP and be placed in the UPDS directory.
If any of these conditions are not met properly, then the account will not be imported. Where
possible, records not meeting these criteria will be written to a file called ERRORS.LOG in the
UPDS directory. Also, all accounts that are imported must be edited to provide the remaining
account information before they may be used.
Figure 4.5 - Account List Import
To import an account list, select Import from the account menu. A list of all importable files will
be shown. Use the cursor keys to select the file to import, and press [ENTER]. The file will be
imported into the account database.
4.5 Viewing an Account
An account may be viewed without modifying its data. When finished, press [ESC] to return to
the Account Menu.
Debitek DOC 970116 Rev A
Page 26
Chapter 5 - The Card Menu
5.0 The Card Menu
The card menu is used to perform maintenance on an account holder’s card. A new account or
dispenser card may be formatted, a card may be read, or the balance removed from a card. The following sections describe each of these operations.
5.1 The Format Card Menu
The format card menu allows the operator to select whether they want to format a card for an
account holder or a batch of cards to be placed in a card dispenser.
Figure 5.1 - The Format Card Menu
5.1.1 Formatting an Account Holder's Card
This menu selection allows an operator to format a new card for an account holder. After
selecting this function, the operator must select an account. See Section 4.2, Selecting an
Account for more information on selecting an account. After a selection is made, the account
data will be shown on the screen, and the Lost Card Code field will be highlighted. When
replacing a lost card, it is recommended that the Lost Card Code be incremented by one, so that
if someone finds the lost card, they will not be able to access the account with it. If a card with
a different Lost Card Code is inserted into a QVTS, it will be invalidated. An invalidated card
will not be usable in any Debitek device, and will cause the error message 'INVALID SITECODE'
to appear on the display of any device it is inserted into. When issuing a new card to replace a
damaged one, it is not necessary to increment the Lost Card Code. To format the card, press
[F10]. The prompt area will instruct the operator to insert a card, and the display of the DCT
will do the same. Insert the new card into the DCT, and it will be formatted. If the PIN option
was selected during setup, a receipt will be printed showing the account holder's PIN number.
The card will then be ejected.
Debitek DOC 970116 Rev A
Page 27
Unattended Payroll Deduction System Users Manual
5.1.2 Formatting Dispenser Cards
This menu selection allows an operator to format a batch of cards to be placed in a card
dispenser, or to be used for visitor's cards. One user type needs to be reserved for these cards.
The operator will select the user type, then enter a value to be written to each dispenser card.
The program will then prompt the operator to insert a card. After the card is inserted, it will be
formatted, and the display will show the count of card done in this batch. The program will
return to the insert card prompt, and the process is repeated until all needed cards have been
formatted.
Figure 5.2 - Formatting Dispenser Cards
5.2 Reading a Card
When the Read Card menu option is selected, the system will prompt the operator to insert a
card. Insert the card to be read into the DCT. The account holder's data will be displayed on the
screen, as well as the card balance. When finished viewing the data, press [ESC] to return to the
Card Menu.
5.3 Zeroing a Card
Zeroing a card involves removing the value from the card and placing it back into the cardholder's
account. This would be done typically when an employee is leaving the company. Dispenser cards
may also be zeroed. As the value removed from a dispenser card would normally be refunded in
cash, there is a special report that may be used to balance the operator's cash drawer. In either case,
a receipt will be printed.
Debitek DOC 970116 Rev A
Page 28
Chapter 6 - Report Function
6.0 Report Functions
Five reports are available in the UPDS. The first four reports are for informational purposes only.
All accounting must be done using the files generated automatically at the end of each cycle. These files
may be printed using the fifth report. For more information on the import files, see Chapter 7.6, Integration with Payroll Programs.
Figure 6.1 - The Report Menu
6.1 Payroll Report
This report shows the current balances for each account holder. This is not the final amount that
should be deducted from the payroll system. It is only an indication of what each account holder has
drawn against payroll at the time the report was taken.
Figure 6.2 - Example Payroll Report
Debitek DOC 970116 Rev A
Page 29
Chapter 6 - Report Function
Unattended Payroll Deduction System Users Manual
Figure 6.3 - Report Date Range Entry
6.2 Inquiry Report
This report allows an operator to print a report showing the activity of a single account holder
over a range of dates. Any transaction made during the date range, as well as any operator maintenance of the account will be printed.
Enter the first day of the date range in the first field. Enter the last day of the date range into the
second field. The last day of the range must be equal to or past the first day of the range.
Figure 6.5 - Example System Report
6.4 Roster Report
Figure 6.4 - Example Inquiry Report
6.3 System Report
This report gives a list of each account holder in the system in alphabetical order. Also included
are the ID and current withdrawal amount.
This report shows in detail the activity of the UPDS during a range of dates. Any activity,
including local and remote transactions, system maintenance, operator logins and logouts, and so on
are printed out.
Debitek DOC 970116 Rev A
Page 30
Debitek DOC 970116 Rev A
Page 31
Chapter 6 - Report Function
Unattended Payroll Deduction System Users Manual
Figure 6.6 - Sample Roster Report
6.5 Dispenser Report
The Dispenser Report allows the operator to print a list showing all dispenser cards formatted
and zeroed for a selected time period. The total value of dispenser cards issued during the selected
time period is shown, along with the total amount zeroed.
Figure 6.8 - Cycle Report File Selection
A list of all available reports will be presented. Use the cursor keys and [Page Up], [Page
Down], [Home] and [End] to highlight the desired deduction file. Press [ENTER] to select the file,
or press [ESC] to abort.
Figure 6.9 - Sample Cycle Report
Figure 6.6 - Sample Roster Report
6.6 Cycle Report
The Cycle Report allows the operator to print the deductions made by all account holders in a
user group during a specific payroll cycle. This is the same information provided in the reports
generated automatically at the end of each cycle. For systems that cannot import these files directly,
this report may be used to enter the deductions manually.
Debitek DOC 970116 Rev A
Page 32
Debitek DOC 970116 Rev A
Page 33
Unattended Payroll Deduction System Users Manual
Debitek DOC 970116 Rev A
Page 34
Chapter 7 - A Sample Installation
7.0 A Sample Installation
The Unattended Payroll Deduction System allows an account holder to add value to their Debitek
Cashless Vending Card using funds that will be deducted from their paycheck at the end of the pay
period. The system is extremely flexible allowing it to be used in widely different payroll environments.
A friendly, easy to use operating environment allows for quick and simple control of how funds are made
available, and automatic reporting keeps accounting overhead to a minimum. Although the operation of
the program seems simple, the underlying concepts are somewhat more complex, and a thorough understanding is required in order to gain the most from the system. The following sections will provide the
information necessary to fully understand and effectively manage the UPDS.
7.1 A Typical Payroll System
To begin our overview of the UPDS, let us first look at a typical payroll setup as it exists before
the installation of the system. Our fictitious example is XYZ Widgets Incorporated. XYZ Widgets
has four major classes of employees. These employees are temporary, hourly, salaried, and executive. The temporary employees are not really handled through payroll at all, but instead are paid
through the temporary service that hired them. Hourly employees are paid weekly, salaried employees biweekly, and executives are paid on a monthly schedule. In addition, the salaried employees can
be broken down into three sub classes; those that make less than $20,000 a year, those that make
between $20,000 and $30,000, and finally those that make over $30,000. This is shown in Figure
7.1.
Finance
Payroll
Executives
Temporary
Hourly
Salary < $20K
Salary $20-$30K
Salary > $30K
Figure 7.1 - Organazinion by Salary of Employee
Debitek DOC 970116 Rev A
Page 35
Chapter 7 - A Sample Installation
Unattended Payroll Deduction System Users Manual
7.2 Bringing UPDS Into the Picture
After seeing the benefits of the Debitek Vending System, XYZ Widgets decides that they want to
purchase and install a complete vending system. The Unattended Payroll Deduction System is seen
as a perfect method for allowing their employees an easy way to revalue their cards. But how will it
work? How will the Payroll Department know how much to deduct from each paycheck? How
much extra work will be involved? These questions and more will be answered in the following
sections.
7.3 Identifying User Types
As we saw with XYZ Widgets, the classification of employees is based on how often they get
paid. This is a very important concept in UPDS. The availability of funds and the scheduling of
automatic reports relies on this heavily. Furthermore, subclasses are generally defined by ranges in
payscale. This is because the limits as to how much can be withdrawn during a pay period can be set
to larger amounts for those who have larger paychecks, if desired.
Employee Class Cycle Cycle Period Base Date
Type Day Length
Period
Max
Daily
Max
Card
Max
Temporary
N/A
N/A
N/A
N/A
N/A
N/A
N/A
Hourly
C
N/A
7
4/17/95
$60.00
$10.00
$20.00
Salaried
Under 20,000
C
N/A
14
4/17/95
$100.00
$10.00
$20.00
Salaried
20,000-30,000
C
N/A
14
4/17/95
$150.00
$20.00
$20.00
Salaried
Over 30,000
C
N/A
14
4/17/95
$200.00
$20.00
$40.00
Executives
F
1
28
4/17/95
$300.00
$30.00
$100.00
7.4 Setting User Parameters
Figure 7.2 -Sample Employee Breakdown
Once the User Types have been determined, the default parameters for each user can be set.
These defaults are the length of the pay period, the base date of the pay period, the maximum
amount that can be deducted during a pay period, the maximum amount that can be deducted in one
day, and the maximum card value. For example, XYZ Widget’s hourly employees are paid on a
weekly basis, so their pay period is seven days. Their pay period runs from Monday to Sunday, so
the base date would be any Monday, for example April 17, 1995. It is decided that no one should be
allowed to deduct more than 20% of their paycheck using the UPDS, and since the average paycheck for XYZ Widget’s hourly employees is $300, the maximum allowed deduction in a period will
be $60. In order to limit liability in case of a stolen card, the daily limit will be set to $10. This is to
prevent someone draining an employee’s available funds before the card can be reported stolen or
lost. After it has been reported, the system will no longer honor the card. Also, to prevent a lost or
stolen card from costing too much to the employee, a maximum card limit of $20 is set. However,
each employee should be reminded that losing a card with a $20 value is just the same as losing a $20
bill. Similar parameters will be set for all other classes of employees. An example is provided in
Figure 7.2.
7.5 Accounting Issues
Now that XYZ Widgets has its UPDS set up and running, the question arises “What is it doing?”
The way the system works is simple. Each employee class goes through what is called a cycle during
each pay period. Each cycle is uniquely numbered starting from one. For example, the first 7 days
following the base date for hourly employees is called ‘Hourly Employee Cycle 1’. The next seven
days would be cycle two, and so on. When a new cycle begins, UPDS writes the amount of deductions from the previous cycle to disk, and resets all of the parameters for each account. The file that
is written is named based on the user type and the cycle number, so that each file has a unique name.
These files are in an industry standard format and may be directly imported into many popular
database and payroll packages.
7.6 Integration With Payroll Programs
The data produced by the UPDS is stored in an industry standard, comma delimited, quote
enclosed, data format which is supported by a large number of database applications. The information includes the account ID and the total deductions for the period. Future versions may include
other data in response to customer requests. Any additional fields will be added to the end of the list
in order to maintain backward compatibility. Each line of the file will be similar to the following:
"ABCD12345","37.50"
Debitek DOC 970116 Rev A
Page 36
Debitek DOC 970116 Rev A
Page 37
Unattended Payroll Deduction System Users Manual
Page 38
The cycle number and user type are used to name the data files. The filename will be made up as
follows: TTCCCCCC.RPT where TT is the user type from 00 to 31, and CCCCCC is the cycle
number. All users of type TT will appear in the report file. Each file is generated automatically at the
end of the cycle. The end of a cycle is checked for at two points in the software. First, each time the
program is loaded, the entire database is scanned to see if any cycle files need to be created. Depending on the size of the database, and the speed of the computer, this may take up to several
minutes. Secondly, each time the date changes while the software is running (namely, at midnight of
each day,) the entire database is scanned.
Debitek DOC 970116 Rev A