1
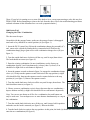
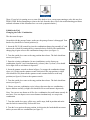
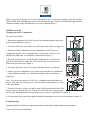
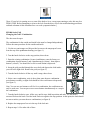
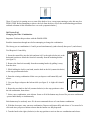
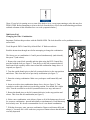
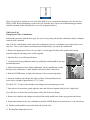
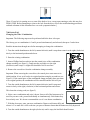
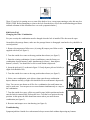
SIMPLEX UNICAN LOCKS
CHANGING THE CODE / COMBINATION
900 Series
1000 Series
L1000 Series
LP1000 Series
EE1000 Series
2000 Series
2015 Series
2400/2500 Series
3000 Series
3100 Series
Simplex 5000 Series
6200 Series
7000 Series
7100 Series
8100 Series
960 Series
[Note: If your lock is opening on every turn of the knob or lever, except upon entering a code, this may be a
ZERO CODE. Before attempting to remove the lock from the door, refer to the troubleshooting procedures
outlined at bottom of this document for a zero code symptom/solution.]
900 Series FAQ
Changing the Code / Combination
The door must be open.
1. Turn the outside thumbturn to the left (counterclockwise) to the stop position; then release. This will clear
any random entries from the mechanism.
Note: When the thumbturn is turned to the left on a deadbolt model, the bolt is automatically thrown into the
locked position; therefore, it is important to keep the door open while changing the combination.
2. Enter the existing combination. On new installations, use the factory-set combination: depress 2 and 4
simultaneously, (release), then 3 (release). You should feel a slight click as each button is depressed.
3. Use the Allen wrench to remove the screw from the top of the lock housing.
4. After removing the screw. Insert the Allen wrench into the hole and depress the internal lockout slide; you
should feel a slight click. Do not force.
5. Remove the wrench.
6. Turn the outside thumbturn to the left (counterclockwise) to the stop position, then release.
7. Choose your new combination, write it down, then enter the new combination — depress buttons carefully
(a slight click should be felt as each button is depressed).
[Note: You can use one button or all five for a combination, but each button can only be used once. You can
depress two or more buttons simultaneously as a step in the combination.]
8. Turn the outside thumbturn to the right (clockwise) to the stop position; then release. The new combination
is now active.
9. Test your new combination a few times before you shut the door.
Lock and unlock the door following the instructions in section 6.
If the outside thumbturn retracts the latch or bolt and you have not entered your combination, steps were done
out of order and the lock is in zero code.
10. Repeat steps 4 to 8 until the latch or bolt retracts only after you enter your new combination.
11. Replace the screw on the top of the lock housing.
[Note: The outside thumbturn cannot be forced to retract the latch / bolt because it is connected to the lock
housing by a friction clutch. If the thumbturn has been forced, it can be turned back to the vertical position by
hand without damaging the lock.]
Troubleshooting
Symptom/problem: Turning outside thumbturn always retracts latch/bolt without depressing without any
buttons.
Cause: Lock is in zero combination.
Solution: Follow the procedure for changing a combination, but omit step 2.
[Note: If your lock is opening on every turn of the knob or lever, except upon entering a code, this may be a
ZERO CODE. Before attempting to remove the lock from the door, refer to the troubleshooting procedures
outlined at bottom of this document for a zero code symptom/solution.]
1000 Series FAQ
Changing the Code / Combination
The door must be open.
On models with the passage feature, make sure the passage feature is disengaged:
turn knob or key should be in vertical position (A) (see figure 1).
1. Insert the DF-59 control key (B) into the combination change plug assembly (C)
and unscrew the cylinder by turning the key counterclockwise. Remove the
combination change plug to gain access to the combination change sleeve (D) (see
figure 1).
2. Turn the outside knob once clockwise (all the way, until it stops) then release.
The latch should not retract (see figure 4).
3. Enter the existing combination. On new installations, use the factory-set
combination: depress 2 and 4 simultaneously, (release), then 3 (release). You
should feel a slight click as each button is depressed.
4. Insert the spanner wrench as shown in figure 2 to engage the combination change
sleeve (A). Gently turn the spanner wrench clockwise to the stop position (a slight
click should be felt), then turn the spanner wrench counterclockwise to the stop
position (A) (see figure 3). Remove the spanner wrench.
5. Turn the outside knob once clockwise all the way until it stops, then release. The
latch should not retract (see figure 4).
6. Choose your new combination, write it down, then enter the new combination —
depress buttons carefully (a slight click should be felt as each button is depressed).
Note: You can use one button or all five for a combination, but each button can
only be used once. You can depress two or more buttons simultaneously as a step in
the combination.
7. Turn the outside knob clockwise once, all the way, until it stops, hold in position
and make sure the latch is retracted (see figure 5). Release the knob.
8. Turn the knob clockwise again to the stop position. At this point, the latch (A) should not retract unless you
enter the new combination (see figure 4).
9. Resecure the combination change plug assembly by screwing it in clockwise with the DF-59 key — do not
overtighten (see figure 6). Remove the key and store it in a secure area with these instructions and the spanner
wrench.
Troubleshooting
Symptom/problem: Outside knob when turned always retracts latch without depressing any buttons.
Cause: Lock is in zero combination.
Solution: Follow the procedure for changing a combination except omit step 3 (do not enter the existing
combination).
[Note: If your lock is opening on every turn of the knob or lever, except upon entering a code, this may be a
ZERO CODE. Before attempting to remove the lock from the door, refer to the troubleshooting procedures
outlined at bottom of this document for a zero code symptom/solution.]
L1000 Series FAQ
Changing the Code / Combination
The door must be open.
On models with the passage feature, make sure the passage feature is disengaged. Turn
knob or key should be in vertical position (A).
1. Insert the DF-59 (B) control key into the combination change plug assembly (C) and
unscrew the cylinder by turning the key counterclockwise. Remove the combination
change plug to gain access to the combination change sleeve (see figure 1).
2. Turn the outside lever once to the stop position then release. The latch should not
retract (see figure 5).
3. Enter the existing combination. On new installations, use the factory-set
combination: depress 2 and 4 simultaneously, (release), then 3 (release). You should
feel a slight click as each button is depressed.
4. Insert the spanner wrench as shown in figure 3 to engage the combination change
sleeve (A). Gently turn the spanner wrench clockwise to the stop position (a slight
click should be felt), then turn the spanner wrench counterclockwise to the stop
position (see figure 4). Remove the spanner wrench.
5. Turn the outside lever once to the stop position then release. The latch should not
retract (see figure 5).
6. Choose your new combination, write it down, then enter the new combination —
depress buttons carefully (a slight click should be felt as each button is depressed).
Note: You can use one button or all five for a combination, but each button can only be
used once. You can depress two or more buttons simultaneously as a step in the
combination.
7. Turn the outside lever once, all the way, until it stops, hold in position and make
sure the latch is retracted fully. Release the lever.
8. Turn the lever again to the stop position. At this point, the latch should not retract
unless you enter the new combination (see figure 5).
9. Resecure the combination change plug assembly by screwing it in clockwise with the DF-59 key — do not
overtighten (see figure 6). Remove the key and store it in a secure area with these instructions and the spanner
wrench.
Troubleshooting
Symptom/problem: Outside lever when turned always retracts latch without depressing any buttons.
Cause: Lock is in zero combination.
Solution: Follow the procedure for changing a combination except omit step 3 (do not enter the existing
combination).
[Note: If your lock is opening on every turn of the knob or lever, except upon entering a code, this may be a
ZERO CODE. Before attempting to remove the lock from the door, refer to the troubleshooting procedures
outlined at bottom of this document for a zero code symptom/solution.]
LP1000 Series FAQ
Changing the Code / Combination
The door must be open.
1. Remove the tamperproof screw (A) from the lock housing using the special bit
wrench (B) provided (see figure 1).
2. Turn the outside lever once all the way until it stops, then release (see figure 2).
3. Enter the existing combination. On new installations, use the factory-set
combination: depress 2 and 4 simultaneously, (release), then 3 (release). You
should feel a slight click as each button is depressed (see figure 3).
4. Insert the special pick (C) provided with lock through the screw hole and
depress the slide inside. A slight click will be left. Do not use excessive force.
Remove the special pick (see figure 4).
5. Turn the outside lever once to the stop position then release (see figure 2).
6. Choose your new combination, write it down, then enter the new combination
— depress buttons carefully. (You should feel a slight click as each button is
depressed.)
Note: You can use one button or all five for a combination, but each button can
only be used once. You can depress two or more buttons simultaneously as a step
in the combination.
7. Turn the lever once, (all the way, until it stops), hold in position and check if the
latch is retracted. Release the lever. Turn the lever one more time to stop position.
At this point, the latch should not retract unless you use the new combination (see figure 2).
8. Use the special bit wrench (B) to tightly reinstall the tamperproof screw (A) in the housing (see figure 1).
Troubleshooting
Symptom/problem: Outside lever when turned always retracts latch without depressing any buttons.
Cause: Lock is in zero combination.
Solution: Follow the procedure for setting a new combination except omit step 3 (do not enter the existing
combination).
[Note: If your lock is opening on every turn of the knob or lever, except upon entering a code, this may be a
ZERO CODE. Before attempting to remove the lock from the door, refer to the troubleshooting procedures
outlined at bottom of this document for a zero code symptom/solution.]
EE1000 Series FAQ
Changing the Code / Combination
The door must be open.
The combination for the outside and inside locks must be changed independently.
Follow the same procedure for the outside and inside.
1. Use the torx anti-tamper tool bit provided to remove the tamperproof screw
from the top of the pushbutton housing (see figure 1).
2. Turn the knob clockwise to the stop position, then release.
3. Enter the existing combination. On new installations, enter the factory-set
combination: depress buttons 2 and 4 simultaneously (release) , then depress
button 3 (release). You should feel a click as each button is depressed.
4. Insert the pick provided through the screw hole and depress the slide inside you will feel a slight click. Remove the pick (see figure 2).
5. Turn the knob clockwise all the way until it stops, then release.
6. Select a new combination, write it down, then enter the new combination press buttons carefully (a slight click should be felt as each button is depressed)
(see figure 3).
Note: You can use one buttons or all five for a combination, but each button can
only be used once. You can press two or more buttons simultaneously as a step in
the combination.
7. Turn the knob clockwise once, all the way, until it stops, hold in position and make sure the latch is
retracted. Release the knob. Turn the knob clockwise again to the stop position. At this point, the latch should
not retract unless you enter the new combination (see figure 4).
8. Replace the tamperproof screw in the top of the lock unit.
9. Repeat steps 1-8 for other side of door.
Troubleshooting
Symptom/problem: Turning outside or inside knob always always retracts latch without depressing any
buttons.
Cause: Lock is in zero combination.
Solution: Follow the procedure for changing a combination (Step 14 on page 26 of your manual) except omit
step 3 (do not enter the existing combination).
[Note: If your lock is opening on every turn of the knob or lever, except upon entering a code, this may be a
ZERO CODE. Before attempting to remove the lock from the door, refer to the troubleshooting procedures
outlined at bottom of this document for a zero code symptom/solution.]
2000 Series FAQ
Changing the Code / Combination
Tool Required: DF59 Control Key (provided with lock)
Read the instructions through once before attempting to change the combination.
The factory pre-set combination is 2 and 4 pressed simultaneously (and released), then press 3 (and release).
The door must be open.
1. Insert the DF59 control key in control lock and turn to the left (counterclockwise). Remove the control key
left in plug. Save for reassembly. (see figure 1)
2. Turn the outside thumb piece to the left (counterclockwise) to the stop position
and release. This clears the lock of previously used buttons.
3. Enter the existing combination.
Make sure you depress each button fully and release.
4. Depress the lever located inside the control lock opening. You should feel a slight click.
5. Rotate the thumb piece to the left (counterclockwise) to the stop position and release. This clears the old
combination.
6. Select a new combination, write it down, Some or all of the buttons may be used for your new combination
- pressed individually or simultaneously. Each button may be used only once. We do not recommend the use
of a one-button combination.
7. Enter your new combination. depress each button fully and release it. You must feel a click each time you
press a button to know that the button was fully depressed.
8. Turn the thumb piece to the right (clockwise) to the stop position to activate the new combination. Release
thumb piece.
9. Replace control key lock by inserting threaded rod portion into the combination change sleeve and turning
to the right (clockwise) until trim plate is snug up against stile of door. The DF59 Control Key can be removed
from the control lock assembly in a vertical or horizontal position only.
[Note: Do not force at any time.
If a wrong combination is entered while operating the lock, turn the outside thumbturn to the left
(counterclockwise) to the stop position and release. This will clear any previously depressed buttons. Enter in
the correct combination. ]
Troubleshooting
Symptom/problem: Turning outside thumbturn clockwise always retracts
latch without depressing any buttons.
Cause: Lock is in zero combination.
Solution: Follow the procedure for setting a new combination except omit step 3.
[Note: If your lock is opening on every turn of the knob or lever, except upon entering a code, this may be a
ZERO CODE. Before attempting to remove the lock from the door, refer to the troubleshooting procedures
outlined at bottom of this document for a zero code symptom/solution.]
2015 Series FAQ
Changing the Code / Combination
Important: Perform this procedure with the DOOR OPEN.
Read the instructions through once before attempting to change the combination.
The factory pre-set combination is 2 and 4 pressed simultaneously (and released), then press 3 (and release).
Tool Required: Control Key
1. Insert the control Key into the lock and turn it 90° to the right (clockwise) to the
horizontal position to unlock the front lock assembly from the mounting bracket
(see figure 1).
2. Remove the front lock assembly from the mounting bracket by pulling it away
from the door.
3. While holding the lock in your hand, turn the knob to the left (counterclockwise)
to the stop position and release.
4. Enter the existing combination. Make sure you depress each button fully and
release.
5. Use your finger to depress the lockout slide (see figure 2). A slight click should
be felt.
6. Rotate the turn knob to the left (counterclockwise) to the stop position to clear
the old combination, then release.
7. Select a new combination, write it down. Some or all of the buttons may be used for your new combination
- pressed individually or simultaneously.
Each button may be used only once. We do not recommend the use of a one-button combination.
8. With the door open, enter your new combination. Depress each button fully and release it. You must feel a
click each time you press a button to know that the button was fully depressed.
9. Turn the knob to the right (clockwise) to the stop position to activate the new combination and release.
10. Remount the front lock assembly by aligning the lock-in studs of the mounting bracket with the mating
holes of the front lock assembly lock-in plate.
11. Turn the control key to the left (counterclockwise) to the vertical position. The front lock assembly is now
locked in place.
12. Enter the new combination and rotate the turn knob to the right (clockwise) and hold. Make sure that the
panic device latch is fully retracted; then release the turn knob.
Note:
Do not use excessive force at any time.
If a wrong combination is entered while operating the lock, turn the outside thumbturn to the left
(counterclockwise) to the stop position and release. This will clear any previously depressed buttons. Enter in
the correct combination.
Troubleshooting
Symptom/problem: Turning outside thumbturn clockwise always retracts latch without depressing any
buttons.
Cause: Lock is in zero combination.
Solution: Follow the procedure for setting a new combination except omit step 2.
[Note: If your lock is opening on every turn of the knob or lever, except upon entering a code, this may be a
ZERO CODE. Before attempting to remove the lock from the door, refer to the troubleshooting procedures
outlined at bottom of this document for a zero code symptom/solution.]
Switch Locks
2400/2500 Series FAQ
Changing the Code / Combination
Tool Required: Combination Change Tool (provided with lock)
Read the instructions through once before attempting to change the combination.
The factory pre-set combination is 2 and 4 pressed simultaneously (and released),
then press 3 (and release). The door must be open.
1. Turn the control knob to the left (counterclockwise) to the stop position and
release (see figure 1). This clears the lock of previously used buttons.
2. Enter the existing combination.
Make sure you depress each button fully and release.
3. Remove the "tamper proof" button head screw from the front escutcheon plate
with the special combination change tool provided. Save for reassembly.
4. Insert the long leg of the combination change tool approximately 3/4" into the
hole where the "tamper proof" button head screw was removed. Lift end up as
arrow shows to depress the combination change lever (see figure 2).
You should feel a slight click.
5. Turn the control knob to the left (counterclockwise) to the stop position and
release (see figure 1). This clears the old combination.
6. Select a new combination, write it down, Some or all of the buttons may be used
for your new combination - pressed individually or simultaneously. Each button
may be used only once. We do not recommend the use of a one-button
combination.
7. Enter your new combination. depress each button fully and release it. You must feel a click each time you
press a button to know that the button was fully depressed (see figure 3).
8. Turn the control knob to the right (clockwise) to the stop position and release to activate the new
combination (see figure 4).
9. Enter new combination and test operation before reassembly.
10. Replace the "tamper proof" button head screw back into the front escutcheon plate with the special
combination change tool provided.
Note:
Do not force at any time.
If a wrong combination is entered while operating the lock, turn the outside thumbturn to the left
(counterclockwise) to the stop position and release. This will clear any previously depressed buttons. Enter in
the correct combination.
Troubleshooting
Symptom/problem Turning outside thumbturn clockwise always retracts latch without depressing any buttons.
Cause: Lock is in zero combination.
Solution: Follow the procedure for setting a new combination except omit step 2.
[Note: If your lock is opening on every turn of the knob or lever, except upon entering a code, this may be a
ZERO CODE. Before attempting to remove the lock from the door, refer to the troubleshooting procedures
outlined at bottom of this document for a zero code symptom/solution.]
3000 Series FAQ
Changing the Code / Combination
Important: Perform this procedure with the DOOR OPEN. The lock should be set for pushbutton access to
retract latch.
Tools Required: DF59 Control Key & Small flat 1.8" blade screwdriver.
Read the instructions through once before attempting to change the combination.
The factory pre-set combination is 2 and 4 pressed simultaneously (and released),
then press 3 (and release).
1. Remove the control lock assembly and trim plate using the DF59 Control Key
provided with the lock (see figure 1). Turn the key to the left (counterclockwise)
until control lock assembly can be removed and the combination change sleeve is
exposed (see figure 2).
2. Turn the outside thumb piece to the left (counterclockwise) to the stop position
and release. This clears the lock of previously used buttons (see figure 3).
3. Enter the existing combination. Make sure you depress each button fully and
release.
4. Insert screwdriver into combination change sleeve slot (see figure 2). Turn
screwdriver to the right (clockwise) to the stop position. You should feel a slight
click. Turn the screwdriver to the left (counterclockwise) to stop, and remove.
5. Rotate the thumb piece to the left (counterclockwise) to the stop position and
release. This clears the old combination (see figure 3).
6. Select a new combination, write it down. Some or all of the buttons may be used
for your new combination - pressed individually or simultaneously. Each button may
be used only once. We do not recommend the use of a one-button combination.
7. With the door open, enter your new combination. Depress each button fully and
release it. You must feel a click each time you press a button to know that the button
was fully depressed.
8. Turn the thumb piece to the right (clockwise) to the stop position to activate the new combination - note that
latch is retracted. Release thumb piece (see figure 4).
9. Replace control lock assembly and trim plate by inserting threaded rod portion into the combination change
sleeve and turning to the right (clockwise) until trim plate is snug up against stile of door. The DF59 Control
Key can be removed from the control lock assembly in a vertical or horizontal position only.
10. BEFORE CLOSING THE DOOR, enter the new combination and turn the thumb piece to the right
(clockwise) to insure proper retraction of latch.
Note:
Do not force at any time.
If a wrong combination is entered while operating the lock, turn the outside thumbturn to the left
(counterclockwise) to the stop position and release. This will clear any previously depressed buttons. Enter in
the correct combination.
Troubleshooting
Symptom/problem: Turning outside thumbturn clockwise always retracts latch without depressing any
buttons.
Cause: Lock is in zero combination.
Solution: Follow the procedure for setting a new combination except omit step 3.
[Note: If your lock is opening on every turn of the knob or lever, except upon entering a code, this may be a
ZERO CODE. Before attempting to remove the lock from the door, refer to the troubleshooting procedures
outlined at bottom of this document for a zero code symptom/solution.]
3100 Series FAQ
Changing the Code / Combination
Perform this procedure with the door open. For your security and protection the combination must be changed
when the lock is installed.
One or all five of the buttons can be used in the combination; however, each button can be depressed or used
only once. Two or more buttons can be depressed simultaneously as a step in the combination.
1. Remove the tamper-proof screw (A) (see figure 1) on the upper left side of the outside lock housing
assembly using the anti-tamper torx wrench supplied.
2. Open the door to avoid being locked out.
3. Clear the lock of any pushbutton entries by pulling the outside paddle to the stop
position and release.
4. Depress the buttons for the existing combination. On new installations, use the
factory-preset combination; 2 and 4 together and release, then 3 and release.
5. Push the ENTER button. A slight click indicates code was entered properly.
6. Insert the chamber code-change tool (B) (see figure 2) horizontally into the
screw hole to a depth of approximately 1/2" (13 mm).
Tip: Mark 1/2" (13 mm) on the chamber code-change tool to eliminate guesswork.
7. Once the tool is in position, gently angle the outer end of the tool upward until you feel a slight click.
Tip: Little force is needed. Successful contact will be felt at the enter button.
8. Remove the chamber code-change tool and pull the outside paddle once to the stop position and release.
9. Depress the buttons for the new combination, push the ENTER button to activate the new code, and release.
10. Pull the outside paddle to retract the latch and clear the lock.
11. Re-install the tamper-proof screw.
12. Before closing the door, test the operation of the lock using the new combination.
Troubleshooting
Symptom/problem: The lock opens when you depress the enter button and pull the outside paddle, without
entering a combination.
Cause: The lock is in zero code (it has no set combination).
Solution: Reset the code by following the instructions in Chapter 13 "Changing Combination" of your manual,
with the exception of step 4, since there is no existing combination.
5000 Series FAQ
Resset Lost or Unknown Combination
To download PDF of this model, see under Downloads/Simplex/Simplex 5000 Series Index.
[Note: If your lock is opening on every turn of the knob or lever, except upon entering a code, this may be a
ZERO CODE. Before attempting to remove the lock from the door, refer to the troubleshooting procedures
outlined at bottom of this document for a zero code symptom/solution.]
6200 Series FAQ
Changing the Code / Combination
For your security the combination must be changed when the lock is installed. Perform this procedure with the
door open.
The factory-set code is 2 and 4 depressed simultaneously release, followed by 3 release. This code should be
changed as soon as the lock is installed.
1. Turn the thumbturn to the left (counterclockwise) to the stop position and
release. This will clear any random entries from the mechanism.
2. Enter the existing combination.
3. Gently remove the rubber cap (A) covering the combination change hole and
save (see figure 1).
4. Insert the pointed end of the spanner wrench (B) into the combination change
hole as shown (see figure 2).
5. Gently lift up until a slight click is heard or felt. Do not force.
6. Remove the spanner wrench.
7. Turn the outside thumbturn to the left (counterclockwise) to the stop position
and release to clear the old combination.
8. Select a new code and write it down (some or all of the buttons may be used
for your new code, depressed individually or simultaneously). Each button may
be used only once.
9. With the door open, enter your new code. Depress each button fully and release. A slight click should be
felt as each button is depressed.
10. Turn the thumbturn to the right (clockwise) to the stop position and hold.
The latch should retract (see figure 4).
11. Release the thumbturn.
12. Try to turn the thumbturn to the right (clockwise) again. The thumbturn will not turn clockwise unless the
correct combination is entered.
Note: Excessive force will slip the thumbturn 180°. The slipping mechanism (force-proof clutch) protects the
lock’s internal mechanism from forced entry.
13. Turn the thumbturn to the left (counterclockwise) to the stop position.
This will clear any previously depressed buttons.
14. Enter the new combination. Turn the thumbturn to the right (clockwise).
The thumbturn should rotate. The latch will be retracted flush with the face plate. The correct combination
must be entered each time you want to unlock the door.
15. Replace the rubber cap to cover the combination change hole.
Troubleshooting
Symptom/problem: Without depressing any buttons, the outside thumbturn always retracts the latch when it is
turned clockwise.
Cause: Lock is in zero combination.
Solution: Follow the procedure for changing a combination except omit step 2 (do not enter the existing
combination).
[Note: If your lock is opening on every turn of the knob or lever, except upon entering a code, this may be a
ZERO CODE. Before attempting to remove the lock from the door, refer to the troubleshooting procedures
outlined at bottom of this document for a zero code symptom/solution.]
7000 Series FAQ
Changing the Code / Combination
Important: The following steps must be performed while the door is be open.
The factory pre-set combination is 2 and 4 pressed simultaneously and released, then press 3 and release.
Read the instructions through once before attempting to change the combination.
1. Turn the outside thumbturn to the left (counterclockwise) until it stops then
return it to the right (clockwise) slowly to the horizontal position and release.
2. Enter the existing combination.
3. Insert a Phillips-head screwdriver into the central piece of the combination
change assembly (see figure 1). Gently turn the screwdriver to the right
(clockwise) until it stops. A slight click should be felt. Do not force.
4. Remove the screwdriver from the combination change assembly.
Important: When removing the screwdriver, the central piece must return to its
initial position, if not, set it back to its original position using the screwdriver
(see Figure 1). If the central piece of the combination change assembly does not
return to its original position, the combination will be cancelled and the lock will
jam.
5. Turn the outside thumbturn to the left (counterclockwise) until it stops and
return it slowly to the right (clockwise) to the horizontal position and release.
This clears the existing code (see figure 2).
6. Select a new combination and write it down. Some or all of the buttons may
be used for your new code, pressed individually or simultaneously. Each button
may be used only once. We do not recommend the use of a one-button
combination.
7. With the door open, enter your new combination. Depress each button fully and release it. You must feel a
click each time you press a button to know that the button was fully depressed.
8. Turn the outside thumbturn to the right (clockwise) until it stops; the latch/bolt should retract.
9. For automatic relocking latches, release the outside thumbturn and the latch should return to its initial
extended position.
For manual relocking deadbolts, turn the outside thumbturn to the left (counterclockwise) until it stops; the
bolt should extend.
Keep the door open and test the operation of the lock 2-3 times to make sure your combination was set
correctly.
Note:
Do not use excessive force at any time.
If a wrong combination is entered while operating the lock, turn the outside thumbturn to the left
(counterclockwise) to the top position and release. (see Figure 2). This will clear any previously depressed
buttons. Enter in the correct combination.
Troubleshooting
Symptom/problem: Turning outside thumbturn clockwise always retracts latch without depressing any
buttons.
Cause: Lock is in zero combination.
Solution: Follow the procedure for setting a new combination except omit step 2.
[Note: If your lock is opening on every turn of the knob or lever, except upon entering a code, this may be a
ZERO CODE. Before attempting to remove the lock from the door, refer to the troubleshooting procedures
outlined at bottom of this document for a zero code symptom/solution.]
7100 Series FAQ
Changing the Code / Combination
Important: The following steps must be performed while the door is be open.
The factory pre-set combination is 2 and 4 pressed simultaneously and released, then press 3 and release.
Read the instructions through once before attempting to change the combination.
1. Turn the outside thumbturn to the left (counterclockwise) until it stops then return it to the right (clockwise)
slowly to the horizontal position and release.
2. Enter the existing combination.
3. Insert a Phillips-head screwdriver into the central piece of the combination
change assembly (see figure 1). Gently turn the screwdriver to the right
(clockwise) until it stops. A slight click should be felt. Do not force.
4. Remove the screwdriver from the combination change assembly.
Important: When removing the screwdriver, the central piece must return to its
initial position, if not, set it back to its original position using the screwdriver (see
Figure 1). If the central piece of the combination change assembly does not return
to its original position, the combination will be cancelled and the lock will jam.
5. Turn the outside thumbturn to the left (counterclockwise) until it stops and
return it slowly to the right (clockwise) to the horizontal position and release.
This clears the existing code (see figure 2).
6. Select a new combination and write it down. Some or all of the buttons may be
used for your new code, pressed individually or simultaneously. Each button may
be used only once. We do not recommend the use of a one-button combination.
7. With the door open, enter your new combination. Depress each button fully and
release it. You must feel a click each time you press a button to know that the button was fully depressed.
8. Turn the outside thumbturn to the right (clockwise) until it stops; the latch/bolt should retract.
9. For automatic relocking latches, release the outside thumbturn and the latch should return to its initial
extended position.
For manual relocking deadbolts, turn the outside thumbturn to the left (counterclockwise) until it stops; the
bolt should extend.
Keep the door open and test the operation of the lock 2-3 times to make sure your combination was set
correctly.
Note:
Do not use excessive force at any time.
If a wrong combination is entered while operating the lock, turn the outside thumbturn to the left
(counterclockwise) to the top position and release. (see Figure 2). This will clear any previously depressed
buttons. Enter in the correct combination.
Troubleshooting
Symptom/problem: Turning outside thumbturn clockwise always retracts latch without depressing any
buttons.
Cause: Lock is in zero combination.
Solution: Follow the procedure for setting a new combination except omit step 2.
[Note: If your lock is opening on every turn of the knob or lever, except upon entering a code, this may be a
ZERO CODE. Before attempting to remove the lock from the door, refer to the troubleshooting procedures
outlined at bottom of this document for a zero code symptom/solution.]
8100 Series FAQ
Changing the Code / Combination
For your security the combination must be changed when the lock is installed. The door must be open.
On models with passage feature, make sure the passage feature is disengaged: turn knob or key should be in
vertical position.
1. Remove the tamperproof allen screw (A) using (B) tamper proof allen wrench
supplied with lock (see figure 1).
2. Turn the outside lever once to the stop position then release (see figure 3).
3. Enter the existing combination. On new installations, enter the factory-set
combination: depress buttons 2 and 4 simultaneously (release) , then depress
button 3 (release). You should feel a click as each button is depressed.
4. Insert the pick tool (C) as shown in figure 2. Gently depress pick tool in hole (a
slight click should be felt).
5. Turn the outside lever once to the stop position then release (see figure 3).
6. Select a new combination, write it down, then enter the new combination depress buttons carefully (a slight click should be felt as each button is depressed)
Note: You can use one button or all five for a combination, but each button can
only be used once. You can press two or more buttons simultaneously as a step in
the combination.
7. Turn the outside lever once, all the way until it stops, hold in position and make
sure the latch is retracted fully. Release the lever. Turn the lever again to the stop
position. At this point, the latch should not retract unless you enter the new
combination (see figure 3).
8. Resecure anti-tamper screw into housing (see figure 4).
Troubleshooting
Symptom/problem: Outside lever when turned always retracts latch without depressing any buttons.
Cause: Lock is in zero combination.
Solution: Follow the procedure for changing a combination except omit step 3 (do not enter the existing
combination).
[Note: If your lock is opening on every turn of the knob or lever, except upon entering a code, this may be a
ZERO CODE. Before attempting to remove the lock from the door, refer to the troubleshooting procedures
outlined at bottom of this document for a zero code symptom/solution.]
Cabinet Locks
9600 Series FAQ
Changing the Code / Combination
Read the instructions through once before attempting to change the combination.
The factory pre-set combination is 2 and 4 pressed simultaneously (and released), then press 3 (and release).
The door must be open.
1. Turn the control knob to the left (counterclockwise) to the stop position and
release (see figure 1). This clears the lock of previously used buttons.
2. Enter the existing combination. Make sure you depress each button fully and
release.
3. Push down the combination change slide on the back side of the lock. Located at
the end opposite control knob (see figure 2).
4. Turn the control knob to the left (counterclockwise) to the stop position and
release (see figure 1). This clears the old combination.
5. Select a new combination, write it down. Some or all of the buttons may be used
for your new combination - pressed individually or simultaneously.
Each button may be used only once. We do not recommend the use of a one-button
combination.
6. Enter your new combination. Depress each button fully and release it. You must
feel a click each time you press a button to know that the button was fully
depressed (see figure 3).
7. Turn the control knob to the right (clockwise) to the stop position and release to
activate the new combination (see figure 4).
8. Enter new combination and test operation.
Note:
Do not force at any time.
If a wrong combination is entered while operating the lock, turn the outside thumbturn to the left
(counterclockwise) to the stop position and release. This will clear any previously depressed buttons. Enter in
the correct combination.
Troubleshooting
Symptom/problem: Turning outside thumbturn clockwise always retracts latch without depressing any
buttons.
Cause: Lock is in zero combination.
Solution: Follow the procedure for setting a new combination except omit step 2.