1
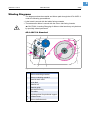
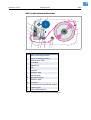
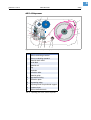
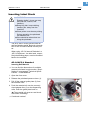
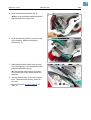
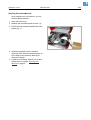
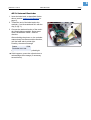
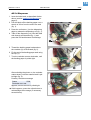
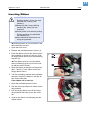
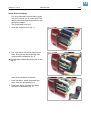
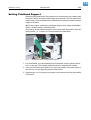
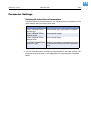
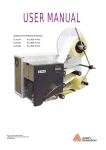
04/09 Rev. 5.02-01 USER MANUAL AP 4.4 – AP 5.4 Setup Winding Diagrams ......................................... 2 AP 4.4/AP 5.4 Standard ............................. 2 AP 5.4 with Internal Rewinder ................... 3 AP 5.4 Dispenser ....................................... 4 Selecting Consumables ................................ 5 Label Stock ............................................... 5 Thermotransfer Ribbon ............................. 5 Inserting Label Stock .................................... 6 AP 4.4/AP 5.4 Standard ............................. 6 AP 5.4 Internal Rewinder ........................... 9 AP 5.4 Dispenser ..................................... 10 Inserting Ribbon ..........................................11 If the roll is used up .....................................13 Material Stock End ...................................13 Ribbon End ..............................................13 Setting Printhead Support ...........................14 Parameter Settings ......................................15 Setting the Label Stock Parameters ........15 Index ............................................................16 2 04/09 Rev. 5.02-01 USER MANUAL Setup AP 4.4 – AP 5.4 Winding Diagrams The diagrams show the material and ribbon path through the AP 4.4/AP 5.4 under the following preconditions: Label stock is wound with the labels facing outwards Thermotransfer ribbon is wound with the colour side facing inwards. ¯ CAUTION! - Inserting/Changing of ribbon or label stock may only be done by specially trained personnel! AP 4.4/AP 5.4 Standard 1 2 3 11 10 4 9 601 5 2 4 3 5 8 Bild_3/Z0194.cdr • • 7 Fig. 1: 6 Material and Ribbon path in AP 4.4/AP 5.4. No. Description 1 Ribbon rewinding mandrel 2 Ribbon unwinding mandrel 3 Material strain relief 4 Guide disk 5 Material roll 6 Material guide 7 Light barrier fitting 8 Print roller 9 Adjusting wheel for printhead support 10 Pressure lever 11 Ribbon deflection axis Tab. 1:Operating parts of the AP 4.4/AP 5.4. 3 04/09 Rev. 5.02-01 USER MANUAL Setup AP 4.4 – AP 5.4 AP 5.4 with Internal Rewinder 1 2 3 15 14 4 13 601 5 2 4 3 5 Bild_3/Z0194.cdr 12 11 Fig. 2: 10 9 8 7 6 Material and ribbon path through AP 5.4 with internal rewinder. No. Description 1 Ribbon rewinding mandrel 2 Ribbon unwinding mandrel 3 Material strain relief 4 Guide disk 5 Material roll 6 Clip 7 Rewinder 8 Deflection tube 9 Material guide 10 Light barrier fitting 11 Deflection plate 12 Print roller 13 Adjusting wheel for printhead support 14 Pressure lever 15 Ribbon deflection axis Tab. 2: Operating parts of the „AP 5.4 Internal Rewinder“. 4 04/09 Rev. 5.02-01 USER MANUAL Setup AP 4.4 – AP 5.4 AP 5.4 Dispenser 1 2 3 15 14 4 13 601 5 2 4 3 5 12 Bild_3/Z0194.cdr 11 10 Fig. 3: 9 8 7 6 Material and ribbon path through „AP 5.4 Dispenser“. No. Description 1 Ribbon rewinding mandrel 2 Ribbon unwinding mandrel 3 Material strain relief 4 Guide disk 5 Material roll 6 Clip 7 Rewinder 8 Deflection tube 9 Material guide 10 Light barrier fitting 11 Deflection plate 12 Dispensing edge 13 Adjusting wheel for printhead support 14 Pressure lever 15 Ribbon deflection axis Tab. 3: Operating parts of the „AP 5.4 Dispenser“. 5 04/09 Rev. 5.02-01 USER MANUAL Setup AP 4.4 – AP 5.4 Selecting Consumables Label Stock You need to pay attention to three factors when selecting a material: – The abrasive wear behaviour of the material surface. – The properties of the chemical reaction for colour transfer printing. – The temperature necessary for colour transfer. Abrasive behaviour If the material is very abrasive, then the printhead will be abraded more quickly than usual. This criterion is especially important in thermoprinting. This is not so critical for thermotransfer printing, because here you can select a ribbon that is wider than the material. This means that the printhead is protected over the entire width of the material. Printhead temperature Similar behaviour is found with high printhead temperatures. The material and ribbon require longer to cool down, the print quality is more critical and the printhead wears out more quickly. Papers with a grammage greater than 240g may require corrections to the application pressure and the position of the printhead. Thermotransfer Ribbon The following recommendation is made for ribbons: – The reverse of the ribbon must have an antistatic and friction-reducing coating (backcoating). – The ribbons must be specified as suitable for use with ‘flat head type’ printheads. – The ribbons should also be designed for speeds up to 8 inch/sec (200 mm/s). ¯ CAUTION! - Ribbon without these properties can reduce the performance of the printer and the print quality and also damage the printhead! 6 04/09 Rev. 5.02-01 USER MANUAL Setup AP 4.4 – AP 5.4 Inserting Label Stock WARNING! Rotating shafts! – these can trap and tear hair, clothes, and jewellery. « Keep long hair, loose clothing, jewellery etc. away from the machine! « Close printer cover bevore printing. During operation, the printhead can become hot! « Care should be taken when touching the printhead. The AP 4.4/AP 5.4 can process both roll and fan-folded material. Below is a description of how to insert material into the printer. When using „AP 5.4 Internal Rewinder“ or „AP 5.4 Dispenser“, the label web, respectively the backing paper, must be threaded back to the rewinder. AP 4.4/AP 5.4 Standard Inserting Roll Material P You can find the dimensions for suitable material rolls listed in topic section “Specifications” in paragraph “Technical Specifications” / “Label Material”. 1. Open the front cover. 2. Release the printhead pressure lever (1) . 1 3. Pull off the external guide plate (2) from the material roller. 4. Push the material roll onto the correctly sized adapter disc (3) on the dispensing roller. Push the guide plate back on. ¯ The material roll must turn anti-clockwise when unwinding! P Continued overleaf 7 04/09 Rev. 5.02-01 USER MANUAL Setup AP 4.4 – AP 5.4 5. Insert the material as shown (fig. 2). 2 ¯ Be sure to route the material around the material stain relief (4) as well! 6. Push the material guide (5) up to the edge of the material, without pinching the material (fig. 3). 3 7. Slide the light barrier fitting using the grip (6) until the pointer (7) is located above the material perforations (fig. 4). 4 ¯ The optional reflex sensor is located 5mm to the right of the pointer below the material! 8. Thermodirect printing: Close the pressure lever. Thermotransfer printing: Insert ribbon next. P See the Abschnitt Inserting Ribbon auf Seite 11. 8 04/09 Rev. 5.02-01 USER MANUAL AP 4.4 – AP 5.4 Inserting Fan-folded Material As an alternative to roll material, you can use fan-folded material: 1. Open the front cover. 2. Release the printhead pressure lever (1). 3. Position the fan-folded material behind the printer (fig. 1). 4. Guide the material over the material unwinder roller. Push the material guide up to the edge of the material, without pinching the material. 5. Continue by following steps 6 to 8 as described above in section Inserting Roll Material on page 6. 1 Setup 9 04/09 Rev. 5.02-01 USER MANUAL Setup AP 4.4 – AP 5.4 AP 5.4 Internal Rewinder 1. Insert the label web, as described further above (section Inserting Roll Material on page 6). 2. Thread the end of the label web to the rewinder (1) as illustrated and fix it with the clip (2) (fig. 1). 1 3. Choose the rotation direction of the rewinder (face inside or outside): Select parameter REWINDER PARA > Rewind direction. After switching the printer on, the rewinder rotates slowly into the set rotation direction, until the label web is pulled tight. Possibly, the status message Status 5004 Rewinder mat. tear appears, before the web is pulled tight. « If this happens, press the online button to acknowledge the message (if necessary several times). 10 04/09 Rev. 5.02-01 USER MANUAL Setup AP 4.4 – AP 5.4 AP 5.4 Dispenser 1. Insert the label web, as described further above (section Inserting Roll Material on page 6). 2. Pull the labels off the backing paper over a stretch of 30 cm from the end of the web (fig. 1). 1 3. Press the red button (1) at the dispensing edge to release the dispensing roll (fig. 1). 4. Take off the dispensing roll, feed the label web through as illustrated (fig. 1) and press the roll back between its bearings. 5. Thread the backing paper backwards to the rewinder (2) as illustrated (fig. 2). 2 6. Fix the end of the backing paper web using the clip (3). 7. Turn the rewinder counter clockwise, until the backing paper is pulled tight. After switching the printer on, the rewinder rotates slowly, until the material web is pulled tight (fig. 3). Possibly, the status message Status 5004 Rewinder mat. tear appears, before the web is pulled tight. « If this happens, press the online button to acknowledge the message (if necessary several times). 3 11 04/09 Rev. 5.02-01 USER MANUAL Setup AP 4.4 – AP 5.4 Inserting Ribbon WARNING! Rotating shafts! – these can trap and tear hair, clothes, and jewellery. « Keep long hair, loose clothing, jewellery etc. away from the machine! « Close printer cover bevore printing. During operation, the printhead can become hot! « Care should be taken when touching the printhead. ¯ Inserting ribbon is only required for the thermotransfer process. 1. Open the front cover. 2. Release the printhead pressure lever (1) . 3. Push the ribbon roll onto the ribbon unwinding mandrel (2) as far as it will go. Push an empty ribbon sleeve onto the rewinding mandrel (3). 1 ¯ The ribbon must turn anti-clockwise when unwinding! (given the roll is wound up with the colour inside) 4. Insert the ribbon as shown into the printer (figs. 1 and 2). Fix the ribbon end to the empty ribbon sleeve. 5. Turn the rewinding mandrel anti-clockwise through a couple of rotations, until the ribbon runs crease-free. If the ribbon roll is used up: 1. Open the printhead pressure lever. 2. Pull the wound-up ribbon roll off the rewinding mandrel. 3. Pull the empty ribbon core off the unwinding mandrel and hang it onto the rewinder. 4. Insert a new ribbon roll following the description above. 2 12 04/09 Rev. 5.02-01 USER MANUAL AP 4.4 – AP 5.4 Quick ribbon exchange For using alternately several ribbon types, you don´t need to cut off, insert and fix the ribbon to the rewind mandrel each time you change the ribbon. The much easier way is to: 1. Open the pressure lever (fig. 1). 1 2. Pull both ribbon rolls off the ribbon mandrels. Remove the ribbon laterally from underneath the printhead (fig. 2). 2 ¯ Deposit often needed ribbon as a pair of rolls (fig. 3)! Insert the next ribbon as follows: 1. Push the ribbon, which is between the rolls, under the printhead (fig. 2). 2. Push both ribbon rolls onto the ribbon mandrels as illustrated (fig. 1). 3 Setup 13 04/09 Rev. 5.02-01 USER MANUAL Setup AP 4.4 – AP 5.4 If the roll is used up Material Stock End When the end of the material roll has passed the perforation sensor, the following message appears: Status Material end 5002 « Release the pressure lever and pull the end of the material forwards out of the printer. Ribbon End The following message appears when the ribbon roll is completely unwound – that is, the unwinder roll mandrel ceases to turn. Status Ribbon end 5008 « Follow the instructions given in Abschnitt Inserting Ribbon auf Seite 11. ¯ Ribbon end recognition can be switched off if required, e.g. for theromodirect printing. « To do this, set the parameter SYSTEM PARAMETERS > Ribbon autoecon. to Thermal printing. P For more information on how to set parameters see the topic section “Info- Printouts and Parameters”. 14 04/09 Rev. 5.02-01 USER MANUAL Setup AP 4.4 – AP 5.4 Setting Printhead Support When printing small labels, the printhead can come directly into contact with the printer roller in the region where there is no material. This can lead to premature wear of the printhead and to different print intensity between the two edges of the label. ¯ For this reason, activate the printhead support when using small labels! Small = material width < printhead width. The position of the printhead support can be seen from the position of the adjusting wheel (1) . Position 0 is recommended for wide labels. Fig. 1: The adjusting wheel for the printhead support. 1. For small labels, turn the adjusting wheel clockwise until the pointer indicates 1 on the dial. This causes the printhead to be raised at the outside. 2. Carry out a test print and check for an even print quality. If the print quality is still uneven, turn the adjusting wheel a little further. 3. Repeat steps 1 to 3 until the print quality is the same across the entire width of the label. 15 04/09 Rev. 5.02-01 USER MANUAL Setup AP 4.4 – AP 5.4 Parameter Settings Setting the Label Stock Parameters Using the following threeparameters, you tell the printer the properties of the label material that you want to work with: Parameter Function PRINT PARAMETERS/ Material type Sets material type (perforated or endless) PRINT PARAMETERS/ Material length Sets material length PRINT PARAMETERS/ Material width Sets material width SYSTEM PARAMETERS/ Sensor type (reflex or transmission) set acLight sens. type cording to the material (marks or perforations) Tab. 1:Important parameters for setting the material properties. P You can find information on how to set parameters in the topic section “Info- Printouts and Parameters” in the paragraph on “Operating the Parameter Menu”. 04/09 Rev. 5.02-01 USER MANUAL Setup, page 16 AP 4.4 – AP 5.4 Index D Dispenser version - Take-up winder full, error message 13 F Foil End 13 I Inserting fan-folded material 8 Inserting roll material 6 L Label material 5 M Material end 13 Material parameters 15 Materialverlauf, schematisch 2 Q Quick ribbon exchange 12 R Ribbon exchange done quickly 12 S Setting label material parameters 15 Setting printhead support 14 T Thermoprint foil 5 Thermotransfer foil 5