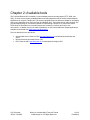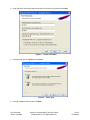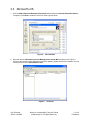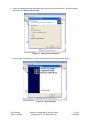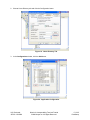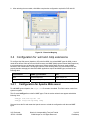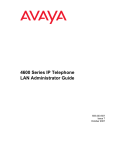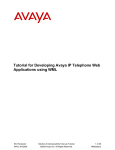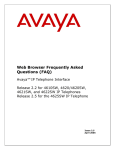
1
Tutorial for Avaya 4600 and 9600 Series IP
Telephones Push and Browser Applications
Setup
KS; Reviewed;
SPOC 1/22/2008
Solution & Interoperability Test Lab Tutorial
©2008 Avaya Inc. All Rights Reserved.
1 of 25
PushSetup
Contents
About this Tutorial ............................................................................................................................ 3
Intended Audience .............................................................................................................. 3
Prerequisites ....................................................................................................................... 3
Chapter 1:
Overview of Avaya IP Telephone Push and Browser API ..................................... 4
1.1
Avaya IP Telephone Push Feature ........................................................................ 4
1.2
The Push/Pull Process – A Two-Step View........................................................... 4
1.3
Push Operation (Step 1a and Step 1b).................................................................. 5
1.4
Pull Operation (Step 2a and Step 2b).................................................................... 5
1.5
Avaya IP Telephone Browser Feature................................................................... 5
Chapter 2:
Available tools ........................................................................................................ 6
Chapter 3:
Set-up and Configuration of Available Tools ......................................................... 7
3.1
Apache Web Server............................................................................................... 7
3.2
Configure PHP with Apache Web Server ............................................................ 10
3.3
Microsoft’s IIS....................................................................................................... 11
3.3.1
3.3.2
3.4
Virtual Directory Creation ........................................................................ 12
Configure PHP with IIS............................................................................ 16
Configuration for .wml and .bmp extensions........................................................ 19
3.4.1
3.4.2
Configuration for Apache Web server ..................................................... 19
Configuration for Microsoft’s IIS .............................................................. 20
Chapter 4:
Push and Browser Configuration Values ............................................................. 22
Chapter 5:
Verify Setup.......................................................................................................... 23
References ................................................................................................................................................. 24
KS; Reviewed;
SPOC 1/22/2008
Solution & Interoperability Test Lab Tutorial
©2008 Avaya Inc. All Rights Reserved.
2 of 25
PushSetup
About this Tutorial
This tutorial explains the steps required to setup the environment for the Avaya 4600 and 9600 Series IP
Telephones Push and Browser interface.
This tutorial comprises sections on available tools, their installation and the configurations that must be
done to execute sample applications on the Avaya 4600 and 9600 Series IP Telephones.
After completing this tutorial, the developer will be able to install, configure and execute the Push and
Browser applications for the Avaya 4600 and 9600 Series IP Telephones.
Intended Audience
This Tutorial is intended for application developers who want to use Avaya’s Push and Browser
functionality to develop IP Telephony applications.
Prerequisites
This tutorial assumes that the developer already knows how to configure 4600 and 9600 series of Avaya
IP phones and is also familiar with scripting languages such as PHP, WML, etc.
KS; Reviewed;
SPOC 1/22/2008
Solution & Interoperability Test Lab Tutorial
©2008 Avaya Inc. All Rights Reserved.
3 of 25
PushSetup
Chapter 1: Overview of Avaya IP Telephone
Push and Browser API
1.1
Avaya IP Telephone Push Feature
Push is the ability for an application to send content to the Web browser, to the topline of the display, or to
the audio transducers of Avaya 4600 and 9600 Series IP Telephones.
The Push interface offers several features:
•
•
•
•
•
•
•
•
Full screen pushes, called Display push types
Single line top area text push, called Topline push types
Audio streaming, called Audio push types
Audio streaming from the telephone, called Transmit Audio push types (96xx only)
Optional alerts
Push priorities
A Security mechanism
A Subscription service
Avaya provides a security mechanism to assure that the content pushed to the phones is from a trusted
source. Additionally, a subscription service allows the phones to provide necessary information to the
application server such that pushes can be targeted to an individual user, a group of users, or to the
enterprise.
1.2
The Push/Pull Process – A Two-Step View
The Push framework is a two-step process – a push operation followed by a pull operation. See Figure 1
for a visual reference to the steps involved in the Push/Pull process.
Figure 1:
KS; Reviewed;
SPOC 1/22/2008
Push/Pull process
Solution & Interoperability Test Lab Tutorial
©2008 Avaya Inc. All Rights Reserved.
4 of 25
PushSetup
1.3
Push Operation (Step 1a and Step 1b)
The Push Initiator (PI), which is an application server, transmits a Push Message using the HTTP POST
method to the phone’s Push Agent (PA).
1.4
Pull Operation (Step 2a and Step 2b)
The phone requests the target URI of the Push Content from a Trusted Push Server. The Trusted Push
Server is any standard Web server capable of serving up WML and XML content in response to standard
HTTP requests. The Push Content can be any valid WML file or an XML file with tags that instruct the
endpoint to do one or more of the following:
•
•
•
•
Set up an RTP audio stream
Display a message on the Top Line
Display a full screen message with images and links, or
Re-subscribe with the subscription server
1.5
Avaya IP Telephone Browser Feature
Avaya 4600 and 9600 Series IP Telephones have a built in Web browser that is capable of rendering
WML pages. Users can navigate to Web applications and retrieve information about the company, news,
or interactive applications such as a conference room scheduler and Company Directory lookup. Any
application that that a developer can conceive of for a traditional PC based browser interface can be
scaled and deployed for access from an Avaya IP Telephone.
Among the features available in the browser interface are:
•
•
•
•
•
•
JPEG and WBMP Images.
Form controls such as Radio buttons, check boxes, etc.
Input elements such as text boxes.
Hyperlinks to a series of other pages with information.
WTAI features such as click-to-dial and add-to-speed dial.
Full use of the IP phones programmable soft keys.
KS; Reviewed;
SPOC 1/22/2008
Solution & Interoperability Test Lab Tutorial
©2008 Avaya Inc. All Rights Reserved.
5 of 25
PushSetup
Chapter 2: Available tools
The Push and Browser API are based on open standard protocols and languages (HTTP, WML, and
XML). As such, there are many available platforms and languages that can be used to build and deploy
applications for Avaya IP Telephones. This section highlights some tools that are available for developing
and running applications built using the Push and Browser APIs. These tools are not really required. Any
programming language or environment capable of implementing a simple HTTP protocol will suffice.
These tools are described in this tutorial because they constitute a common and easy to use
environment. In addition, these tools make it possible to run the Push and Browser sample applications
available for download from www.avaya.com/devconnect.
The tools described in this tutorial are:
•
•
•
Apache Web Server: Refer the URL http://httpd.apache.org to download and install the web
server.
Microsoft Internet Information Server (IIS)
PHP: Refer the URL http://www.php.net to download and configure PHP.
KS; Reviewed;
SPOC 1/22/2008
Solution & Interoperability Test Lab Tutorial
©2008 Avaya Inc. All Rights Reserved.
6 of 25
PushSetup
Chapter 3: Set-up and Configuration of
Available Tools
This chapter explains the steps to install Apache Web Server and IIS Web Server. It also explains
configuring PHP for both these web servers. The user needs to install any one of the above mentioned
web servers.
3.1
Apache Web Server
1. Run the downloaded windows installer for Apache web server and click Next.
Figure 2:
KS; Reviewed;
SPOC 1/22/2008
Installation Wizard
Solution & Interoperability Test Lab Tutorial
©2008 Avaya Inc. All Rights Reserved.
7 of 25
PushSetup
2. Select the accept button and click Next.
Figure 3:
License Acceptance
Figure 4:
Installation Readme
3. Click Next.
KS; Reviewed;
SPOC 1/22/2008
Solution & Interoperability Test Lab Tutorial
©2008 Avaya Inc. All Rights Reserved.
8 of 25
PushSetup
4. Enter the server information and select button for all users on port 80 and click Next.
Figure 5:
Server Information
5. Choose setup type as Typical and click Next.
Figure 6:
Setup Type
6. Choose installation directory and click Next.
KS; Reviewed;
SPOC 1/22/2008
Solution & Interoperability Test Lab Tutorial
©2008 Avaya Inc. All Rights Reserved.
9 of 25
PushSetup
Figure 7:
Destination Folder
7. Click Install to begin the installation.
8. Click Finish to complete installation.
3.2
Configure PHP with Apache Web Server
To configure Apache to use PHP, the httpd.conf file needs to be edited. This file’s location varies from
system to system.
This file uses LoadModule to tell Apache server where to find module plug-ins to load. Find the section
where these appear and add the following line for Apache server to load the module required for
processing .php files. The path to php4apache2.dll may vary depending on how PHP was installed
on the target system.
LoadModule php4_module c:/php/php4apache2.dll
This file uses AddType lines to define MIME types based on file extension. Find the section where these
appear and add the following line for Apache server to process .php files:
AddType application/x-httpd-php .php
Save and close the file and restart the Apache server to reload the configuration.
KS; Reviewed;
SPOC 1/22/2008
Solution & Interoperability Test Lab Tutorial
©2008 Avaya Inc. All Rights Reserved.
10 of 25
PushSetup
3.3
Microsoft’s IIS
1. Click the Add or Remove Windows Components tab and select the Internet Information Service
component. Click Next to install the IIS server. Refer Figure 8 below.
Figure 8:
IIS Installation
2. Open the Internet Information Services Management Console (MC) as shown in the Figure 9.
Access to this console varies depending on the host operating system and the IIS installation, but can
usually be found under Administrative Tools.
Figure 9:
KS; Reviewed;
SPOC 1/22/2008
IIS Screen
Solution & Interoperability Test Lab Tutorial
©2008 Avaya Inc. All Rights Reserved.
11 of 25
PushSetup
3.3.1 Virtual Directory Creation
In order to configure IIS to run a sample application, a virtual directory needs to be created on the
website. The steps to configure the virtual directory are explained below, using the ScreenSaver sample
application as an example.
Note: The ScreenSaver sample application can be found at http://www.avaya.com/devconnect.
1. Select the Virtual Directory tab.
Figure 10: Create Virtual Directory
KS; Reviewed;
SPOC 1/22/2008
Solution & Interoperability Test Lab Tutorial
©2008 Avaya Inc. All Rights Reserved.
12 of 25
PushSetup
2. Click the Next button.
Figure 11: Virtual Directory Wizard
3. Provide an alias name for the Virtual Directory.
Figure 12: Virtual Directory Alias
KS; Reviewed;
SPOC 1/22/2008
Solution & Interoperability Test Lab Tutorial
©2008 Avaya Inc. All Rights Reserved.
13 of 25
PushSetup
4. Click Next and browse for the content that needs to be published on the website.
Figure 13: Browse Folder
5. Verify the directory path and click Next.
Figure 14: Virtual Directory path
KS; Reviewed;
SPOC 1/22/2008
Solution & Interoperability Test Lab Tutorial
©2008 Avaya Inc. All Rights Reserved.
14 of 25
PushSetup
6. Select the appropriate access permissions that need to be set for this directory. The default access
permissions are Read and Run scripts.
Figure 15: Select access permissions
7. Verify that the Virtual Directory Creation is successful as shown in the following figure.
Figure 16: Setup Complete
KS; Reviewed;
SPOC 1/22/2008
Solution & Interoperability Test Lab Tutorial
©2008 Avaya Inc. All Rights Reserved.
15 of 25
PushSetup
8. Verify that the directory has been created under Default Web Site and it contains the files required for
the sample application as shown in the following figure.
Figure 17: Verify Directory
3.3.2 Configure PHP with IIS
To configure PHP with IIS, the following steps must be followed:
1. Open the Internet Information Services Management Console (MC) as shown in Figure 18 and
right-click on the Default Web Site and select Properties.
Figure 18: Select Properties tab
KS; Reviewed;
SPOC 1/22/2008
Solution & Interoperability Test Lab Tutorial
©2008 Avaya Inc. All Rights Reserved.
16 of 25
PushSetup
2. Choose Home Directory tab and click the Configuration button.
Figure 19: Home Directory Tab
3. In the Configuration window, click the Add button.
Figure 20: Application Configuration
KS; Reviewed;
SPOC 1/22/2008
Solution & Interoperability Test Lab Tutorial
©2008 Avaya Inc. All Rights Reserved.
17 of 25
PushSetup
4. Click the Browse button in order locate the executable for PHP.
Figure 21: Extension Mapping
5. Select the executable from the PHP folder.
Figure 22: PHP Executable
KS; Reviewed;
SPOC 1/22/2008
Solution & Interoperability Test Lab Tutorial
©2008 Avaya Inc. All Rights Reserved.
18 of 25
PushSetup
6. After selecting the executable, click OK to complete the configuration required for PHP with IIS.
Figure 23: Extension Mapping
3.4
Configuration for .wml and .bmp extensions
To configure the Web server (Apache or IIS) to deliver WML, the related MIME types for WML content
needs to be defined. Web servers and client browsers use MIME (Multipurpose Internet Mail Extensions)
to communicate the type of data that is being sent. Before sending data, the server sends a MIME
identifier to the client browser, identifying the format of the following data. The client browser can then
properly decode and apply the data. Most WML applications require two MIME types, as listed in the
following table.
File Extension
MIME Type Definition
Use
.wml
text/vnd.wap.wml
WML source file
.wbmp
image/vnd.wap.wbmp
Wireless bitmap file (image)
3.4.1
Configuration for Apache Web server
To add MIME types to Apache, the httpd.conf file needs to be edited. This file’s location varies from
system to system.
This file uses AddType lines to define MIME types. Find the section where these appear and add the
following lines:
AddType text/vnd.wap.wml .wml
AddType image/vnd.wap.wbmp .wbmp
Save and close the file and restart the Apache server to reload the configuration with the new MIME
types.
KS; Reviewed;
SPOC 1/22/2008
Solution & Interoperability Test Lab Tutorial
©2008 Avaya Inc. All Rights Reserved.
19 of 25
PushSetup
3.4.2
Configuration for Microsoft’s IIS
To add the MIME types to IIS, open the Internet Information Services Management Console (MC).
Access to this console varies depending on the host operating system and IIS installation procedure
followed, but can usually be found under Administrative Tools (Windows Server 2000, Windows Server
2003 or Windows XP).
Open the IIS MC, click on the server to expand its tree, and then right-click on Default Web Site and
choose Properties.
Figure 24: Properties Tab
(Note: If the user does not want all the sites on the server to be able to deliver WML, right-click on those
sites that need to be WML-enabled and then continue following these steps.)
KS; Reviewed;
SPOC 1/22/2008
Solution & Interoperability Test Lab Tutorial
©2008 Avaya Inc. All Rights Reserved.
20 of 25
PushSetup
Click on the HTTP Headers tab and then click on the File Types button under the MIME Map section. In
the File Types dialog, click on New Type and enter the extension and MIME definition (“Content Type”)
from the preceding table.
Figure 25: Add File Type
Click OK. Repeat this process for the .wbmp MIME type.
After completing this, close the Web Site Properties dialog by clicking on OK. Exit the
IIS MC. Usually it is not required to restart the IIS service, but it is advisable to restart it.
KS; Reviewed;
SPOC 1/22/2008
Solution & Interoperability Test Lab Tutorial
©2008 Avaya Inc. All Rights Reserved.
21 of 25
PushSetup
Chapter 4: Push and Browser Configuration
Values
The Avaya IP Telephone’s 46xxsettings.txt file provides the following configuration values that control the
behavior of the Push and Browser features (see References for more information on the
46xxsettings.txt file):
•
WMLHOME –This value must be set to allow the sample application to be launched from the IP
Telephone’s Web Browser. The setting ‘WMLHOME’, which sets the URL of the telephone home
page may be different for each set type to take advantage of the capabilities of the individual sets.
Example: SET WMLHOME http://<webserverIP>/<Homepage>
•
WMLIDLETIME – This value must be set to allow the sample application to be launched via an idle
timeout. ‘WMLIDLETIME’ is the number of minutes of no activity on the Avaya IP Telephone WML
Web Browser after which the IP telephone will load the web page pointed to by ‘WMLIDLEURI’.
Example: SET WMLIDLETIME 2
•
WMLIDLEURI – This value must be set to allow the sample application to be launched via an idle
timeout. After ‘WMLIDLETIME’ minutes of no activity on the IP Telephone’s WML Web Browser the
web page pointed to by this setting will be loaded into the browser.
Example: SET WMLIDLEURI http://<webserverIP>/<Webpage>
•
TPSLIST – This value must be set to allow the sample application to be launched by the Avaya IP
Telephone Push API. Depending upon the ‘TPSLIST’ setting in the script file, the Push Message is
either accepted for additional processing or denied.
Example: SET TPSLIST <webserverIP>
•
SUBSCRIBELIST – This list comprises of the web based applications that the IP phone will register
itself with on boot up or when requested to via a ‘Subscribe Push’ request. It is used to allow Push
applications to automatically become aware of the IP phones in the enterprise network. This list
contains one or more fully qualified URLs, separated by commas.
Example: SET SUBSCRIBELIST <webserver URI>
KS; Reviewed;
SPOC 1/22/2008
Solution & Interoperability Test Lab Tutorial
©2008 Avaya Inc. All Rights Reserved.
22 of 25
PushSetup
Chapter 5: Verify Setup
In order to verify whether the environment for IP Telephony Push and Browser Applications has been
successfully setup, try installing one of the IP Telephony sample applications available on the Avaya
Developer Connection website http://www.avaya.com/devconnect. The available sample applications are
as follows:
1. ScreenSaver Sample Application.
2. Rotating Ads Sample Application.
Install any of these application as per the instructions provided in the respective application notes and
confirm that the desired output is achieved. This would indicate the successful completion of the setup
procedure.
KS; Reviewed;
SPOC 1/22/2008
Solution & Interoperability Test Lab Tutorial
©2008 Avaya Inc. All Rights Reserved.
23 of 25
PushSetup
References
•
4600 Series IP Telephones Application Programmer Interface (API) Guide, Issue 1, April 2005.
•
4600 Series IP Telephone Release 2.7 LAN Administrator Guide, Issue 5, November 2006.
•
Avaya one-X™ Deskphone Edition for 9600 Series IP Telephones Application Programmer Interface
(API) Guide, Issue 2, January 2007.
•
Avaya one-X™ Deskphone Edition for 9600 Series IP Telephones Administrator Guide Release 1.5,
Issue 4, May 2007.
KS; Reviewed;
SPOC 1/22/2008
Solution & Interoperability Test Lab Tutorial
©2008 Avaya Inc. All Rights Reserved.
24 of 25
PushSetup
©2008 Avaya Inc. All Rights Reserved.
Avaya and the Avaya Logo are trademarks of Avaya Inc. All trademarks identified by ® and ™ are
registered trademarks or trademarks, respectively, of Avaya Inc. All other trademarks are the property of
their respective owners. The information provided in this tutorial is subject to change without notice. The
configurations, technical data, and recommendations provided in this tutorial is believed to be accurate
and dependable, but is presented without express or implied warranty. Users are responsible for their
application of any products specified in this tutorial.
Please e-mail any questions or comments pertaining to this tutorial along with the full title name and
filename, located in the lower right corner, directly to the Avaya DevConnect Program at
[email protected].
KS; Reviewed;
SPOC 1/22/2008
Solution & Interoperability Test Lab Tutorial
©2008 Avaya Inc. All Rights Reserved.
25 of 25
PushSetup