1
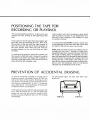
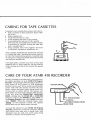
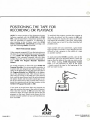
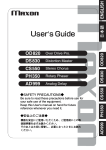
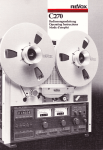
.,
"
A Warner Communications CompanyO
INTRODUCTION
UNPACKING
NOTE: It is important to read all instructions
carefully before attempting to operate the AT ARI®
410™ Program Recorder. Improper use may result
in damage to the system.
This package contains:
The ATARI 410 Program Recorder is used with a
cassette to hold blocks of software too large to be
maintained in cartridge form. Programs, recorded
on magnetic tape, are copied by the computer from
the tape into RAM memory. Once in memory, these
programs can be run or modified by the user according to instructions given through the Keyboard.
Working in BASIC language, the user can also type
his own programs into memory from the Keyboard,
then store them on tape for later use or modifications.
To set up your ATARI 410 Program Recorder:
1. PI ug the data cord (permanently attached to
your recorder) into the jack labeled PERIPHERAL on the side panel of the AT ARI Console.
II
• An ATARI® 410™
• A peripheral data cord permanently attached to
the recorder
SAFETY NOTE: When plugged into a 115 volt wall
outlet, the ATARI 410 Program Recorder contains
dangerous voltage. To prevent shock hazard, it
should never be immersed in water or have liquid
spilled on it. It contains no "user serviceable parts"
and should be opened only by a qualified technician. Do not use the ATARI 410 Program Recorder
out-of doors.
2.
•
.D
--- - .
-
-------------
-
Plug your recorder power cord into the jack
labeled AC on the side of the recorder and into
an ordinary wall socket. Some models will have a
power cord permanently attached to the
recorder.
To operate your ATARI 410 Program Recorder:
CARTRIDGE
•
;
Program Recorder
• A recorder power cord
_":.~-
ATARI(\) 400™
•
•
•
•
•
·----2.-)
*
~.~
•
PLAY enables the computer to read the cassette.
Note that the tape will not move until the computer starts reading from the tape.
RECORD enables the computer to save programs or data on the cassette. Hold the
RECORD key down and push PLAY to enable
record mode.
STOP disengages the play or record modes.
Always STOP the ATARI 410 Program Recorder
when it is not in use to prevent deformation of
the tape.
EJECT opens the cassette door and releases the
cassette. NOTE: On some machines, STOP and
EJECT are the same key. Press the key once to
stop the PLAY/RECORD function; press it again
to eject the cassette.
ADVANCE fast winds the cassette forward.
REWIND fast winds the cassette backward.
Some machines may have a PAUSE key. PAUSE
leaves the cassette machine in the PLAY or
RECORD mode, but disengages the pinch roller
from the tape. Press the PAUSE key once to
disengage the tape; press PAUSE again to
reenable PLAY/RECORD.
The counter reset button sets the tape position
counter to zero. See the section that refers to
making multiple recordings on a tape.
.,
POSITIONING THE TAPE FOR
RECORDING OR PLAYBACK
The recommended procedure is to place only one
program per side, starting at the beginning of the
side.
If you want to record more than one program per
tape side, start by rewinding the tape. Then reset
the counter to 000 and wind the tape forward at
least 10 counts past the end of the last program on
the tape. Always write down the first and last
counter numbers so you can find what you have
recorded.
To read back the program, rewind the cassette, set
the counter to 000 and wind it forward to exactly
the same count where you began the recording. If
this fails, trying again with a count one or two off in
either direction will probably work.
Tape counters will vary (sometimes a great deal!)
from recorder to recorder. It may therefore be very
difficult to find a program in the middle of a tape
on another machine.
To read prerecorded ATARI cassettes, simply start
at the beginning of the tape. Insert the tape so that
the label of the side you want can be seen.
NOTE: Make sure that any tape you intend to use for
recording has less than 7 seconds of leader (nonmagnetized tape that is wound on the reel AHEAD of
the actual recording tape). On playback, the computer will ignore the first 9 seconds of tape (or leader),
but at the end of 9 seconds, the computer MUST be
reading the tape. If the leader is too long the computer will be trying to read data where no data exists,
and an error 143 (checksum Error) or 138 (Device
Timeout) may be displayed on the screen.
PREVENTION OF ACCIDENTAL ERASING
To prevent accidental recording or erasing and to
preserve previous recordings, break off the two
tabs on the back of the cassette. By doing so, your
set's built-in Accidental Erasure Prevention Device
will function automatically. If side 1 is facing upward, then tab NO.1 must be broken off to prevent
accidental erasure (see diagram).
If the opposite surface (side 2) is facing upward, tab
No.2 must be broken off. If a tab was previously
broken off, you may still erase or record by temporarily placing cellophane tape over the missing
tab opening.
All prerecorded tapes are sold with these tabs
broken off.
t
TAB No.2
,
TAB No.1
SAVING & RETRIEVING
COMPUTER PROGRAMS
FROM THE COMPUTER TO A
CASSETTE TAPE
FROM A CASSETTE
TAPE TO THE COMPUTER
1.
Lift the cartridge door and insert the COMPUTING LANGUAGE BASIC cartridge into the
ATARI 400 or ATARI 800 computer. (Use the
LEFT CARTRIDGE slot on the ATARI 800
System.)
1.
2.
Press the POWER switch on the side of the console ON.
2.
3.
Write your program using the keyboard.
3.
4.
Insert a blank cassette tape into the Program
Recorder.
5.
Push REWIND to locate the beginning of the
tape, or to locate the end of a preceding program
using the counter number. Note the counter
number if you have more than one program
recorded per side, for future location of the program.
6.
7.
8.
Using the keyboard, type CSAVE, then press
';!ii"W' . You will hear two beeps.
Next push RECORD and PLAY simultaneously on
the ATARI 410 Program Recorder. Press ';!ii"i;V1
again on the keyboard. (You will hear a series of
tones as your program is copied.)
When the tape stops, your program has been
recorded on the cassette tape. READY will be
displayed on the screen.
Push STOP on the ATARI 410 Program Recorder.
9.
It is good programming practice to ALWAYS
make a duplicate CSAVE "just in case." If this
prevents losing just one long programming effort,
it will justify the small investment in extra time
many times over!
Lift the cartridge door and insert the COMPUTING LANGUAGE BASIC cartridge into the
ATARI 400 or ATARI 800 computer. (Use the
LEFT CARTRIDGE slot on the ATARI 800
system.)
Press the POWER switch on the side of the console ON.
Insert a prerecorded cassette tape or your own
program cassette tape, into the ATARI 410 Program Recorder. (Label reading toward you).
4.
Push REWIND to locate the beginning of the
tape, or locate the beginning of the program you
want using the counter number.
5.
Using the keyboard, type CLOAD, then press
'iijiQ;it1 . You will hear one beep.
6.
Push PLAY on the ATARI 410 Program Recorder.
Press Ijijii@l again on the keyboard.
7.
When the tape stops, your program has been
transferred from the cassette tape to the computer. READY will be displayed on the screen.
Push STOP on the ATARI 410 Program Recorder.
Type: RUN or LIST to see your program
displayed.
For a cross-reference, see the recording and
transferring instructions in sections 8 and 12 of
your ATARI400 Operator's Manual, or sections 8
and 15 of your ATARI 800 Operator's Manual.
For further information on loading and saving
programs with your ATARI 410 Program
Recorder, see the ATARI BASIC Reference
Manual (Chapter 5).
THE ATARI® EDUCATIONAL SYSTEM
1.
Lift the cartridge door and insert the Educational System Master Cartridge into the AT AR I
400 or ATARI 800 Computer. (Use the LEFT
CARTRIDGE slot on the ATARI 800 System.)
2.
Press the POWER switch on the side of the console ON.
3.
Insert an educational cassette tape into the
ATARI 410 Program Recorder with the label
reading toward you.
4.
Press REWIND on the Program Recorder, wait
for the tape to stop, then press STOP.
5.
Push PLAY on the Program Recorder.
6.
Push
ED on
the computer console.
Use the tape counter reset button on the Program Recorder to mark the beginning and the
end of each program. Pressing the button resets
the counter to 000.
Use the ADVANCE button to move the tape
forward, if necessary.
7.
The program will begin playing on the screen
with the audio portion beginning simultaneously.
If the program doesn't start, check all connections, and retrace the previous steps.
8.
The computer keyboard is used to respond to
questions. For three-option, multiple-choice
questions:
Press 1 if the left answer is correct.
Press 2 if the middle answer is correct.
Press 3 if the right answer is correct.
For two-option, multiple-choice questions:
Press 1 if the left answer is correct.
Press 3 if the right answer is correct.
THE PROGRAM WILL NOT ADVANCE AUTOMATICALLY UNTIL YOU HAVE CHOSEN THE
CORRECT ANSWER.
Some frames in the ATARI Educational System are
held on the screen to allow you time to read them.
This is usually indicated by Push or Ptgo (Push to
Go) at the bottom of the screen, but sometimes no
indication is given. Type 1, 2, or 3 to continue.
On rare occasions, the tape may stop when it
shouldn't. To restart it, type 1, 2, or 3 or press
i.t6ii %'ti;liiiii and then press ED.
If you wish to review a section of a lesson, you may
rewind the tape. However, when you start the tape
in the middle of a section of data, you may see gibberish characters on the screen. This occurs
because the machine cannot read data on the tape
until after it comes up to speed. It will recover by
itself. If you want to see the information that was
lost, rewind the tape a bit more.
If you want to start with the second lesson on a
tape, fast wind to about the middle of the tape. An
extra long blank gap is provided between the
lessons to aid you.
CARING FOR TAPE CASSETTES
To protect your valuable data, please take care to:
• Keep cassettes in their protective boxes when
not in use.
• Keep cassettes dry.
• Avoid extreme heat or cold.
• Avoid touching the tape in the cassette.
• Avoid pulling the tape out of the cassette.
(The tape may be wound back into the cassette
if necessary by carefully turning the tape hub
with a six-sided pen.)
• Keep cassettes away from magnets, electrical
or electronic equipment, telephones, etc.
New cassettes should be fast wound and rewound
to "loosen the stack" and eliminate static electricity from the manufacturing process. Ca~settes kept
in storage for a long time should also be fast wound
and rewound periodically.
Even high quality cassettes may stick or bind after
extensive use. In some cases this can be cured by
firmly striking each side of the cassette flat against
a table.
CARE OF YOUR ATARI 410 RECORDER
Periodic cleaning of the tape path is very important
for relible operation of your AlARI 410 Program
Recorder. Any good tape-head cleaner (available at
most record or HI-FI stores), or 95% denatured
alcohol may be used. Wet a quality wood-handled
cotten swab with the cleaner and wipe the tape
heads, capstan and pinch roller, being careful not
to leave bits of cotton behind. The capstan and
pinch roller are most easily cleaned while turning.
To do this, insert the COMPUTING LANGUAGE
BASIC cartridge into the AlARI 400 or AlARI 800
computer and turn the POWER on. Press PLAY on
the Program Recorder, then type CLOAD, and then
press ';!iiii@i. When the computer beeps, press
'i!iiii@1 on the computer console. The capstan
should now turn for about twenty seconds.
To clean the exterior of your AlARI 410 Program
Recorder, disconnect it from the computer and the
wall socket,. then wipe with a damp cloth. Mild
detergent may be used, but avoid using strong
solvents or cleaners on the plastic case.
COTTON SWAB~
I
h@ a @(J
~
L
PINCH ROLLER
CAPSlAN
RECORD-PLA YBACK HEAD
ERASE HEAD
POSITIONING THE TAPE FOR
RECORDING OR PLAYBACK
NOTE: For some versions of the Operating System
Software supplied with the ATARI 400 or ATARI
800, a special procedure is required to position the
tape for recording or playback. To determine if
your machine is one of these, insert the ATARI
BASIC (COMPUTING LANGUAGE) Cartridge, and
type the following BASIC command:
PRINT PEEK (65528) 'dil@1
If the computer responds 255, use the instructions on
this sheet. It is recommended that you place this page
in your ATARI 410 Program Recorder Operator's
Manual. If the computer responds with any other
number than 255, use the instructions preprinted in
your ATARI 410 Program Recorder Operator's
Manual.
To record programs or data with your ATARI 410
Program Recorder, the recommended procedure is
to place only one program per side, starting at the
splice at the beginning of the side. Place the tape in
the Program Recorder and REWIND to the beginning of the appropriate side. Then remove the cassette and, by turning a six-sided pen in the take-up
hub, wind the tape forward until the splice between
the plastic leader and the oxide-coated tape is visible in the center hole of the cassette shell. Then reinsert the cassette and set the tape counter on the
ATARI 410 Program Recorder to 000.
To read back the program, position the cassette at
the splice (as above), set the counter to 000, and
wind it forward to exactly the same count where
you began the recording. If this fails, trying again
with a count one or two off in either direction will
probably work.
Tape counters will vary (sometimes a great deal!)
from recorder to recorder. It may therefore be very
difficult to find a program in the middle of a tape
on another machine.
To read prerecorded AT ARI cassettes, start at the
leader-tape spl ice (as described above). Insert the
tape so that the label of the side you want can be
seen. When reading ATARI Educational System
tapes, it is not necessary to start at the spl ice
-simply rewind the tape to the beginning of the
side you want to play.
If you want to record more than one program per
tape side, position the tape at the splice (as above).
Then reset the counter to 000 and wind the tape
forward at least 10 counts past the end of the last
program on the tape. Always write down the first
and last counter numbers so you can find what you
have recorded.
JI\.
ATARI®
C014810 REV. 2
A Warner Communications Company
~
MANUAL © 1979 AlARI, INC.
PRINTED IN U.S.A.