1
TELELINK™I
I
A Warner Communications CompanyCI
Every effort has been made to ensure that this manual accurately documents this product of the ATARI Computer Division However,
because of the ongoing improvement and update of the computer software and hardware, ATARI, INC. cannot guarantee the accuracy
of printed material after the date of publication and cannot accept responsibility for errors or omissions
Reproduction is forbidden without the specific written permission of ATARI, INC., Sunnyvale, CA 94086. No right to reproduce this document, nor the subject matter thereof, is granted unless by written agreement with, or written permission from the Corporation .
PRINTED IN US.A.
MANUAL AND PROGRAM CONTENTS© 1981 ATARI, INC.
CONTENTS
1
GENERAL DESCRIPTION
1
2
CONNECTING THE SYSTEM
3
3
OPERATION
5
4
ERROR MESSAGES
7
5
USER CONTROL
9
6
CHARACTER CODES
13
7
HELPFUL DEFINITIONS
15
8
ASCII CHARACTER CODES
17
Contents
iii
-'
1
GENERAL DESCRIPTION
Telelink™ I is a program cartridge that enables the user to communicate with
another computer over standard telephone lines when used with the
AT ARI ® 830™ Acoustic Modem. The AT ARI 830 Modem is fully compatible with
the Bell 103A Modem and other similarly operated modems. To use the Telelink
I cartridge, connect the ATARI 850™ Interface Module and the ATARI 830
Modem to either the AT ARI 400™ or AT ARI 800™ Personal Computer System.
This cartridge can be used in conjunction with any of the AT ARI Printers (820™,
822 ™, or 825™) to provide a hardcopy printout of your system' s telephone conversation with a remote system .
The word modem stands for modulator-demodulator. Its function is to convert
data you type on the AT ARI Computer into signals that can be sent over standard
telephone lines. As data is received at the other end of the telephone line, the
modem on the remote system demodulates (converts) the signal back into data
that the remote computer can understand .
Telelink I provides a direct link to time-sharing systems, computer data bases,
and information utilities such as CompuServe, Tymnet, The Dow Jones Information Service, and The Source (see Section 7 Helpful Definitions). Once you have
established the connection with another computer, a conversation may begin.
Each of these systems has its own set of procedures for signing on, signing off,
running programs, backspacing, and other functions unique to each environment.
The Telelink I package includes free access time on several of these systems and
the special instructions necessary to carry on a conversation. After properly ending a conversation, simply switch the ATARI 830 Modem to OFF and hang up the
telephone.
General Description
1
2
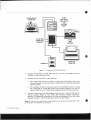
CONNECTING THE SYSTEM
Refer to Figure 1 if you have the ATARI820™ or ATARI822™Printer, or Figure 2
if you have the ATARI 825™ Printer, and follow these steps below. For complete
instructions to set up your ATARI Personal Computer System, please refer to the
ATARI 400 or ATARI 800 Operator's Manual and the appropriate operator's
manuals for any additional peripheral equipment you may have.
ATARI
810 DISK
DRIVE
OR
815 DUAL
DISK DRIVE
ATARI 400 OR
ATARI 800
ATARI 850
INTERFACE
MODULE
ATARI 820
OR
ATARI 822
PRINTER
CASSETTE
Figure 1
Using the ATARI 820 or ATARI 822 Printer
Connecting the System
3
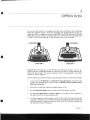
ATARI
815 DUAL
DISK DRIVE
OR
810 DISK
DRIVE
ATARI 400 OR
ATARI 800
ATARI 850
INTERFACE
MODULE
CASSETTE
Figure 2
ATARI 825
PRINTER
Using the ATARI 825 Printer
1.
Plug the ATARI 400 or ATARI 800 computer into the ATARI 850 Interface
Module at either peripheral port.
2.
Plug the printer into ONE of the following:
3.
•
The AT ARI 850 Interface Module if using the ATARI 825 Printer (see
System Diagram). Use printer cable (AT ARI Part No. CA015544) packaged
with the printer.
•
The computer or the 1/0 connector port of any peripheral device if using
the AT ARI 820 or AT ARI 822 Printer (see System Diagram). Use the 1/0
cable (ATARI Part No. CA014122) packaged with each of these printers.
You MUST plug the AT ARI 830 Modem into Serial Port 1 of the AT ARI 850 Interface Module. (Refer to the ATARI 850 Interface Module Operator's
Manual for additional information on hook-up procedures.) Use the cable
(labeled "Modem" CA01571 0-02) that comes with the Modem .
Note: If you have any disk drives connected to your system, turn them OFF. This
is necessary for Telelink I to function .
4
Connecting the System
I!
3
OPERATION
You can use the Telelink I cartridge with either the AT AR I 400 or the AT AR I 800
Personal Computer System . Insert the cartridge (see diagram below) in the cartridge slot (LEFT cartridge slot on the ATARI 800). The ATARI 400 and ATARI 800
Personal Computer Systems automatically shut off whenever the cartridge door
is lifted . This prevents damage to the computer and to the cartridge.
CARTRIDGE
II
II
l/ ~~----~~~--pilll!~lllllll~
\
~ ('
l
-
( \
- ~ )[
1
)
)
I I
I
,
1
I
ll I
J
)-
~ ~~
CARTRIDGE
, ~~~~
k ~ ~~~
l
ATARI400™
l-
ATARI800™
Caution: When setting up your AT ARI Personal Computer System, it is very important that the ATARI 830 Modem is used only with the AC power adapter supplied with the modem . This power adapter is NOT interchangeable with other
AT AR I AC power adapters.
Use the following procedure to begin transmitting data with your Telelink cartridge:
1.
If you have an ATARI810™ or ATARI815™ Dual Disk Drive attached to the
system, turn the disk drive power to OFF. (Telelink I will not operate with a
disk drive turned on.)
2.
Switch the ATARI 850 Interface Module power to ON .
3.
Set the ANS/OFF /ORIG switch on the AT ARI 830 Modem to OR I G.
4.
Set the FULL/TEST/HALF to FULL or HALF as required by the computer at
the other end of the communication link.
5.
Turn the computer console power switch to ON . After you have turned the
computer console on, you will hear clicking and beeping sounds through the
television speaker. These are the normal sounds of the Telelink program and
the interface module setting up.
Operation
5
6
Operation
6.
Dial the telephone number to the remote system .
7.
When you hear the high-pitched tone, place the telephone receiver into the
modem cradle. (See Figure 1 or Figure 2 for positioning the handset onto the
modem .)
B.
When you see the modem READY indicator on, you can begin data transmission .
9.
Type in the appropriate " logon" code. This code varies with each particular
time-share system. You will need to refer to the documentation provided with
your time-sharing account for the codes your system requires.
r
l
4
ERROR MESSAGES
RS232 Error: 138. This means the ATARI 850 Interface Module did not start up
properly. Check to see if your disk drives are OFF and the Interface Module is ON
before you turn on your ATARI 400 or ATARI 800 Personal Computer System .
Printer Error: 138. There is no printer connected to the system, or its power is
turned OFF .
Printer Error: 139. The printer is switched OFFLINE (AT ARI 825 Printer only).
Error Messages
7
t)
5
USER CONTROLS
The memory buffer of Telelink I can save up to 1.5K bytes of data received over
the modem before the information must be emptied to the printer. Generally
speaking, when the buffer is nearing capacity (at 1 K bytes), communications over
the modem must be suspended and the contents of the buffer sent to the printer.
If the printer is not on, a printer error appears. Exactly how suspension of communication for printing occurs depends on whether you are in the Automatic or
Manual Mode.
AUTOMATIC MODE
When the buffer is near capacity, your system sends an XOFF (transmit OFF)
character to the remote system . A brief delay (one second) occurs and then your
computer ignores the modem while the printing of stored data takes place. When
the printing is done, your computer returns to the modem and sends an XON
(transmit ON) character to the remote system telling it to reinitiate transmission.
Note: Not all remote systems react quickly enough for you to use the Automatic
Mode. You can simulate and check this mode by typing a liDI S (XOFF) and
checking the time it takes for the data to stop coming to the screen . You CANNOT use the Automatic Mode if it takes longer than one second, or if the remote
system does not stop at all on XOFF. If you try to use Automatic Mode with either
of these situations occurring, you will lose characters being sent by the remote
system while the printing takes place. Type a Bml Q (XON) to continue after you
run this test.
MANUAL MODE
When you are in the Manual Mode (and the buffer is near capacity of 1 K bytes),
the system assumes that the user will take care of suspending communications by
the remote computer. The XOFF character (or its equivalent for the remote computer being used) is typed in by the user. When you are sure the remote computer
has stopped transmitting, start the print operation by pressing either the EJ!D11
or DmJ1 key. (Read the description of these keys under Printer Controls.) When
the printing is done, you must tell the remote computer that transmission may
resume. To do this, type the XON character (or whatever the equivalent is for the
remote system being used).
When you hear a clicking noise, that indicates the buffer is near capacity. If you
allow information to continue being received after the buffer is full (after 1 .5K
bytes), all further incoming information will be lost. To print the buffer when the
clicking starts, follow the steps below:
1.
Send a 111iJ1 S character (or its equivalent) to the remote system to suspend
communication .
2.
After the data stops, press
EJ!D11 or DmJ1 to
start the printer.
User Co ntrols
9
3.
When the printer stops, send the restart ( &ml Ql command (as required by
the remote system) to reinitiate communication transmission.
The following are the various user controls for Telelink 1:
PRINTER CONTROLS
FUNCTION
KEYS
used BEFORE you press l!l.ml to take you back
and forth between the Automatic Mode and Manual Mode.
If you are in Manual Mode and you want to select
Automatic Mode, do a Em1.1 9, and vice-versa. EmJ1 9 can
also be used AFTER you press the E1iiJ'ill key to turn off the
buffer when printing is complete.
&ml 9 is
~ signals the buffer to begin data storage of data
received from the remote system. In the Automatic Mode,
printing will occur when the buffer is full. In the Manual
Mode, the ~ key signals the buffer to begin storing
data, and as it reaches 1 K bytes of data the terminal makes
a clicking noise. This signal should alert you to print the
contents of the buffer by pressing II!!DI·
You can use lii'.!IBil to begin printing the buffer at any time.
When printing is finished, the buffer will continue to collect
text from the remote computer for the next printing. In the
Automatic Mode, 1ID!i1 initiates a "print early" function.
If BmJ is chosen during the Automatic Mode, the computer sends the XOFF and XON signals to the remote
system. These signals are NOT sent by the computer when
you are in the Manual Mode. Therefore, if you did not give
the proper XOFF code to the remote system before pressing
ES!DJ, you will lose any data transmitted while the printer
is printing. You must familiarize yourself with the XOFF and
XON type codes required by each system.
~ is similar to E!!.1iJ except that it signals the buffer
to stop collecting text from the remote system when the
printing is complete. To start the buffer collecting data
again, press the lii'.l1D key.
ADDITIONAL CONTROLS
m1J 8
&ml 8 selects a wide screen mode that provides a
40-character screen width instead of the 38-character
default width.
&mi O
Use &ml 0 to switch between word mode and character
mode. Character mode displays exact text across the screen
and divides words without a hyphen at the end of a line.
The default is the word mode that does not break words,
but instead moves the entire word to the next line, making
the text easier to read.
Note: Press Ji\iiiJMI;IMJI to reestablish all default control modes.
10
User Controls
\)
Each computer system you communicate with can differ sign ificantly. It is important that you understand the format of the remote computer. Both systems must
be set to the same baud rate (300) and the same duplex (either FULL or HALF).
Note: If you want to establish communication between two AT ARI Personal
Computer Systems, one modem must be in the ORIGINATE mode and the other
in the ANSWER mode. Both systems should use the HALF-DUPLEX mode.
You should ask yourself the following questions about the remote system your
computer is connected to:
•
Does it work at 300 baud?
•
Is the system HALF or FULL duplex?
•
How do I log on?
•
How do I backspace to correct an error?
•
How do I run a program?
•
How do I stop a program?
•
How do I suspend and restart data transfer from the remote system?
•
How do I log off?
For those of you who connect to TYMNET, please note the following:
In order to ensure that TYMNET will give you an immediate response to the XON
and XOFF commands, precede your log-in with a ED.D R. That is, when TYMNET
says " Please Log In," you must type l'im!l R (log-in).
User Contro ls
11
l
I
6
CHARACTER CODES
The software contained in the Telelink I cartridge converts some of the ATARI
AT ASCII characters into ASCII characters . The following table defines the
transmission of these special key functions .
Keyboard
Character
Typed
l EI
11mB l'mi.1l
lmi'IEm
•
liml iiij:ti!;l
'
Emil''·!:i1il
IWIIII;I~i
Sends ASCII
Means (ASCII)
Control I
Tab
Escape
Local Clear Screen
Nothing
Nothing
ESC
Nothing
Nothing
Nothing
Nothing
Nothing
Control M
Control H
Delete
Nothing (this is a
safety feature)
Nothing
Nothing
Return (CR)
Backspace
Rubout
Nothing
Transmits 1/2 second
break
B!J [
&1 1
IE'JI /
B!J ;
umu
limlD ll'iD
IIIDI A
through
IIIDI Z
I!BI produces the lowercase mode.
BIJD 11fiD puts you back into the uppercase mode.
ASCII Control A
through
Control Z
As defined by ASCII;
note the following
in particular:
Control G
Control H
Control J
Control Q
Control S
Bell
Backspace
Linefeed
XON
XOFF
For a complete list of character codes, see the back page of this manual.
Character Codes
13
Printable characters received by your AT ARI Personal Computer System are
displayed on your screen as the characters defined by ASCII. Most CONTROL
characters are ignored by your AT ARI Personal Computer System except for the
following:
CR
Produces new line (END OF LINE), the same as
ASCII CR and LF together
FF
Clears the screen
BS
Backspaces
BELL
Bell
Most CONTROL characters received by the AT ARI Printers will also be ignored
with the following exceptions:
14
Character Codes
CR
Produces new line
BS
Depends on printer
7
HELPFUL DEFINITIONS
ANSWER MODE: This mode on the modem indicates which terminal is receiving
the communication call. In the ANSWER mode you must manually answer the
telephone and switch the ANS/OFF/ORIG control to ANS .
BAUD: The unit measurement of communication speed, usually measured in bitsper-second.
CompuServe: A personal computing service that provides computer programs,
data bases, and other services to its customers.
DOW JONES INFORMATION SERVICES: Instantaneous access to the information resources of Dow Jones & Co., Inc., Reliable and concise business and financial news from The Wall Street Journal, Barrons, Dow Jones News Wire, and other
associated data services .
I
DUPLEX: A general term referring to a communication circuit in which each end
transmits and receives .
FULL-DUPLEX: A communication system in which each end can simultaneously
transmit and receive.
HALF-DUPLEX: A communication system in which each end can transmit and
receive data in either direction, but not simultaneously.
MARK: Signal equivalent to binary 1.
ORIGINATE MODE: This mode on the modem indicates which terminal is initiating the communication link .
PARITY: Parity is a method of checking binary numbers. An extra bit called a parity bit is added to the number. Telelink I transmits even parity, and ignores parity
received . This allows Telelink I to receive data from systems transmitting even,
odd, or no parity.
RS232: For communication between computers and computer-related equipment, the industry standard is the ElA RS232C. This method was adopted by the
Electronic Industries Association to ensure interface uniformity between data
communication equipment and data processing terminal equipment. The
AT ARJ® 850™ Interface Module is equipped with four RS232 interface ports.
SPACE: Signal equivalent to binary 0.
THE SOURCE: The Source is a time-shared service offering personal computing
programs and data bases.
XOFF: Signals remote computer to stop send i ng data. XOFF is
Emil S.
XON: Signals remote computer to begin sending data. XON is
IIID Q.
Helpful Definitions
15
Time-Shared Personal Computing Services
CompuServe Information Service
5000 Arlington Centre Blvd .
Columbus, Ohio 43220
(614) 457-8600
Source Telecomputing Corporation
1616 Anderson Rd.
Mclean, Virginia 22102
(703) 821-6660
Dow Jones News Retrieval
Post Office Box 300
Princeton, New Jersey 08540
1-800-257-5114
(609) 452-1511 (NJ)
Cable Reorder Numbers
Cable
1/0 Data Cord (5 feet)
AT ARI 825™ Printer Cable
Modem Cable
16
Helpful Definitions
ATARI Model No.
CX81
CX86
CX87
8
ASC II CHARACT ER CODE S
Character
NUL
SOH
STX
ETX
EOT
ENQ
ACK
BEL
BS
HT
LF
VT
FF
CR
so
51
OLE
DC1
DC2
DC3
DC4
NAK
SYN
ETB
CAN
EM
SUB
ESC
FS
GS
RS
us
SP
#
$
%
Decimal
0
1
2
3
4
5
6
7
8
9
10
11
12
13
14
15
16
17
18
19
20
21
22
23
24
25
26
27
28
29
30
31
32
33
34
35
36
37
Hexadecimal
Meaning
Null (Type amJ EmJ )
Start of heading IB.ml A
Start of text ED.D B
End of text &I C
End of transmission &I D
Enquiry &D E
Acknowledge l'lml F
Beii iiJD G
Backspace &mJ H
Horizontal tabulation &mJ I
Line feed aD J
Vertical tabulation 1BJ1 K
Form feed liD L
Carriage return &mil M
Shift out 1BJ1 N
Shift in &mJ 0
Data link escape &ml P
Device control 1 &mJ Q XON
Device control 2 Bli'll R
Device control 3 ami S XO FF
Device control 4 &ml T
Negative acknowledge &ill U
Synchronous idl.e &ml V
End of transmiss ion block BID W
Cancel amJ X
End of medium &ml Y
Substitute lEI Z
Escape D
File separator liD [ t ]
Group separator &ml [ +
Reco rd separato r Blill [ .-Unit separator &ml [ -+]
Space
Exclamation point
Quotation mark
Number sign
Dollar sign
Percent sign
]
00
01
02
03
04
05
06
07
08
09
OA
OB
oc
OD
OE
OF
10
11
12
13
14
15
16
17
18
19
1A
1B
1C
10
1E
1F
20
21
22
23
24
25
A SCII Character Codes
17
Character
Decimal
&
38
39
40
41
42
*
+
Asterisk
Plus
Comma
Hyphen (minus)
Period (decimal point)
1
2
3
4
5
6
7
8
9
51
52
53
54
55
56
57
<
58
59
60
61
62
63
64
65
66
67
68
69
70
71
72
73
74
Equals
Greater than
Question mark
Commercial at
Uppercase A
Uppercase B
Uppercase C
Uppercase D
Uppercase E
Uppercase F
Uppercase G
Uppercase H
Uppercase I
Uppercase J
75
76
77
78
79
80
81
82
Uppercase
Uppercase
Uppercase
Uppercase
Uppercase
Uppercase
Uppercase
Uppercase
>
@
A
B
c
D
E
F
G
H
I
J
K
L
M
N
0
p
Q
R
ASCII Character Codes
Ampersand
Apostrophe
Opening parenthesis
Closing parenthesis
Right slant
Ze ro
One
Two
Three
Four
Five
Six
Seven
Eight
Nine
Colon
Semicolon
Less than
0
18
43
44
45
46
47
48
49
Meaning
so
Hexadecimal
26
27
28
29
2A
2B
2C
20
2E
2F
30
31
32
33
34
35
36
37
38
39
3A
3B
3C
0
3D
3E
3F
40
41
42
43
44
45
46
47
48
49
4A
4B
4C
40
4E
4F
P
Q
R
51
52
K
L
M
N
so
Character
Decimal
s
83
84
85
86
87
88
89
90
91
92
93
94
95
96
97
98
99
100
101
102
103
104
105
106
107
108
109
110
111
112
113
114
115
116
117
118
119
120
121
122
123
124
125
126
127
T
u
v
w
X
y
z
[
\
]
1\
a
b
c
d
e
f
g
h
j
k
m
n
0
p
q
s
t
u
v
w
X
y
z
rv
DEL
Meaning
UppercaseS
Uppercase T
Uppercase U
Uppercase V
Uppercase W
Uppercase X
Uppercase Y
Uppercase Z
Opening bracket
Left slant
Closing bracket
Circumflex
Underscore
Grave accent
Lowercase a
Lowercase b
Lowercase c
Lowercase d
Lowercase e
Lowercase f
Lowercase g
Lowercase h
Lowercase i
Lowercase j
Lowercase k
Lowercase I
Lowercase m
Lowercase n
Lowercase o
Lowercase p
Lowercase q
Lowercase r
Lowercases
Lowercase t
Lowercase u
Lowercase v
Lowercase w
Lowercase x
Lowercase y
Lowercase z
Opening brace
Vertical line
Closing brace
Tilde
Delete
Hexadeci mal
53
54
55
56
57
58
59
SA
58
sc
50
SE
SF
60
61
62
63
64
65
66
67
68
69
6A
68
6C
60
6E
6F
70
71
72
73
74
75
76
77
78
79
7A
78
7C
70
7E
7F
ASCII Character Codes
19
I