1
1. GENERAL
The C710 is a desktop DECT GAP compatible handset.
The handset can be registered up to maximum of 4 different DECT GAP compatible base
stations. However, only one base station can be linked at a time. Roaming is NOT available.
Important note: some base station features may be unavailable because of proprietary service
menus and features associated with a particular base stations.
Aristel Networks Pty Ltd
2. INSTALLATION
2.1. Battery
Before you use the unit for the first time, you must make sure the battery are charged for at least 10
hours. If you don’t do this, the telephone will not function properly.
Installation of the battery
- Plug in the battery into compartment located in the rear of the unit.
Important Note: Only use the power supply unit provided to charge the battery.
Battery indicator:
The battery is 25% in capacity.
The battery is almost empty.
When the battery is low, you will hear warning signals and the battery symbol on the
display will blink.
Accessories Include :
DESK Handset ( 1 ), Battery ( 1 ) ,Adaptor ( 1 ) , User Guide ( 1 )
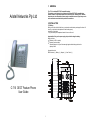
C-710 DECT Feature Phone
User Guide
1
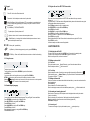
2.2. Keypad
2.5. Register this unit to a DECT GAP base station
Power On/Off
Caller ID - List the caller ID and missed call
Every new unit must be registered onto a DECT GAP base station before you can make
a phone call.
To activate the DECT GAP base station’s Registration Mode, please refer to base station user guide
for Registration Mode activation procedures.
Press UP/Down key when the unit is in standby mode..
Select REGISTER by using the UP and DOWN keys.
Press INT/OK key to confirm.
Select BASE No. by using the UP and DOWN keys.
Press INT/OK key to confirm. It will display “Searching…”
Wait for 15 seconds till 11 digits RFPI No. XXXXX-XXXXXX appears
Press INT/OK key to confirm
Enter the Base station PIN Code. Please refer to the base station user guide for Pin Code.
Press INT/OK to confirm
It will be at standby mode after successful registration.
Phone book - List the telephone number stored in phone book
Mute/Clear/Escape - Mute key (Microphone OFF in conversation), c orrect mistake input
(Clear) or escape from programming menu and any time press 2 seconds to return to
standby mode.
R (Flash/Recall) - FOR PABX TRANSFER
Speaker phone - Speaker phone on/off
Speaker volume control - Increase or decrease speaker volume
Redial/Pause key - browsing of the last three dialed telephone numbers or Insert a
pause in phone book telephone number input.
M1~ M6
áâ
Memory dial - speed dial key
3. UNIT OPERATION
Up/Down key - Activate the programming menu by press UP/DOWN key.
3.1. Switching the unit On/Off
To power off the unit, press and hold the INT/OK key for 2 seconds in the standby mode.
To power on the unit press and hold the INT/OK key again for 2 seconds.
When the unit is power off, no call can be received.
INT/OK Key - Power on/off, establish internal connection or c onfirm function setting.
2.3. Using the menu
3.2. Making an external call
3.2.1. Direct call
Pick up the handset or press Speaker Phone key, you will hear the external dial tone.
Enter the telephone number and wait for connection
The phone is menu driven.
To enter the Menu, press the Menu UP/DOWN key and confirm selection
with INT/OK key.
You are now able to scroll through the menu by using the UP and DOWN Key.
INT/OK key is almost every time used to confirm a setting or to enter a sub menu.
Clear key
(Erase key) is almost every time used to return to previous menu or abort operation.
Press Clear
key for 2 seconds to return to stand by mode.
3.2.2. Pre- dialing
Enter the telephone number. If needed, you can erase digits by pressing the Erase button C
.
Lift the handset or press
Speaker Phone key. The phone number will be dialed automatically.
The maximum 25 digits can be dialed.
3.3. Making an internal call
If you have more than one handset subscribed to the base station, you can make an internal call between the handsets.
Press INT/OK key
Press a handset No. The called handset will ring
When the called party answers, talk to the handsfree speaker phone
or lift the handset to talk.
2.4. Handset display language
3.4. Answering an incoming phone call
When there is an incoming call, the telephone number is displayed when sent by the network
(if service is available).
When the incoming call is an internal call, the display shows the calling handset No.
When it’s an external call and the number is not transferred (private call),
‘EXTERNAL‘ is displayed.
You can select one of three different display languages. They are English, German and Italian.
Press UP/DOWN key when the unit is in standby mode..
Select HS SETTING by using the UP and DOWN keys.
Press INT/OK key to confirm.
Select LANGUAGE by using the UP and DOWN keys.
Press INT/OK key to confirm.
Select the desired language by using the UP and DOWN keys.
Press INT/OK to confirm.
3.4.1. Answering call
To answer an incoming call, pick up the handset or press
2
speaker phone key.
3.4.2. Transferring an call to another handset
You can transfer an internal or external call to another handset.
Answer the call.
Press INT/OK key and then a handset No.
Hang up the handset to disconnect the call and transfer the call to the called handset
The call has now been transferred.
3.9. Memory dial M1~ M6
There are six memory dial (speed dial) available.
Press UP/DOWN key when the unit is in standby mode..
Select MEMORY DIAL by using the UP and DOWN keys.
Press INT/OK key to confirm.
Select MEMORY DIAL No. by using the UP and DOWN keys.
Press INT/OK key to confirm.
Enter number and press INT/OK key to confirm.
During adding, press Clear
key for 2 seconds to abort.
Repeat above to program other memory dial no.
3.5. Changing the speaker volume
The volume of the speaker or handset receiver can be changed via the volume control keys during
conversation.
The volume can be changed in 9 levels.
3.6. Deactivating the microphone (Mute)
It is possible to deactivate the microphone during a conversation:
Press Clear
key to mute the microphone.
Press Clear
key again to activate the microphone.
3.10. Call Duration Display
When the External/Internal call is finished, the call duration will be visible for 3 seconds. The time is
displayed in the following format :{mm : ss}(minutes : seconds)
3.7. Last number redial
The unit saves the three last dialed telephone numbers in the redial memory.
You can enter the Redial list by pushing
REDIAL key in the stand-by mode.
Scroll through the Redial memory by pushing REDIAL key.
When the desired number appears on the display, lift the handset.
The number will be dialed automatically.
Press Clear
key for 2 seconds to escape the redial list if you don’t want to make a call from the
list.
3.11. Out of Range
When the unit is out of the working range of the base unit or when it’s not subscribed to the base unit,
it will display “Searching…”.
4. Call Transfer, On Hold, Toggle and Three Party Conference
4.1. Call on hold (CH)
3.8. Calling a number out of the Caller List
To put a call on hold during conversation, press INT/OK key.
If you want to retrieve the call on hold, press INT/OK key again.
The unit saves the telephone numbers of the last 10 missed calls in the caller list.
This feature is only available if the telephone number of the incoming call has been sent via the
network service.
Press UP/DOWN key when the unit is in standby mode.
Select CALLER ID by using the UP and DOWN keys and press INT/OK key
4.2. Transfer External call to another handset
Make a call or after receiving incoming call, press INT/OK key.’
Enter the internal handset No. and hang up handset to transfer the external call.
You will be disconnected but both other callers can talk together.
4.3. Brokers Call (Toggling between an internal call and an external call)
If you place an external call on hold, you can make a call to another internal handset. You can then
toggle between the first and the second call.
Put the external call on hold by pressing INT/OK key.
Enter the called internal handset No., when the call is connected, press INT/OK key (Toggle) to switch
between both calls. One call will be placed on hold and you can talk to the other caller.
Scroll through the Caller List by using the UP and DOWN keys.
When the desired number appears on the display, lift the handset.
The number will be dialed automatically.
Note: If you hang up, your call will be disconnected and the other handset talking to the external caller along.
4.4. Three party conference call (Conf)
You can establish three party conference with the other internal caller and an external caller.
Put the external call on hold by pressing INT/OK key.
Enter the called internal handset No., when the call is connected, press “ #” button for 2 sec to establish
three party conference. Both handsets will start counting talking time.
Note: If
during conference call you want to talk to internal caller, press INT/OK key. External
call will be placed on hold. You can Toggle or restart conference at any time.
3
5. PHONEBOOK
5.3. Changing a number and name from the Phonebook
Press UP/DOWN key when the unit is in standby mode..
Select PHONE BOOK by using the UP and DOWN keys.
Press INT/OK key to confirm.
Select EDIT by using the UP and DOWN keys.
Press INT/OK key to confirm.
Select the name and number to change by using UP and DOWN keys
Press INT/OK key to confirm.
Use Clear
key to erase old entry, enter new name and press INT/OK key to confirm.
Use Clear
key to erase old entry, enter new number and press INT/OK key to confirm.
During changing, press Clear
key for 2 seconds to abort.
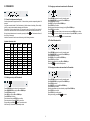
5.1. Use of the alphanumerical keypad
Use the alphanumerical keypad to enter text. To select a letter, press the corresponding button. For
example:
if you press numerical button ‘5’, the first character (J) will be shown on the display. Press multiple
times if you want to select another character under this button.
Press button ‘2’ twice to select the letter ‘B’. If you want to select ‘A’ as well as ‘B’, press button ‘A’
first, wait for 2 seconds until the cursor has moved to the next location and select then button ‘B’.
Wrongly entered characters can be erased by pressing the Clear
key. The character in front of
the cursor will be erased.
Available Characters: Press the correct buttons to get the following characters:
Alphabet allocation chart
Key pressed Once Twice
1
1
2
3
4
5
6
7
8
9
0
*
#
A
D
G
J
M
P
T
W
0
*
#
B
E
H
K
N
Q
U
X
5.4 To Read Phonebook list
3 times
4 times 5 times
(
)
-
C
F
I
L
O
R
V
Y
2
3
4
5
6
S
8
Z
,
:
+
%
/
7
.
9
Press UP/DOWN key when the unit is in standby mode.
Select PHONE BOOK by using the UP and DOWN keys.
Press INT/OK key to confirm.
Select READ by using the UP and DOWN keys.
Press INT/OK key to confirm.
Read the phonebook list by using UP and DOWN keys
Press Clear
key to return to standby mode.
5.5. Erasing one number and name from the Phonebook
5.2. Adding an entry to the Phonebook
Press UP/DOWN key when the unit is in standby mode.
Select PHONE BOOK by using the UP and DOWN keys.
Press INT/OK to confirm.
Select DELETE by using the UP and DOWN keys.
Press INT/OK key to confirm.
Select the phonebook entry to be deleted by using UP and DOWN keys
Press INT/OK key to confirm
Press INT/OK key to confirm again
During the deleting, press Clear
key to abort.
Press UP/DOWN key when the unit is in standby mode..
Select PHONE BOOK by using the UP and DOWN keys.
Press INT/OK key to confirm.
Select ADD by using the UP and DOWN keys.
Press INT/OK key to confirm.
Enter the name and press INT/OK key to confirm.
Enter the number and press INT/OK key to confirm.
During adding, press Clear
key for 2 seconds to abort.
After new entry, all entries are alphabetically sorted.
4
6. HANDSET SETTINGS
5.6. Erasing all numbers and name from the Phonebook
Press UP/DOWN key when the unit is in standby mode.
Select PHONE BOOK by using the UP and DOWN keys.
Press INT/OK to confirm.
Select ERASE ALL by using the UP and DOWN keys.
Press INT/OK key to confirm.
Press INT/OK key to confirm again
During the deleting, press Clear
key to abort
6.1. Key lock
Press UP/DOWN key when the unit is in standby mode.
Select KEY LOCK by using the UP and DOWN keys.
Press INT/OK key to confirm
The display shows “LOCKED”. The keypad is now locked.
After press DOWN key and INT/OK key, the key lock will be released.
6.2. Ringer Melody and Volume for External Calls
Press UP/DOWN key when the unit is in standby mode..
Select HS SETTING by using the UP and DOWN keys.
Press INT/OK key to confirm.
Select SET EXTRING by using the UP and DOWN keys.
Press INT/OK key to confirm.
Select the desired ringer melody by using the UP and DOWN keys.
Press INT/OK key to confirm.
Select the desired ringer volume by using the UP and DOWN keys.
Press INT/OK key to confirm.
6.3. Ringer Melody and Volume for Internal Calls
Press UP/DOWN key when the unit is in standby mode.
Select HS SETTING by using the UP and DOWN keys.
Press INT/OK key to confirm.
Select SET INTRING by using the UP and DOWN keys.
Press INT/OK key to confirm.
Select the desired ringer melody by using the UP and DOWN keys.
Press INT/OK key to confirm.
Select the desired ringer volume by using the UP and DOWN keys.
Press INT/OK key to confirm.
5
6.4. Enable/disable the baby call function
6.7. Set PIN Code
If you enable this function, the programmed number will be dialed automatically
when pushing any keys.
All other functions of the keypad will be disabled until the setting has been cancelled.
Press UP/DOWN key when the unit is in standby mode..
Select HS SETTING by using the UP and DOWN keys.
Press INT/OK key to confirm.
Select BABY CALL by using the UP and DOWN keys.
Press INT/OK key to confirm.
Enter baby call telephone number using numeric key pad.
Press INT/OK key to confirm. The display will show BABY CALL.
Press DOWN key twice quickly to disable baby call.
Note: Baby call function can not be used in handsfree speakerphone mode.
To change default handset PIN code.
Press UP/DOWN key when the unit is in standby mode..
Select HS SETTING by using the UP and DOWN keys.
Press INT/OK key to confirm.
Select SET PINCODE by using the UP and DOWN keys.
Press INT/OK key to confirm.
Enter the Handset Pin Code, HS PIN: (DEFAULT PIN = 1590)
Press INT/OK to confirm.
Enter the new Pin code: NEW PIN:
Press INT/OK key to confirm.
Re-enter the new Pin code: RETYPE:
Press INT/OK key to confirm.
6.5. Enable/Disable Key Tone
6.8. Auto PICKUP On/Off
Press UP/DOWN key when the unit is in standby mode..
Select HS SETTING by using the UP and DOWN keys.
Press INT/OK key to confirm.
Select SET KEYTONE by using the UP and DOWN keys.
Press INT/OK key to confirm.
Select ON/OFF by using the UP and DOWN keys.
Press INT/OK key to confirm
When a call comes in, a handset automatically answers the call when it is removed from charger
Press UP/DOWN key when the unit is in standby mode..
Select HS SETTING by using the UP and DOWN keys.
Press INT/OK key to confirm.
Select AUTO PICKUP by using the UP and DOWN keys.
Press INT/OK key to confirm.
Select ON/OFF by using the UP and DOWN keys.
Press INT/OK key to confirm.
6.6. Handset name
6.9. To Answer Call Using Anykey
The name of the handset will be displayed in standby mode. If you want to enter or
change this name:
Press UP/DOWN key when the unit is in standby mode..
Select HS SETTING by using the UP and DOWN keys.
Press INT/OK key to confirm.
Select USER NAME by using the UP and DOWN keys.
Press INT/OK key to confirm.
Enter or change the handset name by means of the alphanumerical keypad.
Press INT/OK key to confirm.
Press UP/DOWN key when the unit is in standby mode..
Select HS SETTING by using the UP and DOWN keys.
Press INT/OK key to confirm.
Select ANYKEY TALK by using the UP and DOWN keys.
Press INT/OK key to confirm.
Select ON/OFF by using the UP and DOWN keys.
Press INT/OK key to confirm.
6
6.10. ERASE Caller List
7. TECHNICAL DATA
• Standard: DECT ( Digital Enhanced Cordless Telecommunications )
GAP ( Generic Access Profile )
• Frequency range: 1880 ~~ 1900 MHz (BW=20MHz)
• RF channels: 10 channels
• Channel Bandwidth: 1.728
• Modulation: GFSK
• Transmission Output Power: 10Mw
• Data Transmission Rate: 1.152 Mbps
• Speech coding: ADPCM 32 K bps
• Communication Range (max.): Outdoor 300 Meters - Indoor 50 Meters
• Power Supply:
INPUT 230 VAC 50Hz
OUTPUT DC 9V 350mA
• Operating Time: Standby 100 Hours - Talk: 10 Hours
• Operating Temperature: 0°C to 40°C
• Storage Temperature: 0°C to 40°C
Press UP/DOWN key when the unit is in standby mode.
Select HS SETTING by using the UP and DOWN keys.
Press INT/OK key to confirm.
Select ERASE CID by using the UP and DOWN keys.
Press INT/OK key to confirm.
Prompt SURE?
Press INT/OK key to confirm or C
key to escape.
6.11. Reset
The unit default settings are:
Display language: English
Pin Code: 1590
Phone Book: None
Redial List: Empty
Call List: Empty
Baby Call: Off
Key Click: On
Memory Dial: Empty
To reset the handset to its standard settings:
Press UP/DOWN key when the unit is in standby mode..
Select HS SETTING by using the UP and DOWN keys.
Press INT/OK key to confirm.
Select SET DEFAULT by using the UP and DOWN keys.
Press INT/OK key to confirm.
The display shows ARE YOU AURE?
Press INT/OK key again to confirm or C
key to abort.
7