1
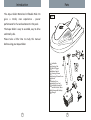
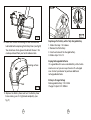
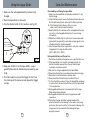
User Guide
MOTORIZED INFLATABLE RIDE ON
Model no. ZS30
© 2005 Daka Designs Ltd. All rights reserved.
Printed in China
CAUTION:
ELECTRICALLY OPERATED PRODUCT
Not recommended for children under 5 years of age. As with all
electrical products, precautions should be observed during handling
and used to reduce the risk of electric shock.
Contents
Introduction
1
Parts
2
Warnings
3
Assembling the Aqua Glider
4
Battery use
6
Using the Aqua Glider
11
Care & Maintenance
12
- Disassembling and Storing the Aqua Glider
12
- Rechargeable Battery & Charger Care
12
- Accidental Flooding
13
- Removing Blockage From Propeller
14
- Repairing the Inflatable
15
- Maintaining the Battery Door Seal
15
Trouble Shooting
16
Technical Specifications
17
FCC Statement
18
Introduction
Parts
The Aqua Glider Motorized Inflatable Ride On
gives
a
totally
new
experience
-
power
Fig.1
performance for fun and excitement in the pool.
The Aqua Glider is easy to assemble, easy to drive
and totally safe.
Please take a little time to study this manual
before using your Aqua Glider.
1
2
3
4
5
6
7
8
9
10
11
12
1
Inflatable
Steering Unit
On/off Trigger
Master Switch
Steering Column
Steering Column Sleeve
Nozzle
Battery Door
Battery Door Seal
Inflatable Repair Kit
and Air Release Tubes
Rechargeable Battery
Charger
2
CAUTION
• Read the User Manual carefully before using the Aqua Glider.
• Keep the packaging since it contains important information.
• Do not operate the Aqua Glider for long periods out of the water to
avoid damage.
• The Aqua Glider must be assembled by an adult.
• A child under 5 years old should never operate the Aqua Glider.
• The Aqua Glider is for pool use only - do not use in the open sea.
• A coast guard approved flotation device should always be worn
when using the Aqua Glider.
• The Aqua Glider is designed to hold ONE person not exceeding
155lbs/70kg.
• Never stick body parts, clothing or other objects in the vicinity of the
propeller.
• Do not wear loose or flowing clothing that could be drawn into the
propeller.
• Particular care should be exercised when using the Aqua Glider near
anybody with long hair.
• Always inspect the area to ensure it is free of hazards or obstacles
such as boats and swimmers before using the Aqua Glider. Never
ride over swimmers or other objects.
• Always ensure sufficient charges remains in the battery to return to
the poolside before using the Aqua Glider.
• The Aqua Glider is to be operated in water only when fully
assembled in accordance with the instructions.
Assembling the Aqua Glider
1. Using a pump (not included) blow up the Inflatable
making sure that the valve for each chamber is
properly closed once inflated.
DO NOT OVER INFLATE THE INFLATABLE.
2. Connect the Steering Column to the Nozzle. (see fig.2)
You will hear a click once the Steering Column has
been correctly connected.
Fig.2
3a. Slide Steering Sleeve into hole in the Inflatable from
top.
3b. Slide Steering Column/nozzle assembly from the
bottom of the inflatable through the Steering Sleeve.
You will hear a click once the Steering Column has
completely passed through the Steering Sleeve.
(see fig.3)
a
CHOKING HAZARD - Small parts
Not for children under 3 years
This is not a life saving device. Do not leave children unattended
while device is in use.
Only to be used in water in which the child is within its depth and
under supervision.
3
b
Fig.3
4
Battery Use
4. Attach the Steering Unit to the Steering Column - you
will hear a click once it has been properly attached.
(see fig.4)
Fig.4
Make sure the Nozzle and Steering unit are correctly
aligned. (see fig.5)
Fig.5
The Aqua Glider is now ready for battery installation.
5
CAUTION
• Always make sure you have a fully charged battery before using
the Aqua Glider.
• The Rechargeable Battery will give you approximately one hour
of use - always make sure you have enough power left to return
to the poolside.
• ALWAYS ensure the unit is dried thoroughly before opening the
battery compartment for charging the battery.
• Non-rechargeable batteries are not to be recharged
• Only batteries of the same or equivalent type as recommended are
to be used
• Exhausted batteries are to be removed from the toy
• Rechargeable batteries are to be recharged under adult
supervision.
Using the Rechargeable Battery
• When the Aqua Glider speed drops it is time to recharge the
battery. Do not continue to use the Aqua Glider after the speed
drops, until it stops, otherwise the battery will be damaged.
• ALWAYS charge battery in a well-ventilated place out of reach of
children.
• ALWAYS connect charger connector to the battery first and then
plug the charger into the mains. When charging is complete,
unplug the charger from the mains first and then from the battery.
• ALWAYS ensure the charger is DRY before plugging it into a live
socket.
• NEVER place the battery in a sealed container when charging.
• NEVER charge battery near water.
• NEVER short circuit the battery or charger terminals. Check the
battery and charger regularly for signs of damage. In the event of
damage do not use the Aqua Glider until the damage has been
repaired or the part refaced.
• If in doubt of the state of the battery, recharge it until the
indicator on the battery charger indicates a full charge. (Indicator
will change to green color)
6
For battery charging follow these instructions.
4. Allow two minutes for any gasses to dissipate.
1. Always ensure that the Master Switch is in the 'Off'
position. (see fig.6)
5. Take out the battery from the Battery Compartment.
OFF
6. Connect the battery to the charger. (see fig.8)
Fig.6
2. Always ensure that the Aqua Glider is out of the water
and placed in a dry area.
3. Unscrew the Battery Door using a coin or similar and
remove. (see fig.7)
Fig.8
7. Plug charger into mains, and turn on the supply.
8. Charging will take 6-8 hours for a fully discharged
battery. When the battery is charging the red LED is on,
when the battery is charged the green LED turns on.
9. Unplug the charger from the mains.
10. Unplug the battery from the charger.
11. Connect the battery and install it, making sure to
insert it the right way round. (see fig.9)
Fig.7
7
8
Fig.11
Fig.9
12. Make sure the seal and sealing surfaces are clean and
lubricated before replacing the Battery Door. (see fig.10)
You should use silicon grease to lubricate the seal - this
can be purchased from your local hardware store.
Sealing surfaces
Seal
Fig.10
Replacing a flat battery with a fully charged battery.
1. Follow the steps 1 to 5 above.
2. Remove the flat battery.
3. Install and connect the charged battery.
4. Follow steps 12 to 13.
Buying Rechargeable Batteries
It is a good idea to have a second battery so that when
one has run out you can swap it over with a charged
one. Contact your dealer to purchase additional
rechargeable batteries.
Battery & Charger Ratings
Rechargeable battery: 12V / 2.8Ah
Charger: Output-12V / 500mA
13. Replace the Battery Door and turn the Battery Door
Screw making sure it is tightened completely. (see
fig.11)
9
10
Using the Aqua Glider
Care And Maintenance
1. Make sure the rechargeable battery has been fully
charged.
2. Place the Aqua Glider in the water.
3. Turn the Master Switch to 'On' position. (see fig.12)
ON
Fig.12
4. Help your child to sit on the Aqua Glider - a coast
guard flotation device should always be worn by your
child.
5. The rider simply has to pull the trigger to start, turn
the steering unit to maneuver and release the trigger
to stop.
11
Disassembling and Storing the Aqua Glider
1. Always rinse the Aqua Glider in fresh water and allow it to dry
before storage.
2. Unclip the Steering Unit, remove the Steering Column Sleeve, the
Nozzle and Steering Column and unclip the Steering Column.
Tip: If the Steering Column Sleeve is stuck, pour some
water over it to lubricate and then remove.
3. Open the Battery Door and remove the rechargeable battery (see
also section on Rechargeable Battery Care for more storage
information).
4. Deflate the inflatable fully. To do this insert one air release tube
(packed with the repair kit) in each valve and press gently on the
inflatable until all air has been expelled.
5. Store the Aqua Glider in the original box in a dry place - ambient
temperature for storage should be within
-20oC to 40oC (-4oF to 104oF).
Rechargeable Battery and Charger Care
1. The battery should be recharged as soon as possible after use.
2. If the Aqua Glider is not used for extended periods, the
battery should be removed from the unit and charged
overnight, every three months.
3. Only use the charger supplied with the Aqua Glider.
4. Never place the battery in a sealed container when charging.
5. Never short-circuit the battery or battery cable.
6. Never place/store the battery near a radiator/fire, etc.
7. To store the battery, remove it from the Aqua Glider and keep
in a place that is dry and cool with the rest of the Aqua Glider
in the original box.
8. Rechargeable batteries are to be removed from the Aqua
Glider before being charged.
9. Rechargeable batteries are only be charged under adult
supervision.
10.The battery charger should be required examined for
potential hazard, such as damage to the cable or cord, plug,
encloser or other parts, and that, in the event of damage, the
charger must not be used until that damage has been
properly removed.
12
Accidental Flooding
Make sure the Battery Door Seal is clean, lubricated and
undamaged and the Battery Door is tightly connected.
However, should the seal not to be cleaned properly or
the battery door not fully closed and water enters the
battery compartment your Aqua Glider will not be
permanently damaged since it is designed for protection
against flooding.
Removing Blockage From Propeller
If the propeller is blocked:
1. Remove Aqua Glider from water and dry completely.
2. Make sure the master switch is in the 'Off' position.
3. Unscrew rear grille. (see fig.13 )
If the Battery Compartment floods
1. Remove the unit from the water and set the master
switch to the locked position.
2. Unscrew the Battery Door using a coin or similar and
remove. (see fig.7)
Fig.13
3. Unplug and remove the rechargeable battery.
4. Thoroughly dry the battery compartment and
battery.
5. Check battery door seal and sealing surface, make
sure they are clean and lubricated.
You should use silicon grease to lubricate the seal this can be purchased from your local hardware
store.
4. Unscrew the propeller nut using an M6 socket.
(see fig.14)
5. Remove the washer, propeller and the drive pin.
(see fig.14)
nut
washer
6. Connect the battery to the battery compartment,
making sure to insert it the right way round.
fig.9)
7. Replace the battery door and turn the battery door
screw making sure it is tightened completely.
(see fig.11)
8. Connect the new Battery Compartment, insert it, and
screw in place.
13
drive pin
Fig.14
14
Trouble Shooting
6. Remove any blockage.
If the Aqua Glider does not work:
7. Replace drive pin, propeller and the washer, and
1. Check the battery is fully charged, if in doubt of
battery state, recharge the battery until charger
indicates full charged.
reattach propeller nut.
8. Replace rear grille.
2. Make sure the rechargeable battery connector is
connected.
Repairing the Inflatable
A repair kit is included in case the inflatable is
accidentally punctured, to repair:
1. Locate the puncture - this can be done by inflating the
inflatable and looking for air bubbles.
3. Make sure the Master Switch is in the 'On' position.
4. Make sure the battery compartment is dry.
5. Make sure the propeller is not blocked.
2. Deflate the inflatable and make sure it is completely dry.
3. Clean punctured area and dry the area.
4. Using inflatable repair kit apply glue around
punctured area.
5. Use repair PVC sheet, cut so it is 5mm bigger around
the punctured area.
6. Stick the repair sheet on top of the punctured area.
7. Let it dry for 2 hours.
8. Inflate the inflatable and check there is no air leakage
before use.
Maintaining Battery Door Seal
Always keep the Battery Door Seal clean and well
lubricated with silicone grease which can be purchased
from your local hardware store.
15
16
Technical Specifications
Unit Dimensions
L 57.5 x W 36.5 x H 32.5" (146 x 93 x 83 cm)
Unit Weight
(with rechargeable battery ) 12.8 lbs (5.8 kg)
Battery Type
1 x rechargeable battery
Battery duration
Approximately 1 hour
Speed
Up to 2mph (3.2km/h)
FCC Statement
This device complies with Part 15 of the FCC Rules.
Operation is subject to the following two conditions :
(1) this device may not cause harmful interference, and
(2) this device must accept any interference received,
including interference that may cause undesired operation.
Warning : Changes or modifications to this unit not expressly
approved by the party responsible for compliance could void
the user authority to operate the equipment.
NOTE : This equipment has been tested and found to comply
with the limits for a Class B digital device, pursuant to Part
15 of the FCC Rules. These limits are designed to provide
reasonable protection against harmful interference in a
residential installation. This equipment generates, uses and
can radiate radio frequency energy and, if not installed and
used in accordance with the instructions, may cause harmful
interference to radio communications.
However, there is no guarantee that interference will not
occur in a particular installation. If this equipment does
cause harmful interference to radio or television reception,
which can be determined by turning the equipment off and
on, the user is encouraged to try to correct the interference
by one or more of the following measures:
• Reorient or relocate the receiving antenna.
• Increase the separation between the equipment and receiver.
• Connect the equipment into an outlet on a circuit different
from that to which the receiver is connected.
• Consult the dealer or an experienced radio/TV technician for
help.
17
18