1
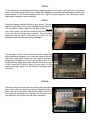
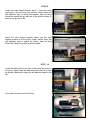
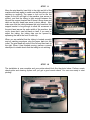
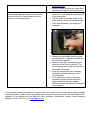
LYSON BULK INK FEED SYSTEM
FOR THE EPSON PHOTO R800
INSTALLATION INSTRUCTIONS AND USER GUIDE
Thank you for purchasing a Lyson bulk ink feed system. You have just taken the first step to enjoying
the cost saving and superior performance benefits of using Lyson bulk ink. Lyson bulk ink feed
systems are simple to install, easy to use and will provide you with many hours of trouble free and
lower cost printing. However, the successful use of the system is dependent on how accurately you
follow this guide during installation. Please read these instructions and familiarise yourself with the
system components before you start the installation. Please also remember that you are now about to
start working with bulk ink instead of sealed cartridges. During installation, protect the area around
your printer in case of ink spillage and wear the disposable gloves included with the kit. Have a roll of
paper towel handy. Remember, accidents can happen!
SYSTEM COMPONENTS
1. Bulk ink feed system.
2. Puncture tool.
3. Instruction CD.
4. Tube support bracket clamp.
5. Alcohol swabs (2).
6. Suction syringes (8).
7. Disposable gloves (2).
8. Filling funnels (only supplied with certain
systems).
STEP 1
Before starting the installation, print a good nozzle check
print using the existing inks installed on your printer.
Write the date on the print and keep it. No warranty claim
regarding the bulk ink feed system will be accepted
unless it is supported by a good nozzle check print
produced before the system was installed. The utility for
producing a nozzle check print can be found under the
‘Maintenance’ or ‘Utilities’ tab of the Epson print driver
software supplied with your printer. A good nozzle check
print should like this:-
STEP 2
If you are using the same Lyson ink in cartridges as you purchased with the bulk ink feed system then
proceed to step 3. If you are currently using a different ink type, then it is a good idea to flush out your
printer before installing the system. Otherwise, you will waste a lot of time and ink purging through
one ink type to another. Lyson supplies cleaning cartridges for the purpose of flushing the printer and
these can be obtained from your local Lyson supplier. If you are in doubt about the need to flush your
printer, then contact your local supplier or e-mail Lyson at [email protected]. Lyson will not be held
responsible for problems caused by the incompatibility of different ink types.
To flush your printer with cleaning cartridges, use the normal cartridge change procedure to remove
the existing cartridges from the machine. Install the cleaning cartridges and print full colour images
onto scrap paper until the printed output is entirely clear. This will take between 5 to 10 prints.
Remove the cleaning cartridges from the printer and dispose of them. Cleaning cartridges are
intended for once only use.
STEP 3
Lay out the bulk ink feed system on a flat surface near to
your printer. Keep the rubber band around the cartridges
as this will help you keep them together. Put some paper
towel underneath the cartridges. Visually inspect the tubing
to make sure it is not kinked or has been damaged during
transit. Look underneath the ink reservoirs to make sure
that all the tubes are connected to a reservoir. Remove the
black rubber filling caps from the top of each reservoir.
These caps may seem a little tight when new but free off
during use.
Fill the reservoirs with ink. Use the funnels (use a separate,
clean funnel for each ink) provided with the system unless
your system came with ink bottles that have spout type
lids. Be careful to ensure that you fill each reservoir with
the correct colour ink. Do not fill the reservoirs above the
100 ml mark (80 ml is ideal). If you used filling funnels then
rinse the funnels clean with water, dry and keep safe for
use later when you need to refill a reservoir.
Replace the black rubber filling caps. Ensure that the
arrows on the top of each cap point at the arrow molded
into the top of each reservoir (there are two correct
positions for this, 180° opposite). This is the ‘Open’
position for the caps and will let air into the reservoirs.
They should always be like this when you are printing.
Ensure that the tube clamp located at the rear of the back
reservoir is completely in the up position.
STEP 4
Turn over the cartridges so that the ink exit holes are
upwards. Take the puncture tool and gently pierce a hole in
the center of the clear film over the ink exit on the right hand
(yellow) cartridge.
STEP 5
Take a suction syringe and firmly push it through the pierced
film at the ink exit hole and into the cartridge about ¼”. Pull
up slowly on the syringe plunger and you should see yellow
ink travel along the tube from the reservoir and into the
cartridge. If you feel that there is a lot of resistance then
angle the syringe slightly to one side. If ink has not entered
the bottom of the syringe by the time the syringe plunger has
reached the limit of it’s travel, then remove the syringe from
the cartridge, push down the plunger, re-insert the syringe
into the cartridge, and pull up on the plunger again. You may
need to extract two or three syringe’s full of air before the
cartridge is full. As soon as ink enters the bottom of the
syringe, stop pulling and remove the syringe from the cartridge. Any ink in the syringe can be squirted
back into the corresponding ink reservoir through the filling hole. Rinse out the syringe with water and
keep safe in case it is needed again.
STEP 6
Fill the remaining six cartridges with ink by repeating steps 5 and 6 with each of the ink exit holes in
order. Use a new syringe for each ink. When the cartridges are upside down and facing you like in the
picture above, the ink colours reading from left to right are gloss optimizer, red, blue, photo black,
matte black, magenta, cyan and yellow.
STEP 7
Press the change cartridge button on your printer. This will
make the print head move to the cartridge change position.
Pull the printer’s power lead from the wall socket (do not
turn off the printer first with the normal on/off button. Don’t
worry, this will not damage your machine). The print head
should be now be free to move easily by hand. Lift the
cartridge lid and remove the existing cartridges.
The cartridge lid can now be removed. Insert a small flat
blade screwdriver between the lid and the hinge on the left
(see photo) and gently bend open the hinge a little while
pulling the lid towards you. Do not use too much force. The
lid should come away quite easily once you bend the hinge
a little. Keep the lid safe in case you ever want to use
normal cartridges again as it can easily be snapped back
into place
STEP 8
Take the reservoirs of the bulk ink feed system and place
them at the right hand end of your printer. Drape the tubing
across the top of the printer. Remove the rubber band from
the cartridges and place the cartridges into the print head
(see photo) as you would a normal set of cartridges.
STEP 9
Locate the tube support bracket about 1” from the inside
right edge of the top cover (see picture). Before using the
self adhesive tape to attach the bracket, wipe the area
where the bracket will go with one of the alcohol swabs to
remove any grease or dirt.
Attach the tube support bracket clamp over the tube
support bracket as in the photo. Again, before using the
self adhesive tape to attach the clamp, wipe the area
where the clamp will go with an alcohol swab.
STEP 10
Locate the tubing clip on the right of the printer as shown in
the photo. Again, wipe the area where the clip will go with
an alcohol swab before using the self adhesive tape on the
clip.
Your printer should now look like this.
STEP 11
Move the print head by hand fully to the right and left of the
machine and back again to make sure that the tubing is not
catching on anything. The areas to look out for are the
edges on the left and right of the machine (see arrows in
photos), and that the tubing is tight enough between the
clip and the support bracket that it doesn’t droop down and
catch on the print head (see arrow in photo below). Also
make sure that the tubing between the print head and the
support bracket is long enough to allow full movement of
the print head across the entire width of the machine, but
not so loose that it can fold back on itself. If you need to
adjust the tubing, the tubing clips can be opened by
squeezing the tab at the front of each clip.
When you are satisfied that the tubing is located correctly
and not catching anywhere, plug the power back into the
outlet. The print head will move to the left and then back to
the right. When it has finished moving, perform a nozzle
check print to double check that the tubing is not catching.
STEP 12
The installation is now complete and your printer should look like the photo below. Perform nozzle
check prints and cleaning cycles until you get a good nozzle check. You are now ready to start
printing!
USER GUIDE
The use of a Lyson bulk ink feed system is very simple as long as you remember five important
points:1. Before switching your printer on to start printing, make sure the reservoir filling caps are turned
to the ‘open’ position as shown in step 3 of the installation instructions. This is where the
arrows molded into the black rubber caps are pointing at the arrows molded into the top of
each reservoir.
2. Top up the reservoirs regularly with ink, and try and keep all the ink levels at the same height
with each other. Be aware that certain colours will be used more quickly than others depending
on what type of printing you do. For instance, the black ink will be used quicker than the other
colours if you print a lot of text. Or, if you print mainly photos, then the cyan and magenta will
run down first. Never let the ink levels drop below the 20 mark on the reservoirs and don’t fill
above the 100 mark.
3. The ink level monitor on your computer may still work and show the ink levels dropping in the
cartridges. Don’t worry as this is normal. If an ink colour shows low or empty, simply stop
printing, switch of your printer, wait 10 seconds and then switch your printer back on. This will
reset the ink level to full on your computer. You may also get the occasional warning on your
computer screen to tell you that you are not using Epson original inks. Just confirm that you
are happy to continue and the warning will go away.
4. When you have finished printing, always turn your
printer off and turn the reservoir filling caps through
90º to the shut position. This where the arrows
molded into the black rubber filling caps are pointing
at the adjacent filling caps as in this photo.
5. Always try and use your printer at least once a
week, even if you only print one small colour print.
This will keep the ink fresh in the printer’s print
heads and reduce the chance of clogging or drying
out of the inks. If you are not going to use your
printer for more than two weeks, then we
recommend removing the system and flushing the
printer with cleaning cartridges (see troubleshooting section).
Apart from these five points, you should use your printer just as you would with normal cartridges,
As long as you follow these simple guidelines, you will enjoy trouble free and cost saving printing.
TROUBLE SHOOTING GUIDE
Problem
Consistent banding present in prints.
Things to do/check
1. Check that the reservoir filling caps are
in the ‘open’ position (see step 3 above).
2. Check that the ink levels in the reservoirs
have not fallen below the 20 mark. Refill
as necessary.
3. Check to make sure that no tubes are
kinked or damaged.
4. Perform a nozzle check print to see if
any jets are missing or clogged. If so,
then perform head cleaning cycles and
nozzle check prints until you get a good
print.
5. If head cleaning doesn’t cure the
problem then remove the cartridges from
the printer and re-prime the cartridges
using the priming syringes as in steps 5
& 6 of the installation guide above. Reinstall the cartridges and perform nozzle
check prints and head cleaning cycles as
necessary.
Ink blobs dropping on prints.
1. Check that the reservoir filling caps are
in the ‘open’ position (see step 3 above).
2. Check that the ink levels in the reservoirs
have not been filled above the 100 mark.
If so, then use a syringe with the
puncture tool connected to the end to
draw some ink out of the over filled
reservoir.
1. Refill the reservoir with new ink.
2. Remove the cartridges from the printer
and re-prime the cartridges using the
priming syringes as in step 5 and 6 of the
installation guide above. Re-install the
cartridges and perform nozzle check
prints and head cleaning cycles as
necessary.
1. Perform a nozzle check print to make
sure all the jets are firing correctly. If jets
are missing then perform head cleaning
cycles and nozzle check prints until a
good print is obtained.
2. Check to see if you are using the correct
printer profile. Some Lyson inks require
that an ICC colour profile is used during
printing to correct colour shifts. Many
free profiles along with user guides are
available for down load at
An ink reservoir is accidentally allowed to run
dry.
Prints appear to be the wrong colour.
You need to leave your printer unused for a
period longer than two weeks, or you want to
remove the bulk ink feed system from your
printer for an extended time.
www.lyson.com.
3. Check to make sure that you have filled
the reservoirs with the correct colour ink.
1. Make sure that the reservoir filling caps
are turned to the off position (see point 4
in the user guide)
2. Roll the roller on the tube clamp to the
down position. Do this by squeezing the
roller down between your thumb and
forefinger :-
3. Remove the cartridges from the printer
and place them in a plastic bag with the
ink exit holes upwards.
4. Open the tube clips by squeezing the
small tab at the front of each clip. The
entire system can now be removed from
the printer for storage
5. Flush the printer with Lyson cleaning
cartridges available from your local
Lyson supplier.
6. To re-install your system, follow the
installation guide from the beginning
again except that the tube support
bracket and clips will already be attached
to your printer.
If you require technical assistance or support with your Lyson bulk ink feed system, please initially
contact the store or dealer where the system was purchased. All Lyson dealers are well trained in the
operation of the system and can help with most problems. Alternatively, contact Lyson technical
support on 0161 442 2111 or at [email protected].
30 DAY GUARANTEE TO REPLACE DEFECTIVE PARTS
Lyson guarantee all parts are defect-free for a period of 30 days from the date that you receive your
new Lyson Bulk ink feed system. If you have received a defective part, please initially contact the
retailer or dealer from where the system was purchased.
DISCLAIMER
As Lyson bulk feeds are self installed by the user, Lyson is not responsible for any damages to your
printer, whether they are or are not related to the Lyson Bulk ink feed system. Please contact the
store or dealer where the printer was purchased, or the printer manufacturer for any problems or
questions related to the printer and its operation.
If the Customer chooses to use ink in the system from another manufacturer other than Lyson, and is
not satisfied with the ink, or it clogs the printer or the bulk feed system, it will be the Customers
responsibility to pay for the parts to repair the system and restore it to normal usage. We can only
guarantee that the Lyson Bulk ink system will deliver Lyson ink just as well as a normal ink cartridge.
We will not accept returns of used systems, or systems filled with third party ink that the customer
later decides does not meet their specific needs.