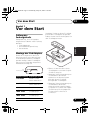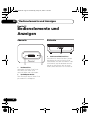
1
IDK-80.book 1 ページ 2006年5月18日 木曜日 午後8時1分
IDK-80
IDK-80.book 2 ページ 2006年5月18日 木曜日 午後8時1分
Thank you for buying this Pioneer product.
Please read through these operating instructions so that you will know how to
operate your model properly. After you have finished reading the instructions, put
them in a safe place for future reference .
Contents
01 Before you start
03 Connecting up
Checking what’s in the box . . . . . . . . . . 3
Attaching the iPod type adapter . . . . . . 3
Connecting to your Pioneer
AV receiver . . . . . . . . . . . . . . . . . . . . . . 5
02 Controls and displays
04 Additional information
Top panel . . . . . . . . . . . . . . . . . . . . . . . . 4
Rear panel . . . . . . . . . . . . . . . . . . . . . . . 4
Specifications . . . . . . . . . . . . . . . . . . . . 6
Cleaning the unit . . . . . . . . . . . . . . . . . 6
Register your product at
www.pioneerelectronics.com (US)
www.pioneerelectronics.ca (Canada)
• Protect your new investment
The details of your purchase will be on file for reference in the event of an
insurance claim such as loss or theft.
• Receive free tips, updates and service bulletins on
your new product
• Improve product development
Your input helps us continue to design products that meet your needs.
• Receive a free Pioneer newsletter
Registered customers can opt in to receive a monthly newsletter.
Discover the benefits of registering your product online at www.pioneer.co.uk
(www.pioneer-eur.com)
If you want to dispose this product, do not mix it with general household waste. There is a separate
collection system for used electronic products in accordance with legislation that requires proper
treatment, recovery and recycling.
Private households in the 25 member states of the EU, in Switzerland and Norway may return their used electronic
products free of charge to designated collection facilities or to a retailer (if you purchase a similar new one).
For countries not mentioned above, please contact your local authorities for the correct method of disposal.
By doing so you will ensure that your disposed product undergoes the necessary treatment, recovery and recycling
and thus prevent potential negative effects on the environment and human health.
K058_En
2
En
IDK-80.book 3 ページ 2006年5月18日 木曜日 午後8時1分
Before you start
01
Before you start
Checking what’s in the box
Deutsch
Attaching the iPod type
adapter
Corresponding iPod
type
iPod 40GB
Fourth generation
40 GB iPod
mini
iPod mini
Color 20GB
30GB
20 GB / 30 GB iPod
<color display>
Color 40GB
60GB
40 GB / 60 GB iPod
<color display>
nano
iPod nano
日本語
Fourth generation
20 GB iPod
Español
iPod 20GB
• It is also possible to connect an
iPod type adapter from an original
iPod dock.
• When using fifth generation iPod
models with this system, please
use the iPod type adapter supplied
with your iPod unit.
• When using a third generation iPod
model with this system, please use
an ‘Apple iPod Universal Dock
adapter 3-pack for iPod with Dock
Connector’ available for purchase
from Apple Computer Inc.
Nederlands
Model mark
Italiano
For your iPod to sit properly in the dock
connector port, you will have to match
the iPod type adapter with your model of
iPod. Each iPod type adapter has a
model marking as shown below.
iPod model
marking
Français
Please check that you've received the
following supplied accessories:
• iPod type adapter x6
• These operating instructions
• Warranty card
After selecting the iPod type adapter
that corresponds with your iPod unit,
insert it into the iPod type adapter
pocket as shown.
English
Chapter 1
3
En
IDK-80.book 4 ページ 2006年5月18日 木曜日 午後8時1分
02
Controls and displays
Chapter 2
Controls and displays
Top panel
Rear panel
3
1
2
1 iPod connector port
Insert your iPod dock connector port to
connect and recharge your iPod unit.
2 iPod type adapter pocket
Holds the iPod type adapter that
matches your iPod unit.
4
En
3 iPod control cable terminal
Use to connect to a Pioneer AV receiver
with a dedicated terminal for an iPod
control cable (such as the VSX-84TXSi
or VSX-AX4ASi (model name depends
on region)).
IDK-80_02_connect_up.fm 5 ページ 2006年5月19日 金曜日 午後6時10分
Connecting up
03
English
Chapter 3
Connecting up
Caution
>
>
>
Nederlands
iPod
Music
Extras
iPod
Settings
Shuffle Songs
Backlight
3 Plug in and switch on your AV
receiver.
Please refer to the manual supplied
with the receiver for detailed
instructions on operating the iPod
using the iPod control cable.
Italiano
• Before connecting or
disconnecting this unit from your
AV receiver, make sure the power
to the AV receiver is switched off.
2 Place the iPod in the connector
port.
Deutsch
Connect this unit to a Pioneer AV
receiver with a dedicated iPod control
cable terminal (such as the VSX-84TXSi
or VSX-AX4ASi (model name depends
on region)). You will be able to use the
remote control supplied with the
receiver to control this unit.
1 Connect the terminal on this unit
to the dedicated iPod terminal on the
receiver.
Use the iPod control cable supplied
with the AV receiver. Connect both ends
as shown below (make sure the
mark on the connector is facing
upwards).
Français
Connecting to your Pioneer
AV receiver
MENU
MENU
Español
This unit
日本語
iPod control
cable (supplied
with your
Pioneer AV
receiver)
IN
Pioneer AV receiver with a
dedicated terminal for an
iPod control cable
5
En
IDK-80.book 6 ページ 2006年5月18日 木曜日 午後8時1分
Additional information
04
Chapter 4
Additional information
Specifications
•
Main unit
Dimensions
. . . 99 mm (W) x 33 mm (H) x 74 mm (D)
3.9 in. (W) x 1.3 in. (H) x 2.9 in. (D)
Weight . . . . . . . . . . . . . . . . . 150 g (5.3 oz.)
•
Accessories
iPod type adapter . . . . . . . . . . . . . . . . . . . 6
These operating instructions . . . . . . . . . .1
Warranty card (North America /Europe /
Japan). . . . . . . . . . . . . . . . . . . . . . . . . . . . . 3
Note
• Specifications and design subject
to possible modification without
notice, due to improvements.
6
En
Cleaning the unit
• Use a polishing cloth or dry cloth to
wipe off dust and dirt.
• When the surface is dirty, wipe with
a soft cloth dipped in some neutral
cleanser diluted five or six times
with water, and wrung out well, and
then wipe again with a dry cloth. Do
not use furniture wax or cleansers.
• Never use thinners, benzine,
insecticide sprays or other
chemicals on or near this unit,
since these will corrode the
surface.
Published by Pioneer Corporation
Copyright ©2006 Pioneer Corporation
All rights reserved
IDK-80.book 7 ページ 2006年5月18日 木曜日 午後8時1分
Additional information
04
English
Should this product require service in the U.S.A. and you wish to locate the nearest Pioneer
Authorized Independent Service Company, or if you wish to purchase replacement parts,
operating instructions, service manuals, or accessories, please call the number shown
below.
800–421–1404
Pioneer Electronics (USA) Inc.
Customer Support Division
P.O. BOX 1760, Long Beach,
CA 90801-1760, U.S.A.
Should this product require service in Canada, please contact a Pioneer Canadian
Authorized Dealer to locate the nearest Pioneer Authorized Service Company in Canada.
Alternatively, please contact the Customer Satisfaction Department at the following address:
For warranty information please see the Limited Warranty sheet included with your product.
Pioneer Électroniques du Canada, Inc.
Service à la clientèle
300, Allstate Parkway, Markham, Ontario L3R OP2
1(877)283-5901
S018_A_EF
Español
Pour obtenir des renseignements sur la garantie, veuillez vous reporter au feuillet sur la
garantie restreinte qui accompagne le produit.
Nederlands
Si ce produit doit être réparé au Canada, veuillez vous adresser à un distributeur autorisé
Pioneer du Canada pour obtenir le nom du Centre de Service Autorisé Pioneer le plus près
de chez-vous. Vous pouvez aussi contacter le Service à la clientèle de Pioneer:
Italiano
Pioneer Electronics of Canada, Inc.
Customer Satisfaction Department
300 Allstate Parkway, Markham, Ontario L3R OP2
1(877)283-5901
Deutsch
For warranty information please see the Limited Warranty sheet included with your product.
Français
Please do not ship your product to Pioneer without first calling the Customer Support
Division at the above listed number for assistance.
日本語
7
En
IDK-80.book Page 2 Wednesday, May 24, 2006 1:56 PM
Nous vous remercions de votre achat d'un produit
Pioneer.
Veuillez lire ce mode d'emploi pour savoir comment utiliser correctement votre
modèle. Après sa lecture, placez ce mode d'emploi dans un endroit accessible pour
pouvoir le consulter.
Table des matières
01 Avant de commencer
03 Connexion
Vérifier le contenu de la boîte . . . . . . . . 3
Fixation de l'adaptateur de type d'iPod. . 3
Connexion à votre récepteur
AV Pioneer . . . . . . . . . . . . . . . . . . . . . . .5
02 Contrôles et affichages
04 Informations supplémentaires
Vue supérieure . . . . . . . . . . . . . . . . . . . 4
Vue arrière. . . . . . . . . . . . . . . . . . . . . . . 4
Caractéristiques techniques . . . . . . . . .6
Nettoyage de l'appareil . . . . . . . . . . . . . .6
Si vous souhaitez vous débarrasser de cet appareil, ne le mettez pas à la poubelle
avec vos ordures ménagères. Il existe un système de collecte séparé pour les
appareils électroniques usagés, qui doivent être récupérés, traités et recyclés
conformément à la législation.
Les habitants des 25 états membres de l’UE, de Suisse et de Norvège peuvent retourner
gratuitement leurs appareils électroniques usagés aux centres de collecte agréés ou à
un détaillant (si vous rachetez un appareil similaire neuf).
Dans les pays qui ne sont pas mentionnés ci-dessus, veuillez contacter les autorités
locales pour savoir comment vous pouvez vous débarrasser de vos appareils.
Vous garantirez ainsi que les appareils dont vous vous débarrassez sont correctement
récupérés, traités et recyclés et préviendrez de cette façon les impacts néfastes
possibles sur l’environnement et la santé humaine.
K058_Fr
2
Fr
IDK-80.book Page 3 Wednesday, May 24, 2006 1:56 PM
Avant de commencer
01
Avant de commencer
Veuillez vérifier que vous avez reçu les
accessoires suivants :
• Adaptateur de type d'iPod x6
• Ce mode d'emploi
• Carte de garantie
Indication de Type d'iPod
modèle
correspondant
nano
iPod nano
Après la sélection de l'adaptateur de
type d'iPod correspondant à votre iPod,
introduisez-le dans l'emplacement
prévu à cet effet comme illustré.
Français
Vérifier le contenu de la
boîte
English
Chapitre 1
Deutsch
Fixation de l'adaptateur de
type d'iPod
Italiano
Pour que votre iPod soit placé
correctement dans le port connecteur
du dock, vous devez sélectionner
l'adaptateur correspondant à votre iPod.
Chaque adaptateur de type d'iPod a une
indication de modèle comme cidessous.
Nederlands
Indication
de modèle d'iPod
Indication de Type d'iPod
modèle
correspondant
iPod 20 Go quatrième
génération
iPod 40GB
iPod 40 Go quatrième
génération
mini
iPod mini
Color
20GB 30GB
iPod 20 Go / 30 Go
<affichage couleur>
Color
40GB 60GB
iPod 40 Go / 60 Go
<affichage couleur>
Español
iPod 20GB
• Il est aussi possible de connecter
un adaptateur de type d'iPod d'un
dock pour iPod original.
• Lors de l'utilisation de modèles
d'iPod de la cinquième génération
avec ce système, veuillez utiliser
l'adaptateur fourni avec votre iPod.
• Lors de l'utilisation d'un iPod de la
troisième génération avec ce
système, veuillez utiliser un ‘Apple
iPod Universal Dock Adapter - Jeu
de 3 adaptateurs pour iPod avec
Dock connector’, disponible chez
Apple Computer Inc.
3
Fr
IDK-80.book Page 4 Wednesday, May 24, 2006 1:56 PM
02
Contrôles et affichages
Chapitre 2
Contrôles et affichages
Vue supérieure
Vue arrière
3
1
2
1 Port connecteur d'iPod
Introduisez le port connecteur de votre
iPod pour brancher et recharger votre
iPod.
2 Emplacement pour adaptateur de
type d'iPod
Pour placer l'adaptateur de type d'iPod
correspondant à votre iPod.
4
Fr
3 Borne pour câble de contrôle iPod
À utiliser pour connecter cet appareil à
un récepteur AV Pioneer avec une borne
spécialisée pour câble de contrôle iPod
(comme le VSX-84TXSi ou le VSXAX4ASi (le nom du modèle varie en
fonction de la région)).
IDK-80.book Page 5 Wednesday, May 24, 2006 1:56 PM
Connexion
03
Connexion
Attention
>
>
>
Nederlands
iPod
Music
Extras
iPod
Settings
Shuffle Songs
Backlight
3 Branchez et mettez votre
récepteur AV sous tension.
Veuillez consulter le mode d'emploi
fourni avec le récepteur pour des
instructions détaillées sur le
fonctionnement de l'iPod à l'aide du
câble de contrôle iPod.
MENU
MENU
Italiano
• Avant de connecter ou de
déconnecter cet appareil de votre
récepteur AV, veillez à ce que le
récepteur AV soit hors tension.
2 Placez l'iPod dans le port
connecteur.
Deutsch
Connectez cet appareil à un récepteur
AV Pioneer avec une borne spécialisée
pour câble de contrôle iPod (comme le
VSX-84TXSi ou le VSX-AX4ASi (le nom
du modèle varie en fonction de la
région)). Vous pourrez utiliser la
télécommande fournie avec le
récepteur pour contrôler cet appareil.
1 Connectez la borne de cet appareil
à la borne spécilalisée de l'iPod sur le
récepteur.
Utilisez le câble de contrôle iPod fourni
avec le récepteur AV. Connectez les
deux extrémités comme indiqué cidessous (veillez à ce que le repère
sur le connecteur soit dirigé vers le
haut).
Français
Connexion à votre
récepteur AV Pioneer
English
Chapitre 3
Español
Cet appareil
Câble de contrôle iPod
(fourni avec votre récepteur
AV Pioneer)
IN
Récepteur AV Pioneer avec
une borne spécialisée pour
câble de contrôle iPod
5
Fr
IDK-80.book Page 6 Wednesday, May 24, 2006 1:56 PM
Informations supplémentaires
04
Chapitre 4
Informations
supplémentaires
Caractéristiques techniques
•
Appareil principal
Dimensions
. . . . .99 mm (L) x 33 mm (H) x 74 mm (P)
Poids . . . . . . . . . . . . . . . . . . . . . . . . . 150 g
•
Accessoires
Adaptateur de type d'iPod . . . . . . . . . . . . 6
Ce mode d'emploi . . . . . . . . . . . . . . . . . . . 1
Carte de garantie (Amérique du Nord /
Europe / Japon ) . . . . . . . . . . . . . . . . . . . . 3
Remarque
• Les caractéristiques techniques
sont sujettes à modification sans
préavis, à des fins d'amélioration.
Nettoyage de l'appareil
• Utilisez un chiffon de nettoyage ou
un chiffon sec pour enlever la
poussière et la saleté.
• Si la surface est sale, essuyez-la
avec un chiffon doux imbibé d'une
solution d'eau et de produit de
nettoyage neutre (cinq à six parts
d'eau pour une de produit) et bien
essoré, puis essuyez-la à nouveau
avec un chiffon sec. Evitez d'utiliser
des cires ou produits de nettoyage
pour mobilier.
• N'utilisez jamais de dissolvants, de
benzine, d'insecticides ou autres
produits chimiques près de ou sur
cet appareil, car ces produits
pourraient en corroder la surface.
Publication de Pioneer Corporation.
© 2006 Pioneer Corporation.
Tous droits de reproduction et de
traduction réservés.
6
Fr
IDK-80.book Page 7 Wednesday, May 24, 2006 1:56 PM
Informations supplémentaires
04
English
Should this product require service in the U.S.A. and you wish to locate the nearest Pioneer
Authorized Independent Service Company, or if you wish to purchase replacement parts,
operating instructions, service manuals, or accessories, please call the number shown
below.
800–421–1404
Pioneer Electronics (USA) Inc.
Customer Support Division
P.O. BOX 1760, Long Beach,
CA 90801-1760, U.S.A.
Should this product require service in Canada, please contact a Pioneer Canadian
Authorized Dealer to locate the nearest Pioneer Authorized Service Company in Canada.
Alternatively, please contact the Customer Satisfaction Department at the following address:
For warranty information please see the Limited Warranty sheet included with your product.
Pioneer Électroniques du Canada, Inc.
Service à la clientèle
300, Allstate Parkway, Markham, Ontario L3R OP2
1(877)283-5901
S018_A_EF
Español
Pour obtenir des renseignements sur la garantie, veuillez vous reporter au feuillet sur la
garantie restreinte qui accompagne le produit.
Nederlands
Si ce produit doit être réparé au Canada, veuillez vous adresser à un distributeur autorisé
Pioneer du Canada pour obtenir le nom du Centre de Service Autorisé Pioneer le plus près
de chez-vous. Vous pouvez aussi contacter le Service à la clientèle de Pioneer:
Italiano
Pioneer Electronics of Canada, Inc.
Customer Satisfaction Department
300 Allstate Parkway, Markham, Ontario L3R OP2
1(877)283-5901
Deutsch
For warranty information please see the Limited Warranty sheet included with your product.
Français
Please do not ship your product to Pioneer without first calling the Customer Support
Division at the above listed number for assistance.
7
Fr
IDK-80.book Page 2 Wednesday, May 24, 2006 1:58 PM
Vielen Dank für den Kauf dieses Pioneer-Produkts.
Lesen Sie bitte diese Bedienungsanleitung sorgfältig durch, damit Sie in der Lage
sind, dieses Modell ordnungsgemäß zu bedienen. Bewahren Sie diese
Bedienungsanleitung zur künftigen Einsichtnahme an einem sicheren Ort auf,
nachdem Sie sie gelesen haben.
Inhalt
01 Vor dem Start
03 Vornahme der Anschlüsse
Prüfung des Packungsinhalts . . . . . . . . 3
Montage des iPod-Adapters . . . . . . . . . 3
Anschluss an Ihren Audio-/Video-Receiver
von Pioneer . . . . . . . . . . . . . . . . . . . . . .5
02 Bedienelemente und Anzeigen
04 Ergänzende Informationen
Oberseite. . . . . . . . . . . . . . . . . . . . . . . . 4
Rückseite . . . . . . . . . . . . . . . . . . . . . . . 4
Technische Daten . . . . . . . . . . . . . . . . .6
Reinigung des Geräts. . . . . . . . . . . . . . .6
Mischen Sie dieses Produkt, wenn Sie es entsorgen wollen, nicht mit
gewöhnlichen Haushaltsabfällen. Es gibt ein getrenntes Sammelsystem für
gebrauchte elektronische Produkte, über das die richtige Behandlung,
Rückgewinnung und Wiederverwertung gemäß der bestehenden Gesetzgebung
gewährleistet wird.
Privathaushalte in den 25 Mitgliedsstaaten der EU, in der Schweiz und in Norwegen
können ihre gebrauchten elektronischen Produkte an vorgesehenen
Sammeleinrichtungen kostenfrei zurückgeben oder aber an einen Händler zurückgeben
(wenn sie ein ähnliches neues Produkt kaufen).
Bitte wenden Sie sich in den Ländern, die oben nicht aufgeführt sind, hinsichtlich der
korrekten Verfahrensweise der Entsorgung an die örtliche Kommunalverwaltung.
Auf diese Weise stellen Sie sicher, dass das zu entsorgende Produkt der notwendigen
Behandlung, Rückgewinnung und Wiederverwertung unterzogen wird, und so mögliche
negative Einflüsse auf die Umwelt und die menschliche Gesundheit vermieden werden.
K058_Ge
2
Ge
IDK-80.book Page 3 Wednesday, May 24, 2006 1:58 PM
Vor dem Start
01
English
Kapitel 1
Vor dem Start
Nachdem Sie den zu Ihrem iPod-Gerät
passenden iPod-Adapter ausgewählt
haben, stecken Sie ihn wie dargestellt in
den iPod-Adapter-Halter.
Deutsch
Überprüfen Sie, ob sich folgendes
mitgeliefertes Zubehör in der Packung
befindet:
• iPod-Adapter x6
• Diese Bedienungsanleitung
• Garantiekarte
Montage des iPod-Adapters
20 GB iPod der
vierten Generation
iPod 40GB
40 GB iPod der
vierten Generation
mini
iPod Mini
Color
20GB 30GB
20 GB / 30 GB iPod
<Farbdisplay>
Color
40GB 60GB
40 GB / 60 GB iPod
<Farbdisplay>
nano
iPod Nano
Español
iPod 20GB
• Ebenso ist der Anschluss eines
iPod-Adapters von einem OriginaliPod-Dock möglich.
• Benutzen Sie bei Verwendung von
iPod-Modellen der fünften
Generation mit diesem System
bitte den Ihrem iPod-Gerät
beiliegenden iPod-Adapter.
• Benutzen Sie bei Verwendung von
iPod-Modellen der dritten
Generation bitte einen bei Apple
Computer Inc. erhältlichen ‘Apple
iPod Universal Dock Adapter 3erPackung für iPod mit Dock
Connector’.
Nederlands
Modellbezeichnung Zugehöriger iPod
Italiano
Damit Ihr iPod genau in den DockAnschluss passt, muss der zu Ihrem
iPod-Modell passende iPod-Adapter
gewählt werden. Jeder iPod-Adapter
weist eine im Folgenden dargestellte
Modellbezeichnung auf.
iPodModellbezeichnung
Français
Prüfung des
Packungsinhalts
3
Ge
IDK-80.book Page 4 Wednesday, May 24, 2006 1:58 PM
02
Bedienelemente und Anzeigen
Kapitel 2
Bedienelemente und
Anzeigen
Oberseite
Rückseite
3
1
1 iPod-Anschluss
Verbinden Sie Ihren iPod DockAnschluss, um Ihren iPod
anzuschließen und aufzuladen.
2 iPod-Adapter-Halter
Zum Einsetzen des zu Ihrem iPod
passenden iPod-Adapters.
4
Ge
2
3 iPod-Steuerkabelanschluss
Schließen Sie dieses Gerät mit einem
dezidierten Anschluss für ein iPodSteuerkabel (wie dem VSX-84TXSi oder
VSX-AX4ASi (die Modellbezeichnung
hängt von der Region ab)) an einen
Audio-/Video-Receiver von Pioneer an.
IDK-80.book Page 5 Wednesday, May 24, 2006 1:58 PM
Vornahme der Anschlüsse
03
Vornahme der Anschlüsse
Achtung
Nederlands
iPod
Music
Extras
iPod
Settings
Shuffle Songs
Backlight
3 Stecken Sie Ihren Audio-/VideoReceiver ein und schalten Sie ihn ein.
Weitere Einzelheiten zum Betrieb des
iPod mit dem iPod-Steuerkabel siehe
bitte die dem Receiver beiliegende
Bedienungsanleitung.
>
>
>
MENU
MENU
Italiano
• Achten Sie darauf, Ihren Audio-/
Video-Receiver auszuschalten,
bevor Sie dieses Gerät an Ihren
Audio-/Video-Receiver anschließen
oder davon abtrennen.
2 Stecken Sie den iPod in den DockAnschluss.
Deutsch
Schließen Sie dieses Gerät mit einem
dezidierten iPod-Steuerkabelanschluss
(wie dem VSX-84TXSi oder VSX-AX4ASi
(die Modellbezeichnung hängt von der
Region ab)) an einen Audio-/VideoReceiver von Pioneer an. Sie können
dann die dem Receiver beiliegende
Fernbedienung zur Bedienung dieses
Geräts verwenden.
1 Schließen Sie den Anschluss dieses
Geräts an den dezidierten iPodAnschluss des Receivers an.
Verwenden Sie hierzu das dem Audio-/
Video-Receiver beiliegende iPodSteuerkabel. Schließen Sie beide Enden
an wie unten dargestellt (achten Sie
darauf, dass das Zeichen
am
Anschluss nach oben weist).
Français
Anschluss an Ihren Audio-/
Video-Receiver von Pioneer
English
Kapitel 3
Español
Dieses Gerät
iPod-Steuerkabel
(ist im Lieferumfang Ihres Audio-/
Video-Receivers von Pioneer enthalten)
IN
Audio-/Video-Receiver von
Pioneer mit einem
dezidierten Anschluss für
ein iPod-Steuerkabel
5
Ge
IDK-80.book Page 6 Wednesday, May 24, 2006 1:58 PM
Ergänzende Informationen
04
Kapitel 4
Ergänzende Informationen
Technische Daten
•
Hauptgerät
Abmessungen
. . . . .99 mm (B) x 33 mm (H) x 74 mm (T)
Gewicht . . . . . . . . . . . . . . . . . . . . . . . 150 g
•
Zubehör
iPod-Adapter . . . . . . . . . . . . . . . . . . . . . . . 6
Diese Bedienungsanleitung. . . . . . . . . . . 1
Garantiekarte (Nordamerika / Europa /
Japan) . . . . . . . . . . . . . . . . . . . . . . . . . . . . 3
Hinweis
• Konstruktive Änderungen, die dem
technischen Fortschritt dienen,
bleiben vorbehalten.
Reinigung des Geräts
• Verwenden Sie ein Staubtuch oder
sonstiges trockenes Tuch, um
Staub und Schmutz abzuwischen.
• Sollte die Oberfläche verschmutzt
sein, wischen Sie sie mit einem in
Wasser (ca. 80 %) aufgelösten
neutralen Reinigungsmittel (ca. 20
%) angefeuchteten und gut
ausgewrungenen weichen Tuch
und danach mit einem trockenen
Tuch ab. Verwenden Sie kein
Möbelwachs oder
Möbelreinigungsmittel.
• Verwenden Sie keine
Lösungsmittel, Benzin,
Insektenspray oder anderen
chemischen Substanzen auf oder
in der Nähe dieses Geräts, da sie
die Oberfläche angreifen.
Veröffentlicht von Pioneer Corporation.
Urheberrechtlich geschützt © 2006
Pioneer Corporation.
Alle Rechte vorbehalten.
6
Ge
IDK-80.book Page 7 Wednesday, May 24, 2006 1:58 PM
Ergänzende Informationen
04
English
Français
Deutsch
Italiano
Nederlands
Español
7
Ge
IDK-80.book Page 2 Wednesday, May 24, 2006 2:00 PM
La ringraziamo per aver acquistato questo prodotto
Pioneer.
Si prega di leggere tutte le istruzioni per l’uso al fine di apprendere come utilizzare
correttamente questo modello. Una volta lette le istruzioni, conservare il manuale in
un luogo sicuro per l’eventuale consultazione in futuro.
Indice
01 Prima di iniziare
03 Collegamenti
Controllo degli accessori in dotazione . . 3
Collegamento dell’adattatore per
iPod. . . . . . . . . . . . . . . . . . . . . . . . . . . . 3
Collegamento al proprio ricevitore AV
Pioneer . . . . . . . . . . . . . . . . . . . . . . . . .5
02 Comandi e display
Specifiche tecniche . . . . . . . . . . . . . . . .6
Pulizia dell’apparecchio . . . . . . . . . . . . .6
Pannello superiore . . . . . . . . . . . . . . . . 4
Pannello posteriore . . . . . . . . . . . . . . . . 4
04 Ulteriori informazioni
Se si vuole eliminare questo prodotto, non gettarlo insieme ai rifiuti domestici.
Esiste un sistema di raccolta differenziata in conformità alle leggi che richiedono
appositi trattamenti, recupero e riciclo.
I privati cittadini dei venticinque paesi membri dell’UE, di Svizzera e Norvegia, possono
restituire senza alcun costo i loro prodotti elettronici usati ad appositi servizi di raccolta
o a un rivenditore (se si desidera acquistarne uno simile).
Per i paesi non citati qui sopra, si prega di prendere contatto con le autorità locali per il
corretto metodo di smaltimento.
In questo modo, si è sicuri che il proprio prodotto eliminato subirà il trattamento, il
recupero e il riciclo necessari per prevenire gli effetti potenzialmente negativi
sull’ambiente e sulla vita dell’uomo.
K058_It
2
It
IDK-80.book Page 3 Wednesday, May 24, 2006 2:00 PM
Prima di iniziare
01
English
Capitolo 1
Prima di iniziare
Modello iPod
corrispondente
nano
iPod nano
Dopo aver selezionato l’adattatore
corrispondente al proprio modello iPod,
inserirlo nella base dell’adattatore per
iPod, come indicato.
Deutsch
Si prega di verificare di aver ricevuto i
seguenti accessori in dotazione:
• Adattatore per iPod x6
• Istruzioni per l’uso
• Scheda di garanzia
Etichetta
modello
Français
Controllo degli accessori in
dotazione
Collegamento
dell’adattatore per iPod
Italiano
Per sistemare correttamente l’iPod
nella porta del connettore, è necessario
far corrispondere l’adattatore per iPod
al proprio modello di iPod. Ciascun
adattatore per iPod dispone di una
etichetta relativa al modello, come
indicato di seguito.
Nederlands
Etichetta
modello iPod
Modello iPod
corrispondente
iPod 20GB
iPod 20 GB di quarta
generazione
iPod 40GB
iPod 40 GB di quarta
generazione
mini
iPod mini
Color
20GB 30GB
iPod 20 GB/30 GB
<display a colori>
Color
40GB 60GB
iPod 40 GB/60 GB
<display a colori>
• È inoltre possibile collegare un
adattatore per iPod da una base
dock originale iPod.
• Se con questo apparecchio si
usano i modelli iPod di quinta
generazione, adoperare
l’adattatore per iPod in dotazione
con l’apparecchio.
• Se con questo apparecchio si usa
un modello iPod di quinta
generazione, acquistare un ‘Apple
iPod Universal Dock Adapter,
confezione da 3 per iPod con
connettore Dock’ della Apple
Computer Inc.
Español
Etichetta
modello
3
It
IDK-80.book Page 4 Wednesday, May 24, 2006 2:00 PM
02
Comandi e display
Capitolo 2
Comandi e display
Pannello superiore
Pannello posteriore
3
1
2
1 Porta connettore iPod
Inserire la porta del connettore dock
dell’iPod per collegare e ricaricare
l’iPod.
2 Base adattatore iPod
Supporta l’adattatore che meglio si
adatta al modello di iPod.
4
It
3 Terminale del cavo per controllo
iPod
Usare per collegare questo apparecchio
ad un ricevitore AV Pioneer con un
terminale dedicato per cavo di controllo
iPod (come il VSX-84TXSi o VSX-AX4ASi
(il nome del modello dipende dal
paese)).
IDK-80.book Page 5 Wednesday, May 24, 2006 2:00 PM
Collegamenti
03
English
Capitolo 3
Collegamenti
Attenzione
Nederlands
iPod
Music
Extras
iPod
Settings
Shuffle Songs
Backlight
3 Inserire la spina ed accendere il
ricevitore AV.
Per maggiori informazioni circa il
funzionamento dell'iPod usando il cavo
di controllo iPod, consultare il manuale
in dotazione con il ricevitore.
>
>
>
MENU
MENU
Italiano
• Prima di collegare o scollegare
questo apparecchio dal proprio
ricevitore AV, assicurarsi che il
ricevitore AV sia spento.
2 Collocare l'iPod nella porta del
connettore.
Deutsch
Collegare questo apparecchio ad un
ricevitore AV Pioneer con un terminale
dedicato per cavo di controllo iPod
(come il VSX-84TXSi o VSX-AX4ASi (il
nome del modello dipende dal paese)).
Per controllare questo apparecchio sarà
possibile usare il telecomando in
dotazione con il ricevitore.
1 Collegare il terminale su questo
apparecchio al terminale dedicato iPod
sul ricevitore.
Usare il cavo di controllo iPod in
dotazione con il ricevitore AV. Collegare
entrambe le estremità come mostrato di
seguito (assicurarsi che il segno
sul connettore sia rivolto verso l'alto).
Français
Collegamento al proprio
ricevitore AV Pioneer
Español
Questo apparecchio
Cavo di controllo iPod
(in dotazione con ricevitore
AV Pioneer)
IN
Ricevitore AV Pioneer con
un terminale dedicato per
un cavo di controllo iPod
5
It
IDK-80.book Page 6 Wednesday, May 24, 2006 2:00 PM
Ulteriori informazioni
04
Capitolo 4
Ulteriori informazioni
Specifiche tecniche
•
Apparecchio principale
Dimensioni
. . . . . 99 mm (L) x 33 mm (A) x 74 mm (P)
Peso . . . . . . . . . . . . . . . . . . . . . . . . . 150 g
•
Accessori
Adattatore per iPod. . . . . . . . . . . . . . . . . . 6
Istruzioni per l’uso. . . . . . . . . . . . . . . . . . . 1
Scheda di garanzia (Nord America /
Europa / Giappone) . . . . . . . . . . . . . . . . . . 3
Nota
• Le specifiche tecniche ed il design
sono soggetti a possibili modifiche
dovute al miglioramento del
prodotto senza previo avviso.
Pulizia dell’apparecchio
• Utilizzare un panno per lucidare o
un panno asciutto per rimuovere
polvere e sporcizia.
• Se la superficie è sporca, pulirla
con un panno morbido impregnato
con un detergente neutro diluito in
cinque o sei parti di acqua e ben
strizzato, quindi pulire di nuovo con
un panno asciutto. Non utilizzare
cera o prodotti per mobili.
• Non utilizzare diluenti, benzina,
spray insetticidi o altre sostanze
chimiche su questo apparecchio o
nei pressi di esso, in quanto
potrebbero corroderne la
superficie.
Pubblicato da Pioneer Corporation.
Copyright © 2006 Pioneer Corporation.
Tutti i diritti riservati.
6
It
IDK-80.book Page 7 Wednesday, May 24, 2006 2:00 PM
Ulteriori informazioni
04
English
Français
Deutsch
Italiano
Nederlands
Español
7
It
IDK-80.book Page 2 Wednesday, May 24, 2006 1:29 PM
Bedankt voor het aanschaffen van dit Pioneerproduct.
Lees deze gebruiksinstructies door om u ervan te verzekeren dat u in staat bent om
uw model op de juiste wijze te bedienen. Bewaar de gebruiksaanwijzing goed als
referentiemateriaal na deze te hebben doorgelezen.
Inhoud
01 Voor u begint
03 Aansluiten
De inhoud van de doos controleren. . . . 3
De iPod type-adapter plaatsen. . . . . . . . 3
Aansluiten op uw Pioneer AV-receiver . .5
02 Bedieningselementen en
displays
Specificaties . . . . . . . . . . . . . . . . . . . . .6
Het apparaat reinigen . . . . . . . . . . . . . .6
04 Aanvullende informatie
Bovenpaneel . . . . . . . . . . . . . . . . . . . . . 4
Achterpaneel. . . . . . . . . . . . . . . . . . . . . 4
Deponeer dit product niet bij het gewone huishoudelijk afval wanneer u het wilt
verwijderen. Er bestaat een speciaal wettelijk voorgeschreven verzamelsysteem
voor de juiste behandeling, het opnieuw bruikbaar maken en de recycling van
gebruikte elektronische producten.
In de 25 lidstaten van de EU, Zwitserland en Noorwegen kunnen particulieren hun
gebruikte elektronische producten gratis bij de daarvoor bestemde verzamelplaatsen of
een verkooppunt (indien u aldaar een gelijkwaardig nieuw product koopt) inleveren.
Indien u zich in een ander dan bovengenoemd land bevindt kunt u contact opnemen
met de plaatselijke overheid voor informatie over de juiste verwijdering van het product.
Zodoende zorgt u ervoor dat het verwijderde product op de juiste wijze wordt behandeld,
opnieuw bruikbaar wordt gemaakt, t gerecycleerd en het niet schadelijk is voor de
gezondheid en het milieu.
K058_Du
2
Du
IDK-80.book Page 3 Wednesday, May 24, 2006 1:29 PM
Voor u begint
01
English
Hoofdstuk 1
Voor u begint
Overeenkomstig
iPod-type
nano
iPod nano
Plaats de iPod type-adapter die
overeenkomt met uw iPod in de iPod
type-adapter opening zoals hier wordt
aangegeven.
Deutsch
Verzeker u ervan dat de volgende
accessoires zijn meegeleverd:
• iPod type-adapter x6
• Deze gebruiksaanwijzing
• Garantiekaart
Modelmarkering
De iPod type-adapter
plaatsen
Italiano
Om uw iPod op de juiste wijze in het
dock te plaatsen, dient u de iPod typeadapter te selecteren die overeenkomt
met het model van uw iPod. Iedere iPod
type-adapter is voorzien van een
modelmarkering zoals hieronder wordt
aangeduid.
Nederlands
iPod
modelmarking
Overeenkomstig
iPod-type
iPod 20GB
Vierde generatie 20
GB iPod
iPod 40GB
Vierde generatie 40
GB iPod
mini
iPod mini
Color
20GB 30GB
20 GB / 30 GB iPod
<kleurendisplay>
Color
40GB 60GB
40 GB / 60 GB iPod
<kleurendisplay>
• U kunt ook een iPod type-adapter
gebruiken die afkomstig is van een
origineel iPod-dock.
• Gebruik in het geval van vijfde
generatie iPod-modellen de iPod
type-adapter die u heeft ontvangen
bij uw iPod.
• Gebruik in het geval van een derde
generatie iPod-model de ‘Apple
iPod Universal Dock Adapter 3Pack voor iPod met Dock
Connector’ die beschikbaar is via
Apple Computer Inc.
Español
Modelmarkering
Français
De inhoud van de doos
controleren
3
Du
IDK-80.book Page 4 Wednesday, May 24, 2006 1:29 PM
02
Bedieningselementen en displays
Hoofdstuk 2
Bedieningselementen en
displays
Bovenpaneel
Achterpaneel
3
1
2
1 iPod-aansluitpoort
Plaats uw iPod-dockaansluitpoort om
uw iPod aan te sluiten en tegelijkertijd
op te laden.
2 iPod type-adapter opening
Plaats hier de iPod type-adapter die
overeenkomt met uw iPod.
4
Du
3 iPod-bedieningskabelaansluiting
Sluit hier een Pioneer AV-receiver op
aan die is voorzien van een specifieke
iPod-bedieningskabelaansluiting (zoals
de VSX-84TXSi of VSX-AX4ASi
(modelnaam afhankelijk van lokatie)).
IDK-80.book Page 5 Wednesday, May 24, 2006 1:29 PM
Aansluiten
03
English
Hoofdstuk 3
Aansluiten
Let op
Nederlands
iPod
Music
Extras
iPod
Settings
Shuffle Songs
Backlight
Plaats de iPod in de aansluitpoort.
3 Stop de stekker in het stopcontact
en schakel uw AV-receiver in.
Raadpleeg de handleiding die u heeft
ontvangen bij uw receiver voor
gedetailleerde instructies voor de
bediening van de iPod via de iPodbedieningskabel.
Italiano
• Verzeker u ervan dat de AV-receiver
is uitgeschakeld, alvorens dit
apparaat aan te sluiten of te
ontkoppelen van uw AV-receiver.
2
Deutsch
Sluit dit apparaat aan op een Pioneer
AV-receiver die is voorzien van een
specifieke iPodbedieningskabelaansluiting (zoals de
VSX-84TXSi of VSX-AX4ASi (modelnaam
afhankelijk van lokatie)). U kunt
vervolgens de afstandsbediening van de
receiver gebruiken om dit apparaat te
bedienen.
1 Verbind de aansluiting van dit
apparaat met de specifieke iPodaansluiting op de receiver.
Gebruik de iPod-bedieningskabel die is
meegeleverd bij de AV-receiver. Sluit
beide uiteinden aan zoals hieronder
wordt aangegeven (let erop dat de
markering op de stekker naar boven is
gericht).
Français
Aansluiten op uw Pioneer
AV-receiver
>
>
>
MENU
MENU
Español
Dit apparaat
iPod-bedieningskabel
(meegeleverd bij uw Pioneer
AV-receiver)
IN
Pioneer AV-receiver met
een specifieke aansluiting
voor een iPodbedieningskabel
5
Du
IDK-80.book Page 6 Wednesday, May 24, 2006 1:29 PM
Aanvullende informatie
04
Hoofdstuk 4
Aanvullende informatie
Specificaties
•
Hoofdeenheid
Afmetingen
. . . . 99 mm (B) x 33 mm (H) x 74 mm (D)
Gewicht . . . . . . . . . . . . . . . . . . . . . . . 150 g
•
Accessoires
iPod type-adapter . . . . . . . . . . . . . . . . . . . 6
Deze gebruiksaanwijzing . . . . . . . . . . . . . 1
Garantiekaart (Noord-Amerika/Europa/
Japan) . . . . . . . . . . . . . . . . . . . . . . . . . . . . 3
Opmerking
• De specificaties en het ontwerp zijn
onderhevig aan mogelijke
aanpassingen in verband met
verbeteringen, zonder voorgande
kennisgeving.
Het apparaat reinigen
• Gebruik een poetsdoek of droge
doek om de stof en ander vuil weg
te vegen.
• Gebruik in het geval dat het
oppervlak vies is een zachte doek
met een beetje neutraal
reinigingsmiddel dat u eerst vijf tot
zes maal heeft verdunt in water, en
vervolgens goed heeft
uitgewrongen, om het schoon te
maken en droog het vervolgens met
een droge doek. Gebruik geen
meubelwas of schoonmaakmiddel.
• Gebruik nooit verdunner, benzine,
insecticidespray of overige
chemicaliën op, of in de buurt van
dit apparaat, aangezien dit het
oppervlak aantast.
Uitgegeven door Pioneer Corporation.
Copyright © 2006 Pioneer Corporation.
Alle rechten voorbehouden.
6
Du
IDK-80.book Page 7 Wednesday, May 24, 2006 1:29 PM
Aanvullende informatie
04
English
Français
Deutsch
Italiano
Nederlands
Español
7
Du
IDK-80.book Page 2 Wednesday, May 24, 2006 2:02 PM
Gracias por la adquisición de este producto
Pioneer.
Lea completamente este manual de instrucciones para aprender a operar
correctamente el aparato. Después de haber terminado la lectura de las
instrucciones, guarde el manual en un lugar seguro para poderlo consultar en el
futuro.
Contenidos
01 Antes de comenzar
03 Conexiones
Comprobar los contenidos de la caja . . 3
Acoplar el adaptador tipo iPod . . . . . . . 3
Conexión a su receptor AV de Pioneer . .5
02 Controles y pantallas
Especificaciones . . . . . . . . . . . . . . . . . .6
Limpieza de la unidad . . . . . . . . . . . . . .6
Panel superior . . . . . . . . . . . . . . . . . . . . 4
Panel posterior . . . . . . . . . . . . . . . . . . . 4
04 Información adicional
Si desea deshacerse de este producto, no lo mezcle con los residuos generales de
su hogar. De conformidad con la legislación
vigente, existe un sistema de recogida distinto para los productos electrónicos
que requieren un procedimiento adecuado de tratamiento, recuperación y
reciclado.
Las viviendas privadas en los 25 estados miembros de la UE, en Suiza y Noruega
pueden devolver gratuitamente sus productos electrónicos usados en las instalaciones
de recolección previstas o bien en las instalaciones de minoristas (si adquieren un
producto similar nuevo).
En el caso de los países que no se han mencionado en el párrafo anterior, póngase en
contacto con sus autoridades locales a fin de conocer el método de eliminación
correcto.
Al actuar siguiendo estas instrucciones, se asegurará de que el producto de desecho se
somete a los procesos de tratamiento, recuperación y reciclaje necesarios, con lo que
se previenen los efectos negativos potenciales para el entorno y la salud humana.
K058_Sp
2
Sp
IDK-80.book Page 3 Wednesday, May 24, 2006 2:02 PM
Antes de comenzar
01
English
Capítulo 1
Antes de comenzar
Tipo de iPod
nano
iPod nano
Después de seleccionar el adaptador
para iPod que corresponda a su unidad
iPod, insértelo en el bolsillo adaptador
para iPod como puede apreciar en la
ilustración.
Deutsch
Le rogamos que compruebe que ha
recibido los siguientes accesorios:
• Adaptador para iPod x6
• Este manual de instrucciones
• Tarjeta de garantía
Modelo
Français
Comprobar los contenidos
de la caja
Acoplar el adaptador tipo
iPod
Italiano
Para que su iPod pueda acoplarse
adecuadamente en el puerto conector
de la base dock, deberá hacer coincidir
el adaptador para iPod con su modelo
iPod. Cada adaptador para iPod tiene
una marca de modelo como puede
apreciar a continuación.
Nederlands
Marca de
modelo iPod
Tipo de iPod
iPod 20GB
iPod 20 GB de cuarta
generación
iPod 40GB
iPod 40 GB de cuarta
generación
mini
iPod mini
Color
20GB 30GB
20 GB / 30 GB iPod
<pantalla a color>
Color
40GB 60GB
40 GB / 60 GB iPod
<pantalla a color>
• También puede conectar un
adaptador para iPod desde un dock
base para iPod original.
• Cuando use modelos iPod de
quinta generación con este
sistema, use el adaptador para
iPod que se suministra con su
unidad iPod.
• Cuando use un modelo iPod de
tercera generación con este
sistema, use un ‘Apple iPod
Universal Dock Adapter - Juego de
3 adaptadores para el iPod con
conector para la base Dock’
disponible de Apple Computer Inc.
Español
Modelo
3
Sp
IDK-80.book Page 4 Wednesday, May 24, 2006 2:02 PM
02
Controles y pantallas
Capítulo 2
Controles y pantallas
Panel superior
Panel posterior
3
1
2
1 Puerto de conexión iPod
Inserte su puerto de conexión de la base
dock del iPod para conectar y recargar
su unidad iPod.
2 Bolsillo del adaptador para iPod
Sostiene el adaptador para iPod que
coincide con su unidad iPod.
4
Sp
3 Terminal del cable de control del
iPod
Utilícelo para conectarse a un receptor
AV de Pioneer con un terminal para un
cable de control del iPod específico
(como el VSX-84TXSi o el VSX-AX4ASi (el
nombre del modelo depende de la
región)).
IDK-80.book Page 5 Wednesday, May 24, 2006 2:02 PM
Conexiones
03
Conexiones
Conexión a su receptor AV
de Pioneer
>
>
>
Nederlands
iPod
Music
Extras
iPod
Settings
Shuffle Songs
Backlight
Italiano
• Antes de conectar o desconectar
esta unidad de su receptor AV,
cerciórese de que el receptor AV
está apagado.
3 Conecte y encienda el receptor AV.
Consulte el manual suministrado con el
receptor para más información sobre el
funcionamiento del iPod con el cable de
control del iPod.
MENU
MENU
Deutsch
Precaución
Français
Conecte esta unidad a un receptor AV
de Pioneer con un terminal para un
cable de control del iPod específico
(como el VSX-84TXSi o el VSX-AX4ASi (el
nombre del modelo depende de la
región)). De este modo podrá usar el
mando a distancia suministrado con el
receptor para controlar la unidad.
1 Conecte el terminal de esta unidad
a un terminal iPod específico del
receptor.
Utilice el cable de control del iPod
suministrado con el receptor AV.
Conecte ambos extremos como se
muestra a continuación (asegúrese de
que la marca
del conector mira
hacia arriba).
2 Coloque el iPod en el puerto de
conexión.
English
Capítulo 3
Español
Esta unidad
Cable de control del iPod
(suministrado con su receptor
AV de Pioneer)
IN
Receptor AV de Pioneer
con un terminal específico
para un cable de control del
iPod.
5
Sp
IDK-80.book Page 6 Wednesday, May 24, 2006 2:02 PM
Información adicional
04
Capítulo 4
Información adicional
Especificaciones
•
Unidad principal
Dimensiones
. . 99 mm (An) x 33 mm (Al) x 74 mm (Lg)
Peso . . . . . . . . . . . . . . . . . . . . . . . . . 150 g
•
Accesorios
Adaptador para iPod. . . . . . . . . . . . . . . . . 6
Este manual de instrucciones . . . . . . . . . 1
Tarjeta de garantía (Norteamérica /
Europa / Japón) . . . . . . . . . . . . . . . . . . . . . 3
Nota
• Las especificaciones y el diseño
están sujetos a posibles
modificaciones sin previo aviso
debido a mejoras que se
introducirán.
6
Sp
Limpieza de la unidad
• Use un paño de pulido o paño seco
para limpiar el polvo y suciedad.
• Cuando la superficie esté sucia,
límpiela con un paño suave
humedecido en algún producto de
limpieza neutro diluido cinco o seis
veces en agua y bien escurrido.
Cuando acabe, frote de nuevo con
un paño seco. No utilice ceras o
productos de limpieza para
muebles.
• Nunca utilice disolventes, benzina,
insecticidas u otros productos
químicos en o cerca de esta unidad
dado que pueden corroer la
superficie.
Publicado por Pioneer Corporation.
Copyright © 2006 Pioneer Corporation.
Todos los derechos reservados.
IDK-80.book Page 7 Wednesday, May 24, 2006 2:02 PM
Información adicional
04
English
Français
Deutsch
Italiano
Nederlands
Español
7
Sp
IDK-80_Ja.book 2 ページ 2006年5月19日 金曜日 午前10時43分
安全上のご注意
●安全にお使いいただくために、必ずお守りください。
●ご使用の前にこの「安全上のご注意」をよくお読みのうえ、正しくお使いください。
この取扱説明書および製品への表示は、製
品を安全に正しくお使いいただき、あなた
や他の人々への危害や財産への損害を未然
に防止するために、いろいろな絵表示をし
ています。その表示と意味は次のように
なっています。
内容をよく理解してから本文をお読みくだ
さい。
絵表示の例
記号は注意(警告を含む)し
なければならない内容であるこ
とを示しています。
図の中に具体的な注意内容(左図
の場合は感電注意)が描かれてい
ます。
警告
記号は禁止(やってはいけな
いこと)を示しています。
図の中や近くに具体的な禁止内
容(左図の場合は分解禁止)が描
かれています。
この表示を無視して、誤った取り扱いをす
ると、人が死亡または重傷を負う可能性が
想定される内容を示しています。
注意
● 記号は行動を強制したり指示
する内容を示しています。
図の中に具体的な指示内容(左図
の場合は電源プラグをコンセン
トから抜け)が描かれています。
この表示を無視して、
誤った取り扱いをす
ると、
人が損害を負う可能性が想定される
内容および物的損害のみの発生が想定され
る内容を示しています。
注意
設置
÷ ぐらついた台の上や傾いたと
ころなど不安定な場所に置か
ないでください。落ちたり、
倒れたりしてけがの原因とな
ることがあります。
注 意
÷ テレビ、オーディオ機器、ス
ピーカー等に機器を接続する
場合は、
おのおのの機器の取扱
説明書をよく読み、電源を切
り、
説明に従って接続してくだ
さい。
また、
接続は指定のコー
ドを使用してください。
取り扱い上のご注意
お手入れについて
÷ 通常は柔らかい布でから拭きしてください。汚れがひどい場合は水で5∼6倍に薄め
た中性洗剤に柔らかい布を浸してよく絞ったあと、汚れを拭き取り、そのあと乾い
た布で拭いてください。アルコール、シンナー、ベンジン、殺虫剤などが付着する
と、印刷、塗装などがはげることがありますのでご注意ください。また、化学ぞう
きん等をお使いの場合は、化学ぞうきん等に添付の注意事項をよくお読みください。
IDK-80_Ja.book 3 ページ 2006年5月19日 金曜日 午前10時43分
付属品を確認する ................................. 4
アダプターを取り付ける ...................... 4
3 接続
Français
2 本体各部の名前とはたらき
上面部 ..................................................... 5
背面部 ..................................................... 5
English
目次
1 準備
AV アンプと接続する .......................... 6
Deutsch
4 その他
保証とアフターサービスについて ...... 7
仕様 ........................................................ 7
Italiano
日本語
このたびは弊社製品をお買い上げいただき、
まことにありがとうございました。
弊社では、
お買い上げいただいたお客様に「お客様登録」をお願いしています。
上記アドレスからご登録いただくと、
ご使用の製品についての重要なお知ら
せなどをお届けいたします。なお、上記アドレスは、困ったときのよくある質
問や各種お問い合わせ先の案内、
カタログや取扱説明書の閲覧など、
お客様
のお役に立てるサービスの提供を目的としたページです。
Español
http://www.pioneer.co.jp/support/
Nederlands
インターネットによる登録のお願い
3
Ja
IDK-80_Ja.book 4 ページ 2006年5月19日 金曜日 午前10時43分
01
準備
第1章
準備
付属品を確認する
・取扱説明書(本書)
・保証書
アダプター
(6種類)
アダプターを取り付ける
お使いの iPod に合わせて、付属のアダ
プターを本機のアダプター挿入部に取り
付けてください。
刻印
刻印表示
iPod 20 GB
第 4 世代の iPod
20 GB
iPod 40 GB
第 4 世代の iPod
40 GB
mini
4
iPod mini
color 20GB 30GB
iPod <color
display>
20 GB / 30 GB
color 40GB 60GB
iPod <color
display> 40 GB /
60 GB
nano
Ja
本機に接続できる
iPod
iPod nano
・ 本機には iPod 用純正ドックのアダ
プターも取り付けられます。
・ 第 5 世代以降の iPod を接続すると
きは、
iPod に付属のドック用アダプ
ターを使用してください。
・ ドックコネクターポートを搭載した
第 3 世代のiPod を接続するときは、
Apple Computer Inc. 製の Apple
iPod Universal Dock アダプ ター
(3 パッ ク ) − iPod with Dock
Connector ( 別売り ) を取り付けて
使用してください。
IDK-80_Ja.book 5 ページ 2006年5月19日 金曜日 午前10時43分
02
本体各部の名前とはたらき
本体各部の名前とはたらき
背面部
Français
上面部
1 iPod コネクター
iPod のドックコネ クタポートと接続 し
ます。
Nederlands
2 アダプター挿入部
アダプター ( 付属 ) を取り付けます。
Italiano
2
Deutsch
3
3 iPod ケーブル端子
iPod専用端子のあるパイオニア製 AV ア
ンプ
(VSA-AX4ASi など)と接続します。
1
English
第2章
Español
日本語
5
Ja
IDK-80_03_connect_up_Ja.fm 6 ページ 2006年5月22日 月曜日 午後8時29分
03
接続
第3章
接続
AV アンプと接続する
iPod 専用端子のあるパイオニア製 AV アンプと接続すると、AV アンプのリモコンで
iPod を操作できます。
注意
機器の接続を行う場合には、必ず電源を切り、電源コードをコンセントから抜いて
ください。
1
本機と AV アンプを接続する
・ 接続には AV アンプに付属の iPod ケーブルをお使いください。
・ ケーブルについている
を上にして本機の端子に接続してください。
2
3
本機に iPod を乗せる
AV アンプの電源をオンにする
・ 操作について、詳しくは AV アンプの取扱説明書をご覧ください。
・ iPod ケーブルを抜くときは必ず AV アンプの電源をオフにしてから抜いてく
ださい。
iPod
Music
Extras
iPod
Settings
Shuffle Songs
Backlight
>
>
>
MENU
MENU
本機
iPodケーブル
(AVアンプに付属)
IN
iPod専用端子付き
AVアンプ
6
Ja
IDK-80_Ja.book 7 ページ 2006年5月19日 金曜日 午前10時43分
04
その他
English
第4章
その他
保証書(別添)
保証期間はご購入日から
1年間です。
・
・
・
・
・
・
・
ご住所
お名前
電話番号
製品名 : iPod 用コントロールドック
型番 : IDK-80
お買い上げ日
故障または異常の内容(できるだけ
詳しく)
・ 訪問ご希望日
・ ご自宅までの道順と目標(建物や公
園など)
修理に関するご質問、ご相談
お買い求めの販売店へご相談・ ご依頼く
ださい。
アダプター .............................................. 6
保証書
取扱説明書
●仕様および外観は改良のため予告なく
変更することがあります。
Español
修理を依頼されるとき
日本語
異常のあるときは、販売店へご依頼くだ
さい。ご転居されたり、ご贈答品などで、
お買い求めの販売店に修理のご依頼がで
きない場合は、
「ご相談窓口のご案内」
(8
ページ)、AV アンプの取扱説明書にある
「修理窓口のご案内」をご覧になり、修理
受付センターにご相談ください。
付属品
Nederlands
当社は、この製品の補修用性能部品を製
造打ち切り後 6 年間保有しています。
性能部品とはその製品の機能を維持する
ために必要な部品です。
外形寸法(幅)x(高さ) × (奥行)
............. 99 mm × 3 3 mm × 74 mm
質量............................................... 150 g
Italiano
仕様
補修用性能部品の保有期間
Deutsch
保証書は、必ず「販売店名・購入日」な
どの記入を確かめて販売店から受け取っ
ていただき、内容をよくお読みのうえ、
大切に保管してください。
連絡していただきたい内容
Français
保証とアフターサービスに
ついて
7
Ja
IDK-80_Ja.book 8 ページ 2006年5月19日 金曜日 午前10時43分
04
その他
フリーフォン
フリーフォン
8
Ja
IDK-80_Ja.book 12 ページ 2006年5月19日 金曜日 午前10時43分
PIONEER CORPORATION
4-1, Meguro 1-Chome, Meguro-ku, Tokyo 153-8654, Japan
PIONEER ELECTRONICS (USA) INC.
P.O. BOX 1540, Long Beach, California 90810-1540, U.S.A. TEL: (800) 421-1404
PIONEER ELECTRONICS OF CANADA, INC.
300 Allstate Parkway, Markham, Ontario L3R OP2, Canada TEL: 1-877-283-5901
PIONEER EUROPE NV
Haven 1087, Keetberglaan 1, B-9120 Melsele, Belgium TEL: 03/570.05.11
PIONEER ELECTRONICS ASIACENTRE PTE. LTD.
253 Alexandra Road, #04-01, Singapore 159936 TEL: 65-6472-7555
PIONEER ELECTRONICS AUSTRALIA PTY. LTD.
178-184 Boundary Road, Braeside, Victoria 3195, Australia, TEL: (03) 9586-6300
PIONEER ELECTRONICS DE MEXICO S.A. DE C.V.
Blvd.Manuel Avila Camacho 138 10 piso Col.Lomas de Chapultepec, Mexico,D.F. 11000 TEL: 55-9178-4270
<06E00001>
Printed in China
Imprimé en Chine
K002_A_En
<5707-00000-006-0>