1
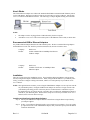
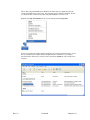
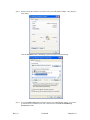
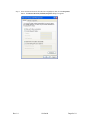
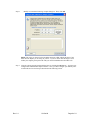
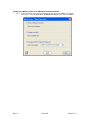
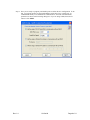
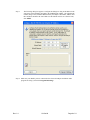
AppNote 10017
Using a USB Ethernet Adapter with a MAJIC®
Probe
Revision: 2.1
Last Modified: October 25, 2006
©Copyright Mentor Graphics Corporation 2006. All rights reserved.
This document contains information that is proprietary to Mentor Graphics Corporation. The original recipient of this document
may duplicate this document in whole or in part for internal business purposes only, provided that this entire notice appears in all
copies. In duplicating any part of this document, the recipient agrees to make every reasonable effort to prevent the unauthorized
use and distribution of the proprietary information.
Trademarks that appear in Mentor Graphics product publications that are not owned by Mentor Graphics are trademarks of their
respective owners.
Introduction
A MAJIC® probe can communicate to a host computer over an Ethernet link or with an RS232 serial
connection. Inexpensive USB to Ethernet adapters are widely available, making it easy to connect your
MAJIC probe to the USB port on a Windows PC. Any such adapter on the market should work.
There are two main reasons why you might want to use a USB to Ethernet adapter. The host PC you’re
using does not have an Ethernet port; or, it is difficult to allocate an Ethernet static IP address in your
network environment.
NOTE: The static IP issue can also be resolved by adding a second Ethernet port to your PC.
Getting Support
For additional assistance configuring a USB Ethernet Adapter connection to a MAJIC probe, please visit
http://www.mentor.com/supportnet/.
Rev. 2.1
25-Oct-06
Page 1 of 11
How it Works
The USB to Ethernet adapter uses a Microsoft standard called NDIS to transmit MAJIC Ethernet packets
via the USB adapter. Debuggers on the host side are not aware they are using a USB port. Instead, they
see it as a software-based Ethernet interface. The following is a simple diagram showing the connection.
NOTE:
1.
2.
The adapter can also be plugged into a USB hub used by the host computer.
An Ethernet “cross over” cable can be used in place of the Ethernet switch or hub, as shown here.
Recommended USB to Ethernet Adapters
Any USB to Ethernet adapter should work with a MAJIC probe. We have tested the following adapters
and found them to work well. Both are priced less than $30 (US) at local electronics stores.
Company:
Product:
FRYS.com
Airlink ASOHOUSB 10/100Mbps Fast Ethernet
USB 2.0 Adapter
Company:
Product:
FRYS.com
TrendNet TU-ET100C 10/100Mbps USB to
Ethernet Adapter
Installation
There are several parts to the installation process. First, install the adapter and adapter software drivers.
Second, configure the adapter’s Ethernet interface. Third, configure the IP address of your MAJIC probe.
Lastly, you need to configure a debug environment, which is covered separately in your MAJIC Probe
User’s Manual.
NOTE: This application note assumes you are using the USB Ethernet Adaptor to create a private network
for your MAJIC probe(s). Using the USB Network Adapter to connect to a larger network with
your MAJIC probe being just one of the many devices on that network is outside the scope of
this application note. In a larger network you need to have your Network Administrator allocate a
static IP for your MAJIC® probe. Details on this setup are covered in your MAJIC Probe User’s
Manual (in the section on Ethernet Setup).
Installing and Configuring the Adapter Software
Step 1: Install your USB Ethernet adapter hardware and software using the directions provided by
your adapter supplier.
Step 2: In Step 1 a new Ethernet Network interface was created on your computer. If you are setting
up a private network via the USB Ethernet adapter, then you need to specify some IP address
connection information.
Rev. 2.1
25-Oct-06
Page 2 of 11
This is done using standard Microsoft Windows interfaces that vary slightly based on the
version of Windows that you are using. The following images all relate to Window XP, but
you should be able to follow along when using other Windows versions as well.
Right-click the My Network Places icon on your desktop and click Properties.
A Network Connections window appears displaying your existing network interfaces. If you
have just completed your adapter install, the highest number connection is your adapter
network interface. Please note you may need to click View > Details in order for this screen
to appear.
Rev. 2.1
25-Oct-06
Page 3 of 11
Step 3: Double-click on the connection you believe to be your USB Ethernet adapter. This displays a
status dialog.
Click the Properties button, which brings up the Local Area Connection dialog.
Step 4: Verify the Connect using: description box matches your USB Ethernet Adapter. If not, then
go back and select a different Local Area Connection from the Network and Dial-Up
Connections window.
Rev. 2.1
25-Oct-06
Page 4 of 11
Step 5: Select the Internet Protocol (TCP/IP) line to highlight it, then, click the Properties
button. The Internet Protocol (TCP/IP) Properties dialog box appears.
Rev. 2.1
25-Oct-06
Page 5 of 11
Step 6:
Modify it to match the following example dialog box. Then, click OK.
NOTE: The value you choose for the IP address must not collide with the IP range of any
other network adapter you are using on your PC. If you are unsure what IP range is used
within your company, then please talk with your network administrator about this issue.
Step 7: Close the various network interface dialog boxes by clicking the OK buttons. You have now
configured the USB Ethernet adapter interface. Next, you must configure your MAJIC probe
to match this new network setup as described in the following section.
Rev. 2.1
25-Oct-06
Page 6 of 11
Configuring a MAJIC® Probe for a USB Ethernet Adapter Network
Step 1: Launch the MAJIC Setup wizard, read the introduction, then, click NEXT. The following
form appears. Select the Static IP for USB Ethernet Adapter option and click NEXT.
Rev. 2.1
25-Oct-06
Page 7 of 11
Step 2: Now you are ready to program your MAJIC probe to utilize this new configuration. To do
this, you typically need to use the supplied RS232 serial cable, since you have not yet
established the ability to use Ethernet for communication. Select the communications
parameters as shown in the following dialog box. If you are using COM2, then select it
instead. Click NEXT.
Rev. 2.1
25-Oct-06
Page 8 of 11
Step 3:
The following dialog box appears. Configure the dialog box using an IP address in the
same range as the IP address assigned to the USB Ethernet Adapter. The rightmost IP
number (range 0.255) should be different than your adapter’s IP number, and the other
three numbers should be the same. Make sure the Subnet mask is set as shown. Then,
click NEXT.
Step 4: Make sure your MAJIC probe is connected to the selected COM port and that no other
programs are using it, then click Program IP Settings.
Rev. 2.1
25-Oct-06
Page 9 of 11
A console window appears to display the progress of the setup.
Rev. 2.1
25-Oct-06
Page 10 of 11
The following dialog box should also appear:
Step 5: Follow the directions in the dialog to confirm the configuration is applied. You now have
completed the setup of your MAJIC probe to work with your USB Ethernet Adapter network.
NOTE: If you encountered any errors during this configuration, please contact technical support via an
email with the file C:\majic_ip_settings.log attached.
Configuring a Debug Environment
This step is covered in Chapter 3, Debug Environment, in your MAJIC Probe User’s Manual. Please refer
to it for details and remember to use the IP address you assigned to your MAJIC probe when specifying the
communications parameters for your debug environment.
Rev. 2.1
25-Oct-06
Page 11 of 11