1
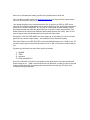
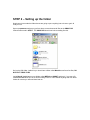
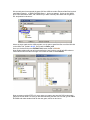
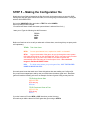
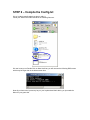
Welcome to
GodSins Guide To
Making MultiBoot Xbox DVDs
v1.00
Ok this is my first attempt at making a guide for the people that don’t know shit
First I would like to thank everyone at www.xbox-scene.com as they have been a great help to
me as I’m sure they have been to you.
I am making this guide for the complete dumb ass. So it’s going to go STEP by STEP for the
most part. Of course this guide should only be used for backing up your original game and not for
piracy which I DO NOT CONDONE, so if you plan to use this guide to pirate software, please
know that the people that make the games spend so much time on them and games like Tony
Hawks, Shenmue and all the other awesome games totally deserve your money. Hell if no one
buys the games, then what would want them to continue to make more?
As always IF YOU LIKE THE GAME, don’t be a cheap ass, go out and buy it. Hell you can pick
games at online auctions super cheap… well cheaper than in a retail store anyway.
This Guide will show you STEP BY STEP on how to put Multiple Games onto 1 DVD-R, why –R?
well that’s cause I got a Pioneer DVR-A04 and not a HP ☺. But it’s the same no matter what you
use.
Programs you will need to do what I did to get this all working
1) WinRAR
2) XISO
3) cpxmenux
4) Prassi PrimoDVD 2.0
Of course I CAN NOT give links to find programs in this guide cause I don’t want the Microsoft
Police looking for me … AND I know that someone from Microsoft, or working in part for them will
read this guide cause they got nothing better to do with their time than jerk off in front of the
computers hunting people down.
STEP 1 – Making The Folder
Make a Folder on your computer
Preferably on one of the drives you got at least 5 gigs of free space.
Call it what ever you want, in this Guide I will be calling it XBOX DVD
STEP 2 – Setting up the folder
Now that we have made the folder that we are going to put everything into we have to get it all
ready for use.
Open up cpxmenux.rar that you got from where ever and extract all files to the XBOX DVD
folder that we made in STEP 1. The XBOX DVD should now look something like this.
Go into the ISO folder, inside this you should see a folder called MenuX as well as a few files, DO
NOT EDIT THESE FILES.
Inside MenuX should be two more folders called MEDIA and SSHOT and that it, if you see a file
called menu.xdi DELETE it as we will be making it later on. Don’t delete anything else from these
folders for now as you will need them later on.
STEP 3 – Checking total file size
All righty, now that we have the XBOX DVD folder all ready to go, go through your game
collection and find out which games you want to put onto this DVD, it doesn’t matter which ones
as long as once they are all extracted they are no more than 4.3 Gigs in combined size. To find
this out all you have to do is select the Game ISO files that you want to put onto this DVD, Right
Click on them and click on Properties.
Once you Click on Properties you should see the Following screen pop up, if it didn’t pop up
minimize the folder and it should be behind it. And your looking for SIZE ON DISK, if its larger
than 4.3 (4,300,000,000 bytes) you may want to remove one game and replace it with something
else.
STEP 4 – Getting the files out of the ISO
OK, now that we know the games we have selected will fit onto this DVD we will Extract the files
from each ISO one at a time into their own folder within the ISO folder in XBOX DVD
Now lets open up the xISO program, Demon Tools may work as well but for this Tutorial I will be
using xISO as it seems to work better for me. Once you have opened up xISO you should see the
following (ignore the red circle for now).
Now click on the File Folder which I put a Red Circle Around, once you do that find where you
put the game ISO file and select it. You should now see something like the following, taken into
note that each game will have a different file structure and may not look exactly like the following.
The above iso used for this one example is DVDx v2
Ok so now that we have opened the game ISO into xISO we need to Extract all the files into their
own folder (Example: x:\XBOX DVD\ISO\Game1 *don’t use spaces). So lets go into XBOX
DVD / ISO and make a folder, call it whatever you want I normally call it what ever the game is.
EX: tonyhawks4 or what ever.
Above we once again see the xISO program, now in order to get all the files out of the ISO click
on the ISOs Title, circled in BLUE, in this case it is DVDx_v2.0
Once you do that Click on the EXTRACT ALL button circled in BROWN
Now another window will pop up like pictured below, here is where you will tell xISO where to
extract all the files from this CD image. In this case the folder is called DVDx2.
Now you pretty much do STEP 4 for every game you want to put onto this DVD, putting each
game into its own folder. So once you are done extracting the files from one ISO, go into XBOX
DVD\ISO and make another folder for the next game, and so on and so on.
STEP 5 – Making the Configuration file
Now that we have finished extracting the files from each iso that we want to put onto this DVD,
making sure that each game has its own folder, we are now going to make the Menu / Config file
which is SO SUPER EASY.
Go into the XBOX DVD folder and make a TEXT file called CONFIG
Open up Config.txt with notepad.
You should now have a blank document open and here is where all the fun is ;)
I want you to Type the following into this Document
TITLE=
INFO=
GFX=
DIR=
Before we Continue on let me tell you what each of those does, even though they are pretty much
self explanatory.
TITLE=
Title of the Game
INFO=
You can put whatever here, maybe who made it or released it
GFX=
Logo or screenshot of the game, as you go through the menu system
this image will be shown on the right hand side. So you can pretty much put what
ever here as long as you save it as a PNG file, the MenuX system will
automatically resize the image to fit into the space it has. You save these
Images in the MenuX\SSHOT folder
DIR=
The folder name where you put the game files, JUST THE FOLDER
NAME NO MORE NO LESS
So now that we know what each one of those things does lets start making our Config.txt file.
So you still have notepad open and by now you should have the above typed into it. Now Each
game will need the following so here is an example of what a 2 game Config.txt may look like.
TITLE=Sega Soccer Slam
INFO=CD RIP
GFX=sss.png
DIR=sss
TITLE=Terminator: Dawn of Fate
INFO=CD Rip
GFX=t2.png
DIR=t2
If you don’t want to fill in the INFO or GFX slots then you don’t have to
So now that you did the above for EACH game lets get moving to STEP 6
STEP 6 – Compile the Config.txt
Ok so I made it sound harder than what it really is.
Inside your XBOX DVD folder should be the following files now.
Ok now I want you to Double Click on MenuX-xdi.bat, you will now see the following DOS screen
which may be larger than in the below screen shot.
Now all you have to do is press any key on your keyboard and that’s that’s, you just made the
Menu for your game dvd.
STEP 7 - Setting the Mood
One thing that I personally love is that with MenuX you can have music playing while you choose
what game you want to play as long as it’s a WMA file so all you would have to do is convert your
MP3s to WMA format, call it ambient.wma and place it in x:\XBox DVD\iso\MenuX\media\ and
now when you load it up in the deamcast that song will play. To my knowledge you can only have
1 song play, no idea if you can get a random song to play.
You can also change the MenuX Look however I am too lazy myself to do this so I just got mine
from www.xbox-scene.com. However you don’t have to worry about it because one should
already be included with the MenuX program so don’t worry about this.
STEP 8 – Burning to DVD with PrimoDVD v2.0
Put a Blank DVD-R\RW in DVD-RW Burner Drive.
Open PrimoDVD 2.0
Click "Go To Full Application" which I circled in ORANGE
Once you are in FULL Application mode (meaning you see all the fancy controls)
Go to File-->New Job-->Data Disk.
For Volume Label put whatever you like.
Max Speed I set to 1x mostly because that’s what my media is certified for and seems to work
best at
Now all you really have to do is drag every file from the ISO folder into the data area below where
you entered the Volume Label.
Select your Recording Device which will be on the left hand side, in this case your DVD Burner.
Simple Double Click on it to select it. Once Selected it will have a Red Arrow beside it.
Now simple click on the Red Circle near the top and that’s all she wrote. You have just made your
First Multi Boot Xbox DVD.
My first few times I messed up, so on your first attempt I would suggest using a DVD-RW so that
incase you did mess up you don’t waste a good DVD-R.
This Document is © GodSin Inc. 1800 – 2002 ☺
This Document was Created on Monday November 7th 2002
I would like to Thank the following people who helped me make my First Multi Boot DVD
I read the articles they had up on www.xbox-scene.com but I never saw screen shots so I got
confused a few times on what to do next as most new people tend to do.
Special Thanks to
Xbox-scene.com
[I]ce[x]
and to everyone that has made the Xbox scene what it is today, keep up the good work.
Don’t have a Xbox? Enter to win a Free Xbox Here
My personal Fav site for all my Gaming Information