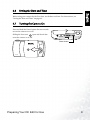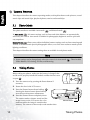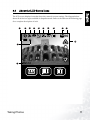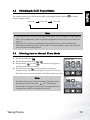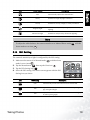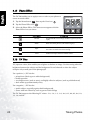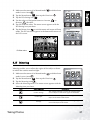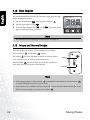
1
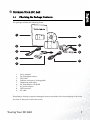
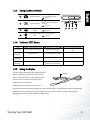
DC E40 Digital Camera User’s Manual Welcome Copyright Copyright 2004 by BENQ Corporation. All rights reserved. No part of this publication may be reproduced, transmitted, transcribed, stored in a retrieval system, or translated into any language or computer language, in any form or by any means, electronic, mechanical, magnetic, optical, chemical, manual, or otherwise, without the prior written permission of this company. Disclaimer BENQ Corporation makes no representations or warranties, either expressed or implied, with respect to the contents hereof and specifically disclaims any warranties, merchantability or fitness for any particular purpose. Further, BENQ Corporation reserves the right to revise this publication and to make changes from time to time in the contents hereof without obligation of this company to notify any person of such revision or changes. *Windows, Internet Explorer and Outlook Express are trademarks of Microsoft Corporation. Others are copyrights of their respective companies or organizations. Taking Care of Your Camera • Do not use your camera at temperatures below 0°C or above 40°C. • Do not use or store your camera in the environments listed below: – Direct sunlight – High and dusty places – Next to an air conditioner, electric heater or other heat sources – In a closed car that is directly under the sun – Unstable locations • If your camera becomes wet, wipe it with dry cloth as soon as possible. • Salt or seawater may cause severe camera damage. • Do not use organic solvents, such as alcohol, etc., to clean your camera. • If the lens or viewfinder is dirty, use a lens brush or soft cloth to clean the lens. Do not touch the lens with your fingers. • To prevent electrical shock, do not attempt to disassemble or repair your camera by yourself. • Water may cause a fire or electric shock. Therefore, store your camera in a dry place. • Do not use your camera outdoors when it is raining or snowing. • Do not use your camera in or near water. • If a foreign substance or water gets in your camera, please turn the power off immediately and disconnect the batteries and the transformer. Remove the foreign substance or water, and send it to the maintenance center. • Transfer the data to the computer as soon as possible to avoid losing your image data. Table of Contents English 1 TOURING YOUR DC E40 .............................................................................................1 1.1 1.2 Checking the Package Contents .......................................................................................... 1 DC E40 Components ........................................................................................................... 2 1.2.1 Front View .................................................................................................................. 2 1.2.2 Rear View .................................................................................................................... 2 1.2.3 Using the Mode Switch .............................................................................................. 3 1.2.4 Indicator LED Status .................................................................................................. 3 1.2.5 Using the Stylus .......................................................................................................... 3 1.2.6 Using the Navigation Button ..................................................................................... 4 1.2.7 Using the Touch Screen ............................................................................................. 4 2 PREPARING YOUR DC E40 FOR USE ............................................................................5 2.1 2.2 2.3 2.4 2.5 2.6 2.7 Inserting the Battery ............................................................................................................. 5 Using an AC Power Adapter ................................................................................................ 6 Charging the Battery ............................................................................................................ 6 Inserting an SD Memory Card ............................................................................................ 7 Attaching the Hand Strap .................................................................................................... 8 Setting the Date and Time ................................................................................................... 9 Turning the Camera On ...................................................................................................... 9 3 TAKING PHOTOS ........................................................................................................10 3.1 3.2 3.3 3.4 3.5 3.6 3.7 3.8 3.9 3.10 3.11 3.12 3.13 3.14 3.15 3.16 3.17 3.18 3.19 3.20 Photo Mode ........................................................................................................................ 10 Taking Photos .................................................................................................................... 10 About the LCD Screen Icons ............................................................................................. 11 Switching the LCD Display Mode ..................................................................................... 13 Selecting Auto or Manual Photo Mode ............................................................................ 13 Selecting the Scene Mode .................................................................................................. 14 Using the Flash ................................................................................................................... 14 Using the Digital Zoom ..................................................................................................... 15 Using the Self-Timer .......................................................................................................... 16 Continuous Shots ............................................................................................................... 16 Image Size ........................................................................................................................... 17 Image Quality ..................................................................................................................... 18 White Balance ..................................................................................................................... 18 ISO Setting .......................................................................................................................... 19 Photo Effect ........................................................................................................................ 20 EV Bias ................................................................................................................................ 20 Metering ............................................................................................................................. 21 Date Imprint ....................................................................................................................... 22 Macro and Normal Modes ................................................................................................ 22 Quick Review and Erase ..................................................................................................... 23 4 RECORDING MOVIE CLIPS .........................................................................................24 4.1 Movie Recording Mode ..................................................................................................... 24 4.1.1 Manual and Automatic Movie Recording Modes .................................................. 25 4.1.2 Movie Recording Mode Camera Settings ............................................................... 25 Table of Contents i 5 RECORDING SOUND CLIPS .........................................................................................26 6 PLAYING BACK PHOTOS, MOVIES AND SOUND CLIPS ...............................................27 Viewing Photos .................................................................................................................. 27 6.1.1 Zoom and Pan .......................................................................................................... 28 6.1.2 Viewing Thumbnails ................................................................................................ 29 6.2 Viewing Movie Clips .......................................................................................................... 30 6.3 Listening to Sound Clips .................................................................................................... 31 6.4 Special Playback Functions ................................................................................................ 32 6.4.1 Scrawling .................................................................................................................. 33 6.4.2 Adding a Frame ........................................................................................................ 34 6.4.3 Adding a Voice Memo ............................................................................................. 35 6.4.4 Listening to Voice Memos ....................................................................................... 36 6.4.5 Erasing Voice Memos .............................................................................................. 36 6.4.6 Playing a Slide Show ................................................................................................ 37 6.4.7 Locking and Unlocking Files ................................................................................... 37 6.4.7.1 Locking a Single File ........................................................................................... 37 6.4.7.2 Locking all Files ................................................................................................... 38 6.4.7.3 Unlocking Single Files ........................................................................................ 38 6.4.7.4 Unlocking all Files ............................................................................................... 38 6.4.8 Erasing Single Files ................................................................................................... 39 6.4.9 Erasing All Files ........................................................................................................ 39 English 6.1 7 CAMERA SETTINGS .....................................................................................................40 7.1 7.2 7.3 7.4 7.5 7.6 7.7 7.8 7.9 7.10 7.11 7.12 Memory: Copying and Formatting ................................................................................... 41 Setting the Date and Time ................................................................................................. 42 Date Format ........................................................................................................................ 42 LCD Brightness .................................................................................................................. 43 Sound .................................................................................................................................. 43 File No. Reset ...................................................................................................................... 43 Video Output ..................................................................................................................... 44 Power Saving ...................................................................................................................... 44 Language ............................................................................................................................. 45 Default Setting .................................................................................................................... 45 Software Version ................................................................................................................ 46 Screen Calibration .............................................................................................................. 46 8 CONNECTING TO A TV ..............................................................................................47 9 CONNECTING TO A COMPUTER .................................................................................48 9.1 9.2 9.3 Installing the Digital Camera Software ............................................................................. 48 Bundled Software ............................................................................................................... 49 Transferring Files To/From a Computer .......................................................................... 50 9.3.1 Transferring Photos, Movie Clips, Sound Clips, and Music Files ......................... 50 9.3.2 Using the QLink Software ....................................................................................... 51 9.3.3 Using the QLink Frame ........................................................................................... 52 9.3.3.1 Downloading Frames .......................................................................................... 53 10 TROUBLESHOOTING ...................................................................................................54 11 SPECIFICATIONS .........................................................................................................55 11.1 System Requirements ......................................................................................................... 56 12 SERVICE INFORMATION .............................................................................................56 ii Table of Contents BenQ DC 5530 User’s Manual TOURING YOUR DC E40 1.1 English 1 Checking the Package Contents The package includes the following items: 1 6 2 7 3 8 4 9 5 1. 2. 3. 4. 5. 6. 7. 8. 9. User's manual DC E40 digital camera USB cable Lithium-ion battery (rechargeable) Hand strap with stylus DC E40 software CD-ROM AC power adapter USB converter AV cable If anything is missing or appears damaged, contact your dealer. Save the packaging in the event you need to ship your camera for service. Touring Your DC E40 1 BenQ DC 5530 User’s Manual English 1.2 DC E40 Components 1.2.1 Front View 1. 2. 3. 4. 5. 6. 7. 8. 9. 10. 11. Shutter button Power button Mode switch Indicator LED Microphone Flash TV out Normal/macro switch Lens Speaker Self-timer indicator LED / Video or sound recording on 12. Lens cover 1 2 3 4 5 6 TuVt o 7 8 DC E4 0 9 10 12 11 1.2.2 Rear View 1. 2. 3. 4. 5. 6. Microphone Indicator LED Mode switch Power button Shutter button Zoom/flash/review/navigation button 7. Battery/SD card cover 8. USB/charger port 9. Touch panel/LCD screen 10. Hand strap attachment 1 2 3 4 5 6 OPEN 10 9 7 8 Note • • 2 The LCD on the digital camera is manufactured with sophisticated technology, however, the display may have some light spots or show unusual colors. This is normal and does not indicate display malfunction, nor will this affect the pictures you take with the camera. The Indicator LED displays the current status of the camera. Touring Your DC E40 BenQ DC 5530 User’s Manual 1.2.3 Using the Mode Switch Snapshot Mode Take photographs in manual or automatic mode. page 10 2 Playback Mode Replay photos, movie clips and sound clips stored in memory. page 27 3 Movie Recording Record movie clips. Mode page 24 4 Sound Recording Record sound clips. Mode page 26 English 1 1 2 3 4 1.2.4 Indicator LED Status Status Top Indicator LED (Green) Top Indicator LED (Orange) Front Indicator LED (Red) Always On Power is on, ready to use Battery is charging Recording movie or sound clip. Fast Blinking Processing data Error/Warning or Low Power — Slow Blinking — Flash is charging — — AC adapter or USB cable attached with no battery — Slowest Blinking 1.2.5 Using the Stylus Use the stylus attached to the included hand strap to perform operations on the touch screen. You can also use your finger, but the stylus is more accurate and won’t cause fingerprints on the screen. Stylus Unfold the stylus from the clip to use it. Operate the touch screen by tapping an icon with the stylus. Some features require tapping and holding an icon to change its value, and other icons, such as sliders, require tapping and dragging with the stylus to adjust the slider value. Touring Your DC E40 3 BenQ DC 5530 User’s Manual 1.2.6 Using the Navigation Button Up English You can use the Navigation button to highlight an icon on the screen and then press OK (push the Navigation button) to select it. Left Pressing Up/Down or Left/Right also adjusts values such as the zoom factor or EV bias. Right Down 1.2.7 Using the Touch Screen BenQ DC E40 is equipped with a touch-sensitive LCD screen that enables you to change your camera’s settings and features quickly and conveniently. Tap the three buttons below the screen to access the following features: DISP Display 4 Menu Erase Icon Name Description DISP Display Tapping the Display button switches the LCD information display mode between Icons On, Icons Off or All Off. Menu Tapping the Menu button turns DC E40’s on-screen menu system off and on in any camera mode. Erase Tapping the Erase button erases the currently displayed photo, movie clips, or sound clips from memory. Touring Your DC E40 BenQ DC 5530 User’s Manual PREPARING YOUR DC E40 FOR USE The lithium ion battery included with the DC E40 allows you to take photos, record movie and sound clips. Use the AC adapter whenever possible to conserve battery power. 2.1 Inserting the Battery 1. Turn the camera off. 2. Slide the battery cover in the direction of the arrow A and open the battery/SD card cover B . 3. Push the battery latch in the direction of the arrow C and insert the battery in the correct orientation as shown D with the notches facing up. If the battery is inserted incorrectly, the latch will not close. 4. Close the battery/SD card cover E . To remove the battery: open the battery cover and push the battery latch. The battery pops out slightly; remove the battery. SD A OPEN B Battery Latch C SD OPEN E D Note • • • Use only the specified battery type (lithium-ion battery). If you are not going to use the battery for an extended time, remove it from the camera to prevent leakage or corrosion. Avoid using the battery in extremely cold environments. Low temperatures reduce battery life and performance. Preparing Your DC E40 for Use 5 English 2 BenQ DC 5530 User’s Manual English 2.2 Using an AC Power Adapter The BenQ DC E40 comes with an AC power adapter that both powers the camera and recharges the battery. Connect the power adapter to the DC E40 as shown below. A 1. Turn the camera off. 2. Connect the included USB converter to the power adapter connector A . 3. Plug the power adapter into a power outlet B . 4. Connect the USB adapter to the USB port at the back of the camera C . Connect the USB converter to the power adapter connector. B Note • • Use only the AC power adapter specified for the camera. Damage caused by the use of an incorrect adapter is not covered under the warranty. Dual Charging Mode allows you to charge the battery when transferring files to or from a computer through the included USB cable. Plug the power adapter into a power outlet. OPEN C Connect the USB adapter to the USB port. 2.3 Charging the Battery 1. Turn the camera off. 2. Insert the battery as described on page 5. 3. Connect the AC power adapter as described in the section above, or connect the included USB cable to a computer USB port as described in “Transferring Files To/From a Computer” on page 50. 6 Preparing Your DC E40 for Use BenQ DC 5530 User’s Manual Note • Use only the AC power adapter specified for the camera. Damage caused by the use of an incorrect adapter is not covered under the warranty. The battery may not begin charging immediately if it is too hot. In this case, let the camera cool before charging the battery. When using the AC power adapter, the camera must be turned off in order to charge the battery. When connected to a PC with the USB cable, the battery will charge if the camera is either on or off. • • • 2.4 Inserting an SD Memory Card A 1. Turn the camera off. OPEN All images, movies, and sound clips taken by the camera can be stored in an SD (Secure Digital) memory card as well as in the camera’s internal memory. Files stored on the SD card remain even if the camera’s power is turned off. 2. Slide the battery/SD card cover in the direction shown A and open the cover B . 3. Insert an SD card C : The front side of the SD card (the side with the label) should be facing the front of the camera. • If the card does not slide into the slot, turn it around and try again. 4. Close the battery/SD card cover. SD • B SD C Preparing Your DC E40 for Use 7 English The Indicator LED at the top of the camera is orange while the camera is charging. When charging is complete, the LED turns off. BenQ DC 5530 User’s Manual SD English 5. To remove the SD card, make sure the camera is turned off, open the battery/SD card cover, and press down lightly on the exposed edge of the card. The card will eject itself D . D Note • To prevent data from being accidentally erased Press the tab in the direction of the arrow from the SD card, slide the write-protect tab to on the card to write the “LOCK” position. protect the SD Memory Card. The SD card must be unlocked in order to save, edit, or erase data. Write-protect tab Format new SD cards using the camera’s format function before use. See “Memory: Copying and Formatting” on page 41 to learn how to format SD cards. LOCK • • 2.5 Attaching the Hand Strap Always use the hand strap to prevent accidentally dropping the camera. The hand strap is also a good way to keep your stylus nearby. 1. Thread the small loop of the hand strap through the strap eyelet at the top left corner of the rear of the camera A . 2. Pull the stylus and large loop through the small loop until the strap is firmly secured A TV out 8 B . B TV out Preparing Your DC E40 for Use BenQ DC 5530 User’s Manual 2.6 Setting the Date and Time English Before using your camera for the first time, set the date and time. For instructions, see “Setting the Date and Time” on page 42. 2.7 Turning the Camera On Press and hold the Power button for two seconds to turn the camera on or off. Sliding the lens cover A open and closed also turns the camera on or off. Power button A DC E40 Preparing Your DC E40 for Use 9 BenQ DC 5530 User’s Manual English 3 TAKING PHOTOS This chapter describes the camera operating modes, and explains how to take pictures, record movie clips and sound clips, play back photos, movies and sound clips. 3.1 Photo Mode Two photo modes are available: Auto mode A and Manual mode . M In Auto mode A , all camera settings, such as focus and white balance, are automatically selected by the camera. Auto mode is suitable for photography beginners and for quick and easy snapshots. Manual mode M allows you to adjust individual camera settings, such as focus metering and EV bias, in order to attain special photographic effects, or to fine-tune results to match specific lighting conditions. This chapter describes the camera settings that are available in each photo mode. Note • 3.2 Some settings can be changed only when the camera is in Auto mode White Balance, ISO Setting, EV Bias, and Metering. . These include Taking Photos Before taking any photos, make sure the battery is charged, that an SD card is properly installed if needed, and that the lens cover is open A . 1. Turn the camera on by pressing the Power button if necessary. 2. Frame the shot in the LCD screen. 3. Press the Shutter button down halfway B . Pressing the shutter button down halfway starts focus and exposure adjustments. 4. Press the Shutter button completely down. The camera makes a shutter sound and the image freezes on the LCD screen for a few moments while the image is transferred to memory. The camera is then ready to take another shot. 10 A A DC E40 B Shutter button Taking Photos BenQ DC 5530 User’s Manual 3.3 About the LCD Screen Icons 1 2 3 4 $$ 5 6 7 $ $ 8 9 10 0 11 13 12 (9 Taking Photos 11 English The LCD screen displays icons that show the camera’s current settings. The diagram below shows all of the icon types available in Snapshot mode. Refer to the table on the following page for a complete description of each. BenQ DC 5530 User’s Manual English The following table shows all of the Snapshot mode icons that can be shown on the LCD screen. For more information, refer to the indicated page number. Setting 1 2 Battery Level Capture Mode Mode Icon Full Page 6 Flash Mode Scene Cloudy Empty Tungsten Light Single Shot 1 7 ISO Setting Auto Self-Timer On 100 Continuous Self-Timer On 200 Auto 14 8 Metering Center Spot Forced On Average 9 A Image Size 14 18 21 4M 1600x1200 2M 1280x968 1M 5 Shots Remaining [number] Back Light Zoom Zoom In 19 200 2304x1728 11 B&W Page 100 6M 10 Night Scene A 2848x2136 Portrait Normal A Center Average Red-Eye Reduction Auto Icon Fluorescent Light 16 Landscape Photo Effect Auto 1/3 Sport 5 Mode Sunny Off 4 White Balance 2/3 Continuous 3 Setting 6 17 15 Zoom Out 20 12 EV bias 13 Macro -2 ~ +2 EV +1.0 20 22 Sepia Vivid 12 Taking Photos BenQ DC 5530 User’s Manual 3.4 Switching the LCD Display Mode Icons On Icons Off DISP English The camera setting icons can be turned off by pressing the Display button between display modes: to switch LCD Off Note • • 3.5 The image on the LCD screen may appear dark when used in sunlight or bright lighting. This is not a malfunction. You can adjust the brightness of the LCD screen as shown on page 43. Using the LCD screen for extended periods consumes battery power and therefore decreases the number of photos you can take. To conserve battery power, turn the LCD screen off when not taking photos. Selecting Auto or Manual Photo Mode 1. Tap the Menu button . 2. Tap the Manual/Auto icon M / A . 3. Select Manual M or Auto A . The menu screen appears with the mode icon you chose. 4. Tap the Return icon to exit the menu and return to Snapshot mode. The camera setting icons on the LCD screen show the current camera settings for the Photo mode you chose. Note To enable full control of camera setting in Snapshot mode, always select Auto Scene mode A (see “Selecting the Scene Mode” on page 14). Some camera settings cannot be changed when other Scene modes are selected. Manual / Auto M 10 6M DISP Auto M A 10 DISP Taking Photos 13 BenQ DC 5530 User’s Manual English 3.6 Selecting the Scene Mode The camera automatically adjusts settings for optimum results when capturing certain types of photographs, or scenes. The DC E40 offers six different Scene modes. 1. Tap the Menu button . 2. Tap the Scene icon A . 3. Select the Scene mode. The menu screen appears with the mode icon you chose. 4. Tap the Return icon to exit the menu and return to Photo mode. The camera setting icons on the LCD screen show the current camera settings for the Photo mode you chose. Landscape A DISP All Scene modes except Auto Scene mode override the Flash settings. If you want to change the Flash setting, you must select Auto Scene mode “Using the Flash” for more information on Flash settings. Icon Scene Mode A Auto Portrait Landscape Sport Backlight Night Scene 3.7 A . See 3.7 Description Select this mode to allow the camera to adjust all settings automatically. Select this mode when taking photos of people. Select this mode to take photos of distant scenery or landscapes in daytime. Select this mode to take photos of fast-moving subjects such as runners or cars. Sport mode is not suitable for indoor photography. Select this mode to take photos in which the light source is behind the subject. Select this mode to take photos of subjects with a dark or poorly-lit background. Using the Flash Use the flash to brighten photos of subjects taken in dark or non-optimal lighting conditions. The DC E40 is equipped with four Flash settings that can be used in both Auto and Manual Photo modes. The Scene mode must be set to Auto A in order to change the flash setting manually. Also note that the Flash setting can’t be changed manually if it is set to Auto Flash mode. 14 Taking Photos BenQ DC 5530 User’s Manual Auto Red-Eye Forced On Press to the right to change the flash Off 2. The LCD screen icon shows the current Flash setting. Icon Flash Setting Description Auto The flash fires automatically according to the ambient light conditions. In some Scene modes (for example Portrait), Red-Eye Reduction is automatically selected. Red-Eye Reduction The flash fires several times in quick succession before firing the main flash. This helps to avoid the phenomenon of eye pupils appearing red in photographs. Forced On The flash fires regardless of the light conditions. Select this setting to take photos of high contrast subjects (back lighting) or dark shadows. Off The flash does not fire. Choose this setting when taking photos in areas where flash photography is prohibited, or when the distance to the subject is beyond the effective range of the flash. Note • • • 3.8 You can change the flash setting only when the Scene mode is set to Auto In Continuous Shot mode (see page 16), the flash is set to Off . Do not use the flash at close distances from young children. A . Using the Digital Zoom The DC E40 is equipped with a 4x digital zoom that enlarges images so that the subject appears to be closer. 1. Set the Photo mode (see page 13). 2. Frame the subject in the LCD screen. 3. Tap the Zoom In or Zoom Out icon on the LCD to adjust the zoom. You can also use the Navigation button to zoom in or out. 4. The zoom slider on the LCD moves up or down to indicate the zoom level. Note • The zoom function is disabled when the image size is set to 6M page 17. Taking Photos 6M . See “Image Size” on 15 English 1. Press the Navigation button to the right to change the Flash setting. BenQ DC 5530 User’s Manual English 3.9 Using the Self-Timer The self-timer enables you to put yourself in the picture. When the Self-Timer is turned on, the camera takes the photo 10 seconds after the Shutter button is pressed. 1. Tap the Menu button . 2. Tap the Self-Timer icon 10 . 3. Select On 10 or Off off . The menu screen appears with the Self-Timer icon you chose. 4. Tap the Return icon to exit the menu and return to Photo mode. The Self-Timer icon appears on the LCD screen. 5. Press the shutter button down halfway to focus, then press it down fully. The red Self-Timer indicator LED at the front of the camera blinks slowly for five seconds, and then quickly for five seconds before the camera takes the shot. A countdown timer also appears on the LCD screen. Press OK to cancel the Self-Timer. Self-timer M 10 6M DISP On 10 off DISP 3.10 Continuous Shots Use Continuous Shot mode to take two consecutive photos in rapid succession. This is used for take photos of fast moving objects. 1. Tap the Menu button . 2. Tap the Continuous Shot icon . 3. Select On or Off . The menu screen appears with the Continuous Shot icon you chose. Continuous Shots M 10 6M DISP 16 Taking Photos BenQ DC 5530 User’s Manual Off English 4. Tap the Return icon to exit the menu and return to Photo mode. The Continuous Shot mode icon appears on the LCD screen. 5. Press the shutter button down halfway to focus, then press it down fully. The camera takes two photos in rapid succession. When complete, a timer icon appears on the LCD for a few moments while the photos are processed. DISP Note • • • The flash is set to Off when Continuous Shot mode is turned on. You can use the Self-Timer 10 function to take continuous shots. The continuous shot function cannot be used in Back Light Scene Mode. 3.11 Image Size The DC E40 allows you to choose from four different image sizes, or resolutions. Higher resolution photos require more memory, so your camera will store fewer high resolution photos than lower resolution photos but the quality will be better. 1. Tap the Menu button Image Size M 10 6M . 2. Tap the Image Size icon 6M . 3. Select the image size. The menu screen appears with the Image Size icon you chose. DISP Icon Image Size Icon Image Size 6M 6M 2848x2136 2M 2M 1600x1200 4M 4M 2048x1536 1M 1M 1280x968 Note • • Use a lower image size if you want to store more photos in a limited amount of memory. Continuous Shot mode (2848x2136) Taking Photos 6M cannot be used when the image size is set to 6M . 17 BenQ DC 5530 User’s Manual English 3.12 Image Quality In addition to Image Size, you can also set the Image Quality, also known as the compression ratio. Higher quality (lower compression) images require more memory storage than lower quality (higher compression) images for images that are the same size (e.g. 2848x2136). 1. Tap the Menu button . 2. Tap the Image Quality icon . 3. Select the Image Quality setting. The menu screen appears with the Image Quality icon you chose. Icon Image Quality Description Fine lower compression Normal higher compression 3.13 White Balance White balance is a measure of the ‘coolness’ of white light. If your photos have a reddish tinge, it probably means that the white balance is set incorrectly. 1. Make sure the camera is in Manual mode mode is set to Auto A . M , and that Scene 2. Tap the Menu button , then tap the Next icon . 3. Tap the White Balance icon A . 4. Select the White Balance setting. The menu screen appears with the White Balance icon you chose. White Balance A EV +13 A YMD DISP 18 Taking Photos BenQ DC 5530 User’s Manual White Balance Description A Auto Automatically adjusts the white balance. Sunny Suitable for bright daylight conditions. Cloudy Suitable for cloudy, twilight, or shady conditions. Tungsten Light Suitable for subjects lit by tungsten (incandescent) lighting. Fluorescent Light English Icon Suitable for subjects lit by fluorescent lighting. Note To adjust the white balance, the camera must be set to Manual Photo mode Scene mode set to Auto A M with the . 3.14 ISO Setting The camera’s sensitivity to light is configured by the ISO setting. 1. Make sure the camera is in Manual mode mode is set to Auto A . M , and that Scene ISO Setting 2. Tap the Menu button , then tap the Next icon . 3. Tap the ISO Setting icon A . 4. Select the ISO setting. The menu screen appears with the ISO Setting icon you chose. A EV +1.3 A YMD DISP Icon ISO Setting A Auto Automatically sets the ISO value between 100 and 200. 100 100 Equivalent to color ISO100 film. Use for outdoor photography in bright sunlight. 200 200 Equivalent to color ISO200 film. Use for outdoor or brightly lit indoor photography. Taking Photos Description 19 BenQ DC 5530 User’s Manual English 3.15 Photo Effect The DC E40 enables you to apply a tone or color to your photos to create an artistic effect. 1. Tap the Menu button , then tap the Next icon . 2. Tap the Photo Effect icon . 3. Select the Photo Effect. The menu screen appears with the Photo Effect icon you chose. Icon Photo Effect A A EV +13 YMD DISP Photo Effect Description Normal Standard RGB color settings suitable for general photography. B&W Black and white photos (with shades of grey). Sepia Produces a warm, old-fashioned style of photo in which the colors are more brown and orange. Vivid Produces sharper and more vibrant colors. 3.16 EV Bias EV (exposure value) bias enables you to lighten or darken an image. Use this setting when the brightness between the subject and the background is not balanced or when the subject occupies only a small part of the photograph. Use a positive (+) EV bias for: • • • • printed text (black type on white background) backlit portraits very bright scenes (such as snow) and highly reflective subjects (such as polished metal) shots made up predominantly of sky Use a negative (-) EV bias for: • spotlit subject, especially against dark backgrounds • scenes with low reflectivity, such as green or dark foliage The DC E40 supports the following EV values: -2.0, -1.6, -1.3, -1.0, -0.6, -0.3, 0.0, 0.3, 0.6, 1.0, 1.3, 1.6, and 2.0. 20 Taking Photos BenQ DC 5530 User’s Manual M , and that Scene 2. Tap the Menu button , then tap the Next icon . 3. Tap the ISO Setting icon A . 4. Use the stylus or Navigation button to increase or decrease the value. 5. Tap OK to set the value. The menu screen appears with the ISO Setting icon you chose. 6. Tap the Return icon to exit the menu and return to Photo mode. The EV bias value appears in the bottom left corner of the LCD screen. $$ $ $ EV bias A English 1. Make sure the camera is in Manual mode mode is set to Auto A . A EV YMD +1.3 DISP Ev:+0.0 -2 +2 OK 0 DISP EV Bias value (9 3.17 Metering Metering enables you to adjust the region of the subject or frame on which the camera measures light. 1. Make sure the camera is in Manual mode mode is set to Auto A . M , and that Scene Metering Mode Center Average Center Spot Average Taking Photos A EV +1.3 2. Tap the Menu button , then tap the Next icon . 3. Tap the Metering icon . 4. Select the Metering mode. The menu screen appears with the Metering icon you chose. Icon Metering A YMD DISP Description The camera metering is set for the average brightness of objects in the center region of the frame. The camera metering is set for the brightness of the object at the center of the frame. The camera metering is set for the average brightness of all objects in the frame. 21 BenQ DC 5530 User’s Manual English 3.18 Date Imprint You can automatically print the current date on the bottom right corner of photos you take. 1. Tap the Menu button , then tap the Next icon 2. Tap the Date Imprint icon YMD . 3. Select the Date Imprint On YMD or Off appears with the setting you chose. Date Imprint A . A EV YMD +1.3 YMD . The menu screen DISP Note For instructions on changing the date format, see page 42. 3.19 Macro and Normal Modes A switch on the side of the DC E40 enables you to change between Macro and Normal modes. Use Macro for close-up shots of people or objects within 30 to 100 cm (12 to 40 inches) of the camera lens. Normal mode should be used for all photos of subjects more than 100 cm (40 inches) from the lens. Macro TV out Normal Note • After taking a photo in Macro mode , remember to switch back to Normal mode to avoid taking photos that are not in focus. • Scene Mode is not available in Macro Mode Mode is automatically set to Auto Scene Mode 22 . If you switch to Macro Mode A , Scene . Taking Photos BenQ DC 5530 User’s Manual 3.20 Quick Review and Erase 1. Take a photo and wait a few moments for the camera to finish processing it. English After taking a photo you can review it on the LCD screen. If you don’t want to keep the photo, you can delete it in order to make more memory available. A Quick Review 2. Press the Navigation button to the left A . The photo you just took appears on the screen. 3. To delete the photo, tap the Erase button below the LCD screen B . 4. You are asked to confirm the delete action. Tap Yes to delete the photo, or press No to cancel. DISP Erase Button B Note • • • Deleting unwanted photos makes more memory available for storing additional photos. Deleting a photo cannot be undone. You can also delete photos at any time by using the Erase function in Playback mode. See “Erasing Single Files” on page 39 and “Erasing All Files” on page 39. Taking Photos 23 BenQ DC 5530 User’s Manual English 4 RECORDING MOVIE CLIPS Switching the camera to Movie Recording mode allows you to record movie clips. The length of the recording depends on the amount of memory remaining on the installed SD memory card, or in the camera’s built-in internal memory. 4.1 Movie Recording mode Movie Recording Mode Follow these steps to record a movie clip. 1. Turn the camera on. 2. Set the Mode switch to Movie Recording mode appears. Camera setting icons . The movie clip recording screen 00:00:11 Remaining battery power Total length of movie clips that can be stored in memory. Record button (press to start recording a movie clip) REC. DISP REC. to begin 3. Frame the subject in the LCD screen and tap the record button recording the movie clip. You can also press OK (push the Navigation button) or the shutter button to start recording. 4. The elapsed recording time appears in red at the top right corner of the LCD screen. 5. Tap the stop button to finish recording. You can also press OK or the shutter button to stop recording. The camera takes a few moments to process the movie clip. Note 24 • In Movie Recording mode • Zoom is disabled in Movie Recording mode , the flash is automatically set to Off . . Recording Movie Clips BenQ DC 5530 User’s Manual 4.1.1 Manual and Automatic Movie Recording Modes 1. In Movie Recording mode , tap the Menu button display the Movie mode menu. English While in Movie Recording mode, setting the camera to Manual enables you to adjust white balance, EV bias, and metering. The camera automatically adjusts these values when it is set to Auto. Manual / Auto EV M +1.3 to 2. Tap the Manual/Auto icon / . 3. Select Manual or Auto . The menu screen appears with the icon you selected. 4. Press the Return icon to exit the menu, or press another icon to change other settings. M DISP M Auto M DISP 4.1.2 Movie Recording Mode Camera Settings To adjust the white balance, EV bias, and metering in Movie Recording mode, follow the instructions given in Snapshot mode. Icon Setting Page A White Balance 18 EV Bias 20 Metering 21 EV +1.3 Note • To adjust camera settings in Movie Recording mode mode • M , you must first select Manual . See “Manual and Automatic Movie Recording Modes” on page 25. If you change the White Balance, EV Bias, or Metering settings in Movie Recording mode, the settings will also be changed in Snapshot mode and vice-versa. Recording Movie Clips 25 BenQ DC 5530 User’s Manual English 5 RECORDING SOUND CLIPS Sound Recording mode allows you to use the DC E40 as a voice recorder. Sound recordings are saved on the installed SD memory card or in the camera’s internal memory. Sound is recorded by the built-in microphone located at the top of the camera. Microphone Follow these steps to record a sound clip. 1. Turn the camera on. 2. Set the Mode switch to Sound Recording mode appears: . The sound clip recording screen 00:05:13 Remaining battery power 00 : 00 : 00 Total length of audio that can be stored in memory. Standby REC. DISP Record button (tap to start recording a sound clip) 3. Tap the record icon REC. to begin recording the sound clip. You can also press OK to start recording (push the Navigation button), or press the shutter button. 4. The elapsed recording time appears in red next to the microphone icon in the center of the LCD screen. 5. Tap the stop icon REC. , press OK, or press the shutter button to finish recording. The available remaining recording time at the top right corner of the LCD screen is updated. Note • • 26 You cannot record a movie or sound clips with a length of less than 3 seconds. Movie or Sound clips will become damaged if you switch off power during the recording process. Recording Sound Clips BenQ DC 5530 User’s Manual 6 PLAYING BACK PHOTOS, MOVIES AND SOUND CLIPS English In Playback mode, the DC E40 can: • display photos on the LCD screen • play movie clips on the LCD screen • play sound clips through the built-in speaker To use Playback mode, set the Mode switch to Playback mode and turn the camera on. Playback mode works with the lens cover open or closed. Playback Mode In Playback mode you can review all of the images, movies, and sound clips stored in the camera’s internal memory or on the installed SD memory card. Files are played back in the order in which they were recorded. Note • Close the camera lens cover and turn the camera on by pressing the Power button in Playback mode to protect the lens from dust and accidental damage. 6.1 Viewing Photos When viewing photos in Playback mode, the LCD screen displays information about the photo as well as navigation and zoom controls. Current file #/Total # of files Playback mode icon Current battery level Date the photo was taken (MM-DD) 0017/0019 M 11-05 Voice memo. 1.0x Zoom in Zoom level View thumbnails View next file View previous file DISP 1. Set the Mode switch to Playback mode . 2. The most recently recorded file appears on the LCD screen. Playing Back Photos, Movies and Sound Clips 27 BenQ DC 5530 User’s Manual English 3. Press Next to view the next image, or press Previous to go back one image. You can also press the Navigation button to the left or right to scroll forward or back. Note • Press the Display button DISP to turn off the icons and view the photo only. When the icon is off, use the Navigation button to view the next or previous image. 6.1.1 Zoom and Pan When a photo is displayed on the LCD screen in Playback mode, you can zoom in or out, and pan up, down, left, or right across the image to view it in closer detail. 1. Tap the Zoom icon or press the Navigation button up. The zoom and pan controls appear on the LCD screen. Zoom in Zoom in 2.5x Zoom out Pan Pan (press OK) Zoom out DISP 2. Tap the Zoom in or Zoom out icons. The zoom factor is displayed. 3. Tap the Pan icon to bring up the pan controls: left , right , up , and down . You can also press OK on the Navigation button to turn panning on and press it left, right, up, or down to pan across the image. 4. When you are finished panning across the photo, tap the 1.0x 1.0x icon or press OK to return to Playback mode. 28 Playing Back Photos, Movies and Sound Clips BenQ DC 5530 User’s Manual 6.1.2 Viewing Thumbnails 1. In Playback mode, press the Thumbnail icon or press the Navigation button down. Thumbnail view appears on the LCD screen. Scroll up one page Selected file has a red border 0007 Selected file # 0023 Total # of files Scroll down one page DISP 2. Tap to scroll up or to scroll down one page. You can also use the Navigation button to scroll up, down, left, and right. A red border appears around the selected file. Note • In Thumbnail mode, photos, movies, and sound files appear as follows: Photo (see “Viewing Photos” on page 27) Movie clip (see “Viewing Movie Clips” on page 30) Sound clip (see “Listening to Sound Clips” on page 31) 3. Tap on a thumbnail to view it at full-size in the LCD screen or press OK to view the selected file. Note • You can also enter Thumbnail mode by pressing the Menu ing the Thumbnail • button, and then press- icon. You can erase a photo, movie clip, or sound clip in Thumbnail Mode by pressing the Erase icon. Playing Back Photos, Movies and Sound Clips 29 English Thumbnails are a quick way to view the files stored in your camera’s memory. BenQ DC 5530 User’s Manual English 6.2 Viewing Movie Clips You can play movie clips that are stored in the camera’s internal memory or on the installed SD memory card when the camera is in Playback mode. Current file #/Total # of files Playback mode icon 0017/0019 11-05 Current battery level 00:00:23 Date the clip was recorded (MM-DD) Time remaining View previous file View next file DISP To play a movie clip: 1. Set the Mode switch to Playback mode . 2. The most recently recorded file appears on the LCD screen. 3. Press Next or Previous to select a movie clip. You can also press the Navigation button to the left or right to scroll forward or back. 4. Tap Play or press OK on the Navigation button to start playing the movie clip. The pause and stop buttons appear on the screen. 5. Press OK on the Navigation button will also pause playback. Note • 30 Tap the Display button DISP to turn off the icons and view the movie clip only. Playing Back Photos, Movies and Sound Clips BenQ DC 5530 User’s Manual 6.3 Listening to Sound Clips English Audio clips can be played in Playback the camera’s built-in speaker. mode through TV out TV out The LCD screen appears as follows when an sound clip is selected. Speaker Current file #/Total # of files Playback mode icon 8/9 01-05 Current battery level 00 : 00 : 00 Standby Date the sound clip was recorded (MM-DD) Total playing time Play Next file Previous file DISP To play a sound clip: 1. Set the Mode switch to Playback mode. 2. Scroll until you come to a sound clip. You will know it is a sound clip if you see the sound clip playback screen, or when you see a sound clip thumbnail (see “Viewing Thumbnails” on page 29). 3. Tap the Play icon or press OK on the Navigation button. Current battery level 00 : 00 : 00 Time remaining Standby Pause playback Increase volume Decrease volume Stop playback DISP Playing Back Photos, Movies and Sound Clips 31 BenQ DC 5530 User’s Manual English 4. Tap to increase the playback volume, tap to decrease the volume. You can also press the Navigation button up or down to adjust the volume. 5. Tap to pause playback at any time or tap to stop and return to the beginning of the clip. Pressing OK on the Navigation button will also pause playback. 6.4 Special Playback Functions To access special functions in Playback mode , tap the Menu icon. Depending on the type of file you are currently viewing (photo, movie clip, or sound clip) the following functions are available. Icon 32 Function Description File Types Page Scrawling Use the stylus to write a note or sketch on top of a photo. Photo 33 Frame Choose from up to 20 different frames to superimpose on a photo. Photo 34 Voice Memo Record a voice annotation to accompany a photo. Photo 35 Slide Show View an automatic slide show on the LCD screen. Photo Movie Clip 37 Lock Lock files to prevent accidental deletion. Photo Movie Clip Sound Clip 37 Thumbnails Toggle Thumbnail mode on and off. Photo Movie Clip Sound Clip 29 Playing Back Photos, Movies and Sound Clips BenQ DC 5530 User’s Manual 6.4.1 Scrawling 1. In Playback mode, select a photo (not a movie or sound clip). 2. Tap the Menu icon. 3. Tap the Scrawling icon. The Scrawling edit menu appears. Pen thickness Start scrawling Eraser thickness Create copy of photo with scrawling and exit. Color palette DISP 4. Select the pen size and color you want, then tap to begin scrawling. 5. Tap the Display button DISP to change the pen or eraser size, or color. 6. Tap the Menu button when you are finished. You are asked if you want to save the new photo with the scrawl. Select Yes to save or No to cancel. 7. The Edited icon appears on the top left of the LCD screen. 0017/0019 Save as new file? YES No DISP 11-05 1.0x Edited icon DISP Note • When you save a photo after scrawling on it, the edited photo is saved as a separate file with a size of 640x480 pixels. The original file remains unchanged in the camera’s memory. Playing Back Photos, Movies and Sound Clips 33 English Scrawling allows you to write a note or draw a sketch on top of a photograph. You can choose the thickness of the pen or eraser, the color, and decide to save the edited picture as a new file. BenQ DC 5530 User’s Manual 6.4.2 Adding a Frame English The DC E40 comes with up to 20 different frame designs that you can add to your photos for a fun and interesting effect. 1. In Playback mode, select a photo (not a movie or sound clip). 2. Tap the Menu 3. Tap the Frame icon. icon. The Frame edit menu appears. Frame #/Total # of frames 10 / 15 Return to Playback mode Select current frame style Previous frame style OK Next frame style DISP 4. Tap and or use the Navigation button to scroll through the frame styles. Tap OK to choose a frame style and save the picture directly to a new file. Alternatively, tap the Menu icon; you are prompted to save the framed picture as a new file. 5. Tap Yes to save the photo with the selected frame or tap No to cancel and return to Playback mode. 6. The Edited Save as new file? YES No DISP icon appears on the top left of the LCD screen. Notes • 34 When you save a photo after adding a frame, the framed photo is saved as a separate file with a size of 640x480 pixels. The original file remains unchanged in the camera’s memory. Playing Back Photos, Movies and Sound Clips BenQ DC 5530 User’s Manual 6.4.3 Adding a Voice Memo 1. In Playback mode, select a photo (not a movie or sound clip). 2. Tap the Menu icon. 3. Tap the Voice Memo icon. The Record Voice Memo screen appears. 4. Tap the Record icon to begin recording. The remaining recording time appears on the LCD screen. Tap Stop or press OK on the Navigation button to end recording. 5. Tap Return to go back to the Playback menu. English Adding a voice memo is a useful way of adding notes and reminders to photos. Record Voice Memo Record Play Erase DISP 0017/0019 11-05 12 sec Available recording time (up to 20 seconds for each photo) STOP DISP Playing Back Photos, Movies and Sound Clips 35 BenQ DC 5530 User’s Manual 6.4.4 Listening to Voice Memos English Follow these steps to listen to a voice memo that was previously added to a photo. 1. In Playback mode, select a photo with a voice memo. You will see the Voice Memo icon in the top left corner of the LCD screen. 2. Tap the Menu icon. 3. Tap the Voice Memo icon. The Record Voice Memo screen appears. 4. Tap the Play Voice Memo icon to play the voice memo for the photo using the camera’s built-in speakers or attached headphones. 5. Tap Stop or press OK on the Navigation button to stop playback at any time. 0017/0019 M 11-05 1.0x Voice Memo icon DISP Record Voice Memo Play DISP Note • A photo can have only one voice memo. If you record a voice memo for a photo with an existing voice memo, the previous voice memo will be erased. 6.4.5 Erasing Voice Memos Follow these steps to erase a voice memo that was previously added to a photo. 1. In Playback mode, select a photo with a voice memo. You will see the Voice Memo icon in the top left corner of the LCD screen. 2. 3. 4. 5. 36 Tap the Menu icon. Tap the Voice Memo icon. The Record Voice Memo screen appears. Tap the Erase Voice Memo icon to erase the voice memo for the photo. Tap Yes or to erase the voice memo, or tap No to cancel. Playing Back Photos, Movies and Sound Clips BenQ DC 5530 User’s Manual 6.4.6 Playing a Slide Show 1. In Playback mode, tap the Menu English The camera can automatically display photos (or the first frame of movie clips) stored in memory in sequence at a two-second interval. Movie clips and sound clips are not played during slide shows. icon. 2. Tap the Slide Show icon. The slide show begins. 3. Tap the Menu icon or press OK to stop the slide show and return to the Playback mode menu. 6.4.7 Locking and Unlocking Files Locking photos, movie clips, and sound clips stored in your camera’s memory or on an installed SD memory card prevents them from being accidentally deleted. You can lock and unlock individual files, or all files. 6.4.7.1 Locking a Single File 1. In Playback mode, select the photo, movie clip, or sound clip you want to lock. Lock 2. Tap the Menu button. 3. Tap the Lock icon. 4. Tap the single Lock icon. The screen returns to the Playback menu. 5. Tap Return . The Locked icon now appears at the top left corner of the playback screen. 1 DISP 0017/0019 M Locked icon 11-05 1.0x DISP Note • To delete a file that is locked, you must first unlock it. See “Unlocking Single Files” on page 38. Playing Back Photos, Movies and Sound Clips 37 BenQ DC 5530 User’s Manual 6.4.7.2 Locking all Files English 1. In Playback 2. 3. 4. 5. mode, tap the Menu button. Tap the Lock icon. Tap the Lock All icon. Tap Yes to lock all files or tap No to return to the Lock menu. Tap Return . The Locked icon appears at the top left corner of the playback screen for all photos, movie clips, and sound clips. All 6.4.7.3 Unlocking Single Files 1. In Playback 2. 3. 4. 5. mode, select a file that is locked (the Locked icon should be visible). Tap the Menu button. Tap the Lock icon. Tap the Unlock icon. The screen returns to the Playback menu. Tap Return . The Locked icon no longer appears at the top left corner of the playback screen. 1 6.4.7.4 Unlocking all Files 1. In Playback 2. 3. 4. 5. 6. mode, tap the Menu button. Tap the Lock icon. Tap the Unlock All icon. Tap Yes to unlock all files or tap No to return to the Lock menu. The screen returns to the Playback menu. Tap Return . The Locked icon no longer appears at the top left corner of the playback screen for all photos. All Note • 38 You cannot add a voice memo for a locked image file. Playing Back Photos, Movies and Sound Clips BenQ DC 5530 User’s Manual 6.4.8 Erasing Single Files 1. In Playback mode, select the photo, movie clip, or sound clip that you want to delete. Erase? 2. Tap the Erase button located below the LCD screen. 3. Tap Yes to erase the file or tap No to cancel and return to Playback mode. No YES DISP Erase button Note • To erase a file that is locked, you must first unlock it. See “Unlocking Single Files” on page 38. 6.4.9 Erasing All Files Selecting this action will permanently remove all unlocked photos, movie clips, and sound clips from the camera’s memory. 1. In Playback mode, tap the Erase button located below the LCD screen. 2. Tap the Erase All icon. 3. Tap Yes to erase all files or tap No to cancel and return to Playback mode. Erase? YES No Erase All DISP Erase button Playing Back Photos, Movies and Sound Clips 39 English Erasing a photo, movie clip, or sound clip permanently removes the file from memory. It cannot be recovered. It is strongly suggested that you lock files that you are certain you want to keep. See “Locking and Unlocking Files” on page 37 for more information. BenQ DC 5530 User’s Manual English 7 CAMERA SETTINGS Camera settings can be accessed in any mode by tapping the Menu button and then tapping the Setup icon. Some settings are located on the second setup screen, accessed by tapping Next . You can change or adjust a number of basic camera settings including: Icon Setting Adjust the camera’s date and time. 42 Select the date format used for the Date Imprint feature (page 22). 42 Set the LCD screen to Bright or Normal. 43 Turn the camera’s system sound effects on or off. 43 Reset the automatic file counter. 43 Video Output Select NTSC or PAL video output. 44 Power Saving Set the camera to automatically power off after three minutes of disuse. 44 Select the default menu language. 45 Return all camera settings to factory preset values. 45 Display the installed firmware version number. 46 Reset the touch screen point and tap settings. 46 Date/Time Date Format LCD Brightness Sound 123 NT SC z z En File Number Reset Language Default Setting Software Version Screen Calibration 40 Page 41 Memory YMD Description Copy files from internal memory to an installed SD card. Format an SD card or internal memory. Camera Settings BenQ DC 5530 User’s Manual 7.1 Memory: Copying and Formatting English This function enables you to: • copy files from the camera’s internal memory to an installed SD memory card • format an installed SD memory card or the camera’s internal memory Follow the steps below. 1. Tap Menu , then tap Setup . 2. Tap Memory . 3. To copy files from the camera’s internal memory to an installed SD memory card, tap . You are prompted to confirm the action. 4. To format an installed SD memory card, tap . You are prompted to confirm the action. 5. To format the camera’s internal memory, make sure an SD card is not installed, and follow steps 1 to 3 above. The internal memory icon appears. Format SD SD SD F SD SD F DISP F Note • • • Formatting an SD card or internal memory permanently removes all files, even if files are locked (see “Locking and Unlocking Files” on page 37). If an SD card is corrupted or you are having problems storing files on the camera, formatting the card will usually solve the problem. Always format the SD card using the camera’s function. Formatting the SD card with another camera or with a computer may make it unusable with the DC E40. Camera Settings 41 BenQ DC 5530 User’s Manual English 7.2 Setting the Date and Time Setting the date and time correctly is important as this information is stored with the photos you take, and is used if you have turned Date Imprint on (see “Date Imprint” on page 22). 1. Tap Menu , then tap Setup . 2. Tap Date/Time . 3. Tap the year. The value adjust screen appears. 4. Tap to increase the year or tap to decrease the year. You can also use the Navigation button to adjust the values. 5. Repeat Step 4 for the remaining values. 6. Tap OK to save the changes or tap to cancel and return to the Setup menu. Date Year 2021 / 2021 / 11 / 03 AM 11 / 03 / 04 : 53 OK DISP 7.3 DISP Date Format The camera can store and display the current date in three different formats: • YMD Year - Month - Day (e.g. 04 01 31) • MDY Month - Day - Year (e.g. 01 31 04) • DMY Day - Month - Year (e.g. 31 01 04) Year/Month/Day YMD MDY DMY Follow these steps to change the date format: 1. Tap Menu , then tap Setup 2. Tap Date Format YMD . 3. Tap the format you prefer. 42 . DISP Camera Settings BenQ DC 5530 User’s Manual 7.4 LCD Brightness 1. Tap Menu , then tap Setup 2. Tap LCD Brightness . 3. Tap Bright or Normal English The brightness of the LCD screen can be set to Bright or Normal. The Bright setting is useful for use in brightly-lit areas, however, battery power is consumed at a faster rate. Bright . . DISP 7.5 Sound The Sound function enables you to toggle system sound effects (such as the beep when tapping or scrolling) on or off. 1. Tap Menu 2. Tap Sound 3. Tap On , then tap Setup . or Off . . Note • 7.6 On DISP The shutter and warning sounds cannot be turned off. File No. Reset The DC E40 automatically assigns incrementing numbers to the file names of all photos, movie clips, and sound clips that you record. You can choose to reset the auto numbering to start from 1. This can be useful if you have erased all files from memory or formatted the SD card. 1. Tap Menu , then tap Setup 2. Tap File No. Reset 3. Tap Yes YES or No Camera Settings 123 No Reset File No.? YES No . . . DISP 43 BenQ DC 5530 User’s Manual English 7.7 Video Output The camera’s TV out port provides audio and video output for listening to sound clips and viewing photos or video clips on a standard TV screen. Use the Audio/Video setup function to set the operating mode. Set the video output mode to either NTSC or PAL. Refer to your local authorities for information on whether NTSC or PAL is used in your region. NTSC NT SC PAL For information on connecting your camera to a TV, see “Connecting to a TV” on page 47. 1. Tap Menu . , then tap Setup 2. Tap Video Output NTSC . 3. Tap NTSC Out NTSC , or PAL out 7.8 and tap Next DISP PAL . Power Saving When power saving is turned on, the LCD screen will turn off after three minutes of disuse, and will shut down completely after five minutes. It is recommended that power saving be turned on to avoid accidental discharging of the battery. 1. Tap Menu Next . , then tap Setup 2. Tap Power Saving 3. Tap On zz or Off 44 z z . z z . On z z z z and tap DISP Camera Settings BenQ DC 5530 User’s Manual 7.9 Language 1. Tap Menu . , then tap Setup and tap Next 2. Tap Language En . 3. Tap the language icon you prefer. English The DC E40’s on-screen menus and messages can be displayed in eight different languages, including: English, Spanish, German, French, Italian, Portuguese, Simplified Chinese, and Traditional Chinese. English ១խ խ En Es De Fr It Pt DISP Note • If you accidentally set the language to one that you don’t understand, you can restore your preferred language by tapping the appropriate language icon. 7.10 Default Setting Selecting this functions returns all camera settings to the condition they were in at the factory. 1. Tap Menu . , then tap Setup 2. Tap Default Setting 3. Tap Yes YES or No No and tap Next Reset to Default ? Yes No . . DISP Camera Settings 45 BenQ DC 5530 User’s Manual English 7.11 Software Version This function displays the version number of the software installed in the DC E40. Should you ever require technical assistance (see “Service Information” on page 56), the technician you speak to may request this information. 1. Tap Menu . , then tap Setup V1000 and tap Next 2. Tap Software Version . 3. The software version appears on the screen. Tap Return to exit. DISP 7.12 Screen Calibration Over time, the LCD touch screen may become uncalibrated, making it difficult to tap on icons, sliders, or other objects. If this occurs, you should calibrate the screen as follows. 1. Tap Menu . , then tap Setup Please tap the target of the center to start and tap Next 2. Tap Screen Calibration . 3. Follow the instructions that appear on the screen. 4. If the calibration succeeds, the camera will restart itself. If it fails, repeat steps 1 to 3. DISP DISP 46 Camera Settings BenQ DC 5530 User’s Manual 8 CONNECTING TO A TV Use the included AV to connect the DC E40 to your television as illustrated below. Your own television input jacks may differ from the illustration. Refer to your television’s user manual for assistance. Connect the yellow RCA jack to the television’s Video In port. R AV L VIDEO Connect the white RCA jack to the television’s left or right Audio In port. Connect the small end of the AV cable to the camera’s TV out port. TVt ou DC E40 1. Turn the camera off and connect the AV cable’s mini-plug to the camera’s earphone jack. 2. Connect the two RCA jacks to your television as illustrated above. 3. Turn the camera on. Everything you can see on the camera’s LCD screen also appears on the television. The image on the camera LCD screen indicates that the TV has been successfully connected. Then the LCD screen turns off; view the previous or next image by pressing the Navigation button. 4. Use the DC E40’s playback functions to view photos, movie clips, etc. Refer to “Playing Back Photos, Movies and Sound Clips” on page 27 for more information. Note • • • Turn the camera off before disconnecting it from the TV. You may need to change the camera’s PAL or NTSC video format setting depending on your region. For information, see “Video Output” on page 44. The DC E40 supports mono audio output only. Connecting to a TV 47 English You can connect the DC E40 to a television and view photos and movie clips on a large screen. BenQ DC 5530 User’s Manual English 9 CONNECTING TO A COMPUTER Connecting the DC E40 to your computer enables you to perform the following functions: • upload photos, movie clips, and sound clips to your computer for storage and organization Before connecting to a computer running Microsoft Windows, you must first install the software that is included on the software installation CD-ROM that came with the DC E40. 9.1 Installing the Digital Camera Software • It's recommended that you set up the driver and software before connecting the digital camera to your PC. Normally, a software installation menu appears automatically after this installation CD is inserted into your CD-ROM drive. If the menu does not appear, browse the CD with Windows Explorer, find a program file named “Autorun.exe” in the root directory and double-click it. The setup menu appears. • Click each item to install the software program of your choice. To browse the content of this CD and install software manually, refer to the descriptions of the CD content in the next section. 48 Connecting to a Computer BenQ DC 5530 User’s Manual 9.2 Bundled Software Software Description PhotoBase Arcsoft PhotoBase enables you to efficiently find and organize your media-files. Use it to create slide shows, Web albums, or video postcards, and share your media-files with your friends on the Internet. PhotoImpression ArcSoft PhotoImpression is an easy-to-use photo editing and creative design program. Edit and retouch your photos, then add special effects or place them in cards, calendars, frames and fantasy templates. PhotoImpression also includes a wide variety of printing options. VideoImpression Arcsoft Video Impression lets you edit and combine video files. New videos can be created by existing video, animation, and image files. Quickly and easily create desktop video presentations for use at home, business, or on the Internet. PhotoPrinter Pro. Arcsoft Photo Printer is a versatile printing utility that lets you print out several different images on a single sheet of paper. It's as simple as opening your image, selecting from an assortment of templates and clicking Print. Microsoft DirectX Microsoft DirectX is an all-in-one and cross-platform media tool. Microsoft Media Player Microsoft Media Player is a Windows utility that plays audio, video, and streaming formats as well as many other popular audio and video formats, including MP3, CD audio, and MIDI files. Acrobat reader Adobe Acrobat Reader is a “must have” utility to read files in the popular cross-platform PDF file format. QLink BenQ QLink is a utility for your smart photo downloads, and has printout and edit functions. Share via e-mail with others, for photos folders management and show slide show photos on screen. Connecting to a Computer 49 English The software installation CD-ROM included with the DC E40 includes the following software. Please refer to the software’s help or electronic user manual for instructions. BenQ DC 5530 User’s Manual English 9.3 Transferring Files To/From a Computer This section explains how to transfer images, movies between your camera and a PC using Windows XP/ME/2000/98SE. 9.3.1 Transferring Photos, Movie Clips, Sound Clips, and Music Files This section shows you how to use the Windows Explorer utility to manipulate files between your camera and a PC. 1. Turn on the computer. USB cable OPEN 2. Turn on the camera. 3. Connect the camera to the PC with the included USB cable. Ensure that the connection is secure. 4. Tap “QLink-Storage” on the camera’s LCD screen. 5. A new disk appears in Windows Explorer labelled “Removable Disk.” (See note below). 6. Stored photos, movie clips, and sound clips can be found in the directory “Removable Disk\DCIM\100MEDIA”. Copy, view, delete, and move images, movie clips, sound clips, and music files using standard drag and drop Windows Explorer commands. Note • • • • • • • 50 If an SD memory card is installed, two “Removable Disks” will appear in Windows Explore. One represents the camera’s internal memory, the other represents the SD card. Photo files have the suffix “.jpg” Voice Memo files have the suffix “.htm” Downloaded frame files have the suffix “.bqf ” (not built-in frame files) Movie clips have the suffix “.mpg” Sound clips have the suffix “.wav” Refer to your computer’s Help for information on viewing or playing multimedia files on your computer. Connecting to a Computer BenQ DC 5530 User’s Manual 9.3.2 Using the QLink Software English The included QLink software is a useful tool for downloading photos from your camera to your computer, and then displaying, e-mailing, printing, or editing them. After successfully installing the software (see “Installing the Digital Camera Software” on page 48), follow the steps below to get started with QLink. 1. Turn on the computer and start the QLink software. 2. Turn on the camera. 3. Connect the camera to the PC with the included USB cable. Ensure that the connection is secure. 4. Tap “QLink-Storage” on the camera’s LCD screen. The software takes a moment to detect and mount the camera. 5. A new disk appears in the navigation panel on the left labelled “Removable Disk.” 6. Photos, movie clips, and sound clips stored on your camera are displayed in the preview screen at center. 7. The buttons at the left of the screen allow you to view a slide show, e-mail selected photos, print selected photos, edit photos, change program settings, and exit the program. 8. Refer to the built-in QLink help for more information on all of QLink’s features. Note • SD memory cards in the following sizes are supported: 8MB, 16MB, 32MB, 64MB, 128MB, 256MB, and 512MB. The DC E40 is compatible with SD memory cards manufactured by Panasonic, Toshiba, and Sandisk. Please contact your local dealer for purchasing information. Connecting to a Computer 51 BenQ DC 5530 User’s Manual 9.3.3 Using the QLink Frame English The included QLink software is also the tool for transferring downloaded frames from your computer to your camera. After successfully installing the software (see “Installing the Digital Camera Software” on page 48), follow the steps below to get started with QLink. 1. Turn on the computer and start the QLink software. 2. Turn on the camera. 3. Connect the camera to the PC with the included USB cable. Ensure that the connection is secure. 4. Tap “QLink-Frame” on the camera’s LCD screen. The software takes a moment to detect and mount the camera. 5. The QLink Frame software will automatically launch as below. 6. If you’ve downloaded frames from our Web site (refer to 9.3.3.1 “Downloading Frames” ), click and browse to the location of the downloaded frames to transfer them to the QLink Frame PC window. 7. Select frames in either the PC or BenQ Camera window, and click to copy frames from the PC to the camera or click to transfer frames from the camera to the PC. Click a frame and drag it to in either window to remove the frame from the window. 8. When you have finished copying frames between the PC and BenQ Camera window, click OK 52 to transfer the files. Connecting to a Computer BenQ DC 5530 User’s Manual Note • You can also import frames from the bundled CD in the directory CD-ROM/PHOTO-FRAMES. 9.3.3.1 Downloading Frames The DC E40 comes with 10 fun photo frames pre-installed in the camera’s internal memory. You can download and install up to 10 more frames styles and also get more information about downloading frames at other locations on the BenQ Web site at the following address: www.BenQ.com.tw/global/ Connecting to a Computer 53 English 9. When you have finished transferring files, detach the camera from the PC; then turn the camera on to make the changes effective. BenQ DC 5530 User’s Manual English 10 54 TROUBLESHOOTING Symptoms Causes Solutions The power won’t turn on. • The battery is out of power. • The AC power adapter is not connected or is damaged. • The USB cable is not properly connected to the camera or PC. • Use the AC power adapter to charge the battery. • Make sure the AC power is connected and it's not damaged. • First turn on the PC, then connect the camera and PC with the USB cable. The power turns off during use. • The battery is out of power. • Power Saving mode is enabled. • The battery/SD card cover is opened when in use. • The adapter has not been connected properly. • Use the AC power adapter to charge the battery. • Switch on the power. • Do not open the battery/SD card cover when the camera is in use. • Connect the adapter correctly. The battery power is being used up too quickly. • The external temperature is too cold. • The battery is not used for a long time. • Keep the camera away from extreme temperatures. • Recharge the battery with the AC power adapter or USB cable. The camera does not take pictures when the shutter button is pressed. • The camera is not in Snapshot Mode. • The battery is weak. • The power has not been switched on. • Set the Mode switch to Snapshot mode. • Replace the battery. • Switch on the power. The close-up image is blurred. • Select the correct focus range. • If the subject is within 30 to 100 cm (12 to 40 inches), select Macro mode. The flash does not fire. • The camera flash is turned off. • The light source is sufficient. • The flash is not fully charged. • Set the flash mode to Auto Flash, Forced Flash, or Red-Eye Reduction mode. • Wait for the flash to fully charge. There is something wrong with the color of the captured image. • White balance is not set properly. • Set the white balance to Auto mode or other suitable mode. The picture is too bright or too dark. • There is excessive or inadequate exposure. • Reset EV bias value. The LCD screen is not clear. • The LCD screen plastic cover is dirty. • The LCD screen has hot spots. • Clean the LCD screen with a soft cloth. • Hot spots are normal and do not affect the camera’s functionality. The camera cannot download images to the PC. • The cable is not connected properly. • The camera is off. • OS is not Windows 98SE /2000/ME/XP or the PC is not equipped with a USB port. • USB driver is not installed (Windows 98SE only). • Check the cable connection. • Turn on the power. • Install Windows 98SE/2000/ME/XP and USB port. • Install the USB Driver (Windows 98SE only). Troubleshooting BenQ DC 5530 User’s Manual 11 SPECIFICATIONS 1/2.5-inch 4.23 megapixel CCD with 4.0 megapixel effective resolution Lens f=35 mm (35 mm film equivalent) F 3.2/F 8.0 Digital Zoom Digital: 4X LCD Monitor 1.5-inch color LTPS LCD Focus Range Macro: 30~100 cm, Normal: 100 cm to infinity Shutter Speed 1/20 ~ 1/1000 seconds (2~1/1000 seconds for Night Scene) Exposure Metering: Spot, Center-Weighted Average, Average Exposure compensation +2 EV (0.3 EV / step) ISO Equivalent Auto, 100, 200 White Balance Auto / Daylight / Cloudy / Tungsten / Fluorescent Flash Auto / Forced Flash / Flash Off / Red - Eye Reduction Self-Timer 10 seconds File Format Still image: JPEG (EXIF 2.2) Movie Mode ASF format Size: 320x240 with sound (continuous) Image size 2848 x 2136 pixels, 2304 x 1728 pixels 1600 x 1200 pixels, 1280 x 960 pixels Dictaphone WAV format (continuous) Voice Memo WAV format (20 seconds) Storage Type Built-in 8MB / SD card compatible Interface Digital out: USB 1.1 TV out: Audio/Video output DC power input: 5V Power Source Rechargeable Lithium-ion battery / AC adapter / USB cable Dimensions (WxHxD) 100.8 x 55.2 x 27.5 mm Weight 125g (without battery) CD-ROM Contents QLink Arcsoft PhotoBase Arcsoft PhotoImpression Arcsoft VideoImpression Arcsoft PhotoPrinter Adobe Acrobat Reader Microsoft DirectX Microsoft Media Player Electronic User’s Manual Specifications 55 English Image Sensor BenQ DC 5530 User’s Manual English 11.1 System Requirements • • • • • • 12 Pentium 166 MHz MMX class or higher CPU 64 MB RAM CD-ROM drive 100 MB free hard disk space Available USB port Windows 98SE/2000/ME/XP SERVICE INFORMATION If you encountered problems using DC E40 and the camera driver program, please send an Email (containing detailed descriptions of the problem you came upon, the hardware and software environment of your system) to the following addresses: USA: [email protected] Europe: [email protected] Taiwan: [email protected] China: [email protected] Asia: [email protected] Australia and New Zealand: [email protected] For free driver program updates, product information and news release, please visit the following web address: http://www.BenQ.com.tw/global/ 56 Service Information