1
®
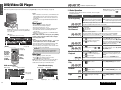
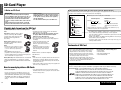
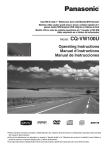
In-Dash 7” Widescreen Color LCD Monitor TV/DVD/SD Receiver
Moniteur/télé couleur de tableau de bord à ÉCL de 7 po (grandécran)/récepteur/lecteur DVD/SD
Reproductor de DVD con receptor SD y monitor LCD de TV en color de pantalla
ancha de 7 pulgadas para el tablero de instrumentos
TILT
CQ-VD7700U/VD7500U
OPEN / CLOSE
Operating Instructions
Manuel d’instructions
Manual de Instrucciones
NAVIGATION
OPEN / CLOSE
TILT
CQ-VD7700U
PWR
NAVI
MODE
MENU
STOP
PAUSE
PLAY
CHAPTER
TOP MENU
RETURN
CQ-VD7700U
OSD
ENTER
RET
DISC
VOLUME
MUTE
NAVI
NAVIGATION
DISP
MODE
ASP
POWER
ASPECT
P·MODE
SD CARD
DVD / SD MENU RANDOM REPEAT
RAND
ST/ MONO
(CQ-VD7700U)
TER
TRACK/
CHANNEL
EN
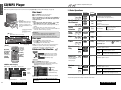
IN-DASH 7" WIDESCREEN COLOR LCD MONITOR TV / DVD / SD RECEIVER
OPEN
AUDIO
CH1
1
ANGLE
PAGE
SUBTITLE
TRACK
SUB
GRP
TITLE / CHAPTER
CH2
2
SCROLL
REP
3
DISP
SCAN
4
5
7
8
9
0
SPACE
6
VOL
ASPECT
A
MUTE
P-MODE
CAR AV
Panasonic Consumer Electronics
Company, Division of Matsushita
Electric Corporation of America
One Panasonic Way, Secaucus,
New Jersey 07094
http://www.panasonic.com
Panasonic Sales Company.
Division of Matsushita Electric of
Puerto Rico, Inc. (“PSC”)
Ave. 65 de Infanteria, Km. 9.5
San Gabriel Industrial Park, Carolina,
Puerto Rico 00985
http://www.panasonic.com
YEFM284237
Panasonic Canada Inc.
5770 Ambler Drive,
Mississauga, Ontario
L4W 2T3
http://www.panasonic.ca
CQ-VD7700U
TEXT
CQ-VD7500U
NB0304-0
Printed in Japan
Imprimé au Japon
Impreso en Japón
¡Please read these instructions carefully before using this product and keep this manual for future reference.
¡Prière de lire ces instructions attentivement avant d’utiliser le produit et garder ce manuel pour l’utilisation ultérieure.
¡Lea con atención estas instrucciones antes de utilizar el producto y guarde este manual para poderlo consultar en el futuro.
E
N
G
L
I
S
H
CAUTION:
WARNING
• TO REDUCE THE RISK FOR FIRE OR ELECTRIC SHOCK AND ANNOYING INTERFERENCE, USE ONLY THE INCLUDED COMPONENTS.
• This unit operates with a 12 V DC negative
ground auto battery system only. Do not
attempt to use it any other system.
• Do not expose unit to direct sunlight or
excessive heat.
• Keep out the SD-Card and batteries of reach
of children.
If swallowed, seek medical advice immediately.
CAUTION!
THIS PRODUCT UTILIZES A CLASS I LASER.
USE OF CONTROLS OR ADJUSTMENTS OR PERFORMANCE OF PROCEDURES OTHER THAN THOSE
SPECIFIED HEREIN MAY RESULT IN HAZARDOUS
RADIATION EXPOSURE.
DO NOT OPEN COVERS AND DO NOT REPAIR YOURSELF. REFER SERVICING TO QUALIFIED PERSONNEL.
2
Consignes de sécurité
Safety Information
ATTENTION!
• PLEASE
FOLLOW THE LAWS AND REGULATIONS
OF YOUR STATE, PROVINCE OR COUNTRY FOR
INSTALLATION OF THE UNIT.
• TO
REDUCE THE RISK OF FIRE OR ELECTRIC
SHOCK OR PRODUCT DAMAGE, DO NOT EXPOSE
THIS APPLIANCE TO RAIN, SPLASHING, DRIPPING
OR MOISTURE.
The following applies only in the U.S.A.
Part 15 of the FCC Rules
FCC Warning:
Any unauthorized changes or modifications to this
equipment would void the user's authority to operate
this device.
NOTICE:
This product has a fluorescent lamp that contains a small amount of mercury. It also contains lead in some components. Disposal of
these materials may be regulated in your
community due to environmental considerations. For disposal or recycling information
please contact your local authorities, or the
Electronics Industries Alliance:
<http://www.eiae.org.>
MISE EN GARDE
• AFIN DE PRÉVENIR TOUT RISQUE D’INCENDIE OU D’INTERFÉRENCES, UTILISER
UNIQUEMENT LES COMPOSANTS FOURNIS.
• Cet appareil ne peut fonctionner que sur
une batterie de 12 V c.c. avec négatif à la
masse. Ne tentez pas de l’utiliser avec une
autre source d’alimentation. Cela pourrait
causer de graves dommages.
CET APPAREIL EST UN PRODUIT LASER DE LA
CLASSE I.
L’UTILISATION DE COMMANDES OU RÉGLAGES OU
L’EXÉCUTION D’OPÉRATIONS AUTRES QUE CELLES
QUI SONT INDIQUÉES DANS CE DOCUMENT
PEUVENT RÉSULTER EN UNE EXPOSITION À UN
RAYONNEMENT DANGEREUX.
N’OUVREZ PAS LES COUVERCLES ET N’ESSAYEZ
PAS D’EFFECTUER VOUS-MÊME DES RÉPARATIONS.
ADRESSEZ-VOUS À UN PERSONNEL QUALIFIÉ POUR
TOUTE RÉPARATION.
ATTENTION:
• N’exposez pas l’unité à la lumière du soleil
directe ou chaleur excessive.
• OBSERVEZ LES LOIS ET RÈGLEMENTS DE VOTRE
• Gardez les cartes SD et les piles hors de
portée des enfants.
Si elle a été avalée, faites immédiatement
appel à l'intervention d'un médecin.
• AFIN DE LIMITER LES RISQUES D’INCENDIE OU
PROVINCE OU PAYS POUR L’INSTALLATION DE
L’APPAREIL.
D’ÉLECTROCUTION OU ENCORE D’ENDOMMAGEMENT DE L’APPAREIL, N’EXPOSEZ PAS CET
APPAREIL À LA PLUIE, AUX ÉCLABOUSSURES
D’EAU OU À L’HUMIDITÉ.
Find the model number and serial number on either the back or bottom of the unit. Please record them in the
space below and retain this booklet as a permanent record of your purchase to help with identification in case of
theft.
Il est recommandé de noter, dans l’espace prévu ci-dessous, les numéros de modèle et de série inscrits soit à l’arrière soit sous le fond de l’appareil, et de conserver ce manuel comme mémorandum de l’achat afin de permettre
l’identification de l’appareil en cas de vol.
MODEL NUMBER
NUMÉRO DE MODÈLE CQ-VD7700U/VD7500U
CQ-VD7700U/VD7500U
SERIAL NUMBER
NUMÉRO DE SÉRIE
DATE PURCHASED
DATE DE L’ACHAT
FROM
VENDEUR
CQ-VD7700U/VD7500U
F
R
A
N
Ç
A
I
S
CQ-VD7700U/VD7500U
3
Información para su seguridad
PRECAUCIONES:
ADVERTENCIA
• PARA EDUCIR EL RIESGO DE INCENDIOS O
SACUDIDAS ELÉCTRICAS< Y PARA EVITAR
LAS INTERFERENCIAS MOLESTAS, UTILICE
SOLAMENTE LOS COMPONENTES INCLUIDOS.
E
S
P
A
Ñ
O
L
• Este unidad sólo funcionará con un sistema
de batería de vehículo de 12 V CC con negativo a masa.
• No exponga la unidad a la luz directa del
sol ni a calor excesivo.
• Mantenga las tarjetas SD y las pilas alejadas del alcance de los niños.
Existe el peligro de que se la traguen.
Si se la traga alguien, llévelo inmediatamente al médico.
PRECAUCIÓN:
ÉSTE UN PRODUCTO LÁSER DE LA CLASE I.
LA UTILIZACIÓN DE CONTROLES, EL HASER
AJUSTES O EL SEGUIR PROCEDIMIENTOS DISTINTOS DE LOS ESPECIFICADOS EN ESTE MANUAL
PODRÍA CAUSAR UNA EXPOSICIÓN PELIGROSA A LA
RADIACIÓN.
NO ABRA LAS CUBIERTAS NI HAGA PERARACIONES
USTED MISMO. SOLICITE LOS TRABAJOS DE SERVICIO AL PERSONAL CUALIFICADO.
• RESPETE LAS LEYES Y REGULACIONES DE SU
ESTADO, PROVINCIA O PAÍS PARA LA INSTALACIÓN
DEL APARATO.
• PARA REDUCIR EL PELIGRO DE INCENDIOS Y DE
DESCARGAS ELÉCTRICAS ASÍ COMO DE DAÑOS
DEL PRODUCTO, NO LO EXPONGA A LA LLUVIA, A
SALPICADURAS, CONDENSACIÓN DE AGUA NI
HUMEDAD.
Lo siguiente se aplica solamente a los EE.UU.
Parte 15 de los Reglamentos FCC
Advertencia FCC:
Cualesquier cambios o modificaciones sin autorización a este equipo puede anular la autoridad del
usuario para operar este dispositivo.
AVISO:
Este producto contiene plomo en algunos
componentes.
La eliminación de estos materiales puede
estar reglamentado en su comunidad debido
a las consideraciones ambientales.
Para informarse acerca de la eliminación o
reciclaje comuníquese con las autoridades
locales, o la Alianza de Industrias
Electrónicas: <http://www.eiae.org.>
Use This Product Safely
WARNING:
TO AVOID RISK OF SERIOUS INJURY OR POSSIBLE VIOLATION OF LAWS, DO NOT USE WHERE
VISIBLE TO DRIVER FOR ANY PURPOSE OTHER THAN NAVIGATION OR USE WITH REAR VIEW
CAMERA.
E
N
G
L
I
S
H
When Driving
¡The driver must not operate the color LCD (liquid crystal display) monitor. Operating the color LCD monitor may lead
to carelessness and cause an accident. Stop your car in a safe location when operating the unit.
¡The driver must not watch videos while driving. It may lead to carelessness and cause an accident.
¡Keep the unit at an appropriate sound level. Driving with the sound at a level that prevents you from hearing sounds
outside and around the car may cause an accident.
CAUTION:
Follow local rules and regulations for installing monitor and TV antenna.
When Car Washing
Do not expose the product, including the speakers and discs, to water or excessive moisture. This could cause electrical
shorts, fire, or other damage.
When Parked
Parking in direct sunlight can produce very high temperatures inside your car. Give the interior a chance to cool down
before switching the unit on.
Use the Proper Power Supply
This product is designed to operate with a 12 V DC, negative ground battery system (the normal system in a North
American car.)
Disc Mechanism
Do not insert coins or any small objects. Keep screwdrivers and other metallic objects away from the disc mechanism and
disc.
Protect the Software
When you leave the car, be sure to eject the disc and SD-card from this unit and remove them from the vehicle.
Use Authorized Servicenters
Do not attempt to disassemble or adjust this precision product. Please refer to the Servicenter list included with this product for service assistance.
For Installation
The product should be installed in a horizontal position with the front end up at a convenient angle, but not more than 30˚.
The user should bear in mind that in some areas there may be restrictions on how and where this unit must be installed.
Consult your dealer for further details.
Busque el número del modelo y el número de serie ya sea en la parte trasera o en el fondo de la unidad. Sírvase
anotar dichos números en el espacio siguiente, y mantenga este librete como una anotación permanente de su
compra para ayudar en la identificación en el caso de robo.
NÚMERO DEL MODELO CQ-VD7700U/VD7500U
NÚMERO DE SERIE
FECHA DE COMPRA
NOMBRE DE LA TIENDA
4
CQ-VD7700U/VD7500U
CQ-VD7700U/VD7500U
5
E
N
G
L
I
S
H
Use This Product Safely (continued)
This system is designed so that you cannot see
moving pictures while you are driving.
¡Park your car in a safe and pull the side brake (parking brake)
lever before watching the monitor.
Panasonic welcomes you to our ever growing family of electronic product owners. We know that this product
will bring you many hours of enjoyment. Our reputation is built on precise electronic and mechanical engineering, manufactured with carefully selected components and assembled by people who take pride in their work.
Once you discover the quality, reliability, and value we have built into this product, you too will be proud to be
a member of our family.
❏ Features
■ Integration of the monitor, TV tuner, FM/AM radio, DVD Video/Audio player, Video
CD player, CD/MP3 player and SD-card player
¡A rear monitor (option) displays moving pictures while driving.
Note: Be sure to connect the side brake (parking brake) connection lead. (a Installation Instructions)
¡A CD-R and a CD-RW that hold CD-DA data can be reproduced.
¡A CD-ROM, a CD-R and a CD-RW that hold MP3 data can be reproduced.
¡MP3 ID3Tag is supported.
■
■
Prior to operating this unit, it is advisable to assign a 4-digit ID code for security. (Make sure to use four digits for ID code.)
Once the ID code has been set, the unit cannot be operated if the main power supply is disconnected then re-connected. It
is electronically locked so that a thief can not use the stolen unit unless that person knows the code you have set.
The ID code operation must be performed only by the person to whom the unit belongs.
Generally, it is not necessary to enter the ID code each time when using the unit if it has never been disconnected from the
main power supply (car battery). For the ID code setting procedures, see page 57.
■
■
■
■
■
Optical digital output (Only for CQ-VD7500U)
GUI (Graphic User Interface) with touch panel
GUI displays various indicators with colorful symbols to enhance visibility, enjoyment, and operability.
Image capture function
Images can be imported from TV, VTR, DVD or Video CD for a wallpaper.
70 W High power high-efficiency digital power amplifier (only for CQ-VD7700U)
Digital power amplifier transmits power at approx. 90 % efficiency.
ID code
External extension terminal
¡2 video inputs
You can connect a car navigation system, VCR and camcorder with this unit if they have a video output type terminal.
¡One video output (on the hide-away unit side)
You can connect an optional monitor for passengers in the rear seat (private mode).
Enter the ID code after turning on the power and activating the display.
Success
7-inch wide LCD (Liquid Crystal Display) display
Delivers images of high quality and superb color reproduction.
4-digit ID code for increased security.
■
ID Code Input
Built-in DSP (only for CQ-VD7700U) (a page 72)
8 sound field (space) and Parametric equalizer.
Equipped with an optical digital output. You can realize the 5.1 channel surround system by connecting an optional
digital surround processor to the output.
■
Caution: Record your registered ID code and keep it in a secure location. If you forget it, you will be unable
to use the unit. If you cannot operate the unit because you forgot the ID code, please consult your nearest Panasonic
Servicenter.
Built-in Dolby Digital decoder, DTS decoder, Dolby Pro Logic II decoder
(only for CQ-VD7700U)
You can enjoy a powerful 5.1 channel surround system by connecting optional center speaker, power amplifier and
sub-woofer.
■
ID Code
SD-card Player (a page 50)
Equipped with 1 SD-Card Slot. You can play MPEG4 Videos, AAC Audios, JPEG still images and Voice(G.726) files on
the SD-Cards. MP3 audio files on the SD-Card cannot be played. (However, MP3 files that were written with SDJukebox in order to use as an SD audio file are playable.)
Cautions:
¡Picture might not be displayed, or it might take more time than usual to display picture in low temperature.
Also, movement of picture might become labored, or picture quality might deteriorate in low temperature.
[practicable temperature: 32 °F to 104 °F (0 °C to 40 °C)]
¡Do not press the Touch Panel with hard pointed sticks.
¡In some cases, noise is generated. It depends on the position or direction of a mobile phone and CB transceiver, etc.
Change the position or direction of the mobile phone and CB transceiver, etc. or keep them away from the unit.
E
N
G
L
I
S
H
■
CD changer control function
An optional CD changer (CX-DP880U) can be connected.
Note: It is necessary to incorporate the Dual CD Changer Selector CA-CD55 (option) when connecting 2 CD changers.
Note: When you fail in entering the ID code, the screen on the right is displayed
and the unit beeps three times. Enter a correct ID code.
If you fail to enter the correct ID code three times consecutively, the power is turned
off. Turn on the power again and enter a correct ID code.
This book refers to connections to the Panasonic car navigation system that will come onto the market in the future.
Descriptions regarding the car navigation system are boxed with a dotted line.
6
CQ-VD7700U/VD7500U
CQ-VD7700U/VD7500U
7
E
N
G
L
I
S
H
Components
Utilisez cet appareil de façon sécuritaire
Components
TILT
AVERTISSEMENT:
AFIN D’ÉVITER LES RISQUES DE BLESSURE GRAVE OU UNE POSSIBILITÉ D’INFRACTIONS AUX
LOIS, N’UTILISEZ PAS L’APPAREIL DANS LE CHAMP DE VISION DU CONDUCTEUR POUR TOUTE
AUTRE FIN QUE LA NAVIGATION OU POUR L’UTILISATION AVEC UNE CAMÉRA DE VISION
ARRIÈRE.
OPEN / CLOSE
NAVIGATION
PWR
NAVI
MODE
MENU
STOP
PAUSE
PLAY
CHAPTER
TOP MENU
RETURN
TER
OSD
EN
RET
DVD / SD MENU RANDOM REPEAT
RAND
ST/ MONO
SUBTITLE
AUDIO
ANGLE
CH1
CH2
1
REP
2
SUB
SCROLL
PAGE
TRACK
GRP
TITLE / CHAPTER
3
DISP
SCAN
4
5
6
7
8
9
0
SPACE
VOL
ASPECT
OPEN / CLOSE
A
TILT
CQ-VD7700U
TRACK/
CHANNEL
ENTER
DISC
VOLUME
MUTE
NAVI
NAVIGATION
DISP
MUTE
P-MODE
CQ-VD7700U
IN-DASH 7" WIDESCREEN COLOR LCD MONITOR TV / DVD / SD RECEIVER
OPEN
MODE
ASP
POWER
ASPECT
P·MODE
SD CARD
1
1
2. Hide-away Unit
1. Display Unit
1
6. Wiping Cloth
<YEFX9991793>
1
3. Remote Control
Unit
<YEFX9995145>
XXXXXXXXXXXXXXX
XXXXXXXXXXXXXXXXX
XXXXXXXXXXXXXX
XXXXXXXXXXXXXXXX
XXXXXXXXXXXXXXX
XXXXXXXXXXXXXXXXX
XXXXXXXXXXXXXX
XXXXXXXXXXXXXXXX
OO-OOOOO
OO-OOOOO
1
7. Operating
Instructions
<YEFM284237>
1
CAR AV
4. Lithium Battery
(CR2025)
1
8. Installation
Instructions
CQ-VD7700U:
<YEFM293264>
CQ-VD7500U:
<YEFM293265>
1 set
5. TV Antenna
<YEAA12692A (R)>
<YEAA12693A (L)>
1 set
9. Warranty Card, etc.
Au volant:
¡Le conducteur ne doit pas faire fonctionner l’écran couleur à cristaux liquides. Le fonctionnement de l’écran couleur à
cristaux liquides pourrait détourner l’attention du conducteur et entraîner un accident. Lorsque vous faites fonctionner
l’appareil, stationnez votre véhicule dans un endroit sûr.
¡Le conducteur ne doit pas visionner de vidéos en conduisant. Cela pourrait détourner son attention et entraîner un accident.
¡Maintenez l’appareil à un niveau de son approprié. La conduite avec un niveau de son qui empêche d’entendre les
sons extérieurs et autour du véhicule pourrait entraîner un accident.
F
R
A
N
Ç
A
I
S
PRÉCAUTION:
Respectez les règlements locaux et la réglementation pour installer le moniteur vidéo et l’antenne de télévision.
Lors du nettoyage du véhicule
10. Installation Hardware (screws, cords, etc.) (a Installation instructions)
N’exposez pas l’appareil, incluant les haut-parleurs et le disque, à l’eau ou à une humidité trop grande. Cela risquerait de
causer des courts-circuits, un incendie ou d’autres dommages.
Note:
¡The number in parenthesis underneath each accessory part name is the part number for maintenance and service.
¡Accessories and their part numbers are subject to modification without prior notice due to improvements.
Lorsque la voiture est stationnée
Le stationnement en plein soleil peut produire des températures très élevées à l’intérieur du véhicule. Laissez l’intérieur du
véhicule refroidir avant d’allumer l’appareil.
Utilisez la bonne source d’alimentation
Cet appareil est conçu pour fonctionner sur un système d’alimentation avec batterie de 12 V c.c. à masse négative (système
standard sur les véhicules de construction nord-américaine).
Differences between 2 models
Mécanisme de lecture de disque
Note: This operating instruction manual is for 2 models CQ-VD7700U and CQ-VD7500U. All illustrations throughout this
manual represent model CQ-VD7700U unless otherwise specified. The following table describes the differences between
the 2 models.
Protégez le logiciel
N’insérez pas de pièces de monnaie ou tout autre petit objet. Gardez les tournevis et autres objets métalliques à l’écart du
mécanisme de lecture de disque et des disques.
Au moment de quitter le véhicule, prenez soin d'éjecter le disque et la carte SD de cet appareil et de les conserver sur soi.
Faites appel aux centres de service après-vente agréés
Ne tentez pas de démonter ou d’ajuster cet appareil de précision. Veuillez consulter la liste des centres de service aprèsvente fournie avec cet appareil pour obtenir de l’aide.
Features
Model
Maximum Power Output
Power Amplifier
CQ-VD7500U
70 W x 4 ch. + 35 W x 1 ch.
50 W x 4 ch.
Digital
Analog
Yes (35 W x 1 ch.)
No
Subwoofer Output
1 ch.
2 ch. (MONO)
5.1 ch. decoder (Dolby digital/DTS)
Yes
No
Optical digital Output
No
Yes
DSP Functions (Space, Parametric EQ.)
Yes
No
Graphic EQ. and other audio functions
No
Yes
Center Speaker Output
8
CQ-VD7700U
CQ-VD7700U/VD7500U
Pour l’installation
Cet appareil doit être installé en position horizontale, avec l’extrémité avant inclinée à un angle commode mais ne dépassant pas 30˚.
L’utilisateur doit garder à l’esprit que dans certaines régions il peut y avoir des restrictions spécifiant comment et où
installer cet appareil. Pour plus de détails, contactez votre détaillant.
CQ-VD7700U/VD7500U
9
Contents
¢ Safety Information.................................. 2
¢ MENU : User Settings .......................... 54
¢ Use This Product Safely ........................ 5
Display unit, beep, guidance, clock, calender, touch
panel, id-code, memory clear
¢ Features .................................................. 7
¢ MENU : Display (Screen) Settings ...... 58
¢ Components ........................................... 8
¢ Differences between 2 models.............. 8
¢ Contents................................................ 17
¢ Preparations ......................................... 18
Remote Control, Main Unit
¢ Name of Controls and Functions........ 20
¢ Touch Panel Operation Overview ....... 24
Operation mode, regular mode
¢ Display Mode Changes ........................ 26
¢ Status Bar ............................................. 27
¢ Icons Used in This Manual .................. 27
¢ Indications on the Screen.................... 28
The state of the current output appears, OSD (On
Screen Display) on/off
¢ Discs that can be Played Back............ 29
¢ System Upgrade ................................... 30
¢ General .................................................. 34
Power, source selection (Mode), volume, mute,
display open/close and monitor position adjustment
¢ TV Tuner/VTR (External Devices)........ 36
TV mode, channel setting, direct channel selection,
preset channels, VTR1/VTR2 mode
¢ DVD/Video CD Player ........................... 38
Disc insert/eject, basic operation, chapter/title
selection, useful functions
E
N
G
L
I
S
H
1
Dimmer, picture, LCD dimmer, LCD contrast
¢ MENU : Capture Function.................... 59
Capture, initialize
¢ MENU : Animation Settings ................. 60
Animation, color
¢ MENU : Audio Settings ........................ 61
Parametric-EQ, pro logic II, down mix, DR comp, SP
setup, SP level, SP delay, VTR level, graphic-EQ,
bal/fad, sub-woofer, HPF
¢ MENU : DVD Settings........................... 67
Language, display
¢ MENU : Input/output Setting ............... 68
Navi setup, camera setup, VTR skip, video-cont,
rear monitor, BGC
¢ Aspect Ratio ......................................... 71
¢ Sound Settings ..................................... 72
Space, dynamic range compression
¢ About Rear Monitor .............................. 74
Rear monitor set up, private mode
¢ Sub-LCD Display Change .................... 76
¢ Troubleshooting ................................... 78
¢ Maintenance.......................................... 86
¢ Definition of Terms............................... 88
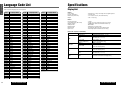
¢ Language Code List ............................. 90
¢ Specifications ....................................... 91
¢ CD/MP3 Player ...................................... 42
Disc insert/eject, direct folder and file selection,
basic operations, points to remember when recording an MP3 disc
¢ Radio ..................................................... 46
Radio mode, band, tuning, One-touch Selection of
a Station
¢ CD Changer Control............................. 48
CD Changer mode, system expansion, basic
operations
¢ SD-Card Player ..................................... 50
Notes on SD-Card, Playable data, SD-Card inserting, SD mode selection, go to SD Menu, go to SD
Setup Menu, removing the SD-Card
CQ-VD7700U/VD7500U
17
E
N
G
L
I
S
H
2
Preparations (Main Unit)
Preparations (Remote Control)
You should check and prepare your unit before initial use referring to the following steps:
Battery Installation (Inserting/Replacing the Battery)
q Remove the battery holder.
Pull the holder by position B while pushing position A
in the direction indicated by the arrow.
w Install the battery on the battery holder.
Set a new battery properly with its (+) side facing up as shown in
the figure.
e Insert the battery holder.
Push the battery holder back into its original position.
Back side
Lithium battery
(CR2025: supplied)
E
N
G
L
I
S
H
3
■ Step 1
Check the connecting external devices for input.
❒ VTR1/VTR2
Connected:
Set the VTR input level, etc. (a page 65, 70)
Position B
❒ Rear View Camera
Connected:
Check if the reverse lead is connected. (a installation
Instructions)
Execute the Camera SetUp. (a page 69)
Battery holder
Position A
Battery Notes
¡Battery life: approx. 6 months (at room temperature)
¡Battery handling:
• Do not disassemble, short-circuit or dispose of batteries in a fire as such action may result in explosion or fire.
• Keep out of the reach of children to prevent risk of choking, swallowing, or other injury.
¡Replace old battery:
Follow the local regulations for disposal.
Caution: Improper use of batteries may cause overheating, an explosion or ignition, resulting in injury or a fire.
Change battery as required - battery leakage may damage the unit.
Unconnected:
Set the VTR Skip. (a page 70)
Unconnected:
Set the Rear View Camera to off. (a page 69)
❒ Car Navigation
Connected:
Check the connection terminal. (a Installation
Instructions)
Execute the NAVI SETUP. (a page 68)
Unconnected:
Check if “NAVI INPUT” is set to “RGB”. (a page 68)
■ Step 2
Check the connecting external devices for output.
❒ Rear Monitor
Connected:
Execute the Rear Monitor Set Up. (a page 74)
Unconnected:
❒ Subwoofer and External amplifier
Connected:
Check the connection of external amplifier control lead
and subwoofer output. (a Installation Instructions)
Execute “SP SETUP”. (a page 63: CQ-VD7700U)
Unconnected:
Set “SUB•W” to “NO”. (a page 64)
❒ Other speakers
This book refers to connections to the Panasonic car navigation system that will come onto the market in the future.
Descriptions regarding the car navigation system are boxed with a dotted line.
Check the connected speakers.(a Installation Instructions)
Execute “SP SETUP” and “AUDIO” setting (a page 63, 64: CQ-VD7700U, a page 66: CQ-VD7500U)
■ Step 3
Check the other equipment and settings.
❒ ID code setting (a page 57)
❒ Check the Illumination lead connection. (a Installation Instructions)
❒ Display (Screen) Settings (a page 58)
❒ “DISPLAY UNIT” setting (TILT, OPEN/CLOSE) (a page 54)
❒ Clock Setting (a page 55)
❒ DVD Setting (if necessary)
Language Setting (a page 67)
Display Aspect and DVD Software Mode (a page 68)
18
CQ-VD7700U/VD7500U
CQ-VD7700U/VD7500U
19
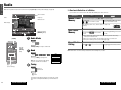
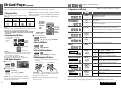
Main Unit
[TILT]
¡Adjust the monitor position.
(a page 35, 54)
¡Tilts the monitor forward
temporarily. (a page 35, 54)
[u]
¡Ejects/reloads a disc.
(a page 38, 42)
TILT
OPEN / CLOSE
Note: You should open
the front panel before
ejecting the disc.
[OPEN/CLOSE]
¡Opens/closes the monitor.
(a page 35)
[}] [{] (DISC)
¡Searches for TV stations and
memorizes them automatically.
(a page 36)
¡Selects a folder or a disc.
(a page 42, 48)
¡Selects (vertically) or adjusts
an operation or item.
[ASP] (ASPECT)
(P•MODE)
¡Selects the aspect ratio.
(a page 71)
¡Activates/inactivates
the private mode.
(a page 75)
OPEN / CLOSE
TILT
CQ-VD7700U
IN-DASH 7" WIDESCREEN COLOR LCD MONITOR TV / DVD / SD RECEIVER
TRACK/
CHANNEL
ENTER
OPEN
DISC
VOLUME
Note: You should open
the front panel before
ejecting the disc.
MUTE
NAVI
NAVIGATION
MODE
ASP
POWER
ASPECT
P·MODE
SD CARD
SD-Card Slot
(a page 52)
[VOLUME]
¡Adjusts the sound volume.
(a page 35)
[MUTE]
¡Mutes the sound temporarily.
(a page 35)
Aim the remote control at the remote control sensor of the display unit and operate it (a previous
page).
[MENU]
¡Shows the menu screen. (a page 54)
¡Shows the BGC menu. (a page 70)
[PWR]
¡Switches the power on/off.
(a page 34)
[RET] (RETURN)
¡Cancel the direct channel selection.
(a page 36)
[]] [[]
(TRACK/CHANNEL)
¡Selects or searches for a channel, track, file or frequency.
(a page 36, 38, 42, 46, 48)
¡Selects (horizontally) or
adjusts an operation or item.
[OSD] (CAPTURE)
¡Displays information about each source on
the screen. (a page 28)
¡Saves your favorite part of a playing picture
as a freeze-frame picture. (a page 59)
NAVIGATION
PWR
NAVI
MODE
MENU
STOP
PAUSE
PLAY
CHAPTER
TOP MENU
[SD] (TOP MENU)
¡Show the SD-Card menu.
¡Goes back to the top menu.
(a page 52)
[DISP]
¡Changes sub-LSD display. (a page 76)
[ENTER]
¡Selects a band.
(a page 46)
¡Searches for broadcast stations and memorizes them
automatically. (a page 46)
¡Determines an operation or
item.
RETURN
RET
DVD / SD MENU RANDOM REPEAT
RAND
ST/ MONO
AUDIO
[DVD/SD MENU]
¡Displays the DVD or the SD-Card
menu. (Operations vary according
to the medium.) (a page 40, 52)
1
REP
SUBTITLE
ANGLE
SUB
TRACK
GRP
TITLE / CHAPTER
CH2
2
SCROLL
PAGE
3
DISP
SCAN
4
5
6
7
8
9
0
SPACE
VOL
ASPECT
[A] (ASPECT) (P • MODE)
¡Selects the aspect ratio.
(a page 71)
¡Activates/inactivates private mode.
(a page 75)
5
[MODE]
¡Switches the power on/off. (a page 34)
¡Changes the modes such as sound and picture. (a page 34)
[NAVI] (NAVIGATION)
Activates/inactivates the car
navigation. (a page 26)
CH1
[MODE] (POWER)
¡Switches on/off the power.
(a page 34)
¡Changes the modes such as
sound and picture.
(a page 34)
Remote control sensor
Main Unit
(Front Panel Open)
DISP
Remote Control (General)
OSD
CQ-VD7700U
[OPEN]
¡Open the Front Panel.
E
N
G
L
I
S
H
TER
4
Name of Controls and Functions
EN
E
N
G
L
I
S
H
A
P-MODE
[NAVI] (NAVIGATION)
¡Activates/inactivates the car navigation.
(a page 68)
CAR AV
MUTE
[}] [{]
¡Searches for TV stations and memorizes them
automatically. (a page 36)
¡Selects a disc. (a page 48)
¡Selects (vertically) or adjusts an operation or
item.
[]] [[]
¡Selects or searches for a channel, frequency,
track or file. (a page 36, 38, 42, 46, 48)
¡Selects (horizontally) or adjusts an operation
or item.
[ENTER]
¡Selects a band. (a page 46)
¡Searches for broadcast stations and memorizes them automatically. (a page 46)
¡Determines an operation or item.
[DISP]
¡Changes the display. (a page 26, 76)
[}] [{] (VOL)
¡Adjusts the sound volume. (a page 35)
Disc slot
OPEN / CLOSE
TILT
Dimmer
Sensor
(a page 58)
CQ-VD7700U
TRACK/
CHANNEL
[0] to [9]
¡Selects a TV channel directly. (a page 36)
¡Scan [5], for the CD/CD changer mode.
(a page 42, 48)
¡Sets the ID code. (a page 57)
[MUTE]
¡Mutes the sound temporarily. (a page 35)
[SPACE]
¡Setting the sound field.
(Only for CQ-VD7700U) (a page 72)
ENTER
DISC
SD CARD
Disc indicator (EJECT button illumination light) (a page 38, 42)
Caution: A disc is in the slot when this is illuminated in blue.
20
CQ-VD7700U/VD7500U
This book refers to connections to the Panasonic car navigation system that will come onto the market in the future.
Descriptions regarding the car navigation system are boxed with a dotted line.
CQ-VD7700U/VD7500U
21
E
N
G
L
I
S
H
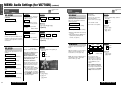
Remote Control Functions for the DVD audio/video, Video CD
DVD DVD VIDEO Indicates compatible types of Media.
VIDEO AUDIO CD
E
N
G
L
I
S
H
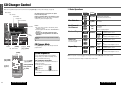
Remote Control Functions for the CD/MP3/SD/CD Changer
LOCK
6
Name of Controls and Functions (continued)
CD
MP3
SD
CD Changer
7
Indicates compatible types of Media.
LOCK
DVD
DVD VIDEO
[MODE] VIDEO AUDIO CD
¡Changes the modes such as
sound and picture. (a page 34)
DVD VIDEO
CD
DVD VIDEO
VIDEO CD
CD CD Changer MP3
SD
[s] [d]
¡Goes to beginning. (a page 42, 48,
52)
¡Fast forward/fast reverse. (a page 42,
48, 52)
¡Selects an operation or item.
LOCK
[ENTER]
¡Determines an operation or item.
[ENTER] MP3
¡Changes to direct folder selection
mode. (a page 42)
[}] [{] []] [[] SD
LOCK
DVD
[}] [{] []] [[] VIDEO AUDIO
¡Selects an operation or item.
CD Changer SD
[MODE] CD MP3
¡Changes modes such as sound
and picture. (a page 34)
LOCK
[■] (STOP)
¡Stops playback. (a page 38)
[❚❚] (PAUSE)
¡Pause (a page 38)
[B] (PLAY)
¡Playback (a page 38)
[s] [d]
¡Goes to beginning. (a page 38)
¡Fast forward/fast reverse. (a page 38)
MP3
CD
SD
[■] (STOP)
¡Stops playback. (a page 42, 48, 52)
[❚❚] (PAUSE)
¡Pause (a page 42, 48, 52)
[B] (PLAY)
¡Playback (a page 42, 48, 52)
LOCK
DVD DVD VIDEO
VIDEO AUDIO CD
NAVIGATION
¡Slow playback [d]. (a page 38)
NAVIGATION
PWR
NAVI
MODE
MENU
PWR
NAVI
MODE
MENU
STOP
PAUSE
PLAY
CHAPTER
STOP
PAUSE
PLAY
CHAPTER
OSD
RET
RAND
ST/ MONO
REP
PAGE
SUBTITLE
ANGLE
CH1
CH2
1
2
TRACK
SUB
GRP
3
DISP
5
6
VOL
7
A
8
9
0
SPACE
¡Repeats a playback. (a page 38)
SD
[DVD/SD MENU]
¡Displays the SD-Card menu. (Operations
vary according to the medium.)
(a page 52)
RAND
ST/ MONO
AUDIO
REP
SUBTITLE
ANGLE
CH1
CH2
1
2
SUB
SCROLL
PAGE
GRP
DISP
SCAN
4
5
6
7
8
9
0
SPACE
CD Changer
TRACK
TITLE / CHAPTER
3
[RAND] (RANDOM) CD MP3
¡Random play. (a page 42, 48)
[REP] (REPEAT) CD MP3 SD
¡Repeats a playback. (a page 42, 48,
52)
VOL
ASPECT
MUTE
P-MODE
CAR AV
DVD
VIDEO
RET
DVD / SD MENU RANDOM REPEAT
A
MUTE
DVD
[AUDIO] (ST/MONO) CD
¡Switches between stereo or
monaural sound. (a page 41)
DVD DVD VIDEO
[REP] (REPEAT) VIDEO AUDIO CD
P-MODE
[ANGLE] VIDEO
¡Switching the angle. (a page 41)
DVD
¡Change the page. (a page 38)
SCAN
4
¡Switching the subtitle language.
(a page 41)
[AUDIO] AUDIO VIDEO
¡Switching the audio language. (a
page 41)
DVD
[PAGE] (SCROLL) AUDIO
TITLE / CHAPTER
ASPECT
DVD
[SUB] (SUB TITLE) VIDEO
¡Random play. (a page 38)
RETURN
CD Changer
LOCK
AUDIO
SCROLL
LOCK
DVD / SD MENU RANDOM REPEAT
TOP MENU
DVD
[RAND] (RANDOM) AUDIO
MP3
[}] [{]
¡Selects a folder. (a page 42)
¡Selects a disc. (a page 48)
TER
RETURN
EN
TOP MENU
TER
DVD VIDEO
OSD
EN
DVD
[RET] (RETURN) VIDEO AUDIO CD
¡Returns to the previous display.
(a page 40)
¡Inputs the number again. (a page 40)
¡Displays the video CD's menu.
(a page 40)
DVD
[DVD/SD MENU] VIDEO
¡Displays the DVD menu. (Operations vary
according to the media.) (a page 40)
CD Changer SD
[]] [[] CD MP3
¡Selects a track or file. (a page 42, 48)
¡Fast forward/fast reverse (a page 42,
48)
DVD
DVD VIDEO
DVD
DVD
[GRP] (TRACK) DVD DVD
(TITLE/CHAPTER) VIDEO AUDIO
¡Selects the group/track. (a page 40)
¡Selects the title/chapter. (a page 40)
[0] to [9] VIDEO AUDIO CD
¡Selects an item on the menu. (a page 40)
[0] to [9] VIDEO AUDIO
¡Selects a title or chapter. (a page 40)
¡Selects a group/track. (a page 40)
CAR AV
[1] (CH 1) CD Changer
¡Selects first CD Changer. (a page 48)
[2] (CH 2)
¡Selects second CD Changer. (a page 48)
* When connecting the dual CD changer selector (CA-CD55 option) and two CD
changers.
[5] (SCAN) CD CD Changer
¡Scan in the CD/CD Changer mode. (a page 42, 48)
22
CQ-VD7700U/VD7500U
CQ-VD7700U/VD7500U
23
E
N
G
L
I
S
H
8
Touch Panel Operation Overview
E
N
G
L
I
S
H
Operation Mode
Regular Mode
While in operation mode, You can operate almost all functions of this unit by touching symbols on
the panel.
While in regular mode, You can operate basic functions of this unit by touching areas
the panel. Each area has following control functions.
How to show operation mode
Example: GUIDANCE ON (a page 55)
TILT
OPEN / CLOSE
When not in operation mode, Touch the center of touch panel [Area A]
to show operation display (see next page).
Area B
Area A
Area D
TV/Radio mode:
Goes to previous frequency or channel.
Regular mode:
Shows operation display.
TV/Radio mode:
Next Preset Frequency/Channels
Note: To return the regular mode, press
[OSD] or touch [OPERATION OFF].
MP3 mode:
Next Folder
OPEN / CLOSE
CQ-VD7700U
Operations on the touch panel
TILT
CQ-VD7700U
Touch the center of touch panel.
Touch operation buttons (Symbols) to opearte.
TILT
OPEN / CLOSE
Touch a symbol to operate. When there is no
operation symbol to operate, touch
,
,
or
to show.
DVD/VCD/CD/MP3/CD
Changer mode:
Previous Chapter/track/
File
Fast reverse
TILT
B
TV/Radio mode:
Previous preset
Frequency/Channels.
Seek
OPEN / CLOSE
Example: DVD operation symbols
CQ-VD7700U
9
OPEN / CLOSE
D
Area E
TILT
on
CD Changer mode:
Next disc
Example: Mode Selection:
CQ-VD7700U
to
A
Area C
TV/Radio mode:
Goes to next frequency or channel.
Seek
C
DVD/VCD/CD/MP3/C
D Changer mode:
Next Chapter/track/
File
Fast forward
E
MP3 mode:
Previous Folder
OPEN / CLOSE
CD Changer mode:
Previous Disc
CQ-VD7700U
TILT
CQ-VD7700U
Notes on the Touch Panel
Return to the regular mode
To return to the regular mode, touch
Example: TV mode
[OPERATION OFF].
Before operation
¡Clean the surface of the touch panel. (a page 86)
TILT
The Guidance display
appears for 4 seconds
(a page 26).
Notes:
¡When no operation is performed for 10 seconds during the Video playback, the display returns to the regular mode.
¡In audio mode (CD/MP3/RADIO/CD Changer), the operation mode remains till the [OPERATION OFF] button is pressed.
24
CQ-VD7700U/VD7500U
Operation
¡Use only your fingers to operate the touch panel.
TILT
OPEN / CLOSE
OPEN / CLOSE
OPEN / CLOSE
CQ-VD7700U
CQ-VD7700U
TILT
OPEN / CLOSE
CQ-VD7700U
TILT
CQ-VD7700U
¡Do not press the panel forcefully.
¡Do not scratch the panel by fingernails or any hard objects.
¡Do not use a pen or other sharp implements to operate the touch panel.
¡Do not bump the front panel.
a Failure to observe the above may damage or break the glass on the surface of the touch panel.
CQ-VD7700U/VD7500U
25
10
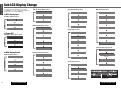
Display Mode Changes
Status Bar
This unit has 10 types screens. The following operations allow you to change among screens.
The status bar provides various information during the playback.
■ TV, DVD Video/Audio, VTR 1/2, SD-Card
Operating mode
[OPERATION
OFF]
Remote [OSD]
Panel
E
N
G
L
I
S
H
The status bar will inform you of a change in the unit whenever it occurs.
Regular mode
11
NAVIGATION
(CQ-VD7700U)
PWR
NAVI
MODE
MENU
STOP
PAUSE
PLAY
CHAPTER
OSD
TOP MENU
RETURN
EN
RET
DVD / SD MENU RANDOM REPEAT
RAND
ST/ MONO
AUDIO
Area A
■ CD, MP3, Radio, CD Changer
Guidance display
appears for 4 seconds
You can let the guidance display set
to off. (a page 55)
Operating mode
Current Source ( : Sound : Video)
Disc Indicator
Current selected changer number when two CD
changers are connected. (a page 48)
CH1
1
ANGLE
SCROLL
REP
PAGE
SUBTITLE
TRACK
SUB
GRP
TITLE / CHAPTER
CH2
2
[OSD]
TER
E
N
G
L
I
S
H
3
DISP
SCAN
4
5
6
7
8
9
0
SPACE
VOL
ASPECT
A
MUTE
P-MODE
CAR AV
P·MODE indicator (a page 75)
Volume level Preset Equalizer Number (a page 62, 66)
Calender Full Screen
[OPERATION OFF]
Area A
[DISP]
Animation
[OSD]
Capture
Full Screen
[DISP]
[DISP]
Calender Window
ID 3 Tag data (only for MP3)
[DISP]
Icons Used in This Manual
This manual uses some icons to explain touch panel operation as follows:
¡Operation unit
These icons represent the unit used to perform an operation.
Panel
Remote
: Operations on the touch panel
: Operations on the remote control or the display unit
[OSD]
Capture Window
■ Navigation
Navi mode
[NAVI]
(NAVIGATION)
Play mode
This book refers to connections to the Panasonic car navigation system that will come onto the market in the future.
Descriptions regarding the car navigation system are boxed with a dotted line.
[NAVI]
(NAVIGATION)
26
CQ-VD7700U/VD7500U
CQ-VD7700U/VD7500U
27
E
N
G
L
I
S
H
12
Indicators on the Screen
Discs that can be Played Back
The State of the Current Output Appears
Note: Displaying contents and their positions partly vary with each mode. Refer to the description of each mode for details.
Example:
DVD Video Mode
Information of Each
Mode
Playing elapsed time,
title, preset list, etc.
(OSD on a see below)
Additional Information
Source type, various
settings, etc.
Mode
Display
Disc
Mark (logo)
13
DVD audio/
video
NTSC
Mode Display/Operating buttons
The current mode and operable touch buttons appear.
Touch this
to appear.
Touch this.
Mode Display temporarily hiding
You can hide the mode display temporarily during some
visual related operations such as DVD menu operation.
Hide
Appear
Video CD
LPCM, MPEG1
CD
LPCM (CD-DA),
MP3
TEXT
❒ Region Management Information
OSD on
(During playback)
1
1 2
4 6
This product is designed and manufactured to respond to the Region Management
Information that is recorded on a DVD disc. If the Region number described on the
DVD disc does not correspond to the Region number of this product, this product
cannot play the disc.
The Region number for this product is “1” and “ALL”.
ALL
❒ Symbols used on jackets (Examples of such symbols include)
¡Number of subtitle languages
2
OSD off
Panel
Touch [Area A]
Touch [OPERATION OFF]
Remote
Press [OSD] .
Note:On-Screen Display can be toggled between on and off only in the TV, VTR1/2, DVD video, DVD audio, VCD and SDCard modes. (When the captured image is set as a wallpaper in the CD, MP3, RADIO and CD changer, pressing [OSD]
switches captured images.)
Screen size (H:V aspect ratio)
¡4:3 standard size
¡Number of audio tracks
4:3
2
3
The numbers indicate the number of languages, tracks, angles, etc., recorded on the
disc.
You can switch between OSD-ON and OSD-OFF regarding the mode information when watching a picture.
1
ALL
Notes:
¡About CD-Rs, CD-RWs and SD-Card refer to “Notes on CD-Rs/RWs” and “Notes on SD-Card”. (a page 50, 87)
¡Some copy-protected music CDs are not playable.
¡Number of angles
OSD (On-Screen Display) On/off
LPCM, PPCM,
MPEG1, MPEG2,
dts,
Dolby Digital
5” (12 cm)
Example:
Prohibition
Input is not possible
because a soundtrack, subtitle language or angle number which was not
recorded on the disc
has been selected or
because the user has
attempted to perform
an operation which is
not supported.
Disc size Video format Audio format Region No.
E
N
G
L
I
S
H
¡Letterbox
LB (a page 88)
¡16:9 wide size
16:9 LB
: Play back in letterbox format on a standard screen (4:3).
16:9 PS
: Play back in “Pan & Scan” (a page 88)
format on a standard screen (4:3).
Note: The size of the image that is displayed on the screen
depends on the screen mode (“Aspect Ratio” a page 71),
and on the screen size for the content on the disc.
❒ The following discs cannot be played back on this product.
¡DVD-ROM
¡DVD-R
¡DVD-RAM
¡DVD+RW
¡DVD-RW
¡SVCD
¡VSD
¡CVD
¡CD-G
¡CD-ROM (except MP3)
¡CD-RW (except MP3 and CD-DA) ¡CD-R (except MP3 and CD-DA) ¡SACD
¡photo CD
¡CDV
¡Divx Video Discs
¡CD-EXTRA (audio-only playback possible)
¡Discs recorded in PAL format, others
¡DVDs with a region number other than “1” or “ALL”
¡Playing back a photo CD disc with this unit could damage the data that is recorded on the disc.
28
CQ-VD7700U/VD7500U
CQ-VD7700U/VD7500U
29
E
N
G
L
I
S
H
14
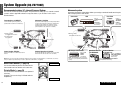
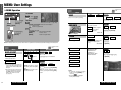
System Upgrade (CQ-VD7700U)
Recommended system: 5.1-channel Surround System
This unit has a built-in 5-channel amplifier. The procedure for setting up a 5.1-channel surround
system in order to play DVD software in a way that creates a “you are there” feel in a car is
described below.
E
N
G
L
I
S
H
Advanced system
Connecting the devices shown below allows you to enjoy a wonderful world consisting of a
wide variety of pictures and sounds.
Camcorder
Front Speakers: CJ-DVD177
Subwoofer: CJ-SW38
Use the left and right front speakers (such as
speakers that are built into the front door).
Because the audio imaging is not nearly as dependent
on the position where the subwoofer is installed as it
is with the other speakers, the subwoofer can be
installed anywhere that is convenient. (A separate
power amplifier for the subwoofer is needed.)
¡Details on wiring:
a Installation Instructions
¡Speaker settings:
a page 63-64
VCR
INTELLIGENT SYSTEM
POWER
BS G-CODE
¡Details on wiring:
a Installation Instructions
TILT
TILT
Rear View
Camera
Refer to
“Connection with
VCR or
Camcorder”
(a Installation
Instructions).
Panaso nic
15
Refer to
“Connection
with Rear View
Camera”
(a Installation
Instructions).
CQ-VD7700U
OPEN / CLOSE
OPEN / CLOSE
OPEN / CLOSE
TILT
CQ-VD7700U
CQ-VD7700U
TRACK/
CHANNEL
IN-DASH 7 INCH WIDE COLOR LCD TV / DVD / SD RECEIVER
ENTER
OPEN
OPEN / CLOSE
TILT
CQ-VD7700U
CQ-VD7700U
TRACK/
CHANNEL
IN-DASH 7 INCH WIDE COLOR LCD TV / DVD / SD RECEIVER
ENTER
OPEN
DISC
VOLUME
MUTE
NAVI
NAVIGATION
DISP
MODE
ASP
POWER
ASPECT
P·MODE
Power amplifier
DISC
VOLUME
MUTE
NAVI
NAVIGATION
DISP
MODE
ASP
POWER
ASPECT
P·MODE
SD CARD
SD CARD
CQ-VD7700U
Center Speaker: EAB-CF2
Surround Speakers: CJ-SS162
CD Changer: CX-DP880U
Install in the middle of the dashboard, near the
monitor.
Use the left and right rear speakers (such as speakers
that are built into the rear door or the rear deck)
Refer to “CD
Changer
Control”
(a page 48).
Note: Two CD Changers can be connected at once by incorporating with CA-CD55
(option).
Note: Even if you are using this unit without installing a center speaker, surround speakers, or a subwoofer, it is still necessary to adjust the speaker settings in order to adjust the sound balance. (a page 63)
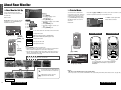
About Rear Monitor (a page 74)
OverHead Monitor:
CY-VMX6800U
Headrest Monitor:
CY-V7100U, etc.
CY-V7100U
PHONES
Refer to “Connection
with Headrest Monitor”
(a Installation
Instructions)
Refer to “Connection with Rear Monitor”
(a Installation Instructions)
Main Unit Monitor
You can have different pictures and sound on the
front monitor and rear monitor at the same time.
Private Mode (a page 75)
You can mute the sounds from the rear speakers if
necessary.
(Example: The case of using CY-V7100U with the
headphones)
Rear Monitor
30
CQ-VD7700U/VD7500U
CQ-VD7700U/VD7500U
31
E
N
G
L
I
S
H
16
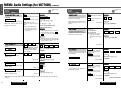
System Upgrade (CQ-VD7500U)
Recommended system: 4.1-channel Surround System
Advanced system
This unit has a built-in 4-channel amplifier. The procedure for setting up a 4.1-channel
surround system in order to play DVD software in a way that creates a “you are there” feel in a
car is described below.
Connecting the devices shown below allows you to enjoy a wonderful world consisting of a
wide variety of pictures and sounds.
Camcorder
Front Speakers: CJ-DVD177
Subwoofer: CJ-SW38
Use the left and right front speakers (such as
speakers that are built into the front door).
Because the audio imaging is not nearly as dependent
on the position where the subwoofer is installed as it
is with the other speakers, the subwoofer can be
installed anywhere that is convenient. (A separate
power amplifier for the subwoofer is needed.)
¡Details on wiring:
a Installation Instructions
¡Speaker settings:
a page 66
VCR
INTELLIGENT SYSTEM
POWER
BS G-CODE
¡Details on wiring:
a Installation Instructions
TILT
CQ-VD7500U
OPEN / CLOSE
OPEN / CLOSE
TILT
CQ-VD7500U
OPEN / CLOSE
TILT
CQ-VD7500U
CQ-VD7500U
CQ-VD7500U
IN-DASH 7 INCH WIDE COLOR LCD TV / DVD / SD RECEIVER
IN-DASH 7 INCH WIDE COLOR LCD TV / DVD / SD RECEIVER
OPEN
TRACK/
TRACK/
CHANNEL
CHANNEL
ENTER
ENTER
OPEN
DISC
DISC
VOLUME VOLUME
MUTE MUTE
MODE
NAVI NAVI DISP DISP MODE
NAVIGATION
NAVIGATION
POWER
POWER
ASPASP
P·MODE
P·MODE
TILT
TILT
Power amplifier
SDSDCARD
CARD
ASPECT
ASPECT
Surround Speakers: CJ-SS162
Use the left and right rear speakers (such as speakers
that are built into the rear door or the rear deck)
Note: Even if you are using this unit without installing surround speakers or a subwoofer, it is still necessary to adjust the
speaker settings in order to adjust the sound balance.
About Rear Monitor (a page 74)
Note: When a DVD audio disc is
playing, no digital audio data
comes out on the optical output.
CD Changer: CX-DP880U
Refer to “CD
Changer
Control”
(a page 48).
Note: Two CD Changers can be
connected at once by incorporating
with CA-CD55 (option).
17
Refer to
“Connection
with Rear View
Camera”
(a Installation
Instructions).
Panaso nic
OPEN / CLOSE
CQ-VD7500U
OPEN / CLOSE
OPEN / CLOSE
OPEN
OPEN/ CLOSE
/ CLOSE
TILT
TILT
CQ-VD7500U
CQ-VD7500U
CQ-VD7500U
CQ-VD7500U
TRACK/
CHANNEL
TRACK/
IN-DASH 7 INCH WIDE COLOR LCD TV / DVD / SD RECEIVER
IN-DASH 7 INCH WIDE COLOR LCD TV / DVD / SD RECEIVER
CHANNEL
OPEN
ENTER
ENTER
OPEN
DISC
VOLUME
VOLUME
MUTE
MUTE
NAVI
NAVIGATION
NAVI
NAVIGATION
DISP
DISP
MODE
POWER
MODE
POWER
ASP
P·MODE
ASPECT
ASP
P·MODE
SD CARD
DISC
SD CARD
ASPECT
Digital Surround Processor:
CY-AC300
L
Headrest Monitor: CY-V7100U,
etc.
DIGITA
PRO LOGIC
SSOR
UND PROCE
AL SURRO
DIGAT
SO
UR
CY-V7100U
CE
AC300
super
VOL
MUTE
SEL
TILT
Rear View
Camera
Refer to
“Connection with
VCR or
Camcorder”
(a Installation
Instructions).
E
N
G
L
I
S
H
SOURCE
brigh
t multi
displ
-color
ay &
30w Powe
4
2
r Ampl
ifier for
Cente
r Spea
ION
POSIT
DR COMP
ker
SPAC
E
DIMM
ER
DIM
SPC
POSI
3
1
PWR
Refer to “Connection with Digital
Surround Processor” (a Installation
Instructions)
PHONES
Refer to
“Connection with
Headrest Monitor”
(a Installation
Instructions)
Main Unit Monitor
You can have different pictures and sound at the
front monitor and rear monitor at the same time.
Private Mode (a page 75)
You can mute the sounds from the rear speakers if
necessary.
(Example: The case of using CY-V7100U with the
headphones)
Rear Monitor
32
CQ-VD7700U/VD7500U
CQ-VD7700U/VD7500U
33
E
N
G
L
I
S
H
General
Volume
[MODE] (POWER)
[TILT]
18
Tilt Angle
OPEN / CLOSE
[
TILT
] (OPEN/CLOSE)
Down
Up
q
Press and hold [TILT] on the display unit for more
than 2 seconds.
E
N
G
L
I
S
H
19
CQ-VD7700U
ENTER
OPEN
DISC
VOLUME
MUTE
NAVI
DISP
NAVIGATION
MODE
ASP
POWER
ASPECT
SD CARD
P·MODE
[]] [[]
(Adjust)
[}] (VOLUME) : up
[{] (VOLUME) : down
(on the remote control)
[VOLUME]
[MUTE]
Setting Range:
–82 dB to 0 dB
default:
–40 dB
(CQ-VD7700U)
Remote Control Sensor
Example: DVD VIDEO
TILT
OPEN / CLOSE
Power
Turn your car's ignition key to ACC or ON position.
ON: press [MODE] (POWER) on the display unit.
Press [PWR] or [MODE] on the remote control.
B
A
Fold Down: press [TILT] on the display unit.
Raise: press [TILT] again on the display unit.
Source selection (Mode)
OPEN: press [ ] (OPEN/CLOSE).
CLOSE: press [ ] (OPEN/CLOSE) again.
(After returning the lateral angle to the
neutral position.)
Notes:
¡When the display unit is opened or closed, a loud beep
sounds three times.
¡If the unit stops halfway, press [ ] (OPEN/CLOSE) again
to draw it all the way in.
¡Opening/closing the display can be done when the power
is off.
TV
DVD/VCD (Video CD)/CD/MP3
(a page 36)
(a page 38, 42)
SD-Card (MPEG4/MP3/AAC/JPEG) (a page 50)
[MODE]
NAVIGATION
NAVI
MODE
MODE
MENU
PAUSE
PLAY
CHAPTER
TER
RETURN
EN
RET
DVD / SD MENU RANDOM REPEAT
RAND
ST/ MONO
AUDIO
CH1
1
ANGLE
PAGE
TRACK
SUB
3
(a page 46)
VTR1
(a page 37)
VTR2
(a page 37)
CH-C (CD Changer Control)*
(a page 48)
Warning: Do not touch the unit while the display
is moving. Inserting hands, fingers or foreign
objects into the unit can cause injuries and
damage to the unit.
Cautions:
¡Avoid physical shock to the monitor.
¡Do not place any object on the display unit, or subject
it to undue force.
¡Do not move the display forcibly.
¡The monitor movable range may be limited by the type of
car, a position where the display is mounted, etc.
[]] [[]
(adjust)
Mode change on the Touch Panel
GRP
TITLE / CHAPTER
CH2
2
SCROLL
REP
SUBTITLE
Radio(AM/FM)
Note: Even when the unit power is off, you can fold down
the display temporarily.
* Selectable only when a CD changer is connected.
OSD
TOP MENU
Mute
Display Open/Close
CQ-VD7700U
PWR
Note: The sound level for each source is stored in memory.
Folding Down the Display
Temporarily
Press [MODE] to change the mode.
STOP
18 (step)
(CQ-VD7500U)
Notes:
¡Vertical angle (TILT) is saved in the memory, so when the
display unit is drawn out next, it is automatically set at
the angle and in the position adjusted before.
¡After adjusting its angle, also adjust the brightness to
make it easy for you to watch. (a page 58)
¡The car model and installation conditions may impose
some restrictions on the adjustment of the monitor's
angle.
MUTE ON: press [MUTE].
MUTE OFF: press [MUTE] again.
OPEN / CLOSE
[PWR] (Power)
0 to 40 (step)
Press []] or [[] to adjust. Setup is the same as
from MENU. Refer to “MENU: User Settings” for
details. (a page 54)
OFF: press [MODE] (POWER) again for more than
2 seconds on the display unit.
Press [PWR] again or [MODE] again for more
than 2 seconds on the remote control.
TILT
CQ-VD7700U
w
or
TRACK/
CHANNEL
IN-DASH 7" WIDESCREEN COLOR LCD MONITOR TV / DVD / SD RECEIVER
DISP
SCAN
4
5
6
7
8
9
0
SPACE
VOL
ASPECT
A
MUTE
[}] [{] (VOL)
[MUTE]
Touch
A
and then touch a symbol in the
B
.
P-MODE
CAR AV
34
CQ-VD7700U/VD7500U
CQ-VD7700U/VD7500U
35
E
N
G
L
I
S
H
TV Tuner/VTR (External Devices)
When not in operation mode, Touch the center of touch panel [Area A] to show operation display. (a page 24)
20
Note: To go back to regular mode, press [OSD] (OSD OFF) or touch [OPERATION OFF].
❑ Preset Channels
TV Tuner
21
This function can search for channels automatically. Up to 18 channels can be stored.
It is necessary to install the supplied antenna to receive TV broadcasts. Refer to the description on mounting the TV
antenna. (a Installation Instructions)
Current channel number
TILT
E
N
G
L
I
S
H
OPEN / CLOSE
Auto Preset Memory
Remote
Press and hold [}] or [{] for more than 2 seconds.
[}]: the search starts from ch. 2 and proceeds successively.
[{]: the search starts from ch. 69 in reverse succession.
Panel
Touch and hold
for more than 2 seconds. Search starts from ch.2 successively.
Mode selection
Operation off
Preset channel
calling
Auto preset memory
Channel selection
TRACK/
CHANNEL
IN-DASH 7" WIDESCREEN COLOR LCD MONITOR TV / DVD / SD RECEIVER
ENTER
OPEN
DISC
VOLUME
MUTE
NAVI
DISP
NAVIGATION
MODE
ASP
POWER
ASPECT
P·MODE
1
[MODE]
NAVI
MODE
MENU
PAUSE
PLAY
CHAPTER
OSD
TER
RETURN
EN
RET
DVD / SD MENU RANDOM REPEAT
RAND
ST/ MONO
AUDIO
ANGLE
CH1
CH2
1
2
TV Mode
SCROLL
REP
PAGE
SUBTITLE
TRACK
SUB
GRP
[]] [[]
(CHANNEL)
[}] [{]
TITLE / CHAPTER
3
DISP
Touch
2
Preset Channel Calling
Remote
Panel
Touch a preset channel number on the touch panel. (Example: channel number 17.
Panel
[OSD]
¡A stored channel can be renewed every time you store another channel.
¡The unit may receive a channel that has poor-quality images depending on broadcasting conditions.
¡The search returns to the start position if there is no receivable channel.
Press [}] or [{] to select the channel.
Remote
Press [MODE] to change to TV mode.
NAVIGATION
PWR
STOP
TOP MENU
SD CARD
[ ] ] [ [ ] (CHANNEL)
[}] [{]
[MODE]
[0] to [9]
(Direct channel
selection)
Sub-LCD
(a page 76)
OPEN / CLOSE
TILT
CQ-VD7700U
CQ-VD7700U
.)
Channel Setting
[[] (CHANNEL): up
[]] (CHANNEL): down
VTR
You can view the images and listen to the sounds from the connected external devices in the VTR1 mode and VTR2 mode
respectively.
SCAN
4
5
6
7
8
9
0
SPACE
VOL
ASPECT
A
MUTE
Press and hold [[] (CHANNEL) or
[]] (CHANNEL) for more than 0.5 seconds.
Seeking will start.
P-MODE
Direct Channel Selection
VTR1/VTR2 Mode
Remote
Enter a channel number by pressing [0] to [9].
Example: Channel Number 17
Press [1] and [7].
Panel
Not available.
CQ-VD7700U/VD7500U
Example:
Remote
Press [MODE] to change to VTR1 or VTR2 mode.
Panel
CAR AV
36
Touch
.
Touch
or
.
Notes:
¡You can set up the system so that the VTR mode is not selected (VTR skip). (a page 70)
(VTR set to NAVI INPUT is not skipped even if VTR skip is set
to on.)
¡VTR1 and VTR2 terminals are not used for the Panasonic car
navigation system (available in future). Refer to “Installation
Instructions” and “NAVI SETUP” for setting. (a page 68)
VTR1
: Camcorder
VTR2
: VCR
VTR1-IN
VTR2-IN
CQ-VD7700U
Hide-away Unit
For details (a Installation Instructions)
CQ-VD7700U/VD7500U
37
E
N
G
L
I
S
H
DVD/Video CD Player
DVD DVD VIDEO
VIDEO AUDIO CD Indicates compatible disc types.
When not in operation mode, Touch the center of touch panel [Area A] to show operation display. (a page 24)
❑ Basic Operation
22
Notes:
¡Due to limitations of certain discs, some DVD video and
Video CD discs may not operate as described in these
Operating Instructions. Refer to the disc jacket for further details.
¡This unit does not support DVD and Video CD karaoke
functions.
CQ-VD770
Operations vary according to the disc. For details, refer to the guide
provided with the disc.
Disc Insert
R
¡Press [OPEN] to open the front panel.
¡Insert the disc horizontally and gently.
¡Push the front panel up to close it.
¡The mode that supports the disc is selected, and playback starts.
¡The audio/video format is automatically identified.
(a page 88)
¡When the menu screen appears, see “DVD Menu/Video
CD Menu” on page 40.
When a DVD or Video CD is in the player, press [MODE]
or touch a symbol to change to DVD or Video CD player
mode and playback starts.
Label side
Caution: When the disc is inserted or ejected, to
prevent disc scratches never exert any downward
force on the disc.
[u] (Eject)
(lights when a disc is in the slot)
Panel
Operations
Go to Beginning
OPEN / CLOSE
TILT
DVD DVD VIDEO
VIDEO AUDIO CD
Fast Forward/
Fast Reverse
DVD DVD VIDEO
VIDEO AUDIO CD
Stop
CQ-VD7700U
TRACK/
CHANNEL
IN-DASH 7" WIDESCREEN COLOR LCD MONITOR TV / DVD / SD RECEIVER
ENTER
OPEN
DISC
MUTE
NAVI
DISP
NAVIGATION
[OPEN]
MODE
ASP
POWER
ASPECT
[MODE]
[MODE]
NAVIGATION
PWR
NAVI
MODE
MENU
STOP
PAUSE
PLAY
CHAPTER
Sub-LCD
(a page 76)
Notes:
¡Do not insert a disc when disc indicator
or eject
button lights because a disc is already loaded.
¡The power will be turned on automatically when a disc is loaded.
¡You can play a disc even if the monitor is closed.
¡The sound may be interrupted for a few moments while
the audio format is being identified.
[]] [[]
(a page 39)
Cautions:
¡Please refer to page 87 for disc-related matters.
¡Do not insert foreign matter into the disc slot.
OSD
RETURN
TER
TOP MENU
RET
DVD / SD MENU RANDOM REPEAT
RAND
ST/ MONO
AUDIO
ANGLE
CH1
CH2
1
2
SCROLL
REP
PAGE
SUBTITLE
TRACK
SUB
GRP
TITLE / CHAPTER
3
4
5
6
7
8
9
0
SPACE
Disc Eject
[PAGE]
(SCROLL)
¡Press [OPEN] to open the front panel.
¡Press [u] to stop playback and eject the disc.
(Press [u] again to reload the disc.)
Note: If you leave a disc in the slot for more than 30 seconds after its ejection, the disc will be automatically
reloaded after a loud beep is emitted three times.
DISP
SCAN
VOL
[RAND]
(RANDOM)
SD CARD
P·MODE
EN
[3] (STOP)
[y] (PAUSE)
[5] (PLAY)
[s] [d]
(a page 39)
[REP]
(REPEAT)
ASPECT
A
MUTE
P-MODE
CAR AV
DVD mode display
Mode display
Remote
: next track (chapter)
[d]: next track (chapter)
: beginning of the current track (chapter) [s]: beginning of the current track (chapter)
Previous track (chapter) (Press twice.)
Previous track (chapter) (Touch twice.)
Title number
Chapter number
Mode display
Shows next operation buttons
Pause
DVD DVD VIDEO
VIDEO AUDIO CD
CQ-VD7700U/VD7500U
Press and hold
[d]: fast forward
[s]: fast reverse
Release to resume playback.
The speed changes if the button is held down as follows (except DVD AUDIO).
Regular speed /1.5 times (DVD Video) /10 times (DVD Video) /20 times
Touch
.
Touch
, and playback resumes where
(Stop) was touched. To cancel resume,
touch
again while stopping.
Press [3] (STOP).
Press [5] (PLAY) again, and play will
resume from the point where [3] (STOP)
was pressed. (Continued playback function)
To cancel continued playback, press [3]
(STOP) again in the stop mode.
Touch
.
To resume playback, touch
Press [y] (PAUSE).
To resume playback, press [5] (PLAY) or
[y] (PAUSE) again.
or
.
Touch and hold
during pause, and playback is at about 1/3 normal speed.
Touch
to resume normal playback.
Touch
to pause again.
Slow
Playback
DVD VIDEO
VIDEO CD
Repeat
Play
Random
Playing time
DVD
AUDIO
Press and hold [d] in the pause mode.
Playback is at about 1/3 normal speed.
To resume normal playback, press [5]
(PLAY).
To pause, press [y] (PAUSE) again.
Note: Reverse slow playback is not possible.
Touch
Touch
.
again to cancel.
Press [REP] (REPEAT).
Press [REP] (REPEAT) again to cancel.
Touch
Touch
.
again to cancel.
Press [RAND] (RANDOM).
Press [RAND] (RANDOM) again to cancel.
Random playback is done in the same group.
Touch
Page
Operating buttons
Touch and hold
: fast forward
: fast reverse
DVD DVD VIDEO
VIDEO AUDIO CD
DVD
AUDIO
Operation buttons
Note: When playing a DVD video, there are cases where it is not possible to return to
the start of a chapter that spans 2 titles. (a page 88)
DVD DVD VIDEO
VIDEO AUDIO CD
Video CD mode display
Audio format
(a page 88)
38
23
0U
ENTE
VOLUME
Note: When there are no operation buttons
you want to operate, touch
.
E
N
G
L
I
S
H
to change the still image.
Press [PAGE] (SCROLL) to change the still
image.
Sound setting
CQ-VD7700U/VD7500U
39
24
DVD/Video CD Player(continued)
DVD DVD VIDEO
VIDEO AUDIO CD Indicates compatible disc types.
❑ Chapter/Title Selection
❑ Useful Functions
Operations
DVD Menu/
Video CD Menu
Use this menu during
playback to select content,
audio, subtitle, etc., from
a menu (the DVD/Video
CD menu) that is unique
to each disc.
Panel
q Touch
Touch
Touch
,
to select
.
to return the previous display.
Title Menu
q Touch and hold
seconds.
If the DVD has multiple
titles recorded on it, it is
possible to select the preferred title from the title
menu to start playback.
w Touch
,
,
the desired title.
e Touch
Touch
,
w Press []], [[], [}] or [{] to
select the desired title.
For a DVD with playback control
(a page 88), press [0] to [9].
to select
.
to return the previous display.
e Press [ENTER].
To return the previous display, press [RET]
(RETURN).
q Touch
to select input mode.
w Touch
to
to input desired
title/chapter/group/track number.
To input the number again, touch
e Touch
start.
or
.
. Playback will
blinks when the chapter/
group selecting
blinks when the
title/track selecting
e Press [ENTER].
q Press and hold [DVD/SD MENU] for
more than 2 seconds.
for more than 2
DVD
VIDEO
DVD DVD
VIDEO AUDIO
w Press []], [[], [}] or [{] to select
the desired menu.
For a DVD/Video CD with playback control (a page 88), press [0] to [9].
Operations
w Press [0] to [9] to input desired
title/chapter/group/track number.
To input the number again, press [RET]
(RETURN).
Title Number Input
Touch
DVD DVD
VIDEO AUDIO
40
. (only for DVD VIDEO)
Touch
Switching
between Stereo
and Monaural
.
Notes:
¡For VCD mode, press the numerical key to enter a number directly.
¡If no operation is performed for 8 seconds after you have touched [GRP], the display
returns to regular mode.
¡If the title/chapter/track/group number is inputted and no operation is performed for 2
seconds, playback will start from the number of the title/chapter/track/group entered.
Press [ANGLE] during playback.
Press [AUDIO] (ST/MONO).
It is possible to switch the audio between
stereo sound and monaural sound (L or R).
VIDEO
CD
STEREO
: stereo sound
MONO.L
: the left channel audio is output on both the left and right speakers.
MONO.R
: the right channel audio is output on both the left and right speakers.
Note: Operation symbols will be change whenever they are touched.
[RET] (RETURN)
NAVIGATION
PWR
NAVI
MODE
MENU
STOP
PAUSE
PLAY
CHAPTER
[DVD/SD MENU]
(a page 40)
TOP MENU
RETURN
[ANGLE]
ST/ MONO
AUDIO
ANGLE
CH1
CH2
2
EN
PAGE
TRACK
SUB
[AUDIO]
(ST/MONO)
[SUB] (SUBTITLE)
GRP
TITLE / CHAPTER
3
4
5
6
DISP
7
8
9
0
SPACE
VOL
ASPECT
A
[]] [[] [}] [{]
[ENTER]
SCROLL
REP
SUBTITLE
SCAN
CQ-VD7700U/VD7500U
Press [AUDIO] during playback.
For DVDs which contain scenes which have been shot simultaneously from a number of
different angles the same scene can be viewed from each of these different angles during play.
DVD DVD
VIDEO AUDIO
1
Playing bonus groups
Some discs contain bonus
groups. If a password screen
appears after selecting a
group, enter the password
with the numbered buttons.
Refer also to the disc’s jacket.
.
Touch
Switching the
Angle
RAND
Group Number Input
Press [SUB] (SUBTITLE) during playback.
It is possible to change the audio language during play if multiple audio languages are
recorded on the disc.
DVD / SD MENU RANDOM REPEAT
Track Number Input
25
Note: There may be a brief delay before the subtitles appear.
RET
DVD Audio:
Regular Mode
. (only for DVD VIDEO)
OSD
Chapter Number Input
Remote
It is possible to change the subtitle language during play if multiple languages are
recorded on the disc.
Switching the
Audio Language
e Press [GRP] (TRACK/TITLE/CHAPTER).
Playback will start automatically.
DVD VIDEO:
Regular Mode
Touch
DVD DVD
VIDEO AUDIO
q Press [GRP] (TRACK/TITLE/CHAPTER)
to select the input mode. The mode
changes as shown at right every time
[GRP] (TRACK/TITLE/CHAPTER) is
pressed.
Note: When there are no play buttons you
want to operate, touch
.
E
N
G
L
I
S
H
Panel
Switching the
Subtitle Language
To return the previous display, press [RET]
(RETURN).
DVD DVD VIDEO
AUDIO VIDEO CD
Starting Playback
from a Specific
Chapter/Title/
Group/Track
During playback
q Press [DVD/SD MENU] .
(For the Video CD menu, press [RET]
(RETURN).)
. : DVD
. : VCD
w Touch
,
,
the desired menu.
e Touch
Remote
During playback
TER
E
N
G
L
I
S
H
[GRP]
(TRACK/TITLE/
CHAPTER)
(a page 40)
MUTE
P-MODE
CAR AV
[0] to [9]
(Title/chapter/track
/group Number)
(a page 40)
Notes:
¡If no operation is performed for 5 seconds,
the display returns to the regular mode.
¡This unit can perform playback only in 2channel stereo for the 192 kHz DVD audio
format.
Use the “Prologic II” function for the multichannel playback with this format.
¡It may not be possible to switch the language unless the unit is at the DVD menu
(a page 40) or is at the DVD settings.
(a page 67)
¡The language on the DVD settings takes priority when the power is turned on or the
disc is loaded. (a page 67)
¡The number of languages depends on the
disc. Some discs have only one language or
have no language.
¡About DVD Video/Audio Wide Dynamic
Range (a page 73)
CQ-VD7700U/VD7500U
41
E
N
G
L
I
S
H
CD/MP3 Player
CD
❑ Basic Operations
When not in operation mode, Touch the center of touch panel [Area A] to show operation display. (a page 24)
Disc Insert
26
Operations
q Press [OPEN] to open the front panel.
w Insert a disc horizontally and gently.
When a CD or MP3 disc is in the player, press [MODE] or
touch a symbol to change to CD or MP3 disc player mode
and playback starts.
Label side
Caution: When the disc is Notes:
¡Do not insert a disc when disc indicator
or eject
inserted or ejected, to prebutton lights because a disc is already loaded.
vent disc scratches never
exert any downward force on ¡The power will be turned on automatically when a disc is
loaded.
the disc.
¡You can play a disc even if the monitor is closed.
¡To prevent disc scratches, never exert the downward force
on the disc when inserting or ejecting.
[ ] ] [ [ ] (Track/file)
[}] [{] (Folder)
Cautions:
[u] (Eject)
¡Please refer to page 87 for disc-related matters.
(lights when a disc is in the slot)
¡Do not insert foreign matter into the disc slot.
¡Do not pinch your finger or hand in the front panel.
CQ-VD770
0U
ENTE
R
OPEN / CLOSE
TILT
CQ-VD7700U
IN-DASH 7" WIDESCREEN COLOR LCD MONITOR TV / DVD / SD RECEIVER
ENTER
DISC
VOLUME
MUTE
NAVI
DISP
NAVIGATION
[OPEN]
ASP
POWER
ASPECT
[MODE]
[MODE]
NAVIGATION
PWR
NAVI
MODE
MENU
STOP
PAUSE
PLAY
CHAPTER
OSD
RETURN
TER
TOP MENU
RET
DVD / SD MENU RANDOM REPEAT
RAND
ST/ MONO
AUDIO
CH1
1
ANGLE
SCROLL
REP
PAGE
SUBTITLE
TRACK
SUB
GRP
TITLE / CHAPTER
CH2
2
P·MODE
SD CARD
Sub-LCD
(a page 76)
[]] [[]
(Track/file)
[}] [{]
(Folder)
3
4
5
6
7
8
9
0
SPACE
VOL
[REP]
(REPEAT)
w Touch
MUTE
P-MODE
MP3
Mode display Track Number Playing time
Title/text
scroll
Sound
Setting
(folder name) to select a folder.
: scrolls up/down the file list by 1 page.
: scrolls up/down the file list by 1 line.
(file name) to play.
: MP3 file
: Folder
(Lighted up symbols
include MP3 files.)
Note: It is not possible to display the whole tree and file
list in a folder.
Operation Buttons
42
Play Setting
CQ-VD7700U/VD7500U
MP3
CD
Folder
Selection
Title
Scroll
Stop
(see previous
page)
[}]
[{]
Next folder
Previous folder
When the file list is displayed:
[}]: previous folder
[{]: next folder
MP3
[PAGE]
(SCROLL)
Touch/Press.
CD
CD
MP3
[3]
(STOP)
Touch/Press.
[y]
(PAUSE)
Touch/Press.
To resume playback, Touch/Press
/[y] (PAUSE) again.
[REP]
(REPEAT)
Touch/Press.
Touch/Press again to cancel.
Repeat
Play
Scan Play
MP3
*
CD
or
CD
*
CD
or
Touch/Press.
Touch/Press again to cancel.
Current
Folder
Touch/Press and hold for more than 2 seconds.
Touch/Press and hold again to cancel.
Touch/Press.
Touch/Press again to cancel.
[RAND]
(RANDOM)
Touch/Press.
Touch/Press again to cancel.
MP3
/[5] (PLAY) or
Current
File
[5] (SCAN)
The first 10 seconds
of each track/file
will be played.
Random
Play
Next track/file
Beginning of the current track/file
Previous track/file (Touch/press twice.)
Touch/Press and hold.
Fast forward
Fast reverse
Release to resume playback.
MP3
MP3
27
[d]
[s]
MP3
q Press [ENTER] during playback.
w Press []], [[] , [}] or [{] to select a folder.
[]] [[]: movement among different levels of trees
[}] [{] : movement in the same tree
e Press [ENTER].
CD/MP3 mode display
[d]
[s]
Fast Forward/
Fast Reverse
CD
Remote
CAR AV
Remote
Pause
Note: If you leave a disc in the slot for more than 30 seconds after its ejection, the disc will be automatically
reloaded after a loud beep is emitted three times.
q Touch
,
,
ASPECT
A
CD
Panel
[PAGE]
(SCROLL)
DISP
SCAN
¡Press [OPEN] to open the front panel.
¡Press [u] to stop playback and eject the disc.
(Press [u] again to reload the disc.)
Folder and File Selection
EN
[3] (STOP)
[y] (PAUSE)
[5] (PLAY)
[s] [d]
(a page 43)
[RAND]
(RANDOM)
MODE
Panel
Go to Beginning
Disc Eject
TRACK/
CHANNEL
OPEN
E
N
G
L
I
S
H
Indicates compatible disc types.
MP3
All
Files
Touch/Press.
Touch/Press again to cancel.
All Files in the Touch/Press and hold for more than 2 seconds.
Current Folder Touch/Press and hold again to cancel.
Note: It is possible to press []] [[] on the display unit instead of [s] [d] on the remote control.
*Touch Panel symbols will change to indicate current mode.
For “Folder selection order/MP3 file playback order”.
(a page 45)
CQ-VD7700U/VD7500U
43
E
N
G
L
I
S
H
28
CD/MP3 Player
E
N
G
L
I
S
H
(continued)
This player allows you to play MP3 files recorded on CD-ROMs, CD-Rs
(Recordable), CD-RWs (Rewritable).
Folder selection order/MP3 file playback order (Example)
: []][[]
2
Playing Folder
What is MP3?
Folder in the next
lower level of tree
Current playing file
MP3, short for MPEG-1 Audio Layer 3, MPEG-2 Audio Layer 3 LSF (Low Sampling Frequency), is a standard for compressing digital video data adopted for video CDs and similar media. It is one of the audio compression systems covered by
MPEG's (Motion Picture Experts Group) digital audio compression standards. What it does is reduce the number of bytes
in a song without detracting from the sound quality by eliminating big sound waves within the sound range that are imperceptible to the human ear. This compression allows you to reduce the contents of a conventional music CD by a factor of
around 10. This means that you can record the contents of 10 music CDs on a single CD-R or CD-RW. (The figures refer
to data recorded on a 650 MB CD-R or CD-RW at a fixed bit rate of 128 kbps and a sampling frequency of 44.1 kHz.)
: MP3 files are included
1
Points to Remember When Recording an MP3 Disc
1
5
¡Do not record files other than MP3s or unnecessary folders on a disc. If many folders or files other than MP3s
are recorded on a disc, it may take some time before playback starts.
¡Use ISO 9660 file system (Extension of the ISO 9660 file systems are included.) (a page 45). APPLE HFS file
system is not supported. If files do not conform to ISO 9660 file system, they may not play normally, or the file or
folder names may not be displayed correctly.
¡Make sure to add the “.mp3” extension to each MP3 file name. A file with a different file name extension or none
at all will not play.
¡Although Multi session recording is supported, the use of Disc-at-Once is recommended. Make sure to close the
session when you finished recording on a disc.
¡Discs recorded by the packet writing software are not supported.
¡A playlist function is not supported. Record files and folders in the order in which you want them to be played.
Some writing software lets you specify the recording order by adding a prefix in the range of “01” - “99”, etc. to the
file name. For details refer to the user manual of your writing software.
Notes:
¡You may encounter trouble in playing MP3s or displaying the information of MP3 files recorded with certain writing
software or CD recorders (CD-R/RW drives).
¡If a disc contains both MP3 and CD-DA, only CD-DA data is reproduced properly. (MP3 files are played but no sound
is output).
Root
Tree 1
6
File Selection
In the order
6
4
~
e
w
■ Converting (encoding) audio data to an MP3 file
~
q
r
Tree 2
Root
: No MP3 files
Root Folder
(Root Directory)
Folder Selection
In the order
q
3
■ Recording MP3 files on a CD-R/RW
3
5
4
2
¡It is recommended that you set the bit rate to “128 kbps or more” and “Fixed”.
¡Bit rate of 8 kbps for MPEG-2 and sampling frequency of 16 kHz for MPEG-2 can not be reproduced.
¡VBR (Variable Bit Rate) is not supported.
¡The playback sound quality differs depending on the encoding software and the bit rate. For details refer to the user
manual of your encoding software.
1
29
: [}][{]
r
Tree 1
Tree 2
Notes:
¡This unit counts the number of folders irrespective
of the presence or absence of MP3 file.
¡If the selected folder does not contain any MP3
files, the nearest MP3 files in the order of playback
will be played.
¡Playback order may be different from other MP3
players even if the same disc is used.
¡“ROOT” appears when displaying the root folder’s
folder name.
Tree 3
Maximum number of files/folders
¡Maximum number of trees: 8
¡Maximum number of folders: 254 (Root folder is not included.)
¡Maximum number of files: 512
Note: If the number of files and folders exceeds the number mentioned above, successful playback may not be
performed.
Supported file systems and file names
Supported file system
ISO 9660 Level 1/Level 2
Displayable folder names and file names
Name files and folders in accordance with the standard of each file system.
Refer to the instructions of writing software for details.
Romeo
¡This player can display file names of up to 31 ASCII characters set in scroll
mode.
* Up to 15 letters can be displayed when scrolling in the Joliet system.
According to the standard, “á”, “ç”, etc. can be used. However, this unit can
not display those letters.
Apple Extension to ISO 9660
¡The unit recognizes only the ASCII character set. Chinese characters, accented
French characters and accented Spanish characters will be converted into asterisks.
Joliet*
Note: MP3 encoding software and writing software are not supplied with this model.
Copyright
Warning: Never assign the “.mp3” file name extension to a file that is not in the MP3 format. This may produce
noise from the speakers and cause speaker damage and can damage your hearing.
It is prohibited by copyright laws to copy, distribute and deliver copyrighted materials such as music without the approval
of the copyright holder except to enjoy yourself personally.
No warranty
Above description complies with our investigations as of December 2003. There is no warranty for reproducibility and displayability of MP3.
44
CQ-VD7700U/VD7500U
CQ-VD7700U/VD7500U
45
E
N
G
L
I
S
H
Radio
E
N
G
L
I
S
H
❑ One-touch Selection of a Station
When not in operation mode, Touch the center of touch panel [Area A] to show operation display. (a page 24)
Up to 6 stations can be saved in each FM1, FM2, FM3 and AM preset station memories.
30
TILT
OPEN / CLOSE
Stereo indicator
Band
Operations
Frequency
Manual Preset
Memory
Band Selection
Mode display
Panel
31
Remote
Select a band and frequency (step w and e on the previous page).
Touch and hold.
to
for more than 2 seconds.
Press and hold [1] to [6] on the remote
control for more than 2 seconds.
The frequency blinks once, and the station is saved in the
memory.
OPEN / CLOSE
TILT
CQ-VD7700U
Auto Preset
Memory
CQ-VD7700U
IN-DASH 7" WIDESCREEN COLOR LCD MONITOR TV / DVD / SD RECEIVER
TRACK/
CHANNEL
ENTER
OPEN
DISC
VOLUME
MUTE
NAVI
DISP
NAVIGATION
MODE
ASP
POWER
ASPECT
P·MODE
SD CARD
[]] [[] (Tuning)
[ENTER] (Band)
1
Radio Mode
Panel
PWR
NAVI
MODE
MENU
STOP
PAUSE
PLAY
CHAPTER
Touch
.
OSD
Remote
NAVIGATION
RETURN
TER
TOP MENU
EN
RET
DVD / SD MENU RANDOM REPEAT
RAND
ST/ MONO
AUDIO
ANGLE
CH1
CH2
1
2
SCROLL
REP
PAGE
SUBTITLE
TRACK
SUB
GRP
[]] [[]
(Tuning)
[ENTER]
(Band)
2
5
6
7
8
9
0
SPACE
Preset Station
Calling
.
Band
Press and hold [ENTER] for more than
2 seconds.
Select a band. (step w on the previous page)
Touch
to
.
Press [1] to [6] on the remote control.
Note: New stations overwrite existing saved stations after following this procedure.
Panel
DISP
Touch
SCAN
4
for more than 2
Press [MODE] to change to radio mode.
TITLE / CHAPTER
3
Touch and hold
seconds.
¡The 6 stations with good reception will be automatically saved in the memory
under preset numbers 1 to 6.
¡Once set, the preset stations are sequentially scanned for 5 seconds each.
¡To stop the scanning, touch or press numbers [1] to [6].
[MODE]
[MODE]
Select a band. (step w on the previous page)
VOL
,
,
or
Remote
.
FM1
FM2
ASPECT
A
Press [ENTER] to change band.
MUTE
P-MODE
FM3
Note: The stereo indicator lights during
reception of an FM stereo broadcast.
CAR AV
[1] to [6]
(Preset memory)
3
AM
Tuning
Panel
Touch
TUNE : up
TUNE : down
Remote
[[]: up
[]]: down
Touch/press and hold [[] or []] for more than 0.5 seconds,
then release. Seeking will start and stop at next available station.
46
CQ-VD7700U/VD7500U
CQ-VD7700U/VD7500U
47
E
N
G
L
I
S
H
32
CD Changer Control
When not in operation mode, Touch the center of touch panel [Area A] to show operation display. (a page 24)
Mode display
CD changer functions are designed for an optional
Panasonic CD changer unit.
Read the operating instructions for CD changer as well.
Disc number
Track number
Total track number
TILT
Play
setting
Notes:
¡The power will be turned on automatically when a
magazine is loaded.
¡Load a magazine with CDs when “NO MAGAZINE” is
displayed.
¡CD text is not supported in CD changer mode.
¡CD changer cannot play MP3 data recorded CDR/RW discs.
Caution: Please refer to page 87 for disc-related
matters.
OPEN / CLOSE
TILT
CQ-VD7700U
TRACK/
CHANNEL
DISC
MUTE
NAVI
DISP
MODE
ASP
POWER
ASPECT
NAVIGATION
SD CARD
P·MODE
Changer number
Disc list
[ ] ] [ [ ] (TRACK)
[}] [{] (DISC)
[MODE]
Operation buttons
[MODE]
PWR
NAVI
MODE
MENU
STOP
PAUSE
PLAY
CHAPTER
TER
RETURN
DVD / SD MENU RANDOM REPEAT
RAND
ST/ MONO
[1] (CH 1)
[2] (CH 2)
REP
SUBTITLE
AUDIO
ANGLE
CH1
CH2
1
2
[ ] ] [ [ ] (TRACK)
[}] [{] (DISC)
EN
RET
SUB
SCROLL
PAGE
TRACK
GRP
TITLE / CHAPTER
3
DISP
[RAND] (RANDOM)
[REP] (REPEAT)
SCAN
4
5
6
7
8
9
0
SPACE
VOL
[5] (SCAN)
ASPECT
A
33
[d] (TRACK) Next track
[s] (TRACK) Beginning of the current track
Previous track (Touch/Press twice.)
Disc Selection
[}] (DISC)
[{] (DISC):
Fast Forward/
Fast Reverse
[d]
[s]
Random Play
*
[RAND]
(RANDOM)
or
Scan Play
*
[5] (SCAN)
or
Next disc
Previous disc
Press [MODE] to change to CD changer mode and
playback starts.
Repeat Play
Touch/Press and hold.
Fast forward
Fast reverse
Release to resume playback.
All Tracks
*
[REP]
(REPEAT)
Touch/Press.
Touch/Press again to cancel.
All Tracks Touch/Press and hold for more than 2 secon the
Current onds.
Touch/Press and hold again to cancel.
Disc
Touch/Press.
All Tracks
Touch/Press again to cancel.
1st Track
on Each
Disc
CD Changer Mode
Touch/Press and hold for more than 2 seconds.
Touch/Press and hold again to cancel.
Current
Track
Touch/Press.
Touch/Press again to cancel.
Current
Disc
Touch/Press and hold for more than 2 seconds.
Touch/Press and hold again to cancel.
or
The use of Dual CD Changer Selector CA-CD55
(option) allows you to make the following connections. (a Installation Instructions)
OSD
TOP MENU
Remote
System Expansion
NAVIGATION
[d] (TRACK)
[s] (TRACK)
Panel
Track Selection
The first 10 seconds of each
track will be played.
ENTER
OPEN
VOLUME
Operations
OPEN / CLOSE
Total time
IN-DASH 7" WIDESCREEN COLOR LCD MONITOR TV / DVD / SD RECEIVER
❑ Basic Operations
Preparation: Connect the CD changer (a Installation
instructions), and load a magazine (disc).
Playing time
CQ-VD7700U
E
N
G
L
I
S
H
MUTE
P-MODE
Note: It is possible to press []] [[] on the display unit instead of [s] [d] on the remote control.
* Touch panel symbols will change to indicate these current mode.
Dual changers connection
Two changers can be connected to the terminals of
CA-CD55 respectively.
The changers are arranged as follows.
*/ [1]: CH 1
*/ [2]: CH 2
* Touch panel symbols will change to indicate these
current mode.
CAR AV
48
CQ-VD7700U/VD7500U
CQ-VD7700U/VD7500U
49
E
N
G
L
I
S
H
34
SD-Card Player
❑ Notes on SD-Card
IMPORTANT
• If you have saved still image and/or moving image
data on SD Memory Cards by yourself using a PC, you
may not be able to play images unless you have configured the folders correctly and named the folders
and files correctly. For further detail, refer to the next
page.
• When playing music using an SD card, play the SD
Audio files which were written on the card using SD-
Jukebox (option).
• If you have saved data on SD cards using “Panasonic
SD Multi AV Device”, for instance, which is available
as an optional accessory, the data can be played by
the unit straight way.
• Use SD card with a memory size of 512 MB or less.
❒ Other equipment (example: Digital still camera, IC Voice Recorder, Digital Camcorder)
E
N
G
L
I
S
H
The SD-Card recorded by some certain equipment (see previous page) can be played back on this unit without special
procedures. This equipment creates folders and files in the following way:
35
❒ Naming rule for the recoding files on SD-Cards.
root
DCIM
JPEG still pictures
JPEG files
SD_VIDEO
PRL001
MPEG4 files
Playable data formats on the SD-Card
CQ-VD7700U/VD7500U can treat the following data formats.
Still Pictures: JPEG files taken on digital
cameras conforming to DCF standards.
(set down by the Japan Electronics and
Information Technology Industries
Association.)
Motion pictures: MPEG4 files (ASF format) taken on a digital video camera or
SD Multi AV Device.
Notes:
• If the file list screen contains 7 or more
files, press [}], [{], []] or [[] to
scroll to the next (or previous)
page.
• When MPEG4 moving pictures are
played back, mosaic-like patterns may occur or frames
may be dropped during scenes with fast-moving subjects.
This is normal and not a sign of trouble.
Music (Audio files): MP3 and AAC audio files recorded with
“Panasonic Media Manager” or “SD-Jukebox” software
included with Panasonic SD Multi AV Device and SD Audio
Player.
Notes:
• SD audio files written using a function other than SDJukebox may not be recognized.
• MP3 audio files cannot be played. (However, this does
not apply to MP3 files that were written using SDJukebox for use as SD audio files.)
• This unit can neither record nor erase the data.
• Titles and names of the artists may not always appear on
the display.
• If there are multiple numbers of still
pictures that are tied in with SDJukebox, only the first still picture is
displayed.
• It may not be possible for the unit to
play back some kind of still pictures
even when they are tied in with SDJukebox.
Voice: G.726 files recorded on a digital video camera or SD
Multi AV Device.
Notes:
• Some files are not compatible with this unit and can not be
played back. For example: Motion picture files recorded
using a digital still camera with motion picture function, IC
recorder voice files etc.
• Under certain condition, some files may not be played back
even if these are compatible ones.
How to record play data on SD-Cards
❒ Personal Computer
• You can copy Still pictures and Motion pictures to your
SD-Card by connecting it to a computer with a USB SDCard Reader/Writer (BN-SDCAP, option) or PC card adapter
(BN-SDABP, option) When recording to an SD-Card on a
computer. (Please refer to the “IMPORTANT” statement
above.)
50
CQ-VD7700U/VD7500U
• If you have attached still pictures to an audio file (using
SD-Jukebox Ver.3.0 or later, option) the unit can also show
the first of these pictures.
MPEG4 motion pictures
100CDPFP
SD_VOICE
Example:
IMGA 0001.JPG
Example:
MOL 001.ASF
Four Four numbers
characters
3 digits hexadecimal numbers
(Numbers 0 to 9 and letters A
to F)
Make sure that none of the files in a folder have the same last 4 (or 3)
characters These files can not be played back.
SD_VC100
Voice files
SD_AUDIO
Music files
• SD_VOICE and SD_AUDIO are hidden folders created when you record
voice or audio files, and play automatically on other equipment.
This unit needs these folders on an SD-Card to play the files. Do not delete
them on your computer.
• “DCIM”, “SD_VIDEO”, “SD_VOICE” and “SD_AUDIO” are necessary to play
files but have no effect on operation.
• You may be unable to play some files due to the origin of the copy, or the
naming of folders and files.
Treatments of SD-Card
Cautions:
• Do not leave the SD-Card where they will be become
hot or exposed to direct sunlight or where electricmagnetic waves or static electricity occurs readily.
• Keep the terminal area on the back of the cards free
from dirt, water and foreign matter. Do not touch this
area with your hands or any other objects.
• Static-Electricity or malfunctioning of the unit or the
cards may cause the cards to be damaged or their data
to be lost. It is recommended that valuable data be
stored on the PC as well.
Note:
Do not leave cards on the following places:
• Direct sunlight
• Near car heaters
• Dirty, dusty and damp areas
• Seats and dashboards
SD logo is a trademark.
Portions of this product are protected under copyright law and are provided a license by
ARIS/SOLANA/4C. Licensed AAC Patents (U.S. patent under numbers);
08/937,950 5,394,473 5,579,430 5,481,614 5,299,238 5,581,654 5848391
5,583,962 08/678,666 5,592,584 5,299,239 05-183,988 5,291,557 5,274,740
98/03037 5,781,888 5,299,240 5,548,574 5,451,954 5,633,981 97/02875
08/039,478 5,197,087 08/506,729 5 400 433 5 297 236 97/02874 08/211,547
5,490,170 08/576,495 5,222,189 4,914,701 98/03036 5,703,999 5,264,846
5,264,846 5,717,821 5,357,594 5,235,671 5,227,788 08/557,046 5,268,685
08/392,756 5 752 225 07/640,550 5,285,498 08/894,844 5,375,189
CQ-VD7700U/VD7500U
51
❑ Operation of SD-Card
Operations
G.726
MODE
MENU
PLAY
CHAPTER
TOP MENU
RETURN
RET
DVD / SD MENU RANDOM REPEAT
1
SUB
GRP
3
JPEG MPEG4
ASF AAC VOICE
5
6
7
8
9
VOL
[REP]
(REPEAT)
:
MPEG4 AAC
ASF
❑ Removing the SD-Card
SELECT PLAYLIST*
Press on the center.
Pull straight out.
:
LOCK
Press on the center of the card to unlock, then pull
straight out.
AAC
DISPLAY ON/OFF*
: [MODE]
52
CQ-VD7700U/VD7500U
SCREEN*
Caution: Do not keep the SD-Card in the slot at half-way
to prevent the front panel from hitting the card when the
front panel is opening or closing.
MPEG4
ASF
LOCK
Caution: To prevent the data damage to the SD-Card,
never eject the SD-Card while playing or turn the ACC off
while the unit is using the card.
LOCK
: [}] or [{] a [ENTER]
LOCK
: Not available
LOCK
JPEG MPEG4
ASF AAC VOICE
LOCK
Remote
[DVD/SD
MENU] a
[}][]]
[{][[]
: [DVD/SD MENU] (SETUP MENU)
w Select the data type.
Panel
LOCK
Remote
Remote
Press this to stop the playback temporarily.
LOCK
Panel
Panel
REPEAT*
LOCK
q Select the SD.
❑ Go to SD Setup Menu*
Press this to return to the file list screen.
JPEG MPEG4
ASF AAC VOICE
LOCK
❑ SD Mode Selection
: [SD] (TOP MENU)
LOCK
Cautions:
¡Do not place your face in front of the slot when inserting
and removing cards. The slot mechanism has a spring
so the card may eject with force.
¡Do not insert the SD-Card into the CD slot.
¡Do not insert foreign materials into the SD-Card slot.
Remote
[3]
(STOP)
[y]
(PAUSE)
Pause
:
LOCK
LOCK
Label side up
JPEG MPEG4
ASF AAC VOICE
❑ Go to SD Menu
Panel
Beveled edge
: [}], [{], []] or [[] a [ENTER]
[}][]]
[{][[]
LOCK
DISC
SD CARD
ODE
LOCK
ENTER
Stop
LOCK
[]] [[]
[}] [{]
(ENTER)
: Not available
LOCK
JPEG MPEG4
ASF AAC VOICE
LOCK
Remote
TRACK/
CHANNEL
ER
Select a file to play back.
File Selection
ASPECT
LOCK
Panel
Playback starts.
The still pictures will be played back for 5 seconds each
(Slidshow). (While the still picture playback screen is displayed.)
DISP
SCAN
4
e Select the playing data.
SD-Card slot
Press and hold.
Fast forward
Fast reverse
Release to resume playback.
TITLE / CHAPTER
CH2
2
PAGE
TRACK
[5] (PLAY)
LOCK
CH1
REP
SUBTITLE
ANGLE
Play (Slideshow)
LOCK
AUDIO
[]] [[]
[}] [{]
[ENTER]
LOCK
RAND
ST/ MONO
SCROLL
LOCK
Insert and slide
the card until it
clicks into
place.
Next file
Beginning of the current file
Previous file (Press twice.)
OSD
LOCK
❑ Inserting the SD-Card
LOCK
NAVI
PAUSE
LOCK
NAVIGATION
PWR
STOP
LOCK
For details, (a page 50).
[SD]
Notes:
(TOP MENU)
¡Play may not be possible sometimes due to the condition of the data.
¡Operation is not guaranteed with Multi Media Card.
¡All functions of SD Card Player cannot be operable only on the
[DVD/SD MENU]
touch panel. Use buttons on the remote control and the main
(SETUP MENU)
unit as well.
[d]
[s]
MPEG4 AAC VOICE
ASF
LOCK
[3] (STOP)
[y] (PAUSE)
[5] (PLAY)
[s] [d]
Fast Forward/
Fast Reverse
TER
AAC
LOCK
MPEG4
JPEG
(DCF Standard) (ASF format)
Voice
[d]
[s]
JPEG MPEG4
ASF AAC VOICE
LOCK
Music
37
LOCK
Movie
Note: To record data on SD-Cards, (a page 50).
E
N
G
L
I
S
H
Remote
Go to Beginning
LOCK
You can play the following types of data recorded on
an SD-Card:
Note: In the SD mode, when the following operation is performed
and then the SD mode is restored, the “MODE SELECT” screen will
appear without failure.
¡Power off ¡ACC off ¡Mode Change
EN
❑ Playable Data
Still pictures
LOCK
When not in operation mode, Touch the center of touch panel [Area A] to show operation display. (a page 24)
LOCK
Indicates compatible data types.
JPEG MPEG4
ASF AAC VOICE
LOCK
36
SD-Card Player (continued)
LOCK
E
N
G
L
I
S
H
[DVD/SD
MENU] a
[}][]]
[{][[]
[DVD/SD
MENU] a
[}][]]
[{][[]
[DVD/SD
MENU] a
[}][]]
[{][[]
Current
File
Select [1 FILE/MUSIC] in [REPEAT] .
Select [OFF] in [REPEAT] to cancel.
ALL
Files
Select [ALL] in [REPEAT] .
Select [OFF] in [REPEAT] to cancel.
DEFAULT All music files recorded are played back.
PLAYLIST (default)
The selected playlist is played back.
PLAYLISTx (If the PLAYLIST is recorded on the SD-Card.)
ON
OFF
FULL
NORMAL
The SD information display is set to ON.
(default)
The SD information display is set to off.
Enlarged screen (default)
Normal screen
* While the file list screen is displayed.
Note: Do not leave an SD-Card inserted inside the unit
when it is not used.
Note: It is possible to press []] [[] on the display unit instead of [s] [d] on the remote control.
CQ-VD7700U/VD7500U
53
E
N
G
L
I
S
H
MENU: User Settings
❏ MENU Operation
38
OPEN / CLOSE
: Previous menu
: Exit
TRACK/
CHANNEL
DASH 7" WIDESCREEN COLOR LCD MONITOR TV / DVD / SD RECEIVER
Panel
ENTER
: Touch
DISC
NAVI
DISP
NAVIGATION
MODE
ASP
POWER
ASPECT
Menu
¡Go to MENU
TILT
CQ-VD7700U
BEEP
.
Remote
OFF
: Press [MENU].
Operations
ON
OFF
Remote
[}][{][]][[]
(Select/adjust)
[ENTER]
[MODE]
Menu selection order (a page 245)
Panel
Touching a menu symbol: Item selection and adjust
: previous menu.
: Return to regular mode
GUIDANCE
Guidance appearance during
video mode operation.
Panel
OFF
ON
: guidance appears
OFF
: no guidance
appears
default: ON
Remote
NAVIGATION
PWR
NAVI
MODE
MENU
STOP
PAUSE
PLAY
CHAPTER
[}], [{], []], [[]
a [ENTER]
: Item selection and adjust
[MENU]
: Previous menu
[MODE]
: Return to regular mode
OSD
RETURN
TER
TOP MENU
EN
RET
DVD / SD MENU RANDOM REPEAT
RAND
ST/ MONO
AUDIO
ANGLE
CH1
CH2
1
2
SCROLL
REP
PAGE
SUBTITLE
TRACK
SUB
GRP
TITLE / CHAPTER
3
[}][{][]][[]
(Select/adjust)
[ENTER]
5
DISP
CLOCK
6
VOL
7
8
9
0
SPACE
ASPECT
A
DISPLAY
MUTE
P-MODE
(Clock display)
CAR AV
Note: The display returns to the previous status if there is no operation for more than 60 seconds after changing to the setting menu.
: Previous menu
: Exit
Menu
DISPLAY UNIT
TILT
Setting Value
1
2
1
3
Notes:
¡For smooth adjustment, make sure
to first return the lateral angle to the
neutral position and then adjust the
tilt angle.
¡The monitor position setting menu
can also be displayed by pressing
the [TILT] button on the display
unit for more than 2 seconds.
(a page 35)
54
Operations
5
Panel
] or [
Remote
[]] or [[]
5
default: 5
(Monitor position)
¡Tilt angle adjustment
OPEN/CLOSE
4
or
ON
Remote
[]] or [[] a [ENTER]
Guidance display
SCAN
4
ON
[]] or [[] a [ENTER]
¡Operations
[MODE] [MENU]
39
Panel
default: ON
(Beep or no beep during operating)
SD CARD
P·MODE
Setting Value
E
N
G
L
I
S
H
* [1] to [5] keys are not available.
YEAR ADJUST
(Year adjustment)
MONTH ADJUST
(Month adjustment)
DAY ADJUST
OFF
:
Panel
clock display OFF
OFF
ON
:
clock display ON ([12:00] is displayed before adjusting the
clock.)
default: OFF
default:
YEAR ADJUST: 2004
MONTH ADJUST: 1
DAY ADJUST: 1
HOUR ADJUST: AM12
MINUTE ADJUST: 0
or
ON
Remote
[]] or [[]
a [ENTER]
Panel
] or [
Remote
[}] or [{] a []] or [[]
a [ENTER]
(Day adjustment)
MANUAL
AUTO
default: MANUAL
AUTO: The monitor is opened
automatically when turning ON
ACC.
MANUAL: The monitor is not
opened automatically.
CQ-VD7700U/VD7500U
HOUR ADJUST
Panel
(Hour adjustment)
MANUAL or
Remote
AUTO
[]] or [[] a [ENTER]
Note: You can also enter this setting
menu by pressing and holding [TILT]
button.
MINUTE ADJUST
(Minute adjustment)
Notes:
¡To starts the clock return to regular
mode by pressing [MODE] or
touching
.
¡Perform the setup of Daylight
Saving Time manually.
CQ-VD7700U/VD7500U
55
E
N
G
L
I
S
H
40
MENU: User Settings (continued)
: Previous menu
: Exit
Menu
Setting Value
MONTH
CALENDAR
MONTH : ] or [
YEAR : { or }
YEAR
Note: The calendar is not editable.
(e.g. Holidays cannot be marked.)
Operations
Panel
default: Same as Clock
(Calendar Display)
default: Same as Clock
Remote
MONTH : []] or [[]
YEAR :[{] or [}]
This function executes no setting, only
viewing.
TOUCH PANEL
(Panel touch position adjustment)
Position difference between the touching position and the displaying symbol
position may appear in the following
situations:
1. The display position adjustment is
executed.
2. The system is initialized.
3. The power is turned off soon after
the touch panel is adjusted.
For the cases above, readjust the
touch panel position.
This function is used only when there are some differences between the
touching position and the symbol position displayed on the monitor.
This function is not used ordinarily.
q Touch the four corners of the touch panel counterclockwise.
w Touch
END
Touch forth
Note: This function can be performed
on the touch panel.
Touch first
: Previous menu
: Exit
to finish this setup. Touch AGAIN to retry.
Touch third
Menu
ID-CODE
(ID Code Setting)
Prior to operating this unit, it is advisable to assign a 4-digit ID code for
security.
(Make sure to use four digits for ID
code.)
Once the ID code has been set, the unit
cannot be operated if the main power
supply is disconnected then re-connected. It is electronically locked so
that a thief can not use the stolen unit
unless that person knows the code you
have set.
The ID code operation must be performed only by the person to whom
the unit belongs.
0 to 9
Panel
4 digits numeric code
default: none
Caution: Record your registered ID code and keep it in a
secure location. If you forget it,
you will be unable to use the
unit. In case you forget the ID
code, please consult your nearest Panasonic Servicenter.
Note: The inputted code is not
displayed for your security.
Touch second
MEMORY CLEAR
Caution: Be aware that this setting
restores the unit to default settings, so
that all the memories and settings that
you have set will be eliminated.
Remote
41
0 to 9
[0] to [9]
How to set your ID code (for the first time)
q Enter an 4 digit ID code.
w Enter the same 4 digit ID code again.
How to change your ID code
q Enter the preset (old) 4 digit ID code.
If the wrong ID code is entered, a new
ID code cannot be registered.
w Enter a new 4 digit ID code.
e Enter the new 4 digit ID code again.
How to cancel the known ID code
Note: Should your unit ever require service,
cancel your ID code before sending for repair.
q Enter the preset (old) 4 digit ID code.
If the wrong ID code is entered, it is
not possible to cancel the ID code
function.
w Press and hold [ENTER] until
“Complete!” is displayed. The ID code
cancelling procedure is completed.
The unit now works without an ID
code.
Note: Refer to ID Code Input regarding
how to enter the ID code. (a page 6)
Note: The ID code setting cannot be
eliminated even by the memory clear
function.
Note: In the SD mode, SD MENU settings are not returned to the default
setting even when YES is selected as
this setting.
CQ-VD7700U/VD7500U
Operations
Generally, it is not necessary to enter
the ID code each time when using the
unit if it has never been disconnected
from the main power supply (car battery).
All current memories are returned to
default settings.
56
Setting Value
E
N
G
L
I
S
H
NO
:
Panel
no memory clear. The display
returns to the previous one.
YES
YES
OK
: Memory clearance
CANCEL : No Memory clearance
:
Remote
default settings
default: NO
[[] a [ENTER]
[[] a [ENTER]:
Memory clearance
[]] a [ENTER]: a
No Memory clearance
CQ-VD7700U/VD7500U
57
E
N
G
L
I
S
H
MENU: Display (Screen) Settings
MENU: Capture Function
: Previous menu
: Exit
Menu
42
Setting Value
Operations
AUTO : automatically adjusted
DIMMER
: Previous menu
: Exit
according to ambient
light intensity.
Panel
] or [
Menu
Setting Value
Operations
Select Save area
CAPTURE
(Image Capture)
Panel
1
2
3
Darker
PICTURE
(Display Adjustment)
4
Brighter
default: AUTO
] : Decrease the contrast
between black and white
[ : Increase the contrast
between black and white
CONTRAST
IMAGE1 to IMAGE5
(Adjust the image brightness)
COLOR
(Adjust the image color depth)
TINT
(Adjust the image tone or tint)
Panel
] or [
Remote
Preparation: Show the image that
you would like to capture on the display.
Note: Refer to “Display mode
changes” page to display the imported
image on the screen. (a page 26)
[}] or [{] a []] or [[]
(Adjust the image contrast)
BRIGHT
[]] or [[]
Copyright
It is prohibited by copyright laws to
copy, distribute and deliver copyrighted materials such as commercial
DVDs/Video CDs or other published or
broadcast material without the
approval of copyright holder except for
personal use.
] : Darken
[ : Lighten
] : Lighten the depth of color
on the display
[ : Deepen the depth of color
on the display
43
q
ENTER a IMAGE1 , IMAGE2
w
Remote
Up to five images can be imported
from TV, VTR, DVD or Video CD (VCD).
E
N
G
L
I
S
H
...... or IMAGE5 a
¡You can store maximum five
images.
¡The existing image is replaced
with a new image when saving it. Check the right-hand
smaller image on the screen
before saving a new one. If
you would like to keep the
existing image, do not overwrite.
YES
Remote
[ENTER] a []] or [[]
a [ENTER] a []] or [[]
Notes:
¡Do not turn off the unit while
saving an image.
¡To capture an image from TV,
the broadcasting condition
should be fairly good.
q
w
Note: A captured image may have
some distortion or be otherwise different from the original image due to
compression.
] : Emphasize red in the
color image
[ : Emphasize green in the
color image
[MODE] (End)
(SUB-LCD dimmer adjustment)
LOW : Darker
Panel
NAVIGATION
HIGH : Brighter
LOW or HIGH
PWR
NAVI
MODE
MODE
MENU
STOP
PAUSE
PLAY
CHAPTER
OSD
default: HIGH
TOP MENU
RETURN
DVD / SD MENU RANDOM REPEAT
RAND
ST/ MONO
AUDIO
CH1
1
LCD CONTRAST
(SUB-LCD contrast adjustment)
2
3
4
5
Panel
EN
RET
[]] or [[] a [ENTER]
1
ANGLE
PAGE
TRACK
SUB
GRP
TITLE / CHAPTER
CH2
2
SCROLL
REP
SUBTITLE
3
DISP
SCAN
4
5
6
7
8
9
0
SPACE
VOL
Decrease
Increase
[MENU]
[OSD] (CAPTURE)
Remote
TER
LCD DIMMER
] or [
default: 4
ASPECT
A
Direct Image Capture (Only for remote control)
If you would like to capture a picture, press and hold [OSD] (CAPTURE)
for more than 2 seconds.
Subsequent steps are the same as the steps w described above.
MUTE
P-MODE
Remote
CAR AV
[]] or [[]
58
CQ-VD7700U/VD7500U
CQ-VD7700U/VD7500U
59
E
N
G
L
I
S
H
MENU: Capture Function (continued)
MENU: Audio Settings (for VD7700U)
: Previous menu
: Exit
Menu
44
Setting Value
Select area
INITIALIZE
You can restore the default image
and delete your captured image.
The level of each of the 15 frequency bands can be adjusted,
and up to 6 different levels can be stored in the memory.
Operations
Panel
PARAMETRIC–EQ
IMAGE1 , IMAGE2 ...... or
IMAGE1 to IMAGE5
Menu
IMAGE5 a
(Adjusting the Level for Each of the
Frequency Bands: EQ=Equalizer)
: Restore the image.
(delete your image)
NO
: Restore no image.
[]] or [[] a [ENTER] a
[[] : Restore the image.
(delete your image)
[]] : Restore no image.
a [ENTER]
MENU: Animation Settings
Wait for a while when “LOADING >>>” appears on the display.
Menu
Setting Value
Animation patterns
A
(Change the animation)
: Previous menu
: Exit
Operations
Panel
B
C
Default: A
Note: This function is available only in
non-video mode.
be set.
Default: ALL
Animation colors
(Change the animation color)
Note: This function is available only in
non-video mode (CD, MP3, Radio, CD
Changer).
A
to
Touch A , B ........ or H
Default: A
Remote
[}] or [{] a []] or [[] a
[ENTER]
Panel
ALL or Professional
Remote
[]] or [[] a [ENTER]
Panel
Default: FRONT
] or [
Remote
[}] or [{] a []] or [[]
BAND
(Select a frequency band of the preset
equalizer to adjust)
LOW :
40/63/80/100/160 Hz
MID
:
315/500/630/800/1.25k Hz
HIGH :
2.5k/4k/5k/6.3k/10k Hz
Default: LOW
FREQ
(Select the center frequency of the setting band)
40/63/80/100/160 Hz (LOW)
315/500/630/800/1.25k Hz (MID)
2.5k/4k/5k/6.3k/10k (HIGH)
Default: 40 Hz
–12 to +12 dB (by 2 dB step)
Default: ±0 dB
(Adjust the gain in each frequency)
WIDTH
Panel
H
FRONT , CENTER , SUR
(For Professional )
GAIN
[]] or [[] a [ENTER]
: Same settings are
used for all speakers
45
(Select the method of setting)
Touch A or B or C
Remote
Operations
Professional : Each speaker can
(Select the speaker to adjust)
Remote
COLOR
ALL
MODE
YES
SPEAKER
ANIMATION
Setting Value
: Previous menu
: Exit
E
N
G
L
I
S
H
1 to 4
Default: 4
(Select a width of the frequency band
to adjust the gain)
Note: These equalizer settings are not
applied to the sub-woofer.
(continued on next page a)
Touch to select
60
CQ-VD7700U/VD7500U
CQ-VD7700U/VD7500U
61
E
N
G
L
I
S
H
MENU: Audio Settings (for VD7700U) (continued)
: Previous menu
: Exit
Menu
46
PARAMETRIC–EQ
(continued)
PRESET
(Recall or preset the equalizer setting)
Note: These equalizer settings are not
applied to the sub-woofer.
Setting Value
ALL :
1 to 3 (Preset number), 7(FLAT)
Professional :
Operations
Panel
1 to
7 FLAT
Remote
4 to 6 (Preset number), 7(FLAT)
Note: When selecting “7
(FLAT)”, the preset level is set to
0 dB.
¡The new level adjustment
will overwrite the previous
level adjustment, erasing it
in the process.
[}] or [{] a []] or [[]
or
[1] , [2] , [3] ....... [7]
: Previous menu
: Exit
Menu
DOWN MIX
(Changing Dolby digital/dts Audio to 2Channel Stereo Playback)
Note: This function is available only
when “Dolby digital” or “dts” source is
playing.
Panel
q Make adjustments before memorizing.
6 for more than 2 seconds.
DR COMP
(Dynamic Range Compression)
(Maintaining the ambience even while
listening at a low volume level)
Remote
q Make adjustments before memorizing.
w Press and hold preset button [1] to [6]
for more than 2 seconds.
OFF , MOVIE , MUSIC ,
(5.1 channel listening in Dolby surround MATRIX
default : OFF
sound)
Notes: “PANORAMA”, “DIMENSION” and ”CENTER WIDTH”
MODE
are adjustable when “MODE” is
(Select a sound type)
set to “MUSIC”.
PANORAMA
OFF , ON
DIMENSION
CENTER WIDTH
[}] or [{] a []] or [[] a
[ENTER]
or
0 to 7
(Widen the sound field of the center
speaker in “MUSIC” mode)
[}] or [{] a []] or [[] a
[ENTER]
] : Down
Remote
[}] or [{] a []] or [[]
default : 0
Note: Effective for 2-channel audio (LPCM, PPCM, Dolby Digital/dts 2-channel) and analog audio (TV, VTR, radio, CD
changer).
62
CQ-VD7700U/VD7500U
SP SETUP
(Speaker Setup)
ON
Panel
default : ±0
default : OFF
Remote
[]] or [[] a [ENTER]
Compression style selecting
(a page 73)
OFF : DR COMP OFF
STD: DR COMP ON
MIN: Made with the greatest
compression, roughly
equivalent to a TV broadcast.
Panel
OFF
or
STD
or
MIN
Remote
[]] or [[] a [ENTER]
default : OFF
(Setting the absence/presence and size
of each speaker)
[ : UP
(Adjust the dimension of the sound in
“MUSIC” mode)
output
Remote
Remote
–3 to +3
Panel
OFF or ON
ON : 2-channel conversion
OFF or MOVIE or MUSIC or MATRIX
OFF
default : OFF
OFF : Original Source Output
47
Panel
Panel
Get large the sound space in the
“MUSIC” mode.
Operations
To store a level adjustment in the
memory (preset memory)
w Touch and hold preset button 1 to
PRO LOGIC II
Setting Value
E
N
G
L
I
S
H
FRONT
LARGE :
for large speakers, when bass
playback is possible (at least
100 Hz or lower)
SMALL :
for small speakers, or when
bass playback is not possible
(Front speaker setting)
CENTER
(Center speaker setting)
A center speaker (option, EAB-CF2 recommended) is required.
Panel
FRONT a SMALL or LARGE
Remote
[}] or [{] a []] or [[]
default: LARGE
LARGE :
a [ENTER]
Panel
for large speakers, when bass
playback is possible (at least
100 Hz or lower)
SMALL :
CENTER a NONE or SMALL or
LARGE
for small speakers, or when
bass playback is not possible
Remote
:
when not using a center speaker
NONE
default: SMALL
[}] or [{] a []] or [[]
a [ENTER]
(continued on next page a)
CQ-VD7700U/VD7500U
63
E
N
G
L
I
S
H
MENU: Audio Settings (for VD7700U) (continued)
: Previous menu
: Exit
Menu
48
SP SETUP
(continued)
SURROUND
(Surround speaker setting)
Setting Value
LARGE :
for large speakers, when bass
playback is possible (at least
100 Hz or lower)
SMALL :
for small speakers, or when
bass playback is not possible
:
when not using surround
speakers
default: LARGE
NONE
Operations
: Previous menu
: Exit
Menu
Panel
SP DELAY
SURROUND a NONE or SMALL
(Speaker Delay)
(Adjusting the timing with which the
audio from each speaker reaches the
listener’s position)
or LARGE
Remote
CENTER
[}] or [{] a []] or [[]
(Center speaker delay time setting)
Setting Value
Operations
Setting range:
Center speaker...
0 ms to 5 ms (1 ms steps)
Surround speakers...
0 ms to 15 ms (1 ms steps)
49
Panel
q Touch a speaker image. (Center or
Surround)
w [ : Long
] : Short
1 ms = 0.001 seconds
Default: 0 ms for all speakers
Remote
SURROUND
a [ENTER]
E
N
G
L
I
S
H
q [}] or [{]
w [[] : Long
(Surround speaker delay time setting)
[]] : Short
SUB • W
(Subwoofer speaker setting)
A subwoofer (option, CJ-SW38 recommended) is required. A power amplifier
(option) is also required for connecting
a subwoofer.
YES
:
Panel
when using a subwoofer
:
when not using a subwoofer
NO
SUB • W a
NO
or
YES
Remote
¡Make this adjustment while listening
to sound.
¡If the speaker setting is “NONE” for a
speaker, that speaker cannot be
selected. (a page 63)
[}] or [{] a []] or [[]
default: NO
a [ENTER]
VTR LEVEL
SP LEVEL
(Speaker Level)
(Adjusting the output balance of each
speaker)
FRONT L
(Left front speaker output balance)
CENTER
(Center speaker output balance)
FRONT R
(Right front speaker output balance)
R¡SURROUND
(Right surround speaker output balance)
L¡SURROUND
(Left surround speaker output balance)
SUB¡W
Setting range: –12 dB to +12 dB
(1 dB steps)
Default: ± 0 dB for all speakers
A test signal (a continuous tone) is
output from each speaker for
approximately two seconds.
Adjust the output balance so that
the tone appears to have the same
volume from each speaker.
Adjusting the output balance:
Adjust the volume of all of the other
speakers to the volume level of the
speaker from which the test signal
appears to be the quietest.
¡If the speaker setting is “NONE” or
“NO” for a speaker, the test signal
is not output and that speaker
cannot be selected. (a page 63)
¡Turn [VOLUME] or press [}] or
[{] (VOLUME) to adjust the volume of the test signal.
(Subwoofer speaker output balance)
64
CQ-VD7700U/VD7500U
Panel
q Touch the image of the speaker you
want to set.
w [ : UP
(Setting the VTR (VTR1/VTR2) input
Level)
Make this setting if it is not possible to
adjust the volume through the connected device (on the output side).
] : Down
Touch to select
Note: This setting is adjustable for an
external device that is connected to
VTR1 or VTR2. (e.g. VCR)
Lower
Panel
Higher
–6 dB
–4 dB
–2 dB
±0 dB
+2 dB
+4 dB
] : Lower
[ : Higher
Remote
+6 dB : Input level
default: ±0 dB
Notes:
¡If the input level from
VTR1/VTR2 is too high, the
audio will not be output normally. Adjust the input level
so that “OVER” does not
appear.
[]] : Lower
[[] : Higher
¡After setting the input level
The volume can be adjusted
by turning the volume knob or
pressing [}] or [{] (VOLUME) on the remote control.
Remote
q [}] or [{]
w [[] : UP
[]] : Down
CQ-VD7700U/VD7500U
65
E
N
G
L
I
S
H
MENU: Audio Settings (for VD7500U)
: Previous menu
: Exit
Menu
50
GRAPHIC-EQ
(Adjusting the Level for Each of the
Frequency Bands: EQ=Equalizer)
The level of each of the 7 frequency
bands can be adjusted, and up to 6 different levels can be stored in the memory.
Note: These equalizer settings are not
applied to the sub-woofer.
Setting Value
Frequency band
Operations
¡Presetting
60 Hz 160 Hz 400 Hz
1 kHz 3 kHz 6 kHz
16 kHz
: Previous menu
: Exit
Panel
q Make adjustments before memorizing.
Menu
HPF
(Adjusting High Pass Filter)
Adjustment range:
–12 dB to +12 dB
(in 2 dB steps)
Default: ±0 dB for each band
90 Hz
¡Preset Recalling
Panel
Touch 1 to 7 .
(Balance/Fader)
(Adjusting the output balance of each
speaker)
Balance/Fader adjustment
} FRONT or { REAR
Adjustment range:
FRONT 15 to +REAR 15
RIGHT ] or [ LEFT
Adjustment range:
RIGHT 15 to +LEFT 15
Default: ±0
SUB-WOOFER
(Adjusting Sub-woofer level)
LEVEL
[
]
default: ±0 dB
(Sub-woofer level)
or
90 Hz or 135 Hz or
180 Hz or 225 Hz
Remote
[]] or [[] a [ENTER]
225 Hz : under 225 Hz
DR COMP (a page 63)
MENU: DVD Settings
Remote
Press [1] to [7].
Panel
} FRONT or { REAR (Fader)
RIGHT ] or [ LEFT (Balance)
: Previous menu
: Exit
LANGUAGE
(Language Setting)
MENU
(DVD menu language)
Setting Value
ENG
FRE
SPA
OTHER
ENG or FRE or SPA or
: Spanish
OTHER a 0 to 9 a [ENTER]
Input a language code. (a page 90)
: other language
Input the language code.
default: ENG
SUBTITLE
(Subtitle language)
Panel
] : Down
Panel
: French
[}] or [{] (Fader)
[]] or [[] (Balance)
Operations
: English
Remote
[ : UP
Adjustment range:
–∞, –6 to +6
OFF
: cuts off under 90
Hz
180 Hz : under 180 Hz
Remote
51
Panel
: filter off
135 Hz : under 135 Hz
Menu
BAL/FAD
OFF
w Touch and hold preset button 1 to
q Make adjustments before memorizing.
w Press and hold preset button [1] to [6]
for more than 2 seconds.
Operations
High Pass Filter
6 for more than 2 seconds.
¡When a level adjustment has
been stored in a preset button, a preset number will
appear.
(The new level adjustment will
overwrite the previous level
adjustment, erasing it in the
process.)
Setting Value
E
N
G
L
I
S
H
Note: A disc supporting closed captioning and subtitles may overlap each
other on the screen. In this case, turn
the subtitle off.
ENG
FRE
SPA
OTHER
Remote
[}] or [{] a []] or [[]
a [ENTER]
: English
: French
when OTHER is selected:
[0] to [9] a [ENTER]
Input a language code. (a page 90)
: Spanish
: other language
Input the language code.
default: ENG
Remote
[}] or [{] a []] or [[]
AUDIO
(Audio language)
80 Hz
LPF
(Low Pass Filter)
160 Hz
(Cut off Frequency)
default: 80 Hz
Note: This function also adjusts the
upper cut off frequency (Low Pass
Filter) to control the thickness of bass
sound.
66
120 Hz
CQ-VD7700U/VD7500U
Panel
80 Hz or 120 Hz or 160 Hz
Remote
[}] or [{] a []] or [[]
Note: These adjustments being executed, playback will start from the
beginning of a disc.
ENG
FRE
SPA
OTHER
: English
: French
: Spanish
: other language
Input the language code.
default: ENG
a [ENTER]
CQ-VD7700U/VD7500U
67
E
N
G
L
I
S
H
MENU: DVD Settings (continued)
MENU: Input/output Settings (continued)
: Previous menu
: Exit
Menu
52
DISPLAY
(Display Aspect and DVD Software
Mode)
DVD ASPECT
Setting Value
:
WIDE
plays a video in wide screen
(16:9).
NARROW :
plays a video in 4:3 screen.
(Display aspect setting)
default: WIDE
: Previous menu
: Exit
Operations
Panel
WIDE
or
NARROW
Menu
NAVI SETUP
(continued)
NAVI SP
Remote
[}] or [{] a []] or [[]
a [ENTER]
(DVD software mode)
Note: Screen aspect of the display
unit is changed according to the aspect
ratio setting (a page 71) and DVD
software's aspect.
PAN & SCAN :
plays wide-screen video in Pan
& Scan mode (in which the left
and right edges of the screen are
cut off).
LETTER BOX :
plays wide-screen video in letterbox mode (in which black
bands appear at the top and bottom of the screen).
Notes:
¡Set the software setting
according to the symbol used
on jacket. (a page 29)
¡DVD software mode setting is
ignored if “PAN & SCAN” or
“LETTER BOX” is already set
in the software.
Panel
(Navigation mute level)
PAN & SCAN or LETTER BOX
Remote
[}] or [{] a []] or [[]
a [ENTER]
NAVI VOLUME
Volume adjustment of the car navigation
system is executed.
CAMERA SETUP
(Rear View Camera)
NAVI SETUP
(Navigation set up)
NAVI INPUT
(Navigation input)
Setting Value
VTR1 :
connected to VTR1-IN
Selection of the terminal that connects to
the car navigation system allows you to
switch to images and sounds of the car
navigation system by pressing [NAVI]
(NAVIGATION).
68
VTR2 :
connected to VTR2-IN
CQ-VD7700U/VD7500U
default: RGB
Rch
: R only
BOTH
default: BOTH
Rch
[}] or [{] a []] or [[] a [ENTER]
: unchanged
Panel
LEVEL1 :
decrease 10 dB (CQ-VD7700U)
decrease 10 step (CQ-VD7500U)
OFF
OFF
Lch
Remote
LEVEL2 :
decrease 20 dB (CQ-VD7700U)
decrease 15 step (CQ-VD7500U)
LEVEL3 : no sound
Adjustment range: 0 to 40
default: 30
Operations
LEVEL1 LEVEL2 LEVEL3
Remote
[}] or [{] a []] or [[]
a [ENTER]
Note: You can set the navigation mute level
when “RGB” is selected as navigation input.
SCALE
(Rear view camera scale display)
VTR1
Panel
]
[
Remote
[}] or [{] a []] or [[]
OFF : camera off
ON
Panel
: camera on
OFF
default: OFF
OFF : scale display off
ON
Remote
ON
[]] or [[] a [ENTER]
Panel
: scale display on
OFF
default: OFF
Images through the rear view camera
can be shown in scale display mode.
Panel
RGB
0 : the sound that a car navigation
system generates does not come out.
CAMERA
: Previous menu
: Exit
:
connected to the RGB input
cord, or a car navigation system
not connected
: L only
Panel
(Navigation volume)
MENU: Input/output Settings
RGB
Lch
53
default: LEVEL1
default: PAN & SCAN
Menu
Select the mute level of this unit during
voice guidance from the Panasonic car
navigation system (available in future).
Preparation: Connect the navi mute
lead.
Operations
BOTH : L/R speaker
(Navigation input)
NAVI MUTE
LETTER BOX
Setting Value
E
N
G
L
I
S
H
Remote
ON
[]] or [[] a [ENTER]
VTR2
Remote
[}] or [{] a []] or [[]
a [ENTER]
Note: Make sure to select “RGB”
when no car navigation system is connected.
SCALE ADJUST
(Scale adjustment)
] or [ : width
} or { : angle
Panel
] or [ : Wide
} or { : Angle
Remote
[[] or []] : Wide a [ENTER]
[}] or [{] : Angle a [ENTER]
CQ-VD7700U/VD7500U
69
MENU: Input/output Settings (continued)
Aspect Ratio
: Previous menu
: Exit
Menu
Setting Value
VTR SKIP
(VTR Skip)
If a VTR is not used, the VTR mode is
skipped when changing the mode.
OFF
: do not skip
ON
: skip VTR1/2
default: OFF
Default: NORMAL
Mode: 4 types
Operations
Press [ASP] (ASPECT) on the display unit or press [A] (ASPECT) on the remote
control to change the aspect ratio as follows.
Panel
OFF
ON
or
Remote
PWR
NAVI
MODE
MENU
STOP
PAUSE
PLAY
CHAPTER
OSD
(VTR1 skip)
TOP MENU
RETURN
RET
VTR 2 SKIP
DVD / SD MENU RANDOM REPEAT
RAND
(VTR2 skip)
ST/ MONO
VIDEO-CONT
(Video control setting)
This “Video Control Setting” is
required when you connect a
Panasonic car navigation system with
a built-in DVD player (available in
future).
REAR MONITOR
VTR1
:
connected to VTR1-IN
:
connected to VTR2-IN
default: VTR1
Notes:
¡Select a terminal connected to
the DVD output terminal of a
Panasonic car navigation system
with a built-in DVD player (available in future) through an RCA
cord.
¡When you connect a Panasonic
car navigation system with a
built-in DVD player, connect a
video control lead as well.
(a Installation Instructions)
AUTO
:
same as front monitor
TV
You can have different picture and
sound on the front and rear monitors
at the same time (a page 74).
DVD
Preparation: Connect another
optional rear monitor. (e.g. CYVMX6800U) (a Installation
Instruction)
VTR1
: VTR1
VTR2
: VTR2
( Always display background camera
on the display)
This function allows the background camera view to be displayed at the all times.
SD
: DVD
: SD
ANGLE
CH1
CH2
2
SCROLL
REP
PAGE
SUBTITLE
TRACK
SUB
FULL
¡The screen is extended horizontally as a
whole to the aspect ratio of 16 to 9.
¡The extension ratio is the same at any point
on the screen.
GRP
TITLE / CHAPTER
3
DISP
SCAN
VTR1
VTR2
or
4
5
6
7
8
9
0
SPACE
VOL
ASPECT
Remote
A
MUTE
P-MODE
[]] or [[]a [ENTER]
ZOOM
¡The screen is fully extended at the normal
aspect ratio of 4 to 3.
¡The top and bottom of the screen are slightly cut off.
CAR AV
[A] (ASPECT)
V / DVD / SD RECEIVER
TRACK/
CHANNEL
ENTER
D
ASP
P·MODE
SD CARD
ASPECT
Panel
JUST
¡The screen is extended horizontally to the
aspect ratio of 16 to 9.
¡The extension ratio increases toward the
right and left ends of the screen.
[ASP] (ASPECT)
AUTO
TV
DVD
SD
VTR1
VTR2
Remote
[]] or [[]a [ENTER]
Notes:
¡This adjustment is applicable to TV, VTR1, VTR2, DVD, video CD and SD-Card mode.
¡The aspect ratio is adjustable between Full and Normal when the wallpaper is on the screen.
¡When the rear view camera is in operation with the transmission gear shift in the reverse position, the image is shown on
the “FULL” screen only.
¡In some cases, the picture looks different from the original one due to your selection of aspect.
default: AUTO
ON
OFF
Note: You can enter the BGC menu
also by pressing and holding [MENU]
for 2 sec. or more.
70
: TV
AUDIO
1
Panel
VTR2
(Rear Monitor Set Up)
BGC (BackGround Camera)
NORMAL
¡The conventional display image has a 4 to 3
ratio of horizontal to vertical.
¡In this case, a blank area remains on the
right and left sides of the display.
NAVIGATION
[}] or [{] a []] or [[]a [ENTER]
VTR 1 SKIP
55
TER
54
E
N
G
L
I
S
H
EN
E
N
G
L
I
S
H
CQ-VD7700U/VD7500U
: Background camera
view is always on
the display.
: Each mode image
is on the display.
default: OFF
Panel
OFF
or
ON
Remote
[]] or [[] a [ENTER]
Cautions:
¡This is to remind you that compression or extension of the screen using the aspect ratio (screen mode) changing
function of this product for commercial purposes of profit making or viewing/listening by the public could infringe on
the rights of the author protected by copyright law.
¡If you expand a normal picture (4 to 3) by using “JUST”, “ZOOM” or “FULL” aspect to the full size of the screen, you
might not see the periphery of the picture, or you might see a distorted picture. Therefore, use “NORMAL” mode to
see the original picture as the author intended it.
CQ-VD7700U/VD7500U
71
E
N
G
L
I
S
H
Sound Settings
Touch the [SPACE] symbol on the touch panel or press [SPACE] to
change the setting.
56
OFF (No Indicator) : no sound field effect
Sound Field
Settings (Space)
LIVE
: 2-channel audio is distributed to be a 5.1channel output.
: sound field effect as if in a live house
HALL
: sound field effect as if in a concert hall
JAZZ
: sound field effect suited to listening to jazz
MULTI-CH
Effective for 2-channel audio
(LPCM, Dolby Digital/dts 2channel) and analog audio
(TV, VTR, radio, CD changer).
Pro Logic II (4-channel surround playback) selection is
automatically invalid after this
setting. (a page 62)
STADIUM
Default: OFF (no indicator)
Setting range: 8 types + “OFF”
: sound field effect as if in a stadium
DISCO
: sound field effect as if in a disco
VOCAL
: sound field effect suited to listening to vocals
CATHEDRAL
NAVIGATION
PWR
NAVI
MODE
MENU
STOP
PAUSE
PLAY
CHAPTER
OSD
RETURN
TER
TOP MENU
EN
RET
DVD / SD MENU RANDOM REPEAT
RAND
ST/ MONO
AUDIO
CH1
1
ANGLE
REP
PAGE
SUBTITLE
TRACK
SUB
GRP
TITLE / CHAPTER
CH2
2
SCROLL
3
DISP
SCAN
4
5
6
7
8
9
0
SPACE
VOL
ASPECT
A
P-MODE
CAR AV
CQ-VD7700U/VD7500U
This function is effective for
playback of Dolby
Digital/Dolby Surround DVD
video. The words of an
actor hardly audible during
playback at a low volume,
for example, will become
easier to listen to by selecting DR COMP MIN.
You can set “DR COMP” in “SETUP: Sound Setting”. Please refer to
page 63 for “DR COMP” setting.
DR COMP OFF
: movie theater mode
with no compression.
DR COMP STD
: mode recommended by the software manufacturer for listening at low volume.
DR COMP MIN
: mode with the greatest compression, roughly
equivalent to a TV broadcast.
OFF
STD
57
MIN
Conversation
level
: sound field effect as if in a church
Notes:
¡Not effective for Dolby Surround audio recordings and down-mixed
2-channel audio.
¡This function can be set individually for each mode.
72
Producing audio
that is audible at
low volumes
(Dynamic Range
Compression)
E
N
G
L
I
S
H
MUTE
[SPACE]
About DVD
Video/Audio Wide
Dynamic Range
Caution: The sound of DVD
audio/video covers a wide
dynamic range of more than
100 dB. Thus, the reproduced sound volume of
some DVD discs may be
significantly low. When you
increase the volume in this
case, the sound may reach
the peak level suddenly and
it may lead to a traffic accident. To avoid such an accident, you can use the DR
COMP (Dynamic Range
Compression) function. This
function can be set by the
following procedure.
Panel
q Turn the volume back to the previous level (decrease the volume).
w When not in operation mode, Touch the center of touch panel
[Area A] to show operation display.(a page 24).
e Touch MENU a AUDIO a DR COMP .
r Touch MIN to select.
t Readjust the volume level.
Remote
q Turn the volume back to the previous level (decrease the volume).
w Press [MENU].
e Press [}] or [{] to select AUDIO .
r Press [}], [{], []] or [[] to select DR COMP a [ENTER].
t Press []] or [[] to select MIN .
y Readjust the volume level.
CQ-VD7700U/VD7500U
73
E
N
G
L
I
S
H
58
About Rear Monitor
E
N
G
L
I
S
H
❏ Private Mode
❏ Rear Monitor Set Up
You can have different pictures and
sounds at the front and rear monitor at
the same time.
Remote
Rear monitor setting menu
Default: AUTO
Panel
Preparation: Connect another optional
rear monitor. (e.g. CY-VMX6800U) (a
Installation Instruction)
q Touch
.
w Touch
.
e Touch
.
r Touch a symbol to select.
t Touch
to set.
q Press [MENU].
w Press [}] or [{] to select
“INPUT/OUTPUT”.
e Press [ENTER] to set .
r Press [}] or [{] to select “REAR
MONITOR”.
t Press [ENTER] to set.
y Press [[] or []] to select the setting.
u Press [ENTER] to set.
You can mute the sound from the
rear speakers if necessary. Activation
of private mode allows you to enjoy
the front monitor and rear monitor
(e.g. CY-VMX6800U) independently
with different input sources at the
same time.
Press and hold [A] (P • MODE) on the remote control for more than 2 seconds to
activate the private mode function or inactivate it in turn.
59
“P • MODE” indicator lights when
Private Mode is activated.
Default: OFF
OPEN / CLOSE
TILT
CQ-VD7700U
AUTO
CQ-VD7700U
TRACK/
CHANNEL
IN-DASH 7" WIDESCREEN COLOR LCD MONITOR TV / DVD / SD RECEIVER
: picture and sound in the same mode as the front monitor.
ENTER
OPEN
DISC
VOLUME
MUTE
NAVI
DISP
NAVIGATION
MODE
ASP
POWER
ASPECT
P·MODE
SD CARD
TV
: TV picture and sound
NAVIGATION
[]] [[]
[ENTER]
DVD
: DVD picture and sound (disc in the DVD player)
Only sound in DVD Audio, CD, MP3 player mode.
NAVI
MODE
MENU
PAUSE
PLAY
CHAPTER
S D
TOP MENU
RETURN
NAVIGATION
PWR
NAVI
MODE
MODE
MENU
PAUSE
PLAY
CHAPTER
[MENU]
VTR1
: SD picture and sound
RAND
ST/ MONO
CH1
: VTR1 picture and sound
1
ANGLE
PAGE
TRACK
SUB
GRP
3
4
5
6
TER
DVD / SD MENU RANDOM REPEAT
RAND
AUDIO
CH1
1
ANGLE
7
8
9
0
SPACE
PAGE
TRACK
SUB
GRP
A
2
3
4
5
6
DISP
7
8
9
0
SPACE
VOL
ASPECT
[]] [[]
[ENTER]
MUTE
P-MODE
CAR AV
Notes:
¡Press [MODE] to return to regular mode.
¡The display returns to the previous one if no operation is performed for
60 seconds after changing to the rear monitor setting menu.
¡You can mute the sound from the rear speakers connected to this unit, so
that you can have different sound of modes at the front and rear monitor.
(a See Private Mode on next page)
Mute
CAR AV
[A] (P • MODE)
V / DVD / SD RECEIVER
TRACK/
CHANNEL
¡Picture and sound from the car navigation system connected to an RGB
input cord are not available in the rear monitor.
Main Unit
Monitor
TV
Radio
MUTE
P-MODE
TITLE / CHAPTER
CH2
DVD
ASPECT
SCROLL
REP
SUBTITLE
SCAN
A
: VTR2 picture and sound
EN
RET
ST/ MONO
VTR2
DVD
DISP
VOL
RETURN
Radio
TITLE / CHAPTER
CH2
2
SCROLL
REP
SUBTITLE
SCAN
OSD
TOP MENU
Radio
EN
DVD / SD MENU RANDOM REPEAT
AUDIO
STOP
Private Mode ON
OSD
RET
[MODE] (End)
Private Mode OFF
TER
[MODE] (End)
PWR
STOP
VTR1/VTR2
DVD (VCD, CD, MP3)/SD
Radio
CD Changer
ENTER
DISC
ASP
P·MODE
SD CARD
ASPECT
[ASP] (P • MODE)
The rear monitor does not display television
picture when the main unit is in radio mode.
It is recommended to use optional Over-head Monitor
(CY-VMX6800U) and headphones supplied with CYVMX6800U.
Notes:
¡Be sure to set to OFF when you do not use private mode.
¡It is not possible to choose and set SP DELAY on the sound setting menu while private mode is active. (a page 65)
Different types of discs cannot be
played back at the same time.
TV
VTR1/VTR2
DVD (VCD, CD, MP3)/SD
Rear Monitor
74
CQ-VD7700U/VD7500U
CQ-VD7700U/VD7500U
75
E
N
G
L
I
S
H
60
Sub-LCD Display Change
The contents on the sub-LCD display are changeable.
Press [DISP] to change the display as follows. (When the
display is opened, press and hold [DISP].)
■ With display open
VTR 1/2, SD with display closed
E
N
G
L
I
S
H
MP3 with display closed
Video CD with display closed
Mode display (Example VTR1)
Mode display
Mode display
Clock time
Play time
File Number/Play time
LCD OFF
Clock time
Folder Number/File Number
61
All modes with display open...
Mode display (Example: TV mode)
Clock time
DVD Audio with display closed
LCD OFF
LCD OFF
■ Power OFF
Mode display
Track Number/Play time
Folder Title
CD with display closed
Mode display
File Title
With display either open or closed
OFF (Back light is OFF)
Group Number/Track Number
Clock time (Back light is OFF)
Track Number/Play time
Clock time
Disc Title
LCD OFF
Clock time
CD Changer with display closed
LCD OFF (Back light is OFF)
LCD OFF
■ With Display Closed
Track Title
Mode display
DVD Video with display closed
Clock Time
Radio with display closed
Disc number/track number/
Play time
Mode display
Mode display
LCD OFF
Chapter Number/Play time
Clock time
TV with display closed
Band/preset number/frequency
Title Number/Chapter Number
Mode display
LCD OFF
Clock time
Channel
LCD OFF
OPEN / CLOSE
TILT
Clock time
CQ-VD7700U
IN-DASH 7" WIDESCREEN COLOR LCD MONITOR TV / DVD / SD RECEIVER
TRACK/
CHANNEL
ENTER
OPEN
Clock time
DISC
VOLUME
MUTE
NAVI
DISP
NAVIGATION
MODE
ASP
POWER
ASPECT
P·MODE
SD CARD
LCD OFF
LCD OFF
76
CQ-VD7700U/VD7500U
Sub-LCD Display
CQ-VD7700U/VD7500U
77
E
N
G
L
I
S
H
62
Troubleshooting
Preliminary Steps
Check and take steps as described in the tables below.
If You Suspect Something is Wrong
Immediately switch power off.
Disconnect the power cable and check that there is neither smoke
nor heat from the unit before asking for repairs. Never try to repair
the unit yourself because it is dangerous to do so.
Cautions:
¡Do not use the unit in an irregular condition,
for example, without sound, or with smoke or
foul smell, which can cause a fire or electric
shock. Immediately stop using the unit and
call the store where you purchased it.
¡Never try to repair the unit by yourself due to
risk of electrical injury and potential damage
to electrical safety equipment.
■ Common
63
The sound field is not
clear in the stereo
mode. Central sound is
not settled.
Problem
MUTE is set to ON.
a Set MUTE to OFF.
The screen is not adjusted properly.
aMake every adjustment of the screen.
The wiring of the speaker lines is not correct, or a break or poor contact exists.
a Check the wiring in accordance with the wiring diagram.
The display does not
go back into the unit.
The monitor stops on the way to the home position.
aPress [ ] (OPEN/CLOSE).
Red, blue, or green
spots appears.
This is a characteristic of liquid crystal panels and is not a problem.
Alternator noise comes from the car.
aChange the wiring position of the ground lead.
aMount a noise filter on the power supply.
Some operations are
not executable.
Some operations are not executable in particular modes such as menu mode.
a Read the operating instructions carefully and change the mode. In case
the unit is still out of order, consult your dealer.
Some sound setting (Example: BAL/FAD, P·MODE, SP SETUP or Dolby Prologic
II) is not appropriate.
a Readjust the sound setting (BAL/FAD, P·MODE, SP SETUP or Dolby
Prologic II, etc.)
■ Remote Control
Problem
The speaker wiring is confused between right and left.
a Perform the speaker wiring in accordance with the wiring diagram.
Pressing buttons does
not perform operations.
Wrong battery.
aCheck the battery.
Battery has run down.
aReplace the battery.
Remote control is facing in the wrong direction.
aDirect the remote control at remote control sensor on the display unit.
■ TV
Problem
Unclear image due to
noise
CQ-VD7700U/VD7500U
Possible cause a Possible solution
Battery poles (+) (–) are reversed.
aInsert the battery correctly.
There is a break, a short circuit, poor contact or wrong wiring regarding the
speaker wiring.
a Check the speaker wiring.
78
Possible cause a Possible solution
The picture is dark. The picture is whitish. Something is
wrong with the picture.
The picture is light in color.
Fuse blowout
a Eliminate the cause of fuse blowout and replace the fuse with new one.
Consult your dealer.
Noise is made in step
with engine revolutions.
The speaker channels
are reversed between
right and left.
The plus and minus terminals at right and left channels of speakers are connected reversely.
aPerform the speaker wiring in accordance with the wiring diagram.
“AUTO” dimmer is selected.
aSelect one of the dimmer levels from among 1 to 4 to make the dimmer
adjustment become indpendent of light intensity.
The contact of the ground lead is poor.
a Make sure that the ground lead is securely connected to an unpainted
part of the chassis.
No sound from speaker(s)
Possible cause a Possible solution
The brightness of the
screen is not stable.
There is an electromagnetic-wave generator such as a cellular phone near the
unit or its electrical lines.
a Keep an electromagnetic-wave generator such as a cellular phone away
from the unit and the wiring of the unit. In case that noise cannot be eliminated due to the wiring harness of the car, consult your dealer.
Noise
Problem
Possible cause a Possible solution
The power cord (battery, ACC and ground) is connected in the wrong way.
a Check the wiring.
Sound is not
generated
■ Common (continued)
■ Display Settings
Problem
No power to the unit
E
N
G
L
I
S
H
Possible cause a Possible solution
The intensity of the radio wave is too low.
aChange the broadcast station.
Connection or installation of the TV antenna has not been performed correctly.
aCheck the connection or installation.
CQ-VD7700U/VD7500U
79
E
N
G
L
I
S
H
64
Troubleshooting
(continued)
■ DVD audio/video, Video CD, CD, CD-R, CD-RW
Problem
Problem
Possible cause a Possible solution
The disc is upside down.
aPlace the disc in the correction direction, the label side up.
The disc is inside but
no sound.
The disc is ejected
automatically.
■ CD
The disc is dirty.
aClean the disc, referring to the section “Notes on Discs” (a page 87).
The unit can only play the following types of disc: DVD video, video CD, music
CD and MP3.
No playback or disc
ejected
Sound skipping or
noise
Sound skipping due to
vibration
Connect the optical fiber cable.
CD sound skips, tone
quality is low.
The disc is dirty.
aClean the disc, referring to the section “Notes on Discs” (a page 87).
Mounting angle is over 30°.
aAdjust mounting angle to less than 30°.
Sound skip due to
vibration.
The buttons do not
work.
The disc is not ejected.
Unstable mounting.
aMount the unit securely with the mounting parts, referring to the section on
installation.
Some operations are not permitted with certain discs.
(Refer to the guide provided with your disc.)
¡Disc is defective.
¡Mechanical trouble.
aPress [u]. If failure persists, press the reset switch (a page 85). If normal operation is not restored, call the store where you purchased the unit
or the nearest Panasonic Servicenter.
Disc unejectable
65
There is a flaw or foreign material on the disc.
aRemove the foreign material, or use a flawless disc.
There is a flaw or foreign material on the disc.
aRemove the foreign material, or use a flawless disc.
The unit is not sufficiently secured.
aSecure the unit to the console box with the rear support strap, etc.
The unit is tilted at over 30˚ in the front-to-end direction.
aMake the angle 30˚ or less.
The microcontroller in the unit operates abnormally due to noise or other factors.
aPress the reset switch(a page 85). If there is no reset switch, unplug the power
cord and plug it again. In case the unit is still out of order, consult the dealer.
■ MP3
Problem
No playback.
Possible cause a Possible solution
The disc does not conform to any of the file systems supported by this player.
aInsert a disc that conforms to the file systems supported by this player.
(a page 44).
The MP3 file is missing the “.mp3” file name extension.
aMake sure to add the “.mp3” extension to each MP3 file name.
It takes too long for
playback to start.
■ DVD video
80
The disc is inserted upside down.
aInsert disc correctly.
A label has peeled off from the CD inside the unit.
aRefer repair to the dealer where you purchased the unit.
Poor recording quality,
sound skipping
The folders and files recorded on the disc are layered too much.
aAs checking of files takes longer in this case, do not record any unnecessary folders or files other than MP3s on the disc.
aThe recording quality differs depending on the encoding software used,
and on settings such as the bit rate. Set the bit rate within the range specified in the specifications chart (a page 44).
It is recommended to set the bit rate to “128 kbps or more” and “Fixed”.
High-speed writing was executed when MP3 data was recorded on the disc.
aDecrease writing speed as low as possible.
Problem
Possible cause a Possible solution
Cannot switch the audio
language/subtitle
language/angle.
¡It is not possible to switch if the disc does not have multiple audio languages/subtitle languages/angles recorded on it. (Refer to the guide provided
with your disc.)
¡Some discs permit switching through a menu screen.
¡Sometimes, switching angles is possible only with certain scenes.
The audio/subtitle
language selected in the
DVD settings is not
used.
Possible cause a Possible solution
E
N
G
L
I
S
H
If audio or subtitles in that language are not recorded on the disc, the audio or
subtitles do not switch to that language. (Some discs permit switching through
a menu screen. Refer to the guide provided with your disc.)
CQ-VD7700U/VD7500U
Files are not played in
the desired order.
Folder/file name is not
displayed correctly.
Files or folders are not recorded in the desired playback order.
aSome writing software lets you specify the recording order by adding a
prefix in the range of “01” - “99”, etc. to the file name. For details refer
to the user manual of your writing software.
The disc does not conform to the file systems supported by this player.
aInsert a disc that conforms to the file systems supported by this player.
(a page 44).
aThere may be a problem with your writing software or CD recorder (CDR/RW drive). For details refer to the user manual of your writing software.
CQ-VD7700U/VD7500U
81
E
N
G
L
I
S
H
66
Troubleshooting
(continued)
■ MP3 (Continued)
■ Car Navigation, VCR, Camcorder, Rear View Camera, Rear Monitor (Continued)
Problem
File playing time is not
displayed correctly.
Possible cause a Possible solution
You turned off the ignition switch of the car during playback.
aPlaying another file will return the file playing time to normal.
■ Radio
Problem
Poor reception or
noise
Problem
The picture from a VCR or a
camcorder is not displayed.
A VCR or Camcorder is not connected correctly.
aConnect a VCR or Camcorder correctly.
No sound from a VCR or
a camcorder.
The VTR1-IN and/or VTR2-IN level is excessively high. (The “OVER” display
appears.)
aAdjust the VTR Input level.
Possible cause a Possible solution
Antenna installation or wiring of antenna cable is faulty.
aCheck whether the antenna mounting position and its wiring are correct. In
addition, check to see whether the antenna ground is securely connected
to the chassis.
The picture from a rear
view camera is not displayed.
No power is supplied to the antenna amplifier (when using a film antenna, etc.).
aCheck the wiring of the antenna battery lead.
The number of auto
preset stations is less
than 6.
The number of receivable stations is less than 6.
aMove to an area where the number of receivable stations is greater, and
try presetting.
Preset stations cannot
be stored.
The contact of the battery lead is poor, or the battery lead is not always powered.
aMake sure that the battery lead is connected securely, and preset stations
again.
■ SD-Card
Problem
The Card is inserted
but unit can not recognize it
The unit recognizes
the SD-Card but no file
can be selected.
Possible cause a Possible solution
Not initialized SD-Card is inserted.
aInitialize the card and record the play data with your personal computer.
SD Card is out of order.
aReplace it with new one.
The picture or the sound
of the rear monitor is not
switchable.
Problem
82
The connection of a car navigation system is not correct.
aConnect it correctly.
Input setting of a car navigation system is not correct.
aCorrect the input setting.
CQ-VD7700U/VD7500U
Input setting of camera is not correct.
aCorrect the input setting.
“AUTO” is not selected as the rear monitor setting.
aSelect “AUTO” for the setting.
Possible cause a Possible solution
Cables are not correctly connected.
aConnect the cables correctly.
Left and right sounds
are reversed.
The speaker leads are connected in reverse between right and left.
aConnect the speaker wires to the correct one.
No sound on the
speaker.
The speaker setting is “NO” or “NONE”.
aSet it correctly.
Playing back a disc having a subwoofer channel
¡Subwoofer is set to “NO” in the speaker setting.
aSet subwoofer to “YES”.
¡Down mix
aNo technical trouble. Cancel the down mix.
¡Private mode is set to “ON”.
aSet private mode to “OFF”.
■ Car Navigation, VCR, Camcorder, Rear View Camera, Rear Monitor
The picture from a car
navigation system is
not displayed.
Rear view camera is not connected correctly.
aConnect a rear view camera correctly.
No sound from left,
right, front, or rear
speaker.
The name of file is not proper
aGive the proper file name to your play data (a page 50).
Possible cause a Possible solution
67
■ Sound Settings
No file recorded
aRecord play data on SD-Card with your Personal computer.
Problem
Possible cause a Possible solution
E
N
G
L
I
S
H
No sound from the
subwoofer
A disc without subwoofer channel is played back, or analog audio is played
back
¡Subwoofer is set to “NO” in the speaker setting.
aSet subwoofer to “YES”.
¡Sound field (SPACE) is set to “OFF”.
aNo technical trouble. Set it to other than “OFF”.
¡A disc recorded on 1 ch, 3 ch, 4 ch, or 5 ch is played back.
aNo technical trouble. No audio is output from the subwoofer when such
a disc is played back.
Note: Sound does not come out of the subwoofer with default speaker setting
when SPACE is set to OFF. (However, some speaker settings allow sound output
even if SPACE is set to OFF.) If SPACE is set to VOCAL, the sound output level
from the subwoofer is lower than with other SPACE settings (except for OFF).
CQ-VD7700U/VD7500U
83
E
N
G
L
I
S
H
68
Troubleshooting
(continued)
If the Unit Begins to Malfunction...
Error Display Messages
■ CD/MP3/DVD/Video CD/CD Changer/SD-Card
Display
Possible cause a Possible solution
- E1 -
Disc is dirty, or is upside down.
aCheck disc.
- E2 -
Disc has scratches.
aCheck disc.
- E3 -
No operation by some cause.
aPress [u]. If failure persists, press the reset switch. (Press the reset
switch in the CD changer). If normal operation is not restored, call the
store where you purchased the unit or the nearest Panasonic
Servicenter.
- E4 -
The type of the file that is selected is not supported.
aCheck disc.
NO DISC
NO MAGAZINE
No disc is in the player.
aInsert disc into the disc slot.
No magazine is in the changer.
aLoad the changer with CD-loaded magazine.
REGION ERROR
An attempt was made to play a disc with a region number other than “1” or
“ALL”.
aPress [u] and check the disc.
NO CARD
No card is inserted into the card slot, the card is not inserted until it clicks,
or the card is defective.
aMake sure of card insertion.
NO FILE
Reset switch
Insert a hard, slender stick into the hole and push the switch.
E
N
G
L
I
S
H
69
Important
Push the switch only when the unit fails to operate with any buttons. (Stored settings and adjustments are not cleared.)
If the unit fails to return to normal condition, call the nearest Panasonic Servicenter and ask for repairs.
Hide-away Unit
Reset switch
Note: If the ID-CODE has been already set, you will be asked to enter the ID-CODE right after the unit is restarted.
The unit cannot recognize the play file, or there is no file on the SD card.
aEnsure that the file name is proper and MP3/AAC files are recorded
with SD-Jukebox.
You are trying to play incompatible or corrupted data. These data cannot be
played.
aCheck the SD-Card.
X
CHECK CARD
The card cannot be played.
aCheck the SD-Card.
Notes:
¡There may be cases when the disc numbers affected by an error are displayed before E1 and E2.
¡Displays and the steps to be taken for errors vary in part from changer to changer. For details, refer to the Operating
Instructions for the changer used.
84
CQ-VD7700U/VD7500U
CQ-VD7700U/VD7500U
85
E
N
G
L
I
S
H
70
Maintenance
To Prevent Damage to the System Exterior
Do not apply pesticides, benzine, thinner or other volatile substances to the unit.
The cabinet surface primarily consists of plastic materials.
Do not wipe with benzine, thinner or similar substances because this will result in
discoloration or removal of the paint.
When a cloth with a cleansing chemical is used, follow the caution points.
Do not leave the unit in contact with rubber or vinyl products for long periods of
time.
Do not use cleansers which have polishing granules because this could damage
the surface of the unit.
Notes on Discs
Pesticide
Alcohol
Wax
Tape
Thinner
Benzine Adhesive
Tape
Clean Dirt by Wiping Lightly with a Soft Cloth
When the unit is dirty, wipe the surface of the display using the Wiping Cloth (supplied).
How to hold the disc
¡Do not touch the underside of the disc.
¡Do not scratch the disc.
¡Do not bend disc.
¡When not in use, keep disc in the case.
OPEN / CLOSE
71
Label side
Do not use irregularly shaped discs.
Disc insert
The surfaces of new discs tend to be slippery. Therefore, when
using such a disc for the first time, it may not load satisfactorily
even when it has been inserted into the main unit. At a time like
this, insert the disc into the main unit as far as it will go until it
is loaded properly.
Do not leave discs in the following places:
¡Direct sunlight
¡Near car heaters
¡Dirty, dusty and damp areas
¡On seats and dashboards
Wipe lightly.
TILT
E
N
G
L
I
S
H
Do not use irregularly shaped discs.
<Right>
<Wrong>
Disc cleaning
Use a dry, soft cloth to wipe from the center outward.
Do not attach any seals or labels to your discs.
OPEN / CLOSE
TILT
CQ-VD7700U
CQ-VD7700U
IN-DASH 7" WIDESCREEN COLOR LCD MONITOR TV / DVD / SD RECEIVER
TRACK/
CHANNEL
ENTER
OPEN
DISC
VOLUME
MUTE
NAVI
NAVIGATION
■
DISP
MODE
ASP
POWER
ASPECT
P·MODE
SD CARD
Without a Wiping Cloth
When the unit is dirty, wipe with a well-wrung cloth dipped in liquid dishwashing detergent (neutral) diluted with water
and then go over the same surface with a dry cloth.
(Since there is the possibility of water drops getting inside of the unit, do not directly apply cleanser to the surface.)
Note: Do not scratch the screen with your nails or other hard objects. The resulting scratches or marks will obscure the
image.
Caution: If water drops or similar wet substances get inside the monitor, it may cause a malfunction.
Do not write on the disc label with a heavy pen or
ballpoint pen.
Notes on CD-Rs/RWs
¡You may have trouble playing back some CD-R/RW discs recorded on CD recorders (CD-R/RW drives), either due to
their recording characteristics or dirt, fingerprints, scratches, etc. on the disc surface.
¡CD-R/RW discs are less resistant to high temperatures and high humidity than ordinary music CDs. Leaving them inside
a car for extended periods may damage them and make playback impossible.
¡The unit may not successfully play back a CD-R/RW that was made by the combination of writing software, a CD
recorder (CD-R/RW drive) and a disc if that are incompatible with one another.
¡This player cannot play CD-R/RW discs if the session is not closed.
¡This player cannot play CD-R/RW discs which contain other than CD-DA or MP3 data (Video CD, etc.).
¡Be sure to observe the handling instructions of CD-R/RW discs.
Product Servicing
If the suggestions in the charts do not solve the problem, we recommend that you take it to your nearest authorized
Panasonic Servicenter. The product should be serviced only by a qualified technician.
Replacing the Fuse
Use fuses of the same specified rating (5 A for display unit, 15 A for hide-away unit). Using different substitutes or fuses
with higher rating, or connecting the product directly without a fuse, could cause a fire or damage to this unit.
If the replacement fuse fails, contact your nearest Panasonic Servicenter for service.
86
CQ-VD7700U/VD7500U
CQ-VD7700U/VD7500U
87
E
N
G
L
I
S
H
72
Definition of Terms
Digital audio output connector (Optical)
The digital audio output connector (optical) converts
electrical signals into optical signals and transfers
them to the amplifier. Consequently, it has a number
of features including its immunity from electrical interference from external sources and its ability to prevent
the generation of noise and its minimal effect on the
external environment. This function is provided only
with CQ-VD7500U
Dolby Digital
This fully discrete format divides the music signals
into 5.1 channels: Front Left (L), Front Right (R),
Center (C), Left Surround (LS), Right Surround (RS)
and Subwoofer (SW: 0.1 channel) for recording and
playback. The number of channels that are recorded
depends on the software (1 to 5.1 channels).
Dolby Digital 5.1
Dolby Digital 5.1 is a method of transmitting and storing 5.1-channel soundtracks via newer digital media
such as DVD, digital cable, digital broadcast TV (DTV),
and satellite transmissions. Unlike the Dolby Surround
encode/Pro Logic decode process, which sacrifices
channel separation to get surround onto any stereo
soundtrack, Dolby Digital 5.1 is a discrete system that
keeps the multiple channels fully separated throughout the encoding and decoding processes. In addition
to having full-range Left (L), Center (C), Right (R), Left
Surround (LR), and Right Surround (RS) channels,
Dolby Digital 5.1 soundtracks carry a sixth (“.1”)
channel (Subwoofer) recorded with low-frequency
effects (those bass rumbles and booms you feel as
well as hear in a well-equipped cinema).
Manufactured under license from Dolby
Laboratories. “Dolby” and the double-D symbol
are trademarks of Dolby Laboratories.
Dolby Pro Logic
This format records signals from four channels [Front
Left (L), Front Right (R), Center (C), and Monaural
Surround (S)] in two channels, decodes those channels through a Dolby Pro Logic decoder, and then outputs the resulting signals in four channels.
Dolby Pro Logic II
Dolby Pro Logic II is an advanced matrix decoder that
derives five-channel surround (Left, Center, Right, Left
Surround, and Right Surround) from any stereo program material, whether or not it has been specifically
88
CQ-VD7700U/VD7500U
Dolby Surround encoded. On encoded material such
as movie soundtracks, the sound is more like Dolby
Digital 5.1 (see above), while on unencoded stereo
material such as music CDs the effect is a wider, more
involving soundfield. Among other improvements over
Pro Logic, Pro Logic II provides two full-range surround channels, as opposed to Pro Logic’s single, limited-bandwidth surround channel.
Manufactured under license from Dolby
Laboratories. “Dolby”, “Pro Logic”, and the
double-D symbol are trademarks of Dolby
Laboratories.
dts
This format requires more data than Dolby Digital, and
provides higher quality surround playback.
Similar to Dolby Digital, this fully discrete format
divides the music signals into 5.1 channels: Front Left
(L), Front Right (R), Center (C), Left Surround (LS),
Right Surround (RS) and Subwoofer (SW: 0.1 channel) for recording and playback.
“DTS” and “DTS Digital Surround” are registered
trademarks of Digital Theater Systems, Inc.
“DTS” and “DTS 2.0” are trademarks of Digital
Theater Systems, Inc.
G.726
G.726 is a sound data standard of compression/expansion
recommended by CCITT (Consultative Committee for
International Telephony and Telegraphy). Applying this
standard, the PCM (Pulse Code Modulation) sound data
can be compressed or expanded effectively.
The applied software is mainly used for digital telephones,
digital voice recorders, digital camcorders and so on.
Interactive DVD
An interactive DVD is DVD software which includes
multiple angles, multiple plot endings, etc.
Letterbox screen
This refers to a screen on which the playback picture
of wide-screen DVDs or Video CDs appears with black
bands running along the top and bottom.
Pan & Scan screen
This refers to a screen on which the playback picture
of wide-screen DVDs or Video CDs is cut off at the left
and right sides.
E
N
G
L
I
S
H
LPCM (Linear PCM audio)
In this format, the audio signal is converted to digital
data and recorded in two channels without compression. Because the capacity of a DVD video disc is
large, it can store more data with better accuracy than
a CD.
73
MPEG4
MPEG4 (ASF) is an audio/video format for the online
streaming proposed by Microsoft Corporation. This format
allows you to treat audio/video data easily on your personal
computer.
Generally, ASF files are so light that they can be stored on
comparatively small-capacity media such as SD memory
card because they are made for online streaming.
Playback control (Video CD)
If the Video CD has “With Playback Control” or something similar written on the disc surface or on the
jacket, the scenes or information to be viewed (or listened to) can be selected interactively by using the
menu shown on the screen.
In these instructions, playback using the menu screen
is referred to as “menu play” for video CDs. This player supports Video CDs with playback control.
Title, Chapter (DVD)
DVDs are divided into large sections (titles) and/or
small sections (chapters). Each section is numbered;
these numbers are called “Title number” or “Chapter
number”.
Title 1
Chapter 1
Title 2
Chapter 2 ……
Chapter 1 ……
Track (Video CD/CD)
Video CDs or CDs are divided into some sections
(tracks). Each section is numbered; these numbers are
called “Track number”.
Track 1
Track 2
Track 3
Track ……
This product incorporates copyright protection technology that is protected by U.S. patents and other intellectual
property rights. Use of this copyright protection technology must be authorized by Macrovision, and is intended for
home and other limited viewing uses only unless otherwise authorized by Macrovision. Reverse engineering or
disassembly is prohibited.
CQ-VD7700U/VD7500U
89
E
N
G
L
I
S
H
74
90
Language Code List
Specifications
How to input the language code, refer to page 67.
Display Unit
Code
6565
6566
6570
6577
6582
6583
6588
6590
6665
6669
6671
6672
6678
6679
6682
6765
6779
6783
6789
6865
6869
6890
6976
6978
6979
6983
6984
6985
7065
7073
7074
7079
7082
7089
7165
7168
7176
7178
7185
7265
7273
7282
7285
Language Name
Afar
Abkhazian
Afrikaans
Ameharic
Arabic
Assamese
Aymara
Azerbaijani
Bashkir
Byelorussian
Bulgarian
Bihari
Bengali; Bangla
Tibetan
Breton
Catalan
Corsican
Czech
Welsh
Danish
German
Bhutani
Greek
English
Esperanto
Spanish
Estonian
Basque
Persian
Finnish
Fiji
Faroese
French
Frisian
Irish
Scots Gaelic
Galician
Guarani
Gujarati
Hausa
Hindi
Croatian
Hungarian
Code
7289
7365
7378
7383
7384
7387
7465
7473
7487
7565
7575
7576
7577
7578
7579
7583
7585
7589
7665
7678
7679
7684
7686
7771
7773
7775
7776
7778
7779
7782
7783
7784
7789
7865
7869
7876
7879
7982
8065
8076
8083
8084
8185
CQ-VD7700U/VD7500U
Language Name
Armenian
Interlingua
Indonesian
Icelandic
Italian
Hebrew
Japanese
Yiddish
Javanese
Georgian
Kazakh
Greenlandic
Cambodian
Kannada
Korean
Kashmiri
Kurdish
Kirghiz
Latin
Lingala
Laothian
Lithuanian
Latvian, Lettish
Malagasy
Maori
Macedonian
Malayalam
Mongolian
Moldavian
Marathi
Malay
Maltese
Burmese
Nauru
Nepali
Dutch
Norwegian
Oriya
Panjabi
Polish
Pashto, Pushto
Portuguese
Quechua
Code
8277
8279
8285
8365
8368
8372
8373
8375
8376
8377
8378
8379
8381
8382
8385
8386
8387
8465
8469
8471
8472
8473
8475
8476
8479
8482
8484
8487
8575
8582
8590
8673
8679
8779
8872
8979
9072
9085
Language Name
Rhaeto-Romance
Romanian
Russian
Sanskrit
Sindhi
Serbo-Croatian
Singhalese
Slovak
Slovenian
Samoan
Shona
Somali
Albanian
Serbian
Sundanese
Swedish
Swahili
Tamil
Telugu
Tajik
Thai
Tigrinya
Turkmen
Tagalog
Tonga
Turkish
Tatar
Twi
Ukrainian
Urdu
Uzbek
Vietnamese
Volapük
Wolof
Xhosa
Yoruba
Chinese
Zulu
E
N
G
L
I
S
H
General
Power supply
Current consumption
Dimensions (W x H x D)
Weight
:
:
:
:
12 V DC (11 V - 16 V), test voltage 14.4 V, negative ground
Less than 1.5 A
7” x 1-15/16” x 6-1/2” (178 x 50 x 165 mm)
5 lbs. 1 oz. (2.3 kg)
Monitor
Liquid crystal panel
Screen dimensions (W x H x D)
Number of pixels
Valid pixel ratio
Display method
Drive method
Light source
:
:
:
:
:
:
:
7” wide
6-1/16” x 3-7/16” x 6-15/16” (154 x 87 x 177 mm)
336 960 pixels (234 vertical x 480 horizontal x 3)
Over 99.99%
Transparent color filter format
TFT (Thin Film Transistor) active matrix format
Internal light (Built-in small fluorescent lamp)
75
Digital audio output (For CQ-VD7500U)
Disc
DVD
Video CD
Sound recording format
Optical digital audio output from connector
Dolby Digital
Dolby Digital bitstream (1 – 5.1 ch)
DTS
DTS bitstream (1 – 5.1 ch)
Linear PCM
(48 kHz 16/20/24 bit)
Linear PCM (2 ch)
(48 kHz sampling/16 bit only)
MPEG 1
MPEG 1 bitstream
Linear PCM
Linear PCM (2 ch)
(44.1 kHz sampling/16 bit)
Linear PCM
Linear PCM (2 ch)
(44.1 kHz sampling/16 bit)
DTS
DTS bitstream (1 – 5.1 ch)
MP3
Linear PCM (2 ch)
(32 kHz/44.1 kHz/48 kHz sampling/16 bit)
CD
MP3
Note: When a DVD audio disc is playing, no digital audio data comes out on the optical output.
CQ-VD7700U/VD7500U
91
E
N
G
L
I
S
H
76
Specifications (continued)
Hide-away Unit
General
Power supply
Current consumption
Maximum power output
Compatible speaker impedance
Video input signal
Audio input sensitivity
Video output signal
Pre-Amp output voltage
Pre-Amp output impedance
Dimensions (W x H x D)
Weight
:
:
:
:
:
:
:
:
:
:
:
:
12 V DC (11 V - 16 V), test voltage 14.4 V, negative ground
Less than 10 A (during disc playback)
70 W x 4 ch + 35 W (at 16 V) (CQ-VD7700U)
50 W x 4 ch (at 16 V) (CQ-VD7500U)
4-8Ω
Composite video signal, 1.0 Vp-p (75 Ω)
2 Vrms
Composite video signal, 1.0 Vp-p (75 Ω)
5 Vrms
Less than 60 Ω
13-1/8” x 1-3/4” x 6-15/16” (334 x 44 x 176 mm)
5 lbs. 4 oz. (2.4 kg) (CQ-VD7700U)
4 lbs. 13 oz. (2.2 kg) (CQ-VD7500U)
FM stereo radio
Frequency range
Usable sensitivity
Stereo separation
S/N ratio
:
:
:
:
87.9 - 107.9 MHz
12 dBf
35 dB (1 kHz)
70 dB
AM stereo radio
Frequency range
Usable sensitivity
Image rejection ratio
: 530 - 1 710 kHz
: 28 dB/µV
: 50 dB
Video section
Signal format
Video output
Region number
: NTSC (Standard signal format in U.S. and Japan)
: 75 Ω, 1 Vp-p
: 1 and ALL
Audio section
Frequency characteristics
(Pre-Amp output)
(when “LARGE” is selected)
Front L/R, Center, Rear (surround) L/R
Delay time
Dolby Digital
Center
Rear (surround) L/R
Dolby Pro Logic II
Rear (surround) L/R
Distortion
Front L/R
S/N ratio (during DVD playback)
CQ-VD7700U
CQ-VD7500U
: 20 Hz - 88 kHz
20 Hz - 20 kHz
: 0 - 5 ms
: 0 - 15 ms
: 15 - 30 ms
: 0.015 % (1 kHz, 0 dB, PCM input)
: 95 dB
0.015 % (1 kHz, 0 dB, PCM input)
95 dB
Above specifications comply with EIA standards.
Note: Specifications and design are subject to modification without notice due to improvements in technology.
92
CQ-VD7700U/VD7500U