1
DVD VIDEO / CD / VCD
5 DISC CAROUSEL CHANGER
SD-5915SU
SD-5915SC
OWNERS MANUAL
© 2004 Toshiba Corporation
Introduction
2
Connections
14
Basic playback
20
Advanced
playback
26
Function setup
38
Others
46
Introduction
SAFETY PRECAUTIONS
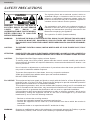
CAUTION
The lightning flash with arrowhead symbol, within an
equilateral triangle, is intended to alert the user to the
presence of uninsulated “dangerous voltage” within the
product’s enclosure that may be of sufficient magnitude to
constitute a risk of electric shock to persons.
WARNING: TO REDUCE THE RISK OF
ELECTRIC SHOCK, DO NOT REMOVE
COVER
(OR
BACK).
NO
USERSERVICEABLE PARTS INSIDES.
REFER SERVICING TO QUALIFIED
SERVICE PERSONNEL.
The exclamation point within an equilateral triangle is
intended to alert the user to the presence of important
operating and maintenance (servicing) instructions in the
literature accompanying the appliance.
The symbol for CLASS II (Double Insulation)
WARNING:
TO REDUCE THE RISK OF FIRE OR ELECTRIC SHOCK, DO NOT EXPOSE THIS APPLIANCE
TO RAIN OR MOISTURE. DANGEROUS HIGH VOLTAGES ARE PRESENT INSIDE THE
ENCLOSURE. DO NOT OPEN THE CABINET. REFER SERVICING TO QUALIFIED PERSONNEL
ONLY.
CAUTION:
TO PREVENT ELECTRIC SHOCK, MATCH WIDE BLADE OF PLUG TO WIDE SLOT, FULLY
INSERT.
ATTENTION:
POUR EVITER LES CHOCS ELECTRIQUES, INTRODUIRE LA LAME LA PLUS LARGE DE LA
FICHE DANS LA BORNE CORRESPONDANTE DE LA PRISE ET POUSSER JUSQU’AU FOND.
CAUTION:
This Digital Video Disc Player employs a Laser System.
To ensure proper use of this product, please read this owner’s manual carefully and retain for
future reference. Should the unit require maintenance, contact an authorized service location - see
service procedure.
Use of controls or adjustments or performance of procedures other than those specified herein
may result in hazardous radiation exposure.
To prevent direct exposure to laser beam, do not try to open the enclosure.
Visible and invisible laser radiation when open and interlocks defeated.
DO NOT STARE INTO BEAM.
FCC NOTICE: This equipment has been tested and found to comply with the limits for a Class B digital device,
pursuant to part 15 of the FCC Rule. These limits are designed to provide reasonable protection
against harmful interference in a residential installation.
This equipment generates, uses, and can radiate radio frequency energy and, if not installed and
used in accordance with instructions, may cause harmful interference to radio communications.
However, there is no guarantee that interference will not occur in a particular installation.
If this equipment does cause harmful interference to radio or television reception, which can be
determined by turning the equipment off and on, the user is encouraged to try to correct the
interference by one or more the following measures:
- Reorient or relocate the receiving antenna.
- Increase the separation between the equipment and receiver.
- Connect the equipment into an outlet on a circuit different from that to which the receiver is
connected.
- Consult the dealer or an experienced radio/TV technician for help.
WARNING:
2
Changes or modifications made to this equipment, not expressly approved by Toshiba, or parties
authorized by Toshiba, could void the user’s authority to operate the equipment.
The instructions shall state that an ALL-POLE MAINS SWITCH with a contact separation of at least 3 mm in each
pole shall be incorporated in the electrical installation of the building.
These servicing instructions are for use by qualified service personnel only. To reduce the risk of
electric shock do not perform any servicing other than that contained in the operating instructions
unless you are qualified to do so.
In the spaces provided below, record the Model and Serial No. located on the rear panel of your DVD video player.
Model No.
Serial No.
Retain this information for future reference.
Location of the required label
1-1, SHIBAURA 1-CHOME, MINATO-KU,
TOKYO 105-8001, JAPAN
MADE IN CHINA
MANUFACTURED
SERIAL NO.
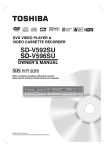
Be aware that this equipment is still powered even after the ON/STANDBY indicator turns off (standby mode) by
pressing the ON/STANDBY button. To disconnect this equipment completely from the mains power, pull out the
power plug from the wall outlet.
3
Introduction
CAUTION:
Introduction
IMPORTANT SAFETY INSTRUCTIONS
CAUTION:
PLEASE READ AND OBSERVE ALL WARNINGS AND INSTRUCTIONS GIVEN IN THIS OWNER’S
MANUAL AND THOSE MARKED ON THE UNIT. RETAIN THIS BOOKLET FOR FUTURE
REFERENCE.
This set has been designed and manufactured to assure personal safety. Improper use can result in electric shock
or fire hazard. The safeguards incorporated in this unit will protect you if you observe the following procedures for
installation, use and servicing. This unit is fully transistorized and does not contain any parts that can be repaired by
the user.
DO NOT REMOVE THE CABINET COVER, OR YOU MAY BE EXPOSED TO DANGEROUS VOLTAGE.
REFER SERVICING TO QUALIFIED SERVICE PERSONNEL ONLY.
1. Read these instructions.
2. Keep these instructions.
3. Heed all warnings.
4. Follow all instructions.
5. Do not use this apparatus near water.
6. Clean only with dry cloth.
7. Do not block any ventilation openings. Install in accordance with the manufacturer’s instructions.
8. Do not install near any heat sources such as radiators, heat registers, stoves, or other apparatus (including
amplifiers) that produce heat.
9. Do not defect the safety purpose of the polarized or grounding-type plug. A polarized plug has two blades with
one wider than the other. A grounding type plug has two blades and a third grounding prong. The wide blade or
the third prong are provided for your safety. If the provided plug does not fit into your outlet, consult an electrician
for replacement of the obsolete outlet.
10. Protect the power cord from being walked on or pinched particularly at plugs, convenience receptacles, and the
point where they exit from the apparatus.
11. Only use attachments/accessories specified by the manufacturer.
12. Use only with the cart, stand, tripod, bracket, or table specified by the manufacturer, or sold with
the apparatus. When a cart is used, use caution when moving the cart/apparatus combination
to avoid injury from tip-over.
S3125A
13. Unplug this apparatus during lightning storms or when unused for long periods of time.
14. Refer all servicing to qualified service personnel. Servicing is required when the apparatus has been damaged
in any way, such as power-supply cord or plug is damaged, liquid has been spilled or objects have fallen into the
apparatus, the apparatus has been exposed to rain or moisture, does not operate normally, or has been
dropped.
4
ADDITIONAL SAFETY INSTRUCTIONS
16. Do not overload wall outlets; extension cords, or integral conveniences receptacles as this can result in a risk of
fire or electric shock.
17. Apparatus shall not be exposed to dripping or splashing and no objects filled with liquids, such as vases, shall
be placed on the apparatus.
18. Keep your fingers well clear of the disc tray as it is closing. Neglecting to do so may cause serious personal
injury.
19. Do not place a heavy object on or step on the apparatus. The object may fall, causing serious personal injury and
serious damage to the apparatus.
20. Do not use a cracked, deformed, or repaired disc. These discs are easily broken and may cause serious
personal injury and apparatus malfunction.
21. If the apparatus should smoke or smell, immediately disconnect the power cord from the wall outlet. Wait until the
smoke or smell stops, then ask your dealer for a check and repair. Neglecting to do so may cause fire.
22. While it is thundering, do not touch the connecting cables or the apparatus.
23. The apparatus includes lead, an ingredient of solder used on the PCB, which is a harmful substance to human
and the environment. When disposing of this apparatus, follow the rules and regulations in your area.
5
Introduction
15. When you use headphones, keep the volume at a moderate level. If you use the headphones continuously with
high volume sound, it may cause hearing damage.
Introduction
Precautions
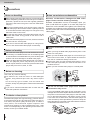
Notes on handling
When shipping the DVD video player, the original shipping
carton and packing materials come in handy. For maximum
protection, repack the unit as it was originally packed at
the factory. Take care not to give it a shock or shake when
carrying.
Do not use volatile liquids, such as insect spray, near the
DVD video player. Do not leave rubber or plastic products
in contact with the DVD video player for a long time. They
will leave marks on the finish.
The top and rear panels of the DVD video player may be
become warm after a long period of use. This is not a
malfunction.
Notes on moisture condensation
Moisture condensation damages the DVD video
player. Please read the following carefully.
Moisture condensation occurs, for example, when you
pour a cold drink into a glass on a warm day. Drops of
water form on the outside of the glass. In the same way,
moisture may condense on the optical pick-up lens inside
this unit, one of the most crucial internal parts of the DVD
video player.
ple of moisture
Exam
condensation!
When the DVD video player is not in use, be sure to remove
the disc and turn off the power.
Optical pick-up
lens
If you do not use the DVD video player for a long future.
Turn on and use the DVD video player occasionally.
Notes on locating
Place the DVD video player on a level surface. Do not use
it on a shaky or unstable surface such as a wobbling table
or inclined stand. The loaded disc may come off the proper
position and cause damage to the DVD video player.
When you place this DVD video player near a TV, radio, or
VCR, the playback picture may become poor and the
sound may be distorted. In this case, place the DVD video
player away from the TV, radio, or VCR.
Moisture condensation occurs during the following
cases.
When you bring the DVD video player directly from a cold
place to a warm place.
When you use the DVD video player in a room where you
just turned on the heater, or a place where the cold wind
from the air conditioner directly hits the unit.
In Summer, when you use the DVD video player in a hot
and humid place just after you move the unit from an air
conditioned room.
When you use the DVD video player in a humid place.
It's too
warm!
Notes on cleaning
Use a soft, dry cloth for cleaning.
For stubborn dirt, soak the cloth in a weak detergent
solution, wring well and wipe. Use a dry cloth to wipe it
dry.
Do not use any type of solvent, such as thinner and
benzine, as they may damage the surface of the DVD video
player.
If you use a chemical saturated cloth to clean the unit,
follow that product’s instructions.
To obtain a clear picture
The DVD video player is a high technology, precision device.
If the optical pick-up lens and disc drive parts are dirty or
worn down, the picture quality becomes poor. To obtain a
clear picture, we recommend regular inspection and
maintenance (cleaning or parts replacement) every 1,000
hours of use depending on the operating environment. For
details, contact your nearest dealer.
6
Do not use the DVD video player when moisture
condensation may occurs.
If you use the DVD video player in such a situation, it may
damage discs and internal parts. Remove the disc, connect
the power cord of the DVD video player to the wall outlet,
turn on the DVD video player, and leave it for two or three
hours. After two or three hours, the DVD video player will
have warmed up and evaporated any moisture. Keep the
DVD video player connected to the wall outlet and moisture
condensation will seldom occur.
Wa
it!
Wall outlet
Notes on Discs
On handling discs
Structure of disc contents
Normally, DVD video discs are divided into titles, and the
titles are sub-divided into chapters. VIDEO CDs and audio
CDs are divided into tracks.
DVD video disc
DVD video disc
Title 1
Playback side
Title 1
Chapter 1 Chapter 2 Chapter 1 Chapter 2 Chapter 3
Do not attach paper or tape to discs.
VIDEO CD/audio CD
VIDEO CD/audio CD
Track 1
Track 2
Track 1
Track 2
Track 3
On cleaning discs
Fingerprints and dust on the disc cause picture and sound
deterioration. Wipe the disc from the center outwards with
a soft cloth. Always keep the disc clean.
Each title, chapter or track is assigned a number, which
is called “title number”, “chapter number” or “track number”
respectively.
There may be discs that do not have these numbers.
Notes on copyright
If you cannot wipe off the dust with a soft cloth, wipe the
disc lightly with a slightly moistened soft clothe and finish
with a dry cloth.
Do not use any type of solvent such as thinner, benzine,
commercially available cleaners or antistatic spray for vinyl
LPs. It may damage the disc.
On storing discs
Do not store discs in a place subject to direct sunlight or
near heat sources.
Do not store discs in place subject to moisture and dust
such as a bathroom or near a humidifier.
It is forbidden by law to copy, broadcast, show, broadcast
on cable, play in public, and rent copyrighted material
without permission.
DVD video discs are copy protected, and any recordings
made from these discs will be distorted.
This product incorporates copyright protection technology
that is protected by method claims of certain U.S. patents
and other intellectual proper ty rights owned by
Macrovision Corporation and other rights owners.
Use of this copyright protection technology must be
authorized by Macrovision Corporation, and is intended
for home and other limited viewing uses only unless
otherwise authorized by Macrovision Corporation.
Reverse engineering or disassembly is prohibited.
Store discs vertically in a case. Stacking or placing objects
on discs outside of their case may cause warping.
7
Introduction
Do not touch the playback side of the disc.
Introduction
Notes on Discs (continued)
About this owner’s manual
Playable discs
This owner’s manual explains the basic instructions of this
DVD video player. Some DVD video discs are produced in a
manner that allows specific or limited operation during playback.
As such, the DVD video player may not respond to all operating
commands. This is not a defect in the DVD video player. Refer
to instruction notes of discs.
“
This DVD video player can play the following discs.
Disc Mark
Contents
Audio
+
DVD
video
discs
12 cm
Approx. 8 hours
(double sided disc)
video
Approx. 80 minutes
(single sided disc)
(moving
pictures)
Notes on region numbers
8 cm
Approx. 160 minutes
(double sided disc)
The region number of this DVD video player is 1. If region
numbers, which stand for their playable area, are printed on
your DVD video disc and you do not find 1 or
Maximum
playback time
Approx. 4 hours
(single sided disc)
” may appear on the TV screen during operation.
A “ ” means that the operation is not permitted by the DVD
video player or the disc.
Disc
Size
Audio
+
, disc
playback will not be allowed by the player. (In this case, the
DVD video player will display a message on-screen.)
VIDEO
CDs
VIDEO CD not equipped with PBC function
8 cm
Approx. 20 minutes
12 cm
Approx. 74 minutes
8 cm
(CD
simple)
Approx. 20 minutes
(moving
On VIDEO CDs
Audio
CDs
Approx. 74 minutes
video
DIGITAL VIDEO
pictures)
This DVD video player supports VIDEO CDs equipped with the
PBC (Version 2.0) function. (PBC is the abbreviation of Playback
Control.) You can enjoy two playback variations depending on
types of discs.
12 cm
Audio
(Version 1.1)
The following discs are also available.
• DVD-R discs of DVD video format.
Sound and movie can be played on this DVD video player in
the same way as an audio CD.
• CD-R/CD-RW discs of CD-DA format.
Some of these discs may be incompatible.
VIDEO CD equipped with PBC function
(Version 2.0)
In addition to operation of a VIDEO CD not equipped with the
PBC function, you can enjoy playback of interactive software
with search function by using the menu displayed on the TV
screen (Menu Playback). Some of functions described in
this owner’s manual may not work with some discs.
• You cannot play discs other than those listed above.
• You cannot play DVD-RAM discs or non-standardized discs,
etc., even if they may be labeled as above.
• This DVD video player uses the NTSC color system, and is
not suitable to play DVD video discs recorded in any other
color system (PAL, SECAM, etc.).
Because of problems and errors that can occur during the
creation of DVD software and/or the manufacture of DVD discs,
Toshiba America Consumer Products, L.L.C., Toshiba Hawaii,
Inc. and Toshiba of Canada, Ltd. cannot guarantee that this
player will play every feature of every DVD bearing the DVD
logo. As one of the creators of DVD technology, Toshiba DVD
players are manufactured to the highest standards of quality
and, as a result, such incompatibilities are very rare. If you
happen to experience and difficulty playing a DVD on a Toshiba
DVD player, please feel free to call our Contact listed in “How to
Obtain Warranty Services” 51 .
8
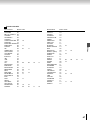
Table of Contents
Introduction
Accessing a Specific Location Directly .. 26
Entering the time counter of the desired
location ........................................................ 26
Playing in a Favorite Order .................... 27
Notes on region numbers ................................ 8
Setting titles, chapters, or tracks in a favorite
order ............................................................ 27
Table of Contents ...................................... 9
Identification of Controls ....................... 10
Playing Repeatedly ................................. 28
Front panel ..................................................... 10
Rear panel ..................................................... 10
DVD display ......................................................... 11
Remote control ............................................... 12
Loading batteries ........................................... 13
Operating with the remote control ................. 13
Connections
Connecting to a TV ................................. 14
Connecting to a TV ......................................... 14
Connecting to an audio system and TV
equipped with component video inputs ...... 15
Repeating a title, chapter or track .................. 28
Repeating a specific segment ....................... 28
Playing in Random Order ...................... 29
Playing titles, chapters or tracks in random
order ...................................................................... 29
On-screen Display Operation ................. 30
On-screen display operation ......................... 30
Selecting a Language ............................. 31
Selecting a playback audio setting ................ 31
Selecting Subtitles ................................. 32
Selecting a subtitle language ........................ 32
Selecting the Camera Angle ................... 33
Connecting to Optional Equipment ....... 16
Changing the camera angle .......................... 33
Connecting to an amplifier equipped with a
Dolby Digital decoder .................................. 17
Connecting to an amplifier equipped with
Dolby Surround Pro Logic ........................... 17
Connecting to an amplifier equipped with a
DTS decoder ................................................ 18
Connecting to an amplifier equipped with an
MPEG2 audio decoder ................................ 18
Connecting to an amplifier equipped with a
digital audio input ........................................ 19
Zooming a Picture .................................. 34
Basic playback
Introduction
SAFETY PRECAUTIONS ........................... 2
IMPORTANT SAFETY INSTRUCTIONS .... 4
Precautions ............................................... 6
Notes on Discs .......................................... 7
Advanced playback
Zooming a picture .......................................... 34
Playing MP3/WMA Files ......................... 35
Playing MP3/WMA files .................................. 35
Viewing JPEG Files ................................ 36
Viewing a single image ................................. 36
Viewing a thumbnail view .............................. 37
Function setup
Customizing the Function Settings ....... 38
Playing a Disc ......................................... 20
Setting procedure .......................................... 38
Setting details ................................................ 40
Basic playback ............................................... 20
Table of Languages ................................ 45
Variable Speed Playback ........................ 22
Playing in fast reverse or fast forward
directions ..................................................... 22
Playing frame by frame .................................. 22
Playing in slow-motion ................................... 23
Resuming playback from the same location . 23
Locating a Desired Section .................... 24
Locating a title using the top menu ................ 24
Locating a desired section by entering the
corresponding number ................................ 25
Skipping to next/previous chapter or track .... 25
Others
Operating a TV with the Remote Control
............................................................. 46
Operating a TV with the remote control ......... 46
Before Calling Service Personnel .......... 48
Specifications ......................................... 49
LIMITED WARRANTY DVD VIDEO
PLAYER ................................................... 50
9
Introduction
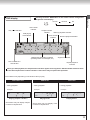
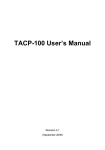
Identification of Controls
See the page in
for details.
Front panel
ON/STANDBY indicator 20
On: Lit in green.
Standby mode: Lit in red.
DISC SKIP button 20
DVD display 11
OPEN/CLOSE button 20
PLAY button 20
Disc Tray 20
PAUSE button
21
OPEN/CLOSE
SKIP
PAUSE
STOP
PLAY
DISC SKIP
MENU
ENTER
SKIP buttons 25
STOP button 21
Remote Sensor 13
MENU button 24
ON/STANDBY button 20
Direction / ENTER
button 20 24
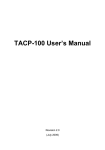
Rear panel
VIDEO OUT (Y/PB/PR) 15
(Component video) jacks
VIDEO OUT jack 14
VIDEO OUT
COAXIAL
Power cord
AUDIO OUT
COAXIAL DIGITAL
AUDIO OUT jack 17
ANALOG AUDIO OUT (L/R) jacks 14
S VIDEO OUT jack 14
10
15
18
17
19
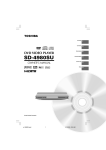
Normal
FL. DIM
Title number
indicator
Play mode indicator
Chapter number
indicator
Total playing
time indicator
TOTAL
CHP
Off
Memory playback indicator
Track number
indicator
TITLE
Dimmed
TRK
Multifunctional indicator (indicates
operating status or messages, etc.)
Random playback indicator
A-B
Angle icon indicator
DVD / VIDEO CD /
CD indicator
Repeat playback
indicator
When you start playback, the elapsed time indicators appear. Pressing the FL. SELECT button switches them
to the title/chapter/track number indicators. Some discs may not permit this operation.
The indicators vary depending on the kinds of discs you play.
VIDEO CD
DVD video disc
• During playback:
Audio CD
• During playback:
• During playback:
Example
Example
Example
TITLE
TRK
CHP
TRK
DVD
VCD
CD
Playing chapter 3 of title 2
Playing track 1
Some discs may not display chapter
numbers or elapsed time.
Some discs may not display track
numbers or elapsed time.
Playing track 6
11
Introduction
Pressing of the FL. DIM button on the remote control changes the
brightness of the display.
DVD display
Introduction
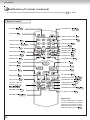
Identification of Controls (continued)
The instruction in this manual describe the functions on the remote control. See the page in
for details.
Remote Control
TV button 20
46
POWER button 20
DVD button 20
46
• POWER
DVD
TV
•
•
•
1
2
3
•
•
•
4
5
6
•
•
•
7
8
9
•
100
SEARCH
OPEN/CLOSE button 20
Number buttons 25
• DISPLAY button
30
* MENU button 24
46
• DISPLAY
OPEN/CLOSE
INPUT SELECT button 46
INPUT SELECT
CLEAR button 25
CLEAR
100 button 46
0
TOP MENU button 24
SUBTITLE button 32
TOP MENU
MENU
REPEAT
ZOOM
ANGLE
SUBTITLE
AUDIO
DISC SKIP
SEARCH button 25
REPEAT button 28
ZOOM button 34
AUDIO button 31
DISC SKIP button 20
ANGLE button 33
PLAY button 20
FF button
PLAY
REW button 22
FF
REW
22
STOP button 21
SLOW button 23
SLOW button 23
SLOW
SLOW
STOP
FL. DIM button 11
SKIP buttons 25
SKIP
SET UP button 38
SET UP
FL. DIM
CH +
PAUSE/STEP
PROGRAM A-B REPEAT
PAUSE/STEP button 21
PROGRAM button 27
22
46
A-B REPEAT button 28
CH / VOL / Direction
buttons ( / / / )
20 24 46
VOL +
VOL
RANDOM
RANDOM button 29
ENTER
RETURN
CH
FL. SELECT PROGRESSIVE
PROGRESSIVE button 15
42
RETURN button 38
FL. SELECT button 11
ENTER button 20
24
* MENU button
Use the MENU button to display
the menu included on many DVD
video discs. To operate a menu,
follow the instructions in “Locating
a title using the top menu”. 24
12
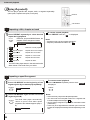
1
Open the cover.
2
Insert batteries (AAA size).
Operating with the remote control
Point the remote control at the remote sensor and
press the buttons.
30°
30°
Within about 7 m (23 feet)
Make sure to match the + and on the batteries
to the marks inside the battery compartment.
3
Close the cover.
Distance: About 7 m (23 feet) from the front of the
remote sensor
Angle :
Notes on batteries
Improper use of batteries may cause battery leakage and
corrosion. To operate the remote control correctly, follow the
instructions below.
• Do not insert batteries into the remote control in the wrong
direction.
• Do not charge, heat, open, or short-circuit the batteries.
Do not throw batteries into a fire.
About 30° in each direction of the front of the
remote sensor
* Do not expose the remote sensor of the DVD video
player to a strong light source such as direct
sunlight or other illumination. If you do so, you
may not be able to operate the DVD video player
via the remote control.
Notes on the remote control
• Direct the remote control at the remote sensor of the DVD
video player.
• When using the remote control, press the buttons at intervals
of about 1 second to ensure the correct mode of operation.
• Do not drop or give the remote control a shock.
• Do not leave dead or exhausted batteries in the remote
control.
• Do not leave the remote control near an extremely hot or
humid place.
• Do not use different types of batteries together, or mix old
and new batteries.
• Do not spill water or put anything wet on the remote control.
• If you do not use the remote control for a long period of time,
remove the batteries to avoid possible damage from battery
corrosion.
• Do not open the remote control.
• If the remote control does not function correctly or if the
operating range becomes reduced, replace all batteries with
new ones.
• If battery leakage occurs, wipe the battery liquid from the
battery compartment, then insert new batteries.
13
Introduction
Loading batteries
Connections
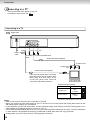
Connecting to a TV
Connect the DVD video player to your TV.
For details of output sound, see 31
Connecting to a TV
Signal flow
COAXIAL
To S
To wall VIDEO
OUT
outlet
(yellow)
To VIDEO
OUT
(red)
(white)
To ANALOG AUDIO OUT
Audio/video cable (supplied)
To audio inputs
To video input
(yellow)
(red)
(white)
S video cable (not supplied)
If the TV has an S video input, connect the
DVD video player with an S video cable.
When using an S video cable, do not
connect the yellow video cable and
component video cables (Y/PB/PR).
To S video input
TV or monitor with
audio/video inputs
• Make the following setting.
On-screen display
“Digital Out”
“Video Output”
Select
Page
“Raw”
38
or “PCM”
43
“CVBS” or
* “YUV”
38
42
* Only for analog video out jack (yellow)
connection with progrssive scan off.
Notes:
• Refer to the owner’s manual of the connected TV as well.
• When you connect the DVD video player to your TV, be sure to turn off the power and unplug both units from the
wall outlet before making any connections.
• If your television set has one audio input, connect the left and right audio outputs of the DVD video player to a Y
cable adapter (not supplied) and then connect to your TV.
• Connect the DVD video player directly to your TV. If you connect the DVD video player to a VCR, TV/VCR combination
or video selector, the playback picture may be distorted as DVD video discs are copy protected.
• Analog audio out will not have sound if DTS playback is selected.
14
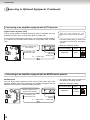
Interlaced outputs/inputs (ColorStream®)
Some TVs or monitors are equipped with component video inputs.
Connecting to these inputs allows you to enjoy higher quality picture
playback.
Actual labels for component video inputs may vary depending on the
TV manufacturer. (ex.Y, R-Y, B-Y or Y, CB, CR)
In some TVs or monitors, the color levels of the playback picture may
be reduced slightly or the tint may change. In such a case, adjust the
TV or monitor for optimum performance.
Progressive outputs/inputs (ColorStream®Pro)
‘CONSUMERS SHOULD NOTE THAT NOT ALL HIGH
DEFINITION TELEVISION SETS ARE FULLY COMPATIBLE WITH
THIS PRODUCT AND MAY CAUSE ARTIFACTS TO BE
DISPLAYED IN THE PICTURE. IN CASE OF 525p OR 625p
PROGRESSIVE SCAN PICTURE PROBLEMS, IT IS
RECOMMENDED THAT THE USER SWITCH THE CONNECTION
TO THE ‘STANDARD DEFINITION’ OUTPUT. IF THERE ARE
QUESTIONS REGARDING OUR TV SET COMPATIBILITY WITH
THIS MODEL 525p AND 625p DVD PLAYER, PLEASE CONTACT
OUR CUSTOMER SERVICE CENTER.’
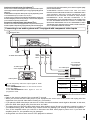
Connecting to an audio system and TV equipped with component video inputs
Signal flow
COAXIAL
To wall
outlet
(red)
(white)
To PR To PB To Y
VIDEO VIDEO VIDEO
OUT OUT OUT
To ANALOG AUDIO OUT
To audio inputs
of the amplifier
TV or monitor
with component
video inputs
(red)
(white)
To Y video input
To PB video input
To PR video input
Audio system
• Make the following setting.
On-screen display
You can temporarily switch the output signal for better
picture quality.
Press PROGRESSIVE button on the remote control
during stop mode.
Press PROGRESSIVE button again to turn off
progressive mode.
“Digital Out”
“Video Output”
Select
Page
“Raw”
38
or “PCM”
43
“YUV”
38
42
If you connect a progressive TV, Press
PROGRESSIVE button on the remote control
to “On” 42 .
Notes:
• Refer to the owner’s manual of the connected TV as well.
• When you connect the DVD video player to your equipment, be sure to turn off the power and unplug all of the
equipment from the wall outlet before making any connections.
• If you place the DVD video player near a tuner or radio, the radio broadcast sound might be distorted. In this case,
place the DVD video player away from the tuner and radio.
• The output sound of the DVD video player has a wide dynamic range. Be sure to adjust the receiver’s volume to
a moderate listening level. Otherwise, high volume sound may damage your hearing as well as the speakers.
• Turn off the amplifier before you connect or disconnect the DVD video player’s power cord. If you leave the
amplifier power on, the speakers may be damaged.
• Analog audio out will not have sound if DTS playback is selected.
15
Connections
Some TVs or monitors are equipped with component video inputs
that are capable of reproducing a progressively scanned video signal.
Connecting to these inputs allows you to view the highest quality
pictures with less flicker.
Connections
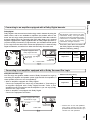
Connecting to Optional Equipment
You can enjoy high quality dynamic sounds by connecting the DVD video player to
optional audio equipment.
• For connection to your TV, see “Connecting to a TV”
14 15
...................
• For details of output sound, see 31 .
• This section uses the following reference marks.
: Rear speaker
: Front speaker
: Sub woofer
: Center Speaker
: Signal flow
Notes:
• DO NOT connect the COAXIAL DIGITAL AUDIO OUT
jack of the DVD video player to the AC-3 RF input of
a Dolby Digital Receiver. This input on your A/V
Receiver is reserved for Laserdisc use only and is
incompatible with the BITSTREAM/PCM AUDIO OUT
jack of the DVD video player.
• Connect the COAXIAL DIGITAL AUDIO OUT jack of
the DVD video player to the “DIGITAL (COAXIAL)”
input of a Receiver or Processor.
• Refer to the owner’s manual of the connected
equipment as well.
• When you connect the DVD video player to other
equipment, be sure to turn off the power and unplug
all of the equipment from the wall outlet before
making any connections.
• The output sound of the DVD video player has a wide
dynamic range. Be sure to adjust the receiver’s
volume to a moderate listening level. Otherwise, the
speakers may be damaged by a sudden high volume
sound.
• Turn off the amplifier before you connect or disconnect
the DVD video player’s power cord. If you leave the
amplifier power on, the speakers may be damaged.
16
Warning:
• When you are connecting (via the COAXIAL
DIGITAL AUDIO OUT jack) an AV decoder that
does not have Dolby Digital, Digital Theater
Systems (DTS) or MPEG2 decoding function, be
sure to set “Digital Out” to “PCM” from the onscreen display 43 . Otherwise, high volume
sound may damage your hearing as well as the
speakers.
• When playing DTS-encoded discs (audio CDs),
excessive noise may be output from the analog
audio output jacks. To avoid possible damage to
the audio system, you should take proper
precautions when the analog audio output jacks
of DVD video player are connected to an
amplification system. To enjoy DTS Digital
SurroundTM playback, an external 5.1 channel
DTS Digital SurroundTM decoder system must be
connected to the COAXIAL DIGITAL AUDIO OUT
jack of the DVD video player.
Connections
Connecting to an amplifier equipped with a Dolby Digital decoder
Dolby Digital
Dolby Digital is the surround sound technology used in theaters showing the
latest movies, and is now available to reproduce this realistic effect in the
home. You can enjoy motion picture and live concert DVD video discs with this
dynamic realistic sound by connecting the DVD video player to a 6 channel
amplifier equipped with a Dolby Digital decoder or Dolby Digital processor. If
you have a Dolby Surround Pro Logic decoder, you will obtain the full benefit
or Pro Logic from the same DVD movies that provide full 5.1-channel Dolby
Digital soundtracks, as well as from titles with the Dolby Surround mark.
Manufactured under license from Dolby
Laboratories. “Dolby”, “Pro Logic” and the
double-D system are trademarks of Dolby
Laboratories. Confidential unpublished
works. Copyright 1992-1997 Dolby
Laboratories. All rights reserved.
• Use DVD video discs encoded via
the Dolby Digital recording system.
• Make the following setting.
Amplifier equipped with a
Dolby Digital decoder
On-screen display
Select
Page
COAXIAL
To COAXIAL type digital
audio input
75 Ω coaxial cable
To COAXIAL
DIGITAL
AUDIO OUT
“Digital Out”
“Raw”
38
or “PCM”
43
Connecting to an amplifier equipped with a Dolby Surround Pro Logic
Dolby Surround Pro Logic
You can enjoy the dynamic realistic sound of Dolby Surround Pro Logic by
connecting an amplifier and speaker system (right and left front speakers, a
center speaker, and one or two rear speakers).
• With an amplifier equipped with Dolby Digital
Connect the equipment the same way as described in “Connecting to
an amplifier equipped with a Dolby Digital Decoder.” Refer to that
amplifier’s owner’s manual and set the amplifier so you can enjoy Dolby
Surround Pro Logic sound.
• With an amplifier not equipped with Dolby Digital
Connect the equipment as follows.
*
Amplifier equipped with Dolby
Sourround Pro Logic
To audio
input
On-screen display
“Digital Out”
Select
Page
“Raw”
38
or “PCM”
43
COAXIAL
To ANALOG
AUDIO OUT
Audio cable
• Make the following setting.
* Connect one or two rear speakers.
The output sound from the rear
speakers will be monaural even if you
connect two rear speakers.
17
Connections
Connecting to Optional Equipment (Continued)
Connecting to an amplifier equipped with a DTS decoder
Digital Theater Systems (DTS)
DTS is a high quality surround technology used in theaters and now
available for home use, on DVD video discs or audio CDs.
If you have a DTS decoder or processor, you can obtain the full benefit of
5.1 channel DTS encoded sound tracks on DVD video discs or audio
CDs.
COAXIAL
75 Ω coaxial cable
• Use DVD video discs or audio CDs
encoded via the DTS recording
system.
• Make the following setting.
Amplifier equipped with a
DTS decoder
To COAXIAL type
digital audio input
“DTS” and “DTS Digital Out” are
trademarks of Digital Theater Systems,
Inc.
To COAXIAL
DIGITAL
AUDIO OUT
On-screen display
Select
“Digital Out”
“Raw”
Page
38
43
Connecting to an amplifier equipped with an MPEG2 audio decoder
MPEG2 sound
You can enjoy motion picture and live concert DVD video discs with
dynamic realistic sound by connecting an amplifier equipped with an
MPEG2 audio decoder or MPEG2 audio processor.
• Use DVD video discs encoded via
the MPEG2 recording system.
• Make the following setting.
On-screen display
Amplifier equipped with an
MPEG2 audio decoder
To COAXIAL type
digital audio input
75 Ω coaxial cable
18
“Digital Out”
COAXIAL
To COAXIAL
DIGITAL
AUDIO OUT
Select
Page
“Raw”
38
or “PCM”
43
Connections
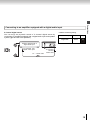
Connecting to an amplifier equipped with a digital audio input
2 channel digital stereo
• Make the following setting.
You can enjoy the dynamic sound of 2 channel digital stereo by
connecting an amplifier equipped with a digital audio input and speaker
system (right and left front speakers).
Amplifier equipped with a
digital audio input
To COAXIAL type
digital audio input
75 Ω coaxial cable
On-screen display
Select
“Digital Out”
“PCM”
Page
38
43
COAXIAL
To COAXIAL
DIGITAL
AUDIO OUT
19
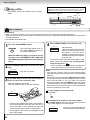
Basic playback
Playing a Disc
This section shows you the basic on how to play
a disc.
CAUTION
Keep your fingers well clear of the disc tray as it is closing.
Neglecting to do so may cause serious personal injury.
2, 4
PLAY
3
ON/STANDYBY indicator
2
PAUSE
OPEN/CLOSE
SKIP
PAUSE
STOP
PLAY
DISC SKIP
MENU
ENTER
1
DVD
VCD
CD
STOP
MENU
/
ENTER
Basic playback
Preparations
• When you want to view a disc, turn on the TV and select the video input connected to the DVD video player.
• When you want to enjoy the sound of discs from the audio system, turn on the audio system and select the input connected to
the DVD video player.
• Press DVD to select DVD mode.
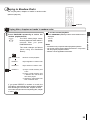
1
Press the ON/STANDBY button.
4
Press OPEN/CLOSE to close the disc tray.
OPEN/CLOSE
The DVD video player turns on.
The ON/STANDBY indicator on
the player illuminates.
When the DVD video player is turned on for the
first time, see CUSTOMIZING THE FUNCTION
SETTINGS (page 38 to 44) before proceeding to
step 2.
2
Press OPEN/CLOSE, place a disc on the disc
tray.
OPEN/CLOSE
3
The disc tray opens.
Press DISC SKIP to revolve the tray clockwise.
Place an other disc on the disc tray.
With the playback side down.
Place an other disc(s) on the disc holder(s).
DISC SKIP
Playback starts.
Players will start to scan and play
from current closed location as the
first location. In case no disc is
available, it will skip to the next tray.
It will stop scanning after completion
of the fifth disc.
If you insert a DVD video disc that contains a top
menu, a menu may appear. See “Locating a title
using the top menu”. 24
• You may need to press MENU button to display disc
menu (depending on the actual DVD video disc.)
Notes
• If the disc tray contains a disc you have already played,
playback will begin from the location where you last stopped
playback.
• Some Video CD are recorded with PBC (Playback Control),
a menu with recorded contents may appear on the TV if you
have turned the PBC on. You can make your selection
according to its PBC menu. Press MENU button on the remote
control to turn PBC on or off anytime during Video CD playback.
When switching from PBC off to PBC on mode, playback will
start from the beginning of the disc.
To start playback in the stop mode
Press PLAY.
PLAY
To playback from a specific disc tray number
• There are two different disc sizes. Place the disc
in the correct guide on the disc tray. If the disc is
out of the guide, it may damage the disc and
cause the DVD video player to malfunction.
• Do not place a disc which is unplayable in this
DVD video player.
20
Press DISC SKIP several times until you see your desired
tray number appears on the DVD display.
DISC SKIP
The disc on the selected disc tray
will be played back automatically.
1
2, 4
DISC SKIP
PLAY
STOP
PASUE/STEP
ENTER
/
To obtain a higher quality picture
Occasionally, some picture noise not usually visible during a normal broadcast may
appear on the TV screen while playing DVD video disc because the high resolution
pictures on these discs include a lot of information. While the amount of noise depends
on the TV you use with this DVD video player, you should generally reduce the
sharpness adjustment on your TV when viewing DVD video discs.
About DVD VCD CD
The DVD VCD CD icons on the heading bar show the playable discs for the
function described under that heading.
DVD
: You can use this function with DVD video discs.
VCD
: You can use this function with VIDEO CDs.
CD
: You can use this function with audio CDs.
To turn the power off (To enter the standby mode)
Press PAUSE/STEP during playback.
Press ON/STANDBY to turn the ON/STANDBY indicator
to red.
PAUSE/STEP
To resume normal playback, press
the PLAY button.
• The sound is muted during still mode.
To stop playback
Press STOP.
STOP
About the screen saver
To remove the disc
Press OPEN/CLOSE and DISC SKIP to revolve the tray
closewise.
OPEN/CLOSE
Note
Be aware that this equipment is still powered even after the
ON/STANDBY indicator turns off (standby mode) by pressing
ON/STANDBY button. To disconnect this equipment
completely from the mains power, pull out the power plug
from the wall outlet.
Remove the disc after the disc tray
opens completely.
DISC SKIP
If you pause a picture of a DVD video disc and leave it still
for a long while, the screen saver of the DVD video player
automatically appears. To turn off the screen saver, press
PLAY button.
Automatic Power Off function
If the DVD video player is stopped, or the screen saver is
engaged for approximately 20 minutes, the DVD video
player will automatically turn itself off.
Be sure to press OPEN/CLOSE button to close the
disc tray after you remove the disc.
Notes:
• Remove all the discs from the DVD video player before moving from one location to another location.
• Do not move the DVD video player during playback. Doing so may damage the disc.
• Use OPEN/CLOSE button to open and close the disc tray. Do not push the disc tray while it is moving. Doing so
may cause the DVD video player to malfunction.
• Do not push up on the disc tray or put any objects other than discs on the disc tray. Doing so may cause the DVD
video player to malfunction.
• In many instances, a menu screen will appear after playback of a movie is completed. Prolonged display of an onscreen menu may damage your television set, permanently etching that image onto its screen. To avoid this, be
sure to press STOP button on your remote control once the movie is completed.
21
Basic playback
To pause playback (still mode)
Basic playback
Variable Speed Playback
You can play discs at various speeds, and
resume playback from the location where you
stopped playback.
DVD
VCD
CD
Playing in fast reverse or fast forward directions
Press REW or FF during playback.
FF
REW
REW: Fast reverse playback
FF: Fast forward playback
Each time you press REW or FF button, the playback speed
changes.
DVD
VCD
PLAY
REW
FF
STOP
SLOW
PAUSE/STEP
To resume normal playback
Press PLAY.
PLAY
Notes
• The DVD video player mutes sound and subtitle during
reverse and forward scan of DVD video discs. However, the
DVD video player plays sound during fast forward or fast
reverse play of audio CDs.
• The playback speed may differ depending on the disc.
Playing frame by frame
Press PAUSE/STEP during still playback.
PAUSE/STEP
Each time you press PAUSE/
STEP button, the picture
advances one frame.
To resume normal playback
Press PLAY.
PLAY
Note
The sound is muted during frame by frame playback.
22
DVD
VCD
Playing in slow-motion
SLOW
SLOW
Press PLAY.
Each time you
press SLOW button,
the slow-motion
speed changes.
1/2
1/4
1/8
1/2
PLAY
Notes
• The sound is muted during slow-motion playback.
• Three speeds are available.
• You cannot use REW SLOW playback function in VIDEO CD.
DVD
VCD
CD
Resuming playback from the same location
1
Press STOP at the location where you want
to interrupt playback.
STOP
Basic playback
To resume normal playback
Press SLOW during playback.
The DVD video player memorizes
the location where playback is
stopped.
To start playback from the beginning regardless of the
location where you stopped playback
1 Press STOP twice.
STOP
The DVD video player deletes the
memory of the location.
2 Press PLAY.
2
DVD
Press PLAY.
PLAY
PLAY
The DVD video player resumes
playback from the lcoation where
you stopped playback.
VCD
CD
Playback starts from the
beginning of the current title.
Playback starts from the
beginning of the disc.
• If you want to return to the beginning of a DVD video disc,
open and close the disc tray once with OPEN/CLOSE
button before pressing PLAY button.
Notes
• Resuming cannot function when:
- you change the parental lock setting 44 or select a
disc menu language 41 .
- you open the disc tray.
- you disconnect the power plug of the DVD video player.
- you play a PBC-feature video CD while the PBC is on.
• There may be a difference in the location where
playback resumes depending on the disc.
• Settings you changed using the on-screen displays
while the DVD video player keeps a location in the
memory may function only after the memory is cleared.
23
Basic playback
Locating a Desired Section
TOP MENU
/
/
/
ENTER
Normally, DVD video discs are divided into titles, and the titles are sub-divided into chapter. VIDEO CDs and audio
CDs are divided into tracks. You can quickly locate any specific title, chapter, or track.
DVD video disc
Title 2
Title 1
Chapter 1 Chapter 2
Track 2
Track 1
Press TOP MENU during playback.
The top menu appears on the TV
screen.
TOP MENU
3
CH +
VOL +
ENTER
e.g.
Press
/
/
CH +
VOL +
VOL
ENTER
CH
24
Track 4
Track 5
Press ENTER.
VOL
2
Track 3
Locating a title using the top menu
DVD
1
VIDEO CD/audio CD
Chapter 1 Chapter 2 Chapter 3
/
Playback starts from
chapter 1 of the selected
title.
CH
TITLE 1
TITLE 2
TITLE 3
TITLE 4
to select the title you want.
If the titles in the top menu are
assigned a number, you can directly
locate a specific title by pressing its
designated number with the number
buttons.
Notes:
• The instructions above describe basic procedures
which may vary depending on the contents of the DVD
video disc. If different instructions appear on the TV
screen, follow these instructions.
• If you display the top menu during playback and press
TOP MENU button again without selecting any title,
the DVD video player may resume playback from the
point where you first pressed TOP MENU button
(depending on the actual DVD video disc.)
• This method of locating a title is available only on a
disc that contains a top menu.
• Instruction notes of discs may refer to the button that
displays the top menu as TITLE button.
Number buttons
CLEAR
SEARCH
SKIP
/ / /
ENTER
DVD
VCD
CD
Press SEARCH.
Press / to highlight the Title/Chapter or Track. If
you are using a VIDEO CD / audio CD, skip step 2.
Then at step 3, enter the number for the track you
want using the number buttons.
e.g.
SEARCH
DVD
3
Press the number buttons to enter title, chapter
or track number.
4
Press ENTER.
Search
Time
--:--:-Title / Chapter - - - / - - -
CH +
VOL +
VOL
Playback starts from the
selected section.
ENTER
CH
CH +
VOL +
VOL
ENTER
CH
2
Press
/
e.g.
VCD
CD
Search
Time
Track
--:--:----
to select a section you want to locate.
e.g. When you want to locate a chapter.
CH +
Notes:
• Pressing CLEAR button resets the numbers. To clear
the display, press SEARCH button several times.
• This method of locating a title is available only on a
disc that contains title numbers.
VOL +
VOL
ENTER
CH
DVD
VCD
CD
Search
Time
Title / Chapter
--:--:----/---
Skipping to next/previous chapter or track
Press
SKIP or SKIP
repeatedly to access
the chapter or track number you want.
Playback starts from the selected chapter or track.
SKIP
To locate succeeding chapters or
tracks.
SKIP
Playback starts from the beginning
of the current chapter or track.
Notes:
• Some titles may not display chapter numbers.
SKIP or SKIP
button on the
• If you press and hold
front panel during playback, the DVD video player
performs fast reverse or fast forward playback. You can
vary the speed by pressing the button repeatedly.
To locate chapters or tracks during fast reverse or fast
forward playback, first press PLAY button to resume normal
SKIP or SKIP
button.
playback, then use
When you press twice in quick
successions, playback starts from
the beginning of the preceding
chapter or track.
25
Basic playback
1
Locating a desired section by entering the corresponding number
Advanced playback
2
Accessing a Specific Location Directly
You can access a specific location by entering its
corresponding time (hours, minutes, seconds).
CLEAR
1
/
/
/
3
DVD
VCD
CD
Entering the time counter of the desired location
To set and play favorite bookmark during playback
1
Press SEARCH.
1 Press SERACH repeatedly until the display of Bookmark
appears, then press ENTER to mark the desired scene.
Press /
counter.
SEARCH
button to highlight the time
SEARCH
Bookmark
Bookmark
Bookmark
e.g.
DVD
Search
Time
--:--:-Title / Chapter - - - / - - -
CH +
VOL +
VOL
ENTER
e.g.
VCD
CD
2
CH
Search
Time
Track
--:--:----
Press the number buttons to enter the time.
e.g.
1 1 : 28 : 20
2-- :-- :-3-- :-- :--
1
2
8
2
2 Press ENTER to play the favorite bookmark.
If you want to set other bookmark. Follow step 1 and
move through the menu by pressing the or button.
0
Search
Time
1 : 28 : 20
Title / Chapter
---/---
Press SEARCH again to remove this display
SEARCH
• The first number you entered represent hours.
• The second two numbers you entered represent
minutes.
• The third two numbers you entered represent
seconds.
• If you input a wrong number, press CLEAR.
3
Press ENTER.
CH +
VOL +
VOL
To cancel the bookmark
Follow step 1, then press CLEAR to cancel the
bookmark, move through the menu by pressing the
or button to cancel other bookmarks.
CLEAR
Playback starts
desired location.
from
the
CH +
ENTER
CH
VOL +
VOL
ENTER
CH
Notes
• Some discs may not respond to this process.
Notes
• Some scenes may not be located precisely as you • This method for accessing specific locations is available
specified.
only within the current disc.
• This method for accessing specific locations is available • Press DISC SKIP to change other disc, STOP or turn
only within the current title of the DVD video disc or
off the DVD video player to clear the memory.
within the current track of the VIDEO CD / audio CD.
• You can move through the menu by pressing the ,
, and buttons.
26
2
Playing in a Favorite Order
You can combine your favorite titles, chapters, or tracks and play
them in the order you determine. You can program up to 12 selections
into the memory. (Program playback)
CLEAR
/
/
/
1
2
DVD
VCD
CD
Setting titles, chapters, or tracks in a favorite order
e.g.
Program Input Title/Chapter
PROGRAM
1 - - - - 4 - - - - 7 - - - - 10 - - - 2 - - - - 5 - - - - 8 - - - - 11 - - - 3 - - - - 6 - - - - 9 - - - - 12 - - - Play Program
Clear All
---Title number
Chapter number
Program Input
PROGRAM
1 --2 --3 ---
4 --5 --6 ---
Play Program
7 --8 --9 ---
10 - - 11 - - 12 - - -
To change the programmed selections
1 While the display appears on the TV screen, press
/ / / to move the highlighted bar to the item you
want to change.
2 Change the selection following the instructions in
step 2.
To cancel the programmed selections
1 Press the PROGRAM button, the display appears
on the TV screen, press / / / to move the
highlighted bar to the item you want to cancel.
2 Press CLEAR.
To resume normal playback from program playback
Press PROGRAM button and press / / / to move
the highlighted bar to the Clear All, then press ENTER.
All the input programmes will be cleared. Press PLAY
button to resume normal playback.
Clear All
PLAY
---
Normal playback will start from
first location.
Track number
2
Select the items in the order you want by
pressing the number buttons, then ENTER for
each item.
Each time you press / / / button, the space
or
is highlighted in turn. Highlight
of
where you want to enter, then press the
corresponding number button.
To select another chapter in the same title, you do not
need to select the title number.
To select tracks from a VIDEO CD / audio CD in order,
press number buttons for the track.
3
Press / / / to move the highlighted bar to
Play Program, then press ENTER.
CH +
VOL +
VOL
To program during playback
If you press PROGRAM button during playback, a
programming display appears.
Follow steps 2 and 3.
Notes
• Some discs may not permit program playback
operation.
• If you press REPEAT button during program playback,
the DVD video player repeats the current program
playback.
• If you press PROGRAM button while the display
appears on the TV screen, the display disappears.
• The programmed selections will be cleared when you
turn off the DVD video player.
The DVD video player starts program
playback.
ENTER
CH
27
Advanced playback
1
Insert a disc and press PROGRAM during
stop.
The following display appears.
Advanced playback
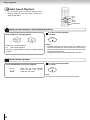
Playing Repeatedly
You can play a specific title, chapter, track, or segment repectedly.
(Title repeat, chapter/track repeat, A-B repeat)
REPEAT
A-B REPEAT
DVD
VCD
CD
Repeating a title, chapter or track
1
Press REPEAT repeatedly to select desired
repeat during playback.
REPEAT
Each time you press REPEAT button, the
playback mode changes as follows.
Repeat Chapter
DVD
VCD
CD
Off
Resumes normal playback.
DVD
Repeat Chapter
Repeats the current chapter.
DVD
Repeat Title
Repeats the current title.
VCD
CD
Rpt One Track
Repeats a current track
VCD
CD
Rpt One Disc
Repeats the entire disc.
CD
Repeat All
Repeats all discs.
To resume normal playback
Press REPEAT until the “ Off ” is displayed.
Notes
• Some discs may not permit these operations.
• Repeat is prohibited when PBC is on. 20
The DVD video player starts in the selected mode
within about 5 seconds after you select.
DVD
VCD
CD
Repeating a specific segment
1
Press A-B REPEAT at the beginning of the
segment (point A) you want to play repeatedly.
To resume normal playback.
A-B REPEAT
Rep A-
2
50:38:20
Press A-B REPEAT again at the end of the
segment (point B).
A-B REPEAT
The DVD video player automatically
returns to point A and starts repeat
playback of the selected segment (Rep AB).
Rep A-B
28
00:46:23
01:03:18
50:38:20
Press A-B REPEAT repeatedly until the word “ Rep Off ”
is displayed.
A-B REPEAT
Notes
• Some discs may not permit A-B repeat operation.
• You cannot set the A-B repeat function for a segment that
includes multiple camera angles 33 .
• You can specify a segment only within the current title or track
(VIDEO CD).
• There may be a slight difference between point A and the
location where playback actually resumes depending on the
disc.
Playing in Random Order
You can play titles, chapters or tracks in random order.
(Random playback)
RANDOM
DVD
VCD
CD
To resume normal playback.
Press RANDOM repeatedly to select the
random playback mode.
RANDOM
The DVD video player starts
random playback within about 5
seconds after you press
RANDOM button.
The mode changes as follows
(when using the RANDOM
button):
Press RANDOM repeatedly until the word “Random Off” is
displayed.
RANDOM
Notes
• Some discs may not permit random playback operation.
• You cannot use the random playback function in conjunction
with the program playback function.
• Random 3 is not applicable in DVD discs.
DVD
VCD
CD
VCD
CD
Random Off
Resumes normal playback.
Random 1
Plays single disc in random order.
Random 2
Plays all discs in random order.
Random 3
a) Plays 3 tracks randomly from
a disc.
b) Plays 3 tracks randomly from
a different disc until all discs
have been played.
c) Repeat (b) until all discs have
been accessed twice.
If you press REPEAT in random on mode, the
DVD player automatically starts random playback
after finishing the current title, chapter or track.
The mode changes same as “Repeating title, chapter
or track” 28 .
29
Advanced playback
1
Playing titles, chapters or tracks in random order
Advanced playback
On-screen Display Operation
When you turn on the on-screen display, you can view information on
operational status and access features and settings.
DISPLAY
SUBTITLE
AUDIO
ANGLE
/
/
/
ENTER
DVD
VCD
CD
On-screen display operation
Features
Press DISPLAY during playback.
• DISPLAY
The following display appears.
e.g. While a DVD video disc is playing.
Elapsed Time
Remaining Time
Elapsed time: Elapsed time from the beginning
of the chapter which is currently playing.
Remaining time: Remaining time of the title
which is currently playing.
The following display appears when press
DISPLAY again.
Press ANGLE, AUDIO or SUBTITLE to change
the current settings, then press ENTER to confirm.
Title
Audio
setting
Chapter
DVD
Title 1/10
Audio
Angle setting 33
• The current angle is displayed. When a disc with only
one angle is played back, “ Angle 1/1” is displayed.
• Press the ANGLE button to select the desired angle.
Audio setting 31
• The type of audio currently selected is displayed.
• Press the AUDIO button to select your desired type of
audio.
Subtitle setting 32
• The subtitle number and language currently selected is
displayed. When a disc with only one subtitle is played back,
“ 1/1 Eng ” is displayed.
Time
• Press the SUBTITLE button to select your desired language.
00:09:29 01:25: 27
Chapter 3/15
Angle 1/3
Bit Rate (Mbit/s)
Subtitle
2/3 Spa
Bitrate
5.888Mbpss
Subtitle Bit Rate
setting
Title number
• The number of the title currently playing and total titles
of disc.
Chapter number
• The number of the chapter currently playing and total
chapters of the currently played title.
Time counter
• Elapsed time from the beginning of the currently playing
chapter and the remaining time from the beginning of
the currently playing title.
Angle
setting
• Amount of picture, sound and subtitle data in DVD video disc
transferred per second. The larger the value is, the more data
processed, but this does not necessarily insure better picture
quality.
Note
After settings, press DISPLAY again to return to
the normal screen.
30
DISPLAY is prohibited during MP3 / WMA playback.
Selecting a Language
You can select a preferred language and sound recording system from those
included on the DVD video disc.
AUDIO
Good morning!
DVD
VCD
ÁBuenos d’as!
Selecting a playback audio setting
Press AUDIO during playback.
The current audio setting is displayed.
Press AUDIO repeatedly until your
desired setting.
AUDIO
Selecting sound channels of VIDEO CDs
Press AUDIO repeatedly during playback to hear a
different audio channel (Stereo, Left or Right).
AUDIO
e.g.
Recorded audio format number changes
sequentially. (The maximum number of possible
audio formats is 8)
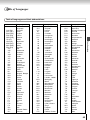
The abbreviation of the language appears
instead of the language name. Refer to the table
of languages and their abbreviations 45 .
2
Press AUDIO while the audio setting is
displayed on the TV screen.
AUDIO
Each time you press the AUDIO button,
the audio settings included on the DVD
video disc change.
Notes:
• When you turn on the DVD video player or replace a
disc, player return to the initial default setting 44 .
If you select a sound track which is not included on the
disc, the DVD video player plays a prior sound track
programmed on the disc.
• Some discs allow you to change audio selections only
via the disc menu. If this is the case, press the MENU
button and choose the appropriate language from the
selections on the disc menu.
• When you change the audio setting during playback of
a DVD audio disc, playback may return to the beginning
of the current track.
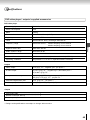
Output sound conversion table
Output
Input
DVD
video discs
VIDEO CD
AUDIO CD
COAXIAL DIGITAL AUDIO OUT jack
“Digital Out” 38 43
“Raw”
“PCM”
Dolby Digital
Raw
PCM
Linear PCM
PCM
PCM
DTS
Raw
Raw
MPEG1, MPEG2
Raw
PCM
MPEG1
PCM
PCM
Linear PCM 44.1 kHz/16 bit
PCM
PCM
DTS
Raw
Raw
PCM
PCM
MP3/WMA
ANALOG
AUDIO
OUT Jacks
• Quantization bit of signals of 20 bit or higher which is output from the COAXIAL DIGITAL AUDIO OUT jack is 16 bit if they are
in a copyright protected disc.
• Virtual Effect is selected. 43
31
Advanced playback
1
Bonjour!
Advanced playback
Selecting Subtitles
You can display subtitles on the TV screen and select a subtitle language
from those included on the DVD video disc.
SUBTITLE
Good evening!
DVD
1
Bonsoir!
ÁBuenas tardes!
Selecting a subtitle language
To turn subtitles on or off.
Press SUBTITLE during playback.
SUBTITLE
The current subtitle setting is
displayed.
Off
2
SUBTITLE
2 Press SUBTITLE repeatedly until the “
Press SUBTITLE while the subtitle setting is
displayed on the TV screen.
SUBTITLE
1 Press SUBTITLE during playback.
Each time you press SUBTITLE
button, the subtitle languages included
on the DVD video disc change.
Off “ is displayed.
Notes:
• Some DVD discs video discs are set to display subtitles
automatically, and you cannot turn them off even if you
set the subtitle function to off.
• During some scenes, the subtitles may not appear
immediately after you select “subtitle number and
language”.
• Some DVD video discs will allow you to make subtitle
selections and turn subtitles on or off only via the disc
menu.
1/3 Fre
Bonsoir!
To turn off the subtitle setting display,
press SUBTITLE button repeatedly
until “ Off ” is displayed.
Notes:
• When you turn on the DVD video player or replace a disc, the player returns to the initial default setting 40 .
When you select a subtitle language which is not included on the disc, the DVD video player plays a prior are
language programmed on the disc.
• During some scenes, the subtitles may not appear immediately after you change the subtitle language.
32
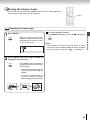
Selecting the Camera Angle
If the scene was recorded from multiple angles, you can easily change the
camera angle of the scene you are watching.
ANGLE
DVD
To resume normal TV screen
Press ANGLE repeatedly until the “
Press ANGLE.
ANGLE
While you are playing a DVD with
different angles recorded, press
ANGLE button to view the number
of the current angle.
2/3
1/3 ”
is displayed.
ANGLE
Notes:
• This function can only be used for discs on which
scenes shot from multiple angles have been recorded.
• If only one angle is recorded, “
1/1 ” is displayed.
Number changes to show the number of the current
angle. (The maximum number of possible angles is 9)
2
Press ANGLE while the angle number is
displayed on the TV screen.
ANGLE
Press ANGLE button repeatedly to
change the scene to the next angle in
those recorded.
• About two seconds later, playback
continues from the new angle you
selected.
• If no button is pressed within 10
seconds, playback continues
without changing the current angle.
33
Advanced playback
1
Changing the camera angle
Advanced playback
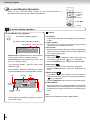
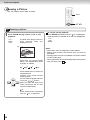
Zooming a Picture
You can magnify areas within a picture.
ZOOM
/
DVD
VCD
1
/
Zooming a picture
Press ZOOM during normal, slow or still
playback.
The DVD video player enters the
zoom playback mode and
displays the icon.
ZOOM
e.g.
1
2
3
Off
Press ZOOM button to select the
magnificant level.
Variation of the levels includes
image reduction.
CH +
VOL +
VOL
ENTER
CH
To resume normal playback
Press ZOOM repeatedly until the “ Off” is displayed.
Original picture is restored when the icon disappears.
ZOOM
2
Each time you press ZOOM
button, the magnification level
changes as follows:
You can shift the highlight within the
icon by the / / / buttons.
When you reach the edge of the
image, the display will not shift
anymore in that direction.
Off
Press ZOOM button repeatedly
until the “ Off” is displayed.
34
/
Notes:
• Some discs may not respond to zoom feature.
• During some scenes, the buttons may not work as
described.
• Zooming does not work on subtitles or menus included
on DVD video discs.
• The magnification level varies depending on the picture
size you select. See 42 .
Number Buttons
1
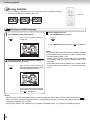
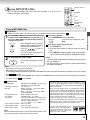
Playing MP3/WMA Files
You can play MP3/WMA files that have been recorded on a CD-R or CDROM on the DVD video player.
SEARCH
1
PLAY
2
SKIP
PAUSE/STEP
ENTER
/ / /
Playing MP3/WMA files
Preparation
• Make sure that a disc you want to play is compatible with this DVD video player. 37
To pause playback
Press PAUSE/STEP during playback.
Press OPEN/CLOSE to open the disc tray, place a
CD that contains MP3/WMA files on the disc tray,
then press DISC SKIP to revolve the tray clockwise
to place other(s) disc.
OPEN/CLOSE
DISC SKIP
PAUSE/STEP
Press OPEN/CLOSE to close the
disc tray, after completion of reading,
playback starts automatically.
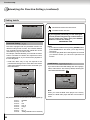
Selecting a track (file) in the disc
1 Press SEARCH.
2 Enter the track number to select a track you want to
play.
3 Press ENTER to begin playback of the selected track.
The current track being played is highlighted in green.
Press the / / / to select a
track you want to play.
The current track being played is
highlighted in green.
2
To stop playback, press STOP.
STOP
To resume normal playback, press
PLAY.
To resume normal playback, press
PLAY.
Notes
• Letters of a file/folder name overflowing the given space
are not displayed.
• You can not play in Fast reverse or Fast forward during
MP3/WMA playback.
Notes
• Some discs may not permit this operation.
• WMA track copy-protected cannot be played.
• The COAXIAL DIGITAL AUDIO OUT jack outputs MP3/WMA sounds in the linear PCM format regardless of the current “Digital
Out” 31 43 selection.
• If you stop playback by pressing STOP button, and then press PLAY button, playback will start from the beginning of the track.
• The SKIP function 25 is also available.
Playable files
• Playable discs:
•
•
•
•
•
•
•
•
CD-ROM, CD-R (650MB / 74 min. only)
CD-RW is not recommendable.
Sampling Frequency:
44.1 kHz only
Bit rate:
WMA: 48 kbps - 192 kbps (CBR Constant Bit Rate)
MP3: 32 kbps - 320 kbps (CBR Constant Bit Rate)
CD physical format:
Mode 1, Mode 2 XA Form 1
File system:
ISO9660 Level 1, 2 or Joliet
File name:
A file name should be in alphabet and
numerals only, and must incorporate
“MP3” or “WMA” extension.
e.g. “********.MP3”, “********.WMA”
Total number of folders: Less than 256
Total number of files:
Less than 1000
WMA codec version:
V7 or V8 (Stereo sound only)
Note
When the WMA or MP3 file is out of the above specifications, the
song may be skipped or muted with counter moving.
This DVD video player requires discs/recordings to meet
certain technical standards in order to achieve optimal
playback quality. Pre-recorded DVDs are automatically set
to these standards.
There are many different types of recordable disc formats
(including CD-R containing MP3/WMA files). Given the fact
that technology in this area is still maturing, Toshiba cannot
guarantee that all genre of recordable discs will produce
optimal playback quality. The technical criteria set out in this
owner’s manual are meant as a guide only.
Customers should also note that permission is required in
order to download MP3 files and music from the internet.
Toshiba has no right to grant such permission. Permission
should always be sought from the copyright owner.
Microsoft, Windows Media, and the
Windows Logo are trademarks or
registered trademarks of Microsoft
Corporation in both the United
States and other countries.
35
Advanced playback
1
Advanced playback
Number Buttons
1
Viewing JPEG Files
You can play JPEG files that have been recorded on a CD-R or CD-RW on
the DVD video player. You can select a preferred view: a page of 9 thumbnail
images and a single image view of a selected folder.
SEARCH
ZOOM
ANGLE
PLAY
Also, rotating, enlarging and shifting of each image can be possible.
STOP
SKIP
PAUSE/STEP
ENTER
/ / /
Viewing a single image
Preparations
• Prepare a disc that contains JPEG files you want to view.
• Make your TV shape conform to the 4:3 picture size. Only 4:3 pictures can be played regardless of the function settings
via the on-screen displays of the DVD video player. If the TV is adjusted to other sizes, e.g. “WIDE,” images will appear to
be horizontally expanded. For details, refer to the owner’s manual of your TV.
1
Press OPEN/CLOSE to open the disc tray, place
a CD that contains JEPG files on the disc tray.
OPEN/CLOSE
A view
appears.
(Automatic
mode)
e.g.
A list of
folders in the
disc
appears.
(Selection
mode)
e.g.
To quit the JPEG playback, press STOP.
Press OPEN/CLOSE to close the disc
tray, after completion of reading,
playback automatically starts.
CD-R
- / 180
Searching for files ..
• Pressing OPEN/CLOSE button to
open the disc tray can also quit the
playback.
STOP
To pause playback
Press PAUSE/STEP during playback.
To resume normal playback,
press PLAY.
PAUSE/STEP
CD-R
30/180
Flower
28
B001
33
B006
29
B002
34
B007
30
B003
35
B008
31
B004
36
B009
32
B005
37
B010
Press
/ / /
to select your
desired file, and then press ENTER
or PLAY button to start playback. The
next picture will automatically display
after 6 seconds.
Press STOP to display a folder list.
To magnify an image
Press ZOOM repeatedly.
ZOOM
Each time you press ZOOM button, the magnification
level changes as follows:
1
“
Off ”
2
3
Off
means original picture is restored.
Variation of the levels includes image reduction.
If you want more list selection
Press to select.
SEARCH
Press SEARCH and enter the track
number to quickly select your image.
Search
Track
36
----
You can shift the highlight within the icon by the / /
/ buttons. When you reach the edge of the image,
the display will not shift anymore in that direction.
To rotate an image
Press ANGLE repeatedly.
ANGLE
The image rotates by clockwise
90-degree.
To change the image
To view the succeeding image, press SKIP
.
SKIP
.
Advanced playback
To view the previous image, press SKIP
Note
• Some files may not display their own entire depending on
the size.
SKIP
Viewing a thumbnail view
1
To quit the JPEG playback, press STOP.
Press TOP MENU in full-screen review.
STOP
TOP MENU
• If you press PLAY button after
pressing STOP button, you can
return to the thumbnail view.
• Pressing OPEN/CLOSE button to
open the disc tray can also quit the
playback.
PREV
To pause playback
Press PAUSE/STEP during playback.
NEXT
PAUSE/STEP
Press the / / / to select a image, press PLAY to
view one image in full-screen and automatically display
one by one again in about 6 seconds.
Turn the page if necessary
or NEXT
Pressing / / / to PREV
ENTER to view other thumbnail screen.
and
JPEG files compatibility
Discs whose compatibility with this DVD video player has
been confirmed by TOSHIBA are as follows.
Many of these discs, when loaded, will make the DVD
video player enter the automatic mode 30 to play a
prescribed folder in the disc. To play other folders, display
a folder list and select a folder.
CANON Quick CD
FUJICOLOR CD
Kodak Picture CD
NORITSU QSS CD
To resume normal playback,
press PLAY.
Notes
• Some files may not display their own entire depending
on the size.
• If you press TOP MENU button in full-screen review, the
DVD video player will display a menu of 9 thumbnail
images.
JPEG disc compatibility with this DVD video player is
limited as follows:
• Playable discs:
CD-ROM, CD-R (650MB / 74
min. only) CD-RW is not
recommendable.
• CD physical format:
Mode 1, Mode 2 XA Form 1
• File system:
ISO9660 Level 1, 2 or Joliet
• File name:
A file name should be in
alphabet and numerals only,
and must incorporate “JPG”
extension. e.g.“********.JPG”
• Total number of folders: Less than 256
• Total number of files: Less than 1000
Some files may not display their own entire image
depending on the size.
37
Function setup
Customizing the Function Settings
You can change the default settings to customize performance to
your preference.
RETURN
1,6
2
3,4
2,3,4
DVD
VCD
CD
1
Setting procedure
Press SETUP during stop.
The following on-screen display
appears.
SET UP
4
Change the selection by
/
buttons, by
referring to the corresponding pages, then
press ENTER.
CH +
Language
Video
Audio
Rating
CH +
VOL +
VOL
ENTER
2
Press / to select a icon for the setting you
want to change, then press ENTER.
(See the next page)
CH +
CH
5
Repeat steps 3 and 4 to change other settings.
6
Press SETUP.
To select another operation, press
times to go back to step 2.
SET UP
several
The on-screen display disappears.
CH +
VOL +
VOL
VOL +
VOL
ENTER
CH
VOL +
VOL
ENTER
ENTER
CH
CH
To return to the previous display
Press RETURN.
Language
RETURN
Video
Audio
Rating
3
Press
/
to select the setting you want to
change, then press ENTER.
CH +
VOL +
VOL
ENTER
CH
38
CH +
VOL +
VOL
ENTER
CH
Notes
• To quit the procedure, press SETUP button to turn off
the on-screen display.
• SETUP button is prohibited when the player is reading
a JPEG disc or a folder list is displayed. SETUP button
can only be accessed in tray opened position.
Setting
Language
Video
Rating
Page
OSD Menu
DVD
VCD
CD
To select a preferred language for on-screen
displays.
40
Subtitle
DVD
To select a preferred language for subtitles.
40
Audio
DVD
To select a preferred language for the sound
track.
41
DVD Menu
DVD
To select a preferred language for disc menus.
41
TV Shape
DVD
To select a picture size according to the aspect
ratio of your TV.
42
TV System
DVD
VCD
CD
To select the video system of a disc.
42
Video Output
DVD
VCD
CD
To select whether you send CVBS or YUV
signals to the connected TV or not.
42
Digital Out
DVD
VCD
CD
To select an output sound format
corresponding to your system connection.
43
Virtual Effect
DVD
VCD
CD
To obtain expansive virtual surround sound
effects from just two speakers.
43
Password/Rating
DVD
To create a personal security code.
Turn the parental lock function on or off.
44
Load Factory
DVD
VCD
CD
To return the initial settings such as Language,
Video, Audio and etc. to the factory default.
44
39
Function setup
Audio
Detail
Function setup
Customizing the Function Settings (continued)
Setting details
Language
Language
Video
Audio
Rating
Subtitle
DVD
To select a preferred language for subtitles.
English: To display subtitles in English.
Deutsch: To display subtitles in German.
Français:To display subtitles in French.
Español: To display subtitles in Spanish.
Italiano: To display subtitles in Italian.
OSD Menu
DVD
VCD
CD
To select a preferred language for on-screen
displays.
English: To view on-screen displays in English.
Deutsch: To view on-screen displays in German.
Français:To view on-screen displays in French.
Español: To view on-screen displays in Spanish.
Italiano: To view on-screen displays in Italian.
Language
OSD Menu
Subtitle
Audio
DVD Menu
Video
English
English
English
English
Audio
To display subtitles in different language
than you selected.
Off:
To disable subtitles.
Language
OSD Menu
Subtitle
Audio
DVD Menu
Video
English
English
English
English
Audio
Rating
English
Deutsch
Français
Español
Italiano
Auto
Off
Rating
English
Deutsch
Français
Español
Italiano
Note
Some DVD video discs may not include your pre-selected
language. In this case, the DVD video player automatically
displays disc menus consistent with the disc’s initial
language setting.
40
Auto:
Notes
• Some DVD video discs may be set to display subtitles
in a different language than you selected. A prior subtitle
language may be programmed on the disc.
• Some DVD video discs allow you to change subtitle
selections only via the disc menu. If this is the case,
press MENU button and choose the appropriate subtitle
language from the selection on the disc menu.
Audio
DVD
DVD Menu
DVD
To select a preferred language for disc menus.
English: To view on-screen displays in English.
Deutsch: To view on-screen displays in German.
English: To view on-screen displays in English.
Deutsch: To view on-screen displays in German.
Français:To view on-screen displays in French.
Français:To view on-screen displays in French.
Español: To view on-screen displays in Spanish.
Español: To view on-screen displays in Spanish.
Italiano: To view on-screen displays in Italian.
Italiano: To view on-screen displays in Italian.
Language
OSD Menu
Subtitle
Audio
DVD Menu
Video
English
English
English
English
Audio
Rating
English
Deutsch
Français
Español
Italiano
Note
Some DVD video discs may be played in a different
language than you selected. A prior language may be
programmed on the disc.
Language
OSD Menu
Subtitle
Audio
DVD Menu
Video
English
English
English
English
Audio
Function setup
To select a preferred language for the sound track.
Rating
English
Deutsch
Français
Español
Italiano
Note
Some DVD video discs may be include your pre-selected
language. In this case, the DVD video player automatically
displays disc menus consistent with the disc’s initial
language setting.
41
Function setup
Customizing the Function Settings (continued)
Setting details
Video
Language
Video
Audio
Rating
DVD
TV System
VCD
CD
To select the video system of a disc.
Language
Video
Audio
TV Shape
4:3 Letter Box
TV System
NTSC
Video Output
CVBS
DVD
TV Shape
NTSC
Auto
VCD
To select a picture size according to the aspect
ratio of your TV.
Language
Video
Audio
Rating
TV Shape
4:3 Letter Box 4:3 Pan Scan
TV System
NTSC
4:3 Letter Box
Video Output
CVBS
16:9
4:3 Pan Scan:
Select when a standard 4:3 TV is
connected.
Displays pictures cropped to fill your
TV screen. Either or both sides of the
picture are cut off.
4:3 Letterbox:
Select when a standard 4:3 TV is
connected.
Displays theatrical images with
masking bars above and below the
picture.
NTSC: To play a NTSC disc. Connect a NTSC TV to
view a picture.
Auto: The DVD video player automatically identifies PAL
or NTSC video system of a disc. Connect a
multisystem TV (PAL/NTSC compatible) to view
a picture.
A playback picture may be distorted when
detected a signal change between PAL and NTSC
on the disc.
For the case of Progressive mode, your
multisystem TV must be able to support 525p
and 625p.
Video Output
Notes
• The displayable picture size is preset on the DVD video
disc. Therefore, the playback picture of some DVD video
discs may not conform to the picture size you select.
• When you play DVD video discs recorded in the 4:3
picture size only, the playback picture always appears
in the 4:3 picture size regardless of the TV shape setting.
• If you select “16:9 Widescreen” and you own a 4:3 TV
set, the DVD playback picture will be horizontally
distorted during playback. Images will appear to be
horizontally compressed. Always be sure that your TV
shape conforms to the actual TV in use.
DVD
VCD
CD
To select whether you send CVBS or YUV signals
to the connected TV or not.
Language
Video
Audio
TV Shape
4:3 Letter Box
TV System
NTSC
Video Output
CVBS
16:9 Widescreen: Select when a 16:9 wide TV is
connected.
42
Rating
Rating
CVBS
YUV
CVBS: Corresponding to your TV which has a video
YUV:
(yellow) or S-video input. 14
Corresponding to your TV which has a YUV
(component video) inputs. S-Video will not have
video signal if YUV have been selected instead
of CVBS. 15
Progressive mode can only be on when YUV is
selected.
Audio
Language
Video
Audio
Rating
Virtual Effect
DVD
VCD
CD
To obtain expansive virtual surround sound effects
from just two speakers.
Language
Digital Out
Virtual Effect
DVD
VCD
PCM
On
Audio
Rating
Off
On
Function setup
Digital Out
Video
CD
Select the output sound format corresponding to your
system connection.
For details of sound recording systems. See 31 .
Language
Digital Out
Virtual Effect
Video
PCM
On
Audio
Rating
Off:
On:
Turn off virtual surround sound effects.
To obtain expansive virtual surround sound
effects from two speakers (ANALOG AUDIO
OUT jacks). Be sure to set “Digital Out” to “PCM”.
PCM
Raw
PCM: Select when connected to a 2 channel digital
stereo amplifier.
The DVD video player outputs sounds in the
PCM 2 ch format when you play a DVD video
disc recorded on the Dolby Digital, MPEG1
or MPEG2 recording system.
Raw: Select when connected to an amplifier
equipped with a Dolby Digital, DTS, MPEG1
or MPEG2 decoder. The DVD video player
outputs digital audio information in the
bitstream format when you play a DVD video
disc recorded on the Dolby Digital, DTS,
MPEG1 or MPEG2 recording system.
Note
When you make a connection to a TV, or Dolby
Surround Pro Logic or stereo system via the analog
audio jacks, select “PCM” or “Raw”.
43
Function setup
Customizing the Function Settings (continued)
Setting details
Rating
Language
Video
Audio
Rating
Indicates Parental lock is NOT active.
The Parental lock is active.
If you forget the password, you can erase your
current password by pressing number button 8
on the remote four times, then press ENTER
button to confirm the setting.
PASSWORD : 8888
Password / Rating
DVD
DVD discs equipped with the password function are
rated according to their content. The contents allowed
by a parental lock level and the way a DVD disc can be
controlled may vary from disc to disc.
For example, if the disc allowed, you could edit out violent
scenes unsuitable for children and replace them with
more suitable scenes, or you could lock out playback of
the disc altogether.
• DVD video discs may or may not respond to the
parental lock settings. This is not a defect in the DVD
video player. Make sure this function works with your
DVD video discs.
Language
Password
Rating
Load Factory
Video
Audio
Rating
Notes
• If you make a mistake before pressing ENTER button,
press CLEAR button and enter your 4-digit security
code again.
• You cannot play DVD discs rated higher than the level
you selected unless you cancel the parental lock
function.
Load factory
DVD
---8. Adult
No
Password
Rating
Load Factory
Video
Language
Audio
CD
If you want to return the initial settings such as Language,
Video, Audio and etc. to the factory default, following the
“SETTING PROCEDURE” 38 .
Password
Rating
Load Factory
Language
VCD
Video
---8. Adult
No
Audio
Rating
No
Yes
Rating
---8. Adult
No
Note
The parental lock level is equivalent to the following ratings:
Level 1 :
Level 2 :
Level 3 :
Level 4 :
Level 5 :
Level 6 :
Level 7 :
Level 8 :
44
Kid Safe
G
PG
PG_13
PG_R
R
NC_17
Adult (parental lock is not active)
When you reset the DVD video player to the factory
default, the DVD video player will take 3-5 seconds to
reset.
Table of Languages
Table of languages and their abbreviations
Abbreviation
---
Abbreviation
GN
GU
HA
HI
HR
HU
HY
IA
IE
IK
IN
IS
IW
JI
JW
KA
KK
KL
KM
KN
KS
KU
KY
LA
LN
LO
LT
LV
MG
MI
MK
ML
MN
MO
MR
MT
MY
NA
NE
NO
OC
OM
OR
PA
PL
PS
Language
Guarani
Gujarati
Hausa
Hindi
Croatian
Hungarian
Armenian
Interlingua
Interlingue
Inupiak
Indonesian
Icelandic
Hebrew
Yiddish
Javanese
Georigian
Kazakh
Greenlandic
Cambodian
Kannada
Kashmiri
Kurdish
Kirghiz
Latin
Lingala
Laotian
Lithuanian
Latvian, Lettish
Malagasy
Maori
Macedonian
Malayalam
Mongolian
Moldavian
Marathi
Maltese
Burmese
Nauru
Nepali
Norwegian
Occitan
(Afan) Oromo
Oriya
Panjabi
Polish
Pashto, Pushto
Abbreviation
PT
QU
RM
RN
RO
RU
RW
SA
SD
SG
SH
SI
SK
SL
SM
SN
SO
SQ
SR
SS
ST
SU
SV
SW
TA
TE
TG
TH
TI
TK
TL
TN
TO
TR
TS
TT
TW
UK
UR
UZ
VI
VO
WO
XH
YO
ZU
Language
Portuguese
Quechua
Rhaeto-Romance
Kirundi
Rumanian
Russian
Kinyarwanda
Sanskrit
Sindhi
Sango
Serbo-Croatian
Singhalese
Slovak
Slovenian
Samoan
Shona
Somali
Albanian
Serbian
Siswati
Sesotho
Sundanese
Swedish
Swahili
Tamil
Telugu
Tajik
Thai
Tigrinya
Turkmen
Tagalog
Setswana
Tongan
Turkish
Tsonga
Tatar
Twi
Ukrainian
Urdu
Uzbek
Vietnamese
Volapük
Wolof
Zhosa
Yoruba
Zulu
45
Function setup
CHI (ZH)
DUT (NL)
ENG (EN)
FRE (FR)
GER (DE)
ITA (IT)
JPN (JA)
KOR (KO)
MAY (MS)
SPA (ES)
AA
AB
AF
AM
AR
AS
AY
AZ
BA
BE
BG
BH
BI
BN
BO
BR
CA
CO
CS
CY
DA
DZ
EL
EO
ET
EU
FA
FI
FJ
FO
FY
GA
GD
GL
Language
No alternate
language
Chinese
Dutch
English
French
German
Italian
Japanese
Korean
Malay
Spanish
Afar
Abkhazian
Afrikaans
Amharic
Arabic
Assamese
Aymara
Azerbaijani
Bashkir
Belorussian
Bulgarian
Bihari
Bislama
Bengali, Bangla
Tibetan
Breton
Catalan
Corsican
Czech
Welsh
Danish
Bhutani
Greek
Esperanto
Estonian
Basque
Persian
Finnish
Fiji
Faroese
Frisian
Irish
Scottish Gaelic
Galician
Others
Operating a TV with the Remote Control
You can operate the basic functions of selected TVs using the
supplied remote control
Operating a TV with the remote control
Preparation
Follow the instruction of “To program the remote control” to set the brand code.
To program the remote control
Point the remote control at your TV, and use buttons
as follows.
1 Press TV to select TV mode.
POWER
To turn the TV on or off.
INPUT SELECT
To select external source such as a
VCR.
2 While holding down PROGRAM enter the two digits
of your TV’s brand code (listed on page 47) using
Number buttons.
NUMBER buttons
To select TV channel. When selecting
channels 1 to 9, first enter 0 and then
the desired number.
100
To substitute for 100 channel key.
• DISPLAY
To turn on or off TV’s screen display.
VOL + / -
To adjust the volume.
CH +/ -
To select a channel.
ENTER
To use for the TV’s ENTER key.
e.g. To program brand code 01.
PROGRAM
0
1
Note
When using the remote control, press the buttons at intervals
of about 1 second to ensure the correct mode of operation.
3 Release PROGRAM.
The DVD remote control memorizes the selected TV brand
code.
Notes
POWER
INPUT SELECT
Numbers/100
• DISPLAY
CH, VOL
PROGRAM
ENTER
• The remote control is programmed at the factory to
operate TOSHIBA TVs.
• A single brand may use different codes depending on the
particular model. Enter the correct number referring to the
brand code table.
• For some brands, several brand codes are provided. Try
each of them until the remote control operates your TV.
• Some TVs may not respond to all of the functions in the table
above, or may not be operated at all with this remote control.
• If you replace the remote control’s batteries, remember to
reprogram the brand codes for TV.
• Press DVD back if DVD operation is required.
46
Brand code table
Brand Name
Brand Code
12
11
07
02
11
09
11
07
11
11
09
10
11
11
14
11
10
02
15
07
11
Brand Code
PHILCO
PHILIPS
PIONEER
PRINCECLUB
PRISM
PROSCAN
PROTON
PULSAR
QUASAR
RADIO SHACK
RCA
REALISTIC
RUNCO (NEC)
SAMSUNG
SANYO
SCOTCH
SCOTT
SEARS
SHARP
SONY
SOUNDESIGN
SUPREME
SYLVANIA
TANDY
TECHNICS
TECHWOOD
TEKNIKA
TMK
VICTOR
VIDIKRON
VIDTECH
WARDS
ZENITH
10
10
16
12
07
02
11
14
07
13
02
09
14
11
09
11
11
01
08
03
11
03
10
08
07
07
04
11
05
10
11
10
14
15
11
Others
TOSHIBA
01
BELL & HOWELL 09
CARVER
10
CELEBRITY
03
CITIZEN
12
CURTIS MATHES 09
DUMONT
14
ELECTRO BRAND 03
EMERSON
09
FISHER
09
GE
02
GIBRALTER
14
GOLDSTAR
11
HALLMARK
11
HITACHI
06
INFINITY
10
JBL
10
JCB
03
JVC
05
LXI
01
MAGNAVOX
10
MARANTZ
10
MEGATRON
06
MEMOREX
04
MGA
04
MIDLAND
02
MITSUBISHI
04
MOTOROLA
08
MTC
12
NAD
01
NIKKO
11
OPTIMUS
09
OPTONICA
08
PANASONIC
07
PENNEY
01
Brand Name
13
12
02
13
09
10
11
15
10
12
11
13
12
47
Others
Before Calling Service Personnel
Check the following guide for the possible cause of a problem before contacting service.
Symptoms and correction
Symptom
Cause
No power.
• The power plug is disconnected.
The DVD video player • The automatic power off function
turned off by itself.
turned the unit off.
No picture or abnormal • The TV is not set to receive DVD
signal output.
color (pinkish, greenish,
etc.).
Correction
• Connect the power plug securely into the wall outlet.
• Press the PLAY button.
• Select the appropriate video input mode on the
TV so the picture from the DVD video player
appears on the TV screen.
Page
14
21
20
• The video cable is not connected
securely.
• Connect the video cable securely into the
appropriate jacks.
• Mismatch setting between TV and this
player.
• Wrong connection.
• Select the correct Video Output setting.
Scrolling, jumping or B/W
picture.
• Incompatible TV system.
• Select the correct TV system.
42
No sound.
• The equipment connected with the
audio cable is not set to receive DVD
signal output.
• Select the correct input mode of the audio receiver
so you can listen to the sound from the DVD video
player.
20
• The audio cable is not connected
securely.
• Connect the audio cable securely into the
appropriate jacks.
14-19
• The audio receiver or TV is turned off.
• Turn on the equipment connected with the audio cable.
• The setting of output sound format is
incorrect.
• Select the proper audio setting.
20
31, 38
43
7
• Check the connection.
14, 15
42
14, 15
• The disc is dirty.
• Eject the disc and clean it.
• It is in fast forward or fast reverse
playback.
• Sometimes a small amount of picture distortion may
appear. This is not a malfunction.
-
Brightness is unstable or
noises are present in the
playback pictures.
• The effect of copy protection.
• Connect the DVD video player directly of the TV.
Avoid connecting the DVD video player to a VCR
or TV/VCR combination.
14
The DVD video player
does not start playback.
• No disc is inserted.
• Insert a disc.
20
• An unplayable disc is inserted.
• Insert a playable disc. (Check the disc type and
color system.)
8
• The disc is placed upside down.
• Place the disc with the playback side down.
20
• The disc is not placed within the
guide.
• Place the disc correctly inside the guide on the
disc tray.
20
• The disc is dirty.
• Clean the disc.
• The parental lock function is set.
• Cancel the parental lock function or change the
parental lock level.
Playback does not follow
the course of the disc’s
program.
• It is in the mode of repeat playback,
memory playback, etc.
• These operations may prevent a proper progress
of the contents.
-
Buttons do not work.
• Power supply fluctuations or other
abnormalities such as static electricity
may interrupt correct operations.
-
The remote control does
not work properly.
• The remote control is not pointed at
the remote sensor of the DVD video
player.
• Press and hold ON/STANDBY button on the front
panel for more than about 3 seconds. The DVD
video player turns off. Press the button again to
turn it on. If the buttons still do not work, disconnect
the power plug and insert it into the wall outlet
again.
• Point the remote control at the remote sensor of
the DVD video player.
The playback picture
has
occasional
distortion.
48
7
38, 44
13
• The remote control is too far from
the DVD video player.
• Operate the remote control within about 7 m.
13
• The batteries in the remote control
are exhausted.
• Replace the batteries with new ones.
13
Specifications
DVD video player / outputs / supplied accessories
DVD video player
Power supply
120 V AC, 60 Hz
Power consumption
13W
Mass
3.86 kg
External dimensions
428 X 76 X 437 mm (W/H/D)
Signal system
Standard NTSC
Laser
Semiconductor laser, wavelength 650/780 nm
Frequency range
DVD linear sound :
48 kHz sampling 4 Hz to 22 kHz
96 kHz sampling 4 Hz to 44 kHz
More than 100 dB
Audio dynamic range
More than 93 dB
Harmonic distortion
Less than 0.005 %
Wow and flutter
Below measurable level (less than ±0.001 % (W.PEAK))
Operating conditions
Temperature: 5 °C to 35 °C, Operation status: Horizontal
Others
Signal-to-noise ratio
Outputs
Video output
1.0 V (p-p), 75 Ω, negative sync., pin jack x 1
S video output
(Y) 1.0 V (p-p), 75 Ω, negative sync., Mini DIN 4-pin x 1
(C) 0.286 V (p-p), 75 Ω
Component video output
(Y) 1.0 V (p-p), 75 Ω, negative sync., pin jack x 1
(PB) (PR) 0.7 V (p-p), 75 Ω, pin jack x 2
COAXIAL Digital Audio Out
0.5 V (p-p), 75 Ω, pin jack x 1
Audio output (ANALOG)
2.0 V (rms), 680 Ω, pin jacks (L, R) x 1
Outputs
Audio/video cable ................................................. 1
Remote control (SE-R0131) ................................ 1
Batteries (AAA) ...................................................... 2
• Designs and specifications are subject to change without notice.
49
Others
Limited United States Warrant y
DVD Players - Exchange Warrant y
Toshiba America Consumer Products, L.L.C. ("TACP") makes the following limited warranties to original
consumers in the United States. THESE LIMITED WARRANTIES EXTEND TO THE ORIGINAL CONSUMER
PURCHASER OR ANY PERSON RECEIVING THIS DVD PLAYER AS A GIFT FROM THE ORIGINAL
CONSUMER PURCHASER AND TO NO OTHER PURCHASER OR TRANSFEREE
PRODUCTS PURCHASED IN THE U.S.A. AND USED IN CANADA ARE NOT COVERED BY THESE
WARRANTIES
PRODUCTS PURCHASED IN CANADA AND USED IN THE U.S.A. ARE NOT COVERED BY THESE
WARRANTIES.
Limited Ninety (90) Day Warrant y
TACP warrant this DVD PLAYER and its parts
against defects in materials or workmanship for a
period of ninety (90) days after the date of original
retail purchase. DURING THE FIRST 90 DAYS
FROM THE PURCHASE DATE, TACP WILL
EXCHANGE A DEFECTIVE DVD PLAYER WITH
A NEW OR REFURBISHED PLAYER WITHOUT
CHARGE TO YOU. YOU MUST CONTACT
TOSHIBA'S CONSUMER SOLUTIONS CENTER
FOR INSTRUCTIONS ON HOW TO PROCESS
YOUR IN WARRANTY EXCHANGE REQUEST. THE
CONSUMER IS RESPONSIBLE FOR ALL INBOUND
TRANSPORTATION AND INSURANCE CHARGES
FOR THE DVD PLAYER TO THE EXCHANGE
CENTER. DURING THE PERIOD FROM 91 DAYS
AND BEYOND, FROM THE PURCHASE DATE, TACP
WILL EXCHANGE A DEFECTIVE DVD PLAYER
WITH A NEW OR REFURBISHED PLAYER FOR A
NOMINAL FEE. YOU MUST CONTACT TOSHIBA'S
CONSUMER SOLUTIONS CENTER FOR INSTRUCTIONS ON HOW TO PROCESS YOUR EXCHANGE
REQUEST. THE CONSUMER IS RESPONSIBLE
FOR ALL INBOUND TRANSPORTATION AND
INSURANCE CHARGES FOR THE DVD PLAYER
TO THE EXCHANGE CENTER.
*Rental Units
The warranty for rental units begins with the first
rental or thirty (30) days from the date of shipment to
the rental firm, whichever comes first.
*Commer cial Units
DVD PLAYERs sold and used for commercial purposes have a limited ninety (90) day warranty for all parts,
labor.
50
Owner's Manual and Demographic Card
You should read this owner's manual thoroughly
before operating this DVD PLAYER. You should complete and mail the enclosed Demographic card within
ten days after you, or the person who has given you
this product as a gift, purchased this DVD PLAYER.
This is one way to enable TACP to provide you with
better customer service and improved products.
Failure to return the Demographic card will not affect
your rights under this warranty.
Your Responsibility
THE ABOVE WARRANTIES ARE SUBJECT TO THE
FOLLOWING CONDITIONS:
(1) You must provide your bill of sale or other proof
of purchase.
(2) All warranty servicing of this DVD PLAYER must
be made by an Authorized TACP Service Station.
(3) The warranties from TACP are effective only if the
DVD PLAYER is purchased and operated in the
U.S.A. or Puerto Rico.
(4) Labor service charges for set installation, set up,
adjustment of customer controls and installation
or repair of antenna systems are not covered by
these warranties. Reception problems caused by
inadequate antenna systems are your
responsibility.
(5) Warranties extend only to defects in materials or
workmanship as limited above and do not extend
to any DVD PLAYER or parts which have been
lost or discarded by you or to damage to DVD
PLAYER or parts caused by misuse, accident,
Acts of God, such as lightning or fluctuations in
electric power, improper installation, improper
maintenance or use in violation of instructions
furnished by TACP; or to units which have been
modified or had the serial number removed,
altered, defaced or rendered illegible.
How to Obtain Warranty Services
If, after following all of the operating instructions in this
manual and checking the section "Before Calling
Service Personnel", you find that service is needed:
(1) For instructions on how to obtain warranty service
for exchange program DVD Players, contact
TACP'S toll free Call Center at 1-866-583-7353.
(2) Include your bill of sale or other proof of purchase
along with the DVD player, when sending it to the
Authorized TACP Service Station SPECIFIED by
TACPs Call Center. You must pay for all
transportation and insurance charges for the DVD
Product to and from the Service Station.
THIS WARRANTY GIVES YOU SPECIFIC LEGAL
RIGHTS, AND YOU MAY ALSO HAVE OTHER
RIGHTS WHICH MAY VARY FROM STATE TO STATE
IN THE U.S.A. SOME STATES OF THE U.S.A. DO
NOT ALLOW LIMITATIONS ON HOW LONG AN
IMPLIED WARRANTY LASTS, WHEN AN ACTION
MAY BE BROUGHT, OR THE EXCLUSION OR
LIMITATION OF INCIDENTAL OR CONSEQUENTIAL
DAMAGES, SO THE AFOREMENTIONED
LIMITATIONS OR EXCLUSIONS MAY NOT APPLY
TO YOU UNDER SUCH CIRCUMSTANCES.
For additional information, visit TACP's web site:
www.tacp.toshiba.com
Others
ALL WARRANTIES IMPLIED BY THE LAW OF ANY
STATE OF THE U.S.A., INCLUDING THE IMPLIED
WARRANTIES OF MERCHANTABILITY AND FITNESS FOR A PARTICULAR PURPOSE, ARE
EXPRESSLY LIMITED TO THE DURATION OF THE
LIMITED WARRANTIES SET FORTH ABOVE. WITH
THE EXCEPTION OF ANY WARRANTIES IMPLIED
BY THE LAW OF ANY STATE OF THE U.S.A. AS
HEREBY LIMITED, THE FOREGOING WARRANTY
IS EXCLUSIVE AND IN LIEU OF ALL OTHER
WARRANTIES, GUARANTEES, AGREEMENTS
AND SIMILAR OBLIGATIONS OF TACP OR THI
WITH RESPECT TO THE REPAIR OR REPLACEMENT OF ANY PARTS. IN NO EVENT SHALL TACP
BE LIABLE FOR CONSEQUENTIAL OR INCIDENTAL DAMAGES.
No person, agent, distributor, dealer or company is
authorized to change, modify or extend the terms of
these warranties in any manner whatsoever. The time
within which action must be commenced to enforce
any obligation of TACP arising under this warranty or
under any law of the United States or of any state
thereof is hereby limited to 90 days from the date you
discovered or should have discovered, the defect. This
limitation does not apply to implied warranties arising
under the law of any state of the U.S.A.
51
Others
- IMPORTANT CANADIAN WARRANTY INFORMATION
GARANTIE CANADIENNE
STANDARD WARRANTY
TYPE OF SET
WARRANTY PERIOD
DVD Player
DVD/VCR Combination
Home Theatre in a Box
DVD Recorder
Portable DVD
12 MONTHS
GARANTIE NORMALE
TYPE D’APPAREIL
Lecteur DVD
DVD/magnétoscope combo
Cinéma maison dans une boîte
Enregistreur DVD
DVD Portatif
DURÉE DE LA GARANTIE: 12 MOIS
CANADIAN WARRANTY
Toshiba of Canada Limited (TCL) makes the following limited
warranties to original consumers in Canada. Please retain
your “Bill of Sale” as proof of purchase. To obtain a
“Canadian Warranty” please register online at
www.toshiba.ca.
GARANTIE CANADIENNE
1) Toshiba du Canada Limit e (TLC) of fre au Canada les garanties
limit es suivantes aux consommateurs origin-aux. Veuillez
conserver votre < facture > comme preuve d’achat. Pour
obtenir une garantie canadienne, veuillez vous inscrire
en ligne à www.toshiba.ca.
Canadian Warranty Information
Should service be required on this unit during the one year warranty
period, TCL’s option will be to repair or exchange the defective
unit. It will be necessary to follow this procedure:
Contact: Toshiba of Canada Limited at the Consumer Electronics
Group, customer support line.
Phone: 1-800-268-3404
Email:
[email protected]
de garantie, Toshiba du Canada Limitée aura l’op tion de réparer
ou échanger l’appareil d féctueux. Vous devrez suivre la procédure
suivante:
Contact: Toshiba du Canada Limitée au Groupe Électronique
aux consommateurs, service à la clientèle.
Tél:
1-800-268-3404
Courriel: [email protected]
All in-warranty repairs must be made by an authorized TCL service
centre.
For service exchange TCL will arrange to have the unit picked up
by courier and a replacement unit will be returned via same courier.
(Note: A major credit card number will be required as a charge of
$25.00 will apply if no fault is found with the unit.) During the first
3 months of ownership, a new unit will be supplied as a replacement.
During the remainder of the warranty period a service-renewed
unit will be supplied.
The original “Bill of Sale” must be provided as proof of purchase (it
will be returned with the replacement unit.)
This 12-month warranty will be strictly adhered to.
Out of warranty units should be repaired by a TCL authorized
service centre.
Note: It is the responsibility of the owner to ensure proper
packaging. Should damage in shipping occur, due to poor
packaging, a charge back for the repair will result. This warranty
applies to the original purchaser only and is not transferable.
This warranty does not apply to sets that have been subjected to
misuse, neglect, accident, physical damage or acts of nature.
Sets with the serial number removed, altered, replaced or defaced
will not be covered by this warranty.
The warranties from TCL are effective only if the product is
purchased in Canada from an authorized TCL dealer and operated
in Canada.
Products utilized for rental or commercial purposes are not covered
by this warranty.
This warranty is in lieu of all other warranties, guaranties or
agreements, whether expressed or implied, and no person, agent
distributor, dealer, service centre or company is author-ized to
change, modify or extend its terms in any manner whatsoever.
Information sur la garantie Canadienne
Si vous avez besoin de service sur cet appareil au cours le l’année
Toutes les réparations au cours de la garantie doivent être faites
par un centre de service autorisé Toshiba.
Pour un échange TCL s’assurera qu’un service de courrier
ramassera l’unité et qu’un appareil de remplacement soit expédié
par le même service de courrier
(Note: Un numéro de carte de crédit sera requis car une charge de
25,00$ sera appliquée si toutefois l’appareil n’avait aucun problème
de fonctionnement.)
Une nouvelle unité sera fournie comme remplacement durant les
premiers 3 mois de propriété. Par contre durant la balance de la
garantie une unité remise à neuf sera fournie.
La <facture> originale doit être fournie comme preuve d’achat (elle
vous sera retournée avec l’unit de remplacement.)
Cette garantie de 12 mois sera strictement adhérée.
Les unités hors de garantie devraient être réparées par un centre
de service autorisé Toshiba.
Note: C’est la responsabilité du propriétaire de s’assurer que
l’emballage est adéquat. Vous serez facturé pour toutes réparations causées par des dommages encourus à cause d’un
emballage non adéquat.
Cette garantie est octroyée à l’acheteur initial et n’est pas
transférable. Cette garantie ne s’aplique pas aux appareils qui ont
été sujets aux abus, négligences, accidents, dommages physiques
ou actes naturels.
Les appareils dont le numéro de série a été enlevé, altété, remplacé
ou barbouillé ne sont pas couverts par cette garantie.
Les garanties de TCL sont valides seulement sur les unités sont
achetées et utilisées au Canada d’un marchand autorisé TCL.
Cette garantie ne couvre pas les produits de location ou à usage
commercial. Cette garantie remplace toutes autres garanties ou
ententes exprimées ou sous-entendues. Aucune personne, agent,
distributeur , concessionaire ou compagnie n’est autorisé à changer,
modifier ou prolonger les termes de cette garantie de quelque
façon que ce soit.
Toshiba of Canada Limited 191 McNabb Street Markham, Ontario L3R 8H2
52
811-SD5991-010
Printed in China