1
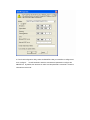
Copyright
Information furnished by SMC Networks, Inc. (SMC) is believed to be accurate and reliable.
However, no responsibility is assumed by SMC for its use, nor for any infringements of patents
or other rights of third parties which may result from its use. No license is granted by implication
or otherwise under any patent or patent rights of SMC. SMC reserves the right to change
specifications at any time without notice.
Copyright © 2004 by
SMC Networks, Inc.
38 Tesla
Irvine, California 92618
All rights reserved.
Trademarks
SMC® is a registered trademark; and EZ-Stream, EZ Connect, Barricade and EZ Hub are
trademarks of SMC Networks, Inc. Other product and company names are trademarks or
registered trademarks of their respective holders.
Compliances
Federal Communication Commission Interference Statement
This equipment has been tested and found to comply with the limits for a Class B digital device,
pursuant to Part 15 of the FCC Rules. These limits are designed to provide reasonable
protection against harmful interference in a residential installation. This equipment generates,
uses and can radiated radio frequency energy and, if not installed and used in accordance with
the instructions, may cause harmful interference to radio communications. However, there is no
guarantee that interference will not occur in a particular installation. If this equipment does
cause harmful interference to radio or television reception, which can be determined by turning
the equipment off and on, the user is encouraged to try to correct the interference by one of the
following measures:
z
Reorient or relocate the receiving antenna.
z
Increase the separation between the equipment and receiver.
z
Connect the equipment into an outlet on a circuit different from that to which the receiver is
connected.
z
Consult the dealer or an experienced radio/TV technician for help.
FCC Caution: To assure continued compliance, (example – use only shielded interface cables
when connecting to computer or peripheral devices). Any changes or modifications not
expressly approved by the party responsible for compliance could void the user’s authority to
operate this equipment.
This transmitter must not be co-located or operating in conjunction with any other antenna or
transmitter.
FCC Radiation Exposure Statement
This equipment complies with FCC radiation exposure limits set forth for an uncontrolled
environment. This equipment should be installed and operated with minimum distance 20 cm
between the radiator & your body.
This device complies with Part 15 of the FCC Rules. Operation is subject to the following two
conditions: (1) This device may not cause harmful interference, and (2) this device must accept
any interference received, including interference that may cause undesired operation.
Industry Canada - Class B
This digital apparatus does not exceed the Class B limits for radio noise emissions from digital
apparatus as set out in the interference-causing equipment standard entitled “Digital
Apparatus,” ICES-003 of Industry Canada.
Cet appareil numerique respecte les limites de bruits radioelectriques applicables
aux appareils umeriques de Classe B prescrites dans la norme sur le material
brouilleur: “Appareils Numeriques,” NMB-003 edictee par l’Industrie.
EC Conformance Declaration
The following importer/manufacturer is responsible for making this declaration:
SMC Networks-Spain, S.L.
Edificio Conata II,
Calle Fructuós Gelabert 6-8, 2o, 4a,
08970 - Sant Joan Despí,
Barcelona, Spain.
This RF product complies with R&TTE Directive 99/5/EC. For the evaluation of the compliance
with this Directive, the following standards were applied:
• Electromagnetic compatibility and radio spectrum matters (ERM)
EN300 328-1 (2001-12)
EN300 328-2 (2001-12)
• Electromagnetic Compatibility (EMC) Standard for radio equipment and services
EN301 489-1
EN301 489-17
• Safety Test
EN60950
Intended for use in the following countries:
Austria
Belgium
Denmark
Finland
France
Germany
Italy
Luxembourg
Netherlands
Norway
Spain
Sweden
Switzerland
United
Kingdom
Portugal
Greece
Ireland
Iceland
Wichtige Sicherheitshinweise (Germany)
1. Bitte lesen Sie diese Hinweise sorgfältig durch.
2. Heben Sie diese Anleitung für den späteren Gebrauch auf.
3. Vor jedem Reinigen ist das Gerät vom Stromnetz zu trennen. Verwenden Sie keine Flüssigoder Aerosolreiniger. Am besten eignet sich ein angefeuchtetes Tuch zur Reinigung.
4. Die Netzanschlußsteckdose soll nahe dem Gerät angebracht und leicht zugänglich sein.
5. Das Gerät ist vor Feuchtigkeit zu schützen.
6. Bei der Aufstellung des Gerätes ist auf sicheren Stand zu achten. Ein Kippen oder Fallen
könnte Beschädigungen hervorrufen.
7. Die Belüftungsöffnungen dienen der Luftzirkulation, die das Gerät vor Überhitzung schützt.
Sorgen Sie dafür, daß diese Öffnungen nicht abgedeckt werden.
8. Beachten Sie beim Anschluß an das Stromnetz die Anschlußwerte.
9. Verlegen Sie die Netzanschlußleitung so, daß niemand darüber fallen kann. Es sollte auch
nichts auf der Leitung abgestellt werden.
10. Alle Hinweise und Warnungen, die sich am Gerät befinden, sind zu beachten.
11.Wird das Gerät über einen längeren Zeitraum nicht benutzt, sollten Sie es vom Stromnetz
trennen. Somit wird im Falle einer Überspannung eine Beschädigung vermieden.
12. Durch die Lüftungsöffnungen dürfen niemals Gegenstände oder Flüssigkeiten in das Gerät
gelangen. Dies könnte einen Brand bzw. elektrischen Schlag auslösen.
13. Öffnen Sie niemals das Gerät. Das Gerät darf aus Gründen der elektrischen Sicherheit nur
von authorisiertem Servicepersonal geöffnet werden.
14. Wenn folgende Situationen auftreten ist das Gerät vom Stromnetz zu trennen und von einer
qualifizierten Servicestelle zu überprüfen:
a. Netzkabel oder Netzstecker sind beschädigt.
b. Flüssigkeit ist in das Gerät eingedrungen.
c. Das Gerät war Feuchtigkeit ausgesetzt.
d. Wenn das Gerät nicht der Bedienungsanleitung entsprechend funktioniert oder Sie mit Hilfe
dieser Anleitung keine Verbesserung erzielen.
e. Das Gerät ist gefallen und/oder das Gehäuse ist beschädigt.
f. Wenn das Gerät deutliche Anzeichen eines Defektes aufweist.
15. Stellen Sie sicher, daß die Stromversorgung dieses Gerätes nach der EN60950 geprüft ist.
Ausgangswerte der Stromversorgung sollten die Werte von AC 7,5-8V, 50-60Hz nicht überoder unterschreiten sowie den minimalen
Strom von 1A nicht unterschreiten. Der arbeitsplatzbezogene Schalldruckpegel nach DIN 45
635 Teil 1000 beträgt 70dB(A) oder weniger.
1. Introduction
1.1 EZ Connect™ g 2.4GHz 802.11g Wireless Traveler’s Kit
SMCWTK-G is another innovative solution brought to you by SMC. It is the industry’s first
compact All-in-One device that fits in a convenient easy-to-carry case. The new product offers
5 different modes: Access Point, Ethernet Bridge, Repeater, Point-to-Point Bridging, and
Point-to-Multipoint Bridging.
The new EZ Connect™ g 802.11g Wireless Traveler’s Kit is the perfect business traveler’s
companion. Imagine checking into your hotel room with broadband connection after a long
day’s trip, plug in your SMCWTK-G as your Personal Access Point, you can now enjoy and
relax at your bed or sofa in your room to check email or surf the Internet.
SMCWTK-G can be used as an Ethernet Bridge that instantly converts any Ethernet device,
such as a gaming console, printer, set-top box, point-of-sale terminal, desktop or laptop
computer into a wireless network device. The new product does not require installing any
drivers. Simply plug it into your Ethernet device and your Ethernet device will become wireless!
The new SMCWTK-G is the ultimate convenient way to expand your wireless local area
network. The new product can also be configured as a Repeater via support for Wireless
Distribution System (WDS). Thus allowing you to connect your 802.11b and/or 802.11g clients
to the wireless network or extend the coverage of your WLAN in your home or office by simply
placing additional SMCWTK-G in the desired locations.
In cases where you need to bridge two networks together, the SMCWTK-G’s Point-to-Point and
Point-to-Multipoint Bridging functions is an ideal solution. That way the networks are
wirelessly connected without the need of expensive cabling.
1.2 Features
•
IEEE 802.11b, and 802.11g-Compliant
•
High Data Rates at up to 54 Mbps
•
EZ Installation Wizard
•
Plug-and-Play, no drivers needed
•
USB powered, no power adapter is needed
•
All-in-one compact device
•
Supports 5 different modes – Access Point, Ethernet Bridge, Repeater, Point-to-Point
Bridging, and Point-to-Multipoint Bridging
•
Personal Access Point mode
•
802.11g Wireless Ethernet Bridge converts any Ethernet-equipped device to wireless
•
Repeater function (via WDS) extends the range of your wireless network
•
Point-to-Point Bridging, and Point-to-Multipoint Bridging connects remote workgroup easily
•
Supports highly secure wireless connections
1.3 System Requirements
•
Internet Explorer/Netscape Navigator 5.0 or higher
•
PC running Windows 98SE/ME/2000/XP
•
CD-ROM drive
•
An AC power outlet or an available USB port to supply power to the SMCWTK-G
•
An available RJ-45 port on a 10/100 Mbps Ethernet hub or switch
•
Another IEEE 802.11b or 802.11g compliant device installed on your network such as
the Barricade™ g Wireless Broadband Router with USB Print Server (SMC2804WBRP-G)
or another wireless adapter such as the EZ Connect™ g Wireless Cardbus Adapter
(SMC2835W)
1.4 Package Contents
After unpacking the SMCWTK-G EZ Connect™ g 2.4GHz 802.11g Wireless Traveler’s Kit,
check the contents of the box to be sure you have received the following components:
•
1 SMCWTK-G device
•
1 USB Cable
•
1 Power Adapter
•
1 Cat-5 Ethernet Cable
•
1 EZ Installation Wizard and Documentation CD
•
1 Quick Installation Guide
Immediately inform your dealer in the event of any incorrect, missing or damaged parts. If
possible, please retain the carton and original packing materials in case there is a need to
return the product.
Please register this product and upgrade the product warranty at SMC’s Web site:
http://www.smc.com
2. Using the EZ Installation Wizard
The installation method makes the process as simple as possible.
1. Connect the SMCWTK-G to a PC using the Cat-5 Ethernet Cable.
2. Plug in the 4V power supply or use the supplied USB cable to plug into an available USB
port on the PC.
3. Insert the EZ Installation Wizard and Documentation CD.
4. Select “Install Utility”.
5. The Scan/Configuration Utility is now installed. Go to “Start”, then “Programs”, select “SMC
802.11g Wireless Traveler’s Kit”, and then “SMC 802.11g Wireless Traveler’s Kit Configuration
Utility” to start the SMCWTK-G Scan/Configuration Utility Program.
6. The Scan/Configuration automatically scans for SMCWTK-G on the network.
7. Highlight the SMCWTK-G that you would like to configure and click “Configure”. If your PC
has the same IP address subnet range as the SMCWTK-G, then the login screen will appear.
Enter the username and password. The default IP address of the SMCWTK-G is 192.168.2.25.
The username is “admin” and the password is “smcadmin”. Skip to Step 10.
8. Make sure the PC has an IP address on the 192.168.2.xxx subnet, such as 192.168.2.30. If
not, the IP window will appear, as shown below. From this window, set the static IP address of
the PC to be in the same subnet as the SMCWTK-G, e.g. 192.168.2.30. Set the “Subnet
Mask” to be “255.255.255.0”. Default Gateway is usually the IP address of your router, e.g.
192.168.2.1. Click OK.
Your PC may require a reboot after changing the IP address. Click
“Yes” to reboot PC if prompted.
9. From Scan/Configuration Utility, select the SMCWTK-G that you would like to configure and
click “Configure”.
You will be asked to enter the username and password to configure the
SMCWTK-G. By default, the username is “admin” and the password is “smcadmin”. Enter this
information and click OK.
10. The default mode of SMCWTK-G is Access Point (AP) mode. To switch to Client,
Repeater, Point-to-Point Bridging (P2P), or Point-to-Multipoint Bridging (PMP) mode, go to the
Mode Page and select the desired mode. Click Apply.
11. Then go to the Mode page and click Setup. Configure the applicable properties for that
mode, such as the SSID, Channel, and Security.
12. The SMCWTK-G is now ready to use.
3. Operating Modes
3.1 Introduction to Operating Modes
3.1.1 Traveler’s AP Mode
The Access Point (AP) mode is by default the out-of-box operational mode.
When the user resets the system to the default manufacturing settings, the
operational mode also reverts to AP mode. In the AP mode, the system functions as
a standard AP, where wireless clients connected to the AP can then connect to other
wireless clients or to the wired network. For example, when traveling to a hotel that
has high speed internet access, the user can connect to the Internet through the AP
which is connected to an Ethernet cable in the room.
Note that the SMCWTK-G AP does not act as a DHCP server. In other words,
it does not supply dynamic IP addresses and instead relies on the network to
supply them.
Figure 1: AP Mode.
3.1.2 Repeater Mode
Repeater mode extends the range of a wireless network. Repeater nodes
re-transmit the signal of an AP or wireless router to effectively extend the range of
that AP or wireless router. Wireless clients can associate with the repeater.
Figure2 shows the network with one repeater, and the repeater allowing
wireless clients to associate.
To configure the SMCWTK-G as a Repeater, please ensure the following:
.
• Enter the MAC address of the Parent AP or wireless router in the Remote AP MAC
.
address field in the SMCWTK-G Repeater.
• Enter the MAC address of the SMCWTK-G (Repeater mode) in the Repeater MAC
address field in the Parent AP or wireless router.
Figure 2: One Wireless Repeater Node
3.1.3 Point-to-Point (P2P) Mode
Two SMCWTK-G devices, each in Point-to-Point (P2P) mode, can establish a
wireless connection between two wired networks, as shown in Figure3. The two
SMCWTK-G devices operating in P2P mode do not allow client associations.
To configure the SMCWTK-G deivces to establish a P2P wireless bridge,
please ensure the following:
.
.
• Enter the MAC address of SMCWTK-G P2P_2 device in the P2P MAC address
field in the SMCWTK-G P2P_1 device.
• Enter the MAC address of SMCWTK-G P2P_1 device in the P2P MAC address
field in the SMCWTK-G P2P_2 device.
Figure 3: P2P Wireless Bridge
3.1.4 Point-to-Multipoint (PMP) Mode
A SMCWTK-G device operating in Point-to-Multipoint (PMP) mode can wirelessly
connect two or more wired networks, as shown in Figure4. The root SMCWTK-G device (LAN
1) operates in PMP mode, and the other SMCWTK-G devices (LAN 2, LAN 3) must operate in
P2P mode.
When operating in PMP mode, the SMCWTK-G device does not allow client
associations. The user must enter the MAC addresses of each (up to six) SMCWTK-G P2P
device into the PMP system's table of Remote AP addresses.
Figure 4: PMP Wireless Bridge
3.1.5 Client Mode
When set to Client mode, the SMCWTK-G device will associate to an AP within
its range in Infrastructure mode, as shown in Figure 5or join with another
SMCWTK-G device in Client mode in an Ad-Hoc network, as shown in Figure 6. The
Client behaves like a normal wireless client.
Figure 5: Client in Infrastructure Mode
Figure 6: Client in Ad-Hoc Mode
SMCWTK-G Client Mode
SMCWTK-G Client Mode
4. Wireless Security Support
The SMCWTK-G will support WEP encryption and WPA/PSK encryption as shown in Table1.
Table 1: Wireless Security
Mode
WEP
WPA/PSK
Comments
Access Point
Yes
Yes
In AP mode, the SMCWTK-G acts like a regular
AP. Supports WEP and WPA/PSK.
The link between the Repeater and wireless clients
will support either WEP or WPA/PSK. However, the
Repeater
Yes
No (for
link between the Repeater and the AP will support
only WEP in the initial release. Future releases will
support WPA/ PSK.
RepeaterAP link)
Yes (for
RepeaterClient link)
The link between SMCWTK-G devices in P2P
Point-to-Point
Yes
No
and/or PMP mode support only WEP in the initial
release. Future releases will support WPA/PSK.
(P2P)
The link between SMCWTK-G devices in P2P
Point-to-Multipoint
Yes
No
and/or PMP mode will support only WEP in the
initial release. Future releases will support
WPA/PSK.
(PMP)
In Client mode, the WTK-G acts like a regular
wireless client, so it will support WEP and
Client
Yes
Yes
WPA/PSK when connecting with an AP in
Infrastructure mode or when connecting to an
Ad-Hoc network.
5. Mode Selection
The first step in using the SMCWTK-G is selecting the operating mode. The default operating
mode is the AP mode.
To view the device’s web page, go to 192.168.2.25 (default IP address of the device) in your
web browser. The default username is “admin” and the password is “smcadmin.”
To select a mode, click the Mode tab. Click the radio button next to the desired mode and click
the Apply button. The device will reboot in the selected mode. After the device reboots, click the
Setup button to begin configuring the device.
Figure 7: Mode Page
6. AP Setup
6.1 Basic Setup
To configure the AP, select AP from the Mode page and click Setup. The following
table shows the basic setup options.
Figure 8: AP Setup Page
Table 2: AP Setup
Field
Description
Mode
Selects 802.11g/b mode:
802.11g only, 802.11b only, or Mixed
SSID
Wireless Network Name
Association
Wireless clients association table
SSID Broadcast
Enable/disable the SSID broadcast feature.
RF Channel
Selects the channel
Security
Selects the option to disable security or to use WEP or
WPA
security. If using WEP or WPA, click the Setup button to
enter the
key(s).
Advanced
Settings
Access Filter
Click Setup to configure advanced settings.
Click Setup to configure the access filter
6.2 Security Setup
To enable security, select the desired security mode (WEP or WPA) from the AP
setup page and click Setup to enter the keys.
Figure 9: WEP Configuration
The following tables describe the security setup options in more detail.
Table 3: WEP Setup
Field
Description
WEP Length
Selects the WEP key length
Mode
Selects the WEP key format, ASCII or Hex
Passphrase
Passphrase used to generate the WEP keys. Click the
Generate
button to generate the keys.
Key 1-4
WEP keys
Default Tx key
Selects the default WEP key (1-4)
Figure 10: WPA Configuration
Table 4: WPA Setup
Field
Description
Authentication
Selects Pre-Shared Key (PSK) only.
Method
Passphrase
Group Re-Key
Time
WPA key
Group Re-Key interval (seconds)
6.3 Advanced Settings
The Advanced Settings page allows you to configure advanced Radio settings as well as
extend the SMCWTK-G (AP mode) range by wirelessly linking it to a SMCWTK-G (Repeater mode).
Figure 11: Advanced Settings
The following table describes the setup options in detail.
Table 5: AP Advanced Settings
Field
Description
Beacon Interval
Beacon interval (in milliseconds)
RTS Threshold
RTS threshold (in bytes)
DTIM Interval
DTIM interval
Protection Mode
Allows user to force 802.11g protection (RTS/CTS) mode
off.
Transmit Rate
Selects the transmit rate: Auto or a fixed rate
Preamble Type
Selects short preamble, long preamble, or Auto
Connect Repeater
Enables/Disables the use of a Repeater
Repeater MAC
MAC address of the Repeater, if used
Address
6.3.1 Adding a Repeater
If a Repeater is used along with the Access Point, go to the Advanced
Settings page. Select Enable for the “Connect Repeater” field. Enter the MAC
address of the Repeater in the “Repeater MAC address” field.
6.4 Access Filter
The Access Filter page allows you to configure the AP to allow or deny association
to the AP based on the client’s MAC address. Up to 32 MAC addresses can be added to
the list.
Figure 12: Access Filter Settings
The following table describes the setup options in detail.
Table 6: AP Access Filter Settings
Field
Description
MAC filtering
Enables/Disables MAC filtering mode
Filter List
Provides the option to allow or deny clients with MAC
addresses
listed
Filter MAC
Up to 32 MAC addresses can be listed, but only 16 can be
viewed/modified at a time. This pulldown menu selects
which
group of 16 to view/modify.
MAC addresses
List of MAC addresses to filter
7. Repeater Setup
7.1 Basic Setup
To configure the Repeater, select Repeater from the Mode page and click Setup.
The following table shows the basic setup options.
To set up the Repeater, you must enter the MAC address of the AP or AP/Router
you want to connect to the Repeater.
Figure 13: Repeater Setup
Table 7: Repeater Setup
Field
AP/Router MAC
Description
MAC address of AP/Router that this Repeater is connected
to.
Address
Mode
Selects 802.11g/b mode:
802.11g only, 802.11b only, or Mixed
SSID Broadcast
Enable/disable the SSID broadcast feature.
Channel
Selects the channel
Selects the option to disable security or to use WEP or
Security
WPA security. If using WEP or WPA, click the Setup button
to enter the key(s).
Advanced
Settings
Access Filter
Click Setup to configure advanced settings.
Click Setup to configure the access filter
7.2 Security Setup
To enable security, select the desired security mode (WEP or WPA) from the setup
page and click Setup to enter the keys. The following tables describe the security setup
options in more detail.
Table 8: WEP Setup
Field
Description
WEP Length
Selects the WEP key length
Mode
Selects the WEP key format, ASCII or Hex
Passphrase
Passphrase used to generate the WEP keys. Click the
Generate button to generate the keys
Key 1-4
WEP keys
Default Tx key
Selects the default WEP key (1-4)
Table 9: WPA Setup
Field
Description
Authentication
Selects Pre-Shared Key (PSK) or 802.1x mode
Method
Passphrase
Group Re-Key
Time
WPA key
Group Re-Key interval (seconds)
7.3 Advanced Settings
The Advanced Settings page allows you to configure advanced Radio settings. The
following table describes the setup options in detail.
Table 10: Repeater Advanced Settings Field
Field
Description
Beacon Interval
Beacon interval (in milliseconds)
RTS Threshold
RTS threshold (in bytes)
DTIM Interval
DTIM interval
Protection Mode
Allows user to force 802.11g protection (RTS/CTS) mode
off.
Transmit Rate
Selects the transmit rate: Auto or a fixed rate
Preamble Type
Selects short preamble, long preamble or Auto
7.4 Access Filter
The Access Filter page allows you to configure the Repeater to allow or deny
association to the Repeater based on the client’s MAC address. Up to 32 MAC addresses
can be added to the list. The following table describes the setup options in detail.
Table 11: Repeater Access Filter Settings
Field
Description
MAC filtering
Enables/Disables MAC filtering mode
Filter List
Filter MAC
Provides the option to allow or deny clients with MAC
addresses listed
Up to 32 MAC addresses can be listed, but only 16 can be
viewed/modified at a time. This pulldown menu selects
which group of 16 to view/modify.
MAC addresses
List of MAC addresses to filter
8. Point-to-Point (P2P) Setup
8.1 Basic Setup
To configure the P2P Bridge, select P2P from the Mode page and click Setup. The
following table shows the basic setup options.
To set up the P2P bridge, you must enter the MAC address of the other P2P
bridge you want to connect to this P2P bridge.
Figure 14: P2P Setup
8.2 Security Setup
To enable security, select WEP from the setup page and click Setup to enter the
keys. The following tables describe the security setup options in more detail.
Table 13: WEP Setup
Field
Description
WEP Length
Selects the WEP key length
Mode
Selects the WEP key format, ASCII or Hex
Passphrase
Passphrase used to generate the WEP keys. Click the
Generate button to generate the keys
Key 1-4
WEP keys
Default Tx key
Selects the default WEP key (1-4)
8.3 Advanced Settings
The Advanced Settings page allows you to configure advanced Radio settings. The
following table describes the setup options in detail.
Table 14: P2P Advanced Settings
Field
Description
RTS Threshold
RTS threshold (in bytes)
DTIM Interval
DTIM interval
Protection Mode
Allows user to force 802.11g protection (RTS/CTS) mode
off.
Transmit Rate
Selects the transmit rate: Auto or a fixed rate
Preamble Type
Selects short preamble, long preamble or Auto
9. Point-to-Multipoint (PMP) Setup
9.1 Basic Setup
To configure the PMP Bridge, select PMP from the Mode page and click Setup.
The following table shows the basic setup options
To set up the PMP bridge, you must enter the MAC address(es) of the P2P bridge(s)
you want to connect to this PMP bridge.
Figure 15: PMP Setup
Table 15: PMP Setup
Field
AP MAC Address
Description
MAC address(es) of the P2P bridges that are connected to
this PMP bridge
(1-6)
Mode
Selects 802.11g/b mode:
802.11g only, 802.11b only, or Mixed
Channel
Selects the channel
Selects the option to disable security or to use WEP
Security
security. If using WEP, click the Setup button to enter the
key(s).
Advanced
Settings
Click Setup to configure advanced settings.
9.2 Security Setup
To enable security, select WEP from the setup page and click Setup to enter the
keys. The following tables describe the security setup options in more detail.
Table 16: WEP Setup
Field
Description
WEP Length
Selects the WEP key length
Mode
Selects the WEP key format, ASCII or Hex
Passphrase
Passphrase used to generate the WEP keys. Click the
Generate button to generate the keys.
Key 1-4
WEP keys
Default Tx key
Selects the default WEP key (1-4)
9.3 Advanced Settings
The Advanced Settings page allows you to configure advanced Radio settings. The
following table describes the setup options in detail.
Table 17: PMP Advanced Settings
Field
Description
RTS Threshold
RTS threshold (in bytes)
DTIM Interval
DTIM interval
Protection Mode
Allows user to force 802.11g protection (RTS/CTS) mode
off.
Transmit Rate
Selects the transmit rate: Auto or a fixed rate
Preamble Type
Selects short preamble, long preamble or Auto
10. Client Mode Setup
10.1 Basic Setup
To configure the Client, select Client from the Mode page and click Setup. The
following table shows the basic setup options.
Figure 16: Client Bridge Setup
Table 18: Client Bridge Setup
Field
Description
Station Mode
Selects 802.11g/b mode:
802.11b only or 802.11g/b
Wireless Network Name. You can enter it directly in this
SSID
field or click the Site Survey button to select from a list of
available networks.
Channel
Selects the channel (Ad-Hoc network only)
Operation Mode
Selects Ad-Hoc or Infrastructure mode
Security
Selects the option to disable security or to use WEP or WPA
security. If using WEP or WPA, click the Setup button to enter the
key(s).
Preamble Type
Selects short or long preamble
Transmit Rate
Selects the transmit rate: a fixed rate or Auto
10.2 MAC Cloning
To enable MAC cloning mode, go to the MAC Cloning field on the LAN page and
select Enabled. MAC cloning clones all the MAC addresses of the devices connected to
the Ethernet (wired) port to a single MAC address sent out wirelessly to an AP or
Repeater.
11. Status Page
The status page reports relevant status information for the device, for both the Ethernet
and wireless interfaces.
Figure 17: Status Page
12. Admin Page
The admin page lets you upgrade the device’s firmware or change the password.
Figure 18: Admin Page
12.1 Firmware Upgrade
To upgrade the firmware, click the Browse button and select the image file. Click
Apply to upgrade.
12.2 Update Password
To change the password, enter the new password in the New Password and
Reconfirm Password fields and click Apply.
12.3 Reboot
To reboot, check the reboot radio and click Apply.
12.4 Reset to Default Setting
To reboot, check the reset to default radio and click Apply.
13. LAN Page
The LAN page lets you set the device’s IP address. The device can be configured to use
an automatic (DHCP) address or a fixed IP address. The default IP address is 192.168.2.25.
When the device is in Client mode, the LAN page also provides the MAC cloning option.
It is important that before you configure the SMCWTK-G device (regardless of the mode it is in)
to Automatic IP, you should know how to determine the SMCWTK-G device’s IP address
from the device it is connected to.
Figure 19: LAN Page
14. Scan/Configuration Utility
14.1 Configuration Utility
The Configuration utility is a discovery tool for an SMCWTK-G. This utility is available in the
EZ Installation Wizard CD that came with the SMCWTK-G package. Use the Configuration utility to
find and condfigure a SMCWTK-G.
Figure 20: Configuration Utility
15. Telnet Management
15.1 Telnet Step-by-Step
Step1: From the remote host, go to Command Prompt, enter the Telnet command and
the IP address of the SMCWTK-G device you want to access (The default IP address is
192.168.2.25)
Step2: At the prompt, enter the username and password (The default username is
“admin” and password is “smcadmin”). The CLI will display the “SMCWTK-G” prompt.
Step3: Enter the necessary commands to complete your desired tasks. Type “help”
for HELP. Below is the “Command Reference Table” for each command and its associated
task.
Table 19: Command Reference Table
Type
Command
Format Example
Get command
Get all
Get ssid
Get channel
Get security
Get defaultkey
Get wepkey
Get wpakey
Get mode
Get all
Get ssid
Get channel
Get security
Get defaultkey
Get wepkey
Get wpakey
Get mode
Get site
Set command
Other command
Get site
Set ssid
Set ssid MYSMC_AP0 (SSID: “MYSMC_AP0”)
Set Channel
Set channel 12 (Channel: 12)
Set Security
Set Security 0 (0 is for Disable)
Set defaultkey
Set defaultkey 1 (Default WEP Key: 1)
Set wepkey
Set wepkey 1 1234567890 (Wepkey1: 1234567890)
Set wpakey
Set wpakey smcisgood! (Wepkey: “smcisgood!”)
Set mode
Set mode 2 (SMCWTK-G change to Repeater mode)
Logout
Quit the telnet management.
Save
Save the configuration to the flash
Finish
Save and reboot
Product Specifications
Standard
•
802.11g/ 802.11b
Ethernet interface
•
RJ45 for 100BaseT with auto-crossover MDI/MDI-X
Data Rate
•
802.11g: 6, 9, 12, 18, 24, 36, 48, 54Mbps
•
802.11b:1, 2, 5.5, 11Mbps
Modulation Type
•
64 QAM(54Mbps,48Mbps)
•
16 QAM(36Mbps,24Mbps)
•
QPSK(18Mbps,12Mbps)
•
BPSK(9Mbps,6Mbps)
•
CCK (11Mbps, 5.5Mbps)
•
DQPSK (2Mbps), DBPSK
Radio Technology
•
OFDM, DSSS
Output Power
•
15 ~ 18 dBm (at nominal temperature range)
Antenna
•
2 internal diversity IFA antennas
Range
•
Up to 1,155 feet
Receiver Sensitivity
PER< 8% @ length=1024 octets (at nominal temperature range)
•
11Mbps: -82 ~ -85 dBm
•
5.5Mbps: -85 ~ -88 dBm
•
2 Mbps: -88 ~ -91 dBm
•
1 Mbps: -91 ~ -93 dBm
Operating Frequency
•
2.412-2.462GHz (N. America)
•
2.412-2.484GHz (Japan)
•
2.412-2.472GHz (Europe ETSI)
Security
•
64-bit/128-bit Wired Equivalent Privacy (WEP)
•
WPA-PSK
•
Disable SSID Broadcast
•
MAC Address Filtering
Management and Configuration
•
Web-based and Windows-based Utility
Operation Mode
•
Access Point mode
•
Ethernet Adapter mode
•
Repeater (WDS)
•
Point to Point Bridging
•
Point to Multipoint Bridging
DC Power Adapter
•
AC Input: 100V~240V (50~60HZ)
•
DC Output: 4V with max. 1 A current
Operating Temperature
•
0 ~ 55 C
Storage Temperature
•
-20~ 70 C
Humidity
•
5~95% (non-condensing)
Emissions
•
FCC
•
CE/ETSI
•
Industry Canada
•
C-tick
Size
•
2.5” x 3.375” x 0.75”
Weight
•
0.14 lbs (not including power adaptor and cables)
FOR TECHNICAL SUPPORT, CALL:
From U.S.A. and Canada (24 hours a day, 7 days a week)
(800) SMC-4-YOU; Phn: (949) 679-8000; Fax: (949) 679-1481
From Europe : Contact details can be found on
www.smc-europe.com or www.smc.com
INTERNET
E-mail addresses:
[email protected]
[email protected]
Driver updates:
http://www.smc.com/index.cfm?action=tech_support_drivers_downloads
World Wide Web:
http://www.smc.com/
http://www.smc-europe.com/
For Literature or Advertising Response, Call:
U.S.A. and Canada:
Spain:
UK:
France:
Italy:
Benelux:
Central Europe:
Nordic:
Eastern Europe:
Sub Saharan Africa:
North West Africa:
CIS:
PRC:
Taiwan:
Asia Pacific:
Korea:
Japan:
Australia:
India:
(800) SMC-4-YOU
34-91-352-00-40
44 (0) 1932 866553
33 (0) 41 38 32 32
39 (0) 3355708602
31 33 455 72 88
49 (0) 89 92861-0
46 (0) 868 70700
34 -93-477-4920
216-712-36616
34 93 477 4920
7 (095) 7893573
86-10-6235-4958
886-2-87978006
(65) 238 6556
82-2-553-0860
81-45-224-2332
Fax (949) 679-1481
Fax 34-93-477-3774
Fax 44 (0) 118 974 8701
Fax 33 (0) 41 38 01 58
Fax 39 02 739 14 17
Fax 31 33 455 73 30
Fax 49 (0) 89 92861-230
Fax 46 (0) 887 62 62
Fax 34 93 477 3774
Fax 216-71751415
Fax 34 93 477 3774
Fax 7 (095) 789 357
Fax 86-10-6235-4962
Fax 886-2-87976288
Fax (65) 238 6466
Fax 82-2-553-7202
Fax 81-45-224-2331
61-2-8875-7887
Fax 61-2-8875-7777
91-22-8204437
Fax 91-22-8204443
If you are looking for further contact information, please
visit www.smc.com or www.smc-europe.com.
Model Number: SMCWTK-G
38 Tesla
Irvine, CA 92618
Phone: (949) 679-8000