1
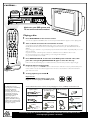
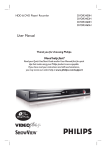
12nc: 3139 115 22042
Printed in China
Use this simple and quick w ay to
watch your favorite DVD movie
and enjoy your Home Cinema
experience!
MX3900D • MX3950D
Recommended Speaker Setup
Rear of TV
(example only)
Y
Front Speaker
(Right)
Front Speaker
(Left)
FM Antenna
Center Speaker
AM Antenna
75 V
S-VIDEO
IN
Pr/Cr
AUDIO
OUT
Pb/Cb
L
VIDEO IN
SPEAKER SYSTEMS (4Ω)
SUBWOOFER SURROUND CENTER FRONT
R
~ AC MAINS
L
AM
R
FM ANTENNA
C
SL
Y
AUDIO
DIGITAL
OUT
AUX
IN
TV
IN
LINE
OUT
VIDEO
OUT
SUB
Pb
R
DIGITAL
IN
Pr
CVBS
L
SR
P-SCAN
ON OFF
Y
S-VIDEO
Helpful Hints
Rear Speaker
(Surround Right)
Rear Speaker
(Surround Left)
You only need to make one video connection to your TV in
order to view the DVD playback.
Pr/Cr
Pb/Cb
Subwoofer
ANTENNA IN
Connecting Speaker Cable
P-SCAN
ON OFF
.0
(1247"
mm
)
PU
SH
IN
PUSH
DOWN
a
b
c
Y
S-VIDEO
IN
If your TV has S-Video or Component
(Pr Pb Y) video jacks, use one of these
video connections instead for higher picture
quality.
If your TV has only a single Antenna In jack, you
will need an accessory RF modulator. The RF modulator
converts the video from the DVD system so it can play
through the TV’s Antenna connector. Refer to your
owner’s manual for proper connection.
Do not switch the P-SCAN to ‘ON’ position,
unless you have connected the DVD system to a
Progressive Scan TV using the Component (Pr Pb Y)
video jacks.
When listening to TV programs, press TV/AV button on
the remote to set the DVD system to TV/AV mode in order for
the sound to be heard.
continue...
SUPER VIDEO
AV IN
OPEN•CLOSE
DVD VIDEO DIGITAL SURROUND SYSTEM
DISC 1
DISC 2
DISC 3
DISC 4
DISC 5
DISC 1
PLAY• PAUSE
DISC 2
STOP
SEATING
SOURCE
VOLUME
DISC 3
TREBLE
DISC 4
SEARCH
SURROUND
DISC 5
PROG
5 DISC CHANGER
TUNING CLOCK•TIMER
BASS
SURR. LEFT
LEFT
CENTER
SUBWOOFER
RIGHT
SURR. RIGHT
iR SENSOR
STANDBY-ON
Make sure your DVD system and
TV are connected and turned on!
DISC/
MEDIA
TV/AV
AUX/DI
TUNER
1
2
3
4
5
6
Playing a disc
7
8
9
SURR.
0
SOUND
1
VOL
You can also adjust the SOURCE button on the front panel until “DISC X” appears on the display panel.
SYSTEM MENU
2
DISC MENU
SEATING
PREV
NEXT
OK
DISC SKIP REPEAT
PLAY/PAUSE
REPEAT PROGRAM
A-B
VOICE
MUTE
DIM
SLEEP
SUB
Turn on the TV and select the correct Video In mode.
You should see the blue Philips DVD background screen on the TV (if no disc in the DVD system).
Usually this channel is between the lowest and highest channels and may be called FRONT, A/V IN, or
VIDEO.
Or, you may go to channel 1 on your TV, then press the Channel down button repeatedly until you see the
Video In channel.
Or, your TV remote control may have a button or switch that chooses different video modes.
Do not use channel 3 or 4 on the TV unless you are using an RF modulator.
See your TV manual for more details.
ZOOM
STOP
Press DISC/MEDIA on the remote control.
TV VOL
3
Press OPEN•CLOSE 0 on the front of the DVD system and load a disc, then
press the corresponding OPEN•CLOSE 0 again to close the disc tray.
Make sure the disc label facing up. For double-sided discs, load the side you want to play facing up.
4
Playback will start automatically.
5
To stop playback, press STOPÇ.
If a disc menu appears, use 3 4 1 2 buttons on the remote to make the necessary selection, then press
OK to confirm. Or, use the numeric keypad on the remote to select features. Follow the instructions
given in the disc menu.
Region Codes
DVDs must be labeled for ALL regions or for
Region 1 in order to play on this DVD system.
ALL
1
Helpful Hints
If a DVD does not play
properly, please contact Philips
at 1-800-531-0039 for
assistance. Due to the
inconsistency of disc formats
provided by various disc
manufacturers, your DVD
system may require a
playability enhancement or
upgrade. As DVD technology
advances, these enhancements
will become common and will
be easy to complete.
You should find the below accessories in the packaging box. If not, call Philips at 1-800-531-0039.
Speaker cables
Component video cables
(red, blue, green)
FM wire antenna
(5x)
(4x)
Subwoofer cable
AM loop antenna
Composite video cable
(yellow)
Brackets and screws
Audio cables
(white, red)
AA size
batteries
AC power cable
Detailed playback features and additional functions are described in the
accompanying owner’s manual.