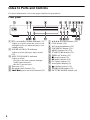
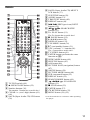
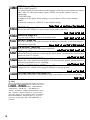
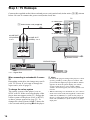
1
3-075-802-31(1)
CD/DVD
Player
Operating Instructions
DVP-NS905V
© 2002 Sony Corporation
WARNING
To prevent fire or shock
hazard, do not expose the
unit to rain or moisture.
To avoid electrical shock, do
not open the cabinet. Refer
servicing to qualified
personnel only.
Power cord (mains lead)
must only be changed at a
qualified service shop.
CAUTION
The use of optical instruments with
this product will increase eye
hazard. As the laser beam used in
this CD/DVD player is harmful to
eyes, do not attempt to disassemble
the cabinet.
Refer servicing to qualified
personnel only.
Welcome!
Precautions
Safety
• This unit operates on 220 - 240 V
AC, 50/60 Hz. Check that the
unit's operating voltage is
identical with your local power
supply.
• To prevent fire or shock hazard,
do not place objects filled with
liquids, such as vases, on the
apparatus.
Installing
• Do not install the unit in an
inclined position. It is designed
to be operated in a horizontal
position only.
• Keep the unit and discs away
from equipment with strong
magnets, such as microwave
ovens, or large loudspeakers.
• Do not place heavy objects on
the unit.
For the model supplied with
the AC plug adaptor
If the AC plug of your unit does not
fit into the wall outlet, attach the
supplied AC plug adaptor.
2
Thank you for purchasing this
Sony CD/DVD Player. Before
operating this player, please read
this manual thoroughly and retain
it for future reference.
On adjusting volume
Precautions
On safety
• Caution – The use of optical instruments
with this product will increase eye hazard.
• Should any solid object or liquid fall into
the cabinet, unplug the player and have it
checked by qualified personnel before
operating it any further.
On power sources
• The player is not disconnected from the AC
power source (mains) as long as it is
connected to the wall outlet, even if the
player itself has been turned off.
• If you are not going to use the player for a
long time, be sure to disconnect the player
from the wall outlet. To disconnect the AC
power cord (mains lead), grasp the plug
itself; never pull the cord.
On placement
• Place the player in a location with adequate
ventilation to prevent heat build-up in the
player.
• Do not place the player on a soft surface
such as a rug that might block the
ventilation holes on the bottom.
• Do not place the player in a location near
heat sources, or in a place subject to direct
sunlight, excessive dust, or mechanical
shock.
Do not turn up the volume while listening to
a section with very low level inputs or no
audio signals. If you do, the speakers may be
damaged when a peak level section is played.
On cleaning
Clean the cabinet, panel, and controls with a
soft cloth slightly moistened with a mild
detergent solution. Do not use any type of
abrasive pad, scouring powder or solvent
such as alcohol or benzine.
On cleaning discs
Do not use a commercially available cleaning
disc. It may cause a malfunction.
IMPORTANT NOTICE
Caution: This player is capable of holding a
still video image or on-screen display image
on your television screen indefinitely. If
you leave the still video image or on-screen
display image displayed on your TV for an
extended period of time you risk permanent
damage to your television screen.
Projection televisions are especially
susceptible to this.
If you have any questions or problems
concerning your player, please consult your
nearest Sony dealer.
On operation
• If the player is brought directly from a cold
to a warm location, or is placed in a very
damp room, moisture may condense on the
lenses inside the player. Should this occur,
the player may not operate properly. In this
case, remove the disc and leave the player
turned on for about half an hour until the
moisture evaporates.
• When you move the player, take out any
discs. If you don’t, the disc may be
damaged.
3
Table of Contents
WARNING . . . . . . . . . . . . . . . . . . . . . . . . . . . . . . . . . . . . . . . . . . . . . . . . . . . . 2
Welcome! . . . . . . . . . . . . . . . . . . . . . . . . . . . . . . . . . . . . . . . . . . . . . . . . . . . . . 2
Precautions . . . . . . . . . . . . . . . . . . . . . . . . . . . . . . . . . . . . . . . . . . . . . . . . . . . 3
About This Manual . . . . . . . . . . . . . . . . . . . . . . . . . . . . . . . . . . . . . . . . . . . . . 6
This Player Can Play the Following Discs . . . . . . . . . . . . . . . . . . . . . . . . . . . 6
Notes About the Discs . . . . . . . . . . . . . . . . . . . . . . . . . . . . . . . . . . . . . . . . . . 7
Index to Parts and Controls . . . . . . . . . . . . . . . . . . . . . . . . . . . . . . . . . . . . . . 8
Guide to the Control Menu Display . . . . . . . . . . . . . . . . . . . . . . . . . . . . . . . . 12
Simple Start Guide . . . . . . . . . . . . . . . . . . . . . . . . . . . . . . . . . . 15
Quick Overview . . . . . . . . . . . . . . . . . . . . . . . . . . . . . . . . . . . . . . . . . . . . . . .
Step 1: Unpacking . . . . . . . . . . . . . . . . . . . . . . . . . . . . . . . . . . . . . . . . . . . . .
Step 2: Inserting Batteries Into the Remote . . . . . . . . . . . . . . . . . . . . . . . . .
Step 3: TV Hookups . . . . . . . . . . . . . . . . . . . . . . . . . . . . . . . . . . . . . . . . . . .
Step 4: Playing a Disc . . . . . . . . . . . . . . . . . . . . . . . . . . . . . . . . . . . . . . . . . .
15
15
15
16
17
Hookups . . . . . . . . . . . . . . . . . . . . . . . . . . . . . . . . . . . . . . . . . 18
Hooking Up the Player . . . . . . . . . . . . . . . . . . . . . . . . . . . . . . . . . . . . . . . . .
Step 1: Connecting the Video Cords . . . . . . . . . . . . . . . . . . . . . . . . . . . . . . .
Step 2: Connecting the Audio Cords . . . . . . . . . . . . . . . . . . . . . . . . . . . . . . .
Step 3: Connecting the Power Cord . . . . . . . . . . . . . . . . . . . . . . . . . . . . . . .
Step 4: Quick Setup . . . . . . . . . . . . . . . . . . . . . . . . . . . . . . . . . . . . . . . . . . .
18
18
20
27
27
Playing Discs . . . . . . . . . . . . . . . . . . . . . . . . . . . . . . . . . . . . . . 31
Playing Discs . . . . . . . . . . . . . . . . . . . . . . . . . . . . . . . . . . . . . . . . . . . . . . . . 31
Searching for a Particular Point on a Disc (Search, Scan, Slow-motion Play,
Freeze Frame) . . . . . . . . . . . . . . . . . . . . . . . . . . . . . . . . . . . . . . . . . . . . 33
Resuming Playback From the Point Where You Stopped the Disc
(Multi-disc Resume) . . . . . . . . . . . . . . . . . . . . . . . . . . . . . . . . . . . . . . . . 35
Using the DVD’s Menu . . . . . . . . . . . . . . . . . . . . . . . . . . . . . . . . . . . . . . . . . 36
Selecting “ORIGINAL” or “PLAY LIST” on a DVD-RW Disc . . . . . . . . . . . . . 36
Selecting a Playback Area for a Super Audio CD Disc . . . . . . . . . . . . . . . . . 37
Playing VIDEO CDs With PBC Functions (PBC Playback) . . . . . . . . . . . . . 38
Playing an MP3 Audio Track . . . . . . . . . . . . . . . . . . . . . . . . . . . . . . . . . . . . . 39
Various Play Mode Functions (Programme Play, Shuffle Play, Repeat Play,
A-B Repeat Play) . . . . . . . . . . . . . . . . . . . . . . . . . . . . . . . . . . . . . . . . . . 41
Searching for a Scene . . . . . . . . . . . . . . . . . . . . . . . . . . . . . . . . 46
Searching for a Title/Chapter/Track/Index/Scene (Search mode) . . . . . . . . 46
Searching by Scene (PICTURE NAVIGATION) . . . . . . . . . . . . . . . . . . . . . . 47
Viewing Information About the Disc . . . . . . . . . . . . . . . . . . . . . . . 49
Checking the Playing Time and Remaining Time . . . . . . . . . . . . . . . . . . . . . 49
Checking the Play Information . . . . . . . . . . . . . . . . . . . . . . . . . . . . . . . . . . . 51
4
Sound Adjustments . . . . . . . . . . . . . . . . . . . . . . . . . . . . . . . . . . 53
Changing the Sound . . . . . . . . . . . . . . . . . . . . . . . . . . . . . . . . . . . . . . . . . . . 53
SURROUND Mode Settings . . . . . . . . . . . . . . . . . . . . . . . . . . . . . . . . . . . . . 55
Enjoying Movies . . . . . . . . . . . . . . . . . . . . . . . . . . . . . . . . . . . . 58
Changing the Angles . . . . . . . . . . . . . . . . . . . . . . . . . . . . . . . . . . . . . . . . . . .
Displaying the Subtitles . . . . . . . . . . . . . . . . . . . . . . . . . . . . . . . . . . . . . . . . .
Adjusting the Picture Quality (BNR) . . . . . . . . . . . . . . . . . . . . . . . . . . . . . . .
Adjusting the Playback Picture (CUSTOM PICTURE MODE) . . . . . . . . . . .
Enhancing the Playback Picture (DIGITAL VIDEO ENHANCER) . . . . . . . .
58
58
59
60
62
Using Various Additional Functions . . . . . . . . . . . . . . . . . . . . . . . 63
Locking Discs (CUSTOM PARENTAL CONTROL,
PARENTAL CONTROL) . . . . . . . . . . . . . . . . . . . . . . . . . . . . . . . . . . . . . 63
Operation Sound Effects (Sound Feedback) . . . . . . . . . . . . . . . . . . . . . . . . 67
Controlling Your TV or AV Amplifier (Receiver) With the Supplied
Remote . . . . . . . . . . . . . . . . . . . . . . . . . . . . . . . . . . . . . . . . . . . . . . . . . . 68
Settings and Adjustments . . . . . . . . . . . . . . . . . . . . . . . . . . . . . . 70
Using the Setup Display . . . . . . . . . . . . . . . . . . . . . . . . . . . . . . . . . . . . . . . .
Setting the Display or Sound Track Language (LANGUAGE SETUP) . . . . .
Settings for the Display (SCREEN SETUP) . . . . . . . . . . . . . . . . . . . . . . . . .
Custom Settings (CUSTOM SETUP) . . . . . . . . . . . . . . . . . . . . . . . . . . . . . .
Settings for the Sound (AUDIO SETUP) . . . . . . . . . . . . . . . . . . . . . . . . . . . .
Settings for the Speakers (SPEAKER SETUP) . . . . . . . . . . . . . . . . . . . . . .
70
71
72
73
75
77
Additional Information . . . . . . . . . . . . . . . . . . . . . . . . . . . . . . . . 80
Troubleshooting . . . . . . . . . . . . . . . . . . . . . . . . . . . . . . . . . . . . . . . . . . . . . .
Self-diagnosis Function (When letters/numbers appear in the display) . . . .
Glossary . . . . . . . . . . . . . . . . . . . . . . . . . . . . . . . . . . . . . . . . . . . . . . . . . . . .
Specifications . . . . . . . . . . . . . . . . . . . . . . . . . . . . . . . . . . . . . . . . . . . . . . . .
Language Code List . . . . . . . . . . . . . . . . . . . . . . . . . . . . . . . . . . . . . . . . . . .
Index . . . . . . . . . . . . . . . . . . . . . . . . . . . . . . . . . . . . . . . . . . . . . . . . . . . . . . .
80
82
83
85
86
87
5
About This Manual
• Instructions in this manual describe the
controls on the remote. You can also use the
controls on the player if they have the same
or similar names as those on the remote.
• “DVD” may be used as a general term for
DVD VIDEOs, DVD-Rs, and DVD-RWs.
• The meanings of the icons used in this
manual are described below:
Icon
This Player Can Play the
Following Discs
Format of discs
DVD VIDEO
(page 83)
DVD-RW
(page 83)
Meaning
Functions available for DVD
VIDEOs or DVD-Rs/DVDRWs in video mode
Functions available for DVDRWs in VR (Video Recording)
mode
Functions available for VIDEO
CDs or CD-Rs/CD-RWs in
video CD format
Functions available for Super
Audio CDs
Functions available for music
CDs or CD-Rs/CD-RWs in
music CD format
Functions available for DATA
CDs (CD-ROMs/CD-Rs/CDRWs containing MP3* audio
tracks)
* MP3 (MPEG 1 Audio Layer 3) is a standard
format defined by ISO/MPEG which compresses
audio data.
Super Audio CD
(page 84)
VIDEO CD
Music CD
“DVD VIDEO” and “DVD-RW” are
trademarks.
Region code
Your player has a region code printed on the
back of the unit and only will play DVD
VIDEO discs (playback only) labelled with
identical region codes. This system is used to
protect copyrights.
DVD VIDEOs labelled
this player.
ALL
will also play on
If you try to play any other DVD VIDEO, the
message “Playback prohibited by area
limitations.” will appear on the TV screen.
Depending on the DVD VIDEO, no region
code indication may be labelled even though
playing the DVD VIDEO is prohibited by
area restrictions.
X
DVP–XXXX
00V 00Hz
00W
NO.
0-000-000-00
6
Region code
Example of discs that the player
cannot play
The player cannot play the following discs:
• All CD-ROMs (including PHOTO CDs)/
CD-Rs/CD-RWs other than those recorded
in the following formats:
–music CD format
–video CD format
–MP3 format that conforms to ISO9660*
Level 1/Level 2, or its extended format,
Joliet
• Data part of CD-Extras
• DVD-ROMs
• DVD Audio discs
* A logical format of files and folders on CDROMs defined by ISO (International Standard
Organization)
Also, the player cannot play the following
discs:
• A DVD VIDEO with a different region
code.
• A disc that has a non-standard shape (e.g.,
card, heart).
• A disc with paper or stickers on it.
• A disc that has the adhesive of cellophane
tape or a sticker still left on it.
some playback features may not be available.
Also, refer to the instructions supplied with
the DVDs or VIDEO CDs.
Copyrights
This product incorporates copyright
protection technology that is protected by
method claims of certain U.S. patents, other
intellectual property rights owned by
Macrovision Corporation, and other rights
owners. Use of this copyright protection
technology must be authorized by
Macrovision Corporation, and is intended for
home and other limited viewing uses only
unless otherwise authorized by Macrovision
Corporation. Reverse engineering or
disassembly is prohibited.
Notes About the Discs
• To keep the disc clean, handle the disc by its
edge. Do not touch the surface.
Note
Some DVD-Rs, DVD-RWs, CD-Rs, or CD-RWs
cannot be played on this player due to the recording
quality or physical condition of the disc, or the
characteristics of the recording device.
The disc will not play if it has not been correctly
finalized. Also, images in DVD-RW discs with
CPRM* protection may not be played if they
contain a copy protection signal. “Copyright lock”
appears on the screen. For more information, see the
operating instructions for the recording device.
Note that discs created in the Packet Write format
cannot be played.
* CPRM (Content Protection for Recordable
Media) is a coding technology that protects the
copyright of images.
Note on playback operations of
DVDs and VIDEO CDs
• Do not expose the disc to direct sunlight or
heat sources such as hot air ducts, or leave it
in a car parked in direct sunlight as the
temperature may rise considerably inside
the car.
• After playing, store the disc in its case.
• Clean the disc with a cleaning cloth.
Wipe the disc from the centre out.
• Do not use solvents such as benzine,
thinner, commercially available cleaners, or
anti-static spray intended for vinyl LPs.
Some playback operations of DVDs and
VIDEO CDs may be intentionally set by
software producers. Since this player plays
DVDs and VIDEO CDs according to the disc
contents the software producers designed,
7
Index to Parts and Controls
For more information, refer to the pages indicated in parentheses.
Front panel
A [/1 (on/standby) button/indicator (31)
Lights up in green when the power is on
and lights up in red when the player is in
standby mode.
B SUPER AUDIO CD indicator
Lights up when playing a Super Audio
CD.
C MULTI CHANNEL indicator
Lights up when:
– playing a disc that contains multiple
audio signal channels
– the disc is not inserted
D Disc tray (31)
E A (open/close) button (31)
F ./> (previous/next) buttons (32)
8
G
H
I
J
K
L
M
N
O
P
Q
R
S
T
C/X/x/c ENTER buttons (36)
Click shuttle (34)
JOG button/indicator (34)
TOP MENU button (36)
MENU button (36) (39)
O RETURN button (32)
DISPLAY button (12)
x (stop) button (32)
X (pause) button (32)
H (play) button (31)
Front panel display (9)
(remote sensor) (15)
SURROUND button (55)
PICTURE MODE button (60)
Front panel display
When playing back a DVD VIDEO/DVD-RW
Disc type Playing status
Current title and chapter (50)
Digital
MULTI
REPEAT 1
SHUFFLE PGM A–B
Current audio
signal (54)
TITLE
TRACK
Current play
mode (41)
CHAP
INDEX
Lights up when the player outputs
the signal in NTSC format
ANGLE
NTSC HOUR
Lights up when you can
change the angle (58)
MIN
SEC
Playing time (50)
When playing back a VIDEO CD with Playback Control (PBC) (38)
Disc type
Playing status
Digital
MULTI
MPEG REPEAT 1
SHUFFLE PGM A–B
Lights up when the player outputs the signal in NTSC format
TITLE
TRACK
CHAP
INDEX
ANGLE
NTSC HOUR
Current play mode (41)
MIN
SEC
Playing time (50)
Current scene (50)
When playing back a Super Audio CD, CD, DATA CD (MP3 audio), or VIDEO CD (without
PBC)
Lights up when playing the multichannel playback area on Super Lights up when the player outputs
the signal in NTSC format
Disc type* Playing status Audio CDs (37)
Digital
MULTI
MP3 REPEAT 1
SHUFFLE PGM A–B
Current play
Lights up when
mode (41)
playing MP3
audio tracks (39)
TITLE
TRACK
CHAP
INDEX
ANGLE
NTSC HOUR
MIN
SEC
Playing time (50)
Current track and index (50)
* When playing the HD layer of Super Audio CD
discs, the disc type is not displayed.
z Hint
You can turn off the front panel display by setting
“DIMMER” in “CUSTOM SETUP” to “OFF”
(page 73).
,continued
9
Rear panel
L
1
1
CENTER
R
COAXIAL OPTICAL
2
FRONT
REAR
WOOFER
2
R
L
AUDIO
PCM/DTS/MPEG/
DOLBY DIGITAL
DIGITAL OUT
5.1CH OUTPUT
Y
VIDEO
S VIDEO OUT
CR
LINE OUT
A DIGITAL OUT (COAXIAL) jack (23)
(24) (25)
B DIGITAL OUT (OPTICAL) jack (23)
(24) (25)
C 5.1CH OUTPUT jacks (25)
D LINE OUT L/R (AUDIO) 1/2 jacks
(22) (23) (24)
10
CB
COMPONENT VIDEO OUT
E LINE OUT (VIDEO) 1/2 jacks (18)
F S VIDEO OUT 1/2 jacks (18)
G COMPONENT VIDEO OUT jacks
(18)
Remote
F SACD (Super Audio CD) MULTI/
2CH button (37)
G SUBTITLE button (58)
H AUDIO button (53)
I TIME/TEXT button (49)
J REPEAT button (44)
K ./> PREV(previous)/NEXT
buttons (32)
L c / C SEARCH/STEP
buttons (33)
M H PLAY button (31)
The H button has a tactile dot.*
N
O
P
Q
R
S
X PAUSE button (32)
C/X/x/c buttons (36)
DISPLAY button (12)
TOP MENU button (36)
[/1 (on/standby) button (31)
VOL (volume) +/– buttons (68)
The + button has a tactile dot.*
A TV/DVD switch (68)
B Z OPEN/CLOSE button (32)
C Number buttons (36)
The number 5 button has a tactile dot.*
D CLEAR /- (ten’s digit) button (41)
(68)
E SACD (Super Audio CD)/CD button
(38)
T TV/VIDEO button (68)
U ENTER button (performs the same
function as ed)
V WIDE MODE button (68)
W SHUFFLE button (43)
X A-B button (44)
Y PICTURE NAVI (navigation) button
(47)
Z ANGLE button (58)
wj PICTURE MODE button (60)
wk SUR (surround) button (55)
wl REPLAY button (32)
e; SEARCH MODE button (46)
ea
m/M
SCAN/SLOW
buttons (33)
es x STOP button (32)
ed ENTER button (27)
ef O RETURN button (32)
eg MENU button (36) (39)
* Use the tactile dot as a reference when operating
the player.
11
Guide to the Control Menu Display
Use the Control Menu to select a function and to view related information. Press DISPLAY
repeatedly to turn on or change the Control Menu display as follows:
, Control Menu display 1
m
Control Menu display 2 (DVD/VIDEO CD only)
m
ADVANCED display (DVD only. See page 51.)
m
Control Menu display off
z Hint
You can skip the ADVANCED display by setting
“OFF” under “ADVANCED” in the Control Menu
(page 51).
Control Menu Display
The Control Menu display 1 and 2 will show different items depending on the disc type. For
details about each item, please refer to the pages in the parentheses.
Example: Control Menu display 1 when playing a DVD VIDEO.
Currently playing title number*
Total number of titles*
Currently playing chapter
number**
Total number of chapters**
Playback status
(N Playback, X Pause, x Stop, etc.)
Control Menu items
12(27)
18(34)
T
1:32:55
Selected item
Function name of
selected Control
Menu item
Operation message
*
DVD VIDEO
OFF
OFF
1: ENGLISH
2: FRENCH
3: SPANISH
SUBTITLE
Select:
Displays the scene number for VIDEO CDs
(PBC is on), track number for VIDEO CDs/
Super Audio CDs/CDs, album number for
DATA CDs.
** Displays the index number for VIDEO CDs/
Super Audio CDs/CDs, MP3 audio track
number for DATA CDs.
12
Type of disc
being played
Playing time
Current setting
Options
ENTER
Cancel: RETURN
List of Control Menu items
Item
Item Name, Function, Relevant Disc Type
TITLE (page 46)/SCENE (page 46)/TRACK (page 46)
Selects the title, scene, or track to be played.
CHAPTER (page 46)/INDEX (page 46)
Selects the chapter or index to be played.
ALBUM (page 39)
Selects the album to be played.
TRACK (page 46)
Selects the track to be played.
INDEX (page 46)
Selects the index to be played.
ORIGINAL/PLAY LIST (page 36)
Selects the type of titles (DVD-RW) to be played, the ORIGINAL one, or an edited
PLAY LIST.
TIME/TEXT (page 46)
Checks the elapsed time and the remaining playback time.
Input the time code for picture and music searching.
Displays the DVD/Super Audio CD/CD text or the DATA CD's track name.
MULTI/2CH (page 37)
Selects the playback area on Super Audio CDs when available.
AUDIO (page 53)
Changes the audio setting.
SUBTITLE (page 58)
Displays the subtitles.
Changes the subtitle language.
ANGLE (page 58)
Changes the angle.
SURROUND (page 55)
Selects the surround functions.
ADVANCED (page 51)
Displays the information (bit rate or layer) of the disc currently playing.
PARENTAL CONTROL (page 63)
Sets to prohibit playback on this player.
,continued
13
SETUP (page 70)
QUICK Setup (page 27)
Use Quick Setup to choose the desired language of the on-screen display,the aspect
ratio of the TV, the audio output signal, and the size of the speakers you are
connecting.
CUSTOM Setup
In addition to the Quick Setup setting, you can adjust various other settings.
RESET
Returns the settings in “SETUP” to the default setting.
PROGRAM (page 41)
Selects the title, chapter, or track to play in the order you want.
SHUFFLE (page 43)
Plays the title, chapter, or track in random order.
REPEAT (page 44)
Plays the entire disc (all titles/all tracks/all albums) repeatedly or one title/chapter/
track/album repeatedly.
A-B REPEAT (page 44)
Specifies the parts you want to play repeatedly.
BNR (page 59)
Adjusts the picture quality by reducing the “block noise” or mosaic like patterns that
appear on your TV screen.
CUSTOM PICTURE MODE (page 60)
Adjusts the video signal from the player. You can select the picture quality that best
suits the programme you are watching.
DIGITAL VIDEO ENHANCER (page 62)
Exaggerates the outline of the image to produce a sharper picture.
PICTURE NAVIGATION (page 47)
Divides the screen into 9 subscreens to help you find the scene you want quickly.
z Hint
The Control Menu icon indicator lights up in green
when you select any item
t
except “OFF.” (“SURROUND,” “PROGRAM,”
“SHUFFLE,” “REPEAT,” “A-B REPEAT,”
“BNR,” “DIGITAL VIDEO ENHANCER” only).
The “ANGLE” indicator lights up in green only
when the angles can be changed. The “CUSTOM
PICTURE MODE” indicator lights up in green
when any setting other than “STANDARD” is
selected.
14
Simple Start Guide
Quick Overview
You can control the player using the supplied
remote. Insert two size R6 (AA) batteries by
matching the 3 and # ends on the batteries
to the markings inside the compartment.
When using the remote, point it at the remote
sensor
on the player.
Simple Start Guide
A quick overview presented in this guide will
give you enough information to start using the
player for your enjoyment. To use the
surround sound features of this player, refer
to “Hookups” on page 18.
Step 2: Inserting
Batteries Into the
Remote
Notes
• You cannot connect this player to a TV that does
not have a video input jack.
• Be sure to disconnect the power cord (mains lead)
of each component before connecting.
Step 1: Unpacking
Check that you have the following items:
• Audio/video cord (pinplug × 3 y pinplug
× 3) (1)
• Remote commander (remote) (1)
• Size R6 (AA) batteries (2)
• A plug adaptor is included with some
models.
Notes
• Do not leave the remote in an extremely hot or
humid place.
• Do not drop any foreign object into the remote
casing, particularly when replacing the batteries.
• Do not expose the remote sensor to direct light
from the sun or a lighting apparatus. Doing so
may cause a malfunction.
• If you do not use the remote for an extended
period of time, remove the batteries to avoid
possible damage from battery leakage and
corrosion.
15
Step 3: TV Hookups
Connect the supplied audio/video cord and power cord (mains lead) in the order (1~3) shown
below. Be sure to connect the power cord (mains lead) last.
TV
to video input
INPUT
1 Audio/video cord (supplied)
VIDEO
(yellow)
L
(white)
AUDIO
R
(red)
to audio input
to LINE OUT
L/R (AUDIO)
1 or 2
to LINE OUT
(VIDEO) 1 or 2
1
2
R
L
AUDIO
VIDEO
LINE OUT
2 Power source
CD/DVD Player
L
1
1
CENTER
R
COAXIAL OPTICAL
2
FRONT
REAR
WOOFER
2
R
L
AUDIO
PCM/DTS/MPEG/
DOLBY DIGITAL
DIGITAL OUT
5.1CH OUTPUT
Y
VIDEO
S VIDEO OUT
CB
CR
COMPONENT VIDEO OUT
LINE OUT
l : Signal flow
When connecting to a standard 4:3 screen
TV
Depending on the disc, the image may not fit
your TV screen. If you want to change the
aspect ratio, refer to page 72.
To change the colour system
The colour system of the player is set to
NTSC or PAL. If the on-screen display of the
player does not appear on the TV, change the
colour system of the player (PAL or NTSC)
so that a picture appears on your TV. To
change the colour system, hold @/1 down for
a few seconds while pressing X on the player.
16
3 Power source
z Hints
• To check the current setting of the player’s colour
system, press @/1 on the player or remote. The
power indicator lights up in green. When “NTSC”
appears on the front panel display, the colour
system of the player is set to NTSC. When
“NTSC” does not appear, the colour system is set
to PAL.
• When connecting to a monaural TV, use a stereomono conversion cord (not supplied). Connect the
LINE OUT (VIDEO) 1/2 jacks on the player to
the TV’s video input jacks, and connect the LINE
OUT L/R (AUDIO) 1/2 jacks to the TV’s audio
input jack.
Step 4: Playing a Disc
Simple Start Guide
With the playback side facing down
A Turn on the TV.
B Press [/1 on the player.
C Switch the input selector on your
TV so that the signal from the
player appears on the TV screen.
After step 6
Depending on the disc, a menu may be
displayed on the TV screen. If so, select the
item you want from the menu and play the
DVD VIDEO (page 36) or VIDEO CD disc
(page 38).
To stop playing
D Press A on the player to open the
disc tray.
Press x.
E Place the disc on the tray with the
playback side facing down.
Press A.
F Press H.
Press [/1. The player enters standby mode
and the power indicator lights up in red.
The disc tray closes and the player begins
playing the disc.
To remove the disc
To turn off the player
17
Hookups
Hooking Up the Player
Follow steps 1 to 4 to hook up and adjust the settings of the player.
Before you start, disconnect the power cords (mains leads), check that you have all of the
supplied accessories, and insert the batteries into the remote (page 15).
Notes
• Plug cords securely to prevent unwanted noise.
• Refer to the instructions supplied with the components to be connected.
Step 1: Connecting the Video Cords
Connect this player to your TV monitor, projector, or AV amplifier (receiver) using a video cord.
Select one of the patterns A through C, according to the input jack on your TV monitor,
projector, or AV amplifier (receiver).
A
C
INPUT
Component
Audio/video cord video cord
(supplied)
(not supplied)
(yellow)
VIDEO
COMPONENT
VIDEO IN
Y
(green)
CB
(blue)
L
CR
AUDIO
(red)
R
TV, projector or AV
amplifier (receiver)
TV, projector or AV
amplifier (receiver)
(yellow)
(green)
(blue)
to LINE OUT
(VIDEO) 1 or 2
L
(red)
to COMPONENT
VIDEO OUT
1
1
CENTER
R
COAXIAL OPTICAL
2
FRONT
REAR
WOOFER
2
R
L
AUDIO
PCM/DTS/MPEG/
DOLBY DIGITAL
DIGITAL OUT
5.1CH OUTPUT
Y
VIDEO
S VIDEO OUT
CB
CR
COMPONENT VIDEO OUT
LINE OUT
to S VIDEO OUT
1 or 2
CD/DVD player
INPUT
S VIDEO
S VIDEO cord (not supplied)
l : Signal flow
18
TV, projector or AV
amplifier (receiver)
B
A If you are connecting to a video input jack
Connect the yellow plug of the audio/video cord (supplied) to the yellow (video) jacks. You will
enjoy standard quality images.
Yellow (Video)
White (L)
White (L)
Red (R)
Red (R)
Hookups
Yellow (Video)
Use the red and white plugs to connect to the audio input jacks (page 22). (Do this if you are
connecting to a TV only.)
B If you are connecting to an S VIDEO input jack
Connect an S VIDEO cord (not supplied). You will enjoy high quality images.
C If you are connecting to a monitor, projector, or AV amplifier (receiver)
having component video input jacks (Y, CB, CR)
Connect the component via the COMPONENT VIDEO OUT jacks using a component video
cord (not supplied) or three video cords (not supplied) of the same kind and length. You will
enjoy accurate colour reproduction and high quality images.
Green
Green
Blue
Blue
Red
Red
Notes
• You can switch the player's colour system to match the colour system of the connected TV (page 16).
• Do not connect a VCR, etc. between your TV and the player. If you pass the player signals via the VCR,
you may not receive a clear image on the TV screen. If your TV has only one audio/video input jack,
connect the player to this jack.
VCR
CD/DVD player
TV
Connect
directly
19
Step 2: Connecting the Audio Cords
Refer to the chart below to select the connection that best suits your system. Be sure to also read
the instructions for the components you wish to connect.
Select a connection
Select one of the following connections,
A
through
Components to be connected
.
Connection
TV
• Surround effects: TVS DYNAMIC (page 55),
TVS WIDE (page 55)
A
(page 22)
Stereo amplifier (receiver) and two speakers
• Surround effects: TVS STANDARD (page 56)
or
MD deck/DAT deck
• Surround effects: TVS STANDARD (page 56)
B
(page 23)
AV amplifier (receiver) having a Dolby*
Surround (Pro Logic) decoder and 3 to 6
speakers
• Surround effects: Dolby Surround (Pro Logic)
(page 83)
C
(page 24)
AV amplifier (receiver) with 5.1 ch input jacks
and 4 to 6 speakers
• Surround effects:
– Dolby Digital (5.1 ch) (page 83)
– DTS (5.1 ch) (page 83)
– Super Audio CD Multi channel (page 84)
– MPEG audio (5.1 ch) (page 84)
D
(page 25)
or
AV amplifier (receiver) with digital input jacks
having a Dolby, DTS**, or MPEG audio decoder
and 6 speakers
• Surround effects:
– Dolby Digital (5.1 ch) (page 83)
– DTS (5.1 ch) (page 83)
– MPEG audio (5.1 ch) (page 84)
20
D
Your setup (example)
z Hint
If you connect an AV amplifier (receiver) that
conforms to the 96 kHz sampling frequency, use
connection D .
Hookups
* Manufactured under license from Dolby
Laboratories. “Dolby,” “Pro Logic,” and the
double-D symbol are trademarks of Dolby
Laboratories.
** Manufactured under license from Digital
Theater Systems, Inc. US Pat. No. 5,451,942,
5,956,674, 5,974,380, 5,978,762 and other
world-wide patents issues and pending. “DTS”
and “DTS Digital Surround” are registered
trademarks of Digital Theater Systems, Inc.
Copyright 1996, 2000 Digital Theater Systems,
Inc. All rights reserved.
,continued
21
Connecting to your TV
A
This connection will use your TV speakers for sound.
CD/DVD player
L
1
1
CENTER
R
COAXIAL OPTICAL
2
FRONT
REAR
WOOFER
2
R
L
AUDIO
Y
VIDEO
PCM/DTS/MPEG/
DOLBY DIGITAL
DIGITAL OUT
A
1
5.1CH OUTPUT
S VIDEO OUT
CB
CR
COMPONENT VIDEO OUT
LINE OUT
(yellow)*
(yellow)
(white)
(white)
TV
2
R
(red)
L
AUDIO
VIDEO
(red)
Audio/video
cord (supplied)
LINE OUT
to LINE OUT L/R (AUDIO) 1 or 2
l : Signal flow
* The yellow plug is used for video signals (page
18).
z Hint
When connecting to a monaural TV, use a stereomono conversion cord (not supplied). Connect the
LINE OUT L/R (AUDIO) 1/2 jacks to the TV’s
audio input jack.
22
to audio input
B Connecting to a stereo amplifier (receiver) and 2 speakers/Connecting to
an MD deck or DAT deck
CD/DVD player
L
1
Hookups
If the stereo amplifier (receiver) has audio input jacks L and R only, use B-1 . If the amplifier
(receiver) has a digital input jack, or when connecting to an MD deck or DAT deck, use B-2 .
In this case, you can also connect the player directly to the MD deck or DAT deck without using
your stereo amplifier (receiver).
1
CENTER
R
COAXIAL OPTICAL
2
FRONT
REAR
WOOFER
2
R
L
AUDIO
PCM/DTS/MPEG/
DOLBY DIGITAL
DIGITAL OUT
B-2
5.1CH OUTPUT
CB
Y
VIDEO
S VIDEO OUT
CR
COMPONENT VIDEO OUT
LINE OUT
Coaxial digital
cord (not supplied)
or
B-1
Stereo audio cord
(not supplied)
(white)
1
or
(red)
2
COAXIAL OPTICAL
R
PCM/DTS/MPEG/
DOLBY DIGITAL
L
AUDIO
VIDEO
DIGITAL OUT
LINE OUT
to DIGITAL OUT
(COAXIAL or OPTICAL)
Optical digital cord
(not supplied)
Remove jack cap
before connecting
to LINE OUT L/R (AUDIO) 1 or 2
(white)
(red)
to coaxial or optical
digital input
[Speakers]
to audio input
Stereo amplifier (receiver)
Front (L)
MD deck/DAT deck
Front (R)
l: Signal flow
z Hints
• In connection B-1 , you can use the supplied
audio/video cord instead of using a separate stereo
audio cord.
• To realize better surround sound effects, make
sure that your listening position is in between
your speakers.
Note
Super Audio CD audio signals are not output from
the digital jack.
,continued
23
C Connecting to an AV amplifier (receiver) having a Dolby Surround (Pro
Logic) decoder and 3 to 6 speakers
You can enjoy the Dolby Surround effects only when playing Dolby Surround audio or multichannel audio (Dolby Digital) discs.
If your amplifier (receiver) has L and R audio input jacks only, use C-1 . If your amplifier
(receiver) has a digital input jack, use C-2 .
CD/DVD player
L
1
1
CENTER
R
COAXIAL OPTICAL
2
FRONT
REAR
WOOFER
2
R
L
AUDIO
PCM/DTS/MPEG/
DOLBY DIGITAL
DIGITAL OUT
C-2
5.1CH OUTPUT
CB
Y
VIDEO
S VIDEO OUT
CR
COMPONENT VIDEO OUT
LINE OUT
Stereo
audio cord (not
supplied)
(white)
Coaxial digital cord
(not supplied)
or
C-1
1
or
(red)
2
COAXIAL OPTICAL
R
PCM/DTS/MPEG/
DOLBY DIGITAL
L
AUDIO
VIDEO
DIGITAL OUT
LINE OUT
to DIGITAL OUT
(COAXIAL or OPTICAL)
Optical digital cord
(not supplied)
Remove jack cap
before connecting
to LINE OUT L/R (AUDIO) 1 or 2
(white)
(red)
to audio input
to coaxial or optical digital
input
[Speakers]
[Speakers]
Amplifier (receiver) with Dolby
Surround decoder
Rear (L)
Front (L)
Rear (R)
l: Signal flow
Subwoofer
Centre
z Hint
For correct speaker location, refer to the operating
instructions of the amplifier (receiver).
Notes
• When connecting 6 speakers, replace the
monaural rear speaker with a centre speaker, 2
rear speakers and a subwoofer.
• Super Audio CD audio signals are not output from
the digital jack.
24
Rear (mono)
Front (R)
D Connecting to an AV amplifier (receiver) with 5.1 ch input jacks and/or a
digital input jack and 4 to 6 speakers
CD/DVD player
L
1
Hookups
If your AV amplifier (receiver) has 5.1 channel inputs, use D-1 .
If you want to use the Dolby Digital, MPEG audio, or DTS decoder function on your AV
amplifier (receiver), connect to its digital jack using D-2 . With the following connections, you
can enjoy a more realistic audio presence in the comfort of your own home.
1
CENTER
R
COAXIAL OPTICAL
2
FRONT
REAR
2
R
WOOFER
L
AUDIO
PCM/DTS/MPEG/
DOLBY DIGITAL
DIGITAL OUT
D-2
Y
VIDEO
S VIDEO OUT
CB
CR
COMPONENT VIDEO OUT
LINE OUT
5.1CH OUTPUT
to DIGITAL OUT
(COAXIAL or OPTICAL)
D-1
to 5.1CH
OUTPUT
L
CENTER
R
COAXIAL OPTICAL
PCM/DTS/MPEG/
DOLBY DIGITAL
DIGITAL OUT
Optical digital cord
(not supplied)
Remove jack cap
before connecting
FRONT
REAR
WOOFER
5.1CH OUTPUT
Stereo audio cord
(not supplied)
or
or
Coaxial digital cord
(not supplied)
Monaural audio cord
(not supplied)
to coaxial or optical
digital input
to audio input
[Speakers]
[Speakers]
AV amplifier (receiver) having
5.1ch inputs or/and a decoder
Centre
Subwoofer
l: Signal flow
Front (L)
Front (R)
Rear (L)
Rear (R)
,continued
25
D-1
: Connecting to the 5.1ch input jacks
You can enjoy 5.1ch surround sound using
the internal Dolby Digital, MPEG audio,
DTS, or Super Audio CD Multi decoder of
this player. (When 6 speakers are connected,
set “SURROUND” to “OFF.”)
You can also enjoy Dolby Surround (Pro
Logic) sounds, or surround sounds using
various “SURROUND” modes (page 55).
D-2
: Connecting to a digital jack
This connection will allow you to use the
Dolby Digital, MPEG audio, or DTS decoder
function of your AV amplifier (receiver). You
are not able to enjoy the surround sound
effects of this player.
z Hints
• For connection D-2
For correct speaker location, refer to the operating
instructions of the connected components.
• To enhance the sound performance:
– Use high-performance speakers.
– Use front, rear, and centre speakers of the same
size and performance.
– Place the subwoofer between the left and right
front speakers.
Notes
For connection D-2
• After you have completed the connection, be sure
to set “DOLBY DIGITAL” to “DOLBY
DIGITAL” and “DTS” to “DTS” in Quick Setup
(page 27). If your AV amplifier (receiver) has an
MPEG audio decoder function, set “MPEG” in
“AUDIO SETUP” to “MPEG” (page 76).
Otherwise, no sound or a loud noise will come
from the speakers.
• When you connect an amplifier (receiver) that
conforms to the 96kHz sampling frequency, set
“48kHz/96kHz PCM” in “AUDIO SETUP” to
“96kHz/24bit” (page 76).
• Super Audio CD audio signals are not output from
the digital jack.
26
Step 3: Connecting the Power Cord
Plug the player and TV power cord (mains lead) into an AC outlet (mains).
Hookups
Step 4: Quick Setup
Follow the steps below to make the minimum number of basic adjustments for using the player.
To skip an adjustment, press >. To return to the previous adjustment, press ..
[/1
./>
X/x
1 Turn on the TV.
2 Press [/1.
3 Switch the input selector on your
TV so that the signal from the
player appears on the TV screen.
“Press [ENTER] to run QUICK SETUP”
appears at the bottom of the screen. If this
message does not appear, select
“QUICK” under “SETUP” in the Control
Menu to run Quick Setup (page 71).
4 Press ENTER without inserting a
disc.
The Setup Display for selecting the
language used in the on-screen display
appears.
The available languages differ depending
upon the player model.
ENTER
LANGUAGE SETUP
OSD:
MENU:
AUDIO:
SUBTITLE:
ENGLISH
ENGLISH
FRANÇAIS
DEUTSCH
ITALIANO
ESPAÑOL
NEDERLANDS
DANSK
SVENSKA
5 Press X/x to select a language.
The player uses the language selected
here to display the menu and subtitles as
well.
6 Press ENTER.
The Setup Display for selecting the
aspect ratio of the TV to be connected
appears.
,continued
27
SCREEN SETUP
TV TYPE:
COLOR SYSTEM:
SCREEN SAVER:
BACKGROUND:
16:9
16:9
4:3 LETTER BOX
4:3 PAN SCAN
D-1 or both D-1 and D-2
• Select “DIGITAL & 5.1CH OUTPUT.”
The Setup Display for “DOLBY
DIGITAL”appears.
10Press X/x to select the type of
7 Press X/x to select the setting that
matches your TV type.
◆ If you have a wide-screen TV or a 4:3
standard TV with a wide-screen mode
• 16:9 (page 72)
◆ If you have a 4:3 standard TV
• 4:3 LETTER BOX or 4:3 PAN SCAN
(page 72)
8 Press ENTER.
The Setup Display for selecting the type
of jack used to connect your amplifier
(receiver) appears.
Is this player connected to an amplifier
(receiver) ? Select the type of jack you
are using.
YES
LINE OUTPUT L/R (AUDIO)
DIGITAL OUTPUT
DIGITAL & 5.1CH OUTPUT
NO
(if any) you are using to connect to
an amplifier (receiver), then press
ENTER.
Choose the item that matches the audio
connection you selected on pages 22 to
25 ( A through D ).
A
• If you connect just a TV and nothing
else, select “NO.” Quick Setup is
finished and connections are complete.
C-1
• Select “LINE OUTPUT L/R
(AUDIO).” Quick Setup is finished and
connections are complete.
B-2
C-2
D-2
• Select “DIGITAL OUTPUT.” The Setup
Display for “DOLBY DIGITAL” appears.
28
Choose the signal that matches the audio
connection you selected on pages 23 to
25 ( B through D ).
AUDIO SETUP
AUDIO ATT:
OFF
AUDIO DRC:
STANDARD
AUDIO FILTER:
SHARP
DOWNMIX:
DOLBY SURROUND
DIGITAL OUT:
ON
D-PCM
DOLBY DIGITAL:
MPEG:
D-PCM
DTS:
DOLBY DIGITAL
48kHz/96kHz PCM:
48kHz/16bit
B-2
C-2
• D-PCM (page 76)
D-2
• DOLBY DIGITAL (only if the
amplifier (receiver) has a Dolby Digital
decoder) (page 76)
11Press ENTER.
“DTS” is selected.
9 Press X/x to select the type of jack
B-1
Dolby Digital signal you wish to
send to your amplifier (receiver).
AUDIO SETUP
AUDIO ATT:
OFF
AUDIO DRC:
STANDARD
AUDIO FILTER:
SHARP
DOWNMIX:
DOLBY SURROUND
DIGITAL OUT:
ON
D-PCM
DOLBY DIGITAL:
MPEG:
PCM
DTS:
D-PCM
48kHz/96kHz PCM:
D-PCM
DTS
12Press X/x to select the type of
DTS signal sent to your amplifier
(receiver).
Choose the item that matches the audio
connection you selected on pages 23 to
25 ( B through D ).
B-2
C-2
• D-PCM (page 76)
D-2
• DTS (page 76)
13Press ENTER.
17Press ENTER.
“SUBWOOFER” is selected.
◆ When “DIGITAL & 5.1CH OUTPUT” is
selected in Step 9
• The Setup Display for “SPEAKER
SETUP” appears.
SPEAKER SETUP
SIZE:
DISTANCE:
BALANCE:
LEVEL:
OFF
TEST TONE:
FRONT:
CENTER:
REAR:
SUBWOOFER:
To set, press
18Press X/x to select whether or
14Press X/x to select the size of the
not you have connected a
subwoofer.
centre speaker.
If no centre speaker is connected, select
“NONE” (page 77).
LARGE
NONE
NONE
LARGE
SMALL
, then ENTER .
15Press ENTER.
“REAR” is selected.
SPEAKER SETUP
SIZE:
DISTANCE:
BALANCE:
LEVEL:
OFF
TEST TONE:
FRONT:
CENTER:
REAR:
SUBWOOFER:
19Press ENTER.
Quick Setup is finished. All connections
and setup operations are complete.
SPEAKER SETUP
SIZE:
DISTANCE:
BALANCE:
LEVEL:
OFF
TEST TONE:
FRONT:
CENTER:
REAR:
SUBWOOFER:
To set, press
LARGE
LARGE
LARGE(REAR)
NONE
NONE
, then ENTER .
YES
Hookups
◆ When “DIGITAL OUTPUT” is selected
in Step 9
• Quick Setup is finished and
connections are complete.
• If your AV amplifier (receiver) has an
MPEG audio decoder, set “MPEG” to
“MPEG” (page 76).
Enjoying the surround sound
effects
To enjoy the surround sound effects of this
player or your amplifier (receiver), set the
following items as described below for the
audio connection you selected on pages 23 to
25 ( B through D ). Each of these is the
default setting and does not need to be adjusted
when you first connect the player. Refer to
page 70 for using the Setup Display.
Audio Connection (pages 22 to 25)
LARGE
LARGE
NONE
NONE
LARGE(REAR)
16Press X/x to select the size of the
rear speakers.
If no rear speaker is connected, select
“NONE.”
“SIDE” and “REAR” refer to the speaker
position relative to your listening
position (page 77).
A
• No additional settings are needed.
B-1
C-1
• Set “DOWNMIX” to “DOLBY
SURROUND” (page 75).
• If the sound distorts even when the volume
is turned down, set “AUDIO ATT” to “ON”
(page 75).
B-2
C-2
D-2
• Set “DOWNMIX” to “DOLBY
SURROUND” (page 75).
• Set “DIGITAL OUT” to “ON” (page 75).
• Set “48kHz/96kHz PCM” to “96kHz/24bit,”
only if you connect an amplifier (receiver)
that conforms to the 96 kHz sampling
frequency (page 76).
,continued
29
D-1
• Set “DISTANCE,” “BALANCE,” and
“LEVEL” according to the connected
speakers (page 78).
• If the sound distorts even when the volume
is turned down, set “AUDIO ATT” to “ON”
(page 75).
30
◆ When using an amplifier (receiver)
Turn on the amplifier (receiver) and
select the appropriate channel so that you
can hear sound from the player.
Playing Discs
Playing Discs
4 Press A on the player, and place a
disc on the disc tray.
Playing Discs
Depending on the DVD or VIDEO CD, some
operations may be different or restricted.
Refer to the operating instructions supplied
with your disc.
Power indicator
With the playback side facing down
A
5 Press H.
H
[/1
Z
[/1
The disc tray closes, and the player starts
playback (continuous play). Adjust the
volume on the TV or the amplifier
(receiver).
Depending on the disc, a menu may
appear on the TV screen. For DVD
VIDEOs, see page 36. For VIDEO CDs,
see page 38.
To turn off the player
Press [/1. The player enters standby mode.
H
z Hint
The player will turn off automatically whenever
you leave it in stop mode for more than 30 minutes
(Auto Power off function).
Note
1 Turn on your TV.
2 Press [/1.
Super Audio CD audio signals are not output from
the digital jack.
The player turns on and the power
indicator lights up in green.
3 Switch the input selector on your
TV so that the signal from the
player appears on the TV screen.
,continued
31
Additional operations
Locking the disc tray (Child
Lock)
Z
You can lock the disc tray to prevent children
from opening it.
[/1
./>
REPLAY
X
H
x
To
Operation
Stop
Press x
Pause
Press X
Resume play after
pause
Press X or H
Go to the next chapter, Press >
track, or scene in
continuous play mode
Go back to the
Press .
previous chapter,
track, or scene in
continuous play mode
Stop play and remove Press Z
the disc
Replay the previous
scene (DVD VIDEO
only)
Press REPLAY
z Hint
The Replay function is useful when you want to
review a scene or dialog that you missed.
Note
You may not be able to use the Replay function with
some scenes.
32
ENTER
O RETURN
When the player is in standby mode, press
O RETURN, ENTER, and then [/1 on the
remote.
The player turns on and “LOCKED” appears
on the front panel display.
The Z button on the player or the remote does
not work while the Child Lock is set.
To unlock the disc tray
When the player is in standby mode, press
O RETURN, ENTER, and then [/1 again.
Note
Even if you select “RESET” under “SETUP” in the
Control Menu (page 71), the disc tray remains
locked.
Searching for a
Particular Point on a
Disc (Search, Scan, Slow-motion
available. With each press the indication
changes as follows:
Playback direction
× 2B (DVD VIDEO/Super Audio CD/CD only)
2M T 1M
Play, Freeze Frame)
Opposite direction
× 2b (DVD VIDEO only) t 1m t 2m
The “× 2B”/“× 2b” playback speed is about
twice the normal speed. The “2M”/“2m”
playback speed is faster than “1M”/
“1m.”
Playing Discs
You can quickly locate a particular point on a
disc by monitoring the picture or playing back
slowly.
Watching frame by frame (Slowmotion Play)
m
c
/
C
M
H
Note
Depending on the DVD/VIDEO CD, you may not
be able to do some of the operations described.
Locating a point quickly (Search)
During playback, keep pressing C to
locate a point in the playback direction or
keep pressing c to locate a point in the
opposite direction. When you find the point
you want, release the button to return to
normal playback speed.
Locating a point quickly by
playing a disc in fast forward or
fast reverse (Scan)
Press
m or M
when the player is
in pause mode. To return to the normal speed,
press H.
Each time you press
m or M
during Slow-motion play, the playback speed
changes. Two speeds are available. With each
press the indication changes as follows:
Playback direction
2
y1
Opposite direction (DVD only)
2
y1
The “2
than “1
”/“2
”/“1
” playback speed is slower
.”
Playing one frame at a time
(Freeze Frame)
When the player is in the pause mode, press
C to go to the next frame. Press c to
go to the preceding frame (DVD only). If you
hold the button down, you can view the
frames in succession. To return to normal
playback, press H.
Press
m or M
while playing a
disc. When you find the point you want, press
H to return to normal speed. Each time you
press
m or M
during scan, the
playback speed changes. Three speeds are
,continued
33
Using the click shuttle on the
player (Shuttle mode)
Playing a disc frame by frame
using the click shuttle
(Jog mode)
1
JOG
The indicator lights up and the player
enters pause mode.
2
Click shuttle
Turn the click shuttle on the player. The
playback speed changes depending on the
turning direction and degree of rotation as
follows:
◆During playback
2M Fast forward (faster than 1M)
Y
1M Fast forward
Y
× 2B (DVD VIDEO/Super Audio CD/
CD only)
Y
N Play (normal speed)
Y
× 2b (DVD VIDEO only)
Y
1m Fast rewind
Y
2m Fast rewind (faster than 1m)
If you turn the click shuttle quickly, the
playback speed goes to “2M” or “2m” at
once.
◆During pause mode (DVD VIDEO, DVD-RW,
VIDEO CD only)
1
Slow (playback direction)
Y
2
Slow (playback direction – slower
than 1 )
Y
X Pause
Y
2
Slow (opposite direction – slower
than 1 ) (DVD only)
Y
1
Slow (opposite direction) (DVD
only)
To return to Continuous Play
Press H.
34
Press JOG.
Turn the click shuttle.
Depending on the turning speed,
playback goes to frame-by-frame
playback in the direction that the click
shuttle is turned. Turn the click shuttle
clockwise to go forward, and
counterclockwise to rewind (DVD only).
If you turn the click shuttle at a constant
speed for a while, the playback speed
goes to slow or normal.
To return to normal playback
Press H.
To turn off the Jog mode
Press JOG again so that the indicator turns
off.
Resuming Playback From
the Point Where You
Stopped the Disc (Multi-disc
Resume)
H
Playing Discs
The player stores the point where you stopped
the disc for up to 40 discs and resumes
playback the next time you insert the same
disc. When you store a resume playback point
for the 41st disc, the resume playback point
for the first disc is deleted.
Notes
• “MULTI-DISC RESUME” in “CUSTOM
SETUP” must be set to “ON” (default) for this
function to work (page 74).
• The resume playback point for the current disc is
cleared when:
– you change the play mode.
– you change the settings on the Setup Display.
• Resume Play does not work during Shuffle Play
and Programme Play.
• This function may not work with some discs.
x
1 While playing a disc, press x to
stop playback.
“RESUME” appears on the front panel
display.
2 Press H.
The player starts playback from the point
where you stopped the disc in step 1.
z Hints
• To play from the beginning of the disc, press x
twice, then press H.
• For DVD-RWs in VR mode, CDs, Super Audio
CDs, and DATA CDs, the player remembers the
resume playback point for the current disc unless
the disc tray is opened, the AC power cord (mains
lead) is disconnected, or only for DATA CDs, the
player enters standby mode.
35
Using the DVD’s Menu
A DVD is divided into long sections of a
picture or a music feature called “titles.”
When you play a DVD which contains
several titles, you can select the title you want
using the TOP MENU button.
When you play DVDs that allow you to select
items such as the language for the subtitles
and the language for the sound, select these
items using the MENU button.
Selecting “ORIGINAL” or
“PLAY LIST” on a DVDRW Disc
Some DVD-RW discs in VR (Video
Recording) mode have two types of titles for
playback: originally recorded titles
(ORIGINAL) and titles that can be created on
recordable DVD players for editing (PLAY
LIST). You can select the type of titles to be
played.
Number
buttons
C/X/x/c
ENTER
X/x
ENTER
DISPLAY
TOP MENU
MENU
1 Press TOP MENU or MENU.
The disc’s menu appears on the TV
screen.
The contents of the menu vary from disc
to disc.
2 Press C/X/x/c or the number
buttons to select the item you want
to play or change.
3 Press ENTER.
z Hint
The disc’s menu also appears when the TOP MENU
or MENU button on the player is pressed.
36
1 Press DISPLAY in stop mode.
The Control Menu appears.
2 Press X/x to select
(ORIGINAL/PLAY LIST), then press
ENTER.
The options for “ORIGINAL/PLAY
LIST” appear.
12(27)
18(34)
PLAY LIST
PLAY LIST
ORIGINAL
DVD-RW
3 Press X/x to select the setting.
• PLAY LIST: plays the titles created
from “ORIGINAL” for editing.
• ORIGINAL: plays the titles originally
recorded.
Selecting a Playback
Area for a Super Audio
CD Disc
4 Press ENTER.
Press DISPLAY repeatedly until the Control
Menu is turned off.
SACD
MULTI/2CH
SACD/CD
Playing Discs
To turn off the Control Menu
Selecting a playback area on a 2
channel + Multi-channel Super
Audio CD
Some Super Audio CDs consist of a 2 channel
playback area and a multi-channel playback
area. You can select the playback area you
want to listen to.
1
Press SACD MULTI/2CH in stop mode.
The following display appears.
2CH
2
Press SACD MULTI/2CH repeatedly to
select the item.
• MULTI: plays a multi-channel
playback area.
• 2CH: plays a 2 channel playback area.
The “MULTI” indicator in the front panel
display lights up when playing a multichannel playback area.
z Hint
You can also select “MULTI/2CH” from the
Control Menu (page 12).
,continued
37
Selecting a playback layer when
playing a hybrid Super Audio CD
Some Super Audio CDs consist of an HD
layer and a CD layer. You can select the
playback layer you want to listen to.
Press SACD/CD in stop mode.
Each time you press the button, an HD layer
or a CD layer is alternately selected. When
playing a CD layer, the “CD” indicator in the
front panel display lights up.
Notes
• For details about Super Audio CD discs, see page
84.
• Each play mode function works only within the
selected layer or playback area.
Playing VIDEO CDs With
PBC Functions (PBC Playback)
PBC (Playback Control) allows you to play
VIDEO CDs interactively by following the
menu on the TV screen.
Number
buttons
./>
H
X/x
x
ENTER
O
RETURN
1 Start playing a VIDEO CD with PBC
functions.
The menu for your selection appears.
2 Select the item number you want
by pressing X/x or the number
buttons.
3 Press ENTER.
4 Follow the instructions in the
menu for interactive operations.
Refer to the instructions supplied with the
disc, as the operating procedure may
differ depending on the VIDEO CD.
38
To return to the menu
Press O RETURN.
You can play back DATA CDs (CD-ROMs/
CD-Rs/CD-RWs) recorded in MP3 (MPEG1
Audio Layer 3) format.
Playing Discs
z Hint
To play without using PBC, press ./> or the
number buttons while the player is stopped to select
a track, then press H or ENTER.
“Play without PBC” appears on the TV screen and
the player starts continuous play. You cannot play
still pictures such as a menu.
To return to PBC playback, press x twice then
press H.
Playing an MP3 Audio
Track
Z
Notes
• Depending on the VIDEO CD, “Press ENTER” in
step 3 may appear as “Press SELECT” in the
instructions supplied with the disc. In this case,
press H.
• The PBC functions of Super VCDs do not work
with this player. Super VCDs are played in
continuous play mode only.
H
C/X/x/c
ENTER
O RETURN
MENU
1 Press Z and place a DATA CD on
the disc tray.
2 Press H.
The disc tray closes, and the player starts
to play the first MP3 audio track in the
first album on the disc.
Notes
• The player can play MP3 audio tracks recorded in
the following sampling frequencies: 32 kHz,
44.1 kHz, 48 kHz.
• The playback order may be different from the
edited order. See “The Playback order of MP3
audio tracks” below for details.
Selecting an album and track
1
Press MENU.
The list of MP3 albums recorded on the
DATA CD appears.
,continued
39
1( 30)
ROCK BEST HIT
KARAOKE
JAZZ
R&B
MY FAVORITE SONGS
CLASSICAL
SALSA OF CUBA
BOSSANOVA
2
Select an album using X/x and press
ENTER.
The list of tracks contained in the album
appears.
JAZZ
1(90)
0
0
0
0
0
0
0
3
1
2
3
4
5
6
7
SHE IS SPECIAL
ALL YOU NEED IS ...
SPICY LIFE
HAPPY HOUR
RIVER SIDE
5
TAKE TIME,TAKE TIME
Select a track using X/x and press
ENTER.
The selected track starts playing.
When a track or album is being played, its
title is shaded.
See the instructions of the CD-R/RW device
or recording software (not supplied) for
details on the recording format.
To play a Multi Session CD
This player can play Multi Session CDs when
an MP3 audio track is located in the first
session. Any subsequent MP3 audio tracks,
recorded in the later sessions, can also be
played back.
When audio tracks and images in music CD
format or video CD format are recorded in the
first session, only the first session will be
played back.
Notes
• If you put the extension “.MP3” to data not in
MP3 format, the player cannot recognize the data
properly and will generate a loud noise which
could damage your speaker system.
• The player cannot play audio tracks in MP3PRO
format.
The Playback order of MP3 audio tracks
The playback order of albums and tracks
recorded on a DATA CD is as follows.
◆Structure of disc contents
Tree 1
To go to the next or previous page
Tree 2
ROOT
Press c or C.
To return to the previous display
Press O RETURN.
To turn off the display
Press MENU.
Notes
• Only the letters in the alphabet and numbers can
be used for album or track names. Anything else
is displayed as “*.”
• ID3 tags cannot be displayed.
About MP3 audio tracks
You can play MP3 audio tracks on CDROMs, CD-Rs, or CD-RWs. However, the
discs must be recorded according to ISO9660
level 1, level 2, or Joliet format for the player
to recognize the tracks.
You can also play discs recorded in Multi
Session.
40
album
track
Tree 3
Tree 4
Tree 5
z Hints
• If you add numbers (01, 02, 03, etc.) to the front
of the track file names, the tracks will be played in
that order.
• Since a disc with many trees takes longer to start
playback, it is recommended that you create
albums of no more than two trees.
Notes
• Depending on the software you use to create the
DATA CD, the playback order may differ from
the illustration above.
• The playback order above may not be applicable
if there are more than a total of 999 albums and
tracks in the DATA CD.
• The player can recognize up to 499 albums (the
player will count just albums, including albums
that do not contain MP3 audio tracks). The player
will not play any albums beyond the first 499
albums. Of the first 499 albums, the player will
play no more than a combined total of 999 albums
and tracks.
Various Play Mode
Functions (Programme Play,
Shuffle Play, Repeat Play, A-B Repeat
Play)
You can set the following play modes:
• Programme Play (page 41)
• Shuffle Play (page 43)
• Repeat Play (page 44)
• A-B Repeat Play (page 44)
Playing Discs
When you insert a DATA CD and press H,
the numbered tracks are played sequentially,
from 1 through 7. Any sub-albums/tracks
contained within a currently selected album
take priority over the next album in the same
tree. (Example: C contains D so 4 is played
before 5.)
When you press MENU and the list of MP3
albums appears (page 39), the albums are
arranged in the following order: A t B t
C t D t F t G. Albums that do not
contain tracks (such as album E) do not
appear in the list.
Note
The play mode is cancelled when:
– you open the disc tray.
– the player enters standby mode by pressing [/1.
Creating your own programme
(Programme Play)
You can play the contents of a disc in the
order you want by arranging the order of the
titles, chapters, or tracks on the disc to create
your own programme. You can programme
up to 99 titles, chapters, and tracks.
Number
buttons
CLEAR
H
X/x/c
ENTER
DISPLAY
,continued
41
1
Press DISPLAY twice (when playing a
Super Audio CD/CD, press once).
PROGRAM
ALL CLEAR
1. TITLE – –
2. TITLE – –
3. TITLE – –
4. TITLE – –
5. TITLE – –
6. TITLE – –
7. TITLE – –
The Control Menu appears.
2
Press X/x to select
(PROGRAM), then press ENTER.
The options for “PROGRAM” appear.
12(27)
18(34)
T
1:32:55
OFF
OFF
SET
ON
DVD VIDEO
C
ALL
01
02
03
04
05
06
Next, press X/x or the number buttons to
select “03” under “C,” then press
ENTER.
PROGRAM
3
T
––
01
02
03
04
05
ALL CLEAR
1. TITLE 0 2 – 0 3
2. TITLE – –
3. TITLE – –
4. TITLE – –
5. TITLE – –
6. TITLE – –
7. TITLE – –
Press X/x to select “SET t,” then
press ENTER.
T
––
01
02
03
04
05
“TRACK” is displayed when you play
a VIDEO CD, Super Audio CD, or CD.
Selected title and chapter
PROGRAM
ALL CLEAR
1. TITLE
2. TITLE – –
3. TITLE – –
4. TITLE – –
5. TITLE – –
6. TITLE – –
7. TITLE – –
T
◆ When playing a VIDEO CD, Super
Audio CD, or CD
For example, select track “02.”
Press X/x or the number buttons to select
“02” under “T,” then press ENTER.
A track number may be displayed in 3
digits for a Super Audio CD.
––
01
02
03
04
05
Titles or tracks
recorded on a disc
4
Selected track
ALL CLEAR
1. TRACK
2. TRACK
3. TRACK
4. TRACK
5. TRACK
6. TRACK
7. TRACK
The cursor moves to the title or track row
“T” (in this case, “01”).
PROGRAM
ALL CLEAR
1. TITLE – –
2. TITLE – –
3. TITLE – –
4. TITLE – –
5. TITLE – –
6. TITLE – –
7. TITLE – –
T
C
––
01
02
03
04
05
ALL
01
02
03
04
05
06
Select the title, chapter, or track you
want to programme.
◆ When playing a DVD VIDEO
For example, select chapter “03” of title
“02.”
Press X/x or the number buttons to select
“02” under “T,” then press ENTER.
42
02
––
––
––
––
––
––
––
01
02
03
04
05
Total time of the programmed tracks
6
To programme other titles, chapters,
or tracks, repeat steps 4 to 5.
The programmed titles, chapters, and
tracks are displayed in the selected order.
Chapters recorded on a disc
5
0:15:30
T
PROGRAM
Press c.
7
Press H to start Programme Play.
Programme Play begins.
When the programme ends, you can
restart the same programme again by
pressing H.
To return to normal play
Press CLEAR, or select “OFF” in step 3. To
play the same programme again, select “ON”
in step 3 and press ENTER.
To turn off the display
Press DISPLAY repeatedly until the display
is turned off.
Playing in random order (Shuffle
Play)
You can have the player “shuffle” titles,
chapters, or tracks. Subsequent “shuffling”
may produce a different playing order.
1
Follow steps 1 through 3 of “Creating
your own programme (Programme
Play).”
2
Select the programme number of the title,
chapter, or track you want to change or
cancel using X/x or the number buttons,
and press c.
3
Follow step 5 for new programming. To
cancel a programme, select “--” under
“T,” then press ENTER.
To cancel all the titles, chapters, or tracks
in the programmed order
1
Follow steps 1 through 3 of “Creating
your own programme (Programme
Play).”
2
3
Press X and select “ALL CLEAR.”
CLEAR
SHUFFLE
Playing Discs
To change or cancel a programme
H
1
Press SHUFFLE during playback.
The following display appears.
TITLE
Press ENTER.
z Hint
You can do Repeat Play or Shuffle Play of the
programmed titles, chapters, or tracks. During
Programme Play, follow the steps of “Repeat Play”
(page 44) or “Shuffle Play” (page 43).
Note
When playing Super VCDs, the total time of the
programmed tracks does not appear on the screen.
2
Press SHUFFLE repeatedly to select
the item to be shuffled.
◆ When playing a DVD VIDEO
• TITLE
• CHAPTER
◆ When playing a VIDEO CD, Super
Audio CD, or CD
• TRACK
◆ When Programme Play is activated
• ON: shuffles titles, chapters, or tracks
selected in Programme Play.
To return to normal play
Press CLEAR, or select “OFF” in step 2.
z Hints
• You can set Shuffle Play while the player is
stopped. After selecting the “SHUFFLE” option,
press H. Shuffle Play starts.
,continued
43
◆ When playing a VIDEO CD, Super
Audio CD, or CD
• DISC: repeats all of the tracks.
• TRACK: repeats the current track.
• Up to 200 chapters in a disc can be played in
random order when “CHAPTER” is selected.
• You can also select “SHUFFLE” from the Control
Menu (page 12).
◆ When playing a DATA CD (MP3 audio)
• DISC: repeats all of the albums.
• ALBUM: repeats the current album.
• TRACK: repeats the current track.
Playing repeatedly (Repeat Play)
You can play all of the titles or tracks on a
disc or a single title, chapter, or track
repeatedly.
You can use a combination of Shuffle or
Programme Play modes.
◆ When Programme Play or Shuffle Play
is activated
• ON: repeats Programme Play or
Shuffle Play.
To return to normal play
Press CLEAR, or select “OFF” in step 2.
z Hints
• You can set Repeat Play while the player is
stopped. After selecting the “REPEAT” option,
press H. Repeat Play starts.
• You can also select “REPEAT” from the Control
Menu (page 12).
CLEAR
REPEAT
H
1
Repeating a specific portion (AB Repeat Play)
Press REPEAT during playback.
The following display appears.
You can play a specific portion of a title,
chapter or track repeatedly. (This function is
useful when you want to memorize lyrics, etc.)
DISC
CLEAR
2
A-B
Press REPEAT repeatedly to select the
item to be repeated.
◆ When playing a DVD VIDEO
• DISC: repeats all of the titles.
• TITLE: repeats the current title on a
disc.
• CHAPTER: repeats the current
chapter.
◆ When playing a DVD-RW
• DISC: repeats all the titles of the
selected type.
• TITLE: repeats the current title on a
disc.
• CHAPTER: repeats the current
chapter.
44
1
During playback, when you find the
starting point (point A) of the portion to
be played repeatedly, press A-B.
The starting point (point A) is set.