1
Installation
Guide
hp StorageWorks
NAS 2000s
Product Version: 1.0
First Edition (September 2003)
Part Number: 345649-001
This installation guide provides information about how to deploy the
HP StorageWorks NAS 2000s.
© Copyright 2003 Hewlett-Packard Development Company, L.P.
Hewlett-Packard Company makes no warranty of any kind with regard to this material,
including, but not limited to, the implied warranties of merchantability and fitness for a
particular purpose. Hewlett-Packard shall not be liable for errors contained herein or for
incidental or consequential damages in connection with the furnishing, performance, or
use of this material.
This document contains proprietary information, which is protected by copyright. No
part of this document may be photocopied, reproduced, or translated into another
language without the prior written consent of Hewlett-Packard. The information
contained in this document is subject to change without notice.
Microsoft®, MS-DOS®, MS Windows®, Windows®, and Windows NT® are U.S.
registered trademarks of Microsoft Corporation.
Hewlett-Packard Company shall not be liable for technical or editorial errors or
omissions contained herein. The information is provided “as is” without warranty of any
kind and is subject to change without notice. The warranties for Hewlett-Packard
Company products are set forth in the express limited warranty statements for such
products. Nothing herein should be construed as constituting an additional warranty.
NAS 2000s Installation Guide
First Edition (September 2003)
Part Number: 345649–001
Contents
Contents
About this Guide . . . . . . . . . . . . . . . . . . . . . . . . . . . . . . . . . . 5
Overview . . . . . . . . . . . . . . . . . . . . . . . . . . . . . . . . . . . . . . . . . . . . . . .5
Intended Audience . . . . . . . . . . . . . . . . . . . . . . . . . . . . . . . . . . . .5
Prerequisites . . . . . . . . . . . . . . . . . . . . . . . . . . . . . . . . . . . . . . . . .5
Related Documentation . . . . . . . . . . . . . . . . . . . . . . . . . . . . . . . .6
Conventions. . . . . . . . . . . . . . . . . . . . . . . . . . . . . . . . . . . . . . . . . . . . .6
Document Conventions . . . . . . . . . . . . . . . . . . . . . . . . . . . . . . . .6
Text Symbols . . . . . . . . . . . . . . . . . . . . . . . . . . . . . . . . . . . . . . . .7
Equipment Symbols . . . . . . . . . . . . . . . . . . . . . . . . . . . . . . . . . . .7
Rack Stability . . . . . . . . . . . . . . . . . . . . . . . . . . . . . . . . . . . . . . . . . . .9
Getting Help . . . . . . . . . . . . . . . . . . . . . . . . . . . . . . . . . . . . . . . . . . . .9
HP Technical Support. . . . . . . . . . . . . . . . . . . . . . . . . . . . . . . . .10
HP Storage Website . . . . . . . . . . . . . . . . . . . . . . . . . . . . . . . . . .10
HP Authorized Reseller . . . . . . . . . . . . . . . . . . . . . . . . . . . . . . .10
1
Product Overview . . . . . . . . . . . . . . . . . . . . . . . . . . . . . . . . . 11
Product Definition and Information . . . . . . . . . . . . . . . . . . . . . . . . .11
Server Hardware Features. . . . . . . . . . . . . . . . . . . . . . . . . . . . . .11
Optional Features . . . . . . . . . . . . . . . . . . . . . . . . . . . . . . . . . . . .13
Rear Panel Connectors . . . . . . . . . . . . . . . . . . . . . . . . . . . . . . . .14
Software Features . . . . . . . . . . . . . . . . . . . . . . . . . . . . . . . . . . . .15
2
Configuration Setup . . . . . . . . . . . . . . . . . . . . . . . . . . . . . . . 17
Preinitialization . . . . . . . . . . . . . . . . . . . . . . . . . . . . . . . . . . . . . . . . .17
Collect Information for Configuration . . . . . . . . . . . . . . . . . . . . . . .18
Configuration Information . . . . . . . . . . . . . . . . . . . . . . . . . . . . .18
WebUI Configuration . . . . . . . . . . . . . . . . . . . . . . . . . . . . . . . . . . . .20
RapidLaunch Method . . . . . . . . . . . . . . . . . . . . . . . . . . . . . . . . .20
Requirements . . . . . . . . . . . . . . . . . . . . . . . . . . . . . . . . . . . .20
Procedure . . . . . . . . . . . . . . . . . . . . . . . . . . . . . . . . . . . . . . .21
NAS 2000s Installation Guide
3
Remote Browser Method (Using Hostname) . . . . . . . . . . . . . . .24
Requirements . . . . . . . . . . . . . . . . . . . . . . . . . . . . . . . . . . . .24
Procedure . . . . . . . . . . . . . . . . . . . . . . . . . . . . . . . . . . . . . . .25
Direct Attach Method . . . . . . . . . . . . . . . . . . . . . . . . . . . . . . . . .26
Procedure . . . . . . . . . . . . . . . . . . . . . . . . . . . . . . . . . . . . . . .26
Rapid Startup Wizard Configuration . . . . . . . . . . . . . . . . . . . . .27
Requirements . . . . . . . . . . . . . . . . . . . . . . . . . . . . . . . . . . . .27
Procedure . . . . . . . . . . . . . . . . . . . . . . . . . . . . . . . . . . . . . . .28
Configure Storage . . . . . . . . . . . . . . . . . . . . . . . . . . . . . . . . . . . . . . .30
Creating Disk Arrays . . . . . . . . . . . . . . . . . . . . . . . . . . . . . . . . .30
Creating Logical Disks. . . . . . . . . . . . . . . . . . . . . . . . . . . . .31
Verifying Logical Disks. . . . . . . . . . . . . . . . . . . . . . . . . . . .31
Creating a Volume . . . . . . . . . . . . . . . . . . . . . . . . . . . . . . . . . . .32
Creating File Shares . . . . . . . . . . . . . . . . . . . . . . . . . . . . . . . . . .33
Basic Setup Complete . . . . . . . . . . . . . . . . . . . . . . . . . . . . . . . . . . . .34
Completing the System Configuration . . . . . . . . . . . . . . . . . . . .34
Index . . . . . . . . . . . . . . . . . . . . . . . . . . . . . . . . . . . . . . . . . . 35
4
NAS 2000s Installation Guide
About This
Guide
About this Guide
This installation guide provides information to help you deploy
the HP StorageWorks NAS 2000s.
About this Guide
“About this Guide” topics include:
■
Overview, page 5
■
Conventions, page 6
■
Rack Stability, page 9
■
Getting Help, page 9
Overview
This section covers the following topics:
■
Intended Audience
■
Prerequisites
■
Related Documentation
Intended Audience
This book is intended for use by technical professionals who are
experienced with the following:
■
Microsoft® administrative procedures
■
file-sharing protocols
Prerequisites
Before you set up the NAS 2000s, HP recommends that you
obtain supplemental documentation relative to the items listed
above in the section titled “Intended Audience.”
NAS 2000s Installation Guide
5
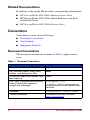
Related Documentation
In addition to this guide, HP provides corresponding information:
■
HP StorageWorks NAS 2000s Administration Guide
■
HP StorageWorks NAS 2000s Quick Reference and Rack
Installation Poster
■
HP StorageWorks NAS 2000s Release Notes
Conventions
Conventions consist of the following:
■
Document Conventions
■
Text Symbols
■
Equipment Symbols
Document Conventions
The document conventions included in Table 1 apply in most
cases.
Table 1: Document Conventions
Element
6
Convention
Cross-reference links
Figure 1
Key and field names, menu items,
buttons, and dialog box titles
Bold
File names, application names, and
text emphasis
Italics
User input, command and directory
names, and system responses
(output and messages)
Monospace font
COMMAND NAMES are uppercase
monospace font unless they are case
sensitive
Variables
<monospace, italic font>
Website addresses
Underlined sans serif font text:
http://www.hp.com
NAS 2000s Installation Guide
Text Symbols
The following symbols may be found in the text of this guide.
They have the following meanings:
WARNING: Text set off in this manner indicates that failure
to follow directions in the warning could result in bodily harm
or death.
Caution: Text set off in this manner indicates that failure to
follow directions could result in damage to equipment or
data.
Note: Text set off in this manner presents commentary, sidelights, or
interesting points of information.
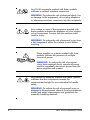
Equipment Symbols
The following equipment symbols may be found on hardware for
which this guide pertains. They have the following meanings:
Any enclosed surface or area of the equipment
marked with these symbols indicates the presence of
electrical shock hazards. Enclosed area contains no
operator serviceable parts.
WARNING: To reduce the risk of personal injury from
electrical shock hazards, do not open this enclosure.
NAS 2000s Installation Guide
7
Any RJ-45 receptacle marked with these symbols
indicates a network interface connection.
WARNING: To reduce the risk of electrical shock, fire,
or damage to the equipment, do not plug telephone
or telecommunications connectors into this receptacle.
Any surface or area of the equipment marked with
these symbols indicates the presence of a hot surface
or hot component. Contact with this surface could
result in injury.
WARNING: To reduce the risk of personal injury from
a hot component, allow the surface to cool before
touching.
Power supplies or systems marked with these
symbols indicate the presence of multiple
sources of power.
WARNING: To reduce the risk of personal
injury from electrical shock, remove all power
cords to completely disconnect power from the
power supplies and systems.
Any product or assembly marked with these symbols
indicates that the component exceeds the
recommended weight for one individual to handle
safely.
WARNING: To reduce the risk of personal injury or
damage to the equipment, observe local occupational
health and safety requirements and guidelines for
manually handling material.
8
NAS 2000s Installation Guide
Rack Stability
Rack stability protects personnel and equipment.
WARNING: To reduce the risk of personal injury or damage
to the equipment, be sure that:
■ The leveling jacks are extended to the floor.
■ The full weight of the rack rests on the leveling jacks.
■ In single rack installations, the stabilizing feet are
attached to the rack.
■ In multiple rack installations, the racks are coupled.
■ Only one rack component is extended at any time. A rack
may become unstable if more than one rack component
is extended for any reason.
Getting Help
If you still have a question after reading this guide, contact an HP
authorized service provider or access our website:
http://www.hp.com.
NAS 2000s Installation Guide
9
HP Technical Support
Telephone numbers for worldwide technical support are listed on
the following HP website: http://www.hp.com/support/. From
this website, select the country of origin.
Note: For continuous quality improvement, calls may be recorded or
monitored.
Be sure to have the following information available before
calling:
■
Technical support registration number (if applicable)
■
Product serial numbers
■
Product model names and numbers
■
Applicable error messages
■
Operating system type and revision level
■
Detailed, specific questions
HP Storage Website
The HP website has the latest information on this product, as well
as the latest drivers. Access storage at: http://www.hp.com/
country/us/eng/prodserv/storage.html. From this website, select
the appropriate product or solution.
HP Authorized Reseller
For the name of your nearest HP authorized reseller:
10
■
In the United States, call 1-800-345-1518
■
In Canada, call 1-800-263-5868
■
Elsewhere, see the HP website for locations and telephone
numbers: http://www.hp.com.
NAS 2000s Installation Guide
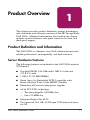
Product Overview
1
This chapter provides product definition, product information,
and a hardware and software overview of the HP StorageWorks
NAS 2000s. Additional information also found in the chapter
includes optional features, rear panel connector location, and
third-party support.
Product Definition and Information
The NAS 2000s is a business class NAS solution that provides
reliable performance, manageability, and fault tolerance.
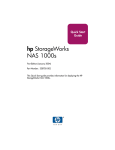
Server Hardware Features
The following features are included in the NAS 2000s internal
SCSI model:
■
One Intel XEON 3.06 GHz with 1 MB L3 cache and
512 K L2 cache
■
1 GB (2 X 512 MB SIMMs)
■
Smart Array 5i+ Embedded SCSI-3 controller with
Battery-Backed Write Cache (BBWC) Enabler
■
Redundant 400-watt hot plug power supplies
■
64-bit PCI-X I/O technology:
— Two hot-pluggable 100-MHz slots
— One 133-MHz slot
■
Integrated Lights-Out (iLO)
■
Two mirrored 36.4-GB, 10,000 rpm U320 universal drives
for OS
NAS 2000s Installation Guide
11
■
Four 146.8-GB, 10,000 rpm U320 universal drives for user
data (allows for RAID 5)
■
Two NC7781 10/100/1000 NICs (embedded)
■
Redundant fans
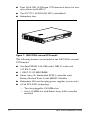
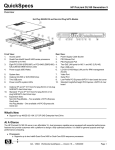
Figure 1: NAS 2000s internal SCSI model
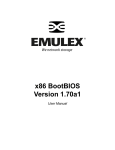
The following features are included in the NAS 2000s external
SCSI model:
■
One Intel XEON 3.06 GHz with 1 MB L3 cache and
512 K L2 cache
■
1 GB (2 X 512 MB SIMM)
■
Smart Array 5i+ Embedded SCSI-3 controller with
Battery-Backed Write Cache (BBWC) Enabler
■
Redundant 400-watt hot plug power supplies (server only)
■
64-bit PCI-X I/O technology:
— Two hot-pluggable 100-MHz slots
— One 133-MHz slot with Smart Array 6404 controller
installed
12
NAS 2000s Installation Guide
■
Integrated Lights-Out (iLO)
■
Two mirrored 36-GB, 10,000 rpm U320 universal drives
for OS
■
Two NC7781 10/100/1000 NICs (embedded)
■
Redundant fans
■
Four 146-GB, 10,000 rpm U320 universal drives for user
data (allows for RAID 5)
■
4414 Storage Cabinet with redundant power supplies and
fans
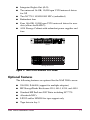
Server
Storage Enclosure
Figure 2: NAS 2000s external SCSI model
Optional Features
The following features are optional for the NAS 2000s server:
■
SA5300, SA6404 (support for multiple adapters)
■
HP StorageWorks Enclosure 4314, 4414, 4354, and 4454
■
Standard HP ProLiant NIC Suite including NC7770
■
Alacritech NICs
■
LP952 and/or LP8000 for tape support only
■
Tape drive in bay 5
NAS 2000s Installation Guide
13
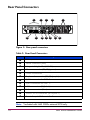
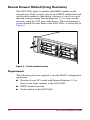
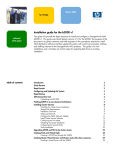
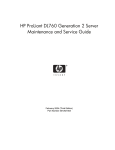
Rear Panel Connectors
1
2
3
4
5
3
2
12
11
10
9
8
7
6
Figure 3: Rear panel connectors
Table 2: Rear Panel Connectors
Item
Description
1
PCI expansion slots
2
Serial connector (teal)
3
Integrated Lights-Out (iLO Eth)
4
Mouse connector (PS/2) (green)
5
Power connectors
6
Keyboard connector (PS/2) (purple)
7
RJ-45 connector for NIC 1
8
RJ-45 connector for NIC 2
9
USB connectors (2) (black)
-
Video connector (blue)
q
VHDCI SCSI connector (SCSI port 1)
w
Smart Array 6404 controller*
Note: * Included with NAS 2000s external SCSI only.
14
NAS 2000s Installation Guide
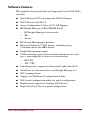
Software Features
HP-supplied software included and supported by the NAS 2000s
includes:
■
Quick Restore DVD containing the NAS OS image
■
WebUI based on NAS 3.0
■
Array Configuration Utility (ACU) XE Support
■
HP Insight Manager (CIM) WBEM Win32
— HP Insight Manager base console
— XE
— Survey
■
■
HP System Management Interface
Microsoft Windows® 2003 drivers, including Array
Controller driver and HBA drivers
■
Insight Management agents
■
UPS monitoring agent with automated shutdown via serial
port – preconfigured at factory no user interface
— HP UPS
— APC UPS
■
Field diagnostics support via Integrated Lights-Out (iLO)
■
SmartStart 6.4 software drivers and Insight Manager 6.4
■
NIC teaming drivers
■
Support for Web Based Configuration Utility
■
Web based configuration utility for quick configuration
■
RapidLaunch support for locating NAS devices
■
Rapid Start-Up Utility for quick configuration
NAS 2000s Installation Guide
15
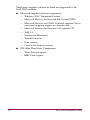
Third-party supplied software included and supported by the
NAS 2000s includes:
■
Microsoft-supplied software components
— Windows 2003 “Embedded License”
— Microsoft Services for Network File System (NFS)
— Microsoft Services for UNIX 3.0 Retail separate CD for
user name mapping support in a domain only
— Microsoft Services for Netware 5.02 separate CD
— SAK 3.0
— Services for Macintosh
— Terminal services
— Print services
— Console for desktop services
■
SW Other Third Party Components
— Tivoli Netview agents
— BMC Patrol agents
16
NAS 2000s Installation Guide
Configuration Setup
2
This chapter provides information about preinitialization,
collecting information, and configuring the HP StorageWorks
NAS 2000s using the online method. Details include three
methods of system configuration and an overview of storage
configuration.
Preinitialization
Before beginning the installation process, verify that the
hardware installation is complete. Verify that the NAS 2000s is
completely installed in the rack and that all cables and cords are
connected.
Note: If you need assistance with rack installation or hardware
connections, refer to the quick reference and rack installation guide
included in the shipping carton.
NAS 2000s Installation Guide
17
Collect Information for Configuration
Choose a host name and collect general information before
initializing the NAS 2000s.
Configuration Information
Collect the general information required to initialize the NAS
device for both dynamic host configuration protocols (DHCP)
and non-DHCP configurations. You will be asked for this
information during configuration, as shown in Table 3. Become
familiar with this information before attempting to configure the
NAS device.
18
NAS 2000s Installation Guide
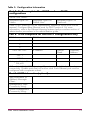
Table 3: Configuration Information
Part A: To Be completed for DHCP and non-DHCP
configurations
Server Host Name:
Integrated Lights-Out
Name:
Integrated Lights-Out
Default User:
Integrated Lights-Out
Password:
Note: If NIC teaming is to be implemented, determine which ports will be
teamed. Configure these Ethernet ports for DHCP protocol. For more
information, refer to the Ethernet teaming features and procedures section of
administrative procedures in the administration guide.
Part B: To be completed for non-DHCP configurations only
DNS Servers
IP Address
1
2
3
NAS NIC Port*
IP Address
Subnet
Mask
Gateway
Address
NIC 1
NIC 2
Integrated Lights-Out
Eth port
* The default NAS 2000s has two Ethernet ports available for network
connectivity. Disable ports that will not be used. Each Ethernet port must be
configured with a separate subnet.
Part C: SNMP Information (optional)
Trap Destination (IP
Address) Manager
Client:
Management Traps
Community String:
System Management
Community String:
NAS 2000s Installation Guide
19
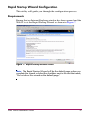
WebUI Configuration
The WebUI is designed to be a graphical, easy-to-use application
that gathers the necessary information for configuration. The
WebUI may be accessed through three methods:
■
RapidLaunch method
■
Remote Browser method (using hostname)
■
Direct Attach method
Note: You can configure this system through the WebUI or manually
through Remote Desktop or Windows Server 2003 Desktop.
Note: The NAS 2000s is designed to be deployed without a monitor,
keyboard, and mouse. These ports are available and supported by
the NAS device, if used.
RapidLaunch Method
The NAS 2000s includes a RapidLaunch CD that can run on any
Windows-based PC using Internet Explorer 5.5 (or later).
Requirements
The following items are required to run the WebUI configuration
application:
20
■
Windows-based PC loaded with Internet Explorer 5.5 (or
later) on the same network segment as the NAS 2000s
■
RapidLaunch CD
NAS 2000s Installation Guide
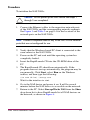
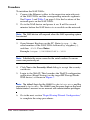
Procedure
To initialize the NAS 2000s:
Caution: Do not power up the NAS device until steps 1
through 5 are completed.
1. Connect the Ethernet cables to the respective network ports
of the NAS 2000s and the corresponding network segments.
See Figure 3 and Table 2 on page 14 for the locations of the
network ports on the NAS 2000s.
Note: Connect a loopback cable to any of the NAS 2000s Ethernet
ports that are not configured for use.
2. Verify that the Windows-based PC client is connected to the
same subnet as the NAS 2000s.
3. Power on the PC and wait until the operating system has
completely loaded.
4. Insert the RapidLaunch CD into the CD-ROM drive of the
PC.
5. The RapidLaunch CD should run automatically. If the
program does not start up automatically, the program may be
run manually. Click Start, select Run on the Windows
taskbar, and then type the following:
{CD ROM drive}:\setup.exe
Wait for the interface to start.
6. Go to the NAS device and power it on. It will be several
minutes before the NAS device is accessible on the network.
7. Return to the PC. Select StorageWorks NAS from the Show
drop-down list to have RapidLaunch list all NAS devices on
the network, as shown in Figure 4.
NAS 2000s Installation Guide
21
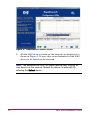
Figure 4: RapidLaunch search screen
8. All the NAS devices found on the network are displayed as
shown in Figure 5. It may take several minutes for the NAS
device to be found on the network.
Note: The RapidLaunch utility will refresh periodically, looking for
new devices on the network. Refresh the device list manually by
selecting the Refresh button.
22
NAS 2000s Installation Guide
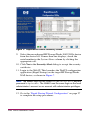
Figure 5: RapidLaunch device discovery screen
9. Select the unconfigured HP StorageWorks NAS 2000s device
from the device list. If more than one displays, check the
serial number in the System Name column by clicking the
appropriate cell.
10. Click Yes in the Security Alert dialog to accept the security
certificate.
11. Login to the WebUI. This launches the WebUI configuration
application (Rapid Startup) on the target HP StorageWorks
NAS device, as shown in Figure 7.
Note: The default login for the WebUI is administrator and the
password is hpinvent. The WebUI uses the same login as the local
administrator's account or an account with administrative privileges.
12. Go to the “Rapid Startup Wizard Configuration” on page 27
to complete the setup procedures.
NAS 2000s Installation Guide
23
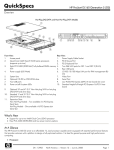
Remote Browser Method (Using Hostname)
The NAS 2000s ships by default with DHCP enabled on the
network port. If the system is placed on a DHCP enabled network
and the serial number of the device is known, it can be accessed
through a client running Internet Explorer 5.5 (or later) on that
network, using the 3202 port of the device. The serial number is
located behind the front bezel of the NAS 2000s, as illustrated in
Figure 6.
nas 2000s
TM
D4059ABC3433
Figure 6: Serial number location
Requirements
The following items are required to run the WebUI configuration
application:
24
■
Windows-based PC loaded with Internet Explorer 5.5 (or
later) on the same segment as the NAS 2000s
■
DHCP-enabled network
■
Serial number of the NAS 2000s
NAS 2000s Installation Guide
Procedure
To initialize the NAS 2000s:
1. Connect the Ethernet cables to the respective network ports
of the NAS 2000s and the corresponding network segments.
See Figure 3 and Table 2 on page 14 for the locations of the
network ports on the NAS 2000s.
2. Go to the NAS device and power it on. It will be several
minutes before the NAS device is accessible on the network.
Note: The NAS device will respond when the NAS operating system
has started.
3. Open Internet Explorer on the PC. Enter https://, the
serial number of the NAS 2000s followed by a hyphen (-),
and then :3202. Press Enter.
Example: https://D4059ABC3433-:3202
Note: Substitute the server name for the serial number if a server
name was previously set.
4. Click Yes in the Security Alert dialog to accept the security
certificate.
5. Login to the WebUI. This launches the WebUI configuration
application (Rapid Startup) on the target HP StorageWorks
NAS device, as shown in Figure 7.
Note: The default login for the WebUI is administrator and the
password is hpinvent. The WebUI uses the same login as the local
administrator's account or an account with administrative privileges.
6. Go to the next section “Rapid Startup Wizard Configuration,”
to complete the setup procedures.
NAS 2000s Installation Guide
25
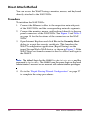
Direct Attach Method
You can access the WebUI using a monitor, mouse, and keyboard
directly attached to the NAS 2000s.
Procedure
To initialize the NAS 2000s:
1. Connect the Ethernet cables to the respective network ports
of the NAS 2000s and the corresponding network segments.
2. Connect the monitor, mouse, and keyboard directly to the rear
panel connectors of the NAS 2000s. See Figure 3 and Table 2
on page 14 for the locations of the connectors on the NAS
2000s.
3. Open Internet Explorer and click Yes in the Security Alert
dialog to accept the security certificate. This launches the
WebUI configuration application (Rapid Startup) on the
target StorageWorks NAS device, as shown in Figure 7. If the
WebUI does not launch connect to the LocalHost and login to
the WebUI.
Note: The default login for the WebUI is administrator and the
password is hpinvent. The WebUI uses the same login as the local
administrator's account or an account with administrative privileges.
4. Go to the “Rapid Startup Wizard Configuration” on page 27
to complete the setup procedures.
26
NAS 2000s Installation Guide
Rapid Startup Wizard Configuration
This utility will guide you through the configuration process.
Requirements
Ensure that an Internet Explorer window has been opened and the
WebUI is at the Rapid Startup Wizard as shown in Figure 7.
Figure 7: Rapid Startup wizard screen
Note: The Rapid Startup Wizard will be the default page unless you
complete the wizard or select the checkbox next to the text that reads,
"Do not show this wizard as the default page."
NAS 2000s Installation Guide
27
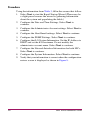
Procedure
Using the information from Table 3, fill in the screens that follow.
1. Select Next to start the Rapid Startup Wizard (There may be
a slight pause because the wizard is gathering information
about the system and populating the fields.)
2. Configure the Date and Time Settings. Select Next to
continue.
3. Configure the Administrator Account settings. Select Next to
continue.
4. Configure the Alert Email settings. Select Next to continue.
5. Configure the SNMP Settings. Select Next to continue.
6. Configure the iLO System Information. Set the IP Address to
DHCP and set the iLO hostname. Do not modify the
administrator account name. Select Next to continue.
7. Configure the Network Interface Information for both NICs.
Select Next to continue.
8. Configure the System Information. Select Next to continue.
9. Verify that your information is correct when the configuration
review screen is displayed as shown in Figure 8.
28
NAS 2000s Installation Guide
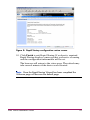
Figure 8: Rapid Startup configuration review screen
10. Click Finish to exit Rapid Startup. If a reboot is required,
Rapid Startup displays a message that a reboot is occurring
and the configuration information will be set.
The browser will return to the status page. The refresh may
take several minutes if the device was restarted.
Note: Once the Rapid Startup Wizard has been completed the
Welcome page will become the default page.
NAS 2000s Installation Guide
29
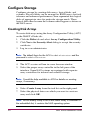
Configure Storage
Configure storage by creating disk arrays, logical disks, and
volumes. Physical disks can be arranged as RAID arrays for fault
tolerance and enhanced performance, then segmented into logical
disks of appropriate sizes for particular storage needs. These
logical disks then become the volumes which appear as drives on
the NAS server.
Creating Disk Arrays
To create disk arrays using the Array Configuration Utility (ACU)
on the WebUI’s Disks tab:
1. Click the Disks tab and select Array Configuration Utility.
2. Click Yes in the Security Alert dialog to accept the security
certificate.
3. Log in as an administrator.
Note: The default login for the ACU is administrator and the
password is administrator.
4. The ACU session will run in a new browser window.
5. Select the proper array controller in the left pane of the
interface. Some NAS systems are equipped with separate
array controllers for internal and external storage.
Note: Consult the help available in ACU for details on creating
arrays, if necessary.
6. Select Create Array from the task list on the right panel.
7. Select the physical drives on which you want to create an
array and click OK.
Note: Do not modify Array A off of the Smart Array 5i controller in
the embedded slot; it contains the NAS operating system.
30
NAS 2000s Installation Guide
Creating Logical Disks
Continue using the ACU to create logical disks from the array
space:
1. Select the array previously created.
2. Select Create Logical Drive from the right pane of the ACU
interface.
3. Complete the logical drive creation wizard to designate some
or all of the array space as a logical disk.
4. Click Save and OK to continue
5. Exit the ACU.
Depending on how many physical disks are included in the array,
several different types of logical disks are possible. Consult the
ACU's help feature for extensive details on creating logical disk
drives.
Verifying Logical Disks
To verify that the NAS System recognizes the newly created
logical disks:
1. Click the Disks tab and select Disks.
2. Select Rescan in the Task section to make the system scan for
newly created logical disks.
3. Click Back to return to the Manage Disks.
4. Verify that disks matching the newly created sizes are
displayed.
NAS 2000s Installation Guide
31
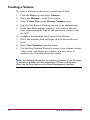
Creating a Volume
To create a Volume on the newly created logical disk:
1. Click the Disks tab and select Volumes.
2. Select the Manage... in the Task section.
3. Select Create New on the Manage Volumes page.
4. Log in to the Remote Desktop session as an administrator.
5. In the Disk Management interface, select one of the disk
items representing the logical disk previously created with
the ACU.
6. Complete the Initialize and Convert Disk Wizard.
7. Select the initialize disk and right-click in the unallocated
space.
8. Select New Partition from the menu.
9. Use the New Partition Wizard to create a new volume, format
a filesystem, and mount the volume on a drive letter or
subdirectory of another mounted volume.
Note: For detailed information on creating volumes such as the types
of volumes available, and the advantages of basic and dynamic
disks, see the help feature in the Disks Management interface.
32
NAS 2000s Installation Guide
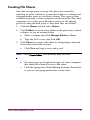
Creating File Shares
Once the storage space is set up, file shares are created by
selecting an entire volume or a particular folder on a volume and
designating that space as a network volume. That space is then
available to groups of client computers on the network. The client
computers access this space through a variety of file sharing
protocols using the disk space to store their files and folders.
1. Click the Shares tab and select Shares.
2. Click Folders to create a new folder on the previously created
volumes, or use an existing folder.
a. Select a volume and click Manage Folders > New...
b. Type the folder name and click OK.
3. Click Shares to create a file share by designating a network
share name and folder location.
a. Click New and type a name and a path.
Note: Check Create Folder if the directory does not exist.
b. Set client types to designate the types of client computers
that should be allowed access to the share.
c. Click the appropriate Client Sharing from the General list
to set user and group permissions on the share.
NAS 2000s Installation Guide
33
Basic Setup Complete
This completes the basic configuration of the HP StorageWorks
NAS system, however, some computing environments may
require additional settings and configuration as noted below.
Completing the System Configuration
Most of these tasks can be completed using the HP StorageWorks
NAS WebUI. All procedures for the configuration tasks may be
found in the HP StorageWorks NAS 2000s Administration Guide.
34
■
Configure shadow copies for creating point-in-time snapshots
of data volumes.
■
Configure data replication software via Microsoft File
Replication Services.
■
Place the NAS system in a domain (highly recommended).
■
Enable and establish space usage quotas.
■
Configure DFS (Distributed File System) or publish the NAS
system's shares into an already existing DFS structure.
■
Enable additional protocols and create the associated file
shares.
■
Adjust logging for system, application, and security events.
■
Install HP network (NIC) teaming.
■
Install additional 3rd party software, such as backup,
anti-virus, or monitoring agents.
■
Configure UNIX user and group mappings.
■
Install the Integrated Lights Out (iLO) license key (included
with the NAS system's country kit) via the iLO port and a
web browser.
■
Create and verify a full NAS system backup before putting
the system into production.
NAS 2000s Installation Guide
Index
A
VHDCI SCSI 14
video 14
conventions
document 6
equipment symbols 7
text symbols 7
creating
disk arrays 30
file shares 33
logical disks 30, 31
volume 32
volumes 30
ACU 31
Alert Email Settings 28
audience 5
authorized reseller, HP 10
auto discovery 22
B
Basic Setup 34
C
NAS 2000s Installation Guide
Index
D
Index
client types 33
completing
system configuration 34
configuration
collect information 18
see also WebUI configuration
20
configuration setup 17
configuration tasks
preinitialization 17
Configure Storage 30
connectors
keyboard 14
mouse 14
NICs 14
power 14
RJ45 14
serial 14
USB 14
data replication 34
default login 23, 25, 26, 30
default page 27
DHCP 28
DHCP (dynamic host configuration
protocol)
defined 18
Disk Management 32
Distributed File System 34
document
conventions 6
prerequisites 5
related documentation 6
domain 34
dynamic host configuration
protocol See DHCP 18
35
E
N
Email Settings 28
equipment symbols 7
Ethernet ports
configuring 19
loopback cables 21
expansion slots, locations 14
getting help 10
NAS B2000
defined 11
software features 15, 16
NAS b2000 v2 external SCSI
model, illustrated 13
NAS b2000 v2 internal SCSI
model, illustrated 12
NAS b2000 v2 rear view,
illustrated 14
Network Interface Information 28
New Partition Wizard 32
NICs
connectors 14
H
P
F
features
software 15, 16
G
help, obtaining 9
host configuration protocols,
DHCP and non-DHCP 18
HP
authorized reseller 10
storage website 10
technical support 10
I
iLO
hostname 28
Settings 28
permissions
group 33
user 33
Physical disks 30
power connector 14
Preinitialization 17
preinitialization
collect information for
configuration 18
prerequisites 5
product overview 11
Q
K
quotas 34
keyboard connector 14
R
L
rack stability, warning 9
RAID arrays 30
Rapid Startup configuration
review screen, illustrated 29
Rapid Startup wizard screen,
illustrated 27
RapidLaunch CD
used for configuration 21
RapidLaunch device discovery
screen, illustrated 23
LocalHost 26
M
mouse connector 14
36
NAS 2000s Installation Guide
RapidLaunch search screen,
illustrated 22
related documentation 6
Remote Desktop 32
Rescan 31
RJ45 connectors
location 14
S
Security Alert 23, 25, 26, 30
serial connector 14
serial number location, illustrated
24
Shadow Copies 34
slot locations
PCI slot 1 14
PCI slots 2 and 3 14
Smart Array 6404 14
SNMP Settings 28
symbols in text 7
symbols on equipment 7
System Information 28
NAS 2000s Installation Guide
T
technical support, HP 10
text symbols 7
U
USB connectors 14
user and group permissions 33
V
VHDCI SCSI connector 14
video connector 14
W
warning
rack stability 9
symbols on equipment 7
websites
HP storage 10
WebUI configuration
direct attach method 26
RapidLaunch method 20
Remote Browser method 24
37
38
NAS 2000s Installation Guide