1
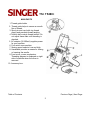
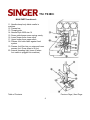
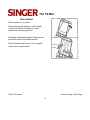
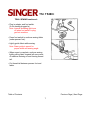
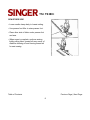
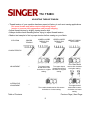
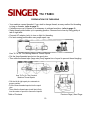
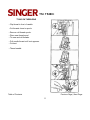
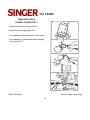
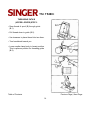
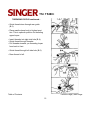
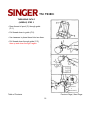
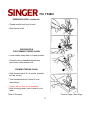
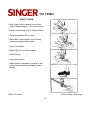
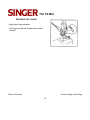
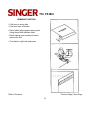
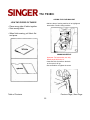
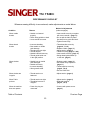
TS+ TS380+
INSTRUCTION MANUAL
Table of Contents
| Next Page
TS+ TS380+
TABLE OF CONTENTS
• MAIN PARTS
• ACCESSORIES
• TRIAL SEWING
• ADJUSTING THREAD TENSION
• PREPARATION FOR THREADING
• TYING ON THREADING
• THREADING PATH A
• THREADING PATH B
• THREADING PATH C
• PREPARATION FOR FORMING
THREAD CHAIN
• FORMING THREAD CHAIN
• START TO SEW
• SECURING TAIL CHAINS
• TURNING SQUARE CORNER
• HEMMING FUNCTION
• JOIN TWO PIECES OF FABRIC
• CARING FOR YOUR MACHINE
• CHANGING NEEDLE
• PERFORMANCE CHECKLIST
IMPORTANT SAFEGUARDS
• Never bend loopers and needle while
threading and sewing.
• Before connecting machine be sure voltage
on AC adaptor matches your electrical outlet
• Disconnect AC adaptor from socket outlet
when changing needle or when leaving
machine unattended
• Do not pull fabric while sewing as this may
bend needle and cause needle breakage or
damage to machine
• Handle foot switch with care and avoid
dropping it on floor Be sure not to place
anything on top of it
• Check machine is threaded correctly before
sewing
Previous Page | Next Page
TS+ TS380+
MAIN PARTS
1. Thread guide holder
2. Thread guide helps to ensure a smooth
flow of thread.
3. Spool pin and cap holds top thread
supply and prevents thread tangling.
4. Tension dial controls thread tension. Do
not adjust these dials until threading is
checked.
5. AC adaptor (9V 650mA) supplies power
for your machine.
6. Foot switch runs machine.
7. Sewing speed selector Low and high
8. Handwheel provides a means for raising
or lowering the needle.
9. Front cover, covers mechanism.
Threading diagram is displayed on right
side of machine when the cover is
removed
10. Accessory box.
Table of Contents
Previous Page | Next Page
3
TS+ TS380+
MAIN PARTS continued...
11. Needle clamp body holds needle in
machine.
12. Presser bar.
13. Thread guide.
14. Needle-Style 2020 size 14
15. Seam guide keeps seam moving evenly.
16. Lower looper forms lower stitch.
17. Upper looper forms upper stitch.
18. Presser foot holds fabric against feed
system.
19. Presser foot lifter lets you raise and lower
presser foot. Press down to lift foot.
20. Internal threading light (turns off when
foot switch is plugged into machine)
Table of Contents
Previous Page | Next Page
4
TS+ TS380+
ACCESSORIES
Table of Contents
Previous Page | Next Page
5
TS+ TS380+
TRIAL SEWING
Take machine out of carton.
Swing thread guide holder up until a slight
sound is heard that indicates you have
reached the operating position.
Straighten all threads between thread spools
and tension dials until thread are taut.
Check thread to make sure it is not tangled
under spool or spool stand.
Table of Contents
Previous Page | Next Page
6
TS+ TS380+
TRIAL SEWING continued...
• Plug in adaptor and foot switch.
(If not already plugged in)
Note: Internal threading light turns
off when foot switch is plugged into machine.
• Press foot switch to continue sewing fabric
(under presser foot).
• Lightly guide fabric while sewing.
Note: Seam guide is preset for
proper width and sewing angle.
• When seam is complete, continue sewing,
lightly pulling fabric towards left rear corner
of machine chaining off and forming thread
tail.
• Cut thread tail between presser foot and
fabric.
Table of Contents
Previous Page | Next Page
7
TS+ TS380+
SEW OTHER SIDE
• Lower needle clamp body to lowest setting.
• Use presser foot lifter to raise presser foot.
• Place other side of fabric under presser foot
and sew.
• When seam is complete, continue sewing,
lightly pulling fabric toward left rear corner of
machine chaining off and forming thread tail
for next sewing.
Table of Contents
Previous Page | Next Page
8
TS+ TS380+
ADJUSTING THREAD TENSION
• Thread tension of your machine has been preset at factory to suit most sewing applications
But some threads and fabrics require readjusting thread
tension to improve stitch appearance and prevent skipping.
• Adjust thread tension by slightly turning tension dial.
• Always double check threading before trying to adjust thread tension.
• Make a test sample to find a proper tension before sewing on your fabric.
SITUATION
PROPER
TENSION
LOWER LOOPER
THREAD TOO
LOOSE
UPPER LOOPER
THREAD TOO
LOOSE
Turn lower looper
thread tension dial
clockwise to a tighter
setting..
Turn upper looper
thread tesnsion dial
clockwise to a tighter
setting.
NEEDLE THREAD
TOO LOOSE
CHARACTERISTIC
ADJUSTMENT
--
ALTERNATIVE
ADJUSTMENT
-Turn needle thread tension dial counterclockwise to a looser setting.
Table of Contents
Turn needle thread
tension dial clockwise
to a tighter setting.
Turn upper thread
tension dial counterclockwise to a looser
setting.
Previous Page | Next Page
9
TS+ TS380+
PREPARATION FOR THREADING
• Your machine comes threaded. If you wish to change thread, an easy method for threading
is tying on threads. (refer to page 5)
• If machine runs out of thread, it is necessary to rethread machine. (refer to page 6)
• Swing thread guide holder up to operating position. Remove front cover by lifting gently at
tab on right side.
• Connect AC adaptor (only) to turn on light for threading.
• For best sewing performance use proper spool cap.
How To Fix On The Sewing Machine Thread Spools
• Put the three threaded spools into the spool pins.
• Then slide the thread caps (large size) firmly against rim of spool to prevent thread tangling.
How To Fix On The Overlock
Machine Thread Spools
• Pull the left & right spool pins outwards to
proper position.
• Put the three threaded spools into the spool
pins.
• Then slide the thread caps (small size) firmly
into the center of spools to secure the spools.
Table of Contents
Previous Page | Next Page
10
TS+ TS380+
TYING ON THREADING
• Clip thread in front of needle.
• Cut threads close to spools.
• Remove old thread spools.
• Place new thread spool.
• Tie new and old threads.
• Pull needle thread until knot appears.
• Cut knot.
• Thread needle
Table of Contents
Previous Page | Next Page
11
TS+ TS380+
THREADING PATH A
(LOWER LOOPER) STEP 1
• Draw thread (A) through guide (A-1)
• Bring thread through guide (A-2).
• Use tweezers to place thread into two discs.
• Use tweezers to guide thread down through
front guide (A-3).
Table of Contents
Previous Page | Next Page
12
TS+ TS380+
THREADING PATH A continued...
• Raise lower looper to near internal cover
(about 3 mm). This is optimum position for
threading lower looper.
• Insert threader into left side hole(A-4).
• Hold tweezers in right hand and guide
thread through threader.
• Pull threader towards you threading looper
from back to front.
• Use tweezers to guide thread.Place thread
between two loopers.
• Guide thread through right side hole (A-5).
• Draw thread to left.
Table of Contents
Previous Page | Next Page
13
TS+ TS380+
THREADING PATH B
(UPPER LOOPER) STEP 2
• Draw thread of spool (B) through guide
(B-1).
• Pull thread down to guide (B-2).
• Use tweezers to place thread into two discs.
• Turn handwheel toward you.
• Lower needle clamp body to lowest position.
This is optimum position for threading guide
(B-3).
Table of Contents
Previous Page | Next Page
14
TS+ TS380+
THREADING PATH B contimued...
• Guide thread down through rear guide
(B-3).
• Place needle clamp body to highest position. This is optimum position for threading
upper looper.
• Insert threader into right side hole (B-4).
• Guide thread through threader.
• Pull threader towards you threading looper
from back to front.
• Guide thread through left side hole (B-5).
• Draw thread to left.
Table of Contents
Previous Page | Next Page
15
TS+ TS380+
THREADING PATH C
(NEEDLE) STEP 3
• Draw thread of spool (C) through guide
(C-1).
• Pull thread down to guide (C-2).
• Use tweezers to place thread into two discs.
• Pull thread down through guide (C-3),
then up and down through it again.
Table of Contents
Previous Page | Next Page
16
TS+ TS380+
THREADING PATH C continued...
• Thread needle from front to back.
• Draw thread to left.
PREPARATION
FOR FORMING THREAD CHAIN
• Lower needle clamp body to lowest position.
• Collect the three threaded threads and
place them under presser foot.
FORMING THREAD CHAIN
• Hold thread ends at 30 to needle. (towards
left rear corner).
• Turn handwheel about 8 times to form
thread chain.
• If chain will not form check threading.
• After producing chain, start to sew on your
fabric.
Table of Contents
Previous Page | Next Page
17
TS+ TS380+
START TO SEW
• Note: Seam guide is preset to limit stitch
width to approximately 11 /64 inch (4.2mm).
• Place needle clamp body to lowest position.
• Place thread chain 90 to needle.
• Place fabric under presser foot touching
needle and against seam guide.
• Plug in foot switch
• Select High or Low sewing speed.
• Start stitching.
• Lightly guide fabric.
• When seam is completed, continue to sew
until enough thread tail available for next
sewing.
Table of Contents
Previous Page | Next Page
18
TS+ TS380+
SECURING TAIL CHAINS
• Apply liquid fray preventer.
• Use large needle and thread chains under
stitches.
Table of Contents
Previous Page | Next Page
19
TS+ TS380+
TURNING SQUARE CORNER
Outside Corner
Inside Corner
• Sew to point A, one stitch past end of
corner.
• Stitch, stopping on point B.
• Leave needle in fabric.
• Raise presser foot. (Push down on lever).
• Pivot fabric.
• Insert needle at edge.
• Continue stitching.
• Pull fabric to left in straight line.
• Stitch and hold fabric in straight line.
Table of Contents
Previous Page | Next Page
20
TS+ TS380+
HEMMING FUNCTION
• Fold hem to wrong side.
• Fold hem back as shown.
• Place folded edge against seam guide.
Using thread that matches fabric
• Stitch making sure needle just barely
catches the fold.
• Turn fabric to right side and press.
Table of Contents
Previous Page | Next Page
21
TS+ TS380+
CARING FOR YOUR MACHINE
JOIN TWO PIECES OF FABRIC
• Add one drop of sewing machine oil to highlighted
areas after or before using machine.
• Place wrong side of fabric together.
• Start sewing fabric.
• When finish sewing, pull fabric flat
and press.
CHANGING NEEDLE
Important: For best results, use only
Needle style 2020 size 14.
• Insert flat side of needle to the back
as far up as it will go.
• Use screwdriver to tighten the screw.
Table of Contents
Previous Page | Next Page
22
TS+ TS380+
PERFORMANCE CHECKLIST
Whenever sewing difficulty is encountered, make adjustments as noted below:
Condition
Method of adjustments
(reference pages)
Reason
When needle
breaks.
• Needle not inserted
properly.
• Fabric being pulled too hard.
• Loose needle set screw.
• Insert needle correctly or replace
with correct needle. (page 11)
• Do not pull the fabric by hand
Use hand onl to guide the fabric.
• Tighten Screw firmly.
When thread
breaks.
• Incorrect threading.
• Bent needle or needle
point damage.
• Thread tension too tight.
• Thread tangled.
• Needle inserted incorrecty.
• Thread guide holder not
in the right position.
• Thread machine correctly.
(pages 6, 7, & 8)
• Replace needle. (page 11)
• Adjust tension. (page 4)
• Thread correctly. (page 6, 7,& 8)
• Insert needle correctly. (page 11)
• Swing thread guide holder up.
to the end. (page 3)
When stitches
skip.
• Needle bent or neelde
point damaged.
• Needle set loosely.
• Incorrect threading.
• Wrong needle used.
• Replace needle. (page 11)
• Set needle firmly in position.
(page 11)
• Thread machine correctly.
(page 6, 7,& 8)
• Use Cat. 2020-014.
When stitches are
irregular.
• Thread tension not
balanced.
• Adjust tension. (page 4)
When Fabric
puckers.
• Thread tension too tight.
• Threading incorrect or
tangled.
• Adjust tension. (page 4)
• Rethread machine.
(page 6, 7,& 8)
When the machine
does not operate.
• Power line plug not
connected.
• Connect with power source.
(page 3)
Table of Contents
Previous Page
23