1
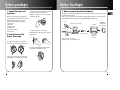
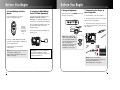
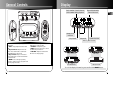
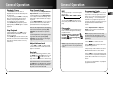
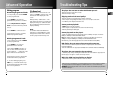
EN
No film output on this page
u
s
e
r
m
a
n
u
on
a
off
next
play
l
last
stop
THOMSON multimedia
46/47 quai A. Le Gallo
92648 Boulogne Cedex
FRANCE
RCS nanterre
B 322 019 464
55672850
www.thomson-multimedia.com
PDP2444/PDP2448
Important Information
Warning
• Do not play your headset at a high volume. Hearing experts warn against extended
high-volume play.
• If you experience a ringing in your ears, reduce volume or discontinue use.
• You should use extreme caution or temporarily discontinue use in potentially
hazardous situations.
Even if your headset is an open-air type designed to let you hear outside sounds, don’t
turn up the volume so high that you are unable to hear what is around you.
Caution While Driving: Use of headphones while operating an automobile or moving vehicle is not recommended and is unlawful in some states
and areas. Be careful and attentive on the road. Stop operation of the
unit if you find it disruptive or distracting while driving.
Important Information
Care of Memory Cards (Not Included)
• Do not touch the golden electrodes. Use a soft dry cloth to clean any dirt.
• Do not bend memory card.
• Do not operate or store memory card in places with frequent static electricity or
electrical noise (e.g. speaker, TV set). Recorded data may be damaged.
• It is normal for memory card to get warm after being used for a long time.
• Always put it in storage case after removing from the unit.
• Do not store memory card near fire, places with high temperature/ humidity or in
direct sunlight.
• We recommend that you make a copy of your recorded contents into another media
(e.g. floppy disc, tape) as back-up.
Power supply
• Battery power: AAA (LR03) x 1.
Precautions for the Unit
• Do not use the unit immediately after transportation from a cold place to a warm
place; condensation problem may result.
• Avoid shock to the unit especially during recording. Recorded data may be damaged.
• Do not store the unit near fire, places with high temperature or in direct sunlight.
• Do not operate or store unit in places with frequent static electricity or electrical
noise (e.g. speaker, TV set).
• Clean the unit with a soft cloth or a damp chamois leather. Never use solvents.
• The unit must only be opened by qualified personnel.
Battery Precautions
• When storing the unit , be sure to remove the batteries because they may leak and
damage the unit.
• Batteries may leak electrolyte if inserted incorrectly, if disposed of in fire, or if an
attempt is made to charge a battery not intended to be recharged.
• Discard leaky batteries immediately. Leaking batteries may cause skin burns or other
personal injury.
• Do not charge batteries which are not intended to be recharged.
• Dispose of batteries, according to federal, state and local regulations.
Warning: Use of this product is for your personal use only. Copying CDs
or downloading music files for sale or other business purposes is a violation of copyright law. It is also a violation of copyright law to download
files without permission of the copyright owner.
The descriptions and characteristics given in this document are given as a general indication and not as a guarantee. In
order to provide the highest quality product possible, we reserve the right to make any improvement or modification
without prior notice. The English version serves as the final reference on all product and operational details should any
discrepancies arise in other languages.
EN
Important Safety Information
IMPORTANT NOTE: To reduce the risk of fire or shock hazard, do not expose this
player to rain or moisture.
CAUTION
RISK OF ELECTRIC SHOCK
DO NOT OPEN
This symbol indicates “dangerous voltage”
inside the product that presents a risk of
electric shock or personal injury.
ATTENTION
RISQUE DE CHOC ELECTRIQUE
NE PAS ENLEVER
This symbol indicates important
instructions accompanying the product.
Table of Content
Important Information
Key Lock . . . . . . . . . . . . . . . . . . . . . . . .7
Important Safety Information
Skip / Search (Scan) . . . . . . . . . . . . . . .7
Before You Begin . . . . . . . . . . . .1
Adjust volume Level . . . . . . . . . . . . . .7
1. Unpacking the player and
accessories . . . . . . . . . . . . . . . . . . . . . .1
Advanced Operation . . . . . . . . .8
2. How to use your clip phones . . . .1
DSP . . . . . . . . . . . . . . . . . . . . . . . . . . . . .8
3. What’s so special about this mp3
player . . . . . . . . . . . . . . . . . . . . . . . . . .2
Play Modes . . . . . . . . . . . . . . . . . . . . .8
4. Insert batteries into the player . . .3
5. Inserting a Memory Card
(optional) . . . . . . . . . . . . . . . . . . . . . . .3
TO REDUCE THE RISK OF ELECTRIC SHOCK, DO NOT REMOVE THE COVER
(OR BACK). NO USER-SERVICEABLE PARTS ARE INSIDE. REFER SERVICING
TO THE QUALIFIED SERVICE PERSONNEL.
7. Connecting the Player to your
Computer . . . . . . . . . . . . . . . . . . . . . . .4
General Controls . . . . . . . . . . . .5
A pleine puissance, l’écoute prolongée du baladeur peut
endommager l’oreille de l’utilisateur.
Editing Program . . . . . . . . . . . . . . . . . .9
File Download . . . . . . . . . . . . . . . . . . .9
6. Using Headphones . . . . . . . . . . . .4
Sound Pressure Control
Les articles de loi L44.5 et 44.6 du code de la santé publique,
modifiés par l’article 2 de la loi du 28 Mai 1996 imposent
une puissance acoustique maximale de 100 décibels. Le
casque livré ( code 55700930 ) et votre appareil respectent
la législation en vigueur.
Programming Tracks . . . . . . . . . . . . . .8
Display . . . . . . . . . . . . . . . . . . . .6
General Operation . . . . . . . . . .7
Playback / Pause . . . . . . . . . . . . . . . . . .7
Stop Playback . . . . . . . . . . . . . . . . . . . .7
Troubleshooting Tips . . . . . . . . .10
EN
Before You Begin
Before you Begin
1. Unpack the player and
accessories
When you unpack your new player, be
sure you have removed all the accessories
and information papers. The items
below are packed with your player.
1. The Player
2. Batteries
3. Software CD
4. Headphones
5. Connection Cable
6. Carry Case
2. How to Use Your Clip
Phones (The e.clipz)
2. Slide the ear hook behind the ear with
the ear pad on the front of the ear.
Rotate the clip phone so the ear pad fits
closely with the ear.
3. What’s so special about this mp3 player?
EN
This player is meant to play mp3 audio files encoded on a memory card or recorded in
the built-in flash memory.
To do so, you need the use of a Windows computer with USB port , connection cable
(included) and a music management software (MusicMatch Jukebox).
CDs
Compression and transfer
and/or
Optional:
MemoryCard
(not included)
Playback
MusicMatch
Jukebox
3. Lock the clip phone in place by
pushing down on the top of the ear hook
until it locks.
off
ST
stop
OP
LAS
T
last
NEXT
next
PL
AY
on
play
Connection cable
mp3 music
built-in flash
memory
Compressed music internet sites
www.musicmatch.com, www.emusic.com
The right ear clip phone is labeled R
while the left ear clip phone is labeled L.
R
L
4. For best sound quality, make sure the
earpad fits closely with your ear.
1. Pull the ear hook away from the ear
pad slightly. You will hear a click sound.
CLICK
1
2
Before You Begin
Before You Begin
A. To insert batteries, open the
battery compartment door.
The player has built-in flash memory
(64MB for PDP2444 / 128MB for
PDP2448). To extend the playtime, you
can use the optional Memory Card slot.
OPEN
Push the
compartment door
downward
and lift it
up
Insert phone jack into PHONES at the top
of player for listening.
7. Connecting the Player to
your Computer
1. Lift the rubber cover on the player.
2. Insert the smaller end of the connection
cable into the socket tightly.
3. Insert the opposite end of the connecting cable to the USB socket on the back of
the computer.
A. Insert a Memory Card into the card
slot when the player is off as the
diagram shows:
B. To remove card, push the Memory
Card to eject.
Note: Have a Blast- Just
Not in Your Eardrums. Make
sure you turn down the volume on the unit before you
put on headphones.
Increase the volume to the
desired level only after
headphones are in place.
B. Insert 1 “AAA”(LR03) battery with
polarities corresponding to indications
on the compartment.
C. Close the door to the battery
compartment
Note: Refer to the power level indicator
on display for battery level.
Replace with new batteries when the
indicator is empty.
6. Using Headphones
DSP
5. Inserting a MultiMedia
Card / SD Card (Optional)
MODE
4. Insert battery into the
player
Caution: Do not remove Memory
Card during playback or when
power is on. It may stop unit from
playing immediately.
1
3
Note: Refer to the Software
Instruction manual for procedures in
setting up USB drivers and
transferring files to the player.
3
4
General Controls
DSP
MODE
6
5
Display
Total number of track / Current
track number during playback
10
Elapsed time/remain
time of the track
EN
7
9
P
8
off
2
3
4
1
on
OPEN
stop
last
next
Battery level
indicator
play
Key locked
Playmode
Volume level bar
Memory card inserted
1. PLAY - Turn unit on, start playback
and pause.
2. STOP - Stop playback and turn unit
off .
3. Skip backward- Skip back to last
track. Press and hold to search backward within the same track.
4. Skip forward - Skip to next track.
Press and hold to search forward within saved tracks.
5. MODE - Select among repeat all,
random , random repeat, program and
repeat program modes.
6. DSP - Select among DSP modes.
(Flat, Bass, Pop, Rock, Jazz)
7. PHONES - headphones jack.
8. HOLD - Slide to lock keys to avoid
accidental key activation.
9. VOLUME - Adjust sound volume.
10. Hole for carrying strap.
P
P
Song information
DSP mode
P
Encoded bitrate
USB connected
To scroll the display information, press and hold the MODE button.
5
6
General Operation
Playback / Pause
• Press PLAY to turn the unit on.
Playback then starts automatically from
the first track.
• In stop mode, press PLAY to start playback of selected track. Current track
number, elapsed playback time and
encoded bit rate show on display.
• Press PLAY during playback to pause
playing and press PLAY again to resume
playback.
Stop Playback
• During playback, press STOP to stop
playback with total number of tracks
shown on display.
• Press STOP again to turn unit off. (The
unit will also turn itself off automatically
after about 1 minute if there is no key
activation. )
General Operation
Skip / Search (Scan)
• In stop mode, press Skip backward or
Skip forward to select desired tracks.
• During playback, press Skip forward
once to skip to next track starting. Press
and hold for quick forward scan of playing track.
• Press Skip backward once to return to
previous track start. Press and hold for
quick backward scan of playing track.
Note: If the elapsed time of the playing
track is less than 0:04, pressing Skip
backward once will return to previous
track.
If the elapsed time of the playing track
is greater than 0:04, pressing Skip
backward once will return to the beginning of the current track.
• Press repeatedly to select among the
DSP modes:
FLAT > BASS > POP > ROCK > JAZZ
• Press and hold DSP will show song
title, artist, format and bit rate on display.
Play modes
• Press MODE repeatedly during playback to switch among the following
playback modes:
Normal playback > Repeat All
>
Shuffle
> Shuffle repeat
>
P>
Program P > Repeat program
Normal playback
Programming Tracks
EN
1. Press and hold MODE for 2 seconds in
stop mode to enter program mode. You
will see ‘P’ icon lit representing program
mode, flashing ‘ - -’ for track selection
and ‘P01’ for program list position. (If
you have program in your player, the preprogrammed track number will be
shown.
2. Press Skip backward or Skip forward to select a track. Selected track
number will flash.
Note: The player will enter Intro Play
mode and play the beginning of each
track as you scroll through tracks for programming.
3. Press MODE to confirm selection.
Adjust Volume Level
• Press VOL + or VOL - to adjust sound
volume. Refer to the volume bar on display for sound level.
Key Lock
7
DSP
Note: Program and Repeat program will
only appears if there are programmed
tracks.
4. Press MODE again to skip to the next
programming position.
5. Repeat steps 2-4 for further selections.
Maximum 20 selections can be made.
To avoid accidental key activation, slide
the LOCK key to ON
position to lock
keys. Lock icon
can be seen on display. Slide to OFF position to unlock keys.
6. Press STOP to exit programming mode
or unit returns to stop mode automatically after 30 seconds if there is no key activation.
Note: When the unit is in off mode and
the HOLD key is in ON position, pressing
PLAY key will cause display to show the
key lock icon for three seconds.
See section on “Play Modes” to playback
programmed tracks.
8
Advanced Operation
Editing program
Overwriting Programmed Tracks
1. In stop mode, press and hold MODE
to enter program mode.
2. Press MODE to select the programmed track you want to overwrite.
3. Press Skip backward or Skip forward to select the new track you want
to store.
4. Press MODE to confirm selection.
5. Repeat steps 2 and 3 to overwrite
additional programmed tracks.
Deleting Programmed Tracks
1. In stop mode, press and hold MODE
to enter program mode.
2. Press MODE to select the programmed track to be deleted.
3. Press and hold DSP for about 3 seconds to delete unwanted track from
your program list, ‘ - - ‘ will show on display to indicate successful deletion.
4. Repeat steps 2 and 3 to delete additional tracks from the program list.
5. To cancel editing program, press
STOP once , or unit will return to stop
mode automatically after 30 seconds if
there is no key activation.
9
File Download
When the unit is connected to the computer, press PLAY to activate, then “USB
Connected” will be displayed on the
screen.
During transfer, “USB Transfer ...” will
flash. When the transfer is complete, the
display will change to "USB Connected".
Do not unplug the USB cable when the
display is flashing.
NOTE:
See Software Instruction Manual for
instructions to install USB driver , music
management software and to transfer
tracks to player and/or memory card.
Troubleshooting Tips
The player does not turn on when PLAY button pressed.
• Batteries may be inserted incorrectly.
• Batteries may be empty.
EN
Skipping tracks or bad sound quality?
• Repeat, random or program function may be activated.
• There may be strong magnetic fields (e.g. too close to TV) near the unit.
• Low Battery level. Replace with new ones.
Cannot perform playback?
• LOCK function may be activated.
• There may be no mp3 tracks in the card or internal memory.
• Memory Card may be damaged.
Cannot play tracks on the player?
• Track encoded bit rate may not be between 32 to 192 kbps for mp3 or between
64kbps to 128kbps for Windows Media Audio.
Note: For better result, we recommend a constant encoded bit rate from 32 to
320kbps for mp3 and 48kbps to 128kbps for Windows Media audio.
Nevertheless, your unit may play tracks encoded in variable bit rate (VBR).
USB display does not appear when connected to computer.
• Check connection between your unit and the computer. (Refer to Software
Instruction Manual)
• Check if USB drivers are properly installed (Refer to Software Instruction Manual)
The player does not respond to key operations?
• Turn the player off by removing the batteries. Reinsert the batteries properly and
turn the player on again to resume normal operations.
Why is the CARD icon keep flashing on display?
• Check if the memory card inserted is in correct format.
Under some rare circumstances, your unit might report less memory than is available
for storing music files. If this happens, format the device to recover all memory.
WARNING: Formatting the device will erase all contents stored. Backup any valuable
files before doing so.
10