1
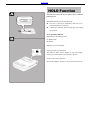
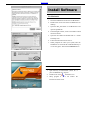
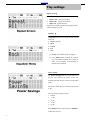
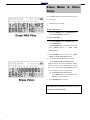
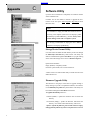
Back to Index
Portable MP3 player
EV64AMX
Operating Instructions
Dear Customer
Thank you for purchasing this product.
For optimum performance and safety, please read these
instructions carefully.
Before connecting, operating or adjusting this product,
please read these instructions completely. Please keep this
manual for future reference.
Back to Index
Back to Index
Table of Contents
1 Introduction
Package……………………………..……..4
Location of Controls ………………………5
HOLD Function……………………………6
2 Setting Up the player
Install software……………………………. 7
Connect to Your P C………..………………9
Download MP3 files to the unit……………11
3 Using the player
LCD and Menus…………………. …...
12
Play MP3 Music (Basic Play)…………….. 13
Play Settings…….………………………... 14
Record Voice…………………………. ….. 15
Erase Music and Record File(s)…………. 16
Information Submenu………………... ….. 17
Appendixes
A
B
C
D
What is MP3?…………………………….. 18
Cautions……………………………… ….. 19
Software Utility…………………….…….. 20
Technical Specifications &
Troubleshooting…………………….…….. 21
Using the battery B
Install battery procedure
1 Press and Pu ll to open battery door .A
2 Insert the AA alkaline type battery.
3 Cover and Push to close battery door.
Back to Index
Package
Please check the box contents before you start to use the unit.
Box Contents : A
[1]
[2]
[3]
[4]
MP3 player
1 installation CD
USB cable
High-quality stereo earphones
Item may be different, depending on the
country or period that you purchased your
player in.
Back to Index
Locations of
Controls
Portable MP3 player A
[A] Microphone (MIC)
[B] Display
[C] Skip to Next (SKIP)
[D] Skip to Previous (SKIP)
[E] Mode button (MODE)
[F] Play/pause/Power button
[G] Belt hole
[H] Earphone Volume control buttons
(VOLUME + / - )
[I] USB port (USB)
[J] Earphone jack (PHONE)
[K] Smart Media Card Slot
[L] Stop/power off button (STOP/OFF)
[M] Record button (REC)
[N] Hold button (HOLD)
[O] Smart Media Card Eject (EJECT)
[P] Battery door open (OPEN)
[Play]: Press this button to turn on the unit, play music
and/or voice file;
[SKIP]:Press the two buttons to skip to next/previous
music or move to next menu.
[STOP/OFF] : Press to stop a music or recording; Press and
hold for 4 seconds to turn the unit off.
[MODE]: Press the button to enter menu, or confirm the
selected options.
Stereo earphones B
(A) Plug
Back to Index
HOLD Function
This function causes the unit to ignore short, accidental
button presses.
The HOLD function prevents the following :
l
l
The unit is powered on accidentally when not in use,
causing the batteries to run down.
A button is accidentally pressed during play, interrupting
the operation.
To use the HOLD function
Set [HOLD] to the HOLD position.
(A) HOLD mode
(B) Release
When the unit is in hold mode:
Pressing the unit is in hold mode:
The indicator “hold” always displays on the LCD display.
Pressing any button causes no any change to the unit.
If turn on the unit in hold mode:
The unit will displays ‘Locked’ on LCD screen and power off.
Back to Index
Install Software
Before using the unit, MP3 music shall be download ed from
computer to the unit. Data files such as pictures, documents or
applications can also download and be stored in the unit for a
fast, safe and high speed mobile data storage use.
Minimum System Requirement
Windows :
Microsoft Windows 98, Windows 98SE,
Windows
Hardware :
Me!,
Windows
2000
Professional and Windows XP or above
Pentium MMX 200 or above
30MB free hard disk space
One available USB port
4x CD-ROM or higher
Macintosh OS : MAC OS 9.2
Mac Hardware :
30MB free hard disk space
One available USB port
4x CD-ROM or higher
For Windows
1. Insert the Installation CD into the CD-ROM driver.
If the Setup program does not run automatically, do
steps 2 through 3.
Otherwise, skip to step 4.
2. Click Start -> Run
3. In the Run dialog, type D:\SETUP.EXE (where D:\
is your CD-ROM drive) and click OK.
4. Setup main screen will display.
To install the driver and application for the unit,
Click Next.
5. Follow the instructions on the screen.
Click on the Right Arrow button to start Installation.
Keep on clicking on the Right Arrow or Yes button if
want to install by default (recommended). Otherwise
please change the options to install manually.
6. When prompted to restart your system, take the
Installation CD out from the CD-ROM and keep it in
a security place . Then select the Yes, I want to
restart my computer now option and then click the
Finish button.
(Continued on next page)
Back to Index
Install Software
For Macintosh
1. Insert the Installation CD into the CD-ROM drive.
2. Double -Click on the icon of the CD-ROM drive on
desktop.
3. Open the Mac_OS folder in CD-ROM drive and
open the packed file.
4. In the dialogue window, create a new folder on hard
disc and continue
5. Open the new folder and double-click on ‘ Install
and Setup’ icon.
6. Follow the instructions on the scre en.
7. When prompted to restart your system, take the
Installation CD out from the CD-ROM and keep it
in a security place. Then click the Restart button.
Install musicmatch (Windows version)
1. Open directory D:\ musicmatch\ (where D:\ is
your CD-ROM drive) in explore.
2. Double click on the
musicmatch icon.
3. Setup program starts to run. Follow the
instructions on the screen.
Musicmatch Setup screen--
Back to Index
Connect to PC
You need not switch off your computer when you connect
the unit to the PC since USB is Plug-and-Play.
Connection
(1) The battery must be in the player.
(2) Position the PC so that its USB ports can be easily
accessed.
(Note : The USB port(s) may be found on the front
panel or elsewhere instead of the back panel. Refer to
your PC dealer for support if necessary. )
(3) Plug the flat USB connector of the bundled USB cable
to the PC.
(4) Plug the square connector of the USB cable to the unit.
(5) Press Play button to turn the unit on.
(6) USB IDLE will appear on LCD of the unit.
For Windows Users
Install and Update
(7) System will detect the new hardware exists in your
system and install each of them automatically.
(8) Upon the driver installation is completed, run the Play
Update utility that is now available in the start menu
of your Windows system.
Verify Correct Installation of the unit
(9) When the Player Update is completed, the player is
ready to use. If you wish to check that whether MP3
Flash Player has properly installed on your system,
double -click on My Computer icon on the desktop of
your Windows.
(10) You will observe your MP3 Flash Player shows up as
Removable Disk (F:) and (G:) drives in Windows.
(11) Removable Disk (F:) implies the built-in flash
memory of the MP3 Flash Player.
Removable Disk (G:) drive implies the Smart Media
Card (if any) inserted into the MP3 Flash Player. In
case if Smart Media Card is not present in the player,
Removable Disk (G:) will not be accessible.
Back to Index
Connect to PC
For Macintosh Users
(7) Computer will detect new hardware and install them
automatically. Untitled Disc(F:) and (G:) will appear on
desktop.
Untitled Disc (F:) implies the built-in flash memoryof the MP3
Flash Player.
Untitled Disk (G:) drive implies the Smart Media Card
inserted into the MP3 Flash Player. In case if Smart Media
Card is not present in the player, Untitled Disk (G:) will not be
accessible.
Notice
It is forbidden to unplug the USB cable while the unit is
accessing with computer (the LCD displays [USB
READING] or [USB WRITING] ), because it may cause
serious damage to the unit or computer system.
It is strongly recommended to unplug the cable ONLY
while the LCD displays [USB IDLE].
10
Back to Index
Download MP3 files to
the unit
The unit is a handy device for data storage. No any specific
software need to upload, download or erase the MP3 or data
files. All you do is copy and paste the desired files into the
mapped drives that appear on your PC (Removable Drives show
up in My Computer or Desktop).
Check the connection between PC and the unit is correct and :
(a) For
Select
MP3 files and right click on the files.
Windows
(If you want to select more than one file, press and hold
Ctrl key and click on the other files.)
(b) Select Copy in right click menu.
(c) Double-click on Removable Disk(F:) to open.
(d) Right -click on blank and select Paste
(e) Copying window appears.
Do not unplug the unit with your computer while
accessing until the unit displays USB IDLE.
(a) Select MP3 music file(s)
For Macintosh OS
(b) Drag and drop the file(s) on the Untitled Disk(F:) icon
(c) Starting to copy MP3 files.
Do not unplug the unit with your computer while
accessing until the unit displays USB IDLE.
(i)
Experienced users may drag and drop the selected
Tips file(s) to the Removable disk.
(ii)
To make Removable disk(G:) available , you install
one SMC(Smart Media Card) to the expansion slot of
(iii)
the unit.
The memory capacity of the removable disk may seem
to be different with the actual capacity size of the unit
due to different calculate method issue.
11
Back to Index
Using the player
After download MP3 file(s) into the unit, you can play the MP3
music with you. Ensure that the HOLD switch is not on before
you continue, and one available battery must be in the unit.
Power ON / OFF
1. Press the [PLAY] button to turn the unit on.
2. To turn the unit off, press and hold the [STOP ]
button for more than about 4 seconds.
Indicators A
1. Battery level indicator
2. Flash card (SMC) indicator
3. Hold mode indicator
4. Repeat mode indicator
5. ID3 Info / Text Info field
6. Text Info field
7. Music Format
8. Equalizer type indicator
9. Recording indicator
10. Repeat mode
11. Volume level
Navigating & Accessing Menus B
Chart B shows the navigating menus.
12
Back to Index
Basic play
1. Do wnload MP3 file(s) to the unit
2. Unplug the cable from the unit
3. Connect the stereo earphones to [PHONES] jack
4. Press [Play] button to turn the unit on
a)
The unit now power on. MP3 music is ready to play,
Open Screen displays on LCD
b)
Press [SKIP] button to move to the music you prefer
5. Press [Play] button to start to play music
Playing MP3 screen displays on LCD
6. Adjust the volume.
(+) : To increase the volume level
(-) : To decrease the volume level
7. Skip to next music
If want to skip to next or previous music, pres s [ SKIP]
button to skip one music.
8. Skip in music
If want to skip in one playing music, press and hold the
[SKIP ] button to skip in the music.
13
Back to Index
Play settings
Repeat modes A
Users can change play methods in Play Mode Menu
1. Repeat None (take off all repeat)
2. Repeat One (repeat current music)
3. Repeat All (repeat all music)
Repeat One or Repeat All selected, the Repeat mode
indicator displays on LCD.
Equalizer B
In EQ Menu there are some kinds of equalizer built
in the unit.
1. No EQ (Normal)
2. Rock
3. Classic
4. Pop
5. Jazz
a) No EQ is the default setting of the player.
b) Press [SKIP] button to change the equalizer
type. The selected equalizer active when you
select. An Icon appears on LCD display to
indicate current equalizer.
Power Savings
The [Power Savings] menu is a special function of
the unit. The function can power off the unit
automatically after the unit is idle to save the battery
power.
The options define the power off time after the unit
is idle.
There are several options to choose:
1. Disable
2. 1 min
3.
2 min
4.
5 min
5. 10 min
Press [SKIP] button to select and press [ MODE] to
confirm the selection.
14
Back to Index
Record Voice
Recording voice A
The unit can record voice via built -in microphone.
1. Select [Voice Record] in [Voice Mode] menu
and press [MODE] button. The unit is ready to
record voice.
2. Press [REC] button to start one recording.
3. Press [STOP] to stop this recording.
Playback voice file B
1. Select [Voice Play] in [Voice Mode] menu and
press [MODE] button.
2. Latest voice file displays on screen.
To playback the latest voice file, press [PLAY]
button. Press [STOP] to stop.
3. Press [SKIP] button to select voice file and
press [PLAY] button to play.
15
Back to Index
Erase Music & Voice
file(s)
It is recommended to stop playing when erase music
or voice file(s).
1. Stop playing or recording;
2.
To Erase MP3 file(s) :
Press the [ MODE] button and [SKIP] button to
go to the [Erase Music] submenu.
To Erase Voice file(s) :
Press the [MODE] button and [SKIP] button to
go to [Voice Mode];
Press [MODE] button to enter the submenu and
press [SKIP] button to [Erase Voice
File ]submenu.
3. Press [MODE] button to enter. the [Erase
Music] or [Erase Voice File] submenu.
4. You will be asked if ERASE the listed file,
a) If it is not the file you want to erase
Keep the answer NO and press [PLAY]. Button.
The unit will ask you the same question on next
music. You may keep pressing [PLAY] button
until you find the music you want to erase.
b) If it is the file you want to erase
Press [SKIP] button to select YES , press
[PLAY] to confirm deletion.
5. Press [MODE] button to return.
The music and record files can also be erased in
computer via USB connection.
16
Back to Index
Information Submenu
To go to [About] Information submenu, press the
[MODE] button to menu and press [SKIP] button
to [ABOUT] submenu and press [MODE] button to
enter the submenu.
Information Submenu
a) Internal memory capacity size
b) External Memory size
c) Firmware version
Press [SKIP] button to view the information on
LCD screen.
Press [MODE] button to exit the submenu.
17
Back to Index
Appendix
A
What is MP3?
MP3 is an acronym for MPEG Layer 3, a type of audio data
compression that can reduce digital sound files by a variable
12:1 ratio with virtually no loss in quantity. It allows to store
more music into a little memory. Little memory means compact
size, so portable MP3 player comes out.
MP3 files can be very small and yet retain a high sound quality.
MP3 files usually have the extension .mp3, and can be
downloaded from the Internet, or can be legally made for
personal use from the audio CDs that you purchased.
Please check if the MP3 file(s) is legal before you start to
use.
It is illegal to encode MP3 files for trade or sale unless you
!
have the expressed and explicit permission of the copyright
holder(s).
MP3 Websites
Through websites, you can download MP3 files either with or
without charge and get information about the latest techniques
and software related with MP3.
Examples of websites with MP3 content are :
(For Reference use ONLY)
MP3.COM
(http://www.mp3.com)
Layer3.org
(http://www.layer3.org)
EMusic
(http://www.emusic.com)
Songs.com
(http://www.songs.com)
Search with ‘mp3’ topic in search engine for more MP3 related
websites and news.
18
Back to Index
Appendix
B
Cautions
Selection and care of battery
l
Precautions for Listening with the Earphones
l
l
Alkaline battery is recommended.
Align the poles (+) and (-) correctly when inserting
the batteries.
Do not play your earphones at a high volume.
Hearing experts advise against continuous
extended play.
l
Battery play time may be shorter than usual after
l
If you experience a ringing in your ears, reduce
l
frequent key operation.
Remove the battery if you do not intend to use the
unit for a long time.
l
volume or discontinue use.
Do not use while operating a motorized vehicle. It
may create a traffic hazard and is illegal in many
l
Do not peel off the covering on battery and do not
use if the covering has been peeled off.
areas.
l
You should use extreme caution or temporarily
discontinue use in potentially hazardous
l
situations.
Don’t turn up the volume so high that you can’t
hear what’s around you.
l
Discontinue use if you experience discomfort
with the headphones or earphones. Continued use
may cause rashes or other allergic reactions.
Handling the Unit
l
No altering or remodeling.
l
This can cause malfunctioning.
No dropping or strong impacts
This may damage the unit.
l
Locations to be avoided
Avoid using or storing the unit in following
locations since they can cause malfunctioning.
1. Bathrooms and other moisture -prone places
2. Warehouses and other dusty place.
l
3. Very hot places near heating appliances, etc.
Avoid keeping the unit in places with high
l
humidity, strong magnetic field, or near high
heat source(s).
Do not leave the unit exposed to direct sunlight
for long periods of time
19
Back to Index
Appendix
C
Software Utility
Upon the driver installation is completed, two software utilities
will be installed in PC.
Customer can use the utilities to format or upgrade the unit.
Connect to PC and open Start >Program> Mp3 Player menu
(Windows OS).
Notice
It is forbidden to unplug the USB cable while the unit is
accessing with computer (while the LCD displays [USB
READING] or [USB WRITING] ), because it may cause
serious damage to the unit or computer system.
It is strongly recommended to unplug the cable ONLY
while the LCD displays [USB IDLE].
Storage Device Format Utility
User will be able to format the flash memory of the unit through
the MP3 Player Format utility shown below. The utility can
either be initialized through the Start Menu or by right clicking
on the removable storage device drives in Windows Explorer.
Quick format checkbox:
Empty (default): Completely format
Checked : Quick format, not scan for bad sectors.
* Please avoid to use other format utility to format the unit or the
Smart Media card.
Firmware Upgrade Utility
The firmware in the player will be able to upgrade through a
utility running on your PC. To update the firmware, user needs to
run the MP3 Player Update utility shown below. This utility can
be initialized through the Start Menu of Windows.
The [Quick download] check box :
Checked (default) : update the firmware and no format the
memory
Not checked (Empty) : update the firmware and format the
memory. All contents in the flash memory will be lost.
* If it is to refresh the firmware, please let the check box empty,
and upgrade the firmware by same version firmware as current.
20
Back to Index
Appendix
D
Troubleshooting
The player can not power on.
Technical Specification
PORTABLE MP3 PLAYER
EV64AMX
¨
Is Battery polarity (+) / (-) right?
Is Battery capacity enough?
(One 1.5 v AA size Alkaline battery is required.)
¨
¨
Take the battery out and reinstall the battery
to reset the unit.
Size(WxHxD)/Weight
¨
57 x 74 x 22 mm / 50g (without battery)
Memory
Internal Memory
¨
64 MB
Type of removable memory :
¨
1 x Smart Media slot
use 16, 32 and 64MB SMC card
LCD displays ’Power on / Locked ‘ and power off.
¨
Unlock the [HOLD] button and try again
The button is not working.
¨
¨
Interface
Is [HOLD] button locked? If it is, Unlock
the [HOLD] button and try again
Take the battery out and reinstall the battery
to reset the unit.
¨
USB ( using standard USB v1.1 cable )
LCD Display
¨
There is no audio produced.
1 line x icon & 2 lines x 12 characters LCD
¨
1 x AA Alkaline
15 hours for MP3/voice playback
¨
Power
¨
¨
Signal to Noise Ratio
folder(s).
¨
¨
88 dB
Frequency Response
¨
20 Hz ~ 20 KHz
Output
¨
¨
0.05 ~ 0.1%
Equalizer
¨
5 presets equalizer
Take the battery out and reinstall the battery
to reset the unit.
Can not download MP3 file(s).
¨
Is USB connection steady? Observe if the
[USB IDLE] displays on LCD of the unit.
¨
Check and / or replace the battery.
Is there no free space to download the file?
(Continued on next page)
20mW (each output)
Harmonic Distortion Output
Check the earphone and / or the connection
is working normally.
Check that MP3 files are NOT stored in
¨
Processor
¨
50 MHz DSP
Audio Codec support
¨
MPEG Audio Layer 3 (MP3)
Firmware
¨
Flash based. User upgradeable.
Voice Recording
¨
¨
IMA-ADPCM encoding.
About 4 hours recording in 64MB Memory
player.
Reset The Unit
The unit is controlled by microcircuit and
software. So, please RESET the unit by taking
out and reinstalling the battery when the unit
stops responding. And if the unit still cannot
work, please REFRESHthe firmware.
Refresh The Firmware
The unit will not work if the built-in software is
Specifications are subject to change without notice.
corrupted. Connect the unit to computer and use
[Firmware Upgrade] utility to refresh the
Mass and dimensions are approximate.
software to normal.
Ref. Appendix C : Software Utility
21
Back to Index
Appendix
D
Troubleshooting
The music skips sometime.
¨
¨
Check the music file.
Use [ MP3 Player Format] utility to format
the flash memory (Let the [Quick format]
check box EMPTY), and download the
music again.
Smart Media Card cannot be used in the player.
¨
Make sure you are using the correct Smart
¨
Media Card.
Insert the card correctly. One SMC icon shall
¨
be on LCD.
Only 3.3V version cards will work in your
MP3 Flash Player. 5V version Cards will not
function correctly.
If you have a Media Card reader/writer or some other
devices using Smart Media, you may have problems
reading the Smart Media Card
¨
Format the Smart Media Card by the ‘MP3
Player Format’ utility.
Notice
All contents in the card will be lost after format!
Backup the contents in the card to safe place BEFORE
you start to format the card.
22
Back to Index
23
Back to Index
Evolution Technologies, Inc.
Web Site: http://www.nowevolution.com/
24