1
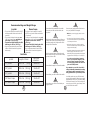
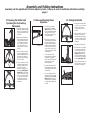
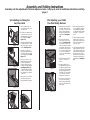
Special features of the Kelty K.I.D.S. jogging strollers
• Folds easily with one hand
• Jogging Stroller becomes narrower
when folded
• Removable, expandable canopy
provides weather/sun protection
• Sneak-A-Peak canopy window allows
view of child
• Lightweight, strong aluminum frame
holds up on tough terrain
• Push-button quick release back wheels
for easy storage
• Bike-style hand brake can be locked
for parking
• Handy underseat basket provides
additional storage
• Quick release front wheel for easy
storage
• Front fender protects child from road
debris
• Safe five-point harness grows with child
(Deuce Coupe comes with two)
Joyrider ™ & Deuce Coupe™ Jogging Stroller
Owner’s Manual and Instructions
Joyrider
Deuce
Coupe
Please read all instructions before using this product
and save these instructions for future use.
If you have any questions at all about your stroller,
regarding the proper use of the jogging stroller, or the instructions,
please call Kelty Customer Service at 1-800-423-2320.
Warning
Read all instructions and all warnings
before using. If instructions are lost
or missing, call Kelty at 1-800-4232320 or log on to www.kelty.com.
2
Recommended Age and Weight Range
Joyrider
Deuce Coupe
• The Joyrider is meant to be used BY ADULTS
to transport small children not less than 12
weeks old.
• The Joyrider is designed to transport one
child up to 5 years of age weighing no
more than 75 lbs. (34 kg.)
• The total load limit including the child
AND cargo is 85 lbs. (38.6 kg.)
• May not be appropriate for special needs
children. Please consult with a physician
before using.
• The Deuce Coupe is meant to be used BY
ADULTS to carry small children not less than
12 weeks old.
• The Deuce Coupe is designed to carry only
two children up to 5 years of age weighing
together no more than 100 lbs
(45.4 kg.)
• The total load limit including the child
AND cargo is 110 lbs. (49.9 kg.)
• May not be appropriate for special needs
children. Please consult with a physician
before using.
Fast Facts
product
weight of stroller
folded with
wheels on
12” Joyrider
22lbs 1oz
(10kg)
49x24x45”
16” Joyrider
22lbs 5oz (10.1kg)
52x24x45”
20” Joyrider
22lbs 9oz (10.2kg)
52x24x45”
16” Deuce Coupe
27lbs 2oz (12.2kg)
59x35x45”
20” Deuce Coupe
27lbs 2oz (12.3kg)
59x35x45”
3
Warning
Never use your jogging stroller if the frame is
in any way deformed or damaged.
Warning
Never leave child unattended in the stroller.
Never let your child touch the wheels, rims
or spokes.
• EACH time you use the jogging stroller, check its
condition.
Warning
Avoid serious injury from falling or sliding out.
Always fasten child’s five-point safety harness
and adjust snugly and closely monitor child’s
activity while in the stroller.
Warning
Avoid runaways. Always use the tether wrist
strap (marked “Safety”) and never use on steep
grades, inclines or hills.
Warning
Never allow horseplay in or around the stroller.
Warning
Never allow your child to stand in the stroller.
Warning
Never place your child’s car seat inside your
jogging stroller.
4
• Prior to each use of the stroller, make absolutely
sure all bolts and fasteners are tight and that there
is no damage to the frame.
• Before each and every use, make sure that the
wheels are installed securely and the parking brake
engages and holds tightly.
• Note that the aluminum frame structure will bend if
handled roughly. Please take care to avoid
mishandling of the jogging stroller by dropping the
jogging stroller or slamming it in a car trunk, etc.
• If you discover that either a fastener is
loose or you suspect the integrity of the
frame has been comprised, discontinue
use of the jogging stroller and return it to
your nearest Kelty dealer.
Pay attention to your child. Your child’s
safety is ultimately determined by reading
and following these instructions and by
being prudent in how you use this product.
In addition, make sure your child is dressed
properly for the weather. Although your activity
generates body heat for you, your child is sitting
still. Also be aware of your child’s activity, and
never give your child any type of object, food
or drink while in the stroller.
-IMPORTANTRead all instructions carefully before using!
Use this Jogger Only for the
Purposes Intended
• This jogger is designed to be used by adults and
should not be pushed by children or young
adolescents. It is not intended for use with animals.
• Never place more than one child in Joyrider at a
time. Never place more than two children in Deuce
Coupe at a time.
• Never place the jogging stroller on a raised surface
(such as a picnic table) as child’s movement can
move jogging stroller to an edge resulting in severe
head injuries.
• Never park on/near an incline or drop-off (steps,
valleys, cliffs, etc.).
• Never use this jogging stroller while roller-skating,
roller-blading or biking.
• Never allow the jogging stroller to be attached to
or pulled by dogs, bicycles, automobiles, snowmobiles
or other machines.
• Do not use while walking/running on loose rock
(scree), or on especially steep terrain, uneven terrain,
or in hazardous weather conditions.
Special Attention
• When attaching rear wheels, make sure quick release
axles are completely pushed into place and engaged.
Rock them back and forth to make sure they are
installed securely and do not slip out.
• If carrying on a roof rack or in the back of a pickup
truck, always anchor down the stroller securely.
• Maximum weight of cargo in the rear pocket is two
pounds for the Joyrider, four pounds for the Deuce
Coupe as excessive weight may cause instability or
tipping.
• Make sure items in underseat basket are properly
secured. The basket is not intended to hold animals
of any type. Max. weight of cargo is 8 lbs (3.6 kg).
• If using this stroller at twilight or after dark, make
sure you have adequate lighting to see and
be seen.
• Avoid using on busy streets and in heavy traffic. Be
especially careful at crosswalks. Always be aware
of conditions around you.
• Do not strap bags or parcels to the handlebars as
this may affect balance and may cause the stroller
to tip over backwards.
• Do not use Accessories or Replacement Parts other
than those produced or approved by Kelty as these
may affect handling, stability and overall safety.
• A helmet for the passenger is strongly advised when
jogging with this stroller, especially if used on uneven
ground.
• If you feel faint, dizzy, nauseated or experience
muscle pain while using jogging stroller, stop
immediately.
Care and Maintenance
• Whenever possible, store your Kelty K.I.D.S. jogging
stroller inside a garage or covered porch to keep
it out of the elements. It is made of durable fabric
and aluminum, but the sun and weather will take
their toll.
• The seat is most easily washed with a sponge, cold
soapy water and a hose for rinsing. Let it dry in the
sun on the frame. It is best not to take the cover off
the frame as this tends to shred the foam frame
padding.
• Once per year (or more often if you jog
a lot) you should take the stroller to a bike shop for
routine maintenance including:
a) greasing/tightening the wheel bearings
b) wheel truing and alignment
c) brake pad adjustment or replacement.
• Check the wheels periodically to keep them inflated
at the right pressure. The manufacturer’s specifications
are written on the side-wall of the stroller’s tires.
5
Kelty K.I.D.S. Limited Lifetime Warranty-Jogging Strollers
Kelty K.I.D.S. takes pride in its workmanship and undertakes to manufacture the best
possible products. Therefore, we warranty all Kelty K.I.D.S. strollers against defects in
the materials or workmanship to the original buyer for the lifetime of the frame and the
fabric. This warranty does not cover institutional or commercial use. This warranty does
not cover tubes and tires. Since no Kelty K.I.D.S. product is indestructible, it does not
cover defects attributable to or resulting from normal wear and tear, natural hazard
damage, abuse, alteration, or UV damage. Service under this warranty is available
to the original purchaser by returning the product to any authorized Kelty K.I.D.S.
dealer with proof of purchase or to our Customer Service Department (return authorization
required) by calling 1.800.423.2320. If we determine a defect exists in the material
or workmanship of the product not caused by normal wear and tear or improper use
or handling of the product, we will repair or replace it, at Kelty’s discretion, free of
charge, after returned without unnecessary delay. This warranty gives you, the original
purchaser, specific legal rights. You may have other rights that vary from state to state.
6235 Lookout Road
Boulder, CO 80301
1.800.423.2320
www.kelty.com
Assembly and Folding Instructions
Assembly and fine-adjustment of brakes require no tools-- but you do need to read these instructions carefully.
page 1
I. Unpacking
II. The Front Wheel
A. Take a look at the wheels.
There is a single front wheel
with a lever type quick-release
mechanism (see Figure 2).
A. Remove the stroller and
wheels from the carton.
B. Place stroller on the floor
laying flat (see Figure 1)
and set the wheels and hood
aside.
Figure 1
III. The Rear Wheels
A. There are two rear wheels
with a skewer type quickrelease mechanism (see
Figure 6).
B. Start by making sure the quick
release lever on the front brake
is in the open position (see
figure 3) so that the tire can
fit past the brake pads.
Figure 2
C. Insert the wheel axle into the
front fork ends as shown in
Figure 4.
B. You will notice that there is
a black rubber button in the
middle of the rear axle. This
is the quick release button
for the rear wheel.
Figure 6
D. Clamp the Front Axle Quick
Release Lever to secure the
wheel to the fork as shown
in Figure 5. Check to make
sure the front wheel is securely
attached to the front fork.
Figure 3
Figure 4
Figure 5
E. With one hand, pinch the front
brake calipers closed so the
brake pads touch the front
rim. Meanwhile close the
quick release on the brake
with the other hand. The
brake pads should come to
rest about 1/16 inch to 1/8
inch from the rim. You can
adjust the tightness of the
brake to the rim into this range
by rotating the Cable
Adjustment Barrel where the
cable comes in to the brake
caliper assembly.
Figure 7
C. Push the button in with your
thumb while inserting the
rear axle all the way into
the rear axle hanger on the
frame (See Figure 7).
Then let your thumb off the
button. This releases the lock
that holds the wheel in place.
D. Check the quick release
axles to make sure they are
completely pushed into
place and engaged.
Without pushing the quick
release black, rubber button,
try to pull the axle back out
of the rear axle hanger. It
should be firmly locked in
place. (If it comes out, repeat
step C and then step D. If
either rear axle does not
lock in place securely, do
not use the stroller. Return to
your Kelty dealer
immediately for
replacement).
Assembly and Folding Instructions
Assembly and fine-adjustment of brakes require no tools-- but you do need to read these instructions carefully.
page 2
IV. Opening the Stroller and
Operating the Foot Locking
Mechanism
V. Brake and Parking Brake
Operation
Figure 8
C. Once you have the handle
bars in an upright position,
push the stroller forward. This
allows the back wheels to
start spreading out towards
their use position.
Figure 9
Figure 10
D. As you continue to push the
handlebars outward while
rolling the stroller forward,
push your foot gently
downward on the Locking
Mechanism (See Figures
9 and 10). Do not kick the
locking mechanism or jump
on it. Do not push it forward
or backward. It should be
pushed with a slow and
consistent motion straight
downward.
A. Never fold the stroller while
a child is in or on it. Never
fold the stroller while it
contains any cargo in the
pockets.
A. Your stroller comes with a
dual-purpose brake (see
Figure 11). It can be used
to slow down the stroller while
jogging. With the locking
mechanism engaged, it acts
as a parking brake.
A. This stroller operates in a way
similar to a standard umbrella
stroller. Look at Figures 8-10
to get a general idea of how
it functions.
B. Lift up on both handle- bars
at the same time and move
them gently toward the rear
of the stroller and outward
as in Figure 8. Make sure
none of the fabric seat or
other parts are catching or
binding.
VI. Folding the Stroller
Figure 11
B. Caution-- Never leave your
child unattended in the stroller
when the parking brake is
engaged. Never count on the
brake to prevent the stroller
from sliding or rolling away
on an incline. Always use a
safety tether when your child
is in the stroller.
C. To lock the brake in the
parking position, squeeze the
brake lever to apply the
brake. Then push the locking
mechanism down while
releasing the lever.
Figure 12
C. Hold the hand brake lever.
D. Push the lever on the Folding
Mechanism to the left with
your foot and then lift your
foot to disengage the lock
(Figure 12) Meanwhile
push the handlebars gently
forward until in fully folded
position (see Figure 13)
Figure 13
D. To release the locking button,
simple squeeze the lever and
the locking button will release
automatically.
E. You can adjust the brake at
the lever by turning the barrel
adjustment mechanism (see
Figure 11). Always make
sure that the brake is adjusted
so that it engages tightly and
securely.
B. Always put the hood in fully
retracted position before
folding the stroller for storage.
If you do not do this, the hood
or hood rod holders may be
damaged.
Figure 14
E. Use the Hold-closed strap as
shown in Figure 14 to keep
the Stroller from opening.
Assembly and Folding Instructions
Assembly and fine-adjustment of brakes require no tools-- but you do need to read these instructions carefully.
page 3
VII. Installing and Using the
Sun/Rain Hood
VIII. Adjusting your Child’s
Five-Point Safety Harness
A. Before loading your child into
the stroller, make sure that
you check to see if the crotch
strap is properly threaded
through the tri-glide buckle
underneath. (see Figure
19).
A. Do not install the sun/rain
hood while the child is in or
near the stroller.
B. First, attach the female snaps
on the sun/rain hood to the
male snaps at the top of each
side of the stroller (see
Figure 15).
Figure 15
C. Bend the acetal plastic support
rod gently until you can insert
the rod ends into the two rod
holders (See Figure 16).
Figure 20
D. Lock the rod in place by
slipping the buttonhole on the
two side corners of the hood
over the small steel posts (See
Figure 17).
Figure 16
E. The sun/rain hood can be
folded between three basic
positions-- fully-retracted,
normal position for partial
protection and fully extended
(see Figures 18 & 19).
To reach the fully extended
position, undo the hook-andloop fasteners in the middle
of the hood.
C. Unbuckle both sides of the
yellow “Y” Kelty K.I.D.S.
buckle.
Figure 21
F. Always put the hood in fully
retracted position before
folding the stroller for storage.
Figure 22
22
Figure
Figure 19
D. Adjust the length of the
shoulder straps to fit your child
by sliding the tri-glide buckles
up and down (located behind
the little backpanel that has
the Kelty K.I.D.S. logo stitched
on it ñ the logo should be
against your child’s back).
E. Now you are ready to lower
your child into the stroller,
making sure that those little
legs are on either side of the
crotch strap.
Figure 17
Figure 18
B. The crotch strap has two
position slots to grow with
your child (see Figure 20).
The slot that is closer to the
back of the seat is for smaller
size children, with the other
slot being for older children.
You can also adjust the strap
up or down for additional
room for your child depending
on their size.
F. Next, making sure that there
is a gray webbing strap over
each individual leg (similar
to a five-point carseat), buckle
the yellow “Y” buckle into
place.
G. Finally, tighten the leg straps
gently on each side of the
child seat area so that the leg
straps fit comfortably over
your child’s legs.
H. Check to see that the shoulder
straps fit smoothly over your
child’s shoulders with no big
gaps, that the backpanel rests
at the base of your child’s
shoulder blades, and that the
leg straps are not binding or
uncomfortable. (see Figure
22)