1
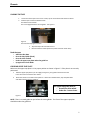
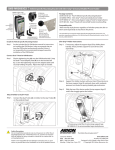
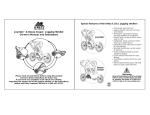
Phoenix This manual is a non-controlled document. This manual has been carefully compiled and checked for accuracy. Information in this manual does not constitute a warranty of performance. Furthermore, MCM reserves the right to revise this publication and make changes from time to time, in its content. This manual covers basic set up and operation of tape dispensers to include model numbers E1, E2, E1EV, E2EV, E1C, E2C, E1EVC and E2EVC. MCM ASSUMES NO LIABILITY WHATSOEVER FOR ANY LOSSES OR DAMAGES INCURRED AS A RESULT OF INFORMATION CONTAINED IN THIS MANUAL. Proprietary Notice McDonald Company Machines (MCM) 1785 Stout Drive Unit G Warminster, PA 18974 Telephone: (800)292-5976 (215)675-7035 Fax: (215)675-6750 Web Site: www.mcdonaldco.com Caution: If an object falls into the unit, disconnect power and notify service personnel. Caution: Metal surfaces of the heater (E4-3.2) may attain temperatures up to 40 degrees Celsius (104 degrees Fahrenheit). More information available later in this document. Caution: This equipment generates, uses, and can radiate radio energy and if not installed and used in accordance with the instruction manual, may cause interference to radio communications. There are built in protections against such interference when operated in a commercial environment. Operation of this equipment in a residential area is likely to cause interference, in which case the user at their own expense will be required to take whatever measures may be required to correct the interference. Caution: When moving the tape dispenser from one location to another, power must be disconnected and the water bottle, water tank and brushes should be removed to prevent spillage that could result in an electrical shock hazard. Caution: Do not spray any lubricants inside the machine. Caution: Cutting Blade has maximum opening of 1/32”. Use caution when working around cutter blade. Caution: Service personnel - parts of the equipment may remain energized after operation of the fuse. Note: Power must be removed before servicing the equipment. 1 Phoenix Section 1- Unpacking and Setup Table of Contents Unpacking the tape dispenser 3 Checking the contents 3 Fill out the Warranty Card 4 Preparing the unit for operation 4 Adjusting the Roll Guides 4 Loading the Tape 5 Upper Tape Plate 5 Installing the Bottle 6 Installing the tank and brushes 6 Section 2 - Detailed Operation Turning the system “ON” 7 How to use your Phoenix 7 Determining Length 7 Using the Electronic Eye (if equipped) 7 Section 3 - Maintenance (Repairs see Website) Washing the brushes and tank 8 Maintaining the heater 8 Shear kit lubrication 8 CPU unit 8 Section 4 - Specifications and Warranty Specifications 8 Warranty Information 9 Thank you 9 2 Phoenix SECTION 1 UNPACKING AND SETUP When you open the top flaps on the box for the tape dispenser, there will be instructions for removing the tape dispenser from its packaging. Save the box and packing materials in case you need to ship the unit at some future time. CHECKING THE CONTENTS Packaged inside the tape dispenser, under the top cover are the following items: See Figure 1. Brush Assembly (three beveled brushes assembled together, under heater) Water tank (a black plastic piece with a metal bracket attached to it, under heater) Bottle (a white plastic bottle) Upper Tape Plate Power Cord ( located beneath rear cover) 1 page set up guide (refers you to this online manual) Warranty Card Phoenix Baseball Hat Figure 1 – Checking Package Contents 3 Phoenix FILL OUT THE WARRANTY CARD Filling out the warranty card and returning it to MCM ensures warranty and allows us to keep you informed of product upgrades. You can also register at phoenixtapers.com and we will log your warranty for you. SETUP ADJUSTING THE TAPE ROLL GUIDES Roll guides fit into slots in the Tie Rod on top and bottom slits of the tape basket on bottom. They hold the tape roll vertical to allow the tape to unwind. You must adjust these guides for the size of the tape being used. NOTE: This machine can dispense tapes from 1-1/2” to 3.0” wide (44mm-78mm) . PROCEDURE 1. Remove a guide from its current position by grasping the guide, lifting it up and pulling the bottom of it to the rear of the unit. See Figure 2. Figure 2 2. Reinsert each guide pressing it first into the bottom slot and then rotating it into the front slot. See Figure 3. Figure 3 4 Phoenix LOADING THE TAPE 1. 2. Cut the end of the tape so that it has a clean, square end to feed under the drive wheel. Load the tape roll into the basket so that: The adhesive side is down. The roll is upright between the roll guides. See Figure 4. Figure 4. The end of the tape goes over the: Top of the tape roll from back to front Over both internal rollers (black vinyl roller and silver metal roller) Feed the tape: o o o o o Adhesive side down Over the Vinyl Roller (black) Over the silver Tie Rod Under the upper tape plate under the guide bar Up against the shear blade CHECKING UPPER TAPE PLATE Make sure the upper tape plate is in its proper position as shown in Figure 5. If the plate is not correctly positioned: 1. 2. Hold the upper tape plate by its rear edge (see Figure 5), and guide it forward so that the Front slot centers around the drive wheel. When the cutouts in the sides of the plate are above the riveted buttons, drop the plate down and slide it forward as far as it will go. The upper tape plate must fit: o Around the drive wheel o Under the button rivets Figure 5. NOTE: There is a round guide bar just before the cutting blade. The front of the upper tape plate should be under that guide bar. 5 Phoenix INSTALLING THE BRUSH AND WATER TANK AND WATER BOTTLE 1. Insert the brush assembly in the water tank. Figure 6. Tilt the brush toward the rear of the tank, this will allow the cotter pin to slide under the metal bracket fastened inside the tank. Make sure brushes are standing upright once the cotter pin is under the bracket . See Figure 6. 2. Lift the front of the heater assembly and slide the water tank into the position at the front of the Dispenser. Brushes must be angled (Cotter pin towards machine) toward the front of the dispenser in order to work. Installing the brushes backwards will cause a troublesome tape jam. 3. Lower the heater assembly so that it lays directly on top of brushes 4. Fill the bottle with water. Place finger over the end of the bottle and place inside the extended neck of water reservoir. 5. Water bottle should always be left in the down position as it ensures proper water level. 6. To adjust water level use thumbscrew at the end of neck in water reservoir. Your unit is now setup and ready to operate. MCM strongly reccomends return of your tape machine to your local distributor when in need of repairs. We offer extensive resources to our dealers so that they can get your equipment running correctly and quickly. MCM also offers specific pdf documents via the website that can help in the everyday maintenance of the machines as well as operation of specialty units and their specific repair needs. Most of these documents can be found on our website www.mcdonaldco.com. Documents include; EVO REPAIR GUIDE EVO OPERATION MANUAL EVO QUICK START GUIDE EVO SHORTCUTS SHEET 6 Phoenix SECTION 2 OPERATION TURN THE SYSTEM “ON” Turn the power switch to the “ON” (up) Position. The switch will light. ! CAUTION: The bottom of the heater assembly gets HOT! Handle the heater only by the tabs protruding from the side of It’s top. The heater is set to the perfect temperature to assure proper adhesion of the tape to your package. MCM manufactures two top heaters and all production equipment is shipped standard with our next generation heater. E4-3.2 “PERFECTEMP” heats to 40 C (104®F). Older style heaters have adjustable knob and can reach temps of 75 C (170®F). USING YOUR PHOENIX ELECTRONIC DISPENSER 1. PLUG IN MACHINE. THE PHOENIX OPERATES ONLY ON 110/1115VOLT, 60 CYCLE CURRENT 2. TURN MACHINE ON, BY DEPRESSING ROCKER SWITCH ON FRONT OF THE MACHINE. LIGHT WILL COME ON. 3. NUMBERS ON KEYPAD CORRESPOND TO LENGTH IN INCHES. TOUCH DESIRED LENGTH 4. * KEY IS ONLY FOR UNITS WITH PHOTOELECTRIC SENSOR, SEE BELOW FOR UNITS WITH THIS OPTION OTHERWISE PRESSING * KEY WILL DEACTIVATE KEYPAD FOR ONE PRESS. TO ACTIVATE THE ELECTRONIC EYE FEATURE 1. PRESS THE * BUTTON LOCATED IN THE UPPER RIGHT HAND CORNER OF THE KEYPAD, PRESS THE DESIRED LENGTH. 2. PASS YOUR HAND IN FRONT OF THE ELECTRIC EYE, LOCATED BELOW KEYPAD AND ABOVE ON/OFF SWITCH, WITHIN 3” TO ACTUATE DESIRED LENGTH. 3. THE KEYPAD WILL REMAIN ACTIVE AND ALL THE LENGTHS ARE AVAILABLE BY PRESSING DESIRED LENGTH. TO DEACTIVATE THE ELECTRIC EYE PRESS THE * BUTTON OR TURN OFF UNIT. THE ELECTRIC EYE MUST BE ACTIVATED EACH TIME THE UNIT IS TURNED ON. 4. TO CHANGE LENGTHS PRESS THE * BUTTON TWICE, ONCE TO DEACTIVATE CURRENT LENGTH AND ONCE TO ACTIVATE DESIRED LENGTH. OPERATING EVOLUTION SERIES INKJET 1. Please see Evo Operations Guide. 7 Phoenix SECTION 3 MAINTENANCE OF YOUR PHOENIX MAINTAINING THE PHOENIX 1. WETTING BRUSHES WASH BRUSHES ONCE AWEEK AS EXPLAINED IN SET UP INSTRUCTIONS. ONCE A MONTH CLEAN OUT THE WATER TANK. REMEMBER TO INSTALL THE BRUSHES THE SAME WAY EACH TIME. 2. HEATER. GLUE WILL ACCUMULATE ON THE BOTTOM OF THE HEATER AFTER EXTENDED USE. GLUE IS WATER SOLUBLE SO DO NOT SCRAPE THE HEATER JUST WASH THE BOTTOM WITH WARM WATER 3. MOVABLE SHEAR. BEHIND THE BLADE THAT GOES UP AND DOWN TO PERFORM THE CUTTING IS A FELT PAD HELD IN PLACE AGAINST THE SHEAR WITH A SPRING. THAT FELT PAD IS FILLED WITH OIL AND THAT KEEPS THE SHEAR FROM GETTING A BUILD UP OF GLUE. ONCE A MONTH FILL THE FELT PAD WITH LIGHT MACHINE OIL, EG 3 IN 1. 4. ELECTRONIC CONTROLLER UNIT. THERE ARE NO SERVICEABLE PARTS IN THIS UNIT. PLEASE DO NOT OPEN THE CPU UNIT. SECTION 4 TECHNICAL SPECIFICATIONS AND WARRANTY Technical Specifications All Phoenix electrics run on 110V / 60 Hz electricity Phoenix heaters (E4-3.2) are set to 40°C Machines can hold tape widths from 1.5” – 3” standard (other options available) Machine will dispense rolls up to 7.5” in diameter (other options available) Units draw less than .5A at rest (power on), unit draws 1 A during run cycle. Shipping weights; Bench Weights; E-1 -- 29lbs 27lbs E-2 -- 30lbs 28lbs Evo Series -- 34lbs 31lbs 8 Phoenix LIMITED WARRANTY The manufacturer warrants each new Phoenix dispenser and accessory to be free from defects in material and workmanship under normal and proper use, its obligation under this warranty being limited to making good any defective parts within one year after delivery to the original purchaser. The company will replace any defective parts within warranty, on a no-charge basis. The Dealer will furnish for the first 6 months, without charge necessary labor, or instruct the customer’s Maintenance Department in servicing the machine. This warranty does not include motor brushes, water brushes or cutter blades that are replaced for normal usage unless proven to be defective. For service (in or out of warranty), contact your local authorized Phoenix Dealer. You can find out who the dealer in your area is by calling 800-292-5976 (US only) 215-675-7035 (Outside US) Other Contact Information FAX: 215-675-6750 US MAIL: 1785 Stout Drive, Unit G Warminster, PA 18974 WEBSITE: www.mcdonaldco.com THANK YOU FOR BUYING THE BEST TAPE MACHINE AVAILABLE ON THE MARKET TODAY. 9