1
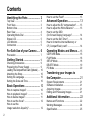
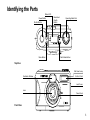
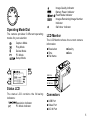
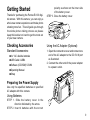
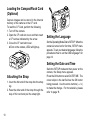
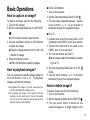
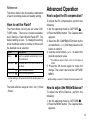
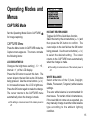
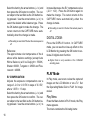
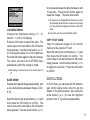
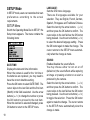
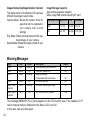
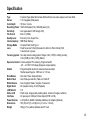
For customers in the USA
STATEMENT OF FCC COMPLIANCE
This device complies with Part 15 of the FCC Rules. Operation is subject to the following two conditions: (1) This device may not
cause harmful interference, and (2) this device must accept any interference received, including interference that may cause
undesired operation.
Changes or modifications not approved by the party responsible for compliance could void the user's authority to operate the
equipment.
This equipment has been tested and found comply with the limits for a Class B digital device, pursuant to part 15 of the FCC
Rules. These limits are designed to provide reasonable protection against harmful interference in a residential installation. This
equipment generates, uses and can radiate frequency energy and, if not installed and used in accordance with the instructions,
may cause harmful interference to radio communications. However, there is no guarantee that interference will not occur in a
particular installation. If this equipment does not cause harmful interference to radio or television reception, which can be determined by turning the equipment off and on, the user is encouraged to try to correct the interference by one or more of the
following measures:
Reorient or relocate the receiving antenna.
Increase the separation between the equipment and receiver.
Connect the equipment into an outlet on a circuit different from that to which the receiver is connected.
Consult the dealer or an experienced radio/TV technician for help.
For customers in Canada
This Class B digital apparatus meets all requirements of the Canadian Interference - Causing Equipment Regulations.
Pour les utilisateurs an Canada
Cet appareil numérique de la classe B respecte toutes les exigences du Règlement sur le matériel brouilleur du Canada.
Regarding copyrights
Images taken using the EI-100 that are for anything other than personal enjoyment cannot be used without permission according
to the rights as specified in the Copyright Act. Please take care, as there are even cases where limitations are placed on taking
pictures even for personal enjoyment during demonstrations, industrial enterprise or as items for display. Images taken with the
purpose of obtaining copyrights also cannot be used outside the scope of use of the copyright as laid out in the Copyright Act,
and care should be taken here also.
Regarding trademarks
CompactFlash and CF are trademarks of SanDisk Corporation.
All other brands or product names are trademarks or registered trademarks of their respective companies.
1
Contents
Identifying the Parts .................... 3
How to set the Flash? ................................ 13
Top View ......................................................
Front View ...................................................
Bottom View ................................................
Rear View ....................................................
Operating Mode Dial ..................................
Status LCD ..................................................
LCD Monitor ................................................
Connectors ..................................................
How to adjust the EV compensation? .......
How to adjust the White Balance? ............
How to set the OSD
(On-Screen Display) language? ................
How to set the Self-Timer? ........................
How to format the Internal Memory or
CF (CompactFlash) card? ..........................
13
13
For Safe Use of your Camera ..... 6
Operating Modes and Menus ....
Precaution ................................................... 7
CAPTURE Mode .........................................
PLAY Mode .................................................
SETUP Mode ..............................................
DELETE Mode ............................................
PC Mode .....................................................
15
15
16
18
19
20
Getting Started ............................
Checking Accessories ................................
Preparing the Power Supply ......................
Loading The CompactFlash Card (Optional) ....
Attaching the Strap .....................................
Setting the Language .................................
Setting the Date and Time .........................
3
3
4
4
5
5
5
5
9
9
9
10
10
10
10
Basic Operations ......................... 10
How to capture images? ............................
How to playback images? ..........................
How to delete images? ...............................
How to set the focus? .................................
How to set the
image resolution & quality? .......................
2
10
11
11
12
12
Advanced Operation .................... 13
14
14
14
Transferring your Images to
the Computer ................................ 21
System Requirements ................................
Software Installation ...................................
Acquiring Images ........................................
Editing and Processing Images .................
21
21
21
21
Additional Information ................ 22
Names and Functions ................................ 22
Warning Messages ..................................... 24
Specification ................................................ 25
Identifying the Parts
Status LCD
Power Button
Shutter Button
Menu Button
Resolution/
Quality
Button
Operating Mode Dial
Flash Mode Button
Top View
Self-timer Lamp
Viewfinder Window
Built-in Flash
Jack Cover
Lens
Focus Knob
Front View
3
Strap Lug
LED-1
Viewfinder
LED-2
Up/Backward/
Self-timer Button
Down/Forward
Button
OK Button/
Digital Zoom Button
LCD Monitor
Display Button
Rear View
Battery Cover
Bottom View
4
Tripod Socket
CF Card Cover
Image Quality Indicator
Battery Power Indicator
Flash Mode Indicator
Images Remaining/Image Number
Indicator
Self-timer Indicator
Operating Mode Dial
The camera provides 5 different operating
modes for your selection:
Capture Mode
Play Mode
Delete Mode
PC Mode
Setup Mode
LCD Monitor
The LCD Monitor shows the current camera
information:
Resolution
Time
File Name
Quality
Date
USB Port
Video Port
DC IN Port
Status LCD
The status LCD contains the following
indicators:
Resolution Indicator
PC Mode Indicator
Connectors
USB Port
Video Port
DC IN Port
5
FOR SAFE USE OF
YOUR CAMERA
Sufficient attention has been paid to the safety
of this product but please pay particular
attention to the warnings indicated by the
following symbols during use.
Warning
These symbols indicate that it is
possible that the user may experience
serious difficulties if the warnings are
not heeded.
Caution
These symbols indicate that it is
possible that the user may experience
some difficulties or physical difficulties
if the warnings are not heeded.
Do not attempt to disassemble or modify the camera.
High voltages are present within the camera, and there
is therefore a danger of electric shocks.
If the inside of the camera should become exposed as a
result of, for example, the camera being dropped, do not
under any circumstances touch such exposed portions,
as there is a danger of receiving an electric shock.
Wrapping the strap of the camera around your neck is
also dangerous, and please take care that small children
do not hang the strap around their necks.
6
Use an AC adapter that is of the power and voltage
specified for exclusive use with this product. The use of
an AC adapter other than that specified exclusively for
use with this product may cause fire or electric shocks.
Discontinue use of the AC adapter during thunderstorms.
This can cause a fire or electrical shock.
Do not attempt to touch the product, should the product
catch fire due to a battery short, etc., and do not attempt
to disassemble or charge the battery at such times, as
there is a danger of the product bursting into flames.
On the other hand, should the camera battery explode
or start smoking, extract the battery as soon as possible,
taking great care not to get burnt at such times.
Some portions of the camera heat up during use, so
please take care, as there is a risk of low temperature
burns if such portions are held for long periods of time.
Precaution
To perform a successful photo shoot, please
follow the instructions below before starting.
On Camera Holding
Hold the camera firmly with both hands and
brace your elbows lightly against your body.
Take care to keep your fingers, hair and the
camera strap away from the camera lens.
Use the viewfinder or LCD monitor to frame
your shot .
Be sure to rest the camera against your
forehead while using the viewfinder to focus
your shot
On Shutter Button Release
Press the Shutter Button slowly and gently
with your finger on it.
Keep your camera still and do not shake
while pressing the Shutter Button.
Release your press when you hear a “Beep”
sound.
On Battery Usage
Use 4 “AA” type batteries only (Alkaline,
NI-MH, lithium battery). Ni-cd battery is not
recommended.
Do not mix battery types or it may cause a
fire or explosion. Use only one battery type
at one time.
Batteries should be inserted in the battery
compartment with the “+” and “-” sides
facing correctly.
Batteries should be replaced when the
battery indicator shows the battery-empty
icon.
To improve battery performance, replace all
installed batteries at the same time and keep
batteries away from heat.
Do not drop, puncture or disassemble
batteries.
Remove the batteries if the camera is to be
stored and not used for a long period of time.
Please note that taking pictures with the LCD
monitor screen turned on uses up the
batteries.
About LCD Monitor
The liquid crystal panel used in the LCD
monitor is manufactured using extremely
high precision technology.
7
Although the level of functioning pixels is 99.
99% or better, you should be aware that 0.
01% of fewer of the pixels may not illuminate or may illuminate when they should not.
However, this has no effect on the captured
image.
Handling of the CF Card
The CF card should only be installed or
ejected when the power for the camera is
off.
Never eject a CF card or turn off the power
during the data storage process or communication with another device. This could
cause damage to the data or the card.
Do not bend a CF card or subject it to a strong
shock. Do not expose it to water nor leave it
place of high temperature.
Be sure to format before using an unused
CF card or a card used on another camera.
Never attempt to eject a CF card while it is
being formatted. If you do so, the card would
be fatally damaged.
It is possible for data stored in the CF card
to be erased under the following conditions,
so please take care. Please be aware that
Pentax bears absolutely no responsibility for
8
erased data.
*Mishandling of the CF card by the user.
*CF card located where it may be susceptible to static
electricity or electrical noise.
*If the card not used for a long period of time.
*If the card ejected or power supply disconnected while
the card access lamp is blinking.
*The CF card has a limited lifespan. The stored data
may become corrupted if the memory card is not used
for a long period of time. Ensure that necessary data
is backed up to a personal computer etc. on a regular
basis.
Avoid using or storing in places where static
electricity or electrical noise is likely to occur.
Avoid using or storing in places where there
are sudden temperature variations or
condensation, or in direct sunlight.
Getting Started
Thanks for purchasing the Pentax EI-100 digital camera. With this camera, you can enjoy a
whole new camera experience and make photo
shooting more fun. This will guide you through
the whole picture taking process so please
keep this booklet on hand to get the most out
of your new camera.
polarity as shown on the inner side
of the battery cover.
STEP 3. Close the battery cover.
Checking Accessories
Using the AC Adapter (Optional)
Standard Accessories:
1. Open the connectors cover and connect one
end of the AC adapter to the DC 6V IN port
as illustrated.
2. Connect the other end of the power adapter
to a power outlet.
4 x “AA” alkaline batteries
USB Cable I-USB4
Software (CD-ROM) S-SW4
Operating Manual
Strap
Preparing the Power Supply
Use only the specified batteries or specified
AC adapter with this camera.
Using Batteries
STEP 1. Slide the battery cover in the
direction indicated by the arrow.
STEP 2. Insert 4 batteries with the correct
9
Loading the CompactFlash Card
(Optional)
Capture images can be stored in the Internal
memory of the camera or the CF card.
To load the CF Card, perform the following.
1. Turn off the camera.
2. Open the CF card slot cover and then insert
a CF card as indicated by the arrow.
3. Close the CF card slot cover.
Turn on the camera, LED2 will light up.
Setting the Language
Set the Operating Mode Dial to SETUP. When the
camera is turned on for first time, SETUP menu
appears. To set your desired language, follow the
procedures How to set the OSD language? On
page 14.
Setting the Date and Time
Attaching the Strap
1. Insert the thin end of the strap into the strap
lug.
2. Pass the other end of the strap through the
loop of thin cord and pull the strap tight.
10
Switch to SETUP mode and then power on the
camera, the Setup menu appears.
Press the OK button to select DATE/TIME. The
cursor skips to the last field as the OK button
being pressed. Use the arrow buttons (/)
to make the change. For more details, please
refer to page 18.
Basic Operations
On the LCD Monitor
1. Turn on the camera.
How to capture an image?
To capture an image, perform the following:
1. Turn on the camera.
2. Set the Operating Mode Dial to CAPTURE
.
2. Set the Operating Mode Dial to PLAY
3. The last image captured appears. Use the
arrow buttons ( / ) to go forward or
backward through the captured images.
.
LED1 will be on under Capture mode.
3. Use the viewfinder window or LCD Monitor
to frame the image.
Press the Display button to turn on the LCD
Monitor for usage.
4. Press the Shutter button.
LED1 will blink while capturing images.
On a TV
1. Connect one end of the video cable I-VC4
(Optional) to the VIDEO port of your camera.
2. Connect the other end of the cable to the
VIDEO port of your television.
3. Turn on the camera and the TV.
Set the video output format before connecting to a TV.
How to playback images?
You can review the captured images either on
the LCD Monitor or on a TV. To playback
images, perform the following:
To playback the image in CF card, make sure to in
sert the card before the image review.
To playback the image in the camera (internal
memory), do not insert any CF card or the camera
will not be able to read the internal data with an
external memory card attached.
4. Set the Operating Mode Dial to PLAY
mode.
5. Use the arrow buttons (/) to forward/
backward through the captured images.
How to delete images?
To delete images, perform the following:
1. Turn on the camera.
2. Set the Operating Mode Dial to DELETE .
3. You can select either to delete all the
captured images or a single image by the
11
arrow buttons (/). See page 20 for more
details.
You can review the captured images on the LCD
Monitor or on a TV.
How to set the focus?
Before taking a picture, you may need to set
the focus. The camera provides 2 different
types for your selection:
Icon
Close-up
Effective Range Description
8 8
Mode
Icon
Portrait/
Telephoto
0.6M~ A
(1.6ft~
)
0.3~0.6M
(0.98~2.0ft)
For a normal/long
distance shot
For a macro shot
This camera provides 6 different image
resolution & quality settings:
1280 x 960 (1280) recording pixels with Super
12
), Economy (
), Fine(
), Economy (
)
quality.
To change the recording pixels & quality setting,
perform the following:
1. Turn on the camera.
2. Set the Operating Mode Dial to CAPTURE
.
3. Select the RESOLUTION & QUALITY
button
and make the change.
Recording pixels and Image Quality
Indicators
How to set the image resolution
& quality?
), Fine (
Fine (
The setting is conserved even if the camera power is
off.
Simply switch the Focus knob to select one.
Fine (
quality.
640 x 480 (640) recording pixels with Super
)
In CAPTURE mode: Shows the currently set
image resolution and quality.
In PLAY mode: Shows the currently displayed
image’s resolution and quality.
Recording Pixels
1280x960
1280x960
1280x960
640x480
640x480
640x480
Quality
Reference:
The above table is the 6 possible combination
of each recording pixels and quality setting.
How to set the Flash?
The Flash Mode can only be set under CAPTURE mode. There are 4 modes available:
Auto, Red-Eye, Flash ON and Flash OFF. The
default setting is Auto. To change the setting,
press the Mode button a number of times until
the desired one is selected.
Mode
Auto
Red-Eye
Flash ON
Flash OFF
Description
Flash is enabled automatically in low
light conditions
Auto Mode with Pre-Flash to reduce red
eye effect
Flash is always enabled
Flash is always disabled
Advanced Operation
How to adjust the EV compensation?
To adjust the EV compensation, perform the
following:
1. Set the operating mode to CAPTURE
.
2. Press the MENU button. The Capture menu
appears.
3. Select the EV COMPENSATION item by the
arrow buttons (/) and then press the OK
button to confirm.
4. Use the arrow buttons (/) to select the
desired exposure value.
*The effective range is from -2.0 to +2.0 in steps of
0.3 EV.
5. Press the OK button again to make the
change. The cursor returns to the CAPTURE
MENU.
The setting is conserved even if the camera power is
off.
This setting is reset to 0.0 when the camera power is off.
The flash effective range is 0.4m - 2m (1.3feet
- 6feet).
How to adjust the White Balance?
To adjust the White Balance, perform the
following:
1. Set the operating mode to CAPTURE
.
2. Press the MENU button. The Capture menu
appears.
13
3. Select the WHITE BALANCE item by the
arrow buttons (/) and then press the OK
button to confirm.
4. Use the arrow buttons (/) to select the
desired white balance setting.
5. Press the OK button again to make the
change. The cursor returns to the CAPTURE
MENU.
To use the Self-Timer function, perform the
following:
This setting is reset to AUTO when the camera power is
off.
1. Set the Operating Mode Dial to CAPTURE
.
2. Press the Self-Timer button to set the
Self-Timer on. appears on the status LCD.
3. Press the Shutter button.
4. After 10 seconds, an image is captured and
the timer will turn itself off.
How to set the OSD (On-Screen
Display) language?
The Self-Timer is located in front of the camera, and it is
designed to count down for 10 seconds. In the first 7
seconds, the indicator lights up and then blinks rapidly
for the last 3 seconds.
To s e t t h e O S D l a n g u a g e , p e r f o r m t h e
following:
1. Set the Operating Mode Dial to SETUP.
2. The Setup menu appears.
3. Select the LANGUAGE item by the arrow
buttons ( / ) and then press the OK
button to confirm.
4. Use the arrow buttons (/) to select the
language.
5. Press the OK button again to make the
change. The cursor returns to the SETUP
MENU.
14
How to set the Self-Timer?
How to format the Internal
Memory or CF (CompactFlash)
card?
Perform the following procedures:
1. Set the Operating Mode Dial to SETUP.
2. Select the FORMAT CARD item by the
arrow buttons (/) and then press the OK
button to confirm.
3. Use the arrow buttons (/) to select
FORMAT.
4. Press the OK button again to re-format the
internal memory or CF card. The cursor
returns to the SETUP MENU.
Operating Modes and
Menus
CAPTURE Mode
Set the Operating Mode Dial to CAPTURE
for image capturing.
CAPTURE Menu
Press the Menu button in CAPTURE mode, the
Capture menu appears. The menu contains
the following items:
LCD BRIGHTNESS:
Changes the brightness setting ( -5 ~ +5 ,
Interval = 1 ) of the LCD display.
Press the OK button to select this item. The
cursor skips to the last field as the OK button
being pressed. Use the arrow buttons (/)
to increase/decrease the LCD brightness.
Press the OK button again to make the change.
The cursor returns to the CAPTURE menu
automatically when the change is made.
The setting is conserved even if the camera power is
off.
INSTANT REVIEW MODE:
Toggles On/Off the QuickView function.
Select the item by the arrow buttons (/) and
then press the OK button to confirm. The
cursor skips to the last field as the OK button
being pressed. Use the arrow buttons (/)
to select the desired setting. The cursor
returns to the CAPTURE menu automatically
when the change is made.
The setting is conserved even if the camera power is
off.
WHITE BALANCE:
Select either one of the 5 (Auto, Daylight,
Shade, Fluorescent, Tungsten) white balance
settings.
The auto white balance is recommended for
most cases. For certain critical circumstances,
if the result did not come out as expected, you
may manually change to another white balance
type according to the ambient lighting
condition.
15
Select the item by the arrow buttons (/) and
then press the OK button to confirm. The cursor skips to the last field as the OK button being pressed. Use the arrow buttons (/) to
select the desired white balance type. Press
the OK button again to make the change. The
cursor returns to the CAPTURE menu automatically when the change is made.
This setting is reset to AUTO when the camera power is
off.
Reference:
The approximate color temperature of the 4
above white balance settings (except Auto
White Balance) will be Daylight = 5500K,
Shade= 6000K, Tungsten = 2850K and Fluorescent = 4000K.
increase/decrease the EV compensate value
(-2.0 ~ +2.0). Press the OK button again to
make the change. The cursor returns to the
CAPTURE menu automatically when the
change is made.
This setting is reset to O.O when the camera power is
off.
DIGITAL ZOOM:
Press the DISPLAY button. In CAPTURE
mode, you can see the close-up effect on the
LCD Monitor by pressing the OK button to activate 2X digital zoom function.
Digital Zoom is only available in the 1280x960
recording pixels.
PLAY Mode
EV COMPENSATION:
Adjusts the exposure compensation over a
range of -2.0 to +2.0 EV in steps of 0.3 EV,
where 1.0 EV = 1 f-stop.
Select the item by the arrow buttons (/) and
then press the OK button to confirm. The cursor skips to the last field as the OK button being pressed. Use the arrow buttons (/) to
16
In Play mode, users can review the captured
images on the LCD Monitor or on a TV. Set
the Operating Mode Dial to PLAY for image
review.
Play Menu
Press the Menu button in PLAY mode, the Play
menu appears.
The menu contains the following items:
to increase/decrease the delay between 2 and
10 seconds. Press the OK button again to
make the change. The slide show starts.
LCD BRIGHTNESS:
Changes the brightness setting (-5 ~ +5,
Interval = 1) of the LCD display.
Press the OK button to select this item. The
cursor skips to the last field as the OK button
being pressed. Use the arrow buttons (/)
to increase/decrease the LCD brightness.
Press the OK button again to make the change.
The cursor returns to the CAPTURE menu
automatically when the change is made.
The setting is conserved even if the camera power is
off.
SLIDE SHOW:
Displays the captured images sequentially, with
a user-defined delay between images (2,4,6,
8,10).
Select the item by the arrow buttons (/) and
then press the OK button to confirm. The
cursor skips to the last field as the OK button
being pressed. Use the arrow buttons (/)
Do not press the Display/Menu/OK buttons or switch
the Operating Mode Dial while a slide show is playing
or it may interrupt the display and returns to the PLAY
mode.
To stop the slide slow, press the Menu button.
COPY TO CF CARD:
Copy the captured images in the internal
memory to the external CF card.
Select the item by the arrow buttons (/) and
then press the OK button to confirm. The
cursor skips to the last field as the OK button
being pressed. Use the arrow buttons (/)
to toggle the selection. Press the OK button
to confirm.
DIGITAL ZOOM:
In PLAY mode, you can press the OK button to
gain 2X/4X digital zoom effect to get the
details of the pictures taken. Also using the
arrow buttons (/) to view the fragment
picture in the “Z” type tracing sequentially.
17
SETUP Mode
In SETUP mode, users can customize their own
preferences according to the actual
requirements.
SETUP Menu
Switch the Operating Mode Dial to SETUP, the
Setup menu appears. The menu contains the
following items:
DATE/TIME:
Displays the date and time information.
When the camera is used for the 1st time or
the batteries are replaced, you may need to
have the correct date/time setting.
Press the OK button to select DATE/TIME. The
cursor skips to the last field and the first item
(Month) in this field is selected. Use the arrow
buttons (/) to change the number or press
the OK button to proceed to the next item.
When the last item is selected/changed, press
OK button to return to the SETUP menu.
18
LANGUAGE:
Sets the OSD menu language.
There are 6 languages available for your
selection. They are English, French, German,
Spanish, Portuguese and Traditional Chinese.
Select the item by the arrow buttons (/)
and then press the OK button to confirm. The
cursor skips to the last field as the OK button
being pressed. Use the arrow buttons (/)
to select the desired language setting . Press
the OK button again to make the change. The
cursor returns to the SETUP menu automatically when the change is made.
SOUND:
Enables/disables the sound effects.
You may choose either to turn on or off
(default=on) the sound effects while capturing
an image or pressing a button or an alert is
produced by the camera.
Select the item by the arrow buttons (/)
and then press the OK button to confirm. The
cursor skips to the last field as the OK button
being pressed. Use the arrow buttons (/)
to toggle the selection. Press the OK button
again to make the change. The cursor returns
to the SETUP menu automatically when the
change is made.
The setting is conserved even if the camera power is
off.
FORMAT CARD:
Formats the Internal Memory or CompactFlash
card.
Select the item by the arrow buttons (/) and
then press the OK button to confirm. The
cursor skips to the last field as the OK button
being pressed. Use the arrow buttons (/)
to toggle the selection. Select FORMAT and
press the OK button to reformat the CF card
and returns to the SETUP menu. Select CANCEL and press the OK button to cancel and
return to the SETUP menu without any change.
VIDEO MODE:
Sets video output type.
The camera provides 2 different video output
type for your selection: NTSC and PAL.
Select the correct video type for the connected
device (e.g. NTSC TV or PAL TV).
RESET TO DEFAULT:
Returns all the camera settings to the factory
default settings.
Select the item by the arrow buttons (/) and
then press the OK button to confirm. The
cursor skips to the last field as the OK button
being pressed. Use the arrow buttons (/)
to toggle the selection. Select RESET and
press the OK button to make the change and
returns to the SETUP menu. Select CANCEL,
and then press the OK button to cancel and
return to the SETUP menu without any change.
Recording Pixels = 1280 x 960
Image Quality = Fine
White Balance = Auto
Flash = Auto
InstantView Mode = On
LCD Brightness = 0
EV Compensation = 0.0
Slide Show Delay = 4 seconds
Sound = On
DELETE Mode
To delete the images recorded in the CF card, make
sure to insert the card before deletion.
To delete the images captured in the camera (internal
memory), do not insert any CF card or the camera will
not be able to read the internal data with an external
memory card attached.
Delete Menu
Switch the Operating Mode Dial to DELETE ,
the Delete menu appears. The menu contains
the following items:
19
DELETE MENU
DELETE CURRENT?
DELETE ALL?
and return to the DELETE menu without any
deletion.
PC Mode
Images can only be transferred to a PC via USB
in this mode.
DELETE CURRENT:
Deletes the selected image.
Select the DELETE CURRENT? item by arrow
buttons (/) and then press the OK button.
The image appears on the LCD monitor.
Select the image you wish to delete by the
arrow buttons (/). Press the OK button to
delete the selected image.
To return to the DELETE menu without any deletion,
press the MENU button.
DELETE ALL:
Deletes all the captured images.
Select the DELETE ALL item by the arrow
buttons (/) and then press the OK button
to confirm.
Use the arrow buttons (/) to toggle the
selection. Select DELETE and press the OK
button to proceed the deletion and return to
the DELETE menu. A NO PICTURE message
in the DELETE menu after the deletion. Select
CANCEL, then press the OK button to cancel
20
Connect the USB cable (I-USB4) in the following steps
Confirm that the USB driver has been installed
in your PC.
1. Connect one end of cable to your PC.
2. Turn the camera ON and set the mode dial
to PC.
3. Connect the other end of cable to the
camera.
Disconnection of the USB cable
For Windows 2000/Me:
On the main menu, left click twice on the icon
with green arrow on the task tray and follow
the instructions of the displayed screen.
For Windows 98:
Unplug the cable from the PC. Unnecessary
for above mentioned procedures.
Transferring your
Images to the Computer
Before image transfer, please read the
following guideline carefully.
System Requirements
Pentium 166 MHz processor or higher
Windows 98/2000/Me
Available USB port
At least 32 MB RAM
80 MB available hard disk space
CD-ROM drive
Appropriate color monitor
VGA card
Software Installation
For Users of Windows 98 and 2000/ME
If you are planning to transfer your images into
your PC and edit images, make sure to complete
the driver and software installation before connecting the camera. Follow the steps on this page.
1. Insert the software CD-ROM disc S-SW4 into
CD-ROM drive.
2. Right click on START, and then left click on
EXPLORER.
3. Left click on the S-SW4 (R) icon.
4. The files of PhotoSuite IIISE, PhotoVista and
USB driver appear.
5. Left click twice for your desired file for
installation. The file will be opened.
6. Left click twice on Setup exe for instillation.
Follow the on screen instructions to complete the software installation.
Acquiring Images
For Users of Windows(98/ME/2000)
Follow the steps below transfer your images
to the computer.
1. Left click twice the my computer icon on your
desktop to open the my computer.
2. Connect one end of the USB cable (I-USB4) to
your PC.
3. Turn the camera ON and set the mode dial to
PC.
4. Connect the other end of cable to the camera.
5. A Removal Disk appears.
6. Drag and drop the images in the above mentioned drive to the other directories desired.
Editing and Processing Images
Using the software S-SW4 for MGI PhotoSuite
and MGI PhotoVista, follow the instruction of
HELP on screen.
21
Additional Information
Names and Functions
LCD Display
When you are about to take a picture, you may
use the LCD monitor to frame the image. Press
the Display button to turn on/off the LCD
monitor.
(Display Button)
The Display button is only active in CAPTURE
and PLAY modes. While in CAPTURE mode,
press the Display button will toggle the LCD
monitor On and Off. In PLAY mode, press the
Display button to review the images in the
following 3 modes:
1. Single image display.
2. Single image display with image information
overlay.
3. Multi-image (3x3 thumbnail) display.
4 . P r e s s t h e D I S P L AY b u t t o n u n t i l t h e
thumbnails screen appear. To select the
single image from the thumbnails screen,
frame the image by the arrow buttons
(/) and then press the DISPLAY button
again.
22
(Menu Button)
The Menu button is only active in CAPTURE
and PLAY modes. Press the Menu button to
turn on the Capture/Play menus. To access
the Capture/Play menus, simply switch the
Operating Mode Dial to CAPTURE/PLAY
modes and then press the menu button. To
turn off the menu, press the menu button again.
OK Button
The OK button is active any time a menu or
dialog is displayed. Use the button to select/
confirm the currently highlighted item.
Power Button
Press the power button to turn on/off the
camera. While the camera is powered on and
there is no button activity or Host
communication for about 90 seconds, the
camera will automatically turn itself off to
conserve battery power (standby) meanwhile
press any button or rotate the Operating Mode
Dial will bring the camera back immediately. If
there is no any activity for 3 minutes, the system power will be off and you will have to press
the power button to turn it on.
Shutter Button
The Shutter button is only active in CAPTURE
mode. You may press the button in CAPTURE
mode for image capturing, processing and
storing. Before photo shooting, please make
sure that your camera has available free space
for image storage and there is appropriate light
for a successful image capturing.
Self-Timer Button
The Self-Timer button is active only in
CAPTURE mode. When the Self-Timer
button is pressed, the 10-second self-timer is
enabled. To disable the self-timer function, do
any of the following:
Press the Self-Timer button again.
Power off the camera.
Change to another mode other than
CAPTURE mode.
PC: Transfer images to PC
SETUP: Change camera settings
Battery Power Indicator
You may check the battery status by the
battery power indicator on the LCD display.
Battery icon with 3 bars on: Power is fully
remaining.
Battery icon with 2 bars on: Power is
partially remaining.
Battery icon with 1 bar on: Prepare new
batteries.
Battery icon with no bars on: There is no
battery power remaining, the batteries need
to be replaced. The camera will be forced
to power it off at once.
Operating Mode Dial
Switch the Operating Mode Dial to select the
desired operating mode. There are five
operating modes available as follows:
CAPTURE: Capture/stores images
PLAY: Review images in memory
DELETE: Delete images in memory
23
Images Remaining/Image Number Indicator
The digit number on the Status LCD may have
different meanings in each mode:
Capture Mode: Shows the number of the images that can be captured in
your camera with current
settings.
Play Mode: Shows the total amount of the captured images in your camera.
Delete Mode: Shows the image number in your
camera.
Image Storage Capacity
Approximate exposure capacity
When using 8MB internal memory/CF card
Recording Pixels Super Fine
Fine
Economy
1280
17 (16)
25 (24)
50 (48)
640
34 (33)
69 (66)
138 (132)
Warning Messages
Type
LED1
LED1
LED1
Color
Red
Green
Green
Status
Blinking
On
Blinking
LED2
SELF-Timer
Indicator
SELF-Timer
Indicator
Green
Red
On
Blinking
Red
On
Description
While detecting the system error
Camera is powered on
Image processing
(Compression/Decompression)
CF card is inserted
Camera is capturing an image
Self-Timer button is pressed
Sound
Yes
No
No
No
No
Yes
The message [MEMORY FULL] rarely appears on the LCD monitor even if the capacity of CF
card or internal memory indicated on the Status LCD is not full.
In this case, take a picture again.
24
Specification
Type
Sensor
Color Depth
Recording Pixels
Sensitivity
File Format
Quality Level
Internal memory
Storage Media
Lens
: Compact-Type digital still camera with fixed focus lens, auto exposure and auto flash.
: 1.31 megapixel (total pixels).
: 10 bits x 3 colors.
: 1280 x 960 pixels (Full), 640x480 pixels (1/4)
: Auto (equivalent to100 through 400)
: Exit 2.1 (JPEG)
: Economy, Fine, Super Fine
: 8MB Flash Memory
: Compact Flash Card Type 1
: Fixed focus lens 5.5mm (Equivalent to 42mm in 35mm format) f/2.8
5 elements in 4 groups
Focusing system : Two step zone-focusing system, Range: 0.6m (1.97ft) to infinity (normal),
0.3m (0.98ft) to 0.6m (1.97ft) (Macro)
Exposure Control : Center-weighted TTL metering, Programmed AE,
-2.0 ~ +2.0 EV 1/3 EV steps (Exposure compensation)
Shutter
: Programmed AE electronic, between-the-lens shutter,
Shutter speed: Approx. 1/800 sec. to 1/10 sec.
Drive Modes
: One shot, 10sec. delay self-timer
Bulit-in flash
: Auto, Red-eye reduction, Flash-on, Flash-off
White Balance
: Auto, Daylight, Shade, Tungsten, Fluorescent
Digital Zoom
: 2X (Capture mode), 2X,4X (Playback)
LCD Monitor
: 1.8"
Status LCD
: Flash mode, image quality, battery status, number of images, self-timer
Interfaces
: AC power port, USB port, Video Output (NTSC or PAL)
Power Sources : 4 AA (Lithium, Ni-MH or Alkaline) batteries; AC adapter (Optional)
Dimensions
: 105 (W) x 67 (H) x 48 (D) mm (4.1 x 2.6 x 1.9 inch)
Weight
: 190g (6.7 oz.) without batteries and CF card
25
WARRANTY POLICY
All Pentax cameras purchased through authorized
bona fide photographic distribution channels are
guaranteed against defects of material or workmanship for a period of twelve months from date
of purchase. Service will be rendered, and defective parts will be replaced without cost to you within
that period, provided the equipment does not show
evidence of impact, sand or liquid damage,
mishandling, tampering, battery or chemical
corrosion, operation contrary to operating
instructions, or modification by an unauthorized
repair shop. The manufacturer or its authorized
representatives shall not be liable for any repair
or alterations except those made with its written
consent and shall not be liable for damages from
delay or loss of use or from other indirect or consequential damages of any kind, whether caused
by defective material or workmanship or
otherwise; and it is expressly agreed that the liability of the manufacturer or its representatives
under all guarantees or warranties, whether expressed or implied, is strictly limited to the replacement of parts as hereinbefore provided. No refunds will be made on repairs by non-authorized
Pentax service facilities.
26
Procedure During 12-month
Warranty Period
Any Pentax, which proves defective during the 12month warranty period should be returned to the
dealer from whom you purchased the equipment
or to the manufacturer. If there is no representative of the manufacturer in your country, send the
equipment to the manufacturer, with postage
prepaid. In this case, it will take a considerable
length of time before the equipment can be returned to you owing to the complicated customs
procedures required. If the equipment is covered
by warranty, repairs will be made and parts replaced free of charge, and the equipment will be
returned to you upon completion of servicing. If
the equipment is not covered by warranty, regular charges of the manufacturer or of its representatives will apply. Shipping charges are to be
borne by the owner. If your Pentax was purchased
outside of the country where you wish to have it
serviced during the warranty period, regular handling and servicing fees may be charged by the
manufacturer's representatives in that country.
Notwithstanding this, your Pentax returned to the
manufacturer will be serviced free of charge according to this procedure and warranty policy. In
any case, however, shipping charges and customs
clearance fees to be borne by the sender. To prove
the date of your purchase when required, please
keep the receipt or bills covering the purchase of
your equipment for at least a year. Before sending your equipment for servicing, please make sure
that you are sending it to the manufacturer's authorized representatives or their approved repair
shops, unless you are sending it directly to the
manufacturer. Always obtain a quotation for the
service charge, and only after you accept the
quoted service charge, instruct the service station to proceed with the servicing.
The local warranty policies available from
Pentax distributors in some countries can supersede this warranty policy. Therefore, we
recommend that you review the warranty card
supplied with your product at the time of
purchase, or contact the PENTAX distributor
in your country for more information and to
receive a copy of the warranty policy.
27