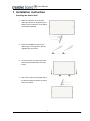
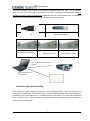
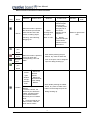
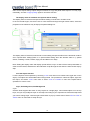
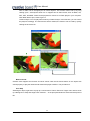
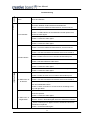
1
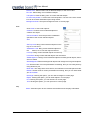
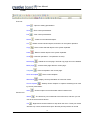
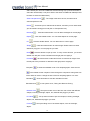
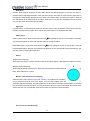
www.creative-board.eu
User Manual
NOTICE
Safety
Don’t look directly into the projector light when the creative board and the projector are both working.
Don’t place the data cable in an area where it’s likely to be stepped on or stumbled by items placed or
against it. If you must run a cable over the floor, lay it in a flat, straight line, and secure it to the floor with
tape or a cable management strip of contrasting color.
Environment
It is advised not to put any electrical apparatus (such as: displayer) within 1.6 feet of the interactive
whiteboard in order to avoid electromagnetic interference. Avoid setting up and using the interactive
whiteboard in an area with excessive levels of dust, humidity, or smoke.
Projector
For a 95” creative board, a ratio of 16:9 is required for your (short throw) projector. Likewise, for a 78”
creative board
The upward line of the projector must parallel with the upward profile of the creative board. At the same
time, the screen center must be at the middle of the whiteboard, and the definite projection distance
must be determined based on the specifications of the projector used. The projection must cover the
area as shown in blue below.
The blue area shows the desired span and ratio of your projection.
If you transport the interactive whiteboard over a long distance, completely repackage it using the
original packaging. If the original packaging is not available, pack all the components in as much
padding as possible to protect them from vibration or shock.
Replacement Parts
If your creative board interactive whiteboard requires replacement parts, please use the parts that are
specified by Creative board. The damage caused by own amendment or replacement, is not covered
by the scope of the guarantee.
1
User Manual
1 Installation instruction
Installing the board itself
1. Make an indication on the surface
where the board is to be placed upon.
Based on this, holes have to be drilled
horizontally separated.
2. Place the installation hooks on the
desired spot, securing them with the
supplied plug and screw.
3. On these hooks, the lower side of the
board will be placed. Make sure they
fit well.
4. Now, do the same for the upper side of
the board. Determine where the holes
have to be drilled.
2
User Manual
5. Place the hooks in the exact same
way as was the case with the hooks
on the lower side of the board, but in
opposite direction in order to hold the
board in place.
6. Place the board on the lower hooks,
and use the upper hooks to secure it.
Software Installation
Operating System requirements
The Windows creative board software is compatible with Microsoft Windows2000 or later, including
Windows 2000, Windows XP, Windows Vista and Windows 7.
For our Mac software, please contact our service department for our latest version and necessary
updates.
Hardware requirements
Minimum requirements: CPU: P3 800Ghz; Memory: 128Mb; Hard disk: 20Gb; Graphic card memory:
32Mb; USB 2.0 interface.
Recommended requirements: CPU P4 2.4Ghz; Memory: 512Mb; Hard disk: 80Gb; Graphic card
memory: 128Mb; USB 2.0 interface.
Software Installation
Insert the creative board CD into your computer. Normally, the installation wizard will start automatically.
If it does not start automatically, locate the setup.exe file on your CD-ROM or DVD drive and start it
manually.
Connection cable
For the interactive whiteboard connection, one USB cable is needed. There is no extra power supply
required for this product. After connecting the cable between the USB interface of PC and the interface
of the interactive whiteboard, the connection is completed. Two ends of the cable are shown. After
3
User Manual
successful installation, the indicator of the interactive whiteboard becomes green. If it is colorless,
there is no connection of the cable. If the indicator is red, there is unsteady connection of the cable (For
detailed information, please see Chapter 8). Double-click the icon “Creative board Tools” to activate the
tools. Interfaces of the interactive whiteboard and indicator colors are shown.
USB interface for connection to the
USB-B interface for connection of the
PC
The indicator is colorless.
interactive whiteboard
The indicator is red.
The indicator is green.
VGA or HDMI connection to the
projector
USB connection to the
creative board.
Calibration and position setting
When using your creative board for the first time, run the utility SetPosition, which can be found in the
creative driver toolbar menu. Through this function, you will calibrate the board and the way it detects the
positioning of your hand and/or pen. In six different angles of the board, six crosses will be displayed
which you have to touch. After doing this, the creative board will automatically save your settings and
return to the screen you were.
4
User Manual
It is absolutely necessary to set position when using your board for the first time. However, in later
instances you might want to finetune your setup again. Just repeat the above procedure at any moment
you feel your board needs finetuning again.
5
User Manual
2 Basic functions
This chapter gives you a short overview of the application of the shortcut buttons placed on both sides of
the creative board.
The shortcut buttons on the right side of the board.
Left mouse or right mouse button
The creative board will normally see every action by either your electronic pen or touch movement, as a
single left mouse button click. It exactly copies these functions as in your regular operating system such
as dragging and dropping or double-clicking. Use your pen or finger (depending on the type of board
you use) to tap on the board in order to execute a mouse-click.
When the arrow button on one of the sides is pressed, the board will switch to a right mouse button
click. To return to left button click, press the arrow again.
Pen
Pen panel include four pen buttons with four different colors separately, which are black, red, blue and
green. For instance: when you press the
button, you can write the black words on the whiteboard
with electronic pen, all the pen trace is vector, and it can be zoom in (out) clearly as you want. You may
save what you drew as picture format with “Screen Capture” (please refers Chapter 2. “Screen
Capture”).
If there is no color you want or the size of the pen is not proper, quickly pressing button twice can
customize the properties of the pen according to your requirements on Property Setting dialog. You may
also modify it on “Control Panel” of Creative board.
6
User Manual
Customizing your pen specifications
You will find a “control panel” menu item if you click the “Creative board Tools” icon at the system tray
area (at bottom right of your Windows interface), then you can modify the properties of the pen in that
dialog. In this way the modification will be valid for all the time, and will be saved by system until the
alteration next time.
Customize the color and the width of the pens in Pen Panel according to your need. The width range of
the pen is from 1 to 100. You may input value directly in the dialog box, or click the adjustment button to
adjust the value, shown as Fig 2.1.3. “Select Color” option provides lots of color for your selection. If click
“Default Value” button, all properties will resume the initial settings.
Eraser
Press the
button, the creative board will see the cursor as an eraser. Move the electronic pen on
what you have drawn and it will be erased, just as using a normal eraser to erase what you’ve written.
The eraser settings can be modified in the same way as the pen, as explained earlier.
7
User Manual
Short overview of functions of shortcut buttons
Press Once
Icon
Name
Windows
Creative tools
Windows
Creative tools
mouse, including object
Magnify any
elements apart
from the text:
1. 1. Double press
the right part of
the certain
Quick
element can be
pressing twice
magnified.
can open a
selecting, area selecting,
folder or a file.
When the button is pressed,
the electronic pen has the
Mouse
Quickly Press Twice
same function of the left
dragging, etc.
2. Double
press the left part
of the certain
element can be
diminished.
Black
pen
button
Red pen
button
Blue pen
button
When the button is pressed,
e-pen can work with
corresponding color and
width.
After double pressing the pen
buttons, any value of width and
color of the pens can be assigned
upon the dialog showing up.
Green
pen
button
Close the
current
open
window
except
“Creative
1. Delete the
selected
element.
2. Delete the
selected words
in text editing.
3. Rubber.
tools”.
Rubber
Switch the e-pen to the
Rubber.
1.Press the button ,the
electronic pen will be the
rubber, and erase what
you’ve drawn with the
electronic pen in Creative
tools:
2. Circle the objects you
want to erase. Click the
inner area to clear it.
After double pressing the rubber
button, any value of width of the
rubber can be assigned upon the
dialog showing up.
8
On Pressing
Windows
Creative
tools
Switch to right mouse
click.
User Manual
3
Using the creative board in your Windows
environment
You can draw or write in your regular Windows environment with ease, as soon as your creative driver is
started. Since it starts automatically when your PC boots, you can immediately start using your board.
When you operate in other software with your electronic pen or touch, the icon
will be found in
the left bottom of the software interface. Any amendment in this software will be saved if you click
,
without changing format. On the other hand, all the illustrations made in the software will be gone if you
don’t save it, when you press
Drag the
button, the bar
to convert into mouse mode.
could be moved with the mouse so as to make your annotation’s
saving convenient and prompt.
9
User Manual
4
A brief introduction to the creative tools
The menu bars
Main menu bar
File
Cick “File” to see under options.
New: Create a new CBT presentation.
Open: Open an existing template presentation.
Save: Save all kinds of open presentations (templates, images).
SaveAs: Save current template presentation to other formats.
SaveAs templates: Save current template
SaveAs Picture: Save current page as a picture file.
Print: Print current presentation.
Exit: Exit from current Creative tools.
Edit
Click “Edit” to see under options:
Cut: Delete current selected objects, and save it in system
clipboard.
Copy: Save current selected object in system clipboard.
Paste: Retrieve saved object in system clipboard.
Delete: Delete current selected object.
Select All: Select all objects in the current page.
Clear page: Delete all objects in the current page, but retain the blank page.
Delete page: Delete the current page.
View
Click “View” to see under options:
Previous: Show the content of previous page.
Next: Show the content of next page.
Insert
Click “Insert” to see under options:
Blank Page: Insert blank page after the current page.
Picture File: Insert picture from picture file in the current page.
Images: Insert an image in the current page.
Templates: Insert and browse a template file.
Format
Click “Format” to see under options:
Font: Select font used in current presentation.
10
User Manual
Border Color: Select border color of different shapes, or the color of text.
Fill color: Select filling color of different shapes.
Transparent: Clear the filling color of current selected shapes.
Lock the text position: Lock the text in a fixed position. The text can not be moved
but can be revised and deleted upon being locked.
Background Color: Set up the background color of current page.
Draw
Click “Draw” to see under options:
Combine: Combine current selected objects to
create a new object.
Cancel Combine: Undo the previous combination
operation of the current selected objects.
Sort:
Set Top Level: Bring current selected objects on the
top, so we can see it.
Set Bottom Level: Bring current selected objects on
the
bottom, so we can see objects behind it.
Level Up: Bring current selected objects one level up.
Level Down: Bring current selected objects one level down.
Set Background: Change current selected objects into background objects, then it
won’t be edited
Get Background: Retrieve background objects and change it to foreground objects.
Pen: Set the mode of current presentation as drawing, then you can easily write by
using electronic pen. .
Brush Pen: The usage is the same as Pen, but will write in semi-transparent mode.
Rubber: Set the mode of current presentation as erasing, then you can erase what
you have written.
Rectangle: Clicking this option, you can draw rectangle in current page
Ellipse: Clicking this option, you can draw ellipse in current page.
Line: Clicking this option, you can draw line in current page.
Text: Clicking this option, you can input text in current page.
Help
About: Click this option to see Creative tools software and company information.
11
User Manual
Toolbar
First Line:
Open
:Open an existing presentation.
Save
:Save current presentation.
Print
:Print current presentation.
:Delete current selected objects.
Delete
Cut
:Delete current selected objects, and save it in the system clipboard.
Copy
:Save current selected objects in the system clipboard.
Paste
:Retrieve saved objects in the system clipboard.
Undo
:Undo last operations(10 operations at most).
:Delete the current page. The final only page can not be deleted.
Delete page
Blank page
:Insert a blank page after the current page.
Templates
:Insert a template in the current page.
Save as template
:Save current template.
:Display current presentation in full-screen mode.
Slide Show
Screen Capture
:Startup “Screen Capture” to capture something to be used
by current presentation.
About
:Click this option to see information about Creative tools.
Second Line:
Mouse
:The electronic pen is switched to the left mouse, and then you can
use as the normal mouse device.
Pen
:Right-mouse click this button to drop-down the menu. Three pen modes
will show up: normal, brush and line pens. Normal pen will perform as normal
12
User Manual
effect. Brush pen can write Traditional Chinese Writing style (it would be better to
select the utmost width). Line pen’s effect is the same as traditional chalks(it would
be better to select a middle width.)
Semi-Transparent Pen
:The usage is the same as Pen, but will write in
semi-transparent mode.
:Electronic pen is switched to the eraser, and then you can erase what
Rubber
you have drawn during pen mode (Pen or Transparent Pen).
: Click this toolbar button. You can draw rectangles in current page.
Rectangle
:Click this toolbar button. You can draw ellipses in current page.
Ellipse
:Click this toolbar button. You can draw lines in current page.
Line
:Click this toolbar button to draw triangle. Select buttons to draw
Shape
dashed or polygon in current page as you want.
Ruler
:Click this button to open up ruler. To carry out this function, you should
double click left part of ruler to diminish it and right part to magnify it.
Protractor
:Click this button to start this function to measure an angle. Click
the left part of the protractor to diminish it and right part to magnify it.
Compass
: To draw the standard circle or fan-shaped graphic. Click the icon
in the toolbar to start compass. Zoom through the compass to change the size
of the radius in order to change the size of the fan-shaped graphics or a circle.
Calculator
:Click this button to start the calculator function.
Simulated clock
Boarder Color
: It has system clock, Timing and Reverse Timing.
:Set up the border color of the font color of text and different
shapes, including rectangle, ellipse, line, dashed and polygon you drew .
Line Width
:Set up the line width of pen and shapes, including rectangle,
ellipse, line, dashed and polygon you drew.
Fill Color
:Set up the filling color of enclosed shapes, such as rectangle,
ellipse.
13
User Manual
Text
:Click this button to input and edit text in current page.
Bold
:Current font is in thickened mode.
Italic
:Current font is in italic mode.
Font
:Set up current font family.
Size
:Set up current font size.
Creative tools elements
Creative tools Software is used for presentation and speech, compatible with various element objects:
handwriting, text, shape, image, sound, animation and hyperlink.
Handwriting
Creative tools Software supports unique handwriting function. It may save your written characters and
figures with electronic pen in Creative tools.
Text
Creative tools Program supports text editing function. It may input and edit characters. You can also
setup font size, font family, font color. When you finish editing, you can move and rotate it.
Shape
Creative tools Program has the shape drawing and editing function, it may draw geometrical figures
including rectangular, square, rhombus, isosceles triangle, circle, oval, pentagon, hexagon, a straight
line, dotted line,color line isosceles trapezoid, right-angled trapezoid, right-angled triangle, arrowhead
straight line, parallelogram,,etc. and set up its properties, such as border color, size and filling color etc.
You can also zoom, move and rotate it conveniently.
Image
Creative tools Program supports image insertion function. You can insert vector graph(such as WMF)
and other formats image(such as JPEG, GIF, BMP) into Creative tools for presentation and annotations.
Zooming, moving and rotating images is very convenient. Dynamic GIF images are supported.
Sound
Creative tools Program has set up sound properties for all objects. Select the object to auto-play the
sound, you can also set up the properties of voice, such as length of sound, start and stop time. Sound
files include all kinds of formats: WMA, WMV, ASF, WM, ASX, AVI, MP3, MP2, MP1, MPA, MPGA,
MPG, MPEG, DAT and WAVE.
14
User Manual
Animation
Creative tools Program supports not only static objects, but also animation. It may link any object in
Creative tools to the target animation. Click “Set Link Target” menu item on context menu (right click on
the object) to setup linked object(such as FLASH) of the object. When you select the object, a shortcut
icon will display at the bottom left of the object. Click the icon to play any animation(such as FLASH).
You can also zoom and control the animation.
Hyperlink
In presentation, it is absolutely necessary for Creative tools to have Hyperlinks. It may link not only file,
website, but also internal pages, which makes the presentation more animated and lively.
Video player
Open by video player: single click at the linked icon
long (lifting the E-pen or mouse after 2 seconds),
The player will appear to work, and stop the video by closing the player.
Embedded player: single click at the linked icon
quickly (lifting the E-pen or mouse after 1 second
the Embedded player will work, the window size depends on the outer border of the linked target, and
stop the video by clicking the blank area.
Select
Single Object Selecting
After clicking an object, a broken line frame will be around the object. That means this object is chosen.
Multiple Objects Selecting
Select objects with an electronic pen. When there are broken line frames around
them, these objects are chosen.
Border, Font and Fill Color Changing
Select an object. Click “Border Color” and “Fill color” on Creative tools Toolbar to
set up the border and fill color of the object. You can draw shapes (such as
rectangle, ellipse and triangle, etc) with shape tools on the toolbar of Creative tools Program. If you want
to draw shapes with different colors, you may click other color pen keys on Pen Panel, then border color
will become the one you selected. (Note: this function only works for shape and text)
Fill in color for hand-drawings
15
User Manual
Closed or unclosed non-standard shapes which are drawn by E-pen can be also filled with colors. “Fill
color”, “Zoom”, and “Combine” are also available. As the following pictures, select the shape you’ve
drawn, click “Fill color”button on the toolbar.
Zoom
It is possible to zoom the figure, image, written contents, animation and character. There is a broken line
frame around the object after it is chosen. Drag the white circle at the right bottom of the broken line
frame with an electronic pen to zoom the object. (Double click left part to diminish it and right part to
magnify it)
Move
Creative tools Software supports any movement of internal object. Drag the
selected object with an electronic pen. It is possible to finely adjust the position
of object with slow movement of mouse or keyboard shortcut key (ctrl + cursor
key), which may be used to create and edit new courseware with mouse and
keyboard in advance.
Rotate
It is possible to rotate shape, image, written contents, and character in Creative
tools. There is a broken line frame around the object after it is chosen. Click the left mouse button to drag
the green button on the broken line frame. Then rotate the object at any angle circumfusing the pivot “+”.
Meanwhile, the circumfusing pivot “+” can be moved after activating the pivot “+” by double-clicking the
green button on the broke.
The Usage of the Right Mouse
All objects in Creative tools can perform right mouse button operation. When an object is selected, a
circle filled with blue color partially will be drawn at the top right corner of the object. Click the circle to get
the same function of the right mouse.
16
User Manual
Combination
Combine many independent objects into one overall object. Keep relative
positions between objects at the same time. The procedure is: select many
objects, click the right mouse button to pop up context menu, then select
“Combination” menu item, or select “Combination” in “Draw” menu on “Menu
Bar”. All objects combined will display as a whole one after combination.
Cancel Combination
Select combined elements. Choose “Cancel Combination” in its context menu (right click on the object).
Then break combined elements into many independent elements. For a vector graph, select the vector
graph, click the right mouse button to select “Cancel Combination” in its context menu, and the vector
graph will be broken into many elements.
Align
Creative tools supports any operation to the selected target. Select the target. Click right mouse. The
Align option will show up as visualized below. Take “Align by top” as an example.
Property
There is a new property function called transparence property. You may configure the transparence of
the object, including the transparence control of fill-in and frame. Please see the following pictures to find
the effects before and after transparence selection.
Copy, Paste, Delete
Creative tools is similar to other software. It also supports the common operations such as Copy, Paste,
Delete, etc. After selecting the object, click the right mouse button, and choose related menu item in
context menu or related menu item in “Edit” on menu bar. Select “Copy by Drag” menu item in its context
17
User Manual
menu for the objects being copied. Drag this element to copy and paste these objects. You may copy
unlimitedly, and click “Copy by Drag” again to cancel this function.
The display order of elements and special effects setting.
The display order of elements and special effects setting could be set in Creative tools.
In the current edit region, if there are two or more elements through the right mouse button, select the
properties of the elements may be Popup Properties dialog box.
The display order of elements could be set in order setting and special effect for the elements could be
set in special effect setting.(There is no special effect setting when the element order is 1) special
effects, including: normal, rotation, flying into and fade in four ways.
Note: Setting the display order and display special effects, only in a state of full-screen presentation in
order to show results, and based on the Edit button to flip through the set when the order shows step by
step.
Lock the Object Position
Lock the object at a fixed position by choosing “Lock” menu item on its context menu (right click on the
object). The object can still be edited when being locked. The procedure is: select the object, right click
the object, and select “Lock” menu item or select “Lock” in “Format” in menu bar. Repeat above
operations to cancel “Lock”.
Layer, Set Background, Get Background
Layer
Creative tools supports the stack of many objects in a single page. Last inserted object is on the top
layer, and you may modify the layer of one object according to your requirements. Select the object that
you want to change layer. Click the right mouse button to pop up context menu. Select “Sort” or “Sort” in
“Draw” menu on menu bar to setup its layer.
18
User Manual
Set Background
By making objects as background, these objects can’t be modified, such as select, rotate, move. The
procedure is: select the objects and right click on the objects to popup context menu to select “Sort” →
“Set Background”, or click “Draw” → “Sort” → “Set Background” to set it as background objects.
Get Background
Comparing with “Set Background”, “Get Background” will retrieve the background objects, so it can be
modified. The procedure is: click “Sort” → “Get
Background” in context menu to do it.
Hyperlink
You may create hyperlinks for any object in Creative
tools. Access to linked target by clicking the object with
hyperlink (text, image, picture, etc.). Linked objects
include: files in PC, web address, animation, and internal
pages in Creative tools.
File Link
Select an object; right click it to pop up context menu, select “Set Link Target” menu item to show up a
dialog box. To setup link target, click “Browse…” in the prompted window, select linked object, and click
“OK” to complete hyperlink setting operation.
Web Address Link
Select an object, right click it to pop up context menu, select “Set Link Target” menu item to show up a
dialog box to setup link target, input the website address in the prompted window, and click “OK” to
complete hyperlink setting operation.
Page Link
Select an object; right click it to pop up context menu. Select “Set Link Target” menu item to show up a
dialog box to setup link target. Choosing “Link to page” in the prompted window, the dialog box will
switch the interface. Select the page being linked in the drop-down list.
Animation Link
Select an object. Right click it to pop up context menu, and select “Set Link Target” menu item to show
up a dialog box to setup link target. Click “Browse…” in the prompted window to choose linked FLASH
animation.
Note: there is a shortcut icon (an arrow icon) at the left bottom of the object with hyperlink. Click the icon
to open its hyperlink.
There are two ways to play linked video:
Embedded player: Size of the video will exactly match the object size. Embedded player will
neither to be paused nor to be noted. While you can write outside the player. The position and
19
User Manual
size of video can be changed just as normal objects. This function will be set up by long
clicking (over 1 second) the arrow icon. It supports lots of video format, such as WMV, AVI,
DAT, ASF, and MPG. Flash can be played even if there is no Flash player in your computer.
Click blank area to quit, check Fig 5.5.2.
Creative Player: You can play linked video by Creative Player. In this function, you can control
the player accordingly. The same as the above method, the function can be used by quickly
clicking the shortcut icon.
Built-in Sound
Creative tools supports the function of built-in sound. Click the left mouse button on the object with
sound property to play the linked sound without the player interface. The procedure is:
First Step
Selecting an object, right click it to pop up a context menu. Select “Set Voice Target” menu item to show
up a dialog box to setup link target. Click “Browse…” in the prompted window to select and setup sound
file.
20
User Manual
Second Step
Input the starting and ending time of playing sound file in “Start” and “End” textbox according to your
requirements.
Third Step
Click “OK” to complete built-in sound
setting.
Note: Multiple clicks may make the
sound playing repeatedly
Flash Insertion
Selecting an object, right-click it to pop up a context menu. Select “Set Link Target” menu item to show
up a dialog box to setup link target. Click “Browse…” in the prompted window to choose the FLASH
animation. There is a shortcut icon (an arrow icon) at the bottom left of object after the linkage. Click the
shortcut icon to open the animation. It is possible to zoom or move it. Click the blank area to exit the
animation.
Screen Capture
“Screen Capture” may capture the contents on the interactive whiteboard or the monitor, and save the
image into Creative tools to modify. It makes your presentation and explanations more convenient.
(Please check point 8, para 3, chapter II, Screen Capture).
21
User Manual
Troubleshooting
Function
Issue
Cause and Solution
1. Indicator
①Cause: No connection between USB interface and PC, or loose
connection between COM interface and whiteboard.
Solution: Check the USB and COM interface, and reconnect it.
②Cause: Replace USB interface or COM interface of whiteboard
Solution: If COM interface of the whiteboard needs replacement,
1. No indicator:
contact the sales agent.
③Cause: Replace USB data cable.
Solution: Contact the sales agent.
④Cause: No indicator, but the whiteboard can be used normally.
Solution: Contact the sales agent.
①Cause: Loose connection of USB or COM interface.
Solution: Check the USB and COM interface, and reconnect it.
②Cause: Failed installation of the interactive whiteboard software.
Solution: Uninstall old whiteboard software driver and reinstall it.
③Cause: No startup of the interactive whiteboard tool software.
2. Red indicator:
Solution: Double-click tool icon of Creative board startup tool.
④Cause: Failed installation of USB data cable driver.
Solution: Reinstall USB data cable driver.
⑤Cause: USB data cable should be replaced.
Solution: Contact the sales agent.
⑥Cause: Control card in the whiteboard should be replaced.
Solution: Contact the sales agent.
HIKey Toolbar
HIKey Toolbar
①Cause: No startup of the interactive whiteboard tool software.
Solution: Double click tool icon of Creative board startup tool.
②Cause: Failed installation of the interactive whiteboard software.
3. Malfunction of
all buttons:
Solution: Uninstall old whiteboard software driver and reinstall it.
③Cause: Loose or wrong connection of two lines between toolbar
back and whiteboard bottom.
Solution: Fasten connection or reconnect lines according to left
gray and right black.
①Cause: Lines between toolbar back and whiteboard bottom
should be replaced.
Solution: Contact the sales agent.
4. Malfunction of
single button:
②Cause: Failed installation of digital interactive whiteboard
software. Solution: Reinstall digital interactive whiteboard software.
③Cause: Internal part of digital interactive whiteboard should be
maintained or replaced.
Solution: contact the sales agent.
22
User Manual
Digital interactive whiteboard
①Cause: Failed installation of digital interactive whiteboard
software. Solution: Uninstall old whiteboard software driver and
reinstall it.
②Cause: No startup of digital interactive whiteboard tool software.
5. Unable to
control the
whiteboard:
Solution: Double click tool icon of Creative board startup tool.
③Cause: Loose connection of two lines between toolbar back and
whiteboard bottom; or replacement is needed.
Solution: If it is loose, reconnect lines according to left gray and right
black; or contact the sales agent.
④Cause: Flat battery or the electronic pen should be replaced.
Solution: Replace battery or the electronic pen.
①Cause: Wrong position-setting
a. change of relative position between the projector and whiteboard;
6. Electronic pen
may control
partial
whiteboard:
b. change of PC; c. reinstall the software.
Solution: Reset the position.
②Cause: Wrong software setting.
Solution: Delete the Creative boardSrv.ini file, restart the computer
and reset the position.
③Cause: Internal lines of the whiteboard should be replaced.
Solution: Contact the sales agent.
①Cause: The horizontal (vertical) line is not straight during the line
draw, which means wrong position-setting.
Solution: Reset the position.
7. Abnormal Line
②Cause: The horizontal (vertical) line is bending during the line
Draw:
draw. Solution: Contact the sales agent.
③Cause: The cursor moves in other row (column) instead of
moving with the pen during the line draw.
Solution: Contact the sales agent.
①Cause: The cursor may sometimes quiver or work normally.
There is an interfering resource around the whiteboard, for
instance, monitor, TV, etc.
Solution: Close the interfering resource or move it over 1.6feet
8. Abnormal
mouse:
away.
②Cause: The cursor may stay at the top left (top right) fixedly or
quiveringly, which means damage of internal parts, or wrong
system file.
Solution: Empty data in system files (Creative boardSrv), restart the
computer, reset the position or contact the sales agent.
23