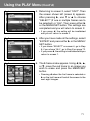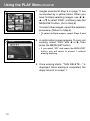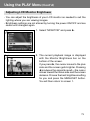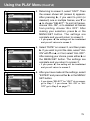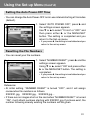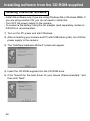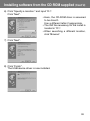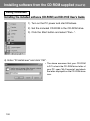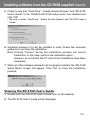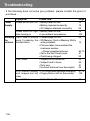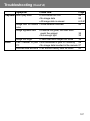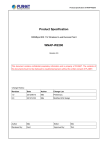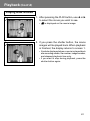
1
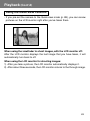
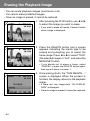
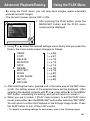
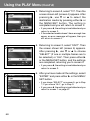
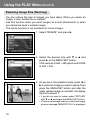
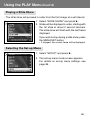
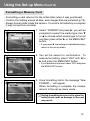
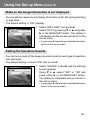
Playback (Cont’d)
Playing Back Movies
1
1. After pressing the PLAY button, use or to select the movie you wish to see.
•
2
is displayed on the movie image.
2. If you press the shutter button, the movie
images will be played back. When playback
is finished, the display returns to screen 1.
• Symbols displayed when a movie is played back
are recording media, file number, image number,
and elapsed playback time only.
• If you want to stop during playback, press the
shutter button again.
61
Playback (Cont’d)
Playing Back Enlarged Images (Digital Zoom)
- You can play back your images as enlargements.
1. After pressing the PLAY button, use or to select the image you wish to see.
Then use the TELE zoom button to zoom
in; every time you press the TELE button,
the image is enlarged further.
1
• The zoom ratio is displayed on the LCD monitor.
• To zoom back out, press the WIDE zoom button.
2. Use , , , or to scroll around the photo
to the part you want to see.
2
• To conserve your battery once you’ve finished
viewing, press the PLAY button again to turn off
the LCD monitor.
62
Playback (Cont’d)
Using the Quick-view Function
- If you pre-set the camera to the Quick-view mode (p. 88), you can review
pictures on the LCD monitor right after you’ve taken them.
When using the viewfinder to shoot images, with the LCD monitor off:
After the LCD monitor displays the last image that you have taken, it will
automatically turn back to off.
When using the LCD monitor for shooting images:
1) After you take a picture, the LCD monitor automatically displays it.
2) After about three seconds, the LCD monitor returns to the through image.
63
Erasing the Playback Image
- You can erase playback images (one frame or all).
- You cannot erase protected images.
- Once an image is erased, it cannot be restored.
1. After pressing the PLAY button, use or to select the image you wish to erase.
1
• If you wish to erase all frames, it doesn’t matter
which image is displayed.
2. Press the DELETE button and a screen
appears indicating the media type to be
erased and prompting you to select the
frame range. Press or to select “THIS”
(the selected image) or “ALL”, and press the
MENU/SET button.
2
• If you decide not to erase a frame, select
“CANCEL” or press the DELETE button again,
then you will return to screen 1.
3. Once erasing starts, the “THIS DELETE…”
screen is displayed. When the process is
finished, the display returns to the playback
image.
3
• If there isn’t any image data, “NO DISPLAY
DATA” is displayed.
• Once an image is erased, it cannot be restored.
64
Advanced Playback/Erasing
Using the PLAY Menu
- By using the PLAY menu, you can play back images, erase unwanted
pictures and edit images.
- The camera’s power can be OFF or ON.
1. After pressing the PLAY button, press the
MENU/SET button and the PLAY menu
screen will be displayed.
1
2. Using or , select the desired settings menu. Every time you press the
button, the menu mode screen changes as follows:
INDEX
COPY
DELETE
MONITOR
DPOF
RESIZE
PROTECT
MOVE
SLIDE SHOW
SET UP
RETURN
(→ p.66)
(→ p.67)
(→ p.70)
(→ p.73)
(→ p.74)
(→ p.78)
(→ p.79)
(→ p.82)
(→ p.85)
(→ p.85)
3. After selecting the menu, press and in the same way as the REC menu
(p.42), the setting screen of the selected menu will be displayed. After
selecting the desired contents with or , press either or the MENU/
SET button, completing the setting, and you will return to screen 1.
4. When you are in screen 1 (PLAY menu screen), to exit the PLAY menu
mode, press either or the MENU/SET button after selecting “RETURN”.
You will return to either the Playback or the through image mode. Press
the PLAY button to turn off the LCD monitor.
• For details on making settings for each menu, refer to the following pages.
65
Using the PLAY Menu (Cont’d)
Viewing Multiple Pages at Once (Index Playback)
- Up to nine frames can be displayed on the LCD monitor simultaneously.
You can quickly access the images you want displayed. You can also erase
unwanted images.
1
1. Select “INDEX” and press .
2
2. The 9-frame index are displayed at the same
time. The image selected when you entered
the menu will be surrounded by a red frame.
Use , , , or to move the frame and
select the image you wish to display (or
erase).
• Pressing when the first frame is selected or
on the last frame will switch the screen to the
next nine images.
3. Press the MENU/SET button and the
selected image will be displayed in the
normal size.
3
If you wish to delete the selected image,
press the DELETE button. After pressing the
DELETE button, the procedures are the
same as explained at Step 2 to 3 on page
64.
• If you wish to delete all the images on a card, it
doesn’t matter which image is displayed.
66
Using the PLAY Menu (Cont’d)
Copying an Image
- You can copy a previously recorded still photo or movie onto another memory
media. (You can select one frame, multiple frames or all frames.)
1
1. Select “COPY” and press .
2
2. A screen with each setting item will appear.
At first “FROM” is selected, so press .
• To select a different item, press or .
3
3. The media types will be displayed. Using or , select the media on which the image
you wish to copy is recorded, then press or the MENU/SET button. The setting is
completed and you will return to screen 2.
• If you press , the setting is invalidated and you
return to screen 2.
• If there are no images on the media selected,
or if a card is not inserted in the camera, you
return to screen 3.
67
Using the PLAY Menu (Cont’d)
4. Returning to screen 2, select “TO”. Then the
screen shown left (screen 4) appears. After
pressing , use or to select the
destination media by pressing either or
the MENU/SET button. The setting is
completed and you will return to screen 2.
4
• If you press , the setting is invalidated and you
return to screen 2.
• If the selected media doesn’t have enough free
space, an error message will appear, then you
will return to screen 4.
5. Returning to screen 2, select “UNIT”. Then
the screen shown left (screen 5) appears.
After pressing , use or to choose
“SELECT” (If one or multiple frames are to
be selected) or “ALL”. Then press either or the MENU/SET button, and the settings
are completed, returning you to screen 2.
5
• If you press , the setting is invalidated and you
return to screen 2.
6. After you have made all the settings, select
“ENTER” and press either or the MENU/
SET button.
6
• If you chose “SELECT” on screen 5, go to Step
7; if you chose “ALL”, go to Step 9.
• If you press , the setting is invalidated and you
return to screen 1 on page 67.
68
Using the PLAY Menu (Cont’d)
7
7. The 8-frame index appears. Using , , ,
or , move the red frame to an image you
wish to select and press the MENU/SET
button.
• Pressing when the first frame is selected or
on the last frame will switch the screen to the
next eight images.
8
8. Images selected at Step 7 are surrounded
by a yellow frame. When you have finished
selecting images, use , , , or to select
“END”, and then press the MENU/SET
button. (Go to Step 9)
To select other images, repeat the selection
procedure. (Return to Step 7)
• To select multiple images, repeat the procedures
Steps 7 and 8.
9
9. A confirmation screen appears. To carry out
copying, select “YES” with or , then
press the MENU/SET button.
• If you select “NO” and press the MENU/SET
button, you will return to screen 1 without making
a copy.
10.Once copying starts, “Now COPY…” is
displayed. Once copying is completed, the
display returns to screen 1.
69
Using the PLAY Menu (Cont’d)
Erasing Unwanted Images
- You can erase unwanted still pictures, movie images etc. (you can select
one frame, multiple frames or all frames.)
- Once images are erased, they cannot be recovered.
- Protected images cannot be erased unless the protection is removed.
1
1. Select “DELETE” and press .
2
2. A screen with each setting item will appear.
At first “MEDIA” is selected, so press .
• To select a different item, press or .
3. Using or , select the media on which
the image you wish to erase is recorded,
then press or the MENU/SET button. The
setting is completed and you will return to
screen 2.
3
• If you press , the setting is invalidated and you
return to screen 2.
• If there are no images on the media selected,
or if a card is not inserted in the camera, you
return to screen 3.
70
Using the PLAY Menu (Cont’d)
4
4. Returning to screen 2, select “UNIT”. Then
the screen shown left (screen 4) appears.
After pressing , use or to choose
“SELECT” (If one or multiple frames are to
be selected) or “ALL”. Then press either or the MENU/SET button. The settings are
completed and you will return to screen 2.
• If you press , the setting will be invalidated
and you will return to screen 2.
5
5. After you have made all the settings, select
“ENTER” and press either or the MENU/
SET button.
• If you chose “SELECT” on screen 4, go to Step
6; if you chose “ALL”, go to Step 8 on page 72.
• If you press , the setting is invalidated and you
return to screen 1.
6
6. The 8-frame index appears. Using , , ,
or , move the red frame to an image you
wish to erase and press the MENU/SET
button.
• Pressing when the first frame is selected or
on the last frame will switch the screen to the
next eight images.
71
Using the PLAY Menu (Cont’d)
7. Images selected at Step 6 on page 71 are
surrounded by a yellow frame. When you
have finished selecting images, use , ,
, or to select “END”, and then press the
MENU/SET button. (Go to Step 8)
7
To select other images, repeat the selection
procedure. (Return to Step 6)
• To select multiple images, repeat Steps 6 and
7.
8. A confirmation screen appears. To carry out
erasing, select “YES” with or , then
press the MENU/SET button.
8
• If you select “NO” and press the MENU/SET
button, you will return to screen 1 without
erasing anything.
9. Once erasing starts, “THIS DELETE…” is
displayed. Once erasing is completed, the
disply returns to screen 1.
72
Using the PLAY Menu (Cont’d)
Adjusting LCD Monitor Brightness
- You can adjust the brightness of your LCD monitor as needed to suit the
lighting where you are viewing images.
- Brightness settings are not altered by turning the power ON/OFF and are
saved until changed again.
1
2
1. Select “MONITOR” and press .
2. The current playback image is displayed
with the Monitor Brightness bar on the
bottom of the screen.
If you press , the cursor moves to the plus
side and the screen gets brighter. Pressing
produces the opposite result—the cursor
moves toward the minus side and the screen
darkens. Choose the best brightness setting
for you and press the MENU/SET button.
You will then return to screen 1.
73
Using the PLAY Menu (Cont’d)
Selecting/Deselecting Images to Print (DPOF)
- DPOF is short for Digital Print Order Format. DPOF is a format for recording
information on memory cards, etc. so they can be used by DPOF compatible
digital printers and lab print services for printing out images you’ve taken
with your camera.
- You can select the frames (one frame, multiple frames or all frames) you
want to print from all the still images you’ve taken. You can also deselect
the settings. However, you cannot print movie images.
- When you print a photo you took previously, you can imprint the date (the
date taken) onto the image. (You can also select not to imprint the date.)
1
1. Select “DPOF” and press .
2
2. A screen with each setting item will appear.
At first “MEDIA” is selected, so press .
• To select a different item, press or .
3. Using or , select the media on which
the image you wish to print (or deselect) is
recorded, then press or the MENU/SET
button. The setting is completed and you will
return to screen 2.
3
74
• If you press , the setting is invalidated and you
return to screen 2.
• If there are no images on the media selected,
or if a card is not inserted in the camera, you
return to screen 3.
Using the PLAY Menu (Cont’d)
4
4. Returning to screen 2, select “UNIT”. Then
the screen shown left (screen 4) appears.
After pressing , if you want to print (or
deselect) one or multiple frames, use or
to choose “SELECT”. To print all frames,
choose “ALL ON”, or to deselect all frames
from printing, choose “ALL OFF”. After
making your selection, press or the
MENU/SET button. The settings are
complete and you will return to screen 2.
• If you press , the settings will be invalidated
and you will returns to screen 2.
5
5. Select “DATE” on screen 2, and then press
. If you wish to print the date, select “ALL
ON” with or , or if not, select “ALL OFF”.
After making your choice, press either or
the MENU/SET button. The settings are
complete and you return to screen 2.
• If you press , the setting will be invalidated
and you will return to screen 2.
6
6. After you have made all the settings, select
“ENTER” and press either or the MENU/
SET button.
• If you chose “SELECT” for “UNIT” at on screen,
go to Step 7; if you chose “ALL ON” or “ALL
OFF” go to Step 9 on page 77.
75
Using the PLAY Menu (Cont’d)
7. The 8-frame index appears. Using , , ,
or , move the red frame to an image you
wish to print (or deselect) and press the
MENU/SET button.
7
• Pressing when the first frame is selected or
on the last frame will switch the screen to the
next eight images.
8. Images selected at Step 7 are surrounded
by a yellow frame. When you have finished
selecting images, use , , , or to select
“END”, and then press the MENU/SET
button. (Go to Step 9)
8
To select other images, repeat the selection
procedure. (Return to Step 7)
• To select multiple images, repeat the procedures
Steps 7 and 8.
76
9
9. A confirmation screen appears.
If you chose “SELECT” or “ALL ON”: Set
the number of prints using or . Next,
select “YES” with or and press the
MENU/SET button.
• You can print from 1 to 99 photos.
• If you select “NO” and press the MENU/SET
button, your settings will be invalidated and you
will return to screen 1.
If you chose “ALL OFF”: select “YES” and
press the MENU/SET button.
• If you select “NO” and press the MENU/SET
button, you will return to screen 1 without
deselecting anything.
10.The “Now DPOF SET…” (or “Now DPOF
OFF…”) screen is displayed. Once settings
(or deselection) are completed, the display
returns to screen 1.
77
Using the PLAY Menu (Cont’d)
Reducing Image Size (Resizing)
- You can reduce the size of images you have taken. When you resize an
image, a new, smaller file is created.
- Use this function when you send images as e-mail attachments or when
you otherwise need a smaller image.
- The resize function is not available for movie images.
1
1. Select “RESIZE” and press .
2
2. Select the desired size with or and
press or the MENU/SET button.
VGA records at 640 × 480 pixels and QVGA
at 320 × 240.
3
3. As you are in the playback mode, press or
to select an image you want to resize. Then
press the MENU/SET button and after the
newly resized image is recorded, the display
returns to screen 1.
• If you do not want to resize, select “RETURN”
with or and press the MENU/SET button.
• If there is not enough memory to save the image,
an error message “MEMORY FULL” is displayed.
78
Using the PLAY Menu (Cont’d)
Setting/Canceling Protection for Your Important Images
- You can protect your important still and moving images from being erased.
(You can select some or all images to be protected). You can also cancel
the protection.
- If you format a card (p.87), even protected images will be erased.
1
1. Select “PROTECT” and press .
2
2. A screen with each setting item will appear.
At first “MEDIA” is selected, so press .
• To select a different item, press or .
3
3. Using or , select the media on which
the image to protect (or cancel protect) is
recorded, then press or the MENU/SET
button. The setting is completed and you will
return to screen 2.
• If you press , the setting will be invalidated
and you return to screen 2.
• If there are no images on the media selected,
or if a card is not inserted in the camera, you
return to screen 3.
79
Using the PLAY Menu (Cont’d)
4. Returning to screen 2, select “UNIT”. Then
the screen shown left (screen 4) appears.
After pressing , if you want to protect (or
cancel protect) one or multiple frames, use
or to choose “SELECT”. To protect all
frames, choose “ALL ON”.
Further, to cancel protection of all frames,
choose “ALL OFF”. After making your
selection, press or the MENU/SET button.
The settings are complete and you will
return to screen 2.
4
• If you press , the settings will be invalidated
and you will return to screen 2.
5. After you have made all the settings, select
“ENTER” and press either or the MENU/
SET button.
5
• If you chose “SELECT” for the “UNIT” setting,
go to step 6; if you chose “ALL ON” or “ALL
OFF”, go to Step 8 on page 81.
6. The 8-frame index appears. Using , , ,
or , move the red frame to an image you
wish to protect (or cancel protect) and press
the MENU/SET button.
6
• Pressing when the first frame is selected or
pressing on the last frame will switch the
display to the next eight images.
80
Using the PLAY Menu (Cont’d)
7
7. Images selected at Step 6 on page 80 are
surrounded by a yellow frame. When you
have finished selecting images, use , ,
, or to select “END”, and then press the
MENU/SET button. (Go to Step 8)
To select other images, repeat the selection
procedure. (Return to Step 6)
• To select multiple images, repeat the procedures
Steps 6 and 7.
8
8. The confirmation screen appears with
“YES”selected.
If you chose “SELECT” or “ALL ON”:
leave “YES” as is and press the MENU/SET
button.
• If you select “NO” with or and press the
MENU/SET button, your settings will be
invalidated and you return to screen 1.
If you chose “ALL OFF”: select “YES” with
or and press the MENU/SET button.
• If you select “NO” and press the MENU/SET
button, you will return to screen 1 without
canceling any settings.
9. The “Now PROTECT…” (or “Now PROTECT
OFF”) screen is displayed. Once settings (or
cancel protect) are completed, the display
returns to screen 1.
81
Using the PLAY Menu (Cont’d)
Moving the Image Data to Another Memory Card
- You can move previously recorded still or movie image data to another
memory card.
- For protected images, you must cancel their protection before you can move
them.
1
1. Select “MOVE” and press .
2
2. A screen with each setting item will appear.
At first “FROM” is selected, so press .
• To select a different item, press or .
3. Using or , select the media on which
the image you wish to move is recorded,
then press or the MENU/SET button. The
setting is completed and you will return to
screen 2.
3
• If you press , the setting is invalidated and you
return to screen 2.
• If there are no images on the media selected,
or if a card is not inserted in the camera, you
return to screen 3.
82
Using the PLAY Menu (Cont’d)
4
4. Returning to screen 2, select “TO”. Then the
screen shown left (screen 4) appears. After
pressing , use or to select the
destination media, then press or the
MENU/SET button.
• If you press , the settings will be invalidated
and you return to screen 2.
• If the selected media doesn’t have enough free
space, or if a card is not inserted, after which
you will return to screen 4.
5
5. Returning to screen 2, select “UNIT”. Then
the screen shown left (screen 5) appears.
After pressing , use or to choose
“SELECT” (if you are moving one or multiple
images), or “ALL” and then press the MENU/
SET button.
The settings are complete and you will
return to screen 2.
• If you press , the setting is invalidated and you
return to screen 2.
6
6. After you have made all the settings, select
“ENTER” and press either or the MENU/
SET button.
• If you chose “SELECT” in screen 5, go to Step
7; if you chose “ALL”, go to Step 9.
• If you press , the settings will be invalidated
and you return to screen 1.
83
Using the PLAY Menu (Cont’d)
7. The 8-frame index appears. Use , , ,
or to move the red frame to an image you
wish to transfer and then press the MENU/
SET button.
7
• Pressing when the first frame is selected or
on the last frame will switch the screen to the
next eight images.
8. Images selected at Step 7 are surrounded
by a yellow frame. When you have finished
selecting images, use , , , or to select
“END”, and then press the MENU/SET
button. (Go to Step 9)
To select other images, repeat the selection
procedure. (Return to Step 7)
8
• To select multiple images, repeat the procedures
Steps 7 and 8.
9. A confirmation screen appears. To move the
image(s), select “YES” with or , then
press the MENU/SET button.
9
• If you select “NO” and press the MENU/SET
button, you will return to screen 1 without moving
anything.
10.The “Now MOVE…” screen is displayed.
Once moving is completed, the display
returns to screen 1.
84
Using the PLAY Menu (Cont’d)
Playing a Slide Show
- The slide show will proceed in order from the first image at a set interval.
1
1. Select “SLIDE SHOW” and press .
2. Slides will be displayed in order, starting with
the 1st slide at about 2 second intervals.
The slide show will finish with the last frame
displayed.
If you wish to stop during a slide show, press
the MENU/SET button.
• If stopped, the current frame will be displayed.
Selecting the Set-up Menu
1
1. Select “SETUP” and press .
2. The set-up menu mode screen appears.
For details on set-up menu settings, see
page 86.
85
Advanced Operations
Using the Set-up Menu
- By setting each item on the set-up menu to your preferences, you can
customize your camera to suit you.
- It does not matter whether the main power is ON or OFF, as the settings
are saved by the camera until they are changed.
1. To display the “SET UP” menu screen, select SETUP menu from either
the REC menu (p.48) or the PLAY menu (p.85).
2. Using 왔 or 왖, select the menu settings; every time the button is pressed,
the menu scrolls through the items one by one.
FORMAT
REC MENU
QUICK VIEW
INFO DISP
SOUND
DATE SET
왔 SELF TIMER
AUTO POWER OFF
NUMBER RESET
MEMORY PRIORITY
LANGUAGES
DEFAULT
RETURN
(→ p.87)
(→ p.88)
(→ p.88)
(→ p.89)
(→ p.89)
(→ p.90)
왖 (→ p.90)
(→ p.91)
(→ p.91)
(→ p.92)
(→ p.92)
(→ p.93)
You can close the set-up menu screen by pressing 왗 or selecting “RETURN”
and then pressing the MENU/SET button.
When you close the set-up menu mode, the LCD monitor will display as follows:
1) If you entered the set-up menu from the REC menu, the display returns to the REC
menu.
2) If you entered the set-up menu from the PLAY menu, the display returns to the
PLAY menu.
• Refer to the following pages for details on making settings for each menu.
86
Using the Set-up Menu (Cont’d)
Formatting a Memory Card
- Formatting a card returns it to the initial state (when it was purchased).
- Caution: Formatting erases all data, even images that are protected (p.79).
- Always format cards inside the camera. If a card is formatted by a computer
it may not perform normally.
1
1. Select “FORMAT”and press 왘; you will be
prompted to select the media type. Use 왔
or 왖 to choose which media type to format
and then press either 왘 or the MENU/SET
button.
• If you press 왗, the setting is invalidated and you
return to the set-up menu.
2
2. You will be asked for confirmation. To
execute formatting, select “YES” with 왗 or
왘 and press the MENU/SET button.
• If you decide not to format, select “NO” and press
the MENU/SET button.
3
3. Once formatting starts, the message “Now
FORMAT…” will appear.
When formatting is complete, the camera
returns to the set-up menu mode.
During formatting be sure not to open the
battery/card cover as damage to the card
may result.
87
Using the Set-up Menu (Cont’d)
REC Menu Settings
- You can change the contents of the REC menu from basic (default settings)
to advanced.
- See pages 42 and 49 for details on this function.
1. Select “REC MENU”, press 왘 and the
settings screen appears. Use 왔 or 왖 to
select “DETAILS”, and then press either 왘
or the MENU/SET button. The setting is
completed and you return to the set-up
menu.
1
• If you press 왗, the setting is invalidated and you
return to the set-up menu.
Quick View Settings
- Turn this mode on if you want to be able to check your images on the LCD
monitor immediately after you have taken them.
- See page 63 for details on this function.
1. Select “QUICK VIEW”, press 왘 and the
settings screen appears.
Using 왔 or 왖, select “ON” and press either
왘 or the MENU/SET button. The setting is
completed and you return to the set-up
menu.
1
• If you press 왗, the setting is invalidated and you
return to the set-up menu.
88
Using the Set-up Menu (Cont’d)
Make so the Image Information is not displayed
- You can set the camera to not display information (p.36, 60) during shooting
or play back.
- The default setting is “ON” (display).
1
1. Select “INFO DISP” and press 왘.
Select “OFF” by pressing 왔 or 왖, and press
왘 or the MENU/SET button. The setting is
completed and the screen will return to the
set-up menu.
• If you press 왗, the setting is invalidated and you
return to the set-up menu.
Setting the Operation Sounds
- You can turn on and off the beeps (sounds made for each type of operation
and warnings).
- The default setting is turned “ON” (set to sound).
1
1. Select “SOUND”, press 왘 and the settings
screen appears.
Using 왔 or 왖, select “OFF” or “ON” and
press either 왘 or the MENU/SET button.
The setting is completed and you return to
the set-up menu.
• If you press 왗, the setting is invalidated and you
return to the set-up menu.
89
Using the Set-up Menu (Cont’d)
Adjusting the Date and Time
- If the battery is removed for approximately 24 hours or more, the date and
time settings will be lost. In this case, please reset the date and time.
1. Select “DATE SET”, press 왘 and the date
and time settings screen appears.
See Steps 3 to 7 on pages 24 and 25 about
how to make the settings.
1
• Once settings are completed, you will return to
the set-up menu.
Setting the Self-timer Delay Time
- You can change the length of time the self-timer delays before shooting
from 10 seconds (default) to 3 seconds.
1. Select “SELF TIMER”, press 왘 and the
settings screen appears.
Using 왔 or 왖, select “3 sec” and press either
왘 or the MENU/SET button. The setting is
completed and you return to the set-up
menu.
1
• If you press 왗, the setting is invalidated and you
return to the set-up menu.
90
Using the Set-up Menu (Cont’d)
Setting the Auto Power-OFF Time
- You can change the Auto Power-OFF not-in-use interval starting at 3 minutes
(default).
1
1. Select “AUTO POWER OFF”, press 왘 and
the settings screen appears.
Use 왔 or 왖 to select “10 min” or “OFF” and
then press either 왘 or the MENU/SET
button. The setting is completed and you
return to the Set-up menu.
• If you press 왗, the setting is invalidated and you
return to the set-up menu.
Resetting the File Numbers
- You can reset your file numbers.
1
1. Select “NUMBER RESET”, press 왘 and the
settings screen appears.
Using 왔 or 왖, select “ON” and press either
왘 or the MENU/SET button. The setting is
completed.
• If you press 왗, the setting is invalidated and you
return to the set-up menu.
Reference:
• At initial setting, “NUMBER RESET” is turned “OFF”, and it will assign
consecutive file numbers as follows.
XXXXX1.jpg, XXXXX2.jpg, XXXXX3.jpg…
• If there are no images shot on the card when “NUMBER RESET” is turned
“ON”, it will attach numbers starting with XXXXX1.jpg. If pictures exist, the
number following already existing file numbers will be given.
91
Using the Set-up Menu (Cont’d)
Setting Memory Priority
- When you have 2 cards in the camera at once, an SD memory card (or
Multi-Media card) and a Memory Stick, you can decide which to record to
first.
1. Select “MEMORY PRIORITY”, press 왘 and
the settings screen appears.
Using 왔 or 왖, select the media type to have
priority and press either 왘 or the MENU/
SET button. The setting is completed and
you will return to the set-up menu.
1
• If you press 왗, the setting is invalidated and you
return to the set-up menu.
Changing Languages
1. Select “LANGUAGE”, press 왘 and the
language settings screen appears.
See page 24 for instructions on making the
settings.
1
• When the setting is completed, you will return
to the set-up menu. If you press 왗, the setting is
invalidated and you return to the set-up menu.
92
Using the Set-up Menu (Cont’d)
Restoring the Default Settings
- You can change the various settings made in the set-up menu back to their
default settings all at one time.
1
1. Select “DEFAULT”, press 왘 and a
confirmation screen will appear. Using 왗 or
왘, select “YES” and press the MENU/SET
button.
The setting is completed and you return to
the set-up menu.
•
If you select “NO” and press the MENU/SET
button, the setting is invalidated and you return to
the set-up menu.
93
Others
Connecting to your PC
Operating Environments
- Images recorded with the camera can be transferred to a PC using the
USB cable supplied.
1. Windows
OS:
Preinstalled versions of Microsoft Windows 98, Windows 98SE,
Windows XP, Windows 2000 Professional or Windows Me
Memory: 16MB or more of available RAM (32MB or more recommended)
Display: 32,000 colors or more, resolution of 640 × 480 pixels or more
Others: CD-ROM drive, USB port (standard equipped)
2. Macintosh
OS:
Mac OS 9.0/9.1/9.2/Mac OS X (Version 10.0.4-10.1)
CPU:
PowerPC or more
Memory: 16MB or more of available RAM (32MB or more recommended)
Display: 32,000 colors or more, resolution of 640 × 480 pixels or higher
Others: CD-ROM drive, USB port (standard equipped)
94
Connecting to your PC (Cont’d)
Connecting with a USB cable
- Turn OFF the power supply to the camera.
- There is no need to turn off your PC power supply when connecting or
disconnecting the USB cable to the camera.
To USB
connector on PC
1. Turn on the power supply to your PC, and
start up the Windows or Mac OS.
2. When Mac OS or Windows desktop screen
appears, connect the camera and PC using
the USB cable.
• Please use only the USB cable supplied with the camera.
• While the camera is connected to your PC, the camera is inoperable.
• While connected to your PC, do not detach the USB cable or open the battery/
card cover.
• Turn the power supply to the camera OFF when detaching the USB cable.
• When communicating with your PC, we recommend using the AC adapter (sold
separately). Attach/detach the AC adapter when the camera power supply is
OFF and your PC and the camera are not connected.
95
Connecting to your PC (Cont’d)
Downloading (transferring) Images
- To conserve the battery, using the AC adapter (sold separately, model no.:
DR-AC4) is recommended.
- If you are using Windows 98 or Windows 98SE, first install the “USB device
driver software” (attached CD-ROM) (pp.98-99).
1. Turn on the power supply to your PC, and start up Windows or Mac OS,
and connect your camera and PC with USB cable (p.95).
2. If you are using Windows, open “My Computer” and double-click the newly
created icon “removable device”. If you are using Mac, a “Undefined Name”
icon will be displayed on the desktop.
3. Double-click the “DCIM” folder.
4. If you double-click “100 KONIC”, the image file icon will be displayed.
• The first 3-digit number of “100 KONIC” differs depending on the directory in the
card.
5. If you double-click the file, the image will be displayed. When saving the
file, copy it to where you want to save it.
96
Connecting to your PC (Cont’d)
Notes
• The camera cannot be connected to your PC if no image data is recorded
on the built-in memory of the camera, or a card with an image data record
is not in the camera.
• Image files can be copied to a hard disk or other media and deleted as
necessary. For details, refer to the instruction manual operating system in
use.
Please note that Konica will not be responsible for any loss resulting from
such operations.
• Always back up important data.
• The protect setting set with this camera is equivalent to the read-only
attribute of a file.
Please note that, if the attribute of a file is changed using a PC the protect
setting set with the camera will be disabled.
• Do not change the file name of image data saved on an SD Memory Card/
Multi-Media Card/Memory Stick using a PC or save files other than image
data taken by this camera. Images that have been altered or newly saved
on an SD Memory Card/Multi-Media Card/Memory Stick using a device
other than this camera will not only play back on the camera but may cause
the camera to malfunction when inserted.
• Do not format the SD Memory Card or Multi-Media Card or Memory Stick
using a PC. Data may become damaged.
97
Installing software from the CD-ROM supplied
Installing USB Driver Software
- Install the software only if you are using Windows 98 or Windows 98SE. If
you are using another OS, you do not need to install this.
- Turn OFF the power supply to the camera.
- To conserve the battery, using the AC adapter (sold separately, model no.:
DR-AC4) is recommended.
1) Turn on the PC power and start Windows.
2) After connecting your camera and PC with USB cable (p.96), turn ON the
power supply to the camera.
3) The “Add New Hardware Wizard” screen will appear.
4) Insert the CD-ROM supplied into the CD-ROM drive.
5) Click “Search for the best driver for your device (Recommended).” and
then click “Next”.
98
Installing software from the CD-ROM supplied (Cont’d)
6) Click “Specify a location:” and input “D:\”.
Click “Next”.
• Here, the CD-ROM drive is assumed
to be drive D.
Use a different letter if appropriate.
• The INF file necessary for the install is
located in “D:\”.
• When searching a different location,
click “Browse”.
7) Click “Next”.
8) Click “Finish”.
The USB device driver is now installed.
99
Installing software from the CD-ROM supplied (Cont’d)
Using Windows
Installing the included software (CD-ROM) and KD-310Z User’s Guide
1) Turn on the PC power and start Windows.
2) Set the included CD-ROM in the CD-ROM drive.
3) Click the Start button and select “Run...”.
4) Enter “D:\install.exe” and click “OK”.
• The above assumes that your CD-ROM
is D. To check the CD-ROM drive letter of
your PC, open “My Computer” and check
the letter displayed on the CD-ROM drive
icon.
100
Installing software from the CD-ROM supplied (Cont’d)
5) Check to see that “QuickTime”, “Adobe Acrobat Reader” and “KD-310Z
User’s Guide” in the “KONICA KD-310Z setup menu” are checked and
click “OK”.
• Be sure to install “QuickTime”, “Adobe Acrobat Reader” and “KD-310Z User’s
Guide”.
6) Software checked in 5) will be installed in order. Follow the onscreen
guidance to continue the installation.
Note: Clicking “Cancel” during the installation process will cancel
installation. In this case, perform the installation again.
However, do not restart the PC until all the installations have been
completed.
7) When all of the software checked in 5) have been installed, the “KD-310Z
Setup Menu” screen will appear. Click “OK” to finish the installation
process.
Viewing the KD-310Z User’s Guide
1) Double click the “KD-310Z User’s Guide” icon on the desktop.
2) The KD-310Z User’s Guide will be displayed.
101
Installing software from the CD-ROM supplied (Cont’d)
Using Macintosh
Installing the Adobe Acrobat Reader
QuickTime installation is not necessary.
• Be sure to install if Adobe Acrobat Reader is not already installed in your
PC. And it is not necessary to install the Adobe Acrobat Reader for Mac
OS X users.
1) Turn on the power of your PC, and set the included CD-ROM in the CDROM drive.
2)
Double click the “Konica” icon.
3)
Double click the “Adobe” icon.
4)
Double click the “English” icon.
5)
Double click the “Acrobat Reader Installer” icon.
6) Follow the instructions shown on the screen.
Installing the KD-310Z User’s Guide
• Be sure to install.
1) Set the included CD-ROM in the CD-ROM drive.
2)
Double click the “Konica” icon.
3)
Double click the “Manual” folder.
4)
Copy “GUIDE_EN” to a location of your choice.
5) Double click the copied “GUIDE_EN” to display the “KD-310Z User’s
Guide”.
102
When Carrying the Camera Overseas
Using the dedicated AC adapter kit (Model No.: DR-AC4)
- Please do not use the AC adapter where the voltage is outside the displayed
power supply voltage (AC 100V to AC240V).
Using the Attached Charger (Model No.: DR-BC-K4)
- Please do not use the charger where the voltage is outside the displayed
power supply voltage (AC 100V to AC240V).
103
Care and Storage
Cleaning the camera
When cleaning the camera, do not use solvents such as benzene or paint
thinner.
• Before cleaning, remove the batteries from the camera, or disconnect the
power plug of the AC adapter from the wall outlet.
• The exterior casing surface consists of paint and printing. Wiping the casing
with benzene or paint thinner may cause discoloration, or the paint or
printing to be removed.
• When the camera becomes dirty, wipe off the dust with a soft, dry cloth.
For stubborn dirt, dampen a cloth in diluted neutral detergent (kitchen
detergent), wring thoroughly and wipe. When finished, wipe the camera
with a dry cloth.
• When using a chemical cloth, follow the safety precautions of the product.
After using the camera
If the camera is not to be used for a long period, remove the batteries
and ensure that the power plug of the AC adapter is disconnected from
the wall outlet.
• Leaving the batteries inside the camera for a long time may cause the
battery fluid to leak, resulting in malfunction of the unit.
• When storing, keep both camera and batteries in cool place with low
humidity and under constant temperature as much as possible.
Recommended temperature: 15˚ – 25˚C (59˚ – 77˚F)
Recommended humidity: 40% – 60%
About the SD Memory Card/Multi-Media Card/Memory Stick
Handling
• Do not bend or apply excessive force.
• Do not store the card in places with high humidity, dusty places or where
static electricity or electromagnetic fields are likely to occur.
• Keep dust, water and foreign objects away from the terminal section.
104
Care and Storage (Cont’d)
About image data
• Use a PC to delete images and files recorded with other models.
• The recorded data may be lost when you or a third part misuses the SD
Memory Card/Multi-Media Card/Memory Stick, if the card is affected by
strong static electricity or electrical shock, or during card repair or
malfunction.
Konica will not be responsible in any way for the loss of recorded data or
the consequences of such loss.
About the LCD monitor
• The LCD monitor has been developed using high-precision engineering.
Although the percentage of active pixels is more than 99.98%, there may
be missing or constantly lit pixels.
• When using the LCD monitor in a cold location, the screen may appear
darker than normal immediately after starting use. The screen will return to
normal brightness as the internal temperature of the camera rises.
• When the LCD monitor becomes dirty with finger prints or dust, wipe with
a soft, dry cloth.
105
Troubleshooting
- If the following does not solve your problem, please contact the point of
purchase.
Symptom
Power
Supply
Check this:
Page
Power will not turn ON • Battery level too low
• Battery inserted incorrectly
• AC Adaptor attached incorrectly
19
19
22
Power turns OFF right • Battery level too low
after turning on
• Low ambient temperature
19
109
Shooting Can’t take a picture • Power supply not on.
the
even if pressing the • SD Memory Card or Memory Stick’s
pictures shutter button
write protected.
• Pictures taken have reached the
maximum number.
→ Erase unwanted pictures.
• Set to the Self-Timer mode.
• Flash being charged.
23
Can’t focus
106
• Subject not in the center
• Subject hard to focus
• Dirty lens
• Incorrect distance from the subject
13
64,70
41
39
34
34
31
32
LCD monitor display • LCD brightness adjusted incorrectly
and images are not • Finger prints or dirt on the monitor
clear
47,73
105
Doesn’t Flash
40
• Set to “Flash off” mode
Troubleshooting (Cont’d)
Symptom
Play back Won’t play back
Check this:
Page
• PLAY button not ON
• No image data
• All image data is erased
59
59
64,70,87
Image with no natural • White balance incorrect
color
Image appears dark
Image too bright
Other
• Distance too great, the flash didn’t
reach the subject
• Not enough light
• Flash used with subject too close
Can’t transfer to your • Not connected to your PC correctly
PC
• No image data inserted in the camera
Incorrect date and time • Left without battery over 24 hours
54
39
33
39
95
97
90
107
Main Specifications
Model
: Digital Still Camera with zoom lens
Effective picture resolution : 3.2 mega pixels
Recording media
: Internal recording media; approx. 2MB flash memory
built-in
External recording media; SD Memory Card, Multi Media
Card, Memory Stick
Image recording capacity : 2048 × 1536 pixels
(About 98 frames/SD Memory Card at 64MB)
1600 × 1200 pixels
(About 213 frames/SD Memory Card at 64 MB)
640 × 480 pixels
(About 640 frames/SD Memory Card at 64 MB)
Recording method
: Still picture; JPEG (DCF compatible1)) /
DPOF compatible2)
Movie; DCF Compatible
(AVI style Motion JPEG compatible)
Image pickup
: 1/1.8 inch CCD
Total resolution 2140 × 1560 pixels (approx. 3,340,000 pixels)
Lens
: F 2.8-4.9, f=8-24mm (7 frame in 6 group)
Equivalent to 35mm camera conversion of 39 to117mm
Focus adjustment/Photometric : TTL center-weighed metering using a CCD image surface
luminance signal, spot metering
Focal Range
: Normal; wide angle 0.5m to ∞ (1.6" to ∞),
telephoto 0.8m to ∞ (2.6" to ∞)
Macro mode Macro-photo; wide angle 0.1m to ∞infinity,
telephoto 0.5m to ∞infinity
Aperture
: Wide angle; F2.8/F4.7, Telephoto; F4.9/F8.2
Shutter speed
Exposure control
: Still picture; about 1 to 1/2000sec.
Movie;
about 1/30 to 1/5000sec
: Program AE (3EV-15.5EV)
White balance
: Auto correct, manual setting (daylight, overcast, tungsten,
fluorescent)
Viewfinder
Flash
: True-image zoom viewfinder
: Built-in auto adjust lighting flash, flash interval about 5 sec.
Flash working range;
wide angle about 0.5m to 3.5m (1.6" – 9.9")
telephoto about 0.5m to 2.0m (1.6" – 6.6")
Viewfinder red LED on while charging
108
Main Specifications (Cont’d)
Shooting modes
: Single shooting/ red eye reduction/ forced flash/ portrait
night view/ no flash/ macro-photo/ distant view/ self-timer
(10 sec, 3 sec.)/ digital zoom (×2)/ movie (320 × 240, with
maximum length of 15 sec.) / sepia
LCD monitor
: 1.5 inch low temperature poly-silicon TFT with back ligh
LCD color monitor
Playback
Erase function
: Single frame/ index playback/ slide show playback/ digital
zoom playback
: Single frame/ designated frames/ all frames/ format
LED display
Buzzer
: Self-timer LED, viewfinder LED
: When shooting, as a warning
Auto-date function
Power supply
: Year, month, date and time up to 20503)
: Lithium battery, dedicated AC adapter (sold separately)
I/O terminals
Operating temperature
: USB terminal
: 0˚(32˚)-50˚C(122˚F) (humidity 20%-80%)
Dimensions
: 94(W) × 56(H) × 29.5 (D)mm
(33/4"(W) × 21/4"(H) × 13/16"(D))
(except parts that stick out)
Weight
Attachments
: 198 g (65oz) excluding battery, card
: Lithium-ion battery, charger/power supply cord, USB cable,
CD-ROM, strap, warranty card, SD Memory Card, Quick
guide
• The performance of the items above is according to the conditions used in our test.
• The specifications and/or appearance of the product may be altered without
notification.
1)
DCF (Design rule for Camera File system) is a standard by JEITA mainly for the
purpose of simplifying the use of image files taken by digital cameras with other
related devices.
2)
DPOF (Digital Print Order Format) specified by Canon, Inc., Kodak Co., Ltd., Fuji
Photo Film Co., Ltd., and Matsushita Electric Industrial Co., Ltd. is a standard for
recording specified information such as the images or quantity to print from the images
taken by a digital camera on a recording medium.
3)
Manganese lithium silicon batteries are in use as back-up batteries for calendar system
(Refer to p.25). It is recommended to replace with new ones at least once three to
five years. (Additional charge is required at the time of replacement.)
109
Warranty and After-sales Service
For repair, handling and care, first consult the dealer from whom you
purchased the camera.
Warranty (separately attached)
Before accepting the warranty card, please make sure that the date of
purchase and dealer of purchase and the dealer's details have been
completed. After reading the warranty, keep it in a safe place.
Warranty period (main unit): one year from the date of purchase
When requesting service
If symptoms persist after having checked the table on pages 106 and 107,
Troubleshooting, disconnect the power supply and contact the dealer from
whom you purchased the camera.
Note: Transportation cost for taking/bringing back the product to/from
repair, shipping costs or carrying charges are at the customer’s
expense. When shipping the product, pack the unit appropriately
and use a shipping method such as registered mail or express mail
to prevent loss of the product.
During the warranty period
Repairs will be made by the dealer from whom you purchased the camera
according to the contents of the warranty. For repair, take the product and
the warranty to the dealer from whom you purchased the camera.
Outside the warranty period
Repairable products can be repaired for a charge upon request. However,
the minimum holding period of performance parts for repairing digital still
cameras is 8 years after termination of production.
Note: Performance parts for repair are parts necessary to maintain the
functions of the product.
110
FCC Compliance Statement:
Declaration of Conformity
Responsible party: KONICA PHOTO IMAGING
Address: 725 Darlington Avenue Mahwah, NJ 07430, U.S.A.
Telephone number: (201) 574-4000
This device complies with Part 15 of the FCC Rules. Operation is subject to
the following two conditions:
(1) this device may not cause harmful interference and (2) this device must
accept any interference received, including interference that may cause
undesired operation.
This equipment has been tested and found to comply with the limits for a
class B digital device, pursuant to Part 15 of the FCC Rules. These limits are
designed to provide reasonable protection against harmful interference in a
residential installation. This equipment generates, uses and can radiate radio
frequency energy and, if not installed and used in accordance with the
instructions, may cause harmful interference to radio communications.
However, there is no guarantee that interference will not occur in a particular
installation. If this equipment does cause harmful interference to radio or
television reception, which can be determined by turning the equipment off
and on, the user is encouraged to try to correct the interference by one or
more of the following measures:
- Reorient or relocate the receiving antenna.
- Increase the separation between the equipment and receiver.
- Connect the equipment into an outlet on a circuit different from that to
which the receiver is connected.
- Consult the dealer or an experienced radio/TV technician for help.
• Shielded cables must be used for this equipment to comply with the relevant
FCC regulation.
• Power requirement is DC 4.2V ± 10% and 1.5 A max. Use only listed certified
power supply adapter.
• The user is cautioned that changes and modifications made to the
equipment without approval of the manufacturer could void the user’s
authority to operate this equipment.
Tested To Comply
With FCC Standards
FOR HOME OR OFFICE USE
• However, note that operation of this unit near a radio or television receiver
could possibly cause radio disturbance.
111
CANADA ONLY
Industry Canada’s Compliance Statement:
This Class B digital apparatus complies with Canadian ICES-003.
Cet appareil numérique de la classe B est conforme à la norme NMB-003
du Canada
112