1
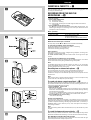
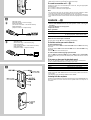
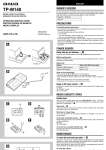
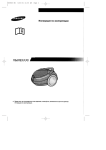
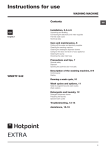
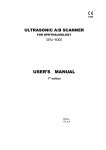
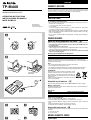
ENGLISH
OWNER’S RECORD
TP-M440
For your convenience, record the model number and the serial number (you will
find it in the battery compartment of your set) in the space provided below. Please
refer them when you contact your Aiwa dealer in case of difficulty.
MICRO CASSETTE RECORDER
GRABADOR DE MICRO CASETES
Model No. TP-M440
Serial No.
OPERATING INSTRUCTIONS
INSTRUCCIONES DE MANEJO
MODE D’EMPLOI
PRECAUTIONS
To maintain good performance
8B-HX4-901-01
001106AYO-OX
Printed in Hong Kong
A
1
2
• Do not use the unit in places which are extremely hot, cold, dusty or humid. In
particular, do not keep the unit:
• in a high humidity area such as a bathroom
• near a heater
• in an area exposed to direct sunlight (e.g., inside a parked car, where there
could be a considerable rise in temperature)
• Keep cassette tapes, magnetic cards and other magnetic recorded materials
away from the speaker as the recorded information may be erased or noise may
occur on cassette tapes.
• Do not open the cassette holder during playback, recording, fast forwarding or
rewinding.
POWER SOURCE
USING ON THE RECHARGEABLE BATTERIES → A
When using the rechargeable batteries for the first time, charge them for 10 hours.
1 Insert two batteries into the battery charger with the 0 and 9 marks are
correctly aligned.
2 Plug the charger into a wall outlet.
After charging, disconnect remove the rechargeable batteries from the battery
charger and disconnect the charger from the wall outlet.
3 Insert the rechargeable batteries into the main unit with the 0 and 9
marks are correctly aligned.
Recharging and playback/recording times
Playback
Recording
B
Approx. 8 hours
Approx. 7 hours
Playback and recording times may vary according to the conditions of use.
Rcharge the batteries when the tape speed slows down, volume decreases or
sound becomes distorted.
Note
• Use only the supplied battery charger to recharge the batteries.
• Do not charge them for more than 24 hours.
• The supplied rechargeable batteries can be recharged approximately 500 times.
• Never attempt to recharge dry cell batteries with the supplied battery charger.
ATTENTION:
The product you have purchased is powered by nickel
cadmium batteries which are recyclable. At the end of
their useful life, under various state and local laws, it is
illegal to dispose of these batteries into your municipal
waste stream.
Please call 1-800-289-2492 for information on how to
recycle these batteries.
C
Using with dry cell batteries → B
Insert two size AA (R6) batteries with the 0 and 9 marks properly aligned.
Battery replacement
Replace the betteries when the tape speed slows down, volume decreases or
sound becomes distorted.
Battery life
Battery
Battery life (EIAJ Recording)
Manganese (R6P) batteries
Alkaline (LR6) batteries
Approx. 7 hrs.
Approx. 24 hrs.
Notes on dry cell batteries
D
E
• Make sure that the 0 and 9 marks are correctly aligned.
• Do not mix different types of batteries, or an old battery with a new one.
• Never recharge the batteries, apply heat to them, soak them in water, or take them
apart.
• Remove the batteries if the unit is not used for a long time.
• If liquid leaks from the batteries, wipe thoroughly to remove.
Using on AC house current → C
Contact your nearest Aiwa service personnel and purchase the AC adaptor Aiwa
AC-D302.
1 to the DC 3 V jack
2 to a wall outlet
MICRO CASSETTE TAPES
F
G
Usable tapes
F
G
Usable tapes
Use only micro cassette tapes with the
mark. The micro
cassette has a small dent a on the A side so that you can distinguish the tape
side even in a dark place. → D
Tape slack → E
Take up any slack in the tape with a pencil or similar tool before use. Slack tape
may break or jam in the mechanism.
90-minute or longer tapes
These are extremely thin and easily deformed or damaged. They are not
recommended.
To prevent accidental erasure → F
H
Break off the plastic tabs on the cassette tape after recording, with a screwdriver
or other pointed tool.
a Side A
b Tab for side A
To record on a cassette without tabs → G
Cover the tab openings with cellophane tape.
c Cellophane tape
MAINTENANCE
To clean the head and tape paths → H
After every 10 hours of use, clean the head and tape paths with a head cleaning
cassette or a cotton swab moistened with cleaning fluid or denatured alcohol.
(These cleaning kits are commercially available.)
When cleaning with a cotton swab a, wipe the recording/playback head b, erasure
head c, pinchroller d, and capstan e.
To clean the cabinet
Use a soft cloth ligtly moistened with a mild detergent solution. Do not use strong
solvents such as alcohol, benzine or thinner.
SPECIFICATIONS
Track system
Usable tapes
Frequency response
Tape speed
Microphone
Maximum output
Output jack
Input jack
Other jack
Speaker
Recording system
Erasing system
Power sources
Micro cassette, 2 tracks 1 channel, monaural
(Normal position type)
250 – 5,000 Hz (2.4 cm/sec) EIAJ
2.4 cm/sec or 1.2 cm/sec switchable
Electret condenser microphone (monaural)
170 mW (EIAJ/DC)
EARPHONE jack (monaural mini-jack) (1)
EXT MIC jack (monaural mini-jack)
DC 3 V jack
Diameter 36 mm, 4 ohms
DC bias
Magnet erasure
DC 3 V using two size AA (R6) batteries
DC 2.4 V using two supplied rechargeable batteries
AC house current using an optional AC adaptor Aiwa AC-D302
Maximum outside dimensions
63.8 (W) × 122 (H) × 25.7 (D) mm
(2 5/8 × 4 7/8 × 1 1/16 in)
Weight
Approx. 116 g (4 oz) (excluding batteries)
Accesories
Battery charger (1)
Rechargeable batteries (2)
Microcassette tape MC-60 (1)
Battery charger RB-N03
Rated voltage
AC 120 V, 60 Hz
Specifications and external appearance are subject to change without notice.
COPYRIGHT
Please check the laws on copyright relating to recordings from discs, radio or
external tape for the country in which the machine is being used.
TROUBLESHOOTING GUIDE
If the unit does not perform as expected, check the following table.
Symptoms
Causes
Tape does not move.
• The batteries are not inserted correctly.
• The batteries are worn out.
• The unit is in pause mode.
Tape transport is unstable.
• There is slack in the tape.
• The pinch roller and capstan are dirty.
• The tape is damaged.
There is no sound.
• The VOL control is turned down completely.
• The earphone is not connected firmly when
listening with the earphone.
The sound is too low or
distorted.
• The recording/playback head is dirty.
• The batteries are worn out.
The playback speed is
not correct.
• The TAPE SPEED switch or the PLAYBACK
SPEED switch is set to the wrong position.
Recording cannot be done.
• The erasure prevention tab on the recording
side of the cassette has been removed.
Tape stops during recording. • Set the V-SENSOR switch to OFF when not
using the V-SENSOR function.
ENGLISH
INSERTING A CASSETTE → I
I
Open the cassette holder and insert a cassette with the recording/playback side
a facing the cassette holder.
RECORDING FROM THE BUILT-IN
MICROPHONE → J
1 Insert a cassette.
2 Set the TAPE SPEED switch.
2.4: Normal recording
1.2: Double time recording
E.g.) A 60-minute recording can be made using both sides of the MC-30
microcassette.
3 Press the w button to start recording.
The x button is depressed simultaneously and the REC indicator lights. The
indicator lights and goes out according to the voice input. Orient the built-in
microphone to the sound source.
Basic operation
To stop recording
Press the s button.
To pause recording
Set the PAUSE switch to a.
The REC indicator lights.
To resume recording, set the switch to OFF.
J
• The PAUSE switch is released automatically when the s button is pressed.
When the end of the tape is reached
The tape stops and the w and x buttons are released automatically.
To select the sensitivity of the microphone
Set the MIC SENS switch according to the location of recording.
HIGH: When recording in a conference etc.
LOW: When recording a dialogue nearby
Tape counter b
The readout of the tape counter changes during playback, recording, fastforwarding or rewinding of the tape.
To set the counter to 000, press the counter button to the right of the tape
counter.
To monitor the sound that you are recording
K
Use the earphone referring to “Listening with the earphone” below. You cannot
monitor the sound currently being recorded through the speaker.
Note
The standard speed of the micro cassette recorder is 2.4 cm/sec. If you record a tape
with the TAPE SPEED switch set to 1.2 and play it back on another micro cassette
recorder, playback sound may not be correct.
Recording from an external microphone → K
To record sound with more clarity, use an optional external microphone.
The plug-in-and-power up type microphones can be used for this unit.
Connect the microphone to the EXT MIC jack and set the microphone near the
sound source.
Note
When recording from an optional external microphone, move the microphone away
from the main unit or the earphone to prevent howling.
To record only above a preset sound level → L
L
Recording will start when the unit detects sound above a certain preset level. If
the unit does not detect the sound for about 4 seconds, recording will pause. This
prevents tape waste and empty recording.
1 Set the V-SENSOR∗ switch to ON.
2 Adjust the sensor level.
Turn the VOL (V-SENSOR LEVEL) control in the direction of a to lower the
sensor level. General background noise will not be recorded, and only relatively
loud sounds will be recorded.
Turn the VOL (V-SENSOR LEVEL) control in the opposite direction of b to
increase the sensor level. Even relatively quiet sounds will be recorded.
3 Press the w button to start recording.
∗ Voice Sensor Recording
Sensor level adjustment
The ideal sensor level varies according to the loudness of the source sound.
Experiment with the sensor level in advance to determine the optimum level before
you start an important recording. Normally, align the white mark c of the VOL (VSENSOR LEVEL) control with the part d first, then adjust it according to
surrounding conditions.
Note
When the recording resumes after sound detection, the very first sounds may not be
recorded.
To record the human voice more clearly → M
M
When the voice you want to record is soft, and the surroundings are noisy, set the
NFR switch to ON and start recording. The voice will be recorded more clearly.
How NFR (Noise Filtration Recording) works
NFR emphasizes the frequency range of the human voice more than the high
and low frequencies that usually comprise noise.
and low frequencies that usually comprise noise.
• NFR does not reduce noise already recorded on the tape.
To record from another unit → N
Connect the other unit to the EXT MIC jack of this unit, using the appropriate
connecting cords.
a To connect to stereo source equipment
b To connect to monaural source equipment
Note
• The connecting cords may vary according to the type of source equipment. Before
connecting a unit, read the operating instructions of the connected unit.
• If the volume setting of the source equipment is too high, the recorded sound may be
noisy or distorted. Be sure to set the volume of the source equipment to a moderate
level.
N
a
Attenuation Cable
(Monaural mini-plug ↔ Stereo mini-plug)
Cable de atenuación
(mini-enchufe monoaural ↔ mini-enchufe estéreo)
Câble d’atténuation
(miniprise monaural ↔ miniprise stéréo)
PLAYBACK → O
1 Insert a cassette.
2 Set the TAPE SPEED switch to the same position it was in during the
recording.
3 Press the x button to start playback.
4 Adjust the volume.
Basic operation
To stop playback
Press the s button.
To pause playback
Set the PAUSE switch to a.
To resume playback, set the switch to OFF.
• The PAUSE switch is released automatically when the s button is pressed.
When the end of the tape is reached
b
The tape stops and the x button is released automatically.
Attenuation Cable
(Monaural mini-plug ↔ Monaural mini-plug)
Cable de atenuación
(mini-enchufe monoaural ↔ mini-enchufe monoaural)
Câble d’atténuation
(miniprise monaural ↔ miniprise monaural)
To find the section you want to listen to
To fast forward/rewind
To fast forward: Slide the fFF/CUE/REW/REVg switch to fFF/CUE during
stop mode.
To rewind: Slide the fFF/CUE/REW/REVg switch to REW/REVg during
stop mode.
Press the s button at the desired point.
To search while monitoring high-speed sound
Keep the fFF/CUE/REW/REVg switch slid to fFF/CUE or REW/REVg
during playback. When you reach the desired point, release the switch to resume
playback.
To increase or decrease the playback speed
This unit can playback a tape at 1.2 times or at 0.8 times the normal speed.
Set the PLAYBACK SPEED switch according to your need.
O
PLAYBACK SPEED switch
Playback
SLOW
NORM
FAST
Playback at 0.8 times the normal speed
Playback at the normal speed
Playback at 1.2 times the normal speed
Notes
• Make sure that the TAPE SPEED switch is set to the same position as that used for
the recording.
• After listening, set the PLAYBACK SPEED switch to NORM.
Listening with the earphone
Connect an optional earphone (3.5ø monaural mini-plug) to the EARPHONE jack.
The sound does not come from the built-in speaker when the earphone is
connected.