1
ULTIMATE 3000XT Series User Manual
ULTIMATE 3000XT Series
Thermal Transfer Printers
ULT-3420XT/3430XT/3460XT/3630XT/3830XT
ULTIMATE 3000XT Series User Manual
Table of contents
1
1.1
1.2
1.3
Notesonthedocumentation
S t r u c t u r e ot hf e d o c u m e n t a t i o n annadv i g a t i o n
W a r n i n g sn,o t e s a n d o t h e r i d e n t i f ym
i nagr k i n g s
Crossreferencesand referencesto graphics,tablesand documents .
2
2.1
2.2
2.3
Safetyandtheenvironment.
lntendeduse.
Safetynotes
E n v i r o n m e n t a l l y - f r i e n d l y d i.s. .p o s a l
.....7
.......7
...7
....8
3
3.1
3.2
3.3
3.4
Installation..
Unpackingthelap
b reiln t e r
S e t t i n g u p t h e l a bper li n t e r
C o n n e c t i n g t h e l a pb rei ln t e r
...9
.......9
.......9
.....10
4
4.1
4.2
Operatingpanel
panel
Layoutof theoperating
panelduringprinting
Functions
of theoperating
.....11
. . . . 11
. . . . 12
5
5.1
5.2
Device types
6
6.1
6.2
6.3
6.4
6.5
6.6
6.7
15
15
15
..16
. . 16
Loadinglabelsfrom a roll
Removingthe wound roll
. . 22
Loadingfanfoldlabels
.....22
Loadingtransferribbon
....23
Settingthe feed path of the transferribbon
. . . 24
Removingand installingthe rewindguide plate,dispenseplateor tear-offplate . . . . . 24
Removingand installingthe feed roll
. . . 25
7
7.1
7.2
7.3
7.4
Printing
Synchronization
T e a r - Om
ffode
Peel-Offmode
Internalrewinding
I
8.1
8.2
8.3
8.4
8.5
8.6
8.7
8.8
Cleaningand basic maintenance
9
9.1
9.2
9.3
E r r o r t r e a t m e n. t. .
Errortypes
Edition5/06
.....5
...... 5
...... 5
... 6
......26
....26
.....26
plan
Maintenance
Toolsand cleaningagents
Generalcleaning
Cleaningthe printroller
Cleaningthe printhead
Cleaningthe labelsensor
Replacingthe printhead
Replacingthe printrollerand rewindassistroller
27
27
28
28
28
28
29
31
32
32
33
34
Instructions
Operating
ULTIMATE 3000XT Series User Manual
1
Noteson the documentation
1.2
Warnings,notes and other identifyingmarkings
1.2.1
Warnings
Warningsare presentedwith three signalwordsfor the differentlevelsof danger.
greatand immediatedangerwhich could lead
The signal word DANGERidentifiesan extraordinarily
to seriousinjuryor even death.
The signal word WARNINGidentifiesa possibledangerwould couldleadto seriousbodilyinjuryor
even death if sufficientprecautionsare not taken.
dangeroussituationwhichcouldleadto moderateor
The signatword CAUTIONindicatesa potentially
lightbodilyinjuryor damageto property.
Warningsare alwaysidentifiedwith a warningsymbol(yellowtriangle)and the signalword and specify
the sourceof the danger,possibleconsequencesand measuresfor avoidingthe danger.
Here'san example:
Edition5/06
Instructions
Operating
ULTIMATE 3000XT Series User Manual
DANGER!
Risk of death via electric shock!
= Before opening the housing cover, disconnect the device from the mains supply and wait
a few minutes until the power supply unit has discharged.
Notes
1.2.2
1
lmportantinformationis identifiedwith an exclamationmark on the left-handside of the page.
.
lnformationis identifiedwith an "i" on the left-handside of the page.
I
I
1.2.3
Displaytextson the printerscreen
>
All textsappearingon the printerscreenare identifiedin a specialway e.g.:Timezone urc+1' This
optionin
urc+1
then
the
and
menu
rimezone
abbreviatedstatementinstructsthe userto selectthe
t h i sm e n u .
1.3
to graphics,tablesand documents
and references
Crossreferences
1.3.1
ltem numbers
e.g. (9). lf no figurenumberis provided,item
Item numbersin the text are identifiedwith parentheses,
the text. lf a referenceis made to another
graphic
above
directly
to
the
refer
numbersin the text always
e.g' Fig.5 (1).
graphic,the figurenumberis specified,
1.3.2
Gross referencesto chapters and sections
With a cross referenceto chaptersand sections,the chapternumberand page numberare specified,
e.g.a referenceto this section:(see"1.3.2"on page6)'
1.3.3
Referencesto other documents
All documents
Referencesto otherdocumentshave the followingform: See "Configurationlnstructions".
and nav"structure
documentation
the
of
are listedin the sectionentitled
referredto in theseinstructions
"1.1"
on page5).
igation".(see
Instructions
Operating
Edition5/06
ULTIMATE 3000XT Series User Manual
2
Safetyand the environment
carefullybeforeusingthe labelprinterfor the firsttime.The operating
Readtheseoperatinginstructions
instructions
describeall of the functionsof the labelprinterduringoperation.The availablefunctions
dependon the versionused for a specificjob.
2.1
2.2
Intendeduse
r
rules
devicewhichcomplieswith the recognizedsafety-related
The labelprinteris a state-of-the-art
Despitethis,a dangerto lifeand limbof the useror thirdpartiescouldariseand the
and regulations.
labelprinteror otherpropertycouldbe damagedwhile operatingthe device.
r
The labelprintermay onlybe usedwhilein properworkingorderand for the intendedpurpose.Users
Faults,in
must be safe,awareof potentialdangersand mustcomplywith the operatinginstructions!
immediately.
particularthosewhich affectsafety,must be remedied
.
The labelprinteris solelyintendedto printsuitablemediawhich have been approvedby the manuis not liablefor damfacturer.Any otheror additionaluse is not intended.The manufacturer/supplier
age resultingfrom misuse.Any misuseis at your own risk.
o
recommendaincludingthe maintenance
Intendeduse includesheedingthe operatinginstructions,
specifiedby the manufacturer.
tions/regulations
Safetynotes
r
The labelprinteris designedfor powersupplysystemsfrom 100 V AC to 240 V AC. Connectthe
labelprinteronly to electricaloutletswith a groundcontact.
.
Couplethe labelprinterto devicesusingextra low voltageonly.
.
Beforemakingor undoingconnections,switchoff all devicesinvolved(computer,printer,accessories etc.).
.
Operatethe labelprinterin a dry environmentonly and do not get it wet (sprayedwater,mist etc.).
lf the labelprinteris operatedwith the coveropen,ensurethat clothing,hair,jewelryand similarpersonalitemsdo not contactthe exposedrotatingparts.
.
.
.
N
Edition5/06
The printmechanismcan becomehot duringprinting.Do not touch it duringoperationand allowit
to cool down beforechangingthe mediaor beforeremovalor adjustment.
Othertasks may only be perCarryout only the actionsdescribedin these operatinginstructions.
formedby trainedpersonnelor servicetechnicians.
DANGER!
Riskof deathvia mainsvoltage!
= Do not openthe housingof the labelprinter.
Instructions
Operating
ULTIMATE 3000XT Series User Manual
2.3
Environmentally-friendly d isposal
Used devicescontainvaluablerecyclablematerialswhich shouldbe utilized.
+ Disposeof used devicesseparatelyfrom otherwaste,i.e. via an appropriatecollectionsite.
The modularnatureof the labelprinterallowsit to easilybe disassembledinto its componentpartsso
that the partscan be turnedin for recycling.
The PCB of the labelprinterhas a lithiumbattery.
+ Disposeof this batteryin a collectioncontainerfor old batteriesat the storeor with the publicwaste
disposalauthority.
Instructions
Operating
Edition5/06
ULTIMATE 3000XT Series User Manual
3
Installation
3.1
Unpackingthe label printer
+ Liftthe labelprinterout of the box via the straps,
+ Checklabelprinterfor damagewhich may have occurredduringtransport.
= Checkdeliveryfor completeness.
Scope of delivery
. Labelprinter
I
3.2
A
.
Emptycardboardcore, mountedon ribbontake_uphub
.
Tear-offplate (basicdevicesonly)
Dispenseplate(peel-offdeviceversion only)
a
Powercable
a
Documentation
Retainthe originalpackagingfor subsequenttransport.
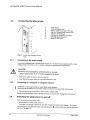
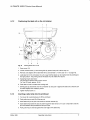
Setting up the label printer
CAUTION!
Thedeviceand the print mediacan be damagedby moistureand water.
= The labelprintermay only be set up in a dry placeprotectedfrom sprayed
water.
=+ Set up printeron a level surface.
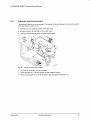
+ Open cover (1) of the labelprinter.
= Removefoam transportation
safeguards
near the printhead(2).
Fig. 1:
Edition5/06
Removingthe transportation
safeguards
Operating
Instructions
ULTIMATE 3000XT Series User Manual
3.3
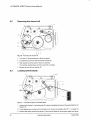
Connectingthe label printer
1
2
3
4
5
6
7
I
Fig.2:
3.3.{
Power switch
Power connectionjack
Slot for Cardbusor a Type ll pC card
Slot for a CompactFlashmemorycard
Ethernet10/100Base-T
USB port for a keyboardor scanner
USB high-speedslaveport
Serial RS 232 C port
Powerandcomputer
connections
Gonnecting
to the powersupply
The printeris equippedwith a versatilepowersupplyunit.The devicemay
be operatedwith a mains
voftageof 230 V AC/ 50 Hz or 115V AC/60 Hz withoutany adjustments
or modifications.
CAUTION!
The device can be damaged by undefined switch-on currents.
=+ set the power switch (1) to "o" before plugging in
the device.
1. Insertpowercableinto powerconnectionjack (2).
2. lnsertplug of the powercable into a groundedelectricalouflet.
3.3.2
Gonnecting to a computer or computer network
I
Insufficient
or missinggroundingcan causefaultsduringoperation.
Ensurethat all computersand connectioncablesconnectedto the labelprinter
are grounded.
-+ connect labelprinterto computeror networkwith a suitable
cable.
Detailson the configurationof the individualinterfacesare found in the "Configuration
lnstructions,,.
3.4
Switchingthe label printer on and off
Once all connectionshave been made:
=+ Switchprinteron via the powerswitch(1).
The printerruns througha systemtest and then indicatesthe systemstatus
Ready in the display.
lf an errorhas occurredwhilethe systemwas startingup, the
symbol
and
the
error
typeare displayed
$
(see"4.2.8"on page 14).
10
OperatingInstructions
Edition5/06
ULTIMATE 3000XT Series User Manual
Operatingpanel
4
The user can controlthe operationof the printerwith the operatingpanel,for example:
.
pause,continueor cancelprintjobs
.
.
of the ports,
set printingparameters,e.g. heatingenergyof the printhead,printspeed,configuration
"Configuration
lnstructions')
languageand time (see
"Configuration
lnstructions"and "Sevice lnstructions')
start test functions (see
o
controlstandaloneoperationwith memorycard (see "Configurationlnstructions')
.
performa firmwareupdate (see "Configurationlnstructions')
commandswith softwareappliSeveralfunctionsand settingscan also be controlledvia printer-specific
cationsor via directprogrammingwith a computer.Detailson this can be found in the "Configuration
lnstructions".
The settingsmade at the operatingpanelare the basicsettingsof the labelprinter.
.
I
4.1
lt is to your advantageto make adjustmentsfor differentprintjobs in the softwarewheneverpossible.
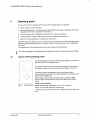
Layout of the operatingpanel
The operatingpanelis comprisedof the graphicaldisplay(1) and the navigator pad (2) with five integratedbuttons.
The graphicaldisplayinformsyou of the currentstatusof the printerand
the printjob, reportserrorsand showsthe printersettingsin the menu.
The buttonfunctionsare dependenton the currentprinterstatus:
Activefunctionsare indicatedby the illuminatedlettersand symbolson the
-1
buttonsof the navigatorpad.
t-*)j
[,.*- r
=-"\
While printing,activefunctionsilluminatewhite (e.9.menu or feed)
",
\** i
Activefunctionsare illuminatedin orangein the offlinemenu (arrows,J
button)
Functions of the buttons
Operatingpanel pause,cancel,menu, reed buttons:(see"4.2.3"on page 13)
a-'- '
1tt*
n
zt\
-l
\
I t
Fig.3:
Arrows:Up, down, leftand rightin the menutree.
-r button:Inputof a parameterin the menu,callingup of help in case of an
error
Edition5/06
lnstructions
Operating
11
ULTIMATE 3000XT Series User Manual
4.2
Functionsof the operatingpanel during printing
4.2.1
Symbol indicators
The symbolindicatorsshown in the followingtable can appearon the statusline of the screen,depending on the configuration
of the printer.They informyou of the currentstatusof the printerat a glance.For
configurationof the status line, see lhe "Configurationlnstructions".
E
Date
I
Ribbonsupplystatus
Tl-
WLAN field strength
?
l;
<...)
Ethernetstatus
F0!t
100
l
Printheadtemperature
@
PPP credit
flEll
User memory
It{F
Inputbuffer
T
ft
II
o.
Printerreceivingdata
ll
Tab. 2:lndicator
symbolsduringprinting
4.2.2
Power-Savemode
lf the printeris not used for some time, it switchesto Power-Savemode automatically.
graphicand buttonillumination
The displayshowsthe *o@
is switchedoff.
To exit Power-Savemode:
=+ Pressany buttonon the navigatorpad.
12
Instructions
Operating
Edition5/06
ULTIMATE 3000XT Series User Manual
4.2.3
'Ready'mode
The printeris readyand can receivedata.
The displayshowsthe text Ready and the configuredsymbolindicators,such as the time , . , and date
B
Button
Label
Function
menu
illuminates
go to offfine menu (see "Configurationlnstructions')
feed
illuminates
advancesan emptylabel
pause
illuminates
once a printjob is complete
repeatprintingof last label
cancel
illuminates
clear printbuffer,
repeatedprintingof the last labelis then not
possible
Tab. 3:Functionsin neady mode
4.2.4
'PrintingLabel'mode
The printeris carryingout a printjob. Datatransferfor a new printjob is possiblein 'Printing'mode.The
new printjob startsonce the precedingjob is completed.
The displayshowsthe text Printins
Label and the numberof the printedlabelwithinthe printjob.
Button
Label
Function
pause
illuminates
pauseprintjob,
printerswitchesto Pause mode
cancel
illuminates
press briefly-+
Tab.4:Functions
in printing
4.2.5
cancelcurrentprintjob
pressand hold-+ cancelcurrentprintjob and
deleteall printjobs
r,abel mode
'Pause'mode
The printjob has been interruptedby the operator.
The displayshowsthe text Pause and the symbolft.
Button
pause
cancel
Label
Function
illuminates
continueprintjob,
printerswitchesto Printing
L,abel mOde
press briefly--> cancelcurrentprintjob
pressand hold--> cancelcurrentprintjob and
deleteafl printjobs
illuminates
Tab. 5:Functions
in Pause mode
Edition5/06
Operating
Instructions
13
ULTIMATE 3000XT Series User Manual
'Fault - correctable' mode
4.2.6
An errorwhich can be remediedby the operatorwithoutcancelingthe printjob has occurred.The print
job can be continuedonce the erroris remedied.
The displayshowsthe symbol@, tne errortype and the numberof labelsstillto be printed.
[_?.:oon
: pause
Label
Function
flashes
continueprintjob aftererrorrecovery,
printerswitchesto printing
r,abel mode
illuminates
cancelcurrentprintjob
pressand hold-+ cancelcurrentprintjob and
deleteall printjobs
illuminates
call up help- briefinformationon errorrecoveryis displayed
I
icancel
,i
;
iI ,,
i
.l button
pressbriefly-+
Tab. 6:Functions
in'errorwhichcan be remedied'mode
'Fault - irrecoverable'mode
4.2.7
An errorwhich cannotbe remediedwithoutcancelingthe printjob has occurred.
The displayshowsthe symbol@, the errortype and the numberof labelsstillto be printed.
Button
cancel
Label
'nrrnua
:.1 button , illuminates
1.,.'*
Function
cancelcurrentprintjob
pressand hold-+ cancelcurrentprintjob and
deleteall printjobs
press briefly-+
call up help- briefinformationon errorrecoveryis displayed
.:."t
Tab. 7:Functions
in 'errorwhichcannotbe remedied'mode
'Systemerror' mode
4.2.8
s
lf an errorhas occurredwhilethe systemwas startingup, the I
syrOol and the errortype are displayed.
= Switchoff printervia the powerswitchand switchit on again.
-or-
+ Pushthe cancel button.
=+ lf the erroroccursrepeatedly,notifythe ServiceDepartment.
14
Instructions
Operating
Edition
5/06
ULTIMATE 3000XT Series User Manual
5
Devicetypes
5.1
Standarddevice
The standarddeviceis used for printinglabelsor continuousmediaon rollsor fanfoldedmedia.
ln Tear-Offmode, labelsare removedby hand.
The labelscan be cut off automatically
with the 'cutter'accessory.For details,see the OperatingInstruc'cutter'
tionsfor the
accessory.
The labelscan be wound up with the 'externalrewinder'accessory.For details,see the Operating
lnstructions
for the'externalrewinder'accessory.
Becausethereis no internalrewinder,automaticpeelingoff of the labelsfrom the carriermedium(PeelOff mode)and internalrewindingare not possible.
5.2
Peel-offdevice version
The peel-offdeviceversionis capableof Peel-Offmode and thus has an internalrewinderand a pulling
systemcomprisedof a rewindassistrollerand a lockingsystem.Printingon labelsor continuousmedia
from rollsor fanfoldedmediais possible.
Operationin Tear-Offmode and withthe'cutter'or'externalrewinder'accessory
is possibfeby installing
the tear-offplate(see "6.6"on page 24), as with the standarddevice.
In Peel-Offmode, the labelis peeledoff the linerafterprinting.The labelcan be removedby handwith
the peel-offsensor(accessory).Labelremovalcan also occurautomatically
via the applicator(accessory).The lineris rolledup via the internalrewinder.
For use in Internal Rewind mode removethe lockingsystem(see "6.7"on page 25) and replacethe
dispenseplatewith a rewindguideplate(see "6.6"on page 24).
Edition5/06
Instructions
Operating
15
ULTIMATE 3000XT Series User Manual
6
Loadingmedia
I
For adjustmentsand simpleinstallation
work, use the accompanyinghexagonalwrench locatedin the
bottomsectionof the printunit.See Fig. 5, ltem 8. No othertoolsare requiredfor the work described
here.
6.1
Loading labelsfrom a roll
6.1.1
Removingand installingthe core adapter (lf the printeryou purchasedhasa coreadapter)
A core adapteris mountedfor betterguidanceof the labelrollon the roll retainerwhen usinglabelrolls
with a core diameter> 75 mm
. Removecore adapterfor smallerlabelrollsas
follows.
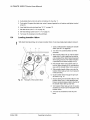
Removing the core adapter
1
1 . O p e nc o v e r( 1 ) .
2. Loosenretainingscrewsof core adapter(2)
with hexagonalwrench.
3. Removecore adapterfrom roll retainer(4).
Installingthe core adapter
1. Opencover(1).
2
2. Loosenretainingscrewsof core adapter(2)
with hexagonalwrench.
3
4
3. Slidefirstcore adapteronto the roll retainer
(4) untilit stopsat the housingand tighten
retainingscrew.
4. Slidesecondcore adapteronto the roll
retainer(4) basedon the rollwidthand
tightenretainingscrew.
Fig.4:
Installing
the coreadapter
Pleasenotethatthedefaultwaythe ULTIMATE
3000xtSeriesPrinters
shipis withouta coreadapter,
Usersdo notneedto usea coreadapterwhenusing
labelsrolledontoindustry-standard
3" (76mm)cores.
16
Instructions
Operating
Edition5/06
ULTIMATE 3000XT Series User Manual
6.1.2
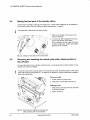
Positioningthe label roll on the roll retainer
Fig. 5:
765
Loadinglabelsfrom a roll
L Opencover(10).
2. Loosenknurledscrew(1) and swivelguide(2) upwardand push it all the way out.
3. Removecore adapter(4) for labelrollswith a core diameter< 75 mm (see"6.1.1"on page 16).
4. Load labelroll on the roll retainerin such a way that the labelscan be insertedintothe printheadin
the rightposition.The printingside of the labelsmust be visiblefrom above.
5. Supplyinglongerlabelstrips:
For Peel-Offor Rewindmode:approx.60 cm
For Tear-Offmode:approx.40 cm
6. Pushlabelrolluntilit contactsthe housingwall.
7. Swivelguide (2) downwardonto the roll retainer(3) and push it againstthe labelroll so that the roll
is brakedslightlywhilesupplyingmedia.
8. Tightenknurledscrew(1).
6.1.3
Insertinga label strip into the printhead
1. Turn lever(9) counterclockwise
to liftthe printhead.
2. Pushguideringon axis (6) all the way out.
3. Guide labelstripto the printunit abovethe internalrewinder(5).
4. Guidelabelstripsbelowthe axis (6) and throughthe labelsensor(7) in such a way that it exitsthe
printunit betweenthe printheadand the print roller.
5. Push guidering on axis (6) againstthe outeredge of the labelstrip.
Edition5/06
Instructions
Operating
17
ULTIMATE 3000XT Series User Manual
6.1.4
Setting the label sensor
Fig. 6:
Settingthe labelsensor
The labelsensor(2) can be shiftedperpendicularto the directionof paperflow for adaptationto the label
medium.The sensorunit(1) of the labelsensoris visiblefromthe frontthroughthe printunitand is
markedwith a indentationin the labelsensorretainer.
=+ Positionlabelsensorwithtab (3) in sucha way that the sensor(1) can detectthe labelgap or a reflex
or perforationmark.
- or, if the labelsdeviatefrom a rectangularshape,=+ Align labelsensorusingthe tab (3) with the front edge of the labelin the directionof paperflow.
For use in Tear-Offmode only:
=+ Turn lever(Fig.5, ltem g) clockwiseto lock the printhead.
The labelroll is loadedfor use in Tear-Offmode.
18
lnstructions
Operating
Edition
5/06
ULTIMATE 3000XT Series User Manual
6.1.5
Winding up the label strip in Rewind mode
321
Fig.7:
Guidingthe labelstripin Rewindmode
In Rewindmode,the labelsare wound up internallyafterprintingfor lateruse.
1' Removethe lockingsystemfor Rewindmode if necessary(see "6.7"on page 25) and installrewind
guide plate (see "6.6" on page 24).
2. Guide labelstriparoundthe rewindguideplate (4) to the internalrewinder(2),
3. Hold rewinder(2) firmly and turn knob (3) clockwiseuntil it stops.
4' Push labelstripundera bracket(1) of the rewinderand turn knob (3) counterclockwise
untilit stops.
The rewinderis fullyspread,thus grippingthe labelstripfirmly.
5. Turn rewinder(2) counterclockwise
to tightenthe labelstrip.
6. Turn lever(5) clockwiseto lock the printhead.
The labelroll is loadedfor use in Rewind mode.
Edition5/06
g Instructions
Operatin
19
ULTIMATE 3000XT Series User Manual
6.1.6
Winding up the liner in Peel-Offmode
4
Fig. 8:
321
Guidanceof the linerin Peel-Offmode
In peel-Offmode,the labelsare removedafterprinting,and only the lineris wound up internally.
1. Liftthe pinchroller( ) off the rewindassistroller(5).
2. Removelabelsfrom the first 100 mm of the liner'
3. Guide linerto the rewinder(2) aroundthe dispenseplate (6) and the rewindassistroller(5)'
4. Hold rewinder(2) firmlyand turn knob (3) clockwiseuntilit stops.
untilit stops.
5. push linerundera bracket(1) of the rewinder(2) and turn knob (3) counterclockwise
The rewinderis fullyspread,thus grippingthe linerfirmly.
to tightenthe liner.
6. Turn rewinder(2) counterclockwise
7. Slighly loosentop fixingscrewat the lockingsystemwith hexagonalwrenchand positionthe pinch
roller(4) centrallyto the liner(see "6.7"on page 25).
8. Closethe lockingsystemand tightentop fixingscrewat the lockingsystem.
9. Turn lever(7) clockwiseto lockthe printhead.
The labelroll is loadedfor use in Peel-Offmode'
20
Instructions
Operating
Edition5/06
ULTIMATE 3000XT Series User Manual
6.1.7
Settingthe head locking system
The printheadis pushedon via two plungers.The locationof the outerplungermust be set to the width
of the labelmediumusedso as to
o
achieveeven printqualityacrossthe entirelabelwidth
.
preventwrinklesin the feed path of the transferribbon
.
preventprematurewearingof the printrollerand printhead.
Kt"#
Fig.9:
*u
)ll(b
lockingsystem
Settingthe head locking
Setting
1. Turn lever(3) clockwiseto lock the printhead.
2. Loosenthreadedpin (1) at outerplunger(2) with hexagonalwrench.
3. Positionouterplunger(2) abovethe outerlabeledgeand tightenthreadedpin (1).
Edition5/06
Instructions
Operating
21
ULTIMATE 3000XT Series User Manual
6.2
Removingthe wound roll
4
321
Fig. 10: Removingthe woundroll
to liftthe printhead.
1. Turn lever(7) counterclockwise
2. Cut labelstripand wind it fullyaroundthe rewinder(2).
3. Hold rewinder(2) firmlyand turn knob (3) clockwise.
The rewinderspindlerelaxesand the wound roll is released.
4. Removewound rollfrom rewinder(2).
6.3
Loadingfanfold labels
Fig. 11: Feedpathof paperwith fanfoldlabels
1. Loosenknurledscrew(1) and slideguide(2) outwardcompletelyand swivelit downwardpastthe roll
retainer(3).
2 . lf core adaptersare mountedon the roll retainer(3), removecore adapters(see "6.1.1"on page 16).
3 . Positionlabelstack(4) behindthe printer.Ensurethat the labelson the stripare visiblefrom above.
22
Instructions
Operating
Edition5/06
ULTIMATE 3000XT Series User Manual
4. Guidelabelstripto printunitvia the rollretainer(3).See Fig. 11.
5. Push guide (2) againstthe labelstrip,swivelit upwardagainstthe roll retainerand tightenknurled
screw(1).
6. Insertlabelstripintoprinthead(see'6.1.3"on page 17).
7. Set labelsensor(see"6.1.4"on page 18).
8. Set head lockingsystem(see "6.1.7"on page 21)
9. Turn lever(5) clockwiseto lock the printhead.
6.4
Loadingtransfer ribbon
With directthermalprinting,do not loada transferribbon;if one has alreadybeen loaded,removeit.
L Cleanprintheadbeforeloadingthe transfer
ribbon(see "8.5"on page 28).
2. Turn lever(4) counterclockwise
to liftthe
printhead.
3. Slidetransferribbonroll (2) onto the ribbon
supplyhub (3) untilit stopsand so that the
colorcoatingof the ribbonfaces downward
when beingunwound.No rotationdirection
is specifiedfor the ribbonsupplyhub (3).
4. Holdtransferribbonroll (2) firmlyand turn
knob on ribbonsupplyhub (3) counterclockwise untilthe transferribbonroll is secured.
5. Slidesuitabletransferribboncore onto the
transferribbontake-uphub (1) and secureit
in the same way.
6. Guidetransferribbonthroughthe printunit
a s s h o w ni n F i g .1 2 .
Fig.12:
Feed path of the transferribbon
7 . Securestartingend of transferribbonto the
transferribboncore (1) with adhesivetape.
Ensurecounterclockwise
rotationdirectionof
the transferribbontake-uphub here.
8. Turntransferribbontake-uphub (1) counterclockwiseto smooth out the feed path of the
transferribbon.
9. Turn lever(4) clockwiseto lockthe printhead.
Edition5/06
Instructions
Operating
23
ULTIMATE 3000XT Series User Manual
Setting the feed path of the transfer ribbon
6.5
Transferribbonwrinklingcan lead to printimageerrors.Transferribbondeflectioncan be adjustedso
as to preventwrinkles.See also "Settingthe head lockingsystem"on page 21.
i
The adjustmentis best carriedout duringprinting.
1 . Read currentsettingon the scale (1) and
record if necessary.
2. Turn screw(2) with hexagonalwrenchand
observethe behaviorof the ribbon.
ln the + direction,the inneredge of the transfer ribbonis tightened,and the outeredge is
tightenedin the - direction.
Fig. 13: Settingthe feed path of the transferribbon
Removingand installingthe rewind guide plate,dispenseplate or
tear-off plate
6.6
To convertthe printerfor use in anotheroperatingmode,a rewindguideplate,a dispenseplateor a tearoff platemay need to be installed.
I
For printerversionswith a lockingsystemon the rewindassistroller,the lockingsystemon the rewind
assistrollermust be removed(see "6.7"on page 25) for operationin Rewindmode beforeinstallation
of the rewindguide plate.
Removing a plate
1. Loosenscrews(2) severalturns.
2. Slideplate(1) to the rightand removeit.
Installing a plate
1. Placeplate(1) onto the screws(2) and slide
to the left completely.
2. Tightenscrews(2).
the rewindguide
Fig. 14: Removingand installing
plate,dispenseplateor tear-offplate
24
Instructions
Operating
Edition
5/06
ULTIMATE 3000XT Series User Manual
6.7
Removingand installingthe locking system
Removing the locking system
1. Positionprinterat edge of table so that the
oblonghole is accessiblefrom below.
2. Screwout screws(1) (2) and removethem.
3. Removethe pinchroller(4) and bottomplate
(3)
Installing the locking system
1. Positionprinterat edge of table so that the
oblonghole is accessiblefrom below.
2. Placethe pinchroller(4) into oblonghole
and lightlytightenscrew(1) of bottomplate
(3) from above.
3. Lightlytightenscrew(2) of bottomplate(3)
from below.
4. Alignthe pinchroller(4) with centerof label
and tightenscrews.
Fig. 15: Removingthe lockingsystem
Edition5/06
Instructions
Operating
25
ULTIMATE 3000XT Series User Manual
Printing
7
CAUTION!
The printheadcan be damaged if handledimproperly!
= Do not touch the bottom of the printhead with your fingers or sharp objects.
= Ensurethat the labelsare clean.
+ Ensure smooth label surfaces. Raw labels are like emery and reduce the service life of the
printhead.
+ Print at the lowest possible printhead temperature.
7.1
Synchronization
The printeris readyfor operationwhen all connectionshave been made.the labelsand, if necessarythe
transferribbon.have been loadedand the nrintho2dis locked.
the printerautois necessary.Duringsynchronization,
After ioadingthe labelmedrum,synchronization
maticallydeterminesthe lengthof the loadedlabelsand sets labeladvancementaccordingly.
1. Pressthe feed buttonto startsynchronization.
2. Removeempty labelsaftersynchronization.
with the loadedlabelmedium.
The printeris synchronized
.
I
7.2
is not necessaryif the printheadwas not openedbetweendifferentprintjobs, even if
Synchronization
the printerwas switchedoff.
Tear-Offmode
In Tear-Offmode,labelsor continuousmediaare printed.After printing,the labelstrip is separatedby
hand.The labelprinteris equippedwith a tear-offplatefor this.
Optionally,the labelcan be cut off or labelstripscan be wound up externally.
7.3
Peel-Offmode
peeledoff the carriermediumafterprintingand presented
In Peel-Offmode,the labelsare automatically
for removal.The labelprinteris equippedwith a dispenseplateand one of the followingaccessory
devicesfor this:peel-offsensor(PSOor PS8),peel-offadapter(PSs)or applicator(A1000).The carrier
mediumis woundup insidethe printer.
7.4
Internalrewinding
The labelsare wound up internallyafterprintingwith the carriermediumfor lateruse. The labelprinter
is equippedwith a rewindguide platefor this.
26
Instructions
Operating
Edition5/06
ULTIMATE 3000XT Series User Manual
8
Cleaningand basic maintenance
DANGER!
Riskof deathvia electricshock!
= Disconnectthe printerfrom the powersupplybeforeperformingany maintenance
work.
Maintenanceplan
8.1
When
I fiaintenange
!3sk
,Generalcleaning(see"8.3"on page28)
' Cleanprintroller(see"8.4"on page28)
r
Cleanprinthead(see "8.5"on page 28)
,
as necessary
;
each time the labelroll is changedor
when the printimageand labeltrans- i
port are adverselyaffected.
directthermalprinting:eachtimethe l:
labelrollis changed
thermal transfer printing. each time
the transferribbonis changed
or when the printimageis adversely
affected
, For 4" wide labelprintersonly:
Cleanlabelsensor(see "8.6"on page 28)
when the labelrollis changed
, Replaceprinthead(see "8.7"on page 29)
when errorsin the printimageoccur
Replaceprintrollerand rewindassistroller
31)
, Il"?__8.8
?' ?.:su
when printimageand labeltransport
are adverselyaffected
plan
Tab. 8:Maintenance
8.2
Tools and cleaningagents
For adjustmentsand simpleinstallation
work, use the accompanyinghexagonalwrenchlocatedin the
bottomsectionof the printunit.See Fig. 5, ltem 8. No othertoolsare requiredfor the work described
here.
i
Edition5/06
Cleaningagents
. soft brush
.
soft cloth
.
pure alcohol
.
.
cotton swabs
.
specialcleaningpen
rollercleaner
OperatingInstructions
27
ULTIMATE 3000XT Series User Manual
Generalcleaning
8.3
CAUTION!
Abrasive cleaning agents can damage the printer!
= Do not use abrasives or solvents to clean the outer surfaces or assemblies.
+ Removedust and paper fuzzin the printingarea with a soft brushor vacuumcleaner.
+ Cleanoutersurfaceswith an all-purposecleaner.
Cleaningthe print roller
8.4
to liftthe printhead.
1. Turn lever(4, Fig. 12) counterclockwise
2. Removelabelsand transferribbonfrom the printer.
3. Removedepositswith rollercleanerand a soft cloth.
4. lf the rollerappearsdamaged,replaceit (see"B.8"on page31).
Cleaningthe printhead
8.5
Substancesmay accumulateon the printheadduringprintingand adverselyaffectprinting,e.g. differences in contrastor verticalstripes.
CAUTION!
Printheadcan be damaged!
= Do not use sharp or hard objects to clean the printhead.
= Do not touch protective glass layer of the printhead.
to liftthe printhead.
1. Turn lever(4, Fig. 12) counterclockwise
2. Removelabelsand transferribbonfrom the printer.
3. Cleanprintheadsurfacewith specialcleaningpen or a cottonswab dippedin pure alcohol.
the printer.
4. Allow printheadto dry for 2-3 minutesbeforecommissioning
Cleaningthe labelsensor
8.6
II
printers.Youcould
Pleasedo notcleanthesensorfor the ULT-3630XT
or the ULT-3830XT
printers
causepermanent
damageto the sensors.lf youfeelthe sensoron thesewide-format
+1-978-2504414
or at
at
needto be cleaned,pleasecontactourServiceDepartment
ils-barcode.
techsupport@
com.
CAUTION!
Label sensor can be damaged!
=+ Do not use sharp or hard objects or solvents to clean the label sensor.
The labelsensorcan becomedirtiedwith paperdust.This can adverselyaffectlabeldetection.
28
Instructions
Operating
Edition5/06
ULTIMATE 3000XT Series User Manual
1 . Turn lever(1) counterclockwise
to liftthe
printhead.
2 . Removelabelsand transferribbonfrom the
printer.
3 . Remove hexagonalwrench (5) from its
retainer.
4 . Pressthe latch(3) and slowlypull labelsensor outwardvia the tab (4). Ensurethat the
labelsensorcableis not tensionedby this.
5 . Cleanlabelsensorand sensorunits(2) with
brushor cottonswab soakedin purealcohol.
6 . Push labelsensorback via tab (3) and set it
(see"6.1.4" on page 18).
7 . Push hexagonalwrench(4) into retainer.
8 . Reloadlabelsand transferribbon(see "6.1"
o n p a g e1 6 ) ,
Fig. 16: Cleaningthe labelsensor
Replacingthe printhead
8.7
The printheadof the labelprintercan be replacedwithoutthe need for fine adjustment.The printhead
must be replacedif worn or when switchingto a printheadwith higheror lowerresolution.For betterdifferentiation,
the printheads have a labelstatingthe printertype and resolution.
1
2
3
4
5
6
7
Head plate
Plug connection
Plug connection
Screw
Printingline
Pins
Printhead
Fig.'17: Structureof the printhead
I
Edition5/06
The printhead(8) is preinstalled
on a head plate(1) and preciselyalignedat the factory.Do not loosen
the screws(4) underany circumstances.
Instructions
Operating
n
ULTIMATE 3000XT Series User Manual
CAUTION!
The printhead can be damaged by static electricity discharges and impacts!
= Set up printer on a grounded,conductivesurface.
+ Ground your body, e.g. by wearing a grounded wristband.
= Do not touch contacts on the plug connections (2, 3).
= Do not touch printing line (5) with hard objects or your hands.
{
0
Fig. 18: Removingand installing
the printhead
Removing the printhead
1. Turn lever(10) counterclockwise
to liftthe printhead.
2. Removelabelsand transferribbonfrom the printer.
3. Removehexagonalwrench(9) from its retainer.
4. Lightlykeep printheadmountingbracket(9) on the printrollerwith one fingerand screwout screw(8)
with the hexagonalwrenchand removeit and the washer.
5. Swivelprintheadmountingbracket(9) upward.
6. Removeprintheadfrom the printheadmountingbracket(9) if necessary.
7. Loosenbothplugconnections(2, 3) on the printheadand set printheaddownon a clean,softsurface.
Installing the printhead
(2, 3).
1. Attachplugconnections
2. Positionprintheadin printheadmountingbracket(9) in such a way that the pins (6) are securedin
holesin the printheadmountingbracket(9).
the corresponding
3. Lightlykeep printheadmountingbracket(9) on the printrollerwith one fingerand checkfor correct
positioningof the printheadmountingbracket(9).
4. Screwin screw(8) with washerwith the hexagonalwrenchand tightenit.
5. Reloadlabelsand transferribbon(see"6.1"on page 16).
30
OperatingInstructions
Edition5/06
ULTIMATE 3000XT Series User Manual
8.8
Replacingthe print roller and rewind assist roller
Removing the side plate
1. Turn lever(1) counterclockwise
to liftthe
printhead.
2. Liftthe pinchroller(5) off the rewindassist
roller.
3. Removelabelsand transferribbonfrom
the printer.
4. Loosenscrews(4) on plate(6) with hexagonal wrenchby severalturns and remove
plate(6).
3a
5. Unscrewscrews(3abc)of the side plate
(2) with hexagonalwrench.
3b
6. Removeside plate(2).
F i g .1 9 : Removingthe side plate
Removing and installing rollers
1. Pullprintroller(7) and rewindassistroller
(8) from the shafts(9, 10) on the housing.
2. Cleanshafts(9, 10) of the rollers(see
expandedview at shaft(10))
3. Slideprintroller(7) and rewindassistroller
(8) onto their respectiveshaftsand turn
slightlyuntilthe hexagonof the shaft
engagesin the hexagonsocketof the print
roller.
4. Set side plate(ltem2, Fig. 19) in placeand
screwit downwith the screws(ltems3abc,
Fig. 19) by tightening
the screwsin order,
i . e .a , b t h e nc .
5. Set plate(ltem6, Fig. 19) in placeand
tightenscrews(ltem4, Fig. 19) with hexagonalwrench.
Fig.20: Removingand installing
rollers
Edition5/06
Instructions
Operating
31
ULTIMATE 3000XT Series User Manual
9
Errortreatment
9.1
Errortypes
When an erroroccurs,the diagnosticsystemdisplaysthe erroron the screenand switchesthe printer
intoone of the three possibleerrormodes,dependingon the errortype:
.n
lffiiBl
pauseflashes
Fault- correctable
"4.2.6"on page14)
(see
illuminates
cancel
,E\
cancelflashes
\!r'
-]:/
s
Fault- irrecoverable
(see"4.2.7"
on page14)
Systemerror
(see"4.2.8"
on page14)
:
'i
i
i
Tab.9:Errormodes
32
Operating
Instructions
Edition
5/06
ULTIMATE 3000XT Series User Manual
9.2
Troubleshooting
iProblem
1Transferribbonwrinkles
Gause
rtinitei iinnon
d;n;;iil;;i
adjusted
Head lockingsystemnot
adjusted
I
I
i
I
I
Transferribbontoo wide
l
1Printimage is blurredor
1missingin places
i
i
:
:
: Printerdoesnotstop
jwnentransfer
ribbonis
Printheaddirty
See "Settingthe feed path of the trans- i
fer ribbon"on page 24.
See "settingthe head lockingsystem" i
o n p a g e2 1 .
i
Use onlytransferribbonswhich are just r
a bit widerthan the label.
.i
See "Cleaningthe printhead"on
page28.
Temperature
too high
Decreasetemperaturevia software
Unfavorablecombinationof
labelsand transferribbon
Use anotherribbontype or brand.
Directthermalprintingis
selectedin the software
,
i
]
Switchto thermaltransferprintingin the ,
software
L
,j oone.
Printeris in Monitormode
Exit Monitormode
1Printerprintsa seriesof
j characters
insteadof the
; labelformat
; Printer
transports
thelabel Transferribbonloadedincor- Checkcourseof transferribbonand oributnotthetrans- rectly
entationof the coveredside and correct
i medium,
if necessary.
iferribbon.
\
Unfavorablecombinationof
labelsand transferribbon
:
.:
i Printerprintsonlyevery Formatsettingin softwareis
too large.
i s e c o n dl a b e l
;
linesin print Printheaddirty
$Verticalwhite
t.
, rmaoe
Use anotherribbontype or brand.
Changeformatsettingin the software.
on
See "Cleaning
the printhead"
page28.
t
Horizontal
whitelinesin
printimage
i.
I
t
$
lighter
on oneside
i Printing
Printheaddefective(failureof
dots)
See "Replacingthe printhead"on
page29.
Printeris beingoperatedin
Cuttingmode or Peel-Off
modewith the setting
Changesetupto sackfeed > always,
See "Configuration Instructions"
Backfeed
smart
>
Printhead dirty
:
t
I
t
1
l
Head locking system not
adjusted
Li
i
on
See "Cleaningthe printhead"
page28.
ii
See "settingthe head lockingsystem"
o n p a g e2 1 .
i)
,".}
Tab. 10 :Troubleshooting
Edition5/06
lnstructions
Operating
33
ULTIMATE 3000XT Series User Manual
9.3
Errormessagesand recovery
Error message
Cause
Error recovery
ADC malfunction
Hardwareerror
Switchprinteroff and on again.
lf it occursagain-+ Service.
Barcode error
Invalidbarcodecontents,e.g. Correctbarcodecontents.
alphanumericcharactersin
numericalbarcode
Barcode too big
Barcodeis too largefor the
allottedarea of the label
Battery
Batteryof the PC card is dead Replacebatteryin PC card.
low
Shrinkor shiftbarcode.
Data inputbufferis full,and
the computeris attemptingto
send more data
Use data transferwith protocol(preferably RTS/CTS).
card futl
Memorycard cannotaccept
any more data
Changememorycard.
Device not conn.
Programmingdoes not
respondto existingdevice
Connectan optionaldeviceor correct
programming.
File
Callingup of a file from the
memorycard which does not
exist
Checkcontentsof the memorycard.
Buf fer
overf low
not found
Errorin the selecteddownload Cancelprintjob,
font
changefont.
FPGA malfunct,ion
Hardwareerror
Switch printeroff and on again.
lf it occursagain-+ Service.
Head error
Hardwareerror
Switchprinteroff and on again.
lf it occursagain-+ replaceprinthead
(see"8.7"on page29).
Head open
Printheadnot locked
Lock printhead.
Head too hot
Printheadexcessivelywarm
The printjob continuesautomatically
afterpausing.
lf this occursrepeatedly,
reducethe
heat levelor printspeed in the software.
rnvalid
Errorin configuration
memory Reconfigureprinter.
lf it occursagain-+ Service.
setup
Memory overf low
Printjob too large:e.g. due to
loadedfonts,largegraphics
Name existe
Fieldname in directprogram- Correctprogramming.
ming enteredtwice
No DHCPserver
Printeris configuredfor
DHCfl and there is no DHCP
il;;;;J li:"ti:;,"'erver
34
Cancelprintjob. Reduceamountof data
to be printed.
DeactivateDHCP in the configuration
and issuea permanentlP address.
is Notirv
thenetwork
administrator.
Instructions
Operating
Edition5/06
ULTIMATE 3000XT Series User Manual
I Error message
i,
.-..." .,...,
i No
Cause
Eiio..efo;;i'
severiirioersaremissing
from the labelstrio
Pressthe pause buttonseveraltimes
untilthe next labelon the stripis
detectedby the printer.
The labelformatspecifiedin
the softwaredoes not match
the actualformatused
Cancelprintjob.
Changelabelformatin the software.
Restartprintjob.
A continuousmediumis
locatedin the printer,but the
softwareis waitingfor labels
Cancelprintjob.
Changelabelformatin the software.
Restartprintjob.
Labelsize not definedin programming
Checkprogramming.
There is no networkconnection
Checknetworkcableand plug.
Errorin the memorycard
optionwhen accessingthe
database
Checkprogrammingand memorycard
contents.
Printeris configuredfor
SMTP,and thereis no SMTP
serveror the SMTP serveris
currentlyunavailable
DeactivateSMTP in the configuration.
Gaution! Warningsvia email(EAlert)
can then no longerbe received!
I
.,.,
Label
found
\
t:
I
i
i,
j No label
size
No Link
!
j
Notifythe networkadministrator.
I
; No record
found
l
i No
Sl,lTP
Eerver
No Timeserver
r Out
of
Out of
Edition5/06
paper
ribbon
Notifythe networkadministrator.
Timeserveris selectedin the DeactivateTimesaverin the configurabut there is no
tion.
configuration,
timeserveror the timeserveris Notifythe networkadministrator.
currentlynot available.
Labelroll used up
Loada labelroll(see"6.1"on page 16)
or
Loadfanfoldlabels(see "6.3"on page
22).
Errorin papercourse
Checkpapercourse.
Transferribbonused up
Load new transferribbon
Transferribbonmelted
throughduringprinting
Cancelprintjob.
Changeheat levelvia software.
Cleanprinthead(see"8.5"on page28).
Loadtransferribbon(see "6.4"on page
23).
Restartprintjob.
Thermalpaperlabelsare to
be used,but the softwareis
set to transferprinting
Cancelprintjob.
Switchto directthermalprintingin the
software.
Restartprintjob.
Supplyrollof transferribbon
not securedto ribbonsupply
hub
Securetransferribbon (see "6.4" on
page23).
g Instructions
Operatin
35
ULTIMATE 3000XT Series User Manual
i Errormessage
Cause
I Protocol error
i
Printerreceives
an unknown Pressthe pausebuttonto skipthecomfrom
mandor
command
9r incorrect
i
the computer.
Pressthe cancel buttonto cancelthe
printjob.
Read errorwhen accessing
memorycard
Checkdata on memorycard.
]
$
$Read error
l
\'
:
, structural
)$
Error recovery
Save data.
Reformatcard.
memorycard.
Errorin directory
of the mem- Reformat
data
orycard,non-secure
access
err.
i
iurrt rro*r, card
$
x
I
Memorycardnotformatted
Memorycardtypenotsupported
Formatcard,
useanothercardtype.
USBdeviceis detected.
but
Do notuseUSBdevice.
i USB error
i Device stalled
does not function
{ USB error
I Too much current
Current
i USB error
USB devicenot recognized
Do not use USB device.
Hardwareerror
Switchprinteroff and on again.
lf it occursagain -+ Service.
The voltagewhich has failedis displayed.Pleasenote this.
; Unknown
device
: Voltage
error
USB devicedrawingtoo much Do not use USB device.
Write
error
Hardwareerror
Repeatwriteattempt.
Reformatcard.
write
protected
Writeprotectionof the PC
card is activated.
Deactivatewrite protection.
Errorwhen loadinga new
firmwareversion.Firmware
does not work with hardware
Load appropriatefirmware.
wrong revision
.
vgrsi_9n
Tab. 11:Errorrecovery
36
Instructions
Operating
Edition5/06
ULTIMATE 3000XT Series User Manual
lndex
c
Cleaning
Labelsensor
Printroller
Printhead
Cleaningagents
Cleaningthelabelsensor . . . . . . .
...
Computerconnection
Connections
.27,28
. ...28
. . ..28
. ...28
....27
. .. .28
..10
. . . .10
D
Devicetypes
Display
Disposal
. .. .15
....11
.....8
E
Environment
Error
Causes
Messages
Recovery
System
Treatment....
Types
.....8
. .. .34
....34
....34
....14
....32
..,,32
F
Fault
correctable
irrecoverable. .
Functionsof the operatingpanel
....14
....14
....12
H
Hexagonalwrench
....16
I
Insertinga labelstripintothe printhead . . . . 1 7
.....9
Installation
Installingthe printhead
....30
.. .26
Internalrewinding
L
Lithiumbattery
Loading
Fanfoldlabels
Labels
Labelsfrom a roll
Media
Ribbon
Transferribbon
.....8
.. . .22
. . ..16
. . ..16
....16
. .23
.. . .23
M
Maintenance
plan
Maintenance
Mode
Fault-correctable...
Fault- irrecoverable
38
....27
....27
14
14
...13
. .13
...13
Pause
PrintingLabel
Ready
N
Navigatorpad
..
N e t w o r k c o n n e c t i o. n
Noteson the documentation
o
...11
...10
....5
.13
.11
modes
Operating
panel
Operating
P
Peel-offdeviceversion
Peel-Offmode
Positioningthe labelroll .
P o w e r c o n n e c t i o. .n. . .
Power-Savemode
Printing
Internalrewinding
Peel-Offmode
Tear-Offmode
......... .20,;z
.17
.10
.12
.26
.26
.26
.26
R
Removing
Printhead
Wound roll . .
Removingand installing
Coreadapter......
Dispenseplate
Lockingsystem
Rewindguide plate
Tear-offplate .
Replacing
Printroller
Printhead
Rewindassistroller .
Rollers
Rewindmode
.30
.22
16
.24
.25
.24
.24
.31
.29
.31
.31
.19
S
Safety notes
Scopeof delivery
Screen
Setting
Feed path of the transferribbon
Head lockingsystem
Labelsensor
Ribbon
Settingup the labelprinter. . . . . . .
Standarddevice
Switchingoff
Switchingon
Symbolindicators
Instructions
Operating
Edition5/06
ULTIMATE 3000XT Series User Manual
Synchronization
Systemerror
T
+::i;oo'"ll
:
""'
::: :
Transportationsafeguards
:
..26
14
''r
16,22?
U
tlnnackino
U
nPacking
... g
strip
windins
uptheraber
1e
.....9
ForTechnical
Supportor Serviceon yourULTIMATE3000xrSeriesprinter,pleasecontact
ourTechnical
ServicesDepartment
at +1-978-2504414
or at [email protected].
Forlabelsandribbons
foryourULTIMATE3000xrSeriesprinter,pleasecontactourSales
andCustomer
ServiceDepartment
at +1-978-250-4414
or at [email protected].
www.ils-barcode.com
Edition5/06
Instructions
Operating
39
ULTIMATE 3000XT Series User Manual
10 Kidder Road, Chelmsford, MA 01824 USA
+1-978-250-4414 www.ils-barcode.com
© 2006 Industrial Labeling Systems, Corporation
Specifications subject to change without notification