1
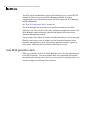
Symantec™ Enterprise Security
Architecture Installation Guide
SESA 2.1
Symantec™ Enterprise Security Architecture
Installation Guide
The software described in this book is furnished under a license agreement and may be
used only in accordance with the terms of the agreement.
Documentation version 2.1
Copyright Notice
Copyright © 2004 Symantec Corporation.
All Rights Reserved.
Any technical documentation that is made available by Symantec Corporation is the
copyrighted work of Symantec Corporation and is owned by Symantec Corporation.
NO WARRANTY. The technical documentation is being delivered to you AS-IS, and
Symantec Corporation makes no warranty as to its accuracy or use. Any use of the
technical documentation or the information contained therein is at the risk of the user.
Documentation may include technical or other inaccuracies or typographical errors.
Symantec reserves the right to make changes without prior notice.
No part of this publication may be copied without the express written permission of
Symantec Corporation, 20330 Stevens Creek Blvd., Cupertino, CA 95014
Trademarks
Symantec and the Symantec logo are U.S. registered trademarks of Symantec Corporation.
SESA, LiveUpdate, Symantec AntiVirus, Symantec Enterprise Security Architecture, and
Symantec Security Response are trademarks of Symantec Corporation.
Sun® is a registered trademark of Sun Microsystems, Inc.
Sun JDK™ and Sun Java™ are trademarks of Sun Microsystems, Inc.
VeriSign® is a registered trademark of Verisign, Inc.
DB2®, Tivoli®, and WebSphere® are registered trademarks of IBM Corporation.
Other brands and product names mentioned in this manual may be trademarks or
registered trademarks of their respective companies and are hereby acknowledged.
Printed in the United States of America.
Middleware notice
The IBM DB2 Universal Database Workgroup Server Edition 8.1 that is included on the
SESA Foundation Pack 2.1 with SESA DataStore (IBM DB2 for Windows) distribution
media is intended for use with SESA only, and not for use as a general purpose database.
Its installation is restricted to a single server with a maximum of four processors, and it is
intended for use by a limited number of users, all of whom must be DB2 system
administrators.
Symantec does not provide IBM upgrade insurance or other upgrade insurance as part of
the SESA Foundation Pack 2.1 with SESA DataStore (IBM DB2 for Windows). To obtain
upgrade insurance for any IBM DB2 databases that you use with SESA, you must contact
IBM directly.
Symantec does not make available for sale or resale any Oracle product, including Oracle 9i
database software. You must purchase the Oracle 9i database software separately if you
want to use the database with SESA.
Disclaimer notice
Symantec, Inc., hereby disclaims all copyright interest in the library ‘Piccolo XML Parser’
(an XML parser for Java) written by Yuval Oren.
10 9 8 7 6 5 4 3 2 1
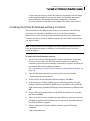
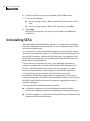
Technical support
As part of Symantec Security Response, the Symantec global Technical Support
group maintains support centers throughout the world. The Technical Support
group’s primary role is to respond to specific questions on product feature/
function, installation, and configuration, as well as to author content for our
Web-accessible Knowledge Base. The Technical Support group works
collaboratively with the other functional areas within Symantec to answer your
questions in a timely fashion. For example, the Technical Support group works
with Product Engineering as well as Symantec Security Response to provide
Alerting Services and Virus Definition Updates for virus outbreaks and security
alerts
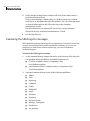
Symantec technical support offerings include:
■
A range of support options that give you the flexibility to select the right
amount of service for any size organization
■
Telephone and Web support components that provide rapid response and
up-to-the-minute information
■
Upgrade insurance that delivers automatic software upgrade protection
■
Content Updates for virus definitions and security signatures that ensure
the highest level of protection
■
Global support from Symantec Security Response experts, which is
available 24 hours a day, 7 days a week worldwide in a variety of languages
■
Advanced features, such as the Symantec Alerting Service and Technical
Account Manager role, offer enhanced response and proactive security
support
Licensing and registration
If the product that you are implementing requires registration and/or a license
key, the fastest and easiest way to register your service is to access the
Symantec licensing and registration site at www.symantec.com/certificate.
Alternatively, you may go to www.symantec.com/techsupp/ent/enterprise.html,
select the product that you wish to register, and from the Product Home Page,
select the Licensing and Registration link.
Contacting Technical Support
Customers with a current support agreement may contact the Technical
Support group via phone or online at www.symantec.com/techsupp.
Customers with Platinum support agreements may contact Platinum Technical
Support via the Platinum Web site at www-secure.symantec.com/platinum/.
When contacting the Technical Support group, please have the following:
■
Product release level
■
Hardware information
■
Available memory, disk space, NIC information
■
Operating system
■
Version and patch level
■
Network topology
■
Router, gateway, and IP address information
■
Problem description
■
Error messages/log files
■
Troubleshooting performed prior to contacting Symantec
■
Recent software configuration changes and/or network changes
Customer Service
To contact Enterprise Customer Service online, go to www.symantec.com, select
the appropriate Global Site for your country, then choose Service and Support.
Customer Service is available to assist with the following types of issues:
■
Questions regarding product licensing or serialization
■
Product registration updates such as address or name changes
■
General product information (features, language availability, local dealers)
■
Latest information on product updates and upgrades
■
Information on upgrade insurance and maintenance contracts
■
Information on Symantec Value License Program
■
Advice on Symantec's technical support options
■
Nontechnical presales questions
■
Missing or defective CD-ROMs or manuals
Please visit our Web site for current information on Support Programs. The
specific features available may vary based on the level of support purchased and
the specific product that you are using.
Symantec Software License Agreement
THIS END USER LICENSE AGREEMENT SUPERSEDES
ALL OTHER TERMS AND CONDITIONS INCLUDED
WITH THE SOFTWARE AND DOCUMENTATION. BY
OPENING THIS PACKAGE, BREAKING THE SEAL,
CLICKING THE “AGREE” OR “YES” BUTTON OR
OTHERWISE INDICATING ASSENT
ELECTRONICALLY, OR LOADING THE SOFTWARE,
YOU AGREE TO THE TERMS AND CONDITIONS
BELOW.
SYMANTEC CORPORATION AND/OR ITS
SUBSIDIARIES (“SYMANTEC”) IS WILLING TO
LICENSE THE SOFTWARE COMPONENT
(“COMPONENT”) TO YOU AS AN INDIVIDUAL, THE
COMPANY, OR THE LEGAL ENTITY THAT WILL BE
UTILIZING THE COMPONENT (REFERENCED BELOW
AS “YOU OR YOUR”) ONLY ON THE CONDITION
THAT YOU ACCEPT ALL OF THE TERMS OF THIS
LICENSE AGREEMENT SUPPLEMENT
(“SUPPLEMENT”) AND THE LICENSE AGREEMENT
ACOMPANYING THE SYMANTEC PRODUCT WITH
WHICH THIS COMPONENT IS UTILIZED (“LICENSE
AGREEMENT”). READ THE TERMS AND CONDITIONS
OF THE LICENSE AGREEMENT AND THIS
SUPPLEMENT CAREFULLY BEFORE USING THE
COMPONENT. THIS IS A LEGAL AND ENFORCEABLE
CONTRACT BETWEEN YOU AND THE LICENSOR. BY
OPENING THIS PACKAGE, BREAKING THE SEAL,
CLICKING THE “ACCEPT” OR “YES” BUTTON OR
OTHERWISE INDICATING ASSENT
ELECTRONICALLY, OR LOADING THE SOFTWARE,
YOU AGREE TO THE TERMS AND CONDITIONS OF
THIS SUPPLEMENT. IF YOU DO NOT AGREE TO
THESE TERMS AND CONDITIONS, CLICK THE “I DO
NOT ACCEPT,” OR “NO” BUTTON, OR OTHERWISE
INDICATE REFUSAL AND MAKE NO FURTHER USE
OF THE COMPONENT.
THE LICENSE AGREEMENT CAN BE LOCATED IN THE
PRODUCT PACKAGING AND DOCUMENTATION
AND/OR DURING THE SOFTWARE INSTALL.
In addition to the License Agreement, the following
terms and conditions apply to You for use of the
Component.
1. License:
The software and documentation that accompanies
this Supplement (collectively the “Component”) is the
proprietary property of Symantec or its licensors and
is protected by copyright law. While Symantec
continues to own the Component, you will have certain
rights to use the Component after your acceptance of
this license. This license governs any releases,
revisions, or enhancements to the Component that the
Licensor may furnish to you. Except as may be
modified by an applicable Symantec license certificate,
license coupon, or license key (each a “License
Module”) that accompanies, precedes, or follows this
license, your rights and obligations with respect to the
use of this Component are as follows:
You may:
A. use the number of copies of the Component as
required for utilization with the applicable Symantec
products as have been licensed to you by Symantec
under a License Module. Your License Module shall
constitute proof of your right to make such copies. If
no License Module accompanies, precedes, or follows
this license, you may make one copy of the Component
you are authorized to use on a single machine.
B. use the Component in combination with any
Symantec recognized product that specifies use with
the Component;
C. use the Component in accordance with any written
agreement between You and Symantec.
2. Limited Warranty:
Symantec warrants that the media on which the
Software is distributed will be free from defects for a
period of sixty (60) days from the date of delivery of the
Software to You. Your sole remedy in the event of a
breach of this warranty will be that Symantec will, at
its option, replace any defective media returned to
Symantec within the warranty period or refund the
money You paid for the Software. Symantec does not
warrant that the Software will meet Your requirements
or that operation of the Software will be uninterrupted
or that the Software will be error-free.
TO THE MAXIMUM EXTENT PERMITTED BY
APPLICABLE LAW, THE ABOVE WARRANTY IS
EXCLUSIVE AND IN LIEU OF ALL OTHER
WARRANTIES, WHETHER EXPRESS OR IMPLIED,
INCLUDING THE IMPLIED WARRANTIES OF
MERCHANTABILITY, FITNESS FOR A PARTICULAR
PURPOSE, AND NONINFRINGEMENT OF
INTELLECTUAL PROPERTY RIGHTS. THIS
WARRANTY GIVES YOU SPECIFIC LEGAL RIGHTS.
YOU MAY HAVE OTHER RIGHTS, WHICH VARY
FROM STATE TO STATE AND COUNTRY TO
COUNTRY.
3. Disclaimer of Damages:
SOME STATES AND COUNTRIES, INCLUDING
MEMBER COUNTRIES OF THE EUROPEAN
ECONOMIC AREA, DO NOT ALLOW THE LIMITATION
OR EXCLUSION OF LIABILITY FOR INCIDENTAL OR
CONSEQUENTIAL DAMAGES, SO THE BELOW
LIMITATION OR EXCLUSION MAY NOT APPLY TO
YOU.
SOME STATES AND COUNTRIES, INCLUDING
MEMBER COUNTRIES OF THE EUROPEAN
ECONOMIC AREA, DO NOT ALLOW THE LIMITATION
OR EXCLUSION OF LIABILITY FOR INCIDENTAL OR
CONSEQUENTIAL DAMAGES, SO THE BELOW
LIMITATION OR EXCLUSION MAY NOT APPLY TO
YOU.
TO THE MAXIMUM EXTENT PERMITTED BY
APPLICABLE LAW AND REGARDLESS OF WHETHER
ANY REMEDY SET FORTH HEREIN FAILS OF ITS
ESSENTIAL PURPOSE, IN NO EVENT WILL
SYMANTEC BE LIABLE TO YOU FOR ANY SPECIAL,
CONSEQUENTIAL, INDIRECT, OR SIMILAR
DAMAGES, INCLUDING ANY LOST PROFITS OR LOST
DATA ARISING OUT OF THE USE OR INABILITY TO
USE THE SOFTWARE EVEN IF SYMANTEC HAS BEEN
ADVISED OF THE POSSIBILITY OF SUCH DAMAGES.
IN NO CASE SHALL SYMANTEC'S LIABILITY EXCEED
THE PURCHASE PRICE FOR THE SOFTWARE. The
disclaimers and limitations set forth above will apply
regardless of whether or not You accept the Software.
4. U.S. Government Restricted Rights:
RESTRICTED RIGHTS LEGEND. All Symantec products
and documentation are commercial in nature. The
software and software documentation are
“Commercial Items,” as that term is defined in 48
C.F.R. section 2.101, consisting of “Commercial
Computer Software” and “Commercial Computer
Software Documentation,” as such terms are defined in
48 C.F.R. section 252.227-7014(a)(5) and 48 C.F.R.
section 252.227-7014(a)(1), and used in 48 C.F.R.
section 12.212 and 48 C.F.R. section 227.7202, as
applicable. Consistent with 48 C.F.R. section 12.212, 48
C.F.R. section 252.227-7015, 48 C.F.R. section 227.7202
through 227.7202-4, 48 C.F.R. section 52.227-14, and
other relevant sections of the Code of Federal
Regulations, as applicable, Symantec's computer
software and computer software documentation are
licensed to United States Government end users with
only those rights as granted to all other end users,
according to the terms and conditions contained in this
license agreement. Manufacturer is Symantec
Corporation, 20330 Stevens Creek Blvd., Cupertino, CA
95014, United States of America.
5. Export Regulation:
Certain Symantec products are subject to export
controls by the U.S. Department of Commerce (DOC),
under the Export Administration Regulations (EAR)
(see www.bxa.doc.gov). Violation of U.S. law is strictly
prohibited. Licensee agrees to comply with the
requirements of the EAR and all applicable
international, national, state, regional and local laws,
and regulations, including any applicable import and
use restrictions. Symantec products are currently
prohibited for export or re-export to Cuba, North
Korea, Iran, Iraq, Libya, Syria and Sudan or to any
country subject to applicable trade sanctions. Licensee
agrees not to export, or re-export, directly or
indirectly, any product to any country outlined in the
EAR, nor to any person or entity on the DOC Denied
Persons, Entities and Unverified Lists, the U.S.
Department of State's Debarred List, or on the U.S.
Department of Treasury's lists of Specially Designated
Nationals, Specially Designated Narcotics Traffickers,
or Specially Designated Terrorists. Furthermore,
Licensee agrees not to export, or re-export, Symantec
products to any military entity not approved under the
EAR, or to any other entity for any military purpose,
nor will it sell any Symantec product for use in
connection with chemical, biological, or nuclear
weapons or missiles capable of delivering such
weapons.
6. General:
This Supplement and the Software License Agreement
are the entire agreement governing the use and
licensing of this Component. In the event of any
conflict between the Supplement and the License
Agreement, with regard to the Component, the
Supplement shall control. All other terms and
conditions of the License Agreement remain in full
force and effect.
7. Additional Uses and Restrictions:
Notwithstanding any of the terms and conditions
contained in this Supplement, the following additional
terms apply to the product you have licensed.
A. The SSL certificate accompanying this Component
will expire within one (1) year of installation of the
Component. You may use a self-signed certificate or a
separately acquired certificate from a third party
vendor.
B. The use of Netscape LDAP SDK for Java is governed
by the Netscape Public License (NPL), the full text of
which can be found at www.mozilla.org/MPL/NPL1.1.html. You are entitled to a copy of the source code
of this third party software, which can be found in the
Component.
C. The use of SNIA CIMOM is governed by the SNIA
Public License (SPL), the full text of which can be found
at www.snia.org/English/Resources/Code/Open
Source.html. You are entitled to a copy of the source
code of this third party software, which can be found in
the Component.
D. If you have received or purchased the IBM DB2
Workgroup or Personal database editions, regardless
of version, You may only use such database with the
Component. You may use the IBM DB2 Workgroup
database on a single server only.
Acknowledgements
This product includes software developed by the Apache Software Foundation
(http://www.apache.org/), namely Tomcat, Xerces, and Apache XML-RPC. A copy of the
license may be found at www.apache.org/LICENSE. Copyright © 2000 The Apache
Software Foundation. All rights reserved.
This product includes software developed by IBM Corporation
(http://www.ibm.com), namely IBM Directory Server, IBM Tivoli Directory Server, IBM
HTTP Server, IBM DB2 Universal Database, and IBM Websphere. Copyright © IBM
Corporation.
Netscape LDAP SDK for Java is under license from the Mozilla Organization. A copy of the
license may be found at www.mozilla.org/MPL/NPL-1.1.html
Copyright © Netscape Communication Corporation.
JoeSNMP library is under license from the OpenNMS Group. A copy of the license may be
found at www.fsf.org/copyleft/lesser.html. Copyright © OpenNMS Group.
SNIA CIMOM is under license from the Storage Networking Industry Association, and is
now hosted by the Open Group. A copy of the license may be found at
http://www.opengroup.org/snia-cimom/license.tpl
Copyright © Storage Networking Industry Association.
This software product includes code licensed from RSA Data Security.
The Pegasus library is under license from the Open Group consortium. Copyright © Open
Group consortium.
Sun’s Java Runtime Environment (JRE) and Java Secure Sockets Extension (JSSE) are
licensed under Sun’s binary license, the text of which can be found at
http://java.sun.com/products/jdk/1.1/LICENSE.
Copyright © Sun Microsystems.
The Piccolo XML Parser library was developed by Yuval Oren and is released as open
source software under the terms of the Apache Software License 2.0. A copy of the license
may be found at http://apache.org/licenses/LICENSE-2.0
Copyright © Yuval Oren.
Copies of all licenses and required source code can be found in the \OPENSRC directory on
SESA Manager for Windows (Installation Disk 1 of 2) of the distribution media.
Symantec Corporation World Headquarters
20330 Stevens Creek Blvd.
Cupertino, CA 95014
tel +1 408 517 8000
www.symantec.com
Contents
Technical support
Acknowledgements
Chapter 1
Introducing Symantec Enterprise Security Architecture
About Symantec Enterprise Security Architecture ........................................ 15
What’s new in this release .................................................................................. 17
Components of SESA ........................................................................................... 19
SESA Directory ............................................................................................. 20
SESA DataStore ............................................................................................ 22
SESA Manager .............................................................................................. 22
SESA Agent ................................................................................................... 23
Symantec management console ................................................................ 25
How SESA works .................................................................................................. 26
How SESA logs events ................................................................................. 27
How SESA generates alerts ........................................................................ 28
How SESA distributes product configurations ....................................... 30
How SESA forwards events ........................................................................ 32
Where to get more information about SESA ................................................... 34
SESA Directory third-party software information ................................. 35
SESA DataStore third-party software information ................................ 36
SESA Manager third-party software information .................................. 38
Chapter 2
Planning for deployment
SESA data paths ................................................................................................... 39
SESA security products and SESA Agents ............................................... 41
Network data paths ..................................................................................... 42
Data security and protocol ................................................................................. 48
Deployment guidelines ....................................................................................... 50
Chapter 3
Before you install SESA
Preparing for installation ................................................................................... 51
Preparation on all platforms ...................................................................... 52
Preparation on Windows platforms .......................................................... 54
Preparation on Solaris platforms .............................................................. 57
10 Contents
Logon accounts for SESA installation .............................................................. 60
Installation CD layout ......................................................................................... 63
SESA Foundation Pack 2.1 with No Database ......................................... 63
SESA Foundation Pack 2.1 with SESA DataStore (IBM DB2 for
Windows) ............................................................................................... 65
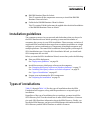
Installation guidelines ........................................................................................ 67
Types of installations .......................................................................................... 67
Chapter 4
Preparing third-party software on Windows platforms
Determining which tasks to perform on Windows platforms ...................... 78
Installing the Java Software Development Kit on Windows ......................... 79
Installing the Java Runtime Environment on Windows ........................ 79
Installing a supported version of the IBM DB2 database .............................. 80
Installing an IBM DB2 Runtime Client on a Windows computer ................. 81
Adding an IBM DB2 SESA DataStore to an existing environment ....... 82
Preparing for and installing Oracle 9i on a Windows computer .................. 83
Preparing the Windows environment for Oracle 9i installation .......... 84
Determining whether to install Oracle 9i on a dedicated Windows
computer ............................................................................................... 84
Installing the Oracle 9i database software on Windows ....................... 85
Creating one or more Oracle 9i databases for SESA on Windows ....... 85
Installing IBM Tivoli Directory Server on Windows ...................................... 92
Chapter 5
Installing third-party software on Solaris computers
Determining which third-party software to install on Solaris
computers ..................................................................................................... 97
Installing Solaris 8 ............................................................................................. 100
Packages that are required to export the SESA GUI to a remote
computer ............................................................................................. 100
Installing Solaris 8 from the CD .............................................................. 101
Solaris 8 post-installation tasks .............................................................. 103
Installing the Java Software Development Kit on Solaris computers ....... 105
Installing the Java Runtime Environment on Solaris or Linux
computers ........................................................................................... 106
Installing IBM DB2 Enterprise Edition on a Solaris computer ................... 108
Preparing for and installing Oracle 9i on a Solaris computer .................... 112
Preparing the Solaris 8 environment for Oracle 9i installation ......... 112
Installing the Oracle 9i database software on Solaris .......................... 115
Applying the required Oracle 9i database patches on Solaris ............ 117
Creating one or more Oracle 9i databases for SESA on Solaris .......... 119
Installing an IBM DB2 Runtime Client on a Solaris computer ................... 126
Contents
Preparing a Solaris computer to run the Symantec management
console .........................................................................................................128
Connecting to a remote Solaris computer and exporting its display ........130
Chapter 6
Installing SESA
SESA Foundation Pack installation overview ...............................................131
Installing SESA with command-line parameters .................................132
Starting the SESA Installation Wizard ..........................................................134
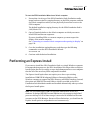
Performing an Express Install .........................................................................135
Installing the SESA Directory ..........................................................................143
Installing the SESA Directory on a Windows computer ......................143
Installing the SESA Directory on a Solaris computer ..........................148
Installing the SESA DataStore .........................................................................151
Circular Logging and Archive Logging ...................................................152
Installing a SESA DataStore for IBM DB2 on a Windows
computer .............................................................................................153
Installing a SESA DataStore for Oracle 9i on a Windows
computer .............................................................................................161
Installing the SESA DataStore for Oracle on a Solaris computer ......166
Installing the SESA Manager ...........................................................................172
Installing the SESA Manager on a Windows computer .......................173
Installing the SESA Manager on a Solaris computer ...........................176
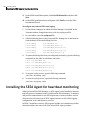
Installing the SESA Agent for heartbeat monitoring ..................................180
Installing a SESA Agent for heartbeat monitoring on a Windows
computer .............................................................................................181
Installing a SESA Agent for heartbeat monitoring on a Solaris
computer .............................................................................................183
Performing a silent installation on Solaris or Windows computers .........185
How a silent installation works ...............................................................185
Creating a silent installation settings file ..............................................187
Running a silent installation ...................................................................188
Chapter 7
After you install SESA
Testing the installation ....................................................................................189
Launching the Symantec management console ...................................190
Verifying that the installed services have started ................................193
Verifying that the IBM HTTP Server is operating ................................194
Verifying that the SESA servlets are operating ....................................195
Verifying that a shared schema is installed ..........................................195
Examining the SESA logs for messages .................................................196
11
12 Contents
Post-installation tasks ...................................................................................... 197
Installing additional SESA domains ....................................................... 198
Deploying SESA Directory replicas ......................................................... 204
Configuring SESA to generate SNMP alert responses ......................... 205
Uninstalling SESA ............................................................................................. 206
SESA heartbeat service and uninstalling the SESA Manager and
SESA Agent ......................................................................................... 207
Uninstalling SESA from a Windows computer ..................................... 208
Uninstalling SESA on Solaris ................................................................... 209
About reinstalling a SESA DataStore in Windows environments ............. 210
Appendix A
System requirements
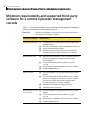
About system requirements ............................................................................. 211
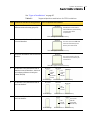
Supported installation configurations ........................................................... 212
Minimum requirements to install all SESA components on a single
Windows computer .................................................................................... 218
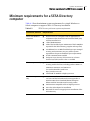
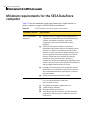
Minimum requirements for a SESA Directory computer ............................ 219
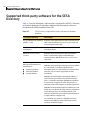
Supported third-party software for the SESA Directory ............................. 220
Minimum requirements for the SESA DataStore computer ....................... 222
Supported third-party software for the SESA DataStore ............................ 223
Minimum requirements for the SESA Manager computer ......................... 225
Supported third-party software for the SESA Manager .............................. 226
Minimum requirements and supported third-party software for a
remote Symantec management console ................................................ 228
Minimum requirements and supported third-party software for a
SESA Agent ................................................................................................. 229
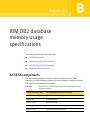
Appendix B
IBM DB2 database memory usage specifications
All SESA components ........................................................................................ 231
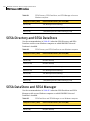
SESA Directory and SESA DataStore .............................................................. 232
SESA DataStore and SESA Manager ............................................................... 232
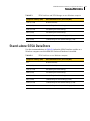
Stand-alone SESA DataStore ........................................................................... 233
Appendix C
SESA logs
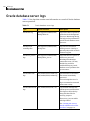
Oracle database server logs .............................................................................. 236
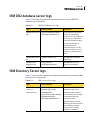
IBM DB2 database server logs ......................................................................... 237
IBM Directory Server logs ................................................................................ 237
IBM HTTP Server logs ....................................................................................... 239
Apache Tomcat Servlet logs ............................................................................. 240
JDBC error log ..................................................................................................... 241
SESA Agent logs ................................................................................................. 241
SESA Manager logs ............................................................................................ 242
Contents
Appendix D
Post-installation SESA files
Post-installation directories on Windows platforms ...................................243
SESA files on Windows platforms ...........................................................243
Third-party software files on Windows platforms ...............................244
Post-installation directories on Solaris platforms .......................................245
SESA files on Solaris platforms ...............................................................245
Third-party software files on Solaris platforms ...................................245
Post-installation directories on Oracle database servers ............................246
SESA files on Oracle database servers ....................................................246
Third-party software files on Oracle database servers ........................246
Index
13
14 Contents
Chapter
1
Introducing Symantec
Enterprise Security
Architecture
This chapter includes the following topics:
■
About Symantec Enterprise Security Architecture
■
What’s new in this release
■
Components of SESA
■
How SESA works
■
Where to get more information about SESA
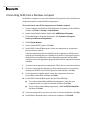
About Symantec Enterprise Security Architecture
Symantec Enterprise Security Architecture (SESA) integrates multiple
Symantec Enterprise Security products and third-party products to provide
flexible control of security within organizations. SESA is designed to meet the
requirements of both large-sized and medium-sized enterprises. It provides a
common management framework for native and integrated SESA security
products to protect your IT infrastructure from malicious code, intrusions, and
blended threats, and help to identify the vulnerabilities that the threats exploit.
SESA helps you increase your organization’s security posture by simplifying the
task of monitoring and managing security-related events and products. You can
monitor and manage security-related events through the Symantec
management console.
16 Introducing Symantec Enterprise Security Architecture
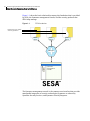
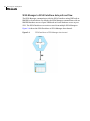
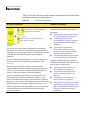
About Symantec Enterprise Security Architecture
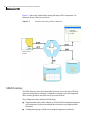
Figure 1-1 shows the basic relationships among the foundation that is provided
by SESA, the Symantec management console, and the security products that
SESA helps manage.
Figure 1-1
SESA foundation
Native and non-native
security products
SESA
Agent
SESA
Agent
SESA
Agent
SESA
Manager
Symantec
management
console
The Symantec management console is the common user interface that provides
manageable integration of security technologies (Symantec or otherwise),
Symantec Security Services, and Symantec Security Response.
Introducing Symantec Enterprise Security Architecture
What’s new in this release
What’s new in this release
SESA includes new features, as well as improvements to existing features.
Table 1-1 lists and describes what’s new in this release.
Table 1-1
New features in SESA
Feature
Description
IBM DB2 Universal Database
Workgroup Server Edition 8.1
for the SESA DataStore now
available from Symantec
IBM DB2 Universal Database Workgroup Server Edition
8.1 for the SESA DataStore can now be purchased from
Symantec through the SESA Foundation Pack 2.1 with
SESA DataStore (IBM DB2 for Windows).
Note: This database software is intended for use with
SESA only, and not for use as a general purpose
database. Its installation is restricted to a single server
with a maximum of four processors, and it is intended
for use by a limited number of users, all of whom must
be DB2 system administrators.
Symantec does not provide IBM upgrade insurance or
other upgrade insurance as part of the SESA
Foundation Pack 2.1 with SESA DataStore (IBM DB2 for
Windows). To obtain upgrade insurance for any IBM
DB2 databases that you use with SESA, you must
contact IBM directly.
For customers who do not need to purchase a database,
Symantec offers the SESA Foundation Pack 2.1 with No
Database.
Support for FixPak 6a for IBM
DB2 Universal Database 8.1
SESA now supports IBM DB2 Universal Database 8.1
(Workgroup Server Edition or Enterprise Server
Edition) with FixPak 6a for both the SESA DataStore
and SESA Directory databases.
Note: FixPak 7a has a known problem when it is applied
to the instance of DB2 8.1 used by IBM Tivoli Directory
Server 5.2. As a result, FixPak 7a should only be
applied to DB2 8.1 if IBM Tivoli Directory Server 5.2 is
not installed on the same machine.
IBM Tivoli Directory Server 5.2
bundled with SESA
IBM Tivoli Directory Server 5.2 is now bundled with the
SESA Foundation Pack 2.1 for use as the SESA
Directory.
IBM Tivoli Directory Server 5.2
support on Solaris 8
IBM Tivoli Directory Server 5.2 is now supported as the
SESA Directory on Solaris 8.
17
18 Introducing Symantec Enterprise Security Architecture
What’s new in this release
Table 1-1
New features in SESA
Feature
Description
Updated version support for
IBM DB2 Universal Database
Personal Edition
During an Express installation on a Windows
computer, SESA now installs version 8.1 of IBM DB2
Universal Database Personal Edition.
Note: The Personal Edition is suitable only for SESA
installations that are used in small or non-production
environments, such as demonstration or evaluation
installations.
Enhanced Windows 2003
platform support
You can now install the SESA Manager component on
computers running Windows 2003. In SESA 2.1, the
SESA Manager, SESA DataStore, and SESA Directory
are all supported on Windows 2003.
Ability to update existing
custom reports
You can now open an existing custom report, edit it,
and save your changes.
New and updated IBM DB2
maintenance scripts
Updated scripts are provided to help you maintain IBM
DB2 database performance, including a script you can
use to reorganize SESA DataStore tables in the
background, without having to take the database
offline.
Faster Web server performance
The XML parser has been updated to enhance SESA
Manager performance.
DNS entries for default,
anonymous SSL certificates
Gives you the option to use either a DNS host name or
an IP address for default, anonymous SSL certificates
on the SESA Manager and SESA Directory computers.
DataStore installation
enhancements
When installing the SESA Datastore, the SESA
installation wizard now prompts you for configuration
information that is used to tune the database for
optimal performance.
Updated version support for
IBM Apache HTTP Server
SESA now supports version 1.3.28 of IBM Apache
HTTP Server.
Updated version support for
Java LiveUpdate
SESA now supports version 2.1 of Symantec Java
LiveUpdate.
Mozilla browser support on
Solaris and Linux
Lets you use the Mozilla 1.7.2 browser to access the
Symantec management console on Solaris computers.
Enhanced SESA Directory
replication
SESA now supports the creation of replica directories
using IBM Tivoli Directory Server 5.2.
Introducing Symantec Enterprise Security Architecture
Components of SESA
Components of SESA
The following components are the core of Symantec Enterprise Security
Architecture:
■
SESA Directory
■
SESA DataStore
■
SESA Manager
■
SESA Agent (on the SESA Directory, SESA DataStore, SESA Manager, and on
the security product)
■
Symantec management console
SESA relies on security product SESA Agents, a SESA Directory, a SESA
DataStore, and a SESA Manager to collect, store, process, and report security
events to the Symantec management console, and to distribute configuration
changes to SESA and SESA security products. In some cases, security products
may also use a Symantec Event Collector to collect security events to forward to
SESA.
19
20 Introducing Symantec Enterprise Security Architecture
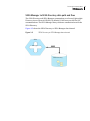
Components of SESA
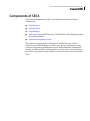
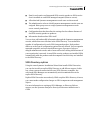
Figure 1-2 shows the relationships among the major SESA components. No
Symantec Event Collectors are shown.
Figure 1-2
Relationships among SESA components
Symantec
management
console
SESA
SESA
Agent
Manager
SESA security
product
SESA Directory
SESA DataStore
SESA Directory
The SESA Directory uses the Lightweight Directory Access Protocol (LDAP) to
store the configuration data that is required to manage native and integrated
SESA security products and SESA services on the network.
The configuration data includes the following:
■
Organizational units, which identify of all of the SESA-managed computers
and components on the network and their locations in an organizational
hierarchy.
■
Configuration groups, which have managed computers as members.
Introducing Symantec Enterprise Security Architecture
Components of SESA
■
Data for each native and integrated SESA security product or SESA service
that is installed on each SESA-managed computer (client or server).
■
All authorized Symantec management console users on the network.
■
The administrative roles to which Symantec management console users are
assigned. Roles group users to assign Symantec management console
access-control permissions.
■
Configuration data that describes the settings for the software features of
the SESA security product or products.
■
Information that describes SESA itself.
You can view, add, and modify information through the Symantec management
console, which then stores the data in the SESA Directory. You can define a
number of configurations for each SESA-integrated product. Each product
differs as to the type of configuration options that are offered. You can organize
managed computers and users into different types of groups to help you
delegate administrative tasks, and to better reflect the existing infrastructure of
your organization’s network. As new SESA security products are installed, SESA
automatically adds the products and the computers on which they are installed
to the SESA Directory.
SESA Directory replicas
Using the same Symantec Installation Wizard that installs SESA Directories,
you can also install one replica SESA Directory to add failover support. In this
way, when a network connection fails on a SESA Directory computer, the
associated SESA Manager can automatically switch communication to the
replica SESA Directory.
Replica SESA Directories are read-only. While a replica SESA Directory is in use,
you cannot make configuration changes to SESA components and management
objects.
For more information on setting up SESA Manager-to-Directory failover
support, see the Symantec Enterprise Security Architecture Administrator’s
Guide.
21
22 Introducing Symantec Enterprise Security Architecture
Components of SESA
SESA DataStore
The SESA DataStore is a relational database that stores all event data that is
generated by SESA and SESA products. In addition, the SESA DataStore stores
alerts that are generated by alert configurations. SESA events and product
events are predefined. You can create alert configurations or notifications based
on one or more events, and set alerting thresholds.
Depending on the rate that security events are logged to the SESA DataStore,
more than one SESA DataStore may be necessary for a SESA installation. During
SESA installation, you can span a single SESA DataStore across multiple drives
or move it to another drive, as available space requires. You can also use thirdparty software to resize and move SESA DataStores after the SESA installation,
if necessary.
SESA Manager
The SESA Manager centrally manages event processing for the SESA Agents,
SESA DataStore, SESA Directory, and Symantec management console.
The SESA Manager contains a Web server and a servlet engine. Each aspect of
the SESA Manager’s functionality is implemented as a Java servlet. All SESA
data passes through the Web server and the servlet engine.
Depending on resource demands and physical constraints such as locations, you
can set up the SESA Manager in the following different configurations:
■
SESA Manager, SESA DataStore, and SESA Directory all on a single
computer (not supported on Solaris platforms)
■
SESA Manager on one computer, SESA DataStore and SESA Directory on
remote computers (distributed)
■
One or more SESA Managers that log event data to their own SESA
DataStores as well as forward events and alerts to other SESA Managers
(event and alert forwarding) but share a single SESA Directory
■
Multiple SESA Managers that point to one SESA Directory and SESA
DataStore
■
SESA DataStores at multiple sites that replicate to a single master SESA
DataStore (replication)
See “Supported installation configurations” on page 212.
You can decide which configuration is most appropriate for your networking
environment during installation planning.
Introducing Symantec Enterprise Security Architecture
Components of SESA
SESA Agent
SESA Agents are Java applications that perform communication functions for
the SESA components or security products on which they are installed.
Depending on where the SESA Agent is running, it handles the following types
of communication tasks:
SESA Agent installed on a When a SESA Agent is installed on a security product, it
security product
handles the communication between the product and the
SESA Manager. The SESA Agent passes event data from the
security product to the SESA Manager and receives product
configuration data. One SESA Agent can support multiple
security products that are installed on the same computer.
(For a SESA Agent to support a product, the product must
have been integrated with SESA.)
SESA Agents are installed and uninstalled with the security
product. If the SESA Agent is not available with the security
product, it is typically installed and uninstalled with a
Symantec Event Manager, Symantec Event Collector, or some
other type of SESA integration method.
For more information on SESA Integration Packages,
Symantec Event Managers, and Symantec Event Collectors,
see the Symantec Enterprise Security Architecture
Administrator’s Guide.
SESA Agent installed on
the SESA Manager (and if
necessary, the SESA
Directory and SESA
DataStore)
A SESA Agent is installed on the SESA Manager, which has a
heartbeat provider that monitors the online and offline status
of SESA services that are running on the SESA Agent. When
security products integrate with SESA, they register certain
critical services with the SESA Agent. You can further define
critical services in the Symantec management console.
The SESA Agent is installed and uninstalled with the SESA
Manager. If the SESA Directory or the SESA DataStore is
installed on different computers than the SESA Manager, you
must use the SESA Installation Wizard to install an additional
SESA Agent on each remote SESA Directory or SESA
DataStore computer.
The purpose of the SESA Agent on a remote SESA Directory
or SESA DataStore is to obtain heartbeat status from these
SESA components.
See “SESA Agent heartbeat service” on page 24.
23
24 Introducing Symantec Enterprise Security Architecture
Components of SESA
SESA Agent heartbeat service
The SESA Agent comes with a heartbeat service that provides the SESA
Manager with near real-time status of critical services. These critical services
register with the SESA Agent. Administrators can view heartbeat status quickly
and easily from the Symantec management console, and can also configure
alerts that are based on heartbeat failure events.
Any time that a defined critical service misses a heartbeat (that is, becomes
unavailable), SESA generates an event, which you can use for creating an alert,
which can generate the proper alert or notification, such as an email or page.
You can view heartbeat status in the Symantec management console. An icon
next to a computer denotes whether the critical services that are running on
that computer are operational, have failed, or are not applicable. Without
making queries, you can use the Systems view tab as a quick and comprehensive
way to identify computers on which a service is unavailable. You can also query
properties to see a more detailed status.
For more information, see the Symantec Management Console User’s Guide.
You can view the length of time that a service has been running or the length of
time that a service has been unavailable. The view also displays the normal
check-in interval of the computer in question.
Event data handling
To pass event data, the SESA Agent sends events as follows:
■
Batch events are normal priority events that accumulate on the SESA Agent
before the SESA Agent sends them. The SESA Agent sends them according
to settings that you configure in the Symantec management console. Batch
events provide efficient communication because each time that the SESA
Agent connects to the SESA Manager, it must open a connection and
authenticate itself to the SESA Manager.
■
Direct events have alert configurations associated with them and are sent
immediately to the SESA Manager, which bypasses the SESA Agent event
queue.
Introducing Symantec Enterprise Security Architecture
Components of SESA
Symantec management console
The Symantec management console provides a simple, lightweight, Java-based,
user-interface framework. The Symantec management console runs in a Web
browser via a secure connection and retrieves events and configurations
through the SESA Manager.
The Symantec management console provides you with flexible features such as
detachable windows, preferences, stored views, and tabular and graphical views.
It also offers extensive filtering capabilities, which let you filter any field in the
data, including date, time, event, event family, SESA security product, and more.
The Symantec management console is data-driven. As SESA security products
integrate into SESA, they extend the Symantec management console’s
functionality by inserting new event classes, views, tabs, and other productspecific data into it.
Figure 1-3 shows the Symantec management console with the All Events view
displayed.
Figure 1-3
Events view displayed in the Symantec management console
25
26 Introducing Symantec Enterprise Security Architecture
How SESA works
How SESA works
Symantec Enterprise Security Architecture (SESA) is an enterprise-scalable
framework on which Symantec builds its Internet security solutions. Together
with native and non-native security products, SESA lets you centrally manage
responses to attacks, threats, and exposures by correlating security information
from Symantec and non-Symantec antivirus products, firewalls, intrusion
detectors, incident management software, and vulnerability scanning tools.
At its most basic level, SESA is composed of a SESA Agent that runs on nodes on
which native and non-native security products are installed. The SESA Agent
communicates with the security products, providing them with configuration
information and collecting events and logs from the products.
One or more SESA Agents pass the data that is generated from the products
through a secure communication channel to a management server (the SESA
Manager). The data that is provided by the SESA Agents is processed by a middle
layer that consists of servlets that run on the SESA Manager. Data that is sent by
the SESA Agents and processed by the SESA Manager is posted to the SESA
DataStore, and configuration changes are written to the SESA Directory.
The Symantec management console process runs in a Web browser, but it
accesses data through the SESA Manager. This process lets you configure alerts
and notifications, review logs, generate reports, manage groups of objects
within SESA, and control access for various user roles for security products that
are integrated into SESA.
To help you manage your security data, SESA performs specific operations,
including the following:
■
Logging an event
See “How SESA logs events” on page 27.
■
Generating an alert
See “How SESA generates alerts” on page 28.
■
Distributing a security product configuration
See “How SESA distributes product configurations” on page 30.
■
Forwarding an event or alert
See “How SESA forwards events” on page 32.
Each operation uses the SESA Manager to process the security data, but data is
handled differently depending on the process.
Introducing Symantec Enterprise Security Architecture
How SESA works
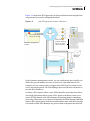
How SESA logs events
SESA logs events in the SESA DataStore. You can view and manipulate them
through the Symantec management console.
Figure 1-4 shows the event logging process in SESA.
Figure 1-4
How SESA logs an event
SESA
SESA
Agent
Manager
SESA DataStore
Security products on a
SESA client computer
Symantec management console
Events
One or more security products that are running on a client send events, which
the SESA Agent collects. The SESA Agent queues the events to more efficiently
manage the transfer of data to the SESA Manager. You can configure the SESA
Agent queue settings, including queue size and flushing interval, through the
Symantec management console.
For more information on setting the SESA Agent queue size, see the Symantec
Enterprise Security Architecture Administrator’s Guide.
27
28 Introducing Symantec Enterprise Security Architecture
How SESA works
The SESA Agent communicates with the SESA Manager over a secure HTTPS
channel. It queues events for the SESA Manager to handle. If an alert
configuration is associated with an event, the SESA Agent and SESA Manager
handle it differently.
See “How SESA generates alerts” on page 28.
The SESA Manager processes the events and inserts them into the SESA
DataStore. You can view the events in the Symantec management console. The
SESA Manager handles the query requests and displays the events in the
Symantec management console.
You can reduce the number of security-related events that you see by querying,
filtering, and sorting events to display only the desired information in the
Symantec management console. You can then generate and print reports of
event status, which are based on filtered views that you create.
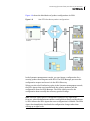
How SESA generates alerts
When you configure an alert, the SESA Manager stores the alert configuration
in the SESA Directory. You can configure alerts to be generated with specific
thresholds and time intervals or for every occurrence of a matching event. You
can also configure a notification for each alert.
Introducing Symantec Enterprise Security Architecture
How SESA works
Figure 1-5 shows how SESA generates an alert notification when enough alerts
are generated to exceed a configured threshold.
Figure 1-5
How SESA generates an alert notification
SESA
Agent
SESA
Alerts
Manager
Threshold = 5
events per minute
Symantec management
console
SESA security
products sending
events on SESA
client computers
SMTP mail
message
SESA Directory
SNPP
email
pager
In the Symantec management console, you can configure an alert in which you
define the type and number of events to track over a specified interval. For
example, you can create an alert to trigger when SESA logs five critical events
over a one-minute period. The SESA Manager processes the alert and inserts it
into the SESA DataStore.
On clients, SESA Agents collect events. SESA identifies events that have alerts
associated with them as direct events. SESA Agents send direct events over a
secure HTTPS channel to the SESA Manager by queuing them for immediate
processing. When there is no connectivity between the SESA Manager and SESA
Agents, SESA Agents queue both direct and batched events until the connection
is restored and the SESA Manager can process them or the queue becomes full.
29
30 Introducing Symantec Enterprise Security Architecture
How SESA works
The SESA Manager immediately processes direct events using its Event Logger
servlet to insert the events into the SESA DataStore. When the particular type of
event that was configured in the alerts is logged to the SESA DataStore the
specified number of times within the specified interval, the alert threshold is
exceeded and the alert is triggered.
In Figure 1-5, the alert configuration has a threshold of five critical events in
one minute. The SESA Manager triggers the alert only after it logs the fifth
critical event that has been sent in under one minute. You can associate one or
more alert notifications with an alert. Depending on how notification delivery is
configured for the user who is specified in the alert, the service can be an SNPP
email pager or SMTP mail message. Additionally, you can use an SNMP trap or
OS Event Log for alert notifications.
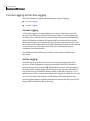
How SESA distributes product configurations
When you configure a security product, the SESA Manager processes the
configuration, stores it in the SESA Directory, and distributes it to the
appropriate security products on the network.
Introducing Symantec Enterprise Security Architecture
How SESA works
Figure 1-6 shows the distribution of product configurations in SESA.
Figure 1-6
How SESA distributes product configurations
Config
SESA
SESA
Agent
Manager
Symantec management
console
SESA
Agent
SESA Directory
SESA
Agent
In the Symantec management console, you can change a configuration for a
security product that integrates with SESA. The SESA Manager processes the
configuration request and stores it in the SESA Directory.
When you select the Distribution option in the Symantec management console,
the SESA Agents that were installed with the security products pull the
configuration from the SESA Manager. The SESA Agent processes the
configuration data to modify the necessary product settings.
Note: All SESA Agents poll for configuration changes every eight hours.
However, when an administrator makes a configuration change and distributes
it, SESA informs the SESA Agent that a new configuration is available. The SESA
Agent then immediately downloads the configuration change rather than
waiting up to eight hours.
31
32 Introducing Symantec Enterprise Security Architecture
How SESA works
How SESA forwards events
You may want to use event forwarding to roll up particular events to certain
locations so that the necessary information is supplied where it is needed. When
you set up an installation for event forwarding, one or more SESA Managers log
events to their own local SESA DataStores. However, you can configure a SESA
Manager to forward a subset of events to another SESA Manager to insert into
its SESA DataStore.
Introducing Symantec Enterprise Security Architecture
How SESA works
Figure 1-7 shows event forwarding in SESA.
Figure 1-7
How SESA forwards events
SESA
Agent
REGION 1
SESA
SESA
Agent
Manager
SESA DataStore
HEADQUARTERS
Security products on
SESA client computers
SESA
Manager
SESA DataStore
SESA
Agent
REGION 2
SESA
SESA
Agent
Manager
SESA DataStore
In Figure 1-7, an organization has installed two SESA Managers and SESA
DataStores at its regional offices, and one SESA Manager and SESA DataStore at
the corporate headquarters. Administrators at the organization want to log all
events to the regional SESA DataStores, but forward only virus events to the
SESA DataStore at corporate IT headquarters.
33
34 Introducing Symantec Enterprise Security Architecture
Where to get more information about SESA
Clients at the regional site generate events, which the SESA Agents pass to their
respective regional SESA Managers. The regional SESA Managers process the
events, which logs them to their own regional SESA DataStores. Because the
regional SESA Managers have been configured to forward virus events from the
regional SESA DataStores, they also forward, over a secure HTTPS channel, a
copy of the virus events to the SESA Manager at corporate headquarters. The
corporate SESA Manager then processes the virus event data and inserts it into
the corporate SESA DataStore. Virus event data from the regional client
computers is logged to both the regional SESA DataStores and the corporate
headquarters SESA DataStore.
Where to get more information about SESA
For more information on SESA, a SESA knowledge base is available on the
Symantec Technical Support Web site at:
www.symantec.com/techsupp/enterprise
The knowledge base link is under Technical Support. You can find the Symantec
Enterprise Security Architecture knowledge base listed under Security
Management.
To obtain an updated version of the Symantec Enterprise Security Architecture
Installation Guide and other SESA guides, visit the Symantec public FTP site at
any of the following URLs:
■
ftp://ftp.symantec.com/public/english_us_canada/doc
■
ftp://ftp.symantec.com/public/english_us_canada/products/sesa/manuals
You can also obtain updated versions of SESA guides from the Symantec
Technical Support Web site for SESA documentation:
http://www.symantec.com/techsupp/enterprise/products/sesa/sesa_2/
manuals.html
Introducing Symantec Enterprise Security Architecture
Where to get more information about SESA
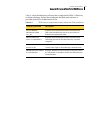
SESA Directory third-party software information
Table 1-2 lists the SESA Directory middleware components and how to access
online documentation for them.
Table 1-2
How to access SESA Directory third-party online documentation
Third-party product
How to access online documentation
IBM Tivoli Directory Server
To access IBM Directory Server online documentation
◆
Navigate to the following directory on the server:
C:\Program Files\IBM\LDAP\doc\<language>\
<filename>
◆
IBM Tivoli Web
Administration Tool
where <language> is a directory containing
documentation in a particular language and
<filename> is the name of a document.
To access IBM Web Administration online documentation
1
Launch the IBM Tivoli Web Administration Tool
console.
For more information, see the Symantec Enterprise
Security Architecture Administration Guide.
2
IBM HTTP Server
To access IBM HTTP Server online documentation
◆
IBM Key Management Utility
(IKEYMAN)
In the IBM Web Administration Tool, in the upperright corner of the right pane, click the question
mark icon.
On the Windows taskbar, click Start > Programs >
IBM HTTP Server 1.3.28.1 > Documentation.
To access IBM IKEYMAN online documentation
1
On the Windows taskbar, click Start > Programs >
IBM HTTP Server 1.3.28.1 > Documentation.
2
In the left pane of the IBM Documentation window,
click IBM HTTP Server, then click How to, and then
click Use IKEYMAN.
35
36 Introducing Symantec Enterprise Security Architecture
Where to get more information about SESA
SESA DataStore third-party software information
Table 1-3 lists the SESA DataStore middleware components and how to access
documentation for them.
Table 1-3
How to access SESA DataStore third-party online documentation
Third-party product
How to access online documentation
IBM DB2 databases
To access IBM DB2 online documentation
◆
IBM DB2 Control Center
IBM DB2 Command Center
On the Windows taskbar, click Start > Programs >
IBM DB2 > Information > Information Center.
To access IBM DB2 Control Center online documentation
1
On the Windows taskbar, click Start > Programs >
IBM DB2 > General Administration Tools > Control
Center.
2
In the Control Center, on the Help menu, click Help
Index, General Help, or Information Center.
To access IBM DB2 Command Center online
documentation
1
On the Windows taskbar, click Start > Programs >
IBM DB2 > Command Line Tools > Command
Center.
2
In the Command Center, on the Help menu, click
Help Index, General Help, or Information Center.
Introducing Symantec Enterprise Security Architecture
Where to get more information about SESA
Table 1-3
How to access SESA DataStore third-party online documentation
Third-party product
How to access online documentation
Oracle database
To access Oracle database server online Help
◆
In Oracle Enterprise Manager, access the online Help
menu.
To access online documentation for Oracle 9i databases
◆
In a Web browser, go to the following URL:
http://otn.oracle.com/pls/db92/db92.homepage
Free registration is required to view documentation.
To access all Oracle documentation
◆
In a Web browser, go to the following URL:
http://otn.oracle.com/
You may find the following reference materials especially
useful:
Oracle database for users
with Oracle support licenses
■
Database Concepts
■
Installation Guide for UNIX Systems
■
Database Administrator's Guide
■
Backup and Recovery Concepts
■
Recovery Manager User's Guide
■
Advanced Security Administrator's Guide
■
Performance Tuning Guide and Reference
To access licensed Oracle customer support
◆
In a Web browser, go to the following URL:
http://metalink.oracle.com/
37
38 Introducing Symantec Enterprise Security Architecture
Where to get more information about SESA
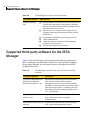
SESA Manager third-party software information
Table 1-4 lists the SESA Manager middleware components and how to access
online documentation for them.
Table 1-4
How to access SESA Manager third-party online documentation
Third-party product
How to access online documentation
IBM DB2
To access IBM DB2 online documentation
◆
IBM DB2 Control Center
IBM DB2 Command Center
IBM HTTP Server
To access IBM DB2 Control Center online documentation
1
On the Windows taskbar, click Start > Programs >
IBM DB2 > General Administration Tools > Control
Center.
2
In the Control Center, on the Help menu, click Help
Index, General Help, or Information Center.
To access IBM DB2 Command Center online
documentation
1
On the Windows taskbar, click Start > Programs >
IBM DB2 > Command Line Tools > Command
Center.
2
In the Command Center, on the Help menu, click
Help Index, General Help, or Information Center.
To access IBM HTTP Server online documentation
◆
IBM Key Management Utility
(IKEYMAN)
On the Windows taskbar, click Start > Programs >
IBM DB2 > Information > Information Center.
On the Windows taskbar, click Start > Programs >
IBM HTTP Server 1.3.28.1 > Documentation.
To access IBM IKEYMAN online documentation
1
On the Windows taskbar, click Start > Programs >
IBM HTTP Server 1.3.28.1 > Documentation.
2
In the left pane of the IBM Documentation window,
click IBM HTTP Server, then click How to, and then
click Use IKEYMAN.
Chapter
2
Planning for deployment
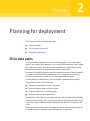
This chapter includes the following topics:
■
SESA data paths
■
Data security and protocol
■
Deployment guidelines
SESA data paths
A SESA installation includes at least one security product, one or more SESA
Agents, one or more SESA Managers, one or more SESA DataStores, and a single
SESA Directory. Data is passed from one component to another along specific
data paths that allow for communication among components.
Providing for the efficient and secure flow of data along each of these data paths
is critical to an efficient SESA installation. SESA is designed to account for
temporary disruption or overflow on its data communication paths.
For the purposes of deployment, you can consider communications among
components in terms of the following:
■
Volume of expected data on each data path
■
Protocols that are used on each data path
■
Supported data flow on each data path
■
Security needs of your organization
The majority of data that is generated, processed, and collected within the SESA
framework is event data. All event data includes base information such as Event
Type, Date, Time, and Machine Name along with the data that is specific to the
event.
SESA also passes configuration data along data paths. Configurations allow you
to distribute product settings to predefined groups of computers.
40 Planning for deployment
SESA data paths
SESA components transmit this data to each other, either over the network,
between computers, or internally, on the same computer. Regardless of the
physical locations of SESA components, data flows in a prescribed hierarchy
along prescribed data paths. Not all components, however, communicate with
all of the others.
Depending on the operating system platform, SESA provides flexibility for a
number of SESA component installation strategies. However, when you consider
network data transmission, SESA component installations fall into the following
types:
■
Centralized installation: The SESA DataStore, SESA Manager, and SESA
Directory are all physically located on the same computer. A centralized
installation is possible only when all of the SESA components are installed
on a Windows operating system. No network data transmission occurs.
■
Distributed installation: One or more SESA components are remotely
located from another SESA component or components, which results in a
SESA installation across multiple computers. A distributed installation is
possible in all-Windows, all-Solaris, or mixed-platform environments.
Network data transmission occurs between the SESA components that are
remotely located. In a fully distributed installation, in which each SESA
component is installed on a different computer, network communication
occurs for all components.
In both centralized and distributed installations, communication between a
security product and its SESA Agent is never over the network, because the
SESA Agent and security product always reside on the same computer.
Planning for deployment
SESA data paths
SESA security products and SESA Agents
The SESA Agent facilitates all SESA communications with an integrated (nonnative) or native SESA security product. The security product sends event data
and requests to the SESA Agent for forwarding to the SESA Manager. Likewise,
the SESA Agent pulls configuration and status data from the SESA Manager,
and communicates this data to the security product.
Security product to SESA Agent data path and flow
Individual SESA security products integrate within the SESA framework by
means of communication with the SESA Agent. A single SESA Agent can
support multiple products.
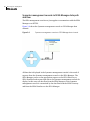
Figure 2-1 shows the security product to SESA Agent data channel on a single
computer that is running three integrated SESA security products.
Figure 2-1
Native and nonnative SESA
security products
Security product to SESA Agent data channel
SESA Agent
Because the SESA Agent always resides on the same physical computer as the
product or products that it is servicing, there are no data security or network
performance issues for this data path. SESA can manage any event data
overflow that may occur, for example, during a network attack.
41
42 Planning for deployment
SESA data paths
Network data paths
Depending on how you group SESA components, a SESA installation can have as
many as four network data channels for communications, as follows:
■
SESA Agent to SESA Manager data path (SSL)
■
SESA Manager to SESA Agent data path (not SSL)
■
Symantec management console to SESA Manager data path
■
SESA Manager to SESA DataStore data path
■
SESA Manager to SESA Directory data path
The SESA DataStore, SESA Directory, and SESA Manager can reside on one, two,
or three computers, which results in up to two additional data channels.
Figure 2-2 shows the maximum number of data channels that a SESA
installation might require.
Figure 2-2
Data channels for major SESA components
Symantec
management
console
SESA
SESA
Agent
SESA security
product
Manager
SESA Directory
SESA DataStore
Planning for deployment
SESA data paths
SESA Agent to SESA Manager data path and flow
The SESA Agent communicates with the SESA Manager by XML-encoded CIM
(Common Information Model) data over HTTPS. HTTPS communication occurs
on port 443 by default. The SESA Agent is a CIMOM (Common Information
Model Object Manager) and uses the default CIMOM port of 5998. SESA can
manage event data overflow that may occur, for example, during a network
attack.
Figure 2-3 shows the SESA Agent to SESA Manager data channel.
Figure 2-3
SESA Agent to SESA Manager data channel
SESA
SESA
SESA
SESA
Manager
43
44 Planning for deployment
SESA data paths
SESA Manager to SESA DataStore data path and flow
The SESA Manager communicates with the SESA DataStore using JDBC and an
IBM DB2 or Oracle driver. By default, the SESA Manager communicates with an
IBM DB2 database server on port 50000 and an Oracle database server on port
1521. The SESA DataStore can receive events from multiple SESA Managers.
Figure 2-4 shows the SESA DataStore to SESA Manager data channel.
Figure 2-4
SESA DataStore to SESA Manager data channel
SESA
Manager
SESA DataStore
Planning for deployment
SESA data paths
SESA Manager to SESA Directory data path and flow
The SESA Directory and SESA Manager communicate over Secure Lightweight
Directory Access Protocol (LDAPS). By default, LDAPS uses port 636 for SSL
communications. The SESA Manager always initiates communication with the
SESA Directory.
Figure 2-5 shows the SESA Directory to SESA Manager data channel.
Figure 2-5
SESA Directory to SESA Manager data channel
SESA
Manager
SESA Directory
45
46 Planning for deployment
SESA data paths
Symantec management console to SESA Manager data path
and flow
The SESA management console uses Java applets to communicate with the SESA
Manager over HTTPS.
Figure 2-6 shows the Symantec management console to SESA Manager data
channel.
Figure 2-6
Symantec management console to SESA Manager data channel
Symantec
management
console
SESA
Manager
All data that is displayed in the Symantec management console is the result of
requests from the Symantec management console to the SESA Manager. The
SESA Manager passes on the appropriate requests to the SESA Directory or
SESA DataStore and returns that data to the Symantec management console for
display. In this sense, all data flow from the SESA Manager to the Symantec
management console is constrained by the data flow from the SESA Directory
and from the SESA DataStore to the SESA Manager.
Planning for deployment
SESA data paths
SESA Manager to SESA Manager communications
In a SESA implementation, SESA Managers communicate with each other in
much the same way that a SESA Agent communicates with SESA Managers. The
data that is passed among SESA Managers includes the information that has
been configured for Event Forwarding and Alert Forwarding.
Event Forwarding and Alert Forwarding
To provide greater flexibility in the aggregation of event data, SESA can filter
events and forward them from one SESA Manager for insertion into another
SESA Manager’s SESA DataStore. Event Forwarding is only possible between
SESA Managers that share the same SESA Directory.
For more information on forwarding a subset of events in real time to another
SESA DataStore, see the Symantec Enterprise Security Architecture
Administrator’s Guide.
Note: To prevent duplicate events, do not forward events between two SESA
Managers that share the same SESA DataStore.
SESA data path properties
Table 2-1 summarizes SESA data path properties.
Table 2-1
Properties of SESA data paths for distributed installations
Data path
Protocol
SESA Agent sending to a SESA Manager
XML-encoded CIM over HTTPS
SESA Manager sending to a SESA Agent
XML-encoded CIM over HTTP
SESA Manager sending to a SESA DataStore
JDBC
SESA Directory sending to a SESA Manager
LDAPS
Symantec management console sending to a
SESA Manager
HTTPS
47
48 Planning for deployment
Data security and protocol
Data security and protocol
SESA uses the Secure Sockets Layer (SSL) protocol for its network transport
security. SESA Manager to SESA Agent communication is not done using SSL.
However, SESA Agent to SESA Manager communication is done using SSL. In its
default installation, SESA implements and enables anonymous SSL to secure
communication between the SESA Manager and the following components:
■
SESA Agent
■
Symantec management console
■
SESA Directory
■
Other SESA Managers
After installation, you can increase SSL security to include authentication. In
order of increasing data security, the levels are as follows:
■
Anonymous, self-signed SSL (default)
■
Authenticated, self-signed SSL
■
Authenticated, Certificate Authority (CA)-signed SSL
Anonymous SSL uses IP addresses in its self-signed certificates instead of DNS
names.
Planning for deployment
Data security and protocol
Figure 2-7 shows the IP addresses that are used and the path that data takes
from the SESA security product and SESA Agent to the various SESA
components.
Figure 2-7
The SESA Agent uses an IP
address of 0.0.0.0, 127.0.0.1, or
the IP address of the local
adapter
IP addresses and security available to SESA data
SESA Agent
Communication from the SESA Agent to
the SESA Manager is over SSL on HTTPS,
and uses the SESA Manager IP address:
This IP address is used on the default selfsigned certificate
Communication from the SESA
Manager to the SESA Agent uses
the SESA Agent IP address and is
not over SSL
SESA
Directory
SESA
Manager
Communication between
the SESA Manager and
the SESA Directory is
over secure LDAP
Communication between the SESA Manager
and the SESA DataStore is over JDBC: A
secure connection can be established
through IPSec, VPN, or a physically secure
connection (SSL is enabled if the database
driver provider supports it)
SESA
DataStore
Anonymous, self-signed SSL encrypts data and ensures data integrity, but does
not provide authentication.
For more information on changing your security configuration, see the
Symantec Enterprise Security Architecture Administrator’s Guide.
49
50 Planning for deployment
Deployment guidelines
Deployment guidelines
Use the following task list to plan your SESA deployment:
■
Define how many SESA administrative domains are required.
■
Define configuration and role groups for the network.
■
Define event correlations that will be used by alert detection.
■
Estimate event volume for each domain.
■
Define failover policy and solutions for each SESA component.
■
Determine how many SESA DataStores are required for each domain, and
the amount of data you want to keep online in SESA DataStores.
■
Determine how many SESA Managers are required for each domain.
■
Determine how many SESA Directories are required for the target network.
■
Determine the types and number of servers that are required.
■
Determine SESA administration staff requirements.
■
Define the roll-out plan.
Chapter
3
Before you install SESA
This chapter includes the following topics:
■
Preparing for installation
■
Logon accounts for SESA installation
■
Installation CD layout
■
Installation guidelines
■
Types of installations
Preparing for installation
Before you install any SESA Foundation Pack software, ensure that the
computers on which SESA components will be installed are properly prepared
and that you understand the logon and other information that the SESA
Installation Wizard requires.
Depending on which operating system platforms and how many computers you
are using for your SESA installation, you will need to preinstall some third-party
components and prepare some computers before you use the SESA Installation
Wizard to install the SESA components.
52 Before you install SESA
Preparing for installation
Preparation on all platforms
Preparing for a successful SESA component installation on both Windows and
Solaris computers involves the following tasks:
■
Using static IP addresses
■
Disabling standby mode
In addition, you should be aware of the conditions that affect both Windows and
Solaris platforms:
■
System times on installation and SESA component computers
■
SESA and non-English languages
Using static IP addresses
If you are using the anonymous SSL self-signed certificates in Solaris and
Windows environments, install the SESA Manager on computers that have
static IP addresses. If you find that you must change the IP address of a SESA
Manager or SESA Directory computer, the SESA Manager and SESA Directory
computer or computers will require reconfiguring to enable SESA to use the new
IP address.
For more information on reconfiguring the SESA Directory or Manager
computer after an IP address change, see the Symantec Enterprise Security
Architecture Administrator’s Guide.
Disabling standby mode
Disable standby mode on any Windows or Solaris computer on which you are
installing the SESA Manager, SESA Directory, or SESA DataStore. These
components cannot make contact with or be contacted by the necessary SESA
components when standby mode is enabled.
System times on installation and SESA component
computers
Ensure that the system time of the computer from which you run the SESA
Installation Wizard is no more than 24 hours behind the system time of the
computer or computers to which you plan to install the SESA components.
System times among the computers that run SESA components must also be
synchronized.
Before you install SESA
Preparing for installation
If system times are not synchronized, the SESA Agents will fail to communicate
with the SESA Manager or Managers, and the SESA Manager-to-SESA Directory
connection can fail. Either failure can generate an untrusted certification
exception error message.
Furthermore, if the SESA Manager-to-SESA Directory connection fails, you may
encounter problems with default SESA SSL authentication. SESA uses a default,
self-signed SSL certificate with an expiration date.
For more information on renewing a default, self-signed SESA Certificate, see
the Symantec Enterprise Security Architecture Administrator’s Guide.
SESA and non-English languages
In SESA installations that use non-English languages, you must install a SESA
Manager in a single, non-English target language. English is always installed. If
you install non-English native and non-native SESA security products, you must
install them in the same language as the SESA Manager. However, you can
install an English-only security product on any non-English SESA Manager.
Typically, SESA logs events in a language-independent format by using tokens
to represent event data. The language of the SESA Manager installation
determines how the event data is displayed. The tokenized event data appears in
the language of the user who is currently logged on, which is defined when the
user is created.
You can only create new users for the one non-English language that the SESA
Manager may support or English. At any time that event data cannot be
displayed in a non-English language, it is displayed in English.
For example, a French SESA Manager is only French and English. A German
SESA Manager is only German and English. A French SESA Manager can only
create new users that have a preferred language of French or English. A French
security product cannot be installed to a German SESA Manager. If a French
SESA Manager is installed, a user whose preferred language is French will see
the tokenized event data in French. An English user will see that same data in
English.
Warning: When you install the SESA Directory on a Solaris computer that uses a
UTF-8 language locale, the installation fails. IBM Directory Server does not
support the UTF-8 locale for any language.
53
54 Before you install SESA
Preparing for installation
Preparation on Windows platforms
Preparing for a SESA component installation on Windows computers involves
the following tasks:
■
Disabling unnecessary services
■
Avoiding port conflicts on Windows computers
In addition, you should be aware of conditions that affect the following Windows
features and software:
■
IBM DB2 library directory ownership
■
Local administrative privileges on the Windows installation computer
■
Locations of Windows installation computers
■
Windows installation drives
■
Windows installation directories
Disabling unnecessary services
Any time that Windows services are running and not being used, they become
potential security risks. The best policy is to turn off unused services.
By default, SESA sets the following services to manual at installation:
■
DB2 Remote Command
■
DB2 Security Server
The IBM HTTP Administration program allows you to configure the IBM HTTP
Server (Web Server) remotely using an Internet browser and is set to run as a
service by the installation program. You may want to change the IBM HTTP
Administration program to manual start for security reasons, but this program
must be running before you can remotely configure the IBM HTTP Server.
To disable unnecessary services
1
On the computer on which you installed IBM DB2 Universal Database
Workgroup Edition or IBM DB2 Universal Database Personal Edition, on the
Windows taskbar, click Start > Settings > Control Panel.
2
In the Control Panel window, double-click Administrative Tools.
3
In the Administrative Tools window, double-click Services.
4
In the Services dialog box, stop the service.
5
Change the Startup Type for the service to Manual.
6
Close the Services dialog box.
Before you install SESA
Preparing for installation
Avoiding port conflicts on Windows computers
On computers on which you plan to install a SESA Manager, ensure that any
Web servers that are running on the computers do not listen on port 443. The
IBM HTTP Server, which is a component used by the SESA Manager, listens on
port 443.
In addition, the SESA Installation Wizard requires that you supply a listening
port for the IBM DB2 or Oracle 9i database server used by the SESA DataStore on
Windows computers. The default IBM DB2 port is 50000 and the default Oracle
9i port is 1521.
Ensure that no other application is listening on the same port. Additionally, if
you currently have another application that is communicating with the IBM DB2
or Oracle 9i database server, ensure that it uses the port you specify during
SESA installation.
By default, SESA Agents use the CIMOM port, 5998, as well as port 8086; you can
change these port assignments when you configure the SESA Agents.
Avoiding Microsoft Internet Information Server conflicts
Before you install the SESA Manager on a Windows computer that is also
hosting Microsoft Internet Information Server (IIS), ensure that the WWW
Publishing Service is stopped in the Services Control Panel.
If you plan to run Microsoft IIS on the same computer as the SESA Manager,
after you install the SESA Manager, make sure to configure IIS to listen on a port
other than 443.
For information on configuring Windows services and Microsoft IIS, see your
Microsoft Windows and Microsoft Internet Information Server documentation.
IBM DB2 library directory ownership
IBM has released a warning about potential security vulnerabilities in IBM DB2
7.2 and 8.1. The suggested solution is to change group ownership on some of the
IBM DB2 libraries (Security Wire Digest Vol. 5, No. 62, dated August 18, 2003).
However, the computers will not have interactive users and the installation of
SESA is performed by superuser. Therefore, you should not change the
ownership or group ownership as suggested.
Local administrative privileges on the Windows installation
computer
On Windows computers, SESA requires that you install the SESA software under
a local administrator’s account. Ensure that you log on to the computer on
55
56 Before you install SESA
Preparing for installation
which you run the SESA Installation Wizard as a local administrator for that
computer.
Warning: The user name for the local administrator account must not include
any spaces, or the SESA Directory does not install properly. For example, the
user name FirstName_LastName is acceptable, while FirstName LastName is
not.
Locations of Windows installation computers
If you are installing a SESA component on a Windows computer, you must be
physically located at the computer to perform the installation. SESA does not
support installations via terminal services on Windows computers.
Windows installation drives
Regardless of the drive that you choose for a SESA installation, make sure that
20 MB of disk space is available on the operating system drive of the computer.
SESA always installs 20 MB of operating system and other environment files to
the default system drive of the installation computer.
As a best practice in Windows environments, install the SESA Manager, SESA
DataStore, and SESA Directory to NTFS drives to ensure security. In addition,
certain processes are faster under NTFS rather than FAT32.
Because of FAT32 file system limitations, the maximum size for the SESA
DataStore is 8 GB under FAT32. Installation fails if a size larger than 8 GB is
specified. To specify a SESA DataStore larger than 8 GB, use NTFS.
On Windows 2000/2003 computers, if you attempt to install SESA to encrypted
folders or compressed drives, the installation fails.
Windows installation directories
When you install SESA, the SESA Installation Wizard requires you to supply a
location for the SESA Working Directory and for the SESA Manager logs. On
Windows computers, the default location is C:\SESA. You can specify the same
or different locations for this directory depending on your needs.
For optimal performance, the installation location should not be on the same
drive as the operating system. Ensure that this directory is not read-only;
otherwise, SESA does not have write access to necessary files.
The SESA Installation Wizard also requires you to supply a temporary location
for installation files, after which SESA deletes them. Ensure that the location
that you specify has at least 75 MB of hard disk space available.
Before you install SESA
Preparing for installation
The Browse dialog box in which you locate a temporary folder contains two
icons: a folder and a solid circle. The solid circle identifies a folder that has no
sub-folders.
Preparation on Solaris platforms
To prepare for a SESA component installation on a Solaris computer involves
the following tasks:
■
Copying the SESA Foundation Pack CDs to a Solaris staging area
■
Creating the /export/home directory
■
Securing Solaris resources and programs
■
Avoiding port conflicts on Solaris computers
In addition, you should be aware of the operating conditions that affect the
following Solaris features and software:
■
Locations of Solaris installation computers
■
Local administrative privileges on the Solaris installation computer
■
Solaris installation volumes
■
Solaris installation directories
Copying the SESA Foundation Pack CDs to a Solaris staging
area
If you are installing any SESA components on Solaris computers, you should
copy the installation images of the SESA Foundation Pack CDs to a staging area
on a local Solaris computer.
To copy the SESA Foundation Pack CDs to a Solaris staging area
1
2
On the Solaris computer, insert the Solaris CD1 into the CD-ROM drive.
To copy the installation image on the CD, type the following command:
cp -pr /cdrom/cdrom0/* /u01/Solaris.CD1
You many need to create a directory first, depending on your Solaris
environment.
3
Repeat steps 1 and 2 for the Solaris CD2.
57
58 Before you install SESA
Preparing for installation
Creating the /export/home directory
This directory must exist before you run the SESA Installation Wizard.
To create the /export/home directory
1
Open a Terminal window to the Solaris computer on which you want to
install SESA and become superuser.
2
Type the following command:
mkdir /export/home
Securing Solaris resources and programs
As a best practice, before you begin the SESA installation, make sure to secure
the various programs and resources that are operating in your Solaris
environment.
The following is a partial list of Solaris resources and programs that you should
secure from exploitation:
■
telnet
■
ftp
■
finger
■
sadmind
■
rusersd
■
sprayd
■
rstatd
■
printer (lpd)
■
fs (font server)
In addition, the Oracle database server sets up default passwords that are known
to all Oracle users. As a best practice, change these default passwords to secure
your Oracle database.
Avoiding port conflicts on Solaris computers
On computers on which you plan to install a SESA Manager, you must ensure
that any Web servers that are running on the computers do not listen on port
443. The IBM HTTP Server, which is a component used by the SESA Manager,
listens on port 443.
Before you install SESA
Preparing for installation
In addition, the SESA Installation Wizard requires that you supply a listening
port for the Oracle 9i database server used by the SESA DataStore. The default
Oracle 9i listening port is 1521. Ensure that no other application is listening on
the same port. Additionally, if you currently have another application that is
communicating with the Oracle 9i database server, ensure that it uses the port
you specify during SESA installation.
By default, SESA Agents use the CIMOM port, 5998, as well as port 8086; you can
change these port assignments when you configure the SESA Agents.
Local administrative privileges on the Solaris installation
computer
On Solaris computers, SESA requires that you become superuser on the
computer on which you are installing a SESA component. If you are initiating a
Telnet session from a remote computer, you can connect to the installation
computer using regular user privileges, and then switch to superuser after the
connection across the network is made.
See “Connecting to a remote Solaris computer and exporting its display” on
page 130.
Locations of Solaris installation computers
If you are installing a SESA component on a Solaris computer, you can be either
physically located at the Solaris computer or remotely located at another Solaris
computer. You should copy the SESA Foundation Pack Solaris CD set to a
staging area that is accessible from your installation computer.
See “Copying the SESA Foundation Pack CDs to a Solaris staging area” on
page 57.
See “Connecting to a remote Solaris computer and exporting its display” on
page 130.
Solaris installation volumes
Regardless of the volume that you choose for a SESA installation, make sure
that 20 MB of free disk space is available on the operating system volume of the
computer. SESA always installs 20 MB of operating system and other
environment files to the default system volume of the installation computer.
As a best practice in Solaris environments, avoid installing SESA components on
NFS volumes. If you install SESA software to an NFS volume, the configuration
of permissions to files on the NFS volume may cause problems.
59
60 Before you install SESA
Logon accounts for SESA installation
Solaris installation directories
When you install SESA, the SESA Installation Wizard requires you to supply a
location for the SESA Working Directory and for the SESA Manager logs. On
Solaris computers, the default location is /opt/Symantec/SESA. You can specify
the same or different locations depending on your needs.
Note: For optimal performance, the installation location should not be on the
same volume as the operating system. Ensure that this directory is not readonly; otherwise, SESA does not have write access to necessary files.
The SESA Installation Wizard also requires you to supply a temporary location
for installation files, after which SESA deletes them. Ensure that the location
that you specify has at least 75 MB of hard disk space available.
Logon accounts for SESA installation
During installation, the SESA Installer prompts you to type user names and
passwords for SESA infrastructure components. Table 3-1 lists the logon
accounts.
Table 3-1
Logon accounts for SESA installation
Account
Description
SESA Directory
The user name (in the form cn=<name>) and password for IBM Tivoli
Directory Server superuser or administrator account.
The SESA Installer creates this account if you are installing IBM Tivoli
Directory Server for the first time. You can use up to 32 characters for
the password, including embedded blank spaces. You can also use
embedded blank spaces in the user name. Do not use characters from a
double-byte character set (DBCS) or extended ASCII.
Use this account to connect to an already installed SESA Directory
when you need to create SESA Directory replicas or top-level domains,
or when you need to perform IBM Tivoli Directory Server maintenance
outside of SESA.
The SESA Directory account is independent of any operating system
account.
Before you install SESA
Logon accounts for SESA installation
Table 3-1
Logon accounts for SESA installation
Account
Description
SESA
Administrator
The user name (SESAdmin) and password (which you supply) for the
default SESA Administrator account. The SESA Installer creates this
account in the SESA Directory. You can use between 6 and 12
characters in the password, including embedded blank spaces.
SESA can have multiple top-level, or root, administrative domains as
well as multiple subdomains. An administrator who uses the SESA
Administrator account to log on to the Symantec management console
has access rights to all SESA administrative domains across the entire
SESA environment, regardless of which SESA Manager and associated
administrative domain was used for logon.
Because this default account has access rights to all SESA
administrative domains on every SESA Manager computer, it is
typically not used as a routine logon account by administrators who
are not managing the entire SESA environment. Instead, the SESA
Domain Administrator account is available to top-level administrators
who need access to the entire SESA Directory tree for installing SESA
DataStores and SESA Managers.
You can log on to the Symantec management console using the SESA
Administrator account after installation without having to specify a
SESA administrative domain.
The SESA Administrator account is independent of any operating
system account.
SESA Domain
Administrator
The specified user name and password of the default SESA Domain
Administrator. The SESA Installer creates this account in the SESA
Directory. You can use between 6 and 12 characters in the password,
including embedded blank spaces. You can use up to 32 characters in
the user name, including embedded blank spaces. Do not use
characters from a double-byte character set (DBCS) in the user name.
SESA has a single administrative domain that contains all SESAmanaged objects and to which the default SESA Domain Administrator
user is granted administrative authority. This default administrator
has access rights to the entire SESA administrative domain.
Use the Domain Administrator name and password to log on to the
SESA Manager after the SESA installation is complete.
The SESA Domain Administrator is not a Windows account, and is
independent of any Windows account.
61
62 Before you install SESA
Logon accounts for SESA installation
Table 3-1
Account
Logon accounts for SESA installation
Description
SESA Secure
The password that is used to access the key database, the company
Communications name and company location, and the key that is used to create the selfsigned certificate. Key size is used to encrypt and decrypt the
certificate key. The longer the key, the higher the security of the data.
The default setting of 1024 bits is standard.
You can use between 6 and 32 characters in the password, including
embedded blank spaces.
SESA DataStore
The user name and password of the IBM DB2 or Oracle 9i database. To
manage password changes, set up a unique account. When you are
installing the database on a Windows computer, the SESA Installer
creates a Windows account if you are installing IBM DB2 for the first
time.
You can use up to 14 characters in the password, including embedded
blank spaces. You can use up to 30 characters for the user name. User
names can only include standard alphabetic characters, digits, and the
characters @, #, and $. Do not prefix a user name with a digit, SQL,
IBM, or SYS, or end it with a $. In addition, you cannot use any of the
following reserved words for user names: USERS, ADMINS, GUESTS,
PUBLIC, or LOCAL. Do not use characters from a double-byte character
set (DBCS) or extended ASCII in either a user name or password.
Use this user name and password to connect to an already installed
SESA DataStore when you install other SESA components and perform
database maintenance outside of SESA.
On Windows platforms, as a best practice, use a local account rather
than a Windows domain account. This prevents domain accounts from
controlling the definition and membership of Windows groups that
the DBA uses to grant DB2 privileges.
Web Server
(Windows only)
The user name and password for a Windows account. These are
required to install the IBM HTTP Server. If the account does not exist,
it is created.
This Windows account must use a password. You can use up to 32
characters in the user name or password, including embedded blank
spaces. Do not use characters from a double-byte character set (DBCS)
in the password.
To manage password changes, set up a unique account.
The Windows account user name is case-sensitive when it is used to
log on to the IBM HTTP Server.
To ensure optimal security, use an account that does not have
administrative privileges.
Before you install SESA
Installation CD layout
Installation CD layout
SESA 2.1 has two CD distribution sets:
■
SESA Foundation Pack 2.1 with No Database
■
SESA Foundation Pack 2.1 with SESA DataStore (IBM DB2 for Windows)
SESA Foundation Pack 2.1 with No Database
The SESA Foundation Pack 2.1 with No Database contains the following CDs:
■
■
SESA Manager for Windows (Installation Disk 1 of 2)
This CD contains the following directories:
■
ACROBAT: Contains Adobe Acrobat Reader software for Windows,
Solaris, and Linux platforms
■
AGENT: Contains the components to install the SESA Agent
■
DOCS: Contains documentation for the SESA product
■
MANAGER: Contains the components to install the SESA Manager
■
OPENSRC: Contains installation open source files (LDAP SDK, SNMP,
and CIMOM)
■
RSPFILES: Contains silent installation response files for IBM DB2
Personal Edition
■
SIPI: Contains some of the components for integrating Symantec and
other security products with SESA
■
SIPPACKAGES: Contains a set of SESA Integration Packages (SIPs)
required for product integration
■
TOOLS/MIGRATION: Contains a set of tools that support migration
■
TOOLS/TOMCAT: Contains a set of files that help to optimize the
TOMCAT JVM
■
UTILS: Contains Windows 32-bit LiveUpdate and redistributed thirdparty components (J2RE, SDK, JSSE, IBM HTTP, Apache Tomcat, and
Microsoft DLLs)
■
UTILS/DBTOOLS: Contains scripts and batch files to maintain and
optimize database performance, and a SESA Data Maintenance Utility
to purge, copy, and move data.
■
UTILS/MIB: Contains SESA SNMP trap definition files
SESA Directory for Windows (Installation Disk 2 of 2)
This CD contains the components to install the IBM Directory Server.
63
64 Before you install SESA
Installation CD layout
■
SESA DataStore for Windows — For Demo Purposes Only (IBM DB2 Personal
Edition 8.1 with FixPak 6a)
This CD contains the components to install the IBM DB2 Database Personal
Edition with FixPak 6a (for demonstration or test installations) and the
product documentation.
■
SESA Manager for Solaris (Installation Disk 1 of 3)
This CD contains the following directories:
■
ACROBAT: Contains Adobe Acrobat Reader software for Windows,
Solaris, and Linux platforms
■
AGENT: Contains the components to install the SESA Agent
■
DOCS: Contains documentation for the SESA product
■
MANAGER: Contains the components to install the SESA Manager
■
OPENSRC: Contains installation open source files (LDAP SDK, SNMP,
and CIMOM)
■
ORACLE: Contains the components to configure the Oracle 9i database
server
■
SIPI: Contains some of the components for integrating Symantec and
other security products with SESA
■
SIPPACKAGES: Contains a set of SESA Integration Packages (SIPs)
required for product integration
■
UTILS: Contains redistributed third-party components (J2RE, SDK,
JSSE, IBM HTTP, Apache Tomcat, and Microsoft DLLs)
■
UTILS/DBTOOLS: Contains scripts and batch files to maintain and
optimize database performance, and a SESA Data Maintenance Utility
to purge, copy, and move data
■
UTILS/MIB: Contains SESA SNMP trap definition files
■
SESA Directory for Solaris CD 1- Database for SESA Directory (Installation
Disk 2 of 3)
This CD contains a restricted version of IBM DB2 Enterprise Edition 8.1
with FixPak 2 that can be used to support IBM Tivoli Directory Server 5.2. It
is intended for use with the SESA Directory only.
■
SESA Directory for Solaris CD 2 (Installation Disk 3 of 3)
This CD contains IBM Tivoli Directory Server 5.2
Before you install SESA
Installation CD layout
SESA Foundation Pack 2.1 with SESA DataStore (IBM DB2 for
Windows)
The SESA Foundation Pack 2.1 with SESA DataStore (IBM DB2 for Windows)
contains the following CDs:
■
SESA Manager for Windows (Installation Disk 1 of 2)
This CD contains the following directories:
■
ACROBAT: Contains Adobe Acrobat Reader software for Windows,
Solaris, and Linux platforms
■
AGENT: Contains the components to install the SESA Agent
■
DOCS: Contains documentation for the SESA product
■
MANAGER: Contains the components to install the SESA Manager
■
OPENSRC: Contains installation open source files (LDAP SDK, SNMP,
and CIMOM)
■
RSPFILES: Contains silent installation response files for IBM DB2
Personal Edition
■
SIPI: Contains some of the components for integrating Symantec and
other security products with SESA
■
SIPPACKAGES: Contains a set of SESA Integration Packages (SIPs)
required for product integration
■
TOOLS/MIGRATION: Contains a set of tools that support migration
■
TOOLS/TOMCAT: Contains a set of files that help to optimize the
TOMCAT JVM
■
UTILS: Contains Windows 32-bit LiveUpdate and redistributed thirdparty components (J2RE, SDK, JSSE, IBM HTTP, Apache Tomcat, and
Microsoft DLLs)
■
UTILS/DBTOOLS: Contains scripts and batch files to maintain and
optimize database performance, and a SESA Data Maintenance Utility
to purge, copy, and move data.
■
UTILS/MIB: Contains SESA SNMP trap definition files
■
SESA Directory for Windows (Installation Disk 2 of 2)
This CD contains the components to install the IBM Directory Server.
■
SESA DataStore for Windows — For Demo Purposes Only (IBM DB2 Personal
Edition 8.1 with FixPak 6a)
This CD contains the components to install the IBM DB2 Database Personal
Edition with FixPak 6a (for demonstration or test installations) and the
product documentation.
65
66 Before you install SESA
Installation CD layout
■
SESA DataStore for Windows (IBM DB2 Workgroup Edition 8.1 with FixPak
6a)
This CD contains a version of IBM DB2 Workgroup Edition 8.1 that can be
used as the SESA DataStore.It is intended for use with SESA only, and not
for use as a general purpose database. Its installation is restricted to a single
server with a maximum of four processors, and it is intended for use by a
limited number of users, all of whom must be DB2 system administrators. It
does not include IBM upgrade insurance or other upgrade insurance.
Contact IBM for information on obtaining upgrades to this product.
■
SESA Manager for Solaris (Installation Disk 1 of 3)
This CD contains the following directories:
■
ACROBAT: Contains Adobe Acrobat Reader software for Windows,
Solaris, and Linux platforms
■
AGENT: Contains the components to install the SESA Agent
■
DOCS: Contains documentation for the SESA product
■
MANAGER: Contains the components to install the SESA Manager
■
OPENSRC: Contains installation open source files (LDAP SDK, SNMP,
and CIMOM)
■
ORACLE: Contains the components to configure the Oracle 9i database
server
■
SIPI: Contains some of the components for integrating Symantec and
other security products with SESA
■
SIPPACKAGES: Contains a set of SESA Integration Packages (SIPs)
required for product integration
■
UTILS: Contains redistributed third-party components (J2RE, SDK,
JSSE, IBM HTTP, Apache Tomcat, and Microsoft DLLs)
■
UTILS/DBTOOLS: Contains scripts and batch files to maintain and
optimize database performance, and a SESA Data Maintenance Utility
to purge, copy, and move data
■
UTILS/MIB: Contains SESA SNMP trap definition files
■
SESA Directory for Solaris CD 1- Database for SESA Directory (Installation
Disk 2 of 3)
This CD contains IBM DB2 8.1 with FixPak 2
■
SESA Directory for Solaris CD 2 (Installation Disk 3 of 3)
This CD contains IBM Tivoli Directory Server 5.2
■
IBM DB2 Runtime Client (with FixPak 6a) for Windows
This CD contains all the components necessary to install the IBM DB2
Runtime Client on Windows.
Before you install SESA
Installation guidelines
■
IBM DB2 Runtime Client for Solaris
This CD contains all the components necessary to install the IBM DB2
Runtime Client on Solaris.
■
FixPak 6a for IBM DB2 Runtime Client for Solaris
This CD contains FixPak 6a that must be applied after the initial installation
of the IBM DB2 Runtime Client on Solaris.
Installation guidelines
The computer resources in your network and the database that you choose for
the SESA DataStore dictate which operating systems and the number of
computers that you use in your SESA installation. There are many variations of
supported SESA installations that range from a complete installation on a single
computer to various combinations of components on multiple computers and
multiple platforms. The same SESA Installation Wizard guides you through all
SESA installation types. Using the SESA Installation Wizard, you install each
SESA component one at a time.
Before you start the SESA Installation Wizard, ensure that you do the following:
■
Plan your SESA deployment.
See “Deployment guidelines” on page 50.
■
Install the necessary third-party software on the computers.
See “Preparing third-party software on Windows platforms” on page 77.
See “Installing third-party software on Solaris computers” on page 97.
See “Types of installations” on page 67.
■
Prepare your environment for SESA components.
See “Preparing for installation” on page 51.
Types of installations
Table 3-2 through Table 3-10 list the types of installations that the SESA
Foundation Pack supports, along with the procedures to set up each type of
installation.
Regardless of the type of installation that you perform, you must install the
SESA Directory first. You then install one or more SESA DataStores. You must
give each SESA DataStore information about the SESA Directory. Finally, you
install the SESA Manager, and give each SESA Manager information about the
SESA Directory and the SESA DataStore to which it connects.
67
68 Before you install SESA
Types of installations
After you install the SESA Directory, SESA DataStore, and SESA Manager, you
can use the SESA Installation Wizard to install a SESA Directory replica,
additional SESA domains, and SESA Agents for heartbeat monitoring, as
necessary.
For more information on setting up SESA Manager-to-Directory failover
support, see the Symantec Enterprise Security Architecture Administrator’s
Guide.
See “Installing additional SESA domains” on page 198.
See “Installing the SESA Agent for heartbeat monitoring” on page 180.
Table 3-2 describes the Express installation and the relevant procedure.
Table 3-2
All-Windows installations
Express Installation
All three SESA components installed on a single Windows
computer. The Express installation program automatically
installs the IBM DB2® Universal Database Personal Edition
Windows
You only need one Windows computer to test or demonstrate SESA in a
nonproduction environment. The express installation installs all three SESA
components and IBM DB2® Universal Database Personal Edition on a single
Windows computer. IBM DB2 Personal Edition is provided on the SESA
distribution media and is used for the SESA DataStore. You are not required to
install any third-party components prior to installing SESA components.
Installation procedure
“Performing an Express Install”
on page 135
Before you install SESA
Types of installations
Table 3-3 describes the three possible hardware configurations for an allWindows installation and the relevant procedures.
Table 3-3
All-Windows installations
All-Windows installation
All three SESA components installed on a
single Windows computer
or
Two SESA components on one Windows computer and
one SESA component on another Windows computer
Installation procedure
Complete the following third-party software
installation and preparation procedures, as
appropriate:
■
“Installing a supported version of the IBM
DB2 database” on page 80 or “Preparing for
and installing Oracle 9i on a Windows
computer” on page 83 (for the SESA
DataStore database server)
■
“Installing an IBM DB2 Runtime Client on a
Windows computer” on page 81 (if the SESA
Manager and SESA DataStore will be
installed on different computers)
or
One SESA component on
each Windows computer
To run SESA in an all-Windows production environment, you
can use up to three computers. SESA supports IBM DB2
Universal Database 8.1 FixPak 6a (Workgroup Edition [WE] or ■
Enterprise Edition [EE]) and Oracle 9i database for the SESA
DataStore. You must have installed the database prior to
installing the SESA DataStore.
■
Before you install the SESA Manager on a Windows computer,
you must first do the following:
■
If you are using IBM DB2 8.1 FixPak 6a as the database
for the SESA DataStore, and the SESA DataStore and
SESA Manager are on different computers, install the
IBM DB2 Runtime Client 8.1 FixPak 6a to support the
remote connection.
“Installing the Java Software Development
Kit on Windows” on page 79 (on the SESA
Manager computer)
“Installing the Java Runtime Environment on
Windows” on page 79 (on all other SESA
component computers)
Complete the following SESA component
installation procedures in the order in which they
are listed, as appropriate:
■
“Installing the SESA Directory on a Windows
computer” on page 143
■
“Installing a SESA DataStore for IBM DB2 on
a Windows computer” on page 153
If the SESA DataStore or SESA Directory is installed remotely ■
from the SESA Manager, before you install the SESA
DataStore, install the supported Java Runtime Environment
■
(J2RE) 1.3.1_09.
“Installing the SESA Manager on a Windows
computer” on page 173
■
Install the Java Software Development Kit (SDK)
1.3.1_09.
After you install the SESA Manager, SESA Directory, and
SESA DataStore, you must install a SESA Agent for heartbeat
monitoring on the SESA Directory and SESA DataStore
computer or computers.
“Installing a SESA Agent for heartbeat
monitoring on a Windows computer” on
page 181 (if more than one Windows
computer is used)
69
70 Before you install SESA
Types of installations
Table 3-4 describes the two possible hardware configurations for an all-Solaris
installation and the relevant procedures.
Table 3-4
All-Solaris installations
All-Solaris installation
Installation procedure
SESA Directory and SESA Manager on
separate Solaris computers
or
Solaris
SESA Directory and SESA Manager on a
single Solaris computer
SESA DataStore
(Oracle)
Complete the following third-party software
installation and preparation procedures, as
appropriate:
■
“Preparing for and installing Oracle 9i
on a Solaris computer” on page 112
■
“Installing the Java Software
Development Kit on Solaris computers”
on page 105 (on the SESA Manager
computer)
■
“Installing the Java Runtime
Environment on Solaris or Linux
computers” on page 106 (on all other
SESA component computers)
You can use two or three Solaris computers for an all-Solaris
installation. You must have a dedicated Solaris computer that is
running Oracle 9i for the SESA DataStore. The SESA Directory and
SESA Manager can be installed on the same or different
■
computers.
Before you install the SESA Manager on a Solaris computer, you
must first install the Java Software Development Kit (SDK)
1.3.1_09.
Before you install the SESA Directory, you must install a
supported IBM DB2 database (Workgroup or Enterprise Edition
version 8.1 with FixPak 6a) to support the IBM Tivoli Directory
Server 5.2 and the connection to the SESA DataStore.
Before you install the SESA Directory or SESA DataStore, you
must install the Java Runtime Environment (J2RE) 1.3.1_09.
After you install the SESA Directory, SESA DataStore, and SESA
Manager, you must install a SESA Agent for heartbeat monitoring
on the SESA DataStore computer. If the SESA Directory is on a
different computer than the SESA Manager, you must also install
another SESA Agent for heartbeat monitoring on the SESA
Directory computer.
“Installing IBM DB2 Enterprise Edition
on a Solaris computer” on page 108
Complete the following SESA component
installation procedures in the order in which
they are listed, as appropriate:
■
“Installing the SESA Directory on a
Solaris computer” on page 148
■
“Installing the SESA DataStore for
Oracle on a Solaris computer” on
page 166
■
“Installing the SESA Manager on a
Solaris computer” on page 176
■
“Installing a SESA Agent for heartbeat
monitoring on a Solaris computer” on
page 183 (on the SESA DataStore and, if
necessary, on the SESA Directory
computers)
Before you install SESA
Types of installations
Table 3-5 describes the mixed platform hardware configuration: SESA Directory
on Solaris; SESA Manager and SESA DataStore on Windows.
Table 3-5
Mixed platform: SESA Directory on Solaris
Mixed platform: SESA Directory on Solaris
SESA DataStore and SESA Manager
on a single Windows computer
or
Solaris
SESA DataStore and SESA
Manager on separate Windows
computers
Installation procedure
Complete the following third-party software
installation and preparation procedures, as
appropriate:
■
“Installing IBM DB2 Enterprise Edition on a
Solaris computer” on page 108
■
“Installing a supported version of the IBM DB2
database” on page 80 or “Preparing for and
installing Oracle 9i on a Windows computer” on
page 83 (for the SESA DataStore database)
SESA Directory
You use one Solaris computer for the SESA Directory, and ■
either one or two Windows computers for the SESA
Manager and SESA DataStore. Prior to installing the
SESA DataStore, you must install Oracle 9i or IBM DB2
Universal Database (Workgroup Edition [WE] or
■
Enterprise Edition [EE]).
Before you install the SESA Directory, you must first
install the following:
■
A supported IBM DB2 8.1 FixPak 6a database (EE 8.1
FixPak 2 is included with SESA 2.1) to support the
IBM Tivoli Directory Server 5.2.
■
The Java Runtime Environment (J2RE) 1.3.1_09
Before you install the SESA Manager on a Windows
computer, you must first install the following:
■
■
The IBM DB2 Runtime Client 8.1 FixPak 6a on the
SESA Manager Windows computer to support the
remote database connection if the SESA DataStore
and SESA Manager are installed on different
computers
Similarly, after you install the SESA Directory, you must
install a SESA Agent for heartbeat monitoring.
“Installing the Java Software Development Kit on
Windows” on page 79 (on the SESA Manager
computer)
■
“Installing the Java Runtime Environment on
Windows” on page 79 (on the SESA DataStore
computer, if it is remotely installed from the SESA
Manager)
■
“Installing the Java Runtime Environment on
Solaris or Linux computers” on page 106 (on the
SESA Directory computer)
Complete the following SESA installation procedures in
the order in which they are listed, as appropriate:
■
“Installing the SESA Directory on a Solaris
computer” on page 148
■
“Installing a SESA DataStore for IBM DB2 on a
Windows computer” on page 153
■
“Installing the SESA Manager on a Windows
computer” on page 173
■
“Installing a SESA Agent for heartbeat
monitoring on a Solaris computer” on page 183
■
“Installing a SESA Agent for heartbeat
monitoring on a Windows computer” on page 181
(if the SESA Manager and SESA DataStore are
remotely installed)
The Java Software Development Kit (SDK) 1.3.1_09
If the SESA DataStore is installed remotely from the
SESA Manager, before you install the SESA DataStore,
you must install the Java Runtime Environment (J2RE)
1.3.1_09. Then, after you install the remote SESA
DataStore, you must install a SESA Agent for heartbeat
monitoring.
“Installing an IBM DB2 Runtime Client on a
Windows computer” on page 81 (if the SESA
Manager and SESA DataStore are remotely
installed)
71
72 Before you install SESA
Types of installations
Table 3-6 describes the mixed platform hardware configuration: SESA
DataStore on Solaris; SESA Manager and SESA Directory on Windows.
Table 3-6
Mixed platform: SESA DataStore on Solaris, SESA Manager and
SESA Directory on Windows
Mixed platform: SESA DataStore on Solaris
SESA Directory and SESA Manager on a
single Windows computer
Installation procedure
Complete the following third-party software
installation and preparation procedures, as
appropriate:
■
“Preparing for and installing Oracle 9i on
a Solaris computer” on page 112
■
“Installing the Java Software
Development Kit on Windows” on page 79
(on the SESA Manager computer)
■
“Installing the Java Runtime
Environment on Solaris or Linux
computers” on page 106 (on the SESA
DataStore computer)
■
“Installing the Java Runtime
Environment on Windows” on page 79 (on
the SESA Directory computer if it is
installed remotely from the SESA
Manager computer)
or
Solaris
SESA Directory and SESA Manager on
separate Windows computers
SESA DataStore (Oracle)
To use Oracle 9i as the database for the SESA DataStore, you
must use a dedicated Solaris computer that has no other SESA
components installed. You can use one or two Windows
computers for the other SESA components.
Before you install the SESA Manager on a Windows computer,
you must first install the Java Software Development Kit (SDK)
1.3.1_09.
To support a SESA 2.1 Directory, you must install the following:
■
A supported IBM DB2 8.1 FixPak 6a database (EE 8.1 FixPak
2 is included with SESA 2.1) to support the IBM Tivoli
Directory Server 5.2.
■
If the SESA Directory is installed remotely from the SESA
Manager, you must install the Sun Java Runtime
Environment (J2RE) 1.3.1_09.
Complete the following SESA installation
procedures in the order in which they are
listed, as appropriate:
■
“Installing the SESA Directory on a
Windows computer” on page 143
■
“Installing the SESA DataStore for Oracle
on a Solaris computer” on page 166
Before you install the SESA DataStore on a Solaris computer, you ■
must install the Java Runtime Environment (J2RE) 1.3.1_09.
After you install the SESA Directory, SESA DataStore, and SESA
Manager, you must do the following:
■
Install a SESA Agent for heartbeat monitoring on the SESA
DataStore Solaris computer or computers.
If the SESA Directory is installed remotely from the SESA
Manager, install the SESA Agent for heartbeat monitoring on the
SESA Directory Solaris computer.
“Installing the SESA Manager on a
Windows computer” on page 173
■
“Installing a SESA Agent for heartbeat
monitoring on a Solaris computer” on
page 183
■
“Installing a SESA Agent for heartbeat
monitoring on a Windows computer” on
page 181 (if the SESA Directory is
installed remotely from the SESA
Manager)
Before you install SESA
Types of installations
Table 3-7 describes the mixed platform hardware configuration: SESA Manager
on Solaris; SESA Datastore and SESA Directory on Windows.
Table 3-7
Mixed platform: SESA Manager on Solaris, SESA DataStore and
SESA Directory on Windows
Mixed platform: SESA Manager on Solaris
SESA DataStore and SESA Directory on a
single Windows computer
or
Solaris
Installation procedure
Complete the following third-party software
installation and preparation procedures, as
appropriate:
■
“Installing a supported version of the
IBM DB2 database” on page 80 or
“Preparing for and installing Oracle 9i
on a Windows computer” on page 83 (for
the SESA DataStore database)
■
“Installing an IBM DB2 Runtime Client
on a Solaris computer” on page 126
SESA DataStore and SESA Directory
on separate Windows computers
SESA Manager
You can install the SESA Manager on a Solaris computer and
install other SESA components on one or two Windows computers. ■
SESA supports Oracle 9i or IBM DB2 Universal Database
(Workgroup Edition [WE] or Enterprise Edition [EE]) for the SESA
DataStore. You must have installed the database prior to installing
the SESA DataStore.
■
Before you install the SESA Manager on a Solaris computer, you
must first install the following:
■
■
The IBM DB2 8.1 Runtime Client FixPak 6a on the SESA
Manager Solaris computer to support the remote database
connection
The Java Software Development Kit (SDK) 1.3.1_09
If the SESA Directory is installed remotely from the SESA
Manager, before you install it on the remote computer, you must
install the Sun Java Runtime Environment (J2RE) 1.3.1_09.
Because the SESA DataStore is installed remotely from the SESA
Manager, before you install it, you must install the Java Runtime
Environment (J2RE) 1.3.1_09 on the SESA DataStore computer.
After you install the SESA Directory, SESA DataStore, and SESA
Manager, you must also install a SESA Agent for heartbeat
monitoring on the SESA Directory and SESA DataStore Windows
computer or computers.
“Installing the Java Software
Development Kit on Solaris computers”
on page 105 (on the SESA Manager
computer)
“Installing the Java Runtime
Environment on Windows” on page 79
(on all other SESA component
computers)
Complete the following SESA component
installation procedures in the order in which
they are listed, as appropriate:
■
“Installing the SESA Directory on a
Windows computer” on page 143
■
“Installing a SESA DataStore for IBM
DB2 on a Windows computer” on
page 153
■
“Installing the SESA Manager on a
Solaris computer” on page 176
■
“Installing a SESA Agent for heartbeat
monitoring on a Windows computer” on
page 181 (on the SESA DataStore and
SESA Directory computer or computers)
73
74 Before you install SESA
Types of installations
Table 3-8 describes the mixed platform hardware configuration: SESA Manager
on Windows; SESA Datastore and SESA Directory on Solaris.
Table 3-8
Mixed platform: SESA Manager on Windows, SESA DataStore and
SESA Directory on Solaris
Mixed platform: SESA Manager on Windows
SESA
Manager
Windows
SESA
Directory
Solaris
SESA
DataStore (Oracle)
Installation procedure
Complete the following third-party software
installation and preparation procedures, as
appropriate:
■
“Preparing for and installing Oracle 9i
on a Solaris computer” on page 112
■
“Installing the Java Software
Development Kit on Windows” on
page 79 (on the SESA Manager
computer)
■
“Installing the Java Runtime
Environment on Solaris or Linux
computers” on page 106 (on all other
SESA component computers)
Solaris
You can install the SESA Manager on a Windows computer and the
other SESA components on two different Solaris computers.
Because the underlying database for the SESA DataStore is Oracle
9i, you must use a dedicated Solaris computer. You can use a
■
different Solaris computer for the SESA Directory.
“Installing IBM DB2 Enterprise Edition
on a Solaris computer” on page 108
Before you install the SESA Manager on a Windows computer, you Complete the following SESA component
must first install the Java Software Development Kit (SDK)
installation procedures in the order in which
1.3.1_09.
they are listed, as appropriate:
Before you install the SESA Directory, you must install a
supported IBM DB2 database (Workgroup or Enterprise Edition
version 8.1 with FixPak 6a) to support the IBM Directory Server
and the connection to the SESA DataStore and SESA Manager.
■
“Installing the SESA Directory on a
Solaris computer” on page 148
■
“Installing the SESA DataStore for
Oracle on a Solaris computer” on
page 166
In addition, you must install the Java Runtime Environment (J2RE)
■
1.3.1_09 on the SESA Directory and SESA DataStore computers.
After you install the SESA Directory, SESA DataStore, and SESA
Manager, you must also install a SESA Agent for heartbeat
monitoring on the SESA DataStore and SESA Directory Solaris
computers.
■
“Installing the SESA Manager on a
Windows computer” on page 173
“Installing a SESA Agent for heartbeat
monitoring on a Solaris computer” on
page 183 (on both the SESA Directory
and SESA DataStore computers)
Before you install SESA
Types of installations
Table 3-9 describes mixed platform hardware configuration: SESA DataStore on
Windows; SESA Manager and SESA Directory on Solaris.
Table 3-9
Mixed platform: SESA DataStore on Windows
Mixed platform: SESA DataStore on Windows
SESA Manager and SESA Directory
on a single Solaris computer
Installation procedure
Complete the following third-party software
installation and preparation procedures, as
appropriate:
■
“Installing a supported version of the IBM
DB2 database” on page 80 or “Preparing for
and installing Oracle 9i on a Windows
computer” on page 83 (for the SESA DataStore
database)
■
“Installing IBM DB2 Enterprise Edition on a
Solaris computer” on page 108
You can install the SESA DataStore on a Windows computer ■
that is running Oracle 9i or IBM DB2 Universal Database
(Workgroup Edition [WE] or Enterprise Edition [EE]). You can ■
install the other SESA components on Solaris computers.
“Installing an IBM DB2 Runtime Client on a
Solaris computer” on page 126
or
Windows
SESA Manager and SESA
Directory on separate Solaris
computers
SESA DataStore (IBM DB2 or Oracle)
Before you install the SESA Manager on a Solaris computer,
you must install the following:
■
The IBM DB2 Runtime Client on the SESA Manager
Solaris computer to support the remote database
connection
■
The Java Software Development Kit (SDK) 1.3.1_09
Before you install the SESA Directory, you must install the
following:
■
■
A supported IBM DB2 8.1 FixPak 6a database (EE 8.1
FixPak 2 is included with SESA 2.1) to support the IBM
Tivoli Directory Server 5.2 and the SESA DataStore
connection
The Java Runtime Environment (J2RE) 1.3.1_09
“Installing the Java Software Development Kit
on Solaris computers” on page 105 (on the
SESA Manager computer)
■
“Installing the Java Runtime Environment on
Solaris or Linux computers” on page 106 (on
the SESA Directory computer, if it is installed
remotely from the SESA Manager computer)
■
“Installing the Java Runtime Environment on
Windows” on page 79 (on the SESA DataStore
computer)
Complete the following SESA component
installation procedures in the order in which they
are listed, as appropriate:
■
“Installing the SESA Directory on a Solaris
computer” on page 148
■
Before you install the SESA DataStore, you must install the
Java Runtime Environment (J2RE) 1.3.1_09.
“Installing a SESA DataStore for IBM DB2 on a
Windows computer” on page 153
■
After you install the SESA Directory, SESA DataStore, and
SESA Manager, you must do the following:
“Installing the SESA Manager on a Solaris
computer” on page 176
■
“Installing a SESA Agent for heartbeat
monitoring on a Windows computer” on
page 181 (on the SESA DataStore computer)
■
“Installing a SESA Agent for heartbeat
monitoring on a Solaris computer” on
page 183 (on the SESA Directory computer if it
is remotely installed from the SESA Manager)
■
Install a SESA Agent for heartbeat monitoring on the
SESA DataStore Windows computer.
If the SESA Directory is installed remotely from the SESA
Manager, install the SESA Agent for heartbeat monitoring on
the SESA Directory Solaris computer.
75
76 Before you install SESA
Types of installations
Table 3-10 describes the mixed platform hardware configuration: SESA
Directory on Windows; SESA Datastore and SESA Manager on Solaris.
Table 3-10
Mixed platform: SESA Directory on Windows, SESA DataStore and
SESA Manager on Solaris
Mixed platform: SESA Directory on Windows
SESA
Directory
Windows
SESA
Manager
Solaris
SESA
DataStore (Oracle)
Solaris
Installation procedure
Complete the following third-party software
installation and preparation procedures, as
appropriate:
■
“Preparing for and installing Oracle 9i on a
Solaris computer” on page 112
■
“Installing the Java Software Development
Kit on Solaris computers” on page 105 (on
the SESA Manager computer)
■
“Installing the Java Runtime Environment
on Solaris or Linux computers” on
page 106 (on the SESA Directory computer)
You can install the SESA Directory on a Windows computer, the
SESA DataStore on a dedicated Solaris computer that is running
■
Oracle 9i, and the SESA Manager on another Solaris computer.
Before you install the SESA Manager on a Solaris computer, you ■
must install the Java Software Development Kit (SDK) 1.3.1_09.
“Installing a supported version of the IBM
DB2 database” on page 80
“Installing the Java Runtime Environment
on Solaris or Linux computers” on
page 106 (on the SESA DataStore computer)
Before you install the SESA DataStore on a Solaris computer,
you must install the Java Runtime Environment (J2RE) 1.3.1_09. Complete the following SESA component
installation procedures in the order in which
Before you install the SESA Directory on Windows, you must
they are listed, as appropriate:
install a supported IBM DB2 8.1 FixPak 6a database (EE 8.1
FixPak 2 is included with SESA 2.1) to support the IBM Tivoli
Directory Server 5.2 and the SESA DataStore connection
■
“Installing the SESA Directory on a
Windows computer” on page 143
In addition, before you install the SESA Directory, you must
install the Java Runtime Environment (J2RE) 1.3.1_09.
■
“Installing the SESA DataStore for Oracle
on a Solaris computer” on page 166
■
“Installing the SESA Manager on a Solaris
computer” on page 176
After you install the SESA Directory, SESA DataStore, and SESA
Manager, you must install a SESA Agent for heartbeat
■
monitoring on the SESA Directory Windows and SESA
DataStore Solaris computers.
“Installing a SESA Agent for heartbeat
monitoring on a Solaris computer” on
page 183
Chapter
Preparing third-party
software on Windows
platforms
This chapter includes the following topics:
■
Determining which tasks to perform on Windows platforms
■
Installing the Java Software Development Kit on Windows
■
Installing a supported version of the IBM DB2 database
■
Installing an IBM DB2 Runtime Client on a Windows computer
■
Preparing for and installing Oracle 9i on a Windows computer
■
Installing IBM Tivoli Directory Server on Windows
4
78 Preparing third-party software on Windows platforms
Determining which tasks to perform on Windows platforms
Determining which tasks to perform on Windows
platforms
Table 4-1 lists the tasks that you must complete to prepare third-party software
on Windows platforms for the installation of the specified SESA component.
Table 4-1
Tasks to prepare third-party software on Windows platforms
SESA component
Tasks
All SESA components
SESA requires the Java Software Development Kit (SDK)
version 1.3.1_09 for SESA Managers. SESA Directories
and SESA DataStores require only the Java Runtime
Environment (J2RE), which is a part of the SDK.
See “Installing the Java Software Development Kit on
Windows” on page 79.
SESA DataStore
In all production environments, you must install a
supported version of IBM DB2 Universal Database or
Oracle 9i database server before you install the SESA
DataStore.
See “Installing a supported version of the IBM DB2
database” on page 80.
If you have an existing IBM DB2 database, make sure the
existing version was installed as a typical version and
not a compact version. SESA does not support compact
IBM DB2 database versions.
Regardless of the IBM DB2 Universal Database edition
that you install, ensure that IBM DB2 services are set to
Automatic Startup in the Windows Services Control
Panel before you install the SESA DataStore and SESA
Manager. If not, the installation fails.
If you are installing an Oracle 9i database server for
Windows, SESA provides Oracle on Windows Installation
scripts that prepare and configure Oracle 9i database on
Windows computers.
See “Preparing for and installing Oracle 9i on a
Windows computer” on page 83.
Preparing third-party software on Windows platforms
Installing the Java Software Development Kit on Windows
Installing the Java Software Development Kit on
Windows
SESA requires the supported version of the Java Software Development Kit
(SDK) (program files only). You must install the supported SDK on any computer
on which the SESA Manager is going to be installed. The Java Runtime
Environment (J2RE) is included in the SDK. All computers that run SESA
components other than the SESA Manager require the J2RE.
If the SDK is already installed, you can initiate an installation of the SDK again,
if necessary.
On Windows platforms, the SDK automatically installs with the default Java
Trust Store password. Password requirements at your organization may require
you to modify the Java Trust Store password after it is installed.
For more information on changing the Java Trust Stores default password, see
the Symantec Enterprise Security Architecture Administrator’s Guide.
To install the Java Software Development Kit (SDK) on a Windows computer
1
To start the SESA Installation Wizard, locate the folder that contains the
SESA installation files, and then double-click CDStart.exe.
2
Click Install JDK 1.3.1_09.
The SESA Manager requires at least the SDK program files. All other SESA
components require only the J2RE, which is installed with the SDK.
3
Follow the on-screen instructions to complete the SDK installation.
Installing the Java Runtime Environment on Windows
All computers that run SESA components other than the SESA Manager require
the Java Runtime Environment (J2RE). When you use the SESA Installation
Wizard to install the SDK, the J2RE is also installed. However, you can also
install the J2RE without the accompanying SDK files. J2RE version 1.3.1_09 is
located on the SESA Foundation Pack Windows CD1 and should be used for new
SESA installations. If you are migrating to SESA 2.1 from an earlier version and
J2RE 1.3.1_02 has already been installed on the computer, it can also be used.
79
80 Preparing third-party software on Windows platforms
Installing a supported version of the IBM DB2 database
To install the Java Runtime Environment on a Windows computer
1
On the SESA component computer, insert the SESA Foundation Pack CD1
into the CD-ROM drive.
2
On the CD, navigate to the UTILS/JRE directory.
3
In the UTILS/JRE directory, double-click j2re-1_3_1_09-windows-i586-i.exe.
4
Follow the on-screen instructions to complete the J2RE installation.
Installing a supported version of the IBM DB2
database
Unless you are installing SESA in a nonproduction environment, you will install
the underlying IBM DB2 database before you run the SESA Installation Wizard.
The SESA Foundation Pack supports a specific set of IBM DB2 databases and
FixPaks.
See “Supported third-party software for the SESA DataStore” on page 223.
Warning: SESA 2.1 supports IBM DB2 8.1 FixPak 6a only. If you install a later
version, such as FixPak 7a, the database installation will not work with SESA 2.1.
The information requested in the DB2 installation wizard may differ depending
on which DB2 database that you choose to install.
Note: If you install the IBM DB2 Universal Database Workgroup Server Edition
8.1 that is included on the SESA Foundation Pack 2.1 with SESA DataStore (IBM
DB2 for Windows) distribution media, the following restrictions apply:
■
It is intended for use with SESA only, and not for use as a general purpose
database.
■
Its installation is restricted to a single server with a maximum of four
processors.
It is intended for use by a limited number of users, all of whom must be DB2
system administrators.
Symantec does not provide IBM upgrade insurance or other upgrade insurance
as part of the SESA Foundation Pack 2.1 with SESA DataStore (IBM DB2 for
Windows). To obtain upgrade insurance for any IBM DB2 databases that you use
with SESA, you must contact IBM directly.
■
Preparing third-party software on Windows platforms
Installing an IBM DB2 Runtime Client on a Windows computer
To install IBM DB2 using the IBM DB2 installation wizard
1
On the Windows computer on which you want to install the IBM DB2
database, change directories to the IBM DB2 installation media.
2
Run the IBM DB2 installation wizard.
3
To begin the installation, follow the on-screen instructions.
4
When a wizard panel prompts you to select a type of IBM DB2 installation,
click Typical.
If you install a compact version, the wizard does not install certain database
tools that SESA requires to operate.
5
When a wizard panel prompts you to specify a database administrator user
name and password, type the user name and password of the DB2 database.
This user name and password is the SESA DataStore account.
See “Logon accounts for SESA installation” on page 60.
6
To complete the software installation and exit the wizard, click Finish.
7
Restart the computer.
You must restart the computer to allow the system path to reflect the new
DB2 files.
Warning: If you do not restart the computer, you will not be able to use the SESA
DataStore.
Installing an IBM DB2 Runtime Client on a Windows
computer
If you are using an IBM DB2 Universal Database server as the SESA DataStore,
and are installing it remotely from the SESA Manager, IBM DB2 software
requires that an IBM DB2 Runtime Client 8.1 with FixPak 6a be installed on the
SESA Manager computer to support the remote database connection.
The IBM DB2 Runtime Client for Windows platforms is available to IBM DB2
Universal Database server users. If it is not included with the SESA Foundation
Pack CD set, it can be obtained from the following location:
http://www-306.ibm.com/software/data/db2/udb/support/downloadv8.html
The IBM DB2 Runtime Client must be installed on the SESA Manager computer
before you install the SESA Manager.
81
82 Preparing third-party software on Windows platforms
Installing an IBM DB2 Runtime Client on a Windows computer
To install an IBM DB2 Runtime Client on a Windows computer
1
Download the IBM DB2 8.1 FixPak 6a Runtime Client for Windows setup
wizard, FP6a_WR21340_RTCL.exe, to a temporary directory.
2
Run the wizard.
3
In the Welcome to the DB2 Setup wizard panel, click Next.
4
In the License Agreement panel, accept the license agreement, and then
click Next.
5
In the Select the Installation type panel, click Typical, and then click Next.
6
In the Select installation folder panel, do one of the following, and then click
Next.
7
■
Confirm the default installation location.
■
Click Change, navigate to your preferred location, and then click OK.
If you need to connect to DB2 servers using the NetBIOS protocol, in the
Configure NetBIOS panel, do the following:
■
Click Configure NetBIOS for connections to DB2 server, and then type
the required information.
8
Click Next.
9
In the Start Copying Files panel, click Install.
Wait while the program installs.
10 In the Setup is Complete panel, click Finish.
11 Restart the computer.
You must restart the computer to allow the system path to reflect the new
DB2 files.
Warning: If you do not restart the computer, you will not be able to use the SESA
DataStore.
Adding an IBM DB2 SESA DataStore to an existing environment
When a SESA Manager is installed and configured to connect to a remote Oracle
database and then an IBM DB2 SESA DataStore is added to the environment, you
need to do the following:
■
Modify the Windows registry to include the IBM DB2 Java file.
■
Restart the Apache Tomcat Server.
Preparing third-party software on Windows platforms
Preparing for and installing Oracle 9i on a Windows computer
To modify the Windows registry to include the IBM DB2 Java file
1
On the computer on which the IBM DB2 Runtime Client is installed, on the
Windows taskbar, click Start > Run.
2
In the Run dialog box, type Regedit
3
In the Registry Editor window, expand HKEY_LOCAL_MACHINE >
SYSTEM > CurrentControlSet > Services > Apache Tomcat > Parameters.
4
In the right pane, double-click JVM Option Number 0.
5
In the Edit String dialog box, in the Value data box, place your cursor in the
path after \bootstrap.jar.
6
Type: C:\Program Files\IBM\Sqllib\Java\Db2java.zip
7
Click OK.
8
Exit the Windows registry.
Preparing for and installing Oracle 9i on a Windows
computer
Oracle 9i must be installed and a supporting database created before you can
install the SESA DataStore software.
See “Installing a SESA DataStore for Oracle 9i on a Windows computer” on
page 161.
Note: Symantec does not make available for sale or resale any Oracle product,
including Oracle 9i database software. You must purchase the Oracle 9i database
software separately if you want to use the database with SESA.
You must complete the following tasks to install the Oracle 9i database on
Windows:
■
Preparing the Windows environment for Oracle 9i installation
■
Determining whether to install Oracle 9i on a dedicated Windows computer
■
Installing the Oracle 9i database software on Windows
■
Creating one or more Oracle 9i databases for SESA on Windows
Oracle 9i is not included with the SESA Foundation Pack.
83
84 Preparing third-party software on Windows platforms
Preparing for and installing Oracle 9i on a Windows computer
The communication between the Oracle 9i database and the SESA Manager is
over normal unencrypted SQL*Net. Therefore, this connection should be on a
private network. Access to the SESA DataStore computer should not be available
to anyone except authorized users through a firewall.
The procedures for installing Oracle 9i assume that you are an Oracle database
administrator or have equivalent knowledge. In addition, you should have
access to Oracle technical support.
Preparing the Windows environment for Oracle 9i installation
The process of creating an Oracle 9i database on Windows requires modifying
files located on the SESA Foundation Pack CD1. To do this, you must first copy
the image of the SESA Foundation Pack CD1 for Windows to the hard drive of
the SESA DataStore computer. You should ensure that the files, once copied, are
not changed to read-only.
Determining whether to install Oracle 9i on a dedicated Windows
computer
When you install Oracle 9i on Windows as the underlying database for one or
more SESA DataStores, the Oracle 9i software can be installed on a dedicated
Windows computer or co-located with other applications and other SESA
components.
You can co-locate Oracle 9i with all three SESA components on a single
Windows computer (an all-in-one installation). However, this type of
installation is impractical for almost every SESA environment except those that
handle only the smallest volumes of data.
More typically, in SESA environments that must handle medium or high data
volumes, the Oracle 9i database and SESA DataStore should be installed on a
dedicated Windows computer. This way, the Oracle 9i database does not have to
share CPU resources with other applications or SESA components. If the Oracle
9i database must be installed with another SESA component, consider installing
it with the SESA Directory. Of the three SESA components (SESA Directory,
SESA DataStore, and SESA Manager), the SESA Directory is the least resourceintensive.
Preparing third-party software on Windows platforms
Preparing for and installing Oracle 9i on a Windows computer
Installing the Oracle 9i database software on Windows
Before the script that SESA uses to create a SESA DataStore database can be run,
you must install the Oracle 9i software. The procedures for installing Oracle 9i
vary by environment. The following guidelines help you to prepare your Oracle
9i installation on Windows so that it is compatible with SESA. See your Oracle
database administrator or the Oracle 9i product documentation for more
information.
Use the following guidelines when installing Oracle 9i on Windows:
ORACLE_HOME
The default location for ORACLE_HOME in SESA is c:\oracle\ora92.
The default Oracle install uses d:\oracle\ora92 as ORACLE_HOME.
These two must match. You must either change ORACLE_HOME to
c:\oracle\ora92 during the install, or modify the SESA database
creation script, create.bat, later.
Also, ensure that your ORACLE_HOME location has enough free
disk space to install the Oracle 9i program files.
Install Type
Custom
Available
Components
The following components conflict with SESA and should not be
installed:
■
Enterprise Manager Web Site 9.2.0.1.0
■
Oracle Management Server 9.2.0.1.0
■
Oracle HTTP Server 9.2.0.1.0
Create a Database?
No
Oracle Net
Configuration
Typical
Once the initial Oracle 9i completes successfully, ensure that you update Oracle
9i with the latest cluster patch (9.2.0.4 or later).
Creating one or more Oracle 9i databases for SESA on Windows
SESA 2.1 provides a new Oracle Installation script for Windows, create.bat, that
you use to create an Oracle 9i database to be used as the SESA DataStore. You
must create a separate Oracle database for each SESA DataStore that you plan to
use. The databases must be created prior to running the SESA Installation
Wizard to install the SESA DataStore software.
The create.bat file creates the database configuration files and the SQL script
used to create the SESA database. By default, create.bat runs the database
creation script automatically.
85
86 Preparing third-party software on Windows platforms
Preparing for and installing Oracle 9i on a Windows computer
Once the initial SESA database is created, you can create as many databases as
are necessary by editing create.bat and running it again for each additional
SESA database.
See “Creating additional databases to support multiple SESA DataStores on
Windows” on page 91.
To create one or more Oracle 9i SESA databases you must complete the
following tasks for each database in the order they are presented:
■
Editing and running the create.bat script on Windows
■
Turning on redo log archival for Oracle on Windows
Editing and running the create.bat script on Windows
The create.bat script is used to create the files needed to create an Oracle
database that can be used as a SESA DataStore. By default the create.bat script
installs and runs the files it creates.
Running the create.bat script creates the following files:
create.sql
A SQL script used to create the <DBNAME> database to be used as a
SESA DataStore.
init<DBNAME>.ora
The configuration file containing all of the initialization
parameters for the <DBNAME> database.
listener.ora
The configuration file for the Oracle listener that makes the
database available over the network to the SESA Manager and
other clients.
tnsnames.ora
A sample tnsnames file that can be used by Oracle clients, such as
SQL*Plus, to connect remotely. This file is not used by the SESA
Manager.
recreate.sql
A SQL script that can be run manually to drop and recreate the
SYMCMGMT database user without having to drop and recreate the
entire database.
You may want to change the RUN_SCRIPTS default value to false, so that the
generated files are not run automatically. The user can then edit the generated
scripts to create Oracle configurations that take full advantage of the hardware
and provide for higher availability.
In the most simple case, you can run the create.bat without modification to
create an Oracle database named SESA. After changing the database name
parameter, the script can be run again to create additional databases as needed
to support multiple SESA DataStores.
Preparing third-party software on Windows platforms
Preparing for and installing Oracle 9i on a Windows computer
There are many parameters and possible configurations that you can use to
create an Oracle database. To reduce the complexity, at the beginning of the
create.bat file, the parameters that users are most likely to change are presented
as batch file variables with default values that can be edited.
To edit and run the create.bat script on Windows
1
Navigate to the location of the SESA Foundation Pack CD1 image on the
SESA DataStore computer, and then open the \ORACLE folder.
2
In a text editor, open the create.bat file, and then modify it as necessary.
Use the following guidelines:
RUN_SCRIPTS
Default = true
Set to false if you do not want the create.bat file to install the
database configuration files and run the database creation script
it generates. Setting this parameter to false allows advanced
users to edit the generated files before running them manually.
DBVERSION
Default = 9.2.0.1.0
ORACLE_HOME
Default = c:\oracle\ora92
Set to the value that matches the value used in the
ORACLE_HOME path used when installing the Oracle 9i
software.
JAVA
Default = %ORACLE_HOME%\ jdk\bin\ java -cp .
Set to the location of the Java executable used by Oracle.
By default, the Oracle 9i installation also installs its own version
of Java. If your Oracle 9i installation does not use the default
Oracle version of Java, replace the default path with the path to
the Java version used by your Oracle installation.
DBNAME
Default = SESA
Set to the database name.
If you are installing multiple databases to support multiple
SESA DataStores, you must change this parameter each time you
run create.sh so that each database has a different name.
BLOCKSIZE
Default = 16384
Set to 32768 for 64-bit Oracle and 16384 for 32-bit Oracle.
87
88 Preparing third-party software on Windows platforms
Preparing for and installing Oracle 9i on a Windows computer
CACHESIZE
Default = 300000000
Set to the amount of physical memory (in bytes) reserved by
Oracle for database caching. This amount is reserved for each
database you create on the same computer
CACHESIZE + PGA_AGG + 100M = the total amount of physical
memory reserved by Oracle for each database you create on the
same computer. You must ensure that these parameters are set
so that amount of memory reserved by Oracle plus the amount
required by the operating system plus the amount required by
any other programs, does not exceed the amount of physical
memory installed on the computer.
PGA_AGG
Default = 200000000
Set to the amount of physical memory (in bytes) reserved by
Oracle for database sorts and joins. This amount is reserved for
each database you create on the same computer
CACHESIZE + PGA_AGG + 100M = the total amount of physical
memory reserved by Oracle for each database you create on the
same computer. You must ensure that these parameters are set
so that amount of memory reserved by Oracle plus the amount
required by the operating system plus the amount required by
any other programs, does not exceed the amount of physical
memory installed on the computer.
TIMEZONE
Default = America/Los_Angeles
Set to the local timezone. See your Oracle documentation for a
list of possible timezone values.
The following script variables are included for completeness. They should
not have to be changed under normal circumstances.
U01DATA
Default = c:\oracle\oradata\%DBNAME%
U02DATA
Default = c:\oracle\oradata\%DBNAME%
ADMIN
Default = c:\oracle\admin\%DBNAME%
USERBASE
Default = %U01DATA%\sesa32kuserbase01.dbf
Most of the SESA event data is stored in USERBASE and
USEROTH. Ensure that the specified location has enough
available disk space to support your event volume.
USEROTH
Default = %U01DATA%\sesa32kuseroth01.dbf
Most of the SESA event data is stored in USERBASE and
USEROTH. Ensure that the specified location has enough
available disk space to support your event volume.
Preparing third-party software on Windows platforms
Preparing for and installing Oracle 9i on a Windows computer
USERDEF
Default = %U01DATA%\sesa32kuserdef01.dbf
SESATEMP
Default = %U01DATA%\sesa32ktempspace01.dbf
USERBASE_SIZE
Default = 1000M
USEROTH_SIZE
Default = 1000M
USERDEF_SIZE
Default = 100M
SESATEMP_SIZE
Default = 1000M
CONTROL1
Default = %U01DATA%\control01.ctl
CONTROL2
Default = %U02DATA%\control02.ctl
CONTROL3
Default = %U01DATA%\control03.ctl
REDO1
Default = %U02DATA%\redo01.log
REDO2
Default =%U02DATA%\redo02.log
SYSTEM
Default = %U01DATA%\system01.dbf
SYSTEMP
Default = %U01DATA%\temp01.dbf
UNDO
Default = %U01DATA%\undotbs01.dbf
BDUMP
Default = %ADMIN%\bdump
CDUMP
Default = %ADMIN%\cdump
UDUMP
Default = %ADMIN%\udump
ARCHIVEDEST
Default = %U01DATA%\arch
RDBMSADMIN
Default = %ORACLE_HOME%\rdbms\admin
SQLPLUSADMIN
Default = %ORACLE_HOME%\sqlplus\admin
3
Save and close the create.bat file.
4
Type the following command to run the create.bat file:
create.bat
The database creation files are generated. If RUN_SCRIPTS = true, then the
generated files are run immediately to create a database; otherwise, you
must run them manually. When run, either automatically or manually, the
database creation SQL script (create.sql) prompts you to enter passwords for
specific administrative database users.
89
90 Preparing third-party software on Windows platforms
Preparing for and installing Oracle 9i on a Windows computer
5
When prompted, type the passwords for SYMCMGMT, SYSTEM, and SYS.
Wait while the SESA database is created. Depending on the speed of your
computer, creating a SESA database can take a long time. When the
database is successfully created, the script returns:
Database creation complete.
Turning on redo log archival for Oracle on Windows
You can turn on redo log archival so that you can reapply changes that are made
to your database after a specific backup point. Turning on redo log archival
results in slower database performance.
To turn on redo log archival on an Oracle database that supports a SESA
DataStore, you must complete the following tasks:
■
Modify the init<DBNAME>.ora file.
■
Shut down and restart the <DBNAME> Oracle database that supports the
SESA DataStore.
■
Change the <DBNAME> Oracle database to turn on redo log archival.
In the following procedures replace the variable <DBNAME> with the name of
the database for which you are turning on redo log archival.
To modify the init<DBNAME>.ora file
1
In a text editor, open the init<DBNAME>.ora file, then remove the pound
characters (#) from the following lines:
# log_archive_start=true
# log_archive_dest_1='location={ARCHIVEDEST}'
2
Save and close the init<DBNAME>.ora file.
3
Verify that the archive directory (c:\oracle\oradata\<DBNAME>\arch) exists.
If it does not, you must create it.
To shut down and restart the Oracle database that supports the SESA
DataStore
1
At the command prompt, type the following command to launch SQL*Plus:
sqlplus /nolog
2
At the SQL*Plus prompt, type the following commands:
connect / as sysdba
shutdown immediate
startup mount
Preparing third-party software on Windows platforms
Preparing for and installing Oracle 9i on a Windows computer
To change the Oracle database to turn on redo log archival
1
Open a Terminal window to the SESA DataStore computer, become Oracle
user, and then type the following command to launch SQL*Plus:
sqlplus /nolog
2
At the SQL*Plus prompt, type the following commands:
alter database archivelog;
alter database open;
3
Type the following command to verify that you turned on archive mode
successfully and generate a brief report about the archive mode:
archive log list
Creating additional databases to support multiple SESA
DataStores on Windows
In SESA 2.1, you create additional databases to support multiple SESA
DataStores in exactly the same way as you create the initial supporting
database. You can create as many databases as your system can support. When
you create additional databases, you must ensure that the names of the
databases used by SESA are all different.
To add an additional database
1
In a text editor, open the \ORACLE\create.bat file.
2
Change the value of DBNAME to an unused value.
When using multiple SESA DataStores, each supporting database within the
SESA system must have a different name.
3
Make any additional changes to create.bat that are required to create this
database.
See “Editing and running the create.bat script on Windows” on page 86.
4
Save and close the create.bat file.
5
Type the following command to run the create.bat file:
create.bat
The database creation files are generated. If RUN_SCRIPTS = true, then the
generated files are run immediately to create a database; otherwise, you
must run them manually. When run, either automatically or manually, the
database creation SQL script (create.sql) prompts you to enter passwords for
certain administrative database users.
91
92 Preparing third-party software on Windows platforms
Installing IBM Tivoli Directory Server on Windows
6
When prompted, type the passwords for SYMCMGMT, SYSTEM, and SYS.
Wait while the SESA database is created. Depending on the speed of your
computer, creating a SESA database can take a long time. When the
database is successfully created, the script returns:
Database creation complete.
Installing IBM Tivoli Directory Server on Windows
When you install a SESA Directory with the SESA Installation Wizard, the
Wizard automatically installs the supported version of IBM Tivoli Directory
Server on Windows or Solaris as the underlying software, or middleware, for the
SESA Directory.
Warning: Before you install or IBM Tivoli Directory Server 5.2, ensure that your
screen resolution is set at or below 1024 x 768 with 16-bit color. If screen
resolution is set to 1280 x 1024 with 32-bit color, the installation may fail
because screen resolution and color display are set too high.
If you are installing the IBM Tivoli Directory server without using the wizard,
you must perform the following tasks:
Before you can use the IBM Tivoli Directory Server Configuration
Create an internal
IBM Directory Server Tool, which is the second part of installing the IBM Directory
Server, you must first create an internal account for the Directory
account.
Server, and then add the account to the Administrator Group in
Windows. The IBM Directory Server Configuration Tool prompts
you for the user name and password of this account.
If you were to install the IBM Directory Server middleware through
the SESA Installation Wizard (as is the case with version 4.1.1 of
the Directory Server), the installation program would
automatically create this internal account for the Directory Server.
The SESA installation program assigns this account a user ID of
SESLDAP and a random password.
When you manually install the IBM Tivoli Directory Server 5.2
version of IBM Directory Server, you can choose the name and
password that you want for the internal account. Regardless of
how the account is created, you can always change the password
later.
For more information on changing the internal IBM Directory
Server account password, see the Symantec Enterprise Security
Architecture Administrator’s Guide.
Preparing third-party software on Windows platforms
Installing IBM Tivoli Directory Server on Windows
Install the IBM Tivoli You install the software with the IBM Directory Server Installation
Directory Server 5.2 Wizard. The Wizard installs the IBM Tivoli Directory Server 5.2
middleware and an IBM DB2 database server for use as the
software.
repository for Directory Server data. The Wizard then restarts the
computer and launches the IBM Directory Server Configuration
Tool.
Configure the IBM
Directory Server.
After installing the IBM Tivoli Directory Server 5.2 for use as the
middleware for the SESA Directory, you must use the IBM
Directory Server Configuration Tool to install an IBM DB2
database instance for the database server and to specify the
following:
■
Administrator DN and password for the Directory Server
You will need to specify the Directory administrator DN and
password again when you use the SESA Installation Wizard to
install the SESA Directory. In the SESA environment, this
user ID and password are known as the SESA Directory
account.
See “Logon accounts for SESA installation” on page 60.
■
User ID and password for an internal IBM Directory Server
account
The user ID should be 8 characters or less. The IBM Directory
Server Configuration Tool creates a DB2 instance based on
this name.
Note: If you have trouble installing from a network share or a staging area on a
local drive, verify that there are no embedded spaces in the source path. If the
path is correct and you are still having trouble, try installing the software from a
CD.
To create an internal IBM Directory Server user
1
On the Windows computer on which you want to install the SESA Directory,
on the Windows taskbar, click Start > Control Panel.
2
In the Control Panel, double-click Administrative Tools.
3
In the Administrative Tools window, double-click Computer Management.
4
In the Computer Management window, in the left pane, expand Local Users
and Groups.
5
Under Local Users and Groups, right-click Users, and then click New User.
6
In the New User dialog, type the user name and password for the internal
IBM Directory Server account.
93
94 Preparing third-party software on Windows platforms
Installing IBM Tivoli Directory Server on Windows
7
To change any password expiration conditions, uncheck or check the
appropriate check box or check boxes.
8
In the right pane, double-click Administrators.
9
Click Create, and then click Close.
10 In the Computer Management window, in the left pane, under Local Users
and Groups, click Groups.
11 In the right pane, double-click Administrators.
12 In the Administrators Properties dialog box, click Add.
13 Under Name, select the user name that you specified in step 6.
This is the internal IBM Directory Server account. In cases in which the
SESA Installation Wizard creates this account, the user ID is SESLDAP and
the password is randomly generated. Regardless of how the account was
generated, you can change the password after creation.
For more information on changing the internal IBM Directory Server
password, see the Symantec Enterprise Security Architecture
Administrator’s Guide.
14 Click Add, and then click OK.
15 In the Administrator Properties dialog box, click Apply, and then click
Close.
To install IBM Tivoli Directory Server 5.2
1
On the Windows computer on which you want to install IBM Tivoli Directory
Server 5.2, insert the IBM Tivoli Directory Server 5.2 CD into the CD-ROM
drive.
The IBM Directory Server Installation Wizard starts.
2
In the IBM Directory Server Installation Wizard, follow the on-screen
instructions.
3
When a panel prompts you to enter the user ID and password for the IBM
DB2 system ID, type a user name and password to use as the database
administrator account for the IBM DB2 repository database used by the IBM
Directory Server.
If you plan to install a SESA DataStore on the same computer as the IBM
Directory Server (SESA Directory), you must also use this same user ID and
password in the SESA Installation Wizard. During SESA DataStore
installation, SESA requires this user ID and password for the SESA
DataStore account.
See “Logon accounts for SESA installation” on page 60.
Preparing third-party software on Windows platforms
Installing IBM Tivoli Directory Server on Windows
4
When a panel prompts you to restart the computer, click Finish to restart
the computer and launch the IBM Directory Server Configuration Tool.
To configure IBM Tivoli Directory Server 5.2
1
On the computer on which IBM Tivoli Directory Server 5.2 is installed, wait
until the computer restarts and displays the IBM Directory Server
Configuration Tool window, then in the IBM Directory Server Configuration
Tool window, in the left pane, click Administrator DN/Password.
This is the SESA Directory account that the SESA Installation Wizard will
prompt you for during SESA Directory installation.
See “Logon accounts for SESA installation” on page 60.
2
In the right pane, type the user ID and password for the SESA Directory
account.
3
Click OK.
4
In the left pane, click Configure database.
5
In the right pane, click Create a new database, and then click Next.
6
Type a user ID and password for the internal account that will allow the IBM
Directory Server to add, modify, and retrieve data from the IBM DB2
database repository.
7
Click Next.
8
Type the name of the IBM DB2 database instance that the IBM Directory
Server will use as its repository, and then click Next.
9
Click Create a universal DB2 database (UTF-8/UCS-2), and then click Next.
10 Under Database location, select the drive on which the database will be
installed, and then click Next.
11 Verify that the settings listed are correct, and then click Finish.
12 Wait until the database is created and the Close button is enabled, and then
click Close.
95
96 Preparing third-party software on Windows platforms
Installing IBM Tivoli Directory Server on Windows
Chapter
5
Installing third-party
software on Solaris
computers
This chapter includes the following topics:
■
Determining which third-party software to install on Solaris computers
■
Installing Solaris 8
■
Installing the Java Software Development Kit on Solaris computers
■
Installing IBM DB2 Enterprise Edition on a Solaris computer
■
Preparing for and installing Oracle 9i on a Solaris computer
■
Installing an IBM DB2 Runtime Client on a Solaris computer
■
Connecting to a remote Solaris computer and exporting its display
Determining which third-party software to install on
Solaris computers
The third-party software that you install depends on the SESA components that
run on the computer. If more than one SESA component runs on a single
computer, install the third-party software required by each SESA component on
that computer. However, if more than one SESA component on a single
computer requires the same third-party software, you need only install the
third-party software once on that computer.
98 Installing third-party software on Solaris computers
Determining which third-party software to install on Solaris computers
Note: The Java Runtime Environment (J2RE) 1.3.1_09 and J2RE 1.4.2_02 are
considered different third-party software components and both must be
installed on a Solaris computer that runs the SESA Agent in addition to the
Symantec management console.
Table 5-1 lists the third-party software that you must install prior to installing
SESA. Except as noted, all the required third-party software is included with the
SESA Foundation Packs.
Table 5-1
Third-party software required on Solaris computers running SESA
components
SESA component Third-party software to install
All computers
running SESA
components
■
Solaris 8 with the latest cluster patch.
Solaris 8 is not included with the SESA Foundation Pack.
See “Installing Solaris 8” on page 100.
SESA Directory
computer
■
IBM DB2 8.1 Enterprise Edition with FixPak 6a.
IBM DB2 8.1 Enterprise Edition is provided for use with the
SESA Directory only.
See “Installing IBM DB2 Enterprise Edition on a Solaris
computer” on page 108.
You can also install other supported versions of IBM DB2 8.1.
These other versions are not included with the SESA
Foundation Pack.
See “Supported third-party software for the SESA Directory”
on page 220.
■
J2RE 1.3.1_09.
See “Installing the Java Runtime Environment on Solaris or
Linux computers” on page 106.
■
Oracle 9i.
Oracle 9i is not included with the SESA Foundation Pack.
See “Preparing for and installing Oracle 9i on a Solaris
computer” on page 112.
■
J2RE 1.3.1_09
See “Installing the Java Runtime Environment on Solaris or
Linux computers” on page 106.
SESA DataStore
computer
Installing third-party software on Solaris computers
Determining which third-party software to install on Solaris computers
Table 5-1
Third-party software required on Solaris computers running SESA
components
SESA component Third-party software to install
SESA Manager
computer
Symantec
management
console computer
■
Java Software Development Kit (SDK) 1.3.1_09 (includes the
J2RE).
See “Installing the Java Software Development Kit on Solaris
computers” on page 105.
■
(If necessary) IBM DB2 8.1 Runtime Client with FixPak 6a.
Required if the SESA Manager connects to a IBM DB2
DataStore on a Windows computer.
The IBM DB2 Runtime Client software is not included with the
SESA Foundation Pack.
See “Installing an IBM DB2 Runtime Client on a Solaris
computer” on page 126.
■
J2RE 1.4.2_02.
See “Installing the Java Runtime Environment on Solaris or
Linux computers” on page 106.
■
Mozilla 1.7.2 (with required Solaris patches and packages).
See “Preparing a Solaris computer to run the Symantec
management console” on page 128.
99
100 Installing third-party software on Solaris computers
Installing Solaris 8
Installing Solaris 8
The procedures for installing Solaris 8 vary by environment. The following
procedures are intended as guidelines only. See your Solaris 8 product
documentation or ask your UNIX administrator for more information.
Packages that are required to export the SESA GUI to a remote
computer
Exporting the SESA graphical user interface (GUI) is required when you are
running the SESA Installation Wizard from a computer other than the one on
which you are installing SESA components. Some Solaris 8 installations (for
example, core only installations) do not install all the required packages needed
to support exporting the GUI to another computer. In such cases, you must
install the missing Solaris 8 packages in order to install SESA.
Ensure that the following packages are installed:
SUNWadmr
SUNWdtcor
SUNWlibm
SUNWpiclx
SUNWudfrx
SUNWarc
SUNWdtct
SUNWlibms
SUNWpl5u
SUNWuiu8
SUNWarcx
SUNWeridx
SUNWlmsx
SUNWqfed
SUNWusb
SUNWatfsr
SUNWesu
SUNWloc
SUNWqfedx
SUNWusbx
SUNWatfsu
SUNWfcip
SUNWlocx
SUNWrmodu
SUNWvolr
SUNWauda
SUNWfcipx
SUNWluxdx
SUNWscpu
SUNWvolu
SUNWaudd
SUNWfcp
SUNWluxop
SUNWses
SUNWvolux
SUNWauddx
SUNWfcpx
SUNWluxox
SUNWsesx
SUNWwsr2
SUNWbtool
SUNWfctl
SUNWm64
SUNWsndmr
SUNWxcu4
SUNWbzip
SUNWfctlx
SUNWm64x
SUNWsndmu
SUNWxildh
SUNWcar
SUNWftpr
SUNWmdi
SUNWsolnm
SUNWxilow
SUNWcarx
SUNWftpu
SUNWmdix
SUNWsprot
SUNWxilrl
SUNWced
SUNWged
SUNWmfrun
SUNWsprox
SUNWxwdv
SUNWcedx
SUNWhea
SUNWnamdt
SUNWssad
SUNWxwdvx
SUNWcg6
SUNWhmd
SUNWnamos
SUNWssadx
SUNWxwfnt
SUNWcg6x
SUNWhmdx
SUNWnamow
SUNWswmt
SUNWxwice
SUNWcsd
SUNWi1of
SUNWnamox
SUNWtltk
SUNWxwicx
SUNWcsl
SUNWjvrt
SUNWnisr
SUNWtoo
SUNWxwmod
SUNWcslx
SUNWkey
SUNWnisu
SUNWtoox
SUNWxwmox
SUNWcsr
SUNWkvm
SUNWpd
SUNWuaud
SUNWxwplt
SUNWcsu
SUNWkvmx
SUNWpdx
SUNWuaudx
SUNWxwplx
SUNWcsxu
SUNWlibC
SUNWpiclr
SUNWudf
SUNWxwrtl
SUNWctpls
SUNWlibCx
SUNWpiclu
SUNWudfr
SUNWxwrtx
SUNWdfb
Installing third-party software on Solaris computers
Installing Solaris 8
Installing Solaris 8 from the CD
If you are doing a core-only Solaris 8 installation, Exporting the SESA GUI is
required when you are running the SESA Installation Wizard from a computer
other than the one on which you are installing components
To install Solaris 8 from a CD
1
Turn on the computer and insert the Solaris 8 software 1 of 2 disk.
If necessary, press STOP+a to stop the computer from launching a preinstalled version of the operating system.
2
At the ok prompt, type the following command:
boot cdrom
3
When prompted, type or select the following information:
Language
English
Locale
en_US ISO8859-1
Networked
Yes
Use DHCP
No
Host Name
User choice
You should not use a mixed-case machine name, as UNIX is casesensitive.
IP Address
The static IP address of the computer
You must use a static IP address or SESA will not install properly.
Obtain a static IP address from your network administrator.
Part of subnet
Yes
Subnet mask
The subnet mask for this computer (for example, 255.255.255.0)
Enable IPv6
No
Enable Kerberos
Security
No
Name service
DNS
Domain name
The fully qualified domain name for this computer (for example,
corp.symantec.com)
DNS servers
The IP address of the Domain Name Service (DNS) servers for
this computer
101
102 Installing third-party software on Solaris computers
Installing Solaris 8
DNS Search List
Specify only if required
See your network administrator for more information.
New name service No
Time Zone
Geographic region
Geographic
Region
Your time zone (for example, United States - Pacific)
Date and Time
The current local date and time
4
In the summary window, verify that the information that you entered is
correct, and then click Continue.
5
In the Solaris Interactive Installation window, click Initial, and then click
Next.
6
When prompted, type or select the following information:
Geographic
Regions
Default (Partial North America) or as needed
Software
Entire Distribution plus OEM support
If you are doing a core only installation, be sure to also install the
packages that are required to support the SESA GUI.
See “Packages that are required to export the SESA GUI to a
remote computer” on page 100.
Disks
The boot disk (for example, c0t0d0)
Preserve Data
Continue
This erases any existing files.
Automatically
Layout File
Systems
Auto Layout
File System and
Disk Layout
Customize…
Installing third-party software on Solaris computers
Installing Solaris 8
Customize Disks
The sizes for the operating system directories that are required
for your computer
The minimum required directories are swap and root. A swap
directory should be twice the maximum amount of memory that
can be installed in the computer. For nonproduction computers,
the balance of the disk space can be allocated to the root
directory.
Ask your UNIX administrator for advice on the optimal layout.
Mount remote?
Continue
7
In the summary window, verify that the information that you entered is
correct, and then click Begin Installation.
8
Click Auto Reboot.
The operating system is copied to your computer.
9
Type the password for root access.
10 When prompted for the media type, click CD/DVD, and then click Next.
11 Insert the Solaris Software disk 2 of 2, and then click OK.
12 After the Solaris Software disk 2 of 2 files are copied to your computer, click
Next.
13 If you are installing additional languages, do the following in the order
listed:
■
When prompted for the media type, click CD/DVD, click Next, insert
the Solaris 8 Languages disk, and then click OK.
■
Verify the languages to be installed, and then click Install Now.
■
After the Solaris 8 Languages files are copied to your computer, in the
Installation Summary window for Languages, verify that the languages
installed successfully, and then click Next.
14 Click Reboot Now.
Solaris 8 post-installation tasks
After the basic Solaris 8 installation completes, you must perform the following
post-installation tasks:
■
Create the defaultrouter file.
■
Apply the required Solaris 8 patches.
103
104 Installing third-party software on Solaris computers
Installing Solaris 8
To create the defaultrouter file
1
Open a Terminal window and become superuser.
2
In a text editor, create a file named etc/defaultrouter.
3
In the etc/defaultrouter file, type the IP address of the default gateway for
your computer.
4
Save and close the file.
5
Verify that the etc/resolv.conf file exists and contains the correct domain
name server information.
If it does not, use a text editor to create the file. Use the following as a model:
domain <your fully qualified domain>
nameserver <IP address of the first DNS server>
nameserver <IP address of the second DNS server>
hostresorder local bind
6
Save and close the file.
7
Restart your computer.
To apply the required Solaris 8 patches
1
On the Internet, go to sunsolve.sun.com
2
Under Sun Solve Patch Contents, click Patch Portal.
3
Under Downloads, click Recommended Patch Clusters.
4
In the Recommended Solaris Patch Clusters and J2SE Clusters box, click 8
(not 8 x86).
5
Click one of the following:
■
Download by HTTP
■
Download by FTP
6
Click Go.
7
Type the location on your computer to which you would like the patch
copied.
For example, /opt/tmp/8_Recommended.zip.
The patch may take a long time to download depending on the speed of your
Internet connection.
8
Go to the location of the patch file, and then type the following command to
decompress the patch:
unzip 8_Recommended.zip
Installing third-party software on Solaris computers
Installing the Java Software Development Kit on Solaris computers
9
Change to the 8_Recommended directory, and then type the following
command to run the patch:
./install_cluster
This step may take longer than the initial OS install. Ignore any Return code
2 or 8 errors that are generated.
10 Restart your computer.
Installing the Java Software Development Kit on
Solaris computers
SESA requires the Java Software Development Kit (SDK) version 1.3.1_09
(program files only) or later. You must install the SDK on a SESA Manager
computer. Other SESA components require only the Java Runtime Environment
(J2RE). However, you may want to consider installing the SDK on all SESA
component computers, because the JDK installation also installs J2RE.
To install the Java Software Development Kit (SDK) on a Solaris computer
1
Ensure that a local copy of the SESA Foundation Pack distribution media
(including the SDK) has been copied to the SESA component computer and
that the Solaris computer at which you are physically located has access to
the SESA component computer.
See “Copying the SESA Foundation Pack CDs to a Solaris staging area” on
page 57.
2
Open a Terminal window to the Solaris computer on which you want to
install the SDK and become superuser.
See “Connecting to a remote Solaris computer and exporting its display” on
page 130.
You do not need to export a display.
3
Type the following command to change to the /usr directory:
cd /usr
4
Type the following command to grant executable privileges to the SDK
installer:
chmod 700 /u01/Solaris.CD1/UTILS/JDK/j2sdk-1_3_1_09-solarissparc.sh
/u01 is the default staging area for the SESA CD images. If you copied your
installation CDs to a different location, replace the default with your
alternate location.
5
Type the following command to run the SDK installer:
/u01/Solaris.CD1/UTILS/JDK/j2sdk-1_3_1_09-solaris-sparc.sh
105
106 Installing third-party software on Solaris computers
Installing the Java Software Development Kit on Solaris computers
6
Follow the on-screen instructions to install the Java files.
7
Type the following command to rename any older SDK files that currently
reside on the Solaris computer:
mv java java.old
8
Type the following command to create a link to the new Java version:
ln -s ./j2sdk1_3_1_09 java
9
Type the following command to confirm that the link is working correctly:
which java
The computer should respond with the following path information:
usr/bin/java
10 Type the following command to confirm that the correct Java version was
installed:
java -version
The command returns the following information:
java version “1.3.1_09”
Java(TM) 2 Runtime Environment, Standard Edition
(build 1.3.1_09-b03)
Java HotSpot(TM) Client VM (build 1.3.1_09-b03, mixed mode)
Installing the Java Runtime Environment on Solaris or Linux
computers
All Solaris computers that run SESA components require the Java Runtime
Environment (J2RE). The J2RE is included in the SDK so that when you install
the SDK, the J2RE is also installed. You can also install the J2RE without the
accompanying SDK files. You need to do this when you install the SESA Agent
on a different computer from the SESA Manager computer. You must also install
a version of the J2RE on Solaris computers which run the Symantec
management console.
The version of the J2RE that you install depends on the Symantec security
products that the computers run. Solaris computers that run SESA components
and Linux computers that run the Symantec management console require J2RE
1.3.1_09 or later. Solaris computers that run the Symantec management console
require J2RE 1.4.2_02. Solaris computers that run SESA components and the
Symantec management console require that both versions of the J2RE be
installed.
The J2RE versions 1.3.1_09 and 1.4.2_02 are located on the SESA Foundation
Pack Windows CD1 in the UTILS/JRE directory.
Installing third-party software on Solaris computers
Installing the Java Software Development Kit on Solaris computers
The installation procedure for either version of J2RE is the same. However, the
directory to which you install the J2RE depends on which J2RE version you
install. J2RE 1.3.1_09 is installed to /usr, while J2RE 1.4.2_02 is installed to /opt.
To install the J2RE 1.3.1_09 on a Solaris or Linux computer
1
Ensure that a local copy of the SESA Foundation Pack distribution media
(including the J2RE) has been copied to the SESA component computer and
that the Solaris computer at which you are physically located has access to
the SESA component computer.
2
Open a Terminal window to the Solaris or Linux computer on which you
want to install the J2RE and become superuser.
See “Connecting to a remote Solaris computer and exporting its display” on
page 130.
You do not need to export a display.
3
Type the following command to change to the /usr directory:
cd /usr
4
Type the following command to grant executable privileges to the J2RE
installer:
chmod 700 /u01/Solaris.CD1/UTILS/JRE/j2re-1_3_1_09-solarissparc.sh
/u01 is the default staging area for the SESA CD images. If you copied your
installation CDs to a different location, replace the default with your
alternate location.
5
To run the J2RE installer, type the following command:
/u01/Solaris.CD1/UTILS/JRE/j2re-1_3_1_09-solaris-sparc.sh
6
Follow the on-screen instructions to install the Java Runtime Environment.
7
Type the following command to rename any older J2RE files that currently
reside on the Solaris computer:
mv java java.old
8
Type the following command to create a link to the new Java version:
ln -s ./j2re1_3_1_09 java
9
Type the following command to confirm that the link is working correctly:
which java
The computer should respond with the following path information:
usr/bin/java
107
108 Installing third-party software on Solaris computers
Installing IBM DB2 Enterprise Edition on a Solaris computer
10 Type the following command to confirm that the correct Java version was
installed:
java -version
The command returns the following information:
java version “1.3.1_09”
Java(TM) 2 Runtime Environment, Standard Edition
(build 1.3.1_09-b03)
Java HotSpot(TM) Client VM (build 1.3.1_09-b03, mixed mode)
Installing IBM DB2 Enterprise Edition on a Solaris
computer
You must install IBM DB2 8.1 Workgroup or Enterprise Edition on the Solaris
SESA Directory computer before you install the SESA Directory (IBM Tivoli
Directory Server 5.2). The SESA Foundation Pack Solaris CD2 includes a version
of IBM DB2 Enterprise Edition 8.1 that is intended to support IBM Tivoli
Directory Server 5.2.
Warning: The IBM DB2 Enterprise Edition 8.1 provided with the SESA
Foundation Pack is a restricted version. It is only intended for use with the SESA
Directory and does not serve as an IBM DB2 database for the SESA Datastore. If
you attempt to install the SESA DataStore using this edition of the IBM DB2
Universal Database, your SESA DataStore installation will fail.
To install IBM DB2 Enterprise Edition with FixPak 2, you must complete the
following tasks:
■
Append IBM DB2 kernel parameters to the /etc/system file.
■
Run the IBM DB2 Enterprise Edition installation script.
■
Download and apply FixPak 6a for IBM DB2 8.1.
■
Add superuser to the dbsysadm group.
■
Update the IBM DB2 license key.
Note: If you are using the SESA CD set to install IBM DB2 on a Solaris computer,
you must manually update the license key that is installed by default. The
correct key is included on the CD, but it is not installed by the installation
wizard.
Installing third-party software on Solaris computers
Installing IBM DB2 Enterprise Edition on a Solaris computer
To append IBM DB2 kernel parameters to the /etc/system file on the SESA
Directory computer
1
Open a terminal window to the SESA Directory computer and become
superuser.
See “Connecting to a remote Solaris computer and exporting its display” on
page 130.
2
In a text editor, open the /etc/system file and append the following lines:
*db2 kernel parameters
set msgsys:msginfo_msgmax = 65535
set msgsys:msginfo_msgmnb = 65535
set msgsys:msginfo_msgmap = 258
set msgsys:msginfo_msgmni = 256
set msgsys:msginfo_msgssz = 16
set msgsys:msginfo_msgtql = 1024
set msgsys:msginfo_msgseg = 32767
set shmsys:shminfo_shmmax = 536870912
set shmsys:shminfo_shmseg = 50
set shmsys:shminfo_shmmni = 300
set semsys:seminfo_semmni = 1024
set semsys:seminfo_semmap = 1026
set semsys:seminfo_semmns = 2048
set semsys:seminfo_semmnu = 2048
set semsys:seminfo_semume = 50
3
Modify the values of the IBM DB2 kernel parameters as necessary. Use the
following guidelines:
msgsys:msginfo_msgmax 65,535 or greater
msgsys:msginfo_msgmnb
msgsys:msginfo_msgseg
32,767 or lower
shmsys:shminfo_shmmax 536870912 or 90% of the physical memory (in bytes) of
the SESA Directory computer, whichever is higher. For
example, if the SESA Directory computer has 2 GB of
physical memory, set the shmsys:shminfo_shmmax
parameter to 1,932,735,283 (2048*1024*1024*0.9).
Limited to 4 GB for 32-bit systems
4
Save and close the /etc/system file.
5
Restart the SESA Directory computer.
109
110 Installing third-party software on Solaris computers
Installing IBM DB2 Enterprise Edition on a Solaris computer
To run the IBM DB2 Enterprise Edition installation script
1
Verify that the IBM DB2 8.1 installation files have been copied to the
installation staging area on the SESA Directory computer (default = /u01).
The IBM DB2 8.1 installation files are located on SESA Foundation Pack CD2
in the /udb81 directory.
See “Copying the SESA Foundation Pack CDs to a Solaris staging area” on
page 57.
2
Open a terminal window to the SESA Directory computer, become superuser,
and then change to the directory that contains the IBM DB2 8.1 Enterprise
Edition installation files.
See “Connecting to a remote Solaris computer and exporting its display” on
page 130.
3
Type the following command to start the IBM DB2 8.1 installation:
./db2_install -p DB2.ESE
4
Wait while the IBM DB2 installation program executes.
When finished, the program responds with the following message:
db2_install program completed successfully.
To download and apply FixPak 6a for IBM DB2 8.1
1
Download FixPak 6a (FP6a_U800266.tar.Z) to the SESA Directory computer
from the following IBM FTP site:
ftp://ftp.software.ibm.com/ps/products/db2/fixes/english-us/db2sunv8/
FP6a_U800266/
2
Go to the location of the patch file, and then type the following command to
decompress the patch:
zcat < FP6a_U800266.tar.Z | tar xvf -
Installing third-party software on Solaris computers
Installing IBM DB2 Enterprise Edition on a Solaris computer
3
After the patch file finishes decompressing, type the following command to
install the patch:
fixpak.s040914/installFixPak
When the patch installs successfully, the following information appears in
the Terminal window:
=========================================================
Summary
=========================================================
Package
Patch ID
Patch Level
Result
--------------------------------------------------------db2sp81
1810750-120
8.1.0
SUCCESS
db2repl81
1810750-118
8.1.0
SUCCESS
db2pext81
1810750-111
8.1.0
SUCCESS
db2msen81
1810750-071
8.1.0
SUCCESS
db2jhen81
1810750-045
8.1.0
SUCCESS
db2jdbc81
1810750-042
8.1.0
SUCCESS
db2icut81
1810750-039
8.1.0
SUCCESS
db2icuc81
1810750-038
8.1.0
SUCCESS
db2essg81
1810750-030
8.1.0
SUCCESS
db2smpl81
1810750-016
8.1.0
SUCCESS
db2rte81
1810750-015
8.1.0
SUCCESS
db2engn81
1810750-014
8.1.0
SUCCESS
db2das81
1810750-013
8.1.0
SUCCESS
db2crte81
1810750-011
8.1.0
SUCCESS
db2conv81
1810750-010
8.1.0
SUCCESS
db2conn81
1810750-009
8.1.0
SUCCESS
db2cliv81
1810750-008
8.1.0
SUCCESS
db2cj81
1810750-007
8.1.0
SUCCESS
Log saved in /tmp/installFixPak.log.8.1.0
To add superuser to the dbsysadm group
1
Open a terminal window to the SESA Directory computer and become
superuser.
See “Connecting to a remote Solaris computer and exporting its display” on
page 130.
2
Modify the dbsysadm group to include "root" in the user members list.
For information on modifying groups on a Solaris computer, see the
information that is provided with the Solaris documentation.
111
112 Installing third-party software on Solaris computers
Preparing for and installing Oracle 9i on a Solaris computer
To update the IBM DB2 license key on a Solaris computer
1
Log on to the Solaris computer as a root user.
2
Insert the SESA Directory for Solaris CD 1: Database for the SESA Directory
CD into the CD-ROM drive. Ensure that the CD is mounted.
3
At the command line, navigate to the /opt/IBM/db2/V8.1/adm64/ directory.
4
At the command line, run the following command:
db2licm -a /sesadirdb2ese/db2/license/DB2_81fp2ese.lic
Preparing for and installing Oracle 9i on a Solaris
computer
Oracle 9i must be installed and a supporting database created before you can
install the SESA DataStore software.
See “Installing the SESA DataStore for Oracle on a Solaris computer” on
page 166.
Note: Symantec does not make available for sale or resale any Oracle product,
including Oracle 9i database software. You must purchase the Oracle 9i database
software separately if you want to use the database with SESA.
You must complete the following tasks to install the Oracle 9i database on
Solaris:
■
Preparing the Solaris 8 environment for Oracle 9i installation
■
Installing the Oracle 9i database software on Solaris
■
Applying the required Oracle 9i database patches on Solaris
■
Creating one or more Oracle 9i databases for SESA on Solaris
The SESA Directory and SESA Manager must reside on different computers than
the one on which the Oracle 9i database server is installed. Oracle 9i is not
included with the SESA Foundation Pack.
The communication between the Oracle 9i database and the SESA Manager is
over normal unencrypted SQL*Net. Therefore, this connection should be on a
private network. Access to the SESA DataStore computer should not be available
to anyone except authorized users through a firewall.
The procedures for installing Oracle 9i assume that you are an Oracle database
administrator or have equivalent knowledge. In addition, you should have
access to Oracle technical support.
Installing third-party software on Solaris computers
Preparing for and installing Oracle 9i on a Solaris computer
Preparing the Solaris 8 environment for Oracle 9i installation
You must complete the following tasks to prepare the Solaris 8 environment for
Oracle 9i installation:
■
Configure kernel parameters in the /etc/system file.
■
Add a dba group and an Oracle user.
■
Copy the Oracle 9i installation disks to a staging area on the SESA DataStore
computer.
■
Modify the .profile file in the Oracle user login environment.
To configure kernel parameters in the /etc/system file
1
Log in to the Solaris 8 SESA DataStore computer and become superuser.
See “Connecting to a remote Solaris computer and exporting its display” on
page 130.
2
In a text editor, open the /etc/system file, and then append the following
lines:
set shmsys:shminfo_shmmax = 4294967295
set shmsys:shminfo_shmmin = 1
set shmsys:shminfo_shmmni = 100
set semsys:seminfo_semmni = 100
set shmsys:shminfo_shmseg = 10
set semsys:seminfo_semmsl = 100
set semsys:seminfo_semmns = 2500
3
Save and close the /etc/system file.
To add a dba group and an Oracle user
1
As superuser in the SESA DataStore computer Terminal window, type the
following command:
groupadd -g 400 dba
2
Verify that the /export/home directory exits, and if it does not, type the
following command to create it:
mkdir /export/home
3
Type the following command to create an Oracle user:
useradd -u 400 -c "Oracle Owner" -d /export/home/oracle -g "dba"
-m -s /usr/bin/ksh oracle
4
Type the following command to set the password for the Oracle user:
passwd oracle
113
114 Installing third-party software on Solaris computers
Preparing for and installing Oracle 9i on a Solaris computer
5
Verify that the /u01 and /u02 directories exist, and if they do not, type the
following command to create them:
mkdir /u01 /u02
6
Type the following command to change the ownership of the /u01 and /u02
directories to the Oracle user:
chown -R oracle:dba /u01 /u02
To copy the Oracle 9i installation disks to a staging area on the SESA
DataStore computer
1
As the superuser in the SESA DataStore computer Terminal window, type
the following command:
mkdir /export/home/oracle/staging
2
On the SESA DataStore computer, insert the Oracle9i Database (64-bit) CD 1
of 3 into the CD-ROM drive, and then type the following command:
cp -rp /cdrom/disk1 /export/home/oracle/staging/Disk1
Make sure that the directory disk1 (as well as disk2 and disk3 in the
following steps) is renamed with an uppercase D in the copy process. This
ensures that the Oracle Installer can copy the files from all 3 disks without
user intervention during the installation process.
3
After the copy process completes, insert the Oracle9i Database (64-bit) CD 2
of 3 into the CD-ROM drive, and then type the following command:
cp -rp /cdrom/disk2 /export/home/oracle/staging/Disk2
4
After the copy process completes, insert the Oracle9i Database (64-bit) CD 3
of 3 into the CD-ROM drive, and then type the following command:
cp -rp /cdrom/disk3 /export/home/oracle/staging/Disk3
5
After the copy process completes, remove CD3 from the CD-ROM drive.
To modify the .profile file in the Oracle user login environment
1
As superuser on the SESA DataStore computer, in a text editor, open the
/export/home/oracle/.profile file, and then append the following lines:
ORACLE_SID=SESA;export ORACLE_SID
ORACLE_HOME=/u02/app/oracle/product/9.2.0.1.0;export
ORACLE_HOME
ORACLE_BASE=/u02/app/oracle;export ORACLE_BASE
PATH=$PATH:$ORACLE_HOME/bin;export PATH
2
Save and close the .profile file.
3
Restart the SESA DataStore computer.
Installing third-party software on Solaris computers
Preparing for and installing Oracle 9i on a Solaris computer
As the computer restarts, ensure that there are no genunix error messages
in the Terminal window. If you see any errors, you probably mistyped a
kernel parameter. Reconfigure the kernel parameters as necessary.
If you are remotely connected to the computer, the Telnet session closes.
Installing the Oracle 9i database software on Solaris
The procedures for installing Oracle 9i vary by environment. The following
procedures are intended as guidelines only. See your Oracle database
administrator or the Oracle 9i product documentation for more information.
You must install one Oracle 9i database instance for each SESA DataStore that
you plan to install.
Note: To install Oracle 9i, you should be an Oracle database administrator or
have equivalent knowledge. In addition, you should have access to Oracle
technical support.
To install the Oracle 9i database software
1
Log in to the Solaris 8 SESA DataStore computer and become Oracle user.
If you are connecting to the SESA DataStore computer from another
computer, you must export the display of the remote computer on which you
are running the Oracle installation program.
See “Connecting to a remote Solaris computer and exporting its display” on
page 130.
2
Type the following command to run the Oracle Universal Installer:
./staging/Disk1/runInstaller
3
In the Oracle Universal Installer Welcome window, click Next.
4
In the Inventory Location window, type or verify the Inventory Location
path that matches the ORACLE_BASE that you specified in the .profile file
with /oraInventory appended (/u02/app/oracle/oraInventory), and then click
OK.
5
In the UNIX Group Name window, in the UNIX Group Name box, type dba,
and then click Next.
6
When an Oracle Universal Installer message informs you that you need root
privileges to perform the following actions, open a new Terminal window to
the SESA DataStore computer.
7
Become superuser in this new window, and then type the following
command:
/tmp/orainstRoot.sh
115
116 Installing third-party software on Solaris computers
Preparing for and installing Oracle 9i on a Solaris computer
8
When the shell script completes, return to the Oracle Universal Installer
message window, and then click Continue.
9
In the File Locations window, type an Oracle Home name (for example,
Oracle920), type or verify the default Oracle Home path that matches what
you specified in the .profile file (u02/app/oracle/product/9.2.0.1.0), and then
click Next.
10 In the Available Products window, click Oracle9i Database 9.2.0.1.0, and
then click Product Languages.
11 In the Language Selection window, use the arrow keys to select the
languages that are required by your installation, and then click OK.
12 Click Next.
13 In the Installation Types window, click Custom, and then click Next.
14 In the Available Product Components window, select all of the software for
which you have a license, except for the following components:
■
Oracle HTTP Server
■
Legato Networker Single Server
15 Expand Oracle Enterprise Manager Products 9.2.0.1.0, and then uncheck
the following:
■
Enterprise Manager Web Site 9.2.0.1.0
■
Oracle Management Server 9.2.0.1.0
■
Oracle HTTP Server 9.2.0.1.0
16 Expand Enterprise Edition Options 9.2.0.1.0, and then uncheck Legato
Networker Single Server 6.1.0.0.0.
17 Click Next.
18 In the Component Locations window, accept the default or change the
location for the Oracle Universal Installer, and then click Next.
19 In the Privileged Operating System Groups window, type or verify dba as the
Database Administrator (OSDBA) Group and the Database Operator
(OSOPER) Group, and then click Next.
20 In the Create Database window, click No, and then click Next.
21 In the Summary window, verify your selections, and then click Install.
22 In the Installation Types window, click the appropriate database server
option, and then click Next.
It is assumed that Oracle has licensed you for the software that you select.
23 In the Summary window, click Install.
Installing third-party software on Solaris computers
Preparing for and installing Oracle 9i on a Solaris computer
24 When the Setup Privileges window informs you that a configuration script
must be run with root privileges, open a SESA DataStore computer Terminal
window, and then become superuser.
25 Go to the directory that is listed in the Setup Privileges message window,
and then type the following command:
./root.sh
26 Follow the instructions in the script.
27 After the script completes, in the Setup Privileges window, click OK.
28 In the Oracle Net Configuration Welcome window, click Perform typical
configuration, and then click Next.
29 In the Add Database to Tree window, click Cancel.
30 In the End of Installation window, click Exit.
31 Ensure that you update Oracle 9i with the required database patch.
Applying the required Oracle 9i database patches on Solaris
After the initial install of Oracle 9i, you must apply the 9.2.0.4 (or later) cluster
patch to prepare your Oracle 9i database for use with SESA. Oracle cluster
patches are collections of individual recommended patches. These patch
collections have passed a more thorough testing process. Apply the patch by
completing the following tasks:
■
Download and decompress the 9.2.0.4. patch from Oracle.
■
Stop any Oracle processes that are running.
■
Launch the currently installed Oracle Universal Installer.
■
Install the Oracle Universal Installer that is included with the patch.
■
Install the Oracle 9.2.0.4 patch.
To download and decompress the 9.2.0.4 patch from Oracle
1
Connect to the Oracle technical support Web site.
You must have an Oracle support account to access this Web site. For more
information, see your Oracle administrator.
2
Download patch 3095277 to the SESA DataStore computer on which you
installed Oracle 9i.
This patch number corresponds to the 9.2.0.4 patch for Solaris 64 bit. If a
later cluster patch than 9.2.0.4 exists, download and install it instead.
3
Decompress the patch.
117
118 Installing third-party software on Solaris computers
Preparing for and installing Oracle 9i on a Solaris computer
To stop any Oracle processes that are running
1
Open a Terminal window to the Solaris 8 SESA DataStore computer and
become Oracle user.
If you are connecting to the SESA DataStore computer from another
computer, you must export the display of the remote computer on which you
are running the Oracle installation program.
See “Connecting to a remote Solaris computer and exporting its display” on
page 130.
2
Type the following commands:
<ORACLE_HOME>/bin/agentctl stop
<ORACLE_HOME>/bin/lsnrctl stop
To launch the currently installed Oracle Universal Installer
1
Go to the home directory for Oracle user (/export/home/oracle), and then
type the following command to run the currently installed Oracle Universal
Installer:
./staging/Disk1/runInstaller
2
In the Oracle Universal Installer Welcome window, click Next.
3
In the File Locations window, in the Source Path box, type the location to
which you downloaded and decompressed the 9.2.0.4 patch., and then click
Next.
4
Verify that the Destination Name and Path match those used in the original
Oracle installation, and if they do not, type the correct values, and then click
Next.
To install the Oracle Universal Installer that is included with the patch
1
In the Available Products window, click Oracle Universal Installer
2.2.0.18.0, and then click Product Languages.
2
In the Language Selection window, use the arrow keys to select the
languages that are required by your installation, click OK, and then click
Next.
3
Click Next.
4
In the Component Locations window, accept the default or change the
location for the new Oracle Universal Installer, and then click Next.
5
In the Summary window, verify your selections, and then click Install.
6
In the End of Installation window, click Next Install.
Installing third-party software on Solaris computers
Preparing for and installing Oracle 9i on a Solaris computer
To install the Oracle 9.2.0.4 patch
1
In the File Locations window, verify the information, and then click Next.
2
In the Available Products window, select Oracle 9iR2 Patchset 9.2.0.4.0, and
then click Next.
3
In the Summary window, verify your selections, and then click Install.
4
When the Setup Privileges window informs you that a configuration script
must be run with root privileges, open a SESA DataStore computer Terminal
window, and then become superuser.
5
Go to the directory that is listed in the Setup Privileges message window,
and then type the following command:
./root.sh
6
Follow the instructions in the script.
7
After the script completes, in the Setup Privileges window, click OK.
8
In the End of Installation window, click Exit.
Creating one or more Oracle 9i databases for SESA on Solaris
SESA 2.1 provides a new Oracle Installation script, create.sh, that you use to
create an Oracle 9i database to be used as the SESA DataStore. You must create a
separate Oracle database for each SESA DataStore that you plan to use. The
databases must be created prior to running the SESA Installation Wizard to
install the SESA DataStore software.
The create.sh script creates the database configuration files and the SQL script
used to create the SESA database. By default, create.sh runs the database
creation script automatically.
Once the initial SESA database is created, you can create as many databases as
necessary by editing create.sh and running it again for each additional SESA
database.
See “Creating additional databases to support multiple SESA DataStores on
Solaris” on page 125.
To create one or more Oracle 9i SESA databases you must complete the
following tasks for each database the order they are presented:
■
Editing and running the create.sh installation script
■
Turning on redo log archival for Oracle on Solaris
119
120 Installing third-party software on Solaris computers
Preparing for and installing Oracle 9i on a Solaris computer
Editing and running the create.sh installation script
The create.sh script creates the files needed to create an Oracle database that
can be used as a SESA DataStore. By default the create.sh script installs and runs
the files it creates.
Running the create.sh script creates the following files:
create.sql
A SQL script used to create the <DBNAME> database to be used as a
SESA DataStore.
init<DBNAME>.ora
The configuration file containing all of the initialization
parameters for the <DBNAME> database.
listener.ora
The configuration file for the Oracle listener that makes the
database available over the network to the SESA Manager and
other clients.
tnsnames.ora
A sample tnsnames file that can be used by Oracle clients, such as
SQL*Plus, to connect remotely. This file is not used by the SESA
Manager.
recreate.sql
A SQL script that can be run manually to drop and recreate the
SYMCMGMT database user without having to drop and recreate the
entire database.
If you are an experienced user, you may want to change the RUN_SCRIPTS
default value to false, so that the generated files are not run automatically. You
can then edit the generated scripts to create Oracle configurations that take full
advantage of the hardware and provide for higher availability.
In the most simple case, you can run the create.sh without modification to
create an Oracle database named SESA. After changing the database name
parameter, the script can be run again to create additional databases as needed
to support multiple SESA DataStores.
There are many parameters and possible configurations that you can use to
create an Oracle database. To reduce the complexity, at the beginning of the
create.sh script, the parameters that you are most likely to change are presented
as script variables with default values that can be edited.
Installing third-party software on Solaris computers
Preparing for and installing Oracle 9i on a Solaris computer
To edit and run the create.sh script
1
Open a Terminal window to the SESA DataStore computer, and then
navigate to the create.sh file location.
If you copied the SESA Foundation Pack to the default installation staging
area, the location is /u01/Solaris.CD1/ORACLE.
2
In a text editor, open the create.sh file, and then modify it as necessary.
Use the following guidelines:
RUN_SCRIPTS
Default = true
Set to false if you do not want the create.sh script to install the
database configuration files and run the database creation script
it generates. Setting this parameter to false allows advanced users
to edit the generated files before running them manually.
DBVERSION
Default = 9.2.0.1.0
Set to the value that matches the value used in the
ORACLE_HOME path used when installing the Oracle 9i software.
This parameter and ORACLE_HOME are used in the directory
path used to build the database file structure.
ORACLE_HOME
Default = /u02/app/oracle/product/$DBVERSION
Set to the value that matches the value used in the
ORACLE_HOME path used when installing the Oracle 9i software.
This parameter and DBVERSION are used in the directory path
used to build the database file structure.
JAVA
Default = "$ORACLE_HOME/jdk/bin /java -cp ."
Set to the location of the Java executable used by Oracle.
By default, the Oracle 9i installation also installs its own version
of Java. If your Oracle 9i installation does not use the default
Oracle version of Java, replace the default path with the path to
the Java version used by your Oracle installation.
DBNAME
Default = SESA
Set to the database name.
If you are installing multiple databases to support multiple SESA
DataStores, you must change this parameter each time you run
create.sh so that each database has a different name.
BLOCKSIZE
Default = 32768
Set to 32768 for 64-bit Oracle and 16384 for 32-bit Oracle.
121
122 Installing third-party software on Solaris computers
Preparing for and installing Oracle 9i on a Solaris computer
CACHESIZE
Default = 300000000
Set to the amount of physical memory (in bytes) reserved by
Oracle for database caching. This amount is reserved for each
database you create on the same computer
CACHESIZE + PGA_AGG + 100M = the total amount of physical
memory reserved by Oracle for each database you create on the
same computer. You must ensure that these parameters are set so
that amount of memory reserved by Oracle plus the amount
required by the operating system plus the amount required by any
other programs, does not exceed the amount of physical memory
installed on the computer.
PGA_AGG
Default = 200000000
Set to the amount of physical memory (in bytes) reserved by
Oracle for database sorts and joins. This amount is reserved for
each database you create on the same computer
CACHESIZE + PGA_AGG + 100M = the total amount of physical
memory reserved by Oracle for each database you create on the
same computer. You must ensure that these parameters are set so
that amount of memory reserved by Oracle plus the amount
required by the operating system plus the amount required by any
other programs, does not exceed the amount of physical memory
installed on the computer.
TIMEZONE
Default = America/Los_Angeles
Set to the local timezone. See your Oracle documentation for a list
of possible timezone values.
The following script variables are included for completeness. They should
not have to be changed under normal circumstances.
U01DATA
Default = /u01/oradata/$DBNAME
U02DATA
Default = /u02/oradata/$DBNAME
ADMIN
Default = /u02/app/oracle/admin/$DBNAME
USERBASE
Default = $U01DATA/sesa32kuserbase01.dbf
Most of the SESA event data is stored in USERBASE and
USEROTH. Ensure that the specified location has enough
available disk space to support your event volume.
USEROTH
Default = $U01DATA/sesa32kuseroth01.dbf
Most of the SESA event data is stored in USERBASE and
USEROTH. Ensure that the specified location has enough
available disk space to support your event volume.
Installing third-party software on Solaris computers
Preparing for and installing Oracle 9i on a Solaris computer
USERDEF
Default = $U01DATA/sesa32kuserdef01.dbf
SESATEMP
Default = $U01DATA/sesa32ktempspace01.dbf
USERBASE_SIZE Default = 1000M
USEROTH_SIZE
Default = 1000M
USERDEF_SIZE
Default = 100M
SESATEMP_SIZE Default = 1000M
CONTROL1
Default = $U01DATA/control01.ctl
CONTROL2
Default = $U02DATA/control02.ctl
CONTROL3
Default = $U01DATA/control03.ctl
REDO1
Default = $U02DATA/redo01.log
REDO2
Default =$U02DATA/redo02.log
SYSTEM
Default = $U01DATA/system01.dbf
SYSTEMP
Default = $U01DATA/temp01.dbf
UNDO
Default = $U01DATA/undotbs01.dbf
BDUMP
Default = $ADMIN/bdump
CDUMP
Default = $ADMIN/cdump
UDUMP
Default = $ADMIN/udump
ARCHIVEDEST
Default = $U01DATA/arch
RDBMSADMIN
Default = $ORACLE_HOME/rdbms/admin
SQLPLUSADMIN Default = $ORACLE_HOME/sqlplus/admin
3
Save and close the create.sh file.
4
Type the following command to run the create.sh script:
sh create.sh
The database creation files are generated. If RUN_SCRIPTS = true, then the
generated files are run immediately to create a database; otherwise, you
must run them manually. When run, either automatically or manually, the
database creation SQL script (create.sql) prompts you to enter passwords for
specific administrative database users.
123
124 Installing third-party software on Solaris computers
Preparing for and installing Oracle 9i on a Solaris computer
5
When prompted, type the passwords for SYMCMGMT, SYSTEM, and SYS.
Wait while the SESA database is created. Depending on the speed of your
computer, creating a SESA database can take a long time. When the
database is successfully created, the script returns:
Database creation complete.
Turning on redo log archival for Oracle on Solaris
You can turn on redo log archival so that you can reapply changes that are made
to your database after a specific backup point. Turning on redo log archival
results in slower database performance.
To turn on redo log archival on an Oracle database that supports a SESA
DataStore, you must complete the following tasks:
■
Modify the init<DBNAME>.ora file.
■
Shut down and restart the <DBNAME> Oracle database that supports the
SESA DataStore.
■
Change the <DBNAME> Oracle database to turn on redo log archival.
In the following procedures substitute the variable <DBNAME> with the name of
the database for which you are turning on redo log archival.
To modify the init<DBNAME>.ora file
1
In a text editor, open the init<DBNAME>.ora file, then remove the pound
characters (#) from the following lines:
# log_archive_start=true
# log_archive_dest_1='location=/u01/oradata/<DBNAME>/arch'
2
Save and close the init<DBNAME>.ora file.
3
Verify that the archive directory exists, and if it does not, change to Oracle
user, and then type the following command to create it:
mkdir /u01/oradata/<DBNAME>/arch
To shut down and restart the Oracle database that supports the SESA
DataStore
1
Open a Terminal window to the SESA DataStore computer, become Oracle
user, and then type the following command to launch SQL*Plus:
sqlplus /nolog
2
At the SQL*Plus prompt, type the following commands:
connect / as sysdba
shutdown immediate
startup mount
Installing third-party software on Solaris computers
Preparing for and installing Oracle 9i on a Solaris computer
To change the Oracle database to turn on redo log archival
1
Open a Terminal window to the SESA DataStore computer, become Oracle
user, and then type the following command to launch SQL*Plus:
sqlplus /nolog
2
At the SQL*Plus prompt, type the following commands:
alter database archivelog;
alter database open;
3
Type the following command to verify that you turned on archive mode
successfully and generate a brief report about the archive mode:
archive log list
Creating additional databases to support multiple SESA
DataStores on Solaris
In SESA 2.1, you create additional databases to support multiple SESA
DataStores in exactly the same way as you create the initial supporting
database. You can create as many databases as your system can support. When
you create additional databases, you must ensure that the names of the
databases used by SESA are all different.
To add an additional database
1
In a text editor, open the /u01/Solaris.CD1/ORACLE/create.sh file.
If you do not use the default SESA installation staging area (/u01/
Solaris.CD1), replace the default with path to the SESA staging on your
computer.
2
Change the value of DBNAME to an unused value.
When using multiple SESA DataStores, each supporting database within the
SESA system must have a different name.
3
Make any additional changes to create.sh that are required to create this
database.
See “Editing and running the create.sh installation script” on page 120.
4
Save and close the create.sh file.
5
Type the following command to run the create.sh script:
sh create.sh
The database creation files are generated. If RUN_SCRIPTS = true, then the
generated files are run immediately to create a database; otherwise, you
must run them manually. When run, either automatically or manually, the
database creation SQL script (create.sql) prompts you to enter passwords for
certain administrative database users.
125
126 Installing third-party software on Solaris computers
Installing an IBM DB2 Runtime Client on a Solaris computer
6
When prompted, type the passwords for SYMCMGMT, SYSTEM, and SYS.
Wait while the SESA database is created. Depending on the speed of your
computer, creating a SESA database can take a long time. When the
database is successfully created, the script returns:
Database creation complete.
Installing an IBM DB2 Runtime Client on a Solaris
computer
If you are installing the SESA Manager on a Solaris computer, but you are using
an IBM DB2 Universal Database server on a Windows computer as the SESA
DataStore, the IBM DB2 software requires that an IBM DB2 Runtime Client 8.1
with FixPak 6a be installed on the SESA Manager computer to support the
remote database connection.
The IBM DB2 Runtime Client for Solaris platforms is available to IBM DB2
Universal Database server users. It is not included with the SESA Foundation
Pack CD set.
The IBM DB2 Runtime Client 8.1 with FixPak 6a must be installed on the SESA
Manager computer before you install the SESA Manager.
To install the IBM DB2 Runtime Client on a Solaris computer, you must do the
following:
■
Download and install the IBM DB2 8.1 Runtime Client with FixPak 6a.
In addition, if a SESA Manager is already installed and configured to connect to
a remote Oracle database, and a new IBM DB2 database has been added to the
environment, you must also complete the following tasks:
■
Modify the catalina.sh script.
■
Create a symbolic link for libdb2jdbc.so.
■
Restart Tomcat.
To download and install the IBM DB2 8.1 Runtime Client with FixPak 6a
1
Download IBM DB2 8.1 Runtime Client with FixPak 6a
(PF6a_U800266_RTCL.tar) to the SESA Manager computer from the
following IBM FTP site:
ftp://ftp.software.ibm.com/ps/products/db2/fixes/english-us/db2sunv8/
client/runtime/
2
Go to the location of the Runtime Client file, and then type the following
command to decompress the patch:
tar xvf PF6a_U800266_RTCL.tar
Installing third-party software on Solaris computers
Installing an IBM DB2 Runtime Client on a Solaris computer
3
After the Runtime Client file finishes decompressing, type the following
command to install the Runtime Client:
/rtcl/db2_install -p DB2.RTCL
When the IBM DB2 8.1 Runtime Client with FixPak 6a installs successfully,
the installation program returns the following:
Installation of <db2rtsg81> was successful.
To modify the catalina.sh script
1
In a text editor, open the shell script /opt/IBMHTTPD/tomcat/bin/
catalina.sh.
2
Verify the following two lines:
DB2INSTANCE=db2inst1
Export DB2INSTANCE
If you did not specify db2inst1 (default) as the instance name when you
installed the IBM DB2 Runtime Client, change db2inst1 to the instance
name that you specified.
3
To add the path /opt/IBM/db2/v8.1/java/db2java.zip to Tomcat’s classpath,
append the path to the line that includes bootstrap.jar.
After modification, the line should read as follows:
CLASSPATH=”$CLASSPATH”:”$CATALINA_HOME”/bin/bootstrap.jar:/opt/
IBM/db2/V7.1/java12/db2java.zip
4
Save and close the catalina.sh script.
To create a symbolic link for libdb2jdbc.so
1
In a Terminal window to the SESA Manager computer, change to superuser,
if you are not already, and then navigate to /usr/lib.
2
Type the following command:
ln -s /opt/IBM/db2/V8.1/lib/libdb2jdbc.so libdb2jdbc.so in
/usr/lib pointing to /opt/IBM/db2/V8.1/lib/libdb2jdbc.so
3
After you create the symbolic link, type the following command to verify
that the link was created correctly:
ls -l /usr/lib/libdb2jdbc.so
The Solaris computer should respond with something similar to the
following:
lrwxrwxrwx
1 root
other
34 Sep 11 20:18
libdb2jdbc.so -> /opt/IBM/db2/V8.1/lib/libdb2jdbc.so
127
128 Installing third-party software on Solaris computers
Preparing a Solaris computer to run the Symantec management console
To restart Tomcat
◆
In a Terminal window on the Tomcat computer, become superuser, and then
type the following commands.
/opt/IBMHTTPD/tomcat/bin/catalina.sh stop
/opt/IBMHTTPD/tomcat/bin/catalina.sh start
Preparing a Solaris computer to run the Symantec
management console
You must complete the following tasks to prepare a Solaris 8 computer to run
the Symantec management console:
■
Download and install the required Solaris 8 packages and patches.
■
Download and install Mozilla 1.7.2.
■
Install J2RE 1.4.2_02 and create a symbolic link to the J2RE 1.4.2_02 plugin.
To download and install the required Solaris 8 packages and patches
1
Go to http://wwws.sun.com/software/solaris/freeware/pkgs_download.html
2
Download the following packages to the Symantec management console
computer:
■
gcmn 1.0
■
glib 1.2.10
gtk 1.2.10
These packages are part of the Solaris 8 Companion CD for your Solaris
computer. You may have to register with Sun to complete the download.
■
3
Navigate to the location of downloaded package files, and then decompress
them.
4
Type the following commands to add the packages:
pkgadd -d <path to package files>/SFWgcmn
pkgadd -d <path to package files>/SFWglib
pkgadd -d <path to package files>/SFWgtk
5
Go to http://sunsolve.sun.com
Installing third-party software on Solaris computers
Preparing a Solaris computer to run the Symantec management console
6
Download the following patches to the Symantec management console
computer:
■
111721-04 (or higher)
■
113261-02 (or higher)
■
114542-01 (or higher)
■
108733-18
■
109159-03
■
109704-03
7
Navigate to the location of downloaded patch files, and then decompress
them.
8
Type the following command to add the patches:
patchadd -M <path to patch files> 111721-04 113261-02 114542-01
108733-18 109159-03 109704-03
To download and install Mozilla 1.7.2
1
Go to http://www.mozilla.org/releases/
2
Download Mozilla 1.7.2 for your Solaris 8 computer.
For example, for a SPARC platform, download the mozilla-sparc-sun-solaris2.8-1.7.2.tar.gz file.
3
Decompress the downloaded file.
4
Move the mozilla folder, created by decompressing the download file, to its
permanent location (for example /opt).
5
Type the following command to begin the Mozilla installation:
<path to mozilla folder>/mozilla/mozilla
6
Follow the onscreen instructions to complete the Mozilla installation.
To install J2RE 1.4.2_02 and create a symbolic link to the J2RE 1.4.2_02
plugin
1
Install J2RE 1.4.2_02 according to the procedure shown here
REF to Installing J2RE on Solaris computers.
2
Navigate to <Mozilla install location>/mozilla/plugins
3
Create a symbolic link to the J2RE 1.4.2_02 plugin.
For example, on a SPARC platform, type the following command:
ln -s <path to J2RE 1.4.2_02 install location>/j2re1.4.2_02/
plugin/sparc/ns610/libjavaplugin_oji.so libjavaplugin_oji.so
129
130 Installing third-party software on Solaris computers
Connecting to a remote Solaris computer and exporting its display
Connecting to a remote Solaris computer and
exporting its display
Remote installations are convenient when the Solaris computer on which the
SESA component is to be installed does not have a video card or monitor, or is
not physically accessible to you. You can use Telnet sessions to access the
installation computer remotely. When the installation has a graphical user
interface (GUI) associated with it, you must set and export the display of the
remote computer to the computer at which you are physically located.
You must also export the display if you are installing Oracle 9i on a local Solaris
computer, but you did not log in to the local computer’s GUI as Oracle user.
To connect to a remote Solaris computer and export its display
1
Log on to the GUI on the local Solaris computer.
2
Open a Terminal window on the local computer, and then type the following
command:
xhost + <Host name of the remote SESA computer>
The only user that can add additional hosts to the access list is the user that
originally logged in to the GUI desktop. You can also check the xhost man
pages for instructions on exporting a display with the level of security that
your environment requires.
3
In the Terminal window on the local computer, type the following command
to initiate a Telnet session with the remote SESA computer:
telnet <IP address or host name of the remote SESA computer>
4
Type the username and password of an account on the remote SESA
computer.
You are now connected to the remote computer through the Terminal
window on the local computer.
5
If you need to change to a different user on the remote computer (such as
root or Oracle), type the following command:
su - <new user>
6
At the prompt, type the password that is associated with the new user.
7
Change to the user under which you want to run a program with a GUI (for
example, the SESA Installation Wizard must be run as superuser), and then
type the following command:
DISPLAY=<Host name of the local Solaris computer>:0;export
DISPLAY
Chapter
6
Installing SESA
This chapter includes the following topics:
■
SESA Foundation Pack installation overview
■
Starting the SESA Installation Wizard
■
Performing an Express Install
■
Installing the SESA Directory
■
Installing the SESA DataStore
■
Installing the SESA Manager
■
Installing the SESA Agent for heartbeat monitoring
■
Performing a silent installation on Solaris or Windows computers
SESA Foundation Pack installation overview
Depending on the computer platforms and database products that you plan to
use for a SESA installation, you can install SESA components in a number of
configurations.
To install SESA components on a Windows platform, you must be physically
located at the Windows computer. You can run a SESA component installation
either locally or remotely on Solaris computers.
The three main components of the SESA Foundation Pack are the SESA
Directory (IBM Directory Server), the SESA DataStore (IBM DB2 on Windows
platforms; Oracle 9i on Solaris platforms), and the SESA Manager. If you are
using IBM DB2 as the SESA DataStore, you can install all of the SESA
components on a single Windows computer. Typically, however, SESA
components are divided among two or more Windows computers, depending on
your network size and configuration requirements.
132 Installing SESA
SESA Foundation Pack installation overview
If you are using Oracle 9i as the SESA DataStore, you must dedicate a single
Solaris computer for its use. The SESA Manager and SESA Directory can reside
on one or two Solaris computers, depending on your networking requirements.
You cannot install SESA directly to the root directory of a computer.
See “Preparing for installation” on page 51.
Whether you install all of the components on one computer or divide
components among computers, you must install the SESA Directory first, then
the SESA DataStore, and, finally, the SESA Manager.
Installing SESA with command-line parameters
You can run the SESA Installation Wizard with command-line parameters on
either Windows or Solaris operating systems. Table 6-1 lists the available
command-line parameters.
Table 6-1
Installation command-line parameter
Parameter
Value
Description
-debug
None
Displays trace output while you are installing SESA.
-log
None
Writes trace output to the Sesainst.log file, which is
located in the system Temp directory that Java uses.
-silent
-f <filename>
Performs a silent (unattended) installation using
the values in the specified settings file <filename>.
See “Performing a silent installation on Solaris or
Windows computers” on page 185.
-silentfile
-f <filename>
Creates a settings file named <filename> by
recording the user’s input.
This option does not perform an actual installation;
it only creates the settings file for use in subsequent
silent (unattended) installations.
See “Performing a silent installation on Solaris or
Windows computers” on page 185.
Note: Do not run the installation with a command line directly from the SESA
Foundation Pack distribution media.
Installing SESA
SESA Foundation Pack installation overview
To install SESA with command-line parameters
1
To change directories to the SESA Foundation Pack CD1, on the computer on
which you are starting the SESA Installation Wizard, at the command
prompt, type the following command:
cd /<SESA CD1 directory>
2
To start the SESA Installation Wizard with the desired command-line
parameters, type the following command:
java -jar setup.ja_ <parameter>
where <parameter> is the command-line parameter that you want to use.
For example, java -jar setup.ja_ -debug.
3
To continue with the installation, do one of the following:
Windows
Go to step 2 of any of the following procedures:
■
“Installing the SESA Directory on a Windows computer” on
page 143
■
“Installing a SESA DataStore for IBM DB2 on a Windows
computer” on page 153
■
“Installing a SESA DataStore for Oracle 9i on a Windows
computer” on page 161
■
“Installing the SESA Manager on a Windows computer” on
page 173
If you want to install SESA in a demonstration or nonproduction
environment, go to step 3 of “Performing an Express Install” on
page 135.
Solaris
Go to step 7 of any of the following procedures:
■
“Installing the SESA Directory on a Solaris computer” on page 148
■
“Installing the SESA DataStore for Oracle on a Solaris computer”
on page 166
■
“Installing the SESA Manager on a Solaris computer” on page 176
133
134 Installing SESA
Starting the SESA Installation Wizard
Starting the SESA Installation Wizard
You can start the SESA Installation Wizard on Windows or Solaris operating
systems using several methods. On Windows platforms, you must be physically
located at the computer on which you are installing the SESA software. On
Solaris platforms, you can either be physically located at the computer or use a
remote connection.
To start the SESA Installation Wizard on a Windows computer
1
To start the SESA Installation Wizard, insert the SESA Foundation Pack CD1
into the CD-ROM drive.
If the wizard does not start automatically, locate the folder that contains the
SESA installation files, and then double-click CDStart.exe.
2
To start the installation, click Install SESA Components.
3
If a message informs you that the SDK is not installed, do the following:
4
■
Click OK.
■
In the SESA Installation Wizard panel, click Install JDK 1.3.1_09 and
follow the on-screen instructions.
■
When the installation of the JDK is complete, rerun the installation by
restarting the Installation Wizard, and then clicking Install SESA
Components.
When you are prompted to supply a location for temporary installation files,
do one of the following:
■
Accept the default location as long as it has at least 75 MB of free hard
disk space available.
■
Type a location or click Browse to find a different location that has 75
MB of hard disk space available.
5
In the introductory wizard panels, accept the license agreement, and follow
the on-screen instructions until you reach the SESA Preinstallation
Requirements Summary panel.
6
In the SESA Preinstallation Requirements Summary panel, if your system
meets the pre-installation requirements, click OK.
7
Continue with the desired installation.
Installing SESA
Performing an Express Install
To start the SESA Installation Wizard on a Solaris computer
1
Ensure that a local copy of the SESA Foundation Pack distribution media
image has been copied to a staging directory on the SESA computer, and that
the Solaris computer at which you are physically located has access to the
SESA computer.
The default installation staging directory for the SESA Foundation Pack is
/u01/Solaris.CD1.
2
Open a Terminal window to the Solaris computer on which you want to
install SESA and become superuser.
If you are installing SESA on a remote computer, you must export the
display of the remote computer.
See “Connecting to a remote Solaris computer and exporting its display” on
page 130.
3
Go to the installation staging directory, and then type the following
command to start the SESA Installation Wizard:
sh install.sh
4
Continue with the desired installation.
Performing an Express Install
If you want to install the SESA Foundation Pack on a single Windows computer
for nonproduction purposes, the SESA Installation Wizard provides an Express
Install option that lets you easily set up a single demonstration or test computer
that has all of the necessary SESA components installed.
The Express Install option does not require you to have a pre-existing
installation of IBM DB2 Workgroup Edition or Enterprise Edition on the
Windows computer to support the SESA Directory and SESA DataStore. Instead,
the option uses IBM DB2 Personal Edition, which is provided on the SESA
Foundation Pack distribution media and installed automatically when you select
the Express Install option.
Note: The size and design of IBM DB2 Personal Edition limits its use as a
database. By design, IBM DB2 Personal Edition can only support a single Intel
processor and up to 2 GB of data storage. It must also be installed on the same
computer as the SESA Manager. Because of these limitations, you should use the
Express Install option in nonproduction environments only.
135
136 Installing SESA
Performing an Express Install
You perform an express installation in two phases. The first phase gathers
information such as logon accounts and component locations. The SESA
Installation Wizard then prompts you to restart your computer to finish the
installation process.
Note: Before you run the installation program, you must disable or stop the
WWW Publishing service. If you are using the IIS service, you should make sure
that IIS is configured to listen on ports other than 443.
To start an Express Install
1
On the computer to which you are installing, start the SESA Installation
Wizard.
See “Starting the SESA Installation Wizard” on page 134.
2
In the SESA Install Menu panel, click Express Install.
3
If a message informs you that no IBM DB2 database is installed, click Yes to
continue.
If you click No, you cannot continue with the installation.
4
In the Select Working Directory panel, do the following, and then click Next:
■
For the Working Directory, accept the default location or select another
location.
SESA requires a folder on your hard drive as a working directory and
database storage location. The drive on which this folder resides should
have at least 1 GB of free hard disk space.
The 1 GB minimum is required only if you plan to install the SESA
DataStore on a single drive. If you plan to install it across multiple
drives, the minimum space requirement decreases according to the
actual drive space that you specify for this directory.
See “Allocating additional physical drives for tablespace containers in
low maintenance mode” on page 158.
■
For the Manager Log Directory, accept the default location or select
another location for SESA Manager logs.
This is the directory to which the SESA Manager will write its working
logs.
Installing SESA
Performing an Express Install
5
In the Local SESA Directory Master panel, do the following for the SESA
Directory installation, and then click Next:
Directory Server Path
Type the location of the SESA Directory (by default,
C:\Program Files\IBM\LDAP).
Administrator Name
Type the name for the IBM Directory Server
administrator account in the form cn=<name> (by
default, cn=root).
Administrator Password
Type and confirm an administrator password.
IP Address
Type the IP address of the computer on which the SESA
Directory is being installed. SESA Managers use this IP
address to communicate with the SESA Directory.
If connections to the SESA Directory computer are made
using authenticated SSL, you must type the host name or
FQDN of the computer instead of the IP address.
Directory port number
Type the secure listening port for the SESA Directory (by
default, 636). SESA Managers use this port to
communicate with the SESA Directory.
6
In the SESA Domain panel, type a unique name for the SESA administrative
domain.
High-ASCII characters are allowed, but do not use special characters such as
!, @, #, $, %, ^, &, and *, or characters from a double-byte character set
(DBCS).
The name appears in the Symantec management console navigational tree
as the top-level administrative domain.
You can install additional SESA domains after the SESA components are
installed.
See “Installing additional SESA domains” on page 198.
7
In the SESA Administrator panel, type a password for the SESA Directory
Administrator account.
The SESA Directory Administrator password must be between six and
twelve alphanumeric characters. This account is intended for top-level SESA
Administrators who need access to the entire SESA Directory tree for
installing SESA DataStores and SESA Managers. You can use this account to
log onto the Symantec management console after installation.
SESA provides a permanent user name of SESAdmin.
137
138 Installing SESA
Performing an Express Install
8
In the SESA Directory Domain Administrator panel, do the following for the
SESA Domain Administrator account:
Domain Administrator
Type the name for the SESA Domain Administrator
account. This account provides access to its associated
SESA administrative domain. Each SESA administrative
domain is associated with a single SESA Manager. Use
this Domain Administrator name and password to log
onto a particular SESA administrative domain (and SESA
Manager) after the SESA installation is complete.
Domain Administrator
Password
Type and confirm a Domain Administrator password
between six and twelve alphanumeric characters.
Select Preferred Language Select the language of the SESA Manager. The default
language is English. If you install non-English security
products, you must install them in the same language as
the SESA Manager.
9
In the SESA Secure Communications panel, to create the key database for
self-signed SSL certificates, do the following:
Key Database Password
Type and confirm the password for the key database of
six alphanumeric characters minimum. High-ASCII and
DBCS characters are not allowed.
Company
Type the company name. High-ASCII and DBCS
characters are not allowed.
Country
Select a country from the drop-down list.
Select host IP Address
Type the IP address of the computer on which the SESA
Manager is being installed.
Key Size (bits)
Select the encryption length in bits for the default, selfsigned certificate that SESA uses to secure data
communication. The default setting of 1024 bits is
standard. The longer the key size, the higher the security
of the data encryption. However, the higher the security
of the data encryption, the greater the amount of time
required to encrypt and decrypt data.
Installing SESA
Performing an Express Install
10 In the Local SESA DataStore panel, do the following for the SESA DataStore
installation:
DB2 path
Type the location for the SESA DataStore (by default,
C:\Program Files\IBM\SQLLIB).
Database Administrator
Name
Type the Database Administrator account name for the
SESA DataStore. If the account does not exist, it is
created.
Database Administrator
Password
Type and confirm a password of six or more
alphanumeric characters. An account with a password is
required.
Host Name or IP Address
Type the IP address of the computer on which the SESA
DataStore is being installed.
If connections to the SESA DataStore computer are made
using authenticated SSL, you must type the host name or
FQDN of the computer instead of the IP address.
Database port number
Type a port number that will be used by the database.
The default is 50000.
11 If the SESA Installation Wizard prompts you to set up a valid Windows NT
user account, click Yes.
12 In the SESA DataStore panel, confirm the default settings or do the
following:
SESA DataStore Name
Type the new name for the SESA DataStore.
The default setting is SESA.
Caption
Type a caption for the SESA DataStore.
The default setting is the name of the computer.
Description
Type a new description, if necessary.
The default setting describes the SESA schema and
database driver type.
139
140 Installing SESA
Performing an Express Install
13 In the SESA DataStore: Database Definition Path panel, in the Enter SESA
DataStore Database definition path box, accept the default location or click
Browse to select another location.
The SESA DataStore Database definition path is the location of the SESA
DataStore system files.
14 In the SESA DataStore: Database Definition Path panel, under SESA
DataStore Log Path, do one of the following:
■
Accept the default log path for the SESA DataStore.
The default path is DB2\node0000\<sql00001>\sqlogdir. Depending on
the number of SESA DataStores that you install, and the number of IBM
DB2 databases, a different number may be supplied for <sql00001>.
■
Check This Log path, and then type a location or browse to the new log
path location.
By default, IBM DB2 stores logs on the same physical drive as the
database. As a best practice, select a different physical drive.
15 In the SESA DataStore: Event Data Tablespace Configuration panel, do one
of the following:
■
To install a SESA DataStore with automatically expanding tablespaces,
click Low maintenance.
You can allocate more than one physical drive for tablespace
containers.
See “Allocating additional physical drives for tablespace containers in
low maintenance mode” on page 158.
■
To install a SESA DataStore with tablespaces that must be manually
increased, click High performance.
You can specify more than one physical drive for tablespace containers
and allocate the amount of available disk space per drive.
If you select this option, you must ensure that any antivirus Realtime
scanning is turned off before the SESA DataStore is installed. You can
turn Realtime scanning back on after the SESA DataStore installation.
See “Allocating additional physical drives for tablespace containers in
high performance mode” on page 158.
Installing SESA
Performing an Express Install
16 In the first SESA DataStore: Tuning panel, confirm the default settings or do
the following:
Number of CPU
Type the number of CPUs available on the DataStore
computer.
Available Memory
Choose a setting from the dropdown list. The option chosen
determines the default setting for the Buffer Pool size
setting in the subsequent wizard panel.
Number of Disks
Type the number of hard disks to be used by the DataStore.
17 In the second SESA DataStore: Tuning panel, confirm the default settings or
do the following:
Buffer Pool Size
Type the amount of temporary RAM in MB to make
available for the computer processor to manipulate SESA
DataStore data before transferring the data to the hard disk.
Extent Size
Type the amount of contiguous storage space in 32-KB
pages to make available to data. The larger the extent size,
the faster the database fills. The smaller the extent size, the
faster the database becomes fragmented.
Circular Logging/
Archive Logging
Click Circular Logging to enable only full, offline backups of
the database.
See “Circular Logging” on page 152.
Click Archive Logging to enable roll-forward database
recovery.
See “Archive Logging” on page 152.
SESA DataStore/IBM
DB2 backup directory
Available for archive logging only. Type a location or click
Browse to navigate to the location of the backup directory
for the IBM DB2 SESA DataStore.
The default Windows location is C:\SESA\symc_data.
Depending on how many computers you are using to deploy the SESA
Manager, SESA Directory, and SESA DataStore, Buffer Pool Size and Extent
Size may work better with certain recommended values.
See “IBM DB2 database memory usage specifications” on page 231.
141
142 Installing SESA
Performing an Express Install
18 In the Java SDK Directory panel, confirm the location in which you installed
the Java Software Development Kit (SDK).
19 In the Web Server Installation panel, for a Windows account, do the
following:
Web Server Directory
Type the path for the IBM HTTP Server installation (by
default, C:\Program Files\IBM Http Server).
Login Name
Type the login name for a Windows account of the
computer on which the IBM HTTP Server is being
installed. If the account does not exist, it is created.
Password
Type and confirm a password for the account. An account
with a password is required.
20 If the SESA Installation Wizard prompts you to set up a valid Windows NT
user account, click Yes.
The SESA Installation Wizard displays this message if the Login Name and
Password pair that you specified for the Web Server is not currently a
Windows account.
21 In the SESA Agent Listen IP panel, confirm that the SESA Agent IP address
is 0.0.0.0.
The express installation does not support Microsoft Windows Network Load
Balancing.
22 In the SESA Agent panel, confirm the IP address of the SESA Manager
computer.
23 In the Insert SESA CD dialog box, when you are prompted, browse to the
location of the requested installation files, which are located on the SESA
Foundation Pack distribution media.
The SESA Installation Wizard reports the status of the components that are
being installed using the specified logons, passwords, paths, and ports
information.
24 Restart the computer when you are prompted.
The restart is required to initialize the SESA Directory.
To finish an express installation
1
After you restart your computer, in the Welcome to the SESA Installation
panel, click Next.
2
In the SESA Install Menu panel, click Exit SESA Installer.
Installing SESA
Installing the SESA Directory
3
When you are prompted to exit the installation, click Yes.
4
In the SESA Installation Successful panel, to complete the installation and
exit the SESA Installation Wizard, click Finish.
Installing the SESA Directory
You install the SESA Directory on a single computer. After you install the SESA
Directory, you install the SESA DataStore on the same computer or a separate
one, depending on your resource requirements and the database software that
you are using.
See “Installing the SESA DataStore” on page 151.
If you are installing the SESA Directory for the first time, you must install it in
two phases. The first phase gathers information such as logon accounts and
component locations. The SESA Installation Wizard then prompts you to restart
your computer to finish the installation process.
If IBM Tivoli Directory Server is already installed on the computer, the SESA
Installation Wizard detects it and prompts you to install over the existing
version or connect to the already installed version. If you are installing over or
connecting to an existing version, the SESA Directory installation steps vary
somewhat from the new installation steps.
Installing the SESA Directory on a Windows computer
The SESA Installation Wizard installs the IBM Tivoli Directory Server as the
underlying software for the SESA Directory.
If the SESA DataStore will be on a computer other than the one on which you are
installing the SESA Directory, the SESA Directory requires that you use a
supported version of the IBM DB2 software.
See “Supported third-party software for the SESA Directory” on page 220.
When no IBM DB2 installations are present and the SESA DataStore will not be
installed on the same computer, the SESA Installation Wizard installs a
restricted version of the IBM DB2 8.1 Enterprise Server Edition.
If you are installing the SESA DataStore on the same Windows computer as the
SESA Directory, and IBM DB2 Personal Edition is already installed on the
computer, the SESA DataStore integrates with IBM DB2 Personal Edition. IBM
DB2 Personal Edition requires that the SESA Manager also be installed on the
same computer, or it won’t be able to process events to the SESA DataStore.
Therefore, if you are installing the SESA Directory on a separate conputer than
the SESA Manager, you must already have IBM DB2 Workgroup Edition or
143
144 Installing SESA
Installing the SESA Directory
Enterprise Edition installed on the Windows computer before you install the
SESA Directory.
On Windows operating systems, to prevent installation failure when you install
the SESA Directory over an existing version of IBM Directory Server, ensure
that the following conditions are met:
■
A SESA DataStore is already installed.
The existing version of the SESA Directory must already be connected to an
existing version of the SESA DataStore. This SESA DataStore must already
have an entry in the SESA Directory or the reinstallation fails.
If the SESA DataStore does not have an entry in the SESA Directory, you
must uninstall the SESA Directory rather than install over it.
■
The existing IBM Directory Server installation was performed using the
Typical Install option rather than the Compact or Custom Install option in
the installation wizard. Existing IBM DB2 databases and IBM HTTP Servers
must also have been installed using a Typical Install option.
Warning: The IBM DB2 Enterprise Edition 8.1 provided with the SESA
Foundation Pack is a restricted version. It is only intended for use with the SESA
Directory and does not serve as an IBM DB2 database for the SESA Datastore. If
you attempt to install the SESA DataStore using this edition of the IBM DB2
Universal Database, your SESA DataStore installation will fail.
IBM DB2 Enterprise Edition installs with FixPak 2. After you install the SESA
directory, you must apply FixPak 6a to IBM DB2 Enterprise Edition.
To start the SESA Directory installation on a Windows computer
1
On the SESA Directory computer, start the SESA Installation Wizard.
See “Starting the SESA Installation Wizard” on page 134.
2
In the SESA Install Menu, click Custom Install.
3
In the SESA Install Menu panel that appears, click Install SESA Directory.
Installing SESA
Installing the SESA Directory
4
If you are installing the SESA Foundation Pack that includes a limited
version of IBM DB2 Enterprise Server Edition, and you have not previously
installed a supported version of IBM DB2, the SESA Install Wizard provides
a choice between the IBM DB2 Enterprise Server Edition and the Personal
Edition.
■
Click Yes to install the Enterprise edition.
■
Click No to go to a panel that will allow you to install Personal Edition.
If a wizard panel appears that asks you to choose whether or not to
install IBM DB2 Personal Edition, click Yes. This version of IBM DB2 is
intended for demonstration or test environments only.
5
In the Select Working Directory panel, accept the default location or select
another location.
SESA requires a folder on your hard drive as a working directory and storage
location. If you are going to install the SESA DataStore on the same
computer, the drive on which the folder resides should have at least 800 MB
of free space. Otherwise, it needs approximately 20 MB of free space.
6
In the Local SESA Directory Master panel, do the following for the SESA
Directory installation:
Directory Server Path
Type the location of the SESA Directory (by default,
C:\Program Files\IBM\LDAP).
Administrator Name
Type the name for the IBM Directory Server
administrator account in the form cn=<name> (by
default, cn=root).
Administrator Password
Type and confirm a Directory Administrator password.
IP Address
Type the IP address of the computer on which the SESA
Directory is being installed. SESA Managers use this IP
address to communicate with the SESA Directory.
If connections to the SESA Directory computer are made
using authenticated SSL, you must type the host name or
FQDN of the computer instead of the IP address.
Directory port number
Type the secure listening port for the SESA Directory (by
default 636). SESA Managers use this port to
communicate with the SESA Directory.
145
146 Installing SESA
Installing the SESA Directory
7
In the SESA Domain panel, type a unique name for the SESA administrative
domain.
High-ASCII characters are allowed, but do not use special characters such as
!, @, #, $, %, ^, &, and *, or characters from a double-byte character set
(DBCS).
The name appears in the Symantec management console navigational tree
as the top-level administrative domain.
You can add additional SESA domains after you install the SESA Foundation
Pack.
See “Installing additional SESA domains” on page 198.
8
In the SESA Administrator panel, type and confirm a password for the SESA
Directory Administrator account.
The SESA Directory Administrator password must be between six and
twelve alphanumeric characters. This account is intended for top-level SESA
Administrators who need access to the entire SESA Directory tree for
installing SESA DataStores and SESA Managers. You can use this account to
log onto the Symantec management console after installation.
SESA provides the user name of SESAdmin.
9
In the SESA Directory Domain Administrator panel, do the following for the
SESA Domain Administrator account:
Domain Administrator
Type the name for the SESA Domain Administrator
account. This account provides access to its associated
SESA administrative domain. Use this Domain
Administrator name and password to log onto a
particular SESA administrative domain (and SESA
Manager) after the SESA installation is complete.
Domain Administrator
Password
Type and confirm a Domain Administrator password
(between six and twelve alphanumeric characters).
Select Preferred Language Select the language of the SESA Manager. The default
language is English. If you install non-English security
products, you must install them in the same language as
the SESA Manager.
Installing SESA
Installing the SESA Directory
10 In the SESA Secure Communications panel, to create the key database for
self-signed SSL certificates, do the following:
Key Database Password
Type and confirm a password for the key database of six
alphanumeric characters minimum. High-ASCII and
DBCS characters are not allowed.
Company
Type the company name. High-ASCII and DBCS
characters are not allowed.
Country
Type the company location.
Select host IP Address
Type the IP address of the computer on which the SESA
Manager is being installed.
If connections to the SESA Manager computer are made
using authenticated SSL, you must type the host name or
FQDN of the computer instead of the IP address.
Key size (bits)
Type the encryption length in bits for the default, selfsigned certificate that SESA uses to secure data
communication. The default setting of 1024 bits is
standard. The longer the key size, the higher the security
of the data encryption. However, the higher the security
of the data encryption, the longer the amount of time
required to encrypt and decrypt data.
11 If an existing installation of IBM DB2 Workgroup Edition or Enterprise
Edition is not present on the computer, in the DB2 Personal Edition
Installation panel, type the requested logon and location information.
12 If the SESA Installation Wizard prompts you to set up a valid Windows NT
user account, click Yes.
The SESA Installation Wizard displays this message if the Login Name and
Password pair that you specified for the IBM DB2 server is not currently a
Windows account.
13 In the Insert SESA CD dialog box, when you are prompted, select the
location of the requested installation files, which are located on the SESA
distribution media.
The SESA Installation Wizard reports the status of the components that are
being installed using the specified logons, passwords, paths, and ports
information.
14 Follow the on-screen instructions.
15 When you are prompted, restart the computer.
The restart is required to initialize the SESA Directory.
147
148 Installing SESA
Installing the SESA Directory
To finish the SESA Directory installation on a Windows computer
1
After you restart your computer, in the Welcome to the SESA Installation
panel, click Next.
2
Follow the on-screen instructions until you reach the SESA Install Menu
panel.
3
In the SESA Install Menu panel, do one of the following:
■
Click Install SESA DataStore to install the SESA DataStore on the same
computer using the SESA Installation Wizard.
See “Installing the SESA DataStore” on page 151.
■
Click Exit SESA Installer, click Next, and then, in the SESA Installation
Successful panel, click Finish to exit the SESA Installation Wizard.
Installing the SESA Directory on a Solaris computer
The SESA Installation Wizard installs the IBM Tivoli Directory Server 5.2 as the
underlying software for the SESA Directory.
If the SESA DataStore will reside on a computer other than the one on which you
are installing the SESA Directory, the SESA Directory requires a supported
version of the IBM DB2 software.
See “Supported third-party software for the SESA Directory” on page 220.
Before you install the SESA Directory, you must install the IBM DB2 database
server. If the database server is not installed, the SESA Installation Wizard
generates an error message. The SESA Foundation Pack distribution media
includes IBM DB2 Enterprise Edition 8.1 with FixPak 2. You must also apply
FixPak 6a to the database.
See “Installing IBM DB2 Enterprise Edition on a Solaris computer” on page 108.
To install the SESA Directory on a Solaris computer
1
On the SESA Directory computer, start the SESA Installation Wizard.
See “Starting the SESA Installation Wizard” on page 134.
2
When you are prompted to supply a location for temporary installation files,
do one of the following:
3
■
Accept the default location as long as it has at least 75 MB of hard disk
space available.
■
Type a location or click Browse to find a different location that has 75
MB of hard disk space available.
In the introductory wizard panels, review and type the requested
information, and then click Next.
Installing SESA
Installing the SESA Directory
4
In the SESA Preinstallation Requirements Summary panel, confirm that the
computer to which you are installing is running Sun Solaris version 8 (64bit).
In addition, the computer must already have an installation of IBM DB2
Workgroup Edition or Enterprise Edition 8.1 with FixPak 6a present.
5
In the SESA Install Menu panel, click Install SESA Directory, and then click
Next.
6
In the Select Working Directory panel, accept the default location of /opt/
Symantec/SESA or select another location, and then click Next.
SESA requires a folder on your hard drive with 20 MB of free disk space as a
working directory.
7
In the Local SESA Directory Master panel, do the following for the SESA
Directory installation:
Directory Server Path
Type the location of the SESA Directory (by default, /opt).
Administrator Name
Type the name for the IBM Directory Server
administrator account in the form cn=<name> (by
default, cn=root).
Administrator Password
Type a Directory Administrator password. An account
with a password is required.
IP Address
Type the IP address of the computer on which the SESA
Directory is being installed. SESA Managers use this IP
address to communicate with the SESA Directory.
If connections to the SESA Directory computer are made
using authenticated SSL, you must type the host name or
FQDN of the computer instead of the IP address.
Directory port number
8
Type the secure listening port for the SESA Directory (by
default, 636). SESA Managers use this port to
communicate with the SESA Directory.
In the Domain Selection panel, type a unique name for the SESA
administrative domain.
To type high-ASCII characters and special characters such as !, @, #, $, %, ^,
&, and * , use the Compose key on the Solaris keyboard.
For example, to type the copyright symbol, use the key sequence,
Compose+c+o. Characters from the double-byte character set (DBCS) are not
allowed.
149
150 Installing SESA
Installing the SESA Directory
The name appears in the Symantec management console navigational tree
as the top-level administrative domain.
You can add additional SESA domains after you install the SESA Foundation
Pack.
See “Installing additional SESA domains” on page 198.
9
In the SESA Administrator panel, type a password for the SESA Directory
Administrator account.
The SESA Directory Administrator password must be between six and
twelve alphanumeric characters. This account is intended for top-level SESA
administrators who need access to the entire SESA Directory tree for
installing SESA DataStores and SESA Managers. You can use this account to
log onto the Symantec management console after installation.
SESA provides the user name SESAdmin.
10 In the SESA Directory Domain Administrator panel, do the following for the
SESA Domain Administrator account:
Domain Administrator
Type the name for the SESA Domain Administrator
account. This account provides access to its associated
SESA administrative domain. Use this Domain
Administrator name and password to log onto a
particular SESA administrative domain (and SESA
Manager) after the SESA installation is complete.
Domain Administrator
Password
Type a Domain Administrator password (between six and
twelve alphanumeric characters).
Select Preferred Language Select the language of the SESA Manager. The default
language is English. If you install non-English security
products, you must install them in the same language as
the SESA Manager.
11 In the SESA Secure Communications panel, to create the key database for
self-signed SSL certificates, do the following:
Key Database Password
Type a password for the key database of six
alphanumeric characters minimum. High-ASCII and
DBCS characters are not allowed.
Company
Type the company name.
Country
Type the company location.
Installing SESA
Installing the SESA DataStore
Select host IP Address
Type the IP address of the computer on which the SESA
Manager is being installed.
If connections to the SESA Manager computer are made
using authenticated SSL, you must type the host name or
FQDN of the computer instead of the IP address.
Key size (bits)
Type the encryption length in bits for the default, selfsigned certificate that SESA uses to secure data
communication. The default setting of 1024 bits is
standard. The longer the key size, the higher the security
of the data encryption. However, the higher the security
of the data encryption, the longer the amount of time
required to encrypt and decrypt data.
12 In the Insert SESA CD dialog box, when you are prompted, type the location
of the IBM Directory Server installation files.
These files are part of the SESA Foundation Pack installation image. When
they are copied to the default staging area, the default location for these
files is /u01/Solaris.CD2/
13 In the Operation Complete panel, click Next.
14 In the SESA Install Menu panel, do one of the following:
■
Click Install SESA DataStore to continue with the installation.
Begin with step 4 of “To install the SESA DataStore for Oracle on a
Solaris computer” on page 167.
■
Click Exit SESA Installer, click Next, and then, in the SESA Installation
Successful panel, click Finish to exit the SESA Installation Wizard.
Installing the SESA DataStore
After you install the SESA Directory, you can install one or more SESA
DataStores. This installation places the SESA DataStore on a single computer. If
you are using an IBM DB2 Universal Database server on Windows or an Oracle
database server on Windows as the underlying software for the SESA DataStore,
you can install the SESA DataStore with the SESA Directory or the SESA
Manager, or with both, or you can install the SESA DataStore remotely on a
separate computer.
If you are using Oracle 9i on Solaris as the underlying software for the SESA
DataStore, you must install the SESA DataStore on a separate, dedicated Solaris
computer.
151
152 Installing SESA
Installing the SESA DataStore
Circular Logging and Archive Logging
The SESA DataStore supports the following two types of logging:
■
Circular Logging
■
Archive Logging
Circular Logging
As the name suggests, circular logging uses a ring of online logs to provide
recovery from transaction failures and system crashes. Circular logging does
not allow you to roll a database forward through transactions performed after
the last full backup operation. All changes that have occurred since the last
backup operation are lost. Because this type of restore operation recovers your
data to the specific point in time at which a full backup occurred, it is also known
as version recovery. This option saves disk space and therefore may be
considered lower maintenance.
The database must be offline (inaccessible to users) when a full backup is
performed.
Archive Logging
Archived logs are logs that are active but are no longer required for crash
recovery. Archive logging lets you perform backups of the SESA DataStore
without having to first stop the IBM DB2 database instance. The advantage of
choosing archive logging is that roll-forward recovery can use both archived
logs and active logs to rebuild a database either to the end of the logs, or to a
specific point in time. Contrast this with circular logging, in which you can only
recover to the time of the backup, and all changes made after that are lost.
Archive logging requires regular maintenance to prevent the drive space from
being totally consumed by the archive logs.
Installing SESA
Installing the SESA DataStore
Installing a SESA DataStore for IBM DB2 on a Windows computer
You can install a SESA DataStore over an IBM DB2 Universal Database server on
a Windows computer as long as a SESA Directory is already installed and
functioning on the same or another computer. The SESA DataStore should not
be installed on the same computer as the SESA Directory if the restricted
version of IBM DB2 8.1 Enterprise Edition is installed on that computer.
Note: If you use the IBM DB2 Universal Database Workgroup Server Edition 8.1
that is included on the SESA Foundation Pack 2.1 with SESA DataStore (IBM
DB2 for Windows) distribution media, the following restrictions apply:
■
It is intended for use with SESA only, and not for use as a general purpose
database.
■
Its installation is restricted to a single server with a maximum of four
processors.
It is intended for use by a limited number of users, all of whom must be DB2
system administrators.
Symantec does not provide IBM upgrade insurance or other upgrade insurance
as part of the SESA Foundation Pack 2.1 with SESA DataStore (IBM DB2 for
Windows). To obtain upgrade insurance for any IBM DB2 databases that you use
with SESA, you must contact IBM directly.
■
To use SESA in a production environment, a supported version of the database
software and FixPak must already be installed. You must ensure that one of the
required supported database versions with the correct IBM DB2 FixPak is
installed prior to running the SESA Installation Wizard. Installing with an
unsupported version or FixPak may result in a failed or corrupt installation.
If none of the supported database servers is present, the SESA Installation
Wizard installs IBM DB2 Personal Edition with the supported FixPak.
See “Supported third-party software for the SESA DataStore” on page 223.
Warning: The Personal Edition of the IBM DB2 database server is not designed to
handle the data volume in production networking environments. In addition,
the SESA Manager must reside on the same computer as the database server, or
the SESA installation does not work.
153
154 Installing SESA
Installing the SESA DataStore
To install a SESA DataStore for IBM DB2 on a Windows computer
1
On the SESA DataStore computer, start the SESA Installation Wizard.
See “Starting the SESA Installation Wizard” on page 134.
2
In the SESA Install Menu panel, click Custom Install, and click Next.
3
In the Install Menu that appears, click Install SESA DataStore, and click
Next.
4
In the SESA DataStore: Database Server Options panel, click Install SESA
DataStore (Use IBM DB2).
5
In the Select Working Directory panel, accept the default location for the
working directory or select another location.
SESA requires a folder on your hard drive as a working directory and
database storage location. The drive on which this folder resides should
have at least 817 MB of free space.
The 817 MB minimum is required only if you plan to install a single SESA
DataStore on a single drive. If you plan to install more than one SESA
DataStore or a single SESA DataStore across multiple drives, the minimum
space requirement decreases according to the actual drive space that you
specify for this directory.
If you have a previously existing SESA component on the computer, this
option is unavailable and you must accept the existing working directory.
6
In the Existing SESA Directory panel, do the following for the SESA
DataStore to connect with the SESA Directory:
SESA Administrator
Password
Type a Directory Administrator password for the
SESAdmin account.
IP Address
Type the IP address of the computer on which the SESA
Directory is installed. This can be the local computer or a
remote computer. SESA Managers use this IP address to
communicate with the SESA Directory.
If connections to the SESA Directory computer are made
using authenticated SSL, you must type the host name or
FQDN of the computer instead of the IP address.
Directory port number
Type the secure listening port for the SESA Directory (by
default, 636). SESA Managers use this port to
communicate with the SESA Directory.
Installing SESA
Installing the SESA DataStore
7
In the Domain Selection panel, correct or confirm the name of the SESA
administrative domain that you typed when you installed the SESA
Directory. If you have previously installed SESA components locally you are
restricted to using the same domain.
The SESA administrative domain name and extension appear in the
Symantec management console navigational tree as the top-level
administrative domain.
8
In the SESA DataStore panel, confirm the default settings or do the
following:
SESA DataStore Name
Type a name for the additional SESA DataStore. The
name must be different from the name of any other SESA
DataStore that exists on the target computer.
The default setting is SESA.
Caption
Type a caption for the SESA DataStore.
The default setting is the name of the computer.
Description
Type a new description, if necessary.
The default setting describes the SESA schema and
database driver type.
9
In the SESA DataStore: Database Definition Path panel, in the Enter SESA
DataStore Database definition path box, accept the default location or click
Browse to select another location.
The SESA DataStore Database definition path is the location of the SESA
DataStore system files.
10 In the SESA DataStore: Database Definition Path panel, under SESA
DataStore Log Path, do one of the following:
■
Accept the default log path for the SESA DataStore.
The default path is DB2\node0000\<sql00001>\sqlogdir. Depending on
the number of SESA DataStores that you install, and the number of IBM
DB2 databases, <sql00001> may use a different number.
■
Check This Log path, and then type a location or browse to the new log
path location.
By default, IBM DB2 stores logs on the same physical drive as the
database. As a best practice, select a different physical drive.
155
156 Installing SESA
Installing the SESA DataStore
11 In the SESA DataStore: Event Data Tablespace Configuration panel, do one
of the following, and then click Next:
■
To install a SESA DataStore with automatically expanding tablespaces,
click Low maintenance.
You can allocate more than one physical drive for tablespace
containers.
See “Allocating additional physical drives for tablespace containers in
low maintenance mode” on page 158.
■
To install a SESA DataStore with tablespaces that must be manually
increased, click High performance.
You can specify more than one physical drive for tablespace containers
as well as allocate the amount of available disk per drive.
If you select this option, you must ensure that any antivirus Realtime
scanning is turned off before the SESA DataStore is installed. You can
reenable Realtime scanning after the SESA DataStore installation.
See “Allocating additional physical drives for tablespace containers in
high performance mode” on page 158.
12 In the first SESA DataStore: Tuning panel, confirm the default settings or do
the following:
Number of CPU
Type the number of CPUs available on the DataStore
computer.
Available Memory
Choose a setting from the dropdown list. The option chosen
determines the default setting for the Buffer Pool size
setting in the subsequent wizard panel.
Number of Disks
Type the number of hard disks to be used by the DataStore.
13 In the second SESA DataStore: Tuning panel, confirm the following settings
or do the following:
Buffer Pool Size
Type a value in MB. The buffer pool is a temporary storage
area in RAM used by the SESA DataStore. It allows the
computer to manipulate data before transferring it to the
hard disk.
Extent Size
Type a value in KB. The extent size is the amount of
contiguous storage space available to data. The larger the
extent size, the faster the database fills. The smaller the
extent size, the faster the database becomes fragmented.
Installing SESA
Installing the SESA DataStore
Circular Logging/
Archive Logging
Click Circular Logging to enable only full, offline backups
of the database.
See “Circular Logging” on page 152.
Click Archive Logging to enable roll-forward database
recovery.
See “Archive Logging” on page 152.
SESA DataStore/IBM
DB2 backup directory
Available for archive logging only. Type a location or click
Browse to navigate to the location of the backup directory
for the IBM DB2 SESA DataStore.
The default Windows location is C:\SESA\symc_data.
The default Solaris location is /opt/Symantec/SESA/
symc_data.
Depending on how many computers you are using to deploy the SESA
Manager, SESA Directory, and SESA DataStore, Buffer Pool Size and Extent
Size may work better with certain recommended values.
See “IBM DB2 database memory usage specifications” on page 231.
14 In the Local SESA DataStore panel, do the following for the SESA DataStore
installation:
Database Administrator
Name
Type the administrator account name for the SESA
DataStore. This account was created when the IBM DB2
database server was installed.
Database Administrator
Password
Type an administrator account password of six or more
alphanumeric characters. An account with a password is
required.
Host Name or IP Address
Type the IP address of the computer on which the SESA
DataStore is being installed.
Database port number
Type the listening port for the SESA DataStore (by
default, 50000).
This installs the SESA DataStore on the computer on which you are running
the SESA Installation Wizard.
15 After the SESA Installation Wizard completes the necessary configuration
tasks, in the Operation Complete panel, click Next.
157
158 Installing SESA
Installing the SESA DataStore
16 In the SESA Install Menu panel, click Exit SESA Installer, click Next, and
then in the SESA Installation Successful panel, click Finish to exit the SESA
Installation Wizard.
17 If necessary, install another SESA DataStore and then restart the computer.
See “Installing an additional SESA DataStore for IBM DB2 on a Windows
computer” on page 160.
Allocating additional physical drives for tablespace
containers in low maintenance mode
To improve database performance, the SESA Installation Wizard lets you install
the tablespace containers in the SESA DataStore across multiple Windows
physical drives. When you install tablespace containers across multiple physical
drives, the system files for the SESA DataStore remain in one location, but the
data is spread across the drives that you specify.
To allocate additional physical drives for tablespace containers in low
maintenance mode
1
In the SESA DataStore: Event Data Tablespace Configuration panel, click
Low maintenance, and then click Add.
2
In the Select Container dialog box, under Drives, select one of the drives on
which to install tablespace containers.
3
Repeat step 2 for the other drives.
4
To return to the SESA DataStore: Event Data Tablespace Configuration
panel, click OK.
5
To remove a drive, select the drive, and then click Remove.
Allocating additional physical drives for tablespace
containers in high performance mode
To improve database performance, the SESA Installation Wizard provides the
option of installing SESA DataStore tablespace containers across multiple
Windows physical drives and then specifying the amount of drive disk space to
allocate for the tables. When you install tablespace containers across multiple
physical drives, the system files for the SESA DataStore remain in one location,
but the data is spread across the drives that you specify.
Note: If you use high performance mode, you must ensure that any antivirus
Realtime scanning is turned off before the SESA DataStore is installed. You can
reenable Realtime scanning after the SESA DataStore installation.
Installing SESA
Installing the SESA DataStore
To allocate additional physical drives for tablespace containers in high
performance mode
1
In the SESA DataStore: Event Data Tablespace Configuration panel, click
High performance, and then click Add.
2
In the Select Container dialog box, under Drive, select one of the drives on
which to install tablespace containers.
3
In the Size box, type the amount of space, in MB, to allocate for the
tablespace container on that drive.
4
Repeat steps 2 and 3 for the other drives.
Ensure that the total allocated space is at least 800 MB. Do not exceed 1024
GB of total allocated space. To calculate the amount of space that you need,
assume that each event is 1.5 KB.
5
To return to the SESA DataStore: Event Data Tablespace Configuration
panel, click OK.
6
To modify the space that is allocated for a particular drive, click Modify.
7
In the Select Container dialog box, under Drive, select the drive to modify.
8
In the Size box, retype the amount of space, in MB, to allocate for the
tablespace container on the drive.
9
To return to the SESA DataStore: Event Data Tablespace Configuration
panel, click OK.
10 To remove a drive, select the drive, and then click Remove.
Retrying an IBM DB2 database installation
If you cancel the SESA Installation Wizard while you are installing the SESA
DataStore on an already installed IBM DB2 database, or the wizard stops or fails
for any reason, the IBM DB2 database may be left in an inconsistent state.
You can use the wizard again to retry the SESA DataStore installation, but only
after you have dropped the database instance to return IBM DB2 to a consistent
state.
For more information on dropping an IBM DB2 database instance, see the
Symantec Enterprise Security Architecture Administrator’s Guide.
159
160 Installing SESA
Installing the SESA DataStore
Installing an additional SESA DataStore for IBM DB2 on a
Windows computer
After you have installed the initial SESA DataStore, depending on your
requirements, you may want to install one or more additional SESA DataStores.
You can install additional SESA DataStores on the same IBM DB2 Universal
Database instance as the first SESA DataStore.
You may want to use two or more SESA DataStores if you have different needs
for event viewing in the Symantec management console, or want to separate
product event data into separate SESA DataStores.
Note: The sum of the bufferpools for all SESA DataStores using DB2 on a single
Windows computer, should not exceed 1.5 GB. This is due to the 2 GB memory
limit a process can use and the fact that all SESA DataStores using DB2 are
created in the same instance.
To install an additional SESA DataStore for IBM DB2 on a Windows computer
1
On the SESA DataStore computer, start the SESA Installation Wizard.
See “Starting the SESA Installation Wizard” on page 134.
2
In the SESA Install Menu panel, click Custom Install, and click Next.
3
In the Install Menu that appears, click Install SESA DataStore, and click
Next.
4
In the SESA DataStore: Database Server Options panel, click Install
Additional SESA DataStore (DB2).
5
The installation procedure for installing an additional DataStore is the same
as the procedure to install the initial SESA DataStore. Follow the
instructions for installing a SESA DataStore beginning with step 5.
See “Installing a SESA DataStore for IBM DB2 on a Windows computer” on
page 153.
Installing SESA
Installing the SESA DataStore
Installing a SESA DataStore for Oracle 9i on a Windows computer
You can install a SESA DataStore over an Oracle database server on a Windows
computer as long as a SESA Directory is already installed and functioning on the
same or another computer. You must use Oracle 9i database software with the
latest Oracle cluster patch.
Before you install the SESA DataStore, you should complete the following tasks:
■
Install the Oracle database server.
■
Create a SESA database on the Oracle database server.
■
Create and grant privileges to an Oracle database user.
SESA 2.1 provides installation scripts to help you prepare Oracle 9i as the
database software on a Windows computer.
See “Preparing for and installing Oracle 9i on a Windows computer” on page 83.
To install the SESA DataStore for Oracle on a Windows computer
1
On the SESA DataStore computer, start the SESA Installation Wizard.
See “Starting the SESA Installation Wizard” on page 134.
2
When you are prompted to supply a location for temporary installation files,
do one of the following:
■
Accept the default location as long as it has at least 75 MB of hard disk
space available.
■
Type a location or click Browse to find a different location that has 75
MB of hard disk space available.
3
In the introductory wizard panels, review and type the requested
information, and then click Next.
4
In the SESA Preinstallation Requirements Summary panel, confirm that the
computer to which you are installing has an existing installation of Oracle 9i
for Windows.
5
In the SESA Install Menu panel, click Install SESA DataStore.
6
In the SESA DataStore: Database Server Options panel, click Install SESA
DataStore (Use Oracle).
7
In the Select Working Directory panel, accept the default location of
C:\SESA, or select another location.
SESA requires a folder on your hard drive with 50 MB of free disk space as a
working directory.
If you have an existing SESA component on the computer, then this option is
unavailable and you must accept the current working directory.
161
162 Installing SESA
Installing the SESA DataStore
8
In the Install SESA DataStore on Oracle panel, click Next.
You must have installed the Oracle 9i for Windows database software, and
run the Oracle installation scripts to prepare and configure the Oracle
database.
See “Preparing for and installing Oracle 9i on a Windows computer” on
page 83.
9
In the Existing SESA Directory panel, do the following for the SESA
DataStore to connect with the SESA Directory:
SESA Directory
Administrator Password
Type the password for the SESAdmin user.
IP Address
Type the IP address of the computer on which the SESA
Directory is installed. This can be the local computer or a
remote computer. SESA Managers use this IP address to
communicate with the SESA Directory.
If connections to the SESA Directory computer are made
using authenticated SSL, you must type the host name or
FQDN of the computer instead of the IP address.
Because the default location is the local computer, you
must modify this address before continuing.
Directory port number
Type the secure listening port for the SESA Directory (by
default, 636). SESA Managers use this port to
communicate with the SESA Directory.
10 In the Domain Selection panel, select the SESA administrative domain that
you typed when you installed the SESA Directory.
The SESA administrative domain name appears in the Symantec
management console navigational tree as the top-level administrative
domain.
Installing SESA
Installing the SESA DataStore
11 In the SESA DataStore panel, confirm the information for the SESA
DataStore installation, or do the following:
SESA DataStore Name
Type the name of the Oracle database (ORACLE_SID) that
you want to use for the SESA DataStore. The default is
SESA.
Caption
Type an additional identifier for the SESA DataStore. The
default is the computer name. SESA DataStores are
identified in the Symantec management console by the
combination of the Caption and the SESA DataStore
Name.
Description
Type an additional description of the database. The
default description includes the type of SESA DataStore,
the schema, and the Oracle driver type.
12 In the Local SESA DataStore panel, confirm the default settings or do the
following for the SESA DataStore installation:
Database Administrator
Name
Type the Database Administrator name symcmgmt. The
symcmgmt Database Administrator account is created
when the Oracle installation script batch file runs the
create.sql script.
Database Administrator
Password
Type the password for the symcmgmt Database
Administrator account. The default password given to
this account by the create.sql script is password.
IP Address
Type the IP address of the computer on which the SESA
DataStore is being installed.
Database port number
Type the listening port for the SESA DataStore (by
default, 1521).
13 In the Database Driver Directory panel, type the location of the Oracle driver
(classes12.jar) or click Browse to navigate to this location.
The default location is /MANAGER/LIB.
The SESA Installation Wizard reports the status of the components that are
being installed using the specified logons, passwords, paths, and ports
information.
14 In the Operation Complete panel, click Next.
163
164 Installing SESA
Installing the SESA DataStore
15 In the SESA Install Menu panel, click Next.
16 In the SESA Installation Successful panel, click Finish to exit the SESA
Installation Wizard.
Installing additional SESA DataStores for Oracle 9i on a
Windows computer
SESA allows you to install multiple SESA DataStores. You may want to use two
or more SESA DataStores if you have different needs for event viewing in the
Symantec management console, or want to separate product event data into
separate SESA DataStores.
Each SESA DataStore is supported by a separate Oracle database. These
databases must be created and configured prior to running the SESA
Installation Wizard.
See “Creating one or more Oracle 9i databases for SESA on Solaris” on page 119.
See “Creating one or more Oracle 9i databases for SESA on Windows” on
page 85.
After the supporting databases have been created and the necessary Oracle
installation scripts configured, you can run the SESA Installation Wizard to
integrate the SESA DataStores into SESA.
To install additional SESA DataStores for Oracle 9i on a Windows computer
1
On the SESA DataStore computer, start the SESA Installation Wizard.
See “Starting the SESA Installation Wizard” on page 134.
2
Follow the on-screen instructions, without modifying existing settings, until
you reach the SESA Install Menu panel.
3
In the SESA Install Menu panel, click Advanced Options, and then click
Next.
4
In the SESA Advanced Install Menu, click Install Additional SESA
DataStore (Oracle), and then click Next.
5
In the Select Working Directory panel, accept the default location of
C:\SESA, or select another location.
SESA requires a folder on your hard drive with 50 MB of free disk space as a
working directory.
If you have an existing SESA component on the computer, then this option is
unavailable and you must accept the current working directory.
6
In the Install SESA DataStore on Oracle panel, click Next.
Installing SESA
Installing the SESA DataStore
7
In the Existing SESA Directory panel, do the following for the additional
SESA DataStore to connect with the SESA Directory:
SESA Administrator
Password
Type the password for the SESAdmin user.
IP Address
Type the IP address of the computer on which the SESA
Directory is installed. This can be the local computer or a
remote computer. SESA Managers use this IP address to
communicate with the SESA Directory.
If connections to the SESA Directory computer are made
using authenticated SSL, you must type the host name or
FQDN of the computer instead of the IP address.
Directory port number
Type the secure listening port for the SESA Directory (by
default, 636). SESA Managers use this port to
communicate with the SESA Directory.
8
In the Domain Selection panel, select the SESA administrative domain that
you typed when you installed the SESA Directory.
The SESA administrative domain name appears in the Symantec
management console navigational tree as the top-level administrative
domain.
9
In the SESA DataStore panel, confirm the default settings or do the
following:
SESA DataStore Name
Type a name for the additional SESA DataStore. The
name must match the ORACLE_SID for the particular
database, and must be different from other SESA
DataStore names.
Caption
Type a caption for the additional SESA DataStore.
The default setting is the name of the computer.
Description
Type a new description, if necessary.
The default setting describes the SESA schema and
database driver type.
165
166 Installing SESA
Installing the SESA DataStore
10 In the Local SESA DataStore panel, confirm the default settings or do the
following for the SESA DataStore installation:
Database Administrator
Name
Type the Administrator account name for the SESA
DataStore. You must have created a symcmgmt user as
the Oracle administrator prior to starting the SESA
Installation Wizard.
Database Administrator
Password
Type the Administrator account password of six or more
alphanumeric characters. An account with a password is
required.
Host Name or IP Address
Type the IP address of the computer on which the SESA
DataStore is being installed.
Database port number
Type the listening port for the SESA DataStore (by
default, 1521).
This installs the additional SESA DataStore on the computer on which you
are running the SESA Installation Wizard.
11 In the Database Driver Directory panel, type the location in which the Oracle
driver (classes12.jar) is installed, or click Browse to navigate to this location.
The default location is MANAGER/LIB.
The SESA Installation Wizard reports the status of the components that are
being installed using the specified logons, passwords, paths, and ports
information.
12 In the Operation Complete panel, click Next.
13 After the SESA DataStore finishes installing, repeat this procedure for each
additional SESA DataStore.
Installing the SESA DataStore for Oracle on a Solaris computer
You can install the SESA DataStore over an Oracle database server on a
dedicated Solaris computer. You must already have installed and prepared
Oracle 9i (version 9.0.x to 9.2.0.x) on the Solaris computer. The SESA Integration
Wizard does not detect whether the Oracle database server is already installed.
Before you install the SESA DataStore, you should complete the following tasks:
■
Install the Oracle database server.
■
Create a SESA database on the Oracle database server.
■
Create and grant privileges to an Oracle database user.
See “Preparing for and installing Oracle 9i on a Solaris computer” on page 112.
Installing SESA
Installing the SESA DataStore
In addition, the SESA Directory must already be installed and functioning on
another Solaris or Windows computer.
Remote installations are convenient when the Solaris computer on which the
SESA DataStore is to be installed does not have a video card or monitor, or is not
physically accessible to you. You can use Telnet sessions to access the
installation computer remotely.
However, because the SESA Installation Wizard has a graphical user interface
associated with it, you must export the display of the installation computer.
To install the SESA DataStore for Oracle on a Solaris computer
1
On the SESA DataStore computer, start the SESA Installation Wizard.
See “Starting the SESA Installation Wizard” on page 134.
2
When you are prompted to supply a location for temporary installation files,
do one of the following:
■
Accept the default location as long as it has at least 75 MB of hard disk
space available.
■
Type a location or click Browse to find a different location that has 75
MB of hard disk space available.
3
In the introductory wizard panels, review and type the requested
information, and then click Next.
4
In the SESA Preinstallation Requirements Summary panel, confirm that the
computer to which you are installing is running Sun Solaris version 8 (64bit).
In addition, the computer must have an existing installation of Oracle 9i.
5
In the SESA Install Menu panel, click Install SESA DataStore.
6
In the SESA DataStore: Database Server Options panel, click Install SESA
DataStore (Use Oracle).
7
In the Select Working Directory panel, accept the default location of /opt/
Symantec/SESA or select another location.
If you have an existing SESA component on the computer, then you must
accept the current working directory.
SESA requires a folder on your hard drive with 817 MB of free disk space as a
working directory.
8
In the Install SESA DataStore on Oracle panel, review the preparation steps
and verify that they have been completed.
9
Verify that the Oracle database instance that you want to use for the SESA
DataStore and the Oracle listener are both running.
167
168 Installing SESA
Installing the SESA DataStore
10 If necessary, type the following commands to start the database:
sqlplus /nolog
connect / as sysdba
startup
11 If necessary, type the following command to start the Oracle listener:
lsnrctl start
12 Click Next.
13 In the Existing SESA Directory panel, do the following for the SESA
DataStore to connect with the SESA Directory:
SESA Directory
Administrator Password
Type the password for the SESAdmin user.
IP Address
Type the IP address of the computer on which the SESA
Directory is installed. This can be the local computer or a
remote computer. SESA Managers use this IP address to
communicate with the SESA Directory.
If connections to the SESA Directory computer are made
using authenticated SSL, you must type the host name or
FQDN of the computer instead of the IP address.
Because the default location is the local computer, you
must modify this address before continuing.
Directory port number
Type the secure listening port for the SESA Directory (by
default, 636). SESA Managers use this port to
communicate with the SESA Directory.
14 In the Domain Selection panel, click the name of the SESA administrative
domain that you typed when you installed the SESA Directory from the
drop-down list.
The SESA administrative domain name appears in the Symantec
management console navigational tree as the top-level administrative
domain.
Installing SESA
Installing the SESA DataStore
15 In the SESA DataStore panel, confirm the information for the SESA
DataStore installation, or do the following:
SESA DataStore Name
Type the name of the Oracle database (ORACLE_SID) that
you want to use for the SESA DataStore. The default is
SESA.
Caption
Type an additional identifier for the SESA DataStore. The
default is the computer name. SESA DataStores are
identified in the Symantec management console by the
combination of the Caption and the SESA DataStore
Name.
Description
Type an additional description of the database. The
default description includes the type of SESA DataStore,
the schema, and the Oracle driver type.
16 In the Local SESA DataStore panel, confirm the default settings or do the
following for the SESA DataStore installation:
Database Administrator
Name
Type the Database Administrator name symcmgmt. The
symcmgmt Database Administrator account is created
when you run the create.sql script.
Database Administrator
Password
Type the password for the symcmgmt Database
Administrator account. The default password given to
this account by the create.sql script is password.
IP Address
Type the IP address of the computer on which the SESA
DataStore is being installed.
Database port number
Type the listening port for the SESA DataStore (by
default, 1521).
17 In the Database Driver Directory panel, type the location of the Oracle driver
(classes12.jar), or click Browse to navigate to this location.
On the Solaris SESA Foundation Pack CDs, the default location is
Solaris.CD1/MANAGER/LIB.
The SESA Installation Wizard reports the status of the components that are
being installed using the specified logons, passwords, paths, and ports
information.
18 In the Operation Complete panel, click Next.
169
170 Installing SESA
Installing the SESA DataStore
19 In the SESA Install Menu panel, click Next.
20 In the SESA Installation Successful panel, click Finish to exit the SESA
Installation Wizard.
Installing multiple SESA DataStores for Oracle on a Solaris
computer
SESA allows you to install multiple SESA DataStores. Each SESA DataStore is
supported by a separate Oracle database. These databases must be created prior
to running the SESA Installation Wizard.
See “Creating one or more Oracle 9i databases for SESA on Solaris” on page 119.
Once the supporting databases have been created, you run the SESA Installation
Wizard to integrate the SESA DataStores into SESA.
To install multiple SESA DataStores for Oracle on a Solaris computer
1
On the SESA DataStore computer, start the SESA Installation Wizard.
See “Starting the SESA Installation Wizard” on page 134.
2
Follow the on-screen instructions, without modifying existing settings, until
you reach the SESA Install Menu panel.
3
In the SESA Install Menu panel, click Advanced Options, and then click
Next.
4
In the SESA Advanced Install Menu, click Install Additional SESA
DataStore (Oracle), and then click Next.
5
In the Install SESA DataStore on Oracle panel, verify that you completed the
required preinstallation steps for an Oracle SESA DataStore, and then click
Next.
Installing SESA
Installing the SESA DataStore
6
In the Existing SESA Directory panel, do the following for the additional
SESA DataStore to connect with the SESA Directory:
SESA Administrator
Password
Type the Directory Administrator password for the
SESAdmin account.
IP Address
Type the IP address of the computer on which the SESA
Directory is installed. This can be the local computer or a
remote computer. SESA Managers use this IP address to
communicate with the SESA Directory.
If connections to the SESA Directory computer are made
using authenticated SSL, you must type the host name or
FQDN of the computer instead of the IP address.
Directory port number
Type the secure listening port for the SESA Directory (by
default, 636). SESA Managers use this port to
communicate with the SESA Directory.
7
In the Domain Selection panel, select the name of the SESA administrative
domain that you typed when you installed the SESA Directory from the
drop-down list.
The SESA administrative domain name appears in the Symantec
management console navigational tree as the top-level administrative
domain.
8
In the SESA DataStore panel, confirm the default settings or do the
following:
SESA DataStore Name
Type a name for the additional SESA DataStore. The
name must be different from other SESA DataStore
names.
Caption
Type a caption for the additional SESA DataStore.
The default setting is the name of the computer.
Description
Type a new description, if necessary.
The default setting describes the SESA schema and
database driver type.
171
172 Installing SESA
Installing the SESA Manager
9
In the Local SESA DataStore panel, confirm the default settings or do the
following for the SESA DataStore installation:
Database Administrator
Name
Type the Administrator account name for the SESA
DataStore. You must have created a symcmgmt user as
the Oracle administrator prior to starting the SESA
Installation Wizard.
Database Administrator
Password
Type the Administrator account password of six or more
alphanumeric characters. An account with a password is
required.
Host Name or IP Address
Type the IP address of the computer on which the SESA
DataStore is being installed.
Database port number
Type the listening port for the SESA DataStore (by
default, 1521).
This installs the additional SESA DataStore on the computer on which you
are running the SESA Installation Wizard.
10 In the Database Driver Directory panel, type the location in which the Oracle
driver (classes12.jar) is installed or click Browse to navigate to this location.
On the Solaris SESA Foundation Pack CDs, the default location is
Solaris.CD1/MANAGER/LIB.
The SESA Installation Wizard reports the status of the components that are
being installed using the specified logons, passwords, paths, and ports
information.
11 In the Operation Complete panel, click Next.
12 After the SESA DataStore finishes installing, repeat this procedure for each
additional SESA DataStore.
Installing the SESA Manager
After you install the SESA Directory and SESA DataStore, you can install the
SESA Manager. The SESA Installation Wizard installs the SESA Manager on a
single computer. On all-Windows platforms, you can install the SESA Manager
with the SESA Directory or the SESA DataStore, or both. On all-Solaris
platforms, however, you must separate the SESA DataStore (Oracle 9i database
server) from all of the other SESA components. This means that you can install
the SESA Manager with the SESA Directory, or by itself, but you cannot install it
on the same computer as the SESA DataStore. When you use Oracle 9i for the
SESA DataStore, you must separate the SESA DataStore from all of the other
SESA components.
Installing SESA
Installing the SESA Manager
See “SESA Foundation Pack installation overview” on page 131.
For installations in which you are using the IBM DB2 Universal Database server
as the SESA DataStore, and are going to install the SESA Manager (Solaris or
Windows platform) on a separate computer, you must also install the supported
IBM DB2 Runtime Client and FixPak on the SESA Manager computer to support
the remote connection with the IBM DB2 Universal Database server (the SESA
DataStore). You must install the IBM DB2 Runtime Client on the SESA Manager
computer before you install the SESA Manager.
Note: After you install the IBM DB2 Runtime Client you must restart the
computer before installing the SESA Manager.
See “Supported third-party software for the SESA Manager” on page 226.
Installing the SESA Manager on a Windows computer
You install the SESA Manager after the SESA Directory and SESA DataStore
have been installed. If the SESA Directory or SESA DataStore is installed on a
Windows computer, you can install the SESA Manager along with one or both of
these other SESA components.
If the computer on which you are installing the SESA Manager is also hosting
Microsoft Internet Information Server (IIS), ensure that the World Wide Web
Publishing Service is stopped.
See “Avoiding Microsoft Internet Information Server conflicts” on page 55.
For installation configurations in which the SESA Manager is installed on a
different Windows computer than the IBM DB2 database server (SESA
DataStore), you must first install the IBM DB2 Runtime Client on the SESA
Manager computer, and then restart the SESA Manager computer before you
can install the SESA Manager.
To install the SESA Manager on a Windows computer
1
On the SESA Manager computer, start the SESA Installation Wizard.
See “Starting the SESA Installation Wizard” on page 134.
2
In the SESA Install Menu panel, click Custom Install, and then click Next.
3
In the SESA Install Menu panel that appears, click Install SESA Manager,
then click Next.
173
174 Installing SESA
Installing the SESA Manager
4
In the Select Working Directory panel, do the following:
■
For the Working Directory, accept the default location or select another
location.
SESA requires a folder on your hard drive as the working directory. The
drive on which this folder resides should have at least 20 MB of free
space.
For the Manager Log Directory, accept the default location or select
another location for SESA Manager logs.
This is the directory to which the SESA Manager will write its working
logs.
If you have a SESA component on this computer, this option will be
unavailable and you must accept the already existing working directory.
■
5
In the Existing SESA Directory panel, do the following for the SESA
DataStore to connect with the SESA Directory:
SESA Directory
Administrator Password
Type the password for the SESAdmin user.
IP Address
Type the IP address of the computer on which the SESA
Directory is installed. This can be the local computer or a
remote computer. SESA Managers use this IP address to
communicate with the SESA Directory.
If connections to the SESA Directory computer are made
using authenticated SSL, you must type the host name or
FQDN of the computer instead of the IP address.
Directory port number
6
Type the secure listening port for the SESA Directory (by
default, 636). SESA Managers use this port to
communicate with the SESA Directory.
In the Domain Selection panel, from the dropdown list, select the name of
the SESA administrative domain that you typed when you installed the
SESA Directory. If you have previously installed any SESA components on
the local computer, the domain selection is restricted.
The SESA administrative domain name appears in the Symantec
management console navigational tree as the top-level administrative
domain.
Installing SESA
Installing the SESA Manager
7
In the Manager Organizational Unit panel, select one of the following:
■
Managers: Store information about the SESA Manager in the Managers
organizational unit.
Default: Store information about the SESA Manager in the Default
organizational unit.
You can view the organizational unit that you select in the Symantec
management console.
For more information, see the Symantec Management Console User’s Guide.
■
8
In the SESA DataStore panel, select the SESA DataStore to configure for the
SESA Manager.
9
In the Java SDK Directory panel, confirm the location in which you installed
the Java Software Development Kit (SDK).
10 If the Web Server Installation panel appears, do the following for a Windows
user account:
Web Server Directory
Type the path for the IBM HTTP Server installation (by
default, C:\Program Files\IBM Http Server).
Login Name
Type the logon name for the Windows account of the
computer on which the IBM HTTP Server is being
installed. If the account does not exist, it is created.
Password
Type the password for the account. An account with a
password is required.
This panel appears only when the SESA Directory is installed on a different
computer.
11 If Microsoft IIS is installed on the computer, in the dialog box that prompts
you to stop and configure IIS or continue, click Yes.
12 If a Windows account has not previously been created for the IBM HTTP
Server, in the dialog box that prompts you to set up a Windows NT account,
click Yes.
13 If the SESA Secure Communications panel appears, do the following to
create the key database for self-signed SSL certificates:
Key Database Password
Type a password for the key database of six
alphanumeric characters minimum. High-ASCII and
DBCS characters are not allowed.
Company
Type the company name. High-ASCII and DBCS
characters are not allowed.
175
176 Installing SESA
Installing the SESA Manager
Country
Select a country from the dropdown list.
Select host IP Address
Type the IP address of the computer on which the SESA
Manager is being installed.
If connections to the SESA Manager computer are made
using authenticated SSL, you must type the host name or
FQDN of the computer instead of the IP address.
Key size (bits)
Type the encryption length in bits for the default, selfsigned certificate that SESA uses to secure data
communication. The default setting of 1024 bits is
standard. The longer the key size, the higher the security
of the data encryption. However, the higher the security
of the data encryption, the longer the amount of time
required to encrypt and decrypt data.
This panel appears only when the SESA Directory is installed on a different
computer.
14 In the SESA Agent Listen IP panel, confirm that the SESA Agent heartbeat
IP address is 0.0.0.0.
The SESA Installation Wizard reports the status of the components that are
being installed using the specified logons, passwords, paths, and ports
information. The SESA Installation Wizard installs the SESA Manager and
SESA Agent on the computer on which you are running the wizard. (Like
SESA clients, the SESA Manager must use a SESA Agent to pass data from
the computer on which you installed the SESA Manager.)
15 In the SESA Agent panel, confirm the IP address of the SESA Manager
computer.
The SESA Installation Wizard configures and installs the SESA Manager.
This process may take a while.
16 In the Operation Complete panel, click Next.
17 In the SESA Install Menu panel, click Exit the Installer.
18 Restart the computer.
Installing the SESA Manager on a Solaris computer
You must install the SESA Manager after the SESA Directory and SESA
DataStore have been installed. If your SESA Directory is installed on a Solaris
computer, you can install the SESA Manager on the same computer.
However, if you are using Oracle 9i as the SESA DataStore on a Solaris
computer, you must install the SESA Manager and the SESA DataStore on
separate computers.
Installing SESA
Installing the SESA Manager
After you install the SESA Manager on a Solaris computer, you must configure
and preinstall the /etc/syslog.conf file on the SESA Manager computer if you
want SESA to log alert notifications.
To install the SESA Manager on a Solaris computer
1
On the SESA Manager computer, start the SESA Installation Wizard.
See “Starting the SESA Installation Wizard” on page 134.
2
When you are prompted to supply a location for temporary installation files,
do one of the following:
■
Accept the default location as long as it has at least 75 MB of hard disk
space available.
■
Type a location or click Browse to find a different location that has 75
MB of hard disk space available.
3
In the introductory wizard panels, review and type the requested
information, and then click Next.
4
In the SESA Preinstallation Requirements Summary panel, confirm that the
computer to which you are installing is running the following:
■
Sun Solaris version 8 (64-bit)
■
Java Software Development Kit (SDK) 1.3.1_09 or later
5
In the SESA Install Menu panel, click Install SESA Manager.
6
In the Select Working Directory panel, do the following:
■
For the Working Directory, accept the default location of /opt/
Symantec/SESA or select another location.
The SESA Manager requires a folder on your hard drive as the working
directory. The drive on which this folder resides should have at least 20
MB of free space.
For the Manager Log Directory, accept the default location of
/opt/Symantec/SESA or select another location for the SESA Manager
logs.
This is the directory to which the SESA Manager will write its working
logs.
If you have a SESA component on this computer, this option will be
unavailable and you must accept the existing working directory.
■
177
178 Installing SESA
Installing the SESA Manager
7
In the Existing SESA Directory panel, do the following for the SESA
DataStore to connect with the SESA Directory:
SESA Directory
Administrator Password
Type the password for the SESAdmin user.
IP Address
Type the IP address of the computer on which the SESA
Directory is installed. This can be the local computer or a
remote computer. SESA Managers use this IP address to
communicate with the SESA Directory.
If connections to the SESA Directory computer are made
using authenticated SSL, you must type the host name or
FQDN of the computer instead of the IP address.
Because the default location of this IP address is the local
computer, you must change the IP address to reflect that
of the SESA Directory computer.
Directory port number
Type the secure listening port for the SESA Directory (by
default 636). SESA Managers use this port to
communicate with the SESA Directory.
8
In the Domain Selection panel, click the name of the SESA administrative
domain that you typed when you installed the SESA Directory from the
drop-down list.
The SESA administrative domain name appears in the Symantec
management console navigational tree as the top-level administrative
domain.
9
In the Manager Organizational Unit panel, select one of the following:
■
Managers: Store information about the SESA Manager in the Managers
organizational unit.
Default: Store information about the SESA Manager in the Default
organizational unit.
You can view the organizational unit that you select in the Symantec
management console.
For more information, see the Symantec Management Console User’s Guide.
■
10 In the SESA DataStore panel, select the SESA DataStore to configure for the
SESA Manager.
11 In the Java SDK Directory panel, confirm the location in which you installed
the SDK.
12 In the Web Server Installation panel, specify the location for the Web server
installation. The default is /opt/IBMHTTPD.
Installing SESA
Installing the SESA Manager
13 If the SESA Secure Communications panel appears, do the following to
create the key database for self-signed SSL certificates:
Key Database Password
Type a password for the key database of six
alphanumeric characters minimum. High-ASCII and
DBCS characters are not allowed.
Company
Type the company name. High-ASCII and DBCS
characters are not allowed.
Country
Click the country from the drop-down list.
Select host IP Address
Type the IP address of the computer on which the SESA
Manager is being installed.
If connections to the SESA Manager computer are made
using authenticated SSL, you must type the host name or
FQDN of the computer instead of the IP address.
Key size (bits)
Type the encryption length in bits for the default, selfsigned certificate that SESA uses to secure data
communication. The default setting of 1024 bits is
standard. The longer the key size, the higher the security
of the data encryption. However, the higher the security
of the data encryption, the longer the amount of time
required to encrypt and decrypt data.
This panel appears only when the SESA Directory is installed on a different
computer.
14 In the SESA Agent Listen IP panel, confirm that the SESA Agent heartbeat
IP address is 0.0.0.0.
The SESA Installation Wizard reports the status of the components that are
being installed using the specified logons, passwords, paths, and ports
information. The SESA Installation Wizard installs the SESA Manager and
SESA Agent on the computer on which you are running the wizard. (As for
SESA clients, the SESA Manager must use a SESA Agent to pass data from
the computer on which you installed the SESA Manager.)
15 In the SESA Agent panel, confirm the IP address of the SESA Manager
computer.
The SESA Installation Wizard configures and installs the SESA Manager.
Depending on the speed of your computer, this process may take a long time.
16 In the Operation Complete panel, click Next.
179
180 Installing SESA
Installing the SESA Agent for heartbeat monitoring
17 In the SESA Install Menu panel, click Exit SESA Installer, and then click
Next.
18 In the SESA Installation Successful panel, click Finish to exit the SESA
Installation Wizard.
To configure and preinstall SESA alert logging
1
On the Solaris computer on which the SESA Manager is installed, in the
Terminal window, change directories to the /etc/syslog.conf file.
2
In a text editor, open the syslog.conf file.
3
Add the following lines to the syslog.conf file, making sure to tab between
each incidence of the words debug and /var:
4
local0.debug
/var/adm/SESA.log
local1.debug
/var/adm/SESA_Alert.log
local2.debug
/var/adm/SESA_DataStore.log
local3.debug
/var/adm/SESA_Directory.log
local4.debug
/var/adm/SESA_Manager.log
To preinstall the log files that you configured previously, type the following
commands in the order in which they are listed:
touch /var/adm/SESA.log
touch /var/adm/SESA_Alert.log
touch /var/adm/SESA_DataStore.log
touch /var/adm/SESA_Directory.log
touch /var/adm/SESA_Manager.log
5
To stop the syslog service, type the following command:
/etc/init.d/syslog stop
6
To start the syslog service, type the following command:
/etc/init.d/syslog start
Installing the SESA Agent for heartbeat monitoring
When you install the SESA Manager, a SESA Agent is also installed to monitor
and help process communications to and from the SESA Manager. To monitor
and process communications, the SESA Agent uses various providers, each of
which assists with some type of SESA Agent function, such as SESA logging,
configuration, state, and inventory services.
In SESA 2.0 and later versions, SESA Agents include a new heartbeat provider,
which determines the state of all of the other SESA Agent providers.
Installing SESA
Installing the SESA Agent for heartbeat monitoring
When a SESA Directory or SESA DataStore component is installed on the same
computer as the SESA Manager, the SESA Agent that is automatically installed
with the SESA Manager handles the communication and heartbeat monitoring
for the SESA Directory and SESA DataStore components, too. However, when a
SESA Directory or SESA DataStore is installed remotely from the SESA
Manager, you must install an additional SESA Agent to provide heartbeat
monitoring between the SESA Manager and the other SESA component.
Installing a SESA Agent for heartbeat monitoring on a Windows
computer
You run the SESA Installation Wizard to install the SESA Agent for heartbeat
monitoring.
To install the SESA Agent for heartbeat monitoring on a Windows computer
1
On the SESA Directory or SESA DataStore computer, start the SESA
Installation Wizard.
See “Starting the SESA Installation Wizard” on page 134.
2
In the SESA Install Menu panel, click Custom Install.
3
In the SESA Install Menu panel that appears, click Advanced Options.
4
In the SESA Advanced Install Menu panel, click Install SESA Agent for
Heartbeats.
5
In the Select Working Directory panel, accept the default directory (C:\SESA)
or select another location.
If you have a SESA component on this computer, this option will be
unavailable and you must accept the existing working directory.
6
In the Existing SESA Directory panel, do the following for the SESA
DataStore to connect with the SESA Directory:
SESA Directory
Administrator Password
Type the password for the SESAdmin user.
IP Address
Type the IP address of the computer on which the SESA
Directory is installed. This can be the local computer or a
remote computer. SESA Managers use this IP address to
communicate with the SESA Directory.
If connections to the SESA Directory computer are made
using authenticated SSL, you must type the host name or
FQDN of the computer instead of the IP address.
181
182 Installing SESA
Installing the SESA Agent for heartbeat monitoring
Directory port number
Type the secure listening port for the SESA Directory (by
default, 636). SESA Managers use this port to
communicate with the SESA Directory.
7
In the Domain Selection panel, confirm the name of the SESA
administrative domain that you typed when you installed the SESA
Directory.
8
In the SESA Agent panel, type or confirm the IP address of the SESA
Manager to which the SESA Agent communicates.
If connections to the SESA Manager computer are made using authenticated
SSL, you must type the host name or FQDN of the computer instead of the IP
address.
9
In the Agent Organizational Unit panel, select one of the following:
■
Managers: Store information about the SESA Agent in the Managers
organizational unit.
Default: Store information about the SESA Agent in the Default
organizational unit.
You can view the organizational unit that you select in the Symantec
management console.
For more information, see the Symantec Management Console User’s Guide.
■
10 In the SESA Agent Listen IP panel, do one of the following:
■
If the Windows computer on which you are installing the SESA
Manager also acts as a cluster server for Microsoft Windows Network
Load Balancing, type the heartbeat IP address of the Microsoft
Windows clustering technology.
If the Windows computer on which you are installing the SESA
Manager is not part of a Microsoft Windows Network Load Balancing
system, confirm that the SESA Agent heartbeat IP address is 0.0.0.0.
The SESA Installation Wizard installs the SESA Agent on the computer on
which you are running the wizard.
■
11 In the Operation Complete panel, click Next.
12 In the SESA Advanced Install Menu panel, click Main SESA Install Menu.
13 In the SESA Install Menu panel, click Exit the Installer.
14 When you are prompted to exit, click Yes.
15 In the SESA Installation Successful panel, click Finish to complete the SESA
Agent installation.
Installing SESA
Installing the SESA Agent for heartbeat monitoring
Installing a SESA Agent for heartbeat monitoring on a Solaris
computer
You must install a SESA Agent for heartbeat monitoring on the SESA DataStore
computer if you are running the Oracle database server. If you have installed the
SESA Directory on a Solaris computer that is remotely located from the SESA
Manager, you must also install a SESA Agent for heartbeat monitoring on the
SESA Directory computer.
You must run the SESA Installation Wizard on the Solaris computer on which
you want to install the SESA Agent. However, you do not need to be physically
located at this computer, as long as you can connect to it from another Solaris
computer.
To install the SESA Agent for heartbeat monitoring on a Solaris computer
1
On the SESA Directory or SESA DataStore computer, start the SESA
Installation Wizard.
See “Starting the SESA Installation Wizard” on page 134.
2
When you are prompted to supply a location for temporary installation files,
do one of the following:
■
Accept the default location as long as it has at least 75 MB of hard disk
space available.
■
Type a location or click Browse to find a different location that has 75
MB of hard disk space available.
3
In the Welcome to the SESA Installation panel, review the information, and
then click Next.
4
In the SESA License Agreement panel, review the agreement, click I accept
the agreement, and then click Next.
If you don’t accept the agreement, you cannot continue the installation.
5
In the SESA Preinstallation Requirements Summary panel, confirm that the
computer to which you are installing is running Sun Solaris version 8 (64bit).
6
In the SESA Install Menu panel, click Advanced Options.
7
In the SESA Advanced Install Menu panel, click Install SESA Agent for
Heartbeats.
8
In the Select Working Directory panel, accept the default location, /opt/
Symantec/SESA, or select another location.
If you have a SESA component on this computer, you must accept the
existing working directory.
183
184 Installing SESA
Installing the SESA Agent for heartbeat monitoring
9
In the Existing SESA Directory panel, do the following for the SESA
DataStore to connect with the SESA Directory:
SESA Directory
Administrator Password
Type the password for the SESAdmin user.
IP Address
Type the IP address of the computer on which the SESA
Directory is installed. This can be the local computer or a
remote computer. SESA Managers use this IP address to
communicate with the SESA Directory.
If connections to the SESA Directory computer are made
using authenticated SSL, you must type the host name or
FQDN of the computer instead of the IP address.
Directory port number
Type the secure listening port for the SESA Directory (by
default 636). SESA Managers use this port to
communicate with the SESA Directory.
10 In the Domain Selection panel, confirm the name of the SESA
administrative domain that you typed when you installed the SESA
Directory.
11 In the SESA Agent panel, type the IP address of the SESA Manager to which
the SESA Agent communicates.
If connections to the SESA Manager computer are made using authenticated
SSL, you must type the host name or FQDN of the computer instead of the IP
address.
12 In the Agent Organizational Unit panel, select one of the following:
■
Managers: Store information about the SESA Agent in the Managers
organizational unit.
Default: Store information about the SESA Agent in the Default
organizational unit.
You can view the organizational unit that you select in the Symantec
management console.
For more information, see the Symantec Management Console User’s Guide.
■
13 In the SESA Agent Listen IP panel, confirm that the SESA Agent heartbeat
IP address is 0.0.0.0.
The SESA Installation Wizard installs the SESA Agent on the computer on
which you are running the wizard.
14 In the Operation Complete panel, click Next.
15 In the SESA Advanced Install Menu panel, click Main SESA Install Menu.
16 In the SESA Install Menu panel, click Exit the Installer.
Installing SESA
Performing a silent installation on Solaris or Windows computers
Performing a silent installation on Solaris or
Windows computers
SESA provides a method for users to perform silent installations. A silent
installation is an unattended, automated installation in which user input is not
required. The values that would normally be typed into the installation panels
by a user during the installation are instead automatically supplied by a settings
file that is created prior to the silent installation.
You may want to perform a silent installation to simplify the repeated
installation of similar components. For example, if you have already installed
the SESA Directory and SESA DataStore, and you plan to install several SESA
Managers on similar computers, you can automate this by creating a silent
installation settings file that will automatically provide the necessary
information.
Alternatively, you may want to perform a silent installation to automate
complex repeated installations. For example, you may need to run several SESA
test cases that you can quickly reinstall. You can set up the silent installation
once to record the steps, and use a silent installation parameter to reinstall each
subsequent time.
How a silent installation works
When you run the SESA Installation Wizard from the command line with the
-silentfile parameter, the wizard only creates the settings file that you can use in
subsequent silent installations. The wizard does not install any SESA
components. You must run the SESA Installation Wizard from the command
line using the -silent parameter to silently install the SESA components with the
settings file that you created.
The silent installation duplicates each segment of an attended installation. You
must create a separate settings file for each segment of the SESA installation
that you want to duplicate. For example, if you are installing the SESA Directory
on one Solaris computer, the SESA DataStore on another Solaris computer, and
the SESA Manager on a Windows computer, you must create an installation
settings file for each of these installations.
Silent installations require that all of the values be identical to the ones that
were typed when the installation settings file was created. This includes SESA
Manager IP addresses, account user names and passwords, directory locations,
and so on. This also includes the location of additional required SESA
installation files. For example, if you directed the SESA Installation Wizard to
drive E when you were prompted for SESA Foundation Pack CD2, you must
ensure that the CD2 files are available on drive E when you execute the silent
185
186 Installing SESA
Performing a silent installation on Solaris or Windows computers
installation. You may want to place these resources on a mapped common
network drive so that they are available for each silent installation that you
perform. You can modify the location of these files by directly editing the silent
installation settings file that you created.
Additional installation steps that take place outside of the SESA Installation
Wizard will not be automated in the silent installation settings file and must be
completed using the SESA Installation Wizard. For example, some distributed
installation scenarios require that you modify certain IBM DB2 services settings
on Windows and that you install an IBM DB2 Runtime Client. This occurs
outside of the scope of the SESA Installation Wizard and cannot be automated as
part of the silent installation.
If any errors are encountered during a silent installation, the installation
process may be interrupted and an error message may be displayed. For
example, the SESA Installation Wizard will display an error that instructs the
user to disable the Microsoft IIS World Wide Web Publishing Service if the
service is running on a computer on which the SESA Manager is to be installed.
In this case, you would want to ensure that the Microsoft IIS World Wide Web
Publishing Service was disabled prior to running the silent installation to avoid
this error message, which would pause the installation process.
lists the available silent installation command-line parameters.
To perform a silent installation, you must complete the following tasks:
■
Creating a silent installation settings file
■
Running a silent installation
Note: To prevent performance problems, do not run the installation with a
command line directly from the SESA Foundation Pack distribution media.
Installing SESA
Performing a silent installation on Solaris or Windows computers
Creating a silent installation settings file
Performing a silent installation requires a settings file to supply the values that
are normally input by the user during installation. Running the SESA
Installation Wizard from the command line to create the settings file does not
install any SESA components.
To create the silent installation settings file
1
To change directories to the SESA Foundation Pack CD1, on the computer on
which you are starting the SESA Installation Wizard, at the command
prompt, type the following command:
cd /<SESA CD1 directory>
2
If you are installing on a UNIX computer, ensure that the environment
variables for HOMEROOT and TMPDIR are set to the desired values before
you run the silent installation.
The default values are as follows:
■
HOMEROOT=/export/home
■
TMPDIR=/var/tmp
3
Ensure that the exported variable LD_LIBRARY_PATH includes the current
directory.
4
If the LD_LIBRARY_PATH variable is not exported from the command line,
to execute it, type the following command:
export LD_LIBRARY_PATH=./
There should be no spaces on either side of the equal (=) operator.
5
To start the SESA Installation Wizard with the -silentfile parameter, type
the following command:
java -jar setup.ja_ -silentfile -f<filename>
where <filename> contains the location and name of the file to be created.
For example, java -jar setup.ja_ -silentfile -f manager.settings.
You must have write access to the file name and location that you specify.
6
Follow the on-screen instructions in the SESA Installation Wizard.
This creates the silent installation settings file. The actual installation of
components does not occur.
The SESA Installation Wizard will display a Silent Install Script File Created
panel that notes the location of the new file.
187
188 Installing SESA
Performing a silent installation on Solaris or Windows computers
Running a silent installation
After you have created the silent installation settings file, you can run the silent
installation using the values in the settings file. You can run repeated silent
installations using the same settings file, for example, if you had several SESA
Managers that you wanted to quickly install on several similar computers.
To run a silent installation
1
Ensure that you have created a silent installation settings file.
See “Creating a silent installation settings file” on page 187.
2
To change directories to the SESA Foundation Pack CD1, on the computer on
which you are starting the SESA Installation Wizard, at the command
prompt, type the following command:
cd /<SESA CD1 directory>
3
4
If you are installing on a UNIX computer, ensure that the environment
variables for HOMEROOT and TMPDIR are set to the desired values before
you run the silent installation.
The default values are as follows:
■
HOMEROOT=/export/home
■
TMPDIR=/var/tmp
To start the SESA Installation Wizard with the -silent parameter, type the
following command:
java -jar setup.ja_ -silent -f <filename>
where <filename> contains the location and name of the silent installation
settings file that you created.
Several processes will launch while the silent installation is running. This
may take several minutes. Do not interrupt the silent installation process.
When the process completes, the focus returns to the original command
prompt from which you launched the silent installation, and one of several
Task Completed messages appears.
Chapter
7
After you install SESA
This chapter includes the following topics:
■
Testing the installation
■
Post-installation tasks
■
Uninstalling SESA
■
About reinstalling a SESA DataStore in Windows environments
Testing the installation
After installation, you can verify that you installed the appropriate components
and that they are working properly.
You can test the SESA installation by performing the following tasks:
■
Verify that the installed services have started.
■
Verify that the IBM HTTP Server is operating.
■
Verify that the SESA servlets are operating.
■
Examine the SESA logs for messages.
190 After you install SESA
Testing the installation
Launching the Symantec management console
The Symantec management console is launched from Windows, Solaris, and
Linux computers via the supported Web browsers and Sun Java 2 Runtime
Environments (J2REs) that are listed in Table 7-1.
Table 7-1
Supported Web browsers and remote computers
Remote computer
Supported Web browser
Supported J2RE
Windows 98 or later
Microsoft Internet Explorer 5.5 with
J2RE 1.3.1_02 or
Service Pack 2 or 6.0 or Netscape Navigator 1.3.1_09
7.0x with the latest security patches
applied
Solaris 7 or later
Mozilla 1.7.2 with the necessary packages
and patches applied
J2RE 1.4.2_02
Red Hat Linux 6.2/7.0/ Mozilla 1.7.2 with the necessary packages
7.1/7.2 or later
and patches applied
J2RE 1.4.2_02
Before you launch the Symantec management console, ensure that the
appropriate Sun Java 2 Runtime Environment is installed on the computer that
is running the Web browser. The J2RE includes the Java Plug-in product, which
is required when running the Java 2 environment inside Mozilla Web browsers.
When installing Mozilla on a Solaris or Linux computer, always install the
patches first, followed by the Mozilla software, and then the Java Plug-in
product.
The J2RE is included on the Windows and Solaris CD1 of the SESA Foundation
Pack CD set in the UTILS\JRE directory.
Note: If you are launching the Symantec management console in a Microsoft
Internet Explorer browser on a Windows 2003 computer, you may encounter
problems connecting to the SESA Manager using the SESA Manager IP address.
The connection fails because Windows 2003 sets Internet Explorer to the
highest security setting by default. To resolve the problem, you must add the IP
address of the local host computer to the Trusted Sites list in Internet Explorer.
For information on adding to the Trusted Sites list in Internet Explorer, see your
Microsoft Internet Explorer online Help or documentation.
You can launch the Symantec management console remotely in an Internet
browser on Windows, Solaris, or Linux platforms. On Windows, you can also
launch the console locally on the SESA Manager computer.
After you install SESA
Testing the installation
To launch the Symantec management console on a Windows computer
1
Do one of the following:
Connect from a remote
computer
In a supported Microsoft Internet Explorer or Netscape
Navigator browser window, type the URL for the SESA
Manager, and then press Enter.
For example:
https://<IP address, host name, or FQDN of SESA
Manager computer>/sesa/ssmc
If connections to the SESA Manager computer are made
using authenticated SSL, you must type the host name or
FQDN of the computer instead of the IP address.
Connect from the SESA
Manager computer
2
On the Windows taskbar, click Start > Programs >
Symantec Enterprise Security > Symantec
management console.
Do one or both of the following:
■
In the security alert message that warns you that you are about to view
pages over a secure connection, click In the future, do not show this
warning, and then click OK.
If you have previously disabled this message, it does not appear.
■
In the security alert message that informs you about your site’s
security certificate, click Yes.
If you do not want this message to appear in the future, upgrade to selfsigned SSL certificates, or to fully authenticated, CA-signed SSL
certificates (recommended).
For more information on upgrading to authenticated, CA-signed
certificates, see the Symantec Enterprise Security Architecture
Administrator’s Guide.
191
192 After you install SESA
Testing the installation
3
In the Logon window, type the name, password, and, optionally, the domain
name for one of the following SESA accounts:
SESA Administrator
account
By default, the user name for this account is SESAdmin.
This account has access rights to every SESA
administrative domain on every SESA Manager
computer. Therefore, you do not have to type a domain
name when you log on to the Symantec management
console using this account.
SESA Domain
Administrator account
This account has access rights to the administrative
domain in which the SESA Manager is located. To log on
to the administrative domain in which the SESA
Manager is located, leave the Domain box empty. To log
on to a different administrative domain or subdomain,
type the domain name in either dotted or full notation.
An example of full notation is: dc=Symantec,dc=SES
An example of dotted notation is: Symantec.SES
4
Click Login.
5
If you are asked whether you want to view both secure and nonsecure items,
select one of the following:
■
Yes
No
Because the browser is connecting over HTTPS (a secure connection), all
items are secured, so selecting Yes or No yields the same results.
■
To launch the Symantec management console on a Solaris or Linux computer
1
In Mozilla, type the URL for the SESA Manager, and then press Enter.
For example, https://<IP address, host name, or FQDN of the SESA Manager
computer>/sesa/ssmc
If connections to the SESA Manager computer are made using authenticated
SSL, you must type the host name or FQDN of the computer instead of the IP
address.
2
In the Website Certified By an Unknown Authority message that warns you
that Mozilla does not recognize your certificate, click Accept this certificate
permanently, and then click OK.
If you have previously disabled this message, it does not appear.
After you install SESA
Testing the installation
3
In the Logon window, type the name, password, and, optionally, the domain
name for one of the following SESA accounts:
SESA Administrator
account
By default, the user name for this account is SESAdmin.
This account has access rights to every SESA
administrative domain on every SESA Manager
computer. Therefore, you do not have to type a domain
name when you log on to the Symantec management
console using this account.
SESA Domain
Administrator account
This account has access rights to the administrative
domain in which the SESA Manager is located. To log on
to the administrative domain in which the SESA
Manager is located, leave the Domain box empty. To log
on to a different administrative domain or subdomain,
type the domain name in either dotted or full notation.
An example of full notation is: dc=Symantec,dc=SES
An example of dotted notation is: Symantec.SES
4
Click Login.
5
In the Warning - Security message that informs you about your site’s
security certificate, click Yes.
Verifying that the installed services have started
SESA installs several applications that run as services on Windows and daemons
on Solaris. You can verify that they are successfully executing by checking the
respective lists of currently running services or processes.
Depending on the platform, you either verify that services or daemons have
started.
To verify that the installed services have started on Windows
◆
On the computer on which the services are installed, open the Windows
Component Services panel and verify that the corresponding services are
listed and that their corresponding status is Started:
■
Apache Tomcat
■
DB2 (all services with a Startup Type of Automatic)
■
IBM HTTP Server
■
IBM Tivoli Directory Server V5.2 and Admin Daemon
■
SESA AgentStart Service
193
194 After you install SESA
Testing the installation
To verify that the installed daemons have started on Solaris
1
On the computer on which the daemons are installed, become superuser.
2
To list the daemon processes that are currently running, at the command
prompt, type the following command:
ps -efu root
3
In the display of processes that are shown, verify that the corresponding
processes are listed for the daemons that you want to verify:
Apache Tomcat
■
/usr/j2sdk1_3_1_09/bin/../bin/sparc/
native_threads/java -server -verbosegc -Xms
■
/usr j2sdk1_3_1_09/jre/bin/../bin/sparc/
native_threads/java -Dnetworkaddress.ca
DB2
db2sysc (multiple entries)
Oracle Database
ora_pmon_<DBNAME>
IBM HTTP Server
opt/IBMHTTPD/bin/httpd
IBM Tivoli Directory Server
V5.2
bin/ibmslapd -f /etc/ibmslapd.conf
SESA AgentStart Service
opt/Symantec/SESA/Agent/agentd
Note that these entries assume you have installed the components in their
default directories. Your display may appear differently. Note also that
seeing these processes listed is only a first-level verification, there may be
other factors affecting their correct operation. However, if you do not see an
entry for the process running, you can assume it was not successfully
installed.
Verifying that the IBM HTTP Server is operating
You can verify that the IBM HTTP Server is installed and operating correctly by
browsing to the IBM HTTP Server administrative interface.
To verify that the IBM HTTP Server is operating on Windows or Solaris
◆
In a supported Internet browser, type the following URL:
https://<IP Address of the HTTP Server>
The IBM HTTP Server welcome page appears.
After you install SESA
Testing the installation
Verifying that the SESA servlets are operating
SESA servlets are components executing on the SESA Manager that are
responsible for specific SESA tasks, such as logging or alerting. You verify that
the SESA servlets are operating successfully by browsing to the corresponding
servlet’s location.
To verify that the SESA servlets are operating in Windows or Solaris
1
In a supported Internet browser, type one of the following URLs:
■
For Event Logger: https://localhost/sesa/servlet/EventLogger
■
For Alert Logger: https://localhost/sesa/servlet/AlertLogger
For Config: https://localhost/sesa/servlet/config?action=stats
If you are browsing to the SESA Manager from a remote computer, type the
IP Address or FQDN of the SESA Manager instead of localhost.
■
2
To display the status page for the server, when prompted, type an
administrator user name and password.
Verifying that a shared schema is installed
You can verify that the schema that the SESA Installation Wizard installs during
SESA Manager installation has been successfully installed.
To verify that a shared schema is installed
1
On the SESA Manager computer, in a supported Web browser, type the
following URL:
https://<IP address of SESA Manager computer>/sipi/servlet/
sipi?action=indexinfo
2
When you are prompted to type a user name and password, type the user
name and password for the SESA Domain Administrator.
3
In the SIP Service Web page, in the Package Info drop-down box, select
Installed Domain Packages, and then click Go.
This option detects that all shared schemas have been successfully deployed
to the SESA administrative domain or domains.
4
If necessary, scroll to the Status tables.
195
196 After you install SESA
Testing the installation
5
Verify that the Package Status column in all of the Status tables shows a
green Installed in each row.
If one or more displays a Failed status, or a Pending status stays without
resolving to an Installed status after five minutes, you can view deployment
or removal information in the SIP Servlet logs or the Symantec
management console.
For more information on viewing SIP Service logs, see the Symantec
Enterprise Security Architecture Administrator’s Guide.
6
Exit the Web browser.
Examining the SESA logs for messages
SESA maintains ongoing status logs for its components. You can use these logs
to verify successful operation and to troubleshoot problems. If you see any
exceptions or other issues written to these logs, you can call Symantec
Technical Support.
To examine the SESA logs for messages
1
2
At the command prompt, change directories to the location of the logs that
you specified during installation. By default the directory is:
■
C:\SESA\<computer name>\<component>\logs
on a Windows machine
■
/opt/Symantec/SESA/<computer name>/<component>/logs
on a Solaris machine
Open and examine the logs in each of the following subfolders:
■
Admin
■
Alert
■
Bootstrap
■
command
■
Config
■
DirMgrAPI
■
Event
■
heartbeat
■
Inventory
■
InventoryQueue
■
Manager_LiveUpdate
■
Notification
■
ses_manager
After you install SESA
Post-installation tasks
■
SIPIConfigurationLoader
■
SIPService
■
State
3
At the command prompt, change directories to the location of the SESA
Agent logs.
The default location on Windows computers is C:\SESA\Agent.
The default location on Solaris computers is /opt/Symantec/SESA/Agent.
4
Open and examine the following logs:
5
■
AgentStart.log (For routine startup information)
■
sesa-agent.log (For SESA Agent operation)
■
uninst.log (After removing SESA components)
If you notice what appear to be error messages in the sesa-agent.log file,
compare the messages to the following:
Error: no management server defined
Error: no management server defined
Created HttpServer object on 127.0.0.1:8086 with 6 threads.
SymcProvider.initialize: finished initialization; using
interface 192.168.01.1
Contents changed - saving sesaagent.svc
Shut down complete
SESA Agent (v 2.0.55.3) - Copyright(c) 2002-2003 - Symantec
Corporation
Created HttpServer object on 127.0.0.1:8086 with 6 threads.
SymcProvider.initialize: finished initialization; using
interface 192.168.01.1
StateProxy::exec() -- error. Connection refused: connect
Disregard any messages that match the text above. They do not indicate
problems.
Post-installation tasks
After you install SESA, ensure that you do the following:
■
Install additional SESA domains, as necessary.
See “Installing additional SESA domains” on page 198.
■
Deploy SESA Directory replicas if you have added a new SESA domain after
installing SESA Directory replicas.
See “Deploying SESA Directory replicas” on page 204.
197
198 After you install SESA
Post-installation tasks
■
Configure SESA to generate SNMP alert responses as necessary.
See “Configuring SESA to generate SNMP alert responses” on page 205.
■
Upgrade the IBM HTTP Server version 1.3.28.1 with the latest security
patches that are available from IBM.
Ensure that you install the proper version-specific patches.
■
Edit the security properties of Windows folders on the applicable SESA
Manager computers.
By default, SESA gives everyone access to the SESA Manager folders in the
SESA Directory on the SESA Manager computer. Similarly, SESA gives full
permissions to everyone who accesses the IBM HTTP Server, IBM DB2, and
IBM Directory Server folders.
Only the administrators group needs access to the SESA Manager and other
third-party component folders. Therefore, you may want to edit the
security properties of the folders in Windows to restrict permissions to
them.
■
Back up the SESA DataStore.
For more information on Data backup and recovery, see the Symantec
Enterprise Security Architecture Administrator’s Guide.
■
Maintain SESA data.
For more information on the SESA Data Maintenance Utility and data
maintenance, see the Symantec Enterprise Security Architecture
Administrator’s Guide.
■
Tune database performance, as necessary.
For more information on maintaining the SESA DataStore or performance
maintenance, see the Symantec Enterprise Security Architecture
Administrator’s Guide.
Installing additional SESA domains
By default, at least one administrative domain is installed when you install your
SESA Manager. You can install additional domains; however, each domain must
have at least one SESA Manager associated with it. You can also install
subdomains under top-level domains.
You install the additional domains and subdomains on the SESA Manager
computer using the SESA Installation Wizard. You can uninstall SESA domains
and subdomains using the SESA Uninstallation Wizard.
See “Uninstalling SESA” on page 206.
After you install SESA
Post-installation tasks
You can use the SESA Installation Wizard to install an additional top-level
domain on a Windows or Solaris computer. If you install a new top-level domain,
and one or more replica SESA Directories already exist, you must manually copy
the domain name suffix of the newly added top-level domain to the replica SESA
Directory or SESA Directories before you can complete the installation of the
additional top-level domain.
You can also install a subdomain under any top-level domain.
To install an additional SESA domain on a Windows or Solaris computer
1
On the SESA Directory computer, start the SESA Installation Wizard.
See “Starting the SESA Installation Wizard” on page 134.
2
In the SESA Install Menu panel, click Custom Install, and then click Next.
3
In the SESA Install Menu panel, click Advanced Options, and then click
Next.
4
In the SESA Advanced Install Menu panel, click Create New Domain, and
then click Next.
5
In the Select Working Directory panel, click Next.
Because you have a previously existing SESA component on this computer,
this option is dimmed and you must accept the already existing working
directory.
6
In the Existing SESA Directory window, for the SESA DataStore to connect
with the SESA Directory, do the following:
SESA Directory
Administrator Name
Type the name for the IBM Directory Server
administrator account in the form cn=<name> (by
default, cn=root).
SESA Directory
Administrator Password
Type the Directory Administrator password.
IP Address
Type the IP address of the computer on which the SESA
Directory is installed. This can be the local computer or a
remote computer. SESA Managers use this IP address to
communicate with the SESA Directory.
If connections to the SESA Directory computer are made
using authenticated SSL, you must type the host name or
FQDN of the computer instead of the IP address.
Directory port number
Type the secure listening port for the SESA Directory (by
default, 636). SESA Managers use this port to
communicate with the SESA Directory.
199
200 After you install SESA
Post-installation tasks
7
In the Create New Domain panel, do one of the following:
■
If the panel contains a domain field, skip to step 9.
■
If the panel contains text instructions, you must manually add domain
suffixes for each replica SESA Directory.
The text instructions appear because the wizard has detected that
replicas exist for the SESA Directory in which you are installing the
new domain. You must manually add the suffix to the replicas before
you can continue with the new domain installation.
See “To manually copy a domain name suffix to each replica SESA
Directory” on page 201.
8
In the Create New Domain panel, type the name of the new SESA
administrative domain that you want to add to the SESA Directory.
The SESA administrative domain name will appear in the Symantec
management console navigational tree as the top-level administrative
domain.
9
In the SESA Directory Domain Administrator panel, do the following:
Domain Administrator
Type or confirm the name for the SESA Domain
Administrator account. This account provides access to
its associated SESA administrative domain. Use this
Domain Administrator name and password to log on to a
particular SESA administrative domain (and SESA
Manager) after the SESA installation is complete.
Domain Administrator
Password
Type or confirm the Domain Administrator password. It
must be between six and twelve alphanumeric
characters.
Select Preferred Language Type or confirm the Language of the SESA Manager. The
default language is English. If you install non-English
security products, you must install them in the same
language as the SESA Manager.
The SESA Installation panel reports the status of components being
installed using the specified logons, passwords, paths, and ports
information.
10 In the Operation Complete panel, click Next.
11 In the SESA Install Menu panel, click Exit SESA Installer, and then click
Next.
12 In the SESA Installation Successful panel, to exit the SESA Installation
Wizard, click Finish.
After you install SESA
Post-installation tasks
To manually copy a domain name suffix to each replica SESA Directory
1
Do one of the following:
■
If you are physically located at the replica SESA Directory Windows
computer, log on using the appropriate administrative privileges.
■
If you are physically located at the replica SESA Directory Solaris
computer, become superuser.
■
If you are located at a remote Solaris computer, you must initiate a
Telnet session with the replica SESA Directory computer, and then
export a display.
See “Connecting to a remote Solaris computer and exporting its
display” on page 130.
2
On the replica SESA Directory computer, stop the IBM Directory Server.
To stop the IBM Directory Server, you use the IBM Directory Server Web
Admin interface.
For more information on starting and stopping the IBM Directory Server, see
the Symantec Enterprise Security Architecture Administrator’s Guide.
3
To log on to the master SESA Directory computer do one of the following:
■
If you are physically located at the master SESA Directory Windows
computer, log on using the appropriate administrative privileges.
■
If you are physically located at the master SESA Directory Solaris
computer, become superuser.
■
If you are located at a remote Solaris computer, you must initiate a
Telnet session with the master SESA Directory computer, and then
export a display.
See “Connecting to a remote Solaris computer and exporting its
display” on page 130.
4
On the master SESA Directory, in a text editor, open the ibmslapd.conf
configuration file.
On Windows computers, the default location is C:\Program
Files\IBM\LDAP\etc\ibmslapd.conf.
On Solaris computers, the default location is /opt/IBMldaps/etc/
ibmslapd.conf.
5
In the configuration file, search for the section that begins with the
following characters:
dn: cn=Directory
6
Locate the last three lines of this section.
Each line starts with the following text: ibm-slapdSuffix:
This text represents the suffixes that are added by SESA.
201
202 After you install SESA
Post-installation tasks
7
Copy the three lines to the same location in the ibmslapd.conf file on the
replica SESA Directory computer.
8
Restart the IBM Directory Server.
For more information on starting and stopping the IBM Directory Server, see
the Symantec Enterprise Security Architecture Administrator’s Guide.
9
Repeat this procedure for each replica computer.
10 Continue with step 8 of “To install an additional SESA domain on a
Windows or Solaris computer” on page 199.
To install an additional SESA subdomain on a Windows or Solaris computer
1
On the SESA Directory computer, start the SESA Installation Wizard.
See “Starting the SESA Installation Wizard” on page 134.
2
In the SESA Install Menu panel, click Custom Install, and then click Next.
3
In the SESA Install Menu panel, click Advanced Options, and then click
Next.
4
In the SESA Advanced Install Menu panel, click Create New Subdomain.
5
In the Select working Directory panel, click Next.
Because you have a previously existing SESA component on this computer,
this option is dimmed and you must accept the already existing working
directory.
6
In the Existing SESA Directory panel, for the SESA DataStore to connect
with the SESA Directory, do the following:
SESA Directory
Administrator Password
Type the Directory Administrator password. For top
domain super user accounts, the account name is in the
form of cn=<name> (by default, cn=root). For
subdomains, the default user is sesadmin. The password
is required.
IP Address
Type the IP address of the computer on which the SESA
Directory is installed. This can be the local computer or a
remote computer. SESA Managers use this IP address to
communicate with the SESA Directory.
If connections to the SESA Directory computer are made
using authenticated SSL, you must type the host name or
FQDN of the computer instead of the IP address.
Directory port number
Type the secure listening port for the SESA Directory (by
default, 636). SESA Managers use this port to
communicate with the SESA Directory.
After you install SESA
Post-installation tasks
7
In the Create New Subdomain panel, do the following:
■
Select the parent domain of the subdomain that you are going to create.
Type the name of the new subdomain without the extension .SES.
High-ASCII characters are allowed, but do not use special characters
such as !, @, #, $, %, ^, &, and *, or characters from a double-byte
character set (DBCS).
The SESA administrative domain name and extension appear in the
Symantec management console navigational tree as a subdomain of the
selected parent domain.
■
8
In the SESA Directory Domain Administrator panel, do the following:
Domain Administrator
Type or confirm the name for the SESA Domain
Administrator account. This account provides access to
its associated SESA administrative domain. Use this
Domain Administrator name and password to log on to a
particular SESA administrative domain (and SESA
Manager) after the SESA installation is complete.
Domain Administrator
Password
Type or confirm the Domain Administrator password. It
must be between six and twelve alphanumeric
characters.
Select Preferred Language Type or confirm the Language of the SESA Manager. The
default language is English. If you install non-English
security products, you must install them in the same
language as the SESA Manager.
The SESA Installation Wizard reports the status of components being
installed using the specified logons, passwords, paths, and ports
information.
9
In the Operation Complete panel, click Next.
10 In the SESA Install Menu panel, click Exit SESA Installer, and then click
Next.
11 In the SESA Installation Successful panel, to exit the SESA Installation
Wizard, click Finish.
203
204 After you install SESA
Post-installation tasks
Deploying SESA Directory replicas
When you install a replica SESA Directory, it is only visible from the SESA
administrative domain to which it was originally installed. If you want to make
an installed SESA Directory replica visible in another SESA domain or
subdomain, you must deploy the replica to the other domains. You can do this
using the Deploy SESA Directory replicas option in the SESA Installation
Wizard.
You must deploy one SESA Directory at a time. Repeat the process for each
additional replica that requires deployment.
To deploy a SESA Directory replica to another domain on Windows or Solaris
computers
1
On the computer on which the SESA Directory for the replica SESA
Directory is installed, start the SESA Installation Wizard.
See “Starting the SESA Installation Wizard” on page 134.
2
Follow the on-screen instructions until the SESA Install Menu panel
appears.
3
In the SESA Install Menu panel, click Advanced Options.
4
In the SESA Advanced Install Menu panel, click Deploy Directory Replicas.
5
In the Select Working Directory panel, click Next.
Because you have a previously existing SESA component on this computer,
this option is dimmed and you must accept the already existing working
directory.
6
In the Existing SESA Directory panel, type the SESA Directory
Administrator password. If necessary, type the IP address and Directory
port number.
This account has a user name in the form cn=<name> (by default, cn=root).
7
In the Installed Directory Replicas panel, check the replica to deploy.
8
In the Installed SESA Domains panel, check the SESA administrative
domain or domains to which to deploy the SESA Directory replica.
9
Wait while the SESA Installation Wizard reports the progress of the
deployment.
10 In the Operation Complete panel, click Next.
11 In the SESA Install Menu panel, click Exit SESA Installer, and then click
Next.
12 In the SESA Installation Successful panel, to exit the SESA Installation
Wizard, click Finish.
After you install SESA
Post-installation tasks
Configuring SESA to generate SNMP alert responses
If you want SESA to generate SNMP alert responses, you must install the
appropriate version of Management Information Base (MIB) to your SNMP
console. The SESA Foundation Pack CD1 (Windows or Solaris) contains four
Version 1 and Version 2 MIB files each.
Depending on the version that your SNMP console uses, you must install one
version set of MIBs on your SNMP console. After you install the MIBs to your
SNMP console, you can configure the Symantec management console to use the
MIBs.
To install the MIB version set on your SNMP console
1
On the computer on which your SNMP console is installed, insert the SESA
Foundation Pack CD1 into the CD-ROM drive.
2
If you are at a Solaris computer, mount the CD.
3
Do one of the following:
4
■
On Windows computers, at the command prompt, change directories to
the UTILS/MIB directory in which the two sets of MIB files are stored.
■
On Solaris computers, in the Terminal, change directories to the
UTILS/MIB directory in which the two sets of MIB files are stored.
Depending on which version set that your SNMP console requires, install
either all Version 1 or Version 2 files.
For more information, see the SNMP console documentation.
To configure the Symantec management console to use the MIBs
1
In an Internet browser, type the following URL:
https://<IP Address, host name, or FQDN of SESA Manager computer>/
sesa/ssmc
If connections to the SESA Manager computer are made using authenticated
SSL, you must type the host name or FQDN of the computer instead of the IP
address.
2
Log on to the Symantec management console using the rights of the SESA
Domain Administrator.
3
In the Symantec management console, on the Configurations view tab,
expand the desired domain.
4
Under the domain, expand SESA > SESA Manager Components
Configuration > Default.
5
In the right pane, on the SNMP tab, in the Host value box, type the IP
address of the SNMP listener.
205
206 After you install SESA
Uninstalling SESA
6
In the Port value box, type the port number of the SNMP listener.
7
Do one of the following:
8
■
If you are using Version 1 MIBs, ensure that the Version one value is
True.
■
If you are using Version 2 MIBs, in the Version box, type False
Click Apply.
When you create an alert, you can now specify SNMP as an additional
notification.
Uninstalling SESA
When uninstalling individual SESA components, it is important to remember
that many components have dependencies on other components and on SESA
infrastructure applications.
As a best practice, you should uninstall components in reverse of the order in
which they were installed. In general, you will uninstall the SESA Manager first,
then the SESA DataStore, and then the SESA Directory. Since portions of the
uninstallation procedure may access information within the SESA Directory, it
should always be uninstalled last.
You can remove all components at once, or any individual component or
component combinations. If you have distributed the SESA Manager, SESA
Directory, and SESA DataStore across more than one computer, you must
execute the uninstallation on each computer to uninstall the component.
You should always use the Symantec Install Wizard to perform an
uninstallation of individual components or all components. Do not remove
components manually outside of the SESA Install Wizard because this will leave
the SESA Install Wizard with incorrect information regarding the status of
installed components.
You launch the SESA Installation wizard as follows:
■
On Windows computers, you use the Symantec Enterprise Security
Architecture Components option in the Add/Remove Programs dialog box.
■
On Solaris computers, you execute the uninstall.sh script in the default /opt/
Symantec/SESA/uninstall directory.
After you install SESA
Uninstalling SESA
Note: On Windows computers, always use the Symantec Enterprise Security
Architecture Components option in the Add/Remove Programs dialog box to
remove SESA components. This option launches the SESA uninstallation
program, which reconfigures SESA appropriately for the components that you
have removed. Do not use entries in the Add/Remove Programs dialog box for
third-party components themselves.
Once you have launched the SESA Install Wizard, you can uninstall the
following components:
■
All SESA components at once
■
All SESA components and infrastructure
■
SESA Directory Server
■
IBM HTTP Server
■
SESA Key database files
■
IBM DB2 Personal Edition
■
SESA administrative domain or subdomain
Only those components installed by the SESA Integrated Installer program (the
SESA Installation Wizard) are uninstalled.
SESA heartbeat service and uninstalling the SESA Manager and SESA
Agent
A SESA Agent is always installed along with the SESA Manager to facilitate its
communication with all other SESA components. The SESA Directory
communicates using LDAPS and the SESA DataStore communicates over JDBC,
and therefore do not require the SESA agent for their communication. If you
have installed the SESA Manager along with either the SESA DataStore or the
SESA Directory on the same computer, a SESA Agent will be installed along with
the SESA Manger. The SESA heartbeat service is always installed along with a
SESA Manager and its Agent.
If you uninstall the SESA Manager from a computer, the SESA Agent will also be
uninstalled, and the heartbeat service along with it. If you wish to use the
heartbeat service to monitor the remaining SESA DataStore or SESA Directory,
you must reinstall the SESA Agent and the heartbeat service.
See “Installing the SESA Agent for heartbeat monitoring” on page 180.
207
208 After you install SESA
Uninstalling SESA
Uninstalling SESA from a Windows computer
On Windows computers, you use the Symantec Enterprise Security Architecture
Component option to uninstall SESA components.
To uninstall one or more SESA components on a Windows computer
1
On the computer on which the SESA DataStore is installed, on the Windows
toolbar, click Start > Settings > Control Panel.
2
In the Control Panel window, double-click Add/Remove Programs.
3
In the Add/Remove Programs dialog box, click Symantec Enterprise
Security Architecture Components.
4
Click Change/Remove.
5
In the Uninstall SESA panel, click Next.
6
In the SESA Uninstall Menu panel, select the component or components
that you want to remove.
Only the components that are installed on the computer on which you are
running the uninstallation are available for selection. Components that are
displayed but unavailable have other dependent programs still installed.
You must remove the dependent programs before these components become
available.
7
To remove the component or components, follow the on-screen instructions.
8
If you see a message that informs you that certain processes are currently
running and locked, to turn off the processes and continue, click Yes.
9
In the Operation Complete panel, review the components that were
successfully uninstalled, and then click Next.
10 In the SESA Uninstall Menu panel, do one of the following:
■
To continue uninstalling additional components, select the next
component that you want to uninstall, and then click Next.
■
If you are done uninstalling components, click Exit SESA Uninstaller,
and then click Next.
11 If you are prompted Are you sure you want to exit the installation, click Yes.
12 In the Reboot Required panel, to reboot the computer, click Finish.
After you install SESA
Uninstalling SESA
Uninstalling SESA on Solaris
On Solaris platforms, you execute the uninstall.sh script in the default /opt/
Symantec/SESA/uninstall directory to launch the SESA Install Wizard.
To uninstall one or more SESA components on a Solaris computer
1
On the computer on which the SESA component is installed, become
superuser.
2
At the command prompt, change directories to the SESA installation
directory.
By default, the directory is:
/opt/Symantec/SESA/uninstall
3
At the command prompt, type the following command:
./uninstall.sh
4
In the Uninstall SESA panel, click Next.
5
In the SESA Uninstall Menu panel, select the component or component
combination that you want to remove, and then click Next.
Only the components installed on the computer on which you are running
the uninstallation are available for selection. Components that are displayed
but unavailable (dimmed) have other dependent programs still installed.
You must remove the corresponding dependent programs before these
components become available.
6
To remove the component or components, follow the on-screen instructions.
7
If you are uninstalling the SESA DataStore, you will be instructed to perform
a manual procedure to remove the SESA user and data tables from the
database. Follow the instructions and when complete, return to the SESA
Install Wizard, and then click Next.
8
To drop the database, on the SESA DataStore computer, in a Terminal
window, become the Oracle user, and then type the following command:
dbshut
209
210 After you install SESA
About reinstalling a SESA DataStore in Windows environments
9
Delete all of the files in the Oracle database directory structure supporting
the SESA DataStore that you are uninstalling.
For example, if you use the default directory structure for a database named
SESA, you would delete the files from the following directories:
/u02/app/oracle admin/SESA/bdump
/u02/app/oracle/admin/SESA/cdump
/u02/app/oracle/admin/SESA/udump
/u01/oradata/SESA
/u02/oradata/SESA
/u01/oradata/SESA/arch
10 If you see a message that informs you that certain processes are currently
running and locked, to turn off the processes and continue, click Yes.
11 In the Operation Complete panel, review the components that were
successfully uninstalled, and then click Next.
12 In the SESA Uninstall Menu panel, do one of the following:
■
To continue uninstalling additional components, select the next
component that you want to uninstall, and then click Next.
■
If you are done uninstalling components, click Exit SESA Uninstaller,
and then click Next.
13 If you are prompted Are you sure you want to exit the installation, click Yes.
14 In the Reboot Required panel, to reboot the computer, click Finish.
About reinstalling a SESA DataStore in Windows
environments
In Windows environments, SESA installs the SESA DataStore using the SESA
alias. It also installs with an additional alias such as SES1, SES2, and SES3. You
can view both of these alias entries in the DB2 Control Center.
If you use the DB2 Control Center to drop the SESA DataStore or any of its
aliases, DB2 removes the SESA data from the computer but does not reconcile
the state of the other DB2 entry. You must therefore additionally right-click the
remaining SESA entry and select Remove to eliminate that entry. After you drop
a SESA DataStore, you cannot reinstall a SESA DataStore successfully until you
do this.
Note: When you drop and reinstall a SESA DataStore, you must also reinstall any
security products that are associated with the SESA DataStore.
Appendix
A
System requirements
This chapter includes the following topics:
■
About system requirements
■
Supported installation configurations
■
Minimum requirements to install all SESA components on a single
Windows computer
■
Minimum requirements for a SESA Directory computer
■
Supported third-party software for the SESA Directory
■
Minimum requirements for the SESA DataStore computer
■
Supported third-party software for the SESA DataStore
■
Minimum requirements for the SESA Manager computer
■
Supported third-party software for the SESA Manager
■
Minimum requirements and supported third-party software for a remote
Symantec management console
■
Minimum requirements and supported third-party software for a SESA
Agent
About system requirements
Before you install SESA, ensure that the computers on which you install SESA
software meet the necessary requirements.
If you are installing more than one component on a single computer, you can
increase the system requirements accordingly.
212 System requirements
Supported installation configurations
Note: The minimum system requirements for SESA are applicable for
demonstration or evaluation deployments of SESA only. For an enterprise
production deployment, the hardware requirements are significantly higher.
Contact your SESA sales engineer or representative for information on
recommended SESA hardware requirements.
On Windows platforms, the RunAsService service must be enabled and running
during the SESA installation. You can disable the service after installation, if
desired.
Warning: Do not install SESA components on a computer that is also functioning
as an Active Directory Domain Controller, or the SESA installation does not run
properly.
Supported installation configurations
The SESA Manager, SESA DataStore, and SESA Directory can run on either
Windows or Solaris operating systems. You can install SESA components on all
Windows computers, all Solaris computers, or a combination of both.
Organizations with high-volume, high-performance, or otherwise large
networking environments should install each SESA component on a separate
computer, regardless of the operating system. If resource limitations make
separate computers impossible, or network size and traffic allow, you can install
two SESA components on one computer (an Oracle database on a Solaris
platform must always be installed on a dedicated computer). Typically, you
install all three SESA components on the same Windows computer for testing or
evaluation purposes only.
Table A-1 lists the various combinations of operating system platforms on
which you can install the SESA Directory, SESA DataStore, and SESA Manager
to set up a minimum SESA installation of one SESA Manager connected to a
SESA DataStore and SESA Directory. More information on the underlying
middleware that is required for each type of installation is contained in Table 32 through Table 3-10.
Note: For the latest guidelines on deployment recommendations and supported
scenarios, see the Symantec Knowledge Base.
System requirements
Supported installation configurations
See “Types of installations” on page 67.
Table A-1
Supported platform combinations for SESA installations
Item Installation hardware configuration
1
SESA component distribution
Express installation: Windows only (for
demonstration and testing purposes)
Windows
IBM DB2 Personal Edition
with 2 GB limit automatically
installed with SESA
components
SESA Manager/DataStore/Directory
2
All-in-one on Windows with an IBM DB2
Universal Database
Windows
You must install an IBM DB2
Universal Database server
before you install SESA
SESA Manager/DataStore/Directory
3
All-in-one on Windows with an Oracle 9i
database
Windows
You must install an Oracle
database server before you
install SESA
SESA Manager/DataStore/Directory
4
All Windows–fully distributed with an
IBM DB2 Universal Database, which can
be Workgroup Edition or Enterprise
Edition (WE/EE)
5
All Windows–fully distributed with an
Oracle 9i database
Windows
Windows
Windows
You
You
install
install
DB2
DB2
Runtime
WE/EE
Client
SESA Manager SESA DataStore SESA Directory
Windows
All Solaris–fully distributed with an
Oracle 9i database
Windows
You
install
Oracle
SESA Manager
6
Windows
Solaris
SESA DataStore SESA Directory
Solaris
Solaris
You
install
Oracle
SESA Manager
You install
DB2 EE
(provided
with SESA)
SESA DataStore SESA Directory
213
214 System requirements
Supported installation configurations
Table A-1
Supported platform combinations for SESA installations
Item Installation hardware configuration
7
8
Mixed platform–fully distributed: SESA
Directory on Solaris, SESA Manager and
SESA DataStore on Windows with an
IBM DB2 Universal Database, which can
be Workgroup Edition or Enterprise
Edition (WE/EE)
Mixed platform–fully distributed: SESA
Directory on Solaris, SESA Manager and
SESA DataStore on Windows with an
Oracle 9i database
SESA component distribution
Windows
Solaris
Windows
You
You
You install
install
install
DB2 EE
DB2
DB2
(provided
Runtime
WE/EE
with SESA)
Client
SESA Manager
Windows
Mixed platform–fully distributed: SESA
DataStore on Solaris (Oracle 9i), and
SESA Manager and SESA Directory on
Windows
Windows
Mixed platform–fully distributed: SESA
Manager on Solaris, SESA DataStore
(IBM DB2 Universal Database) and SESA
Directory on Windows. IBM DB2 can be
the Workgroup Edition or Enterprise
Edition (WE/EE).
11
Mixed platform–fully distributed: SESA
Manager on Solaris, SESA DataStore
(Oracle 9i) and SESA Directory on
Windows
Mixed platform–fully distributed: SESA
Directory on Windows, SESA DataStore
(Oracle 9i) and SESA Manager on Solaris
You install
DB2 EE
(provided
with SESA)
SESA DataStore SESA Directory
Solaris
Windows
SESA DataStore SESA Directory
Windows
Windows
You
You
install
install
DB2
DB2
Runtime
WE/EE
Client
SESA Manager SESA DataStore SESA Directory
Solaris
Solaris
Windows
Windows
You
install
Oracle
SESA Manager
12
Solaris
You
install
Oracle
SESA Manager
10
Windows
You
install
Oracle
SESA Manager
9
SESA DataStore SESA Directory
Solaris
SESA DataStore SESA Directory
Solaris
Windows
You
install
Oracle
SESA Manager
SESA DataStore SESA Directory
System requirements
Supported installation configurations
Table A-1
Supported platform combinations for SESA installations
Item Installation hardware configuration
13
Mixed platform–fully distributed: SESA
DataStore on Windows (IBM DB2
Universal Database), SESA Manager and
SESA Directory on Solaris. IBM DB2 can
be the Workgroup Edition or Enterprise
Edition (WE/EE).
14
Mixed platform–fully distributed: SESA
DataStore on Windows (Oracle 9i), SESA
Manager and SESA Directory on Solaris
SESA component distribution
Windows
Solaris
You
You
You install
install
install
DB2 EE
DB2
DB2
(provided
Runtime
WE/EE
with SESA)
Client
SESA Manager SESA DataStore SESA Directory
Solaris
Solaris
Windows
Mixed platform–fully distributed: SESA
Manager on Windows, SESA DataStore
(Oracle 9i) and SESA Directory on Solaris
All Windows: SESA DataStore (IBM DB2
Universal Database) and SESA Directory
on one Windows computer connected to
a distributed SESA Manager on
Windows. IBM DB2 can be the
Workgroup Edition or Enterprise Edition
(WE/EE).
17
All Windows: SESA DataStore (Oracle 9i)
and SESA Directory on one Windows
computer connected to a distributed
SESA Manager on Windows
Mixed platform–semi-distributed: SESA
Manager on Solaris, SESA DataStore
(IBM DB2 Universal Database) and SESA
Manager on Windows. IBM DB2 can be
the Workgroup Edition or Enterprise
Edition (WE/EE).
Solaris
Solaris
You
install
Oracle
You install
DB2 EE
(provided
with SESA)
SESA DataStore SESA Directory
Windows
Windows
You
You
install
install
DB2
DB2
WE/EE
Runtime
Client
SESA Manager
SESA DataStore/Directory
Windows
Windows
You
install
Oracle
SESA Manager
18
SESA DataStore SESA Directory
Windows
SESA Manager
16
You install
DB2 EE
(provided
with SESA)
You
install
Oracle
SESA Manager
15
Solaris
SESA DataStore/Directory
Solaris
You
install
DB2
Runtime
Client
SESA Manager
Windows
You
install
DB2
WE/EE
SESA DataStore/Directory
215
216 System requirements
Supported installation configurations
Table A-1
Supported platform combinations for SESA installations
Item Installation hardware configuration
19
Mixed platform–semi-distributed: SESA
Manager on Solaris with SESA DataStore
(Oracle 9i) and SESA Manager on
Windows
SESA component distribution
Solaris
Windows
You
install
Oracle
SESA DataStore/Directory
SESA Manager
20
21
All Windows: SESA DataStore (IBM DB2
Universal Database) and SESA Manager
on one Windows computer connected to
a distributed SESA Directory on
Windows. IBM DB2 can be the
Workgroup Edition or Enterprise Edition
(WE/EE).
All Windows: SESA DataStore (Oracle 9i)
and SESA Manager on one Windows
computer connected to a distributed
SESA Directory on Windows
Windows
Windows
You
install
DB2
WE/EE
SESA Directory
SESA Manager/DataStore
Windows
Windows
You
install
Oracle
SESA Manager/DataStore
22
23
Mixed platform–semi-distributed: SESA
Directory on Solaris with SESA
DataStore (IBM DB2 Universal Database)
and SESA Manager on Windows. IBM
DB2 can be the Workgroup Edition or
Enterprise Edition (WE/EE).
Mixed platform–semi-distributed: SESA
Directory on Solaris with SESA
DataStore (Oracle 9i) and SESA Manager
on Windows
Windows
All Windows–semi-distributed: SESA
Manager and SESA Directory on one
Windows computer with SESA DataStore
(IBM DB2 Universal Database) on the
other. IBM DB2 can be the Workgroup
Edition or Enterprise Edition (WE/EE).
Solaris
You
install
DB2
WE/EE
You install
DB2 EE
(provided
with SESA)
SESA Directory
SESA Manager/DataStore
Windows
Solaris
You install
DB2 EE
(provided
with SESA)
You
install
Oracle
SESA Manager/DataStore
24
SESA Directory
Windows
You
install
DB2
WE/EE
SESA DataStore
SESA Directory
Windows
SESA Manager/Directory
System requirements
Supported installation configurations
Table A-1
Supported platform combinations for SESA installations
Item Installation hardware configuration
25
All Windows:–semi-distributed: SESA
Manager and SESA Directory on one
Windows computer with SESA DataStore
(Oracle 9i) on the other
SESA component distribution
Windows
SESA DataStore
26
All Solaris–semi-distributed: SESA
Manager and SESA Directory on one
Solaris computer with SESA DataStore
(Oracle 9i) on the other
Solaris
Mixed platform–semi-distributed: SESA
Directory and SESA Manager on
Windows connected to a SESA DataStore
(Oracle 9i) on Solaris
Solaris
29
Mixed platform–semi distributed: SESA
Manager and SESA Directory on Solaris
connected to a SESA DataStore (IBM DB2
Universal Database) on Windows. IBM
DB2 can be the Workgroup Edition or
Enterprise Edition (WE/EE).
Mixed platform–semi distributed: SESA
Manager and SESA Directory on Solaris
connected to a SESA DataStore (Oracle
9i) on Windows
You install
DB2 EE
(provided
with SESA)
SESA Manager/Directory
Windows
Solaris
You
install
Oracle
SESA DataStore
28
SESA Manager/Directory
You
install
Oracle
SESA DataStore
27
Windows
You
install
Oracle
Windows
You
install
DB2
WE/EE
SESA DataStore
Windows
SESA Manager/Directory
Solaris
SESA Manager/Directory
Solaris
You
install
Oracle
SESA DataStore
You install
DB2 EE
(provided
with SESA)
You install
DB2 EE
(provided
with SESA)
SESA Manager/Directory
217
218 System requirements
Minimum requirements to install all SESA components on a single Windows computer
Minimum requirements to install all SESA
components on a single Windows computer
If you are installing all of the SESA components on a single, Windows computer,
for example, in an express installation, the computer must meet the following
minimum system requirements:
■
Windows 2000 Server/Advanced Server with Service Pack 3 or later and the
latest Microsoft security patches or Windows 2003 Server Standard Edition/
Enterprise Edition with the latest Microsoft security patches
■
Intel Pentium-compatible 2 GHz or higher processor
■
256-color video adapter for installation
■
Microsoft IIS services stopped prior to installation
■
Physical access to a computer with no applications or components other
than SESA and associated third-party software installed on it
■
1 GB of RAM minimum
■
4 GB of free hard disk space minimum plus extra space for event data
■
TCP/IP communications enabled
■
Transport Layer Security (TLS) version 1.0 or Secure Sockets Layer (SSL)
version 3.0 or 3.1 enabled
System requirements
Minimum requirements for a SESA Directory computer
Minimum requirements for a SESA Directory
computer
Table A-2 lists the minimum system requirements for a single Windows or
Solaris computer to support a SESA 2.1 Directory installation.
Table A-2
SESA Directory minimum system requirements
Installation platform
Requirements
Solaris and Windows
computers
■
Physical access to a computer with no applications or
components other than SESA and associated third-party
software installed on it
■
1 GB of RAM minimum
■
4 GB of free hard disk space minimum (of which 200 MB is
required for the SESA Directory program and swap files)
■
An additional 5 to 15 MB of hard disk space per managed
security product instance (see your product system
requirements for precise hard disk space requirements)
■
TCP/IP communications enabled
■
Transport Layer Security (TLS) version 1.0 or Secure
Sockets Layer (SSL) version 3.0 or 3.1 enabled
■
Sun Solaris 8 (64-bit) with the latest recommended
security patches from Sun, including patches 108921-12,
108940-24, 108434-03, and 108528-12
You can download this patch from
http://sunsolve.sun.com
■
UltraSPARC II 500 MHz or higher processor
■
Windows 2000 Server/Advanced Server with Service Pack
3 or later and the latest Microsoft security patches or
Windows 2003 Server Standard Edition/Enterprise
Edition with the latest Microsoft security patches
■
Intel Pentium-compatible 2 GHz or higher processor
■
256-color video adapter for installation
■
Microsoft IIS services stopped prior to installation of the
SESA Directory
Solaris computers only
Windows computers
only
219
220 System requirements
Supported third-party software for the SESA Directory
Supported third-party software for the SESA
Directory
Table A-3 lists the third-party software that is supported by SESA 2.1 Directory
on Windows platforms. Except where indicated, the third-party software is
provided on the SESA Foundation Pack CDs.
Table A-3
SESA Directory supported third-party software on Windows
platforms
Third-party software
Description
Sun Java Runtime Environment Required and included with the SESA Foundation Pack.
(J2RE) 1.3.1_09
J2RE can be installed on its own or as part of the Sun
Java Development Kit (SDK).
IBM Tivoli Directory Server 5.2
with FixPak 2
Required with FixPak and included with the SESA 2.1
Foundation Packs.
IBM HTTP server, version
v1.3.28.1
Required and included with the SESA Foundation
Packs. Used for SESA Agent-to-SESA Manager
communications. IBM HTTP Server 1.3.19.5 is also
supported.
The following editions of IBM
DB2 Universal Database 8.1
with FixPak 6a:
Used for the SESA Directory (LDAP) database.
■
Workgroup Edition
■
Enterprise Edition
■
Personal Edition
IBM DB2 Universal Database Enterprise Server Edition
8.1 with FixPak 2 is included with both SESA
Foundation Packs. It is intended for use with the SESA
Directory only. You must apply FixPak 6a after
installation.
IBM DB2 Universal Database Workgroup Edition 8.1
with FixPak 6a is included on the SESA Foundation
Pack 2.1 with SESA DataStore (IBM DB2 for Windows).
It can be used to support the SESA Directory if it is
installed on the same computer as the SESA DataStore.
IBM DB2 Universal Database Personal Edition 8.1 with
FixPak 6a is installed if the SESA Directory installation
wizard does not detect an installed database. This
edition is intended for non-production installations on
a single Windows computer only.
You can obtain any version 8.1 IBM DB2 Universal
Database from IBM. For more information, contact
Symantec Technical Support.
System requirements
Supported third-party software for the SESA Directory
Table A-4 lists the third-party software that is supported by SESA 2.1 Directory
on Solaris platforms. Except where indicated, the third-party software is
provided on the SESA Foundation Pack CDs.
Table A-4
SESA Directory supported third-party software on Solaris platforms
Third-party software
Description
Sun Java Runtime
Environment (J2RE)
1.3.1_09
Required and included with the SESA Foundation Pack.
J2RE can be installed on its own or as part of the Java
Software Development Kit (SDK).
IBM Tivoli Directory
Server 5.2 with FixPak 2
Required and included with the SESA Foundation Pack.
Underlying software for the SESA Directory on Solaris
computers.
IBM Apache HTTP server,
version 1.3.28.1
Required and included with the SESA Foundation Pack.
Used for SESA Agent-to-SESA Manager communications.
IBM DB2 Enterprise Edition
8.1 with FixPak 6a
Required. IBM DB2 Universal Database Enterprise Edition
8.1 with FixPak 2 is included. Used for the SESA Directory
(LDAP) database.
221
222 System requirements
Minimum requirements for the SESA DataStore computer
Minimum requirements for the SESA DataStore
computer
Table A-5 lists the minimum system requirements for a single Windows or
Solaris computer to support a SESA DataStore installation.
Table A-5
SESA DataStore minimum system requirements
Installation platform
Requirements
Solaris and Windows
computers
■
Physical access to a computer with no applications or
components installed other than associated third-party
software. On Windows computers, other SESA
components can also be installed with the SESA
DataStore.
■
Sufficient disk space for database event entries,
depending on the number and type of managed security
products. As a guide, to maintain one month of SESA
DataStore security event data, 4 MB (for example, for an
antivirus product) to 60 GB (for example, for a firewall
product) of hard disk space should be allocated per
managed security product instance. Disk space
requirements may increase significantly depending on the
number of events that are received by the SESA DataStore
and the length of time that they are stored.
■
For high-load environments, post-installation tasks for
the database server should be completed. This increases
the recommended minimum system memory and hard
disk requirements.
■
TCP/IP communications should be enabled.
■
Sun Solaris 8 (64-bit) with the latest cluster patch from
Sun. You can download this patch from
http://sunsolve.sun.com.
■
UltraSPARC II 500 MHz or higher processor.
■
4 GB of memory minimum.
■
Existing installation of Oracle 9i.
■
20 GB of free disk space minimum for SESA DataStore
program files and swap space in addition to space for
event entries.
Solaris computers only
System requirements
Supported third-party software for the SESA DataStore
Table A-5
SESA DataStore minimum system requirements
Installation platform
Requirements
Windows computers
only
■
Windows 2000 Server/Advanced Server with Service Pack
3 and the latest Microsoft security patches or Windows
2003 Server Standard Edition/Enterprise Edition with the
latest Microsoft security patches.
■
2 GB of RAM minimum.
■
Intel Pentium-compatible 1 GHz or higher processor.
■
Existing installation of a supported version of an Oracle or
IBM DB2 Universal Database.
■
15 GB of free disk space minimum for SESA DataStore
program files and swap space in addition to space for
event entries.
■
256-color video adapter for installation.
Supported third-party software for the SESA
DataStore
Table A-6 lists the third-party software components that are required for a
SESA 2.1 DataStore-only installation of SESA on a single Windows computer.
Except where indicated, the third-party software is provided on the SESA
Foundation Pack CDs.
Table A-6
SESA DataStore supported third-party software on Windows
platforms
Third-party software
Description
Sun Java Runtime Environment
(J2RE) 1.3.1_09
Required and included with the SESA Foundation
Pack. J2RE can be installed on its own or as part of
the Java Software Development Kit (SDK).
Oracle 9i version 9.01
Not included in the SESA Foundation Pack. Used as
the underlying software for the SESA DataStore.
223
224 System requirements
Supported third-party software for the SESA DataStore
Table A-6
SESA DataStore supported third-party software on Windows
platforms
Third-party software
Description
The following editions of IBM DB2 Used as the underlying software for the SESA
Universal Database 8.1 with FixPak DataStore in production environments.
6a:
IBM DB2 Universal Database Enterprise Edition 8.1
■
Workgroup Edition
with FixPak 6a is not included. (The version of IBM
DB2 Enterprise Edition included on the SESA
■
Enterprise Edition
Foundation Packs is intended for use with the SESA
■
Personal Edition
Directory only.)
IBM DB2 Universal Database Workgroup Edition 8.1
with FixPak 6a is included on the SESA Foundation
Pack 2.1 with SESA DataStore (IBM DB2 for
Windows).
IBM DB2 Universal Database Personal Edition 8.1
with FixPak 6a is installed if the SESA DataStore
installation wizard does not detect an installed
database. This edition is intended for nonproduction installations on a single Windows
computer only.
You can obtain any version 8.1 IBM DB2 Universal
Database from IBM. For more information, contact
Symantec Technical Support.
Note: For nonproduction and test environments, the SESA Foundation Pack also
supports IBM DB2 Personal Edition 8.1 with FixPak 6a. However, the database
has a 2-GB storage limit, and it only supports a single processor. The singleprocessor limitation requires you to install the SESA Manager on the same
computer as IBM DB2 Personal Edition.
System requirements
Minimum requirements for the SESA Manager computer
Table A-7 lists the third-party software components that are required for a
SESA 2.1 DataStore-only installation of SESA on a single Solaris computer.
Except where indicated, the third-party software is provided on the SESA
Foundation Pack CDs.
Table A-7
SESA DataStore supported third-party software on Solaris
platforms
Third-party software
Description
Sun Java Runtime Environment
(J2RE) 1.3.1_09
Required and included with the SESA Foundation
Pack. J2RE can be installed on its own or as part of
the Java Software Development Kit (SDK).
Oracle 9i version 9.01 (Release 1,
Not included in the SESA Foundation Pack. Used as
32-bit version) to 9.2.0.1 (Release 2, the underlying software for the SESA DataStore.
64-bit version)
Oracle 9i must reside on a dedicated Solaris
computer.
Minimum requirements for the SESA Manager
computer
Table A-8 lists the minimum system requirements for a single Windows or
Solaris computer to support a SESA 2.1 Manager installation.
Table A-8
SESA Manager minimum system requirements
Installation platform
Requirements
Solaris and Windows
computers
■
Transport Layer Security (TLS) version 1.0 enabled or
Secure Sockets Layer (SSL) version 3.0 or 3.1 enabled
■
TCP/IP communications enabled
■
Sun Solaris 8 (64-bit) with the latest cluster patch from
Sun
You can download this patch from http://
sunsolve.sun.com
■
Physical access to a computer with no applications or
components other than associated third-party software
installed on it
■
UltraSPARC II 500 MHz or higher processor
■
1 GB of memory minimum
■
4 GB of free disk space minimum for SESA Manager
program files and swap space
Solaris computers only
225
226 System requirements
Supported third-party software for the SESA Manager
Table A-8
SESA Manager minimum system requirements
Installation platform
Requirements
Windows computers
only
■
Windows 2000 Server/Advanced Server with Service Pack
3 and the latest Microsoft security patches or Windows
2003 Server Standard Edition/Enterprise Edition with the
latest Microsoft security patches
■
Physical access to a computer with no applications or
components other than associated third-party software
installed on it
■
Intel Pentium-compatible 2 GHz or higher processor
■
1 GB of RAM minimum
■
4 GB of free disk space minimum for SESA Manager
program files and swap space
■
256-color video adapter for installation
Supported third-party software for the SESA
Manager
Table A-9 lists the third-party software components that are required for a
SESA 2.1 Manager-only installation of SESA on a single Windows computer.
Except where indicated, the third-party software is provided on the SESA
Foundation Pack CDs.
Table A-9
SESA Manager supported third-party software on Windows
platforms
Third-party software
Description
Java Software Development Kit
(SDK)/Sun Java Runtime
Environment (J2RE) 1.3.1_09
Required and included with the SESA Foundation
Pack. The SDK is used with the Symantec
management console to access the SESA Manager.
The J2RE is used to install SESA components and for
SESA processing. For SESA 1.1 Managers that have
been migrated to SESA 2.1 Managers, SDK version
1.3.1_2 is supported.
IBM Apache HTTP Server
version 1.3.28.1
Required and included with the SESA Foundation
Pack. Used for SESA Agent-to-Manager
communications.
Apache Tomcat 4.03 Servlet/JSP
container
Required and included with the SESA Foundation
Pack. Used for SESA Manager processing.
System requirements
Supported third-party software for the SESA Manager
Table A-9
SESA Manager supported third-party software on Windows
platforms
Third-party software
Description
IBM DB2 Runtime Client 8.1 with Not included with the SESA Foundation Pack. Used
FixPak 6a
when the SESA Manager on Windows must connect
remotely with an IBM DB2 Universal Database (the
SESA DataStore on Windows).
You can obtain an IBM DB2 Runtime Client from IBM.
For more information, contact Symantec Technical
Support.
Table A-10 lists the third-party software components that are required for a
SESA 2.1 Manager-only installation of SESA on a single Solaris computer.
Except where indicated, the third-party software is provided on the SESA
Foundation Pack CDs.
Table A-10
SESA Manager supported third-party software on Solaris platforms
Third-party software
Description
Java Software Development Kit
(SDK)/Sun Java Runtime
Environment (J2RE) 1.3.1_09
Required and included with the SESA Foundation
Pack. The SDK is used with the Symantec
management console to access the SESA Manager.
The J2RE is used to install SESA components and for
SESA processing. For SESA 1.1 Managers that have
been migrated to SESA 2.1 Managers, SDK version
1.3.1_2 is supported.
IBM Apache HTTP Server
version 1.3.28.1
Required and included with the SESA Foundation
Pack. Used for SESA Agent-to-Manager
communications.
Apache Tomcat 4.03 Servlet/JSP
container
Required and included with the SESA Foundation
Pack. Used for SESA Manager processing.
IBM DB2 Runtime client 8.1 with Not included with the SESA Foundation Pack. Used
FixPak 6a
when the SESA Manager on Windows or Solaris must
connect remotely with an IBM DB2 Universal
Database (the SESA DataStore on Windows).
You can obtain an IBM DB2 Runtime Client from IBM.
For more information, contact Symantec technical
support.
227
228 System requirements
Minimum requirements and supported third-party software for a remote Symantec management console
Minimum requirements and supported third-party
software for a remote Symantec management
console
Table A-11 lists the minimum system requirements and supported third-party
software for the Symantec management console.
Table A-11
Symantec management console minimum system requirements
and supported third-party software
Installation platform
Requirements
All supported platforms ■
Windows 98 or later
Solaris 7 or later
Red Hat Linux 6.2/7.0/
7.1/7.2 or later
Scripting and Java Virtual Machine (JVM) enabled in the
Internet browser
■
256-color video adapter (1024 x 768 minimum resolution)
■
TCP/IP communications enabled
■
Transport Layer Security (TLS) version 1.0 enabled or
Secure Sockets Layer (SSL) version 3.0 or 3.1 enabled
■
Microsoft Internet Explorer 5.5 or 6.0 with Service Pack 2
or Netscape Navigator 7.0x with the latest security
patches applied
■
Sun Java Runtime Environment (J2RE) 1.3.1_02 or
1.3.1_09
■
Intel Pentium-compatible 400-MHz processor or higher
■
64 MB of RAM minimum
■
Netscape Navigator 7.0x with the latest security patches
applied
■
Sun Java Runtime Environment (J2RE) 1.4.2 (To run the
Symantec management console on a Solaris 8 computer,
you must first install and properly configure J2RE
1.4.2_02 and Netscape 7 on that computer)
■
Sun Solaris UltraSPARC II or higher processor
■
128 MB of memory minimum
■
Netscape Navigator 7.0x with the latest security patches
applied
■
Sun Java Runtime Environment (J2RE) 1.3.1_02 or
1.3.1_09
■
Intel Pentium-compatible 233-MHz processor or higher
■
64 MB of RAM minimum
System requirements
Minimum requirements and supported third-party software for a SESA Agent
Minimum requirements and supported third-party
software for a SESA Agent
A SESA Agent that is running on a computer that does not also host the SESA
Manager requires a Java Runtime Environment (J2RE). SESA 2.1 provides J2RE
1.3.1_09. SESA 2.0 and 2.01 support version 1.2.2_008 through 1.4.1_02.
Table A-12 lists the minimum system requirements and supported third-party
software for a SESA Agent.
Table A-12
SESA Agent minimum system requirements and supported thirdparty software
Installation platform
Requirements
All supported platforms
■
32 MB of memory in addition to the minimum system
requirements for the operating system
■
40 MB of free disk space for SESA Agent program
files
■
TCP/IP communications enabled
■
Any remaining hardware requirements imposed by
the security product, Symantec Event Manager,
Symantec Event Collector, Relay, or Bridge being
managed by the SESA Agent
For more information on system requirements, see
the product documentation.
Windows NT 4.0 with Service ■
Pack 6a/2000 Server with
Service Pack 3 or 4/2000
■
Advanced Server with
Service Pack 3 or 4/2000
Professional with Service
Pack 3 or 4/XP/2003 Server
(.NET)
Intel Pentium-compatible 133-MHz processor or
higher
Solaris 7/8/9 (32-bit or 64bit)
■
Sun Solaris UltraSPARC or higher processor
■
Sun Java Runtime Environment (J2RE) 1.3.1_09
(included with the SESA Foundation Pack)
Sun Java Runtime Environment (J2RE) 1.2.2_008
through 1.4.1_02 are supported but not included with
the SESA Foundation Pack. The 32-bit and 64-bit
versions of J2RE 1.4.1_02 are supported.
Sun Java Runtime Environment (J2RE) 1.3.1_09
(included with the SESA Foundation Pack)
Sun Java Runtime Environment (J2RE) 1.2.2_008
through 1.4.1_02 are supported but not included with
the SESA Foundation Pack.
229
230 System requirements
Minimum requirements and supported third-party software for a SESA Agent
Table A-12
SESA Agent minimum system requirements and supported thirdparty software
Installation platform
Requirements
Red Hat Linux 7.2/7.3/Red
Hat Advanced Server 3.0/
Red Hat Enterprise Server
3.0/SuSE Enterprise Linux 9
■
Intel Pentium-compatible 133-MHz processor or
higher
■
Sun Java Runtime Environment (J2RE) 1.3.1_09
(included with SESA Foundation Pack)
Sun Java Runtime Environment (J2RE) 1.2.2_008
through 1.4.1_02 are supported but not included with
the SESA Foundation Pack.
Appendix
B
IBM DB2 database
memory usage
specifications
This chapter includes the following topics:
■
All SESA components
■
SESA Directory and SESA DataStore
■
SESA DataStore and SESA Manager
■
Stand-alone SESA DataStore
All SESA components
Use the recommendations in Table B-1 when the SESA Directory, SESA
DataStore, and SESA Manager reside on the same Windows computer on which
IBM DB2 Universal Database is installed.
Table B-1
SESA Directory, SESA DataStore, and SESA Manager all on one
Windows computer
Computer memory (MB)
Recommended buffer pool size (MB)
512
80 (SESA default)
1,024 (1 GB)
80 (SESA default)
1,536 (1.5 GB)
80 (SESA default)
2,048 (2 GB)
256 (Bufferpool and SortHeap)
2,560 (2.5 GB)
512 (Bufferpool and SortHeap)
232 IBM DB2 database memory usage specifications
SESA Directory and SESA DataStore
Table B-1
SESA Directory, SESA DataStore, and SESA Manager all on one
Windows computer
Computer memory (MB)
Recommended buffer pool size (MB)
3,072 (3 GB)
756 (Bufferpool and SortHeap)
3,584 (3.5 GB)
1,000 (Bufferpool and SortHeap) (/3 GB)
4,096 (4 GB)
1,500 (Bufferpool and 1,000 SortHeap) (/3 GB)
SESA Directory and SESA DataStore
Use the recommendations in Table B-2 when the SESA Directory and SESA
DataStore reside on one Windows computer on which IBM DB2 Universal
Database is installed.
Table B-2
SESA Directory and SESA DataStore on one Windows computer
Computer memory (MB)
Recommended buffer pool size (MB)
512
80 (SESA default)
1,024 (1 GB)
80 (SESA default)
1,536 (1.5 GB)
80 (SESA default)
2,048 (2 GB)
256 (Bufferpool and SortHeap)
2,560 (2.5 GB)
512 (Bufferpool and SortHeap)
3,072 (3 GB)
756 (Bufferpool and SortHeap)
3,584 (3.5 GB)
1,000 (Bufferpool and SortHeap) (/3 GB)
4,096 (4 GB)
1,500 (Bufferpool and 1,000 SortHeap) (/3 GB)
SESA DataStore and SESA Manager
Use the recommendations in Table B-3 when the SESA DataStore and SESA
Manager reside on one Windows computer on which IBM DB2 Universal
Database is installed.
Table B-3
SESA DataStore and SESA Manager on one Windows computer
Computer memory (MB)
Recommended buffer pool size (MB)
512
80 (SESA default)
1,024 (1 GB)
80 (SESA default)
IBM DB2 database memory usage specifications
Stand-alone SESA DataStore
Table B-3
SESA DataStore and SESA Manager on one Windows computer
Computer memory (MB)
Recommended buffer pool size (MB)
1,536 (1.5 GB)
80 (SESA default)
2,048 (2 GB)
256 (Bufferpool and SortHeap)
2,560 (2.5 GB)
512 (Bufferpool and SortHeap)
3,072 (3 GB)
756 (Bufferpool and SortHeap)
3,584 (3.5 GB)
1,000 (Bufferpool and SortHeap) (/3 GB)
4,096 (4 GB)
1,500 (Bufferpool and 1,000 SortHeap) (/3 GB)
Stand-alone SESA DataStore
Use the recommendations in Table B-4 when the SESA DataStore resides on a
Windows computer on which IBM DB2 Universal Database is installed.
Table B-4
SESA DataStore on one Windows computer
Computer memory (MB)
Recommended buffer pool size (MB)
512
80 (SESA default)
1,024 (1 GB)
80 (SESA default)
1,536 (1.5 GB)
256 (Bufferpool and SortHeap)
2,048 (2 GB)
512 (Bufferpool and SortHeap)
2,560 (2.5 GB)
756 (Bufferpool and SortHeap)
3,072 (3 GB)
1,000 (Bufferpool and SortHeap) (/3 GB)
3,584 (3.5 GB)
1,500 (Bufferpool and 1,000 SortHeap) (/3 GB)
4,096 (4 GB)
1,500 (Bufferpool and 1,000 SortHeap) (/3 GB)
233
234 IBM DB2 database memory usage specifications
Stand-alone SESA DataStore
Appendix
SESA logs
This chapter includes the following topics:
■
Oracle database server logs
■
IBM DB2 database server logs
■
IBM Directory Server logs
■
IBM HTTP Server logs
■
Apache Tomcat Servlet logs
■
JDBC error log
■
SESA Agent logs
■
SESA Manager logs
C
236 SESA logs
Oracle database server logs
Oracle database server logs
Table C-1 lists logs that contain event information as a result of Oracle database
server operations.
Table C-1
Oracle database server logs
Type
Default location
Description
Oracle alert log
/u02/app/oracle/admin/SESA/
bdump/SESA*.trc
Logs events that are specific to
particular Oracle background
processes. Monitoring this log
can help you keep informed of
specific Oracle database server
processes.
Oracle process
coredump files
/u02/app/oracle/admin/SESA/
cdump/core*
Log core files from failed
Oracle processes. This log is
generally only useful to Oracle
technical support.
Oracle user process
logs
/u02/app/oracle/admin/SESA/
udump/SESA_ora*.trc
Log events that are specific to
Oracle user processes,
including SESA Manager
connection events. You may
find this log useful for
troubleshooting any Oracle
database server problems that
you encounter.
Oracle online redo
logs
/u02/oradata/SESA/redo01.log
Queue database transactions
that are not immediately
processed.
/u02/oradata/SESA/redo02.log
You can change the size of a
log to accommodate increased
transaction activity.
Oracle archived redo /u01/oradata/SESA/arch/*.arc
logs
Log archived redo logs that
contain prior transaction data.
This log must be backed up
along with data files for
recovery purposes.
If necessary, you can enable
redo log archival.
See “Creating one or more
Oracle 9i databases for SESA
on Solaris” on page 119.
SESA logs
IBM DB2 database server logs
IBM DB2 database server logs
Table C-2 lists logs that contain event information as a result of IBM DB2
database server operations.
Table C-2
IBM DB2 database server logs
Type
Default location
IBM DB2 transaction C:\DB2\NODE0000\SQL00001\
logs
SQLOGDIR\<S000000#.LOG>
Description
Queue database transactions
that are not immediately
processed. You can change the
size of a log to accommodate
increased transaction activity.
For more information on
increasing the Oracle
transaction log size, see the
Symantec Enterprise Security
Architecture Administrator’s
Guide.
IBM DB2 installation C:\DB2LOG\db2inst.log
log
Logs IBM DB2 installation
information.
IBM DB2 error/
diagnostics log
Logs IBM DB2 error and
diagnostics information.
C:\Program Files\
SQLLIB\DB2\db2diag.log
IBM Directory Server logs
Table C-3 lists logs that contain event and other information as a result of IBM
Directory Server operations.
Table C-3
IBM Directory Server logs
Type
Default location
IBM Tivoli Directory
Server 5.2
transaction logs
C:\LDAPDB2\NODE0000\
SQL00001\SQLOGDIR\
<S0000000#.LOG>
Description
Queue IBM Directory Server
transactions that are not
immediately processed. You
/export/home/ldapdb2/ldapdb2/ can increase the size of a log to
accommodate increased
NODE0000/SQL00001/
transaction activity.
SQLOGDIR/<S000000#.LOG>
Note: The directory may be
different if you chose to install
using a different instance
name (examples: sesldap,
db2admin, or ldapdbe).
237
238 SESA logs
IBM Directory Server logs
Table C-3
IBM Directory Server logs
Type
Default location
Description
IBM DB2/Tivoli
Directory Server 5.2
Install log
C:\Program Files\IBM\
Stores installation information
LDAP\ldapinst.log and ibmdir.log for the IBM Tivoli Directory
Server 5.2 installation
program.
IBM DB2/Directory
Server 5.2 setup log
C:\Program Files\IBM\
LDAP\setup.log
Stores setup parameters for
the IBM Tivoli Directory
Server 5.2 installation
program.
IBM Directory
C:\Program Files\IBM\
Server migration log ldap\var\Migrate321.log
Logs migration data that
results from moving from IBM
Directory Server 4.1.1 to 5.2.
IBM Tivoli Directory
Server 5.2
diagnostics logs
C:\Program Files\
SQLLIB\LDAPDB2\db2diag.log
Log diagnostic information for
IBM DB2-related errors.
IBM Tivoli Directory
Server 5.2 Slapd
config file error log
C:\Program Files\
IBM\ldap\var\ibmslapd.conf
Note: The directory may be
different if you chose to install
using a different instance
name (examples: sesldap,
db2admin, or ldapdbe).
Log errors related to the Slapd
configuration file.
SESA logs
IBM HTTP Server logs
IBM HTTP Server logs
Table C-4 lists logs that contain event and other information as a result of IBM
HTTP Server operations.
Table C-4
IBM HTTP Server logs
Type
Default location
Description
HTTP Server log
C:\Program Files\IBM HTTP
Server\setup.log
Logs IBM HTTP Server
installation information.
/var/Symantec/sesainst.log
HTTP Server request C:\Program Files\IBM HTTP
log
Server\logs\access.log
/opt/IBMHTTPD/logs/access_log
HTTP Server
administration
request log
C:\Program Files\IBM HTTP
Server\logs\admin_access.log
Logs HTTP and HTTPS
requests that have been made
to the HTTP Server, including
transactions between the
SESA Agent and SESA
Manager.
Logs HTTP and HTTPS
requests that have been made
to the HTTP Server over the
administration port (8008).
Used only when the HTTP
Administration Web site is
accessed.
HTTP Server
C:\Program Files\IBM HTTP
administration error Server\logs\admin_error.log
log
Logs errors related to
accessing the HTTP Server
over the administration port.
HTTP Server error
log
Logs errors related to
accessing the HTTP Server.
C:\Program Files\IBM HTTP
Server\logs\error.log
/opt/IBMHTTPD/logs/error_log
239
240 SESA logs
Apache Tomcat Servlet logs
Apache Tomcat Servlet logs
Table C-5 lists logs that contain event and other information as a result of
Apache Tomcat Servlet operations.
Table C-5
Apache Tomcat Servlet logs
Type
Default location
Description
Apache Tomcat logs
C:\Program Files\IBM HTTP
Server\tomcat\logs\mod_jk.log
Log information that the
Apache Tomcat servlet
container generates.
C:\Program Files\
IBM HTTP Server\tomcat\logs\
stderr.log
C:\Program Files\
IBM HTTP Server\tomcat\logs\
stdout.log
C:\Program Files\
IBM HTTP Server\tomcat\logs\
apache_log.<date>.txt
C:\Program Files\
IBM HTTP Server\tomcat\logs\
catalina_log.<date>.txt
C:\Program Files\
IBM HTTP Server\tomcat\logs
\localhost_log.<date>.txt
Apache Tomcat
HTTP request log
C:\Program Files\
IBM HTTP Server\tomcat\logs\
localhost_access_log.<date>.txt
Logs requests to Apache
Tomcat using IBM HTTP.
Records all transactions
between the SESA Agent and
SESA Manager that are passed
to Tomcat through the IBM
HTTP Server.
SESA logs
JDBC error log
JDBC error log
Table C-6 lists the log that contains information as a result of Java database
connectivity errors.
Table C-6
JDBC error log
Type
Default location
Description
JDBC error log
C:\Program Files\
SQLLIB\DB2\ jdbcerr.log
Logs errors that are related to
JDBC driver transactions.
SESA Agent logs
Table C-7 lists logs that contain event and other information as a result of SESA
Agent operations.
Table C-7
SESA Agent logs
Type
Default location
Description
SESA Agent startup
and shutdown log
C:\SESA\Agent\AgentStart.log
Records data that is generated
from the startup and
shutdown of the SESA
AgentStart service.
SESA Agent error
and actions log
C:\SESA\Agent\sesa-agent.log
Logs SESA Agent errors and
actions.
SESA Agent
uninstallation log
C:\SESA\Agent\uninst.log
Logs uninstallation
information generated by the
SESA Agent installer.
241
242 SESA logs
SESA Manager logs
SESA Manager logs
Table C-8 lists logs that contain event and other information as a result of SESA
Manager servlet operations.
Table C-8
SESA Manager logs
Type
Default location
Description
SESA Manager
servlet logs
C:\SESA\<computer name>\
Admin\logs\<random 16character value>\
Admin-guid.log
Correspond to specific SESA
Manager servlets. These logs,
created by SESA, contain
servlet startup information,
connection errors, Java
exceptions, and other
information that is related to
servlet operation. These logs
are most useful for
troubleshooting SESA.
C:\SESA\<computer name>\
Alert\logs\guid\Alert-guid.log
C:\SESA\<computer name>\
Bootstrap\logs\<random 16character value>\
Bootstrap-guid.log
C:\SESA\<computer name>\
command\logs\<random 16character value>\
command-guid.log
C:\SESA\<computer name>\
Config\logs\<random 16character value>\
Config-guid.log
C:\SESA\<computer name>\
Event\logs\guid\Event-<random
16-character value>.log
You can specify the location of
the Manager servlet logs when
you install SESA.
You can configure the logs for
more robust logging.
For more information on
configuring SESA Manager
servlet logs, see the Symantec
Enterprise Security
Architecture Administrator’s
Guide.
C:\SESA\<computer name>\
Inventory\logs\<random 16character value>\
Inventory-guid.log
C:\SESA\<computer name>\
State\logs\guid\State-<random
16-character value>.log
SESA Manager log
C:\SESA\computer name\
ses_manager\logs\guid\
ses_manager-guid.log
Logs general SESA Manager
data.
Appendix
D
Post-installation SESA
files
This chapter includes the following topics:
■
Post-installation directories on Windows platforms
■
Post-installation directories on Solaris platforms
■
Post-installation directories on Oracle database servers
Post-installation directories on Windows platforms
On Windows platforms, SESA installs files to both its own and third-party
software directories.
SESA files on Windows platforms
Table D-1 lists SESA files that should appear after a successful installation on
Windows platforms.
Table D-1
SESA files on Windows platforms
Directory or file name
Description
C:\SESA
Directory containing SESA
product files
C:\SESA
Directory containing SESA log
files
C:\Program Files\Common Files\Symantec Shared\
SES\Ses_work.properties
Properties file containing
common information for various
logging servlets for the system
244 Post-installation SESA files
Post-installation directories on Windows platforms
Table D-1
SESA files on Windows platforms
Directory or file name
Description
C:\Program Files\Common Files\Symantec Shared\
SES\AdapterInfo.cfg
File containing information on
the network adapter
C:\Program Files\Common Files\Symantec Shared\
SES\Ses_machine.dat
Encrypted file containing
information on the directory IP
address and password
C:\Program Files\Common Files\Symantec Shared\
SES\Keydb
Directory containing the SSL
certificate database
Third-party software files on Windows platforms
Table D-2 lists third-party software files that should appear after a successful
installation on Windows platforms.
Table D-2
Third-party software files on Windows platforms
Directory or file name
Description
C:\DB2
Directory created by DB2
C:\Program Files\SQLLIB
Directory created by DB2
C:\Program Files\IBM
Directory containing IBM GS Kit
directory and IBM Directory
Server
C:\Program Files\IBM Http Server
Directory containing IBM HTTP
Server files
C:\Program Files\IBM Http Server\tomcat
Directory in which SESA installs
Tomcat
C:\Documents and Settings\<Current User>\Local
Settings\Temp\sesainst.log
Temporary directory used to store
the installation log and
installation files
C:\LDAPDB2
Folder created as part of IBM
Directory Server
Post-installation SESA files
Post-installation directories on Solaris platforms
Post-installation directories on Solaris platforms
On Solaris platforms, SESA installs files to both its own and third-party
software directories.
SESA files on Solaris platforms
Table D-3 lists SESA files that should appear after a successful installation on
Solaris platforms.
Table D-3
SESA files on Solaris platforms
Directory or file name
Description
/opt/Symantec/SESA
SESA working directory
/opt/Symantec/SESA
Directory containing SESA log files
/etc/init.d/sesagentd
Script file that talks to the SESA Agent
/etc/symantec/ses
Common files
/var/Symantec
Installation log file
Third-party software files on Solaris platforms
Table D-4 lists third-party software files that should appear after a successful
installation on Solaris platforms.
Table D-4
Third-party software files on Solaris platforms
Directory or file name
Description
/opt/IBMHTTPD
IBM HTTP Server files
/opt/ibm
Directory containing IBM GS Kit directory and IBM
Directory Server
/var/tmp/sesainst.log
Temporary directory used to store the installation log
and installation files
/opt/IBMHTTPD/tomcat
Directory in which SESA installs Tomcat
/opt/IBMldapc
Directory created by IBM Directory Server installer
/opt/IBMldaps
Directory created by IBM Directory Server installer
/opt/IBMldapi
Directory created by IBM Directory Server installer
/opt/IBMldien
Directory created by IBM Directory Server installer
245
246 Post-installation SESA files
Post-installation directories on Oracle database servers
Post-installation directories on Oracle database
servers
On Oracle database servers, SESA installs files to both its own and third-party
software directories.
SESA files on Oracle database servers
Table D-5 lists SESA files that should appear after a successful installation on
Oracle database servers.
Table D-5
SESA files on Oracle database servers
Directory or file name
Description
/opt/Symantec/SESA
SESA working directory
/opt/Symantec/SESA
Directory containing SESA log files
/etc/init.d/sesagentd
Script file that talks to the SESA Agent
/etc/symantec/ses
Common files
/var/Symantec
Installation log file
Third-party software files on Oracle database servers
Table D-6 lists third-party software files that should appear after a successful
installation on Oracle database servers.
Table D-6
Third-party software files on Oracle database servers
Directory or file name
Description
/usr/j2re1_3_1_09
Java files
/export/home/oracle
Home directory for Oracle user
/opt/ORCLfmap
Oracle file mapping
/var/opt/oracle
Oracle home configuration files
/u01/oradata
Database files
/u02/app/oracle
Oracle executable files and logs
/u02/oradata
Database files
Index
A
H
alerts
forwarding 47
how they are generated 28
SNMP 205
anonymous SSL 48
authentication, in SESA 48
HTTP Server, operation verification 194
I
Data Maintenance Utility, location on CD1 63, 65
data paths
between security products and SESA
Agents 41
between SESA Agent and SESA Manager 43
between SESA DataStore and SESA
Manager 44
between SESA Directory and SESA Manager 45
between two SESA Managers 47
in SESA 39
over the network 42
properties 47
data protocol, SESA 48
data security 48
documentation, accessing for third-party
products 34
domains, installing additional 198
IBM DB2
group ownership and security
vulnerabilities 55
Runtime Client for Windows, installing 81
transaction logs 237
IBM Directory Server, transaction logs 237
installation
about SESA components 131
avoiding port conflicts 55, 58
CD layout 63
command-line parameters 132
directories 56, 60
disabling services during 54
in large network environments 212
logon accounts for 60
on a single computer, requirements for 218
platform combinations 212
preparing for 51
privileges needed for 55, 59
remote locations 56, 59
securing Solaris resources 58
SESA 131
SESA DataStore
across multiple drives 158
initial 151
SESA Directory only 143
SESA Manager only 172
supported configurations 212
testing 189
third-party software requirements 223, 225
E
J
C
CD layout, installation 63
Certificate Authority (CA)-signed certificates,
SSL 48
command-line parameters, installation 132
configurations, distributing 30
D
English and non-English languages with SESA 53
events
forwarding 32, 47
logging 27
Java Trust Store password, about 79
JRE (Java Runtime Environment)
installation 79, 106
location on SESA CD 63, 64, 65, 66
248 Index
JRE (Java Runtime Environment) (continued)
SESA system requirements 229
L
logon accounts
about 60
user name restrictions 60
M
MIB installation 205
N
new product features 17
non-English languages with SESA 53
P
passwords, restrictions
SESA DataStore account 62
SESA Directory account 60
SESA Directory Administrator account 61
SESA Domain Administrator account 61
SESA Secure Communications account 62
Web Server account 62
ports, avoiding conflicts during installation 55
post-installation tasks 197
product, configuration distribution 30
R
remote computers, supported 190
replicas, making visible in other SESA domains 204
S
schema, verification of after installation 195
SDK (Software Development Kit)
installation 79, 80, 105, 107
location on SESA CD 63, 64, 65, 66
secure communication 48
services
disabling unnecessary 54
verifying after installation 193
servlets, verification of 195
SESA (Symantec Enterprise Security Architecture)
about 26
and non-English languages 53
component installation types 40
SESA (Symantec Enterprise Security
Architecture) (continued)
components of 19
data paths 39
operation 26
uninstalling 206
SESA Agent
about 23
system requirements on security product
computer 229
SESA DataStore
adding IBM DB2 to existing environment 82
considerations before installation 55, 59
logon account for 62
SESA Directory
about 20
logon account for 60
SESA Directory Administrator, logon account
for 61
SESA Domain Administrator, logon account for 61
SESA logs, examining after installation 196
SESA Manager, about 22
SESA secure communications, logon account for 62
SNMP alert responses 205
Solaris resources, securing before installation 58
SSL (Secure Sockets Layer)
about 48
anonymous, self-signed 48
authenticated, Certificate Authority-signed 48
Symantec Enterprise Security Architecture. See
SESA
Symantec management console
about 25
launching
on Solaris or Linux 192
remotely 190
system requirements 228
system requirements
Directory-only installation 220
remote Symantec management console 228
SESA DataStore-only installation 222, 225
SESA Directory-only installation 219, 223, 226
Index
T
third-party software, system requirements 221,
223, 225, 226, 227
U
user name restrictions, SESA logon accounts 60
W
Web browsers, supported 190
Web Server, logon account 62
249
250 Index