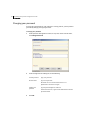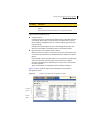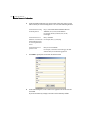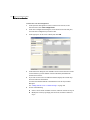
1
Symantec™ Enterprise Security Architecture Symantec Management Console User’s Guide SESA 2.1 Symantec™ Enterprise Security Architecture Symantec Management Console User’s Guide The software described in this book is furnished under a license agreement and may be used only in accordance with the terms of the agreement. Documentation version 2.1 Copyright Notice Copyright 2004 Symantec Corporation All Rights Reserved. Any technical documentation that is made available by Symantec Corporation is the copyrighted work of Symantec Corporation and is owned by Symantec Corporation. NO WARRANTY. The technical documentation is being delivered to you AS-IS, and Symantec Corporation makes no warranty as to its accuracy or use. Any use of the technical documentation or the information contained therein is at the risk of the user. Documentation may include technical or other inaccuracies or typographical errors. Symantec reserves the right to make changes without prior notice. No part of this publication may be copied without the express written permission of Symantec Corporation, 20330 Stevens Creek Blvd., Cupertino, CA 95014. Trademarks Symantec and the Symantec logo are U.S. registered trademarks of Symantec Corporation. SESA, LiveUpdate, Symantec AntiVirus, Symantec Enterprise Security Architecture and Symantec Security Response are trademarks of Symantec Corporation. Sun® is a Registered Trademark of Sun Microsystems, Inc. Sun JDK™ and Sun Java™ are Trademarks of Sun Microsystems, Inc. VeriSign® is a Registered Trademark of Verisign, Inc. Other brands and product names mentioned in this manual may be trademarks or registered trademarks of their respective companies and are hereby acknowledged. Printed in the United States of America. 10 9 8 7 6 5 4 3 2 1 Technical support As part of Symantec Security Response, the Symantec global Technical Support group maintains support centers throughout the world. The Technical Support group’s primary role is to respond to specific questions on product feature/ function, installation, and configuration, as well as to author content for our Web-accessible Knowledge Base. The Technical Support group works collaboratively with the other functional areas within Symantec to answer your questions in a timely fashion. For example, the Technical Support group works with Product Engineering as well as Symantec Security Response to provide Alerting Services and Virus Definition Updates for virus outbreaks and security alerts Symantec technical support offerings include: ■ A range of support options that give you the flexibility to select the right amount of service for any size organization ■ Telephone and Web support components that provide rapid response and up-to-the-minute information ■ Upgrade insurance that delivers automatic software upgrade protection ■ Content Updates for virus definitions and security signatures that ensure the highest level of protection ■ Global support from Symantec Security Response experts, which is available 24 hours a day, 7 days a week worldwide in a variety of languages ■ Advanced features, such as the Symantec Alerting Service and Technical Account Manager role, offer enhanced response and proactive security support Licensing and registration If the product that you are implementing requires registration and/or a license key, the fastest and easiest way to register your service is to access the Symantec licensing and registration site at www.symantec.com/certificate. Alternatively, you may go to www.symantec.com/techsupp/ent/enterprise.html, select the product that you wish to register, and from the Product Home Page, select the Licensing and Registration link. Contacting Technical Support Customers with a current support agreement may contact the Technical Support group via phone or online at www.symantec.com/techsupp. Customers with Platinum support agreements may contact Platinum Technical Support via the Platinum Web site at www-secure.symantec.com/platinum/. When contacting the Technical Support group, please have the following: ■ Product release level ■ Hardware information ■ Available memory, disk space, NIC information ■ Operating system ■ Version and patch level ■ Network topology ■ Router, gateway, and IP address information ■ Problem description ■ Error messages/log files ■ Troubleshooting performed prior to contacting Symantec ■ Recent software configuration changes and/or network changes Customer Service To contact Enterprise Customer Service online, go to www.symantec.com, select the appropriate Global Site for your country, then choose Service and Support. Customer Service is available to assist with the following types of issues: ■ Questions regarding product licensing or serialization ■ Product registration updates such as address or name changes ■ General product information (features, language availability, local dealers) ■ Latest information on product updates and upgrades ■ Information on upgrade insurance and maintenance contracts ■ Information on Symantec Value License Program ■ Advice on Symantec's technical support options ■ Nontechnical presales questions ■ Missing or defective CD-ROMs or manuals Please visit our Web site for current information on Support Programs. The specific features available may vary based on the level of support purchased and the specific product that you are using. Symantec Software License Agreement THIS END USER LICENSE AGREEMENT SUPERSEDES ALL OTHER TERMS AND CONDITIONS INCLUDED WITH THE SOFTWARE AND DOCUMENTATION. BY OPENING THIS PACKAGE, BREAKING THE SEAL, CLICKING THE “AGREE” OR “YES” BUTTON OR OTHERWISE INDICATING ASSENT ELECTRONICALLY, OR LOADING THE SOFTWARE, YOU AGREE TO THE TERMS AND CONDITIONS BELOW. SYMANTEC CORPORATION AND/OR ITS SUBSIDIARIES (“SYMANTEC”) IS WILLING TO LICENSE THE SOFTWARE COMPONENT (“COMPONENT”) TO YOU AS AN INDIVIDUAL, THE COMPANY, OR THE LEGAL ENTITY THAT WILL BE UTILIZING THE COMPONENT (REFERENCED BELOW AS “YOU OR YOUR”) ONLY ON THE CONDITION THAT YOU ACCEPT ALL OF THE TERMS OF THIS LICENSE AGREEMENT SUPPLEMENT (“SUPPLEMENT”) AND THE LICENSE AGREEMENT ACOMPANYING THE SYMANTEC PRODUCT WITH WHICH THIS COMPONENT IS UTILIZED (“LICENSE AGREEMENT”). READ THE TERMS AND CONDITIONS OF THE LICENSE AGREEMENT AND THIS SUPPLEMENT CAREFULLY BEFORE USING THE COMPONENT. THIS IS A LEGAL AND ENFORCEABLE CONTRACT BETWEEN YOU AND THE LICENSOR. BY OPENING THIS PACKAGE, BREAKING THE SEAL, CLICKING THE “ACCEPT” OR “YES” BUTTON OR OTHERWISE INDICATING ASSENT ELECTRONICALLY, OR LOADING THE SOFTWARE, YOU AGREE TO THE TERMS AND CONDITIONS OF THIS SUPPLEMENT. IF YOU DO NOT AGREE TO THESE TERMS AND CONDITIONS, CLICK THE “I DO NOT ACCEPT,” OR “NO” BUTTON, OR OTHERWISE INDICATE REFUSAL AND MAKE NO FURTHER USE OF THE COMPONENT. THE LICENSE AGREEMENT CAN BE LOCATED IN THE PRODUCT PACKAGING AND DOCUMENTATION AND/OR DURING THE SOFTWARE INSTALL. In addition to the License Agreement, the following terms and conditions apply to You for use of the Component. 1. License: The software and documentation that accompanies this Supplement (collectively the “Component”) is the proprietary property of Symantec or its licensors and is protected by copyright law. While Symantec continues to own the Component, you will have certain rights to use the Component after your acceptance of this license. This license governs any releases, revisions, or enhancements to the Component that the Licensor may furnish to you. Except as may be modified by an applicable Symantec license certificate, license coupon, or license key (each a “License Module”) that accompanies, precedes, or follows this license, your rights and obligations with respect to the use of this Component are as follows: You may: A. use the number of copies of the Component as required for utilization with the applicable Symantec products as have been licensed to you by Symantec under a License Module. Your License Module shall constitute proof of your right to make such copies. If no License Module accompanies, precedes, or follows this license, you may make one copy of the Component you are authorized to use on a single machine. B. use the Component in combination with any Symantec recognized product that specifies use with the Component; C. use the Component in accordance with any written agreement between You and Symantec. 2. Limited Warranty: Symantec warrants that the media on which the Software is distributed will be free from defects for a period of sixty (60) days from the date of delivery of the Software to You. Your sole remedy in the event of a breach of this warranty will be that Symantec will, at its option, replace any defective media returned to Symantec within the warranty period or refund the money You paid for the Software. Symantec does not warrant that the Software will meet Your requirements or that operation of the Software will be uninterrupted or that the Software will be error-free. TO THE MAXIMUM EXTENT PERMITTED BY APPLICABLE LAW, THE ABOVE WARRANTY IS EXCLUSIVE AND IN LIEU OF ALL OTHER WARRANTIES, WHETHER EXPRESS OR IMPLIED, INCLUDING THE IMPLIED WARRANTIES OF MERCHANTABILITY, FITNESS FOR A PARTICULAR PURPOSE, AND NONINFRINGEMENT OF INTELLECTUAL PROPERTY RIGHTS. THIS WARRANTY GIVES YOU SPECIFIC LEGAL RIGHTS. YOU MAY HAVE OTHER RIGHTS, WHICH VARY FROM STATE TO STATE AND COUNTRY TO COUNTRY. 3. Disclaimer of Damages: SOME STATES AND COUNTRIES, INCLUDING MEMBER COUNTRIES OF THE EUROPEAN ECONOMIC AREA, DO NOT ALLOW THE LIMITATION OR EXCLUSION OF LIABILITY FOR INCIDENTAL OR CONSEQUENTIAL DAMAGES, SO THE BELOW LIMITATION OR EXCLUSION MAY NOT APPLY TO YOU. SOME STATES AND COUNTRIES, INCLUDING MEMBER COUNTRIES OF THE EUROPEAN ECONOMIC AREA, DO NOT ALLOW THE LIMITATION OR EXCLUSION OF LIABILITY FOR INCIDENTAL OR CONSEQUENTIAL DAMAGES, SO THE BELOW LIMITATION OR EXCLUSION MAY NOT APPLY TO YOU. TO THE MAXIMUM EXTENT PERMITTED BY APPLICABLE LAW AND REGARDLESS OF WHETHER ANY REMEDY SET FORTH HEREIN FAILS OF ITS ESSENTIAL PURPOSE, IN NO EVENT WILL SYMANTEC BE LIABLE TO YOU FOR ANY SPECIAL, CONSEQUENTIAL, INDIRECT, OR SIMILAR DAMAGES, INCLUDING ANY LOST PROFITS OR LOST DATA ARISING OUT OF THE USE OR INABILITY TO USE THE SOFTWARE EVEN IF SYMANTEC HAS BEEN ADVISED OF THE POSSIBILITY OF SUCH DAMAGES. IN NO CASE SHALL SYMANTEC'S LIABILITY EXCEED THE PURCHASE PRICE FOR THE SOFTWARE. The disclaimers and limitations set forth above will apply regardless of whether or not You accept the Software. 4. U.S. Government Restricted Rights: RESTRICTED RIGHTS LEGEND. All Symantec products and documentation are commercial in nature. The software and software documentation are “Commercial Items,” as that term is defined in 48 C.F.R. section 2.101, consisting of “Commercial Computer Software” and “Commercial Computer Software Documentation,” as such terms are defined in 48 C.F.R. section 252.227-7014(a)(5) and 48 C.F.R. section 252.227-7014(a)(1), and used in 48 C.F.R. section 12.212 and 48 C.F.R. section 227.7202, as applicable. Consistent with 48 C.F.R. section 12.212, 48 C.F.R. section 252.227-7015, 48 C.F.R. section 227.7202 through 227.7202-4, 48 C.F.R. section 52.227-14, and other relevant sections of the Code of Federal Regulations, as applicable, Symantec's computer software and computer software documentation are licensed to United States Government end users with only those rights as granted to all other end users, according to the terms and conditions contained in this license agreement. Manufacturer is Symantec Corporation, 20330 Stevens Creek Blvd., Cupertino, CA 95014, United States of America. 5. Export Regulation: Certain Symantec products are subject to export controls by the U.S. Department of Commerce (DOC), under the Export Administration Regulations (EAR) (see www.bxa.doc.gov). Violation of U.S. law is strictly prohibited. Licensee agrees to comply with the requirements of the EAR and all applicable international, national, state, regional and local laws, and regulations, including any applicable import and use restrictions. Symantec products are currently prohibited for export or re-export to Cuba, North Korea, Iran, Iraq, Libya, Syria and Sudan or to any country subject to applicable trade sanctions. Licensee agrees not to export, or re-export, directly or indirectly, any product to any country outlined in the EAR, nor to any person or entity on the DOC Denied Persons, Entities and Unverified Lists, the U.S. Department of State's Debarred List, or on the U.S. Department of Treasury's lists of Specially Designated Nationals, Specially Designated Narcotics Traffickers, or Specially Designated Terrorists. Furthermore, Licensee agrees not to export, or re-export, Symantec products to any military entity not approved under the EAR, or to any other entity for any military purpose, nor will it sell any Symantec product for use in connection with chemical, biological, or nuclear weapons or missiles capable of delivering such weapons. 6. General: This Supplement and the Software License Agreement are the entire agreement governing the use and licensing of this Component. In the event of any conflict between the Supplement and the License Agreement, with regard to the Component, the Supplement shall control. All other terms and conditions of the License Agreement remain in full force and effect. 7. Additional Uses and Restrictions: Notwithstanding any of the terms and conditions contained in this Supplement, the following additional terms apply to the product you have licensed. A. The SSL certificate accompanying this Component will expire within one (1) year of installation of the Component. You may use a self-signed certificate or a separately acquired certificate from a third party vendor. B. The use of Netscape LDAP SDK for Java is governed by the Netscape Public License (NPL), the full text of which can be found at www.mozilla.org/MPL/NPL1.1.html. You are entitled to a copy of the source code of this third party software, which can be found in the Component. C. The use of SNIA CIMOM is governed by the SNIA Public License (SPL), the full text of which can be found at www.snia.org/English/Resources/Code/Open Source.html. You are entitled to a copy of the source code of this third party software, which can be found in the Component. D. If you have received or purchased the IBM DB2 Workgroup or Personal database editions, regardless of version, You may only use such database with the Component. You may use the IBM DB2 Workgroup database on a single server only. Contents Chapter 1 Introducing Symantec Enterprise Security Architecture About Symantec Enterprise Security Architecture ........................................ 13 About the Symantec management console ............................................. 14 Components of SESA ........................................................................................... 15 SESA Directory ............................................................................................. 16 SESA DataStore ............................................................................................ 18 SESA Manager .............................................................................................. 18 SESA Agent ................................................................................................... 19 Symantec management console ................................................................ 20 SESA Integration Packages, Symantec Event Managers, and Symantec Event Collectors ......................................................... 21 What you can do with SESA ............................................................................... 24 Organizational units ................................................................................... 24 Configuration groups .................................................................................. 25 Product configuration distribution ........................................................... 26 Multiple administrative domains .............................................................. 29 SESA users .................................................................................................... 29 Roles in SESA ............................................................................................... 30 Failover support ........................................................................................... 31 Security technology in SESA ...................................................................... 32 LiveUpdate technology ............................................................................... 32 Event exclusion, logging and viewing ...................................................... 33 Alerts and alert notifications ..................................................................... 33 Centralized reporting .................................................................................. 34 Where to get more information about SESA ................................................... 34 Chapter 2 Introducing the Symantec management console Accessing the Symantec management console .............................................. 35 Log on prerequisites .................................................................................... 36 Logging on to the Symantec management console ................................ 37 Introducing the user interface ........................................................................... 41 Using the console view tabs ............................................................................... 42 Using menus ......................................................................................................... 43 Monitoring SESA components ................................................................... 44 Refreshing the Symantec management console ..................................... 47 8 Contents Changing your password ............................................................................ 48 Detaching console windows ....................................................................... 49 Using the toolbar ................................................................................................. 49 Navigating using the left pane .......................................................................... 52 Changing the appearance of the right pane .................................................... 53 Initiating actions .......................................................................................... 54 Re-displaying open windows ..................................................................... 55 Using the status indicator .......................................................................... 55 Accessing Help ............................................................................................. 55 Using SESA wizards ............................................................................................ 56 Starting wizards ........................................................................................... 58 Creating objects with wizards .................................................................... 58 Editing the properties of objects ............................................................... 60 Interaction among wizards ........................................................................ 60 Using Find dialog boxes ...................................................................................... 61 Chapter 3 Defining the administrative structure of SESA About the System view tab administrative features ...................................... 64 Working with domains ....................................................................................... 66 Editing domain properties ......................................................................... 66 Managing roles ..................................................................................................... 68 Planning for role creation .......................................................................... 69 About the Domain Administrator role ..................................................... 70 Creating a role .............................................................................................. 70 Editing role properties ................................................................................ 74 Deleting a role .............................................................................................. 84 Managing users .................................................................................................... 85 Creating a new user ..................................................................................... 85 Editing user properties ............................................................................... 88 Modifying user permissions ....................................................................... 99 Deleting a user ............................................................................................. 99 Managing organizational units ......................................................................... 99 Creating a new organizational unit ........................................................ 100 Editing organizational unit properties ................................................... 102 Modifying organizational unit permissions .......................................... 104 Deleting an organizational unit .............................................................. 104 Distributing configurations by way of an organizational unit ........... 105 Deploying and removing SESA Manager extensions ........................... 106 Managing computers within organizational units ....................................... 114 Creating computers within organizational units ................................. 115 Editing computer properties .................................................................... 118 Distributing a configuration to selected computers in an organizational unit .................................................................. 131 Contents Moving a computer to a different organizational units ......................131 Modifying computer permissions ...........................................................132 Deleting a computer from an organizational unit ................................133 Monitoring computers ..............................................................................134 Managing configuration groups ......................................................................138 Creating a configuration group ...............................................................139 Editing configuration group properties .................................................140 Modifying configuration group permissions .........................................144 Distributing a configuration by way of a configuration group ...........144 Deleting a configuration group ...............................................................145 Managing SESA DataStores .............................................................................145 Editing SESA DataStore properties ........................................................146 Modifying SESA DataStore permissions ................................................147 Managing SESA Directories .............................................................................148 Adding a SESA Directory .........................................................................148 Editing SESA Directory properties .........................................................150 Modifying SESA Directory permissions .................................................152 Deleting a SESA Directory ........................................................................152 Managing notification services .......................................................................153 Adding a notification service ...................................................................154 Editing notification service properties ...................................................155 Modifying notification service permissions ..........................................155 Deleting a notification service .................................................................155 Working with permissions ...............................................................................156 About permissions .....................................................................................156 Modifying permissions from the Permissions dialog box ...................158 Chapter 4 Configuring products Working with configurations ..........................................................................161 Viewing product configurations ......................................................................162 Creating new configurations ............................................................................163 Editing a configuration’s settings ...................................................................165 Editing a configuration’s associations ...........................................................167 Associating computers with configurations ..........................................167 Associating configuration groups with configurations .......................169 Associating organizational units with configurations ........................171 Distributing configurations .............................................................................172 Modifying the permissions of configurations ...............................................173 Deleting configurations ....................................................................................176 9 10 Contents Chapter 5 Configuring SESA 2.0 Introducing the Symantec Enterprise Security Architecture Configurations .................................................................... 177 About the SESA v1.1 and SESA 2.0 products ........................................ 178 Manager Configurations ................................................................................... 180 Increasing the minimum free disk space requirement in high logging volume situations ................................................... 181 Manager Components Configurations ........................................................... 182 Configuring alert email and retry settings ............................................ 184 Configuring event logging ........................................................................ 185 Modifying administrative settings .......................................................... 186 Setting up blacklisting for logon failures ............................................. 188 Forwarding events to other event relays ............................................... 189 Forwarding alerts to other alert mechanisms ....................................... 192 Configuring SNMP alert responses ......................................................... 193 Scheduling SESA Manager LiveUpdate .................................................. 194 Manager Master Heartbeat Configuration .................................................... 196 Changing the Master Heartbeat service computer ............................... 198 How the Master Heartbeat service computer can be changed by an election ......................................................... 199 Manager Connection Configurations ............................................................. 200 Configuring SESA Directories ................................................................. 201 Configuring SESA DataStores .................................................................. 204 Agent Connection Configurations .................................................................. 210 Configuring SESA Agent to SESA Manager failover ............................ 211 Agent Configurations ........................................................................................ 214 Setting the configuration poll time ........................................................ 216 Scheduling SESA Agent LiveUpdate ....................................................... 217 Configuring SESA Agent heartbeat ........................................................ 219 Product Installation Service configurations ................................................. 222 Modifying Product Installation Service configurations ...................... 223 Manager Event Exclusion Configurations ..................................................... 225 Creating event exclusion rules ................................................................ 226 Creating event exclusion configurations ............................................... 232 Specifying event exclusion configuration associations ...................... 233 Adding event exclusion rules to an event exclusion configuration ... 235 Distributing event exclusion configurations ........................................ 235 Deleting event exclusion configurations ............................................... 236 Contents Chapter 6 Viewing and creating reports About reports .....................................................................................................237 Viewing reports ..................................................................................................238 Working with tabular reports ..................................................................239 Working with chart-based reports ..........................................................241 Troubleshooting unavailable SESA DataStores ....................................243 About modifying reports ..................................................................................244 About filtered reports ...............................................................................245 About custom reports ................................................................................246 Modifying reports by using filters ..........................................................246 Filtering shortcuts .....................................................................................257 Creating a custom report using the Custom Reports Wizard .....................265 Printing and exporting report data .................................................................267 Printing reports .........................................................................................267 Exporting reports .......................................................................................269 Monitoring events and alerts in detached windows ....................................273 Chapter 7 Viewing and consolidating events About the Events view tab ................................................................................275 Viewing event statistics ....................................................................................277 Viewing event reports .......................................................................................277 Global Reports ............................................................................................278 System Events ............................................................................................279 Reports for integrated security products ...............................................282 Displaying event details ...................................................................................284 Creating an alert configuration based on an event ......................................285 Chapter 8 Viewing and configuring alerts About the Alerts view tab .................................................................................291 Viewing alert statistics .....................................................................................292 Viewing alert reports ........................................................................................292 Acknowledging alerts ........................................................................................293 Displaying alert details .....................................................................................295 Creating an alert configuration .......................................................................298 Editing alert configurations .............................................................................306 Disabling or enabling alerts .....................................................................306 Specifying alert thresholds and frequency ............................................307 Specifying alert notification methods ....................................................309 Index 11 12 Contents Chapter 1 Introducing Symantec Enterprise Security Architecture This chapter includes the following topics: ■ About Symantec Enterprise Security Architecture ■ About the Symantec management console ■ Components of SESA ■ What you can do with SESA ■ Where to get more information about SESA About Symantec Enterprise Security Architecture Symantec Enterprise Security Architecture (SESA) integrates multiple Symantec Enterprise Security products and third-party products to provide flexible control of security within organizations. SESA is designed to meet the requirements of both large-sized and medium-sized enterprises. It provides a common management framework for native and integrated SESA security products to protect your IT infrastructure from malicious code, intrusions, and blended threats, and help to identify the vulnerabilities that the threats exploit. SESA helps you increase your organization’s security posture by simplifying the task of monitoring and managing security-related events and products. You can monitor and manage security-related events through the Symantec management console. 14 Introducing Symantec Enterprise Security Architecture About Symantec Enterprise Security Architecture Figure 1-1 shows the basic relationships among the foundation that is provided by SESA, the Symantec management console, and the security products that SESA helps manage. Figure 1-1 SESA foundation Native and nonnative security products Agent Agent Agent Manager Symantec management console The Symantec management console is the common user interface that provides manageable integration of security technologies (Symantec or otherwise), Symantec Security Services, and Symantec Security Response. About the Symantec management console Using the Symantec management console with the appropriate native and integrated SESA security products, you can do the following: ■ Centrally manage attacks, threats, and exposures by correlating security information from integrated Symantec and non-Symantec antivirus products, firewalls, intrusion detectors, incident response management software, and vulnerability scanning tools. Introducing Symantec Enterprise Security Architecture Components of SESA ■ Query, filter, and sort data to reduce the security-related events that you see through the Symantec management console, which allows you to focus on threats that require your attention. You can configure alert notifications in response to events, and generate, save, and print tabular and graphical reports of event status, based on filtered views that you have created. ■ Change the security configurations of native and integrated SESA security products. Configuration options differ depending on the features of the integrated product. ■ Configure and adjust SESA components to meet the infrastructure and performance needs of your organization. ■ Group clients according to their security infrastructure and functional management needs to minimize the complexity of managing many security technologies across numerous clients and users. You can logically create groups of managed computers that are based on location, products installed, area of responsibility, or any combination of these. These organizational units help you better delegate event-management, product-configuration, and maintenance tasks. ■ Create user roles and grant product-based or other types of permissions to further help with task delegation. SESA provides role-based administration, in which SESA users are granted permissions according to the roles to which they are assigned. Like organizational units, roles can be defined by product, location, or type of task. The flexible, centralized approach and comprehensive event management capabilities of SESA give you the up-to-date information that you need to make informed decisions about the security of your network and related devices. Components of SESA The following components are the core of Symantec Enterprise Security Architecture: ■ SESA Directory ■ SESA DataStore ■ SESA Manager ■ SESA Agent (on the SESA Directory, SESA DataStore, and SESA Manager, as well as on the integrated security product) ■ Symantec management console ■ SESA Integration Packages, Symantec Event Managers, and Symantec Event Collectors, as required by a security product 15 16 Introducing Symantec Enterprise Security Architecture Components of SESA SESA relies on security product SESA Agents, a SESA Directory, a SESA DataStore, and a SESA Manager to collect, store, process, and report security events to the Symantec management console, and to distribute configuration changes to SESA and SESA security products. In some cases, security products may also use a SESA Event Collector to collect security events for forwarding to SESA. Figure 1-2 shows the relationships among the major SESA components. No SESA Event Collectors are shown. Figure 1-2 Relationships among SESA components Symantec management console Agent Manager Security product Directory DataStore SESA Directory The SESA Directory uses the Lightweight Directory Access Protocol (LDAP) to store the configuration data that is required to manage native and integrated SESA security products and SESA services on the network. Introducing Symantec Enterprise Security Architecture Components of SESA The configuration data includes the following: ■ Organizational units, which identify of all of the SESA-managed computers and components on the network and their locations in an organizational hierarchy. ■ Configuration groups, which have managed computers as members. ■ Data for each native and integrated SESA security product or SESA service that is installed on each SESA-managed computer (client or server). ■ All authorized Symantec management console users on the network. ■ The administrative roles to which Symantec management console users are assigned. Roles group users to assign console access control permissions. ■ Configuration data that describes the settings for the software features of the SESA security product or products. ■ Information that describes SESA itself. You can view, add, and modify information through the Symantec management console, which then stores the data in the SESA Directory. You can define a number of configurations for each SESA-integrated product. Each product differs as to the type of configuration options that are offered. You can organize managed computers and users into different types of groups to help you delegate administrative tasks, and to better reflect the existing infrastructure of your organization’s network. As new SESA security products are installed, SESA automatically adds the products and the computers on which they are installed to the SESA Directory. Directory replicas Using the same Symantec Installation Wizard that installs SESA Directories, you can also install one or more replica SESA Directories to add failover support. In this way, when a network connection fails on a SESA Directory computer, the associated SESA Manager can automatically switch communication to the replica SESA Directory. Replica SESA Directories are read-only. While a replica SESA Directory is in use, you cannot make configuration changes to SESA components and management objects. See the section on setting up SESA Agent-to-Manager failover support in the Symantec Enterprise Security Architecture Implementation Guide and “Configuring SESA Manager to SESA Directory failover” on page 201. 17 18 Introducing Symantec Enterprise Security Architecture Components of SESA SESA DataStore The SESA DataStore is a relational database that stores all event data that is generated by SESA and SESA products. In addition, the SESA DataStore stores alerts that are generated by alert configurations. SESA events and product events are predefined. You can create alert configurations or notifications based on one or more events, and set alerting thresholds. Depending on the rate that security events are logged to the SESA DataStore, more than one SESA DataStore may be necessary for a SESA installation. During SESA installation, you can span a single SESA DataStore across multiple drives or move it to another drive, as available space requires. You can also use thirdparty software to resize and move SESA DataStores after the SESA installation, if necessary. See “Configuring SESA Manager to SESA DataStore failover” on page 205. SESA Manager The SESA Manager centrally manages event processing for the SESA Agents, SESA DataStore, SESA Directory, and Symantec management console. The SESA Manager contains a Web server and a servlet engine. Each aspect of the SESA Manager’s functionality is implemented as a Java servlet. All SESA data passes through the Web server and the servlet engine. Depending on resource demands and physical constraints such as locations, you can set up the SESA Manager in the following different configurations: ■ SESA Manager, SESA DataStore, and SESA Directory all on a single computer (not supported on Solaris platforms) ■ SESA Manager on one computer, SESA DataStore and SESA Directory on remote computers (distributed) ■ One or more SESA Managers that log event data to their own SESA DataStores as well as forward events and alerts to other SESA Managers (event and alert forwarding) but share a single SESA Directory ■ Multiple Managers that point to one SESA Directory and SESA DataStore ■ SESA DataStores at multiple sites that replicate to a single master SESA DataStore (replication) See the section on supported installation configurations in the Symantec Enterprise Security Architecture Implementation Guide. You can decide which configuration is most appropriate for your networking environment during installation planning. Introducing Symantec Enterprise Security Architecture Components of SESA SESA Agent SESA Agents are Java applications that perform communication functions for the SESA components or security products on which they are installed. Depending on where the SESA Agent is running, it handles the following types of communication tasks: SESA Agent installed on a security When a SESA Agent is installed on a security product, product it handles the communication between the product and the SESA Manager. The SESA Agent passes event data from the security product to the SESA Manager and receives product configuration data. One SESA Agent can support multiple security products that are installed on the same computer. (For a SESA Agent to support a product, the product must have been integrated with SESA). SESA Agents are installed and uninstalled with the security product. If the SESA Agent is not available with the security product, it is typically installed and uninstalled with a Symantec Event Manager, Symantec Event Collector, or with some other type of SESA integration method. See “SESA Integration Packages, Symantec Event Managers, and Symantec Event Collectors” on page 21. SESA Agent installed on the SESA Manager (and if necessary, the SESA Directory and SESA DataStore) In SESA 2.0, a SESA Agent is installed on the SESA Manager, which has a heartbeat provider that monitors the online and offline status of SESA services that are running on the SESA Agent. When security products integrate with SESA, they register certain critical services with the SESA Agent. You can further define critical services in the Symantec management console. The SESA Agent is installed and uninstalled with the SESA Manager. If the SESA Directory or the SESA DataStore is installed on different computers than the SESA Manager, you must use the SESA Installation Wizard to install an additional SESA Agent on each remote SESA Directory or SESA DataStore computer. The purpose of the SESA Agent on a remote SESA Directory or SESA DataStore is to obtain heartbeat status from these SESA components. See “SESA Agent heartbeat service” on page 20. 19 20 Introducing Symantec Enterprise Security Architecture Components of SESA SESA Agent heartbeat service The SESA Agent in SESA 2.0 comes with a heartbeat service that provides the SESA Manager with near real-time status of critical services. These critical services register with the SESA Agent. Administrators can view heartbeat status quickly and easily from the Symantec management console, and can also configure alerts that are based on heartbeat failure events. Any time that a defined critical service misses a heartbeat (that is, becomes unavailable), SESA generates an event, which you can use for creating an alert, which can generate the proper alert or notification, such as an email or page. You can view heartbeat status in the Symantec management console. An icon next to a computer denotes whether the critical services that are running on that computer are operational, have failed, or are not applicable. Without making queries, you can use the Systems view tab as a quick and comprehensive way to identify computers on which a service is unavailable. You can also query properties to see a more detailed status. See “Monitoring computers” on page 134. You can view the length of time that a service has been running or the length of time that a service has been unavailable. The view also displays the normal check-in interval of the computer system in question. Event data handling To pass event data, the SESA Agent sends events as follows: ■ Batch events are normal priority events that accumulate on the SESA Agent before the SESA Agent sends them. The SESA Agent sends them according to settings that you configure in the Symantec management console. Batch events provide efficient communication because each time that the SESA Agent connects to the SESA Manager, it must open a connection and authenticate itself to the SESA Manager. ■ Direct events have alert configurations associated with them and are sent immediately to the SESA Manager, which bypasses the SESA Agent event queue. Symantec management console The Symantec management console provides a simple, lightweight, Java-based, user-interface framework. The Symantec management console runs in a Web browser via a secure connection and retrieves events and configurations through the SESA Manager. Introducing Symantec Enterprise Security Architecture Components of SESA The Symantec management console provides you with flexible features such as detachable windows, preferences, stored views, and tabular and graphical views. It also offers extensive filtering capabilities, which let you filter any field in the data, including date, time, event, event family, SESA security product, and more. The Symantec management console is data-driven. As SESA security products integrate into SESA, they extend the Symantec management console’s functionality by inserting new event classes, views, tabs, and other productspecific data into it. Figure 1-3 shows the Symantec management console with the All Events view displayed. Figure 1-3 Events view tab displayed in the Symantec management console SESA Integration Packages, Symantec Event Managers, and Symantec Event Collectors After you install all of the SESA components, including any additional domains, subdomains, SESA Agents for heartbeat monitoring (as necessary), and replica or secondary SESA Directories, SESA DataStores, and SESA Managers for failover support, you can start integrating Symantec or third-party security products with SESA. SESA lets you integrate products through a robust framework called the SESA Integration Package (SIP). SIPs contains the product 21 22 Introducing Symantec Enterprise Security Architecture Components of SESA schemas and other descriptions that let SESA recognize products and log events from them. All products require you to run the SESA Integration Wizard to integrate with SESA. However, some products require that you install other integration components in addition to a product SIP. Table 1-1 lists all of the types of integration components that SESA may require for a product integration. For more information on the specific integration components that your product requires to integrate with SESA, see the product documentation. Table 1-1 SESA integration components Integration component Description SESA Integration Package (SIP) All products that integrate with SESA have a SESA Integration Package (SIP), which is installed on the SESA Manager computer and deployed to the appropriate SESA administrative domains and SESA DataStores. The SIP configures the SESA DataStore to recognize and log events from the product. Each product provides a unique data package, which provides the product schema information for the SESA DataStore. You install SESA Integration Packages using the SESA Integration Wizard. In SESA 2.0, this wizard is accessible on the SESA Manager computer. The wizard prompts you for the product-specific data package. For most Symantec products, this data package is supplied with the product distribution media. Some products are Relays, Bridges, or have UI extensions. Relays and Bridges let SESA relay events from the SESA DataStore to another product. UI extensions allow the Symantec management console to include a unique graphical user interface and functionality for a product. Relays, Bridges, and UI extensions are collectively called Manager extensions. When a SIP contains a Manager extension, you are required to run an additional wizard in the Symantec management console to deploy the Manager extension. See the section on integrating security products with SESA in the Symantec Enterprise Security Architecture Implementation Guide. For instructions on deploying Manager extensions, see “Deploying and removing SESA Manager extensions” on page 106. Other products may use versions of the SESA Integration Wizard prior to SESA 2.0. In such cases, the wizards and SIPs for the product are provided with a Symantec Event Manager, Symantec Event Collector, or on other distribution media Introducing Symantec Enterprise Security Architecture Components of SESA Integration component Description SESA Agent All products require a SESA Agent to integrate with SESA. The SESA Agent runs on the product (or client) computer, and provides communication services between the product and the SESA Manager. Depending on the product, the SESA Agent can be provided through any one of the following mechanisms: ■ Agent Installer: Some products come with a separate software program to install the SESA Agent on the various platforms that are supported by the product. ■ Product installation program: Some products have an option in their installation programs for installing the SESA Agent. Depending on the product, you can install the SESA Agent during product installation, or you can install the SESA Agent later. ■ Manual installation: Some product versions that have shipped before other SESA integration methods became available require manual steps to install the SESA Agent. ■ Symantec collectors (also called sensors): Some products require that additional software be installed on a product computer for the purpose of collecting and configuring event data from the product or product logs. If event collecting software is required, a Symantec Collector will also typically install the SESA Agent. The SESA Agent passes the collected events to the SESA Manager for insertion into the SESA DataStore. Symantec collectors are often packaged with Symantec Event Managers or Symantec Event Collectors. Symantec Event Managers Symantec Event Managers provide a suite of SESA integration components for the Symantec products that they support. Symantec Event Managers always provide versions of SIPs earlier than 2.0. And, depending on the supported product, they may provide a Symantec collector, an Agent Installer, or instructions for installing the SESA Agent manually. Symantec Event Collectors Symantec Event Collectors provide the Symantec collectors (also called sensors), SESA Agents, and SESA Integration Packages that are required for a third-party or non-Symantec product to integrate with SESA. Each Symantec Event Collector supports a particular third-party product or suite of products. Symantec Event Mangers and Symantec Event Collectors let organizations with large SESA installations immediately leverage the benefits of SESA even when their supported security products are versions that were released before SESA. 23 24 Introducing Symantec Enterprise Security Architecture What you can do with SESA What you can do with SESA SESA 2.0 lets you organize resources on your network to more easily manage and view them as objects in graphical and tabular formats. You can change configurations on native and integrated SESA security products as well as on the SESA services that manage these products. You can create and maintain SESA users (who perform SESA administrative tasks), and assign them to roles for the purpose of grouping like-access permissions. Organizational units Organizational units let you group computers into logical collections. You can group computers by location, SESA security product installed, class of user, or class of computer. Through the Symantec management console, you can create, modify, and delete organizational units. This flexibility lets you design your SESA environment to better reflect how your organization is handling or plans to handle its security-management needs across the network. For example, one organization may organize its network by business functions, such as marketing, operations, and accounts payable, while another organization may organize by IT functions. Still others may structure their networks by product groups, such as antivirus and firewall, or by location, for example, regions, cities, or building floors. Many organizations need to organize their networks by a combination of some or all of these criteria. SESA is flexible enough to allow whatever hierarchical grouping is necessary to reflect your organization’s IT structure. While the main purpose of organizational units is to group computers with common configurations, you can also use organizational units to change configurations on native and integrated SESA security products. To override a particular configuration, you use configuration groups. Configuration groups let you create exceptions to the computer configurations in organizational units. See “Configuration groups” on page 25. Organizational unit hierarchy Nested objects in an organizational unit hierarchy can inherit the configuration properties of their parent units, but only if they do not already have configurations associated with them. You can associate configurations with organizational units at any level in the hierarchy. If a computer does not find a configuration at its level, it uses the configuration at the next level up the tree. At the same time, you can distribute a configuration to individual computers within an organizational unit without affecting the other computers in the unit. This type of property inheritance reduces repetitive Introducing Symantec Enterprise Security Architecture What you can do with SESA configuration tasks, which makes the maintenance of native and integrated SESA security product configurations more efficient. Default organizational units The organizational units in Table 1-2 already exist when you access the Symantec management console for the first time. Table 1-2 Default organizational units Organizational unit Description Default The Default organizational unit contains computers on which SESA Agents are installed, but have not yet been assigned to other organizational units. When you create organizational units, you move computers from the Default unit to the newly created unit as necessary. Some native or integrated SESA security products may prompt you to specify their organizational unit during the product installation process. Managers The Managers organizational unit is a special unit that is used to optionally contain computers on which SESA Managers are installed. You decide during the SESA Manager installation process whether you want the SESA Manager to initially appear in the Manager or in the Default organizational unit. You can later move a SESA Manager to another organizational unit. Configuration groups Configuration groups let you create exceptions to the configurations that you have created for computers in organizational units. You may have cases in which a small number of computers have configurations that would match those of a larger group of computers, but for one or two exceptions. You can still include the near-match computers in the same organizational unit as the larger group of computers, and then handle the differences by creating a configuration group for the near matches that specify the exceptions. Any configurations for computers in configuration groups override the configurations of those same computers in organizational units. Therefore, configuration groups provide a convenient way to track exceptions without you having to create a new organizational unit for every computer configuration that differs slightly from existing configurations. 25 26 Introducing Symantec Enterprise Security Architecture What you can do with SESA For example, you may have three computers in three different organizational units that require the same slight modification to an antivirus configuration. Rather than make three separate configuration changes for each computer, you can create one configuration group for the three computers and define a configuration once. Computers are members of configuration groups, but are contained in organizational units. Configuration groups take precedence over organizational units. Organizational units represent the actual SESA-managed computers on the network, while configuration groups represent exceptions to organizational unit configurations. See “Organizational units” on page 24. A computer can only be assigned to one configuration group at a time. If you reassign a computer to another configuration group, SESA automatically removes the computer from its original configuration group. Unlike organizational units, configuration groups do not nest hierarchically. Each group receives only the configurations that you have explicitly assigned to it. Product configuration distribution Integrating products are installed with predefined categories of product configuration options, which are called software features. The values that have been set for these options are what SESA detects as the various configurations for the computers in organizational units. SESA lets you create, modify, or delete these configurations (including configurations for SESA itself). SESA allows you to have multiple configurations for each native or integrated SESA product so that you can apply a specific configuration to a subset of computers that are running the product. For example, you may want to change an existing configuration for a firewall product by opening a port to grant limited access. You can make this change once in the Symantec management console and then have SESA distribute the change to the necessary antivirus computers. Note: The timing of configuration distribution varies depending on the amount of traffic on the SESA Manager Introducing Symantec Enterprise Security Architecture What you can do with SESA Products acquire new configurations in the following ways: ■ An administrator with product management permissions initiates the distribution of the configuration. A message is sent to computers, telling them to contact the SESA Manager for configurations. An administrator can control how to send this message so that the SESA Manager is not overwhelmed by requests for new configurations. ■ The SESA Agent that is installed with a product, or on a SESA Manager, polls the SESA Manager to find out if there are new configurations. This polling can take place at a configured interval, or when the computer on which the SESA Agent is installed is restarted. In both of these cases, the following dialog takes place: ■ The product, by way of the SESA Agent, asks the SESA Manager what configurations that it needs. ■ SESA performs a hierarchical check to find the right configuration. ■ The SESA Agent pulls the configuration to the computer. Figure 1-4 illustrates the hierarchy of precedence that SESA uses to determine which configuration to distribute. The SESA Agent queries the SESA Manager for specific actions. 27 28 Introducing Symantec Enterprise Security Architecture What you can do with SESA Figure 1-4 Configuration distribution hierarchy Do configurations exist that are: Directly associated with this computer? YES SESA Agent pulls the configuration to the computer. YES SESA Agent pulls the configuration to the computer. YES SESA Agent pulls the configuration to the computer. NO For the configuration group to which this computer belongs? NO For the organizational unit to which this computer belongs? NO For an organizational unit above the one to which this computer belongs? NO The SESA Agent pulls the default configuration to the computer. YES SESA Agent pulls the configuration to the computer. Introducing Symantec Enterprise Security Architecture What you can do with SESA Multiple administrative domains Multiple administrative domains facilitate the management of your network resources. An administrative domain is a structural container in the SESA Directory that you use to organize a hierarchy of users, organizational units, computer systems, configuration groups, and managed products and product configurations. By default, at least one administrative domain is installed when you install a SESA Manager. You can install additional domains; however, each domain must have at least one SESA Manager associated with it. For example, if your company is large, with sites in multiple regions, you may need to have a single view of management information, yet have the option to delegate administrative authority, physically separate security data, or have greater flexibility in how users, computers, and policies are organized. You may have similar needs if you are a managed service provider that manages multiple independent companies, as well as Internet service providers. To meet these needs, you can install multiple administrative domains, for example by country, by region, or by company. Each domain that you install provides an additional set of instances of the basic SESA directory tree. You can organize the domains that you install as peers on different servers, or in a hierarchy on a single server, depending on your corporate needs. You can create additional domains when you install your SESA components. See the section on installing additional SESA domains in the Symantec Enterprise Security Architecture Implementation Guide. SESA users SESA maintains a list of SESA users, or people who have SESA management or non-management roles. SESA installs with a default Administrator user, which is defined during installation when the SESA Installer asks for a user name and password for the SESA Directory Domain Administrator. The default Administrator has access rights to the entire SESA administrative domain. A SESA domain is an autonomous group of objects for which administrative authority is granted through roles. Objects include computers, users, databases, application configurations, and application service locations. SESA 2.0 lets administrators install multiple administrative domains that contain all SESAmanaged objects and to which the default Administrator user is granted administrative authority. 29 30 Introducing Symantec Enterprise Security Architecture What you can do with SESA When SESA users are created, they have no access rights to SESA domains. Users are granted permissions to objects in the SESA environment through role assignment. When the SESA installer creates the default Administrator user, it assigns the default role of SESA domain administrator to that user. This role carries the necessary permissions for the default Administrator user to access all objects in the SESA domain. When you create a user, you assign a role that grants that user access rights to a set of objects in the domain. You can add SESA users using a wizard in the Symantec management console. Roles in SESA Roles are a way to create sets of permissions to the various management objects in the Symantec management console. A Symantec management console user can have one or more roles. The logon identity of Symantec management console users determines the role assignment during an administrative session. In SESA 2.0, roles provide more detailed permission levels for almost every management object in the Symantec management console. The first time that you install a SESA Directory, or when you create new domains using the SESA installer, a domain administrator role for the domain is created. You cannot modify or delete this role, but you can add users to it. Users who are members of this role have full access (permissions) to all objects that exist in the same domain as the role. When you do not want to give users such complete access, you can create more limited roles. Limited roles Roles that you create in the Symantec management console apply only to the domain in which they are created, and only to one product. If a user needs access to one product in one domain, you (as a member of the domain administrator role) can make the user a member of a single role. For example, you can limit a user’s access by making the user a member of a single role that allows only the viewing of firewall events and management of firewall configurations. However, if users need access to multiple products over several domains, you can make them members of more than one role. For example, a user may be a member of a firewall event viewing role in one domain and a member of an antivirus management role in another domain. This allows the user to view events from a firewall product in one domain, and manage the configuration of an antivirus product in another domain. Introducing Symantec Enterprise Security Architecture What you can do with SESA Permissions Another way that roles control access to objects is through permissions. Permissions specify the rights (read, write, add, delete, and search) that members of a role have over SESA objects. Permissions are automatically added to a role when it is created. You can remove or modify permissions for specific objects by editing the role’s properties. Permissions, like roles, can only be modified by members of the Domain Administrator role. See “Creating a role” on page 70 and “Working with permissions” on page 156. Failover support SESA 2.0 now lets you configure the Symantec management console to set up one or more alternate servers for SESA components should any SESA component server become unavailable. The failover feature lets you preconfigure the SESA Agent to connect to alternate SESA Managers when the primary SESA Manager is unavailable. You can also preconfigure the SESA Manager to connect to alternate, or replica, SESA DataStores or SESA Directories if the primary SESA DataStore or SESA Directory becomes unavailable. Administrators can configure the following two types of failover schemes: ■ Automatic failover scheme: Selects an alternate server from a predefined, user-ordered list of SESA component servers in the Symantec management console. No administrator intervention takes place, although administrators sequence failover servers in the Symantec management console. For failover SESA Directories, the particular failover server is chosen programatically, without user configuration. SESA selects the alternate SESA Directory server with the primary domain name suffix that most closely matches the primary domain name suffix of the failed server. ■ Manual failover scheme: Requires the administrator to select the SESA component server manually at failover time. SESA lets administrators configure the number of connection attempts before a primary SESA component server fails over to an alternate server. In addition, administrators can configure the time interval between connection attempts, both when a server fails over and when it fails back to the primary server. See the section on setting up failover support in the Symantec Enterprise Security Architecture Implementation Guide. 31 32 Introducing Symantec Enterprise Security Architecture What you can do with SESA Security technology in SESA SESA installs with anonymous Secure Sockets Layer (SSL) technology to encrypt data and secure communications between the SESA Manager and any of the following: ■ SESA Agents over HTTPS ■ SESA Directory over LDAPS ■ Symantec management console over HTTPS ■ Other SESA Managers over HTTPS The default SSL that installs with SESA lets the SESA Manager dynamically create self-signed certificates to validate the integrity of, and encrypt data passing between, these components. Anonymous SSL does not provide authentication. However, SESA lets you convert to authenticated SSL, which authenticates connections among SESA Managers and SESA Agents, SESA Directories, Symantec management consoles, and other SESA Managers. SESA Managers always communicate through HTTPS to pass data to other SESA Managers, and among its internal components. For example, a single SESA Manager can communicate internally between its servlets (such as an Event Logger to an Alert Logger servlet) over HTTPS. In addition, a SESA Manager can communicate with another SESA Manager using HTTPS, as is done in an event forwarding configuration. Communications between the SESA Manager and SESA DataStore use local TCP/ IP communication when the SESA DataStore and SESA Manager reside on the same computer. When they are installed on separate computers, you can secure communication between them by setting up a secure tunnel, such as a virtual private network (VPN). Transport Layer Security (TLS) is also supported on Sun SPARC Solaris installations. See the section on changing your security configuration in the Symantec Enterprise Security Architecture Implementation Guide. LiveUpdate technology LiveUpdate is the Symantec technology that lets installed Symantec products connect to a server automatically for program updates. The connection is made through an HTTP or FTP site. LiveUpdate is installed on the SESA Manager computer when the SESA Installer program installs the SESA Manager. Native SESA security products install the SESA Agent as part of their product installations. Security products that require integration with SESA use an Event Introducing Symantec Enterprise Security Architecture What you can do with SESA Manager, Event Collector, Relay, or Bridge to install the SESA Agent. Regardless of how the SESA Agent is installed, you can configure it to perform a LiveUpdate operation in the Symantec management console. In addition, SESA security products can receive product updates from Symantec through Java LiveUpdate. However, neither the SESA Agent nor SESA Manager Java LiveUpdate sessions are involved in updating native or non-native SESA security products. Note: Some SESA third-party components cannot receive product updates through LiveUpdate. Event exclusion, logging and viewing SESA 2.0 lets you select which types of events to exclude from insertion into the SESA DataStore. An integrated SESA security product forwards events to the SESA Agent, which manages and queues the events and sends them to a SESA Manager. The SESA Manager then logs the events in the SESA DataStore. The only way to exclude events from being logged to the SESA DataStore is to define exclusion event filters. One of the filter elements that you can define is the event type. Event viewing is provided through Symantec management console views and specific product console view extensions. For example, administrators can query, filter, and sort events to quickly find computers that are not protected, are out-of-date, or have high-severity events occurring on them. Alerts and alert notifications SESA lets you create alert notifications for events that are collected on the SESA Manager. Notifications can be sent via pagers, SNMP traps, email, and OS Event Logs. You can define the notification recipients, day and time ranges when specific recipients are notified, and custom data to accompany the notification messages. Each notification recipient can have one or more preferred ways of receiving notification. You select the user to notify for one or more alerts. You may or may not associate an alert notification with alerts. You can configure alerts to accumulate events until a certain number are received or within a time interval. When a threshold is met, an alert is generated. After the alert is generated, any selected notifications for the alert are sent to a pager, email, SNMP trap, or OS Event Log, depending on the alert settings. By applying thresholds, you can use alerts to consolidate the many events that native and non-native security products generate. 33 34 Introducing Symantec Enterprise Security Architecture Where to get more information about SESA See the section on how SESA generates alerts in the Symantec Enterprise Security Architecture Implementation Guide. For information on configuring alert notifications, see “Specifying alert notification methods” on page 309. Centralized reporting SESA provides centralized reporting capabilities, including graphical reports. SESA provides some common reports, while native and integrated SESA security products have additional predefined reports. You can also create custom reports using a Custom Report Wizard. In SESA 2.0, the Custom Report Wizard provides options for multiple filters, and includes a complete selection of operators (for example, =, >, and <). It also includes AND/OR operations. You can use reports to present statistics, recent activity, outbreak and intrusion conditions, and more. SESA provides a variety of report formats such as trend graphs, pie charts, stacked bar charts, and tables, all of which let you drill down to the particular data that you need. You can print current Symantec management console views of events and alerts as reports, or save the views as reports and export them to other formats. Where to get more information about SESA You can obtain information about SESA from the following documents: ■ Symantec Enterprise Security Architecture Implementation Guide ■ Symantec Enterprise Security Architecture 2.0 Migration Guide ■ SESA 2.0 Getting Started card For more information on SESA, a SESA knowledge base is available on the Symantec Technical Support Web site at: www.symantec.com/techsupp/enterprise The knowledge base link is the first one under Technical Support. You can find the Symantec Enterprise Security Architecture knowledge base listed under Security Management. To obtain an updated version of the SESA Implementation Guide and other SESA guides, visit the Symantec Public FTP site at any of the following URLs: ■ ftp://ftp.symantec.com/public/english_us_canada/doc ■ ftp://ftp.symantec.com/english_us_canada/products/sesa/manuals Chapter 2 Introducing the Symantec management console This chapter includes the following topics: ■ Accessing the Symantec management console ■ Introducing the user interface ■ Using the console view tabs ■ Using menus ■ Using the toolbar ■ Navigating using the left pane ■ Changing the appearance of the right pane ■ Using SESA wizards ■ Using Find dialog boxes Accessing the Symantec management console The Symantec management console connects you to the SESA Manager. It is displayed in either a Microsoft Internet Explorer or Netscape browser window. Before you log on, make sure your system meetings the logon requirements. Then follow the logon procedure. 36 Introducing the Symantec management console Accessing the Symantec management console Log on prerequisites To run the Symantec management console, your system must meet the following requirements: ■ Internet Explorer 5.5 or later, with SP2; Netscape 7. ■ 256-color video adapter. ■ Scripting, and Java VM must be enabled in the Internet browser. ■ Java Runtime Environment (JRE) 1.3.1_02 or later (1.4.2 for Netscape 7 on Solaris) Java Runtime Environment considerations The Symantec management console runs as a Java-based user interface in your browser. The version of the Java Runtime Environment (JRE) that you need depends on your browser type, operating system, and language support requirements. If you do not have the correct JRE installed for your browser and operating system combination, SESA prompts you to download JRE 1.3.2_03 from Sun, and automatically runs the installation. You may prefer to link directly to the Sun Web site to install a later version, or a version that supports your language requirements. Determine your Java Runtime Environment (JRE) requirements based on the following: ■ Microsoft Internet Explorer JRE 1.3.1_02 or later If you are not running JRE 1.3.1_02 or later, when you log on to the Symantec management console, you are prompted to download and install it from the Sun Web site. ■ Netscape In you are running Netscape 7 on Solaris, you must have JRE 1.4.2. If you are running Netscape/Mozilla on any operating system, and you are not running JRE 1.3 or later, when you log on to the Symantec management console, you are prompted to download and install it from the Sun Web site. If you have JRE 1.3 or later, you are not prompted to upgrade; however, you should install at least JRE 1.3.1_02 for SESA to run properly. Introducing the Symantec management console Accessing the Symantec management console ■ Additional JRE version recommendations: For a security fix that existed in versions of JRE that are earlier than 1.3.1_02, you should install JRE 1.3.1_09. To avoid warnings about expired certificate authority for Verisign, you should install JRE 1.3.1_10. If you are running the latest JRE (version 1.4.2), you should be aware that SESA has not been tested in this environment. Sun Microsystems download URLs: ■ To download JRE 1.3.1_02 from Sun’s Web site, go to the following URL: http://java.sun.com/products/archive/j2se/1.3.1_02/jre/index.html ■ To download the latest JRE from Sun’s Web site, go to the following URL: http://java.sun.com/j2se/1.3/download.html Language support: ■ If you log on to SESA from the United States and follow the link provided by SESA, the version of the JRE that is downloaded is the United States version, which does not support language variants. ■ For maximum language compatibility, you should download directly from the following SUN site and select the international version: http://java.sun.com/products/archive/j2se/1.3.1_02/jre/index.html Logging on to the Symantec management console You can log on to the Symantec management console either from a remote machine or from the SESA Manager itself. By default, your connection is secured using Secure Socket Layer (SSL). To log on to the Symantec management console 1 In the Symantec management console, do one of the following: ■ To connect from a remote machine: Open a Microsoft Internet Explorer or a Netscape browser window. In the Address text box, type the URL for the SESA Manager. For example: https://yourSESAManager/sesa/ssmc Press Enter. ■ To connect from the SESA Manager: Log on to the account used to install the SESA Manager. From the Start menu, choose Programs > Symantec Enterprise Security > Symantec management console. 37 38 Introducing the Symantec management console Accessing the Symantec management console 2 3 One or both of the following security messages are displayed. Take the action required for the messages that appear on your screen. ■ If you have not previously disabled it, a security alert message warns you that you are about to view pages over a secure connection. To disable future displays of this warning, click the check box, and then click OK. ■ A security alert message concerning your site’s security certificate appears. To use the certificate without installing it, click Yes. To install the certificate, click View Certificate and use the dialog box that appears. If you do not want this message to appear in the future, upgrade to selfsigned SSL certificates, or, as recommended by Symantec, to fully authenticated CA-signed SSL certificates. These upgrade procedures are described in the Symantec Enterprise Security Architecture Implementation Guide. In the Logon window, do the following: Name Type your user name. Password Type your password Domain Do one of the following: ■ If only one domain exists, leave the Domain text box blank. This logs you on to the domain in which the SESA Manager is defined. ■ If there are multiple domains, type the name of the domain in which you are defined as a user in either dotted or full notation. An example of dotted notation is: Symantec.SES An example of full notation is: dc=Symantec,dc=SES Note: The super-user SESAdmin has access to every SESA administrative domain on every SESA Manager computer. If you are logging on as this user, leave the Domain text box blank. 4 Click Logon. 5 If you are asked whether you want to view both secure and nonsecure items, click Yes. To suppress this message for future log ons, you can set your browser to recognize mixed content. See “Configuring browsers to display secure and non-secure content” on page 39. Introducing the Symantec management console Accessing the Symantec management console After the required Java runtime files are downloaded to your system, the Symantec management console appears in the browser window. Note: The language that is displayed in the Symantec management console depends on the language preference defined for your user account and the language of the SESA Manager to which you are logging on. See “Preferred language behavior in the Symantec management console” on page 92. Configuring browsers to display secure and non-secure content In the Symantec management console, some pages contain both secure and nonsecure content. A warning message is displayed if your browser is not set up to display mixed content. You can suppress the warning by modifying your browser configuration. To configure browsers to display secure and non-secure content You can change your browser settings so that mixed content can be displayed. The procedures are different depending on your browser. To configure mixed settings in Internet Explorer 1 In the Internet Explorer browser window, on the Tools menu, click Internet Options. 2 On the Security tab, click Custom Level. 3 In the Miscellaneous group, under Display Mixed Content, select Enable. To configure mixed settings in Netscape 1 In the Netscape browser window, on the Edit menu, click Preferences. 2 In the Privacy & Security category, click SSL. 3 In the SSL Warnings group, uncheck Viewing a page with an Encrypted/ unencrypted mix. 39 40 Introducing the Symantec management console Accessing the Symantec management console Preventing the Symantec management console from timing out For security reasons, the Symantec management console is designed to time out when it is inactive. The initial time out setting is 10 minutes. The Symantec management console is inactive when your actions do not cause the console to contact the SESA Manager. For example, if you work in a dialog box without saving your changes, the console is inactive. If the time you spend working exceeds the time out setting, you are logged out of the console. However, if you display a report, the Symantec management console contacts the SESA Manager to download event data from the SESA DataStore. Similarly, if you display a properties dialog, the console contacts the SESA Manager to download the properties from the SESA Directory. If you are performing these actions the console will not time out because the console is active. To prevent the Symantec management console from timing out 1 In the Symantec management console, on the Configurations view tab, in the left pane, expand SESA 2.0 > Manager Components Configurations. 2 Select the Default configuration. 3 In the right pane, on the Administrative tab, next to Session idle interval, to increase the session idle interval, type a higher value. Introducing the Symantec management console Introducing the user interface 4 Click Apply. 5 To make the change take place immediately, you distribute it to the SESA Manager. Do the following: ■ On the Selection menu, click Distribute. ■ When you are asked if you are sure you want to distribute the configuration, click Yes. Introducing the user interface The Symantec management console user interface consists of the following features: ■ Console view tabs ■ Menus ■ A toolbar ■ Left pane navigation ■ Right pane content ■ Status indicator Figure 2-1 shows the main features of the Symantec management console window. Figure 2-1 Console view tabs Menus Toolbar Left pane navigation Right pane content Status indicator Symantec management console window 41 42 Introducing the Symantec management console Using the console view tabs Using the console view tabs You choose the console view that you want using the tabs at the top of the Symantec management console window. The tabs that are available to you depend on the roles (permissions) that were assigned to you as a Symantec management console user, and the security products that you are managing. Table 2-1 describes each console view tab. Table 2-1 Console view tabs Console view tab Description Alerts Displays reports of alerts. On the Alerts view tab, you can do the following: Events ■ Create alert configurations. ■ Monitor alert reports and create custom reports. ■ Display alert details. ■ Print and export alert data. Displays various reports based on events that have been logged by your security products and the SESA Manager components. On the Events view tab, you can do the following: Configurations ■ View reports and create custom reports. ■ Create alert configurations based on events. ■ Display event details. ■ Print and export event data. Displays your security product configurations. On the Configurations view tab, you can do the following: ■ Create new product software feature configurations. ■ Modify configurations. ■ Associate configurations with computers, organizational units, and configuration groups. ■ Distribute configurations. Introducing the Symantec management console Using menus Console view tab Description System Displays your security infrastructure. On the System view tab, you can do the following: ■ Create and manage roles, users, organizational units, computers, configuration groups, SESA DataStores, SESA Directories, and notification services. ■ Associate configurations with organizational units, computers, and configuration groups. ■ Distribute configurations. Depending on the security products that you have installed, you may see additional console view tabs. Their uses are explained in your security product documentation. Using menus Each console view tab provides four menus, as described in Table 2-2. Table 2-2 Symantec management console menus Menu Description View The options on the View menu let you quickly check the security status of your enterprise. From any point in the Symantec management console, you can select Monitor to display the Monitor viewer. The Monitor viewer shows the health of all SESA Managers and the failover status of all SESA DataStores and SESA Directories in your enterprise. See “Monitoring SESA components” on page 44. On the System view tab, when you select an organizational unit you can also display the Heartbeat Monitor viewer and Failover Monitor viewer for computers in that organizational unit. See “Monitoring heartbeat for computers” on page 134 and “Monitoring failover for your SESA Managers” on page 136. 43 44 Introducing the Symantec management console Using menus Menu Description Selection The options that appear on the Selection menu depend on your console view (Alerts, Events, Configurations, or System) and what you have selected. You can display the Selection menu options by right-clicking a selected item. One Selection menu option that is available on all tabs is Refresh, which redisplays the Symantec management console user interface to pick up any changes that are made by other administrators. See “Refreshing the Symantec management console” on page 47. Console Help The options on the Console menu are the same regardless of view: ■ Change Password lets you change your logon password. See “Changing your password” on page 48. ■ Detach opens a separate window using your current view. See “Detaching console windows” on page 49. ■ Logout logs you out of the console and redisplays the logon window. Use the Help menu to display Help on the selected item, or the entire Help system. If the selected item is in the left pane, the Help describes the actions that you can perform for this item. If Help is selected in a Properties dialog box, the Help describes the associated text boxes. See “Accessing Help” on page 55. Monitoring SESA components The Monitor viewer lets you check the status of your SESA components from any point in the Symantec management console when you receive a warning message that an error has been detected. Introducing the Symantec management console Using menus To monitor SESA components 1 In the Symantec management console, in any view, on the View menu, click Monitor. Installed Monitors SESA component machines SESA component software feature status (Failover monitor only) Monitor status legend Monitor description The Monitor viewer contains four sections: Installed Monitors Lists the available monitors. The following monitors are always available ■ Heartbeat for DataStores ■ Heartbeat for Directories ■ Heartbeat for Managers ■ Failover for Managers The security products that you install may include additional monitors. An icon indicates the overall status of the SESA components that are being monitored. Selected Monitor Details Lists the SESA component machines in your domain that are enabled for the monitor that you have selected. When you select the Failover monitor, a table below the list of machines gives the status for the selected machine. Last Updated: shows the date and time that the status of the monitor was last updated. 45 46 Introducing the Symantec management console Using menus 2 Legend Describes the meaning of the Monitor status indicators. Monitor description Describes the monitor that you select. View the overall status of your SESA components by checking the status indicators that display to the left of the Installed Monitors. The Legend describes the meaning of the indicators: Status is being checked for the computer. Status of all services on the computer is OK. Status of one or more services on the computer is bad. Status of one or more services on the computer is unknown. Heartbeat unsupported–The service is not configured for heartbeat monitoring. Failure of one monitored component sets the status indicator for the monitor. 3 In the Installed Monitors list, click a monitor to select it. The monitor you select is described in the Monitor Description text box. 4 If you are viewing the Failover for Managers monitor, you can display the services that are being monitored. To select the computer whose status you want to view, at the top of the Selected Monitor Details list, click on the computer. The services that are being monitored are listed below. The format of the service name in the monitor is <nnnnnnnn><swfeaturename> where <nnnnnnnn> is the ID of the software feature and <swfeaturename> is the name of the software feature. The following values can be returned when the Failover Monitor is selected: OK The service is working correctly. There has been no need to fail over. Failed over The service has failed over to the IP address indicated in the Result column. NA The service is not configured for failover. Introducing the Symantec management console Using menus 5 To print a report of the selected monitor’s status, click the print icon in the upper right corner of the Monitor viewer. If column data in the printout is truncated, adjust the column widths and print again. 6 To close the Monitor, click Close. Refreshing the Symantec management console Changes that you make using the Symantec management console are visible on the user interfaces as soon as you make the change. Changes are not displayed automatically if they are caused by actions that are not performed in the Symantec management console. For example, if another administrator is connected to the SESA Manager and making changes at the same time as you are, those changes are not displayed automatically. Similarly, changes are not automatically displayed when you add a computer by installing a SESA Agent. Use the Refresh menu option on the Selection menu to see these changes. Note: The only time that the Refresh option is not available is when you select a software feature configuration on the Configuration view tab. To refresh the Symantec management console user interface 1 In the Symantec management console, on any view tab, in the left pane, click the node that you want to refresh. For example, to refresh the list of users, on the System view tab, click Users. 2 On the Selection menu, click Refresh. You can also refresh the user interface by clicking Refresh on the toolbar. Any changes that another administrator who is currently logged on to the SESA Manager has made are applied to all objects in the selected node. 47 48 Introducing the Symantec management console Using menus Changing your password To meet the requirements of your company’s security policies, you may need to periodically change your logon password. To change your password 1 In the Symantec management console, in any view, on the Console menu, click Change Password. 2 In the Change Password dialog box, do the following: Current password Type your password New Password Type a new password Passwords are case sensitive and must be 6 to 12 alphanumeric characters in length. Confirm new password 3 Click OK. Type the password again to confirm it. Under Password rules, a green check mark indicates that the passwords match. Introducing the Symantec management console Using the toolbar Detaching console windows You can detach your current view into a separate window while you work with the console in other views. For example, you could detach the Events view while you make configuration changes on the Configurations view tab. Detach is useful for automatic monitoring of multiple windows. In the detached window, you can perform all of the actions that could be performed prior to the window being detached. The only thing you cannot do in a detached windows is change to a different view. See “Monitoring events and alerts in detached windows” on page 273. To detach a console window 1 In the Symantec management console, on the tabs at the top of the Symantec management console window, select the view that you want to detach. 2 On the Console menu, click Detach. Using the toolbar The toolbar provides a subset of the most commonly performed tasks. When you select an item in the Symantec management console window, a toolbar option appears for each action you can perform for that item. Buttons that are not available either do not appear on the toolbar, or are present but are greyed out until an item to which they apply is selected. For example, on the Alerts view tab, the Details button is visible when you display a report, but it is greyed out until you select an alert since it is used to display the details of a selected alert. Move the cursor over a toolbar icon to see its description. The Symantec management console is a fully independent application that is hosted in the browser window. Do not use the browser toolbar to navigate in or refresh the Symantec management console. This will disconnect you from your session. To print information from the Symantec management console, use the toolbar print button, rather than using the Internet Explorer or Netscape browser print options. 49 50 Introducing the Symantec management console Using the toolbar Table 2-3 shows the toolbar buttons, their function, and where they are displayed. Table 2-3 Button Toolbar buttons Name Function Refresh Refreshes the selection. Auto-Refresh Causes the selection to be refreshed at a specified interval. Alerts Events view tab view tab Configurations view tab System view tab See “Modifying administrative settings” on page 186. Print Prints the currently displayed report or details of an event or alert. Export Exports a report to a printer, or HTML, PDF, or CSV file. Filter Creates a filter for the current report. Filters can be saved as custom reports. Alert Configurations Displays the Alert Configurations dialog box. Alert Wizard Creates a new alert configuration. Acknowledge Acknowledges the selected alerts. Unacknowledge Unacknowledges the selected alerts. Details Displays the details of the selected alert or event. Monitor viewer Monitor Viewer Introducing the Symantec management console Using the toolbar Button Name Function Next Displays the next set of event or alert records when the number of records in a report is larger than the number that is configured to initially display. New Creates a new object of the same kind as the selected object. Alerts Events view tab view tab Add Alert Config In a wizard or dialog box, adds an existing management dialog object. Delete Deletes the selected object. Remove In a wizard or dialog box, removes the selected object. This does not delete the object from the SESA Directory. Save All Saves all changes that have been made using the Alert Configurations dialog box. Properties Displays the properties of the selected object. Permissions Displays the Permissions dialog box, from which you set access control for the selected object. Deploy When Organizational Units is selected, displays the Deploy/ Remove SESA Manager Extensions Wizard. Distribute Sends a message to computers telling them to contact the SESA Manager for a new configuration. Alert Config dialog Custom Reports Alert Config dialog Custom Reports Configurations view tab System view tab 51 52 Introducing the Symantec management console Navigating using the left pane Button Name Function Move Moves computers from one organizational unit to another. Previous In the Event Details and Alert Details dialog boxes, displays the previous alert or event. Next In the Event Details and Alert Details dialog boxes, displays the next alert or event. Out of band notification When you configure SESA DataStore failover, displays a dialog to configure failover notification. Help Displays Help on the selected item. Alerts Events view tab view tab Configurations view tab System view tab Navigating using the left pane The left pane displays a navigation tree that shows the information that is available in the selected view. In the Alerts and Events views, the left pane contains folders and subfolders of reports. In Configurations view, it contains a folder for each product, and subfolders for software feature configurations. On the System view tab, the left pane contains the management objects that you create. You expand the navigation tree to select the items you want to view in the right pane. To navigate using the left pane 1 In the Symantec management console, in the left pane, click the symbol to the left of a folder to expand a folder or subfolder. You can also double-click the folder name. The items that appear (for example, a list of reports) tell you what you can view in the right pane. 2 To change what appears in the right pane, select one of the folders or icons in the left pane. Introducing the Symantec management console Changing the appearance of the right pane Changing the appearance of the right pane When you click on an item in the left pane, the right pane displays the content of the item. For example, if you click on a report title in Alerts or Events view, the right pane displays the report. Actions that you can perform when you select content in the right pane are accessed on the Selection menu, right-click menu, or the toolbar. To change the appearance of the right pane When the display in the right pane is in column format (for example, when you view reports of events or alerts, or management objects such as roles), you can change the column order or the width of the column display. The display returns to its default arrangement the next time that you log on. To change the column order ◆ In the Symantec management console, in the right pane, use the left mouse button to drag the column heading to the right or left. To change the column width 1 Move the mouse pointer over the column border until you see a doubleheaded arrow. 2 Drag the column border to the right or left to change the width of the column. To see the full text of a truncated entry ◆ Move your mouse over the text. A pop-up window is displayed with the full text. If you do not want to resize columns, but the text you want to view is truncated, you can still see the full text. 53 54 Introducing the Symantec management console Changing the appearance of the right pane Initiating actions The Symantec management console provides several ways to initiate actions on objects. To initiate actions The procedures in this documentation describe the use of the Selection menu, but you can use other methods when appropriate, including: ■ Using a toolbar button ■ Using the right-click menu The right-click menu contains the same actions that are available for the object from the Selection menu. ■ Double-clicking To initiate an action using the Selection menu 1 In the Symantec management console, on any console view tab, in the right or left pane, select an object. 2 On the Selection menu, click the action you want to perform. To initiate an action using a toolbar button 1 On any console view tab, in the right or left pane, select an object. 2 Move the mouse over the toolbar buttons to see the button descriptions. 3 Click the appropriate toolbar button. To initiate an action using the right-click menu 1 On any console view tab, in the left pane, right-click on the object. (On the System view tab, you can also right click on an object in the right pane.) 2 On the menu that appears, click the action you want to perform. To display the properties of a management object ◆ On the Systems view tab, in the right pane, double-click an object. To display the details of an alert or an event 1 On the Alerts view tab or the Events view tab, display the events of a report. See “Viewing reports” on page 238. 2 In the table in the right pane, double-click an alert or event. Introducing the Symantec management console Changing the appearance of the right pane Re-displaying open windows SESA dialog boxes or wizards are displayed in separate windows. If an open SESA window becomes covered by other windows, you can redisplay it. To redisplay an open window 1 On the keyboard, hold down the ALT key and press TAB. 2 When a window showing your active applications appears, repeatedly press TAB to highlight the icon of a coffee cup that represents a Java application. 3 View the application description in the text box at the bottom of the window. 4 When the correct application is highlighted, release both ALT and TAB. Using the status indicator When you are viewing the event records of report in the Alerts view tab or the Events view tab, the status indicator in the bottom left corner of the Symantec management console window tells you which set of events or alerts are currently downloaded for the report. When you are viewing a chart-based report without viewing event records, the status indicator gives the name of the report. Accessing Help The Symantec management console offers a fully integrated Help system that provides Help on the management console and on each of the security products that are installed in your security environment. To access Help You can access Help in several ways, depending on where you are in the user interface and what you are trying to accomplish. To display the Help table of contents ◆ In the Symantec management console, do one of the following on any console view tab: ■ On the Help menu, click Contents. Press Alt/Shift/F1. The topic that appears in the right pane of the Symantec Enterprise Security Help window tells you how to use the Contents, Index, and Search tabs to select the topic that you want to view. ■ 55 56 Introducing the Symantec management console Using SESA wizards To display Help about an object 1 On any Symantec management console view tab, in the left pane, select an object. For example, on the Events view tab, click Global Reports or on the System view tab, click Roles. 2 Do one of the following: ■ Click the Help toolbar button. ■ On the Help menu, click Help for the selected object. ■ Press Alt/F1. To display Help about a dialog box 1 2 In a dialog box, do one of the following: ■ Click Help. ■ Press Alt/F1. Use the links in the Help topic to display additional Help. To display Help on a software feature of a configurable product 1 On the Configurations view tab, in the left pane, expand the product folder and select the software feature. 2 Do one of the following: ■ Click Help ■ On the Help menu, click Help for the selected software feature. ■ Press Alt/F1. Using SESA wizards The Symantec management console provides wizards to help you configure products and create management objects. Table 2-4 describes the wizards that are available: Table 2-4 Symantec management console wizards View Wizard Description Alerts Alert Configuration Helps you create a new alert configuration. See “Creating an alert configuration” on page 298 Introducing the Symantec management console Using SESA wizards View Wizard Description Create a New Custom Report Helps you create a custom report by defining filters that focus the report on alerts that are important to you. See “About custom reports” on page 246 Events Alert Configuration Helps you create a new alert configuration based on a specific event. See “Creating an alert configuration based on an event” on page 285 Create a New Custom Report Helps you create a custom report by defining filters that focus the report on events that are important to you. See “About custom reports” on page 246 Configurations Configuration Helps you create duplicates of software feature configurations, which you can then edit. System Role User Organizational Unit Computer Configuration Group Notification Service Helps you create roles, users, organizational units, computers, and configuration groups, and notification services. SESA Manager Extensions Deploy/ Remove See the following: ■ “Creating a role” on page 70 ■ “Creating a new user” on page 85 ■ “Creating a new organizational unit” on page 100 ■ “Creating computers within organizational units” on page 115 ■ “Creating a configuration group” on page 139 ■ “Adding a notification service” on page 154 Helps you deploy or remove SESA Manager extensions. See “Deploying and removing SESA Manager extensions” on page 106. 57 58 Introducing the Symantec management console Using SESA wizards Starting wizards When you access a wizard, wizard panels prompt you for the information that is needed for the object you are creating. To start most wizards ◆ In the Symantec management console, do one of the following: ■ Select an object (Role, User, and so on) that you want to create, and then, on the Selection menu, click New. ■ Right-click an object, and then, on the menu that appears, click New. ■ Select an object, and then, on the toolbar, click New. The exception is the Alert Configuration Wizard. See “Creating an alert configuration based on an event” on page 285 and “Creating an alert configuration” on page 298. Creating objects with wizards When you want to add a new management object to your system, you must create it using a wizard. After you create an object, it appears in the Symantec management console window. Brief instructions tell you how to complete each wizard panel. Red asterisks mark information that you must provide before you can go on to the next panel. All other text boxes are optional. You can leave text boxes that are optional blank. Since the panels of the Symantec management console wizards correspond to the tabs of the Properties dialog box for each object that you create, you can supply the information later by editing the object’s properties. Introducing the Symantec management console Using SESA wizards Figure 2-2 shows the text boxes in a wizard panel. Figure 2-2 Wizard panel Figure 2-3 shows the text boxes in the corresponding properties page. Figure 2-3 Properties dialog box 59 60 Introducing the Symantec management console Using SESA wizards Editing the properties of objects You can edit the properties of any object that you created using a wizard. To edit the properties of an object 1 In the Symantec management console, in the left pane of the appropriate console view tab, select the object. 2 On the Selection menu, click Properties. 3 In the Properties dialog box, on the tabs, edit the object’s properties. 4 For a description of the text boxes and buttons on the tabs, click Help. 5 When you have completed your edits, do one of the following: ■ If you edited a management object, click OK. ■ If you edited a product software feature configuration, click Apply to save the configuration and continue editing, or click OK to save the configuration and exit. ■ If you edited an alert configuration, click Apply to save the changes you have made to the configuration you are editing, or click the Save All button on the toolbar to save all changes you have made to this and other alert configurations. Interaction among wizards Because the management objects of the Symantec management console are interrelated, there is interaction among the wizards. For example, roles define administrative permissions. These permissions are granted to users when they are made members of a role. You can do this using the Role Wizard by adding an existing user to the role that you are creating. Or you can make the association using the User Wizard by adding an existing role to the properties of the user. This flexibility extends even further. When you add a configured object to another management object, you can modify the properties of the added object at the same time. Using the example of roles and users again, when you add users to a role, you can view and change the properties of the users. For the purpose of notifications, you can check that you have full coverage based on the users that you include in the role. If you find that there are uncovered hours, you can edit the properties of the users that you are adding to the role. Introducing the Symantec management console Using Find dialog boxes Using Find dialog boxes When you use a wizard, or view the properties page of a management object, you can click Add to create an association with another management object. This displays the Find dialog for the object to be added. For example, when you are creating or editing a user, to make the user a member of a role, on the Roles page you click Add to display the Find Roles dialog box. There is a Find dialog box for each type of management object. Figure 2-4 Find Organizational Units dialog box The basic functions that are common to all Find dialog boxes are: Look In Defines the where SESA should search for management objects. In some cases, this is an editable field, where you can choose from a drop-down list: ■ In the Find User and Find Role dialog boxes, which support cross-domain searches, you can use the Look In field to select a domain. ■ In the Find Configurations and Find Services dialog boxes, you use the Look In field to select a product. In other cases, where the Look In field defines the domain and crossdomain functionality is not supported, the Look In field is read only. 61 62 Introducing the Symantec management console Using Find dialog boxes Available <management objects> Lists all the instances of the management object that can be selected. For example, in the Find Roles dialog box, it lists all roles in the domain shown in the Look In field. The Find Computers and Find Users dialog boxes include the ability to specify search criteria to narrow the list. Add Adds an item that is selected in the Available list to the Selected list. To select multiple items, use the SHIFT and CTRL keys on the keyboard. You can also double-click on an item in the Available list to add it to the Selected list. Remove Removes an item that is selected in the Selected list. To select multiple items for removal, use the SHIFT and CTRL keys on the keyboard. You can also double-click on an item in the Selected list to remove it. Properties Displays the properties of an item that you have selected in either the Available list or the Selected list. Selected <management objects> Lists all the instances of the management object that have been selected for addition to another management object. OK Closes the Find dialog box and adds the items in the Selected list to the management object from which you displayed the Find dialog. For example, if you displayed the Find Roles dialog box from the Create a new User Wizard or a user’s properties pages, the roles in the Selected list are added to the user. Cancel Closes the Find dialog without adding any management objects. Help Displays Help for the text boxes on the Find dialog box. Chapter Defining the administrative structure of SESA This chapter includes the following topics: ■ About the System view tab administrative features ■ Working with domains ■ Managing roles ■ Managing users ■ Managing organizational units ■ Managing computers within organizational units ■ Managing configuration groups ■ Managing SESA DataStores ■ Managing SESA Directories ■ Managing notification services ■ Working with permissions 3 64 Defining the administrative structure of SESA About the System view tab administrative features About the System view tab administrative features The System view tab lets you access the administrative features that you use to organize the management of your security solutions. When you log on to the Symantec management console, the roles of which you are a member control whether you have access to the System view tab, and what you can do on it. For example: ■ If you are a member of the Domain Administrator role, all management objects on the System view tab are available to you. You must be a member of the Domain Administrator role to define roles, make users members or roles, or change the permissions of management objects. ■ If you are not a member of the Domain Administrator role but have access to the System view tab, the console access rights and permissions defined in your roles determine which management objects you can see and modify. See “Modifying console access rights” on page 77 and “About permissions” on page 156. The System view tab also lets you create organizational units and configuration groups, and work with SESA DataStores and SESA Directories to manage the security configuration of your organization. The left pane displays the management objects that define your security infrastructure. The top of the navigational tree is the domain that you defined when you installed SESA. Beneath this are the management objects described in Table 3-1. You can use the SESA install program to install additional domains to reflect the network structure of your organization. Each installed domain contains a full set of SESA management objects. Defining the administrative structure of SESA About the System view tab administrative features Table 3-1 SESA management objects Management object Description Roles SESA uses role-based access control. A role is a group of access rights that give users who are role members access to various event viewing and management capabilities. A user can be a member of more than one role. You must be a member of the Domain Administrator role to see the Role node, and to create roles and make users members of roles. See “Roles in SESA” on page 30. Users Users are the administrators of your security environment who are granted permissions by being assigned to roles. The roles that users belong to let them create management objects, configure products, and/or view and respond to events and alerts. You can also create a user without assigning a role so that the user can receive notifications. Organizational Units and computers Organizational units let you logically group your network computers. You can add configurations for product software features to an organizational unit so that you can distribute the configurations easily to all member computers as part of your ongoing security policy. Configuration Groups Configuration groups allow for configurations that supersede organizational units. They associate computers and software configurations when you want to perform special-case distribution of the configurations. DataStores SESA DataStores store all event and alert data that is generated by SESA and SESA-enabled products. Depending on the quantity of security events and how fast they are logged to the SESA DataStore, more than one SESA DataStore may be necessary for a SESA installation. Directories The SESA Directory uses the Lightweight Directory Access Protocol (LDAP) to store the configuration data that is required to manage SESA-enabled products and SESA services. Notification Services Notification services are the paging companies that you can use to notify responsible personnel when an alert occurs. A default set of notification services are added when you install the SESA Manager. 65 66 Defining the administrative structure of SESA Working with domains Working with domains Domains facilitate the management of your network resources. A domain is a structural container in the SESA Directory that you use to organize a hierarchy of users, organizational units, computer systems, configuration groups, and managed products and product configurations. By default, at least one domain is installed when you install your SESA Manager. You can install additional domains as necessary. For example, if your company is large, with sites in multiple regions, you may need to have a single view of management information, yet have the option to delegate administrative authority, physically separate security data, or have greater flexibility in how users, computer systems, and policies are organized. You may have similar needs if you are a managed service provider that manages multiple independent companies, as well as Internet service providers. To meet these needs, you can install multiple domains, for example by country, by region, or by company. Each domain you install provides an additional set of instances of the basic SESA directory tree. You can organize the domains you install as peers on different servers, or in a hierarchy on a single server, depending on your corporate needs. The top level domain, sometimes called the administrative domain, is the first item in the left pane on all Symantec management console view tabs. When you select a domain, the Selection menu and toolbar buttons provide options for the following: ■ Editing domain properties ■ Refreshing the objects within the domain See “Refreshing the Symantec management console” on page 47. Domains are the only objects on the System view tab that you cannot create. You can create additional domains when you install SESA. See the section on creating domains in the Symantec Enterprise Security Architecture Implementation Guide. Editing domain properties In the Domain Properties dialog box, you can view or change the properties for the selected domain. The tabs of the Domain Properties dialog box provide options for the following: ■ Editing the domain description ■ Viewing the master heartbeat service computer for the domain Defining the administrative structure of SESA Working with domains Editing the domain description In the Domain Properties dialog box, on the General tab, you can type a description of the domain if none is provided, or edit the existing description. To edit the domain description 1 In the Symantec management console, on the System view tab, in the left pane, click the domain at the top of the directory tree. 2 On the Selection menu, click Properties. 3 In the Domain Properties dialog box, on the General tab, edit the description. You cannot change the Name or Distinguished name text boxes. 4 Click OK. Viewing the master heartbeat service computer for the domain The heartbeat functionality of SESA tracks the health of the SESA network. It provides near real-time status of SESA services on SESA-enabled computers. This information is stored in memory in the master heartbeat service, which is located on the SESA Manager. You can view the status of the monitored services by displaying the Heartbeat Monitor view for a selected organizational unit. See “Monitoring heartbeat for computers” on page 134. By default, the Master Heartbeat service computer for the domain is the first SESA Manager that is installed. After that, the Master Heartbeat service computer can be changed in two ways: ■ Manually, through a configuration process See “Changing the Master Heartbeat service computer” on page 198. ■ Automatically, through an election process See “How the Master Heartbeat service computer can be changed by an election” on page 199. The Heartbeat tab shows the last acting Master Heartbeat service computer. That computer remains the master until a configuration change is made or another computer wins an election. 67 68 Defining the administrative structure of SESA Managing roles To view the master heartbeat service computer for a domain 1 In the Symantec management console, on the System view tab, in the left pane, select a domain. 2 On the Selection menu, click Properties. 3 In the Domain Properties dialog box, on the Heartbeat tab, view the master service computer. 4 Click OK. Managing roles SESA uses role-based access control. A role is a group of access rights that give users who are role members access to various event viewing and management capabilities. A user can be a member of more than one role. See “Roles in SESA” on page 30. When you select Roles, the Selection menu and toolbar provide options for the following: ■ About the Domain Administrator role ■ Creating a role ■ Editing role properties ■ Deleting a role ■ Refreshing the roles list See “Refreshing the Symantec management console” on page 47. Note: Only members of the Domain Administrator role can add or modify roles. You create new roles using the Role Wizard. Each role is specific to one product. If a user needs access to more than one product, you can create a role for each product and then make the user a member of all the necessary roles. Defining the administrative structure of SESA Managing roles Planning for role creation Because roles control user access, before you create roles you should plan carefully. You need to identify the tasks that are done in your security environment, and who performs them. The tasks determine the kinds of roles that you must create. Who performs these tasks determine which users should be members of each role. ■ Who allocates responsibilities within your security environment? If these users need to create roles, they must be members of the Domain Administrator role. ■ Who administers your security network by creating management objects such as users, organizational units, and configuration groups? These users must be members of roles that provide management access and the ability to view the System view tab. ■ What products are installed and who is responsible for configuring them? These users must be members of management roles for the products for which they are responsible. They may only need to view the Configurations view tab. ■ Who is responsible for monitoring events and alerts? These users must be members of event viewing roles for the products for which they are responsible. They must be able to view the Events and Alerts tabs. They may also need to view event and alert details. ■ Who responds to problems and threats? These users must be members of event viewing roles, with access to the Event and Alerts tabs and the ability to acknowledge and unacknowledge alerts. These affect the kinds of roles you create and which users you make members of each role. For example, you can create a single role that gives its members access to both management and event viewing for a product, so that they can both configure the product and monitor the events it generates. On the other hand, if different users are responsible for implementing security policies and security monitoring, you can create two roles for each product: one for product management and configuration and one for event viewing. You could then make different users members of each role. 69 70 Defining the administrative structure of SESA Managing roles About the Domain Administrator role The Domain Administrator role is the default role created during the initial installation of SESA, or when a new domain is created by using the SESA installer. Members of the Domain Administrator role have full access to all items that are contained in the domain that the role is defined in. This means that members of the role can view all events and manage all products that exist or are installed in that domain. The default user, administrator, is also created when the SESA Manager is installed. The administrator is automatically a member of the Domain Administrator role. To access the SESA Manager for the first time, you must log on as this default user. You can add other users to the Domain Administrator role, but you cannot change any other characteristics of the role. Only a user with the Domain Administrator role can add or modify roles, or make a user a member of a role. If a user is a member of the Domain Administrator role, no other roles are needed. See “Making a user a member of a role” on page 75. Creating a role You create all roles using the Role Wizard. Note: Only a user who is a member of the Domain Administrator role can create roles. To create a role 1 In the Symantec management console, on the System view tab, in the left pane, click Roles. 2 On the Selection menu, click New. 3 In the first panel of the Role wizard, click Next. 4 In the General panel, do the following: 5 ■ In the Role name text box, type a name for the role. ■ In the Description text box, type a description of the role. The description is optional. Click Next. Defining the administrative structure of SESA Managing roles 6 In the Product Component panel, in the Product drop-down list, select a product. This role gives its member access to this product alone. If a user needs access to other products, create roles for those products and make the user a member of those roles. 7 Choose whether the role gives members access to all components of a product, or to a limited set of components. Do one of the following: ■ To create the role with access to all features of the product, select Role members will have access to the entire product. ■ To specify product components for the role, select Role members will have access to only the selected product components. Select at least one product component from the list that appears. See “Modifying product component selections” on page 79. 8 Click Next. 9 In the Manage and View Events panel, select one or both of the following: ■ Allow management of policies and configurations for <PRODUCT NAME> Role members can create and modify configurations of the software features of the product. Allow viewing of events generated from <PRODUCT NAME> Role members can view alert and event reports that are generated by the product. If you select both of these options, role members can both modify configurations and view event reports. If members of this role will create and modify alert configurations, check both check boxes so that the members of the role have both the event viewing privileges necessary to create alert configurations and the management privileges necessary to distribute the configurations. ■ 10 Click Next. 11 In the Console Access Rights panel, do one of the following: ■ To give role members the ability to see all of the tabs of the Symantec management console, click Role members will have all console access rights. ■ To limit what role members can see when they display the Symantec management console, click Role members will have only the selected console access rights. Select at least one console access right from the list that appears. See “Modifying console access rights” on page 77. 71 72 Defining the administrative structure of SESA Managing roles Console access rights make the tabs and other features of the Symantec management console visible to role members when they log on. They do not automatically let members use these features. Your choice in the Manage and View Events panel in step 9 determines what kinds of tasks members can perform. If this role allows the creation or modification of alert configurations, give the role access to the Systems tab so that members of the role can distribute the alert configurations. 12 Click Next. 13 if you selected to allow viewing of events in step 9, in the Report Group Selection panel, do one of the following: ■ To create the role with access to all reports, select Role members will have access to all report groups. To limit the report groups for the role, select Role members will have access to only the selected report groups. If you did not select to allow viewing of events, this panel is not displayed. Continue at step 16. If you selected to specify report groups, a list of report groups appears. ■ You can resize the columns, or view the complete description of a report group by moving the mouse pointer over the item. Defining the administrative structure of SESA Managing roles 14 Select one or more report groups by checking or unchecking the check box in the Enabled column. To make selection easier, you can right-click and select from the following: ■ Check All ■ Uncheck All 15 Click Next. 16 In the Organizational Units panel, do one of the following: ■ To give role members access to all organizational units, select Role members will have access to all organizational units. ■ To give role members access to specific organizational units, select Role members will have access to the selected organizational units. This activates the organizational units tree. 17 Select at least one organizational unit to associate with this role. When you select an organizational unit that has additional organizational units below it, users of the role are given access to those organizational units as well. 73 74 Defining the administrative structure of SESA Managing roles If you add an organizational unit to a role, users who are role members and who have event viewing access can see events generated by security products that are installed on the computers that belong to that organizational unit. Role members cannot see events from computers in organizational units that have not been added to their roles. 18 Click Next. 19 In the Members panel, do one of the following: ■ To make users members of the role now, click Add. When you are finished, click Next. Click Next. You can make users members of the role later by editing the role’s properties. See “Making a user a member of a role” on page 75. When users log on to the SESA Manager, the roles of which they are members determine how the Symantec management console user interface appears. For example, users can only see product components that have been defined in their roles. ■ 20 In the Role Summary panel, review the information that you have specified. Then do one of the following: ■ To make changes, click Back. ■ To create the role, click Finish. The Task/Status list at the bottom of the panel scrolls up to show the role properties that are being created. A green check mark indicates success. When the role is created, the Cancel button changes to a Close button. 21 Click Close. The new role is added to the list of roles in the right pane. Editing role properties After you create a role, you can modify it by editing its properties. For example, as you create new organizational units or users, you can add them to existing roles. You can also edit a role to set access control permissions that members of the role have for management objects that are defined in the SESA Directory. You can edit the properties of a role by selecting the role in the right pane, or from any dialog box that lets you display the role’s properties. Defining the administrative structure of SESA Managing roles To edit role properties 1 In the Symantec management console, on the System view tab, in the left pane, click Roles. 2 In the right pane, select the role that you want to edit. 3 On the Selection menu, click Properties. 4 Use the tabs of the Editing Role Properties dialog box to make changes to the role. 5 Do one of the following: ■ To save changes and close the dialog box, click OK. ■ To apply your changes without closing the dialog box, click Apply. ■ To close the dialog box without saving your changes, click Cancel. Making a user a member of a role When a user logs on to SESA, access to the various products and event data is controlled by the user’s role membership. For example, users can only see products if they are members of the roles that have been created for those products. To make a user a member of a role 1 In the Symantec management console, on the System view tab, in the left pane, click Roles. 2 In the right pane, select the role that you want to edit. 75 76 Defining the administrative structure of SESA Managing roles 3 On the Selection menu, click Properties. 4 On the Members tab, click Add. 5 In the Find Users dialog box, do one of the following: ■ To proceed without modifying the Available users list, select one or more users, and then continue at step 6. The Available users list shows all users for the currently selected domain, up to the number of users indicated by the Maximum search count text box. ■ To modify the Available users list by specifying search criteria, do the following: Look in In the drop-down list, select the domain in which to search for users. Logon name Type all ore part of the user’s logon name. For this and the next two text boxes, you can specify a partial name that contains one or more asterisks. For example, if you type *dev* in the Logon name text box, when you search only users whose logon names contain this string are returned. Last name Type all or part of the user’s last name. Defining the administrative structure of SESA Managing roles First name Type all or part of the user’s first name. Maximum search count Type a number to reduce or increase the number of computers that are returned by the search. Start search. Click here to start the search. The Available users list is revised based on the search criteria. Stop search. Click here to stop the search before it is complete. In the revised Available users list, select one or more users. 6 Click Add. The users are added to the Selected Users list. 7 To view or edit the properties of a user, select the user, and then click Properties. Use the Editing User dialog box to make changes to the user’s properties, and then click OK. See “Editing user properties” on page 88. 8 Click OK. 9 In the Editing Role dialog box, click OK. Modifying console access rights Console access rights control what parts of the Symantec management console user interface members of a role can see when they log on. You can modify the console access rights you assigned when you created a role. To modify console access rights 1 In the Symantec management console, on the System view tab, in the left pane, click Roles. 2 In the right pane, select the role that you want to edit. 3 On the Selection menu, click Properties. 4 On the Console Access Rights tab, do one of the following. ■ To give members of the role the ability to see all of the tabs of the Symantec management console, click Role members will have all console access rights. ■ To limit what members of the role can see when they display the Symantec management console, click Role members will have only the selected console access rights. 77 78 Defining the administrative structure of SESA Managing roles If you select to limit what members of the role can see, a list of console access rights appears. The console access rights that are enabled depend on the rights that were granted when the role was created. 5 6 In the right column, enable or disable viewing of the GUI elements listed in the left column. To make selection easier, right-click over the table and select from the following: ■ Check All If you want to allow most of the access rights, this lets you start with all rights enabled. ■ Uncheck All If you want to allow only a few access rights, this lets you start with all rights disabled. Click OK. Defining the administrative structure of SESA Managing roles Modifying product component selections The Product Components tab lets you select the product components to which role members have access. These determine what members of the role can see and do when they log on to the Symantec management console. For example, if you create a role to manage policies and configurations, the members of the role are only able to see and configure the components that you enable on the Product Components Selection tab. Similarly, members of a role for event management only see the events you enable here. To modify product components selections 1 In the Symantec management console, on the System view tab, in the left pane, click Roles. 2 In the right pane, select the role that you want to edit. 3 On the Selection menu, click Properties. 4 On the Product Components tab, do one of the following: ■ To provide access to all features of the product, select Role members will have access to the entire product. To specific product components for the role, select Role members will have access to only the selected product components. If you selected to specify product components, a list of product components appears. ■ The list gives the name of each component, shows whether it is configurable, logs events to SESA, or both, and describes the component. 79 80 Defining the administrative structure of SESA Managing roles You can resize the columns, or view the complete description of a product component by moving the mouse pointer over the item. 5 Select one or more components by checking or unchecking Enabled. To make selection easier, you can right-click and, from the menu that appears, select from the following: ■ Check All ■ Uncheck All ■ Check All Configurable Check All Logging For example, to enable only components that log events, right-click and select Uncheck All. Then right-click again and select Check All Logging. For example, to enable only components that log events, right-click and select Uncheck All. Then right-click again and select Check All Logging. ■ 6 Click OK. Modifying permissions in roles Roles include permissions that define the level of access that members of the role have to objects that appear in the Symantec management console. These objects are stored in the SESA Directory. Role-specific permissions are assigned to the objects when you create each role. You can change the permissions for the following: ■ Container objects that were created when you installed SESA. ■ New objects that you create within the container objects. When you view the properties of a role, you can see and modify the permissions for the role by displaying tabs in the Role Properties dialog box. Figure 3-1 shows the permissions for alert configurations: Defining the administrative structure of SESA Managing roles Figure 3-1 Alert Configuration permissions Tabs used to view and modify permissions in roles Permissions for the container object Permissions for created objects Caution: Modifying permissions is an advanced feature. You should only customize permissions if you have a clear understanding of how access control works in the SESA Directory. For a more detailed description of permissions, see “Working with permissions” on page 156. The initial permissions given to objects depend on the selections that you make when you create the role. For example, the default permissions for members of a role that you create for management are different from the permissions for members of a role that you create for event viewing, as shown in Table 3-2. 81 82 Defining the administrative structure of SESA Managing roles Table 3-2 Access control permissions created for roles Container object Management role permissions Event viewing role permissions Alert Configurations Read/Write/Add/Delete/Search Read/Write/Add/Delete/Search Organizational Units Read/Write/Add/Delete/Search Read/Search DataStores Read/Write/Add/Delete/Search Read/Search Directories Read/Write/Add/Delete/Search Read/Search Notification Services Read/Write/Add/Delete/Search None Configuration Groups Read/Write/Add/Delete/Search None Users Read/Write/Add/Delete/Search None Report Groups None Read/Search Custom Reports None Read/Write/Add/Delete/Search The following procedures describe ways that you can modify permissions by editing a role. You can also modify permissions for most objects by selecting the Permissions option from the Selection menu. See “Modifying permissions from the Permissions dialog box” on page 158. To modify permissions in roles The following examples show how you can modify permissions: ■ To hide a report group from members of a role When members of this role log on and view the Events tab, the report group is not visible. ■ To hide all users from members of a role When members of this role log on, and then click the System view tab, they do not see the Users node in the left pane. ■ To prevent members of a role from deleting configuration groups When members of this role log on and select Configuration Groups from the System view tab, they see configuration groups; however, if they try to delete a configuration group, they receive an error message informing them that they do not have authorization to delete the object. Defining the administrative structure of SESA Managing roles To hide a report group from members of a role 1 In the Symantec management console, on the System view tab, in the left pane, click Roles. 2 In the right pane, select the role that you want to edit. 3 On the Selection menu, click Properties. 4 On the Report Groups tab, under Exclusive permissions for specific report groups (optional), scroll to the Anti Virus Event Family. 5 For the Anti Virus Event Family, uncheck Read and Search. 6 Click OK. To hide all users from members of a role 1 On the System view tab, in the left pane, click Roles. 2 In the right pane, select the role that you want to edit. 3 On the Selection menu, click Properties. 4 On the Users tab, under Default permissions for all users, right-click and the click Uncheck All. 5 Click OK. 83 84 Defining the administrative structure of SESA Managing roles To prevent members of a role from deleting a configuration group 1 On the System view tab, in the left pane, click Roles. 2 In the right pane, select the role that you want to edit. 3 On the Selection menu, click Properties. 4 On the Configuration Groups tab, under Exclusive permission for specific configuration groups (optional), scroll to the configuration group that you want to protect from deletion. 5 If you do not see the configuration group you want, click Add. For example, you would have to add a configuration group to the list if you created it after creating the role. 6 In the Find Configuration Group dialog box, in the Available Configuration Groups list, select the configuration group that you want to protect. 7 Click Add, and then click OK. 8 On the Configuration Groups tab, for the newly added configuration group, uncheck Delete. 9 Click OK. Deleting a role You can delete roles when they are no longer in use. Before you delete a role, you may want to view the properties of the role to ensure that none of your users requires it. To delete a role 1 In the Symantec management console, on the System view tab, in the left pane, click Roles. 2 In the right pane, select the role that you want to delete. 3 On the Selection menu, click Properties. 4 On the Members tab, verify that no users are role members. If a user is a role member, when you delete the role, that user’s role membership is removed. 5 Click Cancel. 6 On the Selection menu, click Delete. A message warns you that all members of the selected role will be removed. This means that users will no longer have access to the role. The users are still defined in the SESA Directory. Defining the administrative structure of SESA Managing users 7 Select one of the following: ■ Yes: Delete the role from the SESA Directory. The role is removed from the list of roles in the right pane. ■ No: Do not delete the role. Managing users Users are the administrators of your security products, contacts for notifications, or both. Users who are administrators are members of roles that define their administrative permissions. Users who only receive notifications do not have to be members of a role. On the System view tab, when you select Users, the Selection menu and toolbar provide options for the following: ■ Creating a new user ■ Editing user properties ■ Modifying user permissions ■ Deleting a user ■ Refreshing the users list See “Refreshing the Symantec management console” on page 47. Creating a new user You must use the Create a new User Wizard to create a user. The wizard prompts you for required information that the user needs to log on to the SESA Manager. It also lets you specify notification information for users who are notified when alerts occur. See “Using SESA wizards” on page 56. When and how you complete the optional user information depends on your organization’s information gathering strategy and the requirements of the security products that you install. The Create a new User Wizard is designed for flexibility and to provide multiple ways to collect information. You can supply all pertinent user information at the time you use the wizard to create the user. Alternatively, you can provide only the required information and add more information later by editing the user’s properties. See “Editing user properties” on page 88. 85 86 Defining the administrative structure of SESA Managing users This procedure describes how to specify required information. It contains pointers to sections that describe how to enter additional user information. To create a new user 1 In the Symantec management console, on the System view tab, in the left pane, click Users. 2 On the Selection menu, click New. 3 In the first panel of the Create a new User Wizard, click Next. 4 In the General panel, do the following: Logon name Type the logon name for the new user. Last name Type the user’s last name. First name Type the user’s first name. The other text boxes in the General panel are optional. You can provide data for optional text boxes later by editing the user’s properties. Online Help on the User Properties dialog box provides text box descriptions. See “Editing user properties” on page 88. Defining the administrative structure of SESA Managing users 5 Click Next. 6 In the Password panel, in the Password text box, type a Password, using from 6 to 12 alphanumeric characters. The password is case sensitive. Green check marks under Password rules indicate that your password conforms to the length rules. 7 In the Confirm password text box, retype the password. A green check mark indicates that the passwords match. 8 Click Next. 9 In the Business panel, do one of the following: ■ Specify business information for the user, and then click Next. Click Next. You can specify business information later by editing the user’s properties. See “Specifying user business and contact information” on page 89. ■ 10 In the Contact Information panel, do one of the following: ■ Specify contact information for the user, and then click Next. Click Next. You can specify contact information later by editing the user’s properties. See “Specifying user business and contact information” on page 89. ■ 87 88 Defining the administrative structure of SESA Managing users 11 In the Notifications panel, do one of the following: ■ Specify email addresses and pager numbers for the user, and times when those contacts can be used for notifications, and then click Next. Click Next. You can specify email addresses, pager numbers, and contact times later by editing the user’s properties. See “Specifying notification information” on page 94. ■ 12 In the Roles panel, do one of the following: ■ To add roles to define the user’s permissions now, click Add. When you are finished, click Next. Click Next. You can add roles later by editing the user’s properties. See “Making a user a member of a role” on page 93. Until a role is added to a user, the user cannot log on to the Symantec management console. ■ 13 In the User Summary panel, review the information that you have specified. Then do one of the following. ■ To make changes, click Back. ■ To create the user, click Finish. The Task/Status list at the bottom of the panel scrolls up to show the user properties that are being created. A green check mark indicates success. When the user is created, the Cancel button changes to a Close button. 14 Click Close. The new user is added to the list of users in the right pane. Editing user properties After you create a user, you can edit the user properties to add or modify information. The following procedures describe how to modify user properties: ■ Changing a user’s password ■ Specifying user business and contact information ■ Making a user a member of a role ■ Specifying notification information Defining the administrative structure of SESA Managing users Changing a user’s password You can change passwords in two ways: ■ Users can change their own passwords using the Change Password option on the Console menu of the Symantec management console. See “Changing your password” on page 48. ■ Administrators can change a user’s password by editing the user properties. To change a user’s password 1 In the Symantec management console, on the System view tab, in the left pane, click Users. 2 In the right pane, select the user whose password you want to change. 3 On the Selection menu, click Properties. 4 In the User Properties dialog box, on the Password tab, in the Password text box, type a new password. Passwords are case sensitive and must be 6 to 12 alphanumeric characters in length. 5 In the Confirm password text box, type the password again to confirm it. 6 Click OK. Specifying user business and contact information In the User Properties dialog box, the Business tab and Contact information tab let you supply detailed information about the user. The choice of a preferred language is particularly important. You can specify this information when you create a user using the Create a New User Wizard or by editing the user properties. To specify user business and contact information 1 In the Symantec management console, on the System view tab, in the left pane, click Users. 2 In the right pane, select the user that you want to edit. 3 On the Selection menu, click Properties. 89 90 Defining the administrative structure of SESA Managing users 4 In the User Properties dialog box, on the Business tab, type the business information for the user. For descriptions of these text boxes, click Help. 5 To specify the user’s preferred language, in the Preferred language dropdown list, select a language. The options from which you can select are variants of the installed languages used on the SESA DataStores to which your logon privileges give you access, and variants of English. The specific options that are displayed are determined by the locales that the visible SESA DataStores support. These locales are specified in one of the following ways: ■ Language code alone All the known language and country pairs are displayed for the language. For example, if the language code is en, then all supported variants of English are displayed. This includes English (United States), English (Great Britain), English (Australian), and so forth. Language code and country code A single entry is displayed that matches both the language code and country code. For example, if the language code is fr and the country code is CA, the option that is displayed is French (Canada). The preferred language that you select controls the format of currency, date and time, and the use of numerical separators when this user is logged into the Symantec management console. Users who have a localized version of SESA see the Symantec management console in their preferred language. ■ Defining the administrative structure of SESA Managing users When the SESA environment includes multiple SESA Managers and SESA DataStores and the installed languages for these are different, users may see a mix of languages. See “Preferred language behavior in the Symantec management console” on page 92. 6 To identify the user’s manager, under Manager, click the browse button (...) to display the Find Users dialog box. The manager must exist as a user in SESA. 7 In the Find Users dialog box, do one of the following: ■ To proceed without modifying the Available users list, select the user who is the manager, and then click OK. The Available users list shows all users for the domain, up to the number of users indicated by the Maximum search count text box. ■ To reduce the number of users in the Available users list, specify search criteria, as follows: Look in This text box shows the domain. You cannot change it. Logon name Type all or part of the user’s logon name. For this and the next two text boxes, you can specify a partial name that contains one or more asterisks. For example, if you type *dev* in the Logon name text box, when you search only users whose logon names contain this string are returned. Last name Type all or part of the user’s last name. First name Type all or part of the user’s first name. Maximum search Type a number to reduce or increase the number of count computers that are returned by the search. Start search. Click here to start the search. The Available users list is revised based on the search criteria. Stop search. Click here to stop the search before it is complete. In the revised Available users list, select the user who is the manager, and then click OK. 8 To identify the user’s administrative assistant, under Administrative assistant, click the browse button (...) to display the Find Users dialog box and select the administrative assistant, as described in step 7. The administrative assistant must exist as a user in SESA. 91 92 Defining the administrative structure of SESA Managing users 9 On the Contact Information tab, type the contact information for the user. 10 Click OK. Preferred language behavior in the Symantec management console The language used in the Symantec management console depends on the language that is preferred by the user, and on the language of the SESA Manager. When the SESA environment uses a single language for all SESA Managers and SESA DataStores and all users are created with that language as the preferred language, then everything in the Symantec management console appears in that language. For example, for a Japanese site with multiple SESA Managers (with full Japanese support), where all clients support and prefer Japanese and all databases support Japanese, everything appears in Japanese. When the SESA environment includes multiple SESA Managers and SESA DataStores and the installed languages for these are different, users may see a mix of languages in the Symantec management console. This is because by default, the supported locale that best fits the session locale is used for the Symantec management console display. Defining the administrative structure of SESA Managing users For example, consider a site that contains both Japanese and English SESA Managers. When a Japanese user logs on to the English SESA Manager, the Symantec management console displays English text almost exclusively. The exceptions would be items such as date choosers and locale lists. No matter which SESA Manager a user logs on to, the English database reports and data appear in English while the Japanese database reports and data appear in Japanese. If a Japanese version of a SESA-integrated product is installed on an English SESA Manager, users who log on to the English SESA Manager see the Symantec management console in English, but if they run the integrated product, it appears in Japanese. Note: Any computer on which you launch the Symantec management console must have the appropriate fonts installed. For example, a computer that does not have Japanese fonts installed cannot display Japanese characters in the Symantec management console. Making a user a member of a role The roles a user is a member of define the user’s administrative permissions in the Symantec management console. Roles are product-specific and are created as one or both of the following: ■ Roles that allow the management of policies and configurations for a product Users who are members of these roles can change the security configurations of an integrated product and distribute them to specific computers, organizational units, and configuration groups. ■ Roles that allow the viewing of events generated by a product Users who are members of these roles can view alerts and events for a product, and create alerts and customized reports. When a user requires access to multiple products, you must make the user a member of multiple roles. You can make a user a member of a role when you create the user using the Create a New User Wizard or by editing the user’s properties. This topic describes adding a role by editing the user’s properties. Note: You must be a member of the Domain Administrator role to make a user a member of a role. 93 94 Defining the administrative structure of SESA Managing users To make a user a member of a role 1 In the Symantec management console, on the System view tab, in the left pane, click Users. 2 In the right pane, select the user that you want to edit. 3 On the Selection menu, click Properties. 4 In User Properties dialog box, on the Roles tab, click Add. 5 In the Find Roles dialog box, use the Look in drop-down list to select the domain in which to find the role. Users can have access to roles in multiple domains. 6 In the Available Roles list, select one or more roles. If you are not a member of the Domain Administrator role, the Find Roles dialog box displays but does not contain roles. 7 Click Add. 8 Click OK. 9 In the User Properties dialog box, to view or edit the properties of a role, select it, and then click Properties. Use the Editing Role Properties dialog box to make changes to the role. See “Editing role properties” on page 74. 10 To remove a role, select it, and then click Remove. 11 Click OK. Specifying notification information When you configure alerts, you can identify users who are notified when the alert occurs. For each user, you can specify the email addresses and pager numbers that are used to send these notifications. You can also specify when the user is notified. For example, you can specify one email address to be used Monday through Friday from 8:00 AM to 5:00 PM, and a pager to be used on “off hours”—Saturday, Sunday, and Monday through Friday from after 5 PM. Note: Before you add users to alert configurations for the purpose of notification, you must specify the email server for alerts. See “Configuring alert email and retry settings” on page 184. Defining the administrative structure of SESA Managing users You can add email addresses, pager numbers, and notification times when you create a user with the Create a New User Wizard or by editing the user. This method describes adding this information by editing the user’s properties. You can supply information using the Notifications tab in the same way when you create the user. When a user is notified of an alert, the information the user receives depends on whether the notification method is email, short email, or pager. See “About alert notifications that are sent to users” on page 98. Specify notification information You can specify the following: ■ Email addresses ■ Pager numbers ■ The day and time ranges when the contact method can be used to send a user notifications of alerts The combined number of email addresses and pager numbers cannot exceed five. To specify a user’s email address 1 In the Symantec management console, on the System view tab, in the left pane, click Users. 2 In the right pane, select the user that you want to edit. 3 On the Selection menu, click Properties. 95 96 Defining the administrative structure of SESA Managing users 4 In the User Properties dialog box, on the Notifications tab, in the drop-down list, select Email. 5 Click Add. 6 In the Email dialog box, in the Email address text box, type an email address. 7 If the user receives email on a device with a small screen such as a handheld device, check Send shortened email message. This sends an abbreviated email message that is easier to read. 8 Click OK. 9 On the Notifications tab, do any of the following: ■ To add additional email addresses, repeat steps 5 through 8. ■ To edit an existing email address, select it, and then click Properties. ■ To remove an existing email address, select it, and then click Delete. 10 Specify notification times if desired. See “To specify notification times” on page 97. 11 Click OK. To specify a user’s pager number 1 On the System view tab, in the left pane, click Users. 2 In the right pane, select the user that you want to edit. 3 On the Selection menu, click Properties. Defining the administrative structure of SESA Managing users 4 In the User Properties dialog box, on the Notifications tab, in the drop-down list, select Pager. 5 Click Add. 6 In the Pager dialog box, In the Number text box, type a pager number. 7 In the Notification service drop-down list, select the notification service used by the user. Notification services are the paging companies used to notify responsible personnel when an alert occurs. If you do not see the service that you want to select, you can add it using the Notification Services node. See “Adding a notification service” on page 154. 8 Click OK. 9 Do any of the following: ■ To add additional pager numbers, repeat steps 5 through 8. ■ To edit an existing pager number, select it, and then click Properties. ■ To remove an existing pager number, select it, and then click Delete. 10 Specify notification times if desired. See “To specify notification times” on page 97. 11 Click OK. To specify notification times 1 On the System view tab, in the left pane, click Users. 2 In the right pane, select the user that you want to edit. 3 On the Selection menu, click Properties. 4 In the User Properties dialog box, on the Notifications tab, select an email address or a pager number. 5 Using the Day controls, deselect days when the contact method cannot be used to contact the user. 6 Using the From and To controls, specify the range of time when the contact method can be used. 7 Click OK. 97 98 Defining the administrative structure of SESA Managing users About alert notifications that are sent to users When a user is notified of an alert, the information the user receives depends on whether the notification method is email, short email, or pager. If the notification method for the user is email, the user receives a long alert message in the following format: From: <[email protected]> To: "BWT" <[email protected]> Sent: Monday, August 05, 2002 9:25 AM Subject: SESA Alert: Example Alert (This is the alert configuration name) Description: This is the Alert Description (only shows in the long alert) Severity: 6 - Fatal Base Filtering: Product: All SW Feature: All Event Class: All Event: All Category: All Severity: All Alert Created: August 5, 2002 9:25:04 AM PDT Threshold Required: 1 event Events Detected: 1 event Alert Correlation Machine: yourSESAmachine Products included in this alert: yourSecurityproduct: If the notification method for the user is pager, or if you selected Send shortened email message when you specified the user’s email address, the user receives a short alert message in the following format: From: <[email protected]> To: "BWT" <[email protected]> Sent: Monday, August 05, 2002 9:25 AM Subject: SESA Alert: Example Alert (This is the alert configuration name) Severity: 6 - Fatal Alert Created: August 5, 2002 9:25:04 AM PDT Threshold Required: 1 event Events Detected: 1 event Defining the administrative structure of SESA Managing organizational units Modifying user permissions When you create a role, permissions are assigned for each user with regard to that role. These permissions control whether role members who log on to the Symantec management console can view, modify, or delete the user. You can modify these permissions in two ways: ■ By displaying and editing the roles that contains the permissions. See “Modifying permissions in roles” on page 80. ■ By displaying the Permissions dialog for the User container object or an individual user. See “Modifying permissions from the Permissions dialog box” on page 158. Note: To modify permissions, you must be logged on as a member of the Domain Administrator role. Deleting a user You can delete users who are no longer administrators of your security network or who no longer receive alert notifications. To delete a user 1 In the Symantec management console, on the System view tab, in the left pane, click Users. 2 In the right pane, select the user that you want to delete. 3 On the Selection menu, click Delete. 4 When asked to confirm the deletion, select one of the following: ■ Yes: Delete the user from the SESA Directory. The user is removed from the list of users in the right pane. ■ No: The user is not deleted. Managing organizational units Organizational units are the primary way that you can structure your security environment. Before you create organizational units, it is important that you understand your security network and create a security plan. See the Symantec Enterprise Security Architecture Implementation Guide for planning and implementation suggestions. 99 100 Defining the administrative structure of SESA Managing organizational units Organizational units let you group the computers and appliances that you manage. You can then add configurations for the software features installed on those computers. This enables the distribution of the configurations to all computers and appliances in the organizational unit. See “Organizational units” on page 24. On the System view tab, when you select Organizational Units, the Selection menu and toolbar provide options for the following tasks: ■ Creating a new organizational unit ■ Editing organizational unit properties ■ Modifying organizational unit permissions ■ Deleting an organizational unit ■ Distributing configurations by way of an organizational unit ■ Deploying and removing SESA Manager extensions ■ Refreshing the hierarchy of organizational units See “Refreshing the Symantec management console” on page 47. In addition, when you select Organizational Units, you can use the options on the View menu to monitor the heartbeat and failover status of services on the computers in the organizational unit. See “Monitoring computers” on page 134. Creating a new organizational unit Organizational units are logical groupings. You can create them to organize computers that are physically co-located or belong to structural groups within your corporation, such as divisions or task groups. However, it is not required that an organizational unit reflect these relationships. You can create all the organizational units that you require at a single level, or you can create a hierarchy of nested organizational units. Note: The combined maximum length of the distinguished name of an organizational unit should be no longer than 170 bytes. Keep in mind that some characters, such as accented characters or Japanese characters take more space to store. Since the distinguished name of an organizational unit is a concatenation of the names above it in the hierarchy, nesting organizational units with long names can exceed this limit. A screen message informs you if you exceed the limit. Defining the administrative structure of SESA Managing organizational units To create an organizational unit 1 In the Symantec management console, on the System view tab, in the left pane, do one of the following: ■ To create a new organizational unit at the top level of the tree, select Organizational Units, and then, on the Selection menu, click New. ■ To create a new organizational unit within an existing organizational unit, expand the organizational unit tree to the desired level, and then on the Selection menu, click New. In the Computer or Organizational Unit dialog box, click Organizational Unit, and then click OK. 2 In the first panel of the Create a new Organizational Unit Wizard, click Next. 3 In the General panel, do the following: ■ In the Organizational Unit name text box, type a name for the organizational unit. ■ In the Description text box, type a description of the organizational unit. The description is optional. 4 Click Next. 5 In the Configurations panel, do one of the following: ■ To add configurations now, click Add. When you are finished, click Next. Click Next. You can add configurations later by editing the organizational unit’s properties. See “Adding configurations of product software features to an organizational unit” on page 102. ■ 6 7 In the Organizational Unit Summary panel, review the information that you have specified, and then do one of the following: ■ To make changes, click Back. ■ To create the organizational unit, click Finish. The Task/Status list at the bottom of the panel scrolls up to show the organizational unit properties that are being created. A green check mark indicates success. When the organizational unit is created, the Cancel button changes to a Close button. Click Close. The new organizational unit is added to the hierarchy of organizational units in the left pane. 101 102 Defining the administrative structure of SESA Managing organizational units Editing organizational unit properties You can edit an existing organizational unit to change the configurations that are associated with it. To edit organizational unit properties 1 In the Symantec management console, on the System view tab, in the left pane, expand the Organizational Units navigation tree until you can select the organizational unit that you want to edit. 2 On the Selection menu, click Properties. 3 In the Organizational Unit Properties dialog box, on the General tab, change the description if desired. 4 On the Configurations tab, do any of the following: 5 ■ To add configurations of product software features, click Add. See “Adding configurations of product software features to an organizational unit” on page 102. ■ To remove a configuration, select it, and then click Remove. ■ To view the properties of a configuration, select it, and then click Properties. See “Editing a configuration’s settings” on page 165. When you have completed your edits, click OK. Adding configurations of product software features to an organizational unit The behavior of security products is controlled by the configurations of the product’s software features. To distribute a configuration using an organizational unit, you associate the configuration with an organizational unit when you create the organizational unit or by editing the organizational unit’s properties. You can then distribute the configuration, either immediately or at a later date. To add configurations of product software features 1 In the Symantec management console, on the System view tab, in the left pane, expand the Organizational Units navigation tree until you can select the organizational unit that you want to edit. 2 On the Selection menu, click Properties. Defining the administrative structure of SESA Managing organizational units 3 In the Organizational Unit Properties dialog box, on the Configurations tab, click Add. 4 In the Find Configurations dialog box, in the Look-in drop-down list, select the product whose configurations you want to associate with the organizational unit. The configurations for the software feature are displayed in the Available configurations list. 5 In the Available configurations list, select a configuration. You can only select one configuration at a time. 6 Click Add. The selected configuration is listed in the Selected configuration list. If the computer already contains a configuration for the selected software feature, and you now select a different configuration, the newly selected configuration takes precedence. 7 To select a configuration for another software feature of the same product or to select configurations for software features of another product, repeat steps 4 through 7. 8 Click OK. 103 104 Defining the administrative structure of SESA Managing organizational units 9 In the Organizational Unit Properties dialog box, do any of the following: ■ To remove a configuration, select it, and then click Remove. To view a configuration’s properties, select it, and then click Properties. See “Editing a configuration’s settings” on page 165. ■ 10 Click OK. Modifying organizational unit permissions When you create a role, permissions are assigned for each organizational unit with regard to that role. These permissions control whether role members who log on to the Symantec management console can view, modify, or delete the organizational unit. You can modify these permissions in two ways: ■ By displaying and editing the roles that contains the permissions. See “Modifying permissions in roles” on page 80. ■ By displaying the Permissions dialog for the Organizational Unit container object or an individual organizational unit. See “Modifying permissions from the Permissions dialog box” on page 158. Note: To modify permissions, you must be logged on as a member of the Domain Administrator role. Deleting an organizational unit The Symantec management console does not let you delete an organizational unit until you move or delete all computers that belong to it, or to any organizational units below it in the navigational structure. See “Moving a computer to a different organizational units” on page 131 and “Deleting a computer from an organizational unit” on page 133. When you delete an organizational unit, all organizational units that are below it in the navigational structure are also deleted. To delete an organizational unit 1 In the Symantec management console, on the System view tab, in the left pane, expand the Organizational Units navigation tree until you can select the organizational unit that you want to delete. Defining the administrative structure of SESA Managing organizational units 2 3 On the Selection menu, click Delete. If the Delete option is greyed out, there are computers in the organizational unit or in an organizational unit that is below it. Do the following: ■ Navigate to the organizational unit that contains the computers. ■ Delete the computers. ■ To refresh the Organizational Unit node, from the Selection menu, click Refresh. ■ Return to the organizational unit that you want to delete. When you are prompted to delete the organizational unit and all its subgroups, select one of the following. ■ Yes: Delete the organizational unit from the SESA Directory. The organizational unit and organizational units below it in the hierarchy are removed from the navigation tree. ■ No: Do not delete the organizational unit. Distributing configurations by way of an organizational unit You can use an organizational unit to distribute the configurations that are associated with the organizational unit to computers. The Distribute option sends a message to the computers in the organizational unit to check for new configurations. When a computer receives this message, it contacts the SESA Manager to request a download of the configurations. Note: The timing of configuration distribution varies depending on the amount of traffic on the SESA Manager. See “Product configuration distribution” on page 26. To distribute configurations by way of an organizational unit 1 In the Symantec management console, on the System view tab, in the left pane, expand the Organizational Units navigation tree until you can select the organizational unit to which you want to distribute configurations. 2 On the Selection menu, click Distribute. 3 When you are prompted to distribute the configuration, select one of the following. ■ Yes: Distribute the configuration. A message is sent to the computers in the organizational unit, informing them to contact the SESA Manager for a new configuration. ■ No: Do not distribute the configuration. 105 106 Defining the administrative structure of SESA Managing organizational units Deploying and removing SESA Manager extensions Products that are managed by SESA provide product-specific SESA Manager extensions to SESA functions. To facilitate the distribution of SESA Manager extensions to other SESA Managers in the domain, SESA provides the Deploy/Remove SESA Manager Extensions Wizard. This wizard lets you install the SESA Manager extensions and relays that are necessary to access the integrated product from another SESA Manager. Deploying SESA Manager extensions After you install a product, use the Deploy/Remove SESA Manager Extensions Wizard to deploy the product’s SESA Manager extensions to one or more SESA Managers. Note: For products that have editable configurations, you can only edit the configurations when you are connected to SESA Managers to which the product has been deployed. To deploy SESA Manager extensions 1 In the Symantec management console, on the System view tab, in the left pane, select Organizational Units. 2 On the Selection menu, click Deploy/Remove SESA Manager Extensions. 3 In the first panel of the Deploy/Remove SESA Manager Extensions Wizard, click Next. 4 In the SESA Manager Extension Action panel, click Deploy SESA Manager extensions. 5 Click Next. 6 The Select SESA Manager Extensions panel lists the SESA integration packages (SIPs) for which SESA Manager extensions will be deployed. Do one of the following: ■ If the list contains a package that you do not want to deploy, select it, and then click Remove. ■ To deploy all of the listed SESA Manager extensions, click Next. Continue at step 11. Defining the administrative structure of SESA Managing organizational units ■ If the list does not contain all the packages that you want to deploy, click, click Add. 7 In the Find SESA Packages dialog box, in the Available packages list, select one or more packages. 8 Click Add. The packages are added to the Selected packages list. 9 Click OK. 10 In the Select SESA Manager Extensions panel, click Next. 11 The Select SESA Manager Computers panel lists the SESA Managers to which the SESA Manager extensions will be added. Do one or more of the following: ■ If the list contains a SESA Manager to which you do not want to deploy SESA Manager extensions, select it, and then click Remove. The SESA Manager is removed from the list. ■ To add SESA Manager extensions to all of the listed SESA Managers, click Next. Continue at step 16. 107 108 Defining the administrative structure of SESA Managing organizational units ■ If the list does not contain a SESA Manager to which you want to deploy SESA Manager extensions, click Add. 12 In the Find Computers dialog box, do one of the following: ■ To proceed without modifying the Available computers list, select one or more computers, and then continue at step 13. The Available computers list shows all SESA Managers for the domain, up to the number of computers indicated by the Maximum search count text box. ■ To modify the Available computers list by specifying search criteria, do the following: Look in Identifies the domain. You cannot change this value. Computer name Type a computer name. You can specify a partial computer name that contains one or more asterisks. For example: *dev* All computers with names that contain this string are returned. SESA Managers only This check box is checked by default and cannot be changed. You can only deploy SESA Manager extensions to SESA Managers. Defining the administrative structure of SESA Managing organizational units Maximum search count Type a number to reduce or increase the number of computers that are returned by the search. Start search. Click here to start the search. The Available computers list is revised based on the search criteria. Stop search. Click here to stop the search before it is complete. In the revised Available computers list, select one or more computers. 13 Click Add. The computers are added to the Selected Computers list. 14 Click OK. 15 In the Select SESA Manager Computers panel, click Next. 16 In the Schedule Deployment/Removal panel, select when the SESA Manager extensions should be deployed, and when the Web service should be restarted. Check the options as follows: Deploy/remove SESA ■ Manager extensions now ■ To deploy SESA Manager extensions immediately, check the check box. Restart the Web server after completing the wizard ■ To restart the Web server immediately, check the check box. ■ To restart the Web server using the schedule configured on the SESA Manager, leave the check box unchecked. For instructions on scheduling Web restart, see “Modifying Product Installation Service configurations” on page 223. 17 Click Next. To deploy SESA Manager extensions using the schedule configured on the SESA Manager, leave the check box unchecked. For instructions on scheduling deployment, see “Modifying Product Installation Service configurations” on page 223. 109 110 Defining the administrative structure of SESA Managing organizational units 18 In the SESA Manager Extensions Deployment/Removal Summary panel, review the information that you have specified. Then do one of the following: ■ To make changes, click Back. ■ To deploy the SESA Manager extensions, click Finish. The Task/Status list at the bottom of the panel scrolls up to show the progress of the deployment. A green check mark indicates success. When the deployment action is complete, the Cancel button changes to a Close button. 19 Click Close. Removing SESA Manager extensions from SESA Managers When the SESA Manager extensions for a product are no longer needed on a SESA Manager, you can remove them. You can remove SESA Manager extensions in two ways: ■ Run the Deploy/Remove SESA Manager Extensions Wizard. This lets you remove the extensions from several SESA Managers at one time. ■ Remove the package that represents the SESA Manager extensions from a single SESA Manager computer by using the Packages tab of the Computer Properties dialog box. See “Removing deployed SESA Manager extensions from a SESA Manager” on page 130. To remove SESA Manager extensions 1 In the Symantec management console, on the System view tab, in the left pane, select Organizational Units. 2 On the Selection menu, click Deploy/Remove SESA Manager Extensions. 3 In the first panel of the Deploy/Remove SESA Manager Extensions Wizard, click Next. 4 In the SESA Manager Extension Action panel, click Remove SESA Manager extensions. 5 Click Next. Defining the administrative structure of SESA Managing organizational units 6 The Select SESA Manager Extensions panel lists the SESA integration packages (SIPs) for which SESA Manager extensions will be removed. Do one of the following: ■ If the list contains a package that you do not want to remove, select it, and then click Remove. The package is removed from the list, which means that it will not be removed from the SESA Managers to which it has been deployed. ■ To remove all of the listed SESA Manager extensions, click Next. Continue at step 11. ■ If the list does not contain all the packages that you want to remove, click Add. 7 In the Find SESA Packages dialog box, in the Available packages list, select one or more packages. 8 Click Add. The packages are added to the Selected packages list. 9 Click OK. 10 In the Select SESA Manager Extensions panel, click Next. 11 The Select SESA Manager Computers panel lists the SESA Managers from which the SESA Manager extensions will be removed. 111 112 Defining the administrative structure of SESA Managing organizational units Do one or more of the following: ■ If the list contains a SESA Manager from which you do not want to remove SESA Manager extensions, select it, and then click Remove. The SESA Manager is removed from the list. ■ To remove SESA Manager extensions from all of the listed SESA Managers, click Next. Continue at step 16. ■ If the list does not contain a SESA Manager from which you want to remove SESA Manager extensions, click Add. 12 In the Find Computers dialog box, do one of the following: ■ To proceed without modifying the Available computers list, select one or more computers, and then continue at step 13. The Available computers list shows all SESA Managers for the domain, up to the number of computers indicated by the Maximum search count text box. Defining the administrative structure of SESA Managing organizational units ■ To modify the Available computers list by specifying search criteria, do the following: Look in Identifies the domain. You cannot change this value. Computer name Type a computer name. You can specify a partial computer name that contains one or more asterisks. For example: *dev* All computers with names that contain this string are returned. SESA Managers only This check box is checked by default and cannot be changed. You can only deploy SESA Manager extensions to SESA Managers. Maximum search count Type a number to reduce or increase the number of computers that are returned by the search. Start search. Click here to start the search. The Available computers list is revised based on the search criteria. Stop search. Click here to stop the search before it is complete. In the revised Available computers list, select one or more computers. 13 Click Add. The computers are added to the Selected Computers list. 14 Click OK. 15 In the Select SESA Manager Computers panel, click Next. 16 In the Schedule Deployment/Removal panel, select when the SESA Manager extensions should be removed, and when the Web service should be restarted. Check the options as follows: Deploy/remove SESA ■ Manager extensions now ■ To remove SESA Manager extensions immediately, check the check box. To remove SESA Manager extensions using the schedule configured on the SESA Manager, leave the check box unchecked. For instructions on scheduling deployment, see “Modifying Product Installation Service configurations” on page 223. 113 114 Defining the administrative structure of SESA Managing computers within organizational units Restart the Web server after completing the wizard ■ To restart the Web server immediately, check the check box. ■ To restart the Web server using the schedule configured on the SESA Manager, leave the check box unchecked. For instructions on scheduling Web restart, see “Modifying Product Installation Service configurations” on page 223. 17 Click Next. 18 In the SESA Manager Extensions Deployment/Removal Summary panel, review the information that you have specified. Then do one of the following: ■ To make changes, click Back. ■ To remove the SESA Manager extensions, click Finish. The Task/Status list at the bottom of the panel scrolls up to show the progress of the removal. A green check mark indicates success. When the removal is complete, the Cancel button changes to a Close button. 19 Click Close. Managing computers within organizational units Organizational units contain computer objects that represent the computers that run your security products. Note: The term computer covers a variety of equipment, from traditional desktop computers, to appliances and handheld devices. In the context of the Symantec management console, a computer is any machine that you manage as part of your enterprise security environment. Computers are placed in organizational units in two ways: ■ When a SESA Agent is installed. When you install a SESA-enabled security product, or when you connect a computer with a SESA-enabled security product to SESA, a SESA Agent is installed on the computer. It is represented in the Symantec management console as a computer within an organizational unit. In some cases, you can specify the organizational unit for the computer when the SESA Agent is installed. Defining the administrative structure of SESA Managing computers within organizational units If an organizational unit is not specified, the computer is placed in the Default organizational unit. See the Symantec Enterprise Security Architecture Implementation Guide. ■ When you can create the computer using the Create a new Computer wizard. You can create computers using this method for security products that do not install SESA Agents. When you select a computer in the right pane, the Selection menu and toolbar provide options for the following tasks: ■ Creating computers within organizational units ■ Editing computer properties ■ Distributing a configuration to selected computers in an organizational unit ■ Moving a computer to a different organizational units ■ Modifying computer permissions ■ Deleting a computer from an organizational unit ■ Refreshing the computer name list See “Refreshing the Symantec management console” on page 47. In addition, when you select Organizational Units, you can use the options on the View menu to monitor the heartbeat and failover status of services on the computers in the organizational unit. See “Monitoring computers” on page 134. Creating computers within organizational units Computers are defined in the SESA Directory as part of the organizational unit in which they are created. If you delete a computer from an organizational unit, it is permanently removed from the SESA Directory. Note: Do not create a computer using the wizard if a SESA Agent will be installed on the computer at a later time. Installation of a SESA Agent on a computer created using the wizard results in duplicate instances of the computer in the SESA Directory. A computer can only belong to one organizational unit at a time; however, depending on the requirements of your security products, you can easily move computers from one organizational unit to another. See “Moving a computer to a different organizational units” on page 131. 115 116 Defining the administrative structure of SESA Managing computers within organizational units To create a computer within an organizational unit 1 In the Symantec management console, on the System view tab, in the left pane, expand the Organizational Units navigation tree until you can select the organizational unit to which you want to add a computer. 2 On the Selection menu, click New. 3 In the Computer or Organizational Unit dialog box, click Computer. 4 In the first panel of the Create a new Computer Wizard, click Next. 5 In the General panel, do the following: ■ In the Computer name text box, type the computer name. ■ In the Description text box, type a description. The description is optional. 6 Click Next. 7 In the Information panel, do one of the following: ■ Type information in some or all of the optional text boxes, and then click Next. Click Next. You can supply the information later by editing the computer’s properties. Online Help on the Computer Properties dialog box provides text box descriptions. See “Editing computer properties” on page 118. ■ Defining the administrative structure of SESA Managing computers within organizational units 8 Click Next. 9 In the Identification panel, do one of the following: ■ Provide the host name, IP addresses, and MAC addresses of the computer now, and then click Next. Click Next. You can provide the identification information later by editing the computer’s properties. See “Providing identification information for a computer” on page 121. ■ 10 In the Configurations panel, do one of the following: ■ To directly associate configurations of product software features with the computer now, click Add. When you are finished, click Next. Click Next. You can add configurations later by editing the computer’s properties. See “Associating configurations of product software features directly with a computer” on page 122. ■ 11 In the Configuration groups panel, do one of the following: ■ To make the computer a member of a configuration group now, click Add. When you are finished, click Next. Click Next. You can add the computer to a configuration group later by editing the computer’s properties. See “Making a computer a member of a configuration group” on page 124. ■ 117 118 Defining the administrative structure of SESA Managing computers within organizational units 12 In the Computer summary panel, review the information that you have specified. Then do one of the following: ■ To make changes, click Back. ■ To create the computer, click Finish. The Task/Status list at the bottom of the panel scrolls up to show the computer properties that are being created. A green check mark indicates success. When the computer is created, the Cancel button changes to a Close button. 13 Click Close. The new computer is added to the list of computers in the right pane. Editing computer properties Whether a computer has a SESA Agent installed determines what you can view and change when you edit the computer’s properties. ■ When a computer has a SESA Agent installed, you cannot change the identification information for the computer. However, you can specify configurations and configuration groups to be associated with the computer and view the services that are running on the computer. See “Editing a computer with a SESA Agent” on page 118 and “Viewing the services running on a computer” on page 125. ■ If a computer does not have a SESA Agent, you can edit the network identification information for the computer. Without a SESA Agent, you cannot view services that are running on the computer. See “Editing a computer that does not have a SESA Agent” on page 120 and “Providing identification information for a computer” on page 121. Editing a computer with a SESA Agent When a computer has a SESA Agent installed, much of the identification information about the computer is captured as a result of the installation of the SESA Agent. You can only modify a few text boxes. On the other hand, you can learn a lot about the computer by viewing information that is provided by the SESA Agent, such as the state of services that are running on the computer, and the computer’s heartbeat status. Defining the administrative structure of SESA Managing computers within organizational units You can also specify configurations and configuration groups to be associated with the computer, and, if the computer is a SESA Manager, add access to other domains. To edit a computer with a SESA Agent 1 In the Symantec management console, on the System view tab, in the left pane, expand the Organizational Units navigation tree until you can select the organizational unit containing the computer that you want to edit. 2 In the right pane, select the computer. 3 On the Selection menu, click Properties. 4 In the Computer Properties dialog box, on the General tab, type a new description if desired. 5 On the Information tab, you can modify the Primary Owner and Owner contact information text boxes. The rest of the information is supplied by the SESA Agent installation. You can view this information but you cannot edit it. 6 On the Identification tab, view the host name, IP addresses, and MAC addresses of the computer. You cannot change this information. 7 On the Configurations tab, do any of the following: 8 ■ To directly associate configurations of product software features with the computer, click Add. See “Associating configurations of product software features directly with a computer” on page 122. ■ To remove a configuration, select it, and then click Remove. ■ To view a configuration’s properties, select it, and then click Properties. See “Editing a configuration’s settings” on page 165. On the Configuration group tab, do any of the following: ■ To make the computer a member of a configuration group, click Add. See “Making a computer a member of a configuration group” on page 124. ■ To remove the computer from configuration group membership, select the configuration group, and then click Remove. ■ To view a configuration group’s properties, select it, and then click Properties. See “Editing configuration group properties” on page 140. 119 120 Defining the administrative structure of SESA Managing computers within organizational units 9 On the Services tab, view information about the services that are running on the computer. See “Viewing the services running on a computer” on page 125. 10 On the Heartbeat Monitor tab, view the heartbeat status of the services that are running on the computer. See “Checking the heartbeat of services on a computer” on page 127. 11 Two additional tabs are available if the computer is a SESA Manager and you are logged on to the Symantec management console as a member of the Domain Administrator role: ■ On the Domain Access tab, you can add or remove domain access for the SESA Manager. See “Adding domain access to a SESA Manager” on page 128. ■ On the Packages tab, you can remove SESA Packages that have been deployed to the SESA Manager. See “Removing deployed SESA Manager extensions from a SESA Manager” on page 130. 12 Click OK. Editing a computer that does not have a SESA Agent When you create a computer using the Create a New Computer Wizard, most of the information for the computer can be modified. To edit the properties of a computer that does not have a SESA Agent 1 In the Symantec management console, on the System view tab, in the left pane, expand the Organizational Units navigation tree until you can select the organizational unit containing the computer that you want to edit. 2 In the right pane, select the computer. 3 On the Selection menu, click Properties. 4 In the Computer Properties dialog box, on the General tab, type a new description if desired. 5 On the Information tab, you can modify all text boxes except the Installation date text box, which is only applicable when a SESA Agent is installed. To enable the Other OS text box, from the Operating system type text box, select Other. 6 On the Identification tab, you can change the host name, and add or remove IP addresses and MAC addresses. See “Providing identification information for a computer” on page 121. Defining the administrative structure of SESA Managing computers within organizational units 7 8 On the Configurations tab, do any of the following: ■ To directly associate configurations of product software features with the computer, click Add. See “Associating configurations of product software features directly with a computer” on page 122. ■ To remove a configuration, select it, and then click Remove. ■ To view a configuration’s properties, select it, and then click Properties. See “Editing a configuration’s settings” on page 165. On the Configuration Group tab, do any of the following: ■ To make the computer a member of a configuration group, click Add. See “Making a computer a member of a configuration group” on page 124. ■ To remove the computer from configuration group membership, select the configuration group, and then click Remove. To view a configuration group’s properties, select it, and then click Properties. See “Editing configuration group properties” on page 140. You cannot view any information on the Services tab. Services are only reported if a SESA Agent is installed on the computer. ■ 9 Click OK. Providing identification information for a computer After you create a computer using the Create a new Computer Wizard, you can provide the network identification information for the computer by editing its properties. When you create a computer by installing a SESA-enabled product, the identification information is supplied automatically by the installation and cannot be changed by editing the computer’s properties. To provide identification information for a computer 1 In the Symantec management console, on the System view tab, in the left pane, expand the Organizational Units navigation tree until you can select the organizational unit containing the computer that you want to edit. 2 In the right pane, select the computer. 3 On the Selection menu, click Properties. 4 In the Computer Properties dialog box, on the Identification tab, in the Host text box, type a fully qualified domain name or DNS hostname. 121 122 Defining the administrative structure of SESA Managing computers within organizational units 5 Under IP addresses, to add an IP address, click Add. 6 In the IP addresses dialog box, in the Enter a valid IP address text box, type an IP address for the computer, and then click OK. 7 If the computer has multiple network interface cards, repeat steps 5 and 6 for each IP address. 8 Under MAC Addresses, to add a MAC address, click Add. 9 In the MAC addresses dialog box, in the Enter a valid MAC address text box, type the MAC addresses of the computer, and then click OK. The MAC address must consist of six hexidecimal pairs. 10 If the computer has multiple network interface cards, repeat steps 8 and 9 for each MAC address. 11 Click OK. Associating configurations of product software features directly with a computer The behavior of security products is controlled by the configurations of the product’s software features. To distribute configurations, you can associate a configuration with a computer when you create the computer or by editing the computer’s properties. You can then distribute the configuration, either immediately or at a later date, depending on your needs. Associating configurations directly with a computer supersedes any associations that you have made with the organizational unit of which the computer is a part. To associate configurations of product software features directly with the computer 1 In the Symantec management console, on the System view tab, in the left pane, expand the Organizational Units navigation tree until you can select the organizational unit that contains the computer that you want to edit. 2 In the right pane, select the computer. 3 On the Selection menu, click Properties. Defining the administrative structure of SESA Managing computers within organizational units 4 In the Organizational Unit Properties dialog box, on the Configurations tab, click Add. 5 In the Find Configurations dialog box, in the Look in drop-down list, select a product/software feature combination. 6 In the Available Configurations list, select a configuration. You can only select one configuration at a time. If the computer already contains a configuration for the selected software feature, and you now select a different configuration, the newly selected configuration takes precedence. 7 Click Add. 8 Click OK. 9 To select a configuration for another software feature of the same product or to select configurations for software features of another product, repeat steps 5 through 8. 10 On the Configurations tab, do any of the following: ■ To remove a configuration, select it, and then click Remove. ■ To view a configuration’s properties, select it, and then click Properties. See “Editing a configuration’s settings” on page 165. 11 Click OK. 123 124 Defining the administrative structure of SESA Managing computers within organizational units Making a computer a member of a configuration group In addition to belonging to an organizational unit, a computer can be a member of a configuration group. Configuration groups are used to distribute special configurations to their member computers. A computer can only belong to one configuration group. See “Managing configuration groups” on page 138.. To make a computer a member of a configuration group 1 In the Symantec management console, on the System view tab, in the left pane, expand the Organizational Units navigational tree until you can select the organizational unit containing the computer that you want to edit. 2 In the right pane, select the computer. 3 On the Selection menu, click Properties. 4 In the Computer Properties dialog box, on the Configuration Groups tab, click Add. 5 In the Available Configuration Groups list, select a configuration group. You can only make a computer a member of one configuration group. If the computer is already a member of a configuration group, the configuration group you select here replaces the original configuration group. 6 Click Add. 7 Click OK. 8 On the Configuration Groups tab, you can also do any of the following: 9 ■ To remove a computer from configuration group membership, select the configuration group, and then click Remove. ■ To view a configuration group’s properties, select it, and then click Properties. See “Editing configuration group properties” on page 140. Click OK. Defining the administrative structure of SESA Managing computers within organizational units Viewing the services running on a computer The Services tab of the Editing Computer dialog box lists the services running on the computer and provides information such as what configurations are in use, and whether the configurations are up to date. To view the services running on a computer 1 In the Symantec management console, on the System view tab, in the left pane, expand the Organizational Units navigation tree until you can select the organizational unit containing the computer whose services you want to view. 2 In the right pane, select the computer. 3 On the Selection menu, click Properties. 4 In the Computer Properties dialog box, on the Services tab, check the In Sync column to determine whether the correct configurations are being used. If the value is Unknown or No, there is a problem with the configuration. For a description of the columns, see Help. 125 126 Defining the administrative structure of SESA Managing computers within organizational units 5 If the In Sync column indicates that a service’s configuration is not in sync, to view more details about the service, select it, and then click Details. The Service Properties dialog box for the selected service contains tabs that describe the service. When a service is not in sync, a red icon is displayed in the Service State section. 6 To determine why the service is not in sync, on the Configuration tab, click Why? 7 Review the message that appears, and then click OK to close it. Defining the administrative structure of SESA Managing computers within organizational units 8 In the Service Properties dialog box, click Close. 9 In the Computer Properties dialog box, to notify the computer that it should download new configurations, click Distribute. 10 To refresh the Computer Properties dialog box display, click Refresh. 11 Click OK. Checking the heartbeat of services on a computer The heartbeat monitor provides near real-time status of the SESA services running on a computer. To check the heartbeat of services on a computer 1 In the Symantec management console, on the System view tab, in the left pane, expand the Organizational Units navigation tree until you can select the organizational unit containing the computer whose heartbeat status you want to view. 2 In the right pane, select the computer. 3 On the Selection menu, click Properties. 4 In the Computer Properties dialog box, on the Heartbeat Monitor tab, view the heartbeat status of the services running on the computer. The services that are listed are the services that you have configured for heartbeat monitoring using the Heartbeat tab of the Agent Configuration. See “Configuring SESA Agent heartbeat” on page 219. 127 128 Defining the administrative structure of SESA Managing computers within organizational units The format of the service name in the monitor is <nnnnnnnn><swfeaturename> where <nnnnnnnn> is the ID of the software feature and <swfeaturename> is the name of the software feature. A computer’s service status as displayed on the Heartbeat Monitor tab can be any of the following: OK All heartbeat tracked services are running normally. No action required. SYSTEM_DOWN The computer system has Investigate why the failed to check in on system is down. schedule. SERVICES_DOWN The computer system is Investigate why the checking in on schedule, service is down. but one or more services that are tracked by the heartbeat monitor are not running. UNKNOWN The computer system is not currently known to the heartbeat monitor. Verify that the computer is configured to be tracked by the heart beat monitor. If it is configured to be tracked, the machine may be down or unable to contact its SESA Manager. Heartbeat Unsupported 5 The service is not configured for heartbeat monitoring. None. Click OK, and then take the recommended action. Adding domain access to a SESA Manager By default, a computer has access to the domain in which it was created. If the computer is a SESA Manager, you can give it access to more than one domain. The following are examples of when you should grant domain access to a SESA Manager: ■ If you create an alert configuration and add notification to users in another domain, you must give each SESA Manager in your top domain access to this domain so that it can do directory lookups. Defining the administrative structure of SESA Managing computers within organizational units ■ If you monitor heartbeat for SESA Managers across domains, you must configure the SESA Managers in both the local and the remote domain to have access to each other. This is because the master heartbeat machines in different domains contact each other to share heartbeat information across domains. To add domain access to a SESA Manager 1 In the Symantec management console, on the System view tab, in the left pane, expand the Organizational Units navigation tree until you can select the organizational unit containing the computer for which you want to expand domain access. 2 In the right pane, select the computer. 3 On the Selection menu, click Properties. 4 In the Computer Properties dialog box, on the Domain Access tab, click Add. 5 In the Find Domains dialog box, in the Available domains list, select one or more domains. 6 Click Add. The domains are added to the Selected domains list. 7 Click OK. 129 130 Defining the administrative structure of SESA Managing computers within organizational units 8 9 On the Domain Access tab, you can also do any of the following: ■ To remove a domain, select it, and then click Remove. You cannot remove domain access to the domain the computer resides in. ■ To view a domain’s properties, select it, and then click Properties. See “Editing domain properties” on page 66. Click OK. Removing deployed SESA Manager extensions from a SESA Manager When a product is installed on a SESA Manager, its SESA Manager extensions can be deployed to other SESA Managers. When SESA Manager extensions have been deployed to a computer, the product appears on the Packages tab of the Computer Properties page for the SESA Manager. You can remove deployed SESA Manager extensions in two ways: ■ Run the Deploy/Remove SESA Manager Extensions Wizard, and selecting Remove SESA Manager extensions. This lets you remove the SESA Manager extensions from several SESA Managers at one time. See “Removing SESA Manager extensions from SESA Managers” on page 110. ■ Remove the SESA Manager extensions from each SESA Manager computer individually by using the Packages tab of the Computer Properties dialog box. To remove SESA Manager extensions from a single SESA Manager 1 In the Symantec management console, on the System view tab, in the left pane, expand the Organizational Units navigation tree until you can select the organizational unit containing a SESA Manager from which you want to remove SESA Manager extensions. 2 In the right pane, select the computer. 3 On the Selection menu, click Properties. 4 In the Computer Properties dialog box, on the Packages tab, select the SESA package you want to remove and then click Remove. Defining the administrative structure of SESA Managing computers within organizational units Distributing a configuration to selected computers in an organizational unit You can select specific computers and use the Distribute option to notify them to contact the SESA Manager for new configurations. To learn how computers are updated with new configurations, see “Product configuration distribution” on page 26. When you distribute an update message by selecting a specific computer, only the selected computer is notified. The other computers in the organizational unit do not receive the update message. To distribute a configuration to selected computers in an organizational unit 1 In the Symantec management console, on the System view tab, in the left pane, expand the Organizational Units navigation tree until you can select the organizational unit that contains the computers to which you want to distribute configurations. 2 In the right pane, select only those computers that you want to notify. You can use the SHIFT or CTRL keys to select multiple computers. 3 On the Selection menu, click Distribute. 4 When you are prompted to distribute the configuration, select one of the following. ■ Yes: Distribute the configuration. A message is sent to the selected computers that informs them to contact the SESA Manager for a new configuration. ■ No: Do not distribute the configuration. Moving a computer to a different organizational units Although a computer can only belong to one organizational unit, you can move computers from one organizational unit to another. Warning: Before you move a computer, make sure that moving computers is supported by the security products that you are managing. To move a computer to a different organizational unit 1 In the Symantec management console, on the System view tab, in the left pane, expand the Organizational Units navigation tree until you can select the organizational unit that contains the computer that you want to move. 2 In the right pane, select one or more computers to move. 131 132 Defining the administrative structure of SESA Managing computers within organizational units 3 On the Selection menu, click Move. 4 When prompted, to confirm that you want to move the computers click OK. 5 In the Find Organizational Units dialog box, select the organizational unit to which you want to move the computers. 6 Click OK. 7 To verify that the move was successful, in the left pane, select the organizational unit to which you moved the computers. Confirm that the computers that you moved are in the list of computers in the right pane. If the computer you move is a SESA Manager, you may have to log on again following the move. Modifying computer permissions When you create a role, permissions are assigned for each computer with regard to that role. These permissions control whether role members who log on to the Symantec management console can view, modify, or move the computer. To modify the permissions for a computer, display the Permissions dialog for the computer, as described in “Modifying permissions from the Permissions dialog box” on page 158. Defining the administrative structure of SESA Managing computers within organizational units You cannot modify permissions for computers using the Role Properties dialog box. Note: To modify permissions, you must be logged on as a member of the Domain Administrator role. Deleting a computer from an organizational unit If you want to delete an organizational unit, you must remove any computers within the organizational unit by moving them or deleting them. You may also want to delete a computer that you no longer want to have under SESA management, or a computer from which you have uninstalled all SESA-enabled security products. Deleting a computer removes it permanently from the SESA Directory. If the computer was created by installing a SESA Agent as part of a security product installation, you should uninstall the security product before you delete the computer. See your security product documentation. You can re-add a computer you have uninstalled by using the manual process that is described in “Creating computers within organizational units” on page 115. You can also re-add a computer by installing a SESA-enabled security product on the computer. To delete a computer from an organizational unit 1 In the Symantec management console, on the System view tab, in the left pane, expand the Organizational Units navigation tree until you can select the organizational unit from which you want to delete the computer. 2 In the right pane, select the computer. 3 On the Selection menu, click Delete. 4 When you are prompted to delete the computer, select one of the following. ■ Yes: Delete the computer from the SESA Directory. The computer is removed from the list in the right pane. ■ No: Do not delete the computer. 133 134 Defining the administrative structure of SESA Managing computers within organizational units Monitoring computers You can monitor the heartbeat and failover status of services on the computers in an organizational unit. Three monitor options are available on the View menu: ■ Heartbeat ■ Failover ■ Monitor This option, which can be accessed from any point in the Symantec management console, displays a monitor for all SESA Managers in the domain. See “Monitoring SESA components” on page 44. Monitoring heartbeat for computers SESA’s heartbeat service monitors the health of services on your computers by regularly receiving their status. The Heartbeat Monitor makes it easy for you to see computers in your organizational unit that have services whose heartbeat indicates problems. Two factors govern whether the heartbeat of a service is reported: ■ The service is designed to report its status to the Heartbeat servlet. ■ The software feature with which the service is associated has been configured for heartbeat. See “Configuring SESA Agent heartbeat” on page 219. For information on configuring the Master Heartbeat service, see “Changing the Master Heartbeat service computer” on page 198. Defining the administrative structure of SESA Managing computers within organizational units To monitor heartbeat for your computers 1 In the Symantec management console, on the System view tab, in the left pane, select an organizational unit. 2 On the View menu, click Heartbeat. 3 In the Heartbeat Monitor view, use the icons in the Machine status field at the top of the dialog box to identify computers that have problems: Status is being checked for the computer. Status of all services on the computer is OK. Status of one or more services on the computer is bad. Status of one or more services on the computer is unknown. Heartbeat unsupported–The service is not configured for heartbeat monitoring. 4 To view the heartbeat status of services on a specific computer, select the computer in the top list. The services that are listed in the lower section of the dialog box are the services that you have configured for heartbeat monitoring. 135 136 Defining the administrative structure of SESA Managing computers within organizational units The format of the service name in the monitor is <nnnnnnnn><swfeaturename> where <nnnnnnnn> is the ID of the software feature and <swfeaturename> is the name of the software feature. A service status can be any of the following: OK All heartbeat tracked services are running normally. No action required. SYSTEM_DOWN The computer system has failed to check in on schedule. Investigate why the system is down. SERVICES_DOWN Investigate why the The computer system is checking in on schedule, but service is down. one or more services that are tracked by the heartbeat monitor are not running. UNKNOWN The computer system is not Verify that the computer currently known to the is configured to be heartbeat monitor. tracked by the heart beat monitor. If it is configured to be tracked, the machine may be down or unable to contact its SESA Manager. N/A The computer system is not No action required. configured for heartbeat monitoring. 5 To view the properties of the selected computer, click the Properties button at the top of the Heartbeat Monitor window. 6 Click Close. Monitoring failover for your SESA Managers Failover status is reported for configured services for the SESA Managers in your organizational unit. See “Configuring SESA Agent to SESA Manager failover” on page 211. Defining the administrative structure of SESA Managing computers within organizational units To monitor failover for your SESA Managers 1 In the Symantec management console, on the System view tab, in the left pane, select an organizational unit. 2 On the View menu, click Failover. 3 In the Failover Monitor View, use the icons in the Failover status field at the top of the dialog box to identify computers that have problems: Failover status is being checked for the computer. No services have failed over on the computer. One or more services on the computer have failed over. The failover status of one or more services on the computer is unknown. Not Applicable–The computer is not configured for failover. 4 To view the failover status of configured services on a specific computer, select the computer in the top list. The services that are being monitored are listed in the lower half of the dialog box. 137 138 Defining the administrative structure of SESA Managing configuration groups The format of the service name in the monitor is <nnnnnnnn><swfeaturename> where <nnnnnnnn> is the ID of the software feature and <swfeaturename> is the name of the software feature. A service status can be any of the following: OK The service is not in a failed No action required. over state. Failed Over The service has failed over, as described in the Result field. Investigate why the service is down. Status Unknown The failover status cannot be detected. Investigate why the failover status is not being reported. NA (Not applicable) No action required. The service is not configured for failover. This is always the case for computer systems that are not SESA Managers. 5 To view the properties of the selected computer, click the Properties button at the top of the Failover Monitor dialog box. 6 Click Close. Managing configuration groups Configuration groups let you set up special cases for the distribution of configurations. For example, you may create organizational units that are based on your departments. You use these organizational units to distribute configurations of security products that are common to each department. However, some of your infrastructure, such as Web or mail servers may span these organizational groups. To distribute configurations to these computers, you can associate the configurations and computers in a configuration group. See “Configuration groups” on page 25. When you select a configuration group, the Selection menu and toolbar provide options for the following: ■ Creating a configuration group ■ Editing configuration group properties Defining the administrative structure of SESA Managing configuration groups ■ Distributing a configuration by way of a configuration group ■ Modifying configuration group permissions ■ Deleting a configuration group ■ Refreshing the configuration group list See “Refreshing the Symantec management console” on page 47. Creating a configuration group You create a configuration group to distribute security product configurations when your computers need different configurations than the ones that are distributed through an organizational unit. To create a configuration group 1 In the Symantec management console, on the System view tab, in the left pane, click Configuration Groups. 2 On the Selection menu, click New. 3 In the first panel of the Create a new Configuration Group Wizard, click Next. 4 In the General panel, do the following: ■ In the Configuration Group name text box, type the Configuration Group Name. ■ In the Description text box, type a description. The description is optional. 5 Click Next. 6 In the Computers panel, do one of the following: ■ To add computers now, click Add. When you are finished, click Next. Click Next. You can add computers later by editing the configuration group’s properties. See “Editing configuration group properties” on page 140. ■ 7 In the Configurations panel, do one of the following: ■ To add configurations now, click Add. When you are finished, click Next. Click Next. You can add configurations later by editing the configuration group’s properties. See “Editing configuration group properties” on page 140. ■ 139 140 Defining the administrative structure of SESA Managing configuration groups 8 9 In the Configuration Group Summary panel, review the information that you have specified. Then do one of the following: ■ To make changes, click Back. ■ To create the configuration group, click Finish. The Task/Status list at the bottom of the panel scrolls up to show the configuration group properties that are being created. A green check mark indicates success. When the configuration group is created, the Cancel button changes to a Close button. Click Close. The new configuration group is added to the list of configuration groups in the right pane. Editing configuration group properties You can edit an existing configuration group to change the configurations and computers that are associated with it. Edit configuration group properties Edit a configuration group to: ■ Add or remove computers ■ Add or remove configurations To add or remove computers 1 In the Symantec management console, on the System view tab, in the left pane, click Configuration Groups. 2 Select the configuration group that you want to edit. 3 On the Selection menu, click Properties. Defining the administrative structure of SESA Managing configuration groups 4 In the Configuration Group Properties dialog box, on the Computers tab, to add a computer, click Add. 5 In the Find Computers dialog box, do one of the following: ■ To proceed without modifying the Available computers list, select one or more computers, and then continue at step 6. The Available computers list shows all computers for the domain, up to the number of computers indicated by the Maximum search count text box. ■ To modify the Available computers list by specifying search criteria, do the following: Look in Identifies the domain. You cannot change this value. Computer name Type a computer name. You can specify a partial computer name that contains one or more asterisks. For example: *dev* All computers with names that contain this string are returned. SESA Managers only Check to limit the search to SESA Managers. 141 142 Defining the administrative structure of SESA Managing configuration groups Maximum search count Type a number to reduce or increase the number of computers that are returned by the search. Start search. Click here to start the search. The Available computers list is revised based on the search criteria. Stop search. Click here to stop the search before it is complete. In the revised Available computers list, select one or more computers. 6 Click Add. The computers are added to the Selected Computers list. 7 Click OK. 8 On the Computers tab, you can also do either of the following: 9 ■ To remove a computer, select it, and then click Remove. ■ To edit a computer’s properties, select it, and then click Properties. See “Editing computer properties” on page 118. Click OK. To add or remove a configuration 1 On the System view tab, in the left pane, click Configuration Groups. 2 Select the configuration group that you want to edit. 3 On the Selection menu, click Properties. Defining the administrative structure of SESA Managing configuration groups 4 In the Configuration Group Properties dialog box, on the Configurations tab, to add a configuration, click Add. 5 In the Find Configurations dialog box, in the Look In drop-down list, select a product/software feature combination. 6 In the Available Configurations list, select the configuration you want to associate with this configuration group. 7 Click Add. The configuration is added to the Selected Configurations list. 8 To select a configuration for another product/software feature combination, repeat steps 5 through 7. 9 When you have completed adding configurations, click OK. The configurations in the Selected Configurations list are added to the organizational unit. If the organizational unit already contains a configuration for the selected software feature, and you now select a different configuration, the newly selected configuration takes precedence. 10 On the Configurations tab, you can also do either of the following: ■ To remove a configuration, select it, and then click Remove. ■ To view a configuration’s properties, select it, and then click Properties. See “Editing a configuration’s settings” on page 165. 11 Click OK. 143 144 Defining the administrative structure of SESA Managing configuration groups Modifying configuration group permissions When you create a role, permissions are assigned for each configuration group with regard to that role. These permissions control whether role members who log on to the Symantec management console can view, modify, or delete the configuration group. You can modify these permissions in two ways: ■ By displaying and editing the roles that contains the permissions. See “Modifying permissions in roles” on page 80. ■ By displaying the Permissions dialog for the Configuration Group container object or an individual configuration group. See “Modifying permissions from the Permissions dialog box” on page 158. Note: To modify permissions, you must be logged on as a member of the Domain Administrator role. Distributing a configuration by way of a configuration group When you distribute configurations by way of a configuration group, they are distributed to all computers that are members of the configuration group. To learn how computers are updated with new configurations, see “Product configuration distribution” on page 26. To distribute a configuration to a configuration group 1 In the Symantec management console, on the System view tab, in the left pane, click Configuration Groups. 2 In the right pane, select the configuration groups through which you want to distribute the configuration. 3 On the Selection menu, click Distribute. 4 When you are prompted to distribute the configuration, select one of the following. ■ Yes: Distribute the configuration. A message is sent to the computers that are associated with the configuration group, informing them to contact the SESA Manager for a new configuration. ■ No: Do not distribute the configuration. Defining the administrative structure of SESA Managing SESA DataStores Deleting a configuration group When you no longer need a configuration group, you can delete it. This deletes the associations between the computers and configurations that make up the configuration group. It does not delete the computers or configurations as objects in the SESA Directory. To delete a configuration group 1 In the Symantec management console, on the System view tab, in the left pane, click Configuration Group. 2 In the right pane, select the configuration group that you want to delete. 3 On the Selection menu, click Delete. 4 When you are prompted to delete the configuration group, select one of the following. ■ Yes: Delete the configuration group from the SESA Directory. The configuration group is removed from the list in the right pane. ■ No: Do not delete the configuration group. Managing SESA DataStores The DataStores node provides access to the SESA DataStores that are available to this domain. Each SESA DataStore stores event data that is generated by SESA and SESAenabled products, and the alerts that are generated by the alert configurations that you create. See “SESA DataStore” on page 18. Depending on the quantity of security events and how fast they are logged to the SESA DataStore, more than one SESA DataStore may be necessary for a SESA installation. You use the SESA installer to create additional SESA Directories. See the section on installing the SESA DataStore in the Symantec Enterprise Security Architecture Implementation Guide. 145 146 Defining the administrative structure of SESA Managing SESA DataStores When there are multiple SESA DataStores, you can redirect the logging of events by selecting a different primary SESA DataStore. See “Identifying the primary SESA DataStore” on page 204. Note: If you plan to access a SESA DataStore that is installed on a Windows system from a SESA Manager that is installed on a Solaris system, you must install the IBM DB2 Runtime Client 7.2 (with FixPack 5) on the Solaris system before installing the SESA Manager. When you select the DataStores node, the Selection menu and toolbar provide options for the following: ■ Editing SESA DataStore properties ■ Modifying SESA DataStore permissions ■ Refreshing the SESA DataStores list See “Refreshing the Symantec management console” on page 47. Editing SESA DataStore properties When the DataStores node is selected in the left pane, the right pane lists the SESA DataStores that are available in the domain. You can view and edit the properties of these SESA DataStores. Edit SESA DataStore properties You must first decide whether it is appropriate to make changes to the SESA DataStore. If it is, you can edit the properties of the selected SESA DataStore. To decide whether to edit the properties of a SESA DataStore ◆ Contact the administrator of the SESA Manager to determine whether changes have been made to the SESA DataStore. See the section on maintaining the SESA DataStore in the Symantec Enterprise Security Architecture Implementation Guide. For example, you must edit the SESA DataStore properties: ■ When the SESA DataStore user name or password are changed. ■ If the Uniform Resource Identifier (URI) is changed to support a multiple SESA DataStore environment or if the SESA DataStore is using a different database driver. Defining the administrative structure of SESA Managing SESA DataStores ■ If the alert correlation service computer is changed, or if you want to turn off alert correlation for the SESA DataStore. The alert correlation service computer is the SESA Manager that identifies the events that become alerts. To edit SESA DataStore properties 1 In the Symantec management console, on the System view tab, in the left pane, click DataStores. 2 On the Selection menu, click Properties. 3 In the SESA DataStore dialog box, on the Connection tab, edit the text boxes as necessary. For a description of the text boxes, click Help. 4 Click OK. Modifying SESA DataStore permissions When you create a role, permissions are assigned for each SESA DataStore with regard to that role. These permissions control whether role members who log on to the Symantec management console can view, modify, or delete the SESA DataStore. 147 148 Defining the administrative structure of SESA Managing SESA Directories You can modify these permissions in two ways: ■ By displaying and editing the roles that contains the permissions. See “Modifying permissions in roles” on page 80. ■ By displaying the Permissions dialog for the DataStore container object or an individual SESA DataStore. See “Modifying permissions from the Permissions dialog box” on page 158. Note: To modify permissions, you must be logged on as a member of the Domain Administrator role. Managing SESA Directories The Directories node provides access to the SESA Directories that are available to this domain. Each SESA Directory uses the Lightweight Directory Access Protocol (LDAP) to store the configuration data that is required to manage SESA-enabled products and SESA services for a specific SESA Manager. See “SESA Directory” on page 16. When you select the Directories node, the Selection menu and toolbar provide options for the following: ■ Adding a SESA Directory ■ Editing SESA Directory properties ■ Modifying SESA Directory permissions ■ Deleting a SESA Directory ■ Refreshing the SESA Directories list See “Refreshing the Symantec management console” on page 47. Adding a SESA Directory When you select the Directories node in the left pane, the right pane lists the SESA Directories that are currently in use for the domain. If you install a new SESA Directory in the domain, it is automatically added to the list. You can also add SESA Directories to the list using the Symantec management console. Defining the administrative structure of SESA Managing SESA Directories For example, in a SESA environment that consists of a single domain, you must install a second read-only replica SESA Directory before you configure SESA Manager to SESA Directory failover. If you add a second domain, you make this same replica SESA Directory accessible for failover for the sub-domain by adding an association to it to the Directories node of the sub-domain. See “Configuring SESA Manager to SESA Directory failover” on page 201. Add SESA Directories You can add to the list of available SESA Directories in two ways: ■ You can associate SESA Directories from other domains with the selected domain. ■ You can create additional instances of a SESA Directory in the current domain. To associate a SESA Directory from another domain with the selected domain 1 In the Symantec management console, on the System view tab, in the left pane, click Directories. 2 On the Selection menu, click New. 3 In the Find SESA Directories dialog box, use the Look in list to select the domain in which to look for a SESA Directory. 149 150 Defining the administrative structure of SESA Managing SESA Directories 4 In the Available Directories list, select a SESA Directory. 5 If you are adding the SESA Directory for failover, the SESA Directory you select should be a read-only replica. To determine whether a SESA Directory is a read-only replica or a read-write master, do the following. ■ Click Properties. ■ In the Directory properties dialog box, on the Connection tab, note the Directory type. ■ Click OK. 6 Click OK. 7 In the dialog box that appears, type a name for the SESA Directory. 8 Click OK. The SESA Directory that you specified appears in the list of SESA Directories in the right pane. To create an additional instance of a SESA Directory in the current domain 1 On the System view tab, in the left pane, click Directories. 2 On the Selection menu, click New. 3 In the Available Directories list, select a SESA Directory in this domain to use as the basis for the new instance. 4 Click OK. 5 In the dialog box that appears, type a name for the new instance of the SESA Directory. 6 Click OK. The SESA Directory that you specified appears in the list of SESA Directories in the right pane. You can edit the properties of the new instance of the SESA Directory to change connection information. Editing SESA Directory properties When the Directories node is selected in the left pane, the right pane lists the SESA Directories that are available in the domain. You can view and edit the properties of the SESA Directories. Edit SESA Directory properties You must first decide whether it is appropriate to make changes to the SESA Directory. If it is, you can edit the properties of the selected SESA Directory. Defining the administrative structure of SESA Managing SESA Directories To decide whether to edit the properties of a SESA Directory ◆ Contact the SESA Manager administrator to determine whether changes have been made to the SESA Directory. See the section on maintaining the SESA Directory in the Symantec Enterprise Security Architecture Implementation Guide. For example, you must edit SESA Directory properties when: ■ The URI for the SESA Directory has changed. ■ The SESA Directory type has changed. To edit SESA Directory properties 1 In the Symantec management console, on the System view tab, in the left pane, click Directories. 2 On the Selection menu, click Properties. 3 In the Directory dialog box, on the Connection tab, in the URI text box, edit the URI if necessary. Warning: If you change the Directory URI, you must also separately reconfigure the SESA Directory so that the Directory SSL settings point to a new certificate that matches the specified URI. If you do not, the SESA Manager and SESA Directory are unable to communicate. 151 152 Defining the administrative structure of SESA Managing SESA Directories 4 Use the Directory Type drop-down list to specify whether the SESA Directory is a read-only replica or a read-write master. You must be a member of the Domain Administrator role to change the Directory type. 5 Click OK. Modifying SESA Directory permissions When you create a role, permissions are assigned for each SESA Directory with regard to that role. These permissions control whether role members who log on to the Symantec management console can view, modify, or delete the SESA Directory. You can modify these permissions in two ways: ■ By displaying and editing the roles that contains the permissions. See “Modifying permissions in roles” on page 80. ■ By displaying the Permissions dialog for the Directory container object or an individual SESA Directory. See “Modifying permissions from the Permissions dialog box” on page 158. Note: To modify permissions, you must be logged on as a member of the Domain Administrator role. Deleting a SESA Directory If a SESA Directory is no longer being used in the domain, you can delete it. This does not uninstall the SESA Directory; it simply removes it from the list of SESA Directories that are available for use in this domain. Warning: If you delete a SESA Directory that is being used a SESA Manager or installed product, the SESA Manager or product may no longer be able to function. To delete a SESA Directory 1 In the Symantec management console, on the System view tab, in the left pane, click Directories. 2 In the right pane, select the SESA Directory that you want to delete from the list of available SESA Directories. 3 On the Selection menu, click Delete. Defining the administrative structure of SESA Managing notification services 4 A message warns you that removing the SESA Directories is permanent. Select one of the following. ■ Yes: Delete the SESA Directory. The SESA Directory is removed from the list in the right pane. ■ No: Do not delete the SESA Directory. Managing notification services Notification services are the paging companies that you can use to notify responsible personnel when an alert occurs. These services are identified to the SESA Manager by the name of the notification server and its Uniform Resource Identifier (URI). A default set of notification services are added when the SESA Manager is installed, as shown in Figure 3-2. Figure 3-2 Notification Services When you select the Notification Services node, the Selection menu and toolbar provide options for the following tasks: ■ Adding a notification service ■ Modifying notification service permissions 153 154 Defining the administrative structure of SESA Managing notification services ■ Refreshing the notification services list See “Refreshing the Symantec management console” on page 47. When you select one of the listed notification services in the right pane, the Selection menu and toolbar provide the following additional options: ■ Editing notification service properties ■ Deleting a notification service Adding a notification service If you want to use a notification service that is not in the default list, you can add it using the Create a new Notification Service Wizard. To add a notification service 1 In the Symantec management console, on the System view tab, in the left pane, click Notification Services. 2 On the Selection menu, click New. 3 In the first panel of the Create a new Notification Service Wizard, click Next. 4 In the Notification Services panel, in the Service Name text box, type the name for the notification service. 5 In the URI text box, type the URI for the notification server. This value is a combination of the Simple Network Paging Protocol (SNPP) address of the server and the port on which it listens. 6 In the Description text box, type a description. This text box is optional. 7 Click Next. 8 In the Notification Service Summary panel, review the information that you have specified. Then do one of the following: 9 ■ To make changes, click Back. ■ To create the notification service, click Finish. The Task/Status list at the bottom of the panel scrolls up to show the notification service properties that are being created. A green check mark indicates success. When the notification service is created, the Cancel button changes to a Close button. Click Close. Defining the administrative structure of SESA Managing notification services Editing notification service properties You can change the URI or description of an existing notification service. You cannot change the service name. To edit an existing notification service 1 In the Symantec management console, on the System view tab, in the left pane, click Notification Services. 2 In the right pane, select the notification service that you want to edit. 3 On the Selection menu, click Properties. 4 In the Notification Service Properties dialog box, modify the URI and/or description. 5 Click OK. Modifying notification service permissions When you create a role, permissions are assigned for each notification service with regard to that role. These permissions control whether role members who log on to the Symantec management console can view, modify, or delete the notification service. You can modify these permissions in two ways: ■ By displaying and editing the roles that contains the permissions. See “Modifying permissions in roles” on page 80. ■ By displaying the Permissions dialog for the Notification Services container object or an individual notification service. See “Modifying permissions from the Permissions dialog box” on page 158. Note: To modify permissions, you must be logged on as a member of the Domain Administrator role. Deleting a notification service You can delete notification services that are not being used by any of your users. To delete a notification service 1 In the Symantec management console, on the System view tab, in the left pane, click Notification Services. 2 In the right pane, select one or more notification services. 155 156 Defining the administrative structure of SESA Working with permissions 3 Click Delete. 4 When asked if you are sure that you want to delete the notification services, select one of the following: ■ Yes: Delete the notification services. The notification services are removed from the list in the right pane. ■ No: Do not delete the notification services. Working with permissions Permissions define the access that members of a role have to specific SESA objects. Along with other role properties, permissions control what users can see and do when they log on to the Symantec management console. As with roles, you can only work with permissions if you are a member of the Domain Administrator role. The permissions of objects are defined initially when you create roles, and when you create new objects. You can then modify the permissions to fine tune your roles. Warning: Modifying permissions is an advanced feature. You should only customize permissions if you have a clear understanding of how access control works in the SESA Directory. About permissions Permissions are always associated with roles and applied when a member of a role logs on to the Symantec management console. Table 3-3 shows the permissions that role members can have to view and work with SESA objects. Table 3-3 Object permissions Permission Description Read Lets role members see the attributes of objects. Write Lets role members modify objects. Add Lets role members create a new child object within the selected container. Add is reserved for top level container objects, except for organizational units, which can be created hierarchically. Delete Lets role members delete objects. Defining the administrative structure of SESA Working with permissions Permission Description Search Lets role members search the SESA Directory or SESA DataStore for objects. Search must be enabled for the other access permissions to work. Objects that have permissions are: ■ Container objects Container objects are created when the SESA Directory and SESA DataStore are installed. These objects contain all of the new objects that you create. In the Symantec management console, container objects appear in the left pane of each tab. Examples of container objects are Users and Configuration Groups, alert and event report folders, and software features of installed products. ■ Objects that you create within container objects When you create new objects to represent your security environment, they are stored in the SESA Directory and SESA DataStore within the container objects. On the System view tab, the objects that you create appear in the right pane when you select their container object in the left pane. For example, selecting Users displays the individual users that you have created within the Users container. These created objects are sometimes known as child or leaf objects. Figure 3-3 shows container objects and created objects in the Symantec management console. Figure 3-3 Container objects Created objects Objects in the Symantec management console 157 158 Defining the administrative structure of SESA Working with permissions Propagation of permissions As you create new management objects, it is important to understand the relationship between the permissions of container objects and the permissions of the objects you create within these containers. In most cases, the permissions of a container object propagate to all new objects that you create within the container. This means that on a role by role basis, when you create new objects the current permissions of the container object are propagated to the new objects. For example, in Role A, on the Users tab, you disable Write permission for the Users container. In Role B, you disable Delete permission for the Users container. When you create new users, members of Role A do not have Write permission, so they cannot modify the properties of the new users. Members of Role B do not have Delete permission, so they cannot delete the new users. Propagation occurs only when you create new objects. For example, you may have already created several users before you disabled the Write permission in Role A and the Delete permission in Role B. These permissions are not disabled for the original users unless you set them explicitly. Modifying permissions from the Permissions dialog box You can modify permissions in two ways: ■ By editing the role using the Role Properties dialog box. Use this method to modify permissions for several objects within one role. See “Modifying permissions in roles” on page 80. You cannot edit the permissions of software products and their configurations through the Role Properties dialog box. ■ By displaying the Permissions dialog box for the object. Use this method to modify the permissions for a specific object within several roles. To modify permissions from the Permissions dialog box 1 Do one of the following: ■ To display the Permissions dialog for a container object, in the Symantec management console, on the System view tab, in the left pane, click the container. For example, click Users. If an object is selected in the right pane (indicated by a highlight on that object), you must deselect it. Click CTRL and then click the highlighted object in the right pane. Defining the administrative structure of SESA Working with permissions ■ 2 To display the Permissions dialog for a created object, on the System view tab, in the left pane, click the container object that contains the created object. For example, to access a user, click Users. In the right pane, select the object whose permissions you want to modify. For example, select a specific user. On the Selection menu, click Permissions. The Permissions dialog box shows the name of the object for which you are changing permissions and roles that contain permissions for that object. Roles are listed if you created them after you created the object. Roles are not listed if you created them before you created the object. 159 160 Defining the administrative structure of SESA Working with permissions 3 4 You can do any of the following: ■ To modify permissions for this object within the listed roles, enable or disable the permissions. You should not disable the Search permission. ■ To add a role, so that you can modify its permissions, click Add. In the Find Roles dialog box, in the Available roles list, select the roles for which you want to modify permissions. Click Add. The selected roles are moved to the Selected roles list. Click OK. You are returned to the Permissions dialog box, with the selected roles listed. ■ To remove a role, select it, and then click Remove. ■ To edit a role’s properties, select it, and then click Properties. Click OK. Chapter 4 Configuring products This chapter includes the following topics: ■ Working with configurations ■ Viewing product configurations ■ Creating new configurations ■ Editing a configuration’s settings ■ Editing a configuration’s associations ■ Distributing configurations ■ Modifying the permissions of configurations ■ Deleting configurations Working with configurations Configurations control the behavior of the software features of your security products. When a software product is installed, its default configurations are used. When you want to change the behavior of a software feature, you can edit its configuration and distribute it to computers in a variety of ways. See “Product configuration distribution” on page 26. The Configurations view tab contains the SESA configurations, and configurations for your SESA-enabled security products. The Configurations view tab provides options for the following: ■ Viewing product configurations ■ Creating new configurations 162 Configuring products Viewing product configurations ■ Editing a configuration’s settings ■ Editing a configuration’s associations ■ Distributing configurations ■ Modifying the permissions of configurations ■ Deleting configurations Viewing product configurations Each SESA-enabled product that you have installed is represented by a folder in the left pane of the Symantec management console. Individual product folders contain the product’s software feature folders. Product software feature folders contain the configurations that are associated with each subcomponent of the product. Software features represent configurable components of a particular product. Each configurable software feature of the security products that are installed on a computer has a configuration called Default. This configuration is always present and cannot be deleted. The default configuration is used when the product is first installed and it continues to be used if you do not designate that another configuration should be used for that computer. See “Creating new configurations” on page 163. You can then make changes to the new configuration by editing its properties. Configuring products Creating new configurations Figure 4-1 shows the Solaris configuration of the Manager Components Configuration software feature of the SESA product. Figure 4-1 Viewing a product software feature configuration Product Software feature Configuration Configuration settings To view product configurations 1 In the Symantec management console, on the Configurations view tab, in the left pane, expand a product folder to display its software features. 2 Expand a software feature folder to view the available product configurations. 3 In the left pane, select a configuration. The data that appears in the right pane reflects what you have selected in the left pane. Creating new configurations Each configurable software feature of the security products that are installed on a computer has a configuration called Default. This configuration is always present and cannot be deleted. The default configuration is used when the product is first installed and it continues to be used if you do not specifically designate that another configuration should be used for that computer. 163 164 Configuring products Creating new configurations To change the behavior of a software feature, you can create a new configuration, using the default configuration or another configuration as a template. You can change the new configuration by editing it, without changing the configuration on which it is based. As you create the configuration, you can assign computers, configuration groups, and organizational units to be used as distribution points for the configuration. Alternatively, you can add these later by editing the configuration. See “Editing a configuration’s settings” on page 165. To create a new configuration 1 In the Symantec management console, on the Configurations view tab, in the left pane, expand a product folder. 2 Select the software feature for which you want to create the configuration. 3 On the Selection menu, click New. 4 In the Create a new Configuration Wizard, click Next. 5 In the General panel, type the Configuration name and Description. The Description text box is optional. 6 If you want to base the new configuration on an existing configuration, in the Choose a configuration to copy from drop-down list, select a base configuration. 7 Click Next. 8 In the Computers panel, do one of the following: ■ To add computers now, click Add, and then click Next. To add computers later, click Next, and then edit the configuration’s properties at another time. See “Associating computers with configurations” on page 167. ■ 9 In the Configuration Groups panel, do one of the following: ■ To add configuration groups now, click Add, and then click Next. To add configuration groups later, click Next, and then edit the configuration’s properties at another time. See “Associating configuration groups with configurations” on page 169. ■ 10 In the Organizational Units panel, do one of the following: ■ To add organizational units now, click Add, and then click Next. To add organizational units later, click Next, and then edit the configuration’s properties at another time. See “Associating organizational units with configurations” on page 171. ■ Configuring products Editing a configuration’s settings 11 In the Configuration properties panel, click Next. The Configuration properties panel lists the tabs that contain the configuration’s settings and describes how you can use them when you edit the configuration. See “Editing a configuration’s settings” on page 165. You cannot change the settings when you create the configuration. 12 In the Configuration summary panel, review the information that you have specified, and then do one of the following: ■ To make changes, click Back. ■ To create the configuration, click Finish. The Task/Status list at the bottom of the panel shows the configuration properties that are being created. A green check mark indicates success. When the configuration is created, the Cancel button changes to a Close button. 13 Click Close. In the left pane, the new configuration is added to the list of configurations for the software feature. If the new configuration does not appear in the left pane, select the product or domain and click Refresh. You can edit the parameters of the configuration. Optionally, you can distribute the configurations to the organizational units, configuration groups, or computers that you associate with the configuration. Editing a configuration’s settings For any software feature, you can create multiple configurations. You can edit the software settings of these configurations to fine tune the implementation of a security product. The details for editing the configurations of the software features of third-party or integrating products are provided in the documentation for those products. 165 166 Configuring products Editing a configuration’s settings The details for editing SESA 2.0 configurations are described in “Configuring SESA 2.0” on page 177. Note: If your environment has multiple SESA Managers, you can install a software product on a single SESA Manager. Then, if you want to be able to edit the product’s configurations when you are connected to a second SESA Manager, deploy the SESA Manager extensions of the product to the second SESA Manager. See “Deploying and removing SESA Manager extensions” on page 106. To edit a configuration’s settings 1 In the Symantec management console, on the Configurations view tab, in the left pane, expand a product folder. 2 Expand the folder of the software feature that you want to edit. 3 Select the configuration that you want to edit. 4 In the right pane, on the General tab, edit the description. You cannot edit the configuration name or the date in the Last Modified On box. If the configuration that you are editing is the default configuration, you cannot edit anything on the General tab. 5 On the other tabs, view or edit property values. For information on the property values, click Help. When you make changes, the icon beside the configuration turns red to warn you that the configuration has been changed and has not been saved. 6 When you finish editing the configuration, select one of the following: ■ Apply: Save your changes and continue editing. Reset: Cancel all of the changes that you have made on all of the tabs and reset the values to the last saved values. After you apply changes, users of the configuration automatically receive the changes when the Config poll time is reached. See “Setting the configuration poll time” on page 216. If you want computers to receive a new configuration immediately, you can distribute it. See “Distributing configurations” on page 172. ■ Configuring products Editing a configuration’s associations Editing a configuration’s associations The management objects that are associated with the configurations that you create control how SESA distributes the configurations. You associate a configuration with individual computers, configuration groups, or organizational units that use it. You can then distribute the configuration immediately or at a later time. When you specify more than one association for a configuration, SESA implements a distribution order. For an explanation of the order in which distribution is performed, see “Product configuration distribution” on page 26. You can make these associations when you create the configuration, or later by editing the configuration. If a computer is not associated with a configuration, either directly or through membership in an organizational unit or configuration group that is associated with the configuration, the computer receives the default configuration for the software feature. You can specify how a configuration is distributed by doing one or more of the following: ■ Associating computers with configurations ■ Associating configuration groups with configurations ■ Associating organizational units with configurations Associating computers with configurations You can associate computers with a configuration when you want the products that are running on the computers to use the new or updated configuration. If the configurations are already associated with a computer, no action is required. To associate computers with a configuration 1 In the Symantec management console, on the Configurations view tab, in the left pane, expand a product folder, and then a software feature. 2 Select the configuration to which you want to associate computers. 3 On the Selection menu, click Properties. 167 168 Configuring products Editing a configuration’s associations 4 In the Configuration Properties dialog box, on the Computers tab, click Add. 5 In the Find Computers dialog box, do one of the following: ■ To proceed without modifying the Available computers list, select one or more computers, and then continue at step 6. The Available computers list shows all computers for the domain, up to the number of computers indicated by the Maximum search count text box. ■ To modify the Available computers list by specifying search criteria, do the following: Look in Identifies the domain. You cannot change this value. Computer name Type a computer name. You can specify a partial computer name that contains one or more asterisks. For example: *dev* All computers with names that contain this string are returned. SESA Managers only Check to limit the search to SESA Managers. Maximum search count Type a number to reduce or increase the number of computers that are returned by the search. Configuring products Editing a configuration’s associations Start search. Click here to start the search. The Available computers list is revised based on the search criteria. Stop search. Click here to stop the search before it is complete. In the revised Available computers list, select one or more computers. 6 Click Add. The computers are added to the Selected computers list. 7 Click OK. 8 On the Computers tab, you can also do either of the following: 9 ■ To remove a computer, select it, and then click Remove. ■ To edit the properties of a computer, select it, and then click Properties. See “Editing computer properties” on page 118. Select one of the following: ■ OK: Save your changes and close the Configuration Properties dialog box. ■ Apply: Save your changes and leave the dialog box open for further editing. Associating configuration groups with configurations You can associate a configuration group with a configuration when you want the products that are running on the computers in the configuration group to use a new or updated configuration. To associate a configuration group with a configuration 1 In the Symantec management console, on the Configurations view tab, in the left pane, expand a product folder, and then a software feature. 2 Select the configuration with which you want to associate the configuration group. 3 On the Selection menu, click Properties. 169 170 Configuring products Editing a configuration’s associations 4 In the Configuration Properties dialog box, on the Configuration Groups tab, click Add. 5 In the Find Configuration Groups dialog box, in the Available Configuration Groups list, select one or more configuration groups. 6 Click Add. The configuration groups are added to the Selected Configuration Groups list. 7 Click OK. 8 On the Configuration Groups tab, you can also do any of the following: 9 ■ To remove a configuration group, select it, and then click Remove. ■ To edit the properties of a configuration group, select it, and then click Properties. See “Editing configuration group properties” on page 140. Select one of the following: ■ OK: Save your changes and close the Configuration Properties dialog box. ■ Apply: Save your changes and leave the dialog box open for further editing. Configuring products Editing a configuration’s associations Associating organizational units with configurations You can associate an organizational unit with a configuration when you want the products that are running on the computers in the organizational unit to use a new or updated configuration. To associate an organizational unit with a configuration 1 In the Symantec management console, on the Configurations view tab, in the left pane, expand a product folder, and then a software feature. 2 Select the configuration with which you want to associate organizational units. 3 On the Selection menu, click Properties. 4 In the Configuration Properties dialog box, on the Organizational Units tab, click Add. In the Find Organizational Units dialog box, the Look in list shows the domain in which you are working. It cannot be changed. 5 In the Find Organizational Units dialog box, in the Available organizational units list, select one or more organizational units. 6 Click Add. The organizational units are added to the Selected Organizational Units list. 7 Click OK. 171 172 Configuring products Distributing configurations 8 9 On the Organizational Units tab, you can also do either of the following: ■ To remove an organizational unit, select it, and then click Remove. ■ To edit the properties of an organizational unit, select it, and then click Properties. See “Editing organizational unit properties” on page 102. Select one of the following: ■ OK: Save your changes and close the Configuration Properties dialog box. ■ Apply: Save your changes and leave the dialog box open for further editing. Distributing configurations After you modify a configuration, you can inform all of the computers that are associated with the configuration that a new configuration is available. Note: The Distribute option lets you override the standard behavior of SESA. “Product configuration distribution” on page 26 describes what happens when you use the Distribute option. If you do not use Distribute, computers automatically request new configurations when the Config poll time is reached. See “Setting the configuration poll time” on page 216. The timing of configuration distribution varies depending on the amount of traffic on the SESA Manager. Before you distribute a configuration, you should associate it with one or more computers. The configuration can be either directly associated with a computer, or indirectly associated by way of organizational units or configuration groups. Except for the Default configurations, distributing a configuration that is not associated with at least one computer (directly or by an association with an organizational unit or a configuration group) has no effect. See “Editing a configuration’s associations” on page 167. To distribute a configuration 1 In the Symantec management console, on the Configurations view tab, in the left pane, expand a product folder until you can select the configuration that you want to distribute. 2 On the Selection menu, click Distribute. Configuring products Modifying the permissions of configurations 3 When you are prompted to distribute the configuration, select one of the following. ■ Yes: Distribute the configuration. A message is sent to the computers that are associated with the configuration, informing them to contact the SESA Manager for a new configuration. ■ No: Do not distribute the configuration. Modifying the permissions of configurations When you create a role, permissions are assigned for each configuration with regard to that role. These permissions control whether role members who log on to the Symantec management console can view, modify, or delete the configuration. To modify the permissions for a configuration, display the Permissions dialog for the configuration, as described in “Modifying permissions from the Permissions dialog box” on page 158. While you can modify the permissions for most SESA objects from the Role Properties dialog box, you cannot use this method to modify permissions for configurations. To modify permissions for configurations, you must be logged on as a member of the Domain Administrator role. To modify permissions The ability to set permissions on specific configurations means that you can very strictly control access to the configurations. This section provides a hypothetical example of how you can modify permissions. You have both Microsoft Windows and Sun Solaris systems and want to be able to distribute configurations that are specific to each kind of system. You have two users, each of which has expertise in one of these operating systems. You want each user to have the sole ability to manage the configuration for the operating system with which he or she is familiar. 173 174 Configuring products Modifying the permissions of configurations Complete the following procedures to use permissions to control access to configurations: ■ First, create a Manage Windows Agent Config role and a Manage UNIX Agent Config role with identical characteristics, and assign a user to each role. ■ Then create a Windows Agent configuration and a UNIX Agent configuration, and set the role permissions so that each configuration is only editable by the correct role and user. ■ Finally, test the roles to make sure that they limit access as you intend. To create the roles and assign users 1 In the Symantec management console, on the System view tab, create users JSmith and ABrown. For details on creating users, see “Creating a new user” on page 85. 2 Create two roles, one called Manage Windows Agent Config and the other called Manage UNIX Agent Config. For details on creating roles, see “Creating a role” on page 70. 3 For both roles, in the Create a Role Wizard panels, make the following selections: Product Components panel Product: SESA 2.0 Role members will have access to only the selected product components: Agent Configuration Manage and View Events panel Allow management of policies and configurations for SESA 2.0 (Deselect event viewing.) Console Access Rights panel Role members will have only the selected console access rights: View Configurations Organizational Units panel Role members will have access to all organizational units. 4 When you create the Manage Windows Agent Config role, in the Members dialog box, make JSmith a member of the role. 5 When you create the Manager UNIX Agent Config role, in the Members dialog box, make ABrown a member of the role. Configuring products Modifying the permissions of configurations To create the configurations and assign permissions 1 On the Configurations view tab, under SESA 2.0 > Agent Configurations, create two configurations based on the Default configuration, named Windows Agent Config and UNIX Agent Config. For details on creating configurations, see “Creating new configurations” on page 163. 2 After completing the configurations, select the Windows Agent Config. 3 Exclude the Manage UNIX Agent Config role from editing this configuration as follows: ■ On the Selection menu, click Permissions. ■ In the Permissions dialog box, click Add. ■ In the Find Roles dialog box, select the Manage UNIX Agent Config role, click Add, and then click OK. ■ In the Permissions dialog box, select the Manage UNIX Agent Config role, uncheck the permissions, and then click OK. Members of the Manage UNIX Agent Config role can no longer edit the Windows Agent Config configuration. 4 Select the UNIX Agent Config. 5 Use the process in step 3 to exclude members of the Manage Windows Agent Config role from managing the UNIX Agent Config. 6 Select the Default configuration. 7 Use the process in steps 3 to exclude members of both the Manage Windows Agent Config and Manage UNIX Agent Config roles from seeing or managing the Default configuration. To test the roles 1 Log out of the Symantec management console. 2 Log on as JSmith, the user who is a member of the Manage Windows Agent Config role. 3 On the Configuration tab (the only tab that this user can see), expand SESA 2.0 > Agent Configuration. You should be able to see and edit only the Windows Agent configuration. 4 Log out, and log on as ABrown, a member of the Manage UNIX Agent Config role. 5 On the Configuration tab, expand SESA 2.0 > Agent Configuration. You should be able to see and edit only the UNIX Agent configuration. 175 176 Configuring products Deleting configurations Deleting configurations You can delete configurations when you no longer need them. You cannot delete default configurations. When you delete a configuration, it is removed from any computer, organizational unit, or configuration group with which it has been associated. Any computer that uses the deleted configuration will continue to do so until you distribute another configuration, or until the poll interval is reached and the computer polls the SESA Manager to see if there are new configurations. To delete a configuration 1 In the Symantec management console, on the Configurations view tab, in the left pane, expand the product folder. 2 Expand the software feature folder that contains the configuration that you want to delete, and then select the configuration. 3 On the Selection menu, click Properties. 4 In the Configuration Properties dialog box, on the tabs, you can see any computer, organizational unit, or configuration group with which the configuration is associated. Verify that the configuration is no longer needed. 5 Click Cancel. 6 On the Selection menu, click Delete. 7 When you are prompted to delete the configuration, select one of the following. ■ Yes: Delete the configuration. The configuration is removed from the list of configurations. ■ No: Do not delete the configuration. Chapter 5 Configuring SESA 2.0 This chapter includes the following topics: ■ Introducing the Symantec Enterprise Security Architecture Configurations ■ Manager Configurations ■ Manager Components Configurations ■ Manager Master Heartbeat Configuration ■ Manager Connection Configurations ■ Agent Connection Configurations ■ Agent Configurations ■ Product Installation Service configurations ■ Manager Event Exclusion Configurations Introducing the Symantec Enterprise Security Architecture Configurations Symantec Enterprise Security Architecture (SESA) relies on SESA Agents, a SESA Directory, a SESA DataStore, and a SESA Manager to collect, store, process, and report security events to the Symantec management console, and to distribute configuration changes to SESA and integrated products. See “Components of SESA” on page 15. The SESA software feature configurations let you configure these components. 178 Configuring SESA 2.0 Introducing the Symantec Enterprise Security Architecture Configurations About the SESA v1.1 and SESA 2.0 products SESA v2.0 installs both the SESA 2.0 and SESA v1.1 products. SESA v1.1 supports backwards compatibility with products that were built to integrate with SESA 1.1. The SESA v1.1 node lets you configure SESA so that products that are built with SIPI 1.1 can install. For example, when you want to distribute an integrated product that uses the SIPI 1.1 installation, you may need to modify the SESA v1.1 SESA Manager Configuration to specify the SESA DataStore and SESA Directory to be used. In SESA 2.0, some of the SESA v1.1 software features have been renamed. While there is a correspondence between the software features, as shown in Table 5-1, some properties have been added or changed in SESA 2.0. Table 5-1 Comparison of SESA v1.1 and SESA 2.0 software features Software feature Description SESA Manager Configurations (SESA v1.1) Configuration data is NOT shared between the two SESA versions. Manager Configurations (SESA 2.0) In SESA 2.0, the Directory and DataStore tabs have been moved to the new Manager Connection Configurations to enable the configuration of failover. SESA Manager Components Configurations (SESA v1.1) Configuration data is NOT shared between the two SESA versions. Manager Components Configurations (SESA 2.0) In SESA 2.0, the Heartbeat and LiveUpdate tabs have been added to support new 2.0 functionality. SESA Agent Configurations (SESA v1.1) Configuration data is shared between the two SESA versions. Agent Configurations (SESA 2.0) This means that the Heartbeat tab that was added for SESA 2.0 also appear in the 1.1 SESA Agent Configurations, although heartbeat is not supported for v1.1. In addition, the software features that are shown in Table 5-2 have been added for SESA 2.0 Configuring SESA 2.0 Introducing the Symantec Enterprise Security Architecture Configurations Table 5-2 New SESA 2.0 software features Software Feature Description Manager Master Heartbeat Configuration Lets you select the machine that is used as the Master Heartbeat service computer. There can be only one configuration, which is the Default configuration. Manager Connection Configurations Lets you configure SESA Manager to SESA Directory and SESA Manager to SESA DataStore failover. Agent Connection Configurations Lets you configure SESA Agent to SESA Manager Failover. Product Installation Service Lets you configure the service that is used to install integrated product packages. Manager Event Exclusion Configurations Lets you filter events to exclude some events from being stored in the SESA DataStore. You can see another difference between SESA v1.1 and SESA 2.0 when you view the properties of the software feature configurations for each product. For example, SESA v1.1 and SESA 2.0 manage connection information using different software features. This is reflected in the properties of their software features, as follows: ■ In SESA v1.1, you select the SESA Directory for the domain by using the Directory tab of the SESA Manager Configuration. When you view the properties of the SESA Manager Configuration, the computer that hosts the SESA Directory appears on the Computers tab. ■ In SESA 2.0, you select the primary SESA Directory for the domain by using the SESA Directory tab of the Manager Connection Configuration. When you view the properties of the Manager Connection Configuration, the computer that hosts the primary SESA Directory appears on the Computers tab. Specific topics that describe each software feature call out the differences between SESA v1.1 and SESA 2.0 configurations where applicable. 179 180 Configuring SESA 2.0 Manager Configurations Manager Configurations Table 5-3 lists the tabs on which you can change settings for Manager Configurations. These configurations hold common SESA Manager settings that may affect one or more of the manager components across SESA Managers. These common settings include selecting the SESA Directory and SESA DataStore for the domain, and setting throttle options that control connection attempts to SESA Managers. Table 5-3 Manager Configuration tabs Tab Description General Contains the name, description, and modification date of the configuration. Debug Lets you enable or disable debugging for specific systems, such as the SESA DataStore, HTTP, or the LDAP directory, and set the time stamp interval. Turning on these settings causes SESA to output more verbose debug information to the log files for tracking down potential problems. This information is useful for debugging purposes. You should not change these settings unless you are debugging a problem with the help of Symantec technical support. Throttle Lets you balance security and scalability issues on a SESA Manager by controlling when or how often events are sent to the SESA DataStore. For example, you can set a threshold for all SESA Managers, so that when a SESA Agent tries to contact a SESA Manager too many times in a given time period, the computer is denied access to the SESA Manager for an allotted time. If you make the timeouts shorter, you protect yourself more against hyperactive clients, or denial-of-service attacks (DOS attacks), but if you make the time allotments longer, you may be able to increase the performance of the server and avoid problems with false positives for hyperactive clients. Client Validation Controls how SESA handles the validation of clients. For example, on this tab, you can set how SESA reacts to clients who provide bogus passwords. If SESA attempts to validate a client and fails, the client is blacklisted until the entry times out. This tab lets you set how long those timeouts last. Configuring SESA 2.0 Manager Configurations Tab Description Web Server Provides your Web server settings to the SESA Manager so that SESA components can contact other SESA components that are running on local or remote computers. Since you can modify the Web server settings independently of SESA, you must provide the SESA Manager with your Web server configuration. If you change the port your Web server is listening on, or change the SESA Servlet Prefix for any reason, you must modify this setting so that SESA can locate its services. This is also where you configure SESA to use SSL communication. Other Contains miscellaneous settings that let you fine tune the operation of your SESA Manager. For example, one setting lets you configure how much minimum disk space is required for the SESA Manager before its logging and other functions are suspended. See “Increasing the minimum free disk space requirement in high logging volume situations” on page 181. Directory (SESA v1.1 Lets you select the SESA Directory for the domain. only) DataStore (SESA v1.1 only) Lets you select the SESA DataStore for the domain. Increasing the minimum free disk space requirement in high logging volume situations The Other tab of the Manager Configurations includes the Free Space Minimum Size property. This specifies the amount of free space that is needed for the SESA Manager to function properly. The amount of free space is checked every two minutes and a warning is displayed if the free space is less than the minimum specified. In an environment that generates a high volume of log messages, you should increase the free space minimum size. To increase the free space minimum size 1 In the Symantec management console, on the Configurations view tab, in the left pane, expand SESA 2.0 > Manager Configuration. 2 Select the configuration that you want to edit. 181 182 Configuring SESA 2.0 Manager Components Configurations 3 In the right pane, on the Other tab, for the Free space minimum size property, increase the value to meet the needs of your environment. By default, the free space minimum size is 50 MB. In an environment with a high volume of log messages, you should increase the minimum disk space to at least 100 MB or higher. If the SESA Manager is installed on the operating system drive, you should set the free space minimum to at least 2 GB. 4 Click Apply. Manager Components Configurations Table 5-4 lists the tabs on which you can change settings for the Manager Components Configurations. These configurations contain specific settings for each of the SESA Manager components. They let you configure the specific settings for each component individually, based on the components configuration requirements. These components generally refer to specific services within the SESA Manager, such as the Event Logging subsystem or the Configuration Service. Table 5-4 Manager Components Configurations tabs Tab Description General Contains the name, description, and modification date of the configuration. Alert Contains email and retry settings that are used by the alert servlet. These settings control how alerts are sent from SESA. See “Configuring alert email and retry settings” on page 184. Event Logger Lets you control and tune the settings of the Event Logger. Only modify the settings on this tab when you want to forward alerts to a remote computer that is off-host, or you want to finetune how event data is inserted into the SESA DataStore. See “Configuring event logging” on page 185. Configuration Lets you configure the SESA Configuration Service by specifying how many times a client can request its configuration during a polling interval. If a client exceeds this value, it is flagged as hyperactive, and is not allowed to get its configuration again for a configured interval. Configuring SESA 2.0 Manager Components Configurations Tab Description Heartbeat Lets you adjust settings for the Heartbeat monitor. Command Controls the settings for the command servlet. When you use the Distribute option to initiate the distribution of configurations, the Command Servlet contacts each computer using the configuration and notifies it to reload its configuration. These settings let you configure throttling information for how many SESA Agents to notify in a given period of time. They can be adjusted based on your environment. If you make this setting too high, you run the risk of overloading your SESA Managers. If the throttling is set too low, it could take a long time to push new settings to a large number of computers. Administrative Lets you modify administrative protections such as how long a console session should be idle before timing out, and how often to update when you set the console to auto-refresh. You can lengthen the session idle interval to keep the console from timing out quickly or shorten it to increase security. You can also specify the character set that the console uses to export information. This toggle lets you select US English ANSI exporting or Unicode encoding for most double-byte character sets, such as Japanese. For v2.0 SESA Managers only, you can modify the following: Event Forwarding ■ The values that control the number of events that are downloaded when a user displays a table-formatted report See “Modifying administrative settings” on page 186. ■ The blacklist settings that control how SESA handles repeated failed attempts to log on the Symantec management console See “Setting up blacklisting for logon failures” on page 188. Lets you specify servlets to which events are forwarded. This is useful for rolling up events to a master SESA DataStore location through another SESA Manager. You can log the event to the local SESA DataStore that the SESA Manager is using, and then forward the events to a master or chained SESA DataStore for event correlation or collection. See “Forwarding events to other event relays” on page 189. 183 184 Configuring SESA 2.0 Manager Components Configurations Tab Description Alert Forwarding Lets you specify servlets to which alerts are forwarded. This is useful for consolidating all alert information in a central location for common reports or a common alerting strategy. See “Forwarding alerts to other alert mechanisms” on page 192. SNMP Contains the settings that control how alert notifications are sent to an SNMP server. You can specify the host, port, and community of the SNMP server to which alerts are forwarded, as well as the version of SNMP traps to send to that server. See “Configuring SNMP alert responses” on page 193. LiveUpdate Lets you schedule a one-time update for the SESA Manager, as well as several retry and delay settings that are related to updating the SESA Manager using LiveUpdate. See “Scheduling SESA Manager LiveUpdate” on page 194. Configuring alert email and retry settings The Alert tab contains email and retry settings that are used by the alert servlet. These settings control how alerts are sent from SESA. It is important to specify the email server before you add users to alert configurations. If you do not, you will receive error messages. To configure alert email and retry settings 1 In the Symantec management console, on the Configurations view tab, in the left pane, expand SESA 2.0 > Manager Components Configuration. 2 Select the configuration that you want to edit. Configuring SESA 2.0 Manager Components Configurations 3 In the right pane, on the Alert tab, next to Email from user, specify the user email address to appear in the From box for all alert response emails. 4 To specify a display name in addition to the email address, use the following syntax: Display Name<[email protected]> 5 Edit the other property values as needed. For descriptions of the property values, click Help. 6 Click Apply. Configuring event logging To fine-tune how event data is inserted into the SESA DataStore, configure the properties on the Event Logger tab. This tab also lets you specify the alert logger to which the event logger sends events. The event logger processes the event and forwards it to the alert logger. The alert logger uses the event to generate an alert if an alert configuration exists for that event. To configure event logging 1 In the Symantec management console, on the Configurations view tab, in the left pane, expand SESA 2.0 > Manager Components Configuration. 2 Select the configuration that you want to edit. 185 186 Configuring SESA 2.0 Manager Components Configurations 3 To specify the alert logger to which events will be forwarded, in the right pane, on the Event logger tab, beside Alert URL, type the URL of the alert logger. 4 To optimize the process of inserting events, next to Insert pool, type a number that is equal to the number of CPUs on the SESA Manager machine. This value represents the number of background threads. 5 Edit the other property values as needed. For descriptions of the property values, click Help. 6 Click Apply. Modifying administrative settings You can control the following behaviors of the Symantec management console by changing administrative settings: ■ How long a console session is idle before timing out ■ How often the Symantec management console is updated when you use auto-refresh ■ The character set that is used when you export reports ■ The number of event records that is initially downloaded for a report ■ How SESA responds to repeated failed logon attempts. See “Setting up blacklisting for logon failures” on page 188. Configuring SESA 2.0 Manager Components Configurations To modify administrative settings 1 In the Symantec management console, on the Configurations view tab, in the left pane, expand SESA 2.0 > Manager Components Configurations. 2 Select the configuration that you want to edit. 3 In the right pane, on the Administrative tab, next to Session idle interval, do one of the following: ■ To increase the time before the Symantec management console times out, type a higher value. Increase the value if you do not want the Symantec management console session to time out so quickly. ■ To decrease the time before the Symantec management console times out, type a higher value. Lower the value to increase security. 4 Next to Auto refresh update interval, type the value to control the frequency with which the Symantec management console display is refreshed. 5 If the SESA DataStore contains double-byte characters for languages such as Japanese, next to Export character set selector, check the check box. This configures the SESA Manager to export data in Unicode encoding, which lets you export reports with double-byte characters to HTML or CSV formats. See “Exporting reports” on page 269. 187 188 Configuring SESA 2.0 Manager Components Configurations 6 If the configuration that you are modifying is for a v2.0 SESA Manager, to set the number of event records that is initially downloaded for a report, change the value of the Number of report rows to load into console property. This option is not available for v1.1 SESA Manager configurations. 7 Click Apply. Setting up blacklisting for logon failures When there are repeated failed attempts to log on to the Symantec management console, it may indicate an attempt to break in to the system. SESA blacklists computers from which repeated failed logon attempts are made. The Administrative tab lets you control how SESA responds to logon failures. To set up blacklisting for logon failures 1 In the Symantec management console, on the Configurations view tab, in the left pane, expand SESA 2.0 > Manager Components Configurations. 2 Select the configuration that you want to edit. 3 On the Administrative tab, to control how SESA handles blacklisting for logon failures, do the following: Blacklist Adjust the window of time during which failed logon attempts are threshold time accumulated. When the accumulated count is larger than the blacklist threshold count, the IP address from which the log ons are being attempted is added to the blacklist. Blacklist Specify the number of failed login attempts within the blacklist threshold count threshold time that causes an IP address to be placed on the blacklist. Blacklist entry Specify the length of time that the IP address will remain on the duration blacklist before it is automatically removed and log ons from the IP address are again permitted. 4 Click Apply. Configuring SESA 2.0 Manager Components Configurations Forwarding events to other event relays By default, the event logger only inserts events into the SESA DataStore without doing other processing. Other components can process the inserted events and either correlate and generate new events or send the events to an external computer. The mechanism by which they do this is event forwarding. To forward events to other event relays 1 In the Symantec management console, on the Configurations view tab, in the left pane, expand SESA 2.0 > Manager Components Configurations. 2 Select the configuration that you want to edit. 3 In the right pane, on the Event Forwarding tab, click Add. 4 In the Event Forwarding dialog box, if you do not want the event forwarding that you specify to take effect at this time, check Disable. You can uncheck it later to enable event forwarding. 5 In the Name text box, type the name of the server that is running the event relay to which you want to forward events. 189 190 Configuring SESA 2.0 Manager Components Configurations 6 In the Destination URL text box, type the URL of the event relay or event sink to which you are forwarding events. Use one of the following formats: To forward events using the HTTP protocol https://<SESA MANAGER MACHINE NAME or IP ADDRESS>/sesa/servlet/<EVENTRELAY> For example, HTTPS://localhost/sesa/servlet/ EventLogger To forward events to a folder that is common for all SESA Managers that are receiving forwarded events FILE://<FOLDER> To forward events to a specific servlet FILE://%sesa%<FOLDER> For example, FILE://c:\sesa\temp For example, to forward to the EventLogger, the URL would be FILE://%sesa%EventLogger\batch 7 Click Add to specify the events that will be forwarded. 8 In the Filter dialog box, create a filter to be applied to the events that are forwarded. If you do not make any changes, all events are forwarded by default. Configuring SESA 2.0 Manager Components Configurations Use the following descriptions as you make selections from the drop-down lists: Event class Event type Product Software feature Category Severity 9 Select one of the following: ■ Any: All event types are available in the Event type dropdown list. ■ Selection: Only the event types that belong to the selected event class are available in the drop-down list. Select one of the following: ■ Any: Events of all event types for the selected event class are forwarded. ■ Selection: Only events of the selected event type are forwarded. Select one of the following: ■ Any: Events from all software features of all SESAenable products are forwarded. ■ Selection: You can use the Software feature drop-down list to specify a software feature for this product: events from the selected software feature are forwarded. Select one of the following: ■ Any: Events from all software features for the selected product are forwarded. ■ Selection: Only events from the selected software feature are forwarded. Select one of the following: ■ Any: Events of any category are forwarded. ■ Selection: Only events that belong to the selected category are forwarded. Select one of the following: ■ Any: Events of all severities are forwarded. ■ Selection: Only events with the selected severity are forwarded. Click OK. 10 To specify another set of events to be forwarded to this event relay, repeat steps 7 through 9. 11 In the Event Forwarding dialog box, if you want to forward additional information that is not defined in the event schema, check Forward extra event information. 191 192 Configuring SESA 2.0 Manager Components Configurations 12 When you have specified all of the events to be forwarded to the event relay, click OK. 13 To specify another event relay to which events will be forwarded, repeat steps 3 through 12. 14 When you have specified all of the event relays to which you want to forward events, click Apply to save your changes. Forwarding alerts to other alert mechanisms By default, alerts are logged to the SESA DataStore for the SESA Manager that you are configuring. You can specify other alert mechanisms, such as thirdparty alert mechanisms, to which alerts will be forwarded. To forward alerts to other alert mechanisms 1 In the Symantec management console, on the Configurations view tab, in the left pane, expand SESA 2.0 > Manager Components Configurations. 2 Select the configuration that you want to edit. 3 In the right pane, on the Alert Forwarding tab, click Add. 4 In the Alert Forwarding dialog box, check Disable if you do not want the alert forwarding that you specify to take effect at this time. You can uncheck it later to enable alert forwarding. 5 In the Name text box, type the name of the server that is running the alert sink to which you want to forward alerts. The alert sink is the software component that receives events after they have been processed by the SESA Manager 6 In the Destination URL text box, type the URL for the alert sink or other alert mechanism. Use one of the following formats: To forward alerts using the https://<SESA MANAGER MACHINE NAME or IP HTTP protocol ADDRESS>/sesa/servlet/<ALERT MECHANISM> For example, HTTPS://localhost/sesa/servlet/ AlertLogger To forward alerts to a folder that is common for all SESA Managers that are receiving forwarded alerts FILE://<FOLDER> For example, FILE://c:\sesa\temp Configuring SESA 2.0 Manager Components Configurations To forward alerts to a specific servlet FILE://%sesa%<FOLDER> For example, to forward to the SampleAlertSink, the URL would be FILE://%sesa%SampleAlertSink\batch 7 Click OK. 8 To add additional alert sinks, repeat steps 3 through 7. 9 Click Apply. Configuring SNMP alert responses When you create alert configurations, you can have an SNMP alert response generated when the alert is logged. See “Creating an alert configuration based on an event” on page 285 and “Creating an alert configuration” on page 298. Symantec provides Management Information Base (MIB) files for SNMP 1 and SNMP 2 so that you can view the SNMP traps in your preferred SNMP console. This is useful if you have tools that automatically check an SNMP host for specific events. To use SNMP notifications, you must first install the SNMP MIB file that you want to use. See the Symantec Enterprise Security Architecture Implementation Guide To configure SNMP alert responses 1 In the Symantec management console, on the Configurations view tab, in the left pane, expand SESA 2.0 > Manager Components Configurations. 2 Select the configuration that you want to edit. 193 194 Configuring SESA 2.0 Manager Components Configurations 3 In the right pane, on the SNMP tab, change the Host value to the IP address of the SNMP listener. 4 Change the Port value to the port number of the SNMP listener. 5 Next to VersionOne, do one of the following: 6 ■ If you are using Version 1 MIBs, check the check box. ■ If you are using Version 2 MIBs, uncheck the check box. Click Apply. Scheduling SESA Manager LiveUpdate LiveUpdate is the Symantec technology that lets installed Symantec products connect to a server automatically for program updates. You can use the settings on the Manager Component Configurations LiveUpdate tab to schedule a LiveUpdate request for a new versions of the SESA Manager. Note: Events are not generated when a SESA Manager LiveUpdate occurs. To schedule LiveUpdate 1 In the Symantec management console, on the Configurations view tab, in the left pane, expand SESA 2.0 > Manager Component Configurations. Configuring SESA 2.0 Manager Components Configurations 2 Select the configuration that you want to edit. 3 In the right pane, on the LiveUpdate tab, specify the date and time that the LiveUpdate is performed by clicking the ellipses (...) to the right of the DateTime value. 4 In the DateTime dialog box, do the following to set the date and time for LiveUpdate to run: Month drop-down list Select a month. 195 196 Configuring SESA 2.0 Manager Master Heartbeat Configuration Year Select a year. Calendar Select a day. Date navigation buttons The buttons below the calendar help you navigate: Time control ■ Go to today–If you move to another month in the calendar, click the left button to return to today’s date. ■ Go to current selection–If you select a date and then move in the calendar, click the right button to return to the selected date. Click each section of the time control (hours, minutes, days, seconds) and use the arrows or type a number to increase or decrease the value. 5 Click OK. 6 On the LiveUpdate tab, do one or more of the following: 7 Retry interval Specify how often to retry if the first attempt is not successful. Random delay Specify a random delay to be used to stagger update requests. Enable Check this check box to enable LiveUpdate to take place at the time scheduled on the LiveUpdate tab. Use local time Specify whether the local time should be used for scheduling purposes. Click Apply. Manager Master Heartbeat Configuration The heartbeat functionality of SESA tracks the health of the SESA network. It provides near real-time status of SESA services on SESA-enabled computers. This information is stored in memory in the Master Heartbeat service, which is located on the SESA Manager that is specified as the master heartbeat service. As shown in Figure 5-1, each SESA Manager has a heartbeat service. SESA Agents report their heartbeats to the heartbeat service. In each domain, one of the heartbeat services acts as the Master Heartbeat service. All the heartbeat services forward their heartbeat information to the Master Heartbeat service. Configuring SESA 2.0 Manager Master Heartbeat Configuration Figure 5-1 SESA Heartbeat When a console requests heartbeat data, it gets it from its local SESA Manager by way of a subscription interface. The heartbeat service returns a set of baseline data and thereafter provides updates. The heartbeat service in turn subscribes to the Master Heartbeat service in order to provide this information. See “Monitoring heartbeat for computers” on page 134. There is one Master Heartbeat service per domain. When the first SESA Manager is installed in a domain, by default it is set to be a Master Heartbeat service. To see which SESA Manager is acting as the Master Heartbeat service, inspect the Heartbeat tab on the Domain properties dialog. See “Viewing the master heartbeat service computer for the domain” on page 67. To change the SESA Manager that acts as the Master Heartbeat service you modify the default Master Heartbeat Configuration. Because the heartbeat system is designed so that there can be only one master heartbeat service computer per domain, you can modify the default configuration; however, you cannot create a new configuration. Allowing only one default configuration ensures that all SESA Managers in the domain have the same configuration for the Master Heartbeat service. Table 5-5 lists the tabs on which you can change settings for the Manager Master Heartbeat Configuration. Table 5-5 Manager Master Heartbeat Configuration tabs Tab Description General Contains the name, description, and modification date of the configuration. Master Heartbeat Lets you specify the primary and secondary SESA Managers to be used as the master heartbeat servers. 197 198 Configuring SESA 2.0 Manager Master Heartbeat Configuration You can view the status of the monitored services by displaying the Heartbeat Monitor view for a selected organizational unit. See “Monitoring heartbeat for computers” on page 134. Changing the Master Heartbeat service computer By default, the Master Heartbeat service computer for the domain is the first SESA Manager installed to the domain. If multiple SESA Managers are installed and designated as potential Master Heartbeat servers, you can select a different SESA Manager as the Master Heartbeat service computer. If you do not manually change the Master Heartbeat service computer, it is possible for SESA to reassign the role of Master Heartbeat server through an election process. See “How the Master Heartbeat service computer can be changed by an election” on page 199. To change the Master Heartbeat service computer You can manually assign a Master Heartbeat service computer by doing the following: ■ Assign the Primary and Secondary Master Heartbeat service computers. ■ If your environment is a multiple domain environment, give the SESA Manager that you configure as the Master Heartbeat service domain access to all domains where heartbeat will be monitored. To assign the Primary and Secondary Master Heartbeat service computers 1 In the Symantec management console, on the Configurations view tab, in the left pane, expand SESA 2.0 > Manager Master Heartbeat Configuration. 2 Select the Default configuration. There can be only one Manager Master Heartbeat configuration. You cannot create a new Manager Master Heartbeat configuration. 3 In the right pane, on the Master Heartbeat tab, in the Primary Master Heartbeat service drop-down list, select the SESA Manager to serve as the Primary Master Heartbeat service computer. For a SESA Manager to appear in the list, it must be specified as a heartbeat server during installation. Configuring SESA 2.0 Manager Master Heartbeat Configuration 4 In the Secondary Master Heartbeat service drop-down list, select the SESA Manager to serve as the Secondary Master Heartbeat service computer. 5 Click Apply. To give a Master Heartbeat service computer access to SESA Managers in other domains 1 In the Symantec management console, on the System view tab, in the left pane, expand the Organizational Units navigation tree until you can select the organizational unit that contains the computer that you have made the Primary Master Heartbeat service computer. 2 In the right pane, select the computer. 3 On the Selection menu, click Properties. 4 On the Domain Access tab, grant domain access to any domains for which heartbeat will be monitored. See “Adding domain access to a SESA Manager” on page 128. 5 To give domain access to the Secondary Master Heartbeat computer, repeat steps 1 through 4. How the Master Heartbeat service computer can be changed by an election As circumstances in the SESA deployment change, SESA can automatically change the Master Heartbeat service computer through a process known as election. The election is designed to allow for routing problems, rather than to conserve network bandwidth. The highest priority in an election is to let the computers form a consensus as to which computer should be the Master Heartbeat service computer. An election is a selection between two configured, ordered candidates. There is a primary candidate and a secondary candidate. An election occurs when a SESA Manager perceives a discrepancy between the configured Master Heartbeat service and the acting Master Heartbeat service. This can happen when a SESA Manager cannot contact the master (if, for example, the master goes down) or when a SESA Manager gets a new configuration and believes that the acting master should no longer be the master. Any computer can initiate the election process by making a request to the computer it believes should be the master. That computer runs an election, if it is not already doing so, or has not recently done so. 199 200 Configuring SESA 2.0 Manager Connection Configurations A computer that is running an election queries all heartbeat services. It assumes the role of the Master Heartbeat service if it receives a majority of responses that indicate that it is the preferred master. The following are the determining factors: ■ Electors prefer a computer that can be contacted over a computer that cannot be contacted in all cases. ■ Electors prefer a primary over a secondary. ■ Clients prefer a secondary over a computer that has the master role, but is not configured as either a primary or a secondary candidate. If there are no configured candidates, the election fails, with the result that any computer that currently has the master role keeps it. If no computer has the master role, then the heartbeat computer is nonfunctional. Manager Connection Configurations Manager Connection Configurations let you configure failover for SESA Managers. Failover is the ability of SESA components to automatically switch to designated secondary resources if the primary resource fails or terminates abnormally. You can configure the following failover scenarios: ■ SESA Manager to SESA DataStore ■ SESA Manager to SESA Directory After you configure failover, you can distribute the configurations to SESA Managers that require failover protection. See “Distributing configurations” on page 172. Table 5-6 lists the tabs on which you can change the failover settings for the SESA Manager. Table 5-6 Manager Connection Configurations tabs Tab Description General Contains the name, description, and modification date of the configuration. Configuring SESA 2.0 Manager Connection Configurations Tab Description SESA Directory Failover Lets you specify the primary SESA Directory and control how failover takes place when that SESA Directory becomes unavailable. See “Configuring SESA Manager to SESA Directory failover” on page 201. SESA DataStore Failover Lets you specify the primary SESA DataStore and an ordered list of SESA DataStores to which the SESA Manager can failover if the primary SESA DataStore becomes unavailable. See “Configuring SESA Manager to SESA DataStore failover” on page 205. Configuring SESA Directories Failover is the ability of the SESA Manager to automatically switch to a standby SESA Directory if the primary SESA Directory fails or terminates abnormally. The SESA Directory Failover tab of the Manager Connection Configurations lets you do more than configure SESA Directory failover. You can use this tab for either of the following: ■ Configuring SESA Manager to SESA Directory failover ■ Logging SESA Directory connection failures Configuring SESA Manager to SESA Directory failover You configure SESA Directory Failover to identify a primary SESA Directory and specify how failover should occur, including the number of retry attempts, time between retry attempts, and whether log messages are generated. The SESA Directories to which you failover must be installed and configured before you complete the SESA Directory failover configuration. These Directories should be read-only replicas. Note: Read-only replica Directories provide access to the SESA Manager but cannot be edited. When a failover occurs, a message notifies users that the domain is using a read-only replica and that modifications cannot be made. For information on installing replica Directories, see the section on setting up SESA Manager-to-Directory failover in the Symantec Enterprise Security Architecture Implementation Guide. 201 202 Configuring SESA 2.0 Manager Connection Configurations To configure SESA Manager to SESA Directory failover 1 In the Symantec management console, on the Configurations view tab, in the left pane, expand SESA 2.0 > Manager Connection Configurations. 2 Select the configuration that you want to edit. 3 In the right pane, on the SESA Directory Failover tab, next to the Primary Directory text box, click the browse button (...). 4 In the Find Directories dialog box, in the Available Directories list, select a directory to be the Primary Directory. 5 Click OK. 6 On the SESA Directory Failover tab, check Enable automatic Directory failover. 7 Under Primary Directory Failover, do the following: ■ In the Reconnect attempts before failover text box, type the number of times that the SESA Manager should attempt to connect to the Primary Directory before it fails over to the SESA Directory with the nearest LDAP suffix. ■ In the Seconds between reconnect attempts text box, type the time interval in seconds that will elapse between each reconnect attempt. Configuring SESA 2.0 Manager Connection Configurations 8 9 Under Secondary Directory Failover, do the following: ■ In the Reconnect attempts before failover text box, type the number of times that the SESA Manager should attempt to connect to the initial Secondary Directory before it fails over to the next SESA Directory. ■ In the Seconds between reconnect attempts text box, type the time interval in seconds that will elapse between each reconnect attempt. To have the SESA Manager automatically attempt to failback to the primary SESA Directory, do the following: ■ Ensure that Enable automatic failback recovery is checked. ■ In the Seconds between failback connection attempts text box, type the number of seconds that should elapse between attempts to failback. 10 Click Apply. Logging SESA Directory connection failures A connection failure event can cause a failover; however, connection failures are a broader category of events. They can also occur any time there is a problem with the connection between the SESA Manager and the SESA Directory, regardless of whether the connection failure causes failover, or whether failover is enabled. To specify how SESA Directory connection failures are logged 1 On the Configurations view tab, in the left pane, expand SESA 2.0 > Manager Connection Configurations. 2 Select the configuration that you want to edit. 3 In the right pane, on the SESA Directory Failover tab, scroll to the bottom of the tab. 4 To configure what happens when connection failure events occur, do one or more of the following: Write an event to the SESA DataStore when a connection failure occurs To log a SESA event when there is a connection failure, check here. Write an event to the system log when To log a system event when there is a a connection failure occurs connection failure, check here. Generate an SNMP trap when a connection failure occurs To generate an SNMP trap when there is a connection failure, check here. 203 204 Configuring SESA 2.0 Manager Connection Configurations Generate a Multiple Connection Failure Event To generate a single event when multiple connection failures occur, do the following: ■ In the Number of connection failures that must occur text box, type a number. ■ In the Time period (seconds) of connection failures text box, type a time period. When the specified number of failovers occurs within the specified time period, an event is logged. 5 Click Apply. Configuring SESA DataStores Failover is the ability of the SESA Manager to automatically switch to a standby SESA DataStore if the primary SESA DataStore fails or terminates abnormally. The SESA DataStore Failover tab of the Manager Connection Configurations lets you do more than configure SESA DataStore failover. You can use this tab for any of the following: ■ Identifying the primary SESA DataStore ■ Configuring SESA Manager to SESA DataStore failover ■ Logging SESA DataStore connection failures In addition to configuring the logging of connection failures, you can also specify users to be notified in the case of SESA DataStore connection failures. Identifying the primary SESA DataStore When additional SESA DataStores are added to a SESA implementation, you may want to specify a new primary SESA DataStore to which events and alerts will be logged. You can do this on the SESA DataStore Failover tab without actually configuring SESA Manager to SESA DataStore failover. To identify the primary SESA DataStore 1 In the Symantec management console, on the Configurations view tab, in the left pane, expand SESA 2.0 > Manager Connection Configurations. 2 Select the configuration that you want to edit. Configuring SESA 2.0 Manager Connection Configurations 3 In the right pane, on the SESA DataStore Failover tab, next to the Primary DataStore text box, click the browse button (...). 4 In the Find DataStores dialog box, in the Available DataStores list, select a SESA DataStore to be the Primary DataStore. 5 Click OK. 6 On the SESA DataStore Failover tab, click Apply. Configuring SESA Manager to SESA DataStore failover You configure SESA DataStore Failover to identify a primary SESA DataStore and provide an ordered list of failover SESA DataStores to which the SESA Manager can connect if the primary SESA DataStore fails. The SESA DataStores that you designate for failover should be dedicated SESA DataStores, rather than SESA DataStores that are also being used to forward events in a distributed configuration. See the section on setting up SESA Manager-to-DataStore failover in the Symantec Enterprise Security Architecture Implementation Guide. 205 206 Configuring SESA 2.0 Manager Connection Configurations To configure SESA Manager to SESA DataStore failover 1 In the Symantec management console, on the Configurations view tab, in the left pane, expand SESA 2.0 > Manager Connection Configurations. 2 Select the configuration that you want to edit. 3 In the right pane, on the SESA DataStore Failover tab, next to the Primary DataStore text box, click the browse button (...). 4 In the Find DataStores dialog box, in the Available DataStores list, select a DataStore to be the Primary DataStore. 5 Click OK. 6 On the SESA DataStore Failover tab, check Enable automatic DataStore failover. 7 Under Primary DataStore Failover, do the following: ■ In the Reconnect attempts before failover text box, type the number of times that the SESA Manager should attempt to connect to the Primary DataStore before it fails over to the first directory in the Secondary DataStores list. ■ In the Seconds between reconnect attempts text box, type the time interval in seconds that will elapse between each reconnect attempt. Configuring SESA 2.0 Manager Connection Configurations 8 9 Under Secondary DataStore Failover, do the following: ■ In the Reconnect attempts before failover text box, type the number of times that the SESA Manager should attempt to connect to the initial Secondary DataStore before it fails over to the next SESA DataStore in the Secondary DataStores list. ■ In the Seconds between reconnect attempts text box, type the time interval in seconds that will elapse between each reconnect attempt. To create an ordered list of Secondary Failover DataStores, do the following: ■ Below the Secondary (failover) DataStores list, click Add. ■ In the Find DataStores dialog box, in the Available DataStores list, select the DataStore that you want to make the first failover SESA DataStore and then click Add. You can also double-click a SESA DataStore to add it. ■ Continue selecting and adding SESA DataStores in the order in which you want them to be used for failover. ■ Click OK. The SESA DataStores that you selected are added to the Secondary (failover) DataStores list on the SESA DataStore Failover tab. ■ To change the order of the SESA DataStores, on the SESA DataStore Failover tab, select a SESA DataStore and use the Move Up and Move Down arrows to the right of the list to move the SESA DataStore relative to the other SESA DataStores in the list. 10 To have the SESA Manager automatically attempt to failback to the primary SESA DataStore, do the following: ■ Ensure that Enable automatic failback recovery is checked. ■ In the Seconds before a failback connection attempt text box, type the number of seconds that should elapse between attempts to failback. 11 Click Apply. Logging SESA DataStore connection failures A connection failure event can cause a failover; however, connection failures are a broader category of events. They can also occur any time there is a problem with the connection between the SESA Manager and the SESA DataStore, regardless of whether the failure causes failover, or whether DataStore failover has been configured. 207 208 Configuring SESA 2.0 Manager Connection Configurations Log SESA DataStore connection failures The SESA DataStore Failover tab lets you do the following: ■ Specify how connection failures are logged. A connection failure event can cause a failover; however, connection failures are a broader category of events. They can also occur any time there is a problem with the connection between the SESA Manager and the SESA DataStore, regardless of whether the failure causes failover, or whether DataStore failover has been configured. ■ Notify users of connection failure events To specify how SESA DataStore connection failures are logged 1 On the Configurations view tab, in the left pane, expand SESA 2.0 > Manager Connection Configurations. 2 Select the configuration that you want to edit. 3 In the right pane, on the SESA DataStore Failover tab, scroll to the bottom of the tab. 4 To configure what happens when connection failure events occur, do one or more of the following: Write an event to the SESA DataStore when a connection failure occurs To log a SESA event when there is a connection failure, check here. Write an event to the system log when To log a system event when there is a a connection failure occurs connection failure, check here. Generate an SNMP trap when a connection failure occurs To generate an SNMP trap when there is a connection failure, check here. Generate a Multiple Connection Failure Event To generate a single event when multiple connection failures occur, do the following: ■ In the Number of connection failures that must occur text box, type a number. ■ In the Time period (seconds) of connection failures text box, type a time period. When the specified number of failovers occurs within the specified time period, an event is logged. 5 Click Apply. Configuring SESA 2.0 Manager Connection Configurations To notify users of connection failure events 1 In the Symantec management console, on the Configurations view tab, in the left pane, expand SESA 2.0 > Manager Connection Configurations. 2 Select the configuration that you want to edit. 3 In the right pane, on the SESA DataStore Failover tab, configure the primary and failover systems as described in “Configuring SESA Manager to SESA DataStore failover” on page 205. 4 Below the Secondary (failover) DataStores list, click Out of Band Notification. 5 Do one of the following: 6 ■ To have a single notification sent when a connection failure occurs, click Notify users of connection failure only once. ■ To have a message sent repeatedly to the user at a time interval that you specify, click Notify users of connection failure repeatedly using the specified time period, and then, in the Time period, in seconds, between out of band notifications text box, type a time. Under Users to notify during connection failure, click Add. 209 210 Configuring SESA 2.0 Agent Connection Configurations 7 In the Find Users dialog box, do one of the following: ■ In the Available users list, select a user. ■ If you cannot locate the user that you want, on the left side of the dialog box, type search criteria, click Start Search, and then, in the Available users list, select a user. 8 To check the notification settings of the user, click Properties. 9 To add the user to the Selected Users list, click Add. 10 Continue selecting and adding users to be notified. 11 Click OK. 12 In the Out of Band Notification dialog box, click OK. Agent Connection Configurations Agent Connection Configurations let you configure SESA Agent to SESA Manager failover. Failover is the ability of SESA components to automatically switch to designated secondary resources if the primary resource fails or terminates abnormally. After you configure failover, you can distribute the configurations to computers that require failover protection. See “Distributing configurations” on page 172. Table 5-7 lists the tabs on which you can change the failover setting for the SESA Agent. Table 5-7 Agent Connection Configurations tabs Tab Description General Contains the name, description, and modification date of the configuration. SESA Manager Failover Lets you specify the primary SESA Manager and an ordered list of SESA Managers to which the SESA Agent can failover if the primary SESA Manager becomes unavailable. Configuring SESA 2.0 Agent Connection Configurations Configuring SESA Agent to SESA Manager failover You configure SESA Manager failover to identify a primary SESA Manager and provide an ordered list of failover SESA Managers to which the SESA Agent can connect if the primary SESA Manager fails. See the section on setting up SESA Agent-to-Manager failover in the Symantec Enterprise Security Architecture Implementation Guide. To configure SESA Agent to SESA Manager failover 1 In the Symantec management console, on the Configurations view tab, in the left pane, expand SESA 2.0 > Agent Connection Configurations. 2 Select the configuration that you want to edit. 3 In the right pane, on the SESA Manager Failover tab, next to the Primary Manager text box, click the browse button (...). 4 In the Find Computers dialog box, do one of the following: ■ To proceed without modifying the Available computers list, select a computer to be the primary manager, and then continue at step 6. The Available computers list shows all SESA Managers for the domain, up to the number of computers indicated by the Maximum search count text box. 211 212 Configuring SESA 2.0 Agent Connection Configurations ■ To modify the Available computers list by specifying search criteria, do the following: Look in Identifies the domain. You cannot change this value. Computer name Type a computer name. You can specify a partial computer name that contains one or more asterisks. For example: *dev* All computers with names that contain this string are returned. SESA Managers only This check box is checked by default and cannot be changed. Maximum search count Type a number to reduce or increase the number of computers that are returned by the search. Start search. To start the search, click here. The Available computers list is revised based on the search criteria. Stop search. To stop the search before it is complete, click here. In the revised Available computers list, select one or more computers. 5 Click OK. 6 On the SESA Manager Failover tab, check Enable automatic Manager Failover. 7 Under Primary Manager Failover, do the following: 8 ■ In the Reconnect attempts before failover text box, type the number of times that the SESA Agent should attempt to connect to the Primary Manager before it fails over to the first SESA Manager in the Secondary Managers list. ■ In the Seconds between reconnect attempts text box, type the time interval in seconds that will elapse between each reconnect attempt. Under Secondary Manager Failover, do the following: ■ In the Reconnect attempts before failover text box, type the number of times that the SESA Agent should attempt to connect to the initial Secondary Manager before it fails over to the next computer in the Secondary Manager list. ■ In the Seconds between reconnect attempts text box, type the time interval in seconds that will elapse between each reconnect attempt. Configuring SESA 2.0 Agent Connection Configurations 9 To create an ordered list of failover SESA Managers, do the following: ■ Below the Secondary (failover) Managers list, click Add. ■ In the Find Computers dialog box, do one of the following: In the Available computers list, select the computer that you want to make the first failover Manager. If you cannot immediately find the computer that you want, on the left side of the dialog box, enter search criteria, click Start Search, and then, in the Available computers list, select a computer. ■ Click Add. ■ Continue selecting and adding computers in the order in which you want them to be used for failover. ■ Click OK. The computers that you selected are added to the Secondary (failover) Managers list. ■ To change the order of the failover SESA Managers, select a SESA Manager and use the Move Up and Move Down arrows to the right of the list to move the SESA Manager relative to the other SESA Managers in the list. 10 To have the SESA Agent automatically attempt to failback to the primary SESA Manager, do the following: ■ Ensure that Enable automatic failback recovery is checked. ■ In the Seconds between failback connection attempts text box, type the number of seconds that should elapse between attempts to failback. ■ In the Maximum failback retry period text box, type the maximum amount of time to wait before all failback attempts end and a new permanent primary SESA Manager is established. After a new permanent primary SESA Manager is established, if you want to reset the connection between the SESA Agent and the original SESA Manager, you must do it manually, using the Primary SESA Manager drop-down list. 11 To generate a single event when multiple connection failures occur, under Generate a Multiple Connection Failure Event, do the following: ■ In the Number of connection failures that must occur text box, type a number. ■ In the Time period (seconds) of connection failures, type a time period. When the specified number of failovers occurs within the specified time period, an event is logged. 213 214 Configuring SESA 2.0 Agent Configurations If you enable SESA Manager failover, connection failure events occur with the same frequency as failovers, based on the values for reconnect attempts. If you do not enable failover, connection failures can still occur. The values you provide here determine how often events are logged for these occurrences. 12 Click Apply. Agent Configurations Agent configurations describe how SESA Agents behave and how they communicate with their corresponding SESA Managers. Table 5-8 lists the tabs on which you can change settings for Agent Configurations. These include what primary and secondary server to connect to, as well as how to get configuration information and report inventory, and how these computers should receive LiveUpdate information. Table 5-8 Agent Configuration tabs Tab Description General Contains the name, description, and modification date of the configuration. Common Controls settings that are common to all SESA Agent services. This tab lets you specify the location of SESA Manager servlets, the batch logging interval, and whether debug is used. The other settings on this tab are only used when a product is installed that contains a 1.1 SESA Agent Configuration Lets you specify how often the SESA Agent Configuration Provider should check with its SESA Manager for configuration updates. This value is independent of using Distribute to send configurations to the SESA Agent directly through the Command Servlet. This setting refers to how long the client waits before asking for new configurations, if it is not contacted sooner. See “Setting the configuration poll time” on page 216. Configuring SESA 2.0 Agent Configurations Tab Description Inventory Lets you configure the SESA Agent Inventory Provider to report inventory information for each SESA Agent. This inventory contains information as to what components are installed, and what version of those components reside on the SESA Agent. You can set how often to report inventory, and how long to wait between failed inventory attempts. State Lets you configure the SESA Agent State Provider to report state information for all SESA Agent providers. Each provider is given the opportunity to report its operational state to its SESA Manager. This operational state includes information such as what SESA Manager it is currently connected to, what its starting mode is, and what configuration it is currently using. Logging Manages the SESA Event Logging Provider so that all events logged through the SESA Agent are sent reliably to its SESA Manager. The logging provider stores events locally if it cannot forward them immediately to its SESA Manager. You can specify information such as what port to listen on, what servlet to contact on the SESA Manager, and how to cache events before sending them to the SESA Manager. Many of these settings control how events are forwarded to the SESA Manager. If you change the Logging Servlet value to a value that is incorrect, you may not be able to forward events to the SESA Agent's SESA Manager. LiveUpdate Lets you schedule a one-time LiveUpdate for the SESA Agent, as well as several retry and delay settings related to running a LiveUpdate session on the SESA Agent. See “Scheduling SESA Agent LiveUpdate” on page 217. Heartbeat Lets you enable and configure heartbeat for critical and noncritical services. See “Configuring SESA Agent heartbeat” on page 219. 215 216 Configuring SESA 2.0 Agent Configurations Setting the configuration poll time You can control the timing of the distribution of configurations by setting the configuration poll time. This lets you control the flow of network traffic rather than having all computers retrieve their configurations at the same time. To set the configuration poll time 1 In the Symantec management console, on the Configurations view tab, in the left pane, expand SESA 2.0 > Agent Configurations. 2 Select the configuration that you want to edit. 3 In the right pane, on the Configuration tab, set the desired value for the Config poll time. This is the interval in minutes in which the SESA Agent automatically requests a new configuration from the configuration servlet on its SESA Manager. The maximum value is 10080 minutes. The minimum value is 1. 4 Click Apply. Configuring SESA 2.0 Agent Configurations Scheduling SESA Agent LiveUpdate LiveUpdate is the Symantec technology that lets installed Symantec products connect to a server automatically for program updates. You can use the settings on the Agent Configuration LiveUpdate tab to schedule LiveUpdate requests for new versions of the SESA Agent. To schedule SESA Agent LiveUpdate 1 In the Symantec management console, on the Configurations view tab, in the left pane, expand SESA 2.0 > Agent Configuration. 2 Select the configuration that you want to edit. 3 In the right pane, on the LiveUpdate tab, schedule the date and time that LiveUpdate is performed by clicking the ellipses (...) to the right of the DateTime value. 217 218 Configuring SESA 2.0 Agent Configurations 4 In the DateTime dialog box, do the following to set a date and time for LiveUpdate to run: Month drop-down list Select a month. Year Select a year. Calendar Select a day. Date navigation buttons The buttons below the calendar help you navigate: Time control ■ Go to today–If you move to another month in the calendar, click the left button to return to today’s date. ■ Go to current selection–If you select a date, and then move in the calendar, click the right button to return to the selected date. Click each section of the time control (hours, minutes, days, seconds) and use the arrows or type a number to increase or decrease the value. 5 Click OK. 6 On the LiveUpdate tab, do one or more of the following: Retry interval Specify how often to retry if the first attempt is not successful. Random delay Specify a random delay to be used to stagger update requests. Configuring SESA 2.0 Agent Configurations 7 Enable Check this check box to enable LiveUpdate to take place at the time scheduled on the LiveUpdate tab. Use local time Specify whether the local time should be used for scheduling purposes. Click Apply. Configuring SESA Agent heartbeat SESA includes a heartbeat service that provides near real-time status of SESA services on SESA-enabled computers. This heartbeat information is stored in the Master Heartbeat server, which is located in a SESA Manager. To identify the SESA Manager that is acting as the Master Heartbeat server, see “Viewing the master heartbeat service computer for the domain” on page 67. To view the results of heartbeat monitoring, see “Monitoring computers” on page 134. SESA Agent heartbeat for the critical services on your SESA Manager is enabled by default. Note: Version 1.1 SESA Agents do not support heartbeat; do not use this tab when configuring 1.1 SESA Agents. Configure SESA Agent heartbeat To configure SESA Agent heartbeat, you do the following: ■ Modify the SESA Agent heartbeat settings. ■ Add services to the list of the critical services that are monitored. To modify the SESA Agent heartbeat settings 1 In the Symantec management console, on the Configurations view tab, in the left pane, expand SESA 2.0 > Agent Configurations. 2 Select the configuration that you want to edit. 219 220 Configuring SESA 2.0 Agent Configurations 3 In the right pane, on the Heartbeat tab, ensure that Enable heartbeat service is checked. 4 Under Critical Services, do one or more of the following: Enable critical service heartbeat Check this option if you want heartbeat monitoring to occur for services in the critical service list. Log critical service heartbeat status changes Check this option if you want log messages to be generated when there is a change in the status of services in the critical services list. Checkin interval (minutes) Type the interval, in minutes, between heartbeat monitor checkins. Critical services list Lists the services that you have identified as critical. Each entry includes the product name, software feature name, and a description. To add a service to the critical services list, click Add. To remove a service from the critical services list, select it, and then click Remove. Configuring SESA 2.0 Agent Configurations 5 Under Non-critical services, do one or more of the following: Enable non-critical service heartbeat If you want heartbeat monitoring to occur for services that are not in the critical service list, check here. Log non-critical service If you want log messages to be generated when there is a heartbeat status change in the status of services that are not in the critical changes services list, check here. Checkin interval (minutes) 6 Type the interval, in minutes, between heartbeat monitor checkins for non-critical services. Click Apply. To add services to the critical services list 1 In a selected Agent Configuration, on the Heartbeat tab, below the list of critical services, click Add. 2 In the Look in drop-down list, select the software product for which you want to monitor software features. 3 In the Available software features list, select the software features that you want to monitor. 221 222 Configuring SESA 2.0 Product Installation Service configurations 4 Click Add. The selected services are added to the Selected software features list on the Heartbeat tab. 5 To remove a service from the Selected software features list, select it, and then click Remove. 6 Click OK. 7 On the Heartbeat tab, complete the configuration of the Heartbeat service, and then click Apply. Product Installation Service configurations Through the use of integration packages, you can install SESA-integrated security products once on a SESA Manager that acts as the SESA master service computer and then deploy selected products to other SESA Manager computers. The Product Installation Service configurations control how and when SESA integrated packages are installed to SESA Managers, the SESA Directory, and SESA DataStores. They perform the following functions: ■ Install SESA integration packages to SESA Managers and their connected SESA Directories and SESA DataStores. SESA integrated packages include product identifiers, default product configurations and settings, event schemas, WAR files, and Help for the product. ■ Register successfully installed SESA integration packages in the SESA Directory. ■ Uninstall SESA integration packages from SESA Managers and their connected SESA Directories and SESA DataStores. ■ Monitor SESA integration packages that have been registered to the domain against those that are actually installed. Configuring SESA 2.0 Product Installation Service configurations Table 5-9 lists the tabs on which you can change the properties of the Product Installation Service configurations: Table 5-9 Product Installation Service tabs Tab Description General Contains the name, description, and modification date of the configuration. Web Restart Period Lets you specify when Web services are restarted after a SESA integrated product package is deployed or removed. Deploy Period Lets you specify when the product installation service checks to see if new SESA integrated product packages need to be deployed, and performs the deployment. MasterSIPI Lets you specify the SESA Manager that hosts the master SIPI service for the domain. The master SIPI service is responsible for deploying and removing SESA integrated packages to the SESA Directory and SESA DataStores in the domain. You should install all SESA integration packages to the SESA Manager that you select here. Delete User Data Lets you specify whether the SESA Integration Wizard removes product events when you remove a SESA integration package (SIP) for a product. You cannot remove a product SIP without also removing product events. Modifying Product Installation Service configurations Modifying Product Installation Service configurations affects the way SESAintegrated products are installed and the behavior of the Deploy/Remove SESA Manager Extensions Wizard. To modify Product Installation Service configurations 1 In the Symantec management console, on the Configurations view tab, in the left pane, expand SESA 2.0 > Product Installation Service. 2 Select the configuration that you want to edit. 223 224 Configuring SESA 2.0 Product Installation Service configurations 3 In the right pane, on the Web Restart Period tab, to specify the schedule for restarting of services, change the value of the Restart time property. 4 On the Deploy Period tab, do the following: 5 ■ Specify the time schedule for the deploying SESA integration packages by changing the value of the Deploy time property. The default value is 0 0 20 ? * 7,1. This is a cron expression that translates to 2:00 PM on Saturdays and Sundays. For a description of how to write cron expressions, see the online Help. ■ If you want the Product Installation service to randomly check for new SESA packages, for the Staggered deployment property, type a value of 1. On the MasterSIPI tab, in the Master SIPI Service drop-down list, select the SESA Manager to host the master SIPI service. This service deploys and removes SESA integration packages. By default, this text box is blank because the SESA Manager that hosts the master SIPI service is selected automatically. If the default SESA Manager is not operational, SESA integration packages cannot be deployed until you select another SESA Manager here. If this text box is blank, you can determine which SESA Manager is hosting the master SIPI service by viewing the SIP Servlet Web Page. See the section on verifying the master SIPI service in the Symantec Enterprise Security Architecture Implementation Guide. Configuring SESA 2.0 Manager Event Exclusion Configurations 6 To remove product events when the SESA Integration Wizard is used to remove the SESA integration package for a product, on the Delete User Data tab, next to Delete user data, check the check box. This check box must be checked to successfully remove SESA-integrated products. 7 Click Apply. Manager Event Exclusion Configurations Manager Event Exclusion Configurations let you filter events before they are forwarded to the SESA DataStore. Table 5-10 describes the tabs of the Manager Event Exclusion Configurations. Table 5-10 Manager Event Exclusion Configurations tabs Tab Description General Contains the name, description, and modification date of the configuration. Event Exclusions Lets you add event exclusion rules to an event exclusion configuration. You exclude unwanted events by doing the following: ■ Creating event exclusion rules ■ Creating event exclusion configurations ■ Specifying event exclusion configuration associations ■ Adding event exclusion rules to an event exclusion configuration ■ Distributing event exclusion configurations 225 226 Configuring SESA 2.0 Manager Event Exclusion Configurations Creating event exclusion rules Event exclusion rules identify events that you do not want to have forwarded to the SESA DataStore. By excluding events, you control the rate of growth of the SESA DataStore. Note: If excluded events are part of an alert configuration, they are still inserted into the SESA DataStore so that the alerting system will work. If excluded events are used in conjunction with Event Forwarding, they are not logged in the SESA DataStore; however, they are forwarded based on the Event Forwarding filter. Before you create event exclusion rules, study the event data that is being logged by your security products to identify data that is not relevant to your product monitoring. Examine the columns, classes, and values that characterize these unwanted events so that you can use them in your event exclusion rules. Warning: You should consider making your event exclusion rules productspecific. If you do not, you may inadvertently exclude events from products that you do not manage. For example, if you create an event exclusion rule that excludes all informational events but do not specify a product in the rule, the rule excludes all informational events from all products. Configuring SESA 2.0 Manager Event Exclusion Configurations To create an event exclusion rule 1 In the Symantec management console, on the Configurations view tab, in the left pane, expand SESA 2.0 and click Manager Event Exclusion Configurations. In the right pane, existing event exclusion rules are displayed at the top of the pane, and the details of the selected event exclusion rule are displayed at the bottom. If no event exclusion rules have been configured, the right pane is blank. 2 On the Selection menu, click New > Event Exclusion. The bottom of the right pane is cleared to let you create an event exclusion. 3 In the Event exclusion name text box, type a unique name for the new event exclusion rule. 4 In the Description text box, type a description. The Description text box is optional. 5 Do one of the following: ■ To make the event exclusion rule effective as soon as you associate it with a configuration and distribute the configuration, check Enable. ■ To configure the event exclusion rule but not use it immediately, uncheck Enable. To use the event exclusion rule later, you can edit it and enable it. 227 228 Configuring SESA 2.0 Manager Event Exclusion Configurations 6 To add a condition to the rule, click Add. A row is added to the condition table above the buttons. If you do not see the condition table, increase the size of the Symantec management console window or resize the bottom pane. Use this row to create a condition that is applied to incoming events. The Event Class, Event Column, Operator, and Value that you specify determine the events that are excluded from the SESA DataStore. 7 Under Event Class, click to activate the field, and then use the drop-down list to select an event class to be used in the rule. 8 Under Event Column, select an event column. The available event columns are determined by the event class that you selected in step 7. 9 Under Operator, select an operator. The available operators are determined by the event column that you selected in step 8. The operator determines how the event class, event column, and value that you specify are handled in the event exclusion rule. 10 Under Value, click the browse button to display an appropriate dialog box for selecting a value. Your previous selections determine what kind of dialog box is displayed. For example, if you select Session Event, Event Date, and Between, the browse button in the Value column displays a calendar for you to use to specify a date range. Click Help on the dialog box to learn how to specify the dates. 11 To add additional conditions, repeat steps 6 through 10. 12 If you added multiple conditions to the event exclusion rule, you must specify which conditions will be used when the rule is applied. Do one of the following: ■ To exclude only events that meet all of the conditions, click Meet all of the above conditions (AND). To understand the results of this selection, consider the example of an event exclusion rule that has a condition that excludes events with an event type of Login and a second condition that excludes events for the product SESA System. If you select the AND option, the only events that are excluded are those that are login events to the SESA System. SESA system events other than login events and logins to products other than SESA System will continue to be forwarded to the SESA DataStore. Configuring SESA 2.0 Manager Event Exclusion Configurations ■ To exclude events that meet any of the conditions, click Meet any of the above conditions (OR). Using the same example, if you select the OR option, all events that are login events, regardless of product, and all events that are generated by SESA System are excluded. 13 Optionally, do either of the following: ■ To remove a condition, click to the left of the appropriate row in the table to select it, and then click Remove. ■ To remove all conditions, click Remove All. 14 Do one of the following: ■ To save all changes to the event exclusion rule, click Apply. If you selected the OR option in step 11, a message warns you that you can unintentionally exclude a large range of events. To complete the Apply, click OK. ■ To discard changes you have made since you last saved the event exclusion rule, click Reset. Editing an event exclusion rule You can edit event exclusion rules to add, modify, or remove conditions, to change the way the conditions are applied, and to enable or disable the rules. Edit an event exclusion rule You can access the event exclusion editor in two ways: ■ From the right pane, with Manager Event Exclusion Configurations selected. Use this method when you want to choose from all event exclusion rules. ■ In the Event Exclusion Properties dialog box, which you display from the Event Exclusion tab of an event exclusion configuration. Use this method when you are only interested in the event exclusion rules used by a single configuration. Once in the editor, make your changes using the same methods that you used when you created the event exclusion rule. See “Creating event exclusion rules” on page 226. 229 230 Configuring SESA 2.0 Manager Event Exclusion Configurations To edit event exclusion rules in the right pane 1 In the Symantec management console, on the Configurations view tab, in the left pane, expand SESA 2.0 and click Manager Event Exclusion Configurations. 2 In the right pane, from the list of event exclusion rules at the top of the pane, select the rule that you want to edit. The bottom of the right pane shows the details of the selected event exclusion rule. 3 Make changes as necessary: 4 5 ■ To enable a disabled rule, check Enable; to disable an enabled rule, uncheck Enable. ■ To modify a condition, in the list of conditions, click on a parameter and then use the drop-down list to make your change. If a change invalidates other parameters of the condition, those fields are cleared and you must make new choices. ■ To add a condition, click Add. ■ To remove a condition, select it and click Remove. ■ To change how the conditions are evaluated, on the right below the conditions list, change the radio button selection. Do one of the following: ■ To save your changes, click Apply. ■ To reset the conditions to their values before you started to edit, click Reset. To edit additional event exclusion rules, repeat steps 2 through 4. To edit event exclusion rules using the Event Exclusion Properties dialog box 1 On the Configurations view tab, in the left pane, expand SESA 2.0 > Manager Event Exclusion Configurations, and then click the configuration that contains the event exclusion rule that you want to edit. Configuring SESA 2.0 Manager Event Exclusion Configurations 2 On the Event Exclusions tab, select an event exclusion rule, and then click Properties. 3 In the Event Exclusion Properties dialog box, make changes as necessary: 4 5 ■ To enable a disabled rule, check Enable; to disable an enabled rule, uncheck Enable. ■ To modify a condition, in the list of conditions, click on a parameter and then use the drop-down list to make your change. If a change invalidates other parameters of the condition, those fields are cleared and you must make new choices. ■ To add a condition, click Add. ■ To remove a condition, select it and click Remove. ■ To change how the conditions are evaluated, on the right below the conditions list, change the radio button selection. Do one of the following: ■ To save your changes and close the Event Exclusion Properties dialog box, click OK. ■ To back out of your changes, click Cancel. Clicking Cancel closes the Event Exclusion Properties dialog box. ■ To save your changes and keep the Event Exclusion Properties dialog box open for continued editing of this event exclusion rule, click Apply. To edit additional event exclusion rules, click OK or Cancel to close the Event Exclusion Properties dialog box, and then repeat steps 2 through 4. 231 232 Configuring SESA 2.0 Manager Event Exclusion Configurations Deleting an event exclusion rule You can delete an event exclusion rule that you are no longer using in a configuration. Note: If you delete an event exclusion rule that is in use by an event exclusion configuration, it is also removed from the configuration. To delete an event exclusion rule 1 In the Symantec management console, on the Configurations view tab, in the left pane, expand SESA 2.0 and click Manager Event Exclusion Configurations. 2 In the right pane, select the event exclusion rule that you want to delete. 3 In the Selection menu, click Delete. 4 When you are asked to confirm that you want to delete the event exclusion, select one of the following. ■ Yes: Delete the event exclusion rule. The event exclusion rule is removed from the list in the right pane. If the rule was in use by a configuration, it is also removed from the configuration. ■ No: Do not delete the configuration. Creating event exclusion configurations You use Manager Event Exclusion configurations to distribute event exclusion rules to SESA Managers. You can use the default Manager Event Exclusion configuration, or you can create additional configurations so that you can combine event exclusion rules to meet your needs. To create a Manager Event Exclusion configuration 1 In the Symantec management console, on the Configurations view tab, in the left pane, expand SESA 2.0 and click Manager Event Exclusion Configurations. 2 On the Selection menu, click New > Configuration. 3 On the first screen of the Event Exclusion Configuration Wizard, click Next. Configuring SESA 2.0 Manager Event Exclusion Configurations 4 5 In the General panel, do the following: ■ In the Event Exclusion Configuration name text box, type a name. ■ In the Description text box, type a description. The description is optional. ■ Click Next. In the Event Exclusions Lists panel, do one of the following: ■ To add event exclusion rules to the configuration now, click Add. When you are finished, click Next. Click Next. You can add event exclusion rules to the configuration later by editing the configuration’s properties. See “Adding event exclusion rules to an event exclusion configuration” on page 235. ■ 6 7 In the Event Exclusion Configuration Summary panel, review the information that you have specified. Then do one of the following: ■ To make changes, click Back. ■ To create the event exclusion configuration, click Finish. The Task/Status list at the bottom of the panel scrolls up to show the event exclusion configuration properties that are being created. A green check mark indicates success. When the event exclusion configuration is created, the Cancel button changes to a Close button. Click Close. The new event exclusion configuration is added to the list of Manager Event Exclusion Configurations in the left pane. Specifying event exclusion configuration associations You must specify how an event exclusion configuration is distributed by associating it with individual computers, or computers in configuration groups and organizational units. You can then distribute the configuration immediately or at a later time. You make these associations by editing the distribution properties of the configuration. For a more detailed explanation of making configuration associations, see “Editing a configuration’s associations” on page 167. 233 234 Configuring SESA 2.0 Manager Event Exclusion Configurations To specify event exclusion configuration associations 1 In the Symantec management console, on the Configurations view tab, in the left pane, expand SESA 2.0 and click Manager Event Exclusion Configurations. 2 Select the configuration to which you want to make associations. 3 On the Selection menu, click Properties. 4 In the Configuration Properties dialog box, do one or more of the following: ■ To associate the configuration with a computer, on the Computers tab, click Add. Use the Find Computers dialog box to add computers to which the event exclusion configuration is distributed. ■ To associate the configuration with a configuration group, on the Configuration Group tab, click Add. Use the Find Configuration Groups dialog box to add configuration groups through which the event exclusion configuration is distributed. ■ To associate the configuration with an organizational unit, on the Organizational Units tab, click Add. Use the Find Organizational Units dialog box to add organizational units through which the event exclusion configuration is distributed. Configuring SESA 2.0 Manager Event Exclusion Configurations 5 6 On any of the tabs, you can also do the following: ■ To remove an association, select it, and then click Remove. ■ To edit the properties of a management object with which you have associated the event exclusion configuration, select it, and then click Properties. Select one of the following: ■ OK: Save your changes and close the Configuration Properties dialog box. ■ Apply: Save your changes and leave the dialog box open for further editing. Adding event exclusion rules to an event exclusion configuration The rules that you add to an event exclusion configuration determine which events will be excluded from the SESA DataStore. When you distribute the configuration to a SESA Manager, all the event exclusion rules that you add to the configuration are applied. To add event exclusion rules to an event exclusion configuration 1 In the Symantec management console, on the Configurations view tab, in the left pane, expand SESA 2.0 and click Manager Event Exclusion Configurations. 2 Select the configuration to which you want to add event exclusion rules. 3 On the Event Exclusion tab, click Add. 4 In the Find Event Exclusions dialog box, in the Available event exclusions list, select one or more event exclusion rules. 5 To add the rules to the Selected event exclusions list, click Add. 6 Click OK. 7 On the Event Exclusions tab, click Apply. Distributing event exclusion configurations Event exclusion rules do not take effect until you distribute the event exclusion configuration that contains the rules to one or more SESA Managers. To distribute an event exclusion configuration, you must associate one or more distribution methods with it, as described in “Specifying event exclusion configuration associations” on page 233. 235 236 Configuring SESA 2.0 Manager Event Exclusion Configurations You distribute the event exclusion configurations in the same way that you distribute other software product configurations. To distribute an event exclusion configuration 1 In the Symantec management console, on the Configurations view tab, in the left pane, expand SESA 2.0 > Manager Event Exclusion Configurations. 2 Select the event exclusion configuration that you want to distribute. 3 On the Selection menu, click Distribute. 4 When you are prompted to distribute the configuration, select one of the following. ■ Yes: Distribute the configuration. A message is sent to the computers that are associated with the configuration, informing them to contact the SESA Manager for the new event exclusion configuration. ■ No: Do not distribute the configuration. Deleting event exclusion configurations You can delete configurations when you no longer need them. You cannot delete default configurations. When you delete a configuration, it is removed from any computer, organizational unit, or configuration group with which it has been associated. Any computer that uses the deleted configuration will continue to do so until you distribute another configuration, or until the poll interval is reached and the computer polls the SESA Manager to see if there are new configurations. To delete an event exclusion configuration 1 In the Symantec management console, on the Configurations view tab, in the left pane, expand SESA 2.0 > Manager Event Exclusion Configurations. 2 Select the event exclusion configuration that you want to delete. 3 On the Selection menu, click Delete. 4 When you are prompted to delete the configuration, select one of the following. ■ Yes: Delete the configuration. The configuration is removed from the list of configurations. ■ No: Do not delete the configuration. Chapter 6 Viewing and creating reports This chapter includes the following topics: ■ About reports ■ Viewing reports ■ About modifying reports ■ Printing and exporting report data ■ Monitoring events and alerts in detached windows About reports The Events and Alerts view tabs of the Symantec management console display the event data of your security products in easy-to-read reports. These reports are grouped by report type. SESA reports can be used by a wide range of security products. The security products you install determine which reports events are sent to. Some reports do not display events if the security product they support is not installed. Reports provide a high level summary of your security posture that you can use for further data analysis. Within a report, you can focus on an individual event’s record, and display a full set of details from the SESA DataStore for that event. 238 Viewing and creating reports Viewing reports You can use the base reports provided with the Symantec management console in two ways to customize your security environment: ■ You can modify a base report for the duration of a console session in order to track particular event behavior. See “Modifying reports by using filters” on page 246. ■ You can create a customized report from a base report. The base report serves as the starting point for a new report that is focused on the events that you want to monitor. See “About custom reports” on page 246. Viewing reports Reports support data analysis by summarizing a subset of the event log data in your SESA DataStores. On both the Alerts and the Events view tabs, the second level of the navigation tree in the left pane displays the SESA DataStores to which you have access. To view a report 1 2 In the Symantec management console, on the Alerts or Events view tab, in the left pane, expand the folder for a SESA DataStore, and any additional folders until you can see the report icons. The following icons indicate the report formats: Table See “Working with tabular reports” on page 239. Bar chart See “Working with chart-based reports” on page 241. Trend chart See “Working with chart-based reports” on page 241. Pie chart See “Working with chart-based reports” on page 241. Click the icon or name of the report you want to view. The report appears in the right pane. Viewing and creating reports Viewing reports Working with tabular reports Tabular reports present event data in column format. Work with tabular reports After you display a tabular report, you can use the techniques described here to work with the report. To display a tabular report 1 In the Symantec management console, on the Alerts or Events view tab, in the left pane, expand the folder for a SESA DataStore, and any additional folders until you can see the report icons. 2 Click the icon or the name of the report that you want to view. The report appears in the right pane. The status bar in the lower left corner of the window indicates the number of event records that are currently available in the Symantec management console for the selected report. To improve performance, event records are downloaded in sets. The size of the set is controlled by a setting in the Manager Components Configuration. The default is 5000 events per set. See “Modifying administrative settings” on page 186. If set of records that are being downloaded is large, a progress bar is displayed. If the nature of the report means that it may take a long time to download, the progress bar is accompanied by a message to that effect. 3 To display an additional set of events, on the toolbar, click Next. 4 To redisplay the first set of event records for the report, click Refresh. 239 240 Viewing and creating reports Viewing reports To view additional columns and events 1 In the report in the right pane, use the horizontal scroll bar to scroll right and left to view additional columns. 2 Use the vertical scroll bar to scroll up and down to view additional events. To reorder report columns ◆ In the right pane, hold down the left mouse button and drag the column heading to the right or the left. To change column width 1 In the report in the right pane, move the mouse pointer over the divider in the column heading until you see a double-headed arrow. 2 Press the left mouse button and drag the border of the column heading to the right or the left. To change the sort order of the table 1 In the report in the right pane, click the heading of the column on which you want the sort to be performed. An inverted arrow appears beside the column label. 2 Click again to reverse the sort order based on the values in the column. The sorting algorithms are different for different locales. In some locales, such as English, column sorting is case sensitive. Columns that start with an uppercase letter are sorted before columns that start with a lowercase letter. To view the details of an event or alert 1 In the report in the right pane, click on the event or alert to select it. 2 On the Selection menu, click Details. A dialog box is displayed, showing the event or alert details. See “Displaying event details” on page 284 and “Displaying alert details” on page 295. To create an alert configuration based on an event (event reports only) 1 In the report in the right pane, select the event. 2 On the Selection menu, click Alert Wizard. See “Creating an alert configuration based on an event” on page 285. Viewing and creating reports Viewing reports Working with chart-based reports Many reports are chart-based rather than tabular, presenting event and alert data graphically. This lets you quickly discern trends or detect security incidents that require your attention. To work with chart-based reports 1 In the Symantec management console, on the Alerts or Events view tab, in the left pane, expand the folder for a SESA DataStore, and any additional folders until you can see the report icons. 2 Click the icon or name of the report you want to view. The report appears in the right pane. The chart labels and legend describe the data being displayed. The status bar at the bottom of the window displays the name of the report. 241 242 Viewing and creating reports Viewing reports 3 To view a specific set of events that are represented by the chart, do one of the following. ■ In a bar chart report, click the bar that represents the events or alerts. A table below the chart shows the selected events. The status bar indicates how many events or alerts have been downloaded for the selected section of the chart. ■ In a trend report, place the pointer at the beginning of the date range for which you want to view events. Click and hold the left mouse button and then drag the mouse to the end of the date range. Release the mouse button. A table below the chart shows the events for the date range that you have selected. ■ In a pie chart report, click the segment of the chart that represents the events or alerts that you want to view. A table below the chart shows the event data used to create the segment that you selected. The segment is offset from the chart to highlight it. 4 Navigate in the table as described in “Working with tabular reports” on page 239. 5 To view the details of an event or alert, select the specific event or alert and then, on the Selection menu, click Details. See “Displaying event details” on page 284 and “Displaying alert details” on page 295. Viewing and creating reports Viewing reports 6 To create an alert configuration based on an event (event reports only), select the specific event and then, on the Selection menu, click Alert Wizard. See “Creating an alert configuration based on an event” on page 285. 7 To remove the table of events, click the X at the top of the scroll bar to the right of the table. If you click on another part of the chart, a table of events that represent that part of the chart replaces the table that was previously displayed. Troubleshooting unavailable SESA DataStores To view events and alerts, the SESA Manager must be able to connect to the SESA DataStore in which they are stored. When a SESA DataStore is installed but not available, its icon in the left pane indicates that there is a problem. If you click on the SESA DataStore, a message in the right pane tells you that there is an error connecting. Figure 6-1 shows that the SESA DataStore named DataStore2 is not available. Figure 6-1 Unavailable SESA DataStore A SESA DataStore may be unavailable for any of the reasons in Table 6-1. 243 244 Viewing and creating reports About modifying reports Table 6-1 Reasons a SESA DataStore may be unavailable Reason the SESA DataStore is unavailable Suggested action You are trying to use a 1.1 SESA Manager to access a SESA DataStore that is installed on an Oracle 9i database server SESA 1.1 does not support Oracle 9i. If you are in a mixed SESA 2.0 and SESA 1.1 environment and you are connected to a 1.1 SESA Manager, you cannot view events from an 2.0 SESA DataStore that is installed on Oracle 9i. To see whether the SESA DataStore is an Oracle-based SESA DataStore, on the System view tab, click DataStores and, in the right pane, view the description of the DataStore. If you need to view events in the Oracle-based SESA DataStore, log off the 1.1 SESA Manager and log on to a 2.0 SESA Manager. You are trying to access a SESA DataStore on a Windows system from a SESA Manager on a Solaris system. If you have a mixed Solaris and Windows SESA environment, to be able to view SESA DataStores that are installed on a Microsoft Windows system, you must install the IBM DB2 Runtime Client 7.2 (with FixPack 5) on the Solaris SESA Manager computer before you install the SESA Manager. The SESA DataStore system has a bad driver Consider configuring your SESA DataStores for failover, as described in “Configuring SESA Manager to SESA DataStore failover” on page 205 The SESA DataStore system is offline Consider configuring your SESA DataStores for failover, as described in “Configuring SESA Manager to SESA DataStore failover” on page 205 About modifying reports You can modify the Global Reports that are provided by SESA and the reports that are provided with your installed security products. A filter dialog box lets you define conditions that focus the report on what is important to you. By adding multiple conditions, you refine the details that will be included in the report. You can use filters to specify data that will be included in the report, or to specify data that will not be included in the report. Until you add conditions, all conditions that are part of the original report are used in the report. You can use the filters you create in two ways: ■ By applying the filter to the report on which it is based. The applied filter is available during the current console session. ■ By saving the filter. This saves the filtered report in the Custom Reports folder for reuse at a later time. Viewing and creating reports About modifying reports About filtered reports You can apply temporary conditions to a report to filter the report data during a console session. For example, if you are distributing configurations, you might want to keep a report open in a detached window to track configuration updates. When you apply a filter, it is visible as an untitled tab at the bottom of the report. Figure 6-2 Event report with filter Each time you modify the filter, a new tab appears. You can apply filters to either a base report or to a custom report. When you log off, the filtered reports are not saved unless you save them deliberately, as described in “To save the filter as a custom report” on page 251. The following sections describe how to filter reports: ■ “Modifying reports by using filters” on page 246 ■ “Filtering shortcuts” on page 257 245 246 Viewing and creating reports About modifying reports About custom reports There are two ways to create a custom report: ■ You can save filtered reports as custom reports when you know that you have a recurring need for the report. As an example, you might want to regularly look at the highest severity events or alerts that occurred over the past 24 hours. This method lets you choose a report format such as a bar or pie chart. The report on which the filtered report is based acts as a template. ■ You can create a new custom report using the Custom Report Wizard. When you use this method, the report you create is always displayed in table format. Modifying reports by using filters How you modify reports depends on the security applications installed on your system, the report format you select, and the event or alert details that you want to capture. When you filter a chart-based report, the results depend on your starting point: ■ If you initiate the filter without displaying events, the resulting report retains the chart format. It is based on the conditions that created the original report plus the conditions you add. Note: For meaningful results, this filter should use the AND condition because you add additional conditions to the conditions that originally defined the report. ■ If you initiate the filter after clicking a section of the chart to drill down to the events that it represents, the resulting report is in table format. It is based on all the events in the SESA DataStore. You can use the techniques described in this section to customize any event report or alert report. To modify a report The following procedures describe a specific scenario to illustrate the basic ways in which you can modify an event report. You can also use these methods to create an alert report. Viewing and creating reports About modifying reports When you modify a report, you: ■ Display the filter dialog box. ■ Specify conditions for the filter by selecting event columns, operators, and values. The method you use to specify values depends on the event column you select. This procedure illustrates the use of the Browse for Object dialog box to select a value. Other methods are: ■ Specifying dates and date ranges ■ Specifying report filter values using Find dialogs ■ Specifying report filter values when there are no selection options ■ Determine which conditions are used. ■ Apply the filter to the displayed report. ■ Optionally, save the filter as a custom report. To display the filter dialog box 1 In the Symantec management console, on the Events view tab, in the left pane, expand the folder for a SESA DataStore, and any additional folders until you can select the report that you want to filter. 2 On the Selection menu, click Filter. 3 In the Filter dialog box, on the Filter Conditions tab, you specify conditions that limit the data that is sent to the report. 247 248 Viewing and creating reports About modifying reports To specify a condition for the filter 1 Click Add. A row is added to the table. Use this row to create a condition that is applied to the report data. The event column, operator, and value that you specify determine the event data that is used for the filter. 2 Under Event Column, click in the field to activate a browse button (...). Viewing and creating reports About modifying reports 3 Click the browse button (...). 4 In the Select a column dialog box, scroll to select Severity as the event column to use in the filter, and then click OK. 5 Under Operator, click the field and use the drop-down list to select not equal to as the operator. The available operators are determined by the event column that you select. When the operator is applied, it specifies how the Event column and value pair that you specify is handled in the filtered report. The operator that you select determines whether the filter includes or excludes event data, as shown in the following examples: Event Column 6 Operator Value To exclude informational events Severity not equal to Informational To include events with an event type of Application start equal to Application start Event type Under Value, click the field. ■ If objects in the SESA DataStore are associated with the Event Column you selected, a browse (...) button is displayed. In this example, a browse button is displayed. ■ If there are no objects in the SESA DataStore that are related to the selected Event Column, the field remains blank. See “Specifying report filter values when there are no selection options” on page 255. 249 250 Viewing and creating reports About modifying reports 7 Click the browse (...) button. The Browse for Objects dialog box displays the objects that apply to the Event Column and operator that you selected. In this case, the Browse for Object dialog box lets you select the severity level to exclude. 8 Select 1 - Informational. 9 Click OK. The completed condition is: Event Column Operator Value Severity not equal to 1-Informational 10 If your filtered report is based on a tabular report, you can use the Columns tab to change which columns are displayed and the column order. See “Modifying the column display of a tabular report” on page 256. To determine which conditions are used 1 If you add multiple conditions to a filter, you can determine which are used when the filter is applied. Do one of the following: ■ To create a filtered report that only shows events that meet all of the conditions, select Meet all of the above conditions (AND). ■ To create a filtered report that shows events that meet any of the conditions, select Meet any of the above conditions (OR). Viewing and creating reports About modifying reports 2 ■ To create a filtered report that only shows events that meet all of the conditions, select Meet all of the above conditions (AND). To understand the results of this selection, consider the example of an report filter that has a condition that excludes events with an event type of Informational and a second condition that includes events for the product SESA System. If you select the AND option, the filtered report contains all SESA System events that are not informational. Events for other products and informational events are not displayed. ■ To create a filtered report that shows events that meet any of the conditions, click Meet any of the above conditions (OR). Using the same example, if you select the OR option, the filtered report contains all events that are not informational events, regardless of product, and all events that are generated by SESA System. Optionally, do either of the following: ■ To remove a condition that you have specified, select the appropriate row in the table, and then click Remove. ■ To remove all conditions, click Remove All. To apply the filter to the displayed report 1 To see the effect of the changes you have made, click Apply. 2 View the report in the right pane of the Symantec management console. As you add filters, tabs at the bottom of the pane let you select which filter to view. 3 Add or change conditions until the report meets your requirements. As you apply each change, a new tab is generated. 4 If you want to remove a filter, right-click on the tab that represents it and select Close. To save the filter as a custom report 1 In the right pane, right-click on the tab that represents the filter that you want to save, and then select Save As. 2 In the Save Filter as Custom Report dialog box, type the custom report name. 3 Click OK. The report is added to the folder of Custom Reports in the left pane, and the name of the filter is displayed on the tab. 251 252 Viewing and creating reports About modifying reports Specifying dates and date ranges When you create a report filter, for some event column selections, the value you select is a date or a date range. This procedure describes how to specify a date range for an Event Date column. To specify dates and date ranges 1 In the Symantec management console, on the Alerts or Events view tab, in the left pane, expand the folder for a SESA DataStore, and any additional folders until you can select the report that you want to filter. 2 On the Selection menu, click Filter. 3 In the Filter dialog box, on the Filter Conditions tab, click Add. 4 Under Event Column, click the field and then click the browse (...) button. 5 In the Select a column dialog box, scroll down and select Event Date. 6 Click OK. 7 Under Operator, click the field and use the drop-down list to select an operator. Some operators in the list let you specify a specific date. The between and not between operators let you specify a date range. Select between as the operator. 8 Under Value, click the field and then click the browse (...) button. Viewing and creating reports About modifying reports 9 In the Select a Date Range dialog box, in the left calendar, set the beginning of the date range. Do the following: Month drop-down list Select a month. Year Select a year. Calendar Select a day. Date navigation buttons The buttons below the calendar help you navigate: Time control ■ Go to today–If you move to another month in the calendar, click the left button to return to today’s date. ■ Go to current selection–If you select a date, and then move in the calendar, click the right button to return to the selected date. Click each section of the time control (hours, minutes, days, seconds) and use the arrows or type a number to increase or decrease the value. 10 To set the end of the date range, in the right calendar, make selections as described in step 9. 11 Click OK. 12 To see the effect of the filter, click Apply. Specifying report filter values using Find dialogs When you create a report filter, for some event column selections, you specify the value using a Find dialog box. This procedure describes how to limit a report to events from a specific computer. To specify a report filter value using a Find dialog 1 In the Symantec management console, on the Alerts or Events view tab, in the left pane, expand the folder for a SESA DataStore, and any additional folders until you can select the report that you want to filter. 2 On the Selection menu, click Filter. 3 In the Filter dialog box, on the Filter Conditions tab, click Add. 4 Under Event Column, click the field and then click the browse (...) button. 5 In the Select a column dialog box, scroll down and select Machine. 253 254 Viewing and creating reports About modifying reports 6 Click OK. 7 From the Operator drop-down list, select equal to. 8 Under Value, click the field and then click the browse (...) button. 9 In the Find Computers dialog box, do one of the following: ■ To proceed without modifying the Available computers list, select a computer, and then continue at step 10. The Available computers list shows all computers for the domain, up to the number of computers indicated by the Maximum search count text box. ■ To modify the Available computers list by specifying search criteria, do the following: Look in Identifies the domain. You cannot change this value. Computer name Type a computer name. You can specify a partial computer name that contains one or more asterisks. For example: *dev* All computers with names that contain this string are returned. SESA Managers only Check to limit the search to SESA Managers. Viewing and creating reports About modifying reports Maximum search count Type a number to reduce or increase the number of computers that are returned by the search. Start search Click here to start the search. The Available computers list is revised based on the search criteria. Stop search Click here to stop the search before it is complete. In the revised Available computers list, select a computer. 10 Click OK. 11 To see the effect of the filter, click Apply. Specifying report filter values when there are no selection options When you create a report filter, for some event column selections, there are no selection options. In this case, you must type the value that is used for the event column. This procedure describes how to specify a value for the User Name event column. To specify a report filter value when there are no selection options 1 In the Symantec management console, on the Alerts or Events view tab, in the left pane, expand the folder for a SESA DataStore, and any additional folders until you can select the report that you want to filter. 2 On the Selection menu, click Filter. 3 In the Filter dialog box, on the Filter Conditions tab, click Add. 4 Under Event Column, click the field and then click the browse (...) button. 5 In the Select a column dialog box, scroll down and select User Name. 6 Click OK. 7 From the Operator drop-down list, select either equal to or matches. 8 Under Value, click the field to activate the value text box. 9 Type the User Name as follows: ■ If you chose equal to as the operator, you must type the value exactly as it is stored in the event report schema. You can determine the exact format by looking at a Details report of an event for this user, as described in “Displaying event details” on page 284. 255 256 Viewing and creating reports About modifying reports ■ If you chose matches as the operator, you can include wildcards to expand the range of possible matches. Use * for string matching or ? for character matching. Note that the case of the text must match. 10 Click OK. 11 To see the effect of the filter, click Apply. Modifying the column display of a tabular report Tabular reports give you the greatest flexibility for filtering reports. You can customize the columns that are displayed and the order in which those columns are displayed, as well as the data that is used to generate the report. You cannot change the column display for pie chart, bar chart, or trend reports. To modify the column display 1 In the Symantec management console, on the Alerts or Events view tab, in the left pane, expand the folder for a SESA DataStore, and any additional folders until you can select the report that you want to filter. 2 On the Selection menu, click Filter Report. In the Filter dialog box, on the Report Columns tab, the Available Report Columns list shows columns that you can add to the display of the report. The Selected Report Columns list shows the columns that are currently displayed when you view the report. Viewing and creating reports About modifying reports 3 4 To add columns to the display, under Available Columns, do one of the following: ■ To add a single column, select it, and then click Add. ■ To add all of the available columns, click Add All. To remove columns from the display, under Selected Columns, do one of the following: ■ To remove a single column, select it, and then click Remove. ■ To remove all of the selected columns, click Remove. This option lets you quickly redesign a report when you want to display only a few specific columns. Until you add back at least one column, the filter is invalid and you cannot apply it. 5 To reorder columns in the Selected Columns list, select a column name, and then click Move Up or Move Down. 6 To see the effect of the changes you have made, click Apply and view the report in the Symantec management console. Filtering shortcuts Right-click menus for reports provide shortcuts for creating filters. The menu that is displayed depends on the location of the cursor when you right-click on reports that are listed in the left pane or events that are listed in the right pane: ■ In the left pane, when you right-click on a report title, a Filter option lets you filter a report before you view it. ■ In a report in the left pane: ■ When you right click over a column heading, the Filter on Column menu is displayed. ■ When you right click over a cell in a row, the Filter on Cell menu is displayed These menus give you multiple options for quickly creating filters. 257 258 Viewing and creating reports About modifying reports Pre-filtering a report before viewing it You may want to pre-filter a report even before you view it. For example, you might want to view only a subset of data from a large report. To prefilter a report before viewing it 1 In the Symantec management console, on the Alerts or Events view tab, in the left pane, expand the folder for a SESA DataStore, and any additional folders until you can see the report that you want to filter. 2 Without selecting the report, right-click on it. 3 On the menu that appears, click Filter. 4 Create a filter for the report by following the steps in “Modifying reports by using filters” on page 246. When you complete the filter and apply it, the filtered report is displayed in the right pane, with an icon to the right of the report title to indicate that this is a filtered view of the report. 5 In the right-pane, at the bottom of the table, you can take action on the filtered report by right-clicking on the report title and choosing one of the following options: ■ To redisplay the Filter dialog box, click Filter. ■ To remove the filter and display the unfiltered report, click Remove Filter. ■ To save the report as a custom report, click Save as. In the Save Filter as Custom Report dialog box, enter the custom report name and then click OK. Filtering a report based on a column You can create a report filter quickly based on the contents of a column in the base report. To filter a report based on a column 1 In the Symantec management console, on the Alerts or Events view tab, in the left pane, expand the folder for a SESA DataStore, and any additional folders until you can select the report that you want to filter. Viewing and creating reports About modifying reports 2 In the right pane, right-click on the column that contains the values on which you want to filter. 3 From the submenu, select whether the report will be based on the events in the base report, or on all events in the database. If the base report was pre-filtered, an icon appears to the right of the title. The Filter dialog box displays with the event column that you selected as the Event Column for the filter. By default, the Operator is “equal to”. 4 Select a value for the condition. 5 Add additional conditions, if desired. 259 260 Viewing and creating reports About modifying reports 6 7 If you add multiple conditions to the filter, determine which will be used when the filter is applied. Do one of the following: ■ To create a filtered report that only shows events that meet all of the conditions, select Meet all of the above conditions (AND). ■ To create a filtered report that shows events that meet any of the conditions, select Meet any of the above conditions (OR). Click Apply. Filtering a report based on a cell You can create a report based on the contents of a single cell in the base report. Filter a report based on a cell You can filter on a cell either automatically or manually, as described in the following procedure. ■ If you select Filter on Cell, the report is created automatically using events that match the contents of that cell. ■ If you select Manually Filter on Cell, the Filter dialog box is displayed. You can use it to create additional conditions, or to alter the condition that is derived from the cell. ■ If you select Filter on cell, showing columns from, you can select an event class on which to base a report. This filter is applied to all events in the SESA DataStore rather than just the events in the report you are viewing. The resulting report shows all columns and all events for the event class that you select, and any subclasses that are derived from it. To automatically filter a report based on a cell 1 In the Symantec management console, on the Alerts or Events view tab, in the left pane, expand the folder for a SESA DataStore, and any additional folders until you can select the report that you want to filter. 2 In the right pane, right-click on a cell that contains the value on which you want to filter. For example, you could select a cell with the event type “Security.” Viewing and creating reports About modifying reports 3 On the menu that appears, select Filter on Cell. 4 From the submenu, select whether the report is based on the events in the base report, or on all events in the database. A new filter is added to the report, using the content of the cell as the filter condition. 261 262 Viewing and creating reports About modifying reports To manually filter a report based on a cell 1 On the Alerts or Events view tab, in the left pane, expand the folder for a SESA DataStore, and any additional folders until you can select the report that you want to filter. 2 In the right pane, right-click on a cell that contains the value on which you want to filter. 3 Select Manually Filter on Cell. 4 From the submenu, select whether the report is based on the events in the base report, or on all events in the database. If the base report was pre-filtered, an icon appears to the right of the title. The Filter dialog box is displayed with a condition already defined using the event column and cell value of your selection. By default, the Operator is “equal to.” 5 Add additional conditions, if desired. 6 If you add multiple conditions to the filter, determine which are used when the filter is applied. Do one of the following: 7 ■ To create a filtered report that only shows events that meet all of the conditions, select Meet all of the above conditions (AND). ■ To create a filtered report that shows events that meet any of the conditions, select Meet any of the above conditions (OR). Click Apply. Viewing and creating reports About modifying reports To generate a filter based on an event class 1 On the Alerts or Events view tab, in the left pane, expand the folder for a SESA DataStore, and any additional folders until you can select the report that you want to filter. 2 In the right pane, right-click on a cell that contains the value on which you want to filter. 3 Select Filter on cell, showing columns from. 4 From the submenu, select one of the following: ■ Audit Activity ■ Other Event Class 263 264 Viewing and creating reports About modifying reports If you select Other Event Class, the Event Class dialog box is displayed. 5 Do the following: ■ Select the event class to be used in the filter. If an arrow appears to the left of the list, click it to display a list of subclasses from which you can select. ■ Click OK. The report that appears is based on all events in the SESA DataStore that have the value of the cell from which you initiated the report and belong to the event class you selected. If the event class that you select is not applicable to the cell that you are using to generate the filter, the right pane displays the message “No Events to Display.” Viewing and creating reports Creating a custom report using the Custom Reports Wizard Creating a custom report using the Custom Reports Wizard You can create a custom report by saving a filtered report as described in “Modifying reports by using filters” on page 246. You can also create a custom report with the Custom Report Wizard, using many of the same processes that you use to modify reports by creating filters. To create a custom report using the Custom Report Wizard 1 In the Symantec management console, on the Alerts or Events view tab, in the left pane, expand the folder for a SESA DataStore. 2 Select the Custom Reports folder. 3 On the Selection menu, click New. 4 In the first panel of the Custom Report Wizard, click Next. 5 6 In the General panel, do the following: ■ In the Custom Report name text box, type a name. ■ In the Description text box, type a description. The description is optional. Click Next. 265 266 Viewing and creating reports Creating a custom report using the Custom Reports Wizard 7 In the Filter Conditions panel, to add filter conditions for the report, click Add. Use the procedure in “To specify a condition for the filter” on page 248. 8 If you add more than one filter condition, to determine how the conditions will be applied, do one of the following: 9 ■ To create a filtered report that only shows events that meet all of the conditions, select Meet all of the above conditions (AND). ■ To create a filtered report that shows events that meet any of the conditions, select Meet any of the above conditions (OR). Click Next. 10 In the Report Columns panel, select the columns that are used in the report and the order in which they appear. Do one or more of the following: ■ To add a single column, select it, and then click Add. ■ To add all of the available columns, click Add All. ■ To remove a single column, select it, and then click Remove. ■ To remove all of the selected columns, click Remove. This option lets you quickly redesign a report when you want to display only a few specific columns. Until you add back at least one column, the filter is invalid and you cannot apply it. ■ To reorder columns in the Selected Report Columns list box, select a column name, and then click Move Up or Move Down. 11 Click Next. Viewing and creating reports Printing and exporting report data 12 In the Custom Report Summary panel, review the information that you have specified. Then do one of the following. ■ To make changes, click Back. ■ To create the user, click Finish. The Task/Status list at the bottom of the panel scrolls up to show the custom report properties that are being created. A green check mark indicates success. When the custom report is created, the Cancel button changes to a Close button. 13 Click Close. The custom report is added to the Custom Reports folder in the left pane. Printing and exporting report data You may need access to report data when you are not working in the Symantec management console. For example, you may want to share the data with other users, or supply it as part of a report. You can do this by: ■ Printing reports ■ Exporting reports Printing reports You can print report data to a printer or a file using the print drivers installed on the computer from which you are running the Symantec management console. When you print directly from a report, all records that are downloaded to the Symantec management console are printed. The number of records depends on the number of records that is downloaded initially and whether you used the Next button in the toolbar to download additional reports. See “Working with tabular reports” on page 239. 267 268 Viewing and creating reports Printing and exporting report data If you notice that column data wraps when you print a report with many columns, you can create a custom report that eliminates columns that you don’t need and print it. See “Modifying reports by using filters” on page 246. Note: While printing is an option from a browser window, do not attempt to initiate printing using the browser menu options or buttons of the browser that is hosting the Symantec management console. This will result in a page that is blank or black. Always use the Symantec management console menus and toolbar buttons to initiate printing. To print a report 1 In the Symantec management console, on the Alerts or Events view tab, in the left pane, expand the folder for a SESA DataStore, and any additional folders until you can select the report that you want to print. If the report is a chart report, you can print just the graphical display of the chart, or you can select a section of the chart to display and print the table of events. 2 On the Selection menu, click Print. A secondary browser window is displayed, containing the report. Viewing and creating reports Printing and exporting report data 3 4 Do one of the following: ■ To print to the default printer that is defined on your computer, click the printer button on the toolbar. ■ To select a printer to which to print, or to specify printer settings, on the browser window’s File menu, click Print. In the Print dialog box, select a printer and set its properties. You can select any print driver configured on your system to create printed output or to print to a file. Click OK. Exporting reports Using the Export feature to save report data gives you more flexibility than simply printing the report. The Export dialog box provides the following export options: ■ Exporting a report to an HTML file ■ Exporting to a PDF file ■ Exporting to CSV format This option is only available if the report is in tabular format, or you have displayed tabular data for a chart-based report. For PDF and HTML reports, you can also customize the exported report by modifying the table header, and supplying a report title and table footer. See “To save the filter as a custom report” on page 251. Note: If the data you want to export uses a double-byte character set (DBCS), you must configure SESA to export data using Unicode encoding. See “Modifying administrative settings” on page 186. Exporting a report to an HTML file Reports exported to HTML format can be incorporated into Web-based presentations or made available by providing the URL of the report. To export a report to an HTML file 1 In the Symantec management console, on the Alerts or Events view tab, in the left pane, expand the folder for a SESA DataStore, and any additional folders until you can select the report that you want to export. 2 On the Selection menu, click Export. 269 270 Viewing and creating reports Printing and exporting report data 3 In the Export dialog box, select HTML. 4 To customize the report title and header and provide an optional footer, click Customize. See “Customizing an exported report” on page 272. 5 Click OK. 6 View the report in the browser window that appears on your desktop. 7 Do one of the following: ■ To save the HTML file to your computer, on the browser’s menu bar, select File > Save As. ■ To view and edit the source HTML code, on the browser’s menu bar, select View > Source. ■ To print the HTML file, use the print button on the toolbar or the print option on the File menu. Exporting to a PDF file Reports exported to PDF format can be sent as attachments that are readable by anyone with an Acrobat reader. Note: Exporting to PDF format is not available for double-byte character sets (DBCS) such as Japanese. If the installed language uses DBCS, the PDF option is not available. If event data contains DBCS characters, exporting to PDF will fail. To export a report to a PDF file 1 In the Symantec management console, on the Alerts or Events view tab, in the left pane, expand the folder for a SESA DataStore, and any additional folders until you can select the report that you want to export. 2 On the Selection menu, click Export. 3 In the Export dialog box, select PDF. 4 To customize the report title and provide an optional header or footer, click Customize. See “Customizing an exported report” on page 272. 5 Click OK. Viewing and creating reports Printing and exporting report data 6 View the report in the browser window that appears on your desktop. The location of the PDF version of the report you are viewing is on the SESA Manager. If the Acrobat Reader is not installed on the client, the File Download dialog box is displayed. Specify a location, and then click Save. 7 To save a copy of the file to your computer, on the Acrobat toolbar, click Save. Exporting to CSV format Exporting to CSV format is only available if the report you have selected is a table formatted report, or if you display table data for a section of a chart-based report. The CSV format converts each row of report data into a set of values separated by commas. You can then import information in this format into a spreadsheet such as Microsoft Excel. To export a report to CSV format 1 In the Symantec management console, on the Alerts or Events view tab, in the left pane, expand the folder for a SESA DataStore, and any additional folders until you can select the report that you want to export. 2 On the Selection menu, click Export. 3 In the Export dialog box, select CSV. 4 Click OK. An empty browser window and File Download dialog box are displayed. 5 In the File Download dialog box, do one of the following: select Save this file to disk. ■ To save the report data to a CSV file, click Save. In the Save As dialog box, navigate to the location to which to save the file, type a file name, and then click Save. Close the browser window. ■ To open the exported file, do one of the following: If you do not have a spreadsheet application, click Open to open the report in the newly displayed browser window. If you have a spreadsheet application associated with.csv files, to open the report in the spreadsheet application, click Open. If desired, use the application to save the .csv file, and then close the application. 271 272 Viewing and creating reports Printing and exporting report data Customizing an exported report When you export reports in HTML or PDF format, you can change the report header information of exported reports, and optionally add a title and footer. Customize an exported report The customization changes you make can be simple text additions or changes. For HTML reports, you can also add HTML coding to control the formatting of titles. To customize an exported report 1 In the Symantec management console, on the Alerts or Events view tab, in the left pane, expand the folder for a SESA DataStore, and any additional folders until you can select the report that you want to export. 2 On the Selection menu, click Export. 3 In the Export dialog box, select the format to which you want to export the report. 4 On the Customize tab, in the Report title text box, type the text that you want to add as a title. 5 In the Header text box, type your revisions to modify the table header. The Header text box initially contains the current date and your logon name. The header text you supply prints above the report. 6 In the Footer text box, type the text that you want to add as a footer. The footer text you supply prints at the end of the report. 7 Click OK. Viewing and creating reports Monitoring events and alerts in detached windows To add formatting to HTML titles 1 To make the title of an HTML report bold, add the HTML tag pair <BOLD></ BOLD>. Be sure to include the closing HTML tag or the formatting that you specify is applied to the header and footer text as well. 2 To change the color, add the tag pair <FONT COLOR=xxxx></FONT COLOR>, where xxxx is the color code. 3 To format a title that contains a character that is an HTML operator, such as the character “>”, use an entity reference for the character. Some common entity references are: HTML character entity reference < < > > & & " " Monitoring events and alerts in detached windows One way to monitor particular security situations is to display reports in detached windows so that you can see events and alerts while you continue to do other work in the Symantec management console. For example, if you are distributing a new configuration and want to see whether the expected updates were taking place, you can open the Configuration Updates report in a detached window. To monitor events in a detached window 1 In the Symantec management console, on the Alerts or Events view tab, in the left pane, expand the folder for a SESA DataStore, and any additional folders until you can see the report icons. 2 Click the icon or the name of the report you want to view. 3 If desired, add filters to the report. See “Modifying reports by using filters” on page 246. 4 On the Selection menu, click Detach. 273 274 Viewing and creating reports Monitoring events and alerts in detached windows 5 In the new Events window (or Alerts window) that appears on your desktop, in the Selection menu, on the Selection menu, click Auto Refresh. The Auto-Refresh button on the toolbar is highlighted and changes color. This button indicates that the event or alert report displayed is regularly updated at a preset auto refresh interval. To change the auto refresh interval, edit the Administrative tab of the Manager Components Configuration. See “Editing a configuration’s settings” on page 165. 6 To turn off Auto-Refresh, click Auto-Refresh on the toolbar. Chapter 7 Viewing and consolidating events This chapter includes the following topics: ■ About the Events view tab ■ Viewing event statistics ■ Viewing event reports ■ Displaying event details ■ Creating an alert configuration based on an event About the Events view tab Events are displayed as reports on the Events view tab. This tab is visible if you are a member of a role that allows event viewing. Your role membership also determines the products for which you can see events. Note: Members of the Domain Administrator role can view all events from all SESA DataStores that are in the domain where the Domain Administrator role exists. Events that are collected from your security products are forwarded to a common SESA DataStore. If multiple SESA DataStores are configured, the left pane of the Events view tab contains a node for each SESA DataStore. 276 Viewing and consolidating events About the Events view tab Under each SESA DataStore, a combination of the reports in Table 7-1 are available to display this event data. Table 7-1 Event reports Report type Description Global reports Global reports are preconfigured reports provided with the SESA Manager. They typically use data gathered across all integrated security products that are sending events to SESA Managers. You can use these reports as templates to generate reports that are specific to your needs. To view global reports, you must have permissions to view event families, as well as global reports. Event family reports Groups of associated event reports are presented as event families. Different integrating products may log events that belong to the same event family. The System Event folder is an example. It contains reports of system events that are common to all products, such as Application Start and Application Stop. In addition, it contains sub folders for system events that are specific to the products installed. Additional folders are available for other families of events. For example, the events logged by products with antivirus components are shown in reports in the AntiVirus Event family, such as Virus Found and Virus Repaired. These reports are preconfigured so that you can use them as the basis for reports you create. Custom reports Custom reports let you reduce the amount of data being shown, so that you can focus on what is important to you. You can create custom reports based on the preconfigured reports in the Global Reports folder and Event family folders. You can also create custom reports by running the Custom Reports Wizard. See “Creating a custom report using the Custom Reports Wizard” on page 265. Viewing and consolidating events Viewing event statistics Viewing event statistics The SESA DataStores you are connected to are represented as folders in the navigation tree in the left pane of the Events view. To view the event statistics for a SESA DataStore ◆ In the Symantec management console, on the Events view tab, in the left pane, click the name of the SESA DataStore. The statistics for the SESA DataStore are displayed in the right pane. Viewing event reports The reports on the Events view tab let you view sets of event information that are logically grouped, rather than a continuous log file of the entire SESA DataStore. See “Viewing reports” on page 238. For each SESA DataStore to which you have access, the Events view provides the following folders of preconfigured reports: ■ Global Reports ■ System Events ■ Reports for integrated security products In addition, you can create and view custom reports based on these preconfigured reports. See “About custom reports” on page 246. Note: In a properly installed Solaris environment, you can connect to a Solaris SESA Manager and view events from a SESA DataStore that is installed on a Microsoft Windows 2000 system. To do this, you must install the IBM DB2 Runtime Client 7.2 (with FixPack 5) on the Solaris SESA Manager computer before you install the SESA Manager. 277 278 Viewing and consolidating events Viewing event reports Global Reports The Global Reports folder contains the preconfigured reports shown in Table 7-2. It may also contain additional reports provided by the products you have installed. See the documentation for the SESA-enabled security products installed on your SESA Manager. Table 7-2 Global reports Global Report Description All events: Top 5 A chart of the five most common events in the SESA DataStore All events: Last 30 days Occurrences of all events over the last 30 days All events: Last 60 days Occurrences of all events over the last 60 days Application events: Updates only All application update events logged to the SESA DataStore Configuration events: Updates only All configuration update events logged to the SESA DataStore User events: Top 10 Events charted by the 10 users that have the most events Application events: All Based on start, stop, and update events for applications All events: Last 8 hours All the events that have been logged over the last 8 hours All events: Last 24 hours All the events that have been logged over the last 24 hours All Events: Top 10 A chart of the 10 most common events in the SESA DataStore Content incidents: Percentage of All Content Events Shows the relative quantities of the following types of anti-virus events: ■ Malware Content Violations ■ Generic Content Violations ■ Spam Content Violations ■ Sensitive Content Violations All events: Severities percentages Percentage of all events shown by severity Machines events: Top 10 Events charted by the 10 computers that have the most events Viewing and consolidating events Viewing event reports Global Report Description All events: Organizational Unit percentages Percentage of all events shown by organizational unit All events: Product percentages Percentage of all events shown by product All events: Software Feature percentages Percentage of all events shown by software feature Note: SESA 1.1 included an All Events report. If you migrate a SESA 1.1 environment to SESA 2.0, the All Events report is listed in Global Reports. In a SESA 2.0 only installation, All Events is not available as a Global report. However, you can access all events when you create a filter based on a report column or cell. See “Filtering shortcuts” on page 257. System Events The System Events folder contains reports for two kinds of events: ■ Reports that are based on all system events ■ Reports that are based on specific products Examples of these subsets of reports are the SESA System reports and the LiveUpdate reports. The System Events folder may also contain additional reports provided by the products you have installed. See your product documentation. The reports in Table 7-3 are based on all system events. Table 7-3 System Event reports - all events Report name Description Definition Updates Events that are generated when Live Update runs and finds that there are updates available, such as virus definitions of firewall rules. Correlated Alert Events All the events that have qualified for an alert. If the event count in the alert is high, there may be correlated events that do not actually generate an alert. 279 280 Viewing and consolidating events Viewing event reports Report name Description Heartbeat Events Events that are generated by the Heartbeat Monitor service. SESA Database License Size Violation Events that are generated when the SESA Database license size is violated. SESA Manager Working Folder Disk Full Events that are generated when the disk space falls below the configured free space minimum size. See “Increasing the minimum free disk space requirement in high logging volume situations” on page 181. User or Group DN Notification Error Events that are generated when a user who is configured to receive a notification cannot be reached. DataStore Tablespace Full by Percent Threshold Events that are generated when tablespace usage is greater than or equal to a configured threshold. SIPI Product Package Deployment Successful Events that are generated when a SIPI package for a SESA-enabled product is successfully deployed. SIPI Product Package Deployment Failed Events that are generated when deploying a SIPI package for a SESA-enabled product fails. SIPI Product Package Uninstallation Successful Events that are generated when a SIPI package for a SESA-enabled product is successfully removed. SIPI Product Package Uninstallation Failed Events that are generated when the removal of a SIPI package for a SESA-enabled product fails. SIPI Component Package Deployment Successful Events that are generated when a SIPI package for a SESA component is successfully deployed. SIPI Component Package Deployment Failed Events that are generated when deploying a SIPI package for a SESA component fails. SIPI Component Package Uninstallation Successful Events that are generated when a SIPI package for a SESA component is successfully removed. SIPI Component Package Uninstallation Failed Events that are generated when the removal of a SIPI package for a SESA component fails. SIPI All Package Audit Events that are generated when a SIPI package is deployed or removed. Audit Events All audit events. Viewing and consolidating events Viewing event reports SESA System reports The reports in Table 7-4 are specific to events logged by the SESA System components. Table 7-4 SESA System reports SESA System reports Description Hyperactive Client Violations Events that indicate an unusual amount of activity on a client, which may indicate a denial of service attack Agent LiveUpdate Sessions LiveUpdates performed on the SESA Agent Failed Agent Start-up Events Failed Startups of SESA Agents Manager events: Access only Accesses to the SESA Manager Admin Service SESA Manager LiveUpdate Sessions LiveUpdates performed on the SESA Manager Service Connection Events Table report of service connection events All Service Connection Events Bar chart report of service connection events LiveUpdate reports The reports in Table 7-5 are specific to events logged by the LiveUpdate components. Table 7-5 LiveUpdate reports SESA System reports Description LiveUpdate Events All LiveUpdate events LiveUpdate Session Start Events Events generated when a LiveUpdate session starts LiveUpdate End Session Events Events generated when a LiveUpdate session ends LiveUpdate Server Selection Events Events that show the servers selected for LiveUpdate LiveUpdate Product Update Events Events that occur when a product is successfully updated LiveUpdate Failure Events Events generated when LiveUpdate fails LiveUpdate End Session Failure Events Events generated when a LiveUpdate session ends in failure 281 282 Viewing and consolidating events Viewing event reports SESA System reports Description LiveUpdate Server Selection Failure Events Events generated when there is a failure to connect to a server for LiveUpdate LiveUpdate Product Update Failure Events Events generated when LiveUpdate fails to update a product LiveUpdate Sessions by Completion Status Bar chart report based on LiveUpdate session completions Daily LiveUpdate Sessions Count Line chart report the daily count of LiveUpdate sessions Applied Updates by Product Name Bar chart report of LiveUpdates by product Updates by Signer Bar chart report of LiveUpdates by signer LiveUpdate Server Selection by Bar chart report of LiveUpdates by result code Result Code LiveUpdate Events by LiveUpdate Client Type Bar chart report of LiveUpdates based on client type Reports for integrated security products Table 7-6 describes additional report folders that are provided for SESAintegrated security products. You will only see events in these reports if you install the security product they represent. For details of the reports in these folders, see the documentation for the security products that you have installed. Table 7-6 Report families for SESA-Integrated products Report family Description Threat Event Family Reports of events that are related to security threat detection. These events are generated by security products that detect and warn about imminent security threats such as virus outbreaks. Firewall Event Family Reports of events from firewalls. These events are generated by Symantec security gateways and integrated third-party collectors. Viewing and consolidating events Viewing event reports Report family Description Intrusion Detection Events Reports of events that are related to Intrusion Detection. These events are generated by events from Symantec and third-party intrusion protection technologies including Symantec ManHunt, Symantec Host IDS, Symantec Decoy Server and Symantec Event Collectors for third-party IDS products. Sensitive Content Filtering Event Family Reports of events that are related to data that is sensitive in nature (for example unauthorized access to certain Web sites that is against company policy). These events are generated by content filtering products: for example, Symantec security gateway products. Content Filtering Event Family Reports of events that are related to the content of the data (generic or spam). These events are generated by content filtering products: for example, Symantec security gateway products. Host Intrusion Detection Events Reports of events that are related to Host Intrusion Detection. These events are generated by host intrusion detection products, including Symantec Host IDS products. Anti Virus Event Family Reports of all events that are related to virus detection. These events are generated by Symantec and third-party antivirus products, including Symantec AntiVirus Corporate Edition, Symantec AntiVirus/Filtering for Microsoft Exchange, Symantec AntiVirus for Handhelds. Vulnerability Event Family Reports of events that are related to detecting vulnerabilities. These events are generated by vulnerability detection products: for example, Symantec Vulnerability Assessment. Network Intrusion Detection Reports of events that are related to Network Intrusion Events Detection These events are generated by network intrusion detection products: for example, Symantec ManHunt. 283 284 Viewing and consolidating events Displaying event details Displaying event details You may want to know more about an event than what is shown in the event report. In that case, you can view all the details about the event that are contained in the SESA DataStore. To view the details of an event 1 In the Symantec management console, on the Events view tab, in the left pane, expand the folder for a SESA DataStore, and any additional folders until you can see the report icons. 2 Click the icon or name of the report you want to view. 3 In the right pane, if the report is a chart, click the chart to display the subset of events you are interested in. 4 Select the event for which you want to view details. 5 On the Selection menu, click Details. The Event Details dialog box shows the information in the SESA DataStore for this event. Viewing and consolidating events Creating an alert configuration based on an event It provides the following buttons: Previous Displays the previous event in the table. Next Displays the next event in the table. Refresh Refreshes the screen. Alert Wizard Displays the Create a new Alert Configuration Wizard. See “Creating an alert configuration based on an event” on page 285. Print Prints a screen shot of the Event details dialog box. Help Provides Help on the Event Detail dialog box. 6 To redisplay the Event Details window if it becomes covered by other windows, cycle through open windows by holding down the ALT key on the keyboard and repeatedly pressing TAB. 7 To close the Event Details dialog box, click Close. Creating an alert configuration based on an event Alerts provide administrators with notification about events or groups of events that require their immediate attention. You can create an alert based on a specific event that is of concern in your security environment. Since most of the required alert information–the details of the event that will trigger the alert–is taken from the event you select, you can create an alert from an event very quickly. The only additional information you must supply is a name for the alert configuration. You can specify the notification information for the alert when you create it or later, by editing the alert configuration. When you edit the completed alert configuration, you can also specify thresholds to control the frequency of the alert. 285 286 Viewing and consolidating events Creating an alert configuration based on an event To create an alert configuration To enable users who oversee your security configurations to receive alerts about problems on your systems, you do the following: ■ Create an alert configuration, including notification instructions. ■ Distribute the alert configuration to the computers in your security environment. To create an alert configuration based on an event 1 In the Symantec management console, on the Events view tab, in the left pane, expand the folder for a SESA DataStore, and any additional folders until you can see the report icons. 2 Click the icon or name of the report you want to view. 3 In the right pane, if the report is a chart, click the chart to display the subset of events that you are interested in. 4 Select the event on which you want to base the alert configuration. 5 On the Selection menu, click Alert Wizard. The first panel of the Create a new Alert Configuration Wizard shows the event details that are automatically recorded for the alert: ■ Event class ■ Event type ■ Product ■ Software feature ■ Category ■ Severity ■ Domain ■ DataStore Viewing and consolidating events Creating an alert configuration based on an event 6 Click Next. 7 In the General panel, in the Alert Configuration name text box, type a name for the alert configuration. Be consistent in the use of case when naming alerts. In some languages, when you sort alerts in reports, alerts whose names begin with uppercase letters are sorted before alerts whose names begin with lowercase letters. 8 In the Alert description text box, type a description of the alert. This description is optional. If it is provided, it is included in the alert notification. 9 In the Alert Severity drop-down list, select the alert severity. This is the severity level at which the alert is logged. For the person viewing alerts, or the person receiving an alert notification, this value indicates how urgent the need for a response is. 10 Click Next. 287 288 Viewing and consolidating events Creating an alert configuration based on an event 11 In the Thresholds and Frequencies panel, do one of the following: ■ Specify an alert threshold and alert frequency now, and then click Next. Accept the default to create an alert for every occurrence of the event by clicking Next. You can specify an alert threshold and frequency later by editing the alert configuration. See “Specifying alert thresholds and frequency” on page 307. ■ 12 In the Users to Notify panel, do one of the following: ■ To add users to be notified now, click Add. When you are finished, click Next. Click Next. You can add users to be notified in case of an alert later by editing the alert configuration. See “Adding users to an alert configuration” on page 309. ■ Warning: If you do not specify an email server before you add users to an alert configuration, you will receive errors. See “Configuring alert email and retry settings” on page 184. 13 In the Additional Notifications panel, do one of the following: ■ Enable SNMP traps and/or local logging as notification methods now, and then click Next. Click Next. You can enable SNMP traps and/or alert logging later by editing the alert configuration. See “Using SNMP traps and logging for alert notification” on page 312. ■ 14 In the Alert Configuration Summary panel, review the information that you have specified. Then do one of the following: ■ To make changes, click Back. ■ To create the alert, click Finish. The Task/Status list at the bottom of the panel scrolls up to show the alert properties that are being created. A green check mark indicates success. When the alert is created, the Cancel button changes to a Close button. 15 Click Close. The new alert is added to the list of alerts in the Alert Configurations dialog box, which you can access from the Alerts view tab. Viewing and consolidating events Creating an alert configuration based on an event To distribute an alert configuration 1 After you create the alert configuration, distribute the change by using the method you have set up for configuration distribution. See one of the following: ■ “Distributing configurations by way of an organizational unit” on page 105 ■ “Distributing a configuration to selected computers in an organizational unit” on page 131 “Distributing a configuration by way of a configuration group” on page 144 To distribute alert configurations, you must be a member of a role that gives you access to the Systems tab. ■ 2 If you do not want to manually distribute the configuration, the new configuration will be picked up when the SESA Agent polls the SESA Manager for changes. You can set the polling interval on the Configuration tab of the SESA Agent Configuration. See “Setting the configuration poll time” on page 216. To set the polling interval, you must be a member of a role that gives you access to the Configurations tab. 289 290 Viewing and consolidating events Creating an alert configuration based on an event Chapter 8 Viewing and configuring alerts This chapter includes the following topics: ■ About the Alerts view tab ■ Viewing alert statistics ■ Viewing alert reports ■ Acknowledging alerts ■ Displaying alert details ■ Creating an alert configuration ■ Editing alert configurations About the Alerts view tab Alerts are high priority events on which users can be notified. To generate alerts, you create alert configurations that are based on events in the SESA DataStores. As part of the alert configuration, you can specify notifications, which are messages that are sent to specified users or logs when alert conditions are met. Examples of notifications are the delivery of email messages, paging messages, or SNMP Traps. Alerts are displayed as reports on the Alerts view tab. This tab is visible if you are a member of roles that allow alert viewing. Your role memberships also determine the products for which you can see alerts. 292 Viewing and configuring alerts Viewing alert statistics To view alerts, you display the tabular or graphical reports that are provided. You can use the provided report formats to create custom reports, sort the alert data, and filter alerts. You can view the details of alerts to see the events that trigger the alert and whether the designated people on your security team have responded to them. Note: If your role membership lets you view alerts, you can view all alerts regardless of the source events that generated them. However, you may not have the rights to see the events that generated the alert. For example, if you can view alerts, but are not a member of the role that allows event viewing for Symantec Host IDS, you can view alerts that are generated by events from Symantec Host IDS but you cannot view the Host IDS events that generated the alerts. Viewing alert statistics The SESA DataStores you are connected to are represented as folders in the navigation tree in the left pane of the Alerts view. To view the alert statistics for a SESA DataStore ◆ In the Symantec management console, in the left pane, click the name of the SESA DataStore. The DataStore statistics are displayed in the right pane. Viewing alert reports The reports in Alerts view let you view sets of alert information that are logically grouped, rather than a continuous log file of the entire SESA DataStore. See “Viewing reports” on page 238. Viewing and configuring alerts Acknowledging alerts Table 8-1 lists the preconfigured alert reports. In addition, you can view custom alert reports you create. Table 8-1 Base alert reports Report name Description All alerts: Top 5 by alert acknowledger Shows alerts acknowledged by the top five alert acknowledgers (based on all alerts) All alerts: Top 5 by event count Show the five alerts with the highest event counts (based on all alerts) All alerts: States percentages The percentage of response successes and retries All alerts: Software Features percentages The percentage of alerts for each software feature All alerts: Products percentages The percentage of alerts for each security product installed All alerts: Totals by event Alerts displayed by event type All alerts: Names percentages The percentage of alerts for each alert configuration All alerts: Severities percentages The percentage of alerts for each event severity All alerts: Last 60 Days All alerts that have occurred over the last 60 days All alerts: Last 30 Days All alerts that have occurred over the last 30 days Acknowledged Alerts All alerts that have been acknowledged All alerts: Top 5 The five alerts that have occurred the most frequently All alerts All alerts All alerts: Not acknowledged (active) All alerts that have not been acknowledged Acknowledging alerts Acknowledging an alert indicates that the administrator is aware of, and is acting on the alert. Use the Acknowledged Alerts report to see all acknowledged alerts. Unacknowledged alerts may require the attention of an administrator. You can view them in the All alerts: Not acknowledged (active) report. 293 294 Viewing and configuring alerts Acknowledging alerts Two menu options and toolbar buttons are added in Alerts view when you are viewing a report. They let you mark alerts as acknowledged or unacknowledged: Acknowledge Unacknowledge Marking an alert as acknowledged or unacknowledged Acknowledging an alert is not a final action. If additional issues arise, an acknowledged alert can be unacknowledged. Acknowledging an already acknowledged alert, updates the Acknowledged and Acknowledged By fields to the current time and user. To acknowledge an alert 1 In the Symantec management console, on the Alerts view tab, in the left pane, expand the folder for a SESA DataStore, and any additional folders until you can see the report icons. 2 Click the icon or name of the report you want to view. 3 In the right pane, view the report. 4 If the report is a chart, click the chart to display the subset of alerts you are interested in. 5 Select the alert you want to acknowledge. You can select more than one alert at a time by using the SHIFT or CTRL keys on the keyboard. 6 On the Selection menu, click Acknowledge. The alert is moved to the Acknowledged Alerts report. If needed, scroll horizontally to view the Acknowledged and Acknowledged By columns. The Acknowledged column shows the time the alert was acknowledged. The Acknowledged By column shows the logon name of the user logged on to the Symantec management console. To unacknowledge an alert 1 On the Alerts view tab, in the left pane, expand the folder for a SESA DataStore, and any additional folders until you can see the report icons. 2 Click the icon or name of the report you want to view. 3 In the right pane, view the report. Viewing and configuring alerts Displaying alert details 4 If the report is a chart, click the appropriate part of the chart to display the alerts you are interested in. 5 Scroll through the alert records and select the alert you want to unacknowledge. 6 On the Selection menu, click Unacknowledge. The alert is removed from the Acknowledged Alerts report and placed in the Not Acknowledged (active) report. Displaying alert details You may want to know more about an alert than what is shown in the alert report. In that case, you can view all the details about the alert that are contained in the SESA DataStore. View the details of an alert After you display the details of an alert, you can: ■ View the events on which the alert is based ■ View the notifications sent for the alert To display the alert details 1 In the Symantec management console, on the Alerts view tab, in the left pane, expand the folder for a SESA DataStore, and any additional folders until you can see the report icons. 2 Click the icon or name of the report you want to view. 3 In the right pane, view the report. 4 If the report is a chart, click the chart to display the subset of alerts you are interested in. 5 Select the alert that you want to view. 6 On the Selection menu, click Details. 295 296 Viewing and configuring alerts Displaying alert details The Alert Details dialog box shows the information in the SESA DataStore for this alert. Use the following button to view the alert details: Previous Displays the previous alert in the table. Next Displays the next alert in the table. Refresh Refreshes the screen. Details Displays the event details of a selected event on the Event Information tab. See “Displaying event details” on page 284. Print Prints a screen shot of the Alert details dialog box. Help Provides Help on the Alert Details dialog box. Viewing and configuring alerts Displaying alert details 7 If desired, resize the dialog box by moving the mouse pointer over the dialog box border until you see a double-headed arrow, and then dragging the border. 8 To redisplay the Alert Details window if it becomes covered by other windows, cycle through open windows by pressing ALT key and repeatedly pressing TAB. 9 To close the Alert Details dialog box, click Close. To view the events on which the alert is based 1 In the Alert Details dialog box, on the Event Information tab, select an event. 2 On the toolbar, click Details. The Event Details dialog box is displayed. See “Displaying event details” on page 284. 3 Click Close. 297 298 Viewing and configuring alerts Creating an alert configuration To view the notifications sent for an alert 1 In the Alert Details dialog box, on the Responses tab, view the notifications that have been sent for the alert. 2 Use the horizontal scroll bar to view additional columns. 3 To close the Alert Details dialog box, click Close. Creating an alert configuration You can configure alerts from existing events or event classes by displaying the events in a report in Events view. This is the easiest way to configure an alert and is recommended when you are first configuring alerts. See “Creating an alert configuration based on an event” on page 285. You can also configure alerts by running the Alert Configuration Wizard from the Alert Configuration dialog box, which is available from the Alerts view tab. Viewing and configuring alerts Creating an alert configuration To create an alert configuration To enable users who oversee your security configurations to receive alerts about problems on your systems, do the following: ■ Create an alert configuration, including notification instructions. ■ Distribute the alert configuration to the computers in your security environment. To create an alert configuration 1 In the Symantec management console, on the Alerts view tab, on the Selection menu, click Alert Configurations. 2 On the toolbar at the top of the Alert Configurations panel, click New (+). 299 300 Viewing and configuring alerts Creating an alert configuration 3 In the first panel of the Create a New Alert Configuration Wizard, click Next. 4 In the General panel, do the following: Alert Configuration name Type a name for the alert configuration. Be consistent in the use of case when naming alerts. In some languages, when you sort alerts in reports, alerts whose names begin with uppercase letters are sorted before alerts whose names begin with lowercase letters. Alert description Optionally, type a description of the alert. This description is included in the alert notification. Alert severity Select the alert severity. This is the severity level at which the alert is logged. It is used only for notifications and in alert reports. For the person viewing alerts, or the person receiving an alert notification, this value indicates how urgent the need for a response is. Domain Click the browse (...) button. In the Find Domain dialog box, select the domain, and then click OK. Viewing and configuring alerts Creating an alert configuration DataStores Select one or more SESA DataStores. If only one SESA DataStore is available, it is already specified and cannot be changed. Your selections are used by the alert correlation service computer to determine which alerts it can actually process. 5 Click Next. 6 In the Event Information panel, specify one or more event filters to restrict the events on which the alert is based. If you do not make selections now, the defaults are used. Using all defaults means that all events are used to generate the alert. The more selections you make, the more finely tuned the alert is. Warning: You cannot change the choices that you make in the Event Information panel and the Event Filter (Advanced) dialog box by editing the alert. 301 302 Viewing and configuring alerts Creating an alert configuration Use the following descriptions as you make selections from the drop-down lists in the Event Information panel: Event class Event type Product Software feature Category Severity Select one of the following: ■ Any: All event types are available in the Event type dropdown list. ■ Selection: Only the event types that belong to the selected event class are available in the drop-down list. Select one of the following: ■ Any: Events of all event types for the selected event class can trigger the alert. ■ Selection: Only events of the selected event type trigger an alert. Select one of the following: ■ Any: The alert is triggered by events from all software features of all SESA-enable products. ■ Selection: You can use the Software feature drop-down list to specify a software feature for this product: events from the selected software feature trigger the alert. Select one of the following: ■ Any: Events from all software features for the selected product can trigger the alert. ■ Selection: Only events from the selected software feature trigger the alert. Select one of the following: ■ Any: Events of any category trigger the alert. ■ Selection: Only events belonging to the selected category trigger the alert. Select one of the following: ■ Any: Events of all severities trigger the alert. ■ Selection: Only events with the selected severity trigger the alert. Viewing and configuring alerts Creating an alert configuration 7 To further restrict the events on which the alert is based, click Advanced. 8 In the Event Filter (Advanced) dialog box, in the Available Common Event Columns drop-down list, select an event column. These columns are common to all events, regardless of event class. 9 In the Value text box under Available Common Event Columns, specify a value for the common event column. Do one of the following: ■ If the column you select has a defined set of values in the SESA Directory, a browse control (...) appears to the right of the Value text box. Click this control to display a dialog box from which you can select a value. For example, if you select Machine as the common event column, clicking the control displays a list of the computers defined in the SESA Directory for your security network. ■ If a control does not appear, type the value, using alphanumeric format. For your entry to be meaningful, you must type the value exactly as it is stored in the alert report schema. For example, the case you use must match the case as it is used in the SESA Directory. 303 304 Viewing and configuring alerts Creating an alert configuration Use SESA reports to determine the exact format in one of the following ways: Details report Look at a Details report of an event that contains the column. See “Displaying event details” on page 284. Event report Display a report that contains the column. Select a row and copy the value for the column. Paste it into the Value text box. 10 In the Available Event Class Columns drop-down list, select an event class column. Depending on the restrictions you have already selected, the Available Event Class Columns drop-down list is unavailable for some alert configurations. 11 If you selected an event class column, in the Value text box under Available Event Class Columns, type a value. If the column you select has a defined set of values in the SESA DataStore, a control is available to help you select a value. 12 In the Thresholds and Frequencies panel, do one of the following: ■ Specify an alert threshold and alert frequency now, and then click Next. Accept the default to create an alert for every occurrence of the event by clicking Next. You can specify an alert threshold and frequency later by editing the alert configuration. See “Specifying alert thresholds and frequency” on page 307. ■ 13 In the Users to Notify panel, do one of the following: ■ To add users to be notified now, click Add, and, when you are finished, click Next. Click Next. You can add Users to be notified in case of an alert later by editing the alert configuration. See “Adding users to an alert configuration” on page 309. ■ Warning: If you do not specify an email server before you add users to an alert configuration, you will receive errors. See “Configuring alert email and retry settings” on page 184. Viewing and configuring alerts Creating an alert configuration 14 In the Additional Notifications panel, do one of the following: ■ Enable SNMP traps and/or local logging as notification methods now, and then click Next. Click Next. You can enable SNMP traps and/or alert logging later by editing the alert configuration. See “Using SNMP traps and logging for alert notification” on page 312. ■ 15 In the Alert Configuration Summary panel, review the information that you have specified. Then do one of the following: ■ To make changes, click Back. ■ To create the alert, click Finish. The Task/Status list at the bottom of the panel scrolls up to show the alert properties that are being created. A green check mark indicates success. When the alert is created, the Cancel button changes to a Close button. 16 Click Close. The new alert is added to the list of alerts in the Alert Configurations dialog box. 17 To close the Alert Configurations dialog box, click Close again. To distribute an alert configuration 1 After you create the alert configuration, distribute the change by using the method you have set up for configuration distribution. Do one of the following: ■ See “Distributing configurations by way of an organizational unit” on page 105. ■ See “Distributing a configuration to selected computers in an organizational unit” on page 131. See “Distributing a configuration by way of a configuration group” on page 144. To distribute alert configurations, you must be a member of a role that gives you access to the Systems tab. ■ 305 306 Viewing and configuring alerts Editing alert configurations 2 If you do not want to manually distribute the configuration, the new configuration is picked up when the SESA Agent polls the SESA Manager for changes. You can set the polling interval on the Configuration tab of the Agent Configurations. See “Setting the configuration poll time” on page 216. To set the polling interval, you must be a member of a role that gives you access to the Configurations tab. Editing alert configurations You can edit alert configurations to make them more specific or as circumstances change. You have the following editing options: ■ Disabling or enabling alerts ■ Specifying alert thresholds and frequency ■ Adding users to an alert configuration ■ Specifying alert notification methods Disabling or enabling alerts When you create an alert it becomes active the next time configurations are updated, as a result of distribution or automatic polling for configurations. You may want some alerts to only be active in certain circumstances; for example, when event monitoring makes you suspect that a server is under attack. To disable or enable an alert You can disable an active alert, or enable an inactive alert. To disable an active alert 1 In the Symantec management console, on the Alerts view tab, on the Selection menu, click Alert Configurations. 2 In the Alert Configurations dialog box, in the list of alerts in the left pane, select the alert configuration you want to disable. 3 In the right pane, on the General tab, check Disable this alert configuration. Viewing and configuring alerts Editing alert configurations 4 5 Do one of the following: ■ To apply the change you made to this configuration, click Apply. ■ To save all unsaved changes to this and other configurations, on the toolbar, click Save All. To close the Alert Configurations dialog box, click Close. To enable a disabled alert 1 On the Alerts view tab, on the Selection menu, click Alert Configurations. 2 In the Alert Configurations dialog box, in the list of alerts in the left pane, select the alert configuration you want to enable. 3 Uncheck Disable this alert configuration. 4 Do one of the following: 5 ■ To apply the change you made to this configuration, click Apply. ■ To save all unsaved changes to this and other configurations, on the toolbar, click Save All. To close the Alert Configurations dialog box, click Close. Specifying alert thresholds and frequency You can configure alerts to reduce the amount of event data you have to monitor. To limit alert notifications You can specify: ■ The threshold of events that occur over a specified time frame that will trigger the alert. ■ An alert frequency that will cause alerts to be sent at specified intervals. To specify alert thresholds 1 In the Symantec management console, on the Alerts view tab, on the Selection menu, click Alert Configurations. 2 In the Alert Configurations dialog box, in the list of alerts in the left pane, select the alert configuration you want to edit. 307 308 Viewing and configuring alerts Editing alert configurations 3 In the right pane, on the Thresholds tab, click Create an Alert after a given number of events in a given time period. 4 Specify the alert threshold by doing the following: Number of Events Type the number of events that must occur before the alert is generated. Time period In the text box, type an integer. In the drop-down list box, select a time delimiter. The combination of the integer and time delimiter specify the time period during which the events that generate the alert must take place. If you specify 10 as the number of events and one hour as the time period, then 10 events of the type specified in the alert configuration must be logged in one hour for the alert to be triggered. 5 6 Do one of the following: ■ To apply the change you made to this configuration, click Apply. ■ To save all unsaved changes to this and other configurations, on the toolbar, click Save All. To close the Alert Configurations dialog box, click Close. Viewing and configuring alerts Editing alert configurations To specify the alert frequency 1 On the Alerts view tab, on the Selection menu, click Alert Configurations. 2 In the Alert Configurations dialog box, in the list of alerts in the left pane, select the alert configuration you want to edit. 3 In the right pane, on the Thresholds tab, click Limit the Alert frequency. 4 In the Alert generated every text box, type an integer. 5 In the drop-down list box, select a time delimiter. The combination of the integer and time delimiter specify the maximum frequency with which the alert is generated. 6 Do one of the following: 7 ■ To apply the change you made to this configuration, click Apply. ■ To save all unsaved changes to this and other configurations, on the toolbar, click Save All. To close the Alert Configurations dialog box, click Close. Specifying alert notification methods There are two alert notification methods: ■ You can add users who have specified notification methods and times and to the alert configuration. See “Adding users to an alert configuration” on page 309. ■ You can enable SNMP traps or local logging. See “Using SNMP traps and logging for alert notification” on page 312. Adding users to an alert configuration When you create or edit users, you can choose the methods–email or pager–by which they are notified in case of an alert. You can also specify the time period during which a particular contact method should be used. See “Specifying notification information” on page 94. You can add users for whom this notification information has been specified to an alert configuration so that they are contacted when the alert is generated. Warning: If you do not specify an email server before you add users to an alert configuration, you will receive errors. See “Configuring alert email and retry settings” on page 184. 309 310 Viewing and configuring alerts Editing alert configurations To add a user to an alert configuration 1 In the Symantec management console, on the Alerts view tab, on the Selection menu, click Alert Configurations. 2 In the Alert Configurations dialog box, in the list of alerts in the left pane, select the alert configuration you want to edit. 3 In the right pane, on the Users to Notify tab, click Add. 4 In the Find Users dialog box, the Available Users list shows the users for the current domain, up to the number of users indicated by the Maximum Search Count text box. 5 If you want to select users in a different domain, display the Look in dropdown list and select the domain. You must also add this domain to the Domain Access tab of your SESA Managers. See “Adding domain access to a SESA Manager” on page 128. 6 Do one of the following: ■ Select a user from the Available Users list, and then continue at step 10. ■ Modify the search by specifying search criteria, and then continue at step 7. Viewing and configuring alerts Editing alert configurations 7 To specify search criteria: Look in In the drop-down list, select a different domain in which to search for users. Logon name Type all or part of a logon name, last name, and/or first name. If you specify a partial name that contains one or more asterisks, all users with names that contain this string is returned. Last name First name For example, if you type *dev* in the Logon name text box, when you search only users whose logon names contain this string is returned. Maximum search count Edit this text box to reduce or increase the number of users returned by the search. 8 Click Start Search. 9 If desired, click Stop Search. The search is terminated before the search is finished. 10 In the Available Users list, select one or more users. 11 Click Add. The users are added to the Selected Users list. 12 Click OK. 13 On the Users tab, select one of the users you added, and then click Properties. 14 In the User Properties dialog box, on the Notifications tab, check the coverage for notifications for this user. If necessary, edit the notifications tab. See “Specifying notification information” on page 94. 15 Repeat steps 12 through 13 for each user to verify that you have added enough users to have full coverage for notifications. 16 Do one of the following: ■ To apply the change you made to this configuration, click Apply. ■ To save all unsaved changes to this and other configurations, on the toolbar, click Save All. 17 To close the Alert Configurations dialog box, click Close. 311 312 Viewing and configuring alerts Editing alert configurations Using SNMP traps and logging for alert notification When you create alert configurations, you can enable the forwarding of alert notifications to the following: ■ SNMP traps The SNMP alert response is sent to the SNMP host that is defined in the Manager Components Configurations. Symantec provides Management Information Base (MIB) files so that you can view the SNMP traps in your preferred SNMP console. See “Configuring SNMP alert responses” on page 193. ■ Local event logs When event logging is enabled, alert notifications are forwarded to the Microsoft NT event log on the SESA Manager. These methods of notification are useful if you have tools that automate checking SNMP messages and local logs for specific events. To enable SNMP traps and local logging 1 In the Symantec management console, on the Alerts view tab, on the Selection menu, click Alert Configurations. 2 In the Alert Configurations dialog box, in the list of alerts in the left pane, select the alert configuration you want to edit. Viewing and configuring alerts Editing alert configurations 3 To enable SNMP messages, in the right pane, in the Additional Notifications tab, under SNMP Trap Message, click Click here to enable SNMP Trap message responses for this alert. 4 To enable local logging, under Logs, click Click here to enable logging of the alert to the local logging facility. 5 Do one of the following: 6 ■ To apply the change you made to this configuration, click Apply. ■ To save all unsaved changes to this and other configurations, on the toolbar, click Save All. To close the Alert Configurations dialog box, click Close. 313 314 Viewing and configuring alerts Editing alert configurations Index A administrative domain. See domain Agent Configurations for 1.1 SESA Agent 214 for 2.0 SESA Agent 214 Alert Configuration Wizard description 56 running from the Alert view tab 298 from the Event view tab 285 alert configurations advanced event filter 298 creating based on an event 285 in Alerts view 298 disabling 306 distributing 285, 298 editing 306 enabling 306 event logger 312 logging 298, 312 notification frequency 298, 307 SNMP traps 298, 312 thresholds 298, 307 users 298, 309 specifying event information 298 alerts about 33 acknowledging 293 configuring email settings 184 retry settings 184 displaying details 54, 295 forwarding configuring 192 disabling 192 to other alert mechanisms 192 role for viewing 70 unacknowledging 293 alerts (cont.) viewing events that created the alert 295 notifications sent 295 reports 292 statistics 292 Alerts view tab, description 42, 291 Anti Virus Event Family, description 282 authentication, in SESA 32 auto-refresh configuring 186 using in a detached window 273 B bar chart report displaying events 241 viewing 238 batch logging, SESA Agent 214 blacklisting, configuring 188 browsers configuring to display secure and non-secure content 39 for Symantec management console display 36 business information, users 89 buttons, toolbar 49 C centralized reporting 34 Change password menu option 48 client validation, configuring 180 columns changing order 53 changing width 53 modifying display in reports 256 Comma Separated Value file. See CSV file Command servlet, configuring 182 Computer Wizard, description 57 316 Index computers adding configuration groups 115, 124 configurations 115, 122 adding to configuration groups 139 configurations 163, 167 associating with event exclusion configurations 233 checking heartbeat 127 creating 115 deleting 133 description 114 distributing configurations 131 editing 118 with SESA Agent 118 without SESA Agent 120 identification information 121 modifying permissions 132 monitoring failover 136 services 134 moving 131 service status 128 specifying IP addresses 115, 121 MAC addresses 115, 121 viewing service properties 125 services 125 with SESA Agents 114 Configuration Group Wizard, description 57 configuration groups about 25 adding computers 139 configurations 139 adding to computers 115, 124 configurations 163, 169 associating with event exclusion configurations 233 creating 139 deleting 145 description 65, 138 distributing configurations 144 editing 140 modifying permissions 144 Configuration service, configuring 182 Configuration Wizard, description 57 configurations adding computers 163, 167 configuration groups 163, 169 organizational units 163, 171 adding to computers 115, 122 configuration groups 139 organizational units 100, 102 Agent Configurations 214 Agent Connection Configurations 210 creating 163 deleting 176 distributing 26, 144 by way of computer Service properties 125 by way of the Configurations view tab 172 to computers 131 using organizational units 105 editing distribution properties 167 settings 165 hierarchy of distribution 28 Manager Component Configurations 182 Manager Event Exclusion Configurations 225 Manager Master Heartbeat Configuration 196 permissions 173 Product Installation Service 222 SESA 2.0 Manager Configurations 180 viewing 162 Configurations view tab, description 42, 161 connection failures notifying users 209 SESA DataStore logging 207 SESA Directory logging 203 console access rights adding to roles 70, 77 modifying 77 Console menu description 43 console view tab descriptions 42 contact information, users 89 Content Filtering Event Family, description 282 Create a New Custom Report Wizard, description 57 CSV file, exporting reports 271 Index custom reports creating with Custom Reports Wizard 265 description 246, 275 saving from filtered reports 246 D data protocol, SESA 32 data security 32 DataStore See SESA DataStore Default organizational unit 25 Deploy/Remove SESA Manager Extensions Wizard, description 57, 106 Detach menu option 49, 273 details displaying alerts 295 events 284 events in alerts 295 Directory See SESA Directory diskspace, configuring minimum free space 181 Distribute menu option 131 distribution poll time 216 distribution of product configurations 26 domain description 66 editing properties 66 MasterHeartbeat service 67 multiple 66 domain access adding to a SESA Manager 128 for Master Heartbeat service computer 199 Domain Administrator role 70 Domain Administrator user 30 double-byte characters, for exported reports 186 E election process to choose Master Heartbeat service computer 199 email address, notification 95 email settings, configuring for alerts 184 event exclusion configurations adding event exclusion rules 232, 235 associating with computers 233 with organizational units 233 associating with configuration groups 233 creating 232 deleting 236 distributing 235 event exclusion rules adding to event exclusion configurations 232, 235 creating 226 deleting 232 editing 229 event families, reports 275 event filters alert configurations 298 event exclusion rules 226 event forwarding 189 event forwarding configuring 189 disabling 189 filtering 189 event information, specifying in alert configurations 298 event logger alert notification 312 event logging configuring 185 configuring for SESA Agent 214 event relays, forwarding events 189 events displaying details 54, 284, 295 download record set for reports, configuring 186 forwarding to event relays 189 logging 33 monitoring 273 role for viewing 70 using to create alert configurations 285 viewing 33 reports 277 statistics 277 Events view tab, description 42, 275 export character set, configuring 186 317 318 Index F I failover configuring SESA Agent to SESA Manager 211 SESA Manager to SESA DataStore 205 SESA Manager to SESA Directory 201 monitoring 136 filtered reports restricting times 252 saving as custom reports 246 filters applying to reports 245, 246 based on cell value 260 based on column contents 258 shortcuts 257 specifying condition user 246 specifying conditions 246 using Find dialogs 253 Find dialog boxes basic functions 61 description 61 Firewall Event Family, description 282 frequency, alert notifications 298, 307 inactivity timeout, preventing 40, 186 installed monitors 45 integration packages 21 Internet Explorer, configuring to display non-secure content 39 Intrusion Detection Events, description 282 inventory, configuring for SESA Agent 214 IP address specifying for computers 115, 121 G global reports description 275 list of provided reports 278 H heartbeat configuring monitor settings 182 monitoring 134 of computer services 127 SESA Agent 219 heartbeat monitor, description 134 heartbeat service computer, changing 196 Help accessing 55 on dialog boxes 56 on management objects 56 on product software features 56 table of contents 55 Help menu description 43 Host Intrusion Detection Events, description 282 HTML format, exporting reports 269 HTTPS 32 J JRE (Java Runtime Environment) download URLs 37 international version 37 requirements for running Symantec management console 36 L language displayed in Symantec management console 92 variants in JRE (JAVA Runtime Environment) 37 left pane description 52 navigation 52 LiveUpdate 32 scheduling SESA Agent 217 SESA Manager 194 logging alerts 298, 312 configuring for SESA Agent 214 logging events, configuring 185 logon failure, configuring blacklisting 188 M MAC addresses specifying for computers 115, 121 management objects creating 58 editing 60 interaction between 60 permissions 157 Manager Connections configuring 200 Index Manager event exclusions, configuring 225 Manager extensions. See SESA Manager extensions 22 Managers organizational unit 25 Master Heartbeat service computer domain access 199 election process 199 specifying 198 viewing 67 Master Heartbeat service, description 196 Master SIPI Service computer, specifying 223 menus. See specific menu entries minimum free disk space, configuring 181 Monitor viewer displaying 44 installed monitors 45 monitor description 46 printing report 47 selected monitor details 45 monitoring failover 136 heartbeat 134 monitors Failover for Managers 44 Heartbeat for DataStores 44 Heartbeat for Directories 44 Heartbeat for Managers 44 viewing 44 Move menu option 131 N navigation tree description 52 Netscape, configuring to display non-secure content 39 Network Intrusion Detection Events, description 282 non-secure content configuring Internet Explorer to display 39 notification alerts 33 connection failures 209 sample message 98 specifying email address 95 user information 94 email address 95 pager numbers 96 times 97 viewing notifications sent for an alert 295 Notification Service wizard description 57 notification services adding 154 deleting 155 description 65, 153 editing 155 modifying permissions 155 O Oracle 9i SESA DataStore, problems accessing 243 Organizational Unit Wizard, description 57 organizational units about 24 adding configurations 100, 102 adding to configurations 163, 171 roles 73 associating with event exclusion configurations 233 creating 100 Default organizational unit 25 deleting 104 description 65, 99 distributing configurations 105 editing 102 how they relate to configuration groups 25 Managers organizational unit 25 modifying permissions 104 moving computers 131 P pager numbers, users 96 paging, notification services 153 passwords changing SESA user 89 Symantec management console user 48 SESA user passwords changing 48, 89 specifying 86 specifying Symantec management console users 86 PDF file, exporting reports 270 319 320 Index permissions 30 configurations 173 default for event viewing roles 81 for management roles 81 description 156 in roles description 80 modifying by way of the Permissions dialog box 158 computers 132 configuration groups 144 for configurations 173 in roles 82 notification services 155 organizational units 104 SESA DataStore 147 SESA Directory 152 users 99 propagation 158 pie chart report displaying events 241 viewing 238 poll time, configuration distribution 216 preferred language in Symantec management console 92 specifying for user 89 prerequisites, for running the Symantec management console 36 primary SESA DataStore, selecting 204 product components, modifying access in roles 79 product configuration distribution 26 Product Installation Service configuring 223 description 222 product software configurations. See configurations product updates 33 R Refresh menu option 47 report filters. See filters reporting, centralized 34 reports 34 Anti Virus Event Family 282 applying filters 246 changing sort order 240 chart-based 241 Content Filtering Event Family 282 custom reports 246 reports (cont.) description 237 displaying events bar chart 241 pie chart 241 trend chart 241 download record set, configuring 186 exporting 269 configuring character set 186 customizing 272 to CSV format 271 to HTML format 269 to PDF format 270 filtering 245, 246 Firewall Event Family 282 global reports 278 Host Intrusion Detection Events 282 integrated security products 282 Intrusion Detection Events 282 LiveUpdate reports 281 modifying 244 modifying column display 256 Network Intrusion Detection Events 282 pre-filtering 258 printing 267 Sensitive Content Filtering Event Family 282 SESA System reports 281 system event reports 279 tabular 239 Threat Event Family 282 viewing 238 alerts 292 events 277 Vulnerability Event Family 282 retry settings, configuring for alerts 184 right pane changing column order 53 column width 53 displaying truncated text 53 role membership assigning to users 93 Role Wizard, description 57 Index roles about 30 adding console access rights 77 organizational units 73 users 75 console access rights 70 creating 68, 70 deleting 84 description 65, 68 editing 74 management of policies and configurations 70 permissions, modifying 82 planning 69 product component selection, modifying 79 SESA Domain Administrator role 30 viewing events 70 S security certificate, installing 38 security technology, in SESA 32 Selection menu description 43 initiating actions 54 Sensitive Content Filtering Event Family, description 282 service status, computers 128 services configuring heartbeat 219 viewing for a computer 125 viewing properties 125 SESA (Symantec Enterprise Security Architecture) components of 15 features about 24 administrative 24 LiveUpdate reports 281 monitoring components 44 new software features for version 2.0 179 system reports 281 version comparison 178 viewing component status 44 SESA Agent 214 about 19 batch logging 214 configuring 214 configuring SESA Manager failover 211 scheduling LiveUpdate 217 SESA Agent heartbeat 219 SESA Agent to SESA Manager failover configuring 211 SESA DataStore configuring failover 205 connection failures notifying users 209 description 18, 65, 145 editing 146 logging connection failures 207 modifying permissions 147 selecting primary SESA DataStore 204 troubleshooting availability problems 243 SESA Directory about 16 adding 148 configuring failover 201 deleting 152 description 16, 65, 148 editing 150 logging connection failures 203 modifying permissions 152 SESA Domain Administrator role 30 SESA Event Collector, about 21 SESA Manager about 18 adding domain access 128 configuring 180, 182 Agent connections 210 Manager connections 200 configuring Manager Master Heartbeat service 196 description 18 scheduling LiveUpdate 194 updating 32 SESA Manager extensions deploying 106 description 22 removing by way of Packages tab 130 by way of the Deploy/Remove SESA Manager Extensions Wizard 110 SNMP traps alert configurations 312 configuring SNMP listener 193 for alerts 298 software configurations. See configurations sort order, changing in reports 240 321 322 Index SSL (Secure Sockets Layer) about 32 use in SESA 32 state information, configuring for SESA Agent 214 statistics alerts 292 events 277 status indicator 55 Symantec Event Collectors 21 Symantec Event Managers 21 Symantec management console about 20 logging on 35, 37 preferred language 92 preventing timeout 40, 186 refreshing 47 system requirements 36 system event reports 279 system prerequisites, for running the Symantec management console 36 System view tab description 42, 64 role-based access 64 T table report, viewing 238 tabular reports 239 third-party alert mechanisms, forwarding alerts 192 Threat Event Family, description 282 thresholds, alert notifications 298, 307 throttling, configuring 180 timeout, preventing 40, 186 times, restricting in filtered reports 252 toolbar buttons description 49 initiating actions 54 trend chart report displaying events 241 viewing 238 truncated text, displaying 53 U updates LiveUpdate technology 32, 194, 217 SESA Agent 217 SESA Manager 194 User Wizard, description 57 users about 29 adding to a role 75 alert notification 298, 309 assigning role membership 93 business information 89 contact information 89 creating 85 deleting 99 description 65, 85 Domain Administrator 30 notification information 94 email addresses 95 notification times 97 pager numbers 96 permissions, modifying 99 preferred language 89 properties, editing 88 V View menu description 43 view tabs. See entries of specific view tabs Vulnerability Event Family, description 282 W Web server, configuring 180 windows detaching 49, 273 re-displaying 55 Windows SESA DataStore, problems accessing 243 wizards creating management objects 58 description 56 interaction between 60 See also entries for specific wizards starting 58 Acknowledgements This product includes software developed by the Apache Software Foundation (http://www.apache.org/), namely Tomcat, Xerces, and Apache XML-RPC. A copy of the license may be found at www.apache.org/LICENSE. Copyright © 2000 The Apache Software Foundation. All rights reserved. This product includes software developed by IBM Corporation (http://www.ibm.com), namely IBM Directory Server, IBM Tivoli Directory Server, IBM HTTP Server, IBM DB2 Universal Database, and IBM Websphere. Copyright © IBM Corporation. Netscape LDAP SDK for Java is under license from the Mozilla Organization. A copy of the license may be found at www.mozilla.org/MPL/NPL-1.1.html Copyright © Netscape Communication Corporation. JoeSNMP library is under license from the OpenNMS Group. A copy of the license may be found at www.fsf.org/copyleft/lesser.html. Copyright © OpenNMS Group. SNIA CIMOM is under license from the Storage Networking Industry Association, and is now hosted by the Open Group. A copy of the license may be found at http://www.opengroup.org/snia-cimom/license.tpl Copyright © Storage Networking Industry Association. This software product includes code licensed from RSA Data Security. The Pegasus library is under license from the Open Group consortium. Copyright © Open Group consortium. Sun’s Java Runtime Environment (JRE) and Java Secure Sockets Extension (JSSE) are licensed under Sun’s binary license, the text of which can be found at http://java.sun.com/products/jdk/1.1/LICENSE. Copyright © Sun Microsystems. The Piccolo XML Parser library was developed by Yuval Oren and is released as open source software under the terms of the Apache Software License 2.0. A copy of the license may be found at http://apache.org/licenses/LICENSE-2.0 Copyright © Yuval Oren. Copies of all licenses and required source code can be found in the \OPENSRC directory on SESA Manager for Windows (Installation Disk 1 of 2) of the distribution media. Symantec Corporation World Headquarters 20330 Stevens Creek Blvd. Cupertino, CA 95014 tel +1 408 517 8000 www.symantec.com