1
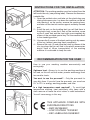
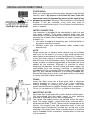
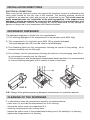
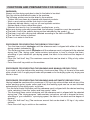
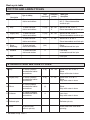
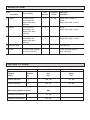
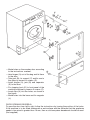
TM
TECNIK
TKL 9290
WASHER DRYER
Instructions
manual
!
e
r
a
c
e
r
o
m
g
n
i
k
a
T
INSTRUCTIONS FOR THE INSTALLATION
ATTENTION: The washing machine must be trucked from the
left hand side only (see packing label). Remove the thermoretractable film.
1 – Open the porthole door and take out the plastic bag con
taining the accessories. Lay down the machine on the left
side leaning it on the corner, remove the packing base,
and take out the two tub inside supports made by foamed
part.
2 – Install the nuts on the levelling feet (you will find them in
the plastic bag); screw the 4 feet on the machine, screw
ng the 2 reaer feet and the front right one completely by
means of the provided special key. Put the machine back
to the standing position.
3 – Unscrew the 3 screws of the back packing rods by means
of the key (without removing them completely).
4 – Remove the rods (3) and close the holes by means of the
clos ing plugs that you will find in the plastic accessories
bag.In case of future transportation of the washing
machine it is advisable to keep the rods.
RECOMMANDATION FOR THE USER
How to use your washing machine economically and
ecologically.
Optimum load - Always try to use the washing machine at
full load, as this will use less water, powder and energy thant
two smaller loads.
You want to use the pre-wash? - Only the pre-wash for
very dirty linen. If you don’t use the pre-wash, you save from
5% to 15% in energy, washing powder, and time.
Is a high temperature wash required? - To avoid high
temperature washing, treat particularly dirty items with a
stain remover of leava the most stains to soak beforehand.
You will save energy in this way.
THIS APPLIANCE COMPLIES WITH
EUROPEAN DIRECTIVES
– EMC 89/336/EEC
– LOW VOLTAGE 73/23/EEC
– EEC-LABELLING 93/68/EEC
CLEANING AND MAINTENANCE
This washing machine does not require any particular maintenance. At the end of each wash
it is recommended to leave the door open so that air will circulate and dry the interior of the
machine. The external part of the machine should never be cleaned with abrasive detergents
since this would ruin the enamel coating as well as the synthetic parts.
Removing and cleaning filter
Place a rag under the washing machine to absorb any residual
water. The filter is located under the base. Turn the filter handle
counterclockwise and pull out the filter. Clean it under running
water. Reinsert the filter and turn the handle clockwise until it is
completely locked. WARNING: Water may leak from the filter if it
is not properly tightened. Remember to clean the filter frequently
to avoid excessive clogging.
TEL. 08705 678910
BEFORE CALLING THE TECHNICAL SERVICE CENTER:
– Check if plug is inserted
– Check that power is available
– Check that the door is properly closed
– Check that the water tap is open
– Check that the water supply hose and water drain hose
– Are not blocked
– Check that the pump filter is clean
NOTE: If you have to call the service center, specify the model
of your washing machine and if necessary the serial number
which is indicated on the rating plate on the reverse of the
porthole door and on the rear side of the machine.
Technical features
dry clothes washing capacity
height
width
depth (piping included)
total net weight
motor
water draining pump
water heating element
supply voltage
power rating
safety fuse
water pressure
5 kg (11 lb)
850 mm (33 in)
595 mm (23.5 in)
530 mm (20.9 in)
62 kg (136 lb) approx
350-500 watt
25 watt
2500 watt
230..240 V - 50 Hz
2850 watt approx
13 A
min. 0,1 Mpa (1 bar)
max. 1 Mpa (10 bar)
max cotton/linen load:
Washing 5Kg
max delicates/synthetic load:
Washing 2,5Kg Drying 1,5Kg
Drying 2,5Kg
max wool load:
Washing 1Kg Drying -
INSTALLATION DIRECTIONS
POSITIONING
After your washing machine has been placed in the desired
location, level it by means of the front left foot, them the
COUNTERNUT
NOT counternut must be blocked by means of the special key
purposely provided. Warning: if the machine is not perfectly
SUPPLIED
ADJUSTABLE FEET
leveled, it will be unstable, noisy and may lead to
SOLID BLOCK BOARD
malfunctions and broken parts. Do not place the machine on
FLOOR
mats or carpets.
WATER CONNECTION
Your machine is designed to be connected to both hot and
cold water supplies. Cold water supplied direct from the
water mains or from a storage tank in the loft of the house will
normally be suitable. Most domestic hot water systems are
suitable, i.e.:
1. Hot water storage tank heated by gas, solid fuel boiler or
by electric immersion heater.
2. Multiple outlet gas instantaneous water heated with
external fuel.
NOTE
Single outlet gas or electric water heaters are not suitable
and must not be used. If you are in any doubt contact the
water heater manufacturer or the Gas/Electricity Company.
If your hot water supply is unsuitable then you may connect
both fill hoses to the cold water supply. The machine will take
longer to wash on certain programmes as the water has to be
heated by the machine. Although it’s possible to effect
temporary connections for both waste and water supply, we
recommend that the washing machine is permanently
plumbed in. To do so connect the two water outlet pipes with
their 3/4” BSP female connectors to a suitably threaded tap.
Ensure that there are no kinks in the pipe and try not to drop
or mislay the black rubber washers.
HEIGHT
HOSE-BEARER
DRAIN:
Insert the drain hose into a drain pipe (with a minimum
internal diameter of 4 cm.) or hook it on a sink or bathtub,
without crimping or creating any sharp curves. The hose
should be positioned at a height ranging from a minimum of
70 cm. to a maximum of 100 cm. as shown in the figure.
IMPORTANT NOTES
Each pipe has to be fitted with a plain washer at both ends.
We recommend that the water supply to your washing
machine is switched off after each programme.
Two water inlet supply hoses are packed within the appliance. Hot water supply - connection ends coloured red or
hose marked 90/95°C MAX. These must be connected up as
follows: Hot supply hose (red connection end) to the red
threaded mount connection, marked red, on the rear of the
machine.Cold supply hose (blue connection end) to the blue
colour threaded mount connection, marked blue, on the rear
of the machine.
INSTALLATION DIRECTIONS
ELECTRICAL CONNECTION
Make sure that the electrical system can support the maximum current as indicated on the
rating plate located on the rear side of the machine. The washing machine should be
connected to an electrical outlet with ground, as prescribed by law. This outlet must be
easily accessible after the, installation of the washing machine. If the supply cord is
damaged, it should be replaced by a special cable available at the manufacturers or at
the technical service. Therefore, the company will not be responsible for any damage to
persons or things due to non-compliance with these instructions.
DETERGENT DISPENSER
The detergent dispenser is divided into four compartments;
1) Pour washing detergent in this compartment for the prewash cycle (MAX 45gr)
2) This compartment is for the wash cycle (MAX 130 gr powder detergent).
The liquid detergent tank (B) must be used for liquid detergent.
3) Pour bleaching liquid into this compartment following the advice on the packing (do ot
exceed in quantity over the filter grid).
4) Pour softener into this compartment following the advice on the packaging (max 60 ml do not exceed in quantity over the filter grid).
Close the dispenser after the detergent compartments have been filled. It is recommended
to use non-foaming detergents and a softener in case of hard water.
PART B
N.B.: Always follow guidance given by detergent manufactures for quantities required.
CLEANING OF THE DISPENSER
It is advisable to clean the compartment regularly, as explained below:
- press lever (A) ans slide the compartment out of its housing;
- remove the siphon cover of compartment 3-4;
- wash the compartments with running water;
- replace the siphon cover in the compartment making sure it fits perfectly in its housing;
- replace the compartment in its housing.
CONTROL PANEL
To become familiar with your machine functions, compare the symbols on the control panel
with those described below.
ON/OFF
By pressing this button the machine turns on and executes the set wash cycle. It is
used to turn the washing-dryer on and off.
POWER INDICATOR
when lit it indicates that the washer-dryer is electrically energized
HALF-LOAD/DRYING
This key has two functions :
WASHING (HALF-LOAD) It reduces the amount of water loaded during both washing and rising, thus providing a considerable saving in the consumption of water,
electricity and washing powder.
Use in cotton and linen cycles for washing a limited amount of dry clothes (MAX 2.5kg)
DRYING: It must always be pressed for the drying cycle to be executed.
STOP WITH WATER IN THE TANK
Can be used on the wool and delicate fabric cycle.
The machine stops before draining the water, leaving the clothes to soak.
To drain the water and execute a short spin-dry cycle, release the key.
To drain the water only, turn the timer control to the drainage cycle (see the cycle table)
Always set the programme with the machine switched off.
In both cases, the machine ends the cycle automatically.
800
1200
SPIN SELECTION BUTTON
By pushing this button the machine will perform the final spin at the maximum spin
speed setting ( i.e. 1200 ).
It is used for resistant fabrics so that there will be less water in the wash at the end
of the spin cycle.
CONTROL PANEL
TIMER DIAL
Used to select the wash cycles and to display them during operation. To
select the cycles, turn the dial clockwise until the mark coincides with
the seleceted cycle.
WARNING: Do not turn the timer dial while the machine is energized.
Do not turn the timer dial counterclockwise.
THERMOSTAT DIAL
To set the temperature, turn the dial until the mark coincides with the
selected temperature. It is used to regulate the washing temperature
from 30° C to 95° C based on the selected wash cycle and the type of
fabric to be washed. It is rscommendet to follow the wash cycle table.
By turning the dial to this symbol ❄ the machine will perform acold wash
cycle, which is particularly indicated for delicate temperature-sensitive
fabrics.
DRYING TIME CONTROL
Enables you to select the drying time and temperature. When set on the
right-hand side, the drying cycle will be executed at a high temperature
with a maximum programmable temperature of over 130 min (for drying
cotton and linen) while, when set on the left, the drying cycle will be executed at a low temperature with a maximum time of 90 minutes (for drying synthetics and delicate fabrics).
To set the drying timer, turn the control clockwise so that the reference
mark is aligned with the selected drying time (The “drying program”
table contains instructions on how to choose the times, according to
your machine’s spin-drying speed, the fabric to be dried and the degree
of dryness)
WARNING: Do not turn the timer control anticlockwise.
DOOR
Use the handle to open the door.
During the wash and dry cycle, a special safety device keeps the door
locked.
To open the door, turn off the machine using the ON-OFF push-button
and wait about 30 seconds after the switching offthe warning light before turning the handle to open the door.
CONTROLS PANEL
SORTING CLOTHES
Each of the following groups should be sorted and washed separately according to the cycle
specified in the cycle table :
- White and resistant coloured fabrics
- non-resistant coloured fabrics
- delicate fabrics (silk/rayon, nylon, etc.)
- wool
The washing/drying machine is designed to WASH only, to DRY only or to WASH + DRY, for
instructions on how to dry clothes, read the “DRYING” section carefully.
WASHING OPERATIONS
- Sort the clothes
- place them uniformly inside the drum
- select the most suitable cycle for the fabrics (see wash cycle table)
- set the cycle by following the instructions in the “control panel” section and turn on the
machine by pushing the ON/OFF button.
WARNING: Set the cycle only when the machine is off. - Always turn the control dial
clockwise. If you pass the desired position, make a complete turn and reset the dial to the
exact position.
WARNING.
It is important to remember, when the washing is finished, to push the on-off button, turn
off the taps and disconnect the plug.
FUNCTIONS AND PREPARATION FOR WASHING
DRYING
The clothes are dried by a flow of warm air made to circulate inside the drum by a fan, which
gradually removes the damp from the clothes. This damp then condenses inside the machine
when it comes into contact with the cold water.
This is the reason why the water tap must remain on and the draining pipe must be
positioned correctly during the drying cycle.
To obtain the best results, spin-dry the clothes before putting them in the machine. The
smaller the amount of water in the clothes, the less time it will take to dry them and the lower
the consumption of electricity will be.
FUNCTIONS AND PREPARATION FOR WASHING
WARNINGS:
Always use the drying cycle best suited to the fabric to be dried.
Only dry articles washed with water in the machine.
The following articles must not be dried in the machine:
- Clothes that have been dry-cleaned with chemical products.
- Wool or wool mixture clothes that shrink in hot water.
- Extremely delicate fabrics, such as silk and synthetic curtains.
- Articles made of foam rubber/fibre glass.
- Materials that tend to fray, for example, woollen bows, or etc.
Before any drying cycle may be executed, the following 4 conditions must be respected:
a)The timer is set in the specific drying position indicated by the symbol
b)The timer is set with a drying time selected according to the fabric to be dried.
c) The “half-load” button is pressed.
d)There is no water in the drum.
PROCEDURE FOR EXECUTING THE DRYING CYCLE ONLY
- Turn the timer control clockwise until the reference mark is aligned with either of the two
drying symbols indicated by
- Turn the drying timer control clockwise until the reference mark is aligned with the selected
drying time (The “drying cycle” table contains instructions in how to choose the times,
according to your machine’s spin-drying speed, the fabric to be dried and the degree of
dryness).
- Press the “half-load” key (The maximum amount that can be dried is 2.5kg of dry cotton
clothes)
- Press the on/off key switch on the machine.
PROCEDURE FOR EXECUTING THE WASHING AND MANUAL DRYING CYCLE
If you wish to dry the clothes after washing a load more than 2.5kg, at the end of the wash
cycle, divide it into 2 roughly equal loads and proceed as for the drying cycle only, drying one
load at a time.
PROCEDURE FOR EXECUTING THE WASHING AND AUTOMATIC DRYING CYCLE
Having loaded the machine with a maximum of 2.5 kg of dry cotton clothes and set one of the
cotton washing cycles (cycles cotton and linen) the washing cycle can be run and followed
automatically by the drying cycle, as follows:
-Turn the timer control clockwise until the reference mark is aligned with the desired washing
cycle, selecting it from the “cotton and linen cycles” table.
- Turn the drying timer control clockwise until the reference mark is aligned with the selected
drying time. (The “drying program” table contains instructions on how to choose the times,
according to your machine’s spin-drying speed, the fabric to be dried and the degree of
dryness).
- Press the “half-load” key (The maximum amount that can be dried is 2.5 kg of dry cotton
clothes)
- Press the on/off key to switch on the machine.
Wash cycle table
COTTON AND LINEN CYCLES
Cycles
Type of clothing
Description
Trays
to be used
Thermostat
position
Wash cycle
description
1
Very dirty
To wash resistant
fabrics and clothes
1-2 (3-4)
40° - 95°
Prewash/ Wash from 40° to
95° C - Rinse Intermediate
and final spin
2
Dirty
To wash resistant
fabrics and clothes
2 (3-4)
40° - 95°
Wash from 40° to 95° C
Rinse-Intermediate and final spin
3
Slightly dirty
To wash resistant
fabrics and clothes
2 (3-4)
40° - 60°
Wash from 40° to 60° C
Rinse-intermediate and final spin
4
Rapid
To wash resistant
fabrics and clothes
2-(4)
❄ - 40°
Wash from ❄ to 40° C
Rinse-Intermediate and final spin
5
Rinse
Bleaching
To rinse resistant
fabrics and clothes
(3-4)
RinseIntermediate and final spin
6
Softener
To soften resistant
fabricsand clothes
4
Last rinseIntermediate and final spin
7
Spin
*
Final spin
SYNTHETIC AND MIXTURE CYCLES
8 dirty
To wash synthetic
and delicate fabrics
and clothes
2-(4)
40° - 60°
Wash from 40° to 60° C
Rinse
Stops with water in drum
9 Slightly dirty
To wash synthetic
and delicate fabrics
and clothes
2-(4)
❄ - 40°
Wash from ❄ to 40° C
Rinse
Stop with water in drum
10 Rinse
To rinse synthetic
and delicate fabrics
and clothes
(4)
Rinse
Stop with water in drum
11 Softener
To soften synthetic
and delicate fabrics
and clothes
4
Last rinse
Stop with water in drum
12 Delicate spin
13 Drain
Delicate spin dry
To drain water
without spin dry
** EN 60456 Progr. 2/60° C
Drain water with slow drum
spinning
WOOL CYCLE
Cycles
Description
14
Type of clothing
Trays
to be used
Thermostat
position
❄ - 40°
Wool
To wash fabrics
and clothes that
require slow drum
spinning
2-(4)
15 Rinse
To rinse fabrics
and clothes that
require slow drum
spinning
(4)
16 Softener
To soften fabrics
and clothes that
require slow drum
spinning
Wash from ❄ to 40° C
Rinse Stops with water in drum
Rinse Stops with water in drum
Last rinse Stops with water in drum
4
Delicate spin
17 spin-dry wool
18 Drain
Wash cycle
description
Water drainage without
drum spinning
To drain water without
any drum spinning
DRYING CYCLES
Spin-drying speed revs/min
1200
1200
Wardrobe
dry
min.
Iron
damp
min.
Type of
fabric
Quantity
kg
Cotton and linen
2.5
100 - 90
70 - 60
Cotton and linen
1.5
80 - 70
60 - 50
Spin-drying speed revs/min
800
Synthetic and delicate
1.5
70 - 60
Synthetic and delicate
1
60 - 50
— Make holes on the wooden door according
to the instructions overleaf.
— take hinges (A) out of the bag and fix them
to the door.
— Take jack (B); its support (C) and fix one to
the other by means of screws (G).
— Install hinges (A), jack (B) and separator
(E) to the door.
— Fix stopping hook (D) to front panel of the
washing machine by means of screws (F).
— Insert caps (H) into the holes, as shown in
the figure.
— Make holes into the base and fix magnets
(L).
DOOR OPENING REVERSAL
To open the door from left to right, follow the instructions by turning the position of the holes.
If the machine is to be fitted underneath a worksurface and the distance that the appliance
needs to be raised is greater than 10 mm, then a solid one-piece baseboard should be used.
(Not supplied)
YOUR TECNIK GUARANTEE
READ CAREFULLY
Your new appliance is guaranteed for 12 months against
electrical/mechanical breakdown due to faulty manufacture.
This guarantee does not apply to:
a) Any faults which occur due to accidental damage, installation or
misuse of the appliance.
b) Repair, or interference with, the appliance by any person not
authorised by the manufacturer to carry out service.
c) Any parts which are fitted to the appliance which are not originaI
manufacturer's parts.
d) Non-domestic use of the machine.
e) Operation at incorrect voltage.
f) Consumer advice and consultation purposes.
g) Cosmetic parts.
The guarantee applies to Great Britain and Northern Ireland only
The aforegoing does not affect your statutory rights.
Before you call for service:
Please read the information given in the user manual.
In the event a technician is called out for any of the reason stated
above or for consultation purposes charges will be made to the
customer either at the time of visit or at a later time in administration.
Service N. 08705 678910
Ediz. 01 / 7-2001
COD. 3.68136.00