1
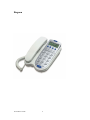
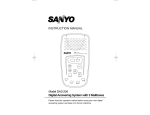
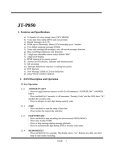
jWIN jWIN Electronics Corporation digital generation JT-P870 OWNER’S MANUAL and OPERATING INSTRUCTIONS 12/19/2003 8:34 AM 1 TABLE OF CONTENTS FEATURES.................................................................................................................................. 3 Diagram........................................................................................................................................ 4 Easy Set Up.............................................................................................................................. 5 SETTINGS................................................................................................................................... 5 Language Setting (English / French / Spanish)........................................................................ 5 Area Code Setting .................................................................................................................... 5 Time/Date Setting .................................................................................................................... 5 LCD Contrast ........................................................................................................................... 6 Ringer HI / LO / OFF Selection............................................................................................... 6 Tone / Pulse Selection .............................................................................................................. 6 Speakerphone and Receiver Volume Adjustment.................................................................... 6 Answer (Recording) On / Off Setting ...................................................................................... 6 Setting the Remote Security Code ........................................................................................... 7 OPERATION ............................................................................................................................... 7 Make Calls ............................................................................................................................... 7 Receive Calls ........................................................................................................................... 7 Flash Function (With Call Waiting Service from your Telephone Company)......................... 7 Redial Last Number ................................................................................................................. 7 Review/Delete Incoming Call List........................................................................................... 7 Caller ID Status Indicators....................................................................................................... 8 Dial Back Incoming Calls........................................................................................................ 8 Out Going Messages ................................................................................................................ 8 Record a Memo........................................................................................................................ 9 Record a Two-way Telephone Conversation ........................................................................... 9 Play Recorded Messages (Incoming)....................................................................................... 9 ICM - Answer On/Off Function ............................................................................................ 10 VOX Function........................................................................................................................ 10 Play New ICM Messages....................................................................................................... 10 Erase and Save Messages....................................................................................................... 10 Remote Control...................................................................................................................... 11 Remote-Control Key Function and Description .................................................................... 11 Room Monitor........................................................................................................................ 11 IMPORTANT NOTES:.............................................................................................................. 12 SAFETY INSTRUCTIONS ...................................................................................................... 12 REMARKS ................................................................................................................................ 12 12/19/2003 8:34 AM 2 FEATURES CALLER ID FUNCTIONS LED For Incoming Call English/Spanish/French Selectable Up To 65 Incoming Call Memory 15 Digit Name Display, 14 Digit Telephone # Display Date And Time Display Last Number Redial/Pause Message Indicator Low Battery Indicator Incoming Call Indicator LCD Contrast Adjustment (8 Levels) Conversation Time Indicator Flash Function Tone/Pulse Selectable Speakerphone Function Speakerphone Volume Control Receiver Volume Control Ringer Volume Control (Hi/Lo/Off) 12/19/2003 8:34 AM 3 ANSWERING MACHINE FUNCTIONS 14 Mins Of Voice Storage Voice Date/Time Stamp (Dts) Up To 59 Recorded Messages OGM1, MEMO, Or ICM Recording Up To 1 Min. Conversation Recording To 14 Minutes Two Default Outgoing Messages Full Recording Message Indication Delete Individual Or All Messages Recover All Deleted Messages New Message LED Indicator Answer-Record On/Off Selector DTMF Detection For Remote Control 3-Digit Remote Security Code VOX Function Room Monitor Diagram 12/19/2003 8:34 AM 4 INSTALLATION Easy Set Up 1. Use the coiled cord to connect the receiver to the phone base or console. 2. Use the flat cord to connect the phone base to the wall jack. 3. Insert the 9V DC Adapter in the topside of the phone base and connect the opposite end to an electrical outlet. The telephone will run a memory check for 15 seconds. The long tone indicates that the memory check is complete. 4. Open the battery cover (on the bottom of the phone base) and install 4 “AA” batteries (not included). Note: Without batteries and adaptor for the power supply, the speakerphone and caller ID function will not function. (The LCD will appear blank.) However, the dial-out and dial-in function will continue to operate. SETTINGS After installing the batteries, you will be prompted to enter settings for Language, Area Code, Time/Date, and LCD Contrast. At other times, you can enter settings mode by pressing the [DEL] and [DOWN] keys at the same time. Language Setting (English / French / Spanish) 1. After installing the batteries, the telephone will prompt you to select the language with “ENGLISH” displaying on the LCD. Use the [UP] and [DOWN] buttons to select the appropriate language: E = English, F = French, S = Spanish) 2. Press [DEL] to confirm. Area Code Setting After the Language Setting you will be prompted to enter the area code setting: 1. Press the [UP] and [DOWN] buttons to set the first digit of the area code. 2. Press [DEL] to confirm the first digit. 3. Repeat first two steps to set the second and the third numbers. Time/Date Setting After the Area Code Setting, you will be prompted to enter the Time/Date Setting. At other times if you need to set the time and date, depress the [TIME] button for 2 seconds to start the time setting procedure, then: 1. The telephone will display the message: ‘Set Day’ 2. Use the [OGM] or [MEMO/REPEAT] buttons to make your selection. 3. Press [TIME] to confirm. 12/19/2003 8:34 AM 5 4. Then the telephone will display ‘Set Hour’. 5. Use steps 2 - 3 to set the hour. 6. Finally the telephone will display ‘Set Minute’. 7. Use steps 2 – 3 to set the minutes. 8. After the settings are complete, press the [TIME] button once and the telephone will announce the time. Note: If you don’t press any keys within 8 seconds after entering the time setting, the telephone will exit setting mode automatically. LCD Contrast After the Time/Date Setting, you will be prompted to enter the LCD Contrast Setting: 1. Press the [UP] and [DOWN] buttons to adjust the LCD contrast. There are eight levels for contrast adjustment. 2. Press [DEL] to confirm and exit settings. Ringer HI / LO / OFF Selection To adjust the volume of your ringer on your phone: 1. Slide the [RINGER] switch to ‘HI’ position or ‘LO’ position according to your preference. 2. Slide the [RINGER] switch to the ‘OFF’ position to turn the ringer off. The ringer will not be activated by any incoming calls. Tone / Pulse Selection Select the dialing mode that your telephone requires by sliding the [T-P] switch to either: ‘T’ position for tone dialing, or to ‘P’ position for pulse dial. Note: While in pulse dial status, press ‘*’ to change to tone dial. Speakerphone and Receiver Volume Adjustment These volume switches are located on the sides of the phone base. The receiver volume is on the left and the speaker volume switch is on the right. - Pick up the receiver and slide the [VOLUME] switch to adjust the receiver volume. - The switch slides from MIN (lowest volume) to MAX. (highest volume). Adjust according to your preference or need. Answer (Recording) On / Off Setting - The default Answer (recording) state is ‘On’, Press [ANSWER] once and the - telephone will display ‘Answer Off’. Press [Answer] again; the telephone will display ‘Answer On’. Note: If you wish to enable incoming callers to leave a message, you must set the ANSWER function to ‘On’. 12/19/2003 8:34 AM 6 Setting the Remote Security Code The remote security code is initially preset to ‘000’. The code range is from 000 to 999. Reset the security code as follows: 1. Depress the [ANSWER] key for about 2 seconds; the telephone will display ‘security code’. 2. Use the [OGM] or [MEMO] button to set the appropriate digit. 3. Press [ANSWER] to confirm the first digit. 4. Use steps 2-3 to set the remaining digits. 5. Press [PLAY/STOP] to exit. (If there is no further activity for 8 seconds, the telephone will exit the setting mode automatically.) OPERATION Make Calls - Lift the receiver or press the [SPEAKER] button. - Input the telephone number by pressing the corresponding digit keys. Receive Calls Lift the receiver or press the [SPEAKER] button to answer an incoming call. Flash Function (With Call Waiting Service from your Telephone Company) - Use the Flash button to pick up a new incoming call (after you hear the call waiting - beep). To make an outgoing call when you already have a party on the line, press the [FLASH] button once to get a dial tone and place a call. Redial Last Number - Lift the receiver or press the [SPEAKER] button. - Press [REDIAL]. The last outgoing number will be dialed. Review/Delete Incoming Call List To review the incoming call list one number at a time: - Press [UP] or [DOWN] to review the call list. To delete a call from the list: - Press [DEL] once when the number you wish to delete is displayed. The LCD will display ‘Del Call?’ - Press [DEL] once again and the call will be deleted. To delete the entire list of incoming calls: - Depress [DEL] for 3 seconds to delete all incoming calls. Note: If any new call has not yet been read, it is impossible to delete all incoming calls at once and the LCD will display the message, ‘NEW CALL PROTEC’. 12/19/2003 8:34 AM 7 Caller ID Status Messages ‘UNAVAILABLE’ - This message indicates that the call is made through a telephone company which does not offer Caller ID service. ‘BLOCKED CALL’ - If the call is restricted, the LCD will display ‘BLOCKED CALL’. Dial Back Incoming Calls a) To dial back local calls: - Use [UP] or [DOWN] to select the desired number. - Press [DIAL] to confirm. The LCD will display ‘PICK UP HANDSET’. - Lift the handset or press [SPEAKER], the number will be automatically dialed. b) To dial back non-local calls and insert a preceding number ‘1’: After you have pressed [DIAL]: - If the number you selected is not a local number, the LCD will display ‘PICKUP OR ADJ’. - Press [DIAL] once more to include a ‘1’ as the first digit automatically. (Press [DIAL] twice to cancel adding ‘1’.) Lift the receiver or press [SPEAKER] -- the number will be dialed automatically. - Out Going Messages Record and Play OGM1 (Out Going Message1) OGM1 is a message that tells the caller to leave a message. The record and play steps are as follows: - If no OGM1 message has been recorded, press the [OGM] button once, the telephone - answering message will announce ‘Hello, please leave a message after the tone.’ This is a default message that accompanies the telephone. If you want to record your own OGM1 message, depress [OGM] for about 2 seconds and release. Start record after hearing a long “beep”. - Recording will stop automatically after 1 minute or you can stop the recording by pressing the [PLAY/STOP] button. The telephone will immediately play the OGM1 after recording. Press [OGM] once to replay the out-going message. - Press [PLAY/STOP] to stop the message. 12/19/2003 8:34 AM 8 OGM2 The JT-P870 Telephone has a backup message, the OGM2, which takes over when the message recorder has reached full capacity. The recording capacity for this phone is as follows: - 59 messages, or - 14 minutes of recording time OGM2 gives callers the following message: “Memory full, please call again later.” This message cannot be changed by the user. Record a Memo The Memo feature enables you to leave a message for others who have direct access to the telephone. To record a memo: - Press and hold the [MEMO] button for about 2 seconds and it will announce, “Record - message after tone.” Memo recording can start after a long “beep”. Recording will stop automatically after 1 minute or you can end recording by pressing [PLAY/STOP]. To play a memo: - Press [MEMO] once. The recorded Memo will be played. - If there are no messages, the telephone will announce, “You have no memos.” Record a Two-way Telephone Conversation - Press and hold the [MEMO] button for about 2 seconds, you will hear a short “beep”. Begin recording after the tone. - Speak your message clearly into the recorder. - Press [PLAY/STOP] to stop recording. Note: When there are more than 59 messages or there has been up to 14 minutes of recording, the telephone will announce ‘Memory full’ and the recording will be terminated. Play Recorded Messages (Incoming) When there are new messages the number of total records will display on your LED screen. - Press [PLAY/STOP] to play all recorded messages. - Skip to the next record by pressing [OGM] once. - Repeat the present record by pressing [REPEAT] once. - Jump to the previous record by pressing [REPEAT] key twice. After the last recording time is played, the telephone will announce ‘End of messages.’ 12/19/2003 8:34 AM 9 ICM - Answer On/Off Function When a call is received in Answer ‘ON’ mode: a) If there are no newly recorded incoming messages, the telephone will play the OGM1 message after 4 rings. b) If there are new ICM messages recorded, the telephone will play the OGM1 message after 2 rings. c) Press [*] to skip OGM1. - After playing OGM1, there will be a long ‘beep’ after which the caller can begin - recording his or her message. The ICM recording will stop if any of the following events occur: Record time exceeds 1 minute A pause exceeds 8 seconds The [PLAY/STOP] button is pressed The phone receiver is lifted (In this case, the message just recorded will be saved as a new message, but will be interrupted.) VOX Function Message recording will stop automatically if the telephone detects continuous 8 busy tones or no operation for 8 seconds. Play New ICM Messages - If there are new ICM messages, the LED will blink to indicate the new messages - received. Press [PLAY/STOP], the telephone will first play the amount of total messages, and then it will play the new messages. If there are no new messages or all new messages have been played, the telephone will play all messages sequentially. After the recorded time of the last message was played, the telephone will announce ‘End of messages.’ Erase and Save Messages Erase a single message: While playing messages you can erase a single message as it is playing: - Press [ERASE] once to delete the currently playing message (the deleted message cannot be recovered.) Erase all messages: - Depress [ERASE] for about 2 seconds. All messages will be erased after a long “beep”. 12/19/2003 8:34 AM 10 Recover all messages (immediately after erasing): - Again, depress [ERASE] for about 2 seconds. All erased messages will be recovered after a long “beep”. Note: If there is no message in record, then there will be two short “beeps” to indicate that no message has been erased. Note: If any recording action is performed after all messages have been erased, the deleted messages cannot be recovered. Remote Control - After you hear the out going message, input the security code (Please refer to Setting - the Remote Security Code). You will hear a long beep. Enter any of the following functions by pressing the appropriate key: Remote-Control Key Function and Description Key(s) * 1 2 3 4 5 Function Skip OGM1 play *1 Play OGM1 Room Monitor (up to 15 seconds) Play Memos (press twice to play previous message) Play all incoming messages or press again to pause Play New Messages (When playing Incoming Messages or MEMO recordings, press this key to play the next message.) Erase Individual Message Stop Play Record OGM1 *2 Record a MEMO *3 Change Security Code *4 Erase all messages *5 # Switch from Answer “On” Mode to Answer “Off” Mode 6 7 Exit Remote Control Room Monitor While in remote control mode, the user can monitor the room of the telephone by entering the corresponding key(s). The room may be monitored for 15 seconds. Procedure: - Use another telephone to dial your telephone number. - Input the security code to enter the remote control menu. Press [2] to enter room monitor mode. 12/19/2003 8:34 AM 11 IMPORTANT NOTES: To operate this unit with all features active, you must have ‘CALLER ID SERVICE’ setup with your local telephone company. Some functions such as ‘CALLER NAME ID’ will only operate if such services are included in the user’s Caller I.D. program with the local telephone company. SAFETY INSTRUCTIONS - This telephone is an electrical device and can be hazardous if immersed in water. If the user accidentally drops it into water, first unplug it from wall jack, and remove it from water. - Please keep the telephone dry and do not use it in a damp place, i.e., near a bathtub, washbowl, kitchen sink, laundry tub or swimming pool. Do not use it in rain. - Unplug the phone from the wall jack before cleaning with damp cloth; please do not use liquid or aerosol cleansers. Do not use the phone to report a gas leak in the gas vicinity (as the phone may cause a spark). Please remove yourself immediately from the area and make the emergency - - phone call in a safe area. Handle the phone carefully. Do not drop it. Do not use or put the unit in extreme temperatures. Keep the phone free of dust and dirt. - Use the correct power batteries as indicated in the manual. Do not put batteries in a - fire as such action can lead to an explosion. Do not modify or tamper with the telephone’s internal components. Improper adjustment can cause damage and can be dangerous. REMARKS If the telephone’s DC 9V adaptor is disconnected for more than 24 hours (while the batteries remain installed), it may not function properly when the adaptor is re-connected. The solution is as follows (in this order): 1. Unplug the adaptor. 2. Remove the batteries. 3. Re-plug the adaptor. The telephone will run a memory check for 15 seconds and return to normal functioning. (All information will be reset.) 12/19/2003 8:34 AM 12