1
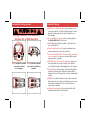
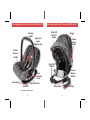
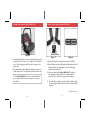
Recall Information
Child restraints could be recalled for safety reasons. You must
register this restraint to be reached in a recall. Send your
name, address and the restraint's model number and manufacturing date to:
Britax Child Safety, Inc.
460-R Greenway Industrial Drive
Fort Mill, SC 29715
HANDLE WITH CARE™
or call
For infants weighing from 5 pounds to 20 pounds
1 (888) 4 BRITAX
For use rear-facing only
For recall information,
call the U.S. Government's Auto Safety Hotline
at 1-800-424-9393.
In the DC area call 1 (202) 366-0123.
Fill out the registration card attached to your Handle With
Care and mail it in today!
BRITAX Child Safety, Inc.
460-R Greenway Industrial Drive
Fort Mill, SC 29715
Tel: (888) 4BRITAX
#1 PN 000-013 4/99
Table of Contents
For Your Information . . . . . . . . . . . . . . . . . . . . . . . . . . . . . 1
Your Child’s Protection Is in Your Hands . . . . . . . . . . . . . . . 1
Airbag Warning. . . . . . . . . . . . . . . . . . . . . . . . . . . . . . . . . 2
Pre-term and Low-Birthweight Infants . . . . . . . . . . . . . . . . 2
A Message to Parents and Caregivers. . . . . . . . . . . . . . . . . 3
Incorrect Use Is Common. . . . . . . . . . . . . . . . . . . . . . . . . . 3
Incompatible Seat Locations . . . . . . . . . . . . . . . . . . . . . . . 4
Important Warnings. . . . . . . . . . . . . . . . . . . . . . . . . . . . . . 5
Incompatible Belts and Vehicle Seats. . . . . . . . . . . . . . . . . . 6
For Your Information
This product fulfills the requirements of the U.S. Federal
Motor Vehicle Safety Standard 213 and is certified for use in
motor vehicles and for use in aircraft. It is designed for infants
weighing between 5 lbs. (2.3 kg) and 20 lbs. (9 kg), and
measuring up to 26 inches (66 cm) in height.
This infant restraint MUST be used rear-facing.
Please read and understand the information in this booklet
before using your infant restraint. Store the booklet in the
pocket located in the back of the restraint, just above the
rocker base. Consult it often to make sure you are using the
restraint correctly.
Becoming Familiar with Handle With Care . . . . . . . . . . . 8 - 9
Securing Your Infant. . . . . . . . . . . . . . . . . . . . . . . . . 10 - 13
Installing with Lap Belt Only and Lap & Shoulder Belt . . . . . . 14 - 16
How to Anchor Perfect-Fit Tether . . . . . . . . . . . . . . . 16 - 18
How to Release & Refasten Perfect-Fit Tether . . . . . . 18 - 20
Attaching Canopy . . . . . . . . . . . . . . . . . . . . . . . . . . . . . . 21
Care and Cleaning. . . . . . . . . . . . . . . . . . . . . . . . . . . . . . 22
Buckle Problems . . . . . . . . . . . . . . . . . . . . . . . . . . . . . . . 23
Types of Belts Vehicles Have. . . . . . . . . . . . . . . . . . . . . . . 25
Using Child Seat in an Airplane . . . . . . . . . . . . . . . . . . . . 26
Register and Warranty . . . . . . . . . . . . . . . . . . . . . . . 27 - 29
Your Child’s Protection
Is in YOUR Hands!
Failure to follow each of the instructions contained in this
booklet can result in your child striking the vehicle interior
during a sudden stop or crash. In a severe crash your child
could be ejected from the vehicle into the roadway.
Secure this child restraint with a vehicle belt as specified
in this instruction booklet and in your vehicle owner’s manual and secure your child in the restraint with the harness
system provided.
Recall Information. . . . . . . . . . . . . . . . . . . . . . . . Back Cover
1
Airbags
A Message to Parents and Caregivers
NEVER place this infant restraint into a front passenger seat
that has an airbag. An airbag inflates with explosive force in a
split second. It can do so even in a minor, fender-bender-type
mishap.
When the bag deploys, it strikes the back of the child
restraint right behind the infant’s head. This violent blow will
cause fatal or catastrophic injuries to the child. Older children
who ride facing forward are also at risk and are safer in the
back seat.
IMPORTANT: Owners of vehicles with front passenger side
airbags should refer to their vehicle owner’s manual for child
restraint installation instructions. You can’t always tell if the
passenger seat has an airbag. If you are renting, driving, or
riding in someone else’s vehicle, don’t take chances! Take the
time and trouble to find out before you place a child in the
front passenger seat.
Some vehicles have side-impact airbags. Follow vehicle
manufacturer instructions.
Pre-term infants weighing less than five pounds, may have
difficulty breathing when placed in a semi-upright position.
Consult your doctor before using your Handle With Care™.
For the first few weeks you may have to use a safety device
that allows your infant to lie flat.
2
Before using your Handle With Care™, please take the
time to read this manual. Get to know the restraint and follow instructions carefully. Also make sure that everyone who
will be driving your child knows how to use it. This includes
babysitters, grandparents and friends.
It is recommended that you give a demonstration on the
correct use of the Handle With Care™ to anyone who will be
using it, even if that person is familiar with other child
restraints. There are differences from brand to brand and from
one model to another. The Handle With Care™ may have features other child restraints don’t have.
Incorrect Use Is All Too Common
Safety checks carried out in many parts of the country have
shown that most safety restraints are not used correctly. This
can lead to tragedy.
Investigations of crashes involving children reveal that the
majority of children who were hurt were not correctly protected at the time of the crash. A mistake in the way the
restraint is attached to the vehicle or in the way the child is
secured in the restraint could put the child at risk.
Even used correctly, a child restraint cannot always prevent
injuries. Some crashes are so violent that they may cause critical or fatal injuries. Correct use of a safety device can help
reduce the severity of injuries. According to accident statistics,
children are safer when properly restrained in the rear seating
positions than in the front seating position.
3
Incompatible Seating Locations
Important Warnings
■
Seating Locations That Must NOT
Be Used for a Child Restraint
■
■
■
■
■
NEVER install this restraint
on a vehicle seat that
faces sideways.
NEVER install this restraint
on a vehicle seat that faces
rearward.
■
■
■
4
NEVER leave a child unattended in this restraint, even for
just a few moments. The child could find a way to become
tangled in webbing and choke, tip the restraint over, or
other dangers.
Keep a watchful eye on your baby if you temporarily use
the Handle With Care™ in the house.
NEVER place the restraint on a table or other raised surface. It could fall off!
Everyone must buckle up! In a crash, unrestrained occupants could injure those who ride protected.
Secure the Handle With Care™ in your vehicle even when
it is not occupied. In a crash, an unsecured child restraint
may injure other occupants.
NEVER take your child out of the restraint or remove harness straps while the vehicle is moving. If the child is in
need of attention pull off the highway into a safe rest area.
Hot Parts! In hot, sunny weather, check the fabric and the
buckle before placing your child in the restraint. When
parking in the sun for long periods, cover the restraint with
a towel.
DO NOT use a child restraint in a seat or with a seat back
that folds down, unless these are latched and secure. Some
seat backs are designed to lock in a crash. Check your
vehicle owner’s manual.
Adjust the head restraint of the seat in which the child
restraint is installed to its lowest position.
5
Incompatible Seat Belts
Seat Belts and Vehicle Seats NOT
Suitable for Child Restraints
To provide effective crash protection, a child restraint must
be firmly secured on the seat of the vehicle. Some belts and
some seating positions make this impossible.
Read and follow your vehicle’s owner’s manual.
If a child restraint shifts around as you drive, it could be out
of the correct position at the moment a crash occurs. This
could lead to the protection engineered into the device being
lowered. For that reason some belts and some vehicle seats
should not be used at all.
DO NOT use a belt that has the lap belt and the shoulder belt
sewn to the latch plate.* (Figure 1).
DO NOT use a belt that has the lap and shoulder portions
attached to the door* (Figure 3).
DO NOT use a lap belt if it’s accompanied by a shoulder belt
that runs on a motorized track.* (Figure 2).
DO NOT use a belt that comes out of the seat cushion more than
2 inches in front of the seat crack.* (Figure 4).
DO NOT use a vehicle seat that’s scooped out or has a
hump.*
* In most vehicles you’ll be able to find a seating location that allows you to
install your child restraint correctly. If not, your vehicle owner's manual has
information on adapting belts for use with a child restraint. In some cases
the dealership can order and install a special belt.
6
Fig 1
Fig 2
Motorized
Fig 3
Belts on Door
Fig 4
7
Becoming Familiar with Your Handle With Care™
Carrying
Handle
Upper and
Lower
Shoulder Slots
Becoming Familiar with Your Handle With Care™
Perfect-Fit
Tether™
Buckle
Canopy
Handle
Release
Button
5 Point
Harness
Buckle
Perfect-Fit
Tether™
Harness
Release
Button
Level
Indicator
Label
Base Rocker
Lap Belt Guides
Lock-Off
Tether Hook
D-Ring
* Infant Chest Clip Not Shown
8
9
Securing Your Infant in the Handle With Care™
Figure 5
1. Shoulder straps (Figure 5) must be threaded through slots
at shoulder level or lower. For a newborn use the lowest
slots. As the baby grows taller, switch the straps to the
upper slots.
2. The infant must wear clothing that leaves the legs free so
buckle strap can be correctly positioned between the legs.
The Handle With Care™ comes to you with the harness straps in the lower slots, ready to use for your
newborn.
Securing Your Infant in the Handle With Care™
Press Release
Figure 7
Figure 8
3. Release the buckle by pressing down on the red button.
4. Open infant chest clip by lifting tab and threading seat belt
through it. Note: the appearance of the chest clip may
vary from figure 8 above.
5. Place your infant in the Handle With Care™, buttocks
first, making sure that its back is in contact with the
restraint. There should be no gaps under the baby.
6. Place the harness straps over the infant’s shoulders. Bring
the two tongues together and insert them into the buckle
(Figure 9).
Continued on Page 12.
10
11
Securing Your Infant in the Handle With Care™
Continued from Page 11.
7. Listen for the click to make sure that the buckle is securely latched. (Figure 10). If you don’t hear it, open the
buckle and try again. Double-check the locking mechanism: Pull up on the straps. If the buckle releases, turn to
Page 24 for help.
8. To adjust harness length, press the harness release button.
(Figure 11).
• To shorten, pull on the narrow strap that’s attached to
the shoulder harness.
• To lengthen, pull out shoulder straps with one hand
while holding down the harness release button with the
other (Figure 12).
9. The infant chest clip should be secured at arm pit level .
Securing Your Infant in the Handle With Care™
10. For the first few weeks, fill gaps around sides of the
infant’s shoulders and head with rolled towels or blankets
to provide side support.
11. When harness straps are fastened and adjusted, you may
place a blanket or quilt over the baby. But don’t put anything underneath the child.
Press Button
To Lengthen
Pull to
Shorten
Figure 11
Figure 9
Figure 12
Figure 10
12
13
Installing Your Handle With Care in the Vehicle™
Installing Your Handle With Care in the Vehicle™
Select a suitable seating location for your Handle With Care™. The
center rear seat usually has a lap belt that locks. Some newer cars now
have lap and shoulder belts in the center seat. Turn to Page 25 for
instructions on how to use such a belt.
A
B
Installing the Handle With Care™ with
a Lap Belt Only or Lap & Shoulder Belt
1. Adjust the Handle With Care™ to its stable position by lowering the stabilizer feet until they lock (Figure 15).
2. Place the restraint rear-facing on the seat of the vehicle. The
carrying handle can stay locked in the fully upright position
marked A (Figure 16).
3. Adjust the base of the Handle With Care™ so it is level on
the seat of the vehicle, the way it would be resting on the
floor in your home. Refer to level indicator line on the side
of seat shell as a guide.
If the vehicle seat slopes back, the restraint will position your
infant too upright. This could allow the head of a young
baby to fall forward.
4. To achieve a level position on the seat of your vehicle, you
may have to wedge a tightly rolled towel under the baby’s
foot area of the restraint. But be careful not to tilt it back
too far. That could be dangerous! The correct maximum
recline angle is 45 degrees (Figure 17).
5. Open the lock-off on the left side of the child seat. (Figure 18).
6. Secure the Handle With Care™ by inserting the seat belt through
the open lock-off and into the two belt guides and buckling it. To
tighten the belt, gently rock the restraint side to side while you pull
14
Figure 15
Pushbutton
(Both
sides)
Figure 16
45°
(Parallel
with ground
or vehicle
floor.)
Figure 17
Figure 18
on the end of the lap belt only or the shoulder belt. Once the belts
are tight, close the clamping arm, move the tab over until the lockoff is closed. (Figure 19). If the belt locks, the restraint will be
securely installed. If doesn’t, turn to Page 25 to find out what you
can do to lock the belt.
15
Installing Your Handle With Care in the Vehicle™
7. If the stabilizer feet don’t make
contact with the seat of the vehicle,
release the belt a little and fill the
gaps with small towels. Then tighten
the belt again.
Belt Guide
Lock-Off
Figure 19
How to Anchor the Perfect-Fit Tether
1. Find the Perfect-Fit Tether located on the back of the seat
near the head area.
2. Check to make sure the latch is inserted into the buckle.
3. The length of the Perfect-Fit Tether can be extended by lifting the silver metal tab and pulling the web strap.
4. The end of the Perfect-Fit Tether has a metal ring (D-ring).
Take this metal ring (D-ring) and find a location underneath the vehicle seat in front of the child restraint to wrap
it around.
How to Anchor the Perfect-Fit Tether
Vehicle Seat
Your Handle with Care should already be installed with the
vehicle belts in the rearward facing position according to the
instruction booklet.
Buckle
Perfect-Fit
Tether™
Silver
metal tab
D-ring
Hook
16
5. You are looking for any structural metal part. The best way
is to feel underneath the vehicle seat directly in front of or
to one side of the Handle With Care for the following:
a. Seat frame bar that the strap can be wrapped around
b. Seat mounting rail that is bolted to the floor of the vehicle
c. A fixed vehicle seat belt anchor to the floor
d. Vehicle seat leg that is bolted to floor
17
How to Anchor the Perfect-Fit Tether
How to Release and Refasten Perfect-Fit Tether
6. Take the D-ring and loop the strap around the metal
anchor
7. Take the hook and clip it around the D-ring
8. Once attached, lift up on strap, relieving the slack in the
belt to achieve a more recline position but no more than 45
degrees. Refer to the red line on the side of the seat to
make sure it is level with the vehicle floor. It is OK to have
the tether at an angle.
18
To remove the Handle With Care from the vehicle, hold the
back of the Handle with Care and press the red buckle button
on the Perfect-Fit Tether and undo the vehicle safety belts.
The Perfect-Fit Tether should remain on the floor board of
your vehicle. With the handle in the upright position, and
locked, the Handle With Care can be carried out of the vehicle.
19
How to Release and Refasten Perfect-Fit Tether
Attaching Canopy
Figure 23
When reinstalling the infant restraint in the vehicle, repeat
the steps for Installing the Handle With Care with a Lap Belt
Only or Lap & Shoulder Belt. The Perfect-Fit Tether is fastened by inserting the buckle into the latch plate. If the
length of the Perfect-Fit Tether makes it difficult to buckle,
lengthen the strap by lifting the silver metal tab and pulling
the web. Once buckled, tighten by pulling the strap.
Figure 24
1. Place handle in upright position by squeezing the side
handle release buttons
2. Spread open the canopy and lay it over the head area of
the cover to the handle. The velcro strips should be on the
same side as the handle with the velcro strips facing
towards the infant restraint.
3. Wrap and fasten the velcro around both sides of the handle. (Figure 23)
4. Then fasten the velcro to the back of the cover. (The positioning velcro patches are located on the cover in the rear
of the child restraint. For a tighter fit, roll the canopy
under 1⁄2” before attaching.)
5. To reverse the direction of the canopy, unattach the velcro
that is fastened to the rear of the cover. *
6. Roll the canopy over the handle so it is now hanging over
child’s leg area.
7. Tighten the position by fastening the velcro patches to
outside left and right of front cover (Figure 24).
* The reverse direction of the canopy can be used to block the sun from shining in the child’s
eyes. Also, this position assists in scooping air-conditioned air towards the child.
20
21
The Buckle
Care and Cleaning
DO NOT take the harness apart when cleaning the seat. It
is unnecessary and dangerous to do so.
DO NOT use solvents, cleaning fluids or chlorine bleach as
these would weaken the harness webbing, the cover fabric
and the plastic shell.
Harness Straps
Add a few drops of mild dishwashing detergent to a bowl
of warm water. Use a cloth dipped in the water to wipe the
webbing. You may use a soft brush to remove caked-on soil.
Rinse with clean water and pat dry.
The Cover
The cover can be machine-washed in warm water (100° F,
40° C). Select a short, gentle wash cycle. If cover is very
soiled, allow it to soak for half an hour. Spin dry at a lowspeed setting. If you prefer, wash it by hand.
DO NOT put the cover into the dryer, not even on a low
temperature setting. Dryer heat would shrink the fabric so
cover would no longer fit. Air dry, out of direct sunlight.
22
Foreign objects, including food, milk, and juice, can accumulate in the buckle. This could become a hazard if it interferes with the locking mechanism. Never use oil or sprays! To
clean the buckle, follow these steps:
1. Slide the cover off the lower
part of the shell.
2. Remove the strap that has
the buckle attached to it by
pushing the narrow end of
the metal plate (slide) up
through the slot. (Figure 20).
3. Immerse the buckle in warm
water with some dishwash ing liquid added to it. Soak
for at least 30 minutes,
longer if possible, preferably
Figure 20
overnight.
4. Flush out loosened debris under running water (lukewarm never hot), then shake out water. Allow to air dry with the
buckle opening facing down. A hair dryer used on a cool
setting or a fan will speed up the drying process. Try the
buckle to make sure it works.
5. Re-insert buckle strap by first threading it through the
cover and then through the opening in the shell. Make
sure that the strap is not twisted.
23
Troubleshooting
What Kinds of Belts Does Your Vehicle Have?
Problems with the Buckle
Most problems relating to the buckle are due to the accumulation of dirt, juice, or milk. This can lead to the tongues:
• Failing to lock with an audible click
• Ejecting slowly when the release button is pressed
• Being difficult to insert (you can feel resistance)
• Not locking into the buckle, but ejecting again.
These problems can usually be corrected by cleaning (see
Page 23). It’s best to clean the buckle from time to time to
keep it in good working condition. Never use oils or sprays!
Important: If the buckle’s tongues of your Handle With
Care™ can not be inserted, fully press down the release button of the buckle, and reinsert.
Your child’s life could depend on the two tongues
locking into the buckle with an audible click.
Warning: In a crash, the Handle With Care™ could sustain structural damage. Although you may not notice
any damage, the infant restraint should be replaced.
Need Assistance?
If you have questions regarding the Handle With Care™ or
have difficulty installing it correctly, call our toll-free Help Line:
1 888 4 BRITAX
24
A child restraint has to be tightly secured to the seat of a
vehicle. It’s important to become familiar with the belts in
your vehicle and get to know how to lock them.
Some lap/shoulder belts have locking latch plates. Others
have free-sliding latch plates that keep the belt loose while
you’re driving, but a mechanism in the belt anchor would lock
the belt in a crash. This system is safe for adults, but for an
infant restraint the belt must be tightly locked from the start.
The rear center seat usually has a locking lap belt which,
once tightened, stays tight. In some vehicles center seats now
have combination lap/shoulder belts. These may be especially
suitable for your Handle With Care™.
Lap/shoulder belts have one of the following:
1. A locking latch plate which, once the belt is tightened, will
keep it tight.
2. A free-sliding latch plate with a special mechanism that
allows the belt to be “switched” from one that’s loose to
one that locks. For information on how to lock the belt,
check the label on the belt webbing and read the vehicle
owner’s guide.
3. A belt with a free-sliding latch plate that has no built-in
locking mechanism. You will need to use built in lock-off
on the side of the seat.
25
How to Make Seat Belts Work with Child Restraints
At times the buckle may be too close to the belt guide of
the child restraint, so that the belt cannot be tightened sufficiently. At other times the belt release mechanism is kept in
the “open” position, so the buckle won’t lock and the belt
stays loose.
In some vehicles turning the latch plate one half-turn (180
degrees) will disable the release mechanism and allow the
belt to lock.
This doesn’t work in all vehicles. In some the latch plate
can’t be locked into the buckle this way.
Using Child Seat In An Airplane
Your Handle With Care is certified for use on aircraft (see
label on seat). Since airlines have some restrictions about the
use of child seats, notify the airline ahead of time to tell them
you intend to bring the seat on board.
For the safety of your child, use
the infant seat in forward facing
aircraft seats only. (Infant facing
rearward.) Follow the installation
instructions as previously
described.
Figure 21
Register Your Handle With Care™
Child restraints could be recalled for safety reasons. You
must register this restraint to be reached in a recall. Send your
name, address and the restraint’s model number and manufacturing date to:
Britax Child Safety, Inc.
460-R Greenway Industrial Drive
Fort Mill, SC 29715
or call toll-free:
1 888 4 BRITAX.
For recall information, call the
U.S. Government’s Auto Safety Hotline at
1-800-424-9393
(202-366-0123 in D.C. area)
Fill out the postage-paid registration card attached to your
Handle With Care™ and MAIL IT TODAY!
Illustration shows Handle with
Care correctly installed in window
seat of an aircraft.
26
27
Warranty
Warranty
This Infant Restraint was manufactured by Britax Child
Safety, Inc., Fort Mill, SC. (Britax Model 191)
Britax Child Safety, Inc. (“Britax”) warrants this product to
the original retail purchaser as follows:
LIMITED ONE YEAR WARRANTY. This product is warranted
against defective materials or workmanship for one year from
the date of original purchase. Your exclusive remedy for this
Warranty is that Britax will, at its option, provide repair or
replacement components for this product or refund the original purchase price of the product. Britax reserves the right to
discontinue or change fabrics, parts, models or products, or to
make substitutions.
To make a claim under this Warranty, you must contact
your Britax retailer or Britax Customer Service Department,
460-R Greenway Industrial Drive, Fort Mill, SC 29715, or call
Britax at 1(888) 427-4829. Proof of purchase required.
PLEASE COMPLETE AND MAIL THE PRE-ADDRESSED
OWNER REGISTRATION CARD WITHIN THIRTY (30) DAYS
OF PURCHASE TO EXPEDITE WARRANTY CLAIMS AND TO
EVIDENCE THE ORIGINAL DATE OF PURCHASE.
LIMITATION OF DAMAGES. The Warranty and remedies as
set forth are exclusive and in lieu of all others, oral or written,
express or implied. In no event will Britax or the retailer selling this product be liable to you for any damages, including
incidental or consequential damages, arising out of the use or
inability to use this product.
LIMITATION OF WARRANTIES AND OTHER WARRANTY
TERMS AND STATE LAW RIGHTS. ANY IMPLIED WARRANTIES, INCLUDING IMPLIED WARRANTIES OF MERCHANTABILIY AND FITNESS FOR A PARTICULAR PURPOSE,
SHALL BE LIMITED TO THE DURATION AND TERMS OF
THE EXPRESS WRITTEN WARRANTY. SOME STATES DO
NOT ALLOW LIMITATIONS ON HOW LONG AN IMPLIED
WARRANTY LASTS OR THE EXCLUSION OF LIMITATION
OF INCIDENTAL OR CONSEQUENTIAL DAMAGES, SO THE
ABOVE LIMITATIONS MAY NOT APPLY TO YOU. THIS
WARRANTY GIVES YOU SPECIFIC LEGAL RIGHTS, AND
YOU MAY HAVE OTHER RIGHTS WHICH VARY FROM
STATE TO STATE. Neither Britax or the retailer selling this
product authorized any person to create for it any other warranty, obligation, or liability in connection with this product.
WARRANTY LIMITATIONS. This Warranty does not include
damages which arise from negligence, misuse or use not in
accordance with the product instruction guide.
28
29