1
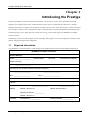
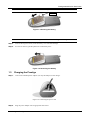
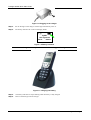
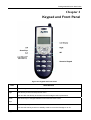
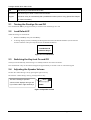
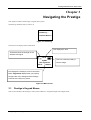
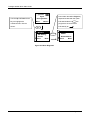
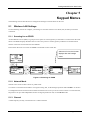
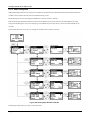
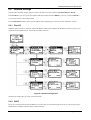
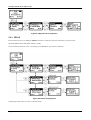
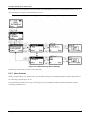
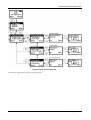
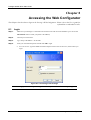
Prestige 2000W
VoIP Wi-Fi Phone
Quick Start Guide
Version 2.0
February 2004
Prestige 2000W Quick Start Guide
Table of Contents
Chapter 1 Introducing the Prestige............................................................................................................. 1-1
1.1
Required Information...................................................................................................... 1-1
1.2
Installing and Removing the Battery .............................................................................. 1-2
1.3
Charging the Prestige .................................................................................................... 1-3
Chapter 2 Keypad and Front Panel............................................................................................................. 2-1
2.1
Turning the Prestige On and Off .................................................................................... 2-2
2.2
Load Default IP .............................................................................................................. 2-2
2.3
Switching the Key-lock On and Off ................................................................................ 2-2
2.4
Adjusting the Speaker Volume ....................................................................................... 2-2
Chapter 3 Navigating the Prestige .............................................................................................................. 3-1
3.1
Prestige’s Keypad Menus .............................................................................................. 3-1
Chapter 4 Initial Configuration .................................................................................................................... 4-1
4.1
Overview ........................................................................................................................ 4-1
Chapter 5 Keypad Menus............................................................................................................................. 5-1
5.1
Wireless LAN Settings ................................................................................................... 5-1
5.2
Network Settings ............................................................................................................ 5-3
5.3
SIP Settings.................................................................................................................... 5-5
Chapter 6 Prestige Usage ............................................................................................................................ 6-1
6.1
Dialing a Telephone Number.......................................................................................... 6-1
6.2
Using the Phonebook to Dial a Telephone Number ....................................................... 6-1
6.3
Redialing a Telephone Number...................................................................................... 6-1
6.4
Answering a Call ............................................................................................................ 6-1
6.5
Rejecting a Call .............................................................................................................. 6-1
6.6
Holding a Call................................................................................................................. 6-1
Chapter 8 Accessing the Web Configurator .............................................................................................. 8-1
8.1
Login............................................................................................................................... 8-1
Chapter 9 Troubleshooting.......................................................................................................................... 9-1
9.1
Warning Messages......................................................................................................... 9-1
9.2
Error Messages.............................................................................................................. 9-1
1-1
Table of Contents
Prestige 2000W Quick Start Guide
Chapter 1
Introducing the Prestige
The Prestige 2000W is a wireless telephone that operates over the Internet. It gives users the benefits of Internet
telephony, for example cheaper calls, without the physical restrictions of a fixed Internet connection i.e. mobility.
Sending compressed voice signals over the Internet is called Voice over IP or VoIP. The Prestige is a Session Initiated
Protocol (SIP) - based wireless VoIP telephone. SIP is an internationally recognized standard for implementing VoIP.
The Prestige allows you to make and receive VoIP calls as long you are within range of an IEEE802.11b enabled
wireless network.
The Prestige is easy to use and configure via the LCD display and keypad. You can even manage your settings over the
Internet using the Prestige's Web Configurator.
1.1
Required Information
You should have a wireless Internet account already set up and have been given most of the following information.
INTERNET ACCOUNT CHECKLIST
Wireless Settings
ESSID: ___________________
Network Mode:
Ad Hoc
Infrastructure (default)
(default: Wireless)
Channel: __________________ (default: 6)
WEP Keys (if your wireless network uses WEP encryption)
Key 1: ____________________
Key 2: ____________________
Key 3: ____________________
Key 2: ____________________
Network Mode (also known as encapsulation)
DHCP
Fixed IP
(default)
Your IP Address : __________________
Subnet Mask: __________________
(default: 192.168.1.3)
(default: 255.255.255.0)
Gateway IP address: ____________
(default: 192.168.1.1)
PPPoE
PPPoE Name: ____________
Introducing the Prestige
PPPoE Password: ____________
1-1
Prestige 2000W Quick Start Guide
You should also have a VoIP account already set up and have been given most of the following information.
VOICE OVER IP CHECKLIST
Proxy Server Information
URL / IP Address: __________________
Port: __________________
Expire Time: ______ seconds (default: 3600)
Outbound Proxy Server Information
URL / IP Address: __________________
Port: __________________
User Account Information
Telephone Number: __________________
Username: __________________
User Password: __________________
It is recommended that you change the default password the first time you login.
WEB CONFIGURATOR ACCOUNT INFORMATION (DEFAULTS)
Administrator Access
Username: zyxeladmin
Password: 1234
User-level Access
Username: admin
1.2
Step 1.
Password: 1234
Installing and Removing the Battery
With Prestige’s display face down, push down on the grooves and slide the battery cover off the telephone.
Figure 1-1 Removing the Back Panel
Step 2.
With the battery label facing towards you; align the three metal contacts on the battery to the three
corresponding contacts on the telephone and press the battery down into place.
1-2
Introducing the Prestige
Prestige 2000W Quick Start Guide
DO NOT remove the plastic tab.
Plastic Tab
Figure 1-2 Inserting the battery
Remember to switch the power off before removing the battery
Step 3.
With the Prestige face down, slide the battery cover off of the Prestige.
Step 4.
For ease of removal, pull the plastic tab on the battery base.
Figure 1-3 Removing the battery
1.3
Step 1.
Charging the Prestige
Connect the included power adaptor (use only this adaptor) to the charger.
Figure 1-4 Connecting the power cord
Step 2.
Plug the power adapter into an appropriate wall socket.
Introducing the Prestige
1-3
Prestige 2000W Quick Start Guide
Figure 1-5 Plugging-in the charger
Step 3.
Set the Prestige on the charger. The Prestige automatically turns on.
Step 4.
The battery indicator bar on the LCD display blinks.
12:00
ZyXEL
Not registered
Menu
Names
Figure 1-6 Battery Indicator
Charge the battery for five hours before using your Prestige.
Figure 1-7 Charging the battery
Step 4.
The battery indicator bar stops blinking when the battery is fully charged.
Step 5.
Remove the Prestige from the charger.
1-4
Introducing the Prestige
Prestige 2000W Quick Start Guide
Chapter 2
Keypad and Front Panel
Figure 2-1 Keypad and Front Panel
KEY
DESCRIPTION
Left
Use this key to select menu options displayed
Right
Use this key to return to the previous menu.
You can also use this key as a shortcut to the Prestige’s built-in phonebook.
Arrow
Use these keys to navigate between menus and move the cursor.
Keys
Off
Use this key to reject or cancel calls.
You also use this key to return to standby mode or to turn the Prestige on or off.
Keypad and Front Panel
2-1
Prestige 2000W Quick Start Guide
Call
Use this key to make and receive calls.
Numerical
Use these keys to enter numbers and characters.
Keypad
Hold down a key to automatically dial a predefined number (refer to Using Speed Dial Chapter
for more information).
2.1
Turning the Prestige On and Off
Press and hold the Off key for approximately 2 seconds to turn the Prestige on or off.
2.2
Load Default IP
While the Prestige is switched off:
1.
Hold down Call key then press the Off key.
2.
A message displays (below) indicating the Prestige has returned to the default IP address (see the Internet
Account Checklist in Required Information for the default IP address).
Load Default IP
<<Release Key!>>
Figure 2-2 Load Default IP
2.3
Switching the Key-lock On and Off
The keys lock automatically if the Prestige is in standby mode for more than one minute.
Press and hold the # key on the numerical keypad for approximately 2 seconds to lock or unlock the keypad.
2.4
Adjusting the Speaker Volume
Increase the volume during a call by pressing the right arrow key.
Decrease the volume during a call by pressing left arrow key.
This is the Prestige’s speaker
12:00
volume, which displays during a call
12 ) ) ) ) ) ) ) ) ) )
if you use the left or right arrow keys.
123456
Figure 2-3 Speaker Volume
2-2
Keypad and Front Panel
Prestige 2000W Quick Start Guide
Chapter 3
Navigating the Prestige
This chapter introduces the Prestige’s keypad menu system.
The Prestige initializes after you turn it on.
Initializing….
>>Please Wait!<<
Figure 3-1 Initializing
The main screen displays after initialization.
This displays the time.
These bars show the strength of the
wireless LAN signal.
12:00
ZyXEL
Not registered
Menu
This icon shows the battery’s
current charge.
Names
This displays the Prestige’s current connection
status. Registered displays after you properly
configure the menu settings and the Prestige
connects to the SIP proxy server.
Figure 3-2 Main Screen
3.1
Prestige’s Keypad Menus
This section introduces the Prestige’s menu system and how to navigate through and configure them.
Navigating the Prestige
3-1
Prestige 2000W Quick Start Guide
This is the Prestige’s main screen.
This displays the function of the
This displays the function of the Left key
12:00
for this screen.
Zyxel
Not registered
Press the Left key while in the main
screen to open the menus.
Menu
Names
Right key for this screen.
Press the Right key while in the
main screen to open the
Prestige’s phonebook.
Figure 3-3 Navigating the User Interface
Use the Up or Down arrow keys to scroll
through the menu items.
1. Information
2. Call History
3. Phone Book
Select
When at the top menu level,
Back
press the Right key to return to
the main screen.
Press the Left key to access the
highlighted menu item.
Figure 3-4 Main Menu
3-2
Navigating the Prestige
Prestige 2000W Quick Start Guide
Chapter 4
Initial Configuration
This chapter details initial configuration and basic usage of your Prestige using the keypad menu system.
4.1
Overview
This section describes the initial steps needed to setup your telephone for basic usage and introduces the diagrams used
to navigate the keypad menu system.
4.1.1 Initial Configuration
The following settings need to be set before you can make calls, unless your service provider has already configured
your Prestige’s settings for you:
4-1.1.1 Wireless LAN (Wireless menu)
First you need to associate your Prestige with a Wireless LAN Access Point. This provides you Prestige with the basic
services for communication.
Your Prestige supports site survey; this means that you can browse the networks available in your area. See Wireless
LAN Settings in the Keypad Menus chapter for information on configuring these menus.
4-1.1.2 Internet (Net menu)
Now configure your IP address to register with your account provider. From here you can manually configure an IP
address if you have one. Otherwise choose an appropriate setting to have the Prestige retrieve and IP address for you.
See Networks Settings in the Keypad Menus Chapter.
4-1.1.3 SIP (Proxy Server, Outbound Proxy and User Account menus)
Finally, register your Prestige with your provider’s SIP-Server:
•
Configure Proxy Server settings to have the Prestige use your providers SIP-Server.
•
Configure the Prestige to use an Outbound Proxy Server if your LAN is behind a NAT Server.
•
Configure the Prestige to use your User Account to complete the registration process.
4.1.2 Menu Navigation Diagrams
This diagrams used in this manual refer to the menu system of the Prestige. The Left and Right keys are used to choose
a menu option displayed in the LCD screen above that button. For example, pressing the Left key in the Main Screen
displays the Main Menu (see Figure 3-2 Main Screen). Follow the arrows to navigate the menus as shown in the
diagrams.
Initial Configuration
4-1
Prestige 2000W Quick Start Guide
12:00
Press either the Left or Right key
Zyxel
Not registered
Use the Up and Down arrow
Menu
keys to highlight the
disposed underneath the option
Names
indicated inside the
numbered menu item as
to
progress to the next screen
shown.
indicated by an
Men
S
T
7. Wireless
8. SSL Setting
9. Restart
Select
S
Select
Back
T
1. Scan
2. ESSID
3. Network Mode
Select
Back
Figure 4-1 Menu Diagrams
4-2
Initial Configuration
Prestige 2000W Quick Start Guide
Chapter 5
Keypad Menus
The following sections describe how to configure the Prestige’s internal menus for first use.
5.1
Wireless LAN Settings
Use the following sections to configure your Prestige to associate with an Access Point (AP) to build your wireless
connection.
5.1.1 Scanning for an ESSID
An Extended Service Set (ESS) is a group of access points or wireless gateways connected to a wired LAN on the same
subnet. An ESSID uniquely identifies each set. All access points or wireless gateways and their associated wireless
stations in the same set must have the same ESSID.
Follow these directions to scan for the ESSIDs of available wireless LAN APs.
Select an AP from the list that
displays after the Prestige
scans.
Figure 5-1 Scanning an ESSID
5.1.2 Network Mode
Wireless LAN works in either: ad-hoc or public mode.
To connect to a wired network within a coverage area using APs, set the Prestige operation mode to Public. An AP acts
as a bridge between the wireless stations and the wired network. In case you do not wish to connect to a wired network,
but prefer to set up a small independent wireless workgroup without an AP, use the Ad-hoc mode.
5.1.3 Channel
A radio frequency used by a wireless device is called a channel.
5-1
Keypad Menus
Prestige 2000W Quick Start Guide
5.1.4 WEP Encryption
WEP (Wired Equivalent Privacy) encryption scrambles all communication transmitted between the Prestige and the AP
or other wireless stations to keep network communications private.
Set the Prestige to use the same length of WEP keys as the AP (64-bit or 128-bit).
Enter the WEP keys manually. Both the wireless clients and the access points must use the same WEP key for data
encryption and decryption. You can configure up to four WEP keys but only one key can be selected (enabled) at any
one time.
Follow these directions to set up your Prestige to associate with a wireless LAN AP.
Figure 5-2 Setting up a Wireless LAN AP
The Prestige restarts after you return to the main menu.
Keypad Menus
5-2
Prestige 2000W Quick Start Guide
5.2
Network Settings
You have three network settings options in order to be able to access the Internet, Fixed IP, DHCP or PPPoE.
Select Fixed IP if you were given an IP address and subnet mask and select DHCP if you were not. Select PPPoE if
you were given a user name and password.
Use the Information menu to check your IP address after completing one of the above three methods to connect.
5.2.1 Fixed IP
With this option you have to manually enter an IP address, subnet mask and gateway IP address. These are given to you
by the the netwrok administrator. Follow this procedure to do this..
Figure 5-3 Fixed IP Configuration
The Prestige restarts after you return to the main menu.
5.2.2 DHCP
If you were not assigned a specific IP address for your Prestige, use the following directions to set your Prestige to get it
automatically via DHCP (Dynamic Host Control Protocol).
5-3
Keypad Menus
Prestige 2000W Quick Start Guide
Figure 5-4 Dynamic IP Configuration
5.2.3 PPPoE
Point-to-Point Protocol over Ethernet (PPPoE) functions as a dial-up connection. Therefore you’ll also need a
username (PPPoE name) and password from you ISP.
Use the following directions to set your Prestige to use PPPoE for your Internet connection.
Figure 5-5 PPPoE Configuration
The Prestige restarts after you return to the main menu.
Keypad Menus
5-4
Prestige 2000W Quick Start Guide
5.3
SIP Settings
Session Initiation Protocol (SIP) is the signaling protocol that handles the setting up, altering and tearing down of your
voice sessions.
5.3.1 SIP Proxy Server Settings
Your Prestige is a SIP client and must connect to a SIP server. The SIP proxy server receives your Prestige’s SIP
requests and forwards them to the next SIP server in the network.
Use the following instructions to set up your Prestige to connect to the SIP server.
Figure 5-6 SIP Client Configuration
The Prestige restarts after you return to the main menu.
5.3.2 Outbound Proxy Server Settings
Some NAT routers are not SIP-friendly and will stop your voice sessions. Sending your voice traffic to an outbound
proxy server solves this problem.
5-5
Keypad Menus
Prestige 2000W Quick Start Guide
If your ISP gave you the IP address and port number of an outbound proxy server, use the following instructions to set
up your Prestige to connect to the outbound proxy server.
You only need to configure these settings when your ITSP requires it.
Figure 5-7 Outbound Proxy Server Settings
The Prestige restarts after you return to the main menu.
5.3.3 User Account
When you registered for your VoIP account, you should have been given a telephone number, username and password
for connecting to the SIP proxy server.
Use the following instructions to set up your Prestige to use your telephone number, username and password when
connecting to the SIP server.
Keypad Menus
5-6
Prestige 2000W Quick Start Guide
Figure 5-8 User Account Settings
The Prestige restarts after you return to the main menu.
5-7
Keypad Menus
Prestige 2000W Quick Start Guide
Chapter 6
Prestige Usage
The following sections describe how to use your Prestige for basic tasks.
6.1
Dialing a Telephone Number
Use the following instructions to call a number that is not already in your Prestige book.
Step 1.
When the Prestige is in standby mode, use the numerical keys to enter the telephone number.
Step 2.
If you enter an incorrect number, press the Right key to backspace.
Step 3.
Press the Call key to make your call.
6.2
Using the Phonebook to Dial a Telephone Number
Use the following instructions to call one of existing entries in your Prestige book.
Step 1.
Press the Right key to enter the Prestige book.
Step 2.
Use the S or T key to choose the name.
Step 3.
Press the Call key to dial the number.
6.3
Redialing a Telephone Number
Step 1.
In the standby mode, press the Call key.
Step 2.
A list of recently called Telephone numbers displays.
Step 3.
Use the S or T key to scroll through the list of Telephone numbers.
Step 4.
Press the Call key to make the call.
6.4
Answering a Call
Press the Call key to answer a call.
6.5
Rejecting a Call
Press the Off key to reject a call.
6.6
Holding a Call
Press the Left key during a call, to hold the call.
Press the Right key again to cancel the hold
6-1
Prestige Usage
Prestige 2000W Quick Start Guide
Chapter 8
Accessing the Web Configurator
This Chapter describes how to login to the Prestige’s Web Configurator. Please refer to the User’s guide for
information on individual screens.
8.1
Step 1.
Login
Make sure your Prestige is connected to the wireless LAN and record its IP address (you can use the
Information menu to check your phone’s IP address).
Step 2.
Launch your web browser.
Step 3.
Type "http://<IP address>" as the URL.
Step 4.
Enter your username and password and click OK to login.
•
For User access: Type the default username and password for user-level access, the first time you
login.
admin
1234
Figure 8-1 Connecting to the Prestige
It is strongly advised that you change the default password the first time you login.
8-1
Accessing the Web Configurator
Prestige 2000W Quick Start Guide
Chapter 9
Troubleshooting
9.1
Warning Messages
The Prestige displays warning messages when it detects a condition that may disrupt your Prestige service.
Warning 1: Battery Low (
12:00
ZyXEL
Net Fail! (DHCP)
Menu
Names
The battery’s power is low.
Corrective Action:
Recharge the battery.
Warning 2: Weak Signal ( blinking)
12:00
ZyXEL
Not registered
Menu
blinking)
Names
The signal quality is low.
Corrective Action:
Connect to another AP.
Move your Prestige closer to the AP.
There may be too much radio interference (for example a microwave or another AP
using the same channel) around your wireless network. Relocate or reduce the radio
interference.
9.2
Error Messages
The Prestige displays error messages to let you know that an error has occurred. An error may prevent you from
connecting to the network or from using the Prestige. You may need to contact the system administrator to resolve the
problem.
12:00
ZyXEL
Not registered
Menu
Names
Error 1: No AP found ( blinking)
The ESSID set on the Prestige does not match any of the Service Set Identifiers (SSIDs)
of the APs that are within range of the Prestige.
Corrective Action:
Set the Prestige to a different ESSID.
Move your Prestige closer to the AP.
Troubleshooting
9-1
Prestige 2000W Quick Start Guide
Error 2: Net Fail! (DHCP)
The Prestige failed to obtain an IP address from a DHCP server.
12:00
ZyXEL
Net Fail! (DHCP)
Menu
Names
Corrective Action:
Make sure your wireless LAN settings are correct.
Make sure the DHCP server is operating properly.
Restart the Prestige.
12:00
ZyXEL
Net Fail! (PPPoE)
Menu
Names
Error 3: Net Fail! (PPPoE)
The Prestige failed to obtain an IP address from the ISP.
Corrective Action:
Make sure your PPPoE settings are correct.
Restart the Prestige.
12:00
ZyXEL
Not registered
Menu
Names
Error 4: Not Registered
The Prestige failed to register with the SIP proxy server.
It is still possible to place a direct IP to IP call without the SIP proxy server.
Corrective Action
Please get in touch with your ITSP, or check your SIP settings.
Troubleshooting
9-2