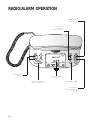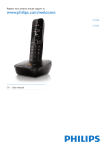
1
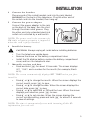
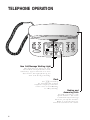
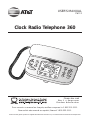
1
USER’S MANUAL
Part 2
Clock Radio Telephone 360
Please also read
Part 1 — Important
Product Information
Pour recevoir ce manuel en français, veuillez composer le 1 800 222–3111.
Para recibir este manual en español, llame al 1 800 222-3111.
AT&T and the globe symbol are registered trademarks of AT&T Corp. licensed to Advanced American Telephones.
© 2000 Advanced American Telephones. All rights reserved.
Printed in Mexico. 850003559 Issue 1AT&T 6/00
CONTENTS
INSTALLATION ..............................................................................................2
Display Dimmer Switch Brightness ...........................................................................4
TELEPHONE OPERATION...............................................................................5
Volume Control..........................................................................................................5
Temporary Tone Dialing.............................................................................................5
Redial .........................................................................................................................5
Mute ...........................................................................................................................5
Set Dial Mode .............................................................................................................5
New Call/Message Waiting Light................................................................................6
Flash ...........................................................................................................................6
Making and Answering Calls ......................................................................................6
TELEPHONE MEMORY...................................................................................7
Dialing Numbers in Telephone Memory....................................................................7
Storing Numbers in Telephone Memory....................................................................7
One Touch Dialing .....................................................................................................7
Storing a Pause in a Memory Number .......................................................................7
CALLER ID OPERATION.................................................................................8
About Caller Identification.........................................................................................9
Reviewing Call History ..............................................................................................9
Removing a Call from Call History ............................................................................9
Removing All Calls from Call History.......................................................................10
Display Dial ..............................................................................................................10
Setting Display Options ...........................................................................................11
Display Screen Messages..........................................................................................13
RADIO/Alarm OPERATION ...........................................................................14
Turning Radio On/Off..............................................................................................15
Selecting AM or FM ..................................................................................................15
Auto Tuning ..............................................................................................................15
Manual Tuning ..........................................................................................................15
Volume .....................................................................................................................15
Sleep Timer...............................................................................................................15
Setting Alarm Time ...................................................................................................16
Turning the Alarm On and Off.................................................................................16
Snooze Alarm............................................................................................................16
IN CASE OF DIFFICULTY..............................................................................17
1
INSTALLATION
Standard
AC Outlet
Power
Cord
Modular
Wall Jack
Coiled
Handset
Cord
Line
Cord
Display
Dimmer
Switch
Strain-relief
groove
(under set)
Before installing, check with your service provider to ensure that you
have subscribed to Caller ID with Call Waiting (combined service), and
voice mail service (if you intend to use the visual message waiting
feature in this phone).
1
2
3
2
•
When you install a 9V alkaline battery (purchased separately), this
unit will retain information stored in memory in the event of a
power failure.
• You’ll need a Phillips head screwdriver to open the battery
compartment.
• Remove the sticker from the display screen.
Set the dial mode.
If you have touch tone service, set the switch on the handset to TT.
If you have dial pulse (rotary) service, set the switch to DP. Even
if you have dial pulse service, you can still use telephone services
requiring tone signals. See “Temporary Tone Dialing” in the
TELEPHONE OPERATION section of this manual.
Connect the telephone line cord.
Plug one end of the telephone line cord into the jack labeled TEL
LINE on the back of the telephone. Plug the other end of the line
cord into a modular telephone wall jack. Make sure the plugs snap
firmly into place.
INSTALLATION
4
5
Connect the handset.
Plug one end of the coiled handset cord into the jack labeled
HANDSET on the back of the telephone. Plug the other end of
the coiled cord into the handset, then hang up.
Connect the power adapter.
Connect the power adapter to the jack
on the back of the base. Run the cord
through the strain relief groove. Plug
the other end into a standard electrical
outlet not controlled by a wall switch.
NOTE: The power cord is the antenna for
FM radio reception; reception is improved
when the cord is fully extended.
6
Install the battery.
CAUTION: Always unplug all cords before installing batteries.
•
•
•
7
Turn the telephone upside down.
Remove the screw on the battery compartment door.
Install the 9V alkaline battery, replace the battery compartment
cover, and turn the telephone over.
Manually set time and date.
• Press and hold T for about 1.5 seconds. The screen displays
SET TIME? and a number for the month (for example, March
is 3 ).
NOTE: The screen automatically displays SET TIME? when you first
install it.
•
•
•
•
Press + or - to change the month. When the screen displays the
correct month, press T to save.
Press + or - to change the date. When the screen displays the
correct date, press T to save.
Press + or - to select AM or PM and the hour. When the screen
displays your selection, press T to save.
Press + or - to set minutes. When the screen displays the
correct minutes setting, press and hold T for about 1.5 seconds
to save all settings.
NOTE: The time is automatically reset with incoming Caller ID
information for each call.
3
INSTALLATION
8
Select Display Language.
Press N. The screen displays WHICH LANGUAGE?. Press +
until the screen displays your selected language. Press N for
1.5 seconds to save the selected display language.
NOTE: To change the display language at a later date, see “Setting
Display Options” in the CALLER ID OPERATION section of this manual.
9
Store Home Area Code(s).
• Press N twice. The screen displays HOME AREA CODE?
• Press + or - until the screen displays the first digit of your
home area code. Press D.
• Press + or - until the screen displays the second digit of
your home area code. Press D.
• Press + or - until the screen displays the third digit of
your home area code.
• Press N to save setting.
NOTE: To store other local area codes, see “Display Dial” in the
CALLER ID OPERATION section of this manual.
10 Check for dial tone.
Lift the handset and check for a dial tone. If you do not hear a dial
tone, turn to IN CASE OF DIFFICULTY in this manual.
Display Dimmer Switch Brightness
Use the DIM switch on the back of the set to adjust the brightness of the
display screen. Set to OFF, LO or HI.
NOTE: You can conserve battery power in a power failure by setting
the switch to OFF.
4
TELEPHONE OPERATION
Volume Control
To adjust the listening level
in the handset, set the volume
control on the left side of the
handset.
Redial
The last number dialed on
this phone (up to 32 digits) is
stored in redial memory until
you dial another number.
To dial the same number
again, lift the handset and
press R.
Temporary Tone Dialing
If you have dial pulse (rotary)
service, you can change from
dial pulse to touch tone
dialing during a call by
pressing *. This is useful if
you need to send touch tone
signals for access to telephone
banking or long-distance
services.
1 Dial the number.
2 Press *. Buttons pressed
after this send touch tone
signals.
3 After you hang up, the
phone automatically
returns to dial pulse
(rotary) service.
Mute
This feature lets you mute
the telephone so that you can
hear the other party, but the
other party can’t hear you.
To activate this feature, press
and hold u. To return
to normal conversation,
release u.
Set Dial Mode
Set to TT for touch tone
service or DP for dial
pulse service.
5
TELEPHONE OPERATION
New Call/Message Waiting Light
This light stays on when you have
unreviewed call information in the
call history. If you subscribe to a voice
mail service, this light flashes if you
have new messages waiting.
Flash
Use F instead of
the switchhook to activate
telephone company subscriber
services such as Call Waiting
or 3-Way Calling.
Making and
Answering Calls
To make or answer a call,
lift the handset. The radio
is automatically turned off
whenever you lift the handset.
Radio is restored when you
return the handset to the cradle.
6
TELEPHONE MEMORY
This telephone can store 13 telephone numbers, each up to 32 digits long.
You can dial numbers stored in memory by pressing one or two buttons.
Dialing Numbers in
Telephone Memory
For two touch dialing, lift
the handset and press m
and the number button (0-9)
where the memory number
is stored.
Storing Numbers in
Telephone Memory
1 Press and release P.
2 Enter the telephone
number (up to 32 digits).
3 Press and release P.
4 For one touch dialing, press
and release the memory
button where you want to
store the number (locations
,
, and
)
— OR —
For two-touch dialing, press
the number button (0–9)
where you want to store
the number.
One-Touch
Dialing
For one-touch dialing,
lift the handset and press
the memory button.
Storing a Pause in a
Memory Number
Press and release P to
store a 3.6-second pause in
a memory dial number.
Each time you press P,
a 3.6-second dialing delay
is stored in the memory
number. To store a longer
pause, press and release
P more than once.
NOTE: Each 3.6-second
pause counts as one digit
when storing numbers in
telephone memory.
Use the directory
card to write the
numbers stored
in telephone
memory.
7
CALLER ID OPERATION
Indicates voice
mail is waiting
When on steadily, indicates phone
on this line is in use. When flashing,
indicates line is ringing
Date call was
received
Indicates battery
needs replacement
Number of new calls/
Total number of calls
Caller’s name
Caller’s telephone
number
Indicates displayed
information has not
been reviewed
Remove a call
from call history
8
Indicates repeat
caller
Customize
features
Dial number
displayed on
screen
CALLER ID OPERATION
About Caller Identification
This telephone is designed to store and display information about incoming
calls. It must be used with Caller Identification service provided by your
local telephone company; there is a fee for this service, and it may not be
available in all areas. This phone can provide information only if both you
and the caller are in areas offering Caller Identification service, and if both
telephone companies use compatible equipment.
When you use this phone with Caller ID service, you can see who’s
calling before you answer the phone. The phone keeps a record of the
names and numbers of the last 70 calls, whether you answer the call
or not. Each call is numbered in the call history, with newer calls having
higher numbers.
NOTE: Caller ID features will not operate without AC power.
Call Waiting
Caller ID with Call Waiting allows you to see who’s calling even while
you’re on another call. This feature requires Caller ID with Visual Call
Waiting, a combined service available through your local telephone
company. If you are already subscribing to Caller ID and Call Waiting as
separate services, you need to request a subscription to Caller ID with
Visual Call Waiting as a single, combined service. If you choose not to
use the Call Waiting feature, this unit will also work with regular Caller ID
service. Such services are not available in all areas. If you wish to answer
a Call Waiting call, press and release F. To return to the original call,
press and release F again.
Reviewing Call History
The screen displays call information for about 30 seconds after it is
received.
1 Press C to enter the call history.
2 Press + or - to review call history.
3 The screen displays END OF LIST at the end or beginning of the
call history to indicate you have reviewed all calls.
Removing a Call from Call History
Press and release r to remove displayed information from the
call history. The screen displays CALL REMOVE?. Press r again.
The screen displays the next call in call history. To exit, press C
or wait a few seconds for the screen to return to standby.
9
CALLER ID OPERATION
Removing All Calls from Call History
1
2
3
Press C to enter the call history.
Press and release r for 1.5 seconds when no call is displayed.
The screen displays REMOVE ALL CALLS?.
Press and release r for 1.5 seconds again to remove all calls.
The screen displays END OF LIST.
Display Dial
As you review the call history, you can dial a displayed phone number.
If the call information came from your home area code (the one you
programmed at installation), the screen displays only the seven-digit
number you are calling (without an area code). If you receive a call
from an area code not programmed into the telephone, the screen will
display the ten digits of the phone number, and will automatically dial
the “1” before the area code.
1 Press C, then use + or - to locate the number you want
to call.
2 Lift the handset, then press and release D to call the number
on the screen. You cannot dial PRIVATE or UNKNOWN calls.
10
CALLER ID OPERATION
Programming Area Codes
In addition to programming your home area code (see Step 9 in
INSTALLATION), you can program up to four other local area codes.
These are area codes that do not require dialing a “1” before them.
After programming, if you receive a call from one of these area codes,
the screen displays the ten digits (three digits of area code plus seven
digits of phone number). When you use the Display Dial feature, the
unit dials ten digits, without inserting a “1” before the area code.
1
2
3
4
Press and release N until the screen displays LOCAL AREA CODE?.
Press + or - until the screen displays the first digit of the area code,
then press D.
Press + or - until the screen displays the second digit of the area
code, then press D.
Press + or - until the screen displays the third digit of the area code,
then press N.
Setting Display Options
You can customize how the Caller ID features of this telephone work.
Press and release N until the option you want to change appears,
then use + or - to scroll through display choices. Press N to save
your setting.
See the following page for Display Options.
11
CALLER ID OPERATION
Option:
Choice:
WHICH LANGUAGE
Choose whether the display appears in English,
Spanish or French. Use + or - to toggle between
language selections.
ENGLISH
SPANISH
FRENCH
STORE HOME AREA CODE
HOME AREA CODE? Set the unit to recognize calls from your area code.
STORE LOCAL AREA CODE(S)
LOCL AREA CODE? Program up to four area codes that do not require
dialing a “1” before them.
CALL HISTORY
ALL CALLS
UNANS. CALLS
NO CALLS
You can choose how the call history is set up for
review.
The screen displays all calls received, in order.
The screen displays only those calls you (or an
answering system) did not answer.
The screen displays no call history.
REPEAT CALLS
COMBINED
SEPARATE
For unreviewed calls, you can choose whether
you want repeat calls listed separately, or each
repeat call combined with the original call.
Combined calls include the repeat count; the time
will reflect the most recent call, and the call history
is reordered (if needed).
CALL LIST ORDER
NEW CALLS
BY TIME
You can choose whether you want to see new
(unreviewed) calls displayed first, or all calls
displayed in the order in which they were received.
CALL WAITING
ON
OFF
Set to ON for Type II (operates with Caller ID
with Call Waiting service) or OFF for Type I
(operates without Call Waiting with Caller ID
service).
MESSAGE WAITING LIGHT (FLASHING)
LEAVE ON
RESET
12
Turn off the message waiting light if it stays
on even when no new voice mail or Caller ID
information is waiting.
CALLER ID OPERATION
Display Screen Messages
Screen Displays:
When:
PRIVATE NAME
The other party is blocking name information.
PPP
The other party is blocking telephone number
information.
PRIVATE CALLER
The other party is blocking name and number
information.
UNKNOWN CALLER
Your phone company is unable to receive
information about this caller’s name and number.
UUU
Your telephone company is unable to receive
information about this caller’s number.
UNKNOWN NAME
Your telephone company is unable to receive
information about this caller’s name.
13
RADIO/ALARM OPERATION
Turn radio
on or off
Search for
next clear
radio station
Set separate
alarms
Current radio
station
Silence alarm for
about 10 minutes
Select AM or FM
Set radio to
automatically
turn off
14
RADIO/ALARM OPERATION
Turning Radio On/Off
Press I to turn the radio on or off. When you turn the radio on, the
screen displays the currently selected station, band, and MHz or KHz.
You can access Caller ID information while the radio is on.
NOTE: If you receive a call while the radio is on, the screen will display
Caller ID information during the call, and for about 30 seconds after
you hang up. You will be unable to tune the radio station during this
30 seconds.
Selecting AM or FM
After pressing I, press and release b to select AM or FM reception.
Auto Tuning
Press and hold + or - for about 1.5 seconds to move to the next clear
radio station.
Manual Tuning
Quickly press and release + or - to move to the next radio station.
Volume
Move the volume control on the right side of the radio to the back to
increase volume or to the front to decrease volume.
The radio is automatically muted whenever the phone rings. Volume is
restored when you hang up.
Sleep Timer
You can set the radio to turn itself off after 30, 60, 90 or 120 minutes.
1 Turn the radio on.
2 Press and release Z.
3 Press and release Z until the screen displays how long you want
the radio to play before turning itself off (30, 60, 90 or 120 minutes).
The screen displays the selected time for about five seconds, then
returns to the radio display.
4 Press Z for more than 1.5 seconds to set the sleep time. The sleep
time flashes for about five seconds, then the system screen returns to
radio mode.
15
RADIO/ALARM OPERATION
Setting Alarm Time
You can set the alarm (ALARM A) or (ALARM B) to wake you with the
radio or the buzzer.
NOTE: To set the clock, see the INSTALLATION section of this manual.
1
2
3
4
5
6
Press and hold d for about one second.
Press and release a A
— OR —
Press and release a B.
Press + or - until the screen displays the hour for the alarm.
Press d when the screen displays the correct alarm hour.
Press + or - until the screen displays the minute setting for the
alarm.
Press and release a A or a B to store the alarm setting. The
screen flashes the appropriate alarm and the time set. The alarm is
now set, and the screen displays the alarm you set.
Turning the Alarm On and Off
To turn the alarm on, press and release a A
— OR —
Press and release a B.
If the screen flashes the alarm selection briefly, then steadily displays the
icon for the selected alarm, the alarm is now set.
To turn the alarm off, press and release the alarm button again. The icon
for the selected alarm disappears.
Snooze Alarm
When the alarm sounds, you can silence it for about 10 minutes by
pressing z.
16
IN CASE OF DIFFICULTY
If you have difficulty operating this phone, try the suggestions below.
For Customer Service, visit our website at www.telephones.att.com or call
1 800 222–3111. Please retain your receipt as your proof of purchase.
No Dial Tone
•
•
•
Make sure all plugs are connected properly. Inspect the line cord
connections at the modular jack and at the telephone. Also inspect
the coiled handset cord connection at both ends.
Unplug the telephone and connect it to another modular jack.
If it still does not work, and other telephones in your home are
working, the problem is with this telephone.
In the event of a power failure, a battery must be installed for the
phone to work.
Difficulty Storing Numbers in Memory
Make sure you are pressing the correct sequence of buttons for storing
in one-touch and two-touch locations.
Telephone Does Not Ring
•
•
Make sure the RINGER switch is not set to OFF.
If there are several other telephones on the same line, try
disconnecting some of the other telephones. Having too many
telephones connected can also create problems such as low ringer
volume or impaired sound quality during calls.
Power Failure
Call history information is saved for up to four hours in a power failure.
Numbers stored in telephone memory are saved up to 72 hours in a
power failure.
Caller ID/Call Waiting Does Not Work
•
•
Check with your service provider to make sure service is activated.
Caller ID features will not work in a power failure.
FM Radio Reception Is Poor
Make sure the power cord (and any extension cord) is fully extended.
AM Radio Reception Is Poor
Try rotating the position of the radio.
17