Download Nikon Nikkor Af 35-70mm F/3.3-4.5 Zoom Macro Lens Slr Film Or Digital Camera - Zoom-Nikkor%2035-70mm%20f-3.3
Transcript
Zoom-Nikkor 35-70mm f/33-4.5 Nikon INSTRUCTION MANUAL BEDIENUNGSANLEITUNC MANUEL D'UTILISATION MANUAL DE INSTRUCCIONES MANUALE Dl ISTRUZION1 [~]jj~| m LMs O 0| rj [J ***-**. * , #«?<»*» I K'Jtt* 9 mwi>^ 2 10 E E S B t f - f 7 # n $ I « 5 •OCS.%) 3 E«i«/»*K«sa*»» 4 sastsffi K(DS-IZttF2AS*j<7K) II BBitaum 7 *.««6«as i2 7 r - f > y — i « j * * » R y i S i3 Ba»F(ia»#-i' K i4 «<J a® 15 BWItJUJ^-f K 8 x— s > * • ' ; > y 16 »IJ 'J >«* 5 *#t-}§« 6 7 ^ - * > > •V') > y ttL'»U ! ZOTfct/li, - •y 3 - J H / > x«-fcm>-tuvfcK#s>'.i* £5 :-?i'j-r. cm U > X [ J - q > F V ^ > hOT*> 7 * f < C t f T i ^ t f f W i t . t f c , TTL BUW- (F-40l7j;<5£P*<) i MB Lxmtamwfri-1t. c m u > X i t , i S l f t m i - >zma.frhAi,nmtT-®.n.- aw** | . # X - A 1 - > « T . * ^!E«IJJSft35nim*-lbaa70«miT-ff3S«S-*'"t-L. M t H f E » 0 . 5 m . S Cjl; 7 7 P « i c i i)o.35m(S*}l»1S* i :«.») j x - m a s a K J ' T **T„ tfc, « * L - > JfCftfrStt » X - i U > X t L T f l f f l T 4 : i : t i T - # , —«E* »B, ^^-•^•?j|»t,%>bA. «i*tt-a¥'i4OT9*sn?.«a¥« • ie*¥«. S ^ T E - B * U f<7)S?*tiC;^fflifii:*ter 5 : c A<T* t 1 . J >;?'£ t" > 1 - • & * ? * ( * , H4AIJ > « f f i 2 • ( * » * * » « LTfc'K 3 ^ c > l l 3 - f < >i>'fi'^%iizM£tiTmtzif>yi'T— • 3 — ?, K75d--'j;i>H* tfWbti, ftroSK'ttfeSS-cflilStt-c^i-t. X- u > X m K U S * OR*) t * > » # 7 " ' - f » J U > X » « t » # i : * # i t j « T . 1->X #'«rOA-AT-U>X«rSa#lt751*1 UEHA"bJiT) U I H L J T . K'J U"f T i S l i , * J> 7*T'<cnj»IJ4*? >*#L'.cA , '= u>x«riepit^-fnii;ia L. i t , rut • Ai7?3tx-attiIta»u"'-* ! "*-tifSm*y ? * r - r i;ccnu>x^8JU«lt 5*&tt. *> 5*x-f OTBStt-iBBllw'C-A'jELuttllirASjMiBL-tBl';
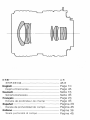
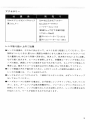
 H*R English 
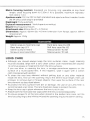
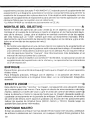
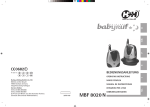
Depth-of-field scale Deutsch Scharfentiefeskala Franpais Echelle de profondeur de champEspanol Escala de profundidad de campoItaliano Scala profondita di campo- •41 -45K - Page 10 - Page 45 -Seite 16 - Seite 45 - Page 23 - Page 45 -Pagina 29 - Pagina 45 • Pagina 36 Pagina 45 tt»T<tz2l\ tit. «*a5TTLHatt#S*J'5il«f-f CJ*M #»»»*-», B SrEl •=.>? X - ; : > y ' J > y S - i a L T X - i > y $ - m \ **ffiK«*.'S!E!KSWi:'&Tfct C-%*!it*15'J * T . « , f i ! 6 » l a ® « , 3 5 ~ * - ' b 7 0 ™ * T 3 * ft (T> B &tfMf!> S H ZC0U>X<7>t*i;!Btl«, i I $ f » » T - « S S (oo) * - c , 0 . 5 m t T - t i i ' - 3 T l . > J T „ S "i l ; i f i * » » ( v ? n » » ) PKs*5:i:s!x-j*r. frS-5«-&l;W,0.5m%axT73— ;<73ts. »-»y'J>y% ea«»!ii«it0.35mt««v#p5SJt% v y p « » 5 £ f f - j : : t A < T - ? . ( l / « B » 7 0 « " T * * « » « H » i :4.4. «,«!§«35".m x-t»iK(e*i: s.3f>m^ntr. <IL. ®*.sf§»iflj-cv?pi(if2£m>j:-f is a f i w E T ^ c t * * ' ) s t m t . x-$umAm&mmmx-iDz-mmitit 
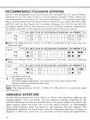
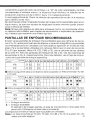
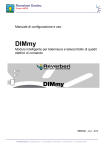
7 7 -r > y - * y y - > t ro«*-e-fc* = a >F3-> y - * « 1 t/F2-> 'j - x c a * « « O T 7 7 < > y - 7. y y - > * < » y , > / < - > - i t g l f l ^ a > / t — » - T C - t D I S . 200. TC-l4AST-f„ 
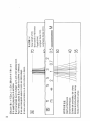
A/L B C D E Gl G2 G3 G4 HI H2 W W J K / P M R T U _F3_ F2 • a x t - a y ' < - # - T C - 2 0 0 J f c ( i , TC-201S4-*j»L/c«§ _7.1><>--s »>5 ^^—_ A/L B C D E Gl G2 G3 G4 HI H2 H3 H4 J K/P M R T|U •© F3 • • • »| •• V 8 F2 • <>. e •a?^a^'<-^-TC-l4AS«r8»Lfc«-& w-> A/L B c D E Gl G2 G3 G4 HI H2 H3 H4 J K/P M R T U 9 F3 m (•; 0* F2 © • * @ • W E < a * £ * e > (••g-fc-ttroiifticti •— e. s o a(M:«ffl^aax-r„ 
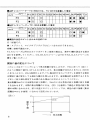
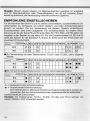
•S-h*%#mLT < fc#l.>. (K2,B2.E2*;> 'J - X J ^ t t ^ ' f t K . B . E * # U-><7> MSFfflWSE-lbCouT 
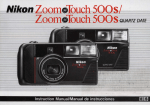
<T)i. TlCIHJSFffl*!3.3*-'b4.5C^-|tLtT„ *,S!§«t*!35™m t * F3.3, 70i"OT £*F4.5£4''K « 5 / 6 S S - | t L * - r „ T T L S W I t # # * / v * T ' - f M*ffl-f 3i*-& iiMMF««!^-(tLTfciH'i:Bta«-»'bniT*<, *aaait«-ffiffl-r-s£*<c *
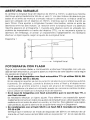
,^!i«35«"mt siittemlSt'Htfflti;. 70n™«i sit3fSOT«ti;ffi«icR'; i f f l
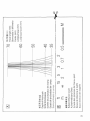
 (El I ) 45 (13.9) M 33 F ; 35 50 - MMfm 70 sMmmmmmmmamamm i C l T M B < fc'<H>„ • T T L a t t n * » » % f f T * ^ ( S B - l 2 , 15, I6A, I6B, 17, 20<MSH*S)HaMFf«m 'Jfia'g'ft'tafc*. M*iBSHEB*tffi'ftL*TOT-t-;3iSLT< «*>.«, • W l t t M * • 7 ; 3 7 ) i - i B i S i » g x f - Kv-f t-MftFtefc-g-fctf ?>« s c i i a t r - t-^-r n»*Fffl«-(H i )msa«F«s:<t«-#RBLTis8iiLtr, • FG-20t>L <(JEM, JiilfSB-ISfcL < tiSB-EMl*'£':b-ttTf£fflT4*-&SBI9(*^E— K-bU#^-4- r AjlC, SB-E(J*>^1zU##-4- r Ajifc(i r FE-FMj l;T5£(?J5OTJ: •3l:LT(J(riaiE''j:SiiJ* ! *'bn*'r„ — 75,SB-l9£rBj,SEES-rBj *fclJ r EMjl;LT(!6ffl-ri)i. * - « >#'(; J; T TIHSFffl^Elt-T 5 fc»ais«i («,sffi»i70") T(tigjEam*!f»%nt-r«s, /SMS (**!EBt35 * f * 5 - 4 f ) Tit, Sffl±-ffifflT5Ctlt^UST-T*!, 
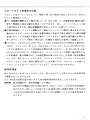
is>)&»$9 >%^-3*> v*?-f Tit, mua**? 7ffi-M*l-7 >ini**<«>**»»« ffifflff] : S.SSE»35™, « * * « • I mOTi*^ Eff)35mmmtt,Sic[lm_hsss^'&h«, HOT I m a t - 6 % a r o + * f t # i c * * > * i t a « K u >XmgIJ * ! f/22(se«»')JBfflf fcffiffl) T-* Wi'E] mft*ro22m»S*![a(7) B f i t t S i ^c.^mffilitf ; <7> t # «)S¥#3!ff t f£ i) i t. e*!«,'5.ffiSit35™«t #, 3?e*!7o™K> £ S M f f l f T . +Km**!iWT(SfflT 7 -r JU # - * • « « L Tffiffl L * T„ ttffi Si.Sffi* •• 35«~70<™ S * P S i b : I : 3.3-4.5 \y > X * l £ t 7 » 8 •* l i f t : 62'~34"20' * j S S 6 « a & ' . 35. 50. 70 « K ! E « a f f i : » ~ 0 . 5 m . 2ft ( # K ) V ? naHJmO.5m~0.35m|81IJM«7S X-j >y:0KS t ' > h £•*?•«- : ®teJt 7 ? D 7 j 5 t : 4 * - J > ^ « « C T V # p » i K ^ I f f i ( « * « i e ( g * I :4.4) R')BB:3.3, 5.6. 8, I I . 16. 22 (f/4tt# U ? ? * h •? 7V)*) 7 r - f > ?'-F*3«»fBR'l BSflfK K'J7Jit: SWiKU ;»!*??« : IfflSMJt 7 9 / h : ^ 3 > F V 7 > I) ' * 7 » J ' > I ' * < X . ' S ( " (P=0.75mn) * § < * : ft63™(E*fl)x6i™(SJ : /<a*-y l-*i»ffi*-ibU>XftiS*X-). ftft69™ • I : W55g 8 ± 7 9-kVi}- 'QPDm,v 52->^7'lJ>?'AU>X^+-v7' K-i'.fcLF-l ffiRA!oW;fc 5Z""fai:a**7<ju>hl;a*7-KHN-2 /i—K*—3WH.-3IS (ma*i-vy#T-i(x»5Ti8i) V7Mr—*N»8Z H?ua>/?-y—TO-201S ayua>/\--?-T0-l4AS Sa > i^A-i>;t$fr:M:tiOT.i.£/U;*l*7'.iL'=i-Mx?/-^) < <S* ibB<tt**-r. x - x J U « - « H L * T t . » « J « n - 7 - - 0 7£*SLfcu >*<nit#, M M i ' M K t s m K i f M l t . fc L # €'J A ! S± L ft • # I : B , **7 , ,»o--/i.*a*i&*#fc*ii.s.#A,"c*#B:i,t:<ft?i>„ • u > X g B o S M « * R C t » i : , L3707-f*#—«>««**>•©»U*T. b>Xff)(*iti;«. 7 - K 6 ( t t « l T . *UTJ»l»T< tfSt.>. • t - > X « " ! r - X C C t t f f t l t f t t t , « f f f l i : i / > X f i . y 7 ^ l , T S i ' t < ft 9 NOMENCLATURE 1 Aperture indexes (green and brown) 2 Macro range line (orange) 3 Distance scale/focal length scale index 4 Distance scale 5 Infrared indexes 6 Focusing ring 7 Focal length scale 8 9 10 11 12 13 14 15 16 Zooming ring Mounting ring EE servo coupling post Meter coupling shoe Aperture direct-readout scale Aperture index post Aperture scale Meter coupling ridge Aperture ring BEFORE USING THE LENS (Read the following carefully to get the most out of your new lens now and in the many years to come.) You now own one of the lightest and most compact zoom lenses in the most-used focal lengths for maximum versatility in everyday picture taking. Your new ZoomNikkor 35-70mm f/3.3-4.5 is versatile, easy-to-operate, compact and high performance. It gives you a choice of focal lengths from a wideangle 35mm to a moderate telephoto 70mm. And you can move right up to smaller subjects with the built-in macro focusing at any focal length. Use it for regular snapshots, souvenir photos, portraits and close-up photography. Zooming and focusing are accomplished through two independent rings so once you have focused on your subject you can frame it with the zoom without losing sharpness. The minimum focusing distance is normally 0.5m (2 ft), but you can get continuous focusing all the way down to 0.35m (1 ft) through the equipped macro function. The maximum reproduction ratio is 1:4.4. For even greater magnification,'just add an optional Nikon close-up lens. For special effects, the front attachment size of 52mm makes the maximum number of optional filters available to you. Constructed of the highest quality Nikon glass, this zoom lens produces sharp images with high contrast from the shortest to the longest focal length with all abberations well corrected. In addition, Nikon Integrated Coating (NIC) is applied to all air-to-glass surfaces of the lens elements to minimize ghost images and flare and produce photographs with natural color rendition. The lens offers "automatic maximum aperture indexing" (Al) with suitably equipped cameras, via the meter coupling ridge provided (except F-401 /N4004*). The meter coupling ridge and automatic diaphragm function together to permit full aperture exposure measurement. For non-AI type Nikon cameras, this lens is also fitted with a meter coupling shoe to permit the same operation. •The Nikon N4004 is sold exclusively in the U.S.A. 10 MOUNTING THE LENS A Align the green aperture index © on the lens with the mounting index on the camera and insert the lens in the camera's bayonet mount. Then twist the lens counterclockwise until it clicks into place. (To remove, depress the lens release button on the camera and twist the lens clockwise.) Notes: 1) When mounting the lens on an Al-type camera with a meter coupling lever, make sure the lever is in the "down" position; when mounting on a camera without this lever (non-AI type), "manual" maximum aperture indexing is required- For more information, refer to the camera's instruction manual. 2) When the lens is used with the Nikon F-401/N4004, the camera meter coupling function does not operate and the exposure indicator LEDs do not appear. FOCUSING B To focus, rotate the focusing ring ® until the image in the viewfinder appears sharp and crisp. For pinpoint focusing, focus with the lens in the 70mm position, then move back to the best focal length for the desired picture composition. ZOOMING C This allows you to 'trim' your picture to fit the frame exactly. To zoom in and out, look through the viewfinder and turn the zooming ring (?) to the right and left until the desired composition is framed on the focusing screen. For reference, a threeposition scale to indicate focal length settings (35mm, 50mm and 70mm) is engraved on the zooming ring, but you can also use intermediate settings. MACRO FOCUSING Although normal focusing is possible from infinity to 0.5m (2 ft), you can focus even closer at any focal length setting with a smooth action of the focusing ring. The orange "M" and line (?) indicate macro mode focusing. The minimum focal distance and maximum reproduction ratio are 0.35m (1 ft) and 1:4.4 respectively. At a focal length of 70mm, its reproduction ratio is 1:4.4, while at 35mm, it becomes 1:8.3. It is recommended to use longer focal lengths as much as possible for macro focusing, because vignetting may occur at shorter focal length settings. Note: Although this lens has macro focusing capability, a Micro-Nikkor lens is recommended for document copying or slide duplication where critical sharpness is required. 11 RECOMMENDED FOCUSING SCREENS Various interchangeable focusing screens are available for F3- and F2-series cameras to suit any type of lens or picture-taking situation. Those which are recommended for use with your lens are listed below. For screens used with Nikon cameras other than F3- and F2-series cameras (e.g., Nikon FA, FE2, FM2 and FE), refer to the column for F3-series cameras. For the K2, B2 and E2 focusing screens, refer to the columns on the K, B and E screens, respectively. For details, also refer to the specific focusing screen's instruction sheet. A/L B C D E Gl G2 G3 G4 HI H2 H3 H4 J K/P M R T U F3 F2 • When the Teleconverter TC-201 or TC-20C is attached to this lens, use he following table: ~T~~~~~~——-__ Screen Camera ——_______ F3 F2 A/L B c D E Gl G2 G3 G4 HI H2 H3 H4 J K/P M R T U Q © • n 3 • • • • • • #® • • When the Teleconverter TC-14A is attached to this lens, use the following table: !2!f.en A/L B C D E Gl G2 G3 G4 HI H2 H3 H4 J K/P M R T U F3 F2 •• • • • @ = Excellent focusing ® = Acceptable focusing The split-image rangefinder, microprism or cross-hair area is dim. Focus on the surrounding matte area. Blank means not usable. Note: The Teleconverters TC-301, TC-300, TC-14B and TC-14 cannot be used with this lens. VARIABLE APERTURE As the lens is zoomed out from 35mm to 70mm, the maximum aperture decreases approx. 5/6 of an f/stop. The two aperture indexes engraved on the chrome mounting ring indicate the difference: the green index is for use at the 35mm setting, while the brown one is for the 70mm setting. For intermediate focal length settings, align the aperture ring between the two indexes. The relationship between the focal length and the maximum aperture is shown in Diagram 1. When this zoom lens is used with cameras having through-lhe-lens 12 (TTL) metering, you need not worry about adjusting the aperture. However, when an independent exposure meter is used, slight adjustment is required, depending on the focal length setting. Diagram 1 4.5 6 (f3.9) £ 3.3 E I = 35 50 70 *• Focal Length FLASH PHOTOGRAPHY CARE Follow the instructions below when you take pictures with the speedlight unit because the maximum aperture ot this lens varies according to the focai length settings. • In TTL automatic flash photography (when using the SB 18, SB 17, SB-16A/B, SB-15 or SB-20) No adjustment is required because the variation in aperture is automatically accounted for. However, when the flash-to-subject distance is close to either the near or far limit of the auto shooting range corresponding to your working aperture, the working aperture may need to be changed as you zoom in or out. • In non-TTL automatic or manual flash photography Slight adjustment is required. You can obtain the roughly correct exposure over all focal length settings by using the intermediate setting between the green and brown aperture indexes. For perfect exposure, adjust the coupling aperture according to Diagram 1. • In combination with the speedlight SB-19 or SB-E mounted on the Nikon FG-20 or EM Make sure to set the shooting mode selector of the SB-19 or camera selector of a new-type SB-E at the "A" position. With an older-type SB-E, set it to "FE- FM". Otherwise, you can obtain the correct exposure only in the telephoto (70mm) setting, while your picture will be overexposed in the wideangle (35mm) setting due to the change of the maximum aperture of this lens. With negative-type film (for example, color negative film), this shift might not affect the picture itself, because it has a larger exposure latitude. But, it is not recommended to use slide film, because it has a narrower exposure latitude. 13 DEPTH-OF-FIELD SCALE You can observe the depth of field through the viewfinder by depressing the depth-of-field preview button when using a camera having this feature. But, unlike other Nikkor lenses, the Zoom-Nikkor 35-70mm f/3.3-4.5 has no color-coded depth-of-field indicators engraved on the lens barrel. However, you can still determine the depth of field by using the scales provided with this manual (see page 45). To use, first cut out the scales along the lines indicated. Then, place the subjectto-camera distance scale (B) over the depth-of-field scale (A), with the top edge of the (B) scale lined up with the focal length in use, and the distance aligned with the central indicator line of the (A) scale. Now read the numbers (on the B scale) which appear opposite the pair of depth-of-field lines (in the A scale) corresponding to the aperture in use. These numbers express the depth of field for the settings in use. For example, if the lens is prefocused at 1 m (3.5 ft) with the focal length set at 35mm and the aperture at f/22, the numbers on the distance scale opposite the depth-of-field lines for the f/22 setting are the actual depth of field at that time. INFRARED PHOTOGRAPHY In infrared photography, the plane of sharpest focus is slightly more distant than the one produced by visible light. As a rule of thumb, you can compensate for shift in focus by referring to the red infrared index lines (f) engraved on the lens barrel. (The line with the green dot at the bottom is for the 35mm focal length setting, while the one with the brown dot is tor 70mm. For intermediate tocal lengths, use the area between the two.) After sharply focusing the subject through the viewfinder, check the focused distance and turn the focusing ring to the left until the prefocused distance figure is aligned with the infrared index. Then attach the filter to the lens and take the picture. SPECIFICATIONS Focal length: 35mm to 70mm Maximum aperture: f/3.3 to 4.5 Lens construction: 8 elements in 7 groups Picture angle: 62° to 34°20' Distance scale: Graduated in meters and feet from 0.5m (2 ft) to infinity (°°); macro focusing mode at any focal length settings down to 0.35m (1 ft) indicated by the orange line and letter "M" Focusing/zooming control: Via two independent control rings; focusing is done by turning the focusing ring, zooming by turning the zooming ring right and left. Reference marks for focal length settings of 35mm in green, 50mm in white and 70mm in brown are engraved on the zooming ring; focusing movement is continuous into macro mode. 14 Macro focusing function: Equipped via focusing ring; operable at any focal length; close focusing down to 0.35m (1 ft) is possible; maximum reproduction ratio is 1:4.4 Aperture scale: f/3.3 to f/22 on both standard and aperture-direct-readout scale (At f/4 only a click stop is provided) Diaphragm: Fully automatic Exposure measurement: Via full-aperture method Mount: Nikon bayonet mount Attachment size: 52mm dia. (P = 0.75mm) Dimensions: Approx. 63mm dia. x 61 mm extension from flange; approx. 69mm long (overall) Weight: Approx. 255g Accessories 52mm snap-on front lens cap Rear lens cap LF-1 52mm screw-in filters Screw-in lens hood HN-2 Hard lens case CL-31S Soft lens case No. 62 TeleconverterTC-201 Teleconverter TC-14A LENS CARE • Although you should always keep the lens surfaces clean, rough cleaning must be avoided. Wipe with a soft, clean cotton cloth moistened with alcohol to remove grease or fingerprints from the lens surfaces. If you use ether in cleaning the lens, a smudge sometimes appears on the surface of a multi-coated lens. If this happens, wipe it again with a cotton cloth moistened with alcohol. • To clean the rear lens element without getting dust or any other material inside the lens, first turn the zooming ring to the 35mm focal length, then use a blower to remove dust or foreign objects; then wipe the surface of the rear lens element as described above. • To protect the lens surface from dirt or damage, the use of an L37C filter is recommended at all times. The lens hood also helps to protect the lens. • Keep the lens cap in place whenever the lens is not in use. • Attach both the front and rear caps when the lens is stored separately. • To ensure proper fit of the lens when stored in the leather lens case, set the lens focusing ring to the infinity (<») and the zooming ring to the 50mm setting. 15 1 Blenden-lndex {grun und braun) 2 Makro-Bereichslinie 3 Entfernungsskala-/Brennweitenskala-lndex 4 Entfernungsskala 5 Infrarot-lndex 6 Einstellring 7 Brennweitenskala 8 Zoomring 9 Montagering 10 Kupplungsstift fur automatische Blendensteuerung 11 Blendenmitnehmer 12 Blendenskala fur SucherDirektablesung 13 Anschlag fur Blendenkupplung 14 Blendenskala 15 Steuerkurve 16 Blendenring VOR DER BENUTZUNG DES OBJEKTIVS (Bitte lesen Sie die folgende Beschreibung sorgfaltig durch, damit Sie viele Jahre ungetrObte Freude an Ihrem neuen Objektiv haben.) Sie besitzen eines der leichtesfen und kompaktesten Zoom-Objektive, innerhalb des am meisten benutzten Brennweitenbereiches, fur maximale AnwendungsmOglichkeiten in alien Situationen des taglichen Lebens. Ihr neues Zoom-Nikkor 35-70mm f/3,3-4,5 ist vielseitig, bedienungsfreundlich, kompakt und zeichnet sich durch hohe Leistung aus. Es bietet Ihnen einen weifen Bereich an Brennweiten, von 35mm Weitwinkel bis zum 70mm Telefolo. Mit der eingebaufen Makrofunktion ktinnen Sie auch auf kleinsfe Motive bei jeder beliebigen Bild-Brennweite herangehen. Ob normale Schnappschusse, Erinnerungsfotos, Portraits Oder Nahaufnahmen, Ihre neue Zoom-Nikkor wird Sie nie im Stich lassen. Scharfeinsteilung und stufenlose Verstellung der Brennweite geschehen uber zwei unabhangige Ringe. Wenn Sie erst einmal das Motiv auf die richtige Brennweite eingestellt haben, kbnnen Sie das Bildfeld mit dem Zoomring wunschgemaft verandern, ohne an Scharfe zu verlieren. Die kleinste Aufnahmeentfernung betrSgt normalerweise 0,5m. Mit der Makrofunktion konnen Sie jedoch stufenlos bis auf 0,35m herangehen. Der maximale Abbildungsmaflstab betragt 1:4,4. Wenn Sie weitere VergroBerung wunschen, setzen Sie einfach eine optionale Nikon Nahlinse an. Fur Spezialeffekte finden Sie eine reichhaltige Auswahl an Zusatzfiltern mit 52mm Durchmesser. Die Optik aus Nikon Glas hdchster Qualitat liefert bei alien Brennweiten scharfe, kontrastreiche Bilder, bei ausgezeichneter Bildfehlerkorrektion. Nikon-Mehrschichtvergutung (NIC) auf alien GlasoberflSchen reduziert Reflexionen und Streulicht auf ein MindestmaB und sorgt fur verbesserte natiirliche Farbwiedergabe. An entsprechend ausgerusteten Nikon Kameras (ausgenommen F-401) ermoglicht das Objektiv "automatische Anzeige der grOBten Blende" (Al). Die Steuerkurve und die AutomatikbIende arbeiten zusammen, und ermoglichen Offenblenden-Belichtungsmessung. Fur nicht mit dem Al-System ausgeriistete Nikon Kameras, besitzt dieses Objektiv einen Blendenmitnehmer zur manuellen Blendenetnstellung. 16 EINSETZEN DES OBJEKTIVS A Setzen Sie das Objektiv so an den BajonettanschluB der Kamera, daB der griine Blenden-lndex (T) und der Objektivansatz-lndex an der Kamera miteinander ausgerichtet sind. Drehen Sie dann das Objektiv gegen den Uhrzeigersinn, bis es hbrbareinrastet. {Zum Abnehmen des Objektivs, driicken Sie den Entsperrknopf an der Kamera und drehen das Objektiv im Uhrzeigersinn.) Zur Beachtung: 1) Wenn Sie das Objektiv an eine Kamera ansetzen, die mit einem Belichtungsmesser-Verbindungshebel ausgestattet ist (Al Type), sicherstellen, daft sich dieser Hebel in der Position "unten" befindet. Wenn Sie das Objektiv an eine Kamera ansetzen, die nicht mit diesem Hebel ausgestattet ist (nicht vom Type Al), ist "manuelle" Anzeige fur die groBte Blende erforderlich. Fur nahere Einzelheiten, siehe Bedienungsanleitung der Kamera. 2) Wenn das Objektiv an eine Nikon F-401 angesetzt wird, ist die Steuerkurve zur automatischen Eingabe der Lichtstarke unwtrksam und die Belichtungs-LEDs im Sucher der Kamera leuchten nicht auf. SCHARFEINSTELLEN DES OBJEKTIVS B Zur Scharfeinstellung den Einstellring © drehen, bis das Bild scharf und klar im Sucher zu sehen ist. Fur punktgenaue Scharfeinstellung, das Objektiv bei 70mm Brennweite scharf einstellen. Danach auf die optimale Brennweite zuruckzoomen, bis Sie den gewunschten Bildaufbau im Sucher haben. STUFENLOSE VERSTELLUNG DER BRENNWEITE—C Die stufenlose Verstellung der Brennweite dieses Zoom-Objektivs bietet Ihnen die Gelegenheit, Ihren Bildausschnitt genauestens auf einen gewunschten Rahmen "zuzuschneiden".ZumHeran-und Wegzoomen.schauenSiedurchden Sucher und drehen Sie den Zoomring nach rechts bzw. links, bis Sie den gewunschten Bildausschnitt auf der Einstellscheibe erhalten. Als Anhaltspunkte sind auf dem Zoomring drei Brennweiten (35mm, 50mm und 70mm) eingestanzt. Zwischenwerte sind jedoch ohne weiteres moglich. MAKROEINSTELLUNG Der Entfernungsbereich erstreckt sich normalerweise von Unendlich bis 0,5m. Die Makrofunktion dieses Zoom-Objektivs erschlie&t Ihnen jedoch noch geringere Aufnahmeabstande, und zwar durch stufenloses Weiterdrehen des Einstellrings bei jeder beliebigen Brennweite. Das orangefarbene "M" und die gleichfarbige Makrobereichsiinie © weisen auf Makro-Scharfeinsfellung hin. Die kleinste Brennweite und der groBte Abbildungsmafistab sind 0,35mm bzw. 1:4,4. Bei einer Brennweite von 70mm betrSgt der AbbildungsmaBstab 1:4,4. Bei einer Brennweite von 35mm betragt er 1:8,3. Zur Scharfeinstellung bei Makroaufnahmen empfiehlt es sich, so groBe Brennweiten wie moglich zu benutzen, weil bei kleineren Brennweiteneinstellungen Abschattung auftreten kann. ., 7 Hinwels: Obwohl dieses Objektiv fur Makroaufnahmen geeignet ist, empfiehlt sich fur Reproaufnahmen oder Diaduplikationen, wo es auf extreme Scharfeleistung ankommt, die Verwendung eines Micro-Nikkor Objektivs. EMPFOHLENE EINSTELLSCHEIBEN Fur die Kameras der Serie F3 und F2 stehen verschiedene, auswechselbare Einstellscheiben zur Verfugung, urn jedem Objektiv und jeder Aufnahmesituation gerecht zu werden. Die zur Verwendung mit diesem Objektiv empfoblenen Einstellscheiben sind unten aufgelistet. Fur Einstellscheiben fur andere Nikon Kameras als die der Serie F3 und F2 (z.B. Nikon FA, FE2, FM2, und FE) gelten die Angaben in den Spalten fur die Nikon F3. Fur die Einstellscheiben K2, B2 und E2 siehe die Spalten fur die Scheiben K, B bzw. E. Siehe auch die Anleitungen der jeweiligen Einstellscheibe. S«*cfeibe A / L B C D E G 1 G2 G3 G4 HI H2 H3H4 J K / P M R T U F3 F2 • Zur Verwendung mit dem Telekonverter TC-201 ode TC-200, siehe folgende Tabelle: "7 —— Kamera Einslellschetbe ^ ^ ^ ^ F3 F2 A/L B C D E Gl G2 G3 G4 HI H2 H3 H4 J K/P M R T ® B> m© ») • mm © r> • • u 9 I Bei Verwendung des TelekonvertersTC-14A, siehe folgende Tabelle: A/L F3 F2 » • G2 G3 G4 H2 H3 H4 K;P • m © = Ausgezeichnete Scharfeinstellung * = Ausreichende Scharfeinstellung Schnittbildindikafor, Mikroprismenfeld und Fadenkreuzbereich dunkeln ab. Verwenden Sie zum Scharfeinstellen das umgebende Mattscheibenfeld. Leerfeld bedeutet unbrauchbar. Hinweis: Die Telekonverter TC-301, TC-300, TC-14B und TC-14 konnen mit diesem Objektiv nicht verwendet werden. 18 ANDERUNG DER BLENDE Wenn das Objekliv von 35mm auf 70mm gezoomt wird, verringert sich die gro&te Blendendffnung urn elwa 5/6 einer Blendenstufe. Die zwei auf dem Chrom-Montagering eingestanzten Markierungen zeigen diesen Unterschied: der griine Index gilt fur die Brennweiteneinstellung von 35mm und der braune Index gilt fiir 70mm. Fur Brennweiten zwischen diesen beiden Extremen, ist der Blendenring zwischen diesen beiden Markierungen einzustellen. Die Beziehung zwischen der Brennweite und der groflten Offnung ist in Abbildung 1 dargestellt. Wird dieses Zoom-Objektiv mit Kameras benutzt, die uber ein InnenmeBsystem (TTL) verfugen, dann brauchen Sie sich um diesen Blendenabgleich nicht zu kummern. Bei Verwendung eines externen Belichtungsmessers ist jedoch eine geringfugige Kompensierung erforderlich, die von der jeweiligen Einstellung der Brennweite abhangt. Abbildung 1 45 (f3,9) 35 50 * Brennweite 70 BLITZLICHTAUFNAHMEN Wenn Sie Aufnahmen mit einem BlitzgerSt machen, lesen Sie bitte folgende Anleitungen, weil die groBte Offnung dieses Objektivs je nach Einstellung der Brennweite unterschiedlich ist. • Bei Automatik-Blitzaufnahmen mit InnenmeBsystem (TTL) (mit den Blitzgeraten SB-18, SB-17, SB-16A/B, SB 15 Oder SB-20) Es ist keine Kompensierung erforderlich, weil die Veranderung der Blende automatish berechnet wird-. Wenn der Abstand zwishen Blitzgerat und Motiv jedoch nahe an der vorderen oder hinteren Grenze des Ihrer Arbeitsblende entsprechenden automatischen Aufnahmebereichs liegt, sollten Sie die Offnung anpassen, wenn das Objektiv auf eine andere Brennweite gezoomt wird • Bei Automatik-Blitzaufnahmen ohne InnenmeBsystem (ohne TTL) oder manueller Regulierung der Belichtungszeit Geringfugige Kompensierung ist erforderlich. Sie erhalten die grob richtige Belichtungszeit fur alle Brennweiteneinstellungen durch Verwendung der Zwischeneinstellung zwischen dem grunen und dem braunen Blenden-lndex. Fur perfekte Belichtung, die grofite Offnung gemali Abbildung 1 abgleichen. 19 • In Kombination mit dem Blitzgerat SB-19 Oder SB-E aut der Nikon FG-20 Oder EM Den Aufnahmewahlschalter der SB-19 bzw. den Kamerawahler bei neueren SB-E Modetlen in Position "A" stellen. Fur aitere SB-E Modelle den Kamerawahler auf "FE-FM" stellen. Ansonsten konnen Sie die korrekte Belichtung aus der Telefotoeinsteltung (70mm) ablesen, wShrend sich bei Weitwmkelaufnahmen (35mm) eine Uberbelichtung ergibt, wetl sich die grolMe Offnung dieses Objektivsgeandert hat. Mit Negativfilm (z.B. Farbnegativfilm) hat diese Veranderung keinen EinfluB auf das Foto, weil diese Filmtypen einen grolieren Spielraum besitzen. Die Verwendung von Diafilm wird nicht empfohlen, weil dieser einen geringeren Belichtungsspielraum hat. TIEFENSCHARFESKALA Wenn Sie die Tiefenscharfetaste Ihrer Kamera drucken, konnen Sie die Tiefenscharfe durch den Sucher beobachten. Im Gegensatz zu anderen Nikkor Objektiven besilzt das Zoom-Nikkor 35-70mm f/3,3-4,5 keine (arbigen Tiefenscharfelinien auf dem Objektivtubus. Zur Feststellung der TiefenschaTfe, konnen Sie die Skala dieses Handbuchs benutzen. (Seite45) Schneiden Sie zuerst die Skalen entlang der angezeigten Linien aus. Legen Sie dann die Motiv-Kamera-Entfernungsskala (B) iiber die Tiefenscharfeskala (A), wobei die Oberkante der Skala (B) mit der verwendeten Brennweite abschlie&en mull, und die Entfernung mit der zentralen Markierungslinie der Skala (A) auszurichten ist. Lesen Sie jetzt die Zahlen (auf der Skala B) die gegenilber dem Paar der Tiefenscharfelinien (auf der Skala A) liegen, die der eingestellten Blende entsprechen. Diese Zahlen drucken die Tiefenscharfe bei den benutzten Einstellungenaus. Z.B., wenn das Objektiv bei 1m, mit einer Brennweite von 35mm und einer Blende von f/22 fokussiert wurde, dann sind die Zahlen auf der Entfernungsskala gegenuber den Tiefenscharfelinien fur die Biendeneinstellung von f/22 die Tiefenscharfe fur diese Einstellung. INFRAROTAUFNAHMEN Bei Infrarotaufnahmen liegt die Ebene der scharfsten Abbiidung etwas weiter entfernt, als bei Aufnahmen mit sichtbarem Licht. Zum Ausgleich dieser Brennpunktverschiebung, konnen Sie sich nach den roten Infrarot-lndexlinien (T) richten, die auf dem Objektivtubus eingestanzt sind. (Die Linie mit dem grunen Punkt gilt fur die Brennweiteneinstellung von 35mm, wShrend die Linie mit dem braunen Punkt fur 70mm gilt. Fur Zwischenwerte, benutzen Sie bitte den Bereich zwischen diesen beiden Linien.) Fokussieren Sie durch den Sucher, lesen Sie die Entfernung am Objektiv ab und drehen Sie den Einstellring nach links, bis die gemessene Entfernung dem Infrarot-lndex genenuberliegt. Setzen Sie dann das Filter an und machen Sie die Aufnahme. 20 TECHNISCHEDATEN Brennweite: 35mm bis 70mm GroBte Offnung: f/3,3 bis 4,5 Optik: 8 Elemente in 7 Gruppen Blldwinkel:62°bis34°20' Entfernungsskala: Einteilung in Meter und FuB von 0,5m (2 ft) bis Unendlich (<»). Makroaufnahmen bei jeder Brennweite bis herunter zu 0,35m (1 ft), uber orangefarbene Linie und Buchstaben "M" gekennzeichnet. Entfernungs/Brennweiteneinstellung: Uber zwei unabhangige Ringe. Scharfetnstellung durch Drehen am Einstellring, stufenlose Versteliung der Brennweite durch Drehen des Zoomrings nach rechts bzw. links. Bezugsmarkierungen fur die Brennweiten 35mm in grun, 50mm in wetfi und 70mm in braun auf dem Zoomring etngraviert. Stufenlose Entfernungseinslellung btsMakio. Makroeinstellung: Uber den Einstellring bei jeder Brennweite moglich. Naheinstellung bis 0,35m moglich. GroBtes Abbiidungsverh<nis 1.4,4. Blendenskala: Blende 3,3 bis 22 auf beiden Skalen. (Bei Blende 4 nur Klickstopp.) Blendentyp: Vollautomatisch Belichtungsmessung:Offenblendenmessung Objektivfassung: Nikon BajonettanschluB Frontgewinde: Durchmesser 52mm (P = 0,75mm) Abmessungen: Durchmesser 63mm x Lange bis Flansch 61 mm; Lflnge uber alles69mm GewichtrCa 255g •HBBHHHHKZ!!!!! H Aufsteckbarer Frontdeckel 52mm Fester Objektivkbcher CL-31S Hinterer Objektivdeckel LF-1 Aufschraubfilter 52mm Auschraubbare Sonnenblende HN-2 Weicher Objektivkdcher Nr. 62 Telekonverter TC-201 Telekonverter TC-14A 21 OBJEKTIVPFLEGE • Die LinsenoberflSchen des Objektivs sollten jederzeit sauber gehalten werden. Vermeiden Sie jedoch grobes Reinigen. Wischen Sie Fett und FingerabdrCicke mil einem weichen, sauberen, mit Alkohol angefeuchteten Tuch. Wenn Sie zum Reinigen des Objektivs Ather verwenden, erscheinen manchmal Schlieren auf der Linsenoberflache mit Mehrschichtvergutung. In diesem Fall noch einmal mit einem in Alkohol getrankten Tuch nachwischen. • Zum Reinigen des Hinterglieds des Objektivs, ohne Staub oder sonsttge Fremdstoffe in das Objektiv gelangen zu lassen, den Zoomring zuerst aut 35mm Brennweite drehen, mit einem Geblase eventuelle Staubteilchen und Schmutzruckstancte wegblasen und anschlieBend die hintere Linsenflache des Objektivs, in gteicher Weise wie oben beschrieben, mit einem Tuch saubern. • Die Frontlinse des Objektivs sollte grundsatzlich durch ein Filter L37C geschutzt werden. Auch die Gegenlichtblende bewah'rt sich als Frontlinsenschutz. • Bei Nichtbenutzung sollte der vordere Objektivdeckel grundsatzlich aufgesetzt bleiben. • Wird das Objektiv ohne Kameragehause aufbewahrt, sollten vorderer und hinterer Objektivdeckel aufgesetzt sein. • Zur Aufbewahrung im Leder-Objektivkocher, den Einstellring auf Unendlich («>) und den Zoomring auf 50mm Brennweite stellen. 22 NOMENCLATURE Reperes d'ouverture (vert et brun) Repere de plage macro (orange) Echelle des distances/echelle des longueurs focales Echelle des distances Index de mise au point en infrarouge Bague de mise au point Echelle des longueurs focales Bague de zooming 9 Bague de montage 10 Borne de servocouplage EE 11 Fourchette de couplage du posemetre 12 Echelle de lecture directe d'ouvertures du diaphragme 13 Borne d'indexage d'ouverture 14 Echelle des ouvertures 15 Nervure de couplage du posemetre 16 Bague des ouvertures AVANT-PROPOS (Lisez attentivement les paragraphes suivants, les quelques minutes ainsi passes vous permettront de tirer le meilleur de votre appareil tout de suite et pour des annees.) Vous possedez maintenant I'un des zooms les plus compacts et legers pour les focales les plus utilisees et une souplesse d'emploi maximale pour la prise de vue de tous les jours.Votre nouveau Zoom-Nikkor 35-70mm f/3,3-4,5 est polyvalent, facile a utiliser, compact et hautement pertormant. II permet d'adopter diverges longueurs focales, depuis le grand-angle 35mm jusqu'a la telephotographie moyenne 70mm. Et vous pouvez passer tout de suite a des sujets plus petits avec la mise au point macro integre utilisable sur toutes les longueurs focales. Utilisez-le pour tes cliches, les photos souvenir, les portraits et la macro-photographie. Le zooming et la mise au point sont effectues par deux bagues independantes, aussi une fois le sujet mis au point, vous pouvez le cadrer avec le zoom sans perdre de la nettete. La distance de mise au point minimale est normalement de 0,5m, mais vous pouvez descendre en continu jusqu'a 0,35m grace au dispositif de macro monte. Le taux de reproduction maximal est de 1:4,4. Pour un grossissement encore plus important, montez slmplement un objectif macro Nikon en option. Pour obtenir des effects spectauz, I'accessoire, frontal de 52mm met a votre disposition un maximum de filtres en option. Realise a partir de verre Nikon de qualite superieure, ce zoom produit des images nettes et bien contrastees de la plus courte a la plus longue des longueurs focales, et les aberrations chromatiques sont bien corrigees. Le revetement integre Nikon (NIC) est applique sur toutes les surfaces air/verre des lentilles pour reduire les reflexions parasites et la diffusion et produire des images a restitution chromatique naturelle. L'objectif est dote d'un index de couplage photometrique interne qui informe automatiquement le posemetre de I'ouverture maximale de l'objectif utilise, dans le cas de boitiers beneficiant de ce type de couplage (Al), (sauf dans le cas du F-401). L'index de couplage et la diaphragme automattque fonctionnent conjointement et permettent une mesure de I'exposition a pleine ouverture. Pour les boitiers Nikon depourvus du 23 systeme Al, I'objectif comporte une fourchette de couplage photometrique qui autorise la meme operation. MONTAGE A Alignez I'index des ouvertures de I'objectif (T) et I'index de montage de I'appareil et inserez I'objectif dans la monture'baionnette du boTtier. Tournez I'objectif dans le sens horaire inverse jusqu'a ce qu'un declic indique son verrouillage en place. (Pour retirer I'objectif, pressez le bouton de deverrouillage sur le boitier et tournez I'objectif dans le sens horaire.) Remarques: 1) En montant I'objectif sur un boTtier pourvu d'un doigt de couplage objectifposemetre (type Al), assurez-vous que le doigt de couplage soit correctement en place; en montant I'objectif sur un boTtier depourvu de ce doigt (type non-AI), etalonnez I'ouverture en manuel. Dans ces deux cas, reportez-vous au mode d'emploide I'appareil. 2) Quand I'objectif est utilise avec le boTtier Nikon F-401, la fonction de couplage photometrique n'opere pas, et I'indicateur d'exposition DEL n'apparait pas. MISE AU POINT B Pour mettre au point, tournez la bague de mise au point © jusqu'a ce que vous obteniez sur le verre de visee une vue nette et ciaire. Pour une mise au point extremement precise, nous vous conseillons de faire la mise au point en position 70mm, puis revenez a la meilleure longueur focale pour la composition de I'image desiree. ZOOMING C II vous permet d'arranger vos photos pour les faire entrer exactement dans le cadre. Lorsque vous voulez varier la focale de votre zoom, regardez a travers le viseur et faites glisser la bague de zooming (?) vers la droite et vers la gauche jusqu'a ce que vous obteniez sur le verre de visee I'image que vous desirez. En reference, une echelle a quatre positions (35mm, 50mm et 70mm) est gravee sur le tube de I'objectif, mais vous pouvez egalement utiliser les reglages intermedial res. MISE AU POINT MACRO Bien que la mise au point normale soit possible depuis I'infini jusqu'a 0,5m, vous pouvez mettre au point encore plus pres a tous les reglages de longueur de focale en actionnant doucement la bague de mise au point. Le "M" et le repere © orange indiquent le mode de mise au point macro. La distance focale minimale et le rapport de reproduction maximum sont respectivement de 0,35mm et 1:4,4. Regie a 70mm, son rapport de reproduction est 1:4,4, tandis qu'a 35mm il devient 1:8,3. II est recommande d'utiliser autant que possible des longueurs focales longues pour la mise au point macro, parce qu'il peut y avoir vignettage aux reglages de longueur focale plus courts. Note: Bien que cet objectif soit capable de prendre des prises de vue en macro, 24 nous recommandons ("utilisation d'un objectif Micro-Nikkor pour la copie de documents ou la duplication de diapositives ou une mise au point parfaite est de rigueur. VERRES DE VISEE RECOMMANDES Differents verres de visee interchangeables peuvent etre montes sur les boTtiers Nikon F3 et Nikon F2 serie, qui permetten! de faire face a toutes les conditions de prise de vues. La liste de ceux qui sont particulierement recommandes pour votre objectif figure ci-dessous. Pour les verres utilises avec des boitiers Nikon autres que F2 et F3 series, (cad, Nikon FA, FE2, FM2 et FE), se referer a la colonne sur les bottiers de serie F3. Pour les verres de visee K2, B2 et E2 se referer aux colonnes sur les verres K, B et E respectivement. Pour des details reportez-vous a la feuille d'instruction specifique concernant les verres. A/L G2 G3 G4 H2 H3 H4 K/P F3 F2 ILorsqu'on adapte le teleconvertisseur TC-201 ou TC-200 sur cet objectif, se referer a la table suivante: A/L F3 F2 m G2 G3 G4 H2 H3 H4 K/P T mm • m ILorsqu'on adapte le teleconvertisseur TC-14A sur cet objectif, se referer a la table suivante: A/L B C D E Gl G2 G3 G4 HI H2 H S H I J K / P M R T U F3 F2 m « • © as Mise au point excellente •m = Mise au point acceptable La zone de stigmometre du verre de visee, du microprisme ou du reticule est floue. Faites la mise au point sur la zone depolie. Les blancs signifient 1'incompatibilite. Note: Les teleconvertisseurs TC-301, TC-300, TC-14B et TC-14 ne peuvent pas etre utilises avec cet objectif. OUVERTURE VARIABLE Pour des longueurs focales allant de 35mm a 70mm, I'ouverture maximale diminue d'environ 5/6 par repere d'ouverture. Les deux index d'ouverture graves sur la bague de montage chromee indiquent cette variation: I'index de couleur verte sert pour le reglage en 35mm, et celui de couleur brune pour le reglage en 70mm. 25 Pour les reglages de longueur focale intermediate, amenez la bague des ouvertures entre les deux index. La relation entre la longueur focale et I'ouverture maximale est indiquee sur le Schema 1. Quandcet objectit est monte sur un boTtier equipe du dispositif de mesure a diodes TTL, il n'est plus necessaire de vous preoccuper du reglage de I'ouverture. Avec un posemetre independant, un reglage fin est cependant requis, selon la longueur focale utilisee. Schema 1 E 4,5 3 93.9) =3 O 35 50 70 * Longueur focale CONSEILS POUR LA PHOTOGRAPHIE AU FLASH Suivez les instructions suivantes quand vous photographiez avec un flash, parce que I'ouverture maximum de cet objectif varie considerablement en fonction des reglages de longueur focale. • Photographie automatique TTL au flash (avec les SB-18, SB-17, SB-16A/B, SB-15 ou SB-20) Aucun ajustement n'est necessaire parce que la variation en ouverture est automatiquement prise en compte. Cependant, si la distance flash-sujet est proche de la limite inferieure ou superieure de la plage de prise de vue en mode auto correspondant a votre ouverture de travail, I'ouverture de travail peut devoir etre changee selon les longueurs focales. • Photographie au flash en mode auto non-TTL ou semi-automatique Un teger aujstement est necessaire. Vous pouvez obtenir I'exposition pratiquement correcte sur tous les reglages de longueur focale en utilisant les reglages intermediates figurant entre les index des ouvertures vert et brun. Pour obtenir une exposition parfaite, ajustez I'ouverture de couplage selon le Schema 1. • En comblnalson avec le flash SB-19 ou SB-E monte sur le Nikon FG-20 ou EM Assurez-vous que le selecteur de mode operatoire du SB-19 ou le selecteur de boitier du nouveau SB-E est en position "A". Avec un type de SB-E plus ancien, placez-lesur "FE-FM". Sinon, vous pourrez obtenir I'ouverture correcte seulement sur le reglage du telephoto (70mm), tandis que votre photo sera surexposee pour le grand-angle (35mm) a cause de la variation d'ouverture maximum de I'objectif. Avec un film de type negatif (par exemple, pour les negatifs couleur), cedeplacement n'affecte pas I'image elle-meme, parce que la plage d'expositions est plus etendue. Mais il n'est recommande d'utiliser un film diapo, parce sa plage des expositions est plus reduite. 26 PROFONDEUR DE CHAMP Vous pouvez apprecier la profondeur de champ sur I'image de visee en pressant le bouton de controle de profondeur de champ si I'appareil en est dote. Mais a la difference d'autres objecifs Nikon, le Zoom-Nikkor 35-70mm f/3,3-4,5 ne possede pas de reperes de profondeur de champ a code couleur grave sur le tube de I'objectif. Cependant, vous pouvez quand meme determiner la profondeur de vue en vous aidant des tableaux fournis avec ce manuel (voir la page45). Pour les utiliser, decoupez d'abord les echelles le long des lignes indiquees. Puis, placez I'echelle des distances (B) sur I'echelle des profondeurs de champ utilisee, le sommet de I'echelle (B) alignee sur la longueur focale utilsee, et la distance alignee sur la ligne indicatrice centrale de I'echelle (A). Lisez les numeros maintenant (sur I'echelle B) qui apparaissent en face d'une paire de lignes de profondeur de champ (sur I'echelle A) correspondant a t'ouverture utilisee. Ces nombres indiquent la profondeur de champ pour les reglages utilises. Par exemple, si I'objectif est en premise au point a 1 m, avec la longueur focale reglee a 35mm et t'ouverture a f/22, les nombres de I'echelle des distances face aux lignes de profondeur de champ pour le reglage f/22 sont le reglage de profondeur de vue reel a ce moment. PHOTOGRAPHIE EN INFRAROUGE En photographie en infrarouge, le plan de la mise au point la plus nette est legerement plus eloignee que celui produit par la lumiere visible. Empiriquement, vous pouvez compenser le delacement de mise au point en vous referant aux index de mise au point infrarouge graves (f) sur le tube de I'objectif. (La ligne a repere vert au bas est la ligne de reglage de longueur focale 35mm, tandis que celle avec le repere brun est celle des 70mm. Pour les longueurs focales intermediates, utilises I'espace entre les deux.) Apres la mise au point nette du sujet a travers le viseur, verifiez la distance de mise au point et tournez la bague de mise au point vers la gauche jusqu'a ce que le nombre premis au point apparaisse aligne sur I'index de mise au point infrarouge. Puis montez le filtre sur I'objectif et declenchez. CARACTERISTIQUES Longueur focale: 35mm a 70mm Ouverture maximum: f/3,3 a 4,5 Construction optique: 8 elements en 7 groupes Champ angulaire: 62° — 34°20 Echelle des distances: Graduee en metres et en pieds de 0,5m (2 ft.) a I'infini {»); mode de mise au point macro a tous les reglages de longueur focale jusqu'a 0,35m (1 ft.) indiquee par une ligne orange et la lettre "M" Controle de mise au point/zooming: Par deux bagues de controle independantes; la mise au point se fait en tournant la bague de mise au point, le zooming en tournant la bague de zooming vers la droite et vers la gauche. Reperes de reference pour les reglages de profondeur de champ 35mm en 27 vert, 50mm en blanc et 70mm en brun graves sur la bague de zooming. Le mouvemenl de mise au point est continu en mode macro. Mise au point en macro: Via bague de mise au point; utilisable a toutes les longueurs focales; mise au point rapprochee possible jusqu'a 0,35m (1 ft.); rapport de reproduction 1:4,4 Echelle des ouvertures: f/3,3 a f/22 sur les deux normes et echelle de lecture directe d'ouverture (a f/4 seul le declic est fourni). Diaphragme: Entierement automatique Mesure de I'exposition: A pleine ouverture Monture: Baionnette Nikon Taille des accessoires: 52 diam (P 0,75mm) Dimensions: Env. 63mm diam x 61mm rallonge de bride; env. 69mm de long (hors-tout) Poids:Env.255g Accessoires Capuchon avant a emboitement de 52mm Bouchon arriere LF-1 Filtres vissants 52mm Parasoleil vissant HN-2 Etui d'objectif rigide CL-31S Etui d'objectif souple No. 62 Teleconvertisseur TC-201 Teleconvertisseur TC-14A SOINS A APPORTER A VOIRE OBJECTIF • II est necessaire de conserver les surfaces des lentiltes de I'objectif dans un etat de proprete maximum. Pour le nettoyage, il est recommande d'utiliser un tissu de coton doux, imbibe d'alcool afin d'effacer des traces de graisse ou de doigts. Lorsque Ton utilise de Tether, des traces peuvent subsister apres evaporation sur une lentille qui a subi le traitement multicouches. Dans un tel cas, frottez a nouveau avec du coton imbibe d'alcool. • Pour nettoyer I'objectif sans laisser penetrer la poussiere ou tout materiau dedans, tournez d'abord la bague de zooming vers la longueur focale 35mm, puis utiliser un soufflet pour eliminer les corps etrangers, puis essuyez la surface arriere de I'objectif. • Pour proteger la surface de I'objectif de la salete et des dommages, utiiisez le filtre L37C. Le parasoleil aide aussi a proteger I'objectif. • Laissez le capuchon d'objectif en place quand I'objectif n'est pas utilise. • Lorsque I'objectif est range separement, mettez-lui toujours ses bouchons avant et arriere. • Afin de pouvoir introduire I'objectif dans son etui de cuir, amenez la bague de mise au point sur I'lnfinl et la bague de zooming sur 50mm. 28 NOMENCLATURA 1 Indicede aberturas (verde y marron) 2 Linea de macro (anaranjado) 3 Escala de distancias/indice de la escala de longitud 4 Escala de distancias 5 Indices de infrarrojo 6 Anillo de enfoque 7 Escala de longitud focal 8 Anillo de efecto zoom 9 Anillo de montaje 10 Borne del acoplamiento del servosistema EE 11 Zapata de acoplamiento al exposimetro 12 Escala de lectura directa de abertura 13 Borne de indicacion de la abertura 14 Escala de aberturas 15 Reborde para el acoplamiento del exposimetro 16 Anillo de aperturas ANTES OE UTILIZAR ESTE OBJETIVO (Lea las siguientes instrucciones cuidadosamente para obtener el mayor rendimiento de su nuevo objetivo ahora y en los numerosos aftos venideros). Usted ahora posee uno de los objetivos zoom mas ligeros y compactos en las longitudes focales mas utilizadas para una maxima versatilidad en la toma cotidiana de fotografias. Su nuevo Zoom-Nikkor 35-70mm f/3,3-4,5 es versatil, de facil operacibn, compacto y de alto rendimiento. Le proporciona una variedad de longitudes focales a elecci6n, desde un granangular de 35mm hasta un teleobjetivo moderado de 70mm. Usted puede aproximarse a objetos pequefios con el sistema de enfoque para macro incorporado que permite enfoques a cualquier longitud focal. Utilice este objetivo para fotografias normales, turisticas, retratos yprimeros pianos. Los controles del efecto zoom y del enfoque se efectuan mediante dos anillos independientes de manera que una vez enfocado el objeto, usted puede cambiar el ajuste del efecto zoom sin alterar la nitidez. Las distancia de enfoque minima normalmente es de 0,5m (2 pies), pero el enfoque continuo es posible hasta una distancia minima de 0,35m (1 pie) gracias a la funcibn de macro equipada. La relacibn de reproducci6n maxima es de 1:4.4. Para obtener una amplificacion aun mayor, sencillamente agregue un lente de aproximacion opcional Nikon. Para lograr efectos especiales, la montura delantera de 52mm permite utilizar un numero maximo de filtro opcionales. Fabricado de cristal Nikon de la mas alta calidad, este objetivo zoom produce imagenes nitidas de alto contraste desde la longitud focal minima a la maxima con una correccidn eficiente de todas las aberraciones. Ademas, el revestimiento integrado de Nikon (NIC) aplicado a todas las superficies de lentes en contacto con el aire a fin de reducir al minimo el espectro secundario y la interreflexi6n entre las superficies de las lentes y asegurar fotografias de colorido natural. El objetivo ofrece "registro automatico de la abertura maxima" (Al) con las camaras convenientement equipadas, gracias a la protuberancia de acoplamiento al 29 exposimetro provista (excepto F-401/N4004*). El reborde para el acoplamiento del exposimentro y el diagrama automatico funcionan conjuntamente para permitir la medicion de la exposicion a plena abertura. Este objetivo esta equipado con una zapata de acoplamiento al exposimetro para permitir la misma operacion con las camaras Nikon que no cuenten con el sistema Al. *La Nikon N4004 es vendida exclusivamente en EE.UU. MONTAJE DEL OBJETIVO A Alinee el indice de aperturas de color verde (T) en el objetivo con el indice de montaje en el cuerpo de la carnara e inserte el objetivo en la montura tipo bayoneta de ia carnara. Luego, gire el objetivo en sentido contrario al de las agujas del reloj hasta que un "click" seftale que esta correctamente montado. (Para desmontarlo, oprima el botdn de liberacidn del objetivo en la carnara y gire el objetivo en el sentido de las agujas del reloj.) Notas: 1) Al montar este objetivo en una carnara tipo Al con palancade acoplamiento al exposimetro, vertfique que la palanca este colocada hacia abajo. Al montarto en una carnara sin esta palanca (carnara que no es del tipo Al), se requiere indicacion de apertura maxima "manual". Vea informaciones mas detalladas en el manual de instrucciones de la carnara. 2) Cuando se utilice el objetivo con la Nikon F-401/N4004, no operara la tunc ion de acoplamiento del exposimetro de la carnara y no apareceran los indicadores LED de exposicion. ENFOQUE B Para enfocar, gire el anillode entoque © hasta que la imagen en el visor aparezca nitida y clara, Para enfoques precisos, enfoque con el objetivo «n la posicibn de 70mm, volviendo posteriormente a la longitud focal ideal ram ia composicibn fotografica deseada. EFECTO ZOOM C Este efecto lepermite "recortar" la imagen, consiguiendo una ubicacion exacta de la misma dentro del marco. Para lograr el efecto de acercamiento o de alejamiento, observe a traves de) visor y gire el anilio de control del efecto zoom (j) hacia la derecha o hacia la izquierda hasta que la imagen deseada quede encuadrada correctamente en la panlalla de enfoque. Como referenda, en el anillo de control del efecto zoom aparece grabada una escala de tres posiciones para indicar los ajustes de longitud focal (35mm, 50mm y 70mm). Desde luego, es posible fijar posiciones intermedias. ENFOQUE MACRO Si bien es posible el enfoque normal desde infinito hasta 0,5m (2 pies), usted puede enfocar a distancias aun menores, en cualquier longitud focal gracias al fun30 cionamiento suave dei anillo de enfoque. La "M" de color anaranjado y la linea corresponden al enfoque macro. La distancia focal minima y la relacion de reproduccion maxima son de 0,35m (1 pie) y 1:4,4 respectivamente. A una longitud focal de 70mm, la relacion de reproduccion es de 1:4,4 mientras que a 35mm, es de 1:8,3. Se recomienda utilizar longitudes focales tan largas como sea posible para el enfoque macro, ya que con ajustes de longitudes focales menores puede presentarse el efecto de vineteo, Nota: Si bien este objetivo es apto para enfoques macro, se recomienda utilizar un objetivo Micro-Nikkor para copias de documentos o duplicados de diapositivas, trabajos que requieren una nitidez rigurosa. PANTALLAS DE ENFOQUE RECOMENDADAS Existen varias pantallas de enfoque intercambiables para las camaras de las series F3 y F2, aptas para todo tipo de objetivo o situacibn fotografica.Las pantallas recomendadas para ser utilizadas con este objetivo aparecen en la lista de mas abajo. Para las pantallas utilizadas con camaras Nikon que no sean de las series F3 y F2 (por ejemplo, Nikon FA, FE2, FM2 y FE), vea la columna de las camara de la serie F3. Para las pantallas de enfoque K2, B2 y E2, vea las columnas de las pantallas K, B y E, respectivamente. Para mas detalles, vea la hoja de instrucoiones de la pantalla de enfoque especifica. ! 2 ! * A/L B C D E Gl G2 G3 G4 HI H2 H3 H4 J K/P M R T U F3 F2 lUtilice la siguiente tabla si el objetivo tiene acoplado un Teleconvertidor TC-201 6 TC-200: J^|A/L|B|C|D|E|GI|G2|G3|G4|HI|H2|H3|H4|J|K/P|M|R|T|U « ® ® # • Utilice la siguiente tabla s el objet vo iene acoplado un Teleconvertidor TC-14A: ~~————^_ Pantalla Camara —~-~___ F3 F2 A/L B C D E Gl G2l G3 G4 HI H2 H3 H4 J K/P M R T U • • © eg © © © m m • © © = Enfoque excelente • = Enfoque aceptable El telemetro de imagen partida, el area de micropi isma o reticulada tiene poco brillo. Enfoque en el area mate circundante. Los espacios en bianco indican que no pueden ser utilizadas. Nota: Los Teleconvertidores TC-301, TC-300, TC-14B y TC-14 no pueden ser utilizados con este objetivo. 31 ABERTURA VARIABLE Al cambiar la longitud focal del objetivo de 35mm a 70mm, la abertura maxima disrninuye aproximadamente 5/6 de un valor M. Los dos indices de abertura grabados en el anillo de montura cromado indican la diferencia: el indice verde es para ser utilizado con el objetivo en 35mm, mientras que el indice marron es para 70mm, Para ajustes a longitudes focates intermedias, altnee el anillo de aberturas entre los dos indices. La relacion entre la longitud focal y la abertura maxima aparece en el Diagrama 1. Cuando este objetivo zoom es utilizado con sistema de exposimetro a traves del objefivo (TTL), no es necesario ajustar la abertura. Sin embargo, al utilizar un exposimetro independiente, es necesario efectuar un ligero ajuste, segun el ajuste de la longitud focal. Diagrama 1 45 (13,9) E * 3,3 E ra D <5 n 35 50 70 *- Longitud tocal FOTOGRAFIA CON FLASH Siga ia instrucciones dadas a continuaci6n al efectuar fotografias con una unidad de flash electronico, ya que la abertura maxima de este objetivo varia segun los ajustes de longitud focal, • En et caso de fotografias con Hash automatic© TTL (al utilizar SB-18, SB17, SB 16A/B, SB-15 o SB-20) No se requieren ajustes ya que la variacion de abertura se compensa automaticamente. Sin embargo, cuando la distancia entre el flash y el objeto se encuentra junto al limite proximo 0 lejano del alcance de enfoque automatico correspondiente a la abertura utilizada, puede ser necesario cambiar la abertura a utilizar al modificar la longitud focal del objetivo. • En el caso de fotografias con flash automatico que no sea de tipo TTL o con flash manual Es necesario efectuar un ligero ajuste. Para obtener una exposicion aproximadamente correcta en todos los ajustes de longitud focal, utilice ajustes intermedios entre el indice de abertura verde y el marron. Para obtener una exposicion perfecta, ajuste la abertura de acoplamiento segun el Diagrama 1. • En combinacion con el flash SB-19 o el Hash SB-E montado en la Nikon FG-20 6 EM Verifique que el selector de modo de disparado del SB-19 0 el selector de camara de un flash nuevo de tipo SB-E este en la posicibn "A". En el caso de mo32 delos anteriores de SB-E, coloque el selector en la posicion "FE-FM". De otra manera, la exposicibn correcta puede ser obtenida unicamente con el ajuste para telefotografia (70mm), mientras la fotografia resultara sobre-expuesta si es tomada con ajuste de granangular (35mm) como consecuencia del cambio de la abertura maxima de este objetivo. Con peliculas de tipo negativo (por ejemplo, pelicula negativa de color), este cambio puede no afectar la fotografia en si, ya que posee una mayor libertad de exposicion. Sin embargo, no se recomienda utilizar pelicula reversible para diapositivas, ya que la libertad de exposicion de estas peliculas es menor. ESCALA DE PROFUNDIDAD DE CAMPO listed puede observar la profundidad de campo a traves del visor oprimiendo el bolon de observacibn previa de la profundidad de campo en el caso de utilizar una camara con este dispositive Sin embargo, a diferencia de otros objetivos Nikkor, el Zoom-Nikkor 35-70mm f/3.3-4,5 no posee indicadores de profundidad de campo codificados por color en el tubo del objetivo. Para determinar la profundidad de campo, utilice ias escalas que aparecen en este manual (vea la pagina45). Para utilizarlas, en primer lugar recorte las escalas a lo largo de las fineas indicadas. Luego, coloque la escala de distancias objeto-camara (B) sobre la escala de profundidades de campo (A), con el borde superior de la escala (B) alineado con la longitud focal utilizada, y la distancia alineada con la linea indice central de la escala (A). A continuaci6n, lea los numeros (en la escala B) que aparecen opuestos al par de lineas de profundidad de campo (en la escala A) correspondientes a la abertura utilizada. Estos numeros corresponden a la profundidad de campo de los ajustes utilizados. Por ejemplo, si el objetivo es preenfocado en 1m (3,5 pies) con la longitud focal fijada en 35mm y )a abertura en f/22, los numeros en la escala de distancias opuestos a las lineas de profundidad de campo para el ajuste de f/22 representan la profundidad de campo real. FOTOGRAFIA POR RAYOS INFRARROJOS En la fotografia por rayos infrarrojos, el piano de foco mas nitido se encuentra a una distancia ligeramente mayor que el piano producido por la luz visible. Como regla general, Ltd. puede compensar la desviacion del foco refiriendose a las lineas de indice para infrarrojo grabadas en el tubo del objetivo. (La linea con el punto verde en el extremo inferior corresponde al ajuste para longitud focal de 35mm, mtentras que la linea con el punto marr6n corresponde al ajuste para longitud focal de 70mm, Para longitudes focales intermedias, utilice el area entre ambas.) Despues de enfocar. nitidamente el objeto a traves del visor, verifique la distancia enfocada y gire el anillo de enfoque hacia la izquierda hasta que el numero correspondiente a la distancia preenfocada quede alineado con el indice de infrarrojo. Luego, monte el filtro en el objetivo y tome ta lotografia. 33 ESPECIFICACIONES Longitud focal: 35mm a 70mm Abertura maxima: f/3,3 a f/4,5 Construction del objetivo: 8 elementos en 7 grupos Angulo fotograftco: 62° a 34°20 Escala de distancias: Graduada en metros y en pies desde 0,5m (2 pies) hasta infinito {°°); modalidad de enfoque macro en cualquier ajuste de longitud focal hasta un minimo de 0,35m (1 pie) indicado por la linea de color anaranjado y la letra "M" Control de enfoque/efecto zoom: Mediante dos anillos de control independientes: el enfoque se efectiia girando el anillo de enfoque hacia la derecha o hacia la izquierda. En el anillo de control del efecto zoom aparecen grabadas marcas de referenda para los ajustes de longitud focal de 35mm, de color verde; para 50mm, de color bianco y para 70mm, de color marrbn. El movimiento del anillo de enfoque es continuo hasta la modalidad de macro Funcion de enfoque macro: Mediante el anillo de enfoque, utilizable a cualquier longitud focal. El enfoque es posible hasta una distancia minima de 0,35m(1 pie). La relacibn de reproduccibn maxima es de 1:4,4 Escala de aberturas: f/3,3 a 122 tanto en la escala normal como en la de lectura directa de abertura (A f/4 solo con un tope tipo "click".) Diafragma: Completamente aulomatico Medicion de la exposicion: Por metodo de plena abertura Montura: Tipo bayoneta de Nikon Dimensiones de los accesorlos: 52mm de diam. (P = 0,75mm) Dimensiones: Aproximadamente 63mm de diam. x 61 mm de extension desde la pestafla, aproximadamente 69mm de largo (total) Peso: Aproximadamente 255 gramos Accesorios Tapa frontal a presion de 52mm Tapa trasera del objetivo LF-1 Filtros con rosea de 52mm Parasol con rosea de HN-2 34 Estuche duro para el objetivo CL-31S Estuche blando para el objetivo No. 62 Teleconvertidor TC-201 Teleconvertidor TC-14A CUIDADOS DEL OBJETIVO • Si bien siempre se deben mantener limpias las superficies de las lentes del objetivo, la limpieza debe ser efectuada cuidadosamente. Limpie frotando con un pafio suave y limpio humedecido en alcohol para eliminar manchas de grasa o impresiones digitales de las superficies de las tentes. Si se utiliza eter para limpiar el objetivo, en algunas ocasiones aparece una mancha en la superficie de las lentes con recubrimiento de capas multiples. Si esto sucede, limpie nuevamente con un pafio de algodbn humedecido en alcohol. • Para limpiar la lente trasera evitando que penetre polvo u otra materia extrafta en el objetivo, en primer lugar gire el anillo de control del efecto zoom hasta la longitud focal de 35mm. Luego, utilice un soplador para etiminar el polvo y las materias extraftas. Finalmente, limpie la superficie de la lente trasera de la manera explicada mas arriba. • Para proteger la superficie de las lentes de suciedad y de dahos, se recomienda utilizar permanentemente un filtro L37C. El parasol asimismo ayuda a proteger el objetivo. • Deje colocada la tapa del objetivo cuando no lo utilice. • Coloque tanto la tapa delantera como la trasera ai guardar el objetivo separadamente. • Para poder guardar adecuadamente el objetivo en el estuche de cuero, coloque el anillo de enfoque del objetivo en la posicion de infinito (*>) y el anillo de control del efecto zoom en la posicion de 50mm. 35 NOMENCLATURA 1 Scala fettira diaframmi (verde e marrone) 2 Indicatore gamma macro (arancio) 3 Scala distanze/lunghezza focale 4 Scala distanze 5 Riferimento per fotografia all'infrarosso 6 Anello di messa a fuoco 7 Scala distanza focale 8 9 10 11 12 13 14 15 16 Anello zoom Anello montaggio obiettivo Atlacco per EE servo Attacco per indicatore Scala per lettura diretta apertura Indice apertura Scala apertura Flangia per attacco indicatore Anello diaframmi PRIMA DI USARE L'OBIETTIVO (Leggere attentamente le seguenti istruzioni per ottenere i migliori risultati per molti anni a venire.) Possedete ora uno degli obtettivi zoom piu leggeri e compatti con le focali maggiormente impiegate per la massima versatility nelle riprese fotografiche piu comuni. II Vostro nuovo Zoom-Nikkor 35-70mm f/3,3-4,5 e versatile, facile da usare, compatto ed offre alte prestazioni. Vi offre una scelta di lunghezze focali da grandangolo (35mm) a un medio tele (70mm). Potrete anche riprendere soggetti piu piccoli con la funzione macro incorporata a qualsiasi lunghezza focale. Usatela per istantanee, foto ricordo, ritratti e close-up. L'azionamento dello zoom e la messa a fuoco vengono attuati tramite due ghiere indipendenti, quindi dopo aver messo a fuoco il Vostro soggetto potrete riprenderlo con lo zoom senza perdere la nttidezza dell'immagine. La distanza minima per la messa a fuoco e solitamente 0,5m, ma potrete ottenere una continua messa a fuoco fino a 0,35m grazie alia funzione macro incorporata. II massimo rapporto di riproduzione e 1:4,4. Per ottenere un ulteriore ingrandimento, bastera aggiungere un obiettivo close-up Nikon opzionale. Per effetti speciali, il diametro filtri di 52mm consente I'uso di una vasta gamma di filtri opzionali. Costruito con vetro Nikon della migliore qualita, questo obiettivo zoom produce immagini nitide con un ottimo contrasto dalla piu corta alia piu lunga distanza focale con un'ottima correzione delle aberrazioni. Inoltre, il rivestimento Nikon NIC (Nikon Integrated Coating) e stato applicato a tutte le superfici dell'obiettivo esposte airaria per ridurre gli effetti di falsa immagine e produrre fotografie con colon naturali. Questo obiettivo offre la funzione di misurazione automatica del valore rnassimo di apertura (Al) con apparecchi attreezzati in modo adeguato, mediante la flangia per attacco indicatore fornita (eccetto il F-401). La ghiera di indicazione e la funzione di apertura automatica funzionano assieme per consentire la misurazione dell'esposizione ad apertura massima. Per fotocamere Nikon non provviste della funzione Al, questo obbiettivo e prowistodi un attacco a slitta per indicatore perpermettere I'attuazione della stessa operazione. 36 MONTAGGIO DELL'OBIETTIVO A Allineare il segno di apertura (verde)® dell'obiettivo con il segno di montaggio della fotocamera ed inserire I'obiettivo nel dispositivo di montaggio a baionetta della fotocamera. Quindi ruotare I'obiettivo in senso antiorario fino a quando si arresta in posizione con uno scatto. {Per togliere I'obiettivo, premere il tasto di disimpegno dell'obiettivo e ruotarlo in senso orario.) Notas: 1) Per I'uso dell'obiettivo con una fotocamera di tipo Al provvista di leva per accoppiamento indicatore, assicurarsi che la leva sia alia posizione "down", per I'uso di una fotocamera non provvista di questa leva, sara necessario effettuare la misurazione "manuale" dell'esposizione massima. Per ulteriori informazioni, leggere il manuale di istruzioni della fotocamera. 2) Se I'obiettivo viene usato con la Nikon F-401, la funzione di attacco indicatore non funziona e i LEDs dell'indicatore di esposizione non si iluminano. MESSA A FUOCO B Per la messa a fuoco, ruotare I'aneUodi messa a fuoco® fino a quando il soggettoappare nitido. Per la messa a fuoco su un soggetto, usare la posizione 70mm dell'obiettivo, quindi spostare indietro alia lunghezza locale necessaria per comporre I'immagine voluta. USO DEL ZOOM C Ouesta funzione Vi consente di creare I'immagine vista attraverso il mirino nel modo preferito. Guardare attraverso il mirino e ruotare I'anello dello zoom ® verso destra e sinistra fino ad ottenere I'immagine voluta sul vetro smerigliato per la messa a fuoco. Per riferimento, una scala a tre posizioni per indicare I'impostazione della lunghezza focale (35mm, 50mm, 70mm) e incisa sull'anello dello zoom, ma e possibile tuttavia usare posizioni intermedie. MESSA A FUOCO IN MACRO Benche la messa a fuoco sia possibile dall'infinito a 0,5m, potrete mettere a fuoco oggetti ancora piu vicini a qualsiasi lunghezza focale con un agevole intervento sull'anello di messa a fuoco. La lettera "M" (arancio) e la linea ® indicano la funzione di messa a fuoco in macro. La distanza focale minima ed il massimo rapporto di riproduzione sono rispettivamente 0,35m e 1:4,4. Ad una lunghezza focale di 70mm, ilsuo rapporto di riproduzione e 1:4,4, mentre a 35mmdiviene 1:8,3. Si consiglia I'uso di lunghezze focali piu lunghe il piu possibile per la messa a fuoco in macro poiche, a lunghezze focali piu corte, potrebbe verificarsi una riduzione della luminosita. Nota: Benche I'obiettivo consenta la messa a fuoco in macro, si consiglia i'uso di un obiettivo Micro-Nikkor per la riproduzione di documenti o la duplicazione di diapositive, casi in cui e necessaria una precisione ad alti livelli. 37 SCHERMI PER MESSA A FUOCO CONSIGLIATI Numerosi schermi per messa a fuoco intercambiabili sono disponibili per le fotocamere delia serie F-3 ed F-2 adattabili a qualsiasi tipo di obiettivo o situazioni di ripresa. Quelli consigliati per I'uso con il Vostro obiettivo sono indicati in basso. Per schermi usati con fotocamere Nikon escluso le F3 ed F2 (es. Nikon FA, FE2, FM2 e FE), vedere la colonna per fotocamere F3. Per gli schermi di messa a fuoco K2, B2 e E2, vedere le colonne per gli schermi K, B ed E rispettivamente. Per dettagli, consultare anche le istruzioni degli schermi di messa a fuoco. ^ ™ A/L B C D E Gl G2 G3 G4 HI H2 H3 H4 J K/P M R T U F3 F2 • Quando il teleconverter TC-201 o TC-200 e applicato a questo obiettivo, usare la tabella seguente: .—__ Schermo A/L B c D E Gl G2 G3 G4 HI H2 H3 H4 J K/P M R T U r" Foo l camera --__ m, © F3 ;.), F2 m o (O) • • • • •» •- • O u a n d o il Teleconverter TC-14A e applicato a questo obiettivo, usare la taoella seguente: ~~ • Schetmo A/L B c D E Gl G2 G3 G4 HI H2 H3 H4 J K/P M R T U r : Folocamera . r» as F3 3 © F2 • • 9 1» © • • • Q O = Messa a fuoco ecceltente ®— Messa a fuoco accettabile II telemetro ad immagine spezzata, la corona di microprismi o la zona smerigliata a croce e scura. Mettere a fuoco la zona intorno. Gli spazi vuoti indicano che non sono utilizzabili. Nota: II Teleconverter TC-301, TC-300, TC-14BeTC-14 non possonoessere usati con questo obiettivo. 38 APERTURAVARIABILE Quando lo zoom viene regolato dalla posizione 35mm a 70mm, I'apertura massima diminuisce intorno a 5/6 di un valore di apertura. I due segni di apertura incisi sull'apposito anello indicano la differenza: il segno verde viene usato per la posizione 35mm, mentre quello marrone viene usato per la posizione 70mm. Per regolazioni intermedie della lunghezza focale, allineare I'anello di apertura fra i due segni. II rapporto fra la lunghezza focale ed il valore massimo di apertura e indicato nel diagramma 1. Ouando questo obiettivo zoom viene usato con fotocamere provviste della funzione di misurazione deila luce attraverso il mirino (TTL), non dovrete regolare manualmente I'apertura. Tuttavia, quando un esposimetro indipendente viene usato sara necessario apportare una leggera modifica secondo I'impostazione delta lunghezza locale Diagramma 1 4,5 (f3,9) 50 -*- Lunghezza focale 70 INFORMAZIONI SU FOTOGRAFIA CON LAMPEGGIATORE Seguire le istruzioni fornite in basso per I'uso di un lampeggiatore poiche I'apertura massima di questo obiettivo varia secondo la regolazione della lunghezza focale. • Fotografia con lampeggiatore TTL (con SB-18, SB-17, SB-16A/B, SB 15 o SB-20) Nessuna regolazione e necessaria poiche la regolazione dell'apertura viene eseguita automaticamente. Tuttavia, quando la distanza fra il lampeggiatore ed il soggetto e vicina o all'estremo del limite che consente le riprese in automatismo in corrispondenza del valore di apertura da Voi regolato, il valore di apertura dovra essere probabilmente cambiato secondo la posizione dello zoom. • Fotografia con lampeggiatore in manuale o non automatica TTL Richiede una leggera modifica. Potete ottenere con approssimita la corretta esposizione in tutte le iunghezze focali usando una regolazione intermedia fra i segni di apertura verde e marrone. Per una perfetla esposizione, regolare I'apertura di accoppiamento secondo il diagramma 1. • Uso del lampeggiatore Speedlight SB-19 o SB-E montato sulla Nikon FG-20 OEM Assicurarsi di regolare il selettore del modo di ripresa dell'SB-19 o del selettore della folocamera di un nuovo tipo SB-E alia posizione "A". Usando un modello SBE non recente, rogolarlo alia posizione "FE-FM". Potreteottenere, altrimenti, la corretta esposizione solarnente in tele t70mm) mentre le Vostre ioto verranno sovraesposte in grandangolare (35mm) dovuto al cambiamento dell'apertura massima di questo obiettivo. Con pellicole negativo (colore negativo, ad es), questo cambiamento potrebbe non influire sulla fotografia poiche presenta una maggiore fatitudine di posa. Non si consiglia I'uso di pellicole per diapositive poiche hanno una inferiore fatitudine di posa. SCALA PROFONDITA DI CAMPO Potete osservare la profondita di campo attraverso il mtrino premendo il tasto apposito quando usate una folocamera provvista di questa funzione. Ma, a ditferenza di altri obiettivi Nikkor, il Zoom-Nikkor 35-70mm f/3,3-4,5 non ha segni a colori di indicazione della profondita di campo incsi sull'obiettivo. Potrete tuttavia determinare la profondita di campo consultando le tabelle fornite in questo manuale (vederepagina45). Per prima cosa. tagliare le scale lungo le linee indicate. Quindi, porre la scala della distanza soggetto/fotocamera (B) sopra la scala della profondita di campo (A) con il lato superiore della scala (B) in corrispondenza della lunghezza focale attualmente usata, e la distanza allineata con la linea di indicazione centrale della scala (A). Ota leggere i numeri (sulla scala B) che appaiono all'opposto della coppia di linee della profondita di campo (nella scala A) corrispondenti all'apertura in uso. Ouesti numeri indicano la profondita di campo per le impostazioni effettuate. Per esempio, se I'obiettivo e stato messo a fuoco su una distanza di 1 metro con la lunghezza focale regolata a 35mm e I'apertura a f/22, i numeri sulla scala deile distanze opposta alle linee della profondita di campo in f/22 sono I attuale profondita di campo. FOTOGRAFIA ALL'INFRAROSSO Per la fotografia all'infrarosso, il piano della piii nitida messa a fuoco e leggermente piu distante di quello prodotto dalla luce visibile. Potrete compensare gli eventuali spostamenti della messa a fuoco facendo riferimentoalle linee di infrarossodi colore rosso © incise sull'obiettivo. (La linea con il punto verde in basso e per una lunghezza focale di 35mm, mentre quella con il punto marrone e per i 70mm. Per lunghezze focali intermedie, usare la zona fra i due.) Dopo aver messo a fuoco con precisione il soggetto attraverso il mirino, controllare la distanza messa a fuoco e ruotare I'anello di messa a fuoco verso sinistra fino a quando il numero della distanza prefissatasi allinei con il segno di infrarosso. Quindi, fissare il filtroall'obiettivo escattare lafoto. 40 CARATTERISTICHE TECNICHE Lunghezza focale: 35mm—70mm Apertura massima: 1/3,3 a 4,5 Costruzione obiettivo: 8 element! in 7 gruppi Angolodicampo:62°a34°20' Scala distanze: graduata in metri epiedi da 0,5m all'infinito(«>); messaafuoco in macro in qualsiasi lunghezza focale fino a 0,35m indicato dalla linea arancio e dalla lettera "M". Messa a fuoco/controllo zoom: tramite due anelli indipendenti; la messa a fuoco viene eseguita ruotando I'anello di messa a fuoco, lo zoom viene attivato azionando I'anello di zoom verso destra e sinistra. I segni di riferimento per la regolazione della lunghezza focale a 35mm, 50mm e 70mm, verde, bianco e marronerispeltivamente,sono incisi sull'anello di zoom; il movimento di messa a fuoco e continuo in macro. Messa a fuoco in macro: con anello di messa a fuoco, attuabile a qualsiasi lunghezza focale; messa a fuoco fino a 0,35m; massimo rapporto di riproduzioneparia 1:4,4 Scala diaframmi: f/3,3 a f/22 su entrambe le scale standard e a lettura diretta dei diaframmi. Diaframma: completamente automatico Misurazione della esposizione: con metodo ad apertura massima Innesto: Nikon a baionetta Diametro filtri: 52mm (P=0,75mm) Dimensioni: 63mm dia. x 61mm estensione dalla flangia, circa; lunghezza: 69mm circa (totaie) Peso:255g. circa Accessor! Tappo anteriore da 52mm dia Tappo posteriore LF-1 Filtri a vite da 52mm dia. Paraluce per obiettivo avvitabile HN-2 Portaobiettivo duro CL-31S Portaobiettivo morbido N. 62 Teleconverter TC-201 Teleconverter "TC-14A CURADEGLIOBIETTIVO • Benche dovreste mantenere sempre le superfici degfi obieEtivi pulite, non pulire con forza. Usare un panno di cotone morbido e pulito inumidito di alcool per togliere il grasso o le impronte digital* dalle superfici dell'obiettivo. Dopo la pulizia dell'obiettivo, delle ombre spesso appaiono sulla superficie di un obiettivo a piu strati. Se cio dovesse veriiicarsi, pulire di nuovo con un panno di cotone inumidito di alcool. • Per pulire la parte posteriore dellbbietttvo senza che polvere o altro materiale penetri all'interno dell'obiettivo, per prima cosa ruotare I'anello di zoom alia posizione 35mm, quindi usare un pennello a pompetta per togliere la polvere o altre impurita; quindi pulire la parte posteriore dell'obiettivo nel modo descritto in precedenza. • Per proteggere la superficie di vetro dell'obiettivo da polvere o danni, I'uso di un filtro L37C e consigliato pe qualsiasi circostanza. II paraluce dell'obiettivo serve anchesso a proteggere I'obiettivo. • Mantenere il tappo fissato sull'obiettivo quando quest'ultimo non viene usato. • Applicare entrambi i tappi quando I'obiettivo viene conservato separatamente. • Per inserire I'obiettivo nella propria custodia di pelle porre I'anello di messa a fuoco aH'infinito (°°) e I'anello di zoom alia posizione 50mm. 42 43 I ll itllif ijif • ilM i < < S g s« ° 5 H o>-g 5 o 1 o - "O J> E 1 m 3 gll| i | S » S go S CD CD Q. m > IS * if c ni t CJJ Oj ^^ . m o „ O c oO O =3 u—i o o o co Lfi CM d CO LO CM LO ° ° o 0) D 5 ra C ro D " a =6 'T3 I O § -ro a D - 0 9 ® i a) >u : -c o re H ill! Ss <i No reproduction in any form of this manual, in whole or in part (except for brief quotation in critical articles or reviews), may be made without written authorization from NIKON CORPORATION. Nikon NIKON CORPORATION FUJI BLDG., 2-3, MARUNOUCHI 3-CHOME, CHIYODA-KU, TOKYO 100, JAPAN P H O N E : 81-3-214-5311 TELEX: J22601 (NIKON) FAX: 81-3-201-5856 Printed in Japan 8&199-O09