1
AIPTEK PENCAM VGA +
Installation Guide
FCC Statement
This equipment generates and uses radio frequency energy.
If not installed and used in accordance with the
manufacturer's instructions, it may interfere radio and
television reception. This equipment has been tested and
certified to comply with the limits of Section 15(J) of FCC
Regulations for Class B computing devices. These regulations are designed to provide
reasonable protection against interference in a residential installation. However,
interference may occur in a particular installation. If this equipment does interfere radio or
television reception , the user is encouraged to correct the interference by the following
steps:
Reorient the antenna of the radio or television
Relocate the computer to match the radio or television receiver
Plug the computer into a different power outlet
If necessary, the user should consult with the dealer or an experienced radio/television
technician for help and suggestions. The user may find the following booklet, prepared by
the FCC, helpful in solving radio/television interference problems:
"How to Identify and Resolve Radio-TV Interference Problems"
This booklet is available by sending a written request to:
U.S. Government Printing Office
Washington D.C., 20402
Request Stock Number 004-000-0345-4.
ECC Statement
This device complies with the requirements of EEC directive
89/336/EEC with regard to Electromagnetic Compatibility.
Dieses Greät entspricht den Anforderungen der EEC-Richtlinie
89/336/EEC für elektromagnetische Verträglichkeit.
Cet appareil est conforme aux exigences de la directive de la Communauté européenne
89/336/EEC sur la compatibilité électromagnétique.
Questo Apparecchio è conforme alla direttiva comunitaria 89/336/CEE relativa alla
compatibilità elettromagnetica.
Este dispositivo cumple con los requerimientos de la normativa de la CEE 89/336/EEC en
lo referente a Compatibilidad Electromagnética.
End User License Agreement
Important - Read Carefully!
The AIPTEK End-User License Agreement ("EULA"), a legal
agreement between you and AIPTEK, Inc., specifies regulations for
using the AIPTEK hardware products, which includes the computer
hardware, software, associated media, printed materials, and
"online" or electronic documentation. As you are installing,
successfully installing, copying, or otherwise using this
HARDWARE PRODUCT, you must comply with the EULA. If you
do not follow the rules of the EULA, do not install or use the
hardware products, and we recommend you return it to your dealer.
HARDWARE PRODUCT LICENSE
The HARDWARE PRODUCT is protected by copyright laws and
international copyright treaties, as well as other intellectual property
laws and treaties. The HARDWARE PRODUCT is licensed, not
sold.
1. GRANT OF LICENSE. The EULA grants you the following rights::
Hardware - You may install the HARDWARE PRODUCT on one
single computer. If you have more than one computer that you
would like to install the HARDWARE PRODUCT on, you may
install the HARDWARE PRODUCT onto that other computer,
provided that you are the only person that will use the
HARDWARE PRODUCT on each computer system.
Software - You may install the additional software included with
this HARDWARE PRODUCT on one single computer, provided
that you agree to the individual EULAs for each software
program. If you have more than one computer that you would
like to install the additional software that came with the
HARDWARE PRODUCT on, you may install the additional
software onto that other computer, provided that you are the only
person that will use the additional software on each computer
system.
Copies - You may make one copy of each disk and CD included
with the HARDWARE PRODUCT for backup purposes only,
provided that you do not lease, lend, rent, or otherwise allow
others to have possession of the copies.
2. OTHER RIGHTS AND LIMITATIONS
Single Entity User - Only the person that the HARDWARE
PRODUCT was purchased for may use the HARDWARE
PRODUCT and its accompanying software.
Individual User - Only you and those in your immediate
household may use the HARDWARE PRODUCT and its
accompanying software.
Product Transfer - You may permanently transfer all of the
HARDWARE PRODUCT under this EULA, provided you retain no
copies of any of the software included in this HARDWARE
PRODUCT. To do this, you must transfer all of the HARDWARE
PRODUCT (including all component parts, the media and printed
materials, any upgrades, this EULA, all software, and all disks),
to the recipient. The recipient must also agree to the terms of this
EULA. The Limited Warranty will also be null and void, and
AIPTEK shall then be released from honoring any and all parts of
the Limited Warranty. If the recipient does not agree to the terms
of the EULA, then the HARDWARE PRODUCT cannot be
transferred.
Gifts - If this HARDWARE PRODUCT was purchased for
someone as a gift, the person purchasing the HARDWARE
PRODUCT may give it to the intended recipient without voiding
the Warranty, provided that the person purchasing the
HARDWARE PRODUCT does not attempt to open the package,
attempt to install the HARDWARE PRODUCT, or otherwise use
the HARDWARE PRODUCT.
Decompilation, Disassembly, and Reverse Engineering - You may
not decompile, disassemble, or reverse engineer any and all
parts of the HARDWARE PRODUCT, except and only to the
extent that such activity is expressly permitted by applicable law
notwithstanding this limitation.
Separation of Components - The HARDWARE PRODUCT is
licensed as a single product. Its component parts and software
may not be separated for use on more than one computer.
Rental - You may not lease, lend, or rent any and all parts of the
HARDWARE PRODUCT, including any and all backup copies
made.
Refunds - If for any reason you wish to return the HARDWARE
PRODUCT, you can seek a refund from the place of purchase. If
you cannot get a refund from the place of purchase, you may not
seek a refund for the HARDWARE PRODUCT from AIPTEK, and
you agree to not attempt to seek a refund for the HARDWARE
PRODUCT from AIPTEK.
Technical Support - AIPTEK may provide you with Technical
Support ("Tech Support") related to the HARDWARE PRODUCT.
Use of Tech Support, which includes the Warranty Service, is
governed by the AIPTEK policies and programs described in the
user manual, in "online" documentation, and/or in other AIPTEKprovided materials, including this EULA. Any supplemental
software code or pieces of hardware provided to you as part of
Tech Support shall be considered part of the HARDWARE
PRODUCT and subject to the terms and conditions of this EULA.
With respect to information you provide to AIPTEK as part of the
Tech Support, AIPTEK may use such information for its business
purposes, including but not limited to product support and
development. AIPTEK will not utilize such information in a form
that personally identifies you.
Registration - You agree to register the HARDWARE PRODUCT
with AIPTEK within 60 days of purchase of the HARDWARE
PRODUCT. As part of this agreement, you agree to provide
AIPTEK with all requested information. All information provided
must be accurate and true.
Termination - Without prejudice to any other rights, AIPTEK may
terminate this EULA if you fail to comply with the terms and
conditions of this EULA. In such event, you must destroy all
copies of the Changes to the EULA - AIPTEK reserves the right
to amend, change, and update this EULA at any time, and
without notice. The user agrees to abide by such amendments,
changes, and updates, should any be made.
For information on the Limited Warranty, please see the
"Statement of Limited Warranty".For the most updated version of
the End-User License Agreement or list of Authorized
Resellers, please visit our webpage at http://www.aiptek.com.
3. COPYRIGHT - All title and copyrights in and to the HARDWARE
PRODUCT (including but not limited to any images, photographs,
animations, video, audio, music, text, and "Applets" incorporated
into the HARDWARE PRODUCT), the accompanying printed
materials, all "online" documentation, any copies of the software
included with the HARDWARE PRODUCT, all pieces of physical
hardware, all media, and/or other AIPTEK provided materials, are
owned by AIPTEK or its suppliers. The HARDWARE PRODUCT is
protected by copyright laws and international treaty provisions;
Therefore, you must treat the HARDWARE PRODUCT like any
other copyrighted material except that you may install the
HARDWARE PRODUCT only as described in this EULA. You may
not copy the printed materials accompanying the HARDWARE
PRODUCT.
4. Other Mediums of Acquisition - You may receive the HARDWARE
PRODUCT in more than one medium. Regardless of the type or
size of medium you receive, you may use only one medium that is
appropriate for your single computer. You may not use or install the
other medium on another computer. You may not rent, lease, loan,
or otherwise transfer the other medium to another user, except as
part of the permanent transfer (as described in Section 2 of this
EULA) of the HARDWARE PRODUCT.
5. Software Upgrades - AIPTEK may occasionally provide upgrades
to the driver program that makes the HARDWARE PRODUCT
function. You are eligible to receive these upgrades provided that
you register the HARDWARE PRODUCT with AIPTEK. Rules for
registering the HARDWARE PRODUCT with AIPTEK are governed
by the AIPTEK policies and programs described in the user manual,
in "Online" documentation, and/or in other AIPTEK-provided
materials, including this EULA (see Section 2 of this EULA for more
information).
6. U.S. GOVERNMENT RESTRICTED RIGHTS - The HARDWARE
PRODUCT and documentation are provided with RESTRICTED
RIGHTS. Use, duplication, or disclosure by the Government is
subject to restrictions as set forth in subparagraph (c)(1)(ii) of the
Rights in Technical Data and Computer Software clause at DFARS
252.227-7013 or subparagraphs (c)(1) and (2) of the Commercial
Computer Software Restricted Rights at 48 CFR 52.227-19, as
applicable. Manufacturer is AIPTEK, Inc. 51 Discovery, Suite 100
Irvine, CA 92618, USA.
7. If you acquired this product in the United States, this EULA is
governed by the laws of the State of California. 8. If this product
was acquired outside the United States or its Territories, then local
law may apply. If you live in Canada, any other nations in Central &
South America, including the Falkland Islands, or the United States,
its Territories, and its Commonwealths, and you have questions
regarding this EULA, please contact AIPTEK at this address:
AIPTEK, Inc.51 Discovery, Suite 100 Irvine, CA 92618, USA If you
live in any nation that is not located in the areas as listed above,
please contact AIPTEK Int'l. Inc. at this address: AIPTEK Int'l.
Inc./No. 5-1 Innovation Road I/Science-Based Industrial Park/HsinChu 300/Taiwan, R.O.C.
TO THE MAXIMUM EXTENT PERMITTED BY APPLICABLE LAW,
IN NO EVENT SHALL AIPTEK OR ITS SUPPLIERS BE LIABLE
FOR ANY SPECIAL, INCIDENTAL, INDIRECT, OR
CONSEQUENTIAL DAMAGES WHATSOEVER (INCLUDING,
WITHOUT LIMITATION, DAMAGES FOR LOSS OF BUSINESS
PROFITS, BUSINESS INTERRUPTION, LOSS OF BUSINESS
INFORMATION, DAMAGE TO COMPUTER SOFTWARE OR
HARDWARE, OR ANY OTHER PECUNIARY LOSS) ARISING OUT
OF THE USE OF, INABILITY TO USE THE SOFTWARE
PRODUCT OR THE PROVISION OF, FAILURE TO PROVIDE
SUPPORT SERVICES, OR INABILITY TO INSTALL THE
HARDWARE PRODUCT, EVEN IF AIPTEK HAS BEEN ADVISED
OF THE POSSIBILITY OF SUCH DAMAGES. IN ANY CASE,
AIPTEK IS RELEASED FROM ALL LIABILITY. BECAUSE SOME
STATES AND JURISDICTIONS DO NOT ALLOW THE
EXCLUSION OR LIMITATION OF LIABILITY, THE ABOVE
LIMITATION MAY NOT APPLY TO YOU.
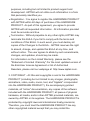
How to Use Your Camera
Introduction
The camera is capable of taking
and storing VGA (640*480
Pixels) images or QVGA
(320*240 Pixels) Images. These
images can be transfered to a
PC via the USB port.
View Finder
Lens
USB Port
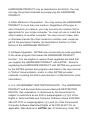
Operation Buttons
The camera has two buttons on
it. One is the shutter button and
the other is the mode button.
The LCD display is combined
with mode button to show the
setting information.
Shutter Button
Mode Button
LCD Display
Installing Batteries
The Camera is powered by 2
AAA batteries, or via the USB
cable when connected to a PC.
***Notes ***
When the battery is low,
please transfer data in the
camera to your PC
immediately to avoid data loss.
Battery Cover
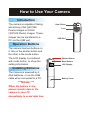
How to Use Your Camera
Switching on the
Camera
Switch on: Pressing the mode
button to turn on the camera.
And the LCD will dispalys the
number of pictures you can take.
The camera will automatically
power off after 30 seconds of
inactivity.
Taking a picture
Press the shutter button to take
a picture. **A high pitched beep
indicates that the picture was
taken successfully and the
counter will decrease accordingly. **A low beep indicates
insufficient light to take a picture.
**A series of beeps indicates
that the camera momery is full.
Press
Mode button
LCD will
be light up
Press the
sutter button
to take picture
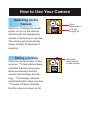
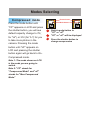
Modes Selecting
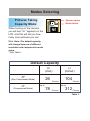
Pictures Taking
Capacity Mode:
Shutter button
Mode button
When turning on the camera,
you will see "26 " appears on the
LCD, and this will tell you how
many more pictures you can
take. Note: The default capacity
will change because of different
resolution and compression mode
setup.
**See Table 1.
Default Capacity
NP
(Non-Compressed Mode)
CP
(Compressed Mode)
Hr
(VGA)
Lr
(QVGA)
26
104 Pictures
Pictures
Up to
Up to
78
Pictures
312 Pictures
Table 1.
Modes Selecting
Switch On / Off
Shutter button
Pressing the mode button until
"OF" appears, then pressing the
shutter button will turn off the
camera. Press the mode button
to turn on the camera.
To switch of the camera,
pressing the mode button till "OF"
is shown on the LCD, then press
the shutter button.
Mode button
Switch mode button to "OF"
"OF" will be displayed
Press the shutter button to
turn off the camera.
Continuous mode
Pressing the mode button until
"Ct" appears on LCD. Then
press and hold the shutter
button, the camera will start to
take pictures continuously as
long as the shutter button is
released or until memory
capacity is full. If the shutter
button is not pressed within 5
seconds, the camera will revert
back to normal picture taking.
Shutter button
Mode button
Switch mode button to "Ct"
"Ct" will be displayed
4
Press and hold the
shutter button to start
Continuous mode
Release the shutter button
to stop taking continuos
pictures
Modes Selecting
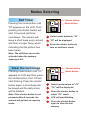
Self Timer
Pressing the mode button until
"St" appears on the LCD. Then
pressing the shutter button will
start 10-second self-timer
countdown. The camera will
issue a short beep every second
and then a longer beep, which
indicating that the picture has
been taken.
Shutter button
Mode button
Switch mode button to "St"
"St" will be displayed
Press the shutter button to
turn on self-timer mode
Note: The self-timer can not be
activated when the memory
capacity is full.
Clear the last image
Pressing mode button until "CL"
appears on LCD and then press
the shutter button, the LCD will
start blinking. Press the shutter
button again, a short beep will
be issued and the last picture
will be deleted.
Note: If the shutter button is not
pressed within 5 seconds, the
camera will go back to capacity
mode.
Shutter button
Mode button
Switch mode button to "CL"
"CL" will be displayed
Press the shutter button to
select "CL" mode
LCD will start blinking
Press the shutter button
again to clear the last
memory
Modes Selecting
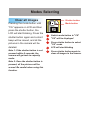
Clear all images
Pressing the mode button until
"CA" appears on LCD and then
press the shutter button, the
LCD will start blinking. Press the
shutter button again and a short
beep will be issued, and all the
pictures in the camera will be
deleted.
Note 1: If the shutter button is not
pressed within 5 seconds, the
camera will go back to capacity
mode.
Note 2: Once the shutter button is
pressed, all the pictures will be
erased. Be careful when using this
function.
Shutter button
Mode button
Switch mode button to "CA"
"CA" will be displayed
Press shutter button to select
"CA" mode
LCD will start blinking
Press shutter button again to
clear all images in the camera.
Modes Selecting
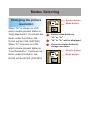
Changing the picture
resolution
When "Hr" is shown on LCD,
which means present status is
"High Resolution". If pictures are
taken under this status, the
format will be VGA (640*480).
When "Lr" is shown on LCD,
which means present status is
"Low Resolution". If pictures are
taken under this status, the
format will be QVGA (320*240).
Shutter button
Mode button
Switch mode button to
"Hr" or "Lr"
"Hr" or "Lr" will be displayed
Press the shutter button to
change resolution.
Shutter button
Mode button
Modes Selecting
Compressed mode
Press the mode button until
"CP" appears on LCD and press
the shutter button, you will see
default capacity change to 78 (
for "Hr") or 312 (for "Lr") for you
to take more photos in the
camera. Pressing the mode
button until "nP" appears on
LCD and pressing the shutter
button again will go back to OnCompressed mode.
Note 1: The mode shown on LCD
is the mode you are going to
switch.
Note 2: "CP" stands for
"Compressed Mode" and "nP"
stands for "Mon-Compressed
Mode."
Shutter button
Mode button
Switch mode button to
"CP" or "nP"
"CP" or "nP" will be displayed
Press the shutter button to
change compression
Modes Selecting
Flicker Settings
Your camera has default flicker
settings. If pictures in DV Disk
mode appear unnatural
flickering noise, please select
"Cancel Flicker" in the setting
dialog.
** See Table 2.
Shutter button
Mode button
Switch mode to "F5" or "F6"
"F5" or "F6" will be displayed
Press the shutter button to
change light frequence
Country
England
Germany
France
Italy
Spain
Netherlands
Setting
50Hz
50Hz
60Hz
50Hz
50Hz
50Hz
Country
Portugal
America
Taiwan
China
Japan
Setting
50Hz
60Hz
60Hz
50Hz
50/
60Hz
Korea
60Hz
Table 2.
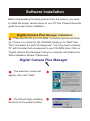
Software Installation
Before downloading the taken pictures from the camera, you need
to install the proper camera driver to your PC first. Please follow this
guide for proper driver installation.
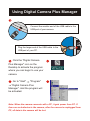
Digital Camera Plus Manager Installation
Place the CD into your CD-ROM. An autorun picture will show
up. If there is no action for the CD-ROM, simply go to "Start" then
"Run" and select the path "D:\Setup.exe". You may need to replace
"D" with the letter that corresponds to your CD-ROM drive. Click on
"Digital Camera Plus Manager" and your computer will initialize the
Wise Installation Wizard. Please wait.
Digital Camera Plus Manager
The welcome screen will
appear, then click "Next".
The CD will begin installing
the driver to the proper location.
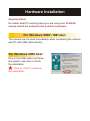
Hardware Installation
Important Note:
No matter what PC working panel you are using now, PLEASE
always install the software first and then hardware.
For Windows 98SE / ME User:
The camera can be used immediately when connecting the camera
and PC with USB cable directly.
For Windows 2000 User:
Plug in the USB cable and follow
the system instruction to finish
the installation.
Click on "Yes" to continue
the installation.
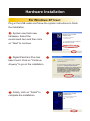
Hardware Installation
For Windows XP User:
Plug in the USB cable and follow the system instructions to finish
the installation.
System now finds new
hardware. Select the
recommend item and then click
on "Next" to continue.
Digital PemCam Plus has
been found. Click on "Continue
Anyway" to go on the installation.
Finally, click on "Finish" to
complete the installation.
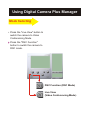
Using Digital Camera Plus Manager
Connect the smaller end of the USB cable to the
USB port of your camera.
USB
Plug the larger end of the USB cable to the
USB port of your PC.
Click the "Digital Camera
Plus Manager" icon on the
Desktop to activate the program
where you can begin to use your
camera.
Go to "Start"
"Program"
"Digital Camera Plus
Manager". And the program will
be activated.
Note: When the camera connects with a PC, it gets power from PC. If
there are no batteries in the camera, after the camera is unplugged from
PC, all data in the camera will be lost.
Using Digital Camera Plus Manager
Mode Selecting
= Press the "Live View" button to
switch the camera to Video
Conferencing Mode.
Press the "DSC Function"
button to switch the camera to
DSC mode.
DSC Function (DSC Mode)
Live View
(Video Conferencing Mode)
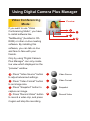
Using Digital Camera Plus Manager
Video Conferencing
Mode:
Preview
If you want to use "Video
Conferencing Mode", you have
to install software like
"NetMeeting" (bundled in CDROM) or other on-line meeting
software. By installing this
software, you can talk on-line
and face to face with your
friends.
Only by using "Digital Camera
Plus Manager" can only create
live view which displayed on the
"preview" window.
Press "Video Source" button
to adjust advanced settings.
Press "Video Format" button
to set image size.
Press "Snapshot" button to
capture an image.
4 Press "Record Video" button
to record a video clip, and press
it again will stop the recording.
4
Video Source
Video Format
Snapshot
4
Record Video
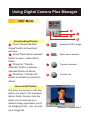
Using Digital Camera Plus Manager
DSC Mode
Downloading Photos:
Press "Download DSC
image" button to download
pictures.
Press "Eject album window"
button to open / close album
folder.
Press the "Transfer
selected" button to transfer
selected photos to album.
4 Press the "Transfer all"
button to transfer all photos to
album.
How to Edit Photos:
It is easy to preview or edit any
photo you want in the manager
album folder. Double click the
photo icon to execute your
default image application (such
as Imaging, Paint... etc.) to edit
your image file.
4
Download DSC image
Eject album window
Transfer selected
4
Transfer all
Example in "Imaging Paint"
Using Digital Camera Plus Manager
How to create Video from still image:
This takes advantage of the continuous mode. This included AVI
Creator can turn your taken pictures with "Ct" mode to AVI movie.
Downloading your "Ct" mode pictures, select the section you want
and then run the AVI creator, your personal short movie will be
made.
If the selected photos were not taken under "Ct" mode, the AVI
creator will only make the photo into slide pictures.
5
4
Step by Step:
Press "Download DSC
Image" button to download the
pictures.
Select photos.
Press "Settings" to adjust
play speed.
4 Press "Video Record
(Forward)" or "Video Record
(Reverse)".
5 Your image will be
processed into a video clip (AVI
file) and stored in the album
folder.
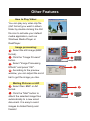
Other Features
How to Play Video:
You can play any video clip file
(AVI format) you want in album
folder by double clicking the AVI
file icon to activate your default
media application, such as
Windows Media Player or
RealPlayer.
Image processing:
Select the still image (BMP
format).
Click the "Image Process"
button.
Select "Image Processing
Effects" and press "OK".
4 According to the preview
window, you can adjust the scroll
bar to get the image you like.
Mailing Pictures or AVI
Select files: BMP or AVI
format.
Click the "Mail" button to
attach the selected image files
automatically to a new email
document. It is easy to send
images to distant family and
friends!
Image Process
Mail
Statement of Limited Warranty
AIPTEK, Inc. "AIPTEK" warranties the enclosed device
"HARDWARE PRODUCT" for a period of one year from the date
of purchase to be free from physical, operational, and
workmanship defects. AIPTEK also warrants that the HARDWARE
PRODUCT will perform in accordance with the accompanying
written materials during the period that the Limited Warranty is
active. Technical Support provided by AIPTEK shall be available as
described in applicable written materials provided to you by AIPTEK
during the period that the Limited Warranty is active. AIPTEK
Technical Support Representatives will make commercially
reasonable efforts to solve any problems that may arise from the
installation and/or use of the HARDWARE PRODUCT. Some states
and jurisdictions do not allow limitations on duration of an implied
warranty, so the above limitation may not apply to you. To the extent
allowed by applicable law, implied warranties on the HARDWARE
PRODUCT, if any, are limited to thirty (30) days.
AIPTEK reserves the right to repair and/or replace defective
HARDWARE PRODUCTS, including the repair and/or replacement
of individual defective components of the HARDWARE PRODUCT,
and the repair and/or replacement of defective disks that contain
software from AIPTEK's suppliers, at its discretion. AIPTEK is the
sole entity that will determine whether or not the HARDWARE
PRODUCT, or an individual piece or components of the
HARDWARE PRODUCT, is/are defective. AIPTEK also reserves
the sole right to decide whether or not the HARDWARE PRODUCT,
or piece(s) of the HARDWARE PRODUCT will be repaired or
replaced. This Limited Warranty only covers all components of the
HARDWARE PRODUCT enclosed herein that have been designed
and/or built by AIPTEK, Inc., or AIPTEK Int'l., Inc. AIPTEK does not
guarantee any and all components of this HARDWARE PRODUCT
that were not designed, programmed, and/or built by AIPTEK, Inc.
itself, or by AIPTEK Int'l., Inc. AIPTEK Technical Support is limited
to helping the End-User with installation of the HARDWARE
PRODUCT only. AIPTEK Technical Support will not provide support
for software provided by AIPTEK's suppliers that was included with
the HARDWARE PRODUCT, nor will AIPTEK Technical Support
provide assistance and/or training in use of the software provided
by AIPTEK's suppliers.
Any attempt by the end user to disassemble any part of the
HARDWARE PRODUCT, decompile any part of the software
included with the HARDWARE PRODUCT, or damage any piece of
the HARDWARE PRODUCT (including but not limited to accidental
damage, incidental damage, purposeful damage, or damage
caused by a person other than the End-User), shall immediately
and irrevocably void the Limited Warranty. AIPTEK shall then be
released from honoring any and all parts of this Limited Warranty,
and the End-User will be ineligible for both the Warranty Service,
and will also be ineligible for receiving Technical Support.
The Limited Warranty cannot be transferred to another individual
from the original purchaser, except as provided in the END-USER
LICENSE AGREEMENT. If the HARDWARE PRODUCT is sold to
another user by the original End-User, the Limited Warranty will be
null and void, and AIPTEK will have no obligation to provide the
Warranty Service.
If the HARDWARE PRODUCT is a gift from the original purchaser
to another person, then the Limited Warranty can be transferred to
the recipient of the HARDWARE PRODUCT, provided the original
purchaser does not attempt to open the box which the HARDWARE
PRODUCT was packaged in.
If this HARDWARE PRODUCT is purchased from an unauthorized
reseller, the Limited Warranty will be null and void, and AIPTEK will
have no obligation to provide the Warranty Service. See the "List of
Authorized Resellers" in the manual to determine whether or not
you purchased the HARDWARE PRODUCT from an Authorized
Reseller.
Only the End-User who has registered the product and who has
kept a copy of the original receipt may receive the Warranty
Service. No other representatives of the End-User's household,
and no other representatives of the single entity that purchased the
HARDWARE PRODUCT (other than the End-User in whose name it
is registered) can receive or ask for the Warranty Service.
If the Warranty Service is activated, and AIPTEK has decided to
send out replacement parts for the HARDWARE PRODUCT before
receiving the defective pieces from the End-User, the End-User
must send the defective hardware to AIPTEK within 10 days of
receiving the authorization to return the defective part(s) of the
HARDWARE PRODUCT. If the defective parts are not received
within 10 days of the End-User being given authorization to return
the defective part(s) of the HARDWARE PRODUCT, then the
Limited Warranty for the End-User's HARDWARE
PRODUCT shall immediately and irrevocably be voided. AIPTEK
shall then be released from honoring any and all parts of this
Limited Warranty, and the End-User will be ineligible for both the
Warranty Service, and will also be ineligible for receiving Technical
Support.
AIPTEK reserves the right to amend, change, and update this
Statement of Limited Warranty at any time without notice. The EndUser agrees to abide by all amendments, changes, and updates
made to this Statement of Limited Warranty.
TO THE MAXIMUM EXTENT PERMITTED BY APPLICABLE LAW,
AIPTEK AND ITS SUPPLIERS DISCLAIM ALL OTHER
WARRANTIES AND CONDITIONS, INCLUDING, BUT NOT
LIMITED TO, EXPRESSED OR IMPLIED WARRANTIES,
WARRANTIES OF MERCHANTABILITY, FITNESS FOR A
PARTICULAR PURPOSE, TITLE, AND NON-INFRINGEMENT,
WITH REGARD TO THE HARDWARE PRODUCT, AND THE
PROVISION OF OR FAILURE TO PROVIDE TECHNICAL
SUPPORT. THIS LIMITED WARRANTY GIVES YOU SPECIFIC
LEGAL RIGHTS. YOU MAY HAVE OTHERS, WHICH VARY FROM
STATE/JURISDICTION TO STATE/JURISDICTION.
How To Obtain A Warranty Service
If you believe that you have a defective HARDWARE PRODUCT, call AIPTEK Tech
Support. They will troubleshoot your HARDWARE PRODUCT to find out if it or any piece
of the hardware is defective. If it is, and your HARDWARE PRODUCT is still covered
under the Limited Warranty, it will be repaired or replaced free of charge. You must be
registered with AIPTEK in order to obtain the Warranty Service. If you have not registered,
you will be required to register the HARDWARE PRODUCT with AIPTEK and provide
proof of purchase. If you need to contact AIPTEK because you believe your HARDWARE
PRODUCT is defective, you can contact the appropriate office which your country is
assigned to below:
For those who live in the United States, its territories, & its Commonwealths, Canada, & all
countries located in Central & South America, including the Falkland Islands, and all
United States citizens living overseas (including U.S. Government & U.S. Military
employees), please contact the office below:
AIPTEK, Inc.
51 Discovery, Suite 100
Irvine, CA 92618, USA
TEL: 949-585-9600
FAX: 949-585-9345
http://www.aiptek.com Hours: 8 a.m. to 5 p.m. Pacific Time
Open Monday through Friday
http://www.aiptek.com
AIPTEK International GmbH
HalskestraBe 6
47877 Willich, Germany
TEL +49 21 54 - 92 35 50
Fax +49 21 54 - 92 35 68
http://www.aiptek.de
If you live in any country outside of the regions listed above,
please contact the office below:
AIPTEK Int'l., Inc.
No. 5-1 Innovation Road I
Science-Based Industrial Park
Hsin-Chu 300
Taiwan, R.O.C.
Tel: 886-3-5678138
Fax: 886-3-5678569
http://www.aiptek.com.tw
Hours: 8 a.m. to 5 p.m. (GMT plus 8 hours)
Open Monday through Friday
For the most updated version of the Limited Warranty, or a list of Authorized Resellers,
please visit our web page at http://www.aiptek.com.tw
82-180-90020v1.0