1
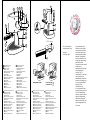
ESPRESSO MAKER WITH PUMP
DESIGN BY LUCA TRAZZI
Instruction manual
Manuale di istruzioni
Bedienungsanleitung
Manual de instrucciones
Manuel d’instructions
Manual de instruções
4
12
6
15
1
2
3
10
8
5
16
14
10
9
E.S.E. Serving
7
13
X3 is a FrancisFrancis!
production made in Italy
11
Design by
Luca Trazzi - Milan
7
USA
GB
I
1 On/Off switch (I/O)
2 Coffee switch
3 Steam switch
4 Steam valve
5 Right temperature pilot light
6 On/Off pilot light
7 Filter-holder
8 Filter- holder housing
9 Steam outlet (Cappuccino)
10 Cold water tank
11 Drip plate
12 Steel cup warmer
13 Drip grill
14 Intake pipe
15 Plate
16 Air absorption hole
1 Interrutore avviamento (I/O)
2 Interrutore caffè
3 Interrutore vapore
4 Valvola vapore
5 Spia luminosa temperatura
6 Spia luminosa avviamento
7 Portafiltro
8 Alloggio porta-filtro
9 Tubo uscita vapore (cappuccino)
10 Deposito acqua fredda
11 Vassoio sgocciolio
12 Scaldatazze in acciaio
13 Reticella sgocciolio
14 Tubo di aspirazione acqua
15 Placca
16 Foro di aspirazione aria
D
E
1 Ein/Aus Schalter I/O
2 Kaffeeschalter
3 Wasserdampfschalter
4 Dampfventil
5 Temperaturkontrollampe
6 Betriebslampe
7 Filterträger
8 Brühkopf
9 Dampfaustrittsrohr (Cappuccino)
10 Kaltwasserbehälter
11 Abtropfschale
12 Tassenwärmer aus Stahl
13 Abtropfgitter
14 Saugschlauch
15 Typenschild
16 Lufteinlass beim Dampfrohr
1 Interruptor puesta en marcha I/O
2 Interruptor café
3 Interruptor vapor
4 Válvula vapor
5 Piloto temperatura ideal
6 Piloto indicador puesta en marcha
7 Porta-filtro
8 Alojamiento porta-filtro
9 Tubo salida vapor (cappuccino)
10 Depósito de agua fría
11 Bandeja de goteo
12 Calienta tazas de acero
13 Rejilla de goteo
14 Tubo de aspiración
15 Placa
16 Orificio de absorción de aire
To close: turn right
To open: turn left
Placing the filter holder
F
1 Interrupteur mise en marche I/O
2 Interrupteur café
3 Interrupteur vapeur
4 Soupape vapeur
5 Voyant température idéale
6 Voyant indicateur mise en marche
7 Porte-filtre
8 Logement porte-filtre
9 Tuyau sortie vapeur (Cappuccino)
10 Réservoir d’eau froide
11 Plateau d’égouttement
12 Chauffe-tasses en acier
13 Grille d’égouttement
14 Conduit d’aspiration
15 Plaque
16 Trou d’absorption d’air
P
1 Interruptor funcionamento I/O
2 Interruptor café
3 Botão vapor
4 Válvula vapor
5 Piloto temperatura ideal
6 Piloto indicador funcionamento
7 Filtro
8 Alojamento porta-filtro
9 Tubo saída vapor (cappuccino)
10 Depósito de agua fría
11 Bandeja de gotejamento
12 Acquecedor de aço para chávenas
13 Grelha de gotejamento
14 Tubo de aspiração
15 Placa
16 Furo de absorção do ar
It should be spoken with
affection, the way a mother
would scold her small child,
whose hands and face she
found stained with forbidden
chocolate. 'FrancisFrancis!'
She tries to be serious, with
her right index finger moving
back and forth like a
metronome, but she is unable
to hold back the
insuppressible smile that will
turn this little tragedy
into a kiss. This, is
FrancisFrancis!. It is the child
in all of us that we love
unconditionally, the child that
makes us smile, laugh, enjoy.
So, if you ask yourself why a
child is part of the
FrancisFrancis! logo.
It is simply because a child
represents the best part of all
of us. And FrancisFrancis! with all its products - wants to
share this affinity with the
child that has the genuine
ability to make us smile, even
when we thought we weren't
in the mood.
USA
IMPORTANT
SAFEGUARDS
When using electrical
appliances, basic safety
precautions should always be
followed, including the
following:
IMPORTANTI MISURE
DI SICUREZZA
Nell'utilizzo di
apparecchiature elettriche
devono essere sempre
osservate le seguenti misure
di sicurezza:
1. Read all instructions.
2. Do not touch hot surfaces.
Use handles or knobs.
3. To protect against fire,
electric shock and injury to
persons do not immerse
cord, plugs or machine in
water or other liquid.
4. Close supervision is
necessary when any
appliance is used by or near
children.
5. Unplug from power socket
when not in use and before
cleaning. Allow to cool before
putting on or taking off parts
and before cleaning the
appliance.
6. Do not operate any
appliance with a damaged
cord or plug or after the
appliance malfunctions, or
has been damaged in any
manner. Return appliance to
the nearest authorised
service facility for
examination, repair, or
adjustment.
7. The use of accessory
attachments not
recommended by the
appliance manufacturer may
result in fire, electric shock,
or injury to persons.
8. Do not use outdoors.
9. Do not let cord hang over
edge of table or counter, or
touch hot surfaces.
10. Do not place on or near a
hot gas or electric burner, or
in a heated oven.
11. Do not use appliance for
anything other than its
intended use.
12. SAVE THESE
INSTRUCTIONS.
1. Leggere attentamente le
istruzioni
2. Non toccare mai una
superficie calda. Usare
manici o pulsanti.
3. Per proteggersi dal fuoco,
scosse elettriche o lesioni
non immergere il cavo, la
spina o in acqua o altro
liquido.
4. Se l'apparecchio viene
utilizzato da bambini o vicino
a bambini, sorvegliare
attentamente.
5. Disinserire la spina
quando l'apparecchio non
viene utilizzato o quando se
ne esegue la pulizia. Lasciar
raffreddare prima di
aggiungere o levare parti
accessorie e prima della
pulizia.
6. Non utilizzare un
apparecchio se il cavo o la
spina sono danneggiati, o se
l'apparecchio mostra segni di
cattivo funzionamento oppure
se ha subìto qualche danno.
Riportare l'apparecchio al
concessionario autorizzato
più vicino per controlli o
riparazioni.
7. L'utilizzo di accessori non
raccomandati dal produttore
può provocare incendi,
scosse elettriche o lesioni
alle persone.
8. Non utilizzare all'esterno.
9. Non lasciare penzolare il
cavo da tavoli o banconi,
impedite che esso venga a
contatto con superfici calde.
10. Non appoggiate
l'apparecchio su fornelli
elettrici o a gas, o dentro un
forno caldo.
GB
I
11. Non utilizzate
l'apparecchio per scopi
diversi da quello previsto.
12. CONSERVATE QUESTE
ISTRUZIONI.
D WICHTIGE
SICHERHEITSHINWEISE
1. Lesen Sie alle
Bedienungshinweise.
2. Berühren Sie keine
heissen Flächen. Griffe und
Knöpfe benützen.
3. Um Feuer, elektrischen
Schlag und Verletzungen zu
vermeiden, nie das Kabel, die
Maschine oder den Stecker in
Wasser oder andere
Flüssigkeiten eintauchen.
4. Wenn die Maschine in der
Nähe von Kindern in
Gebrauch ist, muss die
Maschine überwacht werden.
5. Stecker aus der Steckdose
ausziehen, wenn die
Maschine länger nicht
benutzt wird oder bei
Reinigung.
6. Die Maschine nie mit
einem beschädigten Kabel,
oder Stecker benutzen, wenn
die Funktionsweise Fehler
aufweist, oder wenn die
Maschine beschädigt wurde.
Senden Sie die Maschine an
die nächste Service-Stelle zur
Überprüfung, Reparatur oder
Anpassung ein.
7. Der Gebrauch von
Zusatzgeräten, die nicht vom
Hersteller empfohlen sind,
können zu Feuer,
elektrischem Schlag oder
Verletzung von Personen
führen.
8. Nicht im Freien
verwenden.
9. Vergewissern Sie sich,
dass das Kabel nicht über die
Kante (von Küchenabdeckung
oder Tisch) hängt und lassen
Sie das Kabel keine heissen
Oberflächen berühren.
10. Maschine nicht auf oder
nahe an Gas- oder
Elektrobrenner stellen; nicht
in den heissen Ofen stellen.
11. Maschine nur für den in
der Bedienungsanleitung
beschriebenen Zweck
benutzen.
12. BEWAHREN SIE DIESE
BEDIENUNGSANLEITUNG
AUF.
IMPORTANTES
MEDIDAS DE
SEGURIDAD
Al usar todo aparato
eléctrico, hay que respetar
las siguientes medidas de
seguridad:
E
1. Lea atentamente las
instrucciones.
2. Nunca toque una
superficie caliente. Utilice las
empuñaduras o los botones.
3. Para protegerse contra el
fuego, contra las descargas
eléctricas y las lesiones, en
general, no sumerja el cable,
el enchufe, ni en el agua, ni
en ningún otro líquido.
4. Si los niños utilizan el
artefacto, o bien, si se usa
cerca de los mismos, vigile
con suma atención.
5. Desenchufe el aparato,
cuando deja de usarlo y
antes de proceder a limpiarlo.
Deje que se enfríe antes de
añadirle o quitarle los
accesorios y antes de
limpiarlo.
6. Nunca utilice un aparato,
cuyo cable o enchufe están
estropeados; si el mismo
funciona mal o si se ha
producido algún desperfecto.
Lleve el aparato al
concesionario autorizado de
su zona para que lo controle
o lo arregle.
7. El empleo de accesorios
USA
E.S.E.
(Easy Serving Espresso)
The X3 espresso
machine uses the EASY
SERVING ESPRESSO (E.S.E)
system: for best results, we
recommend using the E.S.E.
servings, which are easily
recognisable by the E.S.E.
logo on the package.
The E.S.E. system
guarantees several benefits:
the quality of the espresso
coffee remains constant
regardless of the user's
experience.
The system is very easy to
use, quick, and extremely
easy to clean.
It is very important, however,
that you store E.S.E. servings
in a closed, airtight container
so that they remain fresh.
GB
La macchina per
espresso X3 impiega il
sistema EASY SERVING
ESPRESSO (E.S.E.): per un
corretto funzionamento è
necessario utilizzare i serving
E.S.E., facilmente
riconoscibili dal marchio
impresso sulle confezioni, lo
stesso che si ritrova anche
sulle macchine per espresso.
Il sistema E.S.E. garantisce
una serie di vantaggi: la
qualità del caffè espresso
rimane sempre costante
indipendentemente
dall’esperienza del
consumatore nel prepararlo,
l’impiego è facile e molto
veloce, la pulizia del sistema
è estremamente semplice.
E’ fondamentale conservare i
serving E.S.E. in un
recipiente chiuso in ambiente
secco e ventilato.
I
Die Espressomaschine
X3 arbeitet mit dem
System EASY SERVING
ESPRESSO (E.S.E.): Für ein
einwandfreies Funktionieren
ist es notwendig, die Portionen
E.S.E. zu verwenden. Die
Portionen erkennen Sie am
E.S.E. Markenzeichen auf der
Kaffeeverpackung. Dieses
Markenzeichen finden Sie
ebenfalls auf der Verpackung
der Espresso-Maschinen.
Das System E.S.E. garantiert
eine Reihe von Vorteilen: Die
Qualität des Espresso bleibt
immer konstant, unabhängig
von der Erfahrung der
zubereitenden Person. Die
Verwendung von Portionen ist
einfach und sehr schnell, die
Reinigung der Maschine
äusserst einfach.
Es ist sehr wichtig, dass die
E.S.E. Portionen in einem
geschlossenen Behälter
trocken und ohne
Fremdgerüche aufbewahrt
werden.
D
La máquina de café
E
exprés X3 se utiliza con
el sistema EASY SERVING
ESPRESSO (E.S.E.). Para que
la misma funcione
correctamente, es preciso
utilizar los servings E.S.E.
Los reconocerá fácilmente
mediante la marca impresa
en los envases, que es la
misma que se aprecia en las
máquinas de café exprés.
El sistema E.S.E. garantiza
una serie de ventajas: la
calidad del café exprés
permanece siempre constante,
independientemente de la
pericia del consumidor, a la
hora de prepararlo; es fácil
de usar y muy rápido; el
sistema es muy sencillo de
limpiar.
Es fundamental que
conserve los serving E.S.E.
en un recipiente cerrado, en
un ambiente seco y ventilado.
La cafetière pour
expresso X3 utilise le
système EASY SERVING
ESPRESSO (E.S.E.): pour
qu'elle fonctionne
correctement, il faut donc
employer les serving E.S.E.
que l'on reconnaîtra
aisément à la marque
imprimée sur les emballage
et qui figure sur la cafetière
elle-même.
Le système E.S.E. présente
toute une série d'avantages:
il garantit une qualité de café
expresso constante,
indépendamment de
l'habileté du consommateur à
le préparer, il est d'utilisation
rapide et facilite le nettoyage
de la machine.
IMPORTANT: les serving
E.S.E. doivent être conservés
dans un récipient fermé et
dans un lieu sec et bien aéré.
F
A máquina para café
expresso X3 utiliza o
sistema EASY SERVING
EXPRESSO (E.S.E.): para o
correcto funcionamento é
necessário utilizar o serving
E.S.E. que se reconhece
facilmente pela marca
gravada nas confecçes, o
mesmo que se encontra nas
máquinas para café expresso.
O sistema E.S.E. garante
uma série de vantagens: a
qualidade do café expresso
permanece sempre constante
independentemente da
prática do consumidor em
prepara-lo, o uso é fácil e
muito rápido, a limpeza do
sistema é extremamente
simples.
É fundamental conservar o
serving E.S.E. fechado num
recipiente num ambiente
seco e ventilado.
P
USA
GB
INSTRUCTION MANUAL
General Rules for Using the
Machine
It is important to keep the machine
clean by frequently washing the drip
plate (11), the filter holder (7), and
the water tank (10). The steam
outlet pipe (9) and the air absorption
hole (16) should also be kept clean.
VERY IMPORTANT: never immerse
the machine in water or put it in a
dishwasher.
The water contained in the tank (10)
must be changed regularly. After
changing the water, check that the
intake pipe (14) is positioned inside
the tank (10).
Depending on the hardness of the
water in your area, it is
recommended that you occasionally
use a special de-scaling product for
coffee machines (do not use vinegar)
to remove scaling inside the
machine.
De-scaling: Follow the directions on
the package for recommended
strength. Mix, as per package
instructions, enough de-scaling
solution to fill the water tank (10)
two-thirds full, and put tank in
machine.
Turn on the machine, but do not wait
for it to heat. Immediately, open the
steam valve (4) and let all but one
third of the solution run through the
steam outlet (9) into a container.
Close the steam valve (4). Then turn
on the coffee switch (2) and let the
remainder of the solution run
through the filter holder (7) into a
container. When the water tank is
empty, turn off the coffee on/off
switch immediately (1).
Rinsing: Wash the water tank (10)
with soap and rinse thoroughly. Refill
the water tank with fresh cold water
and replace in the machine. Open
the steam valve (4) and let the full
tank of water run through the steam
outlet (9) into a container. Close the
steam valve (4). Refill the water tank
with fresh cold water and replace it
in the machine. Turn on the coffee
switch (2) and let all of the water run
through the filter-holder (7) into a
container. When the water tank is
empty, the cleaning process is
complete. After refilling the tank, you
can begin to make coffee again. If
you use your machine frequently, and
live in a area with hard water, you
may want to repeat this process
once every two months. If your water
is not hard, or if you use the
machine less frequently, you can descale every six months to one year.
(If you want proof that all of the
cleaning solution is out of the
machine, steam some milk as
explained in the section on making
cappuccino. The milk will curdle if
any solution is left in the machine.)
In order to enjoy a perfect piping hot
espresso, keep the cups warm by
storing them on the cup warmer
(12) on top of the machine.
Operating the Machine
Installation
It is only necessary to do the
following before using the
machine for the first time.
A) Check that the voltage plate of
the supply current of your machine is
correct by looking on the plate (15)
before plugging it into the electrical
socket.
B) Fill the tank half-full of cold water
(10), ensuring that the intake pipe
(14) is immersed in the water. Place
a container under the filter-holder (7).
Turn on the main on/off switch (1)
and activate the water flow through
the internal system by turning on
the coffee switch (2).
C) Fill the tank again (10), checking
that the intake pipe (14) is
immersed in the water.
How to make the first espresso
after installation (or after the
machine has been turned off).
To make sure the machine is in the
ideal condition to make a perfect
espresso, follow the instructions
below:
D) Turn on the main switch (1) and
make sure that the on/off pilot light
(6) will come on automatically,
indicating that the machine is
heating.
E) Take out an E.S.E. serving and
place it in the filter-holder (7) with the
printed side facing down.
F) Place the filter-holder (7) in its
housing (8), and rotate until it fits
firmly, making a good seal.
G) Make the coffee by turning on the
switch (2): once you have the
desired quantity of coffee (extra
strong-one ounce, or mild-two
ounces) turn off the switch (2).
H) Remove the filter-holder (7) from
its housing (8) by repeating the
operation described in point F in
reverse. Dispose of the used E.S.E.
serving.
Preparation of additional cups of
espresso:
I) To make more cups of espresso,
repeat operations E through H.
Ground Coffee Kit (Using preground coffee to prepare
espresso)
A Ground Coffee Kit is available as
an option with your X3. You will need
this kit if you want to use pre-ground
coffee (not E.S.E. Servings) to make
espresso. The Ground Coffee Kit
contains a filter-holder, which
must be fitted with one of two filters
provided with the kit. The smaller
filter should be used to prepare one
cup of espresso, and the larger filter
for two cups of espresso. The kit
also includes a measuring spoon,
which will also be used to measure
the correct amount of coffee per
serving, and also to tamp or press
the coffee firmly into the filter-holder.
The Ground Coffee Kit is used as
followed:
J) Select the one or two cup filter,
depending on the number of
espressos that you would like to
prepare, and press it firmly into the
filter-holder.
K) Take the measuring spoon and
measure one spoonful (7 grams) of
coffee for the one cup filter and two
spoonfuls (14 grams) for the two cup
filter. For each cup that you want to
you will need to grind coffee or have
pre-ground coffee.
How to produce steam (making a
cappuccino)
In order to make steam for a
cappuccino, it is necessary to
increase the temperature of the
machine, as follows:
L) Make sure that there is no serving
in the filter-holder. With the steam
valve (4) in the closed position, turn
on the steam switch (3). If the
temperature pilot light (5) is not
already lit, this operation will
make it come on.
M) The pilot light (5) will go off when
the correct temperature has been
obtained. When the light goes off,
open the steam valve (4) slightly, by
turning it counter-clockwise, and
allow the residual water to flow from
the pipe (9) until the steam comes
out of the steam outlet. When
steam starts to come out, close the
valve (4).
N) Place a container of milk under
the steam outlet pipe (9) so that a
small part of the pipe is immersed.
Then open the steam valve (4) to
obtain steam. A special hole at the
side of the nozzle brings in air, which
mixes with the milk to make the
foam for cappuccino. If this does
not occur, change the position of the
container so that the air hole (16) is
not covered by the milk. It is
preferable to use very cold milk.
After you have steamed the milk,
turn off the steam switch (3).
After a few minutes, the machine will
return to the correct temperature for
making espresso.
Troubleshooting for cappuccino:
If you notice a reduction in the
supply of steam, close the steam
valve (4) and turn on the coffee
switch (2) until water comes out of
the filter-holder (7). Then repeat
steps K and L.
O) It is very important to avoid
making an espresso immediately
after using the steam function,
as the machine will be too hot.
To reduce the temperature of the
machine quickly in order to make a
perfect espresso, follow the
instruction below:
- Make sure that there is no coffee
serving in the filter-holder.
- Turn on the coffee switch (2) and
put a container under the
filter-holder (7). This will remove
some hot water from the boiler. Do
this until the temperature pilot light
(5) comes on.
- Turn off the coffee switch (2) to
stop the water flow and then wait
again for the temperature pilot light
(5) to go off: the machine is now
ready to make another espresso.
THE MANUFACTURER RESERVES
THE RIGHT TO MAKE
MODIFICATIONS OR IMPROVEMENTS
WITHOUT PRIOR NOTICE.
TECHNICAL CHARACTERISTICS:
VOLTAGE: 220/230 V
(110/120 V US - 110 V J)
POWER: 1.050 W