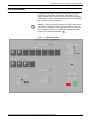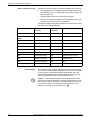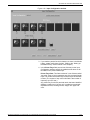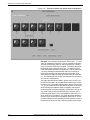
1
Xerox DocuPrint 92C IPS
Guide to Configuring and Managing
the System
Version 7.1
August 2000
721P89180
Xerox Corporation
Printing Systems Documentation and Education
701 South Aviation Boulevard, ESM1-058
El Segundo, CA 90245
©1997, 1998, 1999, 2000 by Xerox Corporation. All rights reserved.
Copyright protection claimed includes all forms and matters of
copyrightable material and information now allowed by statutory or
judicial law or hereinafter granted, including without limitation,
material generated from the software programs which are displayed
on the screen, such as icons, screen displays, looks, etc.
Printed in the United States of America.
Publication number: 721P89180
Xerox® and all Xerox products mentioned in this publication are
trademarks of Xerox Corporation. Products and trademarks of other
companies are also acknowledged.
Changes are periodically made to this document. Changes, technical
inaccuracies, and typographic errors will be corrected in subsequent
editions.
Laser safety
!
Warning: Adjustments, use of controls, or performance of
procedures other than those specified herein may result in
hazardous light exposure. !
The Xerox DocuPrint printers are certified to comply with the
performance standards of the U.S. Department of Health, Education,
and Welfare for Class 1 laser products. Class 1 laser products do not
emit hazardous radiation. The DocuPrint printers do not emit
hazardous radiation because the laser beam is completely enclosed
during all modes of customer operation.
The laser danger labels on the system are for Xerox service
representatives and are on or near panels or shields that must be
removed with a tool. DO NOT REMOVE LABELED PANELS OR
PANELS NEAR LABELS. ONLY XEROX SERVICE
REPRESENTATIVES HAVE ACCESS TO THESE PANELS.
Ozone information
This product produces ozone during normal operation. The amount
of ozone produced depends on copy volume. Ozone is heavier than
air. The environmental parameters specified in the Xerox installation
instructions ensure that concentration levels are within safe limits. If
you need additional information concerning ozone, call 1-800-8286571 to request the Xerox publication 600P83222, OZONE.
XEROX DOCUPRINT 92C IPS GUIDE TO CONFIGURING AND MANAGING THE SYSTEM
iii
Operation safety
Your Xerox equipment and supplies have been designed and tested
to meet strict safety requirements. They have been approved by
safety agencies, and they comply with environmental standards.
Please observe the following precautions to ensure your continued
safety.
•
Always connect equipment to a properly grounded electrical
outlet. If in doubt, have the outlet checked by a qualified
electrician.
Warning: Improper connection of the equipment grounding
conductor may result in risk of electrical shock. !
!
•
Never use a ground adapter plug to connect equipment to an
electrical outlet that lacks a ground connection terminal.
•
Always place equipment on a solid support surface with
adequate strength for its weight.
•
Always use materials and supplies specifically designed for
your Xerox equipment. Use of unsuitable materials may result in
poor performance and may create a hazardous situation.
•
Never move either the printer or the Printer Controller without
first contacting Xerox for approval.
•
Never attempt any maintenance that is not specifically
described in this documentation.
•
Never remove any covers or guards that are fastened with
screws. There are no operator-serviceable areas within these
covers.
•
•
Never override electrical or mechanical interlocks.
•
Never operate the equipment if you notice unusual noises or
odors. Disconnect the power cord from the electrical outlet and
call service to correct the problem.
Never use supplies or cleaning materials for other than their
intended purposes. Keep all materials out of the reach of
children.
If you need any additional safety information concerning the
equipment or materials Xerox supplies, call Xerox Product Safety at
the following toll-free number in the United States:
1-800-828-6571
For customers outside the United States contact your local Xerox
representative or operating company.
iv
XEROX DOCUPRINT 92C IPS GUIDE TO CONFIGURING AND MANAGING THE SYSTEM
Table of contents
Laser safety
iii
Ozone information
iii
Operation safety
iv
Introduction
ix
About this guide
ix
Contents
ix
Conventions
x
Related publications
1.
xi
Introduction to the graphical user interface
The graphical user interface screen
1-1
Using the user interface screens
1-3
Pull-down menus
1-3
Buttons
1-5
Moving a window or icon
1-6
Reducing a window
1-6
Entering in text
1-7
Exiting a window
1-8
IPS main window
1-9
Menus
2.
1-1
1-10
Configuration menu
1-10
Diagnostics menu
1-12
Administration menu
1-13
System Options menu
1-14
Input Configuration section
1-15
Output Configuration section
1-16
Setup and status information
1-18
Host Job Control section
1-20
Subwindow buttons
1-21
Starting and stopping the system
2-1
Powering on the IPS system
2-1
Powering off the IPS system
2-3
In routine operation
2-4
After a power outage
2-5
Communicating with the host computer
Placing the IPS online
XEROX DOCUPRINT 92C IPS GUIDE TO CONFIGURING AND MANAGING THE SYSTEM
2-5
2-5
v
TABLE OF CONTENTS
3.
4.
Taking the IPS offline
2-5
Printer status
2-6
Starting a print job
2-6
Stopping the printer
2-6
Resuming printing
2-7
Automatic print job recovery
2-7
Rebooting the Printer Controller
2-7
Exiting power saver mode
2-7
Removing media from the processor
2-8
Setting up the Printer Controller
Selecting a language
3-2
Specifying the system interface
3-3
Selecting channel interface
3-4
Selecting TCP/IP interface
3-5
Enabling or disabling the modem
3-6
Allocating memory for resources
3-7
Displaying and adding resident fonts
3-8
Displaying resident fonts
3-8
Adding resident fonts
3-9
Loading the IPS software license text string
3-11
Switching modes (Dual Mode)
3-13
Setting the system configuration
Privilege Modes
4-1
4-2
Changing the Privilege Mode
4-3
Changing the password for a Privilege Mode
4-4
Accessing configuration tasks
Configuration menu tasks
4-5
4-5
Indicating the input resolution
4-6
Specifying the maximum simplex value
4-7
Specifying the extraction color for highlight color printing
4-8
Printing the IPS color samples
4-12
Rotating the page origin
4-13
Specifying the media units
4-15
Setting optional processing parameters
4-16
Diagnostics menu tasks
4-18
Printing samples
4-18
Capturing and executing a trace
4-23
Capturing a trace
4-23
Executing a captured trace
4-25
Printing a trace file
vi
3-1
4-26
XEROX DOCUPRINT 92C IPS GUIDE TO CONFIGURING AND MANAGING THE SYSTEM
TABLE OF CONTENTS
Setting of the debug level
4-27
Updating the software using a CD or a diskette
4-28
Updating the software remotely
4-29
System Options menu tasks
4-30
Specifying the input configuration
4-31
Example of an input configuration
4-32
Selecting simplex or duplex printing
4-33
Setting up margin values
4-34
Setting up the Media Library
4-35
Creating a media icon
4-36
Changing a media icon
4-41
Deleting a media icon
4-41
Editing the media defaults
4-41
Adding a new input configuration
4-43
Changing an input configuration file
4-49
Deleting an input configuration file
4-50
Correcting a feeder tray mismatch error
4-51
Specifying the output configuration
4-52
Example of an output configuration
4-53
Creating a new output configuration
4-54
Changing an output configuration
4-61
Deleting an output configuration
4-62
Adding a DFA profile
4-62
Changing a DFA profile
4-66
Deleting a DFA profile
4-66
Backing up and restoring configuration files
4-67
Saving configuration files to diskette
4-68
Restoring configuration files from diskette
4-69
Index
XEROX DOCUPRINT 92C IPS GUIDE TO CONFIGURING AND MANAGING THE SYSTEM
INDEX-1
vii
TABLE OF CONTENTS
viii
XEROX DOCUPRINT 92C IPS GUIDE TO CONFIGURING AND MANAGING THE SYSTEM
Introduction
This Xerox DocuPrint 92C Guide to Configuring and Managing the
System provides information on how to perform DocuPrint system
administration tasks for the DocuPrint 92C IPS.
About this guide
This guide is intended for system administrators who are responsible
for setting up and maintaining DocuPrint printers.
Users should have an understanding of Printer Controller operations
and be familiar with SunOS and basic UNIX commands.
Some of the procedures described in this guide may be performed by
the printer operator. For more information on printer operator tasks,
refer to the other documents listed in the Related publications
section.
Before using this guide, become familiar with its contents and
conventions.
Contents
This section lists the contents of this guide:
•
Chapter 1, “Introduction to the graphical user interface,” gives
an overview of IPS windows and menus, and provides
instructions on interacting with the screens.
•
Chapter 2, “Starting and stopping the system,” describes how
to power on and off the system, how to start and stop job
processing, and how to stop and restart the system.
•
Chapter 3, “Setting up the Printer Controller,” provides
information on how to use the user interface to set up the
Printer Controller to print your jobs.
•
Chapter 4, “Setting the system configuration,” provides
information on how to use the user interface to configure
various features of your IPS, including input and output trays.
An index is provided at the back of the guide.
XEROX DOCUPRINT 92C IPS GUIDE TO CONFIGURING AND MANAGING THE SYSTEM
ix
INTRODUCTION
Conventions
This guide uses the following conventions:
•
All caps and angle brackets — Within procedures, the names of
keys are shown in all caps within angle brackets (for example,
press <ENTER>).
•
Bold — Within procedures, text and numbers that you enter are
shown in bold (for example, enter cmd tool).
•
“Enter” — Within procedures, the two-step process of keying in
data and pressing <RETURN> (for example, enter y).
•
Italics — Document and library names are shown in italics (for
example, the Xerox DocuPrint 92C IPS Guide to Configuring
and Managing the System).
•
Capitalization of graphical user interface (GUI) window titles
matches the titles as they appear on the screen. In cases where
a window does not have a title, it is referenced using all lower
case. For example:
—
At the graphical user interface, use the Output
Configuration window to group the trays.
—
The main window displays the current system status.
Note: Notes are hints that help you perform a task or understand
the text.
Caution: Cautions alert you to an action that could damage
hardware or software.
!
x
Warning: Warnings alert you to conditions that could affect the
safety of people. !
XEROX DOCUPRINT 92C IPS GUIDE TO CONFIGURING AND MANAGING THE SYSTEM
INTRODUCTION
Related publications
This document is part of the Xerox DocuPrint IPS publication set.
Xerox documents
Following is a list of all Xerox DocuPrint IPS documents. For a
complete list and description of available Xerox documentation, refer
to the Xerox Customer Documentation Catalog (publication number
610P17517), or call your service representative.
Application Programmer/System Administrator Quick Reference
Card
Customer Information Quick Reference Card
Generic MICR Fundamentals Guide
Glossary
Guide to Configuring and Managing the System
Guide to Performing Routine Maintenance
Helpful Facts About Paper
Installation Planning Guide
Master Index
Messages Guide
Solutions Guide
System Overview Guide
Troubleshooting Guide
Xerox Standard Font Library Font User Guide
The documentation set also includes an electronic version, the
DocuPrint IPS Interactive Customer Documentation CD.
IBM documents
Following are related IBM documents. Contact your local IBM
representative for ordering instructions for IBM AFP/PSF manuals
that might be useful for your specific installation.
IBM 3825 Page Printer Product Description
IBM Intelligent Printer Data Stream Reference
IBM Advanced Function Presentation Printer Summary
IBM ITSC Distributing AFP Printing from a Host System
IBM Advanced Function Printing Data Stream Reference
IBM Data Stream and Object Architectures: Mixed Object Document
Content Architecture Reference
Guide to Advanced Function Presentation
XEROX DOCUPRINT 92C IPS GUIDE TO CONFIGURING AND MANAGING THE SYSTEM
xi
INTRODUCTION
xii
XEROX DOCUPRINT 92C IPS GUIDE TO CONFIGURING AND MANAGING THE SYSTEM
1.
1Introduction to the graphical
user interface
This chapter gives an overview of the graphical user interface (GUI)
and provides instructions on how to use it to interact with the system.
With the user interface you perform operator and system
administration tasks through a dynamic set of windows. Either a
mouse or certain keyboard combinations are used to move between
windows and select options. You enter commands through windows
on the display screen.
The graphical user interface screen
After you power on the Host Channel Unit (HCU), if appropriate, and
the Sun workstation, the Printer Controller monitor displays three
windows:
•
•
•
IPS main window
IPS Console window
IPS Print Engine Monitor window.
The IPS main window is the largest window on the screen. The main
window displays the current system setup, the current system status,
and any jobs that are running. This window also provides access to
menus and subwindows from which you can configure and operate
your system.
The IPS Console window displays messages that warn you of
Printer Controller problems. The window also indicates the host job
name as it is started and received by the system. This window initially
displays below the IPS main window on the left, but it can be moved
where desired.
Note: High frequency service indicator (HFSI) messages may
appear occasionally in this window. These messages do not indicate
any problem, merely that you should advise your service
representative to check the indicated areas during the next service
call.
The IPS Print Engine Monitor window shows printer error
messages, indicates the printer status and displays printer and DFA
messages. (This window initially displays below the IPS main window
on the right, but it can be moved where desired.)
Figure 1-1 shows these windows on the screen of the Printer
Controller monitor.
XEROX DOCUPRINT 92C IPS GUIDE TO CONFIGURING AND MANAGING THE SYSTEM
1-1
INTRODUCTION TO THE GRAPHICAL USER INTERFACE
Figure 1-1.
1-2
Printer Controller monitor with IPS main window,
IPS Console window, and IPS Print Engine Monitor
window
XEROX DOCUPRINT 92C IPS GUIDE TO CONFIGURING AND MANAGING THE SYSTEM
INTRODUCTION TO THE GRAPHICAL USER INTERFACE
Using the user interface screens
The graphical user interface screens contain various combinations of
pull-down menus and dropdown lists, selection buttons, incremental
spin boxes, and text fields by which you can interact with the system.
The following describes how to use these screen features.
Pull-down menus
A pull-down menu or list is indicated by an inverted triangle within the
menu title box or oval, to the right of the menu name.
Figure 1-2.
Types of pull-down menus
Example of a pull-down menu title button from the
IPS main window
You will encounter two types of pull-down menus on the IPS
windows:
•
File pull-down menus. These menus contain options that are
actually files. When you select an option, the system retrieves
that file. The top line of a file pull-down menu displays the
directory path the system takes to retrieve the file you select.
Examples of this type of pull-down menu include Input and
Output Group Name menus and DFA Profile menus.
Figure 1-3.
•
Example of a file pull-down menu
Standard pull-down menus display the options to be selected.
Figure 1-4.
Example of a standard pull-down menu
XEROX DOCUPRINT 92C IPS GUIDE TO CONFIGURING AND MANAGING THE SYSTEM
1-3
INTRODUCTION TO THE GRAPHICAL USER INTERFACE
Selecting from a pull-down menu
There are two methods of accessing items from a pull-down menu:
•
Click method:
1. Position the cursor over the menu box or oval and click the
right mouse button. The menu options display.
2. With either mouse button, click the option you want. The
menu disappears and the screen for your selection is
displayed.
•
Drag method:
1. Position the cursor over the menu box or oval and hold
down the right mouse button. The menu options display.
2. Continue to hold down the right mouse button while you
drag the cursor to the option you want.
3. Release the mouse button when the cursor is on your
selection. The menu disappears and the screen for your
selection is displayed.
Notes on pull-down menus
Here are a few things to remember about pull-down menus:
•
Clicking a pull-down menu with the left mouse button selects
the first option on the menu/list. (Clicking with the right button
displays the entire menu.)
•
Only one menu item window can be displayed at a time.
Therefore, close a currently open window before opening a new
one.
•
On some of the IPS subwindows, the selection you make from a
pull-down menu is displayed in the lower-right corner of the
window. It remains until you close the window or enter a
selection/value elsewhere on that same window.
Figure 1-5.
1-4
Window displaying the selection made from a pulldown menu (lower-right corner)
XEROX DOCUPRINT 92C IPS GUIDE TO CONFIGURING AND MANAGING THE SYSTEM
INTRODUCTION TO THE GRAPHICAL USER INTERFACE
Buttons
A selection button displays as an oval or box (except for the Stop and
Continue buttons) containing a function name, but no inverted
triangle.
Figure 1-6.
Example of a selection button from the IPS main
window
Cancel Job
To use a button:
1. With the cursor positioned over the button, click the left mouse
button.
2. If the selection button is a toggle (turning a selection on/off),
you can alternately select and deselect it by repeatedly clicking
it with the left mouse button.
Incremental spin buttons
An incremental spin button consists of a line displaying a numeric
value, with buttons next to it containing arrows.
Figure 1-7.
Example of incremental spin buttons
To select an item that has incremental spin buttons:
1. Position the cursor on the triangle (up arrow) button to increase
the value displayed, or on the inverted triangle (down arrow) to
decrease the value.
2. Repeatedly click or hold down the left mouse button until your
desired value is displayed.
Note: You can also enter the values on the line next to the spin
buttons. Refer to “Entering text,” later in this chapter.
Note: On some windows, the value you enter or select is displayed
in the lower-left or -right corner of the window. It remains until you
close the window or enter a selection/value elsewhere on that same
window.
XEROX DOCUPRINT 92C IPS GUIDE TO CONFIGURING AND MANAGING THE SYSTEM
1-5
INTRODUCTION TO THE GRAPHICAL USER INTERFACE
Moving a window or icon
Windows and icons may be moved and repositioned where you want
them on the screen. You may need to do this when a window you
display covers all or part of another window you also need to see.
Drag and drop procedure
To move an item on the screen:
1. Position the cursor on the icon or on the title bar of the window
you want to move.
2. Hold down the left mouse button while moving the cursor to the
desired location. The window or icon moves with the cursor as
long as you hold down the mouse button.
3. Release the mouse button when the item is where you want it.
This procedure is often referred to as “drag and drop.”
Uncovering a window
Clicking with the left mouse button on a window’s title bar places that
window in front (or on top) of any icons or windows that are
overlapping it. You would do this if you want to view an entire window
that is partially covered by other windows or icons you do not want to
close.
If the title bar of the window you want is completely covered, use the
“Front” key on the keyboard, or drag and drop the other windows
away to expose enough of the title bar to click on. (Refer to “Drag and
drop procedure,” above.)
Reducing a window
There are two ways to “shrink” a window on the screen, that is, to get
it out of your way without closing it:
•
Resizing from the corner: Position the cursor on one of the
window’s corners and hold down the left mouse button. A small,
target-shaped icon displays at the point of the cursor. Drag the
corner of the window in the desired direction to shrink or
expand the window. (You are not able to resize the window if the
“target” icon is not displayed.)
•
Reducing to an icon: If a window has a button containing an
inverted triangle in the upper left corner on the title bar, you can
reduce the window to an icon on the screen background by
single-clicking the triangle button. To restore the window to its
original size, double-click that icon with the left mouse button.
Note: Reducing a window to an icon does not in any way
interfere with any ongoing process that was initiated from that
window. It does not close the window.
1-6
XEROX DOCUPRINT 92C IPS GUIDE TO CONFIGURING AND MANAGING THE SYSTEM
INTRODUCTION TO THE GRAPHICAL USER INTERFACE
Entering in text
Some windows contain lines on which you can enter text such as file
names or numeric values. At the beginning of a text field, there is a
small icon. This icon displays as a dark triangle when the cursor is
positioned anywhere in the window containing the text field. When
the cursor is outside the window, the icon on the line becomes a
grayed-out diamond shape, and you cannot enter text in the field.
Here are some rules for entering text on a window:
•
If a window contains more than one text field, click the left
mouse button on the text field you want to use, before beginning
to type.
•
You can enter text only when the line displays the dark triangle
icon. Text that you enter displays in front of the triangle.
•
To highlight or select text in a text field:
1. Position the cursor at the beginning or the end of the text
you are selecting.
2. Holding down the left mouse button, drag the cursor to the
right or left until the desired text is highlighted.
3. Release the mouse button.
•
•
To delete text in a text field, do either of the following:
—
Position the cursor to the right of the text to be deleted and
press either <DELETE> or <BACKSPACE>. This erases
the character to the left of the cursor. If you hold down
either of these keys, characters continue to be deleted to
the left until you release the key or all characters are
erased.
—
Highlight the text you want to delete, then press
<DELETE> or <BACKSPACE>.
To move text:
1. Highlight the text to be moved.
2. Position the cursor on the highlighted text.
3. Holding down the left mouse button, drag the highlighted
text to the right or left on the same line, or to another line
on the same window, and release the mouse button.
Note: You cannot drag text from one window to
another.
XEROX DOCUPRINT 92C IPS GUIDE TO CONFIGURING AND MANAGING THE SYSTEM
1-7
INTRODUCTION TO THE GRAPHICAL USER INTERFACE
Exiting a window
You can exit most IPS windows by clicking the left mouse button on
a Quit, Done, or Cancel button. Sometimes an Apply button closes
the window after applying what has been specified or selected.
Pin buttons
In addition, on certain windows, there is a small button in the shape
of a push-pin in the upper-left corner on the title bar (illustrated in the
following examples).
•
If the pin is “out:”
Figure 1-8.
•
—
You can exit the window by double-clicking the pin button.
—
The window automatically closes after you make a
selection from it.
—
To change the pin to the “in” position, single-click the pin
button.
If the pin is “in:”
Figure 1-9.
1-8
Window with pin button “out”
Upper-left portion of a window with pin button “in”
—
You can exit the window by single-clicking the pin button.
—
The window remains open after you make selections from
it.
XEROX DOCUPRINT 92C IPS GUIDE TO CONFIGURING AND MANAGING THE SYSTEM
INTRODUCTION TO THE GRAPHICAL USER INTERFACE
IPS main window
To configure your system, use the IPS main window to provide
access to the Configuration, Diagnostics, Administration, and
System Options menus, and to the Input and Output Configuration
subwindows. You return to this window from each of the subwindows
after you have made your selections.
Caution: When you are using the mouse on the IPS main window,
it is possible to delete the window by selecting Quit from the pulldown menu on the title bar. Should this occur, you must reboot the
Sun workstation. (Refer to the “Starting and stopping the system”
chapter for the rebooting procedure.)
Figure 1-10. IPS main window
XEROX DOCUPRINT 92C IPS GUIDE TO CONFIGURING AND MANAGING THE SYSTEM
1-9
INTRODUCTION TO THE GRAPHICAL USER INTERFACE
Menus
The IPS main window displays the following pull-down menus:
•
•
•
•
Configuration
Diagnostics
Administration
System Options.
Note: Clicking or pressing the right mouse button with the cursor on
the title bar of a window displays a title bar pull-down menu. This
menu contains options having to do with displaying the window (for
example, the Refresh option redisplays or redraws the window).
The title bar pull-down menu is generated by the Windows system on
your Sun workstation and does not apply to the IPS software. You
should not have occasion to use it.
Configuration menu
Use the Configuration pull-down menu on the IPS main window to set
up various options in the Printer Controller. The figure below
illustrates the items available from the Configuration pull-down menu,
followed by an explanation of each item.
Note: Items in the Configuration pull-down menu that appear
“grayed out” on the screen are unavailable for use with your system’s
configuration.
Figure 1-11. Configuration pull-down menu
1-10
XEROX DOCUPRINT 92C IPS GUIDE TO CONFIGURING AND MANAGING THE SYSTEM
INTRODUCTION TO THE GRAPHICAL USER INTERFACE
The Configuration pull-down menu contains the following items:
•
Language — Allows you to select the language in which GUI
messages will display.
Note: The printer status and fault messages are not part of this
feature.
•
Interface — Allows you to specify the current interface and the
interface options you want to use.
•
Resolution — Allows you to specify the resolution of the fonts
and other resources in the incoming job (240 or 300). This
resolution must match the font resolution in the PSF start-up
procedure (PROC) for MVS, or the font resolution set up by the
PSFCFG command for AS400.
Note: When you change the resolution, you must reboot the
system.
•
Modem Enable/Disable — Enables or disables the modem if it
is installed by your service representative for diagnostic
purposes. This modem is used for dial-in servicing and
diagnostics when needed by your service representative.
•
Maximum Simplex — For jobs containing both duplex and
simplex pages; the Maximum Simplex option allows you to
specify the maximum number of simplex pages that will print in
duplex mode before the system clears the paper path and
switches to simplex mode.
•
•
•
Slumber Mode Timer — Not supported on the 92C IPS.
•
Continuous Form Emulation — Rotates the page origin 90
degrees. This allows the IPS to print on cut sheets the jobs
designed for a continuous forms printer.
•
Resource Limits — Enables you to allocate additional memory
for resources such as forms, fonts, and page segments.
•
Media Units — Allows you to specify the units of measurement
to use for weight and size.
•
Optional Processing Parameters — Allows you to set
processing parameters such as the model number reported to
the host.
•
Resident Fonts — Allows you to display current resident fonts
on your system, and to add new resident fonts.
MICR Mode — Not supported on the 92C IPS.
Extraction Color — Allows you to specify how the solid-color,
shaded, and tinted areas specified in the job sent from the host
will actually appear when printed by the IPS.
XEROX DOCUPRINT 92C IPS GUIDE TO CONFIGURING AND MANAGING THE SYSTEM
1-11
INTRODUCTION TO THE GRAPHICAL USER INTERFACE
Diagnostics menu
Use the Diagnostics menu to print samples and specify trace mode
options. (It is also used by your service representative to access
system diagnostic functions.)
Figure 1-12. Diagnostics pull-down menu
The Diagnostics pull-down menu contains the following items:
•
Sample Prints — Allows you to print sample files (test
patterns), to exercise the print engine, and to perform a manual
print quality adjustment (PQA).
•
Trace Options — Allows you to capture and execute a
diagnostic trace of your system. This function is available to
Administrator and Service privilege mode users only.
•
Service Mode — Accessed by your service representative;
This function is available to Service privilege mode users only.
•
Debug Level — Displays different levels of debug messages to
be stored in log message files. This function is available to
Administrator and Service privilege mode users only.
Note: Operating at a Debug Level other than 0 could reduce
throughput speed.
1-12
•
Null Modem Connection — Accessed by your service
representative; This function is available to Service privilege
mode users only.
•
Log Service Call — Accessed by your service representative;
This function is available to Service privilege mode users only.
•
Update from CDROM — Allows you to update your software
using a CD. This function is available to Administrator and
Service privilege mode users only.
•
Update from Floppy — Allows you to update your software
using a diskette. This function is available to Administrator and
Service privilege mode users only.
•
Install Remote Update — Allows you to update your software
remotely. This function is available to Administrator and Service
privilege mode users only.
XEROX DOCUPRINT 92C IPS GUIDE TO CONFIGURING AND MANAGING THE SYSTEM
INTRODUCTION TO THE GRAPHICAL USER INTERFACE
Administration menu
Use the Administration pull-down menu to access windows for
performing administrative tasks, such as billing reporting.
Figure 1-13. Administration pull-down menu
The Administration pull-down menu contains the following items:
•
IPS Authorization — Enables entry of your IPS operating
system software license text string, provided by
Xerox, which authorizes you to use the IPS software. The IPS
cannot receive data from the host until this license is enabled.
(This is usually done by your service representative.)
•
Billing Information — Displays the meter readings for the
system.
•
Privilege Mode — Enables changing of:
•
—
The privilege mode
—
The password for a selected privilege mode (Operator or
Administrator).
Backup Configuration Files — Enables backing up of:
—
System configuration files
—
Input group configuration files
—
Input DFA Profiles
—
Media library files
—
Output group configuration files
—
Output DFA Profiles.
•
Restore Configuration Files — Enables restoring of files
backed up on diskettes.
•
•
License Status — Displays the license status for your system.
XSIS Authorization — (DFA systems only) Enables entry of
your XSIS Authorization license text string, which enables the
Enhanced Set Recovery option for your system, resulting in
reprinted DFA output sets.
XEROX DOCUPRINT 92C IPS GUIDE TO CONFIGURING AND MANAGING THE SYSTEM
1-13
INTRODUCTION TO THE GRAPHICAL USER INTERFACE
System Options menu
Use the System Options pull-down menu to take the IPS online and
offline, and shut down the system.
Figure 1-14. System Options pull-down menu
The System Options pull-down menu contains the following items:
•
•
•
1-14
Online — Places the system online.
Offline — Takes the system offline.
Shutdown System — Shuts down the system. This option
stops all processes running on the Printer Controller, stops the
printer, and returns to the boot prompt of the operating system.
XEROX DOCUPRINT 92C IPS GUIDE TO CONFIGURING AND MANAGING THE SYSTEM
INTRODUCTION TO THE GRAPHICAL USER INTERFACE
Input Configuration section
The Input Configuration section of the main window provides access
to the windows that enable you to configure the printer input trays to
feed the stocks you want to be used in the print job. It also displays
the current configuration of the feeder trays.
Figure 1-15. Input Configuration section of IPDS main window
The Input Configuration section—the upper part of the larger left
column—contains the following fields:
•
Input Configuration pull-down menu — Allows you to select
an Input Configuration window. Once you select an Input
Configuration window, you will be able to modify margin settings
from that window, and to create or change Input Configurations,
DFA personality profiles, and media icons.
•
IPDS Trays — Graphically shows the stocks that the current
configuration has associated with the input trays that are called
out in the job (IPDS data stream).
This field consists of a row of eight boxes called “tray cells,”
each of which represents an input tray that a job might specify.
The number above each tray cell is the tray’s identification
number. The number(s) below each tray cell indicate the printer
trays to which the IPDS tray has been mapped.
Any IPDS tray for which a particular stock has been identified
displays a media icon in its tray cell. A media icon graphically
represents a stock, showing its weight, color, size, and form
type (3-hole, etc.).
Note: You map an IPDS tray to a printer tray by placing a
media icon for the same stock in the cells for both trays.
The mapping of IPDS trays determines the use of system
memory for handling media of different sizes. It is
recommended that media that are not used in a particular job is
not placed in an IPDS cell.
XEROX DOCUPRINT 92C IPS GUIDE TO CONFIGURING AND MANAGING THE SYSTEM
1-15
INTRODUCTION TO THE GRAPHICAL USER INTERFACE
•
Printer Trays — Graphically shows the stocks that should be
loaded in the physical feeder trays for the current input
configuration.
The Printer Trays field consists of a row of tray cell boxes, each
of which represents one of the printer’s feeder trays. (The
number of cells in this field is the number of input trays your IPS
printer supports.) Tray cells for feeder trays in which stocks will
be loaded contain media icons representing those stocks.
Output Configuration section
The Output Configuration section of the IPS main window provides
access to the windows that enable you to configure the printer
stacker trays to ensure printed output is delivered to the desired
output tray or bin. It also displays the current configuration of the
stacker trays.
Figure 1-16. Output Configuration section of IPS main window
This section—the lower part of the larger left column—contains the
following fields:
•
Output Configuration pull-down menu — Allows you to select
an Output Configuration window. Once you select an Output
Configuration window, you will be able to create or change
Output Configurations and DFA personality profiles.
•
Printer Bins — Graphically shows how IPDS output destination
bins have been mapped to the physical printer bins.
In the Output Configuration section of the main window, the
horizontal rows of icons represent the IPDS bins specified in the
job as the output destination. The vertical columns represent
the actual printer bins to which output will be delivered.
When a bin has been selected as part of the configuration, it
displays bolded on the screen. By looking at the printer bin
number at the top of the column above each bolded icon, and at
the IPDS bin number at the beginning of the row beside the
same bolded icon, you can see which IPDS bins have been
mapped to which printer bins.
1-16
XEROX DOCUPRINT 92C IPS GUIDE TO CONFIGURING AND MANAGING THE SYSTEM
INTRODUCTION TO THE GRAPHICAL USER INTERFACE
Note: IPDS bin 1 is coded in the software to be mapped to the
sample tray. The IPDS row 1 contains only a sample tray icon,
which always displays bolded; there are no other printer bins
available to select. You are not able to change this part of the
output configuration. If “Allow Host Control” is selected, all parts
of any print job in which the data stream calls for IPDS bin 1 are
delivered to the sample tray.
Note: If your system has a stitcher/stacker instead of the dual
stacker, your output configuration display shows only one
stacker bin icon, which has a diagram of a staple above it.
Figure 1-17. Output Configuration Bins field, stitcher/stacker
configuration
•
Finishing — Displays “Enabled” if the system is configured with
a bypass transport or a stitcher/stacker, and “Finishing” or
“Stitching” is selected from the Output Configuration window.
For information on specifying finishing attributes, refer to the
section “Creating a new output configuration” in the chapter
“Setting the system configuration.
If the system has no bypass transport or stitcher/stacker, this
field is grayed-out and displays “Disabled.”
•
Page Order Within Set — Displays the current setting for the
order in which pages are placed in the output bin, from 1 to N
(ascending) or N to 1 (descending). If your system does not
have a bypass transport, or if the Finishing field displays
“Disabled,” this field is grayed out and always displays “N to 1.”
•
End of Set — If your DocuPrint 92C IPS is configured with the
stitcher/stacker, or a bypass transport is installed on your
DocuPrint 92C IPS, this field displays the criterion
(MARKFORM or Offset Stacker) that was selected from the Job
Attributes window to indicate the end of a set or segment within
a job.
If your system does not have the stitcher/stacker configuration
or a bypass transport, or if the Finishing field displays
“Disabled, this field displays grayed-out and always displays
“Offset.”
XEROX DOCUPRINT 92C IPS GUIDE TO CONFIGURING AND MANAGING THE SYSTEM
1-17
INTRODUCTION TO THE GRAPHICAL USER INTERFACE
Setup and status information
The following system setup and status information is displayed in the
right column of the IPS main window:
Control Unit Configuration section
Displays the current configuration of the system. Items that appear
here include:
Figure 1-18. Control Unit Configuration section of main window
•
Highlight Color — Displays the color dry ink installed in the
printer.
•
Resolution — Shows the resolution in dpi of the fonts used in
the current or most recent job sent to the IPS. This field reflects
the value entered on the Resolution window, accessible through
the Configuration pull-down menu.
•
Rotation — Indicates whether Continuous Forms Emulation is
enabled.
•
Privilege Mode — Indicates the current Privilege Mode
(Service, Administrator, Operator, or User).
Note: When a remote Shell is activated, “Remote Shell Active”
displays on the window.
When a remote Shell is activated and a service representative dials
in remotely, “Remote Session Active” displays on the window.
For information on activating a remote shell, refer to the “Setting up
the printer controller” chapter, “Enabling or disabling the modem”
section.
1-18
XEROX DOCUPRINT 92C IPS GUIDE TO CONFIGURING AND MANAGING THE SYSTEM
INTRODUCTION TO THE GRAPHICAL USER INTERFACE
Status section
The following items appear in the Status (middle) section of the right
column on the main window. They indicate what the printer is doing.
Figure 1-19. Status section of main window
•
Control Unit — Indicates whether the system is Receiving,
Processing, Printing, Idle, Stopped, or Not Ready, or has an
error condition (Not Ready, Error, and Fault appear in red). In
case of a Fault, reboot the system.
Note: The Control Unit status remains Not Ready if any submenu items under a pull-down menu are activated and then
canceled. To display the correct status, access the item(s) that
were previously activated and canceled, and select only the
“Cancel” button.
•
Trace — Indicates whether a trace is currently being captured
or executed.
•
Pages Outstanding — Displays the number of pages that have
been received by the system but have not yet been printed.
Note: N-Up jobs are processed in logical pages, not physical
pages. The number of logical pages per physical page varies
based on characteristics of each job. The Pages Outstanding
counter increments in logical pages, not physical pages.
Main window footer
Messages appear in the lower-left corner of the footer space, which
extends across the bottom of the IPS main window. These messages
let you know the system status, and include “Offline” or “Online.”
XEROX DOCUPRINT 92C IPS GUIDE TO CONFIGURING AND MANAGING THE SYSTEM
1-19
INTRODUCTION TO THE GRAPHICAL USER INTERFACE
Host Job Control section
The Host Job Control section, located in the lower-right corner of the
IPS main window contains three buttons:
•
•
•
Stop
Continue
Cancel Job.
Figure 1-20. Host Job Control section of main window
Stop and Continue buttons
Use the Stop and Continue buttons to perform the same functions as
actual buttons on the printer:
•
Stop — Allows you to interrupt job processing. You must also
click this button before you can click the Cancel Job button to
cancel printing.
•
Continue — Allows you to resume job processing.
Note: If you use the screen Stop button to stop a job, you must
use the screen Continue button to resume printing. You cannot
use the printer buttons interchangeably with the screen
buttons.
Cancel Job button
Use the Cancel Job button to cancel the current print job and allow
the printer to proceed with the next job in the host queue. You must
click the Stop button before you click the Cancel Job button.
If no job is being processed, this button is grayed out and cannot be
selected. If a job is in progress, this button remains grayed out until
you click the Stop button and the printer has stopped.
1-20
XEROX DOCUPRINT 92C IPS GUIDE TO CONFIGURING AND MANAGING THE SYSTEM
INTRODUCTION TO THE GRAPHICAL USER INTERFACE
Subwindow buttons
This section describes some of the buttons that appear on subwindows accessed through the main window pull-down menus and
the Input and Output Configuration section.
Add
Saves new input/output configurations and media icons you create,
and displays the Ask for File Name window, where you are prompted
to give the new file a name. On the Create and Edit a Media Icon
windows, adds a new form type to the list.
Add Profile
Saves new DFA personality profiles you create, and displays the Ask
for File Name window, where you are prompted to give the new file a
name.
Apply & Update
Saves changes you make to an input or output configuration file and
puts the changed configuration into effect (followed by confirmation
prompt).
Delete
Erases the file you select from one of the pull-down menus (followed
by a confirmation prompt).
Quit and Apply buttons
Use the Quit and Apply buttons on the IPS main window and on other
windows throughout the system to apply and cancel your system
settings.
•
Quit — Closes the current window but does not undo any
selections or text entries you have made on the screen.
However, your changes are not saved unless you first click Save
or Update.
•
Apply Now — Puts a new or revised DFA profile into effect for
an input or output configuration.
Apply and Save — Puts a new or revised DFA profile into effect
for an output configuration.
•
Apply — Puts a new or revised selection, setting, media icon,
or input/output configuration into effect.
XEROX DOCUPRINT 92C IPS GUIDE TO CONFIGURING AND MANAGING THE SYSTEM
1-21
INTRODUCTION TO THE GRAPHICAL USER INTERFACE
The figure below shows one of the windows that contain the Quit and
Apply buttons.
Figure 1-21. Window with Quit and Apply buttons
Reset
On the Create a new Media Type and Edit a Media Type windows,
restores the attribute settings displayed on the window to the system
defaults.
If selected after you have input changes to a previously saved media
icon, restores the icon’s original saved attributes.
1-22
Clear
On the Output DFA windows, signals the printer to disable the
selected DFA profile name. Resets all profile parameters in printer
memory to zero. You would use this button, for example, if you were
going to remove or take offline your third-party feeding or finishing
equipment.
Save
Saves changes you make to an existing file, such as an output
configuration. Also saves new configuration and DFA personality
profile files you create, after you type the new file name in the Ask For
File Name window.
Update
Saves changes made to an input or output configuration file, but does
not put that configuration into effect (followed by a confirmation
prompt).
XEROX DOCUPRINT 92C IPS GUIDE TO CONFIGURING AND MANAGING THE SYSTEM
2.
2Starting and stopping the
system
This chapter describes how to start and stop your printing system. It
addresses the proper methods of powering the system on and off,
starting and stopping print jobs, shutting down the system, and
dealing with power failures.
Powering on the IPS system
When you power on the IPS, it is important to perform all procedures
in the correct order, including some tasks required before powering
on.
Before powering on
Before powering on the system, make sure the following has been
done:
•
The Printer Controller and monitor are connected to dedicated
power receptacles.
•
The printer cable is connected securely to the connector on the
back of the Printer Controller. If the cable is not connected,
make sure the printer and Printer Controller are powered off.
Then connect the cable.
Caution: Do not connect the printer cable to the Printer
Controller when either the Printer Controller or the printer is
powered on; you could destroy the interface card in the Printer
Controller.
•
Press the Power switch on the printer to the On position so that
the printer powers on automatically when the Printer Controller
is powered on. The Printer Controller automatically boots the
IPS software when it is powered on.
•
Make sure all feeder trays are in Ready position: closed, with
adequate paper loaded. Otherwise the IPS cannot initialize, and
it reports “Not ready” to the host.
If this occurs, correct the tray condition, then reboot the
workstation. (Refer to “Rebooting the Printer Controller,” later in
this chapter.)
•
Always allow at least ten seconds between powering off the
printer and powering it back on again. This pause prevents
possible damage to the sensitive components in the processor.
XEROX DOCUPRINT 92C IPS GUIDE TO CONFIGURING AND MANAGING THE SYSTEM
2-1
STARTING AND STOPPING THE SYSTEM
Powering on procedure
Power on the IPS system in the following sequence:
1. Power on all peripherals, such as the optional tape drive and
display monitor.
2. If your system is channel-attached, power on the Host Channel
Unit (HCU). When the HCU is ready (offline) the code 2
displays in its LED window. You can now power on the
remaining components.
Note: The HCU displays a 2. When the Sun workstation is
completely booted, the display shows 0.
See “HCU Messages” in the Xerox DocuPrint IPS Messages
Guide for a list and explanation of HCU codes.
3. Power on the printer, if necessary.
4. Power on the Sun workstation processor. The operating system
for the Printer Controller and the IPS application software are
automatically loaded.
5. If the printer is not warmed up by the time the Controller has
booted, the window containing the message DocuPrint IPS
Initializing, “Waiting for Printer Configuration” remains on the
screen. Either:
2-2
•
Wait for the printer to warm up and the message to
disappear (which takes a varying amount of time), or,
•
Use the following procedure to reduce the amount of boot
time:
a.
With the cursor on the blue screen background, click
the right mouse button to display the workspace pulldown menu.
b.
Select Restart from the workspace menu, then Confirm
from the confirmation prompt that displays. The Printer
Controller reboots.
c.
After the Controller boots, a window displays with the
message “Media Definition Conflict” (because no
default input configuration has been applied). Click OK
to display the Input Configuration window.
d.
Make sure the paper loaded in the feeder trays
matches the stock specified in the Printer Trays cells
on the Input Configuration window. If it does not, make
any necessary changes to the paper in the trays or to
the media icons in the tray cells. (Refer to “Specifying
the input configuration” in the “Setting the system
configuration” chapter.)
e.
Click Apply & Update on the Input Configuration
window.
f.
On the confirmation prompt window that displays, click
Apply.
g.
Click Quit on the Input Configuration window. The IPS
main window displays.
XEROX DOCUPRINT 92C IPS GUIDE TO CONFIGURING AND MANAGING THE SYSTEM
STARTING AND STOPPING THE SYSTEM
Powering off the IPS system
Do not power off the system until it has stopped printing.
Note: Powering off the system at the end of the day is not
necessary. However, doing so does not damage the system.
Always power off the system before you do any of the following:
•
•
•
•
Remove or install a processor part
•
•
Prepare for an expected power outage
Remove or install an external drive unit or monitor
Unplug the processor power cord
Recover from a system that does not respond to the keyboard
or the mouse
Physically relocate the system.
Note: When a power outage occurs, turn off the power
switches on all your equipment. This protects your equipment
from possible power surge damage when power is restored.
XEROX DOCUPRINT 92C IPS GUIDE TO CONFIGURING AND MANAGING THE SYSTEM
2-3
STARTING AND STOPPING THE SYSTEM
In routine operation
When powering off the system, follow this sequence:
1. Make sure no print jobs are running. Take the IPS offline from
the host by selecting Offline from the System Options menu on
the IPS main window.
2. Use one of the two methods below to shut down the Printer
Controller. Both methods immediately stop all processes
running on the Printer Controller and on the printer, and return
to the Boot prompt for the operating system.
•
With the pointer in the desktop background area of the
screen (not in a window or on an icon), press the right
mouse button. On the workspace menu that displays, select
Shutdown.
•
With the pointer in the IPS main window, select Shutdown
System from the System Options menu.
3. In the System Shutdown Confirmation window, click Confirm.
Figure 2-1.
System Shutdown Confirmation window
Caution: Shut down the Printer Controller only when no print
jobs are running and the IPS is offline from the host.
4. Power off the display monitor.
5. Power off the printer.
Note: Unless the IPS will remain powered off for an extended
period, or is to be moved, it is not necessary to power off the
printer. Powering off the processor also powers off the
printer.
6. Power off the Sun workstation processor.
7. Power off the HCU (if operating in channel-attached mode).
2-4
XEROX DOCUPRINT 92C IPS GUIDE TO CONFIGURING AND MANAGING THE SYSTEM
STARTING AND STOPPING THE SYSTEM
After a power outage
If an unexpected power failure occurs, switch off the printer and all
components of the Printer Controller. Switch the components back
on only after power is restored. Take the printer offline as soon as
possible.
Caution: If you do not switch off all indicated components, a power
surge may damage them when power is restored.
If the power fails during printing, the print job is interrupted but not
lost. Although data is not lost, you should take the printer offline as
soon as possible to prevent data being sent before the printer is
ready to receive it.
To restart the system after an unexpected power failure, restart the
system as described in the “Powering on the IPS system” section
above.
Communicating with the host computer
An IPS is either channel-attached to a host computer or receiving
data via TCP/IP over Ethernet or Token Ring. It receives data from
the host in online mode. Before data can be sent to the printer, the
host operator must issue commands to place the IPS online to the
host.
Placing the IPS online
The IPS is placed online when the IPS software is loaded. This
software is automatically loaded when the Printer Controller is
powered on.
If the printer has been taken offline, select Online from the System
Options menu on the IPS main window.
If the printer does not go online after the system has been booted,
contact your service representative.
Taking the IPS offline
Select Offline from the System Options menu on the IPS main
window.
The printer continues to print the pages that remain in the buffer.
If you want to resume printing, select Online from the System Options
menu on the IPS main window.
XEROX DOCUPRINT 92C IPS GUIDE TO CONFIGURING AND MANAGING THE SYSTEM
2-5
STARTING AND STOPPING THE SYSTEM
Printer status
The default printer status is online and ready to print. The current
status is displayed in the Control Unit Status field on the IPS main
window.
The IPS Print Engine Monitor window displays messages on the
condition of the printer.
Starting a print job
Once the channel or communications system is enabled, the paper
is loaded, trays are selected, and the printer is ready, the IPS system
can receive print jobs. The host application can also release any
queued jobs for printing.
Caution: Be sure the IPS main window is displayed while printing
from the host. Otherwise, the results are unpredictable.
Follow these steps to start printing a job that has been sent from the
host:
1. Verify that the system is set up as required for the print job.
2. Make any changes necessary to the system configuration using
the procedures contained in this chapter.
Jobs are printed in the order they are sent.
Note: If you are printing samples, you must exit the Sample
Printing window before you can print from the host.
Stopping the printer
At times, you may need to stop the printer while it is printing—for
example, to check output or cancel a job. In addition to stopping a
print job from the application at the host, you can stop printing in three
ways:
•
Pressing the red Stop button on the printer control console. This
is the preferred method and stops the printing immediately.
•
Clicking the red Stop button on the IPS main window.
The printer continues to print the pages that remain in the buffer.
Caution: If you select Offline during a duplex printing job, you
might interrupt the job just after the front side of a duplex sheet is
printed. Should this occur, the printer finishes with a blank reverse
side. After the printing resumes, the corresponding back of the
duplex page prints as a simplex sheet.
2-6
XEROX DOCUPRINT 92C IPS GUIDE TO CONFIGURING AND MANAGING THE SYSTEM
STARTING AND STOPPING THE SYSTEM
Resuming printing
You must always resume printing an interrupted job in the same way
you stopped it:
•
If you pressed the red Stop button on the printer control
console, you must use the Continue button on the printer
control console.
•
If you clicked the red Stop button on the IPS main window, you
must click the green Continue button on the IPS main window.
Automatic print job recovery
When a jam occurs, the Printer Controller performs a job recovery. In
more severe conditions, the printer reinitiates a system status check.
If HCU errors occur while printing over a channel, reboot the Sun
workstation and the HCU. Job recovery restarts and resumes at the
last checkpoint held by the host.
Rebooting the Printer Controller
To reboot your Printer Controller without powering it off, follow these
steps:
1. With the pointer in the desktop background area of the monitor
screen (not in a window or on an icon), press the right mouse
button to display the workspace pull-down menu.
2. Select Restart.
Exiting power saver mode
If your IPS is left idle for a predetermined amount of time (set by your
service representative at installation), the system goes into power
saver mode and a screen-saver icon is displayed on an otherwise
blank screen.
•
•
Press any key to redisplay the monitor screen.
Press the Continue button on the printer control console before
sending jobs from the host. This notifies PSF that the printer is
in the Ready state.
XEROX DOCUPRINT 92C IPS GUIDE TO CONFIGURING AND MANAGING THE SYSTEM
2-7
STARTING AND STOPPING THE SYSTEM
Removing media from the processor
This section explains how to eject a diskette from the diskette drive,
and how to remove a CD from the CD-ROM drive.
Ejecting a diskette
To eject a diskette, follow these steps:
1. Place the cursor in the screen background area and press the
right mouse button. The workspace menu displays.
2. Do one of the following:
•
•
Removing a CD
2-8
Select Eject disk from the workspace menu, or
Open a command tool and enter the eject command:
a.
Place the cursor on the blue background of the user
interface screen, and click or hold down the right
mouse button to display the workspace menu.
b.
Select Command Tool from the workspace pull-down
menu. A command tool window opens.
c.
Enter eject on the command tool window.
d.
Close the command tool window by selecting Quit from
the window’s title bar pull-down menu.
To remove a CD from the CD-ROM drive, press the eject button.
XEROX DOCUPRINT 92C IPS GUIDE TO CONFIGURING AND MANAGING THE SYSTEM
3.
3Setting up the Printer
Controller
This chapter describes the procedures that are required to set up
your Printer Controller to receive and process the types of print jobs
you will be running.
Tasks requiring a Controller reboot
Several of the tasks accessed from pull-down menus on the IPS
main window require the Printer Controller to be rebooted to put the
new settings into effect. (The procedure for rebooting the Printer
Controller is in the “Starting and stopping the system” chapter.) You
will need to reboot after performing the tasks associated with these
selections:
Note: You can change one or more of these settings at a time
before rebooting.
Configuration menu:
•
•
•
Language (chapter 3)
Resolution (chapter 4)
Optional Processing Parameters (chapter 4).
For an illustration of the Configuration menu, refer to the “Introduction
to the graphical user interface” chapter.
XEROX DOCUPRINT 92C IPS GUIDE TO CONFIGURING AND MANAGING THE SYSTEM
3-1
SETTING UP THE PRINTER CONTROLLER
Selecting a language
You can select the language in which the GUI panel and labels will
display.
1. From the Configuration pull-down menu, select Language. The
Language window displays.
2. From the pull-down menu, select the language of your choice.
Figure 3-1.
Language window
3. After you have made the selection, reboot the system to put
your selection into effect.
3-2
XEROX DOCUPRINT 92C IPS GUIDE TO CONFIGURING AND MANAGING THE SYSTEM
SETTING UP THE PRINTER CONTROLLER
Specifying the system interface
This section describes the procedure for specifying the network or
channel interface for your system. Your options are Channel and
TCP/IP.
Note: You can have a bus and tag channel connection plus
multiple TCP/IP connections (Token Ring and Ethernet) installed at
the same time. Your TCP/IP selection is made at installation and
enabled by your service representative. You cannot switch printing
between channel and TCP/IP without performing the following
procedure.
1. From the Configuration pull-down menu, select Interface. The
Interface window displays.
2. From the Select Interface pull-down menu, use the right mouse
button to select the interface you want. Your selection displays
in the lower-right corner of the window.
Figure 3-2.
Interface window displaying the Select Interface
pull-down menu
3. Make the appropriate selections and entries on the Channel
Options or the TCP/IP Interface window. (Refer to the
“Selecting channel interface” or the “Selecting TCP/IP interface”
section later in this chapter.)
Caution: Selecting the wrong interface for your equipment—
that is, selecting TCP/IP for a system with an HCU enabled, or
selecting Channel for a system without an HCU—can cause the
parser to shut down, making the system unable to print. If this
happens, you must reboot the Printer Controller, then change
your interface selection.
XEROX DOCUPRINT 92C IPS GUIDE TO CONFIGURING AND MANAGING THE SYSTEM
3-3
SETTING UP THE PRINTER CONTROLLER
Selecting channel interface
To specify your interface as a bus and tag channel (parallel channel
interface), follow these steps:
1. Select Channel from the Interface window pull-down menu. The
Channel Options window displays.
Figure 3-3.
Channel Options window
2. On the Channel Address (HEX) keypad, click the alphanumeric
characters to specify the last two digits of the hexadecimal
channel address of your host.
3. From the Channel Mode pull-down menu, select the channel
mode for your system. The channel modes specify the
operation of the channel signals, determine the data speed, and
specify whether the channel interface mode is interlock or data
stream.
•
Single Tag — Single-tag interlock mode. This is the basic
channel transfer mode. It is the slowest method of data
transfer. Select this mode when no other transfer mode is
available on the host.
•
High Speed — High-speed transfer mode. Although it
maintains a single-tag interlock mode, this mode provides a
higher speed of data transfer than the single-tag mode.
•
1.25 Mb Data Streaming — Data streaming at 1.25 MB per
second. This mode is faster than either of the two single-tag
interlock modes.
•
2.5 Mb Data Streaming — Data streaming at 2.50 MB per
second. This mode provides the fastest data transfer.
4. Click Apply.
5. In the Interface window, click Apply.
3-4
XEROX DOCUPRINT 92C IPS GUIDE TO CONFIGURING AND MANAGING THE SYSTEM
SETTING UP THE PRINTER CONTROLLER
Selecting TCP/IP interface
Note: When the system is sending a resource-intensive job using
TCP/IP, the job will take considerably longer to load via the network.
To specify the TCP/IP port number, follow these steps:
1. Select TCP/IP from the Interface window pull-down menu. The
TCP/IP Interface window displays, displaying the default port
number that PSF is already using for your system.
Figure 3-4.
TCP/IP interface window
2. Enter or use the incremental spin buttons to display the new
port number.
Note: This number must match the port number that your host
uses to connect to the printer. 5001 is the default for PSF.
3. Click Apply to confirm your selection. You are returned to the
IPS main window.
XEROX DOCUPRINT 92C IPS GUIDE TO CONFIGURING AND MANAGING THE SYSTEM
3-5
SETTING UP THE PRINTER CONTROLLER
Enabling or disabling the modem
Your service representative may install a modem in your system for
diagnostic purposes. This modem is used for dial-in servicing and
diagnostics when needed by your service representative.
To enable or disable the modem, follow these steps:
1. Select Modem Enable/Disable from the Configuration pull-down
menu. The Modem Enable/Disable window displays.
Figure 3-5.
Modem Enable/Disable window
2. Click Enabled or Disabled, as appropriate.
3. To allow Shell access to a service representative, mark the
“Remote Shell Access” checkbox.
4. Click Apply. The Modem Enable window displays, prompting
you for a password.
5. Enter the root password.
Note: The modem will automatically be disabled after rebooting the
system.
3-6
XEROX DOCUPRINT 92C IPS GUIDE TO CONFIGURING AND MANAGING THE SYSTEM
SETTING UP THE PRINTER CONTROLLER
Allocating memory for resources
The Resource Limits option allows you to specify additional memory
to be used for resources such as fonts and overlays.
Note: Whatever memory you add to your resource allocation will no
longer be available for system operation.
If you wish to change the memory allocation to provide more memory
for resources, follow these steps:
1. Select Resource Limits from the Configuration pull-down menu.
The System Resource Limits window displays.
Figure 3-6.
System Resource Limits window
2. Enter the amount of memory you want allocated to resources,
or click the arrows in the incremental spin box to select the
value. The range of values is 16-128 megabytes; the default is
16.
3. Click Apply.
XEROX DOCUPRINT 92C IPS GUIDE TO CONFIGURING AND MANAGING THE SYSTEM
3-7
SETTING UP THE PRINTER CONTROLLER
Displaying and adding resident fonts
You can display the resident fonts currently loaded on your system,
or add resident fonts as needed.
Displaying resident fonts
To display the currently loaded resident fonts, select Resident Fonts
from the Configuration pull-down menu.
The Resident Fonts User Interface window displays.
Figure 3-7.
3-8
Resident Fonts User Interface window
XEROX DOCUPRINT 92C IPS GUIDE TO CONFIGURING AND MANAGING THE SYSTEM
SETTING UP THE PRINTER CONTROLLER
Adding resident fonts
You can add resident fonts from various media including CD-ROM,
diskette (floppy), or your network. To add resident fonts to your
system, follow these steps:
1. If the fonts you want to add reside on a CD or a diskette, skip
this step. Otherwise, copy the fonts to the following location:
/var/db/fonts/input
2. Display the Resident Fonts User Interface window. (Refer to the
section “Displaying resident fonts” above.)
3. Click Add. The Resident Outline Fonts User Interface window
displays.
Figure 3-8.
Resident Outline Fonts User Interface window
4. If using a CD-ROM or a diskette (floppy) as the source for the
additional fonts, insert the CD-ROM or the diskette into the
appropriate drive.
XEROX DOCUPRINT 92C IPS GUIDE TO CONFIGURING AND MANAGING THE SYSTEM
3-9
SETTING UP THE PRINTER CONTROLLER
5. From the Input Media pull-down menu, select the medium you
want to use as the source for the additional fonts. The fonts
available on the selected medium display.
Figure 3-9.
Input Media pull-down menu
6. From the displayed list of fonts, either select individual fonts to
add, or click Select All to select all listed fonts.
7. Click Apply.
8. When loading of the new fonts is completed (that is, the Apply
button is no longer grayed out), click Quit.
9. (Optional) Specify the default code page:
a.
Select a font to use as the default code page for Human
Readable Information (HRI), then click the Default for HRI
button on the top portion of the screen.
b.
Select a font to use as the default code page for Text, then
click the Default for Text button on the top portion of the
screen.
10. (Optional) Specify the default character set size:
3-10
a.
Select a font to use as the default character set for HRI, then
click the Default for Text button on the bottom portion of the
screen.
b.
Select a font to use as the default character set for Text,
then click the Default for Text button on the bottom portion
of the screen.
XEROX DOCUPRINT 92C IPS GUIDE TO CONFIGURING AND MANAGING THE SYSTEM
SETTING UP THE PRINTER CONTROLLER
Loading the IPS software license text string
When an IPS system is purchased, the new owners must have a
license authorizing them to use the IPS operating system software.
Your license is obtained for you by your Xerox service
representative, and must be enabled on the Printer Controller for
your IPS to receive data from the host.
For you to obtain authorization to use the IPS software, a licensed
text string of 20 characters, provided by Xerox, must be entered at
the Printer Controller. Initially, your license may be for 90 days. At the
end of this period, you receive a “permanent” license.
To obtain the license string from Xerox, follow the steps below to find
out the host ID on the Sun.
1. Open a Unix command tool, using this procedure:
a.
Click the right mouse button on the blue user interface
screen background to display the workspace pull-down
menu.
b.
Select Command Tool from the workspace menu.
c.
When the command tool window opens, click inside it with
the left mouse button.
2. Enter hostid to display your host ID.
3. Contact Xerox with the host ID, and follow further instructions.
Note: The license string entry procedure is performed only once,
unless you receive a new license string, or load a new version of the
IPS software.
Any time you start the system before your software license is
enabled, the Printer Controller boots up in Disabled mode. This
means the IPS cannot receive data from the host and therefore
cannot print. To enable printing, you must enter your license text
string via windows accessed from the Administration pull-down
menu.
1. From the Administration pull-down menu, select IPS
Authorization.
Figure 3-10. Administration pull-down menu
XEROX DOCUPRINT 92C IPS GUIDE TO CONFIGURING AND MANAGING THE SYSTEM
3-11
SETTING UP THE PRINTER CONTROLLER
The IPS Authorization window displays.
Figure 3-11. IPS Authorization window
2. On the Enter Expiration Date line, enter the license expiration
date provided by your service representative. Make sure to
enter the date exactly the way your service representative gives
it to you (same number of characters, same letters in lower
case, etc.) Any differences will cause your entry to be rejected.
3. On the Enter License line, enter the 20-character license text
string provided by your service representative (in upper case).
Here is an example of a license string:
CB1ED0F1D80EEE534335
4. Click Apply when finished.
Note: If a message pops up, indicating that an invalid license
was entered, your license string text entry was not accepted.
Repeat steps 1 through 4, making sure you are entering the
string correctly—all uppercase letters, etc. If your license string
is rejected again, consult your service representative.
If your license string entry was valid, a message displays in the
IPS Console window, indicating that the license was loaded.
Your system will become authorized in about 30 seconds.
Alternatively, you may load the license string from a diskette:
1. Click the Get String from Diskette button. Make sure that the
diskette containing the string is loaded in the diskette drive.
2. Follow the screen prompts to load the license string.
3-12
XEROX DOCUPRINT 92C IPS GUIDE TO CONFIGURING AND MANAGING THE SYSTEM
SETTING UP THE PRINTER CONTROLLER
Switching modes (Dual Mode)
The Dual Mode printing option lets you switch back and forth
between IPS and NPS modes on your Printer Controller. This allows
your printer to accept IPDS, PostScript, and PCL data streams.
When you are in IPS mode, you can spool PostScript and PCL data
streams in the background; however, you can print these jobs only
when you switch to NPS mode. When you are in NPS mode you
cannot spool IPDS data streams in the background; you can print
them only when you are in IPS mode.
IPS mode to NPS mode
To switch from IPS mode to NPS mode:
1. Check the Control Unit Status field on the IPS main window to
verify that the printer is Idle (not printing or receiving data).
2. Drain the printer at the host (this stops the host from sending
jobs from the queue). Follow procedures for your own host
system.
3. At the host, take the printer offline.
4. Place the pointer on the background area of the screen (not in a
window or on an icon) and click the right mouse button.
5. From the menu that displays, select Start Network Printing.
After a few minutes the Printer Controller switches to NPS
mode.
Caution: Do not select Restart and do not turn the Printer
Controller or the printer off and on.
NPS mode to IPS mode
To switch from NPS mode to IPS mode:
1. While the printer is idle, enter the command list documents at
the >PS prompt and verify that no print jobs are pending or
being received.
2. Place the pointer on the background area of the screen (not in a
window or on an icon) and click the right mouse button.
3. From the menu that displays, select Start IPS Printing.
Caution: Do not select Restart and do not turn the Printer
Controller or the printer off and on.
4. Put the printer online at the host.
5. Start the printer at the host.
XEROX DOCUPRINT 92C IPS GUIDE TO CONFIGURING AND MANAGING THE SYSTEM
3-13
SETTING UP THE PRINTER CONTROLLER
3-14
XEROX DOCUPRINT 92C IPS GUIDE TO CONFIGURING AND MANAGING THE SYSTEM
4.
4Setting the system
configuration
This chapter describes the procedures for configuring your system.
You access those procedures through the pull-down menus on the
IPS main window. The procedures are described in sequence as
they appear on each menu.
Note: During an upgrade to the system, all data on the system
disks is deleted. Therefore, it is important to save the following
system configurations:
•
•
•
•
•
•
•
Channel settings
Resolution
Channel address
Channel mode
Printer firmware revision
Pages between updates
Customer profile file.
For information on saving system configurations, refer to “Backing up
and restoring configuration files,” later in this chapter.
XEROX DOCUPRINT 92C IPS GUIDE TO CONFIGURING AND MANAGING THE SYSTEM
4-1
SETTING THE SYSTEM CONFIGURATION
Privilege Modes
The IPS allows access to various functions based on a user’s
privilege level. The following Privilege Modes are available:
•
User Mode — This is the default and the lowest privilege mode
at which the IPS operates. In this mode, the Configuration
menu, service-related options on the Diagnostics menu, as well
as the Trace, Service, and Debug Level options on the
Diagnostics menu are not accessible.
•
Operator Mode — In this mode, service-related options on the
Configuration and Diagnostic menus, as well as the Trace and
Debug Level options on the Diagnostics menu are not
accessible.
•
Administrator Mode — In this mode, service-related options
on the Configuration and Diagnostic menus are not accessible.
•
Service Mode — In this mode, all functions are accessible.
A user’s current Privilege Mode displays on the Control Unit
Configuration section of the main window.
Figure 4-1.
4-2
Control Unit Configuration section of main window
XEROX DOCUPRINT 92C IPS GUIDE TO CONFIGURING AND MANAGING THE SYSTEM
SETTING THE SYSTEM CONFIGURATION
Changing the Privilege Mode
Changing your current privilege level to an Operator Mode,
Administrator Mode, or Service Mode requires a password.
To change the Privilege Mode:
1. From the Administration menu, select Privilege Mode, then
Change Privilege Mode.
The Change Privilege Mode window displays.
2. From the Privilege Mode pull-down list, select the Privilege
Mode of your choice.
3. In the Enter Password field, enter your password.
4. Click Apply.
XEROX DOCUPRINT 92C IPS GUIDE TO CONFIGURING AND MANAGING THE SYSTEM
4-3
SETTING THE SYSTEM CONFIGURATION
Changing the password for a Privilege Mode
To change the password for a Privilege Mode (Operator or
Administrator):
1. From the Administration menu, select Privilege Mode, then
Change Operator Password. The Change Operator Password
window displays.
2. In the Old Password field, enter your old password.
3. In the New Password field, enter your new password. A
password may consist of digits, letters, punctuation and special
characters. It may not use control characters.
4. In the Confirm Password field, reenter your new password.
5. Click Apply.
Note: If the old password or the confirmed password is invalid, a
notice window will display.
4-4
XEROX DOCUPRINT 92C IPS GUIDE TO CONFIGURING AND MANAGING THE SYSTEM
SETTING THE SYSTEM CONFIGURATION
Accessing configuration tasks
From the IPS main window, configure your system by selecting from
the Configuration, Diagnostics, Administration, and System Options
menus, and from the input and output configuration subwindows.
Return to the IPS main window from each of the submenus or
subwindows after you have made your selections.
For an illustration of the menus and subwindows available from the
IPS main window, refer to the “Introduction to the graphical user
interface” chapter.
Note: Access to certain menus and selections within a menu
depend on the user’s privilege level. Refer to the section “Privilege
Modes” for more information.
Caution: When you are using the mouse on the IPS main window,
it is possible to delete the window by selecting Quit from the pulldown menu on the title bar. If this occurs, reboot the Sun workstation
(refer to the “Starting and stopping the system” chapter for the
rebooting procedure).
Configuration menu tasks
The following procedures can be accessed from the Configuration
pull-down menu.
•
•
•
•
•
•
Indicating the input resolution
Specifying the maximum simplex value
Specifying the extraction color for highlight color printing
Rotating the page origin
Specifying the media units
Setting optional processing parameters.
Other Configuration menu items are discussed in the “Setting up the
Printer Controller” chapter.
XEROX DOCUPRINT 92C IPS GUIDE TO CONFIGURING AND MANAGING THE SYSTEM
4-5
SETTING THE SYSTEM CONFIGURATION
Indicating the input resolution
This section describes the procedure for communicating the
resolution of the fonts used in the incoming job to the IPS. The IPS
then reports this information to PSF.
Caution: The resolution you indicate on this window must match
the font resolution in your host input data stream. Conflicts between
the input font resolution and the IPS configuration may result in
inability to print the job, or in blank output pages.
To indicate the resolution of fonts and other input resources:
1. From the Configuration menu, select Resolution. The
Resolution window displays.
Figure 4-2.
Resolution window
2. Click the resolution of the input resources.
3. (Optional) Select the “Disable hardware scaling” checkbox to
enable scaling.
When this checkbox is not selected, 240 and 300 dpi jobs are
imaged at 240 or 300 dpi by the IPS Printer Controller and are
scaled to 600 dpi by the printer. When the checkbox is selected,
240 and 300 dpi jobs are imaged (and thus scaled) by the IPS
Printer Controller.
Note: Hardware scaling by the printer is faster than software
scaling by the Printer Controller, although the performance gain will
not be noticeable on all jobs. Software scaling can produce better
results for applications that use resolution-independent resources
such as outline fonts, GOCA, and percent shading.
4. (Optional) Select the “Use alternate shading” checkbox to use
an alternate set of shading patterns, originally developed for
300 dpi printing.
5. Click Apply.
6. Drain the printer at the host. (Follow procedures for your host
system.)
4-6
XEROX DOCUPRINT 92C IPS GUIDE TO CONFIGURING AND MANAGING THE SYSTEM
SETTING THE SYSTEM CONFIGURATION
7. Reboot the Printer Controller.
8. Restart the PSF printer session, or the Functional Sub System.
Specifying the maximum simplex value
This section describes the procedure for specifying the number of
simplex pages that the system prints in duplex mode before clearing
the paper path and switching to simplex mode. This capability allows
you to switch between duplex and simplex mode within a single job,
with less degradation to the throughput speed.
When the IPS is printing in duplex mode and encounters a simplex
page, the system may need to clear the paper path of all duplex
sheets before changing to simplex mode. This clearing process may
delay throughput. You can postpone this clearing process by printing
simplex pages in duplex mode and specifying the number of pages,
after which the system changes to simplex mode. Until the number of
simplex pages you specify is sent, any simplex pages are printed in
duplex mode with a blank page on the back, thus providing the
appearance of simplex.
Note: When you print simulated simplex, the blank back pages are
counted as billable pages by the billing meter.
Note: The print engine also performs simulated simplex
independent of the IPS system controller. Blank back pages created
by the print engine are not counted as billable pages by the billing
meter. The print engine performs simulated simplex when the job
changes plex every six pages or less.
To specify the maximum number of simplex pages to be printed in
duplex mode:
1. From the Configuration menu, select Maximum Simplex. The
Maximum Simplex window displays.
Figure 4-3.
Maximum Simplex window
XEROX DOCUPRINT 92C IPS GUIDE TO CONFIGURING AND MANAGING THE SYSTEM
4-7
SETTING THE SYSTEM CONFIGURATION
2. Enter the value for the maximum number of simplex pages you
want printed in duplex mode and press <ENTER>, or click the
arrows to select the value. The range of values is 0 to 20 pages.
The default is 10; the recommended value is 10.
For jobs that contain such high frequency of plex changes, it is
recommended that the Maximum Simplex value be set to 0.
This allows the print engine to perform simulated simplex
without charging for the blank pages.
Note: Ideally, this value should be set to the number of dead cycles
required to clear the printer’s paper path.
3. Click Apply.
Specifying the extraction color for highlight color printing
When the DocuPrint 92C IPS receives a color job, it prints it in
whatever color of ink is loaded in the printer, using solid color and a
variety of shades (color plus black) and tints (color plus white).
Extraction color specifies how the existing color of text, shading, or
graphics contained in a job will print on your DocuPrint 92C IPS
printer, and which color will print in the solid highlight ink color. All
colors other than the highlight (printer ink) color print in a shade or tint
of the color loaded in the printer.
The IPDS data stream allows eight colors to be specified in a job:
1. Red
2. Green
3. Blue
4. Cyan
5. Magenta
6. Yellow
7. Brown
8. Black.
However, the DocuPrint 92C IPS printer has available a different set
of ten highlight color inks plus black that can be selected for loading
in the printer: red, green, blue, cyan, magenta, royal (blue), ruby,
cardinal (red), violet, and brown. Therefore, a job may specify a color
for which the DocuPrint 92C IPS does not have a corresponding ink;
or you may wish to print the job in an ink different from what is
specified.
Note: Solid black is not affected by the extraction color selection; if
specified in the job, it always prints as solid black.
Note: The system requires extra processing to apply shading to
data, when the data uses a color other than the one set as the
extraction color. Therefore, jobs that use a large amount of these
colors may cause performance degradation. For example, a job that
uses a large amount of green will print faster when the extraction
color is set to Green (or “Printer Color” with green ink is loaded in the
printer), than when the extraction color is set to Red.
4-8
XEROX DOCUPRINT 92C IPS GUIDE TO CONFIGURING AND MANAGING THE SYSTEM
SETTING THE SYSTEM CONFIGURATION
Extraction Color window
The Extraction Color window contains the following options:
•
•
Color pull-down menu — Lists the eight colors allowed by the
IPDS data stream, from which you select the extraction color.
—
The Printer Color option selects whatever color ink is
loaded in the printer as the extraction color.
—
Executive Black selects black as the extraction color; that
is, all colors specified in the job print as black or shades of
black.
Exact Color Only — If you click this option, only the extraction
color prints as the solid or “pure” highlight color. All other colors
in the job print as black.
Figure 4-4.
Extraction Color for Highlight Printing window
XEROX DOCUPRINT 92C IPS GUIDE TO CONFIGURING AND MANAGING THE SYSTEM
4-9
SETTING THE SYSTEM CONFIGURATION
Rules for extraction color
Here are some general rules for extraction highlight color on the IPS:
•
The highlight color ink loaded in the printer always determines
the final output color—it is impossible, for example, to obtain red
text from green ink.
•
•
Executive Black prints all non-black colors as black.
Colors in the job that are different from the extraction color print
as black when Exact Color Only is specified.
The following table summarizes the extraction color principles, using
red, green, and blue as examples:
Color specified in job
Extraction color
selected
Exact Color
selected?
Printed color (output)
Red
Red
Yes
Printer ink color (solid)
All non-red (except
black)
Red
Yes
Black
Red
Red
No
Printer ink color
Any non-red
Red
No
Shade/tint of printer ink color
Red
Green (or any non-red) Yes
Black
Red
Green
No
Shade/tint of printer ink color
Any
Executive black
Yes or no
Black
Red
Printer Color (red)
Yes
Printer ink color (solid)
Red
Printer Color (red)
No
Printer ink color
Blue
Printer Color (red)
Yes
Black
Blue
Printer Color (red)
No
Shade/tint of printer ink color
Color samples
The “Extraction color samples” appendix in the Xerox DocuPrint 92C
IPS System Overview Guide shows extractions for the inks available
for your system. It shows approximately what shades, tints, and
solids will be produced by the possible combinations of the printer
inks, the job-specified colors, and the extraction colors.
Caution: These appendix pages show an approximation of the
colors that your printer will produce; they are included to give you an
idea of what to expect. However, the actual printed colors can vary
from printer to printer. You should always run test prints to see
exactly how your printer prints these colors.
4-10
XEROX DOCUPRINT 92C IPS GUIDE TO CONFIGURING AND MANAGING THE SYSTEM
SETTING THE SYSTEM CONFIGURATION
Procedure
To specify the extraction color:
1. From the Configuration menu, select Extraction Color. The
Extraction Color for Highlight Printing window displays.
2. From the color pull-down menu, select your desired extraction
color.
Figure 4-5.
Extraction Color window with color pull-down
menu
3. Select Exact Color Only if you want only the extraction color to
print in the solid color of the ink loaded in the printer.
4. Click Apply.
XEROX DOCUPRINT 92C IPS GUIDE TO CONFIGURING AND MANAGING THE SYSTEM
4-11
SETTING THE SYSTEM CONFIGURATION
Printing the IPS color samples
Your IPS has two sets of color palette trace files, stored in the
/var/db directory on the Printer Controller. Each set contains one
palette for each color of dry ink available for the IPS. Appendix B of
your System Overview Guide contains samples of both sets of
printed palettes for each color ink.
Note: Each color file is applicable only to the corresponding color
of dry ink that is installed in the printer.
Extraction color palettes
By printing the following palette files, you can see how the different
color extractions affect the appearance of colored areas printed with
each color of ink.
•
•
•
•
•
•
•
•
•
•
blue_palette.trace
brown_palette.trace
cardinal_palette.trace
cyan_palette.trace
green_palette.trace
magenta_palette.trace
red_palette.trace
royal_palette.trace
ruby_palette.trace
violet_palette.trace
Shades and tints palettes
The following palettes show the range of shades and tints that can be
printed with each of the highlight color inks, and gives the
percentages of color, black, and/or white that make up each one.
•
•
•
•
•
•
•
•
•
•
blue2_palette.trace
brown2_palette.trace
cardinal2_palette.trace
cyan2_palette.trace
green2_palette.trace
pink2_palette.trace (prints magenta)
red2_palette.trace
royal2_palette.trace
ruby2_palette.trace
violet2_palette.trace
Procedure for printing the palettes
You can print out these palette files, which are actually captured
trace files, to find out how your particular IPS printer produces the
various shades and tints of the color ink that is loaded. Use the
procedure for executing a captured trace, as follows.
1. Make sure that the specified extraction color is the same as the
color ink that is loaded in the printer. For palettes of colors that
are not listed on the Extraction menu, substitute extraction
colors as directed in “Setting the extraction color,” earlier in this
chapter.
2. Select Trace Options from the Diagnostics pull-down menu on
the IPS main window.
3. On the Trace Options window, click Offline.
4-12
XEROX DOCUPRINT 92C IPS GUIDE TO CONFIGURING AND MANAGING THE SYSTEM
SETTING THE SYSTEM CONFIGURATION
4. From the Trace Mode pull-down menu, select Execute Trace.
The Default Trace File Name prompt window displays.
5. On the Default Trace File Name window, enter the following
path:
/var/db/palettename
where palettename is the file name of the palette you want to
print (such as royal2_palette.trace).
6. Click Apply. The system prints ten copies of the specified
palette.
7. After printing has completed, select Normal Operation from the
Trace Options window.
Rotating the page origin
If you want to print a job that was designed for a continuous forms
printer, you can enable the job to print on the cut-sheet IPS printer by
rotating its page origin 90 degrees. When you do this, the IPS
emulates a continuous forms printer while printing on cut sheets.
Example: Suppose you wanted to print a continuous forms job
designed for 17 by 11-inch (or possibly A3) paper on your IPS, which
uses cut sheets.
•
The page or text origin is always in the upper-left corner of the
printed page.
•
For continuous forms printing, the longest edge (17 inches)
is the top edge. (See the illustration below.)
For cut-sheet printing, the short edge (11 inches) is the top
edge. (See the illustration below.)
XEROX DOCUPRINT 92C IPS GUIDE TO CONFIGURING AND MANAGING THE SYSTEM
4-13
SETTING THE SYSTEM CONFIGURATION
For the page to print correctly in portrait orientation on the IPS cut
sheets, its text origin must be rotated 90o, via the Continuous Forms
Emulation window.
4-14
XEROX DOCUPRINT 92C IPS GUIDE TO CONFIGURING AND MANAGING THE SYSTEM
SETTING THE SYSTEM CONFIGURATION
Follow these steps:
1. Select Continuous Forms Emulation from the Configuration
pull-down menu.
2. On the Continuous Form Selection window, click Enabled.
Figure 4-6.
Continuous Form Selection window
3. Click Apply.
XEROX DOCUPRINT 92C IPS GUIDE TO CONFIGURING AND MANAGING THE SYSTEM
4-15
SETTING THE SYSTEM CONFIGURATION
Specifying the media units
This section describes the procedure for specifying the media units
you want to use for weight and size. The specified units are used on
the IPS main window.
To specify the weight and/or size units:
1. From the Configuration menu, select Media Units. The Media
Units window displays.
Figure 4-7.
Media Units window
2. For weight, select g/m2 or lb as the desired units.
3. For size, select mm or in as the desired units.
4. Click Apply. A confirmation window displays.
5. Click OK to confirm your selections.
4-16
XEROX DOCUPRINT 92C IPS GUIDE TO CONFIGURING AND MANAGING THE SYSTEM
SETTING THE SYSTEM CONFIGURATION
Setting optional processing parameters
You can set processing parameters for your system as follows:
1. Select Optional Processing Parameters from the Configuration
pull-down menu.
2. On the Optional Processing Parameters screen (refer to the
next page for an illustration), identify the parameters you want
to set.
•
Number of imagers — Specifies how many imagers to run.
An imager should be added for each CPU on the system.
•
Trace drawing commands — Enables or disables tracing
of the IPDS commands sent from PSF. These commands
result in drawing commands for the imagers.
Checking this option will degrade performance.
•
Ignore black areas — Enables or disables the WCB option.
This option removes large areas of black from IM images to
save printer consumables.
•
Use replicate and trim — Enables or disables the
Replicate and Trim option. This option is used to image
large areas by using a small area pattern supplied by the
host, and replicate the pattern to fill the large area in a tiling
manner. Enabling this option reduces the transmission time
for image data from PSF to the IPS printer. By default, this
parameter should be enabled.
•
Use alternate printer model number — Specifies the
printer model sent by the IPS printer to PSF during a Sense
Type and Model (STM) response. The model number must
consist of four numeric characters.
•
Alternate Markform — Enables or disables the Alternate
Markform option. This option prints a printer specific mark
on the end banner sheets. Enabling this option results in a
Xerox logo. By default, this parameter is set to print a black
bar on the end banner sheets.
•
Apply darkening — Not supported on the 92C IPS.
3. For each parameter, select the checkbox and enter the
information on the right, if applicable.
4. When all parameters are set, click Apply.
XEROX DOCUPRINT 92C IPS GUIDE TO CONFIGURING AND MANAGING THE SYSTEM
4-17
SETTING THE SYSTEM CONFIGURATION
Figure 4-8.
Optional Processing Parameters window
5. Reboot the system to put your settings into effect (except for
“Alternate markform,” which does not require a reboot.)
4-18
XEROX DOCUPRINT 92C IPS GUIDE TO CONFIGURING AND MANAGING THE SYSTEM
SETTING THE SYSTEM CONFIGURATION
Diagnostics menu tasks
The following procedures can be accessed from the Diagnostics pulldown menu.
•
•
•
•
•
•
•
Printing samples
Capturing a trace
Executing a captured trace
Printing a trace file
Setting the debug level
Updating the software using a diskette or a CD
Updating the software remotely.
Printing samples
This section describes the procedure for setting up and printing
sample files (test patterns).
To set up and print sample files:
1. From the Diagnostics menu, select Sample Prints. The Sample
Prints window displays.
Figure 4-9.
Sample Prints window
2. Specify the test pattern and the criteria you want to use to print
the sample file.
XEROX DOCUPRINT 92C IPS GUIDE TO CONFIGURING AND MANAGING THE SYSTEM
4-19
SETTING THE SYSTEM CONFIGURATION
Note: If your DocuPrint 92C IPS has DFA, the Sample Prints
window contains two additional fields: Number of Sets and
Finishing Function.
Figure 4-10. Sample Prints window for the a system with DFA
(shown is a DocuPrint 4635 IPS)
•
4-20
Sample File — Specifies the sample file you want to print.
When you select this field, the Testdocs menu displays,
allowing you to click the file you want to print.
XEROX DOCUPRINT 92C IPS GUIDE TO CONFIGURING AND MANAGING THE SYSTEM
SETTING THE SYSTEM CONFIGURATION
Note: The following screen shows a sampling of the files
that are available. Your system may have different sample
files, or you may choose to have some added or deleted.
Figure 4-11. Portion of Testdocs list of samples to print
XEROX DOCUPRINT 92C IPS GUIDE TO CONFIGURING AND MANAGING THE SYSTEM
4-21
SETTING THE SYSTEM CONFIGURATION
•
Number of Sheets — Specifies the number of pages you
want to print from the sample file. The range is 0 to 500
sheets. The default is 10 sheets.
•
Number of Sets (DFA systems only) — Specifies the
number sets to create, each containing the number of
sheets specified.
•
Finishing Function Option (DFA systems only) —
Enables you to specify finishing functions 1 or 2 for a thirdparty finishing device, if desired.
•
Mode — Specifies whether the sample is printed in simplex
or duplex mode. Simplex is the default. If you select duplex,
the same sample is printed on both sides of each sheet.
•
Printer Tray — Specifies the input tray grouping from which
paper will be fed. (Refer to the “Specifying the input
configuration” section later in this chapter.)
•
Bin Group — Specifies the output bin grouping to which the
printed samples are sent. (Refer to the “Specifying the
output configuration” section later in this chapter.)
Note: If Bin 1 (sample tray) is not selected, the printed
sheets are offset every six sheets.
3. Click Print Samples to initiate printing. Your samples are
delivered to the bin group selected on the Sample Printing
window.
4-22
XEROX DOCUPRINT 92C IPS GUIDE TO CONFIGURING AND MANAGING THE SYSTEM
SETTING THE SYSTEM CONFIGURATION
Manual PQA button
When you click this button, the system prints a one-page sample.
This initiates an automatic print quality adjustment if needed.
While the PQA is in progress, a PQA status window displays, giving
status messages on the adjustment. When the PQA is complete, the
window disappears.
Figure 4-12. PQA status window example
Note: Setting the extraction color to a color other than black will
help the printer to initialize the “adjusting color” process during a
PQA.
XEROX DOCUPRINT 92C IPS GUIDE TO CONFIGURING AND MANAGING THE SYSTEM
4-23
SETTING THE SYSTEM CONFIGURATION
Capturing and executing a trace
This section describes the procedures you use to initiate a trace to
perform system diagnostics and to execute a trace. In general, the
service representative performs this function. However, you may be
asked to perform this task in preparation for a service call. Your
service representative will provide a password, because this function
is password-protected.
Capturing a trace
To capture a trace in preparation for a service call:
1. Drain the printer at the host. (Follow procedures for your host
system.)
2. Restart the Printer Controller by selecting Restart from the Sun
workstation background menu. (Refer to the “Rebooting the
Printer Controller” section in the “Starting and stopping the
system” chapter for this procedure.)
3. From the Diagnostics menu, select Trace Options (available to
Administrator and Service privilege mode users only). The
Trace window displays.
Figure 4-13. Trace window with Online Trace Mode Options
menu displayed (for a system with TCP/IP
interface)
Figure 4-14. Trace window with Offline Trace Mode Options
menu displayed
4-24
XEROX DOCUPRINT 92C IPS GUIDE TO CONFIGURING AND MANAGING THE SYSTEM
SETTING THE SYSTEM CONFIGURATION
The Trace window contains the following options and field:
•
•
Online — Enables the interface after you execute the trace.
•
Trace Mode Options pull-down menu — Specifies how
you want to perform the trace. You use the pull-down menu
to specify the trace options you want to use. The selections
are as follows:
Offline — Disables the interface so that you can execute
the trace.
—
Normal Operation — Specifies no trace options are in
effect.
—
IPDS and Channel — Specifies that the trace will
capture the channel command words (exchanged
between the host and the printer and the IPDS data
stream) into the trace file.
Note: This option displays only if “Channel” was
selected from the Interface window. (Refer to the
“Setting up the Printer Controller” chapter.)
—
IPDS & TCP/IP — Specifies that the trace will capture
the TCP\IP commands (exchanged among the host
and the printer and the IPDS data stream) into the
trace file.
Note: This option displays only if “TCP/IP” was
selected from the Interface window. (Refer to the
“Setting up the Printer Controller” chapter.)
—
IPDS Only—Specifies that the trace will capture only
the IPDS data stream into the trace file.
—
Execute Trace — Specifies that the job will print as
though it was received across the channel or the TCP/
IP interface.
4. From the Trace Mode Options pull-down menu, select IPDS &
Channel, IPDS only, or IPDS & TCP/IP. Your selection is
displayed in the lower right corner of the Trace Mode Options
window, and the Trace Mode Options window displays.
Figure 4-15. Trace Mode Options window
XEROX DOCUPRINT 92C IPS GUIDE TO CONFIGURING AND MANAGING THE SYSTEM
4-25
SETTING THE SYSTEM CONFIGURATION
5. Enter a name for the trace file. You can enter the full directory
path along with the file name to save the trace file directly to a
desired location. If no file name or file path is specified, the file
is saved as Trace and stored in the /var/db directory.
Note: It is recommended that the trace file name start with
trace_, followed by the name of the trace, all in lower case
characters. For example, if the trace name is test, enter the
following as the file name:
trace_test
Note: The trace file is a large file and can quickly fill up a
directory. For that reason, the default /var/db directory is the
recommended place to store trace files.
6. Click OK to start the trace.
7. Start the printer at the host.
8. Send a job to the IPS. The trace runs on this job. (The
throughput speed of the job when running in Trace Mode is
slower than in normal operation.)
9. Select Normal Operation from the Trace Options pull-down
menu.
10. Click Quit.
Executing a captured trace
To execute a trace to assist with system diagnostics:
1. Capture the trace, following the steps described in the section
“Capturing a trace” above.
2. Select Trace Options from the Diagnostics pull-down menu on
the main window.
3. Click Offline to disable the interface.
4. From the Trace Mode pull-down menu, select Execute Trace.
The Default Trace File Name prompt window displays.
5. If you have already given the trace file a name during the
capturing process, that name is displayed on this screen.
If you were not capturing a trace file, or if you want to execute a
trace file different from the one just captured, enter the name on
the line provided in the Default Trace File Name window.
6. Click Apply. The job prints. After the job has completed, the
system returns to normal operation.
7. After the job has completed, select Normal Operation.
8. Click Online to enable the interface.
9. Click Quit.
Note: After executing a trace file, make sure to cancel the FSS and
restart IPS before submitting any jobs. Otherwise, the output of any
submitted jobs may be missing all of the text data.
4-26
XEROX DOCUPRINT 92C IPS GUIDE TO CONFIGURING AND MANAGING THE SYSTEM
SETTING THE SYSTEM CONFIGURATION
Printing a trace file
You can print a trace file using the conprt utility as follows:
1. After capturing the trace and verifying its effects by using the
“Execute trace” option from the Trace Mode pull-down list, open
a Unix command tool.
2. Change the working directory by entering:
cd /var/db
3. Process the trace file using the ipdeb utility by entering:
ipdeb trace > trace_debug (for uncompressed files) or
ipdeb trace.Z > trace_debug (for compressed files)
This creates the file trace_debug that will be an English
rendition of the hex data.
Note: The ipdeb utility supplies default values for those
parameters that are not supplied. The defaults are:
•
•
•
Paper size: USLetter (8.5 by 11-inch)
Resolution: -r 300
Directory: current directory.
To print a file from a directory other than the current directory,
specify the directory as a separate field following the file
name.
4. To print the trace file on a DocuPrint 92C IPS in duplex, enter:
conprt -d trace_debug [/var/db]
where /var/db is the directory, and is optional.
Note: The conprt utility determines whether to specify mono or
hilite for the -c option.
Note: If you are using a paper size other than USLetter (8.5 by
11-inch), specify the dimensions of the paper in pels by using the
-x option. For example, for A4 paper on a DocuPrint 92C IPS
enter:
conprt -d -x 3520x2480 trace_debug [/var/db]
Note: Do not use the conprt utility with large files because
each page of a text file requires about 1 MB of disk space.
XEROX DOCUPRINT 92C IPS GUIDE TO CONFIGURING AND MANAGING THE SYSTEM
4-27
SETTING THE SYSTEM CONFIGURATION
Setting of the debug level
You can set the level of debug messages to be stored in log message
files. To set the debug level:
1. From the Diagnostics menu, select Debug Level. The Debug
Level window displays.
2. Select the debug level of your choice.
3. Click Apply.
Note: Selecting a Debug Level other than 0 or selecting Save
Pages to Disk For Viewing may degrade throughput speed.
4-28
XEROX DOCUPRINT 92C IPS GUIDE TO CONFIGURING AND MANAGING THE SYSTEM
SETTING THE SYSTEM CONFIGURATION
Updating the software using a CD or a diskette
You can update the printing system software using a CD or a
diskette, provided by your service representative. To update the
software:
1. Insert the CD or the diskette containing the software update into
your diskette drive.
2. From the Diagnostics menu, select Update from CDROM or
Update from Floppy. The Update from CD or the Update from
Floppy window displays.
3. Enter the password provided by your service representative.
The software will automatically load from the CD or from the diskette
onto your system.
XEROX DOCUPRINT 92C IPS GUIDE TO CONFIGURING AND MANAGING THE SYSTEM
4-29
SETTING THE SYSTEM CONFIGURATION
Updating the software remotely
You can update the printing system software remotely as follows:
1. From the Diagnostics menu, select Install Remote Update. The
Install Remote Update window displays.
2. Enter the password provided by your service representative.
The software will automatically load onto your system.
4-30
XEROX DOCUPRINT 92C IPS GUIDE TO CONFIGURING AND MANAGING THE SYSTEM
SETTING THE SYSTEM CONFIGURATION
System Options menu tasks
From the System Options pull-down window, you can access
windows to place the IPS online and offline, and shut down the
system.
Figure 4-16. System Options pull-down menu
•
•
•
Online — Places the system online.
Offline — Takes the system offline.
Shutdown System — Shuts down the system. This option
stops all processes running on the Printer Controller, stops the
printer, and returns to the boot prompt of the operating system.
When selecting this option, you are asked to confirm your
selection, as illustrated below.
Figure 4-17. Shutdown confirmation window
Note:
only.
The shutdown confirmation window displays in English
XEROX DOCUPRINT 92C IPS GUIDE TO CONFIGURING AND MANAGING THE SYSTEM
4-31
SETTING THE SYSTEM CONFIGURATION
Specifying the input configuration
This section describes the procedures for creating, changing, and
deleting input tray configurations; selecting the feeder tray(s) for a
job; and indicating the media (stock) that is loaded in each feeder
tray. (For an explanation of the buttons on these windows, refer to the
“Buttons” section in the “Introduction to the graphical user interface”
chapter.)
When you specify the input configuration, you associate one or more
feeder trays with each IPDS tray that is called for in a print job. The
printer then feeds paper from all the printer trays specified for a given
IPDS tray. It stops and requests more paper only when all those trays
are empty.
You can create input configurations by organizing the stocks you will
use in a certain application or set of applications into unique groups
with different paper trays. This allows the host to access different
paper stock from each tray.
Note: When configuring feeder groups, the printer feeds from any
of the feeder trays in the group, with no particular order to follow. In
other words, the printer will not necessarily start with the lowest
numbered tray in the group.
By placing media icons in the IPDS and Printer Tray cells on the Input
Configuration window, you communicate to the printer which feeder
trays to use for each IPDS tray the data stream specifies. At the same
time, you are setting up the Main window input section to display the
stock loaded in each printer tray.
4-32
XEROX DOCUPRINT 92C IPS GUIDE TO CONFIGURING AND MANAGING THE SYSTEM
SETTING THE SYSTEM CONFIGURATION
Example of an input configuration
Here is an example of a hypothetical input configuration you might
create:
You have an application in which only IPDS trays 1 and 2 are called
out, with most of the job calling for IPDS tray 1. The media you will
be using are 20-pound white USLetter and 60-pound blue USLetter.
You have a high-capacity feeder and would like to use all four
available trays.
To accomplish this, you could create a configuration like this:
•
In the IPDS Trays row, specify the 20-pound white stock in the
IPDS Tray 1 cell and the 60-pound blue in the IPDS Tray 2 cell.
•
In the Printer Trays row, specify the 20-pound white paper in the
cells for Printer Trays 1, 3, and 4.
•
Specify the 60-pound blue paper in the Printer Tray 2 cell only,
because a relatively small amount of that stock will be required.
The following figure shows the configuration described above.
Figure 4-18. Example of an input configuration, displayed on
the IPS main window
By invoking this configuration, you ensure your job will print as
follows (be sure the physical printer trays actually contain the stock
you specified):
•
The IPS will feed from printer tray 1 for all parts of the job in
which IPDS tray 1 is specified in the data stream. These pages
will be printed on the 20-pound white paper.
XEROX DOCUPRINT 92C IPS GUIDE TO CONFIGURING AND MANAGING THE SYSTEM
4-33
SETTING THE SYSTEM CONFIGURATION
•
When tray 1 is empty, feeding will switch to tray 3, then tray 4,
without any intervention from the operator. Printing will not stop
until trays 1, 3, and 4 are empty. (These pages will continue to
be printed on the 20-pound white paper.)
•
For those parts of the job in which IPDS tray 2 is specified,
feeding switches to printer tray 2. Those pages will be printed
on the 60-pound blue card stock.
Selecting simplex or duplex printing
The 92C IPS allows you to switch from simplex to duplex printing (or
vice versa) within and between print jobs.
Duplex or mixed plex jobs need to be printed from IPDS trays with
duplex icons. Jobs that need to print in simplex only, such as label
stock or transparencies, should be printed from IPDS trays with
simplex icons. Refer to the section “Creating a media icon” later in
this chapter for information on how to create simplex and duplex
printing icons.
Note: For the 4050/4090, 4850/4890, and DP92C IPS, the systerm
must clear the paper path before each plex change. (The 96/4635/
180 IPS does not do this.) Performance is affected to some extent for
all printers at each plex change. The degree to which performance is
affected depends on whether or not the paper path is cleared and on
the number of plex changes within the job.
To specify simplex or duplex printing, select an IPDS tray with the
appropriate media icon, as shown below.
Figure 4-19. Single (simplex) media icon
Figure 4-20. Single or double (simplex or duplex) media icon
4-34
XEROX DOCUPRINT 92C IPS GUIDE TO CONFIGURING AND MANAGING THE SYSTEM
SETTING THE SYSTEM CONFIGURATION
Setting up margin values
The IPS software allows you to save multiple margin settings by
making the margin values part of the attributes of the IPDS trays.
Also, each IPDS tray can be defined with different margin values.
To set the margin values of an IPDS tray, follow these steps:
1. In the Input Configuration section of the main window, select the
input configuration of your choice using the default pull-down
menu.
Figure 4-21. default pull-down menu
The Input Configuration window displays.
Figure 4-22. Input Configuration window
2. Click the Modify Margin Settings button.
XEROX DOCUPRINT 92C IPS GUIDE TO CONFIGURING AND MANAGING THE SYSTEM
4-35
SETTING THE SYSTEM CONFIGURATION
3. From the Modify Margin Settings window, select one or more
IPDS trays.
Note: The current margin values for the first IPDS tray selected
displays.
Figure 4-23. Modify Margin Settings window
4. Change the margins to the desired values.
5. Click Apply.
6. Repeat steps 3 through 4 until all trays contain the desired
values.
7. Click Quit.
8. From the Input Configuration window, click Apply and Save.
9. From the Input Configuration window, click Quit.
Setting up the Media Library
The Media Library is a virtual representation of the stocks (media)
that you have available for loading in your IPS feeder trays. To create
an input tray configuration, you copy (by dragging and dropping)
media icons from this Library to the tray cells on the Input
Configuration window. When you place icons for the same stock in
an IPDS tray cell and a printer tray cell, the IPDS and printer trays are
automatically mapped together.
When your IPS is first installed, your Xerox representative assists
you in placing media icons in the Media Library for the stocks that you
need for what will be your Default input configuration. If you will be
using stocks in addition to those already in your Media Library, you
must add them. You can create icons representing standard sizes,
weights, form types (3-hole, etc.), and colors of stocks. In addition,
you can create customized icons for non-standard media.
4-36
XEROX DOCUPRINT 92C IPS GUIDE TO CONFIGURING AND MANAGING THE SYSTEM
SETTING THE SYSTEM CONFIGURATION
Creating a media icon
To create new icons for your Media Library, follow these steps:
1. In the Input Configuration section of the main window, using the
default pull-down list, select the input configuration of your
choice. The IPS Input Configuration window displays.
Note: The first time you see this window, it displays your
Default input tray configuration, which your Xerox representative
set up for you at installation. Subsequently, when you open this
window it displays the current input configuration.
Figure 4-24. IPS Input Configuration window
2. Click the Show Media Library button, centered near the bottom
of the window, below the row of Printer Trays cells. The Media
Library window displays.
XEROX DOCUPRINT 92C IPS GUIDE TO CONFIGURING AND MANAGING THE SYSTEM
4-37
SETTING THE SYSTEM CONFIGURATION
Figure 4-25. Media Library window
The Media Library window contains the following elements:
•
•
Buttons
—
Add — Displays the Create a New Media Type
window, which enables you to add new media icons to
the Library.
—
Edit — Displays the Edit a Media Type window, which
allows you to change media icons in the Library.
—
Delete — Deletes a media icon from the Library.
—
Edit Defaults — Displays the Edit the Media Defaults
window, which allows you to create or change the
default media attributes (except for media size)
—
Quit — Closes the Media Library window
Media icons — Icons representing the different stocks that
you use in your IPS printer.
3. Click the left mouse button on the Add button. The Media Type
window displays.
4-38
XEROX DOCUPRINT 92C IPS GUIDE TO CONFIGURING AND MANAGING THE SYSTEM
SETTING THE SYSTEM CONFIGURATION
Figure 4-26. Media Type window
4. On the Media Type window, make your selections in the
following fields for the new media icon you are adding.
Note: The icon display box at the bottom of this window shows
the media icon with which you are currently working. Each time
you make a selection or change in any of the fields on this
window, that change is reflected in the display box. By watching
this box, you are able to continually monitor what you are
creating without needing to apply or save your work first.
•
Size — Lists all the standard sizes of stocks supported on
your IPS printer. To select a media size, highlight it by
clicking it with the left mouse button.
XEROX DOCUPRINT 92C IPS GUIDE TO CONFIGURING AND MANAGING THE SYSTEM
4-39
SETTING THE SYSTEM CONFIGURATION
Note: This list contains only standard stock sizes. You
cannot create or specify paper sizes not contained in this
list.
If you have a job that requires a size of paper that is not on
this size list, add it using the Tools icon on the printer control
console. (Refer to the “Printers” chapter in the Xerox
DocuPrint 92C IPS System Overview Guide.) However, the
size must be within the length/width range supported by
your IPS printer. (Refer to the “Paper and other print media”
chapter in the Xerox DocuPrint 92C IPS System Overview
Guide.)
•
Plex Capability — Specifies whether the media will be
simplex or duplex, or simplex only.
•
Form Type — Lists the types of stock you will use in your
IPS printer (e.g., standard, 3-hole, transparency, etc.). To
select a form type from this list, highlight your selection by
clicking it with the left mouse button.
You can create new stock types to add to this list by
following these steps:
a.
Click the Add button, located below the Form Type list
box. The following window displays:
Figure 4-27. Add a New Form Type window
b.
With the cursor positioned on the Add a New Form
Type window, enter the name of the media type you
want to add to the list (such as 2-hole, Reinforced,
etc.).
c.
Click Add on the Add a New Form Type window. Your
new stock type displays on the Form Type list.
To create a temporary form type: You may have occasion
to create a media icon requiring a form type you know you
will not need again for any other stock. You do not want to
add this form type to the list of those you use frequently. For
this, you can create a temporary form type that will be
available only while you are creating your media icon.
4-40
a.
On the Other Form Type line, located below the Add
and Delete buttons, click the left mouse button.
b.
Enter a name for the new form type. The text you enter
displays in the media icon display box at the bottom of
the screen as well as on the Other Form Type line. Do
not click the Add button.
XEROX DOCUPRINT 92C IPS GUIDE TO CONFIGURING AND MANAGING THE SYSTEM
SETTING THE SYSTEM CONFIGURATION
Note: After you complete all edits to your media icon,
click Apply, and close the Create a new Media Icon
window, your temporary form type will be deleted.
If you want to save the temporary form type to the Form
Type list, do the following before closing the window:
1. Click the Add button. The Add a New Form Type
window displays with your temporary form name
already displayed on the New Form Type Name
line.
2. Click the Add button. Your formerly temporary
form name will now appear in the Form Type
list.
To delete a name from the Form Type list: Click the item
to be deleted, then click the Delete button located below the
Form Type box.
•
Weight (lbs.) — Specifies in pounds the weight of the
media you are adding. Use the incremental spin buttons to
display your desired paper weight. You can specify weights
only within the range supported by your printer.
For information on changing the weight units, refer to the
“Specifying the media units” section earlier in this chapter.
•
•
Color — Specifies the color of the stock represented by the
media icon you are creating. There are two ways to do this:
—
Select a standard stock color by clicking one of the
color boxes in this field.
—
Specify another color by entering its name on the
Other Color line below the color boxes. The text you
enter also displays in the media icon display box at the
bottom of the screen.
Icon display box — Displays the media icon you are
currently creating or changing, and reflects all changes as
you make them.
5. Click Apply. Your new media icon displays in the Media Library
window.
Note: If you want the Create a new Media Type window to
remain open while you create multiple icons, be sure the pin
button in the upper left corner of this window is “in” before you
click Apply. Otherwise, the window closes when you click Apply,
and you must reopen it to create another icon.
•
To “push the pin in,” click once the pin button that is in the
“out” position.
•
When you are finished creating icons, click once the pin
button (in the “in” position), or click the Cancel button to
close the window.
6. Repeat steps 3–5 for any additional media icons you wish to
create.
XEROX DOCUPRINT 92C IPS GUIDE TO CONFIGURING AND MANAGING THE SYSTEM
4-41
SETTING THE SYSTEM CONFIGURATION
Changing a media icon
To change or edit a media icon in your Media Library, follow these
steps:
1. Access the Media Library window. For the procedure, refer to
the “Creating a media icon” section earlier in this chapter.
2. On the Media Library window, do one of the following:
•
•
Double-click the media icon you want to change, or
Single-click the icon to be changed (a white box displays
around the selected icon), then click the Edit button.
3. On the Media Type window, make any desired changes to the
selected icon’s parameter fields. The changes you make are
reflected in the display box at the bottom of the Media Type
window. For an illustration of the window and explanation of the
fields on it, refer to the “Creating a media icon” section earlier in
this chapter.
4. Click Apply to save your changes. The selected icon displays in
the Media Library with the revisions you made.
Deleting a media icon
To delete a media icon from the Media Library:
1. Access the Media Library window. For the procedure, refer to
the “Creating a media icon” section earlier in this chapter.
2. On the Media Library window, click the media icon you want to
delete.
3. Click the Delete button at the top of the window. A confirmation
window displays.
4. Click OK. The selected media icon is removed from the Media
Library.
Editing the media defaults
A set of default media attributes (size, weight, form type, and color)
is established at installation by you or your Xerox representative,
based on your printing requirements.
These default media attributes serve two purposes:
•
When you open the Media Type window, the default attribute
values (size, form type, weight, and color) appear in the various
fields.
•
If you load a stock that is not the size specified in the current
input configuration, the IPS detects this when it checks the
feeder tray adjustment. It does not have a way to identify the
other attributes (form type, weight, and color); therefore, it
assumes the default values for these attributes.
A message window displays, stating that the configuration has
changed. You may then either accept this assumed input
configuration or manually change it.
You are able to edit the default media attributes in much the same
way you would edit any media icon.
4-42
XEROX DOCUPRINT 92C IPS GUIDE TO CONFIGURING AND MANAGING THE SYSTEM
SETTING THE SYSTEM CONFIGURATION
1. Access the Media Library window. For the procedure, refer to
the “Creating a media icon” section earlier in this chapter.
2. Click the Edit Defaults button on the Media Library window. The
Edit the Media Defaults window displays.
Figure 4-28. Media Defaults window
3. Make changes to all desired fields. (For an explanation of these
fields and the procedures for changing them, refer to the
“Creating a media icon” section earlier in this chapter.)
Note: The Media Size field cannot be edited. The default
media size is always the current setting for physical feeder
tray 1. This value is the only item displayed in the Media Size
field.
XEROX DOCUPRINT 92C IPS GUIDE TO CONFIGURING AND MANAGING THE SYSTEM
4-43
SETTING THE SYSTEM CONFIGURATION
Adding a new input configuration
To create a new input configuration:
1. From the Input Configuration pull-down menu, select any name
to use as the base for building the new configuration. (You will
rename the new file, so the existing file you selected to build
from will not be changed.)
Figure 4-29. Input Configuration pull-down menu
If you wish, you can use whatever input configuration was
already displayed when you opened the window, without
selecting from the Input Configuration menu.
2. To access media icons for the stocks you want for this
configuration, click the Show Media Library button to display the
Media Library window. (If all the stocks you need are already
displayed in tray cells on the IPS Input Configuration window,
you can skip this step.)
4-44
XEROX DOCUPRINT 92C IPS GUIDE TO CONFIGURING AND MANAGING THE SYSTEM
SETTING THE SYSTEM CONFIGURATION
Figure 4-30. Input Configuration window
3. If you need any stocks for which there are no icons in the Media
Library, create media icons for them. (Refer to the “Setting up
the Media Library” section earlier in this chapter.)
4. In the Printer Trays field (second row of boxes) on the Input
Configuration window, specify the media that has been or will
be loaded in the printer feeder trays.
Printer Trays field: This field consists of a row of boxes called
“tray cells,” each of which represents one of the printer’s feeder
trays. The number above each tray cell is the tray’s identification
number. (The number of tray cells in this field is the number of
input trays your IPS has.)
Any printer tray for which a particular stock has been identified
displays a media icon in its tray cell. A media icon graphically
represents a stock, showing its size, weight, form type, and
color.
XEROX DOCUPRINT 92C IPS GUIDE TO CONFIGURING AND MANAGING THE SYSTEM
4-45
SETTING THE SYSTEM CONFIGURATION
Figure 4-31. Tray cells section of a sample input configuration
Example: In the example shown above, the cells for printer
trays 1, 2, 3, and 4 all contain media icons for 20-pound white
USLetter (8.5 by 11-inch) paper. Tray 5 is configured with 20pound green three-hole USLetter paper, and tray 6 has 110pound goldenrod USLetter card stock.
To set up the printer tray cells: Place the media icons for the
stocks that will be loaded in the printer in the cells in the Printer
Trays row. Follow these steps for each tray you are configuring:
a.
On the Media Library window, position the cursor over the
media icon you are selecting for that tray.
b.
Holding down the left mouse button, drag the icon to the IPS
Configuration window and to the printer tray cell where you
want it, then release the mouse button (“drag and drop”).
•
If you drag an icon to an empty cell, that icon is copied
into that cell.
•
If you drag an icon to a cell that already contains an
icon, the icon you drag replaces the one that was there.
•
To delete an icon from a cell and leave the cell empty,
drag the icon to the “Trash Bin,” located to the right of
the Printer Tray cells.
You may drag and drop media icons from three places:
•
4-46
The Media Library: Drag any icon from the Media
Library window to a destination tray cell on the IPS
Input Configuration window.
XEROX DOCUPRINT 92C IPS GUIDE TO CONFIGURING AND MANAGING THE SYSTEM
SETTING THE SYSTEM CONFIGURATION
•
Other tray cells: Drag a media icon from any other
IPDS or Printer Tray cell on the IPS Input Configuration
window.
•
The Create or Edit Media Library windows: You can
drag the icon displayed in the viewing box at the bottom
of the window to any tray cell on the Input Configuration
window.
c.
Repeat this procedure for all printer tray cells you want to
fill.
d.
When finished, click the Dismiss button on the Media
Library to close it.
5. In the “IPDS Trays” field (top row of boxes), place a media icon
in each IPDS tray that is called out in the print job, to map it to
the printer tray containing the media on which you want that
part of the job to print.
IPDS Trays field: This field consists of a row of eight tray cells,
each of which represents an input tray that a job might specify.
Mapping IPDS input trays: By placing copies of the same
media icon in a printer tray cell and an IPDS tray cell, you map
that IPDS tray to that printer tray. Then, when the job calls out
that IPDS tray, paper feeds from the printer tray to which it is
mapped.
•
The media icon in each IPDS tray cell represents the stock
in the printer tray to which that IPDS tray is mapped.
•
The number(s) below each tray cell indicate the printer trays
to which the IPDS tray has been mapped.
Note: When a print job calls for paper sizes that span over
different pitch modes, the software will either cycle down or run
at a lower pitch mode, based on the different pitch modes
required, the paper sizes called for, the speed of the printer, and
the time it takes to shut down the printer.
Therefore, map the IPDS trays based on your needs; Do not
place media icons in the IPDS cells if your job does not require
it.
XEROX DOCUPRINT 92C IPS GUIDE TO CONFIGURING AND MANAGING THE SYSTEM
4-47
SETTING THE SYSTEM CONFIGURATION
Figure 4-32. Tray cells section of a sample input configuration
Example: In the example shown above, IPDS trays 1, 2, 3, and
4 are all mapped to printer trays 1 and 2. Note that under each
of these four IPDS tray cells you see the printer tray numbers
(1,2), to which the IPDS tray is mapped. This means that paper
for all parts of the print job in which tray 1 is specified by the
IPDS data stream will feed from feeder tray 1. When printer tray
1 is empty, feeding will automatically switch to printer tray 2.
Printing will not stop until both printer trays are empty. (The
same thing will happen for parts of the job calling for IPDS tray
2, 3, or 4, because all of them are also mapped to printer trays 1
and 2 for this configuration.)
The paper that should be loaded in printer trays 1 and 2 is 20pound white USLetter, as indicated by the media icons in each
printer tray cell. This means that all parts of the job in which tray
1, 2, 3, or 4 is specified in the data stream will print on 20-pound
white USLetter (provided this paper is loaded in the physical
printer trays that have been mapped to IPDS trays 1 through 4).
Any parts of the job that call out IPDS tray 5 will print on the
three-hole green paper, which is specified for printer tray 3, to
which IPDS tray 5 is mapped. (This might be section dividers in
the document.) IPDS tray 6 is mapped to printer tray 4, so the
job parts calling out tray 6 (possibly the front and back covers of
the document) will print on the 110-pound goldenrod card stock.
4-48
XEROX DOCUPRINT 92C IPS GUIDE TO CONFIGURING AND MANAGING THE SYSTEM
SETTING THE SYSTEM CONFIGURATION
To set up the IPDS tray cells: In each IPDS tray cell, place the
same media icon that is in the cell for the printer tray to which
you want to map that IPDS tray. Follow these steps for each
IPDS tray you are mapping:
a.
On the Input Configuration screen, drag the media icon from
the printer tray cell to the IPDS tray cell you want to map to
it. The media icon is copied into the IPDS tray cell where
you release the mouse button.
b.
Repeat step a for each IPDS tray called out in the print job.
Note: The display of eight IPDS tray cells means eight IPDS
trays are reported to the host when the printer is started. Any
IPDS tray not containing a media icon is flagged to the host as
“disabled.” If a job calls out an IPDS tray marked disabled, PSF
on the host substitutes one of the available trays (those
containing media icons), and displays an error message.
6. Click Add. The File Name Entry window displays.
Figure 4-33. File Name Entry window
7. Enter the name for the new input configuration.
8. Click OK to save the new input configuration and return to the
IPS Input Configuration window. Your new configuration name
is added to the Input Configuration pull-down menu.
9. If you want to put your new configuration into effect immediately,
click Apply & Save.
10. Click Quit to return to the IPS main window.
XEROX DOCUPRINT 92C IPS GUIDE TO CONFIGURING AND MANAGING THE SYSTEM
4-49
SETTING THE SYSTEM CONFIGURATION
Changing an input configuration file
To change an existing input configuration:
1. From the Input Configuration pull-down menu, select the input
configuration you want to change.
Figure 4-34. Input Configuration pull-down menu
2. Create or change any media icons you need in the Media
Library. (Refer to the “Setting up the Media Library” section
earlier in this chapter.)
3. Make the necessary changes to the media icons displayed in
the IPDS and Printer Tray cells. (For an explanation of these
fields, refer to the “Adding a new input configuration” section
earlier in this chapter.)
4. Click Save to save your changes, or Apply & Save to set your
selections and to put your updated configuration into effect.
5. On the confirmation prompt window that displays, click Apply.
6. On the Input Configuration window, click Quit to return to the
main window.
4-50
XEROX DOCUPRINT 92C IPS GUIDE TO CONFIGURING AND MANAGING THE SYSTEM
SETTING THE SYSTEM CONFIGURATION
Deleting an input configuration file
To delete an input configuration:
1. From the IPS main window Input section, click the Modify
button. The IPS Input Configuration window displays.
2. From the Input Configuration pull-down menu, select the input
configuration you want to delete.
Figure 4-35. Input Configuration pull-down menu
Note: The “Default” input configuration cannot be deleted.
Attempts to do so produce an error message.
3. Click Delete. A Delete File confirmation prompt window
displays.
Figure 4-36. Delete File confirmation prompt
4. In the confirmation prompt window, click OK to delete the input
configuration and return to the IPS Input Configuration window.
The deleted file name is removed from the Input Configuration
pull-down menu.
5. Click Quit to return to the IPS main window.
XEROX DOCUPRINT 92C IPS GUIDE TO CONFIGURING AND MANAGING THE SYSTEM
4-51
SETTING THE SYSTEM CONFIGURATION
Correcting a feeder tray mismatch error
When a feeder tray is adjusted for a certain size paper, the system
senses that adjustment. (Other stock attributes, such as weight,
color, and form type, are not sensed.) The IPS also reads the input
configuration, which informs it of what size paper should be loaded in
any particular tray.
A feeder tray mismatch error is signaled when the IPS detects that
the paper being specified in the current input configuration for a
particular printer tray is not the same size as the paper actually
loaded in that physical tray.
When you click Apply & Save to implement the configuration, an error
message window displays, giving the number of the printer tray, the
media size that is loaded in it, and the size paper that was specified
for it in its corresponding tray cell. The Input Configuration window
remains open and the configuration you are working on is not
updated.
Figure 4-37. Feeder tray mismatch error message
If a tray mismatch error occurs, follow these steps:
1. Click OK to close the message window and unlock the screen.
2. On the Input Configuration window, do one of the following:
•
In the mismatched printer tray cell, place a media icon that
matches the paper already loaded in the printer.
•
Replace the paper in the physical tray with stock of the size
specified in your input configuration.
3. Click Apply & Save. If there are no more mismatches, the Input
Configuration window closes and your configuration is updated
and applied.
4. If there are additional mismatches, or the first one still has not
been fixed, the Mismatch error message window redisplays and
the Input Configuration window remains open. Repeat steps 1
through 3 until all mismatches are corrected and the Input
Configuration window remains closed.
4-52
XEROX DOCUPRINT 92C IPS GUIDE TO CONFIGURING AND MANAGING THE SYSTEM
SETTING THE SYSTEM CONFIGURATION
Specifying the output configuration
This section describes the procedures you use to specify output tray
configurations for your system. (For an explanation of the buttons on
these windows, refer to the “Buttons” section in the “Introduction to
the graphical user interface” section.)
When you specify the output configuration, you specify one or more
stacker trays for each IPDS output bin specified in a print job. The
printer delivers the printed output to the trays specified for a given
IPDS bin; it stops and notifies you to unload output only when all
those trays are full.
Note: When configuring stacker groups, the printer feeds from any
of the stackers in the group, with no particular order to follow. In other
words, the printer will not necessarily start with the lowest numbered
stacker in the group.
The ability to configure multiple output trays to receive a print job
greatly reduces interruptions for unloading output.
XEROX DOCUPRINT 92C IPS GUIDE TO CONFIGURING AND MANAGING THE SYSTEM
4-53
SETTING THE SYSTEM CONFIGURATION
Example of an output configuration
In the Output Configuration section of the main window, the
horizontal rows of icons represent the IPDS bins specified in the job
as the output destination. The vertical columns represent the actual
printer bins to which output will be delivered.
When a bin has been selected as part of the configuration, it displays
bolded on the screen. By looking at the printer bin number or letter at
the top of the column above each bolded icon, and at the IPDS bin
number at the beginning of the row beside the same bolded icon, you
can see which IPDS bins have been mapped to which printer bins.
Following is an example of an output configuration.
Figure 4-38. Example of an output configuration, displayed on
the IPS main window
In the illustration above, IPDS bin row 2 has the stacker icon in the
Printer Bin column 1 bolded. This shows that IPDS bin 2 has been
mapped to printer output bin (stacker tray) 1. Therefore, all parts of
the job for which IPDS bin 2 is called out will be delivered to stacker
tray 1. When stacker 1is full, printing will stop until it is emptied.
Because IPDS bin 1 is permanently mapped to the printer sample
tray, its row contains only the short sample tray icon, bolded.
Note: To avoid all output going to the sample tray (bin 1), make
bin 2 as your default.
4-54
XEROX DOCUPRINT 92C IPS GUIDE TO CONFIGURING AND MANAGING THE SYSTEM
SETTING THE SYSTEM CONFIGURATION
Creating a new output configuration
To create a new output configuration:
1. From the Output Configuration pull-down menu on the IPS main
window, select any name to use as the base for the new output
configuration.
Figure 4-39. Output Configuration pull-down menu
(You will rename the new file, so the existing file you selected to
build from will not be changed.)
The Output Configuration window displays.
Figure 4-40. Output Configuration window (systems without
DFA)
XEROX DOCUPRINT 92C IPS GUIDE TO CONFIGURING AND MANAGING THE SYSTEM
4-55
SETTING THE SYSTEM CONFIGURATION
2. Make any desired changes in the fields described below.
•
Bin Selection Mode — Specifies how the IPS will
determine the bin to which the job will be delivered.
The option buttons are:
—
Use Default Bin — Output will be delivered to the bin
you designate from the Default Bin Number pull-down
menu.
—
Allow Host Control — The host handles bin
selection, and the system uses the bin you selected to
correspond to the IPDS Bin number.
Note: If you are enabling DFA, select “Allow Host Control”
for the bin selection mode.
•
Default IPDS Bin — Specifies the number for the bin to
which output will be delivered if “Use Default Bin” is selected
from the Bin Selection Mode menu, or if a bin number is not
specified by a job on the host.
Note: Output is delivered to the default bin if one of the
following conditions applies:
—
“Use Default Bin” is selected as the Bin Selection
Mode.
—
“Allow Host Control” is selected as the Bin Selection
Mode, but there is no OUTBIN statement for the host.
—
“Allow Host Control” is selected as the Bin Selection
Mode, but the OUTBIN specified is greater than the
number of stackers.
Figure 4-41. Default IPDS Bin pull-down menu
Note: The IPDS Bin 1 row is set to Sample Tray, and
cannot be changed. If you want your output to be delivered
to the stacker trays, you must select something other than
Bin 1 for the Default Bin Number.
4-56
•
(DFA systems only) Check the “Finishing” box then click the
Finishing Attributes button to specify the finishing attributes.
Refer to “Specifying finishing attributes” later in this section.
•
(Systems with a stitcher only) Check the “Stitching” box
then click the Stitching Attributes button to specify the
finishing attributes. Refer to “Specifying stitching attributes”
later in this section.
XEROX DOCUPRINT 92C IPS GUIDE TO CONFIGURING AND MANAGING THE SYSTEM
SETTING THE SYSTEM CONFIGURATION
3. (DFA systems only) From the DFA Profile pull-down menu on
the IPS main window, select the DFA output personality profile
you will use with this configuration.
Figure 4-42. DFA Profile pull-down menu
If you want to create a new DFA output profile at this time, refer
to the “Adding a DFA output personality profile” section later in
this chapter.
If you do not want to make changes to the displayed profile,
click Quit on the Output DFA Profile window to close it.
Note: If DFA is not enabled on your system, this pull-down
menu does not appear on your IPS Output Configuration
window.
4. On the left side of the Output Configuration window, map each
IPDS bin called out in the job to the stacker(s) that will receive
the parts of the job in which that IPDS bin is specified.
•
IPDS Bins — Each (horizontal) row of rectangular buttons
represents an IPDS bin called out in the job.
•
Printer Bins — Each (vertical) column of bin buttons
represents one of your IPS printer’s stacker bins/trays.
To map IPDS bins to printer stacker bins: In each IPDS bin
row, click the button for the physical printer bin that you want to
receive the parts of the job calling for that IPDS bin. You may
select more than one printer button in each row.
Note: In the illustration below, you can see that the IPDS Bins
row 1 does not contain any selectable bin buttons—only a
sample tray specification. IPDS bin 1 is coded in the software to
be mapped to the sample tray; you are not able to change this
part of the output configuration. All parts of any print job in which
the data stream calls for IPDS bin 1 are delivered to the sample
tray.
XEROX DOCUPRINT 92C IPS GUIDE TO CONFIGURING AND MANAGING THE SYSTEM
4-57
SETTING THE SYSTEM CONFIGURATION
Figure 4-43. Bins section of the Output Configuration window
Example: In the illustration, IPDS bin row 2 has the Stacker 1
button highlighted (selected). This shows that IPDS bin 2 has
been mapped to printer output bin (stacker tray) 1. Therefore, all
parts of the job for which IPDS bin 2 is called out will be
delivered to stacker tray 1. When stacker 1 is full, printing will
stop until it is emptied.
The row for IPDS bin 3 contains a highlighted bin button for
Stacker 2. This means that all parts of the printed job calling for
IPDS bin 3 will go to stacker 2. When stacker 2 is full, printing
will stop until it is emptied.
5. On the IPS Output Configuration window, click Add. The File
Name Entry window displays.
Figure 4-44. File Name Entry window
6. Enter the name of the new configuration.
7. Click OK to save the new configuration and return to the IPS
Output Configuration window. Your new configuration is added
to the Output Group Name menu.
8. If you want to put your new configuration into effect immediately,
click Apply & Save, then, on the confirmation window that
displays, click Apply.
9. Click Quit to return to the IPS main window.
4-58
XEROX DOCUPRINT 92C IPS GUIDE TO CONFIGURING AND MANAGING THE SYSTEM
SETTING THE SYSTEM CONFIGURATION
Specifying finishing attributes
(for systems with DFA)
To specify finishing attributes, follow these steps:
1. On the Output Configuration window, check the “Finishing” box,
then click the Finishing Attributes button. The Finishing
Attributes window displays.
Figure 4-45. Finishing Attributes window (systems with DFA)
2. On the Finishing Attributes window, make selections or enter
values in the fields described below.
•
Set Sheet Delivery — Specifies whether sheets will be
delivered Face Up or Face Down.
•
Page Order within Set — Specifies the order in which
pages in a set will be delivered to the output bin: first-to-last
or last-to-first.
—
1 to N — Output sheets are delivered to the output bin
in ascending order (the first page is delivered first).
XEROX DOCUPRINT 92C IPS GUIDE TO CONFIGURING AND MANAGING THE SYSTEM
4-59
SETTING THE SYSTEM CONFIGURATION
—
N to 1 — Output sheets are delivered to the output bin
in descending order (the last page is delivered first).
Note: The size of the ordered set must fall within the
specified maximum set size.
•
•
End of Set Criteria — Specifies the criterion that marks the
end of a set for your system.
—
Offset Stacker — A JOG (offset) command in the job
indicates the end of a set.
—
MarkForm — A MARKFORM command in the job
indicates the end of a set.
End of Job Criteria — Specifies the criterion that marks the
end of a job.
—
None — No end-of-job marking
—
MarkForm — A MARKFORM command in the job
indicates the end of a job
•
Minimum Set Size — Specifies the minimum number of
sheets that can be in a set. You use this field to ensure that
every job contains enough pages to fulfill the requirements
for any finishing device. The range is 1 to 10.
•
Maximum Set Size — Specifies the maximum number of
sheets that can be in a set. The range for DFA sets is 10 to
60.
•
Maximum Set Size Exceeded — Specifies the action to
take if the maximum set size is exceeded.
•
—
Normal — Pages print as if the Finishing Attributes
were not specified (that is, the page order, end of set
and end of job criteria are not honored).
—
Split into Multiple Sets — Pages are split into
multiple sets, each set up to 60 pages.
—
1 to N Without Finishing — Output sheets are
delivered to the output bin in ascending order (the first
page is delivered first). Use the Redirect to IPDS Bin
pull-down list to specify the desired output bin.
Recovery — Specifies the boundary to which the system
will recover a job if an error occurs during printing.
—
Sheet — Recovers the job to the sheet boundary. If a
third-party finishing device is attached, all queued
pages are printed.
—
Set — Recovers the job to the set boundary. If a thirdparty finishing device is attached, the IPS prints all
pages that are queued, and also reprints any pages in
the segment that were printed before the error
occurred.
3. Click Quit to specify these finishing attributes for the present
configuration file and return to the IPS Output Configuration
window.
4-60
XEROX DOCUPRINT 92C IPS GUIDE TO CONFIGURING AND MANAGING THE SYSTEM
SETTING THE SYSTEM CONFIGURATION
Specifying stitching attributes
(for systems with a stitcher)
To specify stitching attributes, follow these steps:
1. On the Output Configuration window, check the “Stitching” box,
then click the Stitching Attributes button. The Stitching
Attributes window displays.
Figure 4-46. Stitching Attributes window
2. On the Stitching Attributes window, make selections or enter
values in the fields described below.
•
Set Sheet Delivery — Specifies whether sheets will be
delivered Face Up or Face Down.
•
Page Order within Set — Specifies the order in which
pages in a set will be delivered to the output bin: first-to-last
or last-to-first.
—
1 to N — Output sheets are delivered to the output bin
in ascending order (the first page is delivered first).
—
N to 1 — Output sheets are delivered to the output bin
in descending order (the last page is delivered first).
Note: The size of the ordered set must fall within the
specified maximum set size.
•
•
End of Set Criteria — Specifies the criterion that marks the
end of a set for your system.
—
Offset Stacker — A JOG (offset) command in the job
indicates the end of a set.
—
MarkForm — A MARKFORM command in the job
indicates the end of a set.
Maximum Set Size — Specifies the maximum number of
sheets that can be in a set. The range for DFA sets is 10 to
50.
XEROX DOCUPRINT 92C IPS GUIDE TO CONFIGURING AND MANAGING THE SYSTEM
4-61
SETTING THE SYSTEM CONFIGURATION
3. Click Quit to specify these stitching attributes for the present
configuration file and return to the IPS Output Configuration
window.
Changing an output configuration
To change an output configuration:
1. On the Output section of the IPS main window, click the Modify
button. The IPS Output Configuration window displays.
2. From the Output Group Name pull-down menu, select the
configuration file you want to change.
3. Make the necessary changes to the output configuration fields
and the Finishing Attributes or Stitching Attributes options, if
applicable. (Refer to the “Creating a new output configuration”
section earlier in this chapter.)
4. Click Update (or Apply & Save if you want to put the changed
configuration in effect immediately). A confirmation window
displays.
5. On the confirmation window, click Update to save the new
settings.
6. Click Quit to return to the IPS main window.
4-62
XEROX DOCUPRINT 92C IPS GUIDE TO CONFIGURING AND MANAGING THE SYSTEM
SETTING THE SYSTEM CONFIGURATION
Deleting an output configuration
To delete an output configuration file for the system:
1. On the Output section of the IPS main window, click the Modify
button. The IPS Output Configuration window displays.
2. From the Output Configuration pull-down menu, select the
configuration you want to delete.
Note:
You cannot delete the Default output configuration.
Figure 4-47. Output Configuration pull-down menu
3. Click Delete to delete the selected output configuration. A
confirmation window displays.
4. On the confirmation window, click Delete to delete the output
configuration file and return to the IPS Output Configuration
window. The file name is removed from the Output Group Name
pull-down menu.
5. Click Quit to return to the IPS main window.
Adding a DFA profile
The values you enter for a DFA profile are provided by the vendor of
your finishing equipment, except the Set Media Modification (SMM)
values for Finishing Functions 1 and 2 (if used). The SMM values are
specified in the job by your applications programmer.
To create a new DFA profile:
1. Locate the DFA Profile pull-down menu on the IPS main window
(below the Output Configuration pull-down menu).
Figure 4-48. DFA Profile pull-down menu
Note: The DFA Profile menu displays only if you have DFA
enabled on your IPS.
XEROX DOCUPRINT 92C IPS GUIDE TO CONFIGURING AND MANAGING THE SYSTEM
4-63
SETTING THE SYSTEM CONFIGURATION
2. From the DFA Profile pull-down menu, select any name to use
as a base for the new profile. (You will rename the new file, so
the existing file you selected to build from will not be changed.)
Figure 4-49. DFA Profile Name pull-down menu
3. On the Output DFA Profile window, specify the configuration
settings for the new output DFA profile.
Figure 4-50. Output DFA Profile window
4-64
XEROX DOCUPRINT 92C IPS GUIDE TO CONFIGURING AND MANAGING THE SYSTEM
SETTING THE SYSTEM CONFIGURATION
You may make changes to the following fields:
•
Time Between Sheets (ms) (p1) — Specifies the time
required by the third party finishing device from the top of
the sheet to the bottom of the sheet. The printer inserts
skips to enforce this timing. You can specify from 0 to 32767
milliseconds.
•
Time Between Sets (ms) (p3 or p3a) — Specifies the time
required by the third party finishing device from the top of
the last sheet in a set to the bottom of the first sheet in the
next set. The printer inserts skips to enforce this timing. You
can specify from 0 to 32767 milliseconds.
•
Minimum Set Time (ms) (p3b) — (Available on some
systems) Specifies the minimum time required by the third
party finishing device to process a set.
•
Time to Cycle Up (ms) (p5) — Specifies the amount of
time required by the third party finishing device to obtain
Ready status after receiving a CycleUp signal. You can
specify from 0 to 32767 milliseconds.
•
Sheet Jam Time (ms) (p2) — Specifies the maximum time
that the printer will wait to receive a SheetDelivered signal
from the third party finishing device after sending a
SheetExit signal. A jam is declared when the third party
finishing device signal exceeds the time increment you
specify. You can specify from 0 to 13000 milliseconds.
•
Set Jam Time (ms) (p4) — Specifies the maximum time
that the printer will wait to receive a SetDelivered signal
from the third party finishing device after sending an
EndofSet signal. A jam is declared when the third party
finishing device signal exceeds the time increment you
specify. You can specify from 0 to 13000 milliseconds.
•
Recovery Control — Specifies the action to take in case of
system recovery. You can select one of the following:
—
—
•
Let DFA device select sheet or set recovery
Override - always use set recovery
Finishing Function 1 (Attributes p6/c6)
Finishing Function 2 (Attributes p6/c7) — These are
signals through which you can specify instructions to be
sent to your third party finishing device. If these functions
are applicable to your device, your vendor will provide the
information you need to enable them.
For Finishing Functions 1 and 2, your options are:
•
—
ESS control: The data stream will select the Finishing
Function.
—
True: The Finishing Function will always be selected.
—
False: The Finishing Function will always be
deselected.
SMM Value for Finishing Function 1 (Hex)
SMM Value for Finishing Function 2 (Hex) — When the
Set Medium Modification (SMM) value contained in the
IPDS data stream matches the code number you specify
here, the Finishing Function is used.
The codes to use are taken from the two-byte values in the
MMC-structured field within the selected COPYGROUP.
XEROX DOCUPRINT 92C IPS GUIDE TO CONFIGURING AND MANAGING THE SYSTEM
4-65
SETTING THE SYSTEM CONFIGURATION
This is set within a FORMDEF via the PROCESSING
keyword in the PPFA. The range is a hexadecimal value
from 0000 to FFFF. You will need to obtain these values
from the job or the applications programmer.
•
Statuses Supported (p7) — Specifies the status indicators
that are supported by the third party finishing device. You
can check all status indicators that apply. The selections are
as follows:
—
—
—
—
—
•
Not Ready
Faulted
Full
Sheet Delivered
Set Delivered
Delivery Signal Type (p8) — Specifies the type of signal
that can be delivered. You can select one of the following:
—
—
Leading Edge
Trailing Edge
•
Delivery Signal Start Adjust (ms) (p9) — Specifies the
timing of the start of delivery signal. You can enter the value
or set it with the incremental spin boxes. The range is -100
to +300 milliseconds.
•
Delivery Signal Duration (ms) (p10) — Specifies the
timing of the End of Delivery signal. You can enter the value
or set it with the incremental spin boxes. This value
corresponds to the width of the sheet. You specify this value
only when you select Trail Edge for the Delivery Signal
Type. The range is 30 to 110 milliseconds.
•
Sheet Exit to End of Set Time (ms) (p11) — Specifies the
time required between the EndOfSet signal and the
SheetExit signal. You can enter the value or set it with the
incremental spin boxes. The range is 0 to 255 milliseconds.
4. Click the Add button when finished. The File Name Entry
window displays.
Figure 4-51. File Name Entry window
5. Enter the name for the new DFA profile. Be sure to use a name
that will help you remember which third-party finisher (or
specific function) the new profile is for.
6. Click OK to return to the Output DFA Profile window.
7. Click Save to save the new DFA profile.
4-66
XEROX DOCUPRINT 92C IPS GUIDE TO CONFIGURING AND MANAGING THE SYSTEM
SETTING THE SYSTEM CONFIGURATION
8. If you want to put the new profile into effect immediately, click
Apply & Save.
9. Click Quit to return to the IPS main window.
Changing a DFA profile
To make changes to an existing DFA profile:
1. From the DFA Profile pull-down menu on the IPS main window
(below the Output Configuration pull-down menu), select the
name of the profile you want to change.
2. On the Output DFA Profile window, make changes to the
parameters as desired. (Refer to the “Adding a DFA output
personality profile” section earlier in this chapter, for
explanations of the items in this window.)
3. Click Save to save the updated DFA profile.
4. If you want to put the updated profile into effect immediately,
click Apply & Save.
5. Click Quit to return to the IPS main window.
Deleting a DFA profile
To delete a DFA profile:
1. From the DFA Profile pull-down menu on the IPS main window
(below the Output Configuration pull-down menu), select the
name of the profile you want to delete.
2. On the Output DFA Profile window, click the Delete button. A
Delete File confirmation prompt window displays.
3. On the prompt window, click Delete. The deleted profile is
removed from the DFA Profile pull-down menu.
4. Click Quit to return to the IPS main window.
XEROX DOCUPRINT 92C IPS GUIDE TO CONFIGURING AND MANAGING THE SYSTEM
4-67
SETTING THE SYSTEM CONFIGURATION
Backing up and restoring configuration files
The following configuration files can be backed up and restored
between IPS systems operating system software version 5.4 or
higher:
•
•
•
•
•
•
Input DFA profiles (for DFA systems only)
Output DFA profiles (for DFA systems only)
Input tray groups
Output tray groups
System configuration files
Media library files.
Note: Configuration files created with software versions lower than
5.4 cannot be saved or restored to a system running release 5.4 or
higher.
Note: DFA profiles can be backed up and restored between IPS
systems with the same configuration and with operating system
software version 5.1.8 or higher.
Profiles created with software versions lower than 5.1.8 cannot be
saved or restored to a system running release 5.1.8 or higher.
4-68
XEROX DOCUPRINT 92C IPS GUIDE TO CONFIGURING AND MANAGING THE SYSTEM
SETTING THE SYSTEM CONFIGURATION
Saving configuration files to diskette
To copy your configuration files to a diskette for storage or transfer,
follow this procedure:
1. Insert a PC formatted diskette into the drive.
2. From the Administration pull-down menu, select Backup
Configuration Files.
Figure 4-52. Backup Configuration Files window
3. On the Backup Configuration Files window, select the desired
file(s) to backup, either individually or click Select All to select all
files.
4. Click Backup.
5. Click Quit.
XEROX DOCUPRINT 92C IPS GUIDE TO CONFIGURING AND MANAGING THE SYSTEM
4-69
SETTING THE SYSTEM CONFIGURATION
Restoring configuration files from diskette
To restore your configuration files from a diskette, follow this
procedure:
1. Insert the diskette used for a backup of the configuration files
into the drive.
2. From the Administration pull-down menu, select Restore
Configuration Files.
3. On the Restore Configuration Files window, select the desired
file(s) to restore, either individually or click Select All to select all
files.
4. Click Restore.
5. Click Quit.
6. Reboot the system to insure that you are using the newly
restored settings.
4-70
XEROX DOCUPRINT 92C IPS GUIDE TO CONFIGURING AND MANAGING THE SYSTEM
Index
Numerics
1.25 MB Data Streaming, 3-4
2.5 MB Data Streaming, 3-4
A
Add a New Form Type window, 4-39
Add button, 1-21
Add Profile button, 1-21
Administration pull-down menu, 1-13
Administrator Mode, 4-2
Apply & Update button, 1-21
Apply buttons, 1-21
Ask for File Name window, 1-21
attributes
finishing, 4-58
stitching, 4-60
B
backing up configuration files, 1-13, 4-67
Backup Configuration Files window, 4-68
Billing Information, 1-13
Bin Group field, 4-21
Bin Selection Mode pull-down menu, 4-55
Bins display field, 1-16
bus and tag option, 3-3, 3-4
buttons
incremental spin, 1-5
IPS main window
Reset Now, 1-22
Save, 1-22
PQA, 4-22
using, 1-5
C
Cancel Job button, 1-20
CD, removing, 2-8
channel interface, selecting, 3-4
Channel Mode pull-down menu, 3-4
Channel Options window, 3-4
color
extraction samples, 4-10
color palettes, 4-10
printing, 4-12
Color pull-down menu, 4-9
communicating, host computer, 2-5–2-6
configuration
changes requiring reboot, 3-1
input specifying, 4-31–4-50
output specifying, 4-52–4-66
configuration files
backing up, 1-13
backing up and restoring, 4-67
restoring, 1-13
Configuration pull-down menu, 1-11, 4-5–4-17
conprt utility, 4-26
Continue button, 1-20
continuous form emulation, 1-11
Control Unit Configuration section, 1-18
Control Unit display, 1-19
D
danger labels, iii
debug level, 1-12
debug level, setting, 4-27
Default Trace File Name window, 4-24
Delete button, 1-21
Delivery Signal Duration field, 4-65
Delivery Signal Start Adjust field, 4-65
Delivery Signal Type field, 4-65
DFA, 1-21
DFA Profile pull-down menu, 4-56
DFA profiles, 4-66
Diagnostic Authorization, 1-13
diagnostic tracing, 1-12
Diagnostics pull-down menu, 1-12, 4-18
diskette, ejecting, 2-8
documentation
other, xi
dry ink color, displaying, 1-18
Dual Mode, 3-13
duplex
maximum simplex, 1-11
mode, simplex page value, 4-7
printing, selecting, 4-33
E
Edit the Media Defaults window, 4-42
End of Set field, 1-17
Enhanced Diagnostics option, 1-13
Ethernet, 2-5, 3-5
XEROX DOCUPRINT 92C IPS GUIDE TO CONFIGURING AND MANAGING THE SYSTEM
INDEX-1
INDEX
extraction color
samples, 4-10
Extraction Color window, 4-9
extraction color, specifying, 1-11, 4-8–4-11
F
feeder trays, current configuration, 1-15
file pull-down menus, 1-3
finishing attributes, 4-58
Finishing field, 1-17
Finishing Function field, 4-64
Finishing Function Option field, 4-21
fonts, resident, 1-11
adding, 3-9
displaying, 3-8
menus, 1-10–1-14
setup and status information, 1-18–1-19
using, 1-9
IPS mode, switching, 3-13
IPS Output Configuration window, 4-54
IPS Print Engine Monitor window, 2-6
IPS Print Service Console window, 1-1
IPS software license text string, loading, 3-11–3-12
L
labels, danger, iii
language, 1-11
laser safety, iii
License Status, 1-13
logging, service call, 1-12
G
M
graphical user interface, see GUI
GUI, 1-1–1-9
mapping IPDS bins, 1-16
mapping IPDS input trays, 4-46
margin values, 4-34
maximum simplex, 1-11
Maximum Simplex window, 4-7
media defaults, editing, 4-41
media icon
changing, 4-41
creating, 4-36–4-40
deleting, 4-41
Media Library window, 4-36
Media Library, setting up, 4-35–4-41
Media Type window, 4-37
Media Units
specifying size units, 4-15
specifying weight units, 4-15
media units
specifying, 1-11
menus
Administration, 1-13
Bin Selection Mode, 4-55
Channel Mode, 3-4
Color, 4-9
Configuration, 1-11, 4-5–4-17
DFA Profile, 4-56
Diagnostics, 1-12, 4-18
System Options, 1-14, 4-30
Trace Mode Options, 4-24
messages
HFSI, 1-1
meter readings, displaying, 1-13
MICR mode, 1-11
Minimum Set Time field, 4-64
Mode field, 4-21
modem, enable or disable, 1-11, 3-6
modes, switching, 3-13
H
HCU, powering on, 2-2
HFSI (high frequency service indicator), 1-1
highlight color, 4-8–4-11
Highlight Color display, 1-18
high-speed transfer mode, 3-4
host computer, communicating, 2-5–2-6
Host Job Control section, 1-20
hotlines
ozone information, iii
safety, iv
I
icons, moving, 1-6
incremental spin buttons, 1-5
input configuration
changing, 4-49
creating, 4-43–4-48
deleting, 4-50
example, 4-32
Input Configuration section, 1-15–1-16, 4-31
input trays, configuring, 1-15
interface, 1-11
IPDS bins, 1-16
IPDS data streams, 3-13, 4-8
IPDS Trays field, 1-15, 4-46
IPS Authorization, 1-13
IPS Engine Monitor window, 1-1
IPS main window
buttons, 1-21–1-22
components, 1-9–1-22
described, 1-1
Host Job Control section, 1-20
INDEX-2
XEROX DOCUPRINT 92C IPS GUIDE TO CONFIGURING AND MANAGING THE SYSTEM
INDEX
N
NPS mode, switching, 3-13
null modem connection, 1-12
Number of Sets field, 4-21
Number of Sheets field, 4-21
O
Offline field, 4-24
offline, taking, 1-14, 2-5, 4-30
Online field, 4-24
online, placing, 1-14, 2-5
operation safety, iv
Operator Mode, 4-2
optional processing parameters
setting, 1-11
Optional Processing Parameters window, 4-17
output configuration
changing, 4-61
creating, 4-54–4-57
deleting, 4-62
DFA profile
adding, 4-62–4-66
changing, 4-66
deleting, 4-66
example, 4-56
specifying, 4-52–4-66
Output Configuration section, 1-16–1-17
Output DFA Profile window, 4-63
ozone, iii
P
Page Order Within Set field, 1-17
Pages Outstanding display, 1-19
parallel channel interface, 3-4
parameters, processing, 4-16
PCL data streams, 3-13
personality profiles, 1-21, 4-62–4-66
pin buttons, 1-8
PostScript data streams, 3-13
power outage, 2-5
power saver mode, exiting, 2-7
powering off, 2-3–2-5
powering on, 2-1–2-2
PQA button, 4-22
PQA status window, 4-22
print job
automatic recovery, 2-7
starting, 2-6
printer
activity, displaying, 1-19
IPDS bins, mapping, 1-16
resuming, 2-7
stacker trays, configuring, 1-16
status, 2-6
stopping, 2-6
Printer Bins display field, 1-16
Printer Controller
rebooting, 2-7
setting up, 3-1–3-13
printer tray cells, 4-45
Printer Tray field, 4-21
Printer Trays field, 1-16, 4-44
printing
pages remaining display, 1-19
samples, 4-18–4-22
test patterns, 4-18
privilege mode, 4-2
Administrator Mode, 4-2
changing, 1-13, 4-3, 4-4
display on main window, 1-18
Operator Mode, 4-2
Service Mode, 4-2
User Mode, 4-2
procedures
channel connection, switching, 3-3–3-5
channel interface, selecting, 3-4
debug level, setting, 4-27
DFA profiles
changing, 4-66
creating, 4-62–4-66
deleting, 4-66
duplex mode
specifying simplex value, 4-7, 4-15
extraction color, specifying, 4-11
host jobs, printing, 2-6
input configuration
changing, 4-49
creating, 4-43–4-48
deleting, 4-50
IPS mode, switching, 3-13
media icon
changing, 4-41
creating, 4-36–4-40
deleting, 4-41
memory allocation, changing, 3-7
NPS mode, switching, 3-13
output configuration
changing, 4-61
creating, 4-54–4-57
deleting, 4-62
personality profiles
deleting, 4-66
powering off, 2-4
powering on, 2-2
Printer Controller, rebooting, 2-7
resolution, specifying input, 4-6
sample files, printing, 4-18–4-21
TCP/IP
selecting, 3-5
switching, 3-3–3-5
XEROX DOCUPRINT 92C IPS GUIDE TO CONFIGURING AND MANAGING THE SYSTEM
INDEX-3
INDEX
single-tag interlock mode, 3-4
size units, specifying, 4-15
slumber mode timer, 1-11
SMM Value for Finishing Function field, 4-64
software license text string, loading, 3-11–3-12
software updates
from CD, 1-12, 4-28
from diskette, 1-12, 4-28
remotely, 1-12, 4-29
stacker trays, configuring, 1-16
status information, 1-18–1-19
Status section, 1-19
Statuses Supported field, 4-65
stitching attributes, 4-60
Stop button, 1-20
system
changing settings, 1-21
current configuration, displaying, 1-18
interface, specifying, 3-3–3-5
powering off, 2-3–2-5
powering on, 2-1–2-2
setting configuration, 4-1–4-69
shutting down, 1-14
starting and stopping, 2-1–2-7
System Options pull-down menu, 1-14, 4-30
System Resource Limits window, 3-7
System Shutdown Confirmation window, 2-4
trace
capturing, 4-23–4-25
executing captured, 4-25
printing, 4-26
updating software
from CD, 4-28
from diskette, 4-28
remotely, 4-29
processing parameters, setting, 4-16
publications, related, xi
pull-down menus
selecting
click method, 1-4
drag method, 1-4
types, 1-3
Q
Quit buttons, 1-21
R
Recovery Control field, 4-64
Reset button, 1-22
Reset Now button, 1-22
resident fonts, 1-11
adding, 3-9
displaying, 3-8
resolution, 1-11, 4-6
Resolution display, 1-18
Resolution window, 4-6
Resource Limits, 1-11
restoring configuration files, 1-13, 4-67
Rotation display, 1-18
T
S
safety
hotline, iv
precautions, iv
standards, iii
Sample File field, 4-19
Sample printing window, 4-18
samples, printing, 1-12, 4-18–4-22
Save button, 1-22
service call, logging, 1-12
Service Mode, 4-2
service mode, 1-12
Set Jam Time field, 4-64
setup information, 1-18–1-19
Sheet Exit to EndofSet Time field, 4-65
Sheet Jam Time field, 4-64
shutdown system, 1-14
simplex
maximum duplex, 1-11
mode, specifying value maximum, 4-7
printing, selecting, 4-33
INDEX-4
TCP/IP
option, 3-3
receiving data, 2-5, 3-5
TCP/IP Interface window, 3-5
test patterns, printing, 4-18
Testdocs menu, 4-19–4-22
Time Between Sets field, 4-64
Time Between Sheets field, 4-64
Time to Cycle Up field, 4-64
Token Ring, 2-5, 3-5
trace
capturing, 4-23
executing, 4-25
initiating, 4-23–4-25
options, 1-12
printing, 4-26
Trace display, 1-19
Trace Mode Options pull-down menu, 4-24
Trace Mode Options window, 4-24
Trace window, 4-24
trays, stacker, 1-16
U
units, specifying (weight, size), 4-15
XEROX DOCUPRINT 92C IPS GUIDE TO CONFIGURING AND MANAGING THE SYSTEM
INDEX
updates, software
from CD, 1-12, 4-28
from diskette, 1-12, 4-28
remotely, 1-12, 4-29
updating configuration files, 1-21
User Mode, 4-2
W
weight units, specifying, 4-15
windows
Add a New Form Type, 4-39
Ask for File Name, 1-21
Backup Configuration Files, 4-68
Channel Options, 3-4
Default Trace File Name, 4-24
Edit the Media Defaults, 4-42
exiting, 1-6
Extraction Color, 4-9
IPS Engine Monitor, 1-1
IPS main, 1-9
IPS main, described, 1-1
IPS Output Configuration, 4-54
IPS Print Engine Monitor, 2-6
IPS Print Service Console, 1-1
Maximum Simplex, 4-7
Media Library, 4-36
Media Type, 4-37
moving, 1-6
Optional Processing Parameters, 4-17
Output DFA Profile, 4-63
PQA status, 4-22
Resolution, 4-6
Sample printing, 4-18
System Resource Limits, 3-7
System Shutdown Confirmation, 2-4
TCP/IP Interface, 3-5
Trace, 4-24
Trace Mode Options, 4-24
X
XSIS authorization, 1-13
XEROX DOCUPRINT 92C IPS GUIDE TO CONFIGURING AND MANAGING THE SYSTEM
INDEX-5
INDEX
INDEX-6
XEROX DOCUPRINT 92C IPS GUIDE TO CONFIGURING AND MANAGING THE SYSTEM
../../../IPS & LPS Graphics/Dpc0010a.cgm iii
../../../IPS & LPS Graphics/7192-mainplus.tif @ 172 dpi 1-2
../../../IPS & LPS Graphics/slsysoptionsbutton.tif @ 72 dpi 1-3
../../../IPS & LPS Graphics/70 -- outputdefault.TIF @ 72 dpi 1-3
../../../IPS & LPS Graphics/defbin48.wmf 1-3
../../../IPS & LPS Graphics/slinterface1.tif @ 144 dpi 1-4
../../../IPS & LPS Graphics/DPC0481A.CGM 1-5
../../../IPS & LPS Graphics/SPINBOX.WMF 1-5
../../../IPS & LPS Graphics/slpinout.tif @ 144 dpi 1-8
../../../IPS & LPS Graphics/slpinin.tif @ 144 dpi 1-8
../../../IPS & LPS Graphics/7192-main.tif @ 173 dpi 1-9
../../../IPS & LPS Graphics/92ConfigPullDown.TIF @ 173 dpi 1-10
../../../IPS & LPS Graphics/7192-diagmenu.tif @ 172 dpi 1-12
../../../IPS & LPS Graphics/96AdminPullDown.TIF @ 173 dpi 1-13
../../../IPS & LPS Graphics/slsysoptions.tif @ 144 dpi 1-14
../../../IPS & LPS Graphics/70 -- input.TIF @ 112 dpi 1-15
../../../IPS & LPS Graphics/7192-output1.tif @ 120 dpi 1-16
../../../IPS & LPS Graphics/40OutputBinsStitch.TIF @ 121 dpi 1-17
../../../IPS & LPS Graphics/7148-ControlUnitConfig.tif @ 58 dpi 1-18
../../../IPS & LPS Graphics/slstatus1.tif @ 144 dpi 1-19
../../../IPS & LPS Graphics/slhostjob.tif @ 144 dpi 1-20
../../../IPS & LPS Graphics/slmargin.tif @ 144 dpi 1-22
../../../IPS & LPS Graphics/70 -- shutdownconfirm.TIF @ 112 dpi 2-4
../../../IPS & LPS Graphics/sllanguage1.tif @ 144 dpi 3-2
../../../IPS & LPS Graphics/slinterface1.tif @ 144 dpi 3-3
../../../IPS & LPS Graphics/slchannel.tif @ 144 dpi 3-4
../../../IPS & LPS Graphics/sltcpip.tif @ 144 dpi 3-5
../../../IPS & LPS Graphics/70 -- modem.TIF @ 83 dpi 3-6
../../../IPS & LPS Graphics/slresource.tif @ 144 dpi 3-7
../../../IPS & LPS Graphics/resfontdisplay.tif @ 144 dpi 3-8
../../../IPS & LPS Graphics/resfontaddNone.tif @ 144 dpi 3-9
../../../IPS & LPS Graphics/resfontaddpullNone.tif @ 144 dpi 3-10
../../../IPS & LPS Graphics/96AdminPullDown.TIF @ 72 dpi 3-11
../../../IPS & LPS Graphics/96IPSAuthor.TIF @ 72 dpi 3-12
../../../IPS & LPS Graphics/7148-ControlUnitConfig.tif @ 58 dpi 4-2
../../../IPS & LPS Graphics/96PrivilegeMode.TIF @ 72 dpi 4-3
../../../IPS & LPS Graphics/96ChangePrivilegeMode.TIF @ 72 dpi 4-3
../../../IPS & LPS Graphics/96ChangeOpPassword.TIF @ 72 dpi 4-4
../../../IPS & LPS Graphics/7192-res300.tif @ 82 dpi 4-6
../../../IPS & LPS Graphics/7196-maxsimplex.tif @ 82 dpi 4-7
../../../IPS & LPS Graphics/slextractioncolor.tif @ 144 dpi 4-9
../../../IPS & LPS Graphics/slextractionpulldown.tif @ 144 dpi 4-11
../../../IPS & LPS Graphics/slcontform.tif @ 144 dpi 4-14
../../../IPS & LPS Graphics/70 -- mediaunits.TIF @ 76 dpi 4-15
../../../IPS & LPS Graphics/71-464892-optprocessparam.tif @ 83 dpi 4-17
../../../IPS & LPS Graphics/slsampleprints.tif @ 144 dpi 4-18
../../../IPS & LPS Graphics/7146-dfa-sampleprints.tif @ 72 dpi 4-19
../../../IPS & LPS Graphics/slsamplefiles.tif @ 144 dpi 4-20
../../../IPS & LPS Graphics/slmanualpqa.tif @ 144 dpi 4-22
DOUBLE-CLICK ON THIS TEXT FROM ANY MASTER PAGE AND EDIT THE DEFINITION
-1
../../../IPS & LPS Graphics/tracepullOnline.tif @ 144 dpi 4-23
../../../IPS & LPS Graphics/tracepullOffline.tif @ 144 dpi 4-23
../../../IPS & LPS Graphics/tracemodeName.tif @ 144 dpi 4-24
../../../IPS & LPS Graphics/70 -- debug.TIF @ 76 dpi 4-27
../../../IPS & LPS Graphics/96UpdateFromFloppy.TIF @ 80 dpi 4-28
../../../IPS & LPS Graphics/96InstallRemoteUpdate.TIF @ 80 dpi 4-29
../../../IPS & LPS Graphics/slsysoptions.tif @ 144 dpi 4-30
../../../IPS & LPS Graphics/shutdownconfirm.tif @ 144 dpi 4-30
../../../IPS & LPS Graphics/70 -- input1.TIF @ 118 dpi 4-32
../../../IPS & LPS Graphics/70 -- single.TIF @ 91 dpi 4-33
../../../IPS & LPS Graphics/70 -- singleordouble.TIF @ 91 dpi 4-33
../../../IPS & LPS Graphics/slinputdef.tif @ 144 dpi 4-34
../../../IPS & LPS Graphics/70 -- input1.TIF @ 118 dpi 4-34
../../../IPS & LPS Graphics/slmargin.tif @ 144 dpi 4-35
../../../IPS & LPS Graphics/70 -- input1.TIF @ 118 dpi 4-36
../../../IPS & LPS Graphics/70 -- medialibrary.TIF @ 80 dpi 4-37
../../../IPS & LPS Graphics/70 -- mediatype.TIF @ 98 dpi 4-38
../../../IPS & LPS Graphics/sladdnewform.tif @ 144 dpi 4-39
../../../IPS & LPS Graphics/7192-mediadef.tif @ 108 dpi 4-42
../../../IPS & LPS Graphics/ingrnam.wmf 4-43
../../../IPS & LPS Graphics/70 -- inputconfigdefault.TIF @ 118 dpi 4-44
../../../IPS & LPS Graphics/70 -- input2.TIF @ 118 dpi 4-45
../../../IPS & LPS Graphics/70 -- input2.TIF @ 118 dpi 4-47
../../../IPS & LPS Graphics/slfilename.tif @ 144 dpi 4-48
../../../IPS & LPS Graphics/ingrnam.wmf 4-49
../../../IPS & LPS Graphics/ingrnam.wmf 4-50
../../../IPS & LPS Graphics/sldeleteconfirm1.tif @ 144 dpi 4-50
../../../IPS & LPS Graphics/7196wodfa-mismatcherr.tif @ 92 dpi 4-51
../../../IPS & LPS Graphics/7192-output1.tif @ 120 dpi 4-53
../../../IPS & LPS Graphics/sloutputdef.tif @ 144 dpi 4-54
../../../IPS & LPS Graphics/7140-outputconfig2.tif @ 102 dpi 4-54
../../../IPS & LPS Graphics/defbin48.wmf 4-55
../../../IPS & LPS Graphics/dfanam51.wmf 4-56
../../../IPS & LPS Graphics/92OutputConfigBins3.TIF @ 90 dpi 4-57
../../../IPS & LPS Graphics/slfilename.tif @ 144 dpi 4-57
../../../IPS & LPS Graphics/7146-dfa-outfinishattr.tif @ 87 dpi 4-58
../../../IPS & LPS Graphics/7140st-attributes.tif @ 87 dpi 4-60
../../../IPS & LPS Graphics/outgrnam.wmf 4-62
../../../IPS & LPS Graphics/DFA Profile pulldown.tif @ 173 dpi 4-62
../../../IPS & LPS Graphics/dfanam51.wmf 4-63
../../../IPS & LPS Graphics/7146-dfa-outDFAprof.tif @ 122 dpi 4-63
../../../IPS & LPS Graphics/slfilename.tif @ 144 dpi 4-65
../../../IPS & LPS Graphics/96BackupConfigFiles.TIF @ 88 dpi 4-68
-2
DOUBLE-CLICK ON THIS TEXT FROM ANY MASTER PAGE AND EDIT THE DEFINITION