1
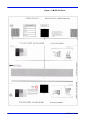
Version 6.0, July 2007
701P47409
Xerox FreeFlow® Print Server
MICR User Guide
Prepared by:
Xerox Corporation
Global Knowledge and Language Services
800 Philips Road Bldg. 845-17S
Webster, New York 14580
USA
©2007 by Xerox Corporation. All rights reserved.
Copyright protection claimed includes all forms and matters of copyrightable material and information
now allowed by statutory judicial law or hereinafter granted, including without limitation, material generated
from the software programs displayed on the screen such as icons, screen displays, or looks.
Printed in the United States of America.
XEROX® and all Xerox product names mentioned in this publication are trademarks of XEROX CORPORATION.
Other company trademarks are also acknowledged.
Changes are periodically made to this document. Changes, technical inaccuracies, and typographic errors will be corrected in
subsequent editions.
Table of contents
. . . . . . . . . . . . . . . . . . . . . . . . . . . . . . . . . . . . . . . . . . . . . . 1-1
MICR features. . . . . . . . . . . . . . . . . . . . . . . . . . . . . . . . . . . . . . 1-1
Datastreams . . . . . . . . . . . . . . . . . . . . . . . . . . . . . . . . . . . . 1-1
MICR Printers . . . . . . . . . . . . . . . . . . . . . . . . . . . . . . . . . . . . . . 1-2
MICR system differences . . . . . . . . . . . . . . . . . . . . . . . . . . 1-2
MICR fonts . . . . . . . . . . . . . . . . . . . . . . . . . . . . . . . . . . . . . . . . 1-3
MICR fonts provided . . . . . . . . . . . . . . . . . . . . . . . . . . . . . . 1-3
MICR fonts installation . . . . . . . . . . . . . . . . . . . . . . . . . . . . 1-5
Installing LCDS fonts . . . . . . . . . . . . . . . . . . . . . . . . . . . . . 1-7
Loading MICR fonts on a PC . . . . . . . . . . . . . . . . . . . . . . . 1-7
Selecting MICR fonts . . . . . . . . . . . . . . . . . . . . . . . . . . . . . . . . 1-8
Checking the font version . . . . . . . . . . . . . . . . . . . . . . . . . . 1-8
Setting the font resolution . . . . . . . . . . . . . . . . . . . . . . . . . . . . 1-13
Setting the font resolution for the queue . . . . . . . . . . . . . . 1-14
Changing font resolution for a job . . . . . . . . . . . . . . . . . . . 1-14
Image quality for PCL . . . . . . . . . . . . . . . . . . . . . . . . . . . . . . . 1-15
Using AFP fonts for IPDS printing . . . . . . . . . . . . . . . . . . . . . 1-15
Implementing AFP MICR fonts . . . . . . . . . . . . . . . . . . . . . 1-15
MICR application resources . . . . . . . . . . . . . . . . . . . . . . . 1-16
MICR forms. . . . . . . . . . . . . . . . . . . . . . . . . . . . . . . . . . . . . . . 1-17
Available MICR test forms . . . . . . . . . . . . . . . . . . . . . . . . 1-17
Printing MICR test forms. . . . . . . . . . . . . . . . . . . . . . . . . . . . . 1-19
Setting up a test forms queue . . . . . . . . . . . . . . . . . . . . . . 1-19
Printing PostScript and PCL test forms. . . . . . . . . . . . . . . 1-19
Printing LCDS MICR test forms . . . . . . . . . . . . . . . . . . . . 1-20
Additional information . . . . . . . . . . . . . . . . . . . . . . . . . . . . . . . 1-22
MICR output verification tools . . . . . . . . . . . . . . . . . . . . . . 1-22
Security . . . . . . . . . . . . . . . . . . . . . . . . . . . . . . . . . . . . . . . 1-22
MI CR U s er G u i de
i
Tab l e o f c on te n ts
ii
MI CR U s er G ui d e
MICR
The purpose of this document is to familiarize you with the MICR
features and functions available with FreeFlow Print Server
systems. It provides information on installing MICR fonts on the
FreeFlow Print Server and documents the process for printing
MICR forms. Other topics include:
•
Selecting MICR fonts
•
Setting up queues for printing MICR jobs
•
Verifying MICR output
•
Security (including Audit Control)
For more information, refer to the Generic MICR Fundamentals
Guide, provided with your Xerox MICR printing system.
MICR features
The following features and functions are available with the Xerox
FreeFlow® Print Server to enable MICR printing:
•
MICR mode, which locks the darkness level at the default
setting
•
Support of the LCDS PDL ABNORMAL SECURITY command,
which restricts the Sample function
•
Secure Mode, which restricts sampling and repositioning
output
•
MICR fonts on CD-ROM. PCL, PostScript, and LCDS fonts are
included. AFP MICR fonts are provided on various media that
can be loaded on the host platform.
Datastreams
The FreeFlow Print Server printers support MICR printing from
PostScript, PCL, IPDS, and LCDS datastreams.
You can print your existing MICR applications that were originally
created for an IBM 3828 MICR printer. These printers access the
Xerox AFP MICR fonts to print the MICR characters required for
the document. For further information on installing MICR fonts,
refer to the AFP Font Installation document, provided with your
IPS system.
MICR User Guide
1
MICR Printers
The following printers support MICR:
•
DocuPrint 100/115/135/155/180 MX
•
DocuPrint 75 MX
•
Nuvera 100MX Digital Production System
•
Nuvera 120MX Digital Production System
•
Nuvera 144MX Digital Production System
MICR system differences
The systems have some differences in the adjustments they make
when entering MICR mode, and in the fonts and datastreams they
support.
The following table shows how these printers differ in their support
of MICR features.
Table 1-1. MICR differences between DP 100/115/135/155/180 MX, DP 75 MX, and Nuvera MX
DP 100/115/135/155/
180 MX
MICR fonts supported
Datastreams and
MICR font resolution
MICR mode automatic
adjustments
Secure Mode
automatic
adjustments
Diagnostic test forms
2
DP 75 MX
Nuvera MX
CMC7, E13B
E13B only
CMC7, E13B
IPDS⎯300 dpi
IPDS⎯300 dpi
IPDS⎯300 dpi
LCDS⎯300 dpi
LCDS⎯300 dpi
LCDS⎯300 dpi
PostScript⎯300 and
600 dpi
PostScript⎯300 and
600 dpi
PostScript⎯ 600 dpi
PCL⎯300 and 600 dpi
PCL⎯300 and 600 dpi
Darkness level set to
the default
Darkness level set to
the default
Repositioning output
disabled
Static and dynamic job
sampling disabled
Repositioning output
disabled
Repositioning output
disabled
LCDS, PostScript, and
PCL
Darkness level set to
the default
Edge treatment
disabled
Lead edge lightening
disabled
Static and dynamic job
sampling disabled
PCL⎯600 dpi
IPDS, LCDS,
PostScript, and PCL
IPDS, LCDS,
PostScript, and PCL
MICR User Guide
MICR fonts
The Xerox-supplied MICR fonts are required to optimize the
quality of the MICR line and ensure excellent performance. It is
critical that the font character raster patterns and metrics are not
modified in any way and that no new characters are added.
NOTE: Xerox MICR fonts must be used. They may not be
modified in any way.
MICR fonts provided
Xerox provides sets of E13B and CMC7 MICR fonts for
PostScript, PCL, LCDS, and IPDS. The following sections
describe the fonts that you receive.
PostScript fonts
You receive the following PostScript MICR fonts:
•
E13B9.PFB: 9-point, 600 dpi E13B. This font can be loaded
and viewed on your PC. Refer to “Loading MICR fonts on a
PC,” later in this chapter, for the procedure.
•
E13B.PFB: 9.12-point, 600 dpi E13B
•
E13B.PS: 9.12-point, 300 dpi E13B
•
CMC72510.PFB: 9.06-point, 600 dpi CMC7
NOTE 1: Use the 9.12 point, 600 dpi E13B font for compatibility
with 300 dpi data. These fonts must be implemented at this exact
point size in order to print MICR characters with the correct
dimensions and spacing.
NOTE 2: The E13B.PFB and E13B.PS MICR fonts cannot be
loaded on the printer at the same time. Refer to “MICR Fonts CDROM,” later in this chapter, for further details.
PCL fonts
You receive the following PCL fonts, all at 600 dpi resolution:
•
CMC72510.HPP
•
E13B-609.HPP
•
E13B-P.HPP
LCDS fonts
You receive the following LCDS fonts, all at 300 dpi resolution:
•
MICR User Guide
CMC74I.FNT
3
•
CMC74J.FNT
•
CMC74L.FNT
•
CMC74P.FNT
•
E14BI.FNT
•
E14BJ.FNT
•
E14BL.FNT
•
E14BP.FNT
NOTE: For the LCDS datastream, the font resolution must be 300
dpi only.
IPDS fonts
The T1001032 code page includes these fonts:
•
X0AE13 (E13B font)
•
X0AT13 (E13B test font)
•
X0LE13 (Landscape E13B)
•
X0LT13 (Landscape test font)
The T1001033 code page includes the CMC7 font X0ACMC.
However, CMC7 fonts are not currently supported on the DP 75
MX.
The Xerox AFP MICR fonts include all E13B characters, plus the
following:
•
Xerox symbol
•
Dollar sign
•
Version identifier
•
1-, 2-, 4-, 8-, 16-, 32-, 38-, and 64-pel spaces
NOTE: For the IPDS datastream, the font resolution must be 300
dpi only.
Media for the MICR fonts
MICR Fonts CD-ROM
The PostScript, PCL, and LCDS MICR fonts are provided on two
CD-ROMs—one for 300 dpi printing and one for 600 dpi and
above. The two CDs contain the same fonts except for the
following:
4
•
The 600 dpi MICR Fonts CD contains the E13B9 and E13B
PostScript 600 dpi fonts.
•
The 300 dpi CD contains a 300 dpi version of the E13B
PostScript font. It does not contain E13B9, which is 600 dpi
only.
MICR User Guide
NOTE: When loading your fonts from CD, load the fonts from
either the 600 dpi MICR Fonts CD or the 300 dpi CD. If both
versions of the 9.12 point E13B PostScript font are present on the
system at the same time, unpredictable results can occur. For this
reason, two CDs are provided, each containing a different version
of the 9.12 point E13B PostScript font.
If you have loaded your MICR fonts from the 600 dpi CD and you
want to print using the 300 dpi PostScript MICR font, you must first
delete the 600 dpi E13B.PFB font, then reload the 300 dpi
E13B.PS font from the 300 dpi CD.
If fonts were loaded from the 300 dpi CD, delete the 300 dpi
E13B.PS font before loading the 600 dpi E13B.PFB font. Refer to
“Loading PostScript fonts,” later in this chapter, for the font loading
procedure.
Media for IPDS fonts
AFP MICR fonts, supporting the IPDS datastream, are provided at
300 dpi on various media (CD, cartridge tape, or diskette). Follow
instructions for your host system for loading these fonts on the
host.
MICR fonts installation
Installing PostScript and PCL fonts
To install the PostScript and PCL fonts, follow these steps.
1. Log in at the Administrator level.
2. Insert the “MICR Fonts” CD into the CD-ROM drive.
3. Select the Administration pull-down menu on the main print
server window.
4. Select the PostScript/PDF/PCL Fonts tab.
5. If PostScript MICR fonts are needed, perform the following
steps.
NOTE: Make sure that you are loading the appropriate CD for the
font resolution (300 or 600 dpi) that you want.
If you do not need PostScript MICR fonts, skip to step 6 for
instructions on loading PCL MICR fonts.
a. Select PostScript Soft from the Font Type pull-down menu.
b. Click the Load… button. The Install Postscript Soft Fonts
window opens.
c. From the Look In... pull-down menu, select DOS CD-RW
0.
d. Click List Fonts. In the Files section, the MICR fonts on
MICR User Guide
5
your CD are listed:
•
600 dpi CD: E13B, E13B9, and CMC72510 are listed.
•
300 dpi CD: E13B and CMC72510
NOTE: The DocuPrint 75 EPS does not support the CMC7 fonts.
For these systems, select only E13B and E13B9 (if available).
e. Highlight the required fonts, and click Install. A Question
window tells you that loading the fonts from CD could take
over 30 minutes. Click OK.
Watch the lower-left corner of the window. The “Installing
Fonts…Done” message is displayed briefly.
f.
Close the Install Postscript Soft Fonts window by clicking
Close.
g. If you do not intend to install any more fonts, click the
green triangle icon to eject the CD.
NOTE: The PostScript fonts are available only after the system is
restarted.
6. If PCL MICR fonts are needed, follow these steps:
a. With the MICR Fonts CD still in the CD drive, select PCL
Cartridge from the Font Type pull-down menu.
b. Click Load…. The Install PCL Cartridge Fonts window
opens.
c. In the Look In... pull-down menu, select DOS CD-RW 0.
d. Click List Fonts. In the Files section, the following PCL
fonts are listed:
•
E13B-P (300 dpi font)
•
E13B (600 dpi font)
•
CMC72510
•
68W
e. Highlight the required fonts, and click Install. The “Installing
Fonts…Done” message is displayed briefly in the lower-left
corner of the Install PCL Cartridge Fonts window.
f.
If you do not intend to install the LCDS fonts, click the
green triangle icon to eject the CD.
g. Click Close on the Import PCL Cartridge Fonts window,
then OK.
7. Restart the system to make all fonts available.
6
MICR User Guide
Installing LCDS fonts
To install the LCDS fonts:
1. From the Administration pull-down menu, select LCDS
Resources.
2. From the Source pull-down menu, select CD-RW 0.
3. Click the Display button. The following eight LCDS fonts are
listed in the resources section.
•
CMC74I.FNT
•
CMC74J.FNT
•
CMC74L.FNT
•
CMC74P.FNT
•
E13B4I.FNT
•
E13B4J.FNT
•
E13B4L.FNT
•
E13B4P.FNT
4. Select and highlight the fonts that you want to load, then rightclick on them.
5. Select Import from the pop-up menu, then click Yes to import
the resources.
6. If the error message “Unable to overwrite Read Only
resource…” appears, click OK to continue.
7. When the importing of LCDS resources is complete, click the
eject button (a green triangle) to eject the CD.
8. Restart the system to make all fonts available.
Loading MICR fonts on a PC
You can load the E13B9.PFB font on your PC for viewing with an
application such as Windows, and download it as part of the
PostScript datastream. Your MICR Fonts CD contains the
following files to enable installation for PC viewing:
•
E13B9.AFM
•
E13B9.CFG
•
EA3B9.INF
•
E13B9.PFM
Consult your application documentation for instructions on loading
the fonts on your PC.
MICR User Guide
7
Selecting MICR fonts
Checking the font version
Selecting the wrong font can result in improper signal strength and
high reject rates at the bank. To make sure that you have the font
that you want, print a question mark, ?, in the MICR line. While
the resulting document does not have a valid MICR line, the
printed font is obvious. You can also print a test pattern. Refer to
“Printing MICR test forms,” for the procedure.
The test forms contain font version information: the font name,
revision character (if applicable), and the datastream type (PS,
PCL, LCDS).
The following table shows the version information that is displayed
on the test form for each font:
Table 1-2. Test Form Font Information
Font type
E13B
Datastream /
Type
PostScript Type 1
Version
information
Resolution
600 dpi
Type 1
E13B
609
PS
E13B
PostScript Type 3
300 dpi
Type 3
E13B
4230
PS
E13B
PCL
600 dpi
E13B
609
PCL
E13B
PCL
300 dpi
E13B
REV.A
PCL
E13B
LCDS
300 dpi
Landscape
E13B4L
REV
A
E13B
Portrait
LCDS
300 dpi
E13B4P
REV
A
8
MICR User Guide
Table 1-2. Test Form Font Information
CMC7
PostScript
600 dpi
CMC7
609
PS
CMC7
PCL
600 dpi
CMC7
2510
PCL
CMC7
LCDS
300 dpi
Portrait
CMC74P
REV
A
CMC7
LCDS
Landscape
300 dpi
CMC74L
REV
A
This information is located in different sections of the test form,
depending on the datastream:
•
PostScript: In the bottom section of the test form, to the right
of the word MICR and the paper size
•
PCL: In a box at the left edge of the form, below the Customer
Signature line
•
LCDS: In the bottom section of the form, in a box below the
paper size
These characters are very small, and you may need a magnifying
glass to read them. The following figure shows a MICR test form
for the PostScript CMC7 font. The text in the red circle indicates
the location of the version information on the printed form.
MICR User Guide
9
Figure 1-1. MICR Test Form
10
MICR User Guide
Selecting PostScript fonts
To select a Xerox Postscript font, set the attributes for one of the
following:
•
Internal name: E13B
Point size: 9.12
•
Internal name: E13B9
Point size: 9
•
Internal name: CMC72510
Point size: 9.06
The Postscript E13B MICR font has the same character mappings
as the PCL fixed pitch E13B font. Refer to the Generic MICR
Fundamentals Guide for a complete listing of the character
mappings.
NOTE: The 300 dpi Type 3 PostScript font can be used in all
applications and queue resolution. In 600 dpi queueus and
applications, a slight change in corner rounding occurs with no
effect on readability or reject rate.
CAUTION: The 600 dpi Type 1 PostScript fonts can only be used
in 600 dpi queues with 600 dpi applications. Use of these fonts
with 300 dpi queueus or 300 dpi applications or resources cause
subtle distortions that degrade readability and are likely to cause a
high reject rate.
Selecting PCL fonts
The following HP PCL escape sequences are used to select the
Xerox PCL MICR fonts:
•
E13B 300 and 600 dpi font:
<ESC>(0U<ESC>(s0p8.00h9.00v0s0b0T
•
CMC7 600 dpi font (DP 100/115/135/155/180 EPS only):
<ESC>(1U<ESC>(s0p8h9.1v0s0b0T
Refer to the Generic MICR Fundamentals Guide for a complete
listing of the fixed pitch E13B and CMC7 MICR font characteristics
and character mappings. The character mappings relate the input
character to the printed character.
If both the 300 and 600 dpi E13B fonts have been loaded on the
printer, the font is selected based on the PCL Unit that was
specified. The default PCL Unit is 300.
MICR User Guide
11
NOTE: 600 dpi PCL fonts must not be used with a 300 dpi queue
or with any 300 dpi resources. The resolution mismatch causes
characters to be one dot further apart than is nominal. While this
spacing meets industry standards, a high reject rate can result if
the adjacent field spacing does not compensate for this error.
You can use the PCL Unit of Measure command to set the PCL
Unit to 600 (for example, <ESC>&u600D). Alternatively, you can
override the resolution to 600 dpi in the queue. Refer to “Setting
the font resolution,” later in this chapter, for information on setting
the resolution in the queue.
12
MICR User Guide
Setting the font resolution
Before printing MICR jobs, you must set the resolution attribute
appropriately for the queue to which you will be sending the jobs.
The following table lists the different MICR font formats and the
resolution at which each font should be printed.
Table 1-3. MICR Font formats
Font name and format
Required resolution
E13B
LCDS
300 DPI
PS
300 DPI and 600 DPI
PCL
300 and 600 DPI
CMC7
LCDS
300 DPI
PS
600 DPI
PCL
600 DPI
If your document contains scalable fonts or simple line art
generated at 600 dpi, the differences between printing at 300 or
600 dpi are subtle. However, if your document contains bitmaps
with a resolution of 600 dpi, printing at 300 dpi causes a
degradation of image quality. To preserve image quality,
regenerate the bitmaps at 300 dpi.
NOTE: PCL and PostScript fonts must be printed at the correct
queue resolution and with the correct resource resolution, or
errors will occur. In PCL, this causes a minro spacing error. In
PostScript, subtle but significant character distortions occur. See
Selecting Fonts for more information.
For the Nuvera MX printers, a 300 DPI queue is not an available
option. Printing using the 1200 DPI queue works fine as long as
the 600 DPI fonts are used.
MICR User Guide
13
Setting the font resolution for the queue
Before sending a document to a print queue, you must make sure
that the resolution of the font used in the document is the same as
that specified for the queue.
If the font and queue resolutions do not match (for example, a
document with a 600 dpi font is sent to a 300 dpi queue), the font
may print with subtle distortions and could be rejected at the bank.
Follow this procedure to set the font resolution as a queue
property:
1. Select the Queue pull-down menu, and select Queue
Manager.
2. On the Queue Manager window, right-click the desired queue
name, and select Properties from the pop-up menu.
3. From the Format menu on the Properties window, select the
appropriate default format for the Print Description Language
(PDL) used in your MICR jobs.
4. Select the PDL Settings tab and select the desired
decomposer (PostScript/PDF, PCL, or LCDS).
5. Select the resolution.
NOTE 1: When selecting the resolution for PCL, you must select
the Override icon if the PCL job does not explicitly specify 600 dpi
as the PCL Unit.
NOTE 2: 1200 by 600 dpi is not a valid resolution for the DP 100/
115/135/155/180 EPS. Selecting this option may result in job
errors.
NOTE 3: Ensure that the font and queue resolutions match. If the
font and queue resolutions do not match, the font may print with
subtle distortions that could cause the form to be rejected.
6. Click OK.
Changing font resolution for a job
You can change the font resolution for an individual job from the
Job Manager window.
1. On the Job Manager window, right-click the job you want to
change, then select Properties from the pop-up menu.
2. On the Properties window, select the Image Quality tab.
3. From the Resolution menu, select the desired resolution
option.
4. Click OK.
14
MICR User Guide
Image quality for PCL
The MICR fonts provided with the MX printers have been
optimized for MICR printing on these systems. Therefore, it is
important that darkening of the bitmap font is disabled when
printing PCL MICR documents. To ensure that bitmap font
darkening is disabled, follow these steps:
1. Log on as Administrator.
2. Select the Printer pull-down menu and select Image Quality.
3. In the Raster Image Processors list, do one of the following:
•
If you are using the 300 dpi font (for example, E13BP.HPP), double-click PCL 300.
•
If you are using the 600 dpi E13B font (for example, E13B609.HPP) or the CMC7 font (for example,
CMC72510.HPP), double-click PCL 600.
The PCL Image Quality window opens.
4. In the Thickening Control section, if the Bitmap Fonts check
box is selected, deselect it. Click OK.
5. If changes were made, a Restart confirmation prompt appears.
Click Yes to restart the Xerox FreeFlow® Print Server
software.
Using AFP fonts for IPDS printing
Implementing AFP MICR fonts
To implement the Xerox AFP MICR fonts in your existing IBM
MICR application, perform the steps from the following
appropriate section.
For information on installing the Xerox AFP MICR fonts, refer to
Installing Xerox AFP MICR Fonts, delivered with your MICR
system.
Existing IBM MICR implementation
1. Install the Xerox MICR fonts on the host AFP system.
2. Ensure that all other fonts used for MICR applications have
been converted to 300 dpi and loaded into the 300 dpi font
library.
3. Substitute the Xerox 300 dpi AFP MICR fonts for the linenamed IBM originals.
MICR User Guide
15
4. Add the new library to the MX font library concatenation.
5. Because the names of the Xerox AFP MICR fonts are the
same as the IBM AFP MICR fonts, be careful not to overwrite
the original IBM fonts. You may need to reference them later.
New MICR implementation
1. Install the Xerox MICR fonts on the host AFP system.
2. Use the X0AE13 and X0AT13 fonts in your applications.
3. Refer to the code page and character set descriptions in the
IBM manuals and Xerox supplements.
4. Ensure that the MICR strings are contiguous. For example, if
you have a string of MICR font text and you insert a non-MICR
font in the middle of that string, the MICR font spacing is not
accurate when printed.
Custom MICR font application
1. Install Xerox MICR fonts on the host AFP system.
2. Substitute the Xerox MICR fonts for your existing custom
MICR fonts.
3. Modify the code page, if necessary.
4. Use the unchanged Xerox MICR character set to ensure the
integrity of the MICR line.
Existing Xerox MICR font application
1. Install Xerox MICR fonts on the host AFP system.
2. Remove the ! spacing from text strings. This character was
required for correct spacing in previous MICR technology.
However, the new set of MICR fonts uses relative metric
technology that inserts blank pel spacing automatically after
every two characters.
3. Code a PageDef to select the E13B font for MICR strings.
MICR application resources
In order to print your MICR documents, you must have all of the
resources used in the application resident on your host system.
You must also have the Xerox AFP MICR fonts installed on your
system. (Refer to Installing Xerox AFP MICR Fonts for DocuPrint
MICR IPS Printers, delivered with your MICR system.)
16
MICR User Guide
Security features
PSF has a security feature that allows you to download MICR
fonts to a MICR printer only. The Xerox MICR printers also support
this feature. MICR Secure Mode disables the following features:
•
Reposition Output
•
Sample Page
•
Job Forwarding
•
Proof
•
Save PDL
•
Move Blocks for Tape
•
Periodic Sample Set
MICR forms
This section provides MICR information for forms and test patterns
on Xerox FreeFlow Print Server systems.
Available MICR test forms
The following sections list the MICR test forms that are available
on your system for PostScript, PCL, and LCDS.
PostScript test forms
For PostScript, the following sample test forms are available for
submission to simulate the callout of the Postscript MICR fonts as
you would in your MICR document:
•
MICRSA.PS (E13B, 300 and 600dpi)
•
MICRSA_9PT.PS (E13B, 600 dpi)
•
CMC7SA.PS (CMC7, 600 dpi)
You can print the sample test forms on U.S. Letter, U.S. Legal, or
A4 paper on DP 100/115/135/155/180 EPS, and U. S. Letter or
A4 on DP 75MX, by setting the required paper size in the queue to
which they are sent.
PCL test forms
Eight sample test forms or jobs are available for submission to
simulate the callout of the PCL MICR fonts as you would in your
MICR document. Each test form prints a MICR line in two
orientations: either portrait and landscape, or inverse portrait and
MICR User Guide
17
inverse landscape. Test forms are provided in US Letter, US
Legal, and A4 paper sizes.
E13B 300 and 600 dpi
•
MICR11_300.PCL (portrait and landscape, US Letter)
•
MICR11_300_I.PCL (inverse orientations, US Letter)
•
MICR11_600.PCL (portrait and landscape, US Letter)
•
MICR11_600_I.PCL (inverse orientations, US Letter)
•
MICR14_300.PCL (portrait and landscape, US Legal)
•
MICR14_300_I.PCL (inverse orientations, US Legal)
•
MICR14_600.PCL (portrait and landscape, US Legal)
•
MICR14_600_I.PCL (inverse orientations, US Legal)
•
MICRA4_300.PCL (portrait and landscape, A4)
•
MICRA4_300_I.PCL (inverse orientations, A4)
•
MICRA4_600.PCL (portrait and landscape, A4)
•
MICRA4_600_I.PCL (inverse orientations, A4)
CMC7 600 dpi
•
MICR11_CMC7.PCL (portrait and landscape, US Letter)
•
MICR11_CMC7_I.PCL(inverse orientations, US Letter)
•
MICR14_CMC7.PCL (portrait and landscape, US Legal)
•
MICR14_CMC7_I.PCL(inverse orientations, US Legal)
•
MICRA4_CMC7.PCL (portrait and landscape, A4)
•
MICRA4_CMC7_I.PCL (inverse orientations, A4)
When the MICR Guarantee is in question and the service
representative needs to emulate the customer's PDL, you can use
the Print command to print the appropriate test form.
LCDS test forms
Six sample test forms are available for sampling, which calls out
the LCDS MICR fonts as you would in your MICR document.
Each test form prints a MICR line in two orientations: portrait and
landscape. Test forms are provided for US Letter, US Legal, and
A4 paper sizes.
E13B 300 dpi
18
•
MICR11 (US Letter)
•
MICR14 (US Legal)
•
MICRA4 (A4)
MICR User Guide
CMC7 300 dpi
•
MXCM11 (US Letter)
•
MXCM14 (US Legal)
•
MXCMA4 (A4)
Printing MICR test forms
Setting up a test forms queue
A queue must be created in order to print any of the MICR test
forms. Follow this procedure to create a new queue.
1. select the Queue pull-down menu and select New Queue.
2. On the New Queue window, enter a name in Queue Name text
box (for example, TestMICR).
3. From the Format menu in the Input section, select the
appropriate default format for the print description language
(PDL) used in your test forms.
4. Select the PDL Settings tab and select the desired PDL
decomposer (PostScript/PDF, PCL, or LCDS).
5. From the Resolution (dpi) menu, select the resolution for the
test forms.
6. Select the Stock tab.
7. From the Size menu, select the paper size for the test forms.
8. Click Add Queue to establish the new test forms queue.
9. Click Close to exit the New Queue window.
Printing PostScript and PCL test forms
Before printing the test forms, ensure darkening of PCL bitmap
fonts has been disabled. (Refer to Image quality for PCL.)
From a Terminal window
1. Open a terminal window by following these steps:
a. Click the right mouse button in an open Workspace area.
b. From the Workspace pop-up menu, select Tools.
c. From the Tools menu, select Terminal.
2. In the Terminal window, enter the following command:
MICR User Guide
19
cd /opt/XRXnps/XRXdatv/data
NOTE: Ensure that the cursor is inside the Terminal window.
3. Enter ls to display the MICR forms in the directory.
4. Enter /usr/ucb/lpr -P queuename -#nn filename
where #nn indicates the required number of copies of the
form.
Example: /usr/ucb/lpr - P MICRTest -#20 MICRSA.ps
From Print from File
1. From the FreeFlow Print Server window, select the Services
pull-down menu and select Print From File.
2. Select Browse.
3. Under Look In, select the File System option.
4. Browse the following path, clicking on the + symbol in front of
each item to open the next level: opt, XRXnps, XRXdatv, data.
5. Select the desired form from the list, for example MICRSA.ps,
and select Okay.
6. Select any other options desired to print the form.
7. Be sure to select the Quantity and print queue in the dialog
boxes at the top of the window.
8. Select Print.
Printing LCDS MICR test forms
To print LCDS MICR test forms, sample them from the LCDS
Resource Manager window using the following procedure.
NOTE: Before beginning this procedure, open the Printer
Manager window and verify that the correct paper is loaded in the
tray you intend to use.
1. From the Administration pull-down menu, select LCDS
Resources.
2. From the Source pull-down menu, select System.
3. Click Display to show the LCDS resources that are available
on the system.
4. In the resources list, right-click the desired form name (ending
with .frm), and select Sample… from the pop-up menu.
5. On the Sample Resources window, make sure that the Print
Form Name check box in the Document Options section is
deselected.
20
MICR User Guide
6. Make any further desired changes to the other fields on this
window. For example, you can print multiple copies by
increasing the number in the Quantity box.
7. Click OK to print the test form.
MICR User Guide
21
Additional information
This section contains information that may be helpful for the user
of MICR on a FreeFlow Print Server system.
MICR output verification tools
The MICR Positioning and Dimension Gauge (part number:
600T80025) is included in the MICR font and documentation kit
that is shipped with your MX printing system. You may also order
additional MICR verification tools, such as the Optical
Comparator. For detailed information on the use of these tools,
refer to the “Quality control” chapter of the Generic MICR
Fundamentals Guide.
Security
Security (audit control) in the printing environment refers to the
features that prevent unauthorized access to privileged data or
forms that are not intended for general use.
There are many techniques available to protect checks and other
valuable documents after the printing cycle. While no security
method provides absolute protection, any feature that makes a
check harder to alter or reproduce is desirable, so long as it does
not impair the automated processing of the document.
Physical security
The primary aspects of physical security for the MX printers
include:
•
Physical access to the printer
•
Access to fonts, logos, and forms
•
Securing paper stock
•
Responsible presence
Physical access to the printer
The most important security feature is control of access to the
MICR printing system. If access is sufficiently limited, further
security procedures may not be necessary. However, as system
usage increases, the number of people who need access to it also
increases. Therefore, the first step in implementing any security
process must include a means of controlling the group of people
22
MICR User Guide
who have access to the printing system, as well as limiting what
they can bring to, or remove from, the printer environment.
Controlling access to critical files
A combination of fonts, logos, signatures, and forms are used in
developing a Xerox MICR application. One approach to securing
these files is to place them on media that can be physically
secured.
The Xerox MICR fonts are supplied on CD ROMs in the ship kit for
the printers. These fonts can be loaded on the printer prior to
printing the MICR document, deleted from the printer after all
MICR jobs have been printed, and physically secured while the
diskette is not in use.
For PCL fonts (such as MICR, signature, and logo fonts), you
must restart the system after deleting the fonts, to ensure that the
fonts are completely removed from the system.
Securing paper stocks
The ability of the Xerox MICR printing system to print a form,
signature, logo, and MICR line on a check at the same time as the
variable data eliminates the security problems involved in keeping
a supply of preprinted checks in storage.
However, because the security paper constitutes one of several
resources used to print the checks, securing the paper stock is a
wise extra precaution. Paper stock should be kept in locked
storage, in sealed boxes, with each ream separately wrapped and
sealed.
The amount of paper brought out of storage for printing can be
used as an audit cross-check against the number of sheets
printed. After the check sheets are printed, the stacked
documents should be carefully secured, because loose sheets are
susceptible to pilfering.
Responsible presence
The key to physical security in any document generation process
is a responsible presence. An individual or group must have the
responsibility of safeguarding the printing process. For critical
applications, the responsibility usually lies with the auditing
operation. In small organizations, the printer operator may be
responsible for security.
Physical security, and the presence of a responsible individual or
group whenever the system and supplies are not secured, can
create a higher level of security. Thus, two persons can have
custody of the printing facility, either by dual-key access to the
physical media or by knowledge of a password to access the data
files and run the print job.
MICR User Guide
23
Software security
There are a number of software features that provide different
levels of protection, ranging from a class-level logon control to the
ability to automatically delete certain files at the end of a print job.
As with physical security, software security focuses on restricting
access to key files for authorized individuals only.
The following software features are provided for security on the
FreeFlow Print Server printers.
Logon levels
Four user access levels are defined for the print server software:
•
User
•
Operator
•
Administrator
•
Service Representative
The Operator, Administrator, and Service Representative levels
require a password. Loading and deleting of MICR fonts is
restricted to the Administrator level, which allows access to all
functions except those reserved for service. Passwords can be
changed at regular intervals using the Change Password menu.
Secure Mode
Enabling Secure Mode when printing MICR jobs limits the ability to
obtain unauthorized copies of job pages.
NOTE: When Secure Mode is enabled on the DocuPrint 100/115/
135/155/180 MX, both job sampling and repositioning output are
disabled. The DocuPrint 75 disables only repositioning output in
Secure Mode.
To enable Secure Mode:
1. Log on as Administrator.
2. From the System menu, select Secure Mode.
3. On the Secure Mode window, select Enable. A confirmation
prompt window opens.
4. Click OK on the confirmation prompt, then on the Secure
Mode window.
When Secure Mode is enabled, a small lock icon is displayed in
the upper-left corner of the printer icon section of the print server
window.
Clearing jobs
To ensure that there are no MICR jobs left on the system, use the
Job Manager Completed Jobs area and determine if any MICR
24
MICR User Guide
documents are waiting for an action in order to be printed. If a
MICR document is waiting to be printed, take the appropriate
actions, depending on the status of the job, to determine the
cause of the problem and correct it.
Ineligible jobs
If a MICR job has Ineligible status, you should follow this
procedure:
1. On the Job Manager window, right-click the ineligible job, and
select Properties… from the pop-up menu.
2. Select the Ineligible tab on the job properties window.
3. In the Ineligible window, check the required resources to find
out which ones are missing.
4. Load any needed resources.
Deleting a job
If you are unable to provide the resources needed to print the job,
delete the document from the queue using the Job Manager. A
deleted job is removed from the system and cannot be printed.
If the system is set to save the last 50 jobs, follow this procedure.
1. Select the Completed Jobs tab on the Job Manager window.
2. Right-click the job that you want to delete.
3. From the pop-up menu, select Delete….
Audit control procedures
The audit requirements for Xerox MICR systems are not different
from any other computer system. The primary interest of the
auditor is to identify the processes or procedures that could
compromise control of valued items. The auditor then finds ways
to control and stop that loss.
An audit trail can be maintained in many ways, including:
MICR User Guide
•
Creating an audit control worksheet to account for each page
•
Keeping a record of information compiled by the operator and
other responsible personnel
•
Maintaining a job log, including completed and failed jobs.
25
26
MICR User Guide