1
The Xerox DocuPrint 4512/
4512N Network Laser Printer
Setting Up Guide
Xerox Corporation
701 South Aviation Blvd.
El Segundo, CA
90245
USA
Xerox Canada, Limited
5650 Yonge Street
North York, Ontario
Canada
M2M 4G7
Americas Operations Support
800 Long Ridge Road
Stamford, CT
06904-1600
USA
Rank Xerox, Limited
Parkway
Marlow
Buckinghamshire
SL7 1YL
United Kingdom
Copyright © 1995, 1996 Xerox Corporation. All Rights Reserved.
Copyright protection claimed includes all forms of matters of copyrightable materials and
information now allowed by statutory or judicial law or hereinafter granted, including
without limitation, material generated from the software programs which are displayed on
the screen such as styles, templates, icons, screen displays, looks, etc.
XEROX®, The Document Company®, the stylized X, DocuPrint, and 4512 are
trademarks of Xerox Corporation or its subsidiaries.
Adobe® and PostScript® are trademarks of Adobe Systems Incorporated.
MultiGray is a trademark of Xionics Document Technologies, Inc. TrueRes is a
trademark of DP-Tek. PCL, HP, and LaserJet are trademarks of Hewlett-Packard
Company. IBM is a trademark of International Business Machines Corporation.
Microsoft, Microsoft Windows, Microsoft Word, MS, and MS-DOS are trademarks of
Microsoft Corporation. Intellifont is a registered trademark of Miles, Inc. MicroType is a
trademark of Bayer Corporation, Agfa Division. Times, Univers, Helvetica, and Palatino
are trademarks of LINOTYPE-HELL AG and/or its subsidiaries. ITC Avant Garde, ITC
Bookman, ITC Zapf Chancery, and ITC Zapf Dingbats are registered trademarks of
International Typeface Corporation. Arial and Times New Roman are registered
trademarks of the Monotype Corporation PLC. WordPerfect is a trademark of
WordPerfect Corporation. Centronics is a trademark of Centronics Corporation.
Macintosh and TrueType are trademarks of Apple Computer, Incorporated. OnPage is a
trademark of Computer:applications, Inc. All other product names are trademarks/
tradenames of their respective owners.
PCL and PCL 5e are trademarks of Hewlett-Packard Company. This printer contains an
emulation of the Hewlett-Packard PCL 5e command language, recognizes HP PCL 5e
commands, and processes these commands in a manner comparable with
Hewlett-Packard LaserJet printer products.
Notice
Specifications described in this publication are subject to change without notice. Use of
some features may be limited by your hardware or software configuration. Contact your
dealer, Xerox, or Rank Xerox for details.
Table of Contents
i
Overview ............................................................................................... 2
Selecting a Printer Location ................................................................ 3
Unpacking the Printer ......................................................................... 4
Getting to Know the Printer ................................................................ 5
Assembling the Printer ........................................................................ 6
Testing the Printer ............................................................................. 12
Installing Printer Options .................................................................. 13
Connecting to the Host ...................................................................... 14
Xerox Font Manager ......................................................................... 16
Installing a Printer Driver ................................................................. 17
What to Do Next ................................................................................. 19
Setting Up Guide
❖
1
Setting Up the DocuPrint 4512/4512N
Overview
Setting up your Xerox DocuPrint 4512/4512N Network Laser Printer is
quite easy. It will likely take 10 to 30 minutes, depending on which
printer options you install. Follow all instructions in this guide to
complete printer setup.
1. “Selecting a Printer Location” (page 3)
2. “Unpacking the Printer” (page 4)
3. “Getting to Know the Printer” (page 5)
4. “Assembling the Printer” (page 6)
5. “Testing the Printer” (page 12)
6. “Installing Printer Options” (page 13)
7. “Connecting to the Host” (page 14)
8. “Xerox Font Manager” (page 16)
9. “Installing a Printer Driver” (page 17)
2 ❖
Setting Up Guide
Setting Up the DocuPrint 4512/4512N
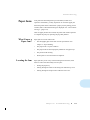
Selecting a
Printer
Location
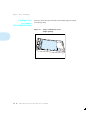
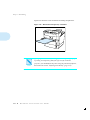
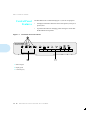
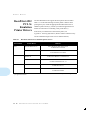
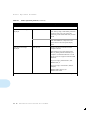
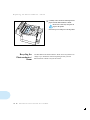
Select a printer location that meets the minimum space requirements
shown in Figure 1. Set the printer on a flat, stable surface away from
direct sunlight and electrical interference.
Figure 1 Minimum space
requirements around
the printer
Top View
1 8 in. (203 mm)
2 4 in. (102 mm)
3 20 in. (508 mm)
In selecting a location for the printer, you should also consider the
following:
•
Is the Control Panel accessible for viewing and use?
•
Is there enough clearance above and around the printer to replace
consumables?
•
Is there enough clearance above the printer to add the optional High
Capacity Feeder? It adds 155 mm (6.5 in.) to the height of the
printer.
•
Is there enough clearance around the printer to install options on the
controller board (accessed from the rear)?
•
Is there enough clearance around the printer should it ever require
servicing? (If not, you may need to relocate the printer for
servicing.)
Setting Up Guide
❖
3
Setting Up the DocuPrint 4512/4512N
Unpacking the
Printer
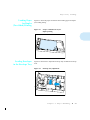
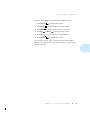
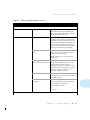
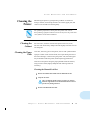
Unpack the printer from its box. Make sure that all of the parts, as
shown in Figure 2, are present. If they are not, contact your dealer or
Xerox/Rank Xerox.
Figure 2 Printer parts
1 Power Cord
2 Photoconductor / Drum
3 Toner Cartridge
4 Tray Extension
5 Printer
6 Diskettes
7 User Documentation
8 Manual Feed Guide
9 Cleaning Felt
Keep all packing material should you ever need to repack and transport
the printer.
Note
4 ❖
Setting Up Guide
Setting Up the DocuPrint 4512/4512N
Getting to
Know the
Printer
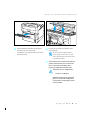
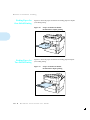
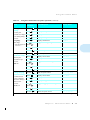
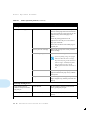
First, familiarize yourself with the major components identified in
Figure 3. Then continue with “Assembling the Printer” (page 6).
Figure 3 Major printer components
Front View
1 Fuser Cover
2 Control Panel Display
3 Front Cover
4 Manual Feed Slot
5 Manual Feed Guide
6 Upper Paper Tray
7 Lower Paper Tray
8 Paper Output Tray
9 Top Cover
10 Tray Release Buttons
Rear View
1 Top Cover Release Lever
2 Tray Extension
3 Power Switch
4 Power Cord Connector
5 High Capacity Feeder
Connector
6 Corotron Cleaner
7 Controller Board
8 Top Cover
9 Cooling Fan Outlet
10 Print Density Adjuster
11 Parallel Interface
12 Paper Trays
Setting Up Guide
❖
5
Setting Up the DocuPrint 4512/4512N
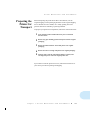
Assembling the
Printer
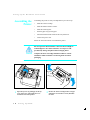
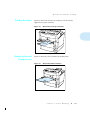
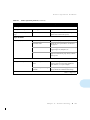
Assembling the printer is easily accomplished in just a few steps:
•
Install the Toner Cartridge.
•
Install the Photoconductor / Drum.
•
Install the Cleaning Felt.
•
Load the paper tray(s) with paper.
•
Attach the Manual Feed Guide and the Tray Extension.
•
Connect the power cord.
Follow the instructions below to assemble the printer.
Do not expose the Photoconductor / Drum to direct sunlight or
artificial light for more than 15 minutes. Overexposure will
permanently damage the photosensitive imaging drum.
Caution
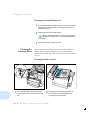
1
6 ❖
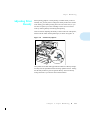
Complete the Toner Cartridge and Photoconductor / Drum
installation within 15 minutes of removing them from their
packaging.
Open the top cover by pulling up on the top
cover release lever and pivoting the cover
toward the front of the printer.
Setting Up Guide
2
Remove the Toner Cartridge from its wrapper
and shake it several times to evenly distribute
the toner.
Assembling the Printer
3
Hold the Toner Cartridge by its handle and
gently lower it into the printer.
4
Hold the Toner Cartridge in place and pull the
tab to remove the tape strip.
The cartridge does not click into place.
The arrows on the cartridge and printer
should line up.
Setting Up Guide
❖
7
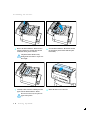
Assembling the Printer
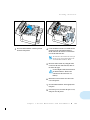
5
Remove the Photoconductor / Drum from its
wrapper and insert it vertically into the slots
on the sides of the printer’s interior.
6
Pivot the Photoconductor / Drum down toward
the back of the printer until it falls into place
horizontally.
8
Rotate the fuser cover to the rear.
The photosensitive drum is easily
damaged. Do not touch it or expose it to
direct light.
7
Carefully remove the sheet of black protective
paper from the Photoconductor / Drum.
Be sure not to leave any torn pieces of
paper in the printer.
8 ❖
Setting Up Guide
Assembling the Printer
9
Remove the Cleaning Felt from its wrapper
and, holding it by the protruding grip, insert it
into the slot.
10
Press the tray release button on the right side
of the upper paper tray, then remove the tray
from the printer.
12
Push down the metal pressure plate until it
locks into place.
Close the front cover and the top cover.
11
Remove the stopper that protects the tray’s
spring mechanism by twisting it out.
Keep the stopper in case you need it when
transporting the printer.
Setting Up Guide
❖
9
Assembling the Printer
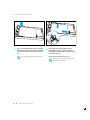
13
Insert a stack of paper into the tray so that the
stack fits under the two metal tabs at the inside
front corners of the tray. Do not overload the
tray.
The side of paper facing up gets printed.
14
If the paper does not fit within the preset
paper guides, adjust the guides so that they
rest against the stack of paper. Then insert the
tray into the printer.
Repeat steps 10-14 for the lower tray.
The lower tray will not feed paper unless
the upper tray is in place.
10 ❖
Setting Up Guide
Setting Up the DocuPrint 4512/4512N
15
Insert the Manual Feed Guide into the manual
feed slot on the front of the printer.
16
Insert the Tray Extension into the back of the
paper output tray.
The Tray Extension supports printed
sheets of paper as they come out of the
printer. You may find it convenient to leave
it permanently in place.
It should rest on its support brackets in an almost
horizontal position.
17
Check that the power switch is in the OFF (O)
position, then insert the power cord into the
power cord connector and plug it into a
properly grounded and rated wall outlet.
The printer has two configurations:
110-115 V or 220-240 V
Read the data plate on the back of the
printer to verify which configuration
you have before connecting the printer
to the wall outlet.
Setting Up Guide
❖
11
Setting Up the DocuPrint 4512/4512N
Testing the
Printer
To test the printer, power it ON, then print a configuration sheet using
the Control Panel.
1
Power ON the printer and observe the following sequence on the
Control Panel:
The display reads Self Test.
The On Line light goes on.
The display reads Emulation Size/Size.
where Emulation is the emulation (PCL, PS2, Auto, HEX), and
Size/Size is the size of paper in the upper tray/lower tray.
2
Press On Line
.
The On Line light goes off.
The display reads Printing Menu.
3
Press Menu
until:
The display reads Test Menu.
4
Press Item
until:
The display reads Config. Sheet.
5
Press Enter
.
The Data light goes on and the Configuration Sheet prints.
If the Configuration Sheet does not print, refer to Chapter 6:
Troubleshooting in the DocuPrint 4512/4512N User Guide.
When the page finishes printing, the DATA light goes off.
6
Press On Line
.
The On Line light goes on.
The display reads Emulation Size/Size.
7
12 ❖
Setting Up Guide
If you have purchased printer options, power off the printer, unplug
the power cord, and continue to “Installing Printer Options”
(page 13). Otherwise, skip to “Connecting to the Host” (page 14).
Setting Up the DocuPrint 4512/4512N
Installing
Printer Options
A number of options are available to increase the capabilities of your
DocuPrint 4512/4512N. Contact your dealer or Xerox/Rank Xerox for
ordering information.
Printer options include:
•
Memory SIMMS
•
PostScript
•
AppleTalk/Serial Interface Board
•
Ethernet Interface Board (pre-installed on the 4512N)
•
Token Ring Interface Board
Paper handling options include:
•
High Capacity Feeder
•
Envelope Tray
If you have purchased any of these options, install them now. Refer to
Appendix B: Installing Options in the DocuPrint 4512/4512N User
Guide for complete instructions.
Note
Installation of memory SIMMS, PostScript and/or an interface card
requires removal of the controller board. If you have more than one of
these options, you can install all of them while the controller board is
removed (before reinserting the controller board into the printer).
Setting Up Guide
❖
13
Connecting to the Host
Connecting to
the Host
The DocuPrint 4512 can have up to two communication ports
(Figure 4). These ports allow you to connect to two distinct host systems
concurrently.
Figure 4 DocuPrint 4512 input/output ports
Rear View
1 Parallel Interface
2 Network port (option)
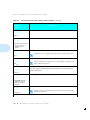
You must supply the appropriate interface cable(s) to connect the printer
to the host(s). Refer to Table 1 on page 15 for specifications.
If the printer has the Ethernet NIC option preinstalled, refer to the NIC
card installation manual to initialize, configure and set up the NIC card
on the printer.
Always power off the DocuPrint 4512 and the host before attaching
the printer interface cable.
Caution
14 ❖
Setting Up Guide
Setting Up the DocuPrint 4512/4512N
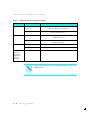
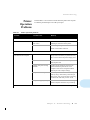
Table 1
DocuPrint 4512 cable specifications
Port Type
Cable Type(s)
Connection Type
Maximum Length
Parallel P1284
IEEE P1284-B Compliant
Parallel Cable
Standard Centronics
36-pin male
6 feet (2 meters)
Serial (option)
9 to 25-pin M/F RS-232
DB-25
9 feet (3 meters)
Ethernet (option)
ThinNet (10base2)
(RG-58 coaxial cable)
BNC
607 feet (185 meters) and
30 devices per segment
10baseT
(24 gauge, unshielded
twisted pair cable)
RJ-45
330 feet (100 meters)
per cable
STP (shielded twisted pair)
DB-9
330 feet (100 meters)
per cable
UTP
(unshielded twisted pair)
RJ-45
330 feet (100 meters)
per cable
LocalTalk
PhoneNet
DIN-8
990 feet (300 meters) with
a maximum of 32 devices
Token Ring (option)
LocalTalk (option)
Install the appropriate DocuPrint 4512 printer driver(s) (described on
page 17) on your host as per the instructions provided with each driver.
To verify communications, send a job to the printer.
Refer to Appendix B: Installing Options in the DocuPrint 4512/4512N
User Guide for complete instructions.
Setting Up Guide
❖
15
Setting Up the DocuPrint 4512/4512N
Xerox Font
Manager
The Xerox Font Manager ships with 110 fonts. Most importantly, the
Xerox Font Manager uses Agfa’s new MicroType font compression
technology, designed for high throughput of all type styles with
uncompromised type rendering.
The Xerox Font Manager also includes a number of productivity
enhancements, such as double clicking for font previews, on-demand
drive search, font grouping, and available font listings. In addition, the
Xerox Font Manager installs and de-installs all the major Windows
fonts, including TrueType, PostScript, screen bitmaps, and MicroType.
16 ❖
Setting Up Guide
Installing a Printer Driver
Installing a
Printer Driver
Table 2
DocuPrint 4512 PCL 5e emulation printer drivers
Environment
DOS†
Windows
Printer Driver
Diskette
Microsoft Word Ver. 6.0
Xerox DocuPrint 4512 Printer Driver
for MS Word 6.0 for DOS
WordPerfect Ver. 6.0
Xerox DocuPrint 4512 Printer Driver
for WordPerfect 6.0 for DOS
Windows 3.1 /
Windows 95
Windows NT 3.5
IBM OS/2
The DocuPrint 4512 supports the PCL 5e emulation printer drivers
listed in Table 2. To take full advantage of all the printer’s features when
printing PCL jobs, install the appropriate DocuPrint 4512 PCL 5e
emulation printer driver(s). (Consult your operating system user manual
for instructions on installing a new printer driver.)
Xerox DocuPrint 4512 PCL 5e Emulation Printer Driver
for Microsoft Windows 3.1/ Windows 95
OnPAGE PCL 5e Emulation Printer Driver
for Microsoft Windows NT 3.5
OS/2 Ver. 2.1
Xerox DocuPrint 4512 PCL 5e Emulation Printer Driver
for IBM OS/2 Ver. 2.1
OS/2 WARP
Xerox DocuPrint 4512 PCL 5e Emulation Printer Driver
for IBM OS/2 WARP
† If you are using a DOS application other than Microsoft Word or WordPerfect, use the HP LaserJet 4si printer driver supplied with
your application software.
If you purchased the PostScript option, your printer will also support the
PostScript drivers listed in Table 3 on page 18. To take full advantage of
all the printer’s features when printing PostScript jobs, install the
appropriate DocuPrint 4512 PostScript printer driver(s). (Consult your
operating system user manual for instructions on installing a new printer
driver.)
Contact your dealer or Xerox/Rank Xerox for any drivers you need
beyond those supplied with the printer.
Setting Up Guide
❖
17
Setting Up the DocuPrint 4512/4512N
Table 3
DocuPrint 4512 PostScript printer drivers
Environment
Windows
Printer Driver
Windows 3.1 /
Windows 95
Xerox DocuPrint 4512 PS2 Printer Driver
for Microsoft Windows 3.1/ Windows 95
Windows NT 3.5
IBM OS/2
Macintosh
UNIX
(SUN 4.1x,
SCO UNIX,
IBM AIX 3.1,
HP.UX on
HP 9000)
Diskette
OnPAGE PS2 Printer Driver
for Microsoft Windows NT 3.5
OS/2 Ver. 2.1
Xerox DocuPrint 4512 PS2 Printer Driver
for IBM OS/2 Ver. 2.1
OS/2 WARP
Xerox DocuPrint 4512 PS2 Printer Driver
for IBM OS/2 WARP
System 6.x
OnPAGE
System 7.x
OnPAGE
Document Manager
Xerox DocuPrint 4512 PS2 Printer Driver for SUN OS 4.1.3
Printer software and drivers may be available through on-line services
and the Internet.
Note
18 ❖
Setting Up Guide
What to Do Next
What to
Do Next
Congratulations! You have completed your setup of the
Xerox DocuPrint 4512/4512N Network Laser Printer.
If you have any questions or need to set optional parameters for printing,
the DocuPrint 4512/4512N User Guide is a complete reference guide to
all the printer’s features and functions.
For a listing of the printer’s factory default settings, refer to Chapter 3:
The Control Panel in the DocuPrint 4512/4512N User Guide.
Note
Setting Up Guide
❖
19
What to Do Next
20 ❖
Setting Up Guide
Chapter 1
Introduction
1 r e t pahC
Overview of the User Guide .............................................................. 1-2
Printer Components .......................................................................... 1-3
Special Features ................................................................................ 1-4
Duplex Printing .............................................................................. 1-4
Multiple Paper Trays and Increased Paper Handling ................... 1-4
Automatic Emulation/Input Switching ........................................... 1-4
State Saving .................................................................................... 1-4
Printer Generated Reports ............................................................. 1-5
Memory Expansion ........................................................................ 1-5
MultiGray Enhancement ................................................................ 1-6
Power Saving ................................................................................. 1-6
Memory Considerations .................................................................... 1-7
Chapter 1: Introduction
❖
1-1
Introduction
Overview of the
User Guide
This book is for use with both the Xerox DocuPrint 4512 and DocuPrint
4512N Network Laser Printers. The DocuPrint 4512N contains all the
components of the DocuPrint 4512, plus the Ethernet Network Interface
Card pre-installed.
As this guide serves both printers, the DocuPrint 4512N will hereafter
be referred to as the DocuPrint 4512.
The DocuPrint 4512 is ready to go after you set it up following the
instructions in the Setting Up Guide. As you use the printer, however,
you may occasionally need to refer to this User Guide as a reference for
the following:
1-2 ❖
•
Learning about special printer features [“Special Features”
(page 1-4)]
•
Paper specifications, loading paper, and duplex printing
(Chapter 2: Paper Handling)
•
Instructions on using the Control Panel (Chapter 3: The Control
Panel)
•
Downloading fonts (Chapter 4: Fonts)
•
Installing printer drivers (Chapter 5: Printer Drivers)
•
Troubleshooting printing problems if they occur
(Chapter 6: Troubleshooting)
•
Tips on taking care of the printer (Chapter 7: Printer Maintenance
and Consumables)
•
Replacing consumables (Chapter 7: Printer Maintenance and
Consumables)
•
Ordering printer options (Appendix A: Ordering Information)
•
Installing printer options (Appendix B: Installing Options)
•
Printer specifications (Appendix C: Printer Specifications)
DocuPrint 4512/4512N User Guide
Introduction
Printer
Components
The major printer components are indicated below.
Figure 1.1
Major printer components
Front View
1 Fuser Cover
2 Control Panel Display
3 Front Cover
4 Manual Feed Slot
5 Manual Feed Guide
6 Upper Paper Tray
7 Lower Paper Tray
8 Paper Output Tray
9 Top Cover
10 Tray Release Buttons
Rear View
1 Top Cover Release Lever
2 Tray Extension
3 Power Switch
4 Power Cord Connector
5 High Capacity Feeder
Connector
6 Corotron Cleaner
7 Controller Board
8 Top Cover
9 Cooling Fan Outlet
10 Print Density Adjuster
11 Parallel Interface
12 Paper Trays
Chapter 1: Introduction
❖
1-3
Introduction
Special Features
Several features have been designed into the DocuPrint 4512 to enhance
your printing environment. Using the Control Panel menu system, you
can tailor printer settings to match your printing requirements.
See Chapter 3: The Control Panel for more information about the
Control Panel and its menu system.
Duplex Printing
The DocuPrint 4512 can print two-sided documents. Duplex printing is
as easy as printing a one-sided job.
Multiple
Paper Trays and
Increased Paper
Handling
The DocuPrint 4512 offers two paper trays, each of which can hold up
to 250 sheets of paper. When the paper source is set to AUTO SELECT
(the factory default), the printer automatically senses the paper size and
feeds paper from the appropriate tray according to print instructions
from the application software. If both trays contain the same size of
paper, the printer gives priority to the lower tray and feeds from there
first, effectively giving you a 500-sheet capacity.
You can also install the optional 1000-sheet High Capacity Feeder to
further extend your printing capacity.
For more information on using the paper trays, see the section “Paper
Tray Loading” (page 2-5) in Chapter 2: Paper Handling.
Automatic
Emulation/Input
Switching
When you have installed the PostScript option, the printer can process
both PCL and PostScript jobs. When Emulation is set to Auto, the
DocuPrint 4512 samples the incoming data stream to determine which
language the print job requires. The DocuPrint 4512 then switches to the
proper language for that job.
The DocuPrint 4512 can have up to two active ports when you install an
optional interface card (AppleTalk/Serial Interface, Ethernet or Token
Ring). The printer automatically switches between input sources,
samples the print job, and switches to the appropriate processing
language.
State Saving
1-4 ❖
When you have installed the PostScript option and are printing both
PostScript and PCL jobs, the printer clears any data in memory when it
switches between PostScript and PCL 5e emulations. However, you can
DocuPrint 4512/4512N User Guide
Special Features
set the State Saving item to On, and the printer will save the data in
memory when it switches emulations. This saves you from having to
download fonts and headers every time the printer switches between
PostScript and PCL 5e emulation.
Printer Generated
Reports
Using the Control Panel, you can print the following reports:
•
The Configuration Sheet lists the options you have installed and
the current settings for each option in the Control Panel’s menu
system.
•
The PCL 5e Demo Page provides a sample of the printer’s
capabilities and lists the printer’s key features.
•
The PCL 5e Font List shows which PCL fonts are currently
available. The list includes resident fonts and downloaded fonts.
•
When PostScript is installed on the DocuPrint 4512, the PostScript
(PS2) Font List shows which PostScript fonts are currently
available (both resident and downloaded fonts), and the PostScript
Demo Page provides a sample of the printer’s PostScript
capabilities.
See Chapter 3: The Control Panel for more information about these
reports.
Memory Expansion
The DocuPrint 4512 printer has 2 MB resident memory and can be
increased with additional memory SIMMs up to 50 MB. See “Memory
Considerations” (page 1-7). Also see Appendix A: Ordering
Information to order more printer memory.
Chapter 1: Introduction
❖
1-5
Special Features
MultiGray
Enhancement
When the PostScript option is installed, MultiGray enhancement
multiplies the number of gray scales available for printing scanned
photographs or computer graphic images with graded fills.
Power Saving
After 30 minutes of inactivity, the printer automatically turns off internal
components to reduce the amount of electricity used. The printer
automatically turns those parts back on when it receives a print job.
Using the Control Panel, you can send the printer into Power Saver
mode after your choice of 15, 30, or 45 minutes of inactivity.
1-6 ❖
DocuPrint 4512/4512N User Guide
Introduction
Memory
Considerations
In today’s printing environments, technologies have advanced greatly.
Corresponding memory requirements have increased too.
•
DocuPrint 4512 printing features such as duplex printing, page
protection and state saving, when on, use available printer
memory—memory that is otherwise used for processing jobs.
•
Downloading fonts also uses available printer memory.
If you plan to print highly complex jobs or need features like state
saving and page protection, you may need to add printer memory.
Table 1.1 lists memory requirements when printing simplex (one-sided)
and duplex (two-sided) jobs at 300 and 600 dpi.
Table 1.1
Memory requirements
Page Protection Setting
Paper Size
Simplex
Duplex
300 dpi
600 dpi
300 dpi
600 dpi
2 MB
2 MB
2 MB
2 MB
Letter
3 MB
8 MB
4 MB
14 MB
A4
3 MB
8 MB
4 MB
14 MB
A5
3 MB
8 MB
4 MB
14 MB
Executive
3 MB
8 MB
4 MB
14 MB
Legal
4 MB
10 MB
8 MB
18 MB
Folio
4 MB
10 MB
8 MB
18 MB
Page Protection Auto
Page Protection On
Chapter 1: Introduction
❖
1-7
1-8 ❖
DocuPrint 4512/4512N User Guide
Chapter 2
Paper Handling
2 r e t pahC
Selecting Paper ................................................................................. 2-3
Storing Paper ................................................................................. 2-4
Paper Tray Loading .......................................................................... 2-5
Paper Trays .................................................................................... 2-5
Adjusting Trays for Paper Size ...................................................... 2-5
Loading Paper for Simplex (One-Sided) Printing ......................... 2-6
Loading Paper for Duplex (Two-Sided) Printing .......................... 2-7
Loading Envelopes in the Envelope Tray ...................................... 2-7
Manual Feed Guide Loading ........................................................... 2-9
Fitting and Adjusting the Manual Feed Guide .............................. 2-9
Feeding Paper for One-Sided Printing ........................................ 2-10
Feeding Paper for Two-Sided Printing ........................................ 2-10
Printing Envelopes ....................................................................... 2-11
Printing Labels and Transparencies ............................................ 2-11
Adjusting Print Density .................................................................. 2-13
Chapter 2: Paper Handling
❖
2-1
Paper Handling
Paper Output ................................................................................... 2-14
Using the Tray Extension ............................................................. 2-14
Automatic Tray Switching .............................................................. 2-15
Bind Options for Duplex Printing .................................................. 2-16
2-2 ❖
DocuPrint 4512/4512N User Guide
Paper Handling
Selecting Paper
Table 2.1
Table 2.1 lists the size paper, envelopes, and other print media you can
use with all DocuPrint 4512 input and output trays. Using sizes other
than those listed below, or paper not recommended for laser printers,
may result in paper jams.
Media specifications for all DocuPrint 4512 trays
Upper Tray
Lower Tray
High
Capacity
Feeder†
A4
(210x297mm)
16-24lb
60-90 g/m2
16-24lb
60-90 g/m2
16-36lb
60-136 g/m2
Letter
(8.5x11” / 216x279mm)
16-24lb
60-90 g/m2
16-24lb
60-90 g/m2
16-36lb
60-136 g/m2
Folio (Legal 13”)
(8.5x13” / 216x330mm)
16-24lb
60-90 g/m2
16-24lb
60-90 g/m2
16-36lb
60-136 g/m2
Legal (Legal 14”)
(8.5x14” / 216x356mm)
16-24lb
60-90 g/m2
16-24lb
60-90 g/m2
16-36lb
60-136 g/m2
Executive
(7.25x10.5” / 184x267mm)
16-24lb
60-90 g/m2
16-24lb
60-90 g/m2
16-36lb
60-136 g/m2
A5
(148.5x210mm)
16-24lb
60-90 g/m2
16-24lb
60-90 g/m2
16-36lb
60-136 g/m2
Paper Size
Envelopes
COM-10 (4.12x9.5” / 105x241mm)
Monarch (3.87x7.5” / 98x191mm)
DL (4.33x8.66” / 110x220mm)
C5 (6.38x9.01” / 162x229mm)
Transparency
A4 (210x297 mm)
Letter (8.5x11” / 216x279mm)
Envelope
Tray†
Manual
Feed
16-24lb
60-90 g/m2
Clear, paperbacked or
permanent
stripe
Label
A4 (210x297 mm)
Letter (8.5x11” / 216x279mm)
Paper
† Optional paper handler. See Appendix A for ordering information.
Chapter 2: Paper Handling
❖
2-3
Selecting Paper
Storing Paper
2-4 ❖
The DocuPrint 4512’s print quality is optimized when paper and other
print media are properly stored. Proper storage ensures optimum print
quality and trouble-free printer options.
•
Store the paper on a flat surface, in a relatively low humidity
environment.
•
Do not unwrap paper until you are ready to use it, and rewrap any
paper you are not using.
•
Do not expose paper to direct sunlight or high humidity.
DocuPrint 4512/4512N User Guide
Paper Handling
Paper Tray
Loading
Paper Trays
Adjusting Trays for
Paper Size
Paper and other print media are loaded into the upper and lower trays
identically. Refer to Table 2.1 on page 2-3 for acceptable paper sizes.
The DocuPrint 4512 provides the following paper trays:
•
The upper and lower trays each hold 250 sheets of 20 lb (75 g/m2)
paper.
•
The optional High Capacity Feeder holds 1,000 sheets of 20 lb (75
g/m2) paper.
•
An optional Envelope Tray holds up to 20 envelopes and replaces
the upper paper tray for automatic envelope loading.
Figure 2.1 shows how to adjust the upper and lower paper trays for
different paper sizes.
Figure 2.1
Upper/Lower tray paper
adjustment guides
1 Side guide
2 End guide
The width guide (1) slides to fit the width of the paper.
The end guide (2) slides to fit the length of the paper.
Proper orientation of media in the paper and envelope trays is discussed
in the following sections.
Chapter 2: Paper Handling
❖
2-5
Paper Tray Loading
Loading Paper
for Simplex
(One-Sided) Printing
Figure 2.2 shows the proper orientation when loading paper for simplex
(one-sided) printing.
Figure 2.2
2-6 ❖
Proper orientation in tray for
simplex printing
DocuPrint 4512/4512N User Guide
Paper Tray Loading
Loading Paper
for Duplex
(Two-Sided) Printing
Figure 2.3 shows the proper orientation when loading paper for duplex
(two-sided) printing.
Figure 2.3
Loading Envelopes
in the Envelope Tray
Proper orientation in tray for
duplex printing
Figure 2.4 shows how to adjust the Envelope Tray for different envelope
sizes.
Figure 2.4
Envelope Tray adjustment
Chapter 2: Paper Handling
❖
2-7
Paper Handling
Figure 2.5 shows how envelopes are loaded flap down for printing. Use
the software application for proper orientation.
Figure 2.5
2-8 ❖
Proper envelope orientation in
Envelope Tray
DocuPrint 4512/4512N User Guide
Manual Feed Guide Loading
Manual Feed
Guide Loading
To print sizes of paper that the paper trays cannot accommodate, or to
print other media such as envelopes, adhesive labels or transparencies,
you will need to feed the media into the printer manually.
Fitting and
Adjusting the
Manual Feed Guide
If the manual feed guide is not attached to the manual feed slot on the
front of the printer, start with Step 1, below. Otherwise, skip to Step 2.
1
Insert the manual feed guide into the manual feed
slot on the front of the printer.
It should rest on its support brackets in an almost
horizontal position.
2
Place the item you want to print on the manual
feed guide, lined up along the right edge. Then
move the adjustable edge guide gently against the
left edge of the item to be printed.
Proper orientation of media in the manual feed guide is discussed in the
following sections.
Chapter 2: Paper Handling
❖
2-9
Manual Feed Guide Loading
Feeding Paper for
One-Sided Printing
Figure 2.6 shows the proper orientation for feeding paper for simplex
(one-sided) printing.
Figure 2.6
Feeding Paper for
Two-Sided Printing
Figure 2.7 shows the proper orientation for feeding paper for duplex
(two-sided) printing.
Figure 2.7
2-10 ❖
Proper orientation in Manual
Feed Guide for simplex printing
Proper orientation in Manual
Feed Guide for duplex printing
DocuPrint 4512/4512N User Guide
Manual Feed Guide Loading
Printing Envelopes
Figure 2.8 shows how envelopes are fed flap up. Use the software
application for proper orientation.
Figure 2.8
Printing Labels and
Transparencies
Manual feed envelope orientation
Figure 2.9 shows the correct orientation for feeding labels.
Figure 2.9
Manual feed label orientation
Chapter 2: Paper Handling
❖
2-11
Paper Handling
Figure 2.10 shows the correct orientation for feeding transparencies.
Figure 2.10 Manual feed transparency orientation
Note
2-12 ❖
If you get poor results when you change from normal printing on paper
to printing on transparency film of the type used for overhead
projectors, you should adjust the printer using the print density adjuster,
discussed in the section “Adjusting Print Density” (page 2-13).
DocuPrint 4512/4512N User Guide
Paper Handling
Adjusting Print
Density
When printing graphics or when printing on media which you do not
normally use, you may want to change the density of the toner. Greater
toner density gives darker printing, but it also uses more toner, so you
will have to replace your Toner Cartridge sooner. You can conserve
toner by reducing density when doing draft printing.
There is a dial for adjusting the density of toner at the rear of the printer,
between the fan outlet and the parallel port, as shown in Figure 2.11.
Figure 2.11 Print density adjuster
The symbols on the dial offer approximate indicators of density settings.
You may need to experiment before achieving optimum results. Turning
the dial fully clockwise gives the greatest density. The toner density
setting decreases as you turn the dial counterclockwise.
Chapter 2: Paper Handling
❖
2-13
Paper Handling
Paper Output
Printed items are delivered face down to the output tray. The output tray
supports up to 250 sheets of 80 g/m2 paper. A Tray Extension supports
larger sheet sizes and helps to neatly stack large volumes of output.
Using the Tray
Extension
The Tray Extension is inserted into the slots on the back of the printer as
shown in Figure 2.12. (It may have already been installed as part of the
procedure described in the Setting Up Guide.)
Figure 2.12 The Tray Extension
You will probably find it convenient to leave the Tray Extension
permanently in place. However should you want to remove it, grasp the
bottom of the bracket and gently pull it out.
2-14 ❖
DocuPrint 4512/4512N User Guide
Paper Handling
Automatic Tray
Switching
Automatic tray switching is available for both PCL and PostScript jobs.
Tray switching is useful for:
•
Increasing paper capacity.
When the current paper tray runs out of paper, the printer
automatically switches to the next tray in the sequence, provided
the paper in the next tray is the same size as that in the current tray.
•
Searching for the correct paper size.
If the paper size specified in your software application does not
match the size paper loaded in the current paper tray, the printer
automatically searches the next tray in the sequence for a paper size
that matches. The default tray is the lowest tray installed.
Chapter 2: Paper Handling
❖
2-15
Bind Options
for Duplex
Printing
To ensure that duplex jobs print in the proper orientation, set the Bind
item (in the Control Panel’s Printing menu) to the appropriate settings
(see Figure 2.13).
Figure 2.13 Duplex binding orientation and Control Panel menu settings
2-16 ❖
Portrait Printing
Landscape Printing
Set Bind to Long Edge
Set Bind to Long Edge
Set Bind to Short Edge
Set Bind to Short Edge
DocuPrint 4512/4512N User Guide
Bind Options for Duplex Printing
Chapter 2: Paper Handling
❖
2-17
Bind Options for Duplex Printing
2-18 ❖
DocuPrint 4512/4512N User Guide
Bind Options for Duplex Printing
Chapter 2: Paper Handling
❖
2-19
Bind Options for Duplex Printing
2-20 ❖
DocuPrint 4512/4512N User Guide
Chapter 3
The Control Panel
3 r e t pahC
Control Panel Features .................................................................... 3-2
Indicator Lights .............................................................................. 3-3
Display Panel Messages ................................................................ 3-3
Control Keys .................................................................................. 3-4
The Menu System ............................................................................. 3-6
Using the Control Panel ................................................................... 3-7
Setting the Printer .......................................................................... 3-7
Printing Test Sheets ..................................................................... 3-17
Setting Power Saver Mode ........................................................... 3-20
Printing Simplex and Duplex Demo Pages .................................. 3-20
Printer Parameters and Default Settings ....................................... 3-22
Chapter 3: The Control Panel
❖
3-1
The Control Panel
Control Panel
Features
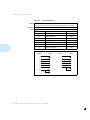
Figure 3.1
The DocuPrint 4512 Control Panel (Figure 3.1) serves two purposes:
•
It displays information about the status of the printer (or the job in
process) and
•
It provides the means for changing printer settings to control how
the DocuPrint 4512 operates.
DocuPrint 4512 Control Panel
1 Indicator lights
2 Display panel
3 Control keys (8)
3-2 ❖
DocuPrint 4512/4512N User Guide
Control Panel Features
Indicator Lights
The Control Panel contains four indicator lights. Table 3.1 describes the
function of each light.
Table 3.1
Light
Display Panel
Messages
Control Panel
indicator lights and
their functions
Description
Fault
(Yellow)
Glows to show that an error has occurred. It flashes when
the selected paper tray has run out of paper.
Toner/Drum
(Yellow)
Begins to glow when the toner is low or when the
Photoconductor / Drum is near the end of its life.
Data
(Green)
Glows when the printer is processing data normally. It
goes off when the final page of a print job has finished
printing. It flashes if data for a page is in the printer
memory and the end of page cannot be determined.
On Line
(Green)
Glows when the printer is ready to receive print data from
the computer. It flashes when the printer is receiving
and/or processing data.
The Control Panel’s display shows the following:
•
Status messages
These inform you of the printer’s operating condition, such as
Self Test or PCL 5e A4/A4.
•
Menu settings
These are manually set using the Control Panel keys. See the
section “The Menu System” (page 3-6) for an overview of the
menus.
•
Error conditions
These indicate the likely cause of printer problems, such as paper
jams and running out of supplies.
•
Service messages
These provide technical information about equipment failure.
Chapter 3: The Control Panel
❖
3-3
Control Panel Features
Control Keys
The Control Panel keypad consists of eight control keys. Table 3.2
describes the function of each key.
Table 3.2
Key
On Line
Control Panel keys
and their functions
Description
Sets the printer on-line and off-line.
When on-line, the printer is ready to receive, or has
already accepted, data for printing.
You must take the printer off-line to set menus, perform
off-line print tests, and do other manual tasks. The
other keys do not function when the printer is on-line.
Menu
Cycles the display through the menus.
Item
Cycles the display through the items in each menu.
Up
Cycles the display backward through the values for
each menu item.
The current setting is indicated by an asterisk (*) at the
right edge of the display.
Down
Cycles the display forward through the values for each
menu item.
The current setting is indicated by an asterisk (*) at the
right edge of the display.
Enter
Sets the displayed value of the currently displayed
menu item, or executes the currently displayed off-line
print test.
Form Feed
Prints the data which is left in printer memory when the
printer is taken off-line.
This key has no effect when the printer is on-line.
Data Clear
3-4 ❖
Clears printer memory of print job data.
DocuPrint 4512/4512N User Guide
Control Panel Features
In general, the control keys are used in the following sequence:
1. Press On Line
to set the printer off-line.
2. Press Menu
to display the menu you want to access.
3. Press Item
to display the menu item you want to set.
4. Press Up
or Down
5. Press Enter
to change the item’s value.
to set the item to the value displayed.
6. Press On Line
to set the printer on-line.
See “The Menu System” (page 3-6) for an overview of the Control
Panel’s menu structure, and “Using the Control Panel” (page 3-7) for
specific procedures.
Chapter 3: The Control Panel
❖
3-5
The Control Panel
The Menu
System
Table 3.3
Table 3.3 shows the Control Panel menu structure. The name of the
menu appears at the top of the column, and the menu’s items are
displayed beneath it.
Control Panel menus and items
Printing
Menu
Job Menu
Config Menu
Serial Menu†
Test Menu
Misc Menu
Copies
Resolution
Warn Msg
Baud Rate
Config Sheet
Prt Screen
Font Number
Page P
Manual Set
Data Bit
PCL 5e Font List
Message
Duplex
St Saving
High Speed
Parity
PS2 Font List‡
Bind††
Emulation
Adv Fnctns
Robust XON
PCL 5e Demo
Page
DTR Polarity
PS2 Demo Page‡
† Appears when the serial interface option is installed.
‡ Appears when the PostScript option is installed.
†† Appears when the Printing Menu’s Duplex item is set to On.
3-6 ❖
DocuPrint 4512/4512N User Guide
The Control Panel
Using the
Control Panel
The Control Panel is used to set various printer operations and to print
test sheets.
Setting the Printer
Table 3.4, starting on the next page, lists the most common printer
setting tasks, organized by menu and menu item. The examples show a
printer set for PCL 5e emulation with A4 paper in both upper and lower
tray (PCL 5e A4/A4). Your settings may be different.
For an alphabetical listing of menu items (and more detailed
descriptions), see Table 3.6 on page 3-23.
For each task listed in Table 3.4, you will find:
•
All possible choices for the item to be set. The choice shown in
bold is the factory default setting.
•
The key press sequence to complete the task.
•
For each key press, the action/response, along with the message
displayed. ‘=X’ indicates the current setting, ‘=N’ indicates a new
setting, and the asterisk (*) indicates that the new setting has been
entered.
You can normally control the printer’s operation through your
applications, such as specifying how many copies of the print job you
want.
Note
Chapter 3: The Control Panel
❖
3-7
Using the Control Panel
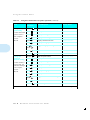
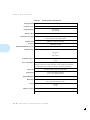
Table 3.4
Using the Control Panel to set printer operation
Task
Change the copies
setting.
Sets how many copies
to print.
Choices:
1-999
Change the font
number setting.
Key Press
Sequence†
Action/Response
Display Shows
On Line
Takes the printer off-line.
Printing Menu
Item
Displays the Copies item.
Copies=X
Changes the number of copies.
Copies=N
Enter
Sets the new value.
Copies=N
On Line
Returns the printer on-line.
PCL 5e A4/A4
On Line
Takes the printer off-line.
Printing Menu
Up
Down
or
*
*
Item
Displays the Copies item.
Copies=X
*
Sets the printer’s base
font.
Item
Displays the Font Number item.
Font Number=X
*
Choices:
0-45
Up
Down
Changes the font number.
Font Number=N
Enter
Saves the new value.
Font Number=N
On Line
Returns the printer on-line.
PCL 5e A4/A4
On Line
Takes the printer off-line.
Printing Menu
Item
Displays the Copies item.
Copies=X
*
Item
Displays the Font Number item.
Font Number=X
*
Item
Displays the Duplex item.
Duplex=X
*
Toggles the duplex setting.
Duplex=N
Enter
Saves the new value.
Duplex=N
On Line
Returns the printer on-line.
PCL 5e A4/A4
Change the duplex
setting.
Controls duplex
(two-sided) printing.
Choices:
Off, On
Up
Down
or
or
*
*
Table 3.4 Page 1 of 9
3-8 ❖
DocuPrint 4512/4512N User Guide
Using the Control Panel
Table 3.4
Using the Control Panel to set printer operation (continued)
Task
Change the bind
setting†.
Key Press
Sequence†
Action/Response
Display Shows
On Line
Takes the printer off-line.
Printing Menu
Item
Displays the Copies item.
Copies=X
*
Controls print
orientation for duplex
(two-sided) printing.
Item
Displays the Font Number item.
Font Number=X
*
Item
Displays the Duplex item.
Duplex=On
*
Choices:
Long Edge,
Short Edge
Item
Displays the Bind item.
Bind=X
*
Toggles the binding setting.
Bind=N
Enter
Saves the new value.
Bind=N
On Line
Returns the printer on-line.
PCL 5e A4/A4
On Line
Takes the printer off-line.
Printing Menu
†
When the Duplex item
is set to On.
Change the
resolution setting.
Up
Down
or
*
Menu
Displays the Job Menu.
Job Menu
Sets the print
resolution in dpi.
Item
Displays the Resolution item.
Resolution=X
Choices:
600, 300
Up
Down
Toggles the resolution setting.
Resolution=N
Enter
Saves the new value.
Resolution=N
On Line
Returns the printer on-line.
PCL 5e A4/A4
On Line
Takes the printer off-line.
Printing Menu
Menu
Displays the Job Menu.
Job Menu
Item
Displays the Resolution item.
Resolution=X
*
Item
Displays the Page P item.
Page P=X
*
Toggles the page protection setting.
Page P=N
Enter
Saves the new value.
Page P=N
On Line
Returns the printer on-line.
PCL 5e A4/A4
Change the page
protection setting.
Controls how the
printer completes a
job that is causing a
data loss error.
Choices:
AUTO, On
Up
Down
or
or
*
*
*
Table 3.4 Page 2 of 9
Chapter 3: The Control Panel
❖
3-9
Using the Control Panel
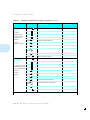
Table 3.4
Using the Control Panel to set printer operation (continued)
Task
Change the state
saving setting.
Controls whether or
not the printer saves
data in memory when
switching between
PCL 5e and Postscript
emulation.
Key Press
Sequence†
Action/Response
Display Shows
On Line
Takes the printer off-line.
Printing Menu
Menu
Displays the Job Menu.
Job Menu
Item
Displays the Resolution item.
Resolution=X
*
Item
Displays the Page P item.
Page P=X
*
Item
Displays the St Saving item.
St Saving=X
*
Toggles the state saving setting.
St Saving=N
Enter
Saves the new value.
St Saving=N
On Line
Returns the printer on-line.
PCL 5e A4/A4
On Line
Takes the printer off-line.
Printing Menu
Menu
Displays the Job Menu.
Job Menu
Item
Displays the Resolution item.
Resolution=X
*
Item
Displays the Page P item.
Page P=X
*
Item
Displays the St Saving item.
St Saving=X
*
Item
Displays the Emulation item.
Emulation=X
*
Changes the emulation setting.
Emulation=N
Enter
Saves the new value.
Emulation=N
On Line
Returns the printer on-line.
PCL 5e A4/A4
Up
Down
Choices:
Off, On
Change the
emulation setting.
Sets the base printer
emulation.
Choices:
PCL 5e, PS2, AUTO,
HEX
Up
Down
or
or
*
*
Table 3.4 Page 3 of 9
3-10 ❖
DocuPrint 4512/4512N User Guide
Using the Control Panel
Table 3.4
Using the Control Panel to set printer operation (continued)
Key Press
Sequence†
Action/Response
Display Shows
On Line
Takes the printer off-line.
Printing Menu
Menu
Displays the Job Menu.
Job Menu
Controls the display
of memory-related
warning messages.
Menu
Displays the Config Menu.
Config Menu
Item
Displays the Warn Msg item.
Warn Msg=X
Choices:
On, Off
Up
Down
Toggles the warning messages setting.
Warn Msg=N
Enter
Saves the new value.
Warn Msg=N
On Line
Returns the printer on-line.
PCL 5e A4/A4
On Line
Takes the printer off-line.
Printing Menu
Menu
Displays the Job Menu.
Job Menu
Menu
Displays the Config Menu.
Config Menu
Item
Displays the Warn Msg item.
Warn Msg=X
*
Item
Displays the Manual Set item.
Manual Set=X
*
Toggles the manual feed setting.
Manual Set=N
Enter
Saves the new value.
Manual Set=N
On Line
Returns the printer on-line.
PCL 5e A4/A4
Task
Change the
warning message
setting.
Change the
manual feed
setting.
Controls the override
of manual paper feed
requests from
computer
applications.
Choices:
On, Off
Up
Down
or
or
*
*
*
Table 3.4 Page 4 of 9
Chapter 3: The Control Panel
❖
3-11
Using the Control Panel
Table 3.4
Using the Control Panel to set printer operation (continued)
Task
Change the high
speed setting.
Key Press
Sequence†
Action/Response
Display Shows
On Line
Takes the printer off-line.
Printing Menu
Menu
Displays the Job Menu.
Job Menu
Controls data transfer
speed to slower or
older computers.
Menu
Displays the Config Menu.
Config Menu
Item
Displays the Warn Msg item.
Warn Msg=X
*
Choices:
On, Off
Item
Displays the Manual Set item.
Manual Set=X
*
Item
Displays the High Speed item.
High Speed=X
*
Toggles the high speed setting.
High Speed=N
Enter
Saves the new value.
High Speed=N
On Line
Returns the printer on-line.
PCL 5e A4/A4
On Line
Takes the printer off-line.
Printing Menu
Menu
Displays the Job Menu.
Job Menu
Menu
Displays the Config Menu.
Config Menu
Item
Displays the Warn Msg item.
Warn Msg=X
*
Item
Displays the Manual Set item.
Manual Set=X
*
Item
Displays the High Speed item.
High Speed=X
*
Item
Displays the Adv Fnctns item.
Adv Fnctns=X
*
Toggles the advanced functions setting.
Adv Fnctns=N
Enter
Saves the new value.
Adv Fnctns=N
On Line
Returns the printer on-line.
PCL 5e A4/A4
Up
Down
Change the
advanced
functions setting.
Controls whether or
not the printer will
send status messages
to the computer.
Choices:
On, Off
Up
Down
or
or
*
*
Table 3.4 Page 5 of 9
3-12 ❖
DocuPrint 4512/4512N User Guide
Using the Control Panel
Table 3.4
Using the Control Panel to set printer operation (continued)
Task
Change the baud
rate setting.
Controls the rate at
which data is
transferred between
the computer and the
printer through the
optional serial
interface.
Choices:
300, 600, 1200, 2400,
4800, 9600, 19200,
38400, 57600
Change the data
bit setting.
Controls a
communications
parameter for the
optional serial
interface.
Choices:
8, 7
Key Press
Sequence†
Action/Response
Display Shows
On Line
Takes the printer off-line.
Printing Menu
Menu
Displays the Job Menu.
Job Menu
Menu
Displays the Config Menu.
Config Menu
Menu
Displays the Serial Menu (if present).
Serial Menu
Item
Displays the Baud Rate item.
Baud Rate=X
Changes the baud rate setting.
Baud Rate=N
Enter
Saves the new value.
Baud Rate=N
On Line
Returns the printer on-line.
PCL 5e A4/A4
On Line
Takes the printer off-line.
Printing Menu
Menu
Displays the Job Menu.
Job Menu
Menu
Displays the Config Menu.
Config Menu
Menu
Displays the Serial Menu (if present).
Serial Menu
Item
Displays the Baud Rate item.
Baud Rate=X
*
Item
Displays the Data Bit item.
Data Bit=X
*
Changes the data bit setting.
Data Bit=N
Enter
Saves the new value.
Data Bit=N
On Line
Returns the printer on-line.
PCL 5e A4/A4
Up
Down
Up
Down
or
or
*
*
*
Table 3.4 Page 6 of 9
Chapter 3: The Control Panel
❖
3-13
Using the Control Panel
Table 3.4
Using the Control Panel to set printer operation (continued)
Task
Change the parity
setting.
Controls a
communications
parameter for the
optional serial
interface.
Choices:
None, Even, Odd
Key Press
Sequence†
Action/Response
Display Shows
On Line
Takes the printer off-line.
Printing Menu
Menu
Displays the Job Menu.
Job Menu
Menu
Displays the Config Menu.
Config Menu
Menu
Displays the Serial Menu (if present).
Serial Menu
Item
Displays the Baud Rate item.
Baud Rate=X
*
Item
Displays the Data Bit item.
Data Bit=X
*
Item
Displays the Parity item.
Parity=X
*
Changes the parity setting.
Parity=N
Enter
Saves the new value.
Parity=N
On Line
Returns the printer on-line.
PCL 5e A4/A4
On Line
Takes the printer off-line.
Printing Menu
Menu
Displays the Job Menu.
Job Menu
Menu
Displays the Config Menu.
Config Menu
Menu
Displays the Serial Menu (if present).
Serial Menu
Item
Displays the Baud Rate item.
Baud Rate=X
*
Item
Displays the Data Bit item.
Data Bit=X
*
Item
Displays the Parity item.
Parity=X
*
Item
Displays the Robust XON item.
Robust XON=X
*
Changes the Robust XON setting.
Robust XON=N
Enter
Saves the new value.
Robust XON=N
On Line
Returns the printer on-line.
PCL 5e A4/A4
Up
Down
Change the
Robust XON
setting.
Controls a datastream
handshaking protocol
for the optional serial
interface.
Choices:
On, Off
Up
Down
or
or
*
*
Table 3.4 Page 7 of 9
3-14 ❖
DocuPrint 4512/4512N User Guide
Using the Control Panel
Table 3.4
Using the Control Panel to set printer operation (continued)
Task
Change the DTR
Polarity setting.
Controls the
configuration of Data
Terminal Ready
polarity for the
optional serial
interface.
Choices:
High, Low
Key Press
Sequence†
Action/Response
Display Shows
On Line
Takes the printer off-line.
Printing Menu
Menu
Displays the Job Menu.
Job Menu
Menu
Displays the Config Menu.
Config Menu
Menu
Displays the Serial Menu (if present).
Serial Menu
Item
Displays the Baud Rate item.
Baud Rate=X
*
Item
Displays the Data Bit item.
Data Bit=X
*
Item
Displays the Parity item.
Parity=X
*
Item
Displays the Robust XON item.
Robust XON=X
*
Item
Displays the DTR Polarity item.
DTR Polarity=X *
Changes the polarity setting.
DTR Polarity=N
Enter
Saves the new value.
DTR Polarity=N *
On Line
Returns the printer on-line.
PCL 5e A4/A4
On Line
Takes printer off-line.
Printing Menu
Menu
Displays Job Menu.
Job Menu
Menu
Displays Config Menu.
Config Menu
Menu
Displays Serial Menu (if present).
Serial Menu
Menu
Displays Test Menu.
Test Menu
Menu
Displays Misc Menu.
Misc Menu
Item
Displays Prt Screen item.
Prt Screen=X
Changes the screen dump setting.
Prt Screen=N
Enter
Saves the new value.
Prt Screen=N
On Line
Returns printer on-line.
PCL 5e A4/A4
Up
Down
Change the print
screen setting.
Controls the default
symbol set to allow
80 characters per line
on A4 paper.
Choices:
OFF, 850, 852
Up
Down
or
or
*
*
Table 3.4 Page 8 of 9
Chapter 3: The Control Panel
❖
3-15
Using the Control Panel
Table 3.4
Using the Control Panel to set printer operation (continued)
Task
Change the
Message setting.
Sets the language of
display panel
messages.
Choices:
English, FRENCH,
GERMAN,
ITALIAN, PORTUG,
RUSSIAN, SPANISH
Key Press
Sequence†
Action/Response
Display Shows
On Line
Takes printer off-line.
Printing Menu
Menu
Displays Job Menu.
Job Menu
Menu
Displays Config Menu.
Config Menu
Menu
Displays Serial Menu (if present).
Serial Menu
Menu
Displays Test Menu.
Test Menu
Menu
Displays Misc Menu.
Misc Menu
Item
Displays Prt Screen item.
Prt Screen=X
*
Item
Displays Message item.
Message=X
*
Changes the message language setting.
Message=N
Enter
Saves the new value.
Message=N
On Line
Returns printer on-line.
PCL 5e A4/A4
Up
Down
or
*
Table 3.4 Page 9 of 9
† The number of menus and menu items will vary, depending on whether or not you have option boards installed in the printer.
Therefore, the number of times you have to press the Menu or Item key may vary from that shown in this table.
3-16 ❖
DocuPrint 4512/4512N User Guide
Using the Control Panel
Printing Test Sheets
Table 3.5
Table 3.5 lists the procedures for printing the various test prints.
Using the Control Panel to print test sheets
Task
Print the
Configuration
Sheet.
Lists the options you
have installed and the
current settings for
each option in the
Control Panel’s menu
system.
Print the PCL 5e
Font List.
Shows which PCL
fonts are currently
available. The list
includes resident
fonts and downloaded
fonts.
Key Press
Sequence†
Action/Response
Display Shows
On Line
Takes the printer off-line.
Printing Menu
Menu
Displays the Job Menu.
Job Menu
Menu
Displays the Config Menu.
Config Menu
Menu
Displays the Serial Menu (if present).
Serial Menu
Menu
Displays the Test Menu.
Test Menu
Item
Displays the Config Sheet item.
Config Sheet
Enter
Prints the Configuration Sheet.
Config Sheet
On Line
Returns the printer on-line.
PCL 5e A4/A4
On Line
Takes the printer off-line.
Printing Menu
Menu
Displays the Job Menu.
Job Menu
Menu
Displays the Config Menu.
Config Menu
Menu
Displays the Serial Menu (if present).
Serial Menu
Menu
Displays the Test Menu.
Test Menu
Item
Displays the Config Sheet item.
Config Sheet
Item
Displays the PCL 5e Font List item.
PCL 5e Font List
Enter
Prints the PCL 5e Font List.
PCL 5e Font List
On Line
Returns the printer on-line.
PCL 5e A4/A4
Table 3.5 Page 1 of 3
Chapter 3: The Control Panel
❖
3-17
Using the Control Panel
Table 3.5
Using the Control Panel to print test sheets (continued)
Task
Print the PS2 Font
List.
Shows which
PostScript fonts are
currently available (if
the PostScript option
has been installed).
The list includes
resident fonts and
downloaded fonts.
Print the PCL 5e
Demo Page.
Provides a sample of
the printer’s
capabilities and lists
the printer’s key
features.
Key Press
Sequence†
Action/Response
Display Shows
On Line
Takes the printer off-line.
Printing Menu
Menu
Displays the Job Menu.
Job Menu
Menu
Displays the Config Menu.
Config Menu
Menu
Displays the Serial Menu (if present).
Serial Menu
Menu
Displays the Test Menu.
Test Menu
Item
Displays the Config Sheet item.
Config Sheet
Item
Displays the PCL 5e Font List item.
PCL 5e Font List
Item
Displays the PS2 Font List item.
PS2 Font List
Enter
Prints the PS2 Font List.
PS2 Font List
On Line
Returns the printer on-line.
PCL 5e A4/A4
On Line
Takes the printer off-line.
Printing Menu
Menu
Displays the Job Menu.
Job Menu
Menu
Displays the Config Menu.
Config Menu
Menu
Displays the Serial Menu (if present).
Serial Menu
Menu
Displays the Test Menu.
Test Menu
Item
Displays the Config Sheet item.
Config Sheet
Item
Displays the PCL 5e Font List item.
PCL 5e Font List
Item
Displays the PS2 Font List item.
PS2 Font List
Item
Displays the PCL 5e Demo Page item.
PCL 5e Demo Page
Enter
Prints the PCL 5e Demo Page.
PCL 5e Demo Page
On Line
Returns the printer on-line.
PCL 5e A4/A4
Table 3.5 Page 2 of 3
3-18 ❖
DocuPrint 4512/4512N User Guide
Using the Control Panel
Table 3.5
Using the Control Panel to print test sheets (continued)
Task
Print the PS2
Demo Page.
Provides a sample
of the printer’s
PostScript capabilities
(if the PostScript
option has been
installed).
Key Press
Sequence†
Action/Response
Display Shows
On Line
Takes the printer off-line.
Printing Menu
Menu
Displays the Job Menu.
Job Menu
Menu
Displays the Config Menu.
Config Menu
Menu
Displays the Serial Menu (if present).
Serial Menu
Menu
Displays the Test Menu.
Test Menu
Item
Displays the Config Sheet item.
Config Sheet
Item
Displays the PCL 5e Font List item.
PCL 5e Font List
Item
Displays the PS2 Font List item.
PS2 Font List
Item
Displays the PCL 5e Demo Page item.
PCL 5e Demo Page
Item
Displays the PS2 Demo Page item.
PS2 Demo Page
Enter
Prints the PS2 Demo Page.
PS2 Demo Page
On Line
Returns the printer on-line.
PCL 5e A4/A4
Table 3.5 Page 3 of 3
† The number of menus and menu items will vary, depending on whether or not you have option boards installed in the printer.
Therefore, the number of times you have to press the Menu or Item key may vary from that shown in this table.
Chapter 3: The Control Panel
❖
3-19
Using the Control Panel
Setting Power Saver
Mode
The DocuPrint 4512 conforms to the U.S. EPA Energy Star power saver
mode specifications. By default, the printer’s power consumption drops
to less than 30 watts when no data is received for a period of 30 minutes.
Other power saving modes are available that reduce power consumption
to less than 10% of peak consumption after 15, 30, or 45 minutes.
To set the power saver mode:
1
Power off the printer.
2
Press Data Clear
printer back on.
and hold the key down while powering the
The display will read:
POWER SAVE 30
3
Press Form Feed
saver choices.
or Data Clear
to cycle through the power
POWER SAVE 15
POWER SAVE 30
POWER SAVE 45
4
When the value you want is displayed, turn the printer off.
5
Wait 10 to 15 seconds, then turn the printer back on.
The new value will then be set.
Printing Simplex
and Duplex
Demo Pages
The DocuPrint 4512 has a Demo Page Mode in which demo pages can
be printed by a single key press. To enter Demo Page Mode:
1
Power off the printer.
2
Press Form Feed
and Data Clear
while powering the printer back on.
The display will read:
DEMO PAGE
3-20 ❖
DocuPrint 4512/4512N User Guide
and hold the keys down
Using the Control Panel
3
To print a simplex demo page, press Enter
To print a duplex demo page, press Up
.
.
If the PostScript option is installed, the PS2 demo pages will be printed.
Otherwise, the PCL 5e demo pages will be printed.
4
To cancel Demo Page Mode, either power off the printer or
simultaneously press Menu
, Up
, and Down
.
Chapter 3: The Control Panel
❖
3-21
The Control Panel
Printer
Parameters and
Default Settings
Table 3.6, starting on the next page, contains an alphabetical listing of
all Control Panel menu items. For each item listed, you will find:
•
The menu item.
•
The menu under which the item is located.
•
All possible settings for the item.
•
The factory default setting for the item. A boldfaced setting means
it is a factory default setting.
•
A description of the item.
You can normally override many of the printer’s default settings through
your applications, such as the font(s) to be used for a print job.
Note
3-22 ❖
DocuPrint 4512/4512N User Guide
Printer Parameters and Default Settings
Table 3.6
Control Panel menu items, settings, and descriptions
Menu Item,
Location,
Setting(s)
Adv Fnctns
Config Menu
Description
When set to On, allows status messages to be sent to the computer through the printer’s
bi-directional parallel port.
On, Off
Baud Rate†
Serial Menu
Determines the rate at which data is transferred between the computer and the printer.
Older computers require slower settings. Refer to your computer manual.
300, 600, 1200, 2400, 4800,
9600, 19200, 38400, 57600
†
Appears only when the
serial interface option is
installed.
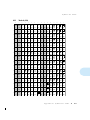
Bind
Sets the binding of the print job for duplex printing.
Printing Menu
Long Edge, Short Edge
Copies
Sets how many copies to print.
Printing Menu
1 ~ 999
Data Bit†
Serial Menu
Sets 7 or 8 bit communications.
Printer and host values must match.
8, 7
†
Appears only when the
serial interface option is
installed.
DTR Polarity†
Serial Menu
Sets the configuration of Data Terminal Ready polarity, which determines whether the
signal at pin 20 of the serial interface connector is high or low when the printer is ready.
High, Low
†
Appears only when the
serial interface option is
installed.
Table 3.6 Page 1 of 3
Chapter 3: The Control Panel
❖
3-23
Printer Parameters and Default Settings
Table 3.6
Control Panel menu items, settings, and descriptions (continued)
Menu Item,
Location,
Setting(s)
Description
When set to On, enables duplex (two-sided printing).
Duplex
Printing Menu
Off, On
Emulation†
Sets the base printer emulation.
Job Menu
PCL 5e, PS2, AUTO, HEX
†
Appears only when a
PostScript option is
installed.
Font Number
Printing Menu
Sets the font number of the printer’s base font.
The number varies according to how many fonts are installed on the printer.
0-45
High Speed
Config Menu
On, Off
Manual Set
Config Menu
Controls data transfer speed.
This item should be set to Off for slower or older computers. Setting it to On
improves data transfer speed.
Controls processing of manual feed request from computer application. When set to
Off, causes paper to feed automatically from the paper tray even if the application
requests manual feed.
On, Off
Sets the language for the messages that display on the Control Panel.
Message
Misc Menu
ENGLISH, FRENCH,
GERMAN, ITALIAN,
PORTUG, RUSSIAN,
SPANISH
Page P
Job Menu
AUTO, On
Controls how data is processed when DATA LOSS ERROR occurs.
If printing speed is a consideration, more memory may be required to make
effective use of this item.
Table 3.6 Page 2 of 3
3-24 ❖
DocuPrint 4512/4512N User Guide
Printer Parameters and Default Settings
Table 3.6
Control Panel menu items, settings, and descriptions (continued)
Menu Item,
Location,
Setting(s)
Parity†
Serial Menu
Description
Sets the parity communications parameter.
Printer and host values must match.
None, Even, Odd
†
Appears only when the
serial interface option is
installed.
Prt Screen
Misc Menu
OFF, 850, 852
Resolution
Controls the default symbol set to allow 80 characters per line on A4 paper.
A4 paper is usually 77 characters wide. When set to 850 or 852, A4 width will
be able to accommodate 80 characters per line, and the default symbol set value
will correspond to PC-850 or PC-852. This item is useful when printing the 80
characters per line width of computer displays.
Sets the print resolution in dpi (dots per inch).
Job Menu
600, 300
Robust XON†
Serial Menu
Controls the XON datastream handshaking protocol. When set to On, the printer sends
signals at one-second intervals to tell the host it is ready to receive data.
On, Off
†
Appears only when the
serial interface option is
installed.
St Saving†
Job Menu
Controls whether or not the printer saves data in memory when switching between PCL
5e and Postscript emulation. When set to Off, the user area is cleared at emulation
change.
Off, On
†
Used only when the
PostScript option is
installed.
Warn Msg
Config Menu
Setting this item to On may require more memory.
Controls the display of memory-related warning messages. When set to On, Data Loss
Error and Data Memory Full messages will not be displayed.
On, Off
Table 3.6 Page 3 of 3
Chapter 3: The Control Panel
❖
3-25
3-26 ❖
DocuPrint 4512/4512N User Guide
Chapter 4
Fonts
4 r e t pahC
Fonts in Your Printer ....................................................................... 4-2
Xerox Font Manager ...................................................................... 4-2
Intellifont ........................................................................................ 4-3
TrueType ........................................................................................ 4-3
Bitmap ............................................................................................ 4-4
PostScript ....................................................................................... 4-4
Printing Font Lists ............................................................................ 4-5
Selecting Fonts .................................................................................. 4-6
Changing the Font Number Setting ............................................... 4-6
Downloading Fonts .......................................................................... 4-7
Chapter 4: Fonts
❖
4-1
Fonts
Fonts in
Your Printer
The DocuPrint 4512 base printer is equipped with 46 resident fonts that
can be used for PCL jobs:
•
10 TrueType™ scalable typefaces
•
35 Intellifont™ scalable typefaces
•
1 PCL Bitmap font
The PostScript option provides an additional 35 PostScript-compatible
fonts for PostScript jobs.
To review the fonts in your printer, you can print font lists, as described
in the section “Printing Font Lists” (page 4-5).
Note
Xerox Font Manager
The Xerox Font Manager ships with 110 fonts. Most important, the
Xerox Font Manager uses Agfa’s new MicroType font compression
technology, designed for high throughput of all type styles with
uncompromised type rendering.
The Xerox Font Manager also includes a number of productivity
enhancements, such as double clicking for font previews, on-demand
drive search, font grouping, and available font listings. In addition, the
Xerox Font Manager installs and de-installs all the major Windows
fonts, including TrueType, PostScript, screen bitmaps, and MicroType.
4-2 ❖
DocuPrint 4512/4512N User Guide
Fonts in Your Printer
Intellifont
Table 4.1 lists the 35 Intellifont scalable typefaces that are available in
the DocuPrint 4512.
Table 4.1
Antique Olive™
Antique Olive Bold
Antique Olive Italic
Albertus™ Medium
Albertus Extra Bold
CG Omega®
CG Omega Bold
CG Omega Bold Italic
CG Omega Italic
CG Times®
CG Times Bold
CG Times Bold Italic
CG Times Italic
Clarendon Condensed
Coronet™
DocuPrint 4512 base
printer Intellifont
fonts
Garamond Antiqua
Garamond Halbfett
Garamond Kursiv
Garamond Kursiv Halbfett
Letter Gothic
Letter Gothic Bold
Letter Gothic Italic
Marigold
Univers® Medium
Univers Medium Italic
Univers Bold
Univers Bold Italic
Univers Medium Condensed
Univers Medium Condensed Italic
Univers Bold Condensed
Univers Bold Condensed Italic
Courier
Courier Bold
Courier Bold Italic
Courier Italic
TrueType
Table 4.2 lists the ten TrueType typefaces that are available in the
DocuPrint 4512.
Table 4.2
DocuPrint 4512 base
printer TrueType
fonts
Arial™
Arial Bold
Arial Bold Italic
Arial Italic
Times New Roman®
Times New Roman Bold
Times New Roman Bold Italic
Times New Roman Italic
Symbol
Wingdings
Chapter 4: Fonts
❖
4-3
Fonts in Your Printer
Bitmap
There is one bitmap font available in the DocuPrint 4512:
Line Printer
PostScript
Table 4.3
When the PostScript option is installed, there are 35 resident
PostScript-compatible fonts available for printing PostScript jobs (as
shown in Table 4.3).
DocuPrint 4512 optional PostScript fonts
ITC Avant Garde Gothic® Book
ITC Avant Garde Gothic Book Oblique
ITC Avant Garde Gothic Demi
ITC Avant Garde Gothic Demi Oblique
New Century Schoolbook® Roman
New Century Schoolbook Bold
New Century Schoolbook Bold Italic
New Century Schoolbook Italic
ITC Bookman® Demi
ITC Bookman Demi Italic
ITC Bookman Light
ITC Bookman Light Italic
Palatino®
Palatino Bold
Palatino Bold Italic
Palatino Italic
Courier®
Courier Bold
Courier Bold Oblique
Courier Oblique
Symbol
Helvetica®
Helvetica Bold
Helvetica Bold Oblique
Helvetica Oblique
Times® Roman
Times Bold
Times Bold Italic
Times Italic
ITC Zapf Chancery® Medium Italic
ITC Zapf Dingbats®
Helvetica® Narrow
Helvetica Narrow Bold
Helvetica Narrow Bold Oblique
Helvetica Narrow Oblique
4-4 ❖
DocuPrint 4512/4512N User Guide
Fonts
Printing
Font Lists
The DocuPrint 4512 can print font lists that show which fonts are
currently available for use. The lists include resident fonts and
downloaded fonts.
Table 4.4 lists the procedures for printing font lists.
Table 4.4
Using the Control Panel to print font lists
Task
Print the PCL 5e
Font List.
Print the PS2 Font
List.
Key Press
Sequence†
Action/Response
Display Shows
On Line
Takes the printer off-line.
Printing Menu
Menu
Displays the Job Menu.
Job Menu
Menu
Displays the Config Menu.
Config Menu
Menu
Displays the Serial Menu (if present).
Serial Menu
Menu
Displays the Test Menu.
Test Menu
Item
Displays the Config Sheet item.
Config Sheet
Item
Displays the PCL 5e Font List item.
PCL 5e Font List
Enter
Prints the PCL 5e Font List.
PCL 5e Font List
On Line
Returns the printer on-line.
PCL 5e A4/A4
On Line
Takes the printer off-line.
Printing Menu
Menu
Displays the Job Menu.
Job Menu
Menu
Displays the Config Menu.
Config Menu
Menu
Displays the Serial Menu (if present).
Serial Menu
Menu
Displays the Test Menu.
Test Menu
Item
Displays the Config Sheet item.
Config Sheet
Item
Displays the PCL 5e Font List item.
PCL 5e Font List
Item
Displays the PS2 Font List item.
PS2 Font List
Enter
Prints the PS2 Font List.
PS2 Font List
On Line
Returns the printer on-line.
PCL 5e A4/A4
† The number of menus and menu items will vary, depending on whether or not you have option boards installed in the printer.
Therefore, the number of times you have to press the Menu or Item key may vary from that shown in this table.
Chapter 4: Fonts
❖
4-5
Fonts
Selecting Fonts
Selecting fonts is rarely done manually, due to the use of WYSIWYG
(What You See Is What You Get) application software, which enables
you to control the look of your output from the computer monitor.
There may be times, however, when you want to print older text files
without going through application software. At such times, you can
print files straight to the printer, using the printer’s default font. Any of
the printer’s resident fonts can be set as the default, as described in the
following section.
Changing the Font
Number Setting
Table 4.5
Using the Control Panel to change the font number setting
Task
Change the Font
Number setting.
Choices:
0-45
You can set the printer’s default font at the Control Panel. Table 4.5 lists
the procedure. The factory default is 0 (zero). The ‘=X’ indicates the
current setting, the ‘=N’ indicates a new setting, and the asterisk (*)
indicates that the new setting has been entered.
Key Press
Sequence†
Action/Response
Display Shows
On Line
Takes the printer off-line.
Printing Menu
Item
Displays the Copies item.
Copies=X
Item
Displays the Font Number item.
Font Number=X
Up or Down
Changes the font number.
Font Number=N
Enter
Saves the new value.
Font Number=N*
On Line
Returns the printer on-line.
PCL 5e A4/A4
† The number of menus and menu items will vary, depending on whether or not you have option boards installed in the printer.
Therefore, the number of times you have to press the Menu or Item key may vary from that shown in this table.
The PCL 5e Font List contains the names and corresponding numbers of
the fonts that can be set with the Font Number item. Downloaded fonts
cannot be selected through the Control Panel.
Note
4-6 ❖
DocuPrint 4512/4512N User Guide
Fonts
Downloading
Fonts
Xerox DocuPrint 4512 printer drivers provide you with the ability to
download fonts to the printer.
•
To download fonts you must first install the appropriate DocuPrint
4512 Windows 3.1/’95, Macintosh, Windows NT, or UNIX drivers.
See Chapter 5: Printer Drivers.
•
“Temporary” fonts downloaded to printer memory on a job basis
are cleared from the printer’s memory after each job.
•
“Permanent” fonts downloaded to printer memory are cleared from
the printer’s memory whenever the printer is powered OFF, and
whenever the printer switches PDLs and the State Saving
option is set to Off.
(When State Saving is set to On, “permanent” fonts are only
cleared from printer memory when you power OFF the printer.)
The DocuPrint 4512 printer driver software contains Font Manager, a
utility that enables you to easily download fonts.
Note
Chapter 4: Fonts
❖
4-7
4-8 ❖
DocuPrint 4512/4512N User Guide
Chapter 5
Printer Drivers
5 r e t pahC
DocuPrint 4512 PCL 5e Emulation Printer Drivers ....................... 5-2
DocuPrint 4512 PostScript Printer Drivers ..................................... 5-3
Chapter 5: Printer Drivers
❖
5-1
Printer Drivers
DocuPrint 4512
PCL 5e
Emulation
Printer Drivers
Table 5.1
The base DocuPrint 4512 supports the PCL printer drivers listed in
Table 5.1. To take full advantage of all the printer’s features when
printing PCL jobs, install the appropriate DocuPrint 4512 PCL 5e
emulation printer driver(s). (Consult your software application user
manual for instructions on installing a new printer driver.)
If the driver you need did not come with the printer, see
Appendix A: Ordering Information. (Printer software and drivers may
also be available through on-line services and the Internet.)
DocuPrint 4512 PCL 5e emulation printer drivers
Environment
DOS†
Windows
Printer Driver
Microsoft Word Ver. 6.0
Xerox DocuPrint 4512 Printer Driver
for MS Word 6.0 for DOS
WordPerfect Ver. 6.0
Xerox DocuPrint 4512 Printer Driver
for WordPerfect 6.0 for DOS
Windows 3.1 /
Windows 95
Windows NT 3.5
IBM OS/2
Diskette
Xerox DocuPrint 4512 PCL 5e Emulation Printer Driver
for Microsoft Windows 3.1/ Windows 95
OnPAGE PCL 5e Emulation Printer Driver
for Microsoft Windows NT 3.5
OS/2 Ver. 2.1
Xerox DocuPrint 4512 PCL 5e Emulation Printer Driver
for IBM OS/2 Ver. 2.1
OS/2 WARP
Xerox DocuPrint 4512 PCL 5e Emulation Printer Driver
for IBM OS/2 WARP
† If you are using a DOS application other than Microsoft Word or WordPerfect, use the HP LaserJet 4si printer driver supplied with
your application software.
5-2 ❖
DocuPrint 4512/4512N User Guide
Printer Drivers
DocuPrint 4512
PostScript
Printer Drivers
The PostScript option supports the PostScript drivers listed in Table 5.2.
To take full advantage of all the printer’s features when printing
PostScript jobs, install the appropriate DocuPrint 4512 PostScript
printer driver(s). (Consult your software application user manual for
instructions on installing a new printer driver.)
If the driver you need did not come with the printer, see
Appendix A: Ordering Information. (Printer software and drivers may
also be available through on-line services and the Internet.)
Table 5.2
DocuPrint 4512 PostScript printer drivers
Environment
Windows
Printer Driver
Windows 3.1 /
Windows 95
Windows NT 3.5
IBM OS/2
Macintosh
UNIX
(SUN 4.1x,
SCO UNIX,
IBM AIX 3.1,
HP.UX on
HP 9000)
Diskette
Xerox DocuPrint 4512 PS2 Printer Driver
for Microsoft Windows 3.1/ Windows 95
OnPAGE PS2 Printer Driver
for Microsoft Windows NT 3.5
OS/2 Ver. 2.1
Xerox DocuPrint 4512 PS2 Printer Driver
for IBM OS/2 Ver. 2.1
OS/2 WARP
Xerox DocuPrint 4512 PS2 Printer Driver
for IBM OS/2 WARP
System 6.x
OnPAGE
System 7.x
OnPAGE
Document Manager
Xerox DocuPrint 4512 PS2 Printer Driver for SUN OS 4.1.3
Chapter 5: Printer Drivers
❖
5-3
5-4 ❖
DocuPrint 4512/4512N User Guide
Chapter 6
Troubleshooting
6 r e t pahC
Contacting Technical Support ......................................................... 6-2
Before Calling for Service .............................................................. 6-2
Printer Operation Problems ............................................................. 6-3
Print Quality Problems ..................................................................... 6-8
Control Panel Messages ................................................................. 6-15
Error Messages at Power On ....................................................... 6-18
Paper Jams ...................................................................................... 6-19
What Causes a Paper Jam? ......................................................... 6-19
Locating the Jam .......................................................................... 6-19
Clearing the Jam .......................................................................... 6-20
Chapter 6: Troubleshooting
❖
6-1
Troubleshooting
Contacting
Technical
Support
Before Calling
for Service
6-2 ❖
If you are unable to resolve a printing problem related to the printer by
using the instructions in this chapter, contact the dealer from which you
bought your printer or contact Xerox/Rank Xerox. However:
•
If the problem is operating system related, consider contacting the
original manufacturer.
•
If the problem is related to a specific application package, consider
contacting the original manufacturer.
•
If the problem is driver related, consider accessing the Xerox
CompuServe or Internet site.
Before contacting your dealer or Xerox/Rank Xerox, please have the
following information available:
•
Printer Serial No. (located on the inside of the printer, under the
Photoconductor / Drum)
•
A Configuration Sheet
•
Any error code or message displayed on the Control Panel
•
A description of the problem
•
Type of network (if problem is possibly network related)
DocuPrint 4512/4512N User Guide
Troubleshooting
Printer
Operation
Problems
Table 6.1
Consult Table 6.1 for corrective actions when the printer will not print
or when the printed output is not what you expect.
Printer operation problems
Problem
Probable Cause
Remedy
Printer is not connected to
power source.
Check all connections and power switches,
including at wall socket and on printer.
Power source defective.
Check voltage rating of circuit.
Power
Printer does not switch on.
Check circuit breakers and fuses.
Print data not received
Printer turns on, but will not
print data from the computer.
Printer is not on-line.
Check if On Line indicator is glowing. If it is
not, press the On Line key. A printer error may
have occurred. Check the printer display panel.
Interface cable not secured.
Reseat the interface cable at both the printer
and computer ends.
Computer and printer settings
mismatch.
Confirm that the emulation selected on the
printer matches the printer driver on the
computer. Print out the Configuration Sheet
and compare with computer settings.
Computer connection problem.
Check the printer cable connections. Test your
cable by using it with another printer that you
know works. Test your printer after connecting
it with another cable that you know works.
Computer not properly set up.
Check the MS-DOS manual for mode settings
and the computer manual for I/O port settings.
Table 6.1 Page 1 of 5
Chapter 6: Troubleshooting
❖
6-3
Printer Operation Problems
Table 6.1
Printer operation problems (continued)
Problem
Probable Cause
Remedy
Bad cable.
Check the interface cable connections. Test
your cable by using it with another printer that
you know works. Test your printer after
connecting it with another cable that you know
works.
Printer not on-line.
Check if the printer is on-line. A printer error
other than PAPER OUT may have set the
printer off-line. Check the printer display
panel.
Time out error.
Increase the time for I/O time-out in the
computer software.
Print data not received
Write Error Fault message
displayed.
Time Out Error message
displayed.
If the problem occurs when printing from
DOS, try adding a Mode command to your
computer’s AUTOEXEC.BAT file. It can be
put on its own on a single line after the PATH
statement:
If you are using a parallel interface, add:
MODE LPT1:,,P
If you are using a serial interface, add (for
example):
MODE COM1: 9600,N,8,1,P
MODE LPT1:COM1
Table 6.1 Page 2 of 5
6-4 ❖
DocuPrint 4512/4512N User Guide
Printer Operation Problems
Table 6.1
Printer operation problems (continued)
Problem
Probable Cause
Remedy
Print job stalled.
End of page code not received.
If a long time elapses before a page prints and
the DATA indicator continues flashing, the
printer has probably stalled. Press the On Line
key and then the Form Feed key.
Full pages do not print.
Job prematurely terminated.
Check that all the data was received from the
computer. If an application was exited before
the data was sent, the computer may not have
sent the complete file data. The data file may
also have been corrupted before transmission.
If you cancel a print job from the computer,
partially printed pages may be produced.
Pages too complex (data loss
error).
Try simplifying the file by using fewer
characters per line. Turn on page protection
and try to print the file again.
Printing Errors
Install more memory if you want to print
complex files.
Too many fonts transferred to
printer (data memory full error).
Clearing soft fonts will free up memory. When
printing without additional memory, avoid
using too many soft fonts and macros.
Lowering the resolution to 300 dpi will also
reduce the memory requirements of a print job.
If you are getting a lot of memory error
messages, install more memory.
Interface cable faulty.
Reseat the connectors at both the printer and
the computer ends. Check the cable by using it
with another printer.
Software application sending
wrong data.
To check if the application is causing the
problem, print plain text from DOS with the
Copy command or redirection, e.g.:
C:\copy filename.txt LPT1:
or
C:\dir >prn
Table 6.1 Page 3 of 5
Chapter 6: Troubleshooting
❖
6-5
Printer Operation Problems
Table 6.1
Printer operation problems (continued)
Problem
Probable Cause
Remedy
Print data.
Check the print data sent from the computer. If
there are natural page breaks and forced breaks
close to each other in a word processor file, the
application may send a blank page to the
printer.
Printing Errors
Printer ejects blank page.
Check the printing parameters in the
application to see if they are set to send extra
page eject commands.
Some network software inserts blank pages to
separate jobs.
Tape strip on Toner Cartridge.
Remove the tape strip from a newly installed
Toner Cartridge.
Toner Cartridge empty.
Replace the Toner Cartridge.
If you are printing a long run of pages
with more than 30% toner coverage,
the printer may not give the usual toner
status messages. Normally the printer
will give advice messages on the
display panel when toner runs out or is
low.
Paper size mismatch.
Check that the page size setting in your
application matches the paper size(s) available
in the printer.
Multiple sheets fed.
Remove the paper from the paper tray, fan the
edges, straighten it up, and then put it back into
the tray.
A page listing PostScript
commands is output instead of
your print job.
PCL 5e selected.
Set the emulation parameter to PS2 or Auto
and try printing the job again.
A PostScript job fails to print.
Insufficient memory.
Either simplify the print job or install more
memory.
PostScript Printing Errors
Table 6.1 Page 4 of 5
6-6 ❖
DocuPrint 4512/4512N User Guide
Printer Operation Problems
Table 6.1
Printer operation problems (continued)
Problem
Probable Cause
Remedy
Printing takes a long time.
Toner supply low.
Replace the Toner Cartridge.
Long time needed to print first
page.
Printer standby.
Change the Power Saver mode (although the
printer will consume more power).
Overloaded tray.
Remove some paper from the tray.
Unsuitable media.
Check the paper specifications. See Table 2.1
on page 2-3.
Bad media.
Check the paper batch for creases, tears, nicks,
ragged edges, dirt, dampness, etc.
Paper size mismatch.
Check that the page size setting in your
application matches the paper size(s) available
in the printer.
Characters not present in
printer.
Check that the typefaces and fonts that you are
trying to print are in the printer, installed in
your software, or on your computer.
Computer and printer settings
mismatch.
Check your emulation setting options, and
parity and data bit communication settings.
Print Speed Problems
Paper Problems
Frequent paper jams.
Print Character Problems
Wrong characters print.
Table 6.1 Page 5 of 5
Chapter 6: Troubleshooting
❖
6-7
Troubleshooting
Print Quality
Problems
Table 6.2
Table 6.2 lists common print quality problems, possible causes, and
recommended actions.
Print quality problems
Possible Cause(s)
Problem
Spot deletions.
Irregular faded patches of
print.
Corrective Action(s)
Paper quality problem.
Replace paper stock.
Photoconductor / Drum damaged.
Replace the Photoconductor / Drum, as
described in the section “Replacing the
Photoconductor / Drum” (page 7-6).
Paper quality problem.
Replace paper stock.
Corotron parts dirty.
Clean the transfer corotron and the main
corotron, as described in the section “Cleaning
the Corotron Wires” (page 7-10).
Toner low or unevenly distributed.
Carefully remove the Toner Cartridge and
gently agitate it to distribute toner evenly.
Photoconductor / Drum unevenly
worn.
Replace the Photoconductor / Drum, as
described in the section “Replacing the
Photoconductor / Drum” (page 7-6).
Table 6.2 Page 1 of 7
6-8 ❖
DocuPrint 4512/4512N User Guide
Print Quality Problems
Table 6.2
Print quality problems (continued)
Problem
Staining.
Vertical lines.
Possible Cause(s)
Corrective Action(s)
Paper quality problem.
Replace paper stock.
Paper feed surfaces or guide dirty.
Inspect and clean the paper path, as described
in the section “Cleaning the Paper Path”
(page 7-9).
Fusing unit dirty.
Replace the Cleaning Felt, as described in the
section “Replacing the Toner Cartridge and
Cleaning Felt” (page 7-2).
Photoconductor / Drum damaged.
If marks repeat at regular 95mm intervals, the
Photoconductor / Drum is damaged. Replace
the Photoconductor / Drum, as described in the
section “Replacing the Photoconductor /
Drum” (page 7-6).
Used Toner Cartridge from a
different printer installed.
Install a new Toner Cartridge, as described in
the section “Replacing the Toner Cartridge
and Cleaning Felt” (page 7-2).
Main corotron dirty.
Clean the main corotron, as described in the
section “Cleaning the Corotron Wires”
(page 7-10).
Paper feed surfaces or guide dirty.
Inspect and clean the paper path, as described
in the section “Cleaning the Paper Path”
(page 7-9).
Fusing unit dirty.
Replace the Cleaning Felt, as described in the
section “Replacing the Toner Cartridge and
Cleaning Felt” (page 7-2).
Photoconductor / Drum damaged.
Replace the Photoconductor / Drum, as
described in the section “Replacing the
Photoconductor / Drum” (page 7-6).
Table 6.2 Page 2 of 7
Chapter 6: Troubleshooting
❖
6-9
Print Quality Problems
Table 6.2
Print quality problems (continued)
Possible Cause(s)
Problem
Vertical white stripes.
Repetitive defects
including ghost images.
Corrective Action(s)
Corotron parts dirty.
Clean the main corotron and tranfer corotron,
as described in the section “Cleaning the
Corotron Wires” (page 7-10).
Toner Cartridge defective.
Replace the Toner Cartridge, as described in
the section “Replacing the Toner Cartridge
and Cleaning Felt” (page 7-2).
Fusing unit dirty.
Replace the Cleaning Felt, as described in the
section “Replacing the Toner Cartridge and
Cleaning Felt” (page 7-2).
Photoconductor / Drum unevenly
worn.
Replace the Photoconductor / Drum, as
described in the section “Replacing the
Photoconductor / Drum” (page 7-6).
Print density set too high.
Turn the print density adjuster dial
counterclockwise to decrease the toner density.
Refer to “Printer Components” (page 1-3) to
locate the print density adjuster.
Fusing unit dirty.
Replace the Cleaning Felt, as described in the
section “Replacing the Toner Cartridge and
Cleaning Felt” (page 7-2).
Toner low or unevenly distributed.
Carefully remove the Toner Cartridge and
gently agitate it to distribute toner evenly.
Photoconductor / Drum damaged.
Replace the Photoconductor / Drum, as
described in the section “Replacing the
Photoconductor / Drum” (page 7-6).
Table 6.2 Page 3 of 7
6-10 ❖
DocuPrint 4512/4512N User Guide
Print Quality Problems
Table 6.2
Print quality problems (continued)
Problem
Black pages.
Character voids.
Possible Cause(s)
Corrective Action(s)
Toner Cartridge defective.
Replace the Toner Cartridge, as described in
the section “Replacing the Toner Cartridge
and Cleaning Felt” (page 7-2).
Photoconductor / Drum defective.
Replace the Photoconductor / Drum, as
described in the section “Replacing the
Photoconductor / Drum” (page 7-6).
Paper quality problem.
Replace paper stock.
Toner Cartridge defective.
Replace the Toner Cartridge, as described in
the section “Replacing the Toner Cartridge
and Cleaning Felt” (page 7-2).
Photoconductor / Drum damaged.
Replace the Photoconductor / Drum, as
described in the section “Replacing the
Photoconductor / Drum” (page 7-6).
Table 6.2 Page 4 of 7
Chapter 6: Troubleshooting
❖
6-11
Print Quality Problems
Table 6.2
Print quality problems (continued)
Possible Cause(s)
Problem
Background areas of
printed sheets gray or
evenly spotted.
Light print.
Corrective Action(s)
Print density set too high.
Turn the print density adjuster dial
counter-clockwise to decrease the toner
density.
Corotron parts dirty.
Clean the main corotron and tranfer corotron,
as described in the section “Cleaning the
Corotron Wires” (page 7-10).
Paper quality problem.
Replace paper stock.
Printing over uneven surfaces
(envelope seams).
Change page layout in software application.
Toner Cartridge defective.
Replace the Toner Cartridge, as described in
the section “Replacing the Toner Cartridge
and Cleaning Felt” (page 7-2).
Photoconductor / Drum defective.
Replace the Photoconductor / Drum, as
described in the section “Replacing the
Photoconductor / Drum” (page 7-6).
The print density is set too low.
Turn the Print Density aduster dial clockwise to
increase the toner density.
Paper quality problem.
Replace paper stock.
Toner cartridge empty or defective.
Replace the Toner Cartridge, as described in
the section “Replacing the Toner Cartridge
and Cleaning Felt” (page 7-2).
Photoconductor / Drum defective.
Replace the Photoconductor / Drum, as
described in the section “Replacing the
Photoconductor / Drum” (page 7-6).
Table 6.2 Page 5 of 7
6-12 ❖
DocuPrint 4512/4512N User Guide
Print Quality Problems
Table 6.2
Print quality problems (continued)
Problem
Repetitive horizontal dark
streaks.
Dark spots or marks.
Possible Cause(s)
Corrective Action(s)
Paper feed surfaces or guide dirty.
Inspect and clean the paper path, as described
in the section “Cleaning the Paper Path”
(page 7-9).
Photoconductor / Drum defective.
Replace the Photoconductor / Drum, as
described in the section “Replacing the
Photoconductor / Drum” (page 7-6).
Fusing unit dirty.
Replace the Cleaning Felt, as described in the
section “Replacing the Toner Cartridge and
Cleaning Felt” (page 7-2).
Photoconductor / Drum defective.
Replace the Photoconductor / Drum, as
described in the section “Replacing the
Photoconductor / Drum” (page 7-6).
Table 6.2 Page 6 of 7
Chapter 6: Troubleshooting
❖
6-13
Print Quality Problems
Table 6.2
Print quality problems (continued)
Possible Cause(s)
Problem
Corrective Action(s)
Unfused or partially fused
image.
Damp paper stock.
Replace paper stock.
Unsuitable media.
Check the paper specifications. See Table 2.1
on page 2-3.
Wrinkled print.
Poor paper condition.
Inspect/replace paper stock.
Unsuitable media.
Check the paper specifications. See Table 2.1
on page 2-3.
Paper not properly loaded in paper
tray.
Reload the paper. See Chapter 2: Paper
Handling for paper handling.
Paper feed surfaces or guide dirty.
Inspect and clean the paper path, as described
in the section “Cleaning the Paper Path”
(page 7-9).
Back of printout dirty.
Table 6.2 Page 7 of 7
6-14 ❖
DocuPrint 4512/4512N User Guide
Troubleshooting
Control Panel
Messages
Table 6.3
Table 6.3 lists Control Panel messages related to printer operation. For
each message, the table provides the cause of the message, the indicator
light status and advice on what to do. The messages are listed in
alphabetical order.
Control Panel messages
Description/Corrective Action
Message
A4
A paper tray is loaded with A4 paper.
Media status is indicated in the display as UPPER/LOWER, indicating status of
upper tray and lower tray. For example: A4/PO indicates that the upper tray is
loaded with A4 paper and the lower tray is out of paper.
The On Line light remains on.
ACTION: None.
Auto
The printer is set to automatic emulation switching between PCL 5e and PS2. The On
Line light remains on.
ACTION: None.
Cover Open
A cover or the Photoconductor / Drum is not correctly fitted. The Error light remains
on.
ACTION: Close all the covers.
Data Clear
Data in the printer is being cleared. The On Line light remains on.
ACTION: None.
Data Loss Error
The data is too complex to be processed at operating speed. Page ejects without
printing. The Error light remains on.
ACTION: Press the ENTER key. Normal printing begins with the next page.
Data Memory Full
Printer memory cannot handle the amount of data for the present page. The Error light
remains on.
ACTION: Press the ENTER key. Cancel the print job from the computer side. The
remaining pages of this print job may not print properly. The next job will
print normally.
Drum Near End
The Photoconductor / Drum is nearing the end of its rated life. The Supply light
remains on.
ACTION: Order a new Photoconductor / Drum.
Table 6.3 Page 1 of 3
Chapter 6: Troubleshooting
❖
6-15
Control Panel Messages
Table 6.3
Control Panel messages (continued)
Description/Corrective Action
Message
The Envelope Tray is loaded with envelopes.
EV
Media status is indicated in the display as UPPER/LOWER, indicating status of
upper tray and lower tray. For example: EV/PO indicates that the upper tray is
loaded with envelopes and the lower tray is out of paper.
The On Line light remains on.
ACTION: None.
Interface Error
Improper signals have been received through the serial interface, most likely when the
computer is powering up or down. The Error light remains on.
ACTION: Press the On Line key. If trouble recurs, check cable connections, computer
and printer settings. Also, try reseating the interface board into the
controller board.
A paper tray is loaded with letter-sized paper.
LE
Media status is indicated in the display as UPPER/LOWER, indicating status of
upper tray and lower tray. For example: LE/PO indicates that the upper tray is
loaded with letter-sized paper and the lower tray is out of paper.
The On Line light remains on.
ACTION: None.
A paper tray is loaded with legal-sized paper.
LL
Media status is indicated in the display as UPPER/LOWER, indicating status of
upper tray and lower tray. For example: LL/PO indicates that the upper tray is
loaded with legal-sized paper and the lower tray is out of paper.
The On Line light remains on.
ACTION: None.
Paper Out
Paper Out Upper
Paper Out Lower
Paper has run out or paper tray is removed. The Error light flashes.
Paper Jam
Paper is stuck in the print path. The Error light remains on.
ACTION: Re-install the tray(s). If the tray in use is empty, refill it. Do not overfill.
ACTION: Clear the misfeed according to the section “Paper Jams” (page 6-19).
Table 6.3 Page 2 of 3
6-16 ❖
DocuPrint 4512/4512N User Guide
Control Panel Messages
Table 6.3
Control Panel messages (continued)
Description/Corrective Action
Message
Pause
The printing process has been suspended by setting the printer off-line. The On Line
light goes off.
ACTION: None.
PCL 5e
The printer is set to PCL 5e emulation. The On Line light remains on.
ACTION: None.
PO
A paper tray is out of paper.
Media status is indicated in the display as UPPER/LOWER, indicating status of
upper tray and lower tray. For example: PO/A4 indicates that the upper tray is
out of paper and the lower tray is loaded with A4 paper.
The On Line light remains on.
ACTION: Re-load the applicable paper tray.
PS2
The printer is set to PostScript Level 2 emulation. The On Line light remains on.
ACTION: None.
Repl Drum
The Photoconductor / Drum has worn out. The Supply and Error lights remain on.
ACTION: Replace the Photoconductor / Drum.
Repl Toner
Toner has run out. The Supply and Error lights remain on.
ACTION: Replace the Toner Cartridge.
Repl Drum&Toner
The Photoconductor / Drum has reached its rated life and toner has run out. The Supply
and Error lights remain on.
ACTION: Replace the Photoconductor / Drum and Toner Cartridge.
Self Test
The printer is testing itself at power on. The On Line light goes on at the completion of
testing.
ACTION: None.
Toner Low
Toner in reservoir is getting low. The Supply light remains on.
ACTION: Order a new Toner Cartridge.
Table 6.3 Page 3 of 3
Chapter 6: Troubleshooting
❖
6-17
Control Panel Messages
Error Messages
at Power On
Table 6.4 lists Control Panel messages related to errors that may occur
when the printer is powered on. If the printer discovers a problem while
running its self test, you may see one of these messages. You may be
able to clear the error by powering the printer off and on again, or by
reseating any options installed on the controller board. If any of these
messages persists, contact your dealer or Xerox/Rank Xerox.
Table 6.4
Message
6-18 ❖
Error messages
when the printer is
turned on
Description
ROM Error
Error with read only memory (ROM).
RAM Error
Error with random access memory (RAM).
I/F Board Error
Error with interface board.
ROM&RAM Error
Error with ROM and RAM.
ROM&IFB Error
Error with ROM and interface board.
RAM&IFB Error
Error with RAM and interface board.
ROM&RAM&IFB Err
Error with RAM, ROM, and interface board.
DocuPrint 4512/4512N User Guide
Troubleshooting
Paper Jams
Your printer has been designed to provide reliable, trouble- free
operation. Nonetheless, you may experience an occasional paper jam.
When the printer detects a misfeed or a paper jam, the printing process
is halted, and a Control Panel message is displayed. See “Control Panel
Messages” (page 6-15).
After the paper jam has been cleared, the printer will resume operation
to complete the print job, reprinting the page that jammed.
What Causes a
Paper Jam?
Locating the Jam
Paper jams occur most often when:
•
The throughput paper stock does not meet specification. See
Chapter 2: Paper Handling.
•
The paper stock is in poor condition.
•
The paper stock has been improperly loaded into the paper trays.
•
The printer needs cleaning.
•
Printer parts are worn and need to be replaced.
Paper jams may occur in any of the following three locations, listed
below in order of the most likely area for a jam:
•
Exiting the paper tray.
•
Moving through the rollers to the fusing unit under the top cover.
•
Moving through the output section under the front cover.
Chapter 6: Troubleshooting
❖
6-19
Paper Jams
Clearing the Jam
Search for the jammed paper, starting with the paper trays, then under
the top cover, then under the front cover.
Be careful not to touch any of the components inside the printer
when removing jammed paper. They may be very hot.
Caution
Also, jammed paper may have loose toner on it and should therefore
be handled carefully.
From the Paper Tray(s)
1
If you know which tray was feeding paper,
open that tray first. If not, begin with the lower
tray. Open the tray part way and look inside.
2
If you see a misfed sheet of paper (out of
alignment or loose in the tray), remove it as
carefully as you can.
If you tear the paper, be sure to remove
all of the pieces.
3
If the paper has been partially fed from the
lower tray to the upper tray, open the upper
tray and try to remove the paper from there.
If a length of paper has already been
fed up into the printer, do not try to
remove it because the paper will have
loose toner on it. Instead, close the
paper tray(s) and go to “From Under
the Top Cover” (page 6-21) for
directions.
4
When you have completely cleared the jam,
push the tray(s) back in.
The printer will then resume the print job
6-20 ❖
DocuPrint 4512/4512N User Guide
Paper Jams
From Under the Top Cover
1
2
Open the top cover.
If you see a misfed sheet of paper, remove it as
carefully as you can, pulling it straight up and
out.
If you tear the paper, be sure to remove
all of the pieces.
If you cannot get the paper completely
out, do not try to remove it because it
may have loose toner on it. Instead,
close the cover and try the procedure
“From Under the Front Cover,” below.
3
When you have completely cleared the jam,
close the cover.
The printer will then resume the print job.
From Under the Front Cover
1
2
Open the front cover.
If you see a misfed sheet of paper, remove it as
carefully as you can, pulling it straight up and
out.
If you tear the paper, be sure to remove
all of the pieces. Also, the paper may
have loose toner on it.
If you cannot get the paper completely
out, do not try to remove it because it
may have loose toner on it. Instead,
close the cover and try the procedure
“From Under the Top Cover,” above.
3
When you have completely cleared the jam,
close the cover.
The printer will then resume the print job.
Chapter 6: Troubleshooting
❖
6-21
6-22 ❖
DocuPrint 4512/4512N User Guide
Chapter 7
Printer Maintenance and
Consumables
7 r e t pahC
Replacing the Toner Cartridge and Cleaning Felt .......................... 7-2
Recycling the Toner Cartridge ....................................................... 7-5
Replacing the Photoconductor / Drum ............................................ 7-6
Recycling the Photoconductor / Drum ........................................... 7-8
Cleaning the Printer ......................................................................... 7-9
Cleaning the Cabinet ..................................................................... 7-9
Cleaning the Paper Path ................................................................ 7-9
Cleaning the Corotron Wires ....................................................... 7-10
Preparing the Printer for Transport .............................................. 7-13
Chapter 7: Printer Maintenance and Consumables
❖
7-1
Printer Maintenance and Consumables
Replacing the
Toner Cartridge
and Cleaning
Felt
A Toner Cartridge will print approximately 12,000 pages of A4 or 8.5 x
11 paper under average operating conditions (5% image area coverage).
The number of prints per cartridge will decrease if you routinely:
•
Print dense text and graphics.
•
Adjust the Print Density to a dark setting.
•
Exceed five percent area coverage.
Replace the Toner Cartridge as soon as you see the following message at
the Control Panel display:
Toner Low
The Supply indicator light will also glow.
When you replace the Toner Cartridge, you should also replace the
Cleaning Felt with the spare provided in the new Toner Cartridge kit.
Instructions begin on the next page.
See Appendix A: Ordering Information for ordering a new Toner
Cartridge.
Note
Do not expose the Photoconductor / Drum to direct sunlight or
artificial light for more than 15 minutes. Overexposure will
permanently damage the photosensitive imaging drum.
Caution
7-2 ❖
DocuPrint 4512/4512N User Guide
Replacing the Toner Cartridge and Cleaning Felt
1
3
Power OFF the printer and open the top cover
by pulling up on the top cover release lever and
pivoting the cover toward the front of the
printer.
2
Lift the old Toner Cartridge by its handle
straight up and out of the printer.
4
Pivot the Photoconductor / Drum up toward
the front of the printer and lift it straight up
and out. Set it on a smooth, flat surface.
The Photoconductor / Drum is easily
damaged. Do not touch the drum or
expose it to direct light.
Remove the new Toner Cartridge from its
wrapper and shake it several times to evenly
distribute the toner.
Chapter 7: Printer Maintenance and Consumables
❖
7-3
Replacing the Toner Cartridge and Cleaning Felt
5
Hold the Toner Cartridge by its handle and
gently lower it into the printer.
6
Hold the cartridge in place and pull the tab to
remove the tape strip.
8
Pivot the Photoconductor / Drum down toward
the back of the printer until it falls into place
horizontally.
The cartridge does not click into place.
The arrows on the cartridge and printer
should line up.
7
Re-insert the Photoconductor / Drum
vertically into the slots on the sides of the
interior.
7-4 ❖
DocuPrint 4512/4512N User Guide
Replacing the Toner Cartridge and Cleaning Felt
9
Rotate the fuser cover to the rear.
10
Remove the old Cleaning Felt by grabbing
hold of its protruding grip.
11
Remove the new Cleaning Felt from its
wrapper and, holding it by the protruding
grip, insert it into the slot.
Close the fuser cover and the top cover and
power ON the printer.
Recycling the Toner
Cartridge
The DocuPrint 4512 Toner Cartridge can be recycled free of charge to
you. Follow the instructions packaged with your new Toner Cartridge to
recycle the old one.
Chapter 7: Printer Maintenance and Consumables
❖
7-5
Printer Maintenance and Consumables
Replacing the
Photoconductor /
Drum
The DocuPrint 4512’s Photoconductor / Drum will print approximately
30,000 pages of A4 or 8.5 x 11 paper under average operating
conditions (5% image area coverage). The number of prints per
Photoconductor / Drum will decrease if you routinely:
•
Print dense text and graphics.
•
Adjust the Print Density to a dark setting.
•
Exceed five percent area coverage.
Replace the Photoconductor / Drum as soon as you see the following
message at the Control Panel display:
Drum Near End
The Supply indicator light will also glow.
Instructions begin on the next page.
See Appendix A: Ordering Information for ordering a new
Photoconductor / Drum.
Note
Do not expose the Photoconductor / Drum to direct sunlight or
artificial light for more than 15 minutes. Overexposure will
permanently damage the photosensitive imaging drum.
Caution
7-6 ❖
DocuPrint 4512/4512N User Guide
Replacing the Photoconductor / Drum
1
Power OFF the printer and open the top cover
by pulling up on the top cover release lever and
pivoting the cover toward the front of the
printer.
2
Pivot the old Photoconductor / Drum up
toward the front of the printer and lift it
straight up and out.
3
Remove the new Photoconductor / Drum from
its wrapper and insert it vertically into the
slots on the sides of the interior.
4
Pivot the Photoconductor / Drum down toward
the back of the printer until it falls into place
horizontally.
The Photoconductor / Drum is easily
damaged. Do not touch the drum or
expose it to direct light.
Chapter 7: Printer Maintenance and Consumables
❖
7-7
Replacing the Photoconductor / Drum
5
Carefully remove the sheet of black protective
paper from the Photoconductor / Drum.
Be sure not to leave any torn pieces of
paper in the printer.
Close the top cover and power ON the printer.
Recycling the
Photoconductor /
Drum
7-8 ❖
The DocuPrint 4512 Photoconductor / Drum can be recycled free of
charge to you. Follow the instructions packaged with your new
Photoconductor / Drum to recycle the old one.
DocuPrint 4512/4512N User Guide
Printer Maintenance and Consumables
Cleaning the
Printer
Maintaining the printer in good operating condition is essential to
having a reliable, well-running machine. The cabinet, paper path, and
corotron wires should be cleaned regularly.
For optimum performance, do not place the printer near vents or
dust-producing equipment. Particles in the air may enter the printer and
cause failures in internal mechanisms.
Note
Cleaning the
Cabinet
Cleaning the Paper
Path
For best results, clean the outside of the printer with a soft, clean,
lint-free cloth. If necessary, dampen the cloth slightly with water. Do not
use detergents.
Over time, toner may get into the printer, such as from a jammed sheet
of paper to which it has not been fused, from a spill during removal of
the Toner Cartridge, or from moving the printer. Also, dust from paper
may accumulate inside the printer, further impairing performance.
There are several places along the paper path that should be cleaned,
using a lint-free cloth (slightly dampened with cleaning alcohol if
necessary).
Cleaning the Manual Feed Slot
1
Remove the Manual Feed Guide from the Manual Feed slot.
2
Wipe the slot clean.
There is a delicate media sensor lever about 1 in. (20 cm.)
inside the right hand area of the Manual Feed Slot. Lateral
pressure may damage this lever.
3
Re-insert the Manual Feed Guide.
Chapter 7: Printer Maintenance and Consumables
❖
7-9
Cleaning the Printer
Cleaning the Autofeed Pickup Area
1
Power OFF the printer, disconnect the power cord, and remove the
Photoconductor / Drum and Toner Cartridge, following Steps 1
through 3 on page 7-3.
2
Wipe the interior surfaces of the printer.
The gears inside the printer are coated with grease and will
soil hands and cleaning cloths. Try to avoid touching these
gears.
3
Cleaning the
Corotron Wires
Reassemble the printer and power it ON.
If the corotron wires become dirty, printouts may show streaks and
blotches. There are wires in the main corotron, located under the
Photoconductor / Drum, and in the transfer corotron, located inside the
top cover.
Cleaning the Main Corotron
1
Power OFF the printer, disconnect the power
cord, and remove the corotron cleaner from its
slot.
7-10 ❖
2
DocuPrint 4512/4512N User Guide
Open the top cover by pulling up on the top
cover release lever and pivoting the cover
toward the front of the printer.
Cleaning the Printer
3
Pivot the Photoconductor / Drum up toward
the front of the printer.
4
Locate the main corotron’s wire inside the slot
at the base of the raised Photoconductor /
Drum, and insert the cleaner’s red brush into
one extreme end of the slot.
The tabs above the brush on the cleaner fit
into the groove above and parallel to the
slot in the Photoconductor / Drum.
5
Draw the cleaner all the way along the main
corotron to the other end of the slot, either to
the left or the right.
Go the complete width, from one side of
the Photoconductor / Drum to the
other. Do not take the cleaner out
halfway.
6
Return the corotron cleaner to its slot at the
rear of the printer.
7
Pivot the Photoconductor / Drum gently back
into place.
8
Close the top cover, reconnect the power cord,
and power ON the printer.
Chapter 7: Printer Maintenance and Consumables
❖
7-11
Cleaning the Printer
Cleaning the Transfer Corotron
1
Power OFF the printer, disconnect the power
cord, and remove the corotron cleaner from its
slot.
2
Open the top cover by pulling up on the top
cover release lever and pivoting the cover
toward the front of the printer.
3
Locate the transfer corotron’s wire on the open
side of the top cover, and, looking at the open
printer from the back, insert the cleaner’s
black indented edge over the left end of the
wire (1).
The cleaner’s other angled surfaces fit
against other parts of the printer.
4
Draw the cleaner from left to right along the
wire.
Going from right to left may damage
the corotron wire. Make one complete
sweep from the left end of the wire to
the right end. Do not stop halfway.
7-12 ❖
5
Return the corotron cleaner to its slot at the
rear of the printer.
6
Close the top cover, reconnect the power cord,
and power ON the printer.
DocuPrint 4512/4512N User Guide
Printer Maintenance and Consumables
Preparing the
Printer for
Transport
When transporting the printer more than a short distance, use the
original shipping box and packaging materials. If the original shipping
box or materials are not available, use a sturdy packing box and a
generous amount of cushioning or packing materials.
To prepare your printer for transportation, follow the instructions below.
1
Power OFF the printer and disconnect the power cord and all
interface cables.
2
Remove any paper handing options and repack each in its original
packaging.
3
Remove the Photoconductor / Drum and pack it in its original
packaging.
4
Remove the Toner Cartridge and pack it in its original packaging.
5
Pack the printer with the sealed Photoconductor / Drum, Toner
Cartridge and power cord in the original printer box.
If you need to return the printer for service, follow the instructions of
your service provider for packing and shipping.
Chapter 7: Printer Maintenance and Consumables
❖
7-13
7-14 ❖
DocuPrint 4512/4512N User Guide
Appendix A
Ordering Information
Appendix A: Ordering Information
A x i dneppA
❖
A-1
Ordering Information
Contact your dealer or Xerox / Rank Xerox to order any of the printer
options and accessories listed in Table A.1.
Table A.1
Printer options and accessories
Options and Accessories
Part Number
Comments
Consumables
Toner Cartridge
106R00088
Photoconductor / Drum
101R00090
Paper Handling Options
High Capacity Feeder
97S01502
1,000 sheet capacity
Envelope Tray
97S01493
Replaces upper paper tray
Universal Tray
97S01494
Memory Options
4 MB SIMM
97K15280
No parity, 70-ns, 32 bits, one sided
16 MB SIMM
97K15300
No parity, 70-ns, 32 bits, one sided
PostScript Option Kit
97S01491
English
PostScript Option Kit
97S01495
Spanish
PostScript Option Kit
97S01497
Portuguese
PostScript Option Kit
97K28490
French
PostScript Option Kit
97K28510
German
PostScript Option Kit
97K28500
Italian
PostScript Option Kit
97K28530
Russian
PostScript Option Kit
97K28520
RX Spanish
PostScript Option Kit
97K28480
English (Rank Xerox)
PostScript Option
Table A.1 Page 1 of 3
A-2 ❖
DocuPrint 4512/4512N User Guide
Ordering Information
Table A.1
Printer options and accessories (continued)
Options and Accessories
Part Number
Comments
OnPage Manual for MAC
PostScript - MN
720P53970
English (only)
MAC PS (S/W)
301E7340
US English
301E7390
French Canadian
301E7440
AO Spanish
301E7490
AO Portuguese
301E7760
RX English
301E7770
RX French
301E7780
RX Italian
301E7790
RX German
301E7800
RX Spanish
AppleTalk/Serial Option
97S01492
English
Ethernet Option Kit
97S01498
English
Ethernet Option Kit
97S01499
Spanish
Ethernet Option Kit
97S01501
Portuguese
Ethernet Option Kit
97K28550
French
Ethernet Option Kit
97K28570
German
Ethernet Option Kit
97K28560
Italian
Ethernet Option Kit
97K28590
Russian
Ethernet Option Kit
97K28580
RX Spanish
Ethernet Option Kit
97K28540
English (Rank Xerox)
PostScript Option (cont’d)
Kit Contents
Network Interface Cards
Table A.1 Page 2 of 3
Appendix A: Ordering Information
❖
A-3
Ordering Information
Table A.1
Printer options and accessories (continued)
Options and Accessories
Part Number
Comments
Token Ring Option Kit
97S01537
English
Token Ring Option Kit
97S01538
Spanish
Token Ring Option Kit
97S01540
Portuguese
Token Ring Option Kit
97K28670
French
Token Ring Option Kit
97K28690
German
Token Ring Option Kit
97K28680
Italian
Token Ring Option Kit
97K28710
Russian
Token Ring Option Kit
97K28700
RX Spanish
Token Ring Option Kit
97K28660
English (Rank Xerox)
Base Documentation Kit
673K29920
US English
Base Documentation Kit
673K29930
French Canadian
Base Documentation Kit
673K29940
AO Spanish
Base Documentation Kit
673K29950
AO Portuguese
Base Documentation Kit
673K30000
RX English
Base Documentation Kit
673K30010
RX French
Base Documentation Kit
673K30020
RX Italian
Base Documentation Kit
673K30030
RX German
Base Documentation Kit
673K30040
RX Spanish
Base Documentation Kit
673K30050
RX Russian
Network Interface Cards
Base Documentation
Table A.1 Page 3 of 3
A-4 ❖
DocuPrint 4512/4512N User Guide
Appendix B
Installing Options
B x i dneppA
Precautions ...................................................................................... B-2
Memory SIMMs ............................................................................... B-3
PostScript Board .............................................................................. B-6
AppleTalk/Serial Interface Board ................................................... B-8
Ethernet/Token Ring Interface Board .......................................... B-10
Envelope Tray ................................................................................ B-12
Appendix B: Installing Options
❖
B-1
Installing Options
Precautions
The DocuPrint 4512 printer options are easy to install. Installing and
testing any one option is likely to take 5 to 15 minutes.
Before installing or removing any printer option, take the precautionary
steps outlined below.
Caution
POWER OFF THE PRINTER: The printer determines which
options are installed through a self-test. The self-test is run when
you power ON the printer. Therefore, for proper operation, you
must power OFF the printer before installing/removing an option,
then power it back ON after installing/removing an option.
DISCONNECT THE POWER CORD: Never remove the printer
controller board while the printer is plugged in.
B-2 ❖
Caution
To avoid the possibility of electrical shock, always disconnect the
power cord when installing or removing ANY internal or external
printer option.
Caution
DISCHARGE STATIC ELECTRICITY: The controller board and
internal printer options (SIMMs, PostScript board, and interface
boards) are sensitive to static electricity. Before installing or
removing an internal option, discharge static electricity from your
body by touching something metal, such as the metal back plate on
any device plugged into a grounded power source. If you walk
around before finishing the installation, again discharge any static
electricity.
DocuPrint 4512/4512N User Guide
Installing Options
Memory
SIMMs
Follow these instructions for installing additional memory into the
printer.
The DocuPrint 4512 has three SIMM slots that accept 72-pin, 70-ns, no
parity SIMMs in the following sizes:
Note
•
1 MB
•
4 MB
•
8 MB
•
16 MB
(4 MB SIMMs and 16 MB SIMMs are available from Xerox/Rank Xerox.
See Appendix A: Ordering Information for ordering additional
memory.)
Caution
SIMMs and controller boards are sensitive to static electricity.
Before installing a SIMM, discharge static electricity from your
body by touching something metal, such as the metal back plate on
any device plugged into a grounded power source. If you walk
around before finishing the installation, again discharge any static
electricity.
Never remove the printer controller board while the printer is
plugged in.
Appendix B: Installing Options
❖
B-3
Memory SIMMs
1
Power OFF the printer and disconnect all cables from the back of the printer.
2
Unscrew the outside pair of retaining screws
holding the controller board in place. Keep the
screws in a safe place.
B-4 ❖
3
DocuPrint 4512/4512N User Guide
Carefully slide out the controller board.
Set the controller board down on a safe, level
surface.
Memory SIMMs
4
Select a slot for the SIMM and, holding the
SIMM at an angle, line it up with the slot.
5
Push the SIMM gently but firmly down into
the slot, then rotate it into position.
The SIMM should pop into place with two
retaining lugs fitting into holes on either
side of the SIMM and the spring clips
gripping it in position.
6
To remove a SIMM, release the spring clips
holding the SIMM in place.
7
Reinstall the controller board by sliding it
carefully along the guide rails in the printer
and gently pushing it back into place. When it
is properly seated, replace the retaining
screws.
8
Reconnect all cables to the printer and power
it ON.
9
Print out a Configuration Sheet (see page 3-17)
to check that the printer recognizes the
additional memory.
Appendix B: Installing Options
❖
B-5
Installing Options
PostScript
Board
Caution
Follow these instructions for installing the PostScript board into the
printer.
The controller and PostScript boards are sensitive to static
electricity. Before installing the PostScript board, discharge static
electricity from your body by touching something metal, such as the
metal back plate on any device plugged into a grounded power
source. If you walk around before finishing the installation, again
discharge any static electricity.
Never remove the printer controller board while the printer is
plugged in.
1
Power OFF the printer and disconnect all cables from the back of the printer.
2
Unscrew the outside pair of retaining screws
holding the controller board in place. Keep the
screws in a safe place.
B-6 ❖
3
DocuPrint 4512/4512N User Guide
Carefully slide out the controller board.
Set the controller board down on a safe, level
surface.
PostScript Board
4
Locate the socket on the right side of the
controller board.
There is a plug on the bottom of the
PostScript board that fits into the socket.
There is also a plastic post fitted on the
bottom of the PostScript board near the
edge opposite the connector. The plastic
post fits into a hole at the side of the
controller board.
Line up the PostScript board plug with the
controller board socket and the plastic post
with its locating hole. Then push the board
into place.
5
Reinstall the controller board by sliding it carefully along the guide rails in the printer and gently
pushing it back into place. When it is properly seated, replace the retaining screws.
6
7
Reconnect all cables to the printer and power it ON.
Print out a Configuration Sheet (see page 3-17) to check that the printer recognizes the PostScript
board.
Keep the original packaging material in case you ever need to remove
the option.
Note
Appendix B: Installing Options
❖
B-7
Installing Options
AppleTalk/
Serial Interface
Board
Caution
Follow these instructions for installing the AppleTalk/Serial Interface
board into the printer.
Controller and interface boards are sensitive to static electricity.
Before installing the interface board, discharge static electricity
from your body by touching something metal, such as the metal
back plate on any device plugged into a grounded power source. If
you walk around before finishing the installation, again discharge
any static electricity.
Never remove the printer controller board while the printer is
plugged in.
1
Power OFF the printer and disconnect all cables from the back of the printer.
2
Unscrew the outside pair of retaining screws
holding the controller board in place. Keep the
screws in a safe place.
B-8 ❖
3
DocuPrint 4512/4512N User Guide
Carefully slide out the controller board.
Set the controller board down on a safe, level
surface.
AppleTalk/Serial Interface Board
4
Unscrew the slot cover on the back plate of the
controller board and remove it.
5
Keep the slot cover, in case the interface
board is removed for any reason.
Locate the socket on the controller board to
the right of the slot opening.
There is a plug on the bottom of the
interface board that fits into the socket.
Line up the interface board plug with the
controller board socket while angling the
interface board’s connection port into the slot.
Then push the board into place.
6
7
8
9
10
Secure the interface board with the screws removed from the slot cover in Step 4.
Reinstall the controller board by sliding it carefully along the guide rails in the printer and gently
pushing it back into place. When it is properly seated, replace the retaining screws.
Reconnect all cables to the printer and power it ON.
Print out a Configuration Sheet (see page 3-17) to check that the printer recognizes the interface board.
Configure the serial port using the Control Panel menus (see Chapter 3: The Control Panel).
Keep the original packaging material in case you ever need to remove
the option.
Note
Appendix B: Installing Options
❖
B-9
Installing Options
Ethernet/Token
Ring Interface
Board
Caution
Follow these instructions for installing the Ethernet or Token Ring
Interface board into the printer.
Controller and interface boards are sensitive to static electricity.
Before installing the interface board, discharge static electricity
from your body by touching something metal, such as the metal
back plate on any device plugged into a grounded power source. If
you walk around before finishing the installation, again discharge
any static electricity.
Never remove the printer controller board while the printer is
plugged in.
1
Power OFF the printer and disconnect all cables from the back of the printer.
2
Unscrew the outside pair of retaining screws
holding the controller board in place. Keep the
screws in a safe place.
B-10 ❖
3
Carefully slide out the controller board.
Set the controller board down on a safe, level
surface.
DocuPrint 4512/4512N User Guide
Ethernet/Token Ring Interface Board
4
Unscrew the slot cover on the back plate of the
controller board and remove it.
5
Keep the slot cover, in case the interface
board is removed for any reason.
Locate the socket on the controller board to
the right of the slot opening.
There is a plug on the bottom of the
interface board that fits into the socket.
Line up the interface board plug with the
controller board socket while angling the
interface board’s connection port into the slot.
Then push the board into place.
6
7
Secure the interface board with the screws removed from the slot cover in Step 4.
8
9
Reconnect all cables to the printer and power it ON.
Reinstall the controller board by sliding it carefully along the guide rails in the printer and gently
pushing it back into place. When it is properly seated, replace the retaining screws.
Print out a Configuration Sheet (see page 3-17) to check that the printer recognizes the interface board.
Keep the original packaging material in case you ever need to remove
the option.
Note
Appendix B: Installing Options
❖
B-11
Installing Options
Envelope Tray
The Envelope Tray replaces the upper paper tray. To install it, remove
the upper tray and slide the Envelope Tray into place. The Envelope
Tray will not fit into the lower tray slot.
Figure B.1 shows how to adjust the Envelope Tray for different envelope
sizes.
Figure B.1
Envelope Tray adjustment
Keep the original packaging material in case you ever need to remove
the option.
Note
B-12 ❖
DocuPrint 4512/4512N User Guide
Appendix C
Printer Specifications
C x i dneppA
DocuPrint 4512 Specifications ........................................................ C-2
Interface Hardware ......................................................................... C-4
Appendix C: Printer Specifications
❖
C-1
Printer Specifications
Table C.1
DocuPrint 4512 Specifications
Imaging Method
Electro-photography
Exposure System
Semiconductor laser beam (laser diode) scanning
Image Resolution
300 x 300 dpi
600 x 600 dpi
Warm Up Time
Continuous Print Speed
Printable Area
Less than 60 seconds
Up to 12 impressions per minute, simplex
Up to 8 impressions per minute, duplex
4900 dots x 8200 lines (600 dpi)
Processor
AMD 29240 20 MHz
Maximum Monthly Duty Cycle
Nominal Voltage
Up to 35,000 prints
There are two configurations:
110 - 115 V
or
220 - 240 V
Nominal Frequency
Power Consumption
Noise Level
Temperature
Relative Humidity
Dimensions
50 Hz
60 Hz
500 W peak consumption; In Energy Star sleep mode, power consumption
reduces to about 5% of peak. Other Power Saver modes operational after
specified period of not printing (15 minutes, 30 minutes, 45 minutes)
Less than 52 dBA (printing); 44 dBA (idle)
50º F to 86º F during operation
10º C to 30º C during operation
20% to 85% during operation
13 x 13 x 18.4 inches (H x W x D)
330 x 330 x 468 mm (H x W x D)
Weight
Memory Capacity
34.2 lbs
15.5 kg
50 MB maximum
Table C.1 Page 1 of 2
C-2 ❖
DocuPrint 4512/4512N User Guide
Printer Specifications
Table C.1
Factory-Provided Features
Available Options
(See Appendix A: Ordering
Information for more details.)
DocuPrint 4512 Specifications (continued)
Two 250-sheet paper trays
Manual Feed Guide
Toner cartridge
Photoconductor / Drum
Power cord
Printer driver diskettes
User documentation
2 MB RAM (printer memory)
4 MB SIMM (72-pin, 70-ns)
16 MB SIMM (72-pin, 70-ns)
1,000-sheet High Capacity Feeder
Envelope Tray
PostScript Board
AppleTalk/Serial Interface Board
Ethernet Interface Board
Token Ring Interface Board
Table C.1 Page 2 of 2
Appendix C: Printer Specifications
❖
C-3
Printer Specifications
Table C.2
Parallel
AppleTalk
Serial
Interface Hardware
Conforms to IEEE STD 1284, February 2, 1993
Connector: Female 36-pin DDK 57LE-40360-730B (D29) or equivalent
Connector: Female 8-pin TCS7189-01-201 or equivalent
Connector: Female 25-pin DDK 17LE-13250-28 (D4CK) or equivalent
Pin
Signal Name
Source
1
Frame (Ground)
....
2
Transmitted Data
Printer
3
Received Data
4
Request to Send
Printer
6
Data Set Ready
Host
7
Ground (Signal)
....
20
Data Terminal Ready
Host
Printer
Serial Cable Pin Outs
25 Pin M
25 Pin F
25 Pin M
9 Pin F
Printer
Host
Printer
Host
1
1
2
2
2
3
3
3
3
2
4
8
4
5
6
4
6
20
7
5
7
7
20
1
20
6
8
C-4 ❖
DocuPrint 4512/4512N User Guide
6
Appendix D
DocuPrint 4512 Unique Printer
Commands
D x i dneppA
Appendix D: DocuPrint 4512 Unique Printer Commands
❖
D-1
DocuPrint 4512 Unique Printer Commands
In addition to the standard PCL printer commands, Xerox has added
some unique settings for the DocuPrint 4512 in the area of paper size.
Table D.1 shows the paper sizes and corresponding paper trays
supported by the DocuPrint 4512. An “X” indicates support for a paper
size in a specific tray. The escape sequence number refers to the “#”
parameter in the PCL Page Size command (Esc & | # A).
Table D.1
Paper size support
Paper Trays
Escape
Sequence
Number
Upper Tray
Lower Tray
High
Capacity
Feeder
Executive
1
X
X
X
Letter
2
X
X
X
Legal (8.5 x 14”)
3
X
X
X
Folio (8.5 x 13”)
110
X
X
X
A4
26
X
X
X
A5
25
X
X
X
Paper Size
Envelope
Tray
Envelopes
Monarch
Com10
DL
C5
D-2 ❖
80
81
90
91
DocuPrint 4512/4512N User Guide
X
X
X
X
Manual
Feed
Appendix E
Symbol Set Table
Appendix E: Symbol Set Table
E x i dneppA
❖
E-1
Symbol Set Table
1
2
3
4
0
1
2
NUL
DLE
SP
0
@
P
‘
p
0
16
32
48
64
80
96
112
7
8
9
A
B
C
D
E
F
5
6
7
!
1
A
Q
a
q
17
33
49
65
81
97
113
STX
DC2
"
2
B
R
b
r
2
18
34
50
66
82
98
114
ETX
DC3
#
3
C
S
c
s
3
19
35
51
67
83
99
115
EOT DC4
20
ENQ NAK
5
6
4
1
SOH DC1
4
5
3
21
$
4
D
T
d
t
36
52
68
84
100
116
%
5
E
U
e
u
37
53
69
85
101
117
&
6
F
V
f
v
6
22
38
54
70
86
102
118
BEL
ETB
'
7
G
W
g
w
7
23
39
55
71
87
103
119
BS
CAN
(
8
H
X
h
x
ACK SYN
8
24
40
56
72
88
104
120
HT
EM
)
9
I
Y
i
y
9
25
41
57
73
89
105
121
LF
SUB
*
:
J
Z
j
z
10
26
42
58
74
90
106
122
VT
ESC
+
;
K
[
k
{
11
27
43
59
75
91
107
123
FF
FS
,
<
L
\
l
|
12
28
44
60
76
92
108
124
CR
GS
-
=
M
]
m
}
8
9
128
144
129
130
145
146
A
B
C
D
E
–
â
Å
Á
160
176
192
208
224
À
Y´
ê
î
Ã
161
177
193
209
225
241
Â
y´
ô
Ø
ã
•
162
178
194
210
226
242
È
˚
û
Æ
D
µ
179
195
211
227
243
228
244
240
131
147
163
Ê
Ç
á
å
132
148
164
180
196
212
Ë
ç
é
í
Í
133
149
165
181
197
213
229
Î
Ñ
ó
ø
Ì
–
134
150
166
182
198
214
230
246
Ï
ñ
ú
æ
Ó
167
183
199
215
231
´
¡
à
Ä
Ò
168
184
200
216
232
248
`
¿
è
ì
Õ
ª
185
201
217
233
249
135
136
151
152
¶
245
247
137
153
169
ˆ
¤
ò
Ö
õ
º
138
154
170
186
202
218
234
250
¨
£
ù
Ü
S
«
139
155
171
187
203
219
235
251
~
¥
ä
É
s
■
140
156
172
188
204
220
236
252
Ù
§
ë
ï
Ú
»
173
189
205
221
237
253
Û
ƒ
ö
ß
Ÿ
±
190
206
222
238
254
13
29
45
61
77
93
109
125
SO
RS
.
>
N
^
n
~
14
30
46
62
78
94
110
126
142
158
174
SI
US
/
?
O
_
o
£
c
ü
Ô
ÿ
15
31
47
63
79
95
111
127
143
159
175
191
207
223
239
E-2 ❖
F
NBS
ˆ
0
Roman-8 (R8)
ˆ
8U
141
157
DocuPrint 4512/4512N User Guide
255
Symbol Set Table
0
1
2
3
4
DeskTop (DT)
0
1
2
NUL
DLE
SP
0
@
P
‘
p
0
16
32
48
64
80
96
112
!
1
A
Q
a
q
SOH DC1
7
8
9
A
B
C
D
E
F
5
6
7
1
17
33
49
65
81
97
113
DC2
"
2
B
R
b
r
2
18
34
50
66
82
98
114
ETX
DC3
#
3
C
S
c
s
3
19
35
51
67
83
99
115
EOT DC4
20
ENQ NAK
5
6
4
STX
4
5
3
21
ACK SYN
$
4
D
T
d
t
36
52
68
84
100
116
%
5
E
U
e
u
37
53
69
85
101
117
&
6
F
V
f
v
6
22
38
54
70
86
102
118
BEL
ETB
'
7
G
W
g
w
7
23
39
55
71
87
103
119
BS
CAN
(
8
H
X
h
x
8
24
40
56
72
88
104
120
HT
EM
)
9
I
Y
i
y
9
25
41
57
73
89
105
121
LF
SUB
*
:
J
Z
j
z
10
26
42
58
74
90
106
122
VT
ESC
+
;
K
[
k
{
11
27
43
59
75
91
107
123
FF
FS
,
<
L
\
l
|
12
28
44
60
76
92
108
124
CR
GS
-
=
M
]
m
}
13
29
45
61
77
93
109
125
SO
RS
.
>
N
^
n
~
14
30
46
62
78
94
110
SI
US
/
?
O
_
o
15
31
47
63
79
95
111
8
9
128
144
129
A
145
B
C
D
E
F
NBS
“
–
‹
ª
´
160
176
192
208
224
240
¶
”
±
›
º
`
161
177
193
209
225
241
§
µ
«
æ
ˆ
178
210
226
242
130
146
162
†
‰
÷
»
Æ
¨
131
147
163
179
195
211
227
243
‡
•
˚
’
132
148
164
180
196
212
228
244
©
●
'
„
D
133
149
165
181
197
213
229
245
"
•
ij
˘
198
214
230
246
¡
IJ
231
®
134
150
166
182
194
™
135
151
167
152
168
199
215
¿
l
˚
184
200
216
232
248
Pt
L
•
217
233
249
c
137
153
169
138
154
170
139
155
201
1
l
œ
186
202
218
234
2
£
Œ
¸
171
187
203
219
235
251
…
'
3
¥
ø
˛
172
188
204
220
236
252
fi
¬
/
¤
Ø
•
189
205
221
237
253
238
254
239
255
––
156
247
185
–
140
"
183
co
136
~
ˆ
7J
141
157
173
126
142
158
174
190
206
222
127
143
159
175
191
207
223
fl
ƒ
250
1
ß
Appendix E: Symbol Set Table
❖
E-3
Symbol Set Table
19U
2
3
4
1
2
NUL
DLE
SP
0
@
P
`
p
0
16
32
48
64
80
96
112
7
8
9
A
B
C
D
E
F
5
6
7
8
9
128
144
A
B
C
D
E
NBS
º
À
D
à
160
176
192
208
224
F
240
!
1
A
Q
a
q
‘
¡
±
Á
Ñ
á
ñ
17
33
49
65
81
97
113
129
145
161
177
193
209
225
241
STX
DC2
"
2
B
R
b
r
,
’
c
2
Â
Ò
â
ò
2
18
34
50
66
82
98
114
130
146
162
178
194
210
226
242
ETX
DC3
#
3
C
S
c
s
ƒ
“
£
3
Ã
Ó
ã
ó
3
19
35
51
67
83
99
115
131
147
163
179
195
211
227
243
„
”
¤
'
Ä
Ô
ä
ô
132
148
164
180
196
212
228
244
EOT DC4
20
ENQ NAK
5
6
4
1
SOH DC1
4
5
3
21
$
4
D
T
d
t
36
52
68
84
100
116
%
5
E
U
e
u
…
•
¥
µ
Å
Õ
å
õ
37
53
69
85
101
117
133
149
165
181
197
213
229
245
&
6
F
V
f
v
†
–
¶
Æ
Ö
æ
ö
6
22
38
54
70
86
102
118
134
150
166
182
198
214
230
246
BEL
ETB
'
7
G
W
g
w
‡
---
§
•
Ç
ç
÷
7
23
39
55
71
87
103
119
135
151
167
183
199
215
231
247
BS
CAN
(
8
H
X
h
x
ˆ
~
¨
¸
È
Ø
è
ø
ACK SYN
8
24
40
56
72
88
104
120
136
152
168
184
200
216
232
248
HT
EM
)
9
I
Y
i
y
‰
™
©
ı
É
Ù
é
ù
9
25
41
57
73
89
105
121
137
153
169
185
201
217
233
249
ˆ
1
0
ˆ
0
Windows 3.1 Latin 1 (W1)
LF
SUB
*
:
J
Z
j
z
S
s
ª
º
Ê
Ú
ê
ú
10
26
42
58
74
90
106
122
138
154
170
186
202
218
234
250
VT
ESC
+
;
K
[
k
{
‹
›
«
»
Ë
Û
ë
û
11
27
43
59
75
91
107
123
139
155
171
187
203
219
235
251
Ì
Ü
ì
ü
188
204
220
236
252
Í
´
Y
í
y´
205
221
237
253
FF
FS
,
<
L
\
l
|
Œ
œ
¬
12
28
44
60
76
92
108
124
140
156
172
CR
GS
-
=
M
]
m
}
13
29
45
61
77
93
109
125
SO
RS
.
>
N
^
n
~
14
30
46
62
78
94
110
126
SI
US
/
?
O
_
o
15
31
47
63
79
95
111
E-4 ❖
–
141
157
173
142
158
143
159
Î
î
174
190
¿
Ï
ß
ï
ÿ
175
191
207
223
239
255
¨
Y
127
189
®
DocuPrint 4512/4512N User Guide
206
222
238
254
Symbol Set Table
1
2
3
4
0
1
2
NUL
DLE
SP
0
@
P
‘
p
0
16
32
48
64
80
96
112
7
8
9
A
B
C
D
E
F
5
6
7
!
1
A
Q
a
q
17
33
49
65
81
97
113
STX
DC2
"
2
B
R
b
r
2
18
34
50
66
82
98
114
ETX
DC3
#
3
C
S
c
s
3
19
35
51
67
83
99
115
EOT DC4
20
ENQ NAK
5
6
4
1
SOH DC1
4
5
3
21
$
4
D
T
d
t
36
52
68
84
100
116
%
5
E
U
e
u
37
53
69
85
101
117
&
6
F
V
f
v
6
22
38
54
70
86
102
118
BEL
ETB
’
7
G
W
g
w
7
23
39
55
71
87
103
119
BS
CAN
(
8
H
X
h
x
ACK SYN
8
24
40
56
72
88
104
120
HT
EM
)
9
I
Y
i
y
9
25
41
57
73
89
105
121
LF
SUB
*
:
J
Z
j
z
10
26
42
58
74
90
106
122
VT
ESC
+
;
K
[
k
{
11
27
43
59
75
91
107
123
FF
FS
,
<
L
\
l
|
12
28
44
60
76
92
108
124
CR
GS
-
=
M
]
m
}
8
9
NBS
˚
À
D
à
128
144
160
176
192
208
224
¡
±
Á
Ñ
á
ñ
129
145
161
177
193
209
225
241
c
2
Â
Ò
â
ò
162
178
194
210
226
242
£
3
Ã
Ó
ã
ó
179
195
211
227
243
130
A
146
B
C
D
E
F
240
131
147
163
¤
'
Ä
Ô
ä
ô
132
148
164
180
196
212
228
244
¥
µ
Å
Õ
å
õ
133
149
165
181
197
213
229
245
¶
Æ
Ö
æ
ö
134
150
166
182
198
214
230
246
§
•
Ç
ç
÷
167
183
199
215
231
247
¨
¸
È
Ø
è
ø
168
184
200
216
232
248
©
ı
É
Ù
é
ù
185
201
217
233
249
135
136
151
152
137
153
169
ª
º
Ê
Ú
ê
ú
138
154
170
186
202
218
234
250
«
»
Ë
Û
ë
û
139
155
171
187
203
219
235
251
Ì
Ü
ì
ü
140
156
172
188
204
220
236
252
Í
´
Y
í
y´
205
221
237
253
ˆ
0
ISO 8859/1 Latin 1 (E1)
ˆ
ON
¬
–
13
29
45
61
77
93
109
125
SO
RS
.
>
N
^
n
~
14
30
46
62
78
94
110
126
142
158
174
190
SI
US
/
?
O
_
o
¿
Ï
ß
ï
ÿ
15
31
47
63
79
95
111
127
143
159
175
191
207
223
239
255
141
157
173
189
®
Î
206
î
222
238
254
Appendix E: Symbol Set Table
❖
E-5
Symbol Set Table
0
0
PC-8 Code Page 437 (PC)
1
2
3
0
@
P
`
p
Ç
É
á
0
16
32
48
64
80
96
112
128
144
160
!
1
A
Q
a
q
ü
æ
í
1
17
33
49
65
81
97
113
129
145
161
"
2
B
R
b
r
é
Æ
ó
2
18
34
50
66
82
98
114
130
146
162
!!
#
3
C
S
c
s
â
ô
ú
19
35
51
67
83
99
115
131
147
163
¶
$
4
D
T
d
t
ä
ö
ñ
4
20
36
52
68
84
100
116
132
148
164
§
%
5
E
U
e
u
à
ò
Ñ
5
21
37
53
69
85
101
117
133
149
165
&
6
F
V
f
v
å
û
ª
6
22
38
54
70
86
102
118
134
150
166
'
7
G
W
g
w
ç
ù
º
7
23
39
55
71
87
103
119
135
151
167
(
8
H
X
h
x
ê
ÿ
¿
40
56
72
88
104
120
136
152
168
)
9
I
Y
i
y
ë
Ö
57
73
89
105
121
137
153
NUL
1
2
3
3
4
5
6
7
8
8
24
9
4
5
6
7
8
9
9
25
41
*
:
J
Z
j
z
è
Ü
10
26
42
58
74
90
106
122
138
154
+
;
K
[
k
{
ï
c
11
27
43
59
75
91
107
123
139
155
,
<
L
\
l
|
î
£
12
28
44
60
76
92
108
124
140
-
=
M
]
m
}
45
61
77
93
109
.
>
N
^
n
62
78
94
110
A
B
C
D
13
29
E
14
30
46
/
?
O
_
o
15
31
47
63
79
95
111
F
E-6 ❖
A
B
C
D
E
α
≡
176
192
208
224
240
ß
±
177
193
209
225
241
Γ
≥
178
194
210
226
242
π
≤
227
243
179
195
211
F
Σ
⌡
10U
244
180
196
212
228
σ
⌡
181
197
213
229
245
µ
÷
182
198
214
230
246
Τ
≈
183
199
215
231
247
Φ
°
232
248
Θ
•
249
184
200
216
169
185
201
217
233
Ω
•
170
186
202
218
234
250
171
187
203
219
235
∞
n
156
172
188
204
220
236
252
ì
¥
¡
ø
2
125
141
157
173
~
Ä
Pt
«
126
142
158
174
Å
ƒ
»
127
143
159
175
δ
DocuPrint 4512/4512N User Guide
251
189
205
221
237
253
190
206
222
238
254
191
207
223
239
255
Symbol Set Table
12U
0
0
PC-850 Multilingual (PM)
1
2
3
0
@
P
`
p
Ç
É
á
0
16
32
48
64
80
96
112
128
144
160
!
1
A
Q
a
q
ü
æ
í
1
17
33
49
65
81
97
113
129
145
161
"
2
B
R
b
r
é
Æ
ó
18
34
50
66
82
98
114
130
146
162
!!
#
3
C
S
c
s
â
ô
ú
19
35
51
67
83
99
115
131
147
163
¶
$
4
D
T
d
t
ä
ö
ñ
4
20
36
52
68
84
100
116
132
148
164
§
%
5
E
U
e
u
à
ò
Ñ
Á
5
21
37
53
69
85
101
117
133
149
165
181
&
6
F
V
f
v
å
û
ª
Â
ã
Í
µ
÷
6
22
38
54
70
86
102
118
134
150
166
182
198
214
230
246
'
7
G
W
g
w
ç
ù
º
À
Ã
Î
7
23
39
55
71
87
103
119
135
151
167
183
199
215
231
247
(
8
H
X
h
x
ê
ÿ
¿
©
40
56
72
88
104
120
136
152
168
184
)
9
I
Y
i
y
ë
Ö
®
57
73
89
105
121
137
153
169
185
201
170
186
171
NUL
1
2
2
3
3
4
5
6
7
8
8
24
9
4
5
6
7
8
9
A
B
C
D
E
Ó
–
176
192
208
224
240
D
ß
±
177
193
209
225
241
Ê
Ô
210
226
Ë
Ò
211
227
243
È
õ
¶
196
212
228
244
1
Õ
§
197
213
229
245
178
179
180
217
233
249
Û
•
202
218
234
250
Ù
1
187
203
219
235
251
y´
3
204
220
236
252
´
Y
2
237
253
238
254
´
NBS
239
255
*
:
J
Z
j
z
è
Ü
26
42
58
74
90
106
122
138
154
+
;
K
[
k
{
ï
ø
11
27
43
59
75
91
107
123
139
155
,
<
L
\
l
î
£
12
28
44
60
76
92
108
124
140
156
172
188
-
=
M
]
m
}
ì
Ø
¡
c
45
61
77
93
109
125
141
157
173
189
.
>
N
^
n
~
Ä
«
¥
46
62
78
94
110
126
142
174
190
13
29
E
14
30
F
15
31
/
?
O
_
o
47
63
79
95
111
127
158
Å
ƒ
»
143
159
175
216
¨
10
D
200
248
41
C
˚
Ï
Ú
25
B
195
242
232
9
A
194
F
205
221
206
222
Ì
¤
191
207
223
Appendix E: Symbol Set Table
❖
E-7
Symbol Set Table
10J
0
1
2
3
4
0
1
2
NUL
DLE
SP
0
@
P
‘
p
0
16
32
48
64
80
96
112
7
8
9
A
B
C
D
E
F
4
5
6
7
!
1
A
Q
a
q
17
33
49
65
81
97
113
STX
DC2
"
2
B
R
b
r
2
18
34
50
66
82
98
114
ETX
DC3
#
3
C
S
c
s
3
19
35
51
67
83
99
115
EOT DC4
20
ENQ NAK
5
6
3
1
SOH DC1
4
5
PS Text (TS)
21
$
4
D
T
d
t
36
52
68
84
100
116
%
5
E
U
e
u
37
53
69
85
101
117
&
6
F
V
f
v
6
22
38
54
70
86
102
118
BEL
ETB
'
7
G
W
g
w
7
23
39
55
71
87
103
119
BS
CAN
(
8
H
X
h
x
ACK SYN
8
24
40
56
72
88
104
120
HT
EM
)
9
I
Y
i
y
9
25
41
57
73
89
105
121
LF
SUB
*
:
J
Z
j
z
10
26
42
58
74
90
106
122
VT
ESC
+
;
K
[
k
{
11
27
43
59
75
91
107
123
8
9
A
B
C
D
E
F
128
144
160
176
192
208
224
240
¡
–
`
129
145
161
177
193
Æ
æ
209
225
241
c
†
´
162
178
194
£
‡
ˆ
210
226
242
179
195
NBS
130
146
131
147
163
/
•
~
132
148
164
180
196
133
149
165
181
197
ƒ
¶
ù
134
150
166
182
198
§
•
.
167
183
199
¤
,
¨
168
184
200
'
„
185
¥
135
136
151
152
211
227
243
212
228
244
213
229
245
214
230
246
215
231
247
L
l
232
248
Ø
ø
217
233
249
Œ
œ
218
234
250
–
216
137
153
169
“
”
˚
138
154
170
186
202
«
»
¸
º
ß
139
155
171
187
203
219
235
251
‹
…
140
156
172
188
204
220
236
252
›
‰
173
189
221
237
253
222
238
254
223
239
255
201
FF
FS
,
<
L
\
l
|
12
28
44
60
76
92
108
124
CR
GS
-
=
M
]
m
}
13
29
45
61
77
93
109
125
SO
RS
.
>
N
^
n
~
14
30
46
62
78
94
110
126
142
158
174
SI
US
/
?
O
_
o
ß
¿
ù
15
31
47
63
79
95
111
127
143
159
175
191
207
E-8 ❖
ª
141
157
fi
DocuPrint 4512/4512N User Guide
"
205
˛
190
206
Symbol Set Table
12J
1
2
3
4
0
1
2
NUL
DLE
SP
0
@
P
`
p
Ä
ê
†
∞
¿
–
‡
0
16
32
48
64
80
96
112
128
144
160
176
192
208
224
7
8
9
A
B
C
D
E
F
5
6
7
8
9
A
B
C
D
E
F
240
!
1
A
Q
a
q
Å
ë
˚
±
¡
•
Ò
17
33
49
65
81
97
113
129
145
161
177
193
209
225
241
STX
DC2
"
2
B
R
b
r
Ç
í
c
≤
¬
“
,
Ú
2
18
34
50
66
82
98
114
130
146
162
178
194
210
226
242
ETX
DC3
#
3
C
S
c
s
É
ì
£
≥
√
”
„
Û
3
19
35
51
67
83
99
115
131
147
163
179
195
211
227
243
Ñ
î
§
¥
ƒ
‘
‰
Ù
132
148
164
180
196
212
228
244
EOT DC4
20
ENQ NAK
5
6
4
1
SOH DC1
4
5
3
21
$
4
D
T
d
t
36
52
68
84
100
116
%
5
E
U
e
u
Ö
ï
•
µ
≈
’
Â
ı
37
53
69
85
101
117
133
149
165
181
197
213
229
245
&
6
F
V
f
v
Ü
ñ
¶
∂
6
22
38
54
70
86
102
118
134
150
166
182
BEL
ETB
'
7
G
W
g
w
á
ó
ß
Σ
«
7
23
39
55
71
87
103
119
135
151
167
183
199
BS
CAN
(
8
H
X
h
x
à
ò
®
Π
»
ACK SYN
∇
0
MC TEXT (MC)
÷
Ê
ˆ
198
214
230
246
Á
˜
215
231
247
ÿ
Ë
¯
8
24
40
56
72
88
104
120
136
152
168
184
200
216
232
248
HT
EM
)
9
I
Y
i
y
â
ô
©
π
…
Ÿ
È
˘
9
25
41
57
73
89
105
121
137
153
169
185
201
217
233
249
LF
SUB
*
:
J
Z
j
z
ä
ö
™
∫
NBS
/
Í
.
10
26
42
58
74
90
106
122
138
154
170
186
202
218
234
250
VT
ESC
+
;
K
[
k
{
ã
õ
´
ª
À
¤
Î
˚
11
27
43
59
75
91
107
123
139
155
171
187
203
219
235
251
FF
FS
,
<
L
\
l
|
å
ú
¨
º
Ã
‹
Ï
¸
12
28
44
60
76
92
108
124
140
156
172
188
204
220
236
252
CR
GS
-
=
M
]
m
}
ç
ù
≠
Ω
Õ
›
Ì
"
13
29
45
61
77
93
109
125
141
157
173
189
205
221
237
253
SO
RS
.
>
N
^
n
~
é
û
Æ
æ
Œ
fi
Ó
˛
14
30
46
62
78
94
110
126
142
158
174
190
206
222
238
254
SI
US
/
?
O
_
o
è
ü
Ø
ø
œ
fl
Ô
ˇ
15
31
47
63
79
95
111
127
143
159
175
191
207
223
239
255
Appendix E: Symbol Set Table
❖
E-9
Symbol Set Table
13J
0
1
2
3
4
Ventura International (VI)
0
1
2
NUL
DLE
SP
0
@
P
‘
p
0
16
32
48
64
80
96
112
!
1
A
Q
a
q
SOH DC1
7
8
9
A
B
C
D
E
F
5
6
7
1
17
33
49
65
81
97
113
DC2
"
2
B
R
b
r
2
18
34
50
66
82
98
114
ETX
DC3
#
3
C
S
c
s
3
19
35
51
67
83
99
115
EOT DC4
20
ENQ NAK
5
6
4
STX
4
5
3
21
ACK SYN
$
4
D
T
d
t
36
52
68
84
100
116
%
5
E
U
e
u
37
53
69
85
101
117
&
6
F
V
f
v
6
22
38
54
70
86
102
118
BEL
ETB
'
7
G
W
g
w
7
23
39
55
71
87
103
119
BS
CAN
(
8
H
X
h
x
8
24
40
56
72
88
104
120
HT
EM
)
9
I
Y
i
y
9
25
41
57
73
89
105
121
LF
SUB
*
:
J
Z
j
z
10
26
42
58
74
90
106
122
VT
ESC
+
;
K
[
k
{
11
27
43
59
75
91
107
123
FF
FS
,
<
L
\
l
|
12
28
44
60
76
92
108
124
CR
GS
-
=
M
]
m
}
13
29
45
61
77
93
109
125
SO
RS
.
>
N
^
n
~
14
30
46
62
78
94
110
SI
US
/
?
O
_
o
15
31
47
63
79
95
111
E-10 ❖
8
9
A
„
‰
â
Å
Á
Œ
128
144
160
176
192
208
224
240
À
“
ê
î
Ã
œ
161
177
193
209
225
241
Â
”
ô
Ø
ã
¶
162
178
194
210
226
242
È
°
û
Æ
179
195
211
129
130
145
146
B
C
D
E
F
†
131
147
163
Ê
Ç
á
å
132
148
164
180
196
212
Ë
ç
é
í
Í
––
133
149
165
181
197
213
229
245
Î
Ñ
ó
ø
Ì
–
166
182
198
214
230
246
Ï
ñ
ú
æ
Ó
167
183
199
215
231
©
¡
à
Ü
Ò
184
200
216
232
134
135
150
151
227
243
228
244
‡
247
136
152
168
®
¿
è
ì
Õ
ª
137
153
169
185
201
217
233
249
™
¤
ò
Ö
õ
º
138
154
170
186
202
218
234
250
‹
£
ù
Ü
S˘
«
171
187
203
219
235
251
›
¥
ä
É
s˘
•
172
188
204
220
236
252
Ù
§
ë
ï
Ú
»
189
205
221
237
253
139
140
155
156
248
141
157
173
Û
ƒ
ö
ß
Ÿ
126
142
158
174
190
206
222
238
c
ü
Ô
ÿ
…
127
143
159
175
191
207
223
239
255
DocuPrint 4512/4512N User Guide
254
Symbol Set Table
0
0
PC-8 Danish/Norwegian (PD)
1
2
3
0
@
P
`
p
Ç
É
á
0
16
32
48
64
80
96
112
128
144
160
!
1
A
Q
a
q
ü
æ
í
1
17
33
49
65
81
97
113
129
145
161
"
2
B
R
b
r
é
Æ
ó
2
18
34
50
66
82
98
114
130
146
162
!!
#
3
C
S
c
s
â
ô
ú
19
35
51
67
83
99
115
131
147
163
¶
$
4
D
T
d
t
ä
ö
ñ
4
20
36
52
68
84
100
116
132
148
164
§
%
5
E
U
e
u
à
ò
Ñ
5
21
37
53
69
85
101
117
133
149
165
&
6
F
V
f
v
å
û
õ
6
22
38
54
70
86
102
118
134
150
166
'
7
G
W
g
w
ç
ù
Õ
7
23
39
55
71
87
103
119
135
151
167
(
8
H
X
h
x
ê
ÿ
¿
40
56
72
88
104
120
136
152
168
)
9
I
Y
i
y
ë
Ö
ã
57
73
89
105
121
137
153
169
NUL
1
2
3
3
4
5
6
7
8
8
24
9
4
5
6
7
8
9
A
9
25
41
*
:
J
Z
j
z
è
Ü
Ã
10
26
42
58
74
90
106
122
138
154
170
+
;
K
[
k
{
ï
ø
l
11
27
43
59
75
91
107
123
139
155
171
,
<
L
\
l
î
£
’n
12
28
44
60
76
92
108
124
140
156
172
-
=
M
]
m
}
ì
Ø
¡
45
61
77
93
109
125
141
157
173
.
>
N
^
n
~
Ä
L.
3
46
62
78
94
110
126
142
158
174
Å
l.
¤
143
159
175
A
B
C
D
13
29
E
14
30
F
15
31
/
?
O
_
o
47
63
79
95
111
127
B
C
D
E
α
≡
176
192
208
224
240
ß
±
177
193
209
225
241
Γ
≥
178
194
210
226
242
π
≤
227
243
179
195
211
F
Σ
⌡
11U
244
180
196
212
228
σ
⌡
181
197
213
229
245
µ
÷
182
198
214
230
246
Τ
≈
183
199
215
231
247
Φ
°
232
248
θ
•
249
184
200
216
185
201
217
233
Ω
•
186
202
218
234
250
δ
√
187
203
219
235
251
∞
n
188
204
220
236
252
ø
2
237
253
189
205
221
e
190
206
222
238
254
191
207
223
239
NBS
255
Appendix E: Symbol Set Table
❖
E-11
Symbol Set Table
14J
0
1
2
3
4
Ventura US (VU)
0
1
2
NUL
DLE
SP
0
@
P
‘
p
0
16
32
48
64
80
96
112
7
8
9
A
B
C
D
E
F
5
6
7
!
1
A
Q
a
q
17
33
49
65
81
97
113
STX
DC2
"
2
B
R
b
r
2
18
34
50
66
82
98
114
ETX
DC3
#
3
C
S
c
s
3
19
35
51
67
83
99
115
EOT DC4
20
ENQ NAK
5
6
4
1
SOH DC1
4
5
3
21
$
4
D
T
d
t
36
52
68
84
100
116
%
5
E
U
e
u
37
53
69
85
101
117
&
6
F
V
f
v
6
22
38
54
70
86
102
118
BEL
ETB
'
7
G
W
g
w
7
23
39
55
71
87
103
119
BS
CAN
(
8
H
X
h
x
ACK SYN
8
24
40
56
72
88
104
120
HT
EM
)
9
I
Y
i
y
9
25
41
57
73
89
105
121
LF
SUB
*
:
J
Z
j
z
10
26
42
58
74
90
106
122
VT
ESC
+
;
K
[
k
{
11
27
43
59
75
91
107
123
FF
FS
,
<
L
\
l
|
12
28
44
60
76
92
108
124
CR
GS
-
=
M
]
m
}
13
29
45
61
77
93
109
125
SO
RS
.
>
N
^
n
~
14
30
46
62
78
94
110
SI
US
/
?
O
_
o
15
31
47
63
79
95
111
E-12 ❖
8
9
A
B
„
‰
128
144
160
176
129
145
161
177
C
D
E
F
192
208
224
240
193
209
225
241
“
”
130
146
162
178
¶
194
210
226
˚
242
†
131
147
163
179
195
211
227
243
132
148
164
180
196
212
228
244
133
149
165
181
197
213
229
245
134
150
166
182
198
214
230
246
135
151
167
183
199
215
231
247
184
200
216
232
248
185
201
217
233
249
‡
––
–
©
136
152
168
®
137
153
169
138
154
170
186
202
218
234
250
139
155
171
187
203
219
235
251
140
156
172
188
204
220
236
252
™
•
§
141
157
173
189
205
221
237
253
126
142
158
174
190
206
222
238
254
127
143
159
175
191
207
223
239
255
c
DocuPrint 4512/4512N User Guide
…
Symbol Set Table
1U
0
1
2
3
4
Legal (LG)
0
1
2
NUL
DLE
SP
0
@
P
˚
p
0
16
32
48
64
80
96
112
7
8
9
A
B
C
D
E
F
5
6
7
!
1
A
Q
a
q
17
33
49
65
81
97
113
STX
DC2
"
2
B
R
b
r
2
18
34
50
66
82
98
114
ETX
DC3
#
3
C
S
c
s
3
19
35
51
67
83
99
115
EOT DC4
20
ENQ NAK
5
6
4
1
SOH DC1
4
5
3
21
$
4
D
T
d
t
36
52
68
84
100
116
%
5
E
U
e
u
37
53
69
85
101
117
&
6
F
V
f
v
6
22
38
54
70
86
102
118
BEL
ETB
´
7
G
W
g
w
7
23
39
55
71
87
103
119
BS
CAN
(
8
H
X
h
x
ACK SYN
8
24
40
56
72
88
104
120
HT
EM
)
9
I
Y
i
y
9
25
41
57
73
89
105
121
LF
SUB
*
:
J
Z
j
z
10
26
42
58
74
90
106
122
VT
ESC
+
;
K
[
k
§
11
27
43
59
75
91
107
123
FF
FS
,
<
L
®
l
¶
12
28
44
60
76
92
108
124
CR
GS
-
=
M
]
m
†
8
9
A
B
C
D
E
F
128
144
160
176
192
208
224
240
129
145
161
177
193
209
225
241
130
146
162
178
194
210
226
242
131
147
163
179
195
211
227
243
132
148
164
180
196
212
228
244
133
149
165
181
197
213
229
245
134
150
166
182
198
214
230
246
135
151
167
183
199
215
231
247
136
152
168
184
200
216
232
248
137
153
169
185
201
217
233
249
138
154
170
186
202
218
234
250
139
155
171
187
203
219
235
251
140
156
172
188
204
220
236
252
141
157
173
189
205
221
237
253
13
29
45
61
77
93
109
125
SO
RS
.
c
N
©
n
™
14
30
46
62
78
94
110
126
142
158
174
190
206
222
238
254
SI
US
/
?
O
_
o
15
31
47
63
79
95
111
127
143
159
175
191
207
223
239
255
Appendix E: Symbol Set Table
❖
E-13
Symbol Set Table
9U
0
1
2
3
4
Windows 3.0 Latin 1 (WO)
0
1
2
NUL
DLE
SP
0
@
P
`
p
0
16
32
48
64
80
96
112
7
8
9
A
B
C
D
E
F
5
6
7
!
1
A
Q
a
q
17
33
49
65
81
97
113
STX
DC2
"
2
B
R
b
r
2
18
34
50
66
82
98
114
ETX
DC3
#
3
C
S
c
s
3
19
35
51
67
83
99
115
EOT DC4
20
ENQ NAK
5
6
4
1
SOH DC1
4
5
3
21
$
4
D
T
d
t
36
52
68
84
100
116
%
5
E
U
e
u
37
53
69
85
101
117
&
6
F
V
f
v
6
22
38
54
70
86
102
118
BEL
ETB
'
7
G
W
g
w
7
23
39
55
71
87
103
119
BS
CAN
(
8
H
X
h
x
ACK SYN
8
24
40
56
72
88
104
120
HT
EM
)
9
I
Y
i
y
9
25
41
57
73
89
105
121
LF
SUB
*
:
J
Z
j
z
10
26
42
58
74
90
106
122
VT
ESC
+
;
K
[
k
{
11
27
43
59
75
91
107
123
FF
FS
,
<
L
\
l
|
12
28
44
60
76
92
108
124
CR
GS
-
=
M
]
m
}
8
9
NBS
˚
À
D
à
128
144
160
176
192
208
224
¡
±
Á
Ñ
á
ñ
129
145
161
177
193
209
225
241
c
2
Â
Ò
â
ò
162
178
194
210
226
242
£
3
Ã
Ó
ã
ó
163
179
195
211
227
243
¤
'
Ä
Ô
ä
ô
180
196
212
228
244
130
131
146
147
A
B
C
D
E
F
240
132
148
164
¥
µ
Å
Õ
å
õ
133
149
165
181
197
213
229
245
¶
Æ
Ö
æ
ö
134
150
166
182
198
214
230
246
§
•
Ç
ç
÷
167
183
199
215
231
247
¨
¸
È
Ø
è
ø
168
184
200
216
232
248
©
ı
É
Ù
é
ù
185
201
217
233
249
135
136
151
152
137
153
169
ª
º
Ê
Ú
ê
ú
138
154
170
186
202
218
234
250
«
»
Ë
Û
ë
û
139
155
171
187
203
219
235
251
Ì
Ü
ì
ü
140
156
172
188
204
220
236
252
Í
Y´
í
y´
205
221
237
253
¬
–
13
29
45
61
77
93
109
125
SO
RS
.
>
N
^
n
~
14
30
46
62
78
94
110
126
142
158
174
SI
US
/
?
O
_
o
¯
¿
Ï
ß
ï
ÿ
15
31
47
63
79
95
111
127
143
159
175
191
207
223
239
255
E-14 ❖
141
157
173
189
DocuPrint 4512/4512N User Guide
î
Î
®
190
206
222
238
254
Symbol Set Table
6J
0
1
2
3
4
Microsoft Publishing (PB)
0
1
2
NUL
DLE
SP
0
16
32
SOH DC1
17
33
STX
DC2
”
2
18
34
ETX
DC3
3
3
19
35
4
5
ENQ NAK
5
6
7
8
9
A
B
C
D
E
F
20
21
ACK SYN
4
5
6
48
49
7
8
9
A
B
64
80
96
112
128
144
160
65
81
97
113
129
145
161
‘
2
D
E
176
192
208
224
240
`
`
177
193
209
225
241
226
242
227
243
228
244
229
245
'
R
50
51
66
67
"
82
98
Sˇ
c
83
o
99
114
130
146
sˇ
115
178
131
147
163
22
38
BEL
ETB
’
7
23
39
BS
CAN
9
8
24
40
HT
EM
0
9
25
41
LF
SUB
8
10
26
42
´
194
210
ˆ
195
211
˜
˜
68
84
100
116
132
148
164
180
196
212
-
-
53
69
85
101
117
133
149
165
181
197
213
˘
˘
IJ
ij
54
70
86
102
118
134
150
166
182
198
214
230
246
.
.
L.
l.
199
215
231
247
¨
¨
L
l
184
200
216
232
248
185
201
217
233
249
˚
˚
186
202
218
234
250
~
7
6
´
179
5
37
Ω
ˆ
ˆ
Thin
Space
™
162
F
52
4
36
C
˚
1
1
EOT DC4
3
55
56
71
72
87
88
103
119
135
151
104
120
136
152
168
105
121
137
153
169
106
122
138
154
170
Ÿ
57
73
89
VT
ESC
†
11
27
43
FF
FS
,
„
12
28
44
60
74
90
183
fi
Zˇ
58
167
zˇ
fl
¸
¸
187
203
219
235
251
172
188
204
220
236
252
ffl
‰
"
"
173
189
205
221
237
253
238
254
ff
59
75
91
107
76
92
108
123
139
155
171
124
140
156
l
ffi
Em
Space
CR
GS
–
‡
––
13
29
45
61
77
93
109
125
SO
RS
…
–
6
En
Space
“
14
30
46
78
94
110
126
SI
US
/
15
31
47
127
62
63
ı
Œ
=
œ
79
95
111
141
157
Pt
‹
142
158
174
ƒ
›
143
159
175
˛
˛
190
206
222
ˇ
ˇ
’n
191
207
223
239
255
Appendix E: Symbol Set Table
❖
E-15
Symbol Set Table
17U
0
0
PC-852 Latin 2 (PE)
1
2
3
0
@
P
`
p
Ç
É
á
16
32
48
64
80
96
112
128
144
160
!
1
A
Q
a
q
ü
´
L
í
33
49
65
81
97
113
129
145
161
"
2
B
R
b
r
é
´l
ó
18
34
50
66
82
98
114
130
146
162
!!
#
3
C
S
c
s
â
ô
ú
19
35
51
67
83
99
115
131
147
163
NUL
0
1
1
17
2
2
3
3
4
4
5
5
t
ä
ö
A˛
20
36
52
68
84
100
116
132
148
164
E-16 ❖
d
Ó
–
176
192
208
224
240
D
ß
"
177
193
209
225
241
ˇ
D
Ô
˛
210
226
242
Ë
´
N
ˇ
211
227
243
d’
n´
˘
212
228
244
178
179
180
194
195
196
ˇ
N
E
F
%
5
E
U
e
u
u˚
L’
a˛
Á
nˇ
§
53
69
85
101
117
133
149
165
181
197
213
229
245
&
6
F
V
f
v
c´
l’
Zˇ
Â
˘
A
Í
Sˇ
÷
38
54
70
86
102
118
134
150
166
182
198
214
230
246
'
7
G
W
g
w
ç
S´
zˇ
Eˇ
a˘
Î
sˇ
39
55
71
87
103
119
135
151
167
183
199
215
231
247
(
8
H
X
h
x
l
s´
E
˛
˛S
eˇ
´
R
˚
40
56
72
88
104
120
136
152
168
184
216
232
248
)
9
I
Y
i
y
ë
Ö
˛e
U´
¨
41
57
73
89
105
121
137
153
169
233
249
Ü
22
23
24
25
26
27
28
29
30
F
15
D
37
E
14
C
§
D
13
B
21
C
12
A
d
B
11
9
T
A
10
8
D
9
9
7
4
8
8
6
$
7
7
5
¶
6
6
4
31
185
*
:
J
Z
j
z
´´
O
42
58
74
90
106
122
138
154
170
+
;
K
[
k
{
o´´
Tˇ
z´
43
59
75
91
107
123
139
155
171
,
<
L
\
l
|
î
t’
Cˇ
44
60
76
92
108
124
140
156
172
188
186
187
200
201
202
203
204
-
=
M
]
m
}
Z´
L
s¸
Z˚
45
61
77
93
109
125
141
157
173
189
.
>
N
^
n
~
Ä
«
Z˚
46
62
78
94
110
126
142
190
206
191
207
/
?
O
_
o
47
63
79
95
111
127
158
174
C´
cˇ
»
143
159
175
DocuPrint 4512/4512N User Guide
205
217
218
r´
•
234
250
´´
U
u´´
235
251
y´
ˇ
R
220
236
252
T¸
´
Y
rˇ
221
237
253
˚
U
¸t
222
238
254
´
NBS
223
239
255
219
¤
Symbol Set Table
PC-Turkish (PT)
0
0
1
2
3
0
@
P
`
p
Ç
É
á
0
16
32
48
64
80
96
112
128
144
160
!
1
A
Q
a
q
ü
æ
í
1
17
33
49
65
81
97
113
129
145
161
"
2
B
R
b
r
é
Æ
ó
2
18
34
50
66
82
98
114
130
146
162
!!
#
3
C
S
c
s
â
ô
ú
19
35
51
67
83
99
115
131
147
163
¶
$
4
D
T
d
t
ä
ö
ñ
4
20
36
52
68
84
100
116
132
148
164
§
%
5
E
U
e
u
à
ò
Ñ
5
21
37
53
69
85
101
117
133
149
165
&
6
F
V
f
v
å
û
˘
G
54
70
86
102
118
134
150
166
NUL
1
2
3
3
4
5
6
4
5
6
7
8
9
A
6
22
38
'
7
G
W
g
w
ç
ù
g˘
7
23
39
55
71
87
103
119
135
151
167
(
8
H
X
h
x
ê
˚I
¿
40
56
72
88
104
120
136
152
168
)
9
I
Y
i
y
ë
Ö
¬
57
73
89
105
121
137
153
169
7
8
8
24
9
9
25
41
*
:
J
Z
j
z
è
Ü
¬
10
26
42
58
74
90
106
122
138
154
+
;
K
[
k
{
ï
c
11
27
43
59
75
91
107
123
139
155
,
<
L
\
l
|
î
£
12
28
44
60
76
92
108
124
140
-
=
M
]
m
}
45
61
77
93
109
.
>
N
^
n
62
78
94
110
A
B
C
D
13
29
E
14
30
46
/
?
O
_
o
15
31
47
63
79
95
111
F
B
C
D
E
α
≡
176
192
208
224
240
ß
±
177
193
209
225
241
Γ
≥
178
194
210
226
242
π
≤
227
243
179
195
211
F
Σ
⌡
9T
244
180
196
212
228
σ
⌡
181
197
213
229
245
µ
÷
182
198
214
230
246
Τ
≈
183
199
215
231
247
Φ
°
232
248
θ
•
249
184
200
216
185
201
217
233
Ω
•
170
186
202
218
234
250
δ
=
171
187
203
219
235
251
∞
n
156
172
188
204
220
236
252
ì
¥
¡
ø
2
125
141
157
173
253
~
Ä
S¸
«
126
142
158
174
Å
s¸
»
127
143
159
175
189
205
221
237
190
206
222
238
254
191
207
223
239
NBS
255
e
Appendix E: Symbol Set Table
❖
E-17
Symbol Set Table
2N
ISO 8859/2 Latin 2 (E2)
0
0
1
2
3
4
1
7
8
9
A
B
C
D
E
F
4
5
6
7
DLE
SP
0
@
P
`
p
0
16
32
48
64
80
96
112
!
1
A
Q
a
q
SOH DC1
1
17
33
49
65
81
97
113
STX
DC2
"
2
B
R
b
r
2
18
34
50
66
82
98
114
ETX
DC3
#
3
C
S
c
s
3
19
35
51
67
83
99
115
EOT DC4
20
ENQ NAK
5
6
3
NUL
4
5
2
21
ACK SYN
$
4
D
T
d
t
36
52
68
84
100
116
%
5
E
U
e
u
37
53
69
85
101
117
&
6
F
V
f
v
6
22
38
54
70
86
102
118
BEL
ETB
'
7
G
W
g
w
7
23
39
55
71
87
103
119
BS
CAN
(
8
H
X
h
x
8
24
40
56
72
88
104
120
HT
EM
)
9
I
Y
i
y
9
25
41
57
73
89
105
121
LF
SUB
*
:
J
Z
j
z
10
26
42
58
74
90
106
122
VT
ESC
+
;
K
[
k
{
11
27
43
59
75
91
107
123
FF
FS
,
<
L
\
l
|
12
28
44
60
76
92
108
124
CR
GS
-
=
M
]
m
}
13
29
45
61
77
93
109
125
SO
RS
.
>
N
^
n
~
14
30
46
62
78
94
110
126
SI
US
/
?
O
_
o
15
31
47
63
79
95
111
E-18 ❖
127
8
128
129
130
131
132
133
134
135
136
9
144
145
146
147
148
149
150
151
152
A
B
C
NBS
˚
´
R
D
E
F
D
r´
d
160
176
192
208
224
240
A˛
˛a
´
A
´
N
á
n´
161
177
193
209
225
241
˘
˛
Â
ˇ
N
â
nˇ
162
178
194
210
226
242
L
l
˘
A
Ó
a˘
ó
163
179
195
211
227
243
¤
´
Ä
Ô
ä
ô
164
180
196
212
228
244
´´
O
Í
´´
o
213
229
245
L’
l’
´
L
165
181
197
S´
s´
C´
Ö
c´
ö
166
182
198
214
230
246
§
ˇ
Ç
ç
÷
167
183
199
215
231
247
¨
¸
Cˇ
ˇ
R
cˇ
rˇ
168
184
200
216
232
248
Sˇ
sˇ
É
˚
U
é
u˚
185
201
217
233
249
137
153
169
S¸
s¸
E
˛
Ú
˛e
ú
138
154
170
186
202
218
234
250
Tˇ
t’
Ë
U´
ë
´´
u
171
187
203
219
235
251
Z´
z´
Eˇ
Ü
eˇ
ü
172
188
204
220
236
252
-
´´
Í
Y´
í
y´
173
189
205
221
237
253
Zˇ
zˇ
Î
T¸
î
t¸
174
190
206
222
238
254
139
140
141
142
143
155
156
157
158
159
.
Z
.
z
175
191
DocuPrint 4512/4512N User Guide
ˇ
D
ß
d’
.
207
223
239
255
Symbol Set Table
9E
Windows 3.1 Latin 2 (WE)
0
0
1
2
3
4
7
8
9
A
B
C
D
E
F
3
4
5
6
7
DLE
SP
0
@
P
`
p
0
16
32
48
64
80
96
112
!
1
A
Q
a
q
8
128
9
A
B
C
D
E
F
NBS
º
´
R
D
r´
d
144
160
176
192
208
224
240
‘
ˇ
±
Á
´
N
á
n´
1
17
33
49
65
81
97
113
129
145
161
177
193
209
225
241
STX
DC2
"
2
B
R
b
r
,
’
˘
˛
Â
ˇ
N
â
nˇ
130
146
162
178
194
210
226
242
“
L
l
˘
A
Ó
a˘
ó
147
163
179
195
211
227
243
´
Ä
Ô
ä
ô
244
SOH DC1
2
18
34
50
66
82
98
114
ETX
DC3
#
3
C
S
c
s
3
19
35
51
67
83
99
115
EOT DC4
20
ENQ NAK
5
6
2
NUL
4
5
1
21
ACK SYN
131
$
4
D
T
d
t
„
”
¤
36
52
68
84
100
116
132
148
164
180
196
212
228
%
5
E
U
e
u
…
•
A˛
µ
´
L
´´
O
´l
´´
o
37
53
69
85
101
117
133
149
165
181
197
213
229
245
&
6
F
V
f
v
†
–
¶
C´
Ö
c´
ö
214
230
246
ç
÷
6
22
38
54
70
86
102
118
134
150
166
182
198
BEL
ETB
'
7
G
W
g
w
‡
––
§
•
Ç
7
23
39
55
71
87
103
119
135
151
167
183
199
215
231
247
BS
CAN
(
8
H
X
h
x
¨
¸
Cˇ
ˇ
R
cˇ
rˇ
8
24
40
56
72
88
104
120
136
152
168
184
200
216
232
248
HT
EM
)
9
I
Y
i
y
‰
™
©
˛a
É
˚
U
é
u˚
9
25
41
57
73
89
105
121
137
153
169
185
201
217
233
249
LF
SUB
*
:
J
Z
j
z
Sˇ
sˇ
S¸
s¸
˛E
Ú
˛e
ú
10
26
42
58
74
90
106
122
138
154
170
186
202
218
234
250
VT
ESC
+
;
K
[
k
{
‹
›
«
»
Ë
´´
U
ë
´´
u
11
27
43
59
75
91
107
123
139
155
171
187
203
219
235
251
FF
FS
,
<
L
\
l
S´
s´
¬
L’
Eˇ
Ü
eˇ
ü
12
28
44
60
76
92
108
124
140
156
172
188
204
220
236
252
CR
GS
-
=
M
]
m
}
ˇ
T
t’
–
´´
Í
Y´
í
y´
13
29
45
61
77
93
109
125
141
157
173
189
205
221
237
253
SO
RS
.
>
N
^
n
~
Zˇ
zˇ
®
l’
Î
T¸
î
t¸
14
30
46
62
78
94
110
126
142
158
174
190
206
222
238
254
Z´
z´
Z˙
z˙
ˇ
D
ß
d’
˙
143
159
175
191
207
223
239
255
SI
US
/
?
O
_
o
15
31
47
63
79
95
111
127
Appendix E: Symbol Set Table
❖
E-19
Symbol Set Table
5N
ISO 8859/9 Latin 5 (E5)
0
0
1
2
3
4
5
6
7
8
9
A
B
C
D
E
F
1
2
3
4
5
6
7
p
NUL
DLE
SP
0
@
P
`
0
16
32
48
64
80
96
112
SOH
DC1
!
1
A
Q
a
q
1
17
33
49
65
81
97
113
STX
DC2
"
2
B
R
b
r
2
18
34
50
66
82
98
114
ETX
DC3
#
3
C
S
c
s
3
19
35
51
67
83
99
115
EOT
DC4
$
4
D
T
d
t
4
20
36
52
68
84
100
ENQ
NAK
%
5
E
U
e
5
21
37
53
69
85
101
ACK
SYN
&
6
F
V
f
86
102
6
22
38
54
70
BEL
ETB
'
7
G W
7
23
39
55
71
87
g
103
BS
CAN
(
8
H
X
h
8
24
40
56
72
88
104
HT
EM
)
9
I
Y
i
9
25
41
57
73
89
105
LF
SUB
*
:
J
Z
j
10
26
42
58
74
90
106
VT
ESC
+
;
K
[
k
91
107
11
27
43
59
75
FF
FS
,
<
L
\
l
12
28
44
60
76
92
CR
GS
-
=
M
13
29
45
61
SO
RS
.
14
30
46
SI
US
15
31
E-20 ❖
116
8
128
129
130
9
144
145
146
B
NBS
˚
À
à
g˘
160
176
192
208
224
240
¡
±
Á
Ñ
á
ñ
161
177
193
209
225
241
c
2
Â
Ò
â
ò
162
178
194
210
226
242
Ã
Ó
ã
ó
195
211
227
243
£
163
179
¤
´
Ä
Ô
ä
ô
132
148
164
180
196
212
228
244
¥
µ
Å
Õ
å
õ
133
149
165
181
197
213
229
245
Æ Ö
æ
ö
230
246
ç
÷
231
247
134
150
182
198
§
•
Ç
183
199
214
151
167
¨
¸
È
Ø
è
ø
136
152
168
184
200
216
232
248
©
1
É
Ù
é
ù
137
153
169
185
201
217
233
249
ª
0
Ê
Ú
ê
ú
138
154
170
186
202
218
234
250
«
»
Ë
Û
ë
û
187
203
219
235
251
Ì
Ü
ì
ü
188
204
220
236
252
Í
I
í
i
189
205
221
237
253
Î
S¸
î
s¸
190
206
222
238
254
z
122
166
135
y
121
F
147
x
120
E
131
w
119
D
˘
G
v
118
C
3
u
117
A
{
215
123
139
155
171
108
124
140
156
172
]
m
}
77
93
109
125
141
157
173
>
N
ˆ
n
62
78
94
110
126
142
158
174
/
?
O
_
o
¯
¿
Ï
ß
ï
ÿ
47
63
79
95
111
127
143
159
175
191
207
223
239
255
¬
-
~
®
DocuPrint 4512/4512N User Guide
Symbol Set Table
5T
Windows 3.1 Latin 5 (WT)
0
0
1
2
3
4
5
6
7
8
9
A
B
C
1
F
3
4
5
6
7
NUL
DLE
SP
0
@
P
`
p
0
16
32
48
64
80
96
112
SOH
DC1
!
1
A
Q
a
q
1
17
33
49
65
81
97
STX
DC2
"
2
B
R
2
18
34
50
66
ETX
DC3
#
3
3
19
35
51
EOT
DC4
$
4
8
9
A
B
C
D
E
F
à
g˘
224
240
NBS
˚
À
˘
G
160
176
192
208
128
144
‘
¡
±
Á
Ñ
á
ñ
113
129
145
161
177
193
209
225
241
b
r
,
’
c
2
Â
Ò
â
ò
82
98
114
130
146
162
178
194
210
226
242
C
S
c
s
ƒ
“
£
3
Ã
Ó
ã
ó
67
83
99
115
131
147
163
179
195
211
227
243
D
T
d
t
,,
”
¤
´
Ä
Ô
ä
ô
132
148
164
180
196
212
228
244
¥
µ
Å
Õ
å
õ
165
181
197
213
229
245
Æ Ö
æ
ö
166
182
198
230
246
§
•
Ç
ç
÷
167
183
199
231
247
4
20
36
52
68
84
100
116
ENQ
NAK
%
5
E
U
e
u
...
5
21
37
53
69
85
101
117
133
ACK
SYN
&
6
F
V
f
v
†
–
6
22
38
54
70
86
102
118
134
150
BEL
ETB
'
7
G W
g
w
39
55
71
87
103
119
149
‡ —
214
7
23
BS
CAN
(
8
H
X
h
x
ˆ
˜
¨
¸
È
Ø
è
ø
8
24
40
56
72
88
104
120
136
152
168
184
200
216
232
248
HT
EM
)
9
I
Y
i
y
‰ ™
©
1
É
Ù
é
ù
9
25
41
57
73
89
105
121
137
153
169
185
201
217
233
249
LF
SUB
*
:
J
Z
j
z
Sˇ
sˇ
ª
0
Ê
Ú
ê
ú
10
26
42
58
74
90
106
122
138
154
170
186
202
218
234
250
VT
ESC
+
;
K
[
k
{
‹
›
«
»
Ë
Û
ë
û
11
27
43
59
75
91
107
123
139
155
171
187
203
219
235
251
FF
FS
,
<
L
\
l
Ì
Ü
ì
ü
12
28
44
60
76
92
108
124
140
188
204
220
236
252
CR
GS
-
=
M
]
m
}
Í
I
í
i
13
29
45
61
77
93
109
125
189
205
221
237
253
SO
RS
.
>
N
ˆ
n
~
14
30
46
62
78
94
110
126
SI
US
/
?
O
_
o
15
31
47
63
79
95
111
D
E
2
135
151
Œ œ
127
156
¬
172
-
215
141
157
173
Î
S¸
î
s¸
142
158
174
190
206
222
238
254
Ÿ
¯
¿
Ï
ß
ï
ÿ
159
175
191
207
223
239
255
®
143
Appendix E: Symbol Set Table
❖
E-21
Symbol Set Table
1
2
3
4
5
6
7
8
9
A
B
C
0
1
2
NUL
DLE
SP
0
≅
)
0
16
32
48
64
SOH
DC1
!
1
1
17
33
49
STX
DC2
2
18
ETX
DC3
3
19
EOT
DC4
F
4
5
6
7
80
96
112
A
U
α
u
65
81
97
113
2
B
R
ß
r
34
50
66
82
98
114
#
3
X
S
χ
s
35
51
67
83
99
115
4
δ
t
100
116
4
20
36
52
68
84
ENQ
NAK
%
5
E
Y
ε
y
5
21
37
53
69
85
101
117
ACK
SYN
&
6
F
ς
φ
ϖ
6
22
38
54
70
86
102
118
BEL
ETB
7
G
V
γ
ω
55
71
87
103
119
7
23
BS
CAN
(
8
H
J
η
ξ
8
24
40
56
72
88
104
120
HT
EM
)
9
I
C
ι
ψ
9
25
41
57
73
89
105
121
LF
SUB
*
:
q
Z
ϕ
ζ
10
26
42
58
74
90
106
122
VT
ESC
+
;
K
11
27
43
59
75
91
FF
FS
,
<
L
∴
λ
|
12
28
44
60
76
92
108
124
CR
GS
–
=
M
#
µ
}
13
29
45
61
77
93
109
125
SO
RS
.
>
N
⊥
ν
∼
14
30
46
62
78
94
110
126
SI
US
/
?
O
15
31
47
63
79
E-22 ❖
39
@
8
9
A
◊
≤
↓
|
128
144
160
176
192
208
224
240
√
⊃
♦
←
⋅
129
145
161
177
193
209
225
241
⊇
≥
∠
⇐
178
194
210
226
242
p
T
D
E
3
∇
0
Ventura Math (VM)
A
6M
κ
{
107
123
111
127
C
D
E
F
130
146
162
∂
″
⇔
131
147
163
179
195
211
227
243
ℵ
ƒ
196
212
228
Σ
213
229
245
∨
132
148
164
♣
′
133
149
165
181
197
⊕
ℜ
134
150
166
182
198
214
230
246
⊗
℘
±
〉
|
183
199
215
231
247
232
248
180
244
135
151
167
⇑
⊇
∞
→
136
152
168
184
200
216
⇒
∪
♠
↑
¬
∅
137
153
169
185
201
217
233
249
⇓
∝
≠
∇
∩
202
218
234
250
138
154
170
186
⊃
…
•
≡
∈
139
155
171
187
203
219
235
251
⊃
⁄
°
|
140
156
172
188
204
220
236
252
♥
↔
∉
205
221
237
253
⌡
141
157
173
|
↵
142
158
174
190
206
222
238
254
≈
ϒ
∫
÷
〈
175
191
207
223
239
255
ο
95
B
143
159
DocuPrint 4512/4512N User Guide
189
Symbol Set Table
2
3
4
5
6
7
8
A
C
NUL
DLE
0
16
SOH
DC1
1
17
STX
DC2
2
18
ETX
DC3
°
3
19
35
EOT
DC4
∞
F
4
5
36
6
7
SP
0
∴
Π
π
32
48
64
80
96
112
√
1
Α
Ρ
α
ρ
33
49
65
81
97
113
″
2
Β
Σ
β
σ
34
50
66
82
98
114
3
Γ
Τ
γ
τ
51
67
83
99
115
4
∆
Y
δ
υ
52
68
84
100
116
4
20
ENQ
NAK
÷
5
Ε
Φ
e
φ
5
21
37
53
69
85
101
117
ACK
SYN
∝
6
Ζ
Χ
ζ
χ
6
22
38
54
70
86
102
118
BEL
ETB
′
7
Η
Ψ
η
ψ
7
23
39
55
71
87
103
119
BS
CAN
(
8
θ
Ω
θ
ω
8
24
40
56
72
88
104
120
HT
EM
)
9
Ι
∇
ι
ϑ
9
25
41
57
73
89
105
121
LF
SUB
×
Κ
∂
κ
ϕ
10
26
42
58
74
90
106
122
VT
ESC
+
ε
Λ
ς
λ
ϖ
11
27
43
59
75
91
107
123
FF
FS
,
<
Μ
≤
µ
∼
−
12
28
44
60
76
92
108
124
CR
GS
−
=
Ν
≠
ν
≡
13
29
45
61
77
93
109
125
SO
RS
.
>
Ξ
≥
ξ
≡
14
30
46
62
78
94
110
126
SI
US
/
≈
Ο
_
ο
15
31
47
63
79
95
111
D
E
3
127
8
9
A
B
C
D
128
144
160
176
192
↑
∀
129
145
161
177
→
∃
130
146
162
178
↓
131
147
163
179
←
⊥
180
132
148
164
⇑
∪
133
149
165
181
134
150
⇒
∩
166
182
⇓
∈
167
183
E
F
208
224
240
193
209
225
241
194
210
226
242
195
211
227
243
∋
196
212
228
244
∫
|
197
213
229
245
∫
|
|
198
214
230
246
Å
∠
⌡
199
215
231
247
200
216
232
248
201
217
233
249
202
218
234
250
203
219
235
251
204
220
205
221
135
151
136
152
137
153
138
154
139
155
⇔
⊃
140
156
172
188
141
157
173
189
⊇
†
ℜ
∗
±
142
158
174
190
206
222
238
254
⊇
‡
191
207
223
239
⇐
∈
168
184
∉
169
185
↔
⊃
170
186
⇔
B
2
↔
9
1
⊃
171
187
∅
ℵ
⊃
143
159
175
〉
〈
236
252
±
1
0
⊥
0
Math-8 (M8)
∴
8M
237
253
≅
255
Appendix E: Symbol Set Table
❖
E-23
Symbol Set Table
4
5
6
7
8
9
A
B
C
NUL
DLE
SP
0
16
SOH
DC1
1
17
STX
DC2
„
ˇ
2
18
34
50
ETX
DC3
,
˙
3
19
35
51
EOT
DC4
“
4
20
36
52
ENQ
NAK
”
5
21
37
53
ACK
SYN
‘
6
22
38
54
BEL
ETB
’
7
23
39
BS
CAN
〉
8
24
40
HT
EM
〈
9
25
41
LF
SUB
10
26
42
VT
ESC
SM
11
27
43
FF
FS
12
28
44
CR
GS
§
13
29
45
SO
RS
M
14
30
SI
US
15
31
D
E
F
E-24 ❖
3
4
5
6
7
8
9
A
B
C
D
E
F
32
48
64
80
96
112
128
144
160
176
192
208
224
240
33
49
97
113
129
145
161
177
193
209
225
241
98
114
130
146
162
178
194
210
226
242
℘
˘
65
81
R
66
82
Σ
67
83
99
115
131
147
163
179
195
211
227
243
68
84
100
116
132
148
164
180
196
212
228
244
69
85
101
117
133
149
165
181
197
213
229
245
70
86
102
118
134
150
166
182
198
214
230
246
55
71
87
103
119
135
151
167
183
199
215
231
247
56
72
88
104
120
136
152
168
184
200
216
232
248
57
73
89
105
121
137
153
169
185
201
217
233
249
58
74
90
106
122
138
154
170
186
202
218
234
250
59
75
91
107
123
139
155
171
187
203
219
235
251
60
76
92
108
124
140
156
172
188
204
220
236
252
61
77
93
109
125
141
157
173
189
205
221
237
253
46
62
78
94
110
126
142
158
174
190
206
222
238
254
47
63
79
95
111
127
143
159
175
191
207
223
239
255
↑
3
2
,
2
1
↑
1
0
↑
0
Pi Font (PI)
↑
15U
\
DocuPrint 4512/4512N User Guide
Symbol Set Table
5M
1
2
3
4
5
6
7
8
9
A
B
C
0
1
2
NUL
DLE
SP
0
16
32
SOH
DC1
!
1
Α
θ
α
θ
1
17
33
49
65
81
97
113
STX
DC2
A
0
PS Math (MS)
2
Β
Ρ
β
ρ
2
18
34
50
66
82
98
114
ETX
DC3
#
3
Χ
Σ
χ
σ
3
19
35
51
67
83
99
115
EOT
DC4
4
∆
Τ
δ
t
F
4
5
0
≅
Π
48
64
80
6
7
96
112
100
116
4
20
36
52
68
84
NAK
%
5
Ε
Υ
ε
υ
5
21
37
53
69
85
101
117
ACK
SYN
&
6
Φ
ς
φ
ϖ
6
22
38
54
70
86
102
118
BEL
ETB
7
Γ
Ω
γ
ω
7
23
55
71
87
103
119
BS
CAN
(
8
Η
J
η
ξ
8
24
40
56
72
88
104
120
HT
EM
)
9
Ι
Ψ
ι
ψ
9
25
41
57
73
89
105
121
LF
SUB
*
:
ϑ
Ζ
ϕ
ζ
10
26
42
58
74
90
106
122
VT
ESC
+
;
Κ
[
κ
{
11
27
43
59
75
91
107
123
FF
FS
,
<
Λ
∴
λ
|
12
28
44
60
76
92
108
124
CR
GS
–
=
Μ
]
µ
}
13
29
45
61
77
93
109
125
SO
RS
.
>
Ν
⊥
ν
∼
14
30
46
62
78
94
110
126
SI
US
/
?
Ο
_
ο
15
31
47
63
79
95
111
39
8
9
A
B
°
ℵ
∠
◊
128
144
160
176
192
208
224
γ
±
∇
〈
〉
129
145
161
177
193
209
225
241
′
″
ℜ
∫
130
146
162
178
194
210
226
242
≤
≥
℘
131
147
163
179
195
211
227
243
⁄
×
⊕
|
180
196
212
228
244
π
ENQ
D
E
3
127
C
D
E
F
240
132
148
164
∞
∝
⊗
∏
Σ
⌡
133
149
165
181
197
213
229
245
ƒ
∂
∅
√
134
150
166
182
198
214
230
246
♣
•
∩
⋅
|
|
183
199
215
231
247
216
232
248
217
233
249
|
|
234
250
135
151
167
♦
÷
∪
136
152
168
184
200
♥
≠
⊃
185
201
137
153
169
♠
≡
⊇
138
154
170
186
202
218
139
155
140
156
↑
|
⊇
⇑
141
157
173
189
205
221
237
253
→
∈
⇒
142
158
174
190
206
222
238
254
↓
↵
∉
⇓
|
175
191
207
223
239
143
159
↔
≈
⊃
⇔
171
187
203
219
235
251
←
…
⊃
⇐
172
188
204
220
236
252
255
Appendix E: Symbol Set Table
❖
E-25
Symbol Set Table
19M
1
2
3
4
5
6
7
8
9
A
B
C
0
1
2
NUL
DLE
SP
0
16
32
SOH
DC1
!
1
17
33
STX
DC2
2
18
ETX
DC3
3
19
EOT
DC4
F
4
5
6
7
0
≅
Π
48
64
80
96
112
1
Α
Θ
α
θ
49
65
81
97
113
2
Β
Ρ
β
ρ
34
50
66
82
98
114
#
3
Χ
Σ
χ
σ
35
51
67
83
99
115
4
∆
Τ
δ
t
100
116
4
20
36
52
68
84
NAK
%
5
Ε
Υ
ε
υ
5
21
37
53
69
85
101
117
ACK
SYN
&
6
Φ
ς
φ
ϖ
6
22
38
54
70
86
102
118
BEL
ETB
7
Γ
Ω
γ
ω
7
23
55
71
87
103
119
BS
CAN
(
8
Η
J
η
ξ
8
24
40
56
72
88
104
120
HT
EM
)
9
Ι
Ψ
ι
ψ
9
25
41
57
73
89
105
121
LF
SUB
*
:
ϑ
Ζ
ϕ
ζ
10
26
42
58
74
90
106
122
VT
ESC
+
;
Κ
[
κ
{
11
27
43
59
75
91
107
123
FF
FS
,
<
Λ
∴
λ
|
12
28
44
60
76
92
108
124
CR
GS
–
=
Μ
]
µ
}
13
29
45
61
77
93
109
125
SO
RS
.
>
Ν
⊥
ν
∼
14
30
46
62
78
94
110
126
SI
US
/
?
Ο
_
ο
15
31
47
63
79
95
111
E-26 ❖
39
8
9
A
B
°
ℵ
∠
◊
128
144
160
176
192
208
224
Y
±
∇
〈
〉
129
145
161
177
193
209
225
241
′
″
ℜ
∫
130
146
162
178
194
210
226
242
≤
≥
℘
131
147
163
179
195
211
227
243
⁄
×
⊕
|
180
196
212
228
244
π
ENQ
D
E
3
A
0
Symbol Font (AS)
127
C
D
E
F
240
132
148
164
∞
∝
⊗
∏
Σ
⌡
133
149
165
181
197
213
229
245
ƒ
∂
∅
√
134
150
166
182
198
214
230
246
♣
•
∩
⋅
|
|
183
199
215
231
247
216
232
248
217
233
249
|
|
234
250
135
151
167
♦
÷
∪
136
152
168
184
200
♥
≠
⊃
185
201
137
153
169
♠
≡
⊇
138
154
170
186
202
218
139
155
140
156
↑
|
⊇
⇑
141
157
173
189
205
221
237
253
→
∈
⇒
142
158
174
190
206
222
238
254
↓
↵
∉
⇓
|
175
191
207
223
239
143
159
↔
≈
⊃
⇔
171
187
203
219
235
251
←
…
⊃
⇐
172
188
204
220
236
252
DocuPrint 4512/4512N User Guide
255
Symbol Set Table
579L Wingdings Font (L$)
1
2
3
4
5
6
7
9
A
B
C
2
NUL
DLE
SP
0
16
32
SOH
DC1
✎
1
17
33
STX
DC2
✂
2
18
34
ETX
DC3
✁
3
19
35
EOT
DC4
4
20
ENQ
NAK
5
21
ACK
SYN
6
22
BEL
ETB
7
23
BS
CAN
8
3
4
5
6
7
8
0
5
80
96
112
128
144
1
6
81
97
113
129
145
2
7
146
✍
48
64
✌
49
65
66
82
98
114
130
3
8
51
67
83
99
115
131
147
4
9
148
F
A
B
C
D
E
F
160
176
192
208
224
240
161
177
193
209
225
241
162
178
194
210
226
242
163
179
195
211
227
243
164
180
196
212
228
244
?
84
100
116
132
5
10
85
101
117
133
149
165
181
197
213
229
245
86
102
118
134
150
166
182
198
214
230
246
87
103
119
135
151
167
183
199
215
231
247
72
88
104
120
136
152
168
184
200
216
232
248
57
73
89
105
121
137
153
169
185
201
217
233
249
42
58
74
90
106
122
138
154
170
186
202
218
234
250
43
59
75
91
107
123
139
155
171
187
203
219
235
251
44
60
76
92
108
124
140
156
172
188
204
220
236
252
45
61
77
93
109
125
141
157
173
189
205
221
237
253
46
62
78
94
110
126
142
158
174
190
206
222
238
254
79
95
111
127
143
159
175
191
207
223
239
255
36
52
37
53
38
54
39
55
24
40
56
HT
EM
✆
9
25
41
LF
SUB
10
26
VT
ESC
11
27
FF
FS
12
28
CR
GS
13
29
SO
RS
14
30
SI
US
15
31
68
☞
69
☞
70
6
71
7
8
9
10
0
1
2
D
E
9
50
☞
8
1
☞
0
0
3
✍
47
63
4
Appendix E: Symbol Set Table
❖
E-27
Symbol Set Table
ISO Substitution Table
Decimal Character Equivalents
ISO Name
ID 35
36
64
91 92
93
94
96 123 124 125 126
6
ASCII
0U
#
$
@
[
\
]
ˆ
`
{
|
}
~
4
United Kingdom
1E
£
$
@
[
\
]
ˆ
`
{
|
}
–
69
French
1F
£
$
à
˚
ç
§
ˆ
µ
é
ù
è
-
21
German
1G
#
$
§
Ä
Ö
Ü
ˆ
`
ä
ö
ü
ß
15
Italian
0I
£
$
§
˚
ç
é
ˆ
ù
à
ò
è
ì
11
Swedish for Names
0S
#
É
Ä
Ö
Å
Ü
é
ä
ö
å
ü
17
Spanish
2S
£
$
§
¡
Ñ
¿
ˆ
`
˚
ñ
ç
-
60
Norwegian version 1
0D
#
$
@
Æ
Ø
Å
ˆ
`
æ
ø
å
–
E-28 ❖
DocuPrint 4512/4512N User Guide
Appendix F
Environmental Specifications
Appendix F: Environmental Specifications
❖
F x i dneppA
F-1
Environmental Specifications
The Xerox
Commitment to
Environmental
Quality
Xerox Corporation is committed to an international program to
safeguard our environment by diverting certain products and materials
from the solid waste stream. We do this by reusing serviceable
components and remanufacturing selected products.
To support this effort, we have made it easy for you to return selected
printer equipment and empty print cartridges to Xerox. We recondition
the print cartridges and refill them with Xerox toner and developer. All
products we manufacture meet our stringent performance standards.
The worldwide effort to remanufacture printer equipment and recall EP
(print) cartridges benefits the environment and conserves our natural
resources by reducing waste going into our landfills. Besides, it makes
good business sense for Xerox and Xerox customers. Please join us in
this effort.
Acoustic Noise
Figures
On Standby (ROS Pause): 44 dB(A)
Under Operation:
Continuous Sound: 52 dB(A)
F-2 ❖
DocuPrint 4512/4512N User Guide
Environmental Specifications
FCC Compliance
Statement for United
States Users
Class B:
This equipment has been tested and found to comply with the limits for
a Class B digital device, pursuant to Part 15 of the FCC Rules. These
limits are designed to provide reasonable protection against harmful
interference in a residential installation. This equipment generates, uses,
and can radiate radio frequency energy and, if not installed and used in
accordance with the instructions, may cause harmful interference to
radio communications. However, there is no guarantee that interference
will not occur in a particular installation. If this equipment does cause
harmful interference to radio or television reception, which can be
determined by turning the equipment off and on, the user is encouraged
to try to correct the interference by one or more of the following
measures:
•
Reorient or relocate the receiving antenna.
•
Increase the separation between the equipment and receiver.
•
Connect the equipment into an outlet on a circuit different from that
to which the receiver is connected.
•
Consult the dealer or an experienced radio/television technician for
help.
Shielded cables must be used with this equipment to maintain
compliance with FCC regulations.
Caution: Changes or modifications not expressly approved by Xerox
Corporation could void the user’s authority to operate the equipment.
Appendix F: Environmental Specifications
❖
F-3
Environmental Specifications
Compliance
Statement for
International Users
Canadian EME Regulations:
This digital apparatus does not exceed the Class B limits for radio noise
emissions from digital apparatus set out in the radio interference
regulations of the Canadian Department of Communications.
Cet appareil numérique est conforme aux limites d’émission de bruits
radioélectriques pour les appareils de Classe B stipulées dans le
Réglement sur le brouillage radioélectrique du Ministère des
Communications du Canada.
European EME Regulations:
“The CE marking applied to this product symbolizes Rank Xerox
Declaration of Conformity with the following applicable Directives of
the European Union as of the dates indicated:
January 1, 1995: - Council Directive 73/23/EEC amended by Council
Directive 93/68/EEC, approximation of the laws of the member states
related to low voltage equipment.
January 1, 1996: - Council Directive 89/336/EEC, approximation of the
laws of the member states related to electromagnetic compatibility.
A full declaration, defining the relevant Directives and referenced
standards can be obtained from your Rank Xerox representative.”
F-4 ❖
DocuPrint 4512/4512N User Guide
Environmental Specifications
Operational Safety
Your Xerox equipment and supplies were designed and tested to meet
strict safety requirements. These include safety agency examination,
approval, and compliance with established environmental standards.
Attention to the following notes ensures the continued safe operation of
your equipment.
Always connect the equipment to a properly grounded power source
receptacle. If in doubt, have the receptacle checked by a qualified
electrician.
WARNING: Improper connection of the equipment grounding
conductor can result in electrical shock.
Always follow all warnings and instructions marked on, or supplied
with, the equipment.
Always locate the equipment on a solid support surface with adequate
strength for the weight of the machine.
Always exercise care in moving or relocating the equipment.
Always place the equipment in an area which provides adequate room
area for ventilation and servicing.
Always use the materials and supplies specifically designed for your
Xerox equipment. Use of unsuitable materials may result in poor
performance and, possibly, a hazardous situation.
Never use a ground adaptor plug to connect the equipment to a power
source receptacle that lacks a ground connection terminal.
Never attempt any maintenance function that is not specifically
described in this documentation.
Never obstruct ventilation openings. These are provided to prevent
overheating.
Never install the equipment near a radiator or any other heat source.
Never override or “cheat” electrical or mechanical interlock devices.
Never push objects of any kind into the ventilation openings.
Never operate the equipment if you notice unusual noises or odors.
Disconnect the power cord from the power source receptacle and
contact your dealer or Xerox / Rank Xerox to correct the problem.
Appendix F: Environmental Specifications
❖
F-5
Environmental Specifications
If you need any additional safety information concerning the equipment
or materials, contact your dealer or Xerox / Rank Xerox.
WARNING: Use of controls, adjustments, or performance of
procedures other than those specified herein may result in a hazardous
radiation exposure.
This product will produce less than 0.1 ppm ozone during normal
operation. The ozone produced is dependent on copy volume and is
heavier than air. Providing the proper environmental parameters as
specified by Xerox will ensure that concentration levels meet safe limits.
If additional information concerning ozone is needed, request the Xerox
publication (600P83222), “Ozone,” by calling in the USA
1-800-828-6571.
F-6 ❖
DocuPrint 4512/4512N User Guide
Environmental Specifications
Laser Safety
WARNING: Use of controls or adjustments or performance of
procedures other than those specified herein may result in hazardous
light exposure.
This equipment complies with appropriate safety standards.
With specific regard to lasers, the equipment complies with laser
product performance standards set by governmental, national, and
international agencies as a Class 1 laser product. It does not emit
hazardous light as the beam is totally enclosed during all phases of
customer operation and maintenance.
When you perform various operator functions, laser danger labels may
be visible. These labels are for your dealer or service technician and are
placed on or near panels, or shields, which require a tool for removal.
THESE PANELS ARE NOT TO BE REMOVED BY USERS OF
THE PRINTER. THERE ARE NO USER SERVICEABLE AREAS
INSIDE THESE COVERS.
Laser Safety
Warning for Finland
and Sweden
Luokitus on tehty standardin EN 60825 mukaisesti
Klassningen är gjord i enlighet met standarden EN 60 825
LUOKAN 1 LASERLAITE
KLASS 1 LASER APPARAT
VAROITUS!
Laitteen käyttäminen muulla kuin tässä käyttöohjeessa mainitulla
tavalla saattaa altistaa käyttäjän turvallisuusluokan 1 ylittävälle
näkymättömälle lasersäteilylle.
VARNING!
Om apparaten används på annat sätt än i denna bruksansvisning
specficerats, kan användaren utsättas för osynlig laserstrålning, som
överskrider gränsen för laserklass 1.
Appendix F: Environmental Specifications
❖
F-7
F-8 ❖
DocuPrint 4512/4512N User Guide
Index
XI
A
A4 message
On Control Panel display 6-15
Adv Fnctns item
Changing 3-12
Described 3-23
Advanced functions, see Adv Fnctns item
AppleTalk 1-4
AppleTalk/Serial Interface board
Installing B-8 to B-9
Auto message
On Control Panel display 6-15
Autofeed pickup area
Cleaning 7-10
B
Baud Rate item
Changing 3-13
Described 3-23
Bind item
Changing 3-9
Described 3-23
Examples 2-15
Index ❖
IX-1
C
Binding, see Bind option
Bitmap
Fonts 4-3
C
Cleaning Felt
Replacing 7-2, 7-5
Cleaning the printer 7-9 to 7-12
Config Menu 3-6, 3-11, 3-12, 3-13, 3-14, 3-15, 3-16, 3-17, 3-18, 3-19, 3-23, 3-24, 3-25
Config. Sheet item
Selecting 3-17
Configuration Sheet 1-5
Printing 3-17
Control Panel
Changing language displayed 3-16
Display 3-3
Indicator lights 3-3
Keys 3-4 to 3-5
Location of 1-3
Menu system 3-6
Purpose of 3-2
Control Panel messages 6-15 to 6-18
Controller board
Location of 1-3
Cooling fan outlet
Location of 1-3
Copies item
Changing 3-8
Described 3-23
Corotron cleaner
Location of 1-3
Using 7-10 to 7-12
Corotron wires
Cleaning 7-10 to 7-12
Main corotron 7-10 to 7-11
Transfer corotron 7-12
Cover Open message
On Control Panel display 6-15
D
Data Bit item
Changing 3-13
Described 3-23
IX-2 ❖
DocuPrint 4512/4512N User Guide
E
Data Clear message
On Control Panel display 6-15
Data Loss Error message
On Control Panel display 6-15
Data Memory Full message
On Control Panel display 6-15
Demo Page Mode
Entering 3-21
DocuPrint 4512
Specifications C-2 to ??
Drum Near End message
On Control Panel display 6-15
DTR Polarity item
Changing 3-15
Described 3-23
Duplex item
Changing 3-8
Described 3-24
Duplex printing 1-4
Binding options 2-15
Manual paper feed 2-9
Paper tray loading 2-6
E
Emulation
Switching 1-4
Emulation item
Changing 3-10
Described 3-24
Envelope Tray
Adjusting 2-7
Installing B-12
Loading 2-7
Envelopes
Loading 2-7
Manual feeding 2-10
Specifications 2-3
Ethernet 1-4
Ethernet Interface board
Installing B-10 to B-11
EV message
On Control Panel display 6-16
:
❖
IX-3
F
F
Font Number item
Changing 3-8, 4-6
Described 3-24
Fonts
Bitmap 4-3
Downloading 4-7
Intellifont 4-3
PostScript 4-4
TrueType 4-3
Front cover
Location of 1-3
Fuser cover
Location of 1-3
H
High Capacity Feeder connector
Location of 1-3
High Speed item
Changing 3-12
Described 3-24
I
I/F Board Error message
On Control Panel display 6-18
Intellifont
Fonts 4-3
Interface Error message
On Control Panel display 6-16
J
Job Menu 3-6, 3-9, 3-10, 3-11, 3-12, 3-13, 3-14, 3-15, 3-16, 3-17, 3-18, 3-19, 3-24, 3-25
L
Labels
Manual feeding 2-10
Specifications 2-3
LE message
On Control Panel display 6-16
LL message
On Control Panel display 6-16
Lower paper tray
Location of 1-3
IX-4 ❖
DocuPrint 4512/4512N User Guide
M
M
Main corotron
Cleaning 7-10 to 7-11
Manual feed guide
Adjusting 2-8
Envelope feeding 2-10
Fitting 2-8
Label feeding 2-10
Location of 1-3
Paper feeding
Duplex 2-9
Simplex 2-9
Transparency feeding 2-11
Manual feed slot
Location of 1-3
Manual Set item
Changing 3-11
Described 3-24
Media
Specifications 2-3
Memory
Expanding 1-5
Installing B-3 to B-5
Requirements 1-7
Menu system 3-6
Message item
Changing 3-16
Described 3-24
Misc Menu 3-6, 3-15, 3-16, 3-24, 3-25
MultiGray enhancement 1-6
O
Output tray 2-13
P
Page P item
Changing 3-9
Described 3-24
Page protection, see Page P item
Paper
Specifications 2-3
Storage of 2-4
Paper Jam message
On Control Panel display 6-16
:
❖
IX-5
Paper jams 6-19 to 6-21
Causes 6-19
Clearing 6-20 to 6-21
Locating 6-19
Paper Out Lower message
On Control Panel display 6-16
Paper Out message
On Control Panel display 6-16
Paper Out Upper message
On Control Panel display 6-16
Paper output tray
Location of 1-3
Paper trays
Adjusting 2-5
Loading
Duplex 2-6
Simplex 2-6
Location of 1-3
Overview 1-4
Tray switching 2-14
Parallel interface
Location of 1-3
Parity item
Changing 3-14
Described 3-25
Pause message
On Control Panel display 6-17
PCL 5e Demo Page 1-5
Printing 3-18, 3-21
PCL 5e Demo Page item
Selecting 3-18
PCL 5e emulation
Printer drivers 5-2
PCL 5e Font List 1-5
Printing 3-17, 4-5
PCL 5e Font List item
Selecting 3-17
PCL 5e message
On Control Panel display 6-17
PCL printer commands D-2
Photoconductor / Drum
Life of drum 7-6
Recycling 7-8
Replacing 7-6 to 7-8
IX-6 ❖
DocuPrint 4512/4512N User Guide
P
PO message
On Control Panel display 6-17
PostScript
Fonts 4-4
Printer drivers 5-3
PostScript board
Installing B-6 to B-7
PostScript Demo Page, see PS2 Demo Page
PostScript Font List, see PS2 Font List
PostScript option, see PostScript board
Power cord connector
Location of 1-3
Power Saver Mode
Setting 3-20
Power Saver mode 1-6
Power saving 1-6
Power switch
Location of 1-3
Print density
Adjusting 2-12
Print density adjuster
Location of 1-3
Using 2-12
Printer drivers
PCL 5e emulation 5-2
PostScript 5-3
Printing Menu 3-6, 3-8, 3-9, 3-10, 3-11, 3-12, 3-13, 3-14, 3-15, 3-16, 3-17, 3-18, 3-19, 3-23, 3-24
Prt Screen item
Changing 3-15
Described 3-25
PS2 Demo Page
Printing 3-19, 3-21
PS2 Demo Page item
Selecting 3-19
PS2 Font List 1-5
Printing 3-18, 4-5
PS2 Font List item
Selecting 3-18
PS2 message
On Control Panel display 6-17
:
❖
IX-7
R
R
RAM Error message
On Control Panel display 6-18
RAM&IFB Error message
On Control Panel display 6-18
Repl Drum message
On Control Panel display 6-17
Repl Drum&Toner message
On Control Panel display 6-17
Repl Toner message
On Control Panel display 6-17
Resolution item
Changing 3-9
Described 3-25
Robust XON item
Changing 3-14
Described 3-25
ROM Error message
On Control Panel display 6-18
ROM&IFB Error message
On Control Panel display 6-18
ROM&RAM Error message
On Control Panel display 6-18
ROM&RAM&IFB Err message
On Control Panel display 6-18
S
Self Test message
On Control Panel display 6-17
Serial Interface 1-4
Serial Menu 3-6, 3-13, 3-14, 3-15, 3-16, 3-17, 3-18, 3-19, 3-23, 3-25
Serial number
Location of 6-2
SIMMs, see Memory
St Saving item 1-5
Changing 3-10
Described 3-25
IX-8 ❖
DocuPrint 4512/4512N User Guide
T
State saving, see St Saving item
T
Technical support 6-2
Test Menu 3-6, 3-15, 3-16, 3-17, 3-18, 3-19
Token Ring 1-4
Token Ring Interface board
Installing B-10 to B-11
Toner Cartridge
Life of cartridge 7-2
Recycling 7-5
Replacing 7-2 to 7-5
Toner density 2-12
Toner Low message
On Control Panel display 6-17
Top cover
Location of 1-3
Top cover release lever
Location of 1-3
Transfer corotron
Cleaning 7-12
Transparencies
Manual feeding 2-11
Specifications 2-3
Transporting the printer 7-13
Tray Extension
Inserting 2-13
Location of 1-3
Tray release buttons
Location of 1-3
Tray switching 2-14
Troubleshooting
Paper problems 6-7
PostScript printing errors 6-6
Power problems 6-3
Print character problems 6-7
Print data not received 6-3 to 6-4
Print quality problems 6-8 to 6-14
Print speed problems 6-7
Printing errors 6-5 to 6-6
TrueType
Fonts 4-3
:
❖
IX-9
U
U
Upper paper tray
Location of 1-3
W
Warn Msg item
Changing 3-11
Described 3-25
Warning message, see Warn Msg item
X
Xerox Font Manager 4-2
IX-10 ❖
DocuPrint 4512/4512N User Guide