1
System
Requirements
2
Chapter 1
Introduction
Welcome!
Where to find helpful information
Introduction to the Document WorkCentre 450c
WorkCentre features
Control panel keys
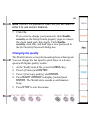
How to navigate the WorkCentre menus
Using the numeric keypad
Understanding the document flow icons
Using the ControlCentre software
Setting the ControlCentre properties
Selecting and Ordering Supplies
WorkCentre 450c Specifications
Keypad Character Assignments
Keypad character assignments for North and South
America
Keypad character assignments for Europe
3
Welcome!
Thank you for choosing the Xerox Document WorkCentre
450c, the dependable and efficient multi-function device
that handles your office tasks with ease. The WorkCentre
works the way you do, performing more than one job at a
time.
Using the WorkCentre, you can:
• Send and receive paper and electronic faxes
• Print color and black-and-white documents
• Copy, collate, reduce, and enlarge documents
• Scan paper documents and convert them to fully
editable electronic documents
The WorkCentre CD-ROM includes Xerox Pagis™ Pro 97
and TextBridge™ Pro software. Using Pagis Pro you can
scan, organize, and retrieve the documents in your office.
TextBridge optical character recognition software lets you
easily convert your paper documents to electronic
documents, while retaining text formatting and pictures.
4
Where to find helpful information
Document WorkCentre 450c Quick Installation &
Quick Reference Guide
Step-by-step instructions explain how to set up the
WorkCentre, install the ControlCentre™ software,
and perform frequently used tasks.
Document WorkCentre 450c Guided Tour
An online introduction to the WorkCentre 450c and
its ControlCentre software. To run the guided tour,
click the Help button in the WorkCentre Status
window and then double-click the WorkCentre 450c
Guided Tour.
Document WorkCentre 450c Online Help
Concise explanations and procedures on
WorkCentre tasks and features. To open Help, click
the Help button in the WorkCentre Status window.
Document WorkCentre 450c User Guide
This online guide provides complete instructions on
how to use the WorkCentre, descriptions of
maintenance and troubleshooting tasks, and
reference information.
5
To obtain a printed version of the guide, use the
order form included with the WorkCentre.
Pagis Pro Multimedia Tutorial
A comprehensive and entertaining summary of the
features and benefits of Pagis Pro 97. To run the
tutorial, insert the WorkCentre 450c CD-ROM,
open the folders (directories):
English\Pagis\Tutorial
Double-click Tutorial.exe. For best results, your PC
should be equipped with a sound card and
multimedia speakers.
http://www.teamxrx.com
Visit the Document WorkCentre 450c Web Site for
product and technical information.
1-800-TEAM XRX
(United States and Canada only)
For technical help, call the Xerox Customer Support
Center.
6
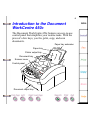
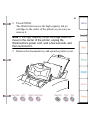
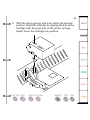
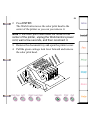
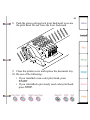
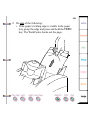
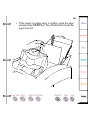
Introduction to the Document
WorkCentre 450c
The Document WorkCentre 450c features an easy-to-use
control panel that simplifies your routine tasks. With the
press of a few keys, you fax, print, copy, and scan
documents.
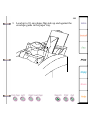
Paper tray extension
Paper tray
Printer output tray
Document tray
Scanner cover
Control panel
Document output tray
7
Using the ControlCentre software, you can efficiently
monitor the WorkCentre’s status from your PC, change any
of the default settings, and set up a Phonebook of speed dial
numbers.
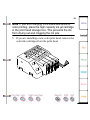
WorkCentre features
The WorkCentre 450c’s advanced design lets you easily
access its components. Its compact size allows the
WorkCentre to fit into any office environment.
The control panel includes function keys, a numeric
keypad, document flow icons, and a liquid crystal display
(LCD) that shows menus and system messages.
Control panel keys
Press this key To do this
SCAN
MODE
FEED
Automatically run the scanning application on
your PC.
Switch among the print modes: print & fax,
offline, printer only.
Load a single sheet of paper into the printer,
or clear a jammed page from the printer.
8
Press this key To do this
CARTRIDGE
COPY
SIZE
JOB STATUS
COVER PAGE
CONFIRM
CONTRAST
RESOLUTION
LEFT ARROW
RIGHT ARROW
Switch among the cartridge maintenance
options: change, clean, replace color head.
Start a copy job.
Switch among the resize options for copies:
95%, 100% (same size), enlarge 125%,
enlarge 150%, 75%, 80%, 85%, 90%.
Display the WorkCentre’s active and pending
jobs.
Toggle the fax cover page option on and off.
Toggle the fax confirmation report feature on
and off.
Switch among the contrast settings for outgoing faxes and copies: lighten, normal, darken,
photo lighten, photo normal, photo darken.
Switch among the resolution settings for outgoing faxes: standard, fine, superfine.
Display the previous menu or option, or when
entering text, move the cursor one position to
the left.
Display the next menu or option, or when
entering text, move the cursor one position to
the right.
9
Press this key To do this
EXIT/CLEAR
ENTER
MENU
SPEED DIAL
PAUSE
REDIAL
HELP
STOP
START
Display the previous menu. When entering
text, delete the blinking character or, if the
cursor is to the right of the text, delete the last
character.
or
Clear a document from the scanner.
Choose a menu and display its submenu or
options, or choose the option or text you
entered.
Display the first top-level menu.
Enter a speed dial number from your Phonebook.
Insert a timed interval in the dialing sequence.
Redial the last fax number dialed, combine
several numbers during a single dialing
sequence, or add a plus (+) to a speed dial
entry in a Phonebook.
Print the WorkCentre menus and the current
default settings.
Halt a process or exit the menu system.
Begin the specified job.
10
How to navigate the
WorkCentre menus
Using control panel keys and the numeric keypad, you can
easily navigate the WorkCentre menus. As you navigate the
menus, the LCD displays the options you can choose and
provides helpful prompts to guide you.
To access the WorkCentre menu system, press the MENU
key. The first top-level menu displays:
Menu (1-6)
1 Fax job
To display the second top-level menu, press the RIGHT
ARROW key or the 2 key:
Menu (1-6)
2 Reports
Press the ENTER key to choose the Reports menu and
display the first Reports menu:
Reports (1-2)
1 Print report
11
Press ENTER to choose the Print report menu and display
the first Print report option:
Print report (1-6)
1 Activity
Press ENTER to choose Activity.
At any time you can press the EXIT/CLEAR key to display
the previous menu or press the STOP key to exit the
menus.
Note: To print a diagram of the WorkCentre menus,
press the HELP key.
Using the numeric keypad
You use the numeric keypad to enter numbers, letters, and
symbols. Most WorkCentre tasks require a numeric entry,
for example, a fax number. To enter a number at the control
panel, press the number key you want.
The primary letters corresponding to each number key are
shown above the key. Additional characters and symbols
are also assigned to each key on the numeric keypad.
12
To enter a letter or symbol, you repeatedly press the
appropriate key until the character you want displays on the
LCD. For example, to enter the letter “C,” press the 2 key
three times.
Understanding the
document flow icons
Document flow icons indicate when the WorkCentre is
receiving and sending information.
Indicator lights between the telephone and WorkCentre
icons illuminate when a fax is being sent or received. When
you’re printing or scanning, the indicator lights between the
PC and the WorkCentre icons illuminate.
13
Using the ControlCentre software
The ControlCentre software on your PC enables you to
easily view the WorkCentre’s status and change any of the
WorkCentre’s default settings. For faster dialing when
sending faxes, you can use the ControlCentre to set up your
Phonebook of speed dial numbers. You can also get help
quickly on a particular task or dialog box from the
ControlCentre.
When you start Windows, the WorkCentre 450c icon
automatically displays in the notification area on the
taskbar. (In Windows 3.1/3.11, the icon displays on the
desktop.)
The icon’s appearance indicates the WorkCentre’s
condition.
The WorkCentre is ready to use. You can fax, copy,
print, or scan a document.
The WorkCentre is not operational and requires
your immediate attention. For example, you might
need to load paper or clear a jam.
14
The WorkCentre is operational, but will soon need a
replacement part. For example, the ink supply may
be running low and you’ll need to install a new ink
cartridge.
Note When you move the mouse pointer over the
WorkCentre icon in Windows 95, a ToolTip window
displays. The ToolTip provides a brief description of
the WorkCentre’s status.
To open the ControlCentre on your PC, do one of the
following:
• In Windows 95, double-click the WorkCentre icon
in the notification area on the taskbar.
• In Windows 3.1 or 3.11, double-click the
WorkCentre icon on your desktop.
Note You can also find the WorkCentre icon in the
WorkCentre 450c program folder (program group)
and Windows Control Panel.
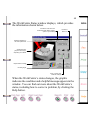
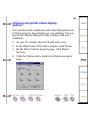
15
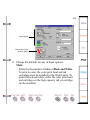
The WorkCentre Status window displays, which provides
the information shown below.
Conditions under which the
W orkCentre 450c Status window
opens on your desktop
Doc ument
flow ic ons
Mess age displayed on
the c ontrol panel LCD
W orkCentre 450c
graphic that changes ,
depending on its status
Helpful status mes sage
Ink level gauges
Photo, contrast, and
resolution s ettings
When the WorkCentre’s status changes, the graphic
indicates the condition and a helpful message appears in the
window. You can find out more about the WorkCentre’s
status, including how to correct a problem, by clicking the
Help button.
16
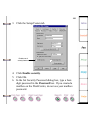
Setting the ControlCentre
properties
Using the ControlCentre Properties dialog box, you can
change the conditions under which the WorkCentre Status
window automatically opens on your desktop. For
example, you can set the window to open any time an error
occurs, such as when the WorkCentre is out of paper or ink.
You also use the dialog box to choose which scanning
application to run when you press the SCAN key on the
WorkCentre control panel.
1. At your PC, do one of the following:
• In Windows 95, click the WorkCentre icon on the
taskbar with the right mouse button and then click
Properties.
• In Windows 3.1 or 3.11, click the WorkCentre icon
on the desktop with the left mouse button and then
click Properties.
17
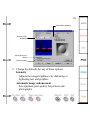
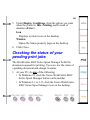
The ControlCentre Properties dialog box displays.
Controls the display of the
W orkCentre 450c Status
window
Displays the W orkCentre icon
on the taskbar (or desktop)
Runs the specified scanning
application when you press the
SCAN key
2. Under Display status window, click one of the
following:
• At start-up, to open the WorkCentre Status window
when you run Windows.
• On error, to open the WorkCentre Status window
when an error occurs.
• On warning to open the WorkCentre Status window
when a warning condition occurs.
18
Note: You can also click one or more of the Display
status window check boxes in the WorkCentre 450c
Status window to change the condition under which
the window opens.
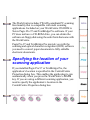
3. To not display the WorkCentre icon on your taskbar or
desktop, do one of the following:
• In Windows 95, click Show icon on the taskbar to
remove the check mark.
• In Windows 3.1 or 3.11, click Show icon on the
desktop to remove the check mark.
You can access the WorkCentre icon from the
WorkCentre 450c program folder (group) and
Windows Control Panel.
4. To choose the scanning application to run
automatically when you press the SCAN key on the
WorkCentre, do the following:
• Click Run scanning application.
• Click the Browse button to find the scanning
application’s location.
19
• Click the application and then click Open.
The application’s location displays in the Run
scanning application box.
5. Click OK
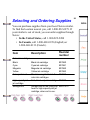
Selecting and Ordering Supplies
20
You can purchase supplies from your local Xerox retailer.
To find the location nearest you, call 1-800-832-6979. If
your retailer is out of stock, you can order supplies through
Xerox:
• In the United States, call 1-800-822-2200
• In Canada, call 1-800-668-0199 (English) or
1-800-668-0133 (French).
Item
Description
Reorder
number
Color ink cartridges
Black
Cyan
Magenta
Yellow
Color print head
High capacity ink
jet cartridge
Storage box
Black ink cartridge
Cyan ink cartridge
Magenta ink cartridge
Yellow ink cartridge
Black housing that holds the
color ink cartridges
Fast, black-only ink cartridge
8R7660
8R7661
8R7662
8R7663
8R7659
8R7638
Storage box for the color print 60K01010
head or high capacity ink jet
cartridge, when not in use.
21
Plain paper and media
Most types of paper will work well in the WorkCentre,
although some variables in paper composition may affect
print quality. Most high-grade photocopying papers and
cotton bond papers produce good results. You should fully
test a paper before purchasing large quantities.
You can order plain paper and media from your local Xerox
retailer. To find the location nearest you, call 1-800-8326979. If your retailer is out of stock, you can order supplies
through Xerox:
• In the United States, call 1-800-822-2200
• In Canada, call 1-800-668-0199 (English) or
1-800-668-0133 (French).
22
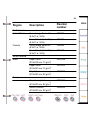
Region
North America
United States
Canada
South America
Brazil
Description
Reorder
number
Xerox Image Series LX
(8.5x11 in, 24 lb)
Xerox Select Ink Jet Paper
(8.5x11 in, 24 lb)
Xerox Image Series LX
(8.5x11 in, 24 lb)
Xerox Select Ink Jet Paper
(8.5x11 in, 24 lb)
3R3874
Papel Xerox
(216x279 mm, 75 g/m2)
Papel Xerox
(210x297 mm, 75 g/m2)
Papel Xerox
(210x297 mm, 90 g/m2)
3R70024
Xerox Laserprint
(210x297 mm, 80 g/m2)
Xerox Colotech
(210x297 mm, 90 g/m2)
3R93556
3R5433
3R4284
3R5433
3R70033
3R70355
Europe
3R93022
23
Other Countries
Xerox Colotech
(210x297 mm, 100 g/m2)
Contact Xerox for correct
reorder numbers
3R91290
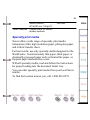
Specialty print media
Xerox offers a wide range of specialty print media:
transparency film, high resolution paper, photogloss paper,
and a fabric transfer sheet.
For best results, use only specialty media designed for the
WorkCentre. Avoid extremely thin paper, thick paper, or
chemically processed paper such as thermal fax paper, as
frequent paper misfeeds may occur.
With all specialty media, read and follow the instructions
for proper loading into the document feeder tray.
You can order specialty print media from your local Xerox
retailer.
To find the location nearest you, call 1-800-832-6979.
24
If your retailer is out of stock, you can order supplies
through Xerox:
• In the United States, call 1-800-822-2200
• In Canada, call 1-800-668-0199 (English) or
1-800-668-0133 (French).
Reorder
number
Size
Description
Letter
(8.5x11 in)
Ink Jet Transparency
(4.2 mil, 20 sheets)
Ink Jet High Resolution Paper
(28 lb, 200 sheets)
double-sided, matte-coated paper
Ink Jet Photo Glossy Paper
(6 mil, 10 sheets)
Ink Jet Fabric Transfer
(10 sheets)
Ink Jet Transparency
(4.2 mil, 20 sheets)
3R5813
Ink Jet High Resolution Paper
(104 g/m2, 200 sheets)
double-sided, matte-coated paper
3R93881
A4
(210x297
mm)
3R5814
3R5877
3R5878
3R93880
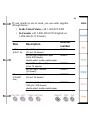
25
Color Ink Jet
(100 g/m2, 100 sheets)
single-sided, matte-coated paper
Ink Jet Photo Glossy Paper
(6 mil, 10 sheets)
Ink Jet Fabric Transfer (10 sheets)
3R93312
3R93882
3R93883
26
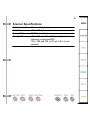
WorkCentre 450c Specifications
General Specifications
Power
Power consumption
Size and weight
Environment
110/220 VAC; 50/60 Hz
14 watts, in idle mode
Height (with trays): 11.5 in (292 mm)
Width: 16.5 in (419 mm)
Depth: 17.25 in (438 mm)
Weight: 18 lbs (8.2 kgs)
Temperature range: 50(F (10(C) to 90(F
(32(C)
Humidity range: 20% to 80%, non-condensing
Fax Specifications
Transmission speed
6 seconds per page (CCITT Document
#1; 14,400 bps, standard resolution)
Memory
23 pages (CCITT Document #1, standard resolution)
Speed dialing
94 individual entries; 5 group entries
Group dial
One-time transmission and pre-programmed
Distinctive ring detection Up to three different ring patterns
27
Fax Specifications (Continued)
Security
Resolution
Document sizes
(for document tray)
Document tray capacity
Modem speed
Compatibility
Data compression
Unprintable area
(Incoming faxes)
Confidential send and receive
300 x 300 dpi
Letter: 8.5x11 in (216x279 mm)
Legal: 8.5x14 in (216x356 mm)
A4: 8.3x11.7 in (210x297 mm)
20 pages
14400, 9600, and 4800 bps
CCITT Group 3, Error Correction Mode
MH, MR, and MMR
Top, left, and right margins: 5 mm
Bottom margin: 10 mm with high
capacity ink jet cartridge; 12.7 mm with
color print head with black ink cartridge
28
Printer Specifications
Technology
Compatibility
Print speed
Resolution
Media sizes (for
paper tray)
Thermal ink jet drop-on-demand
Windows 3.1/3.11, Windows 95, DOS
Black and white High capacity ink jet cartridge:
Up to 6 pages per minute
Color print head with black ink cartridge: Up to
4 pages per minute
Color: Up to 1 page per minute
Black and white: 600 x 600, 600 x 300, and
300 x 300 dpi
Color: 600 x 600 and 300 x 300 dpi
Fax (black and white only): 300 x 300 dpi
Letter: 8.5x11 in (216x279 mm)
Legal: 8.5x14 in (216x356 mm)
A4: 8.3x11.7 in (210x297 mm)
U.S. card stock: 4x6 in, 5x8 in
U.S. No. 10 envelope: 4.12x9.5 in
European DL envelope: 110x220 mm
Paper tray capacity 150 sheets of paper, 20 lb (75 g/m2)
10 sheets of transparency film
10 envelopes
Printer output tray 50 sheets of paper, 20 lb (75 g/m2)
capacity
Emulation
PCL3c
29
Printer Specifications (Continued)
Resident fonts
Character Sets
Unprintable area
(PC printing)
Courier (portrait and landscape)
Pitch: 5, 10, 16.67, 20 cpi
Point size: 6, 12, 24 pt
Univers (portrait and landscape)
Pitch: Proportional
Point size: 6, 12, 24 pt
CG Times (portrait and landscape)
Pitch: Proportional
Point size: 6, 12, 24 pt
HP PC-8, HP Roman-8, PC-8 Dan/Nor ISO 21,
PC-850, ECMA-94 Latin 1 ISO 8859/1, German ISO 21, French ISO 69, Italian ISO 15,
Spain ISO 17, Swedish Names ISO 11, Swedish ISO 10, Norwegian 1 ISO 60, Norwegian 2
ISO 61, Portuguese ISO 16, UK ISO 4, ANSI
ASCII ISO 6, HP-Legal, ISO IRV ISO 2, HP
PC-852, Latin 2 ISO 8859/2, Latin 5 ISO 8859/
9, HP PC-8 Turkish, Cyrillic 3R, Cyrillic 10N
Top, left, and right margins: 5 mm
Bottom margin: 12.7 mm
30
Copier Specifications
Copy speed
Multiple copies
Resolution
Image quality
Contrast
Reduction
Enlargement
Collation
Paper sizes (for
document tray, 20
sheets maximum)
Unprintable area
(Copying)
Up to 3 pages per minute
Up to 99 copies of multi-page originals
300 x 300 dpi
Normal: Bi-level and 4 levels of gray
Halftone: Error diffusion (10 perceptible levels
of gray)
Normal, lighten, darken, photo-normal, photolighten, photo-darken
100% to 75%, in 5% increments
125% and 150%
Yes, user selectable
Letter: 8.5x11 in (216x279 mm)
Legal: 8.5x14 in (216x356 mm)
A4: 8.3x11.7 in (210x297 mm)
Top, left, and right margins: 5 mm
Bottom margin: 10 mm with high capacity ink
jet cartridge; 12.7 mm with color print head with
black ink cartridge
31
Scanner Specifications
Scanner speed
Resolution
Compatibility
Scan to PC
10 seconds per page
300 x 300 dpi
TWAIN-compliant
300 x 300 and 200 x 200 spi, single-bit, uncompressed, compressed MH
300 x 300 and 200 x 200 spi, 4-bit, uncompressed
32
Keypad Character Assignments
Alphabetic characters and symbols are assigned to the keys
on the numeric keypad, which enables you to enter words
at the control panel. For example, if you are adding a
Phonebook entry at the control panel, you can enter the
name that you want to assign to the speed dial number.
This appendix includes the keypad character assignments
for North and South America, and Europe.
33
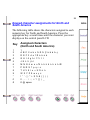
Keypad character assignments for North and
South America
The following table shows the characters assigned to each
numeric key for North and South America. Press the
appropriate key several times until the character you want
displays on the control panel LCD.
Key
Assigned characters
(North and South America)
1
2
3
4
5
6
7
8
9
*
0
#
1
A B C 2 a b c Á Â À Ç á â à ã ç
D E F 3 d e f É é ê è ë
G H I 4 g h i Í Î í î ï
J K L 5 j k l
M N O 6 m n o Ñ ó ô õ ñ ó ô ò õ Œ
P Q R S 7 p q r s
T U V 8 t u v Ú Ü ú ü
W X Y Z 9 w x y z
! “ ‘ ( ) * + $ % & { } ( (
0 , - . / : ; = ? [ ] ( _
# @ space
34
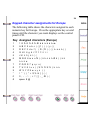
Keypad character assignments for Europe
The following table shows the characters assigned to each
numeric key for Europe. Press the appropriate key several
times until the character you want displays on the control
panel LCD.
Key Assigned characters (Europe)
1
2
3
4
5
6
7
8
9
*
0
#
1 Å Ä À Â Á Ã Æ å ä à â á ã æ
A B C 2 a b c ( ( Ç ( ( ( ( ç ( (
D E F 3 d e f ( ( È ( Ê ( ( ( ( ë è é ê ( (
G H I 4 g h i Ï Î Í Ì ï î í ì
J K L 5 j k l ( (
M N O 6 m n o Ñ ( ( ö ô ó ò õ Ø ñ ( ( ö ô
ó ò õ ø
P Q R S 7 p q r s (
T U V 8 t u v ( ( Ü Ù Û Ú Ù ( ü ú ù
W X Y Z 9 w x y z ( (
! “ ‘ ( ) * + $ % & { } ( (
0 , - . / : ; = ? [ ] ( _ Π( (
space # @
35
Chapter 2
Installation, setup and
maintenance
Connecting the telephone lines
Connecting the power and parallel cables
Using the Setup Wizard to select your fax options
Customizing the Control Panel
Changing the control panel default settings
Maintenance Procedures
Cleaning a color print head or high capacity ink jet
cartridge
Installing a high capacity (black only) ink jet cartridge
Installing the color ink cartridges
Installing a color print head
Replacing the automatic document feed pad
Cleaning the WorkCentre
36
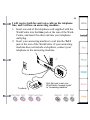
Connecting the telephone lines
There are three telephone line jacks at the rear of the
WorkCentre. To connect the telephone lines properly,
decide how you will use the WorkCentre and then follow
the appropriate steps.
I will receive fax calls only on the telephone line
(dedicated fax machine).
Insert one end of the telephone cord supplied with the
WorkCentre into the Line jack at the rear of the
WorkCentre, and insert the other end into your
telephone wall plug.
37
I will receive both fax and voice calls on the telephone
line, and I will not use an answering machine.
1. Insert one end of the telephone cord supplied with the
WorkCentre into the Line jack at the rear of the WorkCentre, and insert the other end into your telephone
wall plug.
2. Insert your telephone’s cord into the Tel 1 jack at the
rear of the WorkCentre.
38
I will receive both fax and voice calls on the telephone
line, and I will use an answering machine.
1. Insert one end of the telephone cord supplied with the
WorkCentre into the Line jack at the rear of the WorkCentre, and insert the other end into your telephone
wall plug.
2. Insert your answering machine’s cord into the Tel 2
jack at the rear of the WorkCentre. If your answering
machine does not include a telephone, connect your
telephone to the answering machine.
To phone
Hint: Be sure to set your
WorkCentre “answer mode”
to “answering machine”
39
I also want to use a data modem with my PC and
WorkCentre 450c.
Use a phone cord “Y” cable, or splitter at the wall jack.
A splitter has one connector that plugs into your wall
jack, and two jacks that accept phone cables.
Connect a phone cord from your modem’s Line jack to
one jack on the Y cable, and another phone cord from
the WorkCentre’s Line jack to the other jack on the Y
cable. Plug the Y cable connector into your wall jack.
Note Be sure your data modem is not set to “auto
answer”, otherwise it may answer incoming calls
before the WorkCentre 450c. See your modem’s
documentation for more information.
40
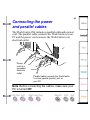
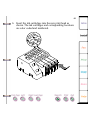
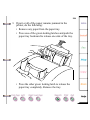
Connecting the power
and parallel cables
The WorkCentre 450c includes a parallel cable and a power
cord. The parallel cable connects the WorkCentre to your
PC and the power cord connects the WorkCentre to an
electrical outlet.
Power
cord to a
grounded
electrical
outlet
Parallel cable connects the WorkCentre
to a free parallel (printer) port on
your PC
Note Before connecting the cables, make sure your
PC is turned Off.
41
1. Attach the parallel cable to the parallel port at the rear
of the WorkCentre, securing it with the wire clips, and
then to a free parallel (printer) port on your PC.
2. Attach the power cord to the power connector at the
rear of the WorkCentre.
3. Plug the cord into a grounded electrical outlet.]
Note In the United States and Canada, use a UL listed and
CSA labeled detachable power cord, 3-conductor, 18
AWG, SJT or SVT type, plug grounding type parallel
blade, cord connector body IEC 320 style to connect to the
WorkCentre. Make sure the electrical outlet is near the
WorkCentre and easily accessible.
The power cord is used as the main disconnect device.
42
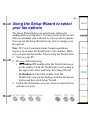
Using the Setup Wizard to select
your fax options
The Setup Wizard helps you select basic options for
sending and receiving faxes. You may have run the wizard
after you installed your software to select your fax options.
You can run the Setup Wizard at any time to change your
fax options.
Note FCC and Communications Canada regulations
require you to enter the WorkCentre’s fax number. Make
sure you provide the number before using the WorkCentre.
1. Turn on your PC.
2. Do one of the following:
• In Windows 95, double-click the WorkCentre icon
on the taskbar. Click the WorkCentre icon located in
the upper left corner and then click Setup Wizard.
• In Windows 3.1 or 3.11, double-click the
WorkCentre icon on the desktop with the left mouse
button and then click Setup Wizard.
3. Follow the instructions on your screen to select the fax
options you want.
43
Customizing the Control Panel
After you’ve been using the WorkCentre for a while, you
may want to change the control panel’s default settings. For
example, you can specify the types of sounds the
WorkCentre makes and the settings for some of the keys on
the control panel.
44
Changing the control panel default settings
1. At your PC, double-click the WorkCentre icon.
2. In the WorkCentre Status window, click Settings.
3. Click the Panel tab.
Specifies language
used to display menus
Defines sounds to activate
and volume levels
Sets defaults for
control panel keys
Automatically collates
copies
Returns options to their
default settings
45
4. Change the defaults for any of these options:
Language
Sets the language used to display the menus on the
WorkCentre’s LCD. The options vary, depending on
the country in which you reside.
Volume
Sets the volume level for the alarm, button, and dial
tone sounds. Options are Low, Medium, and High.
Alarm sound
Sounds an alert tone when an error occurs.
Button sound
Activates a sound each time you press a key.
Listen to dial
Activates an audible dial tone at the start of a call.
Resolution
Sets the sharpness of the outgoing faxes. Options are
standard (200 x 100 dpi), fine (200 x 200 dpi), and
superfine (300 x 300 dpi).
46
Contrast
Adjusts the lightness and darkness of your copies
and outgoing faxes. Options are lighten, normal,
darken, photo lighten, photo normal, and photo
darken.
Size
Reduces or enlarges copies by the percentage you
choose. Options are 95%, 100% (same size),
enlarge 125%, enlarge 150%, 75%, 80%, 85%,
and 90%.
Pause
Defines how the PAUSE key is used. Options are
pause only and dial options. Pause only inserts a
timed interval in a dialing sequence. Dial options
lets you enter a pause, enter a charge code, and
switch to touch-tone dialing if your telephone is set
to pulse (rotary) dialing.
You define the pause length on the Phone Line
property page
Collate copies
Arranges, in sequential order, multiple copies of the
same document.
47
5. Do one of the following:
• Click OK to change the options at the WorkCentre
and close the WorkCentre Settings window.
• Click Apply to change the options at the
WorkCentre and keep the WorkCentre Settings
window open.
Note To use the factory defaults, click the Restore
Defaults button.
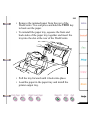
Maintenance Procedures
To keep your WorkCentre in good operating condition, you
need to perform periodic maintenance tasks.
Cleaning a color print head or high capacity ink jet
cartridge
When you notice streaks or lines on your printed pages, you
should clean the color print head or high capacity ink jet
cartridge. If cleaning the head or cartridge two or three
times does not improve your print quality, then you should
replace the color print head or high capacity ink jet
cartridge.
48
1. At the WorkCentre 450c, press the CARTRIDGE key
twice to display [clean] on the LCD.
2. Press ENTER.
A message displays on the LCD while the WorkCentre
is cleaning. When cleaning is complete, you can run a
printer test to check
your print quality.
3. Press the MENU key.
4. Press 6 [Printer] and ENTER.
5. Press 5 [Make test print] and ENTER.
6. Check the test print. If you notice breaks in the ink
coverage, clean the color print head or high capacity
ink jet cartridge again.
49
Installing a high capacity (black only) ink jet
cartridge
The WorkCentre 450c Status window on your PC includes
an ink level gauge which indicates your ink supply. When
the ink supply runs low, the WorkCentre displays a
message in the WorkCentre 450c Status window and on the
control panel LCD. If your print quality is good, press the
START key on the control panel and continue using the ink
jet cartridge.
If you need to replace the high capacity ink jet cartridge,
use the following procedure. You can also use the
procedure to install an ink jet cartridge for the first time,
and to reinstall a previously used ink jet cartridge when
changing from color to black-and-white printing.
Note If you run out of ink while printing faxes or
documents stored to memory, any pages printed
before you change the ink cartridge are lost.
1. At the WorkCentre 450c, press the CARTRIDGE key
to display [change] on the LCD.
50
2. Press ENTER.
The WorkCentre moves the high capacity ink jet
cartridge to the center of the printer so you can you
remove it.
Note If the high capacity ink jet cartridge does not
move to the center of the printer, unplug the
WorkCentre’s power cord, wait a few seconds, and
then reconnect it.
3. Remove the document tray and open the printer cover.
51
4. Pull the green carriage lock lever forward and remove
the cartridge.
Note If you are changing from color to black-andwhite printing, place the color print head in the print
head storage box. This prevents the ink from drying
out and clogging the ink jets.
5. If you are installing a new cartridge, remove the ink jet
cartridge from the box, peel back the foil cover, and lift
out the cartridge. Remove the green nozzle protector
tab and the tape from the cartridge.
52
6. With the green carriage lock lever still in the forward
position, install the cartridge by aligning the hole in the
cartridge with the green post on the printer carriage.
Gently lower the cartridge into position.
53
7. Push the green carriage lock lever backward to secure
the cartridge. Do not force the lever backward.
8. Close the printer cover and replace the document tray.
9. Do one of the following:
• If you installed a new high capacity ink jet cartridge,
press START.
• If you reinstalled a previously used high capacity
ink jet cartridge, press STOP.
The cartridge returns to the home position (far left side of
printer) and the WorkCentre cleans the cartridge. After a
few moments, the printer returns to normal print mode.
If the cartridge does not return to the home position, try
removing and reinstalling the ink jet cartridge.
54
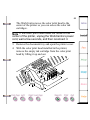
Installing the color ink cartridges
For color printing, the WorkCentre uses four ink cartridges:
magenta, cyan, yellow, and black. The four cartridges are
housed in the color print head. You can replace individual
ink cartridges as needed.
The WorkCentre 450c Status window on your PC includes
ink level gauges which indicate the ink supply in each
cartridge. When the ink supply runs low in a cartridge, the
WorkCentre displays a message in the WorkCentre 450c
Status window and on the control panel LCD. You should
replace the black ink cartridge as soon as possible to ensure
your incoming faxes will continue to print.
Note If you run out of ink while printing faxes or
documents stored to memory, any pages printed
before you change the ink cartridge are lost.
Caution Keep the ink cartridges out of the reach of
children. Do not get the ink near your eyes or mouth.
1. At the WorkCentre 450c, press the CARTRIDGE key
to display [change] on the LCD.
2. Press ENTER.
55
The WorkCentre moves the color print head to the
center of the printer so you can access the color ink
cartridges.
Note If the color print head does not move to the
center of the printer, unplug the WorkCentre’s power
cord, wait a few seconds, and then reconnect it.
3. Remove the document tray and open the printer cover.
4. With the color print head installed in the printer,
remove the empty ink cartridge from the color print
head by lifting it up and out.
56
5. Remove the new ink cartridge from its package.
Slowly remove the protective strip from the cartridge
in the direction of the arrow.
Note Do not touch the uncovered hole in the ink
cartridge, as ink will get on your hands.
6. Insert the ink cartridge into the correct location on the
color print head as shown. The ink cartridges and
corresponding locations are color coded and
numbered.
57
7. Snap the ink cartridge into position.
Caution Do not force the ink cartridge into the print
head.
8. Close the printer cover and replace the document tray.
9. Press the START key.
58
The color print head returns to the home position (far left
side of printer) and the WorkCentre cleans the head. After
a few moments, the printer returns to normal print mode.
If the color print head does not return to the home position,
try removing and reinstalling the head.
Installing a color print head
The WorkCentre displays a graphic in the WorkCentre
450c Status window on your PC and a message on the
control panel LCD when it is time to install a new color
print head. The color print head is the black plastic housing
that contains the color ink cartridges. You can reuse the
same ink cartridges if they still contain ink.
Use the following procedure to replace the color print head.
You can also use the procedure to install a color print head
for the first time, and to reinstall a previously used color
print head when changing from black-and-white to color
printing.
1. At the WorkCentre 450c, press the CARTRIDGE key
three times to display [replace color head] on the LCD.
59
2. Press ENTER.
The WorkCentre moves the color print head to the
center of the printer so you can you remove it.
Note If the color print head does not move to the
center of the printer, unplug the WorkCentre’s power
cord, wait a few seconds, and then reconnect it.
3. Remove the document tray and open the printer cover.
4. Pull the green carriage lock lever forward and remove
the color print head.
60
Note If you are changing from black-and-white to
color printing, place the high capacity ink jet cartridge
in the print head storage box. This prevents the ink
from drying out and clogging the ink jets.
5. If you are installing a new color print head, remove the
color ink cartridges from the print head.
61
6. Insert the ink cartridges into the new print head as
shown. The ink cartridges and corresponding locations
are color coded and numbered.
62
7. Reinstall the print head by aligning the hole in the print
head with the green post on the printer carriage. Gently
lower the print head into position.
63
8. Push the green carriage lock lever backward to secure
the print head. Do not force the lever backward.
9. Close the printer cover and replace the document tray.
10. Do one of the following:
• If you installed a new color print head, press
START.
• If you reinstalled a previously used color print head,
press STOP.
64
The color print head returns to the home position (far left
side of printer) and the WorkCentre cleans the head. After
a few moments, the printer returns to normal print mode.
If the print head does not return to the home position, try
removing and reinstalling the head.
Replacing the automatic
document feed pad
The WorkCentre displays a graphic in the WorkCentre
450c Status window and a message on the control panel
LCD when it’s time to replace the automatic document feed
(ADF) pad. Changes in paper feeding performance also
indicate that you should replace the ADF pad. The ADF pad
allows a single page to be scanned while any remaining
pages stay in the document tray.
To order an ADF pad:
• In the United States, call 1-800-822-2200.
• In Canada, call 1-800-668-0199 (English) or
1-800-668-0133 (French).
1. At the WorkCentre 450c, press the MENU key.
2. Press 5 [Setup] and ENTER.
65
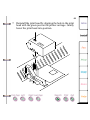
3. Press 9 [Maintenance] and ENTER.
4. Press ENTER to select [Replace ADF pad].
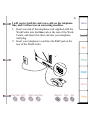
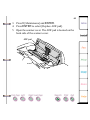
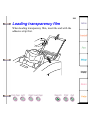
5. Open the scanner cover. The ADF pad is located on the
back side of the scanner cover.
ADF pad
66
6. Squeeze the two sides of the plastic housing that holds
the pad and remove the housing with the pad.
67
7. Replace the ADF pad by inserting the plastic tabs on
the housing into the slots in the back side of the
scanner cover and snapping the pad into place.
8. Close the scanner cover.
9. Do one of the following:
• If you installed a new ADF pad, press START.
• If you reinstalled a previously used ADF pad, press
STOP.
68
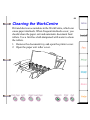
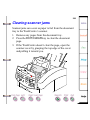
Cleaning the WorkCentre
Dirt and dust can accumulate in the WorkCentre, which can
cause paper misfeeds. When frequent misfeeds occur, you
should clean the paper exit and automatic document feed
rollers. Use a lint-free cloth dampened with water to clean
the rollers.
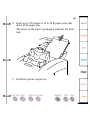
1. Remove the document tray and open the printer cover.
2. Open the paper exit roller cover.
69
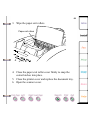
3. Wipe the paper exit rollers.
Paper exit rollers
4. Close the paper exit roller cover firmly to snap the
corner latches into place.
5. Close the printer cover and replace the document tray.
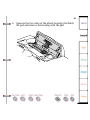
6. Open the scanner cover.
70
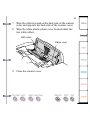
7. Wipe the rollers located on the back side of the scanner
cover and opposite the back side of the scanner cover.
8. Wipe the white plastic platen cover located under the
two white rollers.
ADF rollers
Platen cover
9. Close the scanner cover.
71
Chapter 3
Fax Operations
Sending a Fax
Changing fax settings before sending a fax
Sending a fax to more than one fax number
Sending a fax at a later time
Using a confidential charge code when sending a fax
Switching from pulse to touch-tone dialing during a dialing
sequence
Combining several numbers during a single dialing
sequence
Faxing long documents
Sending confidential faxes
Faxing documents from your PC
Changing the default settings for sending faxes
Changing telephone line dialing options
Using a document carrier
More entries on the following page...
72
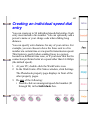
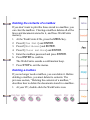
Creating a phonebook of speed dial entries
Creating an individual speed dial entry
Creating a group speed dial entry
Editing a speed dial entry
Deleting speed dial entries
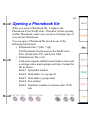
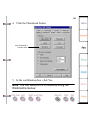
Saving a Phonebook file to your PC
Opening a Phonebook file
Printing a Phonebook of speed dial entries
Receiving Faxes
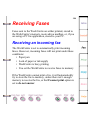
Receiving an incoming fax
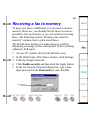
Receiving a fax to memory
Printing a fax stored to memory
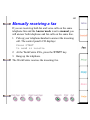
Manually receiving a fax
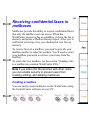
Receiving confidential faxes in mailboxes
Retrieving your faxes and printing them on another fax
machine
Automatically forwarding your faxes
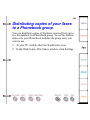
Distributing copies of your faxes to a Phonebook group
More entries on the following page...
73
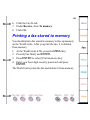
Retrieving documents from another fax machine to the
WorkCentre
Receiving faxes to your PC
Changing the default settings for receiving faxes
Changing telephone line answer options
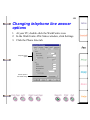
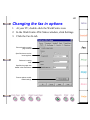
Changing the fax in options
Checking the status of your fax jobs
Canceling a fax job
74
Sending a Fax
You send a fax at the WorkCentre using the keys on the
control panel. By default, the WorkCentre uses standard
resolution and normal contrast.
When sending a fax, you can use the following dialing
methods:
Direct dial
Speed dial
Manual dial
Enter the fax number using the numeric keypad.
Press SPEED DIAL and enter the speed dial number. To use speed dial, you need to create a
Phonebook.
If your telephone is connected to the WorkCentre,
dial the fax number using the telephone handset.
Note Make sure the document you want to fax is free
of rips, wrinkles, folds, staples, paper clips, and sticky
notes.
At any time before sending the fax, you can press the EXIT/
CLEAR key to remove the document from the
WorkCentre.
1. At the WorkCentre 450c, load up to 20 pages face
down in the document tray.
75
2. Do one of the following:
• Using the numeric keypad, enter the fax number.
• To change the fax number, press the LEFT
ARROW key to move the cursor to the left, press
the RIGHT ARROW key to move the cursor to the
right, and press the EXIT/CLEAR key to delete a
highlighted number.
• Press SPEED DIAL and enter the speed dial
number.
Note Depending on your phone system, you may
need to enter a prefix (for example, 8 or 9) and press
the PAUSE key to add a timed interval before entering
the fax number.
3. Press START.
The WorkCentre dials the fax number, sends the fax, and
sounds a confirmation beep when the transmission is
complete. By default, the WorkCentre prints a report if the
fax could not be sent.
To cancel the transmission before the WorkCentre sends
the fax, press the STOP key and then the ENTER key.
76
Changing fax settings before
sending a fax
Before sending a fax, you can change the contrast and
resolution of your document. You can also choose to
include the cover page the WorkCentre provides, and print
a confirmation report after the fax is sent.
You change fax settings using the keys on the WorkCentre
control panel. The settings you change affect the fax you
are sending. After the fax is sent, the WorkCentre returns to
its default settings.
Note At any time before sending the fax, you can
press the EXIT/CLEAR key to remove the document
from the WorkCentre.
1. At the WorkCentre, load up to 20 pages face down in
the document tray.
2. To include a cover page with the fax, press the
COVER PAGE key to display [yes] and then press
ENTER.
77
3. To print a confirmation report after the fax is sent,
press the CONFIRM key to display [yes] and then
press ENTER.
4. Press the CONTRAST key several times to switch
among these options:
For documents with good dark and light values.
For documents that are too dark.
For documents that are too light.
For photographs and documents that contain
different shades of gray.
Photo lighten For photographs and grayscale documents
that are too dark.
Photo darken For photographs and grayscale documents
that are too light.
Normal
Lighten
Darken
Photo normal
When you choose a photo setting, the WorkCentre
automatically sets the resolution to fine if it was
previously set to standard.
5. Press the RESOLUTION key several times to switch
among these options:
Standard
Fine
Superfine
200 x 100 dots per inch.
200 x 200 dots per inch.
300 x 300 dots per inch.
78
Note Fine and superfine assure you of a better quality
fax. However, the fax transmission time is longer,
which may increase your telephone cost. Generally,
standard resolution is good for documents with font
sizes of 10 points and larger; fine and superfine
improve readability of documents with font sizes
smaller than 10 points.
6. Do one of the following:
• Using the numeric keypad, enter the fax number.
To change the fax number, press the LEFT
ARROW key to move the cursor to the left, press
the RIGHT ARROW key to move the cursor to the
right, and press the EXIT/CLEAR key to delete a
highlighted number.
• Press SPEED DIAL and enter the speed dial
number.
7. Press START to begin the fax transmission.
8. If you chose to include a cover page with your fax,
enter the number of pages in the document and then
press ENTER.
To cancel the transmission before the WorkCentre sends
the fax, press the STOP key and then the ENTER key.
79
Sending a fax to more than one fax
number
You can send the same fax to more than one fax number.
You can use a combination of both direct and speed dialing.
Note If you routinely send faxes to the same group of
fax numbers, you can create a group entry in your
Phonebook. Then you can use the SPEED DIAL key
to send the fax quickly to the group of fax numbers.
1. At the WorkCentre 450c, load up to 20 pages face
down in the document tray.
2. Do one of the following:
• Using the numeric keypad, enter the fax number.
To change the fax number, press the LEFT
ARROW key to move the cursor to the left, press
the RIGHT ARROW key to move the cursor to the
right, and press the EXIT/CLEAR key to delete a
highlighted number.
• Press SPEED DIAL and enter the speed dial
number.
80
3. Press ENTER.
4. Repeat step 2 to enter the next fax number.
5. Do one of the following:
• Press ENTER and enter another fax number. The
maximum number of entries is ten.
• Press START to begin the fax transmission.
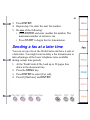
Sending a fax at a later time
You can set up a fax at the WorkCentre and have it sent at
a later time. You might want to delay a fax transmission to
take advantage of the lower telephone rates available
during certain time periods.
1. At the WorkCentre 450c, load up to 20 pages face
down in the document tray.
2. Press the MENU key.
3. Press ENTER to select [Fax job].
4. Press 2 [Dial later] and ENTER.
81
5. Using the numeric keypad, enter the time.
To change the time, press the LEFT ARROW key to
move the cursor to the left, press the RIGHT ARROW
key to move the cursor to the right, and press the EXIT/
CLEAR key to delete a highlighted number.
6. If you are using a 12-hour clock, press RIGHT
ARROW to switch between am and pm.
7. Press ENTER.
8. Enter the fax number and press START.
The WorkCentre stores the document to memory until it
sends the fax at the specified time.
Note If your document remains in the document tray,
the Always send from memory option is not selected
on the ControlCentre’s Fax Out property page. To
select the option, see “Changing the fax out options”
later in this chapter.
82
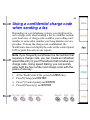
Using a confidential charge code
when sending a fax
Depending on your telephone system, you might need to
use a charge code when sending a fax to a number outside
your local area. A charge code could be your calling card
number or some other number your long-distance service
provides. To keep the charge code confidential, the
WorkCentre does not display the code on the control panel
LCD or print the code on any reports.
Note If you frequently send faxes to a fax number that
requires a charge code, you can create an individual
speed dial entry in your Phonebook that includes your
charge code. Using speed dialing, you can quickly
enter both the fax number and charge code with the
press of one key.
1.
2.
3.
4.
At the WorkCentre 450c, press the MENU key.
Press 5 [Setup] and ENTER.
Press 7 [Control panel] and ENTER.
Press 4 [Pause key] and ENTER.
83
5. Press RIGHT ARROW to display [dial options] and
ENTER.
The WorkCentre sounds a confirmation beep.
6. Press STOP to exit the menus.
7. Load up to 20 pages face down in the document tray.
8. Enter the fax number.
Note If you need to add a pause (timed interval) in the
fax number, press PAUSE and then ENTER. A
comma displays for each pause you add.
9. When you need to enter a charge code, press the
PAUSE key to display the dial options menu.
Dial options
pause
10. Press RIGHT ARROW to display [charge code] and
ENTER.
11. Enter the charge code. A dollar sign ($) displays for
each number in the charge code. The dollar signs
display after the fax number.
84
12. When you are done entering the charge code, press
PAUSE. Any additional numbers you might enter will
display on the LCD.
13. Do one of the following:
• Press START to begin the fax transmission.
• Press ENTER, add another fax number, and then
press START.
Note After the fax is sent, you may want to change
the PAUSE key setting to pause only. Repeat steps
1 through 5 and choose pause only in step 5.
85
Switching from pulse to touchtone dialing during
a dialing sequence
If your phone line uses pulse (rotary) dialing, you can
switch from pulse to touch-tone dialing when sending a fax.
Depending on your telephone system, you may need to use
touch-tone dialing to enter the access number for your longdistance service.
To switch from pulse to touch-tone dialing, you need to
change the PAUSE key setting from pause only (the
default) to dial options. This procedure describes how to
change the PAUSE key setting.
1. At the WorkCentre 450c, press the MENU key.
2. Press 5 [Setup] and ENTER.
3. Press 7 [Control panel] and ENTER.
4. Press 4 [Pause key] and ENTER.
5. Press RIGHT ARROW to display [dial options] and
ENTER.
The WorkCentre sounds a confirmation beep.
6. Press STOP to exit the menus.
86
7. Load up to 20 pages face down in the document tray.
8. Begin dialing the fax number.
9. When you need to switch to touch-tone dialing, press
the PAUSE key to display the dial options.
10. Press the RIGHT ARROW key twice to display [tone
dialing] and then press ENTER. The letter “T”
displays on the LCD, which indicates that the next
number you enter will use touch-tone dialing.
11. Enter the next fax number.
12. Do one of the following:
• Press START to begin the fax transmission.
• Press ENTER, add another fax number, and then
press START.
Note After the fax is sent, you may want to change
the PAUSE key setting to pause only. Repeat steps
1 through 5 and choose pause only in step 5.
87
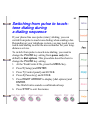
Combining several numbers
during a single dialing sequence
You can combine a fax number, speed dial numbers, and
access numbers during a single dialing sequence. For
example, you may have created a speed dial number for
your long-distance service and another speed dial number
for your charge code your company provides. You could
dial all the numbers at one time to send a fax to a number
that requires the long-distance service.
1. At the WorkCentre 450c, load up to 20 pages face
down in the document tray.
2. To enter the first number, do one of the following:
• Using the numeric keypad, enter the number.
• Press SPEED DIAL and enter the speed dial
number.
3. Press REDIAL to add another number.
4. To enter the next number, do one of the following:
• Using the numeric keypad, enter the number.
• Press SPEED DIAL and enter the speed dial
number.
88
5. Repeat steps 3 and 4 to until you’ve entered the
complete number.
6. Press START.
Faxing long documents
If the document you want to fax is longer than 40 inches,
you must use the WorkCentre’s long original feature. This
feature lets you fax a long document without causing a
paper jam or an error condition. After you’ve faxed the
document, the long original feature is turned off.
If you do not use the long original feature to fax a long
document, the WorkCentre stops scanning the document
and sounds an alarm. Press the START key to continue
scanning the document.
1. At the WorkCentre, load up to 20 pages face down in
the document tray.
2. Press MENU.
3. Press ENTER to select [Fax job].
4. Press 5 [Advanced] and ENTER.
5. Press ENTER to select [Long original].
6. Press RIGHT ARROW to display [yes] and ENTER.
7. Enter the fax number and then press START.
89
Sending confidential faxes
To keep faxes confidential, you can fax them to a mailbox
on a remote WorkCentre, or you can store them to memory
on your WorkCentre. This allows the fax recipient to
retrieve and print the fax when needed.
Sending a fax to a mailbox on a remote
WorkCentre
A WorkCentre 450c can provide up to five mailboxes to
which you can send faxes. To send a fax to a mailbox on
another user’s WorkCentre, a telephone must be connected
to your WorkCentre, and you need to know the remote
user’s mailbox number. After sending the fax, it remains in
the mailbox until the recipient prints it.
See “Receiving faxes,” later in this chapter to learn how to
create and use mailboxes on your WorkCentre.
1. At the WorkCentre 450c, load up to 20 pages face
down in the document tray.
2. Using the telephone connected to your WorkCentre,
lift the handset and dial the fax number.
After the remote WorkCentre answers, you hear a fax
tone sequence.
90
3. When you hear a pause in the tone sequence, press #
and wait for three confirmation tones.
4. Press **1# and the mailbox number.
5. Press ##.
For example, the complete key sequence is as follows:
#**1#mailbox number##
6. After you hear three confirmation tones, press
START.
7. Hang up the telephone.
Note You can send the fax to more than one mailbox
on the same WorkCentre by separating each mailbox
number with the # character. For example, you would
press the following keys to send a fax to mailboxes 1
and 2: #**1#1#2##.
91
Storing documents to memory for retrieval by a
remote fax machine
You can store a document to the WorkCentre’s memory to
have another fax machine retrieve it later. This capability,
called being polled or poll out, lets another fax user choose
when to retrieve the document.
1. At the WorkCentre 450c, load up to 20 pages face
down in the document tray.
2. At the control panel, press START.
3. Press RIGHT ARROW to display [Be polled].
4. Press ENTER.
5. Do one of the following:
• If you will not require the remote user to enter a
password, press ENTER.
• If you will require the remote user to enter a
password (for security), press RIGHT ARROW and
ENTER. Type the password and press ENTER.
Inform the remote user of this password.
6. Press START.
See “Retrieving documents from another fax machine to
the WorkCentre” later in this chapter for information on
how to retrieve a document to the WorkCentre.
92
Faxing documents from your PC
The WorkCentre 450c provides a CCITT-compatible Class
2 interface for sending and receiving fax documents using
your PC. To use the WorkCentre as a fax modem for your
PC, a fax application must be installed on your computer.
If you are running Windows 95, you can install Microsoft
Fax or Symantec Winfax Pro 7.5. If you are running
Windows 3.1/3.11, install Symantec WinFax Lite 4.0
(provided with the WorkCentre 450c) or Symantec WinFax
Pro 4.0.
When sending faxes, you can fax a paper document from
the WorkCentre, or an electronic document using your
PC’s fax software.
Setting up Microsoft Fax to send faxes
from your PC
Before you can fax a document using Microsoft Fax, you
need to set up the WorkCentre 450c as your fax modem.
1. Click the Start button, point to Programs, and then
click Microsoft Exchange. The Inbox window for
Microsoft Exchange opens.
93
2. Click Tools, point to Microsoft Fax Tools, then click
Options.
3. Click the Modem tab.
4. In the Available Fax Modems box, click Xerox
WC450c Class 2 Fax Modem and then click the Set as
Active Fax Modem button.
Note The WorkCentre 450c supports MR
compression. However, the Enable MR compression
option in the Microsoft Fax Advanced dialog box does
not work.
5. Click OK.
6. In the Inbox window, click File and then click Exit.
Sending a fax using Microsoft Fax
You fax a document directly from the software application
you used to create it.
1. Open the document in your software application. For
example, open a document in Microsoft Word.
2. Click the application’s File menu and then click Print.
3. In the Name box, select Microsoft Fax and then click
OK. The Compose New Fax wizard opens.
94
4. Use the Compose New Fax wizard to specify the fax
information and send the fax.
Note If you experience problems using your current
version of Microsoft Fax, you can download Windows
Messenging (a newer version of Microsoft Exchange)
from the Microsoft Web site:
http://www.microsoft.com
95
Changing the default settings for
sending faxes
Using the ControlCentre software on your PC, you can
easily change the default settings for sending faxes. The
WorkCentre 450c is configured with the following factory
defaults for sending faxes:
Fax Out
Options
Setup/Comm
Options
Phone Line
Dialing Options
Option
Add cover page
Include send header
Include cover page and send header
Retry failed faxes
Always send from memory
Default setting
No
Yes
No
Yes
Yes
If memory fills
Fax number
Name
Date format
Time format
Maximum fax speed
ECM (error correct mode)
Continue fax job
User specified
User specified
MM/DD/YY
12-hour
14400 bps
Yes
Redials
Redial interval (min)
Pause length (secs)
Dial mode
Detect dial tone
5
5
2
Tone
Yes
96
Changing the fax out options
1. At your PC, double-click the WorkCentre icon.
2. In the WorkCentre Status window, click Settings.
3. Click the Fax Out tab.
Faxes a separate
cover page, prints a
send header on each
faxed page, or does
b th
Resends a fax
whose transmission
f il d
Sends the fax from
memory
Continues or ends the
fax job if there isn’t
enough memory
Returns options to
their default settings
97
4. Change the defaults for any of these options:
Add cover page
Faxes a separate page that includes the
WorkCentre’s name and fax number, the date and
time of the fax transmission, the recipient’s name (if
specified in your Phonebook) and fax number (from
your Phonebook or entered using the numeric
keypad), and the number of pages being faxed. The
cover page is the first faxed page.
Include send header
Prints the WorkCentre’s name and fax number, the
date and time of the fax transmission, the recipient’s
fax number, and the page number at the top of each
faxed page.
Include cover page and send header
Faxes a separate cover page and prints header
information at the top of each faxed page.
Retry failed faxes
Resends a fax whose transmission failed.
98
Always send from memory
Scans the document and stores it to memory until
the fax is sent. This lets you remove your document
from the WorkCentre once it’s scanned.
If memory fills
When sending a fax at a later time or to more than
one fax number, instructs the WorkCentre to either
continue fax job or end fax job if there is not
enough memory to store the entire document. If you
choose continue fax job, the document remains in
the document tray and is sent as memory becomes
available.
5. Do one of the following:
• Click OK to change the options at the WorkCentre
and close the WorkCentre 450c Settings window.
• Click Apply to change the options at the
WorkCentre and keep the WorkCentre 450c Settings
window open.
Note To use the factory defaults, click the Restore
Defaults button.
99
Changing the setup and
communication options
1. At your PC, double-click the WorkCentre icon.
2. In the WorkCentre 450c Status window, click Settings.
3. Click the Setup/Comm tab.
WorkCentre fax
number and name
Specifies the format
used to display the
date and time
Sets maximum fax
speed and error correct
Returns options to
their default settings
100
4. Change the defaults for any of these options:
Fax number
Displays the number specified using the Setup
Wizard. If your fax number changes, you can edit
the number. Do not include parentheses or hyphens
in the number.
Your fax number is included on the send header and
cover page, and displays on the fax machine
receiving your fax.
Name
Type a name for the WorkCentre (optional). The fax
name is included on the send header and cover page.
Date format
Sets the format used for displaying the date on the
control panel LCD and in the WorkCentre 450c
Status window.
Time format
Sets the format used for displaying the time on the
control panel LCD and in the WorkCentre 450c
Status window.
101
Set Date and Time From PC
Click to use the date and time set on your PC for the
WorkCentre.
Maximum fax speed
Sets the maximum speed at which a fax is initially
sent. The WorkCentre automatically lowers the
speed as needed.
ECM (error correct mode)
Monitors the phone line for errors and, if an error
occurs, resends any portion of the document until
the transmission is complete. When using ECM, the
fax transmission time can be longer, but the
complete fax is sent.
Permit remote test
Allows a Xerox Customer Support representative to
perform remote testing on the WorkCentre.
5. Do one of the following:
• Click OK to change the options at the WorkCentre
and close the WorkCentre 450c Settings window.
• Click Apply to change the options at the
WorkCentre and keep the WorkCentre 450c Settings
window open.
102
Note To use the factory defaults, click the Restore
Defaults button.
Changing telephone line dialing
options
1. At your PC, double-click the WorkCentre icon.
2. In the WorkCentre 450c Status window, click Settings.
3. Click the Phone Line tab.
Dialing options
Returns options to
their default settings
103
4. Change the defaults for any of these options:
Redials
Specifies the number of times, from 0 to 9, you want
the WorkCentre to redial a fax number after a failed
fax transmission.
Redial interval (min)
Specifies the interval, from 1 to 255 minutes,
between redials.
Pause length (secs)
Defines the interval, from 1 to 9 seconds, assigned
to the PAUSE key on the control panel. When you
press the PAUSE key in a dialing sequence, a
comma (,) displays on the LCD and the specified
time interval is inserted between the numbers.
Dial mode
Sets the dialing mode to tone if your telephone has
touch-tone capability, or pulse if it doesn’t.
104
Detect dial tone
Instructs the WorkCentre to wait for a dial tone
before sending a fax.
If the phone system does not provide a dial tone
quickly or uses a different type of dial tone, you can
clear Detect dial tone to have the WorkCentre send a
fax without waiting for a dial tone.
5. Do one of the following:
• Click OK to change the options at the WorkCentre
and close the WorkCentre 450c Settings window.
• Click Apply to change the options at the
WorkCentre and keep the WorkCentre 450c Settings
window open.
Note To use the factory defaults, click the Restore
Defaults button.
105
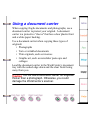
Using a document carrier
When faxing fragile documents and photographs, use a
document carrier to protect your original. A document
carrier is a protective “sleeve” that has a clear plastic front
and a white paper backing.
Use a document carrier when faxing these types of
originals:
• Photographs
• Torn or wrinkled documents
• Thin originals, such as invoices
• Graphic art, such as newsletter paste-ups and
collages
Load the document carrier in the WorkCentre’s document
tray with the sealed edge down and the clear front facing
away from you.
Caution Do not use a document carrier for originals
thicker than a photograph, other wise you could
damage the WorkCentre’s Scanner.
106
Creating a phonebook of
speed dial entries
To use the SPEED DIAL key on the WorkCentre, you need
to create a Phonebook of speed dial entries. Your
Phonebook can include up to 94 individual entries and 5
group entries. The Phonebook identifies the names and fax
numbers assigned to the individual speed dial numbers, and
the people assigned to the group speed dial numbers.
This section explains how to create a Phonebook using the
ControlCentre at your PC.
Note You can also create a phonebook using the
workcentre menus.
107
Creating an individual speed dial
entry
You can create up to 94 individual speed dial entries. Each
entry must include a fax number. You can optionally add a
person’s name or your charge code when dialing long
distance.
You can specify extra features for any of your entries. For
example, you can choose to have the faxes sent to a fax
number at a certain time or at a specific transmission speed.
This feature is useful when sending faxes to a person
located in a different time zone, or if you know that the fax
connection performs better at a speed other than 14.4 Kbps
(the default speed).
1. At your PC, double-click the WorkCentre icon.
2. In the WorkCentre 450c Status window, click Settings.
The Phonebook property page displays in front of the
other property pages.
3. Do one of the following:
• Double-click an unassigned speed dial number (01
through 94) in the Individuals box.
108
• Select an unassigned speed dial number (01 through
94) in the Individuals box and click New.
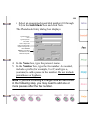
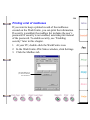
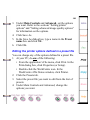
The Phonebook Entry dialog box displays.
Type the person’s
name.
Type the person’s
fax number.
Click a c harge code
button if the fax number
requires a charge code.
Click Use extra
features to send faxes
at a later time or at a
maximum fax speed.
4. In the Name box, type the person’s name.
5. In the Number box, type the fax number. As needed,
include a prefix (for example, 8 or 9) and type a ,
(comma) to add a pause in the number. Do not include
parentheses or hyphens.
Note If you are including a charge code as described
in the following step, you may need to add one or
more pauses after the fax number.
109
6. To include a charge code with the fax number, do one
of the following:
• Click Enter now. Type your charge code in the
Enter charge code box and click OK. The charge
code displays as a series of vertical bars (|) and is
entered automatically when you use the speed dial
number.
• Click Enter later. The letter “C” displays at the end
of the fax number. The WorkCentre will prompt you
to enter the charge code at the control panel when
you use the speed dial number to send a fax.
Note When sending or distributing a fax to a
Phonebook group, the WorkCentre prompts you once
to enter a charge code. The charge code you enter is
used for all the other speed dial entries in the group
that you set up with this feature.
7. If you want to specify a delayed start time or a
maximum fax speed, click Use extra features and do
one or both of the following:
• To send faxes at a specific time, click Dial later. In
the box, type the time using the format for either a
12- or 24-hour clock.
110
Note When sending or distributing a fax to a
Phonebook group, the WorkCentre ignores this
feature.
• To specify a fax speed that is different (usually
lower) than the maximum fax speed set on the
Setup/Comm property page, select a maximum
speed in the Maximum fax speed box.
8. Click OK.
The name and fax number you assigned to the speed
dial number appear in the Individuals box.
9. Click OK on the Phonebook property page.
The speed dial entries you created are saved in the
WorkCentre only. To save a backup copy of your
Phonebook to your PC, see “Saving a Phonebook file to
your PC” later in this chapter. To print the list of entries in
your Phonebook, see “Printing a Phonebook of speed dial
entries” later in this chapter.
111
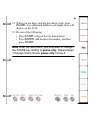
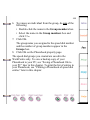
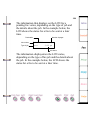
Creating a group speed dial entry
Group speed dial entries enable you to quickly send a fax to
several fax numbers at one time. When you use the group’s
speed dial number, the WorkCentre will send the fax to
each group member.
Before you can create a group speed dial entry, you need to
create the individual entries. See the previous section,
“Creating an individual speed dial entry” for more
information.
You use the speed dial numbers 95 through 99 for group
entries. Each group can consist of a maximum of ten people
and the same person can be in more than one group.
If your Phonebook includes group speed dial entries, you
also can distribute the faxes received from a specific fax
number to one of your speed dial groups. To use this
feature, see “Setting up fax distribution at the WorkCentre”
in this chapter.
1. At your PC, double-click the WorkCentre icon.
2. In the WorkCentre 450c Status window, click Settings.
The Phonebook property page displays in front of the
other property pages.
112
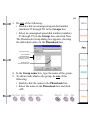
3. Do one of the following:
• Double-click an unassigned speed dial number
(numbers 95 through 99) in the Groups box.
• Select an unassigned speed dial number (numbers
95 through 99) in the Groups box and click New.
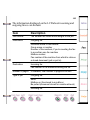
The Phonebook Group dialog box appears, showing
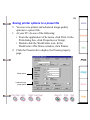
the individual entries in the Phonebook box.
Type a group name.
List of individual
Phonebook entries.
Choose two or more to
create a group entry.
Names of group
members appear here.
4. In the Group name box, type the name of the group.
5. To add an individual to the group, do one of the
following:
• Double-click the name in the Phonebook box.
• Select the name in the Phonebook box and click
-->>.
113
6. To remove an individual from the group, do one of the
following:
• Double-click the name in the Group members box.
• Select the name in the Group members box and
click <<--.
7. Click OK.
The group name you assigned to the speed dial number
and the number of group members appear in the
Groups box.
8. Click OK on the Phonebook property page.
The speed dial groups you created are saved in the
WorkCentre only. To save a backup copy of your
Phonebook to your PC, see “Saving a Phonebook file to
your PC” later in this chapter. To print the list of entries in
your Phonebook, see “Printing a Phonebook of speed dial
entries” later in this chapter.
114
Editing a speed dial entry
Once you’ve created a Phonebook of speed dial entries, you
can change an individual or a group entry at any time.
1. At your PC, double-click the WorkCentre icon.
2. In the WorkCentre 450c Status window, click Settings.
3. On the Phonebook property page, do one of the
following:
• To edit an individual entry, double-click the name in
the Individuals box. Go to step 4.
• To edit a group entry, double-click the name in the
Groups box. Go to step 5.
4. In the Phonebook Entry dialog box, make the changes
you want and then click OK. Refer to “Creating an
individual speed dial entry” as needed. Go to step 6.
5. In the Phonebook Group dialog box, make the changes
you want and then click OK. Refer to “Creating a
group speed dial entry” as needed.
6. Click OK on the Phonebook property page.
115
Deleting speed dial entries
You can delete the individual or group assigned to a speed
dial number, or the entries assigned to all the speed dial
numbers in your Phonebook.
1. At your PC, double-click the WorkCentre icon.
2. In the WorkCentre 450c Status window, click Settings.
The Phonebook property page displays.
Select an entr y and click
Delete to remove it from
your Phonebook.
Click Clear All to delete
all Phonebook entries.
116
3. To delete one entry, do the following:
• Click the individual or group name you want to
delete.
• Click Delete.
• In the confirmation box, click Yes.
4. To delete all the entries, click Clear All and then click
Yes in the confirmation box.
5. Click OK on the Phonebook property page.
Saving a Phonebook file
to your PC
The Phonebook you create is stored in the WorkCentre
only. Any changes you make to your speed dial entries
automatically affect the Phonebook on the WorkCentre.
Therefore, you should save a copy of your original
Phonebook to keep a backup copy on your PC, and to share
the information in it with other applications on your system.
You can create more than one Phonebook, although only
one can be in use at a time.
117
You can save a Phonebook in one of two file formats:
• Phonebook files (*.phn)
Provides a complete backup copy by saving all the
individual and group information in your
Phonebook.
• Delimited text files (*.txt)
Saves all the individual and group information in
your Phonebook. Each field (for example, name or
fax number) is separated with a tab, and each
Phonebook entry is separated with a carriage return.
This format lets you use your Phonebook
information with other PC applications.
1. At your PC, double-click the WorkCentre icon.
2. In the WorkCentre 450c Status window, click Settings.
3. On the Phonebook property page, click Save As.
118
The Save As dialog box displays.
Select a location for
the Phonebook.
Type a Phonebook
name.
Click the arrow next to
Save as type and then
click the type you want.
4. In the Save in box, select a location for the Phonebook.
5. In the File name box, type a name for the Phonebook.
6. Click the arrow next to Save as type and click one of
the following formats:
• Phonebook files (*.phn)
• Delimited text files (*.txt)
7. Click Save.
119
Opening a Phonebook file
When you open a Phonebook file, it replaces the
Phonebook in the WorkCentre. Therefore, before opening
another Phonebook, make sure you have a backup copy of
your current Phonebook.
You can open a Phonebook file saved in one of the
following file formats:
• Phonebook files (*.phn; *.cfg)
The Phonebook format used on the WorkCentre
450c, WorkCenter 250, and Xerox 3006.
• Delimited text files (.txt)
A tab must separate (delimit) each field on a line and
a carriage return must separate each line. Format the
file as shown:
Field 1 Speed dial number
Field 2 Individual (1) or group (2)
Field 3 Individual or group name
Field 4 Fax number
Field 5 Dial later (number of minutes after 12:00
am)
120
Field 6 Fax speed (0=4800, 1=9600, 2=14400)
Field 7 Group members (individual speed dial
numbers, each separated by a comma)
Note For an individual entry, fields 3, 5, and 6 are
optional and field 7 is not required. For a group entry,
fields 4, 5, and 6 are not required. If you omit one or
more fields on a line, be sure to include a tab for each
field that precedes a field containing information.
For example (the ® character represents a tab):
01®1®Denise Franks®3247594
02®1®Jane Brown®3245962®®1
03®1®Taylor Jones®3248835®60®1
95®2®Engineering®®®®01,02.
1. At your PC, double-click the WorkCentre icon.
2. In the WorkCentre 450c Status window, click Settings.
3. On the Phonebook property page, click Open File.
4. In the warning box, do one of the following:
• If the currently displayed Phonebook is saved to a
file, click Yes to open another Phonebook.
121
• If you have not saved the currently displayed
Phonebook, click No. Save your Phonebook using
the procedure described in “Saving a Phonebook file
to your PC” earlier in this chapter.
The Open dialog box displays.
Select the Phonebook’s
location.
Click the arrow next to
Files of type and then
clic k the type you want.
5. Click the arrow next to Files of type and click one of
the following formats:
• Phonebook files (*.phn; *.cfg) to open a Phonebook
saved in Phonebook format.
• Delimited text files (*.txt) to open a text file that
contains Phonebook information.
6. In the Look in box, select the location for the saved
Phonebook.
122
7. Click Open.
The Phonebook property page displays the entries
from the Phonebook you opened.
Printing a Phonebook of speed
dial entries
You can print a Phonebook report that includes the
information about the individual and group speed dial
entries you created.
1. At your PC, double-click the WorkCentre icon.
2. In the WorkCentre 450c Status window, click Settings.
3. Click the Reports tab.
123
4. Click the Phonebook button.
Click Phonebook to
print the report.
5. In the confirmation box, click Yes.
Note You can also print a Phonebook using the
WorkCentre menus.
124
Receiving Faxes
Faxes sent to the WorkCentre are either printed, stored to
the WorkCentre’s memory, received in a mailbox, or, if you
are using a PC fax application, stored to your PC.
Receiving an incoming fax
The WorkCentre is set to automatically print incoming
faxes. However, incoming faxes will not print under these
conditions:
• Paper jam
• Lack of paper or ink supply
• WorkCentre is busy printing
• You set the WorkCentre to receive faxes to memory
If the WorkCentre cannot print a fax, it will automatically
try to store the fax to memory, unless there isn’t enough
memory to receive the fax, or the If cannot print option is
set to do not answer.
125
Receiving a fax to memory
To keep your faxes confidential, you can receive them to
memory. However, you should print the faxes as soon as
possible to free up memory so you can continue receiving
faxes. The following section “Printing a fax stored to
memory” explains how to print stored faxes.
The WorkCentre notifies you when memory is full by
displaying a message on the control panel LCD or printing
a Memory Full report.
1. At your PC, double-click the WorkCentre icon.
2. In the WorkCentre 450c Status window, click Settings.
3. Click the Setup/Comm tab.
4. Click Enable security and then click the Apply button.
5. In the Set Security Password dialog box, type a fourdigit password in the Password box and click OK.
Type a four-digit
pass word
126
6. Click the Fax In tab.
7. Under Receive, click To memory.
8. Click OK.
Printing a fax stored to memory
You should print a fax stored to memory to free up memory
on the WorkCentre. After you print the fax, it is deleted
from memory.
1. At the WorkCentre 450c, press the MENU key.
2. Press 4 [Fax Mail] and ENTER.
3. Press ENTER to select [Print memory doc].
4. Enter your four-digit security password and press
ENTER.
The WorkCentre prints the fax and deletes it from memory.
127
Manually receiving a fax
If you are receiving both fax and voice calls on the same
telephone line and the Answer mode is set to manual, you
will answer both telephone and fax calls on the same line.
1. Pick up your telephone handset to answer the incoming
call. The control panel LCD displays:
Press START
to send or receive
2. At the WorkCentre 450c, press the START key.
3. Hang up the telephone.
The WorkCentre receives the incoming fax.
128
Receiving confidential faxes in
mailboxes
Mailboxes provide the ability to receive confidential faxes
that only the mailbox user can access. When the
WorkCentre receives a fax in a mailbox, it stores the fax to
memory and prints a Mailbox Receipt report. After you’re
notified of receiving a fax, you should print it to free up
memory.
To receive faxes in a mailbox, you need to provide your
mailbox number to other fax senders. You’ll need to enter
your mailbox password to retrieve your faxes from the
mailbox.
To send a fax to a mailbox, see the section “Sending a fax
to a mailbox on a remote WorkCentre 450c.”
Note If you share the WorkCentre with other users,
you can enable security to prevent users from
creating, editing, and deleting mailboxes.
Creating a mailbox
You can easily create mailboxes on the WorkCentre using
the ControlCentre software on your PC.
129
1. At your PC, double-click the WorkCentre icon.
2. In the WorkCentre 450c Status window, click Settings.
3. Click the Mailbox tab.
Click a mailbox
number.
Click New.
4. Do one of the following:
• Double-click an unassigned mailbox number.
• Click an unassigned mailbox number and click New.
5. In the Mailbox dialog box, type the user’s four-digit
password and name, and then click OK.
130
Note If you enabled security, do not use your security
password.
Type a four-digit
password.
Type the mailbox
user’s name.
Click OK.
6. Do one of the following:
• Click OK to create the mailbox on the WorkCentre
and close the WorkCentre 450c Settings window.
• Click Apply to create the mailbox on the
WorkCentre and keep the WorkCentre 450c Settings
window open.
Note You can also create mailboxes using the
WorkCentre menus.
131
Printing the faxes received in a mailbox
To obtain paper copies of your faxes and free up
WorkCentre memory, you should print the contents of a
mailbox. The WorkCentre deletes the faxes after they’re
printed.
1. At the WorkCentre 450c, press the MENU key.
2. Press 4 [Fax Mail] and ENTER.
3. Press 2 [Mailboxes] and ENTER.
4. Press ENTER to select [Print contents].
5. Enter the mailbox password and press ENTER.
The faxes stored in the mailbox begin printing.
Storing a document in a mailbox
You can store a document in a mailbox so a remote fax user
can retrieve the document when needed.
1. At the WorkCentre 450c, load up to 20 pages face
down in the document tray.
2. Press the START key.
3. Press ENTER to select [mailbox retrieve].
4. Enter the mailbox number and press ENTER.
5. Press START.
132
Deleting the contents of a mailbox
If you don’t want to print the faxes stored to a mailbox, you
can clear the mailbox. Clearing a mailbox deletes all of the
faxes and documents stored to it, and frees WorkCentre
memory.
1. At the WorkCentre 450c, press the MENU key.
2. Press 4 [Fax Mail] and ENTER.
3. Press 2 [Mailboxes] and ENTER.
4. Press 3 [Clear mailbox] and ENTER.
5. Enter the mailbox password and press ENTER.
6. Press ENTER to confirm.
The WorkCentre sounds a confirmation beep.
7. Press STOP to exit the menus.
Deleting a mailbox
If you no longer need a mailbox, you can delete it. Before
deleting a mailbox, you must delete its contents. The
previous section, “Deleting the contents of a mailbox,”
describes how to delete the documents stored in a mailbox.
1. At your PC, double-click the WorkCentre icon.
133
2. In the WorkCentre 450c Status window, click Settings.
3. Click the Mailbox tab.
4. In the Mailboxes box, select the mailbox you want to
delete.
Note To delete all the mailboxes at once, click Clear
All.
5. Click Delete.
6. Click Yes to confirm the deletion.
7. Do one of the following:
• Click OK to delete the mailbox from the
WorkCentre and close the WorkCentre 450c
Settings window.
• Click Apply to delete the mailbox from the
WorkCentre and keep the WorkCentre 450c Settings
window open.
Note You can also delete mailboxes using the
WorkCentre menus.
134
Printing a list of mailboxes
If you want to keep a printed record of the mailboxes
created on the WorkCentre, you can print the information.
If security is enabled, the mailbox list includes the user’s
password. If security is not enabled, asterisks print instead
of the password. To enable security, see “Enabling
security” later in this chapter.
1. At your PC, double-click the WorkCentre icon.
2. In the WorkCentre 450c Status window, click Settings.
3. Click the Mailbox tab.
Click Print Mailbox List to
print the list of mailboxes
on the WorkCentre.
135
4. Click Print Mailbox List.
5. In the confirmation box, click Yes.
Note You can also print a mailbox list using the
WorkCentre menus.
Editing a mailbox
You can change both the name and password assigned to a
mailbox.
1. At your PC, double-click the WorkCentre icon.
2. In the WorkCentre 450c Status window, click Settings.
3. Click the Mailbox tab.
4. Do one of the following:
• Double-click the mailbox you want to edit.
• Click the mailbox you want to edit and click Edit.
5. In the Mailbox dialog box, make the changes you want
and then click OK.
6. Do one of the following:
• Click OK to change the mailbox on the WorkCentre
and close the WorkCentre 450c Settings window.
136
• Click Apply to change the mailbox on the
WorkCentre and keep the WorkCentre 450c Settings
window open.
Retrieving your faxes and printing
them on another fax machine
When you’re away from the WorkCentre, you can retrieve
your faxes remotely. Using a touch-tone telephone, you can
retrieve the faxes stored to memory or in a mailbox and
print them on the fax machine near you.
If you are retrieving the faxes from a telephone connected
to a fax machine, you can print the faxes during the same
call. If the fax machine is not connected to the telephone
from which you’re calling, the WorkCentre calls the fax
machine you specify and sends the faxes.
Retrieving your faxes using the telephone
connected to the remote fax machine
1. Lift the telephone handset and wait for a dial tone.
2. Dial your WorkCentre’s fax number.
After the WorkCentre answers, you hear a fax tones.
137
3. When you hear a pause in the tone sequence, press #
and wait for three confirmation tones.
4. Press **3#.
5. Do one of the following:
• If you’re retrieving faxes from your mailbox, press
your mailbox password and ##.
• If you’re retrieving the faxes stored to memory,
press the password used to enable security and ##.
For example, the complete key sequence is:
#**3#password##
6. By default, the WorkCentre deletes the fax after it’s
sent. To change the default, press one of the following:
• 1 to save the fax on your WorkCentre after
transmission.
• 2 to print the fax on your WorkCentre, then delete it
after transmission.
7. Remain on the line until you hear three beeps, which
means the WorkCentre received your request, and then
press the START key on the fax machine.
8. Hang up the telephone.
138
Retrieving your faxes using a telephone not
connected to the remote fax machine
1. Lift the telephone handset and wait for a dial tone.
2. Dial your WorkCentre’s fax number.
After the WorkCentre answers, you hear a fax tone
sequence.
3. When you hear a pause in the tone sequence, press #
and wait for three confirmation tones.
4. Press **4#.
5. Do one of the following:
• If you’re retrieving faxes from your mailbox, press
your mailbox password and #.
• If you’re retrieving the faxes stored to memory,
press the password used to enable security and #.
6. Dial the fax number of the machine you want the faxes
sent to and press ##.
For example, the complete key sequence is as follows:
#**4#password#fax number##
139
7. By default, the WorkCentre deletes the fax after it’s
sent. To change the default, press one of the following:
• 1 to save the fax on your WorkCentre after
transmission.
• 2 to print the fax on your WorkCentre, then delete it
after transmission.
Remain on the line until you hear three beeps, which means
the WorkCentre received your request, and then hang up
the telephone.
Automatically forwarding
your faxes
When you’re away from the WorkCentre, you can have
your faxes automatically forwarded to a fax machine near
you. This lets you continue to receive your faxes regardless
of where you’re located. You can set up fax forwarding at
the WorkCentre or from a remote location.
Setting up fax forwarding at the WorkCentre
1. At your PC, double-click the WorkCentre icon.
2. In the WorkCentre 450c Status window, click Settings.
3. Click the Setup/Comm tab.
140
4. Click Enable security and then click the Apply button.
5. In the Set Security Password dialog box, type a fourdigit password and click OK.
Type a four-digit
password
141
6. Click the Fax Routing tab.
Forwards your faxes to
another f ax number
Specifies the fax number to
forward your faxes to
7. Click Forward all faxes.
8. In the To fax number box, type the fax number you
want your faxes sent to.
142
9. Do one of the following:
• Click OK to change the options at the WorkCentre
and close the WorkCentre 450c Settings window.
• Click Apply to change the options at the
WorkCentre and keep the WorkCentre 450c Settings
window open.
Using fax forwarding from a remote location
If you’re away from your WorkCentre and you didn’t set up
fax forwarding, you can set up the feature if security is
enabled on your WorkCentre and you have access to a
touch-tone telephone.
Setting up fax forwarding from a remote location
Use this procedure to set up fax forwarding for the first time
and to specify a new fax number as your location changes.
1. Lift the telephone handset and wait for a dial tone.
2. Dial your WorkCentre’s fax number.
After the WorkCentre answers, you hear the fax tones.
3. When you hear a pause in the tone sequence, press #
and wait for three confirmation tones.
4. Press **7#.
143
5. Press your four-digit security password and #.
6. Press the fax number you want your faxes forwarded to
and ##.
7. Remain on the line until you hear three beeps, which
means the WorkCentre received your request, and then
hang up the telephone.
The WorkCentre deletes the fax after it’s sent.
Turning off fax forwarding from a remote location
You can turn off fax forwarding when you’ll no longer be
near a fax machine. When you turn off fax forwarding, the
WorkCentre either prints your faxes or stores them to
memory, depending on the Receive option setting.
Note If the Receive option is set To memory, you
should retrieve your faxes as soon as possible to free
up memory.
1. Lift the telephone handset and wait for a dial tone.
2. Dial your WorkCentre’s fax number.
After the WorkCentre answers, you hear the fax tones.
3. When you hear a pause in the tone sequence, press #
and wait for three confirmation tones.
144
4. Press **5#.
5. Press your four-digit security password and ##.
6. Remain on the line until you hear three beeps, which
means the WorkCentre received your request, and then
hang up the telephone.
Turning on fax forwarding from a remote location
If you turned off fax forwarding, you can easily turn it on
again. The WorkCentre will forward your faxes to the last
fax number specified for fax forwarding.
1. Lift the telephone handset and wait for a dial tone.
2. Dial your WorkCentre’s fax number.
After the WorkCentre answers, you hear a fax tone
sequence.
3. When you hear a pause in the tone sequence, press #
and wait for three confirmation tones.
4. Press **6#.
5. Press your four-digit security password and ##.
6. Remain on the line until you hear three beeps, which
means the WorkCentre received your request, and then
hang up the telephone.
145
Distributing copies of your faxes
to a Phonebook group
You can distribute copies of the faxes received from up to
two fax numbers to a Phonebook group. To use this feature,
make sure your Phonebook includes the group entry you
want to use.
1. At your PC, double-click the WorkCentre icon.
2. In the WorkCentre 450c Status window, click Settings.
146
3. Click the Fax Routing tab.
Distributes your faxes
to a Phonebook group
Specifies the sender’s
fax number
Specifies the speed
dial group to distribute
the f axes to
4. Click Distribute faxes.
5. Enter a fax number in the From sender (fax number)
box and the group speed dial number in the To group
box.
147
Note To verify that the sender’s fax number is the
same as the number the WorkCentre receives, select
Include receive header on the Fax In property page
and have the sender fax you a document. Enter the
fax number printed on the fax header in the From
sender (fax number) box.
6. Do one of the following:
• Click OK to change the options at the WorkCentre
and close the WorkCentre 450c Settings window.
• Click Apply to change the options at the
WorkCentre and keep the WorkCentre 450c Settings
window open.
Retrieving documents from
another fax machine to the
WorkCentre
You can retrieve a document that is stored in another fax
machine’s memory. This capability, called polling or poll
in, lets you and other fax users retrieve the same fax from
the remote fax machine, and pay for the cost of the fax call.
148
1. At the WorkCentre 450c, enter the fax number of the
remote machine and press the START key.
2. Press START again.
3. Do one of the following:
• If a password is not required, press ENTER.
• If a password is required, press RIGHT ARROW
and ENTER. Type the password and press ENTER.
4. Press START.
Receiving faxes to your PC
The WorkCentre 450c provides a CCITT-compatible Class
2 interface for sending and receiving fax documents using
your PC. To use the WorkCentre as a fax modem for your
PC, a fax application must be installed on your computer.
If you are running Windows 95, you can install Microsoft
Fax or Symantec Winfax Pro 7.5. If you are running
Windows 3.1/3.11, install Symantec WinFax Lite 4.0
(provided with the WorkCentre 450c) or Symantec WinFax
Pro 4.0.
149
Setting up Microsoft Fax to receive faxes
from your PC
5. By default, the WorkCentre is set to receive incoming
faxes. Before you can receive fax a document using
Microsoft Fax, you need to start Microsoft Exchange
and set up your modem properties.
Note: If you experience problems using your current
version of Microsoft Fax, you can download Windows
Messenging (a newer version of Microsoft Exchange)
from the Microsoft Web site:
http://www.microsoft.com
1. Click the Start button, point to Programs, and then
click Microsoft Exchange. The Inbox window for
Microsoft Exchange opens.
2. Click Tools, point to Microsoft Fax Tools, then click
Options.
3. Click the Modem tab.
150
4. In the Available Fax Modems box, click Xerox
WC450c Class 2 Fax Modem and then click the
Properties button. The Fax Modem Properties dialog
box opens.
5. In the Answer Mode box, click one of the following:
• Answer after # rings. Microsoft Fax receives a fax
after the number of rings you specify. Be sure to set
Microsoft fax to answer the call one to two rings
before the WorkCentre is set to answer the call.
• Manual. You have a telephone attached to the
WorkCentre and you will answer all calls.
• Don’t answer. The WorkCentre 450c receives all
your incoming faxes.
Note The WorkCentre 450c supports MR
compression. However, the Enable MR compression
option in the Microsoft Fax Advanced dialog box does
not work.
6. In the Fax Modem Properties dialog box, Click OK,
then click OK on the Modem Properties page.
151
7. Do not Exit the Inbox. Microsoft Exchange must be
running to receive faxes to your PC.
Note Do not use the Microsoft Fax Request a Fax
wizard to retrieve a document from a remote fax
machine. This capability is an optional feature for
Class 2 modems. The WorkCentre 450c does not
support this feature.
152
Changing the default settings for
receiving faxes
Using the ControlCentre software on your PC, you can
easily change the default settings for receiving faxes.
The WorkCentre 450c is configured with the following
factory default settings
Phone Line
Answer Options
Fax In
Options
Printer
Option
Default setting
Answer mode
Rings to answer
Distinctive ring
Pick-up code
Include receive
Receive
If cannot print
Reduce
Loaded paper size
Fax/copy quality
Automatic
1
No
No
Yes
To print
Receive to memory
Reduce to fit
Letter
Fast
Note You can also change the default settings using
the WorkCentre menus.
153
Changing telephone line answer
options
1. At your PC, double-click the WorkCentre icon.
2. In the WorkCentre 450c Status window, click Settings.
3. Click the Phone Line tab.
Telephone answer
options
Returns options to
their default settings
154
4. Change the defaults for any of these options:
Answer mode
Specifies how the WorkCentre answers a fax. Options
include:
• automatic
You are using a telephone number for fax
communication only (no voice calls). The
WorkCentre answers the call after the number of
rings entered in the Rings to answer box.
• manual
You are using the same telephone number for both
voice and fax calls and you will answer all calls. See
“Manually receiving a fax” earlier in this chapter for
information on how to manually receive a fax.
• answering machine
You are using the same telephone number for both
voice and fax calls and your answering machine will
answer your phone calls. Make sure your answering
machine is set to answer the call within one to four
rings. The WorkCentre automatically answers a fax
call after five rings.
155
Distinctive ring
If your telephone company offers a distinctive ring
service, you can have multiple telephone numbers
on the same phone line. The telephone company
provides a distinctive ring pattern for each telephone
number so you can distinguish which number is
receiving a call. If you are using this service, select a
distinctive ring pattern for the WorkCentre that is
different from your telephone’s ring pattern.
Pick-up code
If you set the Answer mode to answering machine,
you can specify the three-digit code used to switch
between voice and fax communication on the same
telephone line. The code can consist of numbers (09), and the asterisk (*) and pound (#) characters.
Choose a code not in use elsewhere in your phone
system.
You can use the pick-up code in two ways. First,
when you answer your telephone on an extension
line and you hear fax tones, enter the pick-up code to
activate the WorkCentre to receive the fax. Second,
callers can send you a fax instead of leaving you a
voice message by entering your pick-up code to
156
activate the WorkCentre. You need to inform callers
of your pick-up code in your telephone answer
message.
5. Do one of the following:
• Click OK to change the options at the WorkCentre
and close the WorkCentre 450c Settings window.
• Click Apply to change the options at the
WorkCentre and keep the WorkCentre 450c Settings
window open.
Note To use the factory defaults, click the Restore
Defaults button.
157
Changing the fax in options
1. At your PC, double-click the WorkCentre icon.
2. In the WorkCentre 450c Status window, click Settings.
3. Click the Fax In tab.
Prints a header on each
page received
Specifies how to receive
incoming faxes
Reduces incoming
faxes
Specifies the paper size
loaded in the W orkCentre
Returns options to their
default settings
158
4. Change the defaults for any of these options:
Include receive header
Prints the date and time the fax is received, the
number sending the fax, your fax name (if specified)
or your fax number, and the page number at the top
of each page received.
Receive
Specifies how the WorkCentre receives the fax,
either To print or To memory. If you choose to
receive your faxes to memory, you’ll need to print
them as soon as possible to free up memory.
Note To receive faxes to memory, you must click
Enable security on the Setup/Comm property page.
See “Enabling security” later in this chapter.
If cannot print
Instructs the WorkCentre to either receive to
memory or do not answer when it’s unable to print.
For example, the WorkCentre could be out of paper
or ink.
159
Reduce
Reduces the size of the incoming fax. Options
include: reduce to fit, none (100%), legal > letter
(75%), legal > A4 (80%), A4 > letter (90%), and
95%.
Loaded paper size
Specifies the paper loaded in the WorkCentre:
letter, legal, or A4. Be sure the corresponding paper
size is loaded in the WorkCentre. Otherwise, your
faxes may not print completely.
5. Do one of the following:
• Click OK to change the options at the WorkCentre
and close the WorkCentre 450c Settings window.
• Click Apply to change the options at the
WorkCentre and keep the WorkCentre 450c Settings
window open.
Note To use the factory defaults, click the Restore
Defaults button.
160
Enabling security
You need to select the Enable security option if you want
to receive your faxes to memory and forward your faxes to
another fax machine. After you enable security, you must to
enter your password each time you click Settings in the
WorkCentre 450c Status window and when you use secure
features at the WorkCentre.
1. At your PC, double-click the WorkCentre icon.
2. In the WorkCentre 450c Status window, click Settings.
161
3. Click the Setup/Comm tab.
Enables use of
security features
4. Click Enable security.
5. Click OK.
6. In the Set Security Password dialog box, type a fourdigit password in the Password box. If you created a
mailbox on the WorkCentre, do not use your mailbox
password.
162
Note Record the password used, as you will need to
enter it to use secure features.
7. Click OK.
If you want to change your password, click Enable
security on the Setup/Comm property page to remove
the check mark and click Apply. Click Enable
security, click OK, and then type a new password in
the Set Security Password dialog box.
Changing fax quality
The WorkCentre is set to print incoming faxes at fast speed.
You can change the fax speed to print faxes at a slower
speed with higher quality results.
1. At the WorkCentre 450c, press the MENU key.
2. Press 6 [Printer] and ENTER.
3. Press 3 [Fax/copy quality] and ENTER.
4. Press RIGHT ARROW to display [normal] and
ENTER. The WorkCentre sounds a confirmation
beep.
5. Press STOP to exit the menus.
163
Checking the status of your
fax jobs
You can view the status of your fax jobs on the control
panel LCD or the LCD display in the WorkCentre Status
window. The WorkCentre displays active jobs first, then
pending jobs.
1. At the WorkCentre control panel, press the JOB
STATUS key. If you have an active job, its status
displays on the LCD.
2. If you have more than one active job, press the JOB
STATUS key to display the status of each job. At the
end of the active jobs list, the LCD displays:
Pending jobs list ->
STOP to cancel job
3. To display the status of each pending fax job, do one of
the following:
• Press the JOB STATUS key.
• Press the RIGHT ARROW key.
4. To print the first page of the pending fax job displayed
on the LCD, press the START key.
164
The information that displays on the LCD for a
pending fax varies, depending on the type of job and
the details about the job. In the example below, the
LCD shows the status for a fax to be sent at a later
time.
Destination
Number of pages
Job number
7)2132378
Type of job
Send
1P
2:00 pm
Job status
The information displayed on the LCD varies,
depending on the type of fax job and the details about
the job. In the example below, the LCD shows the
status for a fax to be sent at a later time.
165
The information displayed on the LCD about incoming and
outgoing faxes can include:
Item
Description
Job number
The number the WorkCentre assigns to the job.
Destination
Outgoing fax
Individual name or fax number
Group name or number
Number of fax numbers, if you’re sending the fax
to more than one fax machine
Mailbox number
Fax number of the machine from which to retrieve
a stored document (poll or poll in)
Destination
Incoming fax
Fax number of the machine sending the fax
Number of pages
If available, total number of pages to be sent
Type of job
Outgoing fax
Send
Mailbox nn (fax stored to a mailbox)
Be polled (document stored for remote retrieval)
Incoming fax
166
Item
Description
Receive
Poll (retrieving a document from a remote fax
machine)
Job status
Outgoing fax
Pending (queued for dialing)
Redial (waiting to redial)
Stored (waiting to print or be retrieved)
HH:MM am/pm (waiting to be faxed at a later
time)
Incoming fax
Stored (waiting to be polled)
167
Canceling a fax job
You cancel a fax job at the WorkCentre.
1. At the WorkCentre control panel, press the
JOB STATUS key.
2. Do one of the following:
• Press the RIGHT ARROW key until the job you
want to cancel displays.
• Press the JOB STATUS key until the job you want
to cancel displays.
3. Press STOP.
4. If a password is required, type the password and press
ENTER.
5. Press ENTER to confirm that you want to cancel the
job.
168
Chapter 4
Printing Documents
Printing guidelines
Printing a document
Setting printer options
Setting advanced image quality options
Using preset files
Saving printer options to a preset file
Editing the printer options defined in a preset file
Using a preset file for a print job
Deleting a preset file
Using printer services
Checking the status of your current print job
Maintaining the color print head or high capacity ink jet
cartridge
Choosing the printer status display options
Checking the status of your pending print jobs
Loading envelopes
Printing from DOS
169
The WorkCentre provides high quality color and blackand-white printing. You can print on a range of media,
including plain paper, transparency film, and envelopes.
On-screen ink level gauges enable you to easily monitor
your ink supply.
Printing guidelines
Before printing documents on the WorkCentre, review the
following guidelines.
Set the WorkCentre as your default printer
If you didn’t set the WorkCentre as your default printer
during software installation, you’ll want to set it as
your default printer to have your documents
automatically print on the WorkCentre.
• In Windows 95, click the Start button, point to
Settings, and then click Printers. Double-click the
Xerox WorkCentre 400c Series icon, click Printer,
and then click Set as Default.
• In Windows 3.1/3.11, double-click the Print
Manager icon. Click Xerox WorkCentre 400c
Series, click Printer, and then click Set Default
Printer.
170
Choose and load media
For a list of the types of media you can use for printing
and media loading instructions, see Chapter 5, "Copy."
For instructions on how to load envelopes in the
WorkCentre, see "Loading envelopes" later in this
chapter.
Understand the print modes
You can press the MODE key several times to switch
among the options:
Print & fax
Printer only
Offline
To print documents and receive faxes.
To print documents from your PC. Faxes
received at the WorkCentre are stored to
memory.
To disable the printer.
171
Printing a document
You print a document on the WorkCentre from a
Windows application. The WorkCentre prints onesided pages within these margins:
Left:
Right:
5 mm
5 mm
Top:
Bottom:
5 mm
12.7 mm
1. At your PC, open the document you want to print.
2. On the File menu, click Print.
Note If you are using Windows 95, you can also
drag the icon for your document onto a printer
shortcut icon on your desktop. See your Windows
95 documentation for information on creating
shortcuts.
3. In the Print dialog box, choose the options you
want and click OK.
The WorkCentre 400c Series Status window and Spool
Manager display on the Windows taskbar or desktop.
You can open the Status window to view the status of
the current print job or open the Spool Manager to
view the print queue.
172
Setting printer options
Before you print a document, you can change the size and
orientation of the document, select the printing media, and
set the print quality. The settings you choose are used until
you change them.
Note Some applications may override any of the
options you choose.
1. At your PC, do one of the following:
• From the application’s File menu, click Print. In the
Print dialog box, click Properties (or Setup).
• Double-click the WorkCentre icon. In the
WorkCentre 450c Status window, click Printer. The
Main Controls property page displays (see following
page).
173
Printer options
Click to open Printer
Services options
2. Change the defaults for any of these options:
Mode
Prints the document in Color or Black and White.
To print in color, the color print head and ink
cartridges must be installed in the WorkCentre. To
print in black and white, either the color print head
and cartridges or the high capacity ink jet cartridge
can be installed.
174
Type
Selects the image quality to use based on the
contents of the document. Options are Auto, Photo,
Graphics, and Text.
Print quality
Sets printing at different speed and print quality
combinations. Fast uses the fastest speed
appropriate for the selected media, Normal
provides letter quality printing, and High Quality
provides high quality printing at a slower speed.
Preset name
Loads a file with predefined printer settings. Select
none if you don’t have a file of predefined settings.
See “Saving printer options to a preset file,” later in
this chapter, for more information.
Copies
Specifies the number of copies to print, from 1 to
99.
Collate
Arranges, in sequential order, multiple copies of the
same document.
175
Reverse order
Prints the document from last page to first page.
Media
Specifies the type of paper used for printing.
Media size
Sets the paper size used for printing.
Portrait or Landscape
Sets the paper orientation.
3. Click OK.
176
Setting advanced image quality
options
You can control advanced image quality features, including
image brightness and halftone printing.
1. At your PC, do one of the following:
• From the application’s File menu, click Print. In the
Print dialog box, click Properties (or Setup).
• Double-click the WorkCentre icon. In the
WorkCentre 450c Status window, click Printer.
2. Click the Advanced tab to display the Advanced
property page (see following page).
177
Sets halftone rendering
Controls image
brightness
Sets optimum print
quality
Reverses image
3. Change the defaults for any of these options:
Intensity
Adjusts the image brightness, by darkening or
lightening text and graphics.
Automatic image enhancement
Sets optimum print quality for pictures and
photographs.
178
Mirror image
Reverses the image from left to right for special
applications such as transfer media.
Halftone
Sets the halftone rendering. Use None to print solid
colors and black, Fine Dither for business graphics
such as pie charts and bar graphs, High Speed Air
Brush for pictures and photographs with the best
combinations of quality and speed, and High
Quality Air Brush for high quality pictures and
photographs.
4. Click OK.
Using preset files
You can save your printer options to a file called a preset.
You can later open the saved preset file and use the
predefined printer options for a print job.
Using preset files eliminates specifying printer options for
each type of print job. For example, you can create a preset
file that defines the options for printing color transparencies
and use the file each time you print color transparencies.
179
Saving printer options to a preset file
5. You can save printer and advanced image quality
options to a preset file.
1. At your PC, do one of the following:
• From the application’s File menu, click Print. In the
Print dialog box, click Properties (or Setup).
• Double-click the WorkCentre icon. In the
WorkCentre 450c Status window, click Printer.
2. Click the Presets tab to display the Presets property
page.
Printer options
Advanced image
quality options
180
3. Under Main Controls and Advanced, set the options
you want. Refer to the sections “Setting printer
options” and “Setting advanced image quality options”
for information on the options.
4. Click Save As.
5. In the Save As dialog box, type a name in the Preset
name box and click OK.
6. Click OK.
Editing the printer options defined in a preset file
You can change any of the options defined in a preset file.
1. At your PC, do one of the following:
• From the application’s File menu, click Print. In the
Print dialog box, click Properties (or Setup).
• Double-click the WorkCentre icon. In the
WorkCentre 450c Status window, click Printer.
2. Click the Presets tab.
3. Select the preset file you want to edit from the List of
presets.
4. Under Main Controls and Advanced, change the
options you want.
181
Refer to the sections "Setting printer options" and
"Setting advanced image quality options" for
information on the options.
5. Click OK.
6. In the confirmation box, click Yes to save the changes.
7. Click OK to save the changes to the same preset file.
Using a preset file for a print job
1. At your PC, do one of the following:
• From the application’s File menu, click Print. In the
Print dialog box, click Properties (or Setup).
• Double-click the WorkCentre icon. In the
WorkCentre 450c Status window, click Printer.
2. Click the Main Controls tab.
3. In the Preset name box, select the preset file to use for
the print job.
4. Click OK.
182
Deleting a preset file
When you no longer need a preset file, you can delete it.
1. At your PC, do one of the following:
• From the application’s File menu, click Print. In the
Print dialog box, click Properties (or Setup).
• Double-click the WorkCentre icon. In the
WorkCentre 450c Status window, click Printer.
2. Click the Presets tab.
3. Select the preset file you want to delete from the List
of presets.
4. Click Delete.
5. In the confirmation box, click Yes.
183
Using printer services
You can use printer services to view the status of your
current print job and the ink level in the cartridges, maintain
the color print head and high capacity ink jet cartridge, and
choose the conditions under which the printer icon or Status
property page displays on your desktop.
Checking the status of your current print job
The Status property page lets you monitor the progress of
the current print job, and view any printer status messages
or errors. You can also determine the level of ink in the
currently loaded ink cartridge(s).
1. At your PC, do one of the following:
• In Windows 95, click the Xerox WorkCentre 400c
Series button on the taskbar.
• In Windows 3.1 or 3.11, double-click the Xerox
WorkCentre 400c Series icon on the desktop.
The Status property page displays (see following
page).
184
Shows progress of
print job
Cancels print job
Pauses print job
Shows ink levels
2. To cancel the current print job, click Cancel Print.
3. To pause a print job, click Pause.
4. Do one of the following:
• Click Close to exit the printer settings.
• Click Print Driver to return to the Main Controls
property page and keep the Status property page
open.
185
Maintaining the color print head or high capacity
ink jet cartridge
You use the Print Head property page to perform
maintenance tasks such as cleaning, replacing, and aligning
the color print head and high capacity ink jet cartridge.
Note You can also clean and replace the color print
head and high capacity ink jet cartridge using the
CARTRIDGE key on the control panel.
1. At your PC, double-click the WorkCentre icon.
2. In the WorkCentre 450c Status window, click Printer.
3. On the Main Controls property page, click Printer
Services.
4. Click the Print Head tab to display the Print Head
property page (see following page).
186
Click type of installed
print head
Maintenance
buttons
5. Under Default Print Head, click the type of print head
currently installed in the WorkCentre:
Color
Color print head and ink cartridges.
High Capacity Black
High capacity ink jet cartridge.
187
6. Under Maintenance, click one of the following
buttons:
Clean
Cleans the color print head or high capacity ink jet
cartridge.
Change
Moves the printer carriage to the center position so
you can remove the print head or ink jet cartridge.
Align
Correctly positions the print head or ink jet
cartridge in the printer and prints a test pattern that
you can use to verify the alignment.
Demo Print
Prints a sample page that demonstrates the
WorkCentre’s printing capabilities.
Test Print
Prints a diagnostic sample page that you can use to
determine printer problems.
7. Click Close.
188
Choosing the printer status display
options
You can choose the conditions under which the printer icon
or Status property page displays on your desktop. You can
specify the display settings for idle, printing, and error
conditions.
1. At your PC, double-click the WorkCentre icon.
2. In the WorkCentre 450c Status window, click Printer.
3. On the Main Controls property page, click Printer
Services.
4. Click the Options tab to display the Options property
page.
189
5. Under Display Conditions, click the option you want
when the printer is Idle, Printing, and in need of
attention (Error):
Icon
Displays a printer icon on the desktop.
Window
Opens the Status property page on the desktop.
6. Click Close.
Checking the status of your
pending print jobs
The WorkCentre 400C Series Spool Manager holds the
documents queued for printing. You can view the status of
a pending document and change its status.
1. At your PC, do one of the following:
• In Windows 95, click the Xerox WorkCentre 400C
Series Spool Manager button on the taskbar.
• In Windows 3.1 or 3.11, click the Xerox WorkCentre
400C Series Spool Manager icon on the desktop.
190
The Spool Manager window displays, showing the list
of print jobs pending on the WorkCentre and the status
of each job.
2. To change the status of a print job, click the document
name and then click one of the following options from
the Document menu:
Hold
Does not print the document, but keeps it in the
queue, or prints the document if it was held in the
queue.
Keep after printing
Keeps the document in the queue after it’s printed
for printing at a later time.
Delete
Removes the document from the print queue.
Requeue
Changes the document’s position in the print queue.
Info
Displays information about the print job.
191
3. To change the status of the print queue, do the
following:
• Under Printer/document name, click Xerox
WorkCentre 400c Series.
• On the Queue menu, click Hold to stop printing the
documents in the print queue, or to release a held
print queue.
192
Loading envelopes
You can load either letter- or legal-size envelopes.
1. Remove the printer output tray and any media from the
paper tray.
2. Lift the envelope guide located on the paper tray.
193
3. Load up to 10 envelopes flap side up and against the
envelope guide in the paper tray.
194
4. Slide the paper guide to the left until it rests lightly
against the envelopes.
5. Install the printer output tray.
195
Printing from DOS
If you print from DOS or a DOS application, the
WorkCentre 450c includes a software application called the
DOS Control Panel. The DOS Control Panel enables you to
change DOS printing options such as font, point size, and
page orientation.
1. In DOS, do one of the following:
• On Windows 95 systems, change to the directory
c:\ProgramFiles\Xerox\WorkCentre450c.
• On Windows 3.1/3/11 systems, change to the
directory c:\xerox\xw450c.
2. Type x400cnpl
3. In the Control Panel window, change the options you
want.
4. Type O (for OK).
5. The options you chose are set on the WorkCentre.
Note Some DOS applications override the options
you set on the Control Panel
196
Chapter 5
Copying Documents
The WorkCentre provides high quality black-and-white
copying at speeds up to three pages per minute. You can
make up to 99 copies of a single document, collate multiple
copies, and reduce or enlarge originals.
Choosing the media to use
Loading paper
Loading transparency film
Copying a document
Setting copy collation before copying a document
Changing copy quality
Using a document carrier
197
Choosing the media to use
You can copy documents on the following types of media.
Type of Media
Plain paper
(16 to 36 lb or 60 to 135 g/m2)
Letter 8.5x11 in (216x279
mm
Legal 8.5x14 in (216x356
mm
A4 8.3x11.7 in (210x297
mm
Xerox ink jet high resolution paper (letter and A4)
Xerox ink jet photo glossy paper (letter
and A4)
Xerox ink jet transparency film (letter
and A4)
Xerox ink jet fabric transfer (letter and
A4)
Card stock (110 lb index or 110 to 200
g/m2)
No. 10 envelopes (20 to 24 lb or 75 to
90 g/m2)
Paper-faced labels
Maximum number of sheets in
paper tray
150 sheets (20 lb or 75 g/m2)
150 sheets (20 lb or 75 g/m2)
150 sheets (20 lb or 75 g/m2)
150 sheets (20 lb or 75 g/m2)
150 sheets (20 lb or 75 g/m2)
10 sheets
1 sheet
10 sheets (90 lb index or 143 g/m2)
10 envelopes (20 lb or 75 g/m2)
1 sheet
198
Loading paper
You can load letter, legal, and A4 size paper. To avoid a
printer jam, do not load paper in the paper tray while the
WorkCentre is printing.
1. Remove the clear, plastic printer output tray.
2. Make sure the paper guide is positioned to the far right
side of the paper tray.
3. Slide out the paper tray extension.
Paper
guide
199
4. Insert up to 150 sheets of 16 to 24 lb paper print side
down in the paper tray.
The arrow on the paper’s packaging indicates the print
side.
5. Install the printer output tray.
200
Loading transparency film
When loading transparency film, insert the end with the
adhesive strip first.
201
Copying a document
You copy a document using the keys on the WorkCentre
control panel. Before copying a document, you can change
the contrast and reduce or enlarge the original. The settings
you choose are used for the document you are copying.
After you’ve made the copies, the WorkCentre returns to its
default copy settings.
When you copy a document, the WorkCentre stores the
document to memory and then prints the copies. If the
memory becomes full while copying, the WorkCentre stops
scanning and copies the pages already stored to memory.
To free up WorkCentre memory, delete any documents
stored to memory or make single copies of your document.
1. At the WorkCentre 450c, load up to 20 pages face
down in the document tray.
2. Press the COPY key.
3. To make more than one copy, enter the number of
copies using the numeric keypad.
To change the number you entered, press EXIT/
CLEAR and enter a new number.
202
4. To change the lightness and darkness of your copies,
press the CONTRAST key several times to switch
among these options:
For documents with good dark and light
values.
For documents that are too dark.
Lighten
For documents that are too light.
Darken
Photo normal For photographs and documents that contain
different shades of gray.
Photo lighten For photographs and grayscale documents
that are too dark.
Photo darken For photographs and grayscale documents
that are too light.
Normal
5. To reduce or enlarge your document, press the SIZE
key several times to switch among these Size options:
95%, 100%, 125%, 150%, 75%, 80%, 85%, 90%.
6. Press START.
If you don’t want to copy the document, remove any
pages from the document tray and press the EXIT/
CLEAR key to remove the page fed into the scanner.
203
Setting copy collation before
copying a document
By default, the WorkCentre does not collate multiple
copies. You can change the default setting at the control
panel to have the WorkCentre always collate multiple
copies.
Note The WorkCentre stores the document to
memory before printing the collated copies. If the
WorkCentre’s memory runs low, it will not collate the
copies.
1.
2.
3.
4.
5.
6.
At the WorkCentre 450c, press MENU.
Press 5 [Setup] and ENTER.
Press 7 [Control panel] and ENTER.
Press 7 [Collate copies] and ENTER.
Press RIGHT ARROW to display [yes] and ENTER.
Press STOP to exit the menus.
The WorkCentre is set to collate multiple copies of the
same document. To copy a document, see the previous
section, “Copying a document.
204
Changing copy quality
The WorkCentre is set to print copies at fast speed. You can
change the copy speed to print copies at a slower speed with
higher quality results.
1. At the WorkCentre 450c, press the MENU key.
2. Press 6 [Printer] and ENTER.
3. Press 3 [Fax/copy quality] and ENTER.
4. Press RIGHT ARROW to display [normal] and
ENTER.
The WorkCentre sounds a confirmation beep.
5. Press STOP to exit the menus.
205
Using a document carrier
When copying fragile documents and photographs, use a
document carrier to protect your original. A document
carrier is a protective "sleeve" that has a clear plastic front
and a white paper backing.
Use a document carrier when copying these types of
originals:
• Photographs
• Torn or wrinkled documents
• Thin originals, such as invoices
• Graphic art, such as newsletter paste-ups and
collages
Load the document carrier in the WorkCentre’s document
tray with the sealed edge down and the clear front facing
away from you.
Caution Do not use a document carrier for originals
thicker than a photograph. Otherwise, you could
damage the WorkCentre’s scanner.
206
Chapter 6
Scanning Documents
Specifying the location of your scanning application
Scanning a document
Scanning a document using Pagis Pro 97
Scanning a document using TextBridge Pro
Scanning a document using another scanning application
Using a document carrier
207
The WorkCentre includes TWAIN-compliant PC scanning
functionality that is compatible with most scanning
applications. Included on your WorkCentre CD-ROM is
Xerox Pagis Pro 97 and TextBridge Pro software. If your
PC does not have a CD-ROM drive, you can obtain the
software on floppy disk using the order form that came with
the WorkCentre.
Pagis Pro 97 and TextBridge Pro provide you with the
scanning and optical character recognition (OCR) software
you need to convert paper documents to fully editable
electronic documents.
Specifying the location of your
scanning application
If you installed Pagis Pro 97 or TextBridge Pro, the
application’s location is specified in the ControlCentre
Properties dialog box. This enables the application to run
automatically when you press the WorkCentre’s SCAN
key. If you are using a different scanning application, you
need to specify the application’s location in the
ControlCentre Properties dialog box.
208
If you don’t know the name of the folder (directory) in
which your scanning application was installed, you can
browse your hard drive to look for the application.
1. At your PC, do one of the following:
• In Windows 95, click the WorkCentre icon on the
taskbar with the right mouse button and then click
Properties.
• In Windows 3.1 or 3.11, click the WorkCentre icon
on the desktop with the left mouse button and then
click Properties.
The ControlCentre Properties dialog box displays.
Click Run scanning
application
Click to find your scanning
application’s location on
your hard drive
209
2. Click Run scanning application.
3. Click the Browse button to look for the scanning
application’s location.
4. Click the application and then click Open.
The application’s location displays in the Run scanning
application box.
5. Click OK.
210
Scanning a document
The WorkCentre scans a black-and-white document at 10
seconds per page. You can scan letter-, legal-, and A4-size
documents.
This section provides instructions for scanning documents
using Pagis Pro 97, TextBridge Pro, and other scanning
applications.
211
Scanning a document using Pagis Pro 97
1. At the WorkCentre 450c, load up to 20 pages face
down in the document tray.
2. Press the SCAN key.
The Pagis Scan Tool opens on your Windows desktop.
Indic ates the type of
document page
Specifies the name
and location of the
saved document after
it’s scanned
Scans the document
from the W orkCentre
to your PC
3. Select the options you want and click Scan.
The WorkCentre begins scanning the document.
For information on how to use Pagis, see the Pagis online
help or Pagis Pro 97 Getting Started.
212
Scanning a document using TextBridge Pro
1. At the WorkCentre 450c, load up to 20 pages face
down in the document tray.
2. Press the SCAN key. The TextBridge Pro window
opens on your Windows desktop.
3. Click Go on the TextBridge toolbar. The WorkCentre
400c Series Scanner Setup dialog box displays.
4. Choose from the following options:
Paper Size
Specifies the document size you are scanning: letter,
legal, and A4.
213
Resolution
Sets the scan resolution. Options are fine (200 x 200
dpi) and superfine (300 x 300 dpi). Superfine is
recommended for OCR processing.
Color Depth
Specifies the number of bits per picture element
(pixel) at which the scanned image is stored in a file.
Options are black and white and 16 shades of gray.
Black and white is recommended for OCR
processing.
Contrast
Adjusts the lightness and darkness of the scanned
document. Options are darken, normal, and lighten.
Apply Halftone to Photo
Processes a photographic image into halftone dots.
Use this option when scanning original photographs
and using black-and-white color depth.
5. Click OK. The WorkCentre begins scanning the
document.
For information on how to use TextBridge, see the
TextBridge documentation.
214
Scanning a document using another scanning
application
This section provides a general procedure for scanning a
document using other scanning applications. See the
application’s documentation for specific information.
1. At the WorkCentre 450c, load up to 20 pages face
down in the document tray.
2. Press the SCAN key.
The scanning application opens on your Windows
desktop.
3. If you are using the WorkCentre 450c to scan a
document for the first time, you need to set the
WorkCentre as your scanner source. Do the following:
• On the File menu, click Select source, or click Twain
and then Select source.
• Do one of the following:
In Windows 95, click WorkCentre 400c Series (32).
In Windows 3.1/3.11, click WorkCentre
400c Series (16).
215
4. On the File menu, click Acquire, or click Twain and
then Acquire. The WorkCentre 400c Series Scanner
Setup dialog box displays.
5. Choose from the following options:
Paper Size
Specifies the document size you are scanning:
letter, legal, and A4.
Resolution
Sets the scan resolution. Options are fine (200 x 200
dpi) and superfine (300 x 300 dpi).
216
Color Depth
Specifies the number of bits per picture element
(pixel) at which the scanned image is stored in a file.
Options are black and white and 16 shades of gray.
Contrast
Adjusts the lightness and darkness of the scanned
document. Options are darken, normal, and lighten.
Apply Halftone to Photo
Processes a photographic image into halftone dots.
Use this option when scanning original photographs
and using black-and-white color depth.
6. Click OK. The WorkCentre begins scanning the
document.
217
Using a document carrier
When copying fragile documents and photographs, use a
document carrier to protect your original. A document
carrier is a protective "sleeve" that has a clear plastic front
and a white paper backing.
Use a document carrier when copying these types of
originals:
• Photographs
• Torn or wrinkled documents
• Thin originals, such as invoices
• Graphic art, such as newsletter paste-ups and
collages
Load the document carrier in the WorkCentre’s document
tray with the sealed edge down and the clear front facing
away from you.
Caution Do not use a document carrier for originals
thicker than a photograph. Otherwise, you could
damage the WorkCentre’s scanner.
218
Chapter 7
Troubleshooting
This chapter provides the Xerox Customer Support Center
telephone number, explains how to solve common
WorkCentre problems, and describes the messages you
might see when using the WorkCentre.
Calling the Xerox Customer Support Center
Clearing paper jams
Clearing printer jams
Clearing scanner jams
Solving WorkCentre problems
Solving communication problems between the WorkCentre
and your PC
Solving problems when sending faxes
Solving problems when receiving faxes
Solving copying and printing problems
Solving scanning problems
Understanding WorkCentre messages
219
Calling the Xerox
Customer Support Center
If you are unable to solve a WorkCentre problem using this
guide or the online Help, call the Xerox Customer Support
Center. Before calling, make sure you have the following
information:
• WorkCentre’s serial number, which is located above
the parallel port on the back of the machine
• WorkCentre 400c Series Software and firmware
version, which is specified in the About box
• Windows operating system version (Windows 95,
Windows 3.1, or Windows 3.11)
• Amount of memory in your PC
• Information about the problem, including the steps
taken to create the problem, any error messages, and
the expected behavior.
The Xerox Customer Support Center telephone number in
the United States and Canada is:
1-800-TEAM XRX (1-800-832-6979)
Call from a telephone near your PC and the WorkCentre.
Make sure both your PC and WorkCentre are turned on.
220
Clearing paper jams
Paper can jam in the WorkCentre’s printer or scanner.
When a jam occurs, the WorkCentre displays a message on
the control panel LCD, and displays a graphic and message
in the WorkCentre 450c Status window on your PC.
221
Clearing printer jams
A printer jam can occur as paper is fed from the paper tray
to the WorkCentre’s printer. After clearing a printer jam,
you will need to reprint the jammed page.
Note To avoid printer jams, do not load paper in the
paper tray while the WorkCentre is printing.
1. Remove any paper from the paper tray and the printer
output tray.
222
2. Do one of the following:
• If the paper’s trailing edge is visible in the paper
tray, grasp the edge and press and hold the FEED
key. The WorkCentre backs out the page.
223
• If the paper’s leading edge is visible, grasp the edge
and press the FEED key. The WorkCentre feeds the
page forward.
224
3. If part or all of the paper remains jammed in the
printer, do the following:
• Remove any paper from the paper tray.
• Press one of the green locking latches and push the
paper tray backward to release one side of the tray.
• Press the other green locking latch to release the
paper tray completely. Remove the tray.
225
• Remove the jammed paper from the rear of the
WorkCentre. You can press and hold the FEED key
to back out the paper.
• To reinstall the paper tray, squeeze the front and
back sides of the paper tray together and insert the
tray into the slot at the rear of the WorkCentre.
• Pull the tray forward until it locks into place.
• Load the paper in the paper tray and install the
printer output tray.
226
Clearing scanner jams
Scanner jams can occur as paper is fed from the document
tray to the WorkCentre’s scanner.
1. Remove any pages from the document tray.
2. Press the EXIT/CLEAR key to clear the document
page.
3. If the WorkCentre doesn’t clear the page, open the
scanner cover by grasping the top edge of the cover
and pulling it toward you.
227
4. Pull the jammed page up and out.
5. Close the scanner cover.
228
Solving WorkCentre problems
Use the solutions in this section to solve the problems that
might occur while using the WorkCentre.
Solving general WorkCentre
problems
Problem
My PC is not
communicating
with the
WorkCentre.
Solution
Do one or more of the following:
1.
Make sure power is supplied to both the
WorkCentre and your PC.
2.
Make sure the WorkCentre is directly
connected to your PC using the parallel
cable. You should not connect an in-line
device such as an A/B switch or a print
buffer to the parallel cable.
3.
Unplug the WorkCentre’s power cord, wait a
few seconds, and then reconnect it. Restart
your PC.
4.
In the WorkCentre 450c Status window,
click the Test button. Follow the instructions
on your screen to test the communications
between your PC and the WorkCentre.
229
Problem
I can’t use the
WorkCentre for
other tasks when
I’m making a
phone call using
the telephone
attached to the
WorkCentre.
I have audio or
video problems on
my PC when using
multimedia
applications.
Solution
Press the JOB STATUS key to display the
following message on the LCD:
Dial number, COPY or
press START to store
Then perform the task you want.
Do one or more of the following:
1.
Make sure the ControlCentre is running. To
run the ControlCentre, double-click the
WorkCentre icon.
2.
Close the WorkCentre 400c Series Status
window.
230
Solving problems when sending
faxes
Problem
I cannot send a fax.
Solution
Do one or more of the following:
1.
Check your telephone line connections and make sure you have a dial
tone.
2.
Depending on your telephone
system, make sure the Dial mode
(tone or pulse) is set correctly on
the Phone Line property page.
3.
If the WorkCentre’s memory is low,
print or delete the documents stored
to memory or in a mailbox.
The page background on Clean the platen cover in the scanner.
the faxes received by
other fax machines
is gray.
Vertical lines appear on Clean the automatic document feed
the faxes received by
rollers and platen cover.
other fax machines.
231
Solving problems when receiving
faxes
Problem
I cannot receive
a fax.
Solution
Do one or more of the following:
1.
Check your telephone line connections and
make sure you have a dial tone.
2.
Make sure paper is loaded in the paper tray
and that a print head or cartridge is installed.
3.
Clean the color print head or high capacity ink
jet cartridge and then run a test print. If the
print still appears faint, repeat the process
two more times. If the problems persists,
replace the print head or cartridge.
4.
If the WorkCentre’s memory is low, print or
delete the documents stored to memory or in
a mailbox.
5.
If the Receive option is set To memory, print
the faxes stored to memory.
6.
Depending on how you’re using the
WorkCentre, make sure the following
telephone answer options are set correctly:
Answer mode
Rings to answer
Distinctive ring
232
Solving copying and printing
problems
Problem
Solution
I can’t print on the Do one or more of the following:
WorkCentre.
1. Check that your parallel cable connects the
WorkCentre to your PC.
2.
Make sure that the Xerox WorkCentre 400c
Series is set as your default printer or
appears in the Print dialog box.
3.
Press the MODE key. Make sure the Print
mode is set to Print & Fax or Printer only.
4.
Make sure the print job is not held in the
Spool Manager queue. Open the Spool
Manager, select the held document, and
click Hold in the Document menu.
The print is faint or Clean the color print head or high capacity ink
missing on my
jet cartridge and then run a test print. If the print
copies or printed still appears faint, repeat the process two more
pages.
times. If the problems persists, replace the print
head or cartridge.
233
Problem
Solution
There are streaks Do one or more of the following:
or lines on
1. Make sure the printer output tray is
my copies or
installed.
printed pages.
2. Clean the color print head or high capacity
ink jet cartridge. If streaks or lines still
appear, replace the print head or cartridge.
The print is blurry, Align the color print head or high capacity ink jet
or jagged vertical cartridge. In the WorkCentre 450c Status
lines appear on
window, click the Printer button. Click Printer
the printed pages. Services on the Main Controls property page,
click the Print Head tab, and then click the Align
button.
My copies are gray Clean the platen cover in the scanner.
or a thin black line
appears on my
copies.
Vertical lines
Clean the automatic document feed rollers and
appear on the
platen cover.
faxes received by
other fax
machines.
Blank pages print Make sure you removed the protective tape
after changing
from the cartridge.
the ink cartridge.
234
Problem
The print quality
of my
transparencies is
poor.
Solution
Do one or more of the following:
1.
2.
Make sure Transparency is selected as the
Media on the Main Controls property page
(click Printer in the WorkCentre 450c Status window to open the property page).
You also might need to use the application’s Page Setup command to select
Transparency.
Check that your transparency film is loaded
properly. The end with the adhesive strip
must be loaded first.
My document
Remove the paper from the document tray and
doesn’t feed into fan the pages. Make sure you do not load more
the scanner.
than 20 pages of 16 to 24 lb paper in the tray. If
problems still occur, clean the automatic
document feed rollers.
The paper doesn’t Remove the paper from the paper tray and fan
feed into the
the pages. Make sure you do not load more
printer.
than 150 pages of 20 lb paper in the tray, and
do not load more than one type of media. If
problems still occur, clean the paper exit rollers.
235
Problem
The application
from which I’m
printing does not
use the printing
options I chose on
the Main
Controls property
page.
Solution
Some software applications override the
options set on the Main Controls property page.
Choose your printing options from the
application.
236
Solving scanning problems
Problem
Solution
When I press the SCAN Do one or more of the following:
key, nothing happens.
1. Check that your parallel cable
connects the WorkCentre to
your PC.
2.
Make sure a scanning
application is installed on your
PC and you entered its location
in the ControlCentre Properties
dialog box.
3.
Make sure the WorkCentre fed
the first page of your document
into the scanner.
4.
In the WorkCentre 450c Status
window, click the Test button.
Follow the instructions on your
screen to test scanning from the
WorkCentre to your PC.
237
Understanding WorkCentre
messages
This section provides an alphabetic listing of the messages
you may see when using the WorkCentre.
Message
Meaning
nn is a group.
Cannot dial group.
You cannot use a group
speed dial number when
dialing manually.
ADF pad low. START You may need to replace
if OK, or MENU 5, 9, 1. the automatic document
feed (ADF) pad.
Black low. START if
OK, or CARTRIDGE .
The ink supply in the black
ink cartridge is low.
Action
Use a speed dial number
for an individual (numbers
01 through 94).
If you are not having paper
feed problems, press START
to clear the message and
continue using the ADF
pad. If paper feed problems
occur, replace the ADF pad.
Check the printed pages. If
the print quality is good,
press START to clear the
message and continue
using the cartridge. If the
print quality is not good,
replace the black ink
cartridge.
238
Message
Call ended. No dial
tone. Check line.
Meaning
The WorkCentre ended the
call, after using the
specified number of redials,
because it could not detect
a line current or a dial tone.
Action
Do one or more of the
following:
1.Make sure the
WorkCentre is connected to
a telephone wall plug.
2.Make sure your
telephone or answering
machine is connected to
the WorkCentre.
Can only poll.
WorkCentre memory is full. Increase memory by
You can retrieve a
deleting or printing the
document from another fax documents stored to
machine only.
memory.
Can only view a job You cannot print the first
No action.
with a document.
page of the document
because it isn’t stored in the
WorkCentre. The
WorkCentre could be
retrieving the document
from a remote fax machine.
Can only view/print There are no pending jobs No action.
a pending job.
on the WorkCentre.
Cannot cancel job
You tried to cancel a job
No action.
being printed.
that the WorkCentre is
printing.
239
Message
Meaning
Cannot receive fax. The WorkCentre cannot
Printer unavailable. receive the fax because
either the printer is
unavailable, you set the If
cannot print option to do
not answer, or there isn’t
enough memory to store
the fax.
Cannot receive. Low
ink. Change
cartridge.
Cannot run PC scan
application.
Cartridge error.
Check printed
pages.
The WorkCentre cannot
receive the fax because
your ink supply is low.
After pressing the SCAN key,
the system could not run
the scanning application on
your PC.
Action
Do one or more of the
following:
1.Make sure paper is
loaded in the paper tray.
2.Clear any printer jams.
3.Make sure a print head or
cartridge is installed.
4.Increase memory by
deleting or printing the
documents stored to
memory.
Replace the print head or
color ink cartridge.
Do one or more of the
following:
1.Make sure you installed
a scanning application on
your PC.
2.Open the ControlCentre
Properties dialog box and
make sure the application’s
location appears in the Run
scanning application box.
Part of your document may Check the printed pages
not have printed completely and reprint any pages as
because of an ink cartridge needed.
problem.
240
Message
Meaning
Change ink:
The WorkCentre ran out of
CARTRIDGE key. Check ink while printing an
prints.
incoming fax. The last page
printed and any following
pages are stored to
memory, provided there is
enough memory.
Close printer
The printer cover is open.
cover.
Color head low.
You may need to replace
START if OK, or
the color print head.
CARTRIDGE .
Cyan low. START if
OK, or CARTRIDGE .
The ink supply in the cyan
ink cartridge is low.
Action
Install a new ink cartridge.
After installing the
cartridge, press START to
print the pages stored to
memory.
Close the printer cover.
Check your printed pages.
If the print quality is good,
press START to clear the
message and continue
using the print head. If the
quality is poor, replace the
color print head.
Check the printed pages. If
the print quality is good,
press START to clear the
message and continue
using the cartridge. If the
print quality is not good,
replace the cyan ink
cartridge.
241
Message
If long document,
START to continue.
Or press EXIT to
clear scanner jam.
Ink low. START if OK
or CARTRIDGE key.
Input limit reached.
Meaning
The WorkCentre detected a
long document in the
document tray or there is a
scanner jam.
Action
If you are faxing a long
document, press START. If
there is a scanner jam,
remove your originals from
the document tray, and
then press EXIT/CLEAR to clear
the jam or open the
scanner cover and remove
the misfed page.
The ink in the high capacity Check the printed pages. If
ink jet cartridge is low.
the print quality is good,
press START to clear the
message and continue
using the cartridge. If the
print quality is not good,
replace the high capacity
ink jet cartridge.
You cannot enter any more Send the current job. After
speed dial numbers during the fax is sent, send the
the current dialing
document to the additional
sequence.
numbers.
242
Message
Meaning
Invalid date or time
Date & Time
You did not enter the date
or time using the correct
format.
Invalid entry
number.
You entered a Phonebook
or mailbox number that is
not within the allowable
range.
Invalid start time.
Date & Time
You did not enter the time
using the correct format.
Job will start when
phone is available.
The WorkCentre is busy
sending or receiving a fax.
When the telephone line is
free, the job will start.
Action
Use one of the following
formats to specify the date:
(1) MM/DD/YY
(2) YY/MM/DD
(3) DD/MM/YY
Enter the time using either
a 12- or a 24-hour clock.
For example, enter 03:45
pm if you’re using a 12-hour
clock, or enter 15:45 if
you’re using a 24-hour
clock.
Enter a valid mailbox
number (1—5) or
Phonebook number
(individuals, 1—94;
groups, 95—99).
Enter the time using either
a 12- or a 24-hour clock.
For example, enter 03:45
pm if you’re using a 12-hour
clock, or enter 15:45 if
you’re using a 24-hour
clock.
No action.
243
Message
Job will start when
printer is available.
Load cartridge
or color print head.
Machine is busy.
Magenta low. START
if OK, or CARTRIDGE.
Meaning
You tried to retrieve a
document from another fax
machine when the printer
was unavailable and the If
cannot print option is set
to do not answer.
Action
Try again when the printer
is available. Set If cannot
print to receive to memory
to retrieve the document to
memory if the printer
becomes unavailable
again.
A high capacity ink jet
Install a high capacity ink
cartridge or color print head jet cartridge or color print
is not installed in the
head.
WorkCentre.
Either there isn’t enough
Wait until the WorkCentre
WorkCentre memory or the completes the job. If
phone line is not available. needed, delete or print any
documents stored to
memory.
The ink supply in the
Check the printed pages. If
magenta ink cartridge is
the print quality is good,
low.
press START to clear the
message and continue
using the cartridge. If the
print quality is not good,
replace the magenta ink
cartridge.
244
Message
Mailbox n
has no entry.
Meaning
There isn’t a mailbox with
that number on the
WorkCentre.
Action
To print a list of the
mailboxes created on the
WorkCentre, open the
ControlCentre, click the
Mailbox tab, and then click
Print Mailbox List. Use a
number for which there is a
mailbox created on the
WorkCentre.
Mailbox not empty. You cannot delete the
Before deleting the
Print docs or delete. mailbox because it contains mailbox, either print or
documents.
delete the contents of the
mailbox.
Memory full. Cannot There isn’t enough
Increase memory by
store document.
WorkCentre memory to
deleting or printing the
store the document in the
documents stored to
mailbox or to memory for
memory, and then try
retrieval by a remote fax
again.
machine.
Memory full. Reload The WorkCentre ran out of Increase memory by
unscanned pages. memory during scanning.
deleting or printing the
documents stored to
memory. Reload the pages
not scanned and restart
the job (when applicable).
245
Message
Memory is full.
Memory is full.
Can fax from ADF.
Memory is full.
Cannot poll.
Memory is full.
Cannot receive.
Memory is full.
Job was canceled.
Meaning
There isn’t enough
WorkCentre memory.
Action
Increase memory by
deleting any documents
stored in mailboxes or to
memory, or canceling any
pending jobs held in
memory.
There isn’t enough
Increase memory by
WorkCentre memory to
deleting or printing the
retrieve the document from documents stored to
the remote fax machine.
memory.
You can send a fax.
There isn’t enough
You can retrieve a
WorkCentre memory and
document from another fax
you tried to send a fax
machine only. Dial the fax
without loading a
number and press START to
document in the document retrieve the document.
tray.
There isn’t enough
Increase memory by
WorkCentre memory to
deleting or printing the
receive the fax.
documents stored to
memory.
There isn’t enough
Press the STOP key to clear
WorkCentre memory to
the message. Increase
perform the task.
memory by deleting or
printing the documents
stored to memory, and then
try again.
246
Message
Meaning
Memory is full.
Poll was canceled.
There isn’t enough
memory to retrieve the
document from the other
fax machine.
Memory is full. Will
retry: MM-DD,
HH:MM am/pm.
There isn’t enough
WorkCentre memory. Your
fax will be sent at the
specified time.
Memory is full. Will
try dialing later.
Action
Increase memory by
deleting or printing the
documents stored to
memory, and then try
again.
Increase memory by
deleting or printing the
documents stored to
memory. If you do not want
to wait until the WorkCentre
sends the fax, press EXIT/
CLEAR to remove the
document, and try faxing it
again.
Increase memory by
deleting or printing the
documents stored to
memory. Make sure your
telephone line is
connected.
There isn’t enough
WorkCentre memory and
the phone line is not
available. When the
WorkCentre’s memory
increases, it will continue
scanning the document and
then redial the number
when the phone line is free.
Menu not available You tried to use other
Press START to send your
during fax job setup. menus before pressing the fax, and then perform
START key to send your fax.
another task.
247
Message
Need a fax number
to forward faxes.
Meaning
You did not enter a fax
number for fax forwarding.
No active or pending There are no active or
jobs to report.
pending jobs to either print
or cancel.
No answer.
The WorkCentre used the
All redials tried.
maximum number of redial
attempts and the remote
fax machine did not
answer.
No answer at
The remote fax machine did
remote. No redials. not answer and redials are
not allowed.
No answer at
remote.
Will redial.
No black ink.
Load cartridge.
No black ink. Press
CARTRIDGE key.
Action
Enter the fax number to
which you want the
WorkCentre to forward your
faxes.
No action.
Press STOP to clear the
message. Check to make
sure the fax number is valid
and that the device is
functional. Resend the job.
Check to make sure the fax
number is valid and that the
device is functional.
Resend the job.
The remote fax machine did Check to make sure the fax
not answer. The
number is valid and that the
WorkCentre will use all
device is functional.
redial attempts.
Either the black ink
Insert a Xerox color ink
cartridge is missing or an
cartridge.
ink cartridge made for
another machine is
installed in the WorkCentre.
The ink supply in the black Insert a Xerox color ink
ink cartridge is out.
cartridge.
248
Message
No cyan ink.
Load cartridge.
Meaning
Either the cyan ink cartridge
is missing or an ink
cartridge made for another
machine is installed in the
WorkCentre.
No cyan ink. Press The ink supply in the cyan
CARTRIDGE key.
ink cartridge is out.
No document to poll The WorkCentre is unable
or wrong password. to retrieve a document
because the remote fax
machine’s document tray is
empty or the document isn’t
stored to memory.
No documents in
The mailbox doesn’t
mailbox n.
contain any documents.
No documents in
The WorkCentre cannot
memory to be
print because there aren’t
printed.
any documents stored to
memory.
No magenta ink.
Either the magenta ink
Load cartridge.
cartridge is missing or an
ink cartridge made for
another machine is
installed in the WorkCentre.
No magenta ink.
The ink supply in the
Press CARTRIDGE key. magenta ink cartridge is
out.
Action
Insert a Xerox color ink
cartridge.
Insert a Xerox color ink
cartridge.
Have the remote user verify
that the document is stored
for you to retrieve.
No action.
No action.
Insert a Xerox color ink
cartridge.
Insert a Xerox color ink
cartridge.
249
Message
No mailbox entries
to report.
Meaning
You tried to print a mailbox
list, but there aren’t any
mailboxes on the
WorkCentre.
No Phonebook
You tried to print a
entries to report.
Phonebook, but there aren’t
any speed dial entries.
No yellow ink.
Either the yellow ink
Load cartridge.
cartridge is missing or an
ink cartridge made for
another machine is
installed in the WorkCentre.
No yellow ink. Press The ink supply in the yellow
CARTRIDGE key.
ink cartridge is out.
Open cover or press The document either
EXIT to clear scanner. remained in the document
tray or was partially fed into
the scanner.
Out of paper.
The WorkCentre is out of
Please add paper.
paper.
Paper misfeed or
The paper did not load
jam. Press FEED to
properly into the printer.
clear.
Action
No action.
No action.
Insert a Xerox color ink
cartridge.
Insert a Xerox color ink
cartridge.
Press EXIT/CLEAR to clear the
document, or open the
scanner cover and remove
the document.
Load up to 150 sheets of
paper in the paper tray.
Press the FEED key to clear
the misfed or jammed
paper.
250
Message
Password
already in use.
Meaning
You entered a password
used elsewhere on the
WorkCentre. For example,
you may have entered your
security password as the
password for a mailbox.
Password must
You did not enter a fourhave 4 digits.
digit password.
PC error. Reload
While using a PC
pages.
application to scan a
document, an error
occurred.
PC error. Try again. While using a PC
application to print or scan
a document, an error
occurred.
PC not connected. The WorkCentre cannot
communicate with your PC.
Action
Enter a unique four-digit
password.
Check the password; be
sure to enter all four digits.
Reload the document in the
document tray and try
scanning again.
Retry the task. If you
receive the error message
again, restart your PC.
Do one or more of the
following:
1.Make sure power is
supplied to both the
WorkCentre and your PC.
2.Make sure the printer
cable connects the
WorkCentre to your PC.
3.Turn your PC off, then
turn it on.
251
Message
Pending jobs full.
Try again later.
Phone is off hook.
Reseat handset.
Meaning
The job queue is full.
The telephone connected
to the WorkCentre is offhook.
Print Mode is offline. You were unable to print
because the print mode is
set to offline.
Print Mode is PC
printing only.
Printer unavailable.
Printer paper jam.
Press FEED to clear.
Action
Delete or print any pending
jobs. Try the operation later,
after some pending jobs
have completed.
Place the handset on the
cradle.
Press the MODE key to
change the print mode to
print & fax or PC printer
only.
You were unable to print or Press the MODE key to
copy because the print
change the print mode to
mode is set to PC printer
print & fax.
only.
The WorkCentre cannot
Do one or more of the
print the documents stored following:
to memory, or is in use.
1.Make sure paper is
loaded in the paper tray.
2.Make sure a print head or
cartridge is installed.
3.Make sure the printer
cable connects the
WorkCentre to your PC.
4.Clear any printer jams.
5.Wait until the current print
job finishes.
There is a paper jam in the Press and hold the FEED key
printer.
to clear the jam.
252
Message
Meaning
Action
Receive ended.
Press FEED to clear.
The WorkCentre could not
receive the fax because of
a paper jam in the printer.
Receive ended.
Paper out. Add
paper.
Remote was busy.
All redials tried.
The WorkCentre ran out of Load up to 150 sheets of
paper while receiving a fax. paper in the paper tray.
Remote was busy.
Will redial.
You can wait for the
WorkCentre to redial the
number or you can send
the fax later.
The remote fax machine’s
line is busy (busy tone
detected). The WorkCentre
used all the specified redial
attempts.
The remote fax machine’s
line is busy (busy tone
detected). The WorkCentre
will redial the number.
Remove any paper from the
paper tray and the printer
output tray, and then do
one of the following:
1.If the paper’s trailing edge
is visible in the paper tray,
grasp the edge and press
and hold the FEED key as the
WorkCentre backs out the
page.
2.If the paper’s leading
edge is visible in the printer
output tray, grasp the edge
and press the FEED key. The
WorkCentre feeds the
Check the telephone line
and verify that the remote
fax machine is functional.
Resend the job later.
253
Message
Scanner cover
open. Clear docs
and close.
Scanner jam/long
original: No reply.
Scanner jam. Open
cover to clear.
Scanner not
available.
Speed dial nn
has no fax number.
Meaning
Action
Either the scanner cover is
open or you opened it while
the WorkCentre was
scanning a document.
You did not press START to
fax a long document. The
WorkCentre canceled the
job.
The document did not load
into the scanner properly.
Press EXIT/CLEAR to remove
any pages from the
scanner, and then close the
scanner cover.
Resend the long document,
or if there is a scanner jam,
press EXIT/CLEAR to clear it.
Remove your originals from
the document tray. Open
the scanner cover and
remove the misfed page.
Close the cover and reload
the document.
You tried to copy or scan a Do one or more of the
document while the
following:
scanner was unavailable.
1.Make sure the scanner
cover is closed.
2.Clear any scanner jams
by pressing the EXIT/CLEAR
key.
3.Open the scanner cover
to manually remove any
jammed pages.
You pressed a speed dial
Assign a fax number to the
number that doesn’t have a speed dial number in your
fax number assigned to it. Phonebook.
254
Message
Will redial. No dial
tone. Check line.
Wrong passwordretry ****.
Yellow low. START if
OK, or CARTRIDGE .
Meaning
The WorkCentre could not
detect a line current or dial
tone. The WorkCentre will
redial the number.
Action
Do one or more of the
following:
1.Make sure the
WorkCentre is connected to
a telephone wall plug.
2.Make sure your
telephone or answering
machine is connected to
the WorkCentre.
You entered an invalid
Make sure you have the
password.
correct password, then
enter it again.
The ink supply in the yellow Check the printed pages. If
ink cartridge is low.
the print quality is good,
press START to clear the
message and continue
using the cartridge. If the
print quality is not good,
replace the yellow ink
cartridge.
255
Understand error codes
This section lists the error codes you may see the
WorkCentre LCD and in printed reports. An error code
indicates a problem occurred during fax transmissions or
reception.
Code
E001
E003
E004
E005
Meaning
Communication ended
without errors.
The remote machine sent a
disconnect signal while the
WorkCentre was waiting
for the remote machine to
identify its capabilities.
The telephone line dropped
while communicating with
the remote machine.
Action
No action.
Retry the operation. If
unsuccessful, test with a
known good machine.
Call the remote machine
with a handset to verify the
phone line is good. Then
retry the operation.
The remote machine did not Call the remote machine
respond while the
with a handset to verify the
WorkCentre was waiting
phone line is good.
for a confirmation to send.
The remote user may have
stopped the fax machine
while receiving, or the
telephone line could be
bad.
256
Code
E006
E007
E008
E009
E010
Meaning
An internal error occurred at
the WorkCentre. You may
have tried to send a
document, but it was not
found in memory, or the
data needed to send a
document could not be
found
An internal error occurred at
the WorkCentre.
The remote machine did not
respond after the
WorkCentre’s three
attempts to confirm the
remote machine’s ability to
receive the fax. The
telephone line could be
noisy.
There is a transmission
speed mismatch between
the WorkCentre and the
remote machine, which can
be caused by a noisy phone
line. The two machines will
try different transmission
speeds.
The WorkCentre timed out
when it received a (PRI)
signal (T3 timeout).
Action
Retry the operation.
No action.
Retry the operation. If
unsuccessful, test with a
known good machine.
If this is a consistent
problem when sending a
fax to the remote machine,
always send the fax at
slower speed or at a later
time.
Check the WorkCentre with
a known good machine.
257
Code
E011
E012
E013
E014
Meaning
Action
The remote machine is
busy. The WorkCentre used
all of its redial attempts.
The WorkCentre received
an illegal disconnect signal
from the remote machine.
There could be a problem
with the remote machine.
The WorkCentre received
an unexpected signal or
illegal command from the
remote machine. There
could be a problem with the
remote machine.
While transmitting, the
WorkCentre received a
Memory Full or Out of
Paper signal. The page was
not completely received, or
a page was received with
an unacceptable number of
errors. There could be
telephone line noise or line
errors.
Use a handset to check the
remote machine. Retry the
operation at a later time.
Check the WorkCentre with
a known good machine.
Check the WorkCentre with
a known good machine.
Check the remote machine
and the telephone line.
Reduce the transmission
speed and try again.
258
Code
Meaning
Action
E015
The WorkCentre had an
error while transmitting, or
there were mismatched
identification signals
between the two machines.
E016
The WorkCentre received
a confirmation to end retries
from the remote machine
when it tried to end a
retransmission.
The password sent from the
WorkCentre did not match
the password from the
remote machine.
The WorkCentre does not
have a document stored for
remote retrieval (poll out).
Check that junk mail is
disabled on the remote
machine (this feature filters
out calls from unknown fax
numbers). Retry the
operation.
No action.
E017
E020
E021
E022
Call the remote location and
verify the password. Retry
the operation.
Store a document to be
retrieved, and then contact
the remote location to retry
the operation.
The password you entered Call the remote location and
to retrieve the document
verify the password. Retry
from the remote machine
the operation.
(poll in) is incorrect.
The remote machine does Check that junk mail is
not have the capability to
disabled on the remote
respond as requested. The machine. Call the remote
WorkCentre is not
machine with a handset to
compatible with the remote verify it is still operable.
machine.
Then retry the operation.
259
Code
E023
E024
E025
E026
Meaning
Action
A line of data could not be
decoded within the
prescribed time, or there is
a transmission speed
mismatch (receive errors).
The WorkCentre timed out
while receiving a fax
because it did not receive a
command from the remote
machine within the
required time frame.
The remote machine
cannot do what you are
requesting from the
WorkCentre.
Communications are
terminated due to poor line
conditions resulting in too
many errors.
The WorkCentre did not
receive a post message
response from the remote
machine after three
attempts. The WorkCentre
used all of its retry
attempts.
Check the WorkCentre with
a known good machine.
Call the remote location and
have the fax resent, or
retrieve the document from
the remote machine (poll
in).
Check the WorkCentre with
a known good machine.
Check the WorkCentre with
a known good machine.
260
Code
E027
E028
Meaning
Action
The telephone line dropped
while the WorkCentre was
receiving a fax from the
remote machine.
The WorkCentre received
an incorrect password from
the remote machine.
Call the remote machine
with a handset to verify the
phone line is good. Then
retry the operation.
Call the remote location and
verify the user has the
correct password. Retry
the operation.
Locate and correct the
error.
Make sure the
WorkCentre’s phone line is
plugged in and operational.
Use a handset to dial the
remote machine and verify
that its line is good.
Make sure there is a
document stored to
memory or in a mailbox,
and then have the remote
user retry the operation. If
you don’t have a document
stored for remote retrieval,
notify the remote user.
E029
Internal machine error.
E039
The WorkCentre did not
detect a dial tone and it
used all of its redial
attempts.
E040
The remote machine tried
to retrieve a document
stored on the WorkCentre.
261
Code
E042
E043
E044
E045
Meaning
The remote machine did not
respond within 60 seconds
after starting the DTMF
operation. You may not
have entered the DTMF
digits within 60 seconds
after DTMF started.
The remote machine does
not have a document stored
for retrieval (poll in), or you
used an incorrect
password.
The WorkCentre did not
receive a response from the
remote machine within 60
seconds. The WorkCentre
used all redial attempts.
There could be a problem
with the remote machine or
it may not be a fax machine.
The WorkCentre did not
receive a response from the
remote machine within the
required time frame (T2
time-out error).
Action
Retry the operation, using
correct DTMF procedures.
Check with the remote user
to verify a document is
stored for retrieval. If a
password is needed, make
sure it is correct.
Use a handset to call the
remote number and confirm
whether or not it’s a fax
machine. If you dialed a
remote fax machine, retry
the operation.
Retry the operation.
262
Code
E046
E048
E049
Meaning
Action
The WorkCentre did not
receive a response from the
remote machine within the
required time frame
(CCITT T1 time-out error).
The WorkCentre used all
redial attempts. There could
be a problem with the
remote machine or it may
not be a fax machine.
The WorkCentre stopped
receiving the fax because
its memory is full.
Use a handset to call the
remote number and confirm
whether or not it’s a fax
machine. If you dialed a
remote fax machine, retry
the operation.
Increase memory by
deleting or printing the
documents stored to
memory. Set the Receive
option To print. Retry the
operation.
The WorkCentre cannot
Correct the printer problem
receive the call because of and retry the operation.
a problem with its printer.
For example, you could
have the Receive option
set To print and the If
cannot print option set to
Do not answer. If the
WorkCentre cannot print
because of a problem, such
as no paper loaded, it will
not answer the call.
System
Requirements
The software that is included with the WorkCentre 450c
requires an IBM compatible PC with the following
specifications:
Xerox ControlCentre
• an Intel (or compatible) 80386, 80486, or Pentium™
microprocessor
• VGA, SVGA, or Multi-sync color monitor
• 8 megabytes (Mb) of random access memory
(RAM)
• a hard disk with a minimum of 10Mb of free space
Pagis Pro (Windows95 only)
• an Intel (or compatible) 80486 or Pentium™
microprocessor
• VGA, SVGA, or Multi-sync color monitor
• 16 megabytes (Mb) of random access memory (RAM)
and at least 16 megabytes (16Mb) of virtual memory
(swap space on your hard disk)
• a hard disk with a minimum of 20Mb of free space in
which to install Pagis Pro; the 20Mb minimum disk
space requirement enables installation of all Pagis Pro
application software and one OCR language pack.
Please allow 700Kb for each additional language pack
you intend to install.
Textbridge Pro
(Windows 3.1/3.11 only)
• an Intel (or compatible) 80486 or Pentium™
microprocessor
• VGA, SVGA, or Multi-sync color monitor
• 8 megabytes (Mb) of random access memory (RAM)
• a hard disk with a minimum of 20Mb of free space