1
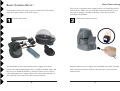
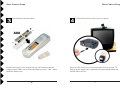
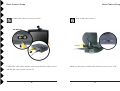
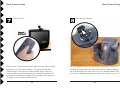
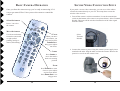
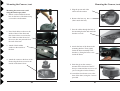
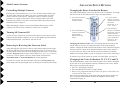
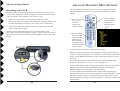
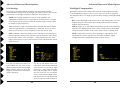
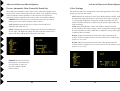
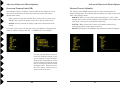
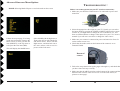
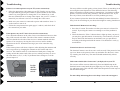
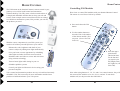
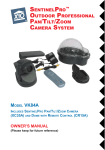
SENTINEL™
OUTDOOR PROFESSIONAL
PAN/TILT/ZOOM
CAMERA SYSTEM
MODEL VK79A
INCLUDES SENTINEL PAN/TILT/ZOOM CAMERA (XC24A)
AND DOME WITH REMOTE CONTROL (CR15A)
OWNER’S MANUAL
(Please keep for future reference)
INTRODUCTION
CONTENTS
Congratulations! You have purchased X10’s premier video
surveillance solution. The Sentinel Pan/Tilt/Zoom Camera
has superior image quality, a high powered zoom, and pan
and tilt motion. You can operate the camera through walls
using the supplied remote control.
Introduction ........................................................................ 2
It comes with a weather resistant dome for outdoor
mounting under an eve, on your patio, or deck, for
example.
Remote Control Features .................................................. 15
The camera uses X10’s 2.4 Gigahertz wireless technology
to transmit live video through walls to a television up to
100 feet away. If you prefer a secure video connection, you
can use a video cable to connect the camera directly to
your TV.
The camera is also designed so that you can combine
multiple cameras to provide comprehensive coverage of
your home or business. Use the remote control to switch
between cameras so that you don’t miss anything that goes
on.
This owner’s manual will take you through setting up and
using the camera. A new world of sophisticated video
surveillance is waiting for you!
Basic Camera Setup ............................................................ 4
Basic Camera Operation ................................................... 12
Secure Video Connection Setup ....................................... 13
Storing/Selecting/Changing Positions ......................... 15
Clearing Positions ........................................................ 16
Focus Controls ............................................................. 16
Iris Controls ................................................................. 16
Mounting the Camera ....................................................... 17
Mounting the Camera on a ceiling ............................... 18
Mounting the Camera on a wall ................................... 20
Picture Orientation ............................................................ 22
Multi-Camera Systems ..................................................... 23
Advanced Setup Options .................................................. 25
Changing the Housecode ............................................. 25
Changing Camera Unit Codes ..................................... 25
Recording the camera with a VCR .............................. 26
Advanced On Screen Menu Options ................................ 27
Troubleshooting ................................................................ 39
Home Control ................................................................... 42
2
3
Basic Camera Setup
BASIC CAMERA SETUP
Your Sentinel Camera is ready to go out of the box! Follow these
steps for a quick setup of your new camera.
First you’ll set up and test the camera before you install the camera
into the dome. Make sure you read this entire manual first in case
you want to change a setting on the base of the camera before
installing it in the dome.
Connect the camera to power.
Unpack these items.
You should have: the camera and its power supply; the camera
remote; the camera mounting bracket, a weather resistant dome, and
the screws to install the bracket. A wireless video receiver, and it’s
video cable and power supply (shown above but sold separately) is
also required if you want to use the camera wirelessly.
Plug the camera’s power supply into a standard wall outlet. Plug the
other end into the camera. Remove the protective cover from the
camera’s lens.
4
5
Basic Camera Setup
Basic Camera Setup
Insert batteries into the remote.
Remove the battery cover and put four (4) AAA batteries into the
camera remote. Make sure to match the batteries to the + and – marks
inside the battery case.
6
Connect the wireless video receiver to power.
Put your video receiver in a convenient place near or on your TV.
Plug its power supply into a standard wall outlet and the other end
into the video receiver.
7
Basic Camera Setup
Basic Camera Setup
Connect the video receiver to your TV.
Connect the video cable into the video-out jack on the video receiver
and into the video-in jack on your TV.
8
Turn on the video receiver.
Make sure the power switch on the video receiver is set to “ON.”
9
Basic Camera Setup
Basic Camera Setup
Turn on your TV.
Fine tune the antennas.
Turn on your TV and select its video input. Use the Video or Select
buttons on your TV remote control, or try channel 0 and then
Channel Down. The camera’s picture should appear. Note, the
picture will be upside down because the camera is intended to be
mounted on a ceiling or overhang, after installing it into the dome.
See page 22 if you want to flip the picture.
10
Once the camera and receiver are in place, adjust their antennas so
that they face each other. The side of the camera’s antenna with the
dot on it should face the side of the receiver’s antenna marked with
four squares. Adjust the positions to improve the picture on your TV.
11
BASIC CAMERA OPERATION
SECURE VIDEO CONNECTION SETUP
Once you have the camera set up, you’re ready to start using it. It’s
easy to get started. Here’s how you use the remote to control the
camera:
If you prefer a secure video connection, you can use a video cable to
connect the camera directly to your TV. This setup does not use the
wireless video receiver.
1. Turn off the camera’s wireless transmitter: Locate the transmission
switch on the bottom of the camera (see picture below). Select Transmit
Disable. This turns off the wireless transmission of the video signal
from the camera.
Select the camera
Press C1 to select
the camera.
Move the camera
Focus
Use the arrow buttons
to turn the camera left
or right (called
panning) and up or
down (called tilting).
When you move
the camera, you
may need to press
Autofocus to
bring your subject
into focus.
Center
Press Center, to
move the camera
back to its starting
position
Select
Transmit
Disable.
2. Connect the camera to power: Plug the camera’s power supply into a
standard wall outlet. Plug the other end into the camera. Remove the
protective cover from the camera’s lens.
Zoom
Press Zoom In to zoom
closer to your subject
and see more detail.
Press Zoom Out to see
a bigger area.
12
13
Secure Video Connection Setup
3. Connect the video cable: Plug one end of a video cable into the camera.
Run the rest of the cable to your TV.
4. Connect the other end of the cable to the video-in jack on your TV.
REMOTE CONTROL FEATURES
Your Sentinel Camera includes many versatile and powerful features. This
section will show you how to get the most from your camera.
Stored Positions
Your Sentinel Camera can remember nine locations, including vertical/
horizontal positions, and zoom settings.
Storing a Position
You can store up to nine positions in your camera. Here’s how:
1. Press and release C1.
2. Press and hold the Setup button on your remote control until the C1
button lights green.
3. Move the camera to the position you want to store. Press Autofocus to
set the focus for that position.
4. Press the number button (1 through 9) on the remote to store the
position under that button.
5. Repeat steps 2 and 3 for each position you want to store.
6. When finished, press Setup to save the positions you entered.
Selecting Positions
Once you’ve stored positions in the camera, press the desired number
button on the remote to move to that position. If you press Sweep, the
camera will automatically switch through all the positions you’ve stored.
Press any of the movement buttons on the remote to stop the camera from
sweeping.
Turn on your TV and select its video input. Use the Video or Select
buttons on your TV remote control, or try channel 0 and then
Channel Down. The camera’s picture should appear. Note, the
picture will be upside down because the camera is intended to be
mounted on a ceiling or overhang, after installing it into the dome.
See page 22 if you want to flip the picture.
14
Changing Stored Positions
You can store new positions over positions you’ve already stored, by
following the instructions above. Just store the new position using a button
that you programmed before.
15
Remote Control Features
Mounting the Camera
Clearing Stored Positions
You can delete all stored positions. Here’s how:
1. Press and release C1.
2. Press and hold Setup until the C1 button lights green.
You can install the Sentinel Camera into the supplied dome and mount it on
a ceiling, or you can use the supplied mounting bracket to mount the
complete assembly on a wall. In either case make sure the ABCD channel
switch, and Transmit Enable/Disable switch on the base of the camera are
set as you desire before installing the camera in the dome.
You can then attach the camera to the base of the dome using the brass
screw on the outside of the dome’s base.
3. Press Center.
4. Press Setup again.
Focus Controls
In addition to the auto focus feature, you can control the focus of the
camera manually. Press the focus buttons, Up or Down, to adjust the focus.
Use this feature to improve the picture after auto focus, or to adjust the
focus of a specific object in the camera’s view.
Iris Controls
Brass screw
The camera’s iris controls the amount of light that enters the lens. The
camera automatically adjusts the iris when it focuses so that it has the right
amount of light for your subject. If you want to brighten the picture, press
the Iris Up button to open the iris wider and let more light in. To limit the
amount of light in the picture, press Iris Down to close the iris more.
16
Warning! The power supply is intended for indoor use only. Do not install
the power supply outdoors.
17
Mounting the Camera, cont.
Camera should be installed into the base of the dome after knocking out the
holes, knock out 3 holes for mounting on a ceiling or 1 hole for the wall
mounting bracket:
Mounting the Camera, cont.
4. Attach the camera to the base of the
dome using the brass screw on the
outside of the dome’s base.
Mounting the camera on a ceiling
1. Knock out the three holes on the base
of the dome using a screwdriver and
hammer.
5. Plug the power and video
cables into the camera.
2. Insert the white rubber plugs into the
knockout holes on the inside of the
base.
3. Attach the black rubber washers on
the outside of the base.
6. Remove the lens cap.
(Don’t touch the lens).
7. Attach the base of the dome to a
ceiling by inserting three screws
into the knockout holes on the
inside of the base.
8. Point the pip on the camera’s
antenna in the direction of the TV
that you connected the receiver to
(if you’re using the wireless
feature).
9. Attach the clear dome cover to the
base of the dome, using the 5
screws provided.
18
19
Mounting the Camera, cont.
Mounting the Camera, cont.
5. Plug the power and video
cables into the camera.
Mounting the camera on a wall
using the bracket provided
1. Knock out the ONE hole shown
here on the base of the dome using
a screwdriver and hammer.
6. Remove the lens cap
(Don’t touch the lens).
7. Pass the cables through the hole in
the mounting bracket and attach the
bracket to a wall.
2. Put a black rubber washer on the
inside of base of the dome and
then insert a brass screw into the
hole. Make sure that the end of
the screw does not protrude from
the wall of the base.
3. Attach a black rubber
washer on the outside of
the base.
8. Attach the base of the dome to the
mounting bracket. Then, tightly
fasten the dome assembly to the
bracket, by fixing the brass screw
inside the dome.
4. Attach the camera to the base of the
dome using the brass screw on the
outside of the dome’s base.
9. Point the pip on the camera’s
antenna in the direction of the TV
that you connected the receiver to (if
you’re using the wireless feature).
10. Attach the clear dome cover to the
base of the dome, using the 5 screws
provided.
20
21
Additional Setup Options
MULTI-CAMERA SYSTEMS
Picture Orientation
Vertical Orientation: If you choose not to mount the camera upside down.
Here’s how to flip the picture vertically in the camera so that the display on
the TV is the right way up:
The Sentinel Camera System is designed so that you can use up to four
cameras together. Follow the steps in this section to set up and use your
additional cameras.
1. Press and release C1.
Setting Up Multiple Cameras
2. Press and hold Setup on the remote until the C1 button lights green.
Each camera comes pre-programmed as camera 1 (C1). The first camera
you set up will stay C1. Program the additional cameras as C2, C3, and C4:
3. Press Iris Up to flip the picture. Press Iris Down to flip it back.
4. Press Setup again to save this setting.
Horizontal Orientation: You can also use the camera like a rearview
mirror by reversing the picture horizontally from left to right:
1. Press and release C1.
1. Pick the camera to use as C2.
Follow the instructions at the
beginning of the manual to set it up.
2. Press and hold Setup on the remote until the C1 button lights green.
3. Press Focus Up to reverse the picture.
2. Set the mode switch on the bottom
of that camera to Program.
Press Focus Down to reverse it back.
4. Press Setup again to save this setting.
Bottom of
camera
Note, if you flip the picture vertically,
you also need to flip it horizontally.
This also makes the left and right
movement buttons work the correct
way for upside down mounting.
3. Press C2 on your remote control to
set this camera to C2.
4. Set the mode switch back to
Transmit Enable.
Up and Down arrows flip
the camera image from
left to right (mirror
image).
Up and Down arrows
flip the image from
top to bottom.
22
Repeat these steps for the rest of the cameras, using C3 for the third camera
and C4 for the fourth camera.
23
Multi-Camera Systems
ADVANCED SETUP OPTIONS
Controlling Multiple Cameras
Changing the House Code for the Remote
Pressing any camera button (C1, C2, C3 or C4) turns on that camera and
turns the other cameras off. When you press a camera button, all of the
camera controls on the remote– moving the camera, zooming, storing
positions, etc.–apply to that camera. To use stored positions, press the
button for the camera you want to control then follow the instructions for
Stored Positions on page 15.
The Camera and Remote come set to House Code A by default. To change
the House Code on the remote follow steps 1 through 4 below:
1. Press and release the
X10 button (red
indicator flashes).
3. Use the number
buttons to enter the
number equivalent to
the chosen
Housecode (1=A,
2=B....16=P).
Note: for multiple camera systems that include different types of X10
Cameras (XCam2 or Ninja cameras) a Transceiver is required.
Turning All Cameras Off
To turn all your cameras off, press the X10 button on your remote control
followed by the number 1 button (not C1) on the number pad, and then the
Off (tilt down) button. All cameras will now be off.
Removing or Restoring the Onscreen Label
After changing the code for the camera, as described on the previous page,
the House and Unit Code is shown at the bottom of the TV screen. If you
do not want the House and Unit Code displayed on the screen, set the mode
switch to Program, then press the camera button (C1, C2, C3, or C4) once
to remove it. Press again to restore it. Set the mode switch back to
Transmit Enable or Transmit Disable for normal operation.
To remove or restore the onscreen label (while NOT in Program mode)
press Setup (until the green light stays on) then press Sweep (0) then Setup.
24
4. Press the Setup
button to confirm the
Housecode. The red
indicator blinks to
indicate the code set,
(twice for B, three
times for C, etc.),
then turns off.
2. Press and hold Setup
until the red indicator
lights steadily.
Release the Setup
button.
Changing the camera’s code: Once you change the House Code on the
remote control, you have to change the House Code on the Sentinel
Camera. Change the mode switch on the bottom of the camera to Program,
then press the C1 button on the Sentinel Remote Control. The camera is
now set to the new house code. Put the mode switch back to Transmit
Enable (or Transmit Disable if you are using the secure video connection).
To learn how to use the remote to control your X10 lights, see page 39.
Changing Unit Codes for Buttons C1, C2, C3, and C4
The Sentinel Remote comes set to control cameras set to units 1 through 4.
If you want to set your Sentinel Cameras to different Unit Codes, follow
these steps to reprogram the remote:
1. Press C1. The button will flash.
2. Press and hold SETUP until C1 lights steady.
3. Press: C2 to program the remote to Units 5-8; press C3 for Units 9-12;
or, press C4 for Units 13-16.
Once you have changed the group Unit Codes on the remote control you
have to reprogram the cameras. Follow the Multiple Camera Setup
instructions on page 23.
25
Advanced Setup Options
ADVANCED ONSCREEN MENU OPTIONS
Recording with a VCR
Whether you have set up your camera to use the wireless receiver or the
secure video connection, you can configure your Sentinel Camera so that
you can record its video signal on your VCR. It’s easy:
1. Make sure your VCR is connected to play back on your TV.
2. Set up your camera according to the instructions on pages 4 thru 11 (for
wireless transmission) or pages 13 and 14 (for secure connection).
3. Connect the video cable from the camera or video receiver into the
Video In jack on your VCR.
With the camera connected to the VCR, you will be able record
surveillance video while watching on your TV. Check your VCR owner’s
manual if you aren’t sure how to select the Sentinel Camera as the video
source.
The onscreen menus change the low-level, technical operation of the
Sentinel camera. In most cases you do not need to change any of these
settings.
3. Press the Right
arrow button to
bring up the
onscreen menu.
1. Press C1, C2,
C3, or C4 to
select the
camera you
want to control.
2. Press and hold
Setup until the
camera button
light stays on.
Press and hold
setup again until
the camera button
stays on again.
To open the onscreen menus, follow these three steps:
When it’s open, the onscreen menu is displayed over the picture from the
camera. Use the Up and Down arrow buttons to select items from the main
menu. Use the Right arrow button to select a menu item and move into its
sub-menu.
To exit the onscreen menu, press the Left arrow button until the menu
disappears. Then press C1, C2, C3, or C4 as appropriate.
To discard all changes made in the onscreen menus and restore the default
settings to the camera, select the PRESET submenu, and change the
PRESET option to ON. See page 37 for more details.
If you leave the onscreen menu open for a while without pressing any
buttons on the remote, you will stop being able to control the menu. Follow
the steps 1 through 3 above to enter the menu mode again. You can then
close the menu by pressing the Left arrow button, or continue working with
menu options.
26
27
Advanced Onscreen Menu Options
Advanced Onscreen Menu Options
Iris Settings
Backlight Compensation
Iris settings control the amount of light let into the Sentinel camera.
Changing these settings affect how bright your picture will be, and how the
camera reacts to changes in lighting conditions. Your options are:
Backlight compensation settings affect how the camera adjusts for light
sources behind the camera’s view or focus. You can use this to adjust for
the silhouette effect you might get when looking at things with light behind
them.
·
PEAK: This setting controls the reaction of the automatic iris
adjustment in relation to the average light level in the picture. A higher
level of peak sets the camera so that the automatic light controls adjust
to a higher average light level.
·
BLC: Turns Backlight Compensation On or Off. Turning BLC On will
brighten the part of the picture that is being silhouetted, but will also
brighten the background.
·
ALC: Automatic Light Control determines whether the camera should
adjust for light differences automatically or manually. If you set this to
manual, you can set the level of lighting control that will be used.
·
AREA: If BLC is on, the AREA setting allows you to set the sensitivity
separately for different parts of the camera’s field of view. The default
setting only turns on BLC in the center of the camera’s viewing field.
·
AES: (Automatic Exposure Setting) selects whether to use automatic or
manual exposure settings, how long the exposure should be. This affects
how fast the camera “sees” an image – a long exposure time lets more
light in and could give you a clearer picture, but it will mean that motion
is harder to see.
·
SENS: Adjusts the sensitivity of the Backlight Compensation. Low
means that the camera responds less to backlit conditions, higher
settings means that compensation turns on more quickly.
Use the Up and Down arrows to
select IRIS (use the Left Arrow
(Dim) to back out of the menu). With
IRIS selected, when you press the
Right arrow button the screen above
right is displayed.
Use the up and Down arrows (On
and Off) to select the desired menu
item from the screen above right
(Peak, ALC, AES). Then select the
item with the Right Arrow. Adjust
the item with the Up and Down
arrows. Select with the Right Arrow,
and then back out of the menu with
successive presses of the Left arrow.
28
29
Advanced Onscreen Menu Options
Advanced Onscreen Menu Options
Freeze, Automatic Gain Control & Sensitivity
Color Settings
The settings for Automatic Gain Control (AGC) affect the brightness and
picture levels of the video produced by the camera. AGC amplifies existing
video to help the camera reproduce a video signal at low light levels.
Sensitivity controls adjust how the camera works in low light conditions.
The options in the color settings menu control the appearance of the video
picture you get from the camera.
·
FREEZE: Freezes the picture in a still mode until you select Off, or
until you move the camera with the remote control.
·
AGC Levels: Selects the base level of gain control used when
automatic gain control is on.
·
·
·
ATW: Adjusts the settings for Auto Trace White Balance (ATW). ATW
automatically adjusts the picture to accurately show white in response
to varying light conditions. Change the setting towards R (red) or B
(blue) to tell the ATW how to adjust for your specific light conditions
more accurately.
·
AWB: Auto White Balance works with ATW to maintain accurate
levels of white in the video from the camera. Change the setting towards
R (red) or B (blue) to tell the AWB how to adjust for your specific light
conditions more accurately.
·
R Gain: Adjusts the saturation of red in the video produced by the
camera. Set this to higher levels to correct for low levels of red in your
picture, or vice versa.
·
B Gain: Adjusts the saturation of red in the video produced by the
camera. Set this to higher levels to correct for low levels of blue in your
picture, or vice versa.
SENS: Changing the sensitivity changes how the camera compensates
for low light. The higher the setting, the more light the camera lets in
when in the dark, and the better the picture that results.
FREEZE: Freezes the Field or
the Frame in a still mode until
you select Off, or until you
move the camera with the
remote control.
30
31
Advanced Onscreen Menu Options
Advanced Onscreen Menu Options
Automatic Picture Control
Lens Settings
Automatic Picture Control (APC) changes the geometry of the picture
produced by the camera. These changes are slight and it can be hard to
notice how the picture is different.
These settings control how the lens in the Sentinel Camera behaves during
normal use.
·
H-GAIN: The Horizontal Gain setting adjusts the horizontal (left to
right) line of the picture.
·
V-GAIN: The Vertical Gain setting adjusts the vertical line of the
picture.
32
·
Digital ZOOM: The camera uses digital zoom (10X) after reaching the
maximum optical zoom level (22X). Digital zoom produces a slightly
less clear picture than optical, and can be turned off.
·
ZOOM Speed: Controls how quickly the camera zooms in.
·
ZOOM Type: Choose WIDE or TELE.
·
Focus Speed: Controls how quickly the camera focuses.
·
Focus: Choose between Auto (automatic continuous) and Manual focus
(the default setting). If using Manual Focus you can select a long focal
length (INF, or infinite) to allow the camera to focus on objects any
distance away, or a short focal length (NEAR) if you are using the
camera only to view objects relatively close. In Manual mode the
camera will set focus automatically after a zoom in or out. If you select
Auto, you can use the automatic continuous setting until you zoom in or
out, at which point the camera sets back to Manual.
33
Advanced Onscreen Menu Options
Picture Reversal
Advanced Onscreen Menu Options
Alarm Position
You can set the Sentinel Camera to reverse, either horizontally, vertically
the picture it produces. Or you can do both.
·
H. REV: Reverses the picture horizontally, or from left to right. Set this
to “ON” if you want to use the camera like a mirror for viewing objects
behind you.
·
V. REV: When set to “ON” this settings mirrors the picture vertically,
allowing you to mount the camera upside down, as on a ceiling.
The Sentinel Camera does not use this feature.
See page 22 for an alternate method of reversing the picture horizontally or
vertically.
·
POSI/NEGA: Lets you select a
Positive or Negative image.
34
35
Advanced Onscreen Menu Options
Advanced Onscreen Menu Options
Onscreen Camera Label (ID)
Restore Presets (defaults)
The Sentinel Camera can display a title or label for the camera on screen.
This can be useful when you have more than one camera and want to
identify them easily.
The settings in the PRESET menu work to set the camera back to its
default configuration. This will discard any changes you made in any of the
other video settings menus.
·
Select characters from the available list to set the title you want to use.
·
·
UP: Sets the position for display of the title to the top of the screen.
PRESET: When you select this option and change it to “ON,” all the
settings in the camera will be changed to their defaults. The camera will
reset itself, so the picture will go dark temporarily.
·
DOWN: Sets the position for display of the title to the bottom of the
screen.
·
INITIAL: When selected, the camera will initialize autofocus by
focusing through the entire range of the lens.
If you don’t select your own title, the camera will default to displaying the
camera’s address setting as the title – “CAMERA A1” for example.
·
PHASE: This option is not enabled in the camera and cannot be changed.
Use the Up and Down arrows to
select the desired position on the
screen (up/top or down/bottom).
Then use the Up and Down arrows
to select characters from the screen
above, selecting each character with
the Right Arrow. Then back out to
the main menu with successive
presses of the Left arrow.
36
37
Advanced Onscreen Menu Options
TROUBLESHOOTING
·
MARK: Selecting Mark ON puts a cross-hairs mark on the screen.
If there’s no camera picture on your TV (wireless connection):
1. Make sure your Wireless Video Receiver is connected to power and
turned On.
Follow the step on page 27 to bring
up the onscreen menu. Then use the
Down arrow to select past the last
item (PRESET), or the Up arrow to
select past the first item (IRIS).
Select MARK with the Right Arrow.
Then select OFF or ON with the Up
and Down arrows. Select with the
Right Arrow, and then back out to
the main menu with successive
presses of the Left arrow.
This will display the MARK menu.
2. Select the appropriate video input on your TV. Usually you can select
the input mode by pressing the VIDEO or INPUT button on the remote
control. Or you might have to change the TV to Channel 0 or 2, and
then use Channel Down to change video inputs. See your TV’s owner’s
manual if you still aren’t sure how to change the video source.
3. Make sure your camera is connected to power and turned on. Press C1
on the remote to turn it on.
4. Check that the mode switch on the bottom of the camera is set to
Transmit Enable.
Bottom of
camera
5. Follow the setup instructions again (pages 4 through 11), and check that
you have done each step correctly.
6. Make sure that the ABCD switches on the bottom of the camera and the
bottom of the wireless video receiver are set to the same letter (see
pictures on next page).
38
39
Troubleshooting
Troubleshooting
If there’s no camera picture on your TV (secure connection):
1. Select the appropriate video input on your TV. Usually you can select
the input mode by pressing the VIDEO or INPUT button on the remote
control. Or you might have to change the TV to Channel 0 or 2, and
then use Channel Down to change video inputs. See your TV’s owner’s
manual if you still aren’t sure how to change the video source.
2. Make sure your camera is connected to power and turned on. Press C1
on the remote to turn it on.
3. Follow the setup instructions again (page 13 and 14), and check all of
the connections you make.
If the picture on your TV isn’t clear (wireless connection):
First, adjust the antennas on the video receiver and Sentinel Camera so that
they point towards each other. The side of the camera’s antenna with the
dot on it should face the side of the receiver’s antenna marked with four
squares. You can also try moving the video receiver itself to another
location near the TV. Sometimes moving it just a foot can make a big
difference.
If the camera picture still doesn’t improve after adjusting the antennas and
receiver position, try changing the channels on the camera and video
receiver. The channel switch is on the bottom of both parts. Change the
setting on both the camera and video receiver, making sure they are set to
the same letter (A, B, C, or D). Try different letter settings to see if the
picture improves.
You may still have trouble getting a clear picture if there is something in the
area using the same frequencies as the Sentinel Camera. The following
things can interfere with the camera’s transmission: 2.4 gigahertz cordless
phones, wireless networks, baby monitors, and microwave ovens. If you
have any of these, turn them off to see if the problem goes away.
If your camera’s picture has been fine and suddenly becomes distorted or
fuzzy, look for new things in your house that might be causing interference.
If the Sentinel Remote isn’t working:
1. Press the C1 button. This makes sure that your camera is selected for
control. Try moving the camera or zooming to see if the problem is
fixed.
2. Check the batteries. If the C1 button doesn’t light up when you press it,
you may have put the batteries in incorrectly, or the batteries you used
may be dead. Take the batteries out and make sure you put them in
according to the diagram inside the remote. If it still doesn’t work, try
new batteries.
If Autofocus doesn’t work correctly:
The Sentinel Camera’s auto focus can’t work correctly if the protective lens
cap is on. Remove the protective lens cap and make sure the lens is clean.
Try zooming out all the way. The camera should automatically refocus
correctly.
If the camera label (like “Camera A1”) is displayed on your TV:
You can turn off the onscreen label easily. Press and hold Setup on the
Sentinel remote control until the green light stays on. Then, press Sweep
(0), and Setup again. This will turn off the label. Repeat these same steps to
turn the label on again.
Set the
ABCD
channel
switch
Bottom of camera
Bottom of receiver
40
For more help with setup please visit: http://www.x10.com/support
41
Home Control
HOME CONTROL
Controlling X10 Modules
The X10 button on the Sentinel Camera’s remote control is your
gateway to a world of useful control and automation
solutions built by X10. Why enter a dark room when there is
a simple and affordable solution that can keep you safe and
secure? From a simple remote control that can turn on a lamp,
to a full-blown automation system, X10 provides you with all
the products you need.
Here’s how to control X10 modules with your Sentinel Remote Control.
The remote is set to House Code A by default.
1. Press and release the X10
button.
2. Use the number buttons to
enter the Unit Code number
of the chosen module. (You
can press 1, then 6 for Unit
Code 16).
With the correct components in your X10 system, you
can have all of these powerful options at your control:
·
Enhance the color, brightness and detail of your
camera’s subject by adding more light automatically
·
Give your home a secure appearance by scheduling
when lights and other electronics turn on and off
·
CAMERA
Turn on house lights while sitting in your car
·
Schedule sprinkler systems
·
Control your lights and electronic devices using your
personal computer
C2
C1
C3
C4
On
Dim
C
Brt
All
Lts on
Distribute audio and video to stereos and televisions
using wireless technology
·
All off
Off
1
2
4
M
n
u
a
l
Foc us
3
5
7
6
8
9
0
Setu p
Iris
X10’s control and automation products are easy to install and extremely
affordable. Visit X10.com today for more information and the latest
products to build and enhance your X10 system.
42
3. Press the appropriate button
(labeled in blue)
for the function
you require (On,
Off, Bright, Dim,
All Lights On, All
Units Off).
Autofocu
s
Note: when using buttons C1, C2, C3, and C4 to control cameras, they will
also turn on X10 modules set to A1, A2, A3, and A4. To turn these
modules off, use the procedure described above.
43
FCC Caution
THIS DEVICE COMPLIES WITH PART 15 OF THE FCC RULES.
OPERATION IS SUBJECT TO THE FOLLOWING TWO CONDITIONS:
(1) THIS DEVICE MAY NOT CAUSE HARMFUL INTERFERENCE, AND
(2) THIS DEVICE MUST ACCEPT ANY INTERFERENCE RECEIVED,
INCLUDING INTERFERENCE THAT MAY CAUSE UNDESIRED
OPERATION.
This equipment generates and uses radio frequency energy, and if not installed and
used properly, that is, in strict accordance with the manufacturers instructions, it may
cause interference to radio and television reception. It has been type tested and found
to comply with the limits for remote control devices in accordance with the
specifications in Sub-Parts B and C of Part 15 of FCC Rules, which are designed to
provide reasonable protection against such interference in a residential installation.
However, there is no guarantee that interference will not occur in a particular
installation. If this equipment does cause interference to radio or television reception,
which can be determined by unplugging the equipment, try to correct the interference
by one or more of the following measures.
• Reorient the antenna of the radio/TV experiencing the interference.
• Relocate the equipment with respect to the radio/TV.
• Move the equipment away from the radio/TV.
• Plug the equipment into an outlet on a different electrical circuit from the radio/
TV experiencing the interference.
• If necessary, consult your local dealer for additional suggestions.
NOTE: Modifications to this product will void the user’s authority to operate this
equipment.
X10 Wireless Technology, Inc. Limited One Year Warranty
X10.com, a division of X10 Wireless Technology, Inc. (X10) warrants X10 products
to be free from defective material and workmanship for a period of one (1) year from
the original date of purchase at retail. X10 agrees to repair or replace, at its sole
discretion, a defective X10 product if returned to X10 within the warranty period and
with proof of purchase. If service is required under this warranty:
Call 1-800-442-5065, visit www.x10.com, or e-mail [email protected].
For help or more information on setup, please visit:
http://www.x10.com/support
X10.com, a division of X10 Wireless Technology, Inc.
3824 North 5th St., Suite C,
North Las Vegas, NV 89032
VK79A-04/06