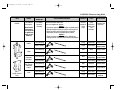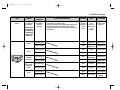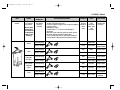
1
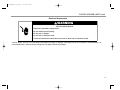
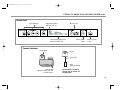
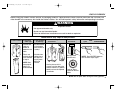
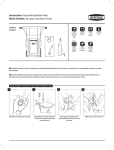
8527278FB 9/25/02 8:30 AM Page 1
®
®
Owner’s
Manual
How to get the most out of your clothes vitalizing system
For questions about features, operation/performance, parts, accessories or service, call 1-866-MYVALET
or visit our website at www.personalvalet.com
8527278B
8527278Body 10/10/02 9:12 AM Page 1
TABLE OF CONTENTS
A NOTE TO YOU ................................................................3
CLOTHES VITALIZER SAFETY..........................................4
Electrical Requirements................................................6
GETTING TO KNOW YOUR CLOTHES VITALIZER..........7
START-UP OVERVIEW ......................................................9
FABRICS NOT RECOMMENDED ....................................10
ACCESSORIES ................................................................11
Hanging Accessories ..................................................11
Tensioning Accessories ..............................................12
Optional Accessories ..................................................13
Optional Accessory Kits..............................................14
LOADING ..........................................................................15
Suit Coat & Jacket......................................................16
Pants & Slacks ..........................................................17
Shirts – Button Up ......................................................18
Polo Shirts & Knits – Non-button Up ........................19
Blouses – Non-button Up ..........................................20
Skirts ..........................................................................21
Dresses or Long Skirts ..............................................22
Sweaters ....................................................................23
Shorts ........................................................................24
FORMULA ........................................................................25
CYCLE SELECTION..........................................................27
MAINTENANCE ................................................................29
FREQUENTLY ASKED QUESTIONS................................30
TROUBLESHOOTING ......................................................32
ASSISTANCE OR SERVICE ............................................34
WARRANTY ......................................................................35
2
8527278Body 9/25/02 8:59 AM Page 2
A NOTE TO YOU
Your Clothes Are Ready When You Are!
Your WHIRLPOOL® PERSONAL VALET® clothes vitalizing system is a breakthrough in home fabric care that gets your clothes
ready-to-wear in about 30 minutes (RegularCare cycle). The clothes vitalizer uses a two-stage process (except for the
GENTLEDRY™ cycle. See “Cycle Selection.”) that leaves your clothes looking neat and smelling fresh. During the first stage, the
clothes vitalizer, through a patented process, creates a mist of heat-activated formula that is circulated within the clothes vitalizer,
penetrating clothing fibers. The second stage of the cycle is the drying stage. The heating element activates the formula and, in
conjunction with the tensioning accessories, works to remove wrinkles and clean odors.
The clothes vitalizer is safe for virtually all your clothes.* Your clothes vitalizer will not only change how you care for your clothes, it
will change your daily routine. In order to maximize your satisfaction, it is important to know what the clothes vitalizer DOES and
DOES NOT do.
IT DOES:
• Remove wrinkles
• Clean odors
• Reduce ironing
• Reduce trips to the dry cleaners
• Finish clothes
IT DOES NOT:
• Remove visible stains
• Give a pressed look
• Dry clean
Before reading through this Owner’s Manual, we recommend that you watch the Use and Care Video if you have not already done
so. The video can be found inside the box that contains the accessories. The video gives many visual instructions on how to use
the accessories, which will help during your first several loads. Some of the material presented in this manual may be easier to
understand after watching the video.
Your clothes vitalizer is designed to be versatile. You will find it is a fast and easy way to care for your clothes. This Owner’s
Manual gives step-by-step instructions for achieving the BEST performance. The Body Shaper and Sleeve Shapers (see page 12)
may not be required for every article of clothing, especially on less wrinkled suit coats, blouses and skirts. When you load clothes, it
is important to remember two key things:
SPACING
Having space around the clothes is directly related to
performance. Two articles of clothing will do better than
three since there is more space for the mist to circulate.
TENSIONING
This is required to remove wrinkles. Some clothes will require
fewer tensioning accessories (Body and Sleeve Shapers) while
others will require all of the recommended accessories.
*For fabrics not recommended for use in the clothes vitalizer, see “Fabrics Not Recommended” section.
3
Safety
Safety
Please read and follow all Safety messages before
using your clothes vitalizing system.
8527278Body 9/16/02 2:20 PM Page 3
CLOTHES VITALIZER SAFETY
Your safety and the safety of others are very important.
We have provided many important safety messages in this manual and on your appliance. Always read and
obey all safety messages.
This is the safety alert symbol.
This symbol alerts you to potential hazards that can kill or hurt you and others.
All safety messages will follow the safety alert symbol and either the word “DANGER” or
“WARNING.” These words mean:
wDANGER
You can be killed or seriously injured if you don't
immediately follow instructions.
wWARNING
You can be killed or seriously injured if you don't
follow instructions.
All safety messages will tell you what the potential hazard is, tell you how to reduce the chance of injury,
and tell you what can happen if the instructions are not followed.
WARNING
Tip Over Hazard
Do not use clothes vitalizer until completely installed.
Install lag bolts securely into wall studs.
Use two or more people to move and install clothes vitalizer.
Reapply tape or strap to secure doors before moving clothes vitalizer.
Failure to follow these instructions can result in death or serious injury.
4
8527278Body 10/31/01 3:17 PM Page 4
CLOTHES VITALIZER SAFETY (cont.)
5
8527278Body 10/31/01 3:17 PM Page 5
CLOTHES VITALIZER SAFETY (cont.)
Electrical Requirements
WARNING
Electrical Shock Hazard
Plug into a grounded 3 prong outlet.
Do not remove ground prong.
Do not use an adapter.
Do not use an extension cord.
Failure to follow these instructions can result in death, fire, or electrical shock.
120-volt, 60-Hz., AC-only, 15- or 20-ampere fused electrical supply is required. (Time-delay fuse or circuit breaker is recommended.) It is
recommended that a separate circuit serving only the clothes vitalizer be provided.
6
Start-up
Start-up
How to get the most out of your clothes vitalizing system
8527278Body 11/6/01 11:22 AM Page 6
GETTING TO KNOW YOUR CLOTHES VITALIZER
1
5
2
6
3
7
1.
2.
3.
4.
5.
6.
7.
8.
Exterior vent
Staging hooks
Hanger bar
Collection basin cover
Interior vent
Formula container
Draping bar indentations
Model/Serial Number label
Accessories Included:
2 Clothes Hangers
2 Pant Hangers
1 Draping Bar
8 Heavy Clips
4 Light Clips
1 Mini Clip
1 Body Shaper
1 Pair Sleeve Shapers
2 Formula Containers
2 Hanger Extenders*
2 Compact Hangers*
1 Additional Draping Bar*
4 Closet Adapters*
4
8
* Found only in models:
PVBN600LW
PVBN600LT
PVBM600LY
PVBC600LY
PVBS600LY
7
8527278Body 10/31/01 3:17 PM Page 7
GETTING TO KNOW YOUR CLOTHES VITALIZER (cont.)
Control Panel
Cycle Selections
Dry only cycle
Lights indicate which
stage the cycle is in
Time Remaining lights show
the time left in the cycle
Selects audible
signal
Starts or cancels
a cycle
Formula Container
Nozzle Pack
Nozzle
Plastic Tube
Filter
(Change annually)
Formula Label
(Apply before first cycle. See
Formula section.)
See Maintenance section for
clearing clogs in nozzles and
changing filters.
8
8527278Body 10/31/01 3:17 PM Page 8
START-UP OVERVIEW
Before using your clothes vitalizer, remove all packaging materials. Read the entire Owner’s Manual and watch the Use and Care
video located in the accessory box inside the clothes vitalizer. You will find important safety information and operating instructions.
WARNING
Explosion Hazard
Use approved formula only.
Do not use any flammable liquids.
Failure to follow these instructions can result in death or explosion.
Follow these 6 easy steps to look your best.
1. Select clothes. 2. Determine
fabric type.
3. How wrinkled
is clothing?
Use the care
labels on
clothes to
determine the
fabric.
Are the wrinkles
in the clothing
from re-wear or
laundry?
Fabric and
wrinkles dictate
cycle selection
in step 6.
Wrinkles from
clothes out of
the dryer are
usually more
difficult to
remove.
NOTE: See
next page for
fabrics not
recommended.
4. Add tensioning
accessories.
5. Select formula and
check level.
Use approved
formulas only.
Use the pictures in this
manual or on the door of the
clothes vitalizer as a guide to
identify and use the required
accessories.
6. Select
cycle.
AND
Press
START/CANCEL.
NOTE: Press BUZZER button to
turn on End of Cycle signal.
™
Look for above
symbol on formula
bottle.
NOTE: Do not open doors during the misting process.
9
8527278Body 9/25/02 9:00 AM Page 9
START-UP OVERVIEW (cont.)
Stopping Your Clothes Vitalizer
During the misting stage of the cycle:
1. Press the START/CANCEL button to cancel the cycle.
NOTE: Do not open the doors while the misting portion of the
cycle is in progress. This reduces performance by allowing the
heat-activated mist to escape from within the clothes vitalizer.
Wait 1 minute before opening doors.
During the drying stage of the cycle:
1. Open the door. This will interrupt the cycle in progress.
2. Close the door. Press START/CANCEL to continue the cycle.
OR
1. Press the START/CANCEL button to cancel the cycle.
FABRICS NOT RECOMMENDED
Certain fabrics and items should never be placed inside the clothes vitalizer. Below is a list of the fabrics and items that we do not recommend for use in
the clothes vitalizer. This list will be updated periodically, so be sure to check our website at www.personalvalet.com for updated information on items
that are NOT recommended for use in the PERSONAL VALET® clothes vitalizer.
Fabrics
Items
Other
These fabrics are not recommended as the
formula cannot penetrate the fabric, and
therefore, will leave a powdery residue.
These items may be damaged or stained if
placed inside the clothes vitalizer or if allowed
to touch the interior cabinet walls.
These items will be damaged by the system.
•
•
•
•
•
•
•
•
•
• Large pillows that will touch the interior walls.
• Bulky comforters or blankets that will touch
the interior walls.
• Shoes (Leather, plastic, or nylon).
• Belts
• Purses
• Drapes that will touch the interior walls.
• Non-colorfast items
Fur
Faux fur
Fleece
Plastic
Nylon
Velour
Velvet
Pleather (artificial leather)
Feathers
10
Accessories
Accessories
How to get the most out of your clothes vitalizing system
8527278Body 11/6/01 11:22 AM Page 10
ACCESSORIES
Hanging Accessories - What they are and how they are used
NAME
Clothes Hanger
with Grips
USED WITH
Shirts, blouses,
coats, jackets
and dresses.
Grips
Skirts and shorts
are inserted up
into the Grips.
WHAT IT DOES
HOW TO USE
VISUAL
Hangs clothes
and provides
proper support in
the shoulder area.
Shirts/blouses that button are draped over the Clothes
Hanger and then buttoned. For non-buttoned shirts (polo
shirts and blouses), the clothes hanger is inserted into the
shirt from the bottom.
Logo faces front
Grips
Used to hang
skirts and shorts.
Shorts are hung
by the legs.
Grips
With the clothes hanger on the front notch of the hanger
bar, adjust the width of the Grips to 11/2 in. less than the
width of the waistband or the legs of a pair of shorts. With
both hands, slide the clothing up into the Grips, making
sure the top of the clothing is all the way up. Do not
squeeze these Grips to open. To remove clothing, pull
handles on Grips toward you.
Grips
Pant Hanger
Pants and
Slacks
Hangs pants to
expose both the
inside and outside
seam to the
formula.
Hold pants at cuffs seam-to-seam and slide between the
“arms” of the hanger. Drape one leg of the pants over
one of the arms and the other leg over the other arm of
the hanger. The pant leg should hang down about 12 to
18 in.
Draping Bar
Long dresses,
skirts, sweaters
and other
household items.
Prevents long
dresses from
touching the
bottom of the
cabinet.
Place one end of the Draping Bar into the holes on the right
side of the interior wall. Slide the other end into the opposite
channel on the left side. Place the dress on the hanger and
drape the dress over the Draping Bar. Adjust the bottom of the
dress so that it does not touch the bottom of the cabinet.
Slide up
For sweaters, hang the sweater over the bar with the arms
supported by the Draping Bar.
Two Draping Bars at the same level make a platform for small
pillows, blankets and other household items. Make sure items
do not touch the cabinet sides. The second Draping Bar is part
of an accessory kit that is sold separately (page 14).
11
8527278Body 9/25/02 10:17 AM Page 11
ACCESSORIES (cont.)
Tensioning Accessories
NAME
Weight Clips
Heavy Clip (gray)
Light Clip (white)
Mini Clip (small white)
USED WITH
WHAT IT DOES
HOW TO USE
Heavy Clip:
Cotton,
heavyweight
wool, linen and
polyester.
Provides vertical
tension to virtually
all types of
clothes to remove
wrinkles.
Squeeze the handles of the clip to open and insert the
clothing between the pads.
Light Clip:
Silk, rayon, knits,
lightweight wool
and delicate
fabrics.
Do not use on
cashmere, lace or
other fine fabrics
that will stretch.
Make sure weights touch for the best results on buttondown shirts, blouses and skirts.
Mini Clip:
Column of
buttons on front
of shirts.
VISUAL
Be sure not to add wrinkles when placing the clothing into
the clip.
When placing weights over seams on pants and skirts, be
sure to align the depression in the middle of the pad with
the seam.
Mini Clip
Body Shaper
Shirts, blouses,
coats, jackets
and skirts.
Removes
wrinkles by
providing
horizontal tension
to the body of
shirts, blouses
and
jackets.
Holding from outside of the shirt, place the spring-loaded
end of the shaper against the left side seam of the shirt.
With your right hand outside the shirt, place the right side
seam against the end of the shaper. Make sure both ends
are against the side seams in order to prevent the shaper
from falling out. Expand the shaper by pulling the right end
of the shaper until there is enough tension to hold the
shaper inside the clothing. Slight pulling in the button area
is normal. To retract the shaper, gently press the button on
the shaper and push the extended side back.
Sleeve Shapers
Long sleeve
shirts, blouses,
coats and
jackets.
Provides
horizontal tension
to long sleeves by
expanding the
sleeve.
Remove shapers from the black strap. Insert the sleeve
shaper into a buttoned long-sleeve with the straight end of
the shaper being inserted first. Align one side of the shaper
to the seam of the sleeve. Insert the shaper until 1/4 in. of
the shaper extends past the cuff. To remove, squeeze the
shaper and remove from the sleeve. (When storing sleeve
shapers, use the black strap to keep shapers closed.)
12
8527278Body 10/31/01 3:17 PM Page 12
ACCESSORIES (cont.)
Optional Accessories - Sold Separately in Accessory Kits
NAME
Hanger
Extender
Compact
Hanger
Closet Hook
USED WITH
WHAT IT DOES
HOW TO USE
Provides best
performance on
men’s sizes:
- 46+ for coats
- 17" neck sizes
- XXL shirt sizes
Increases the
width of the
shoulder area to
improve
dewrinkling
performance for
shirts and coats.
Place the opening of the Hanger Extender over the oval
head on the Clothes Hanger.
Offers best
performance on
women’s sizes 4
and under and
children’s sizes
up to 16.
The narrower
support in the
shoulder area
accommodates
smaller sized
clothes, which
improves
dewrinkling
performance.
Hang clothes as you normally would.
Used with the
Clothes Hanger
and Pant
Hanger.
Allows the Clothes
and Pant Hangers
to hang in a
standard closet.
Slide the Closet Hook into the oval opening at the top of
the Clothes or Pant Hanger.
VISUAL
Available in the Combination Pak (Part No. 4396281) and
the Versatility Pak (Part No. 4396280).
Available in the Combination Pak (Part No. 4396281) and
the Versatility Pak (Part No. 4396280).
Available in the Combination Pak (Part No. 4396281) and
the Versatility Pak (Part No. 4396280).
13
8527278Body 9/25/02 9:06 AM Page 13
ACCESSORIES (cont.)
Optional Accessory Kits
There are several optional accessories you can purchase for your clothes vitalizer that gives you more flexibility in loading your
clothes. To order any of the following accessory kits, call 1-866-MYVALET, visit our website at www.personalvalet.com or go to
any retail store that sells the PERSONAL VALET® clothes vitalizer.
Versatility Pak
Part No. 4396280
Performance Pak
Part No. 8171480
Handles larger and smaller Offers best performance
sized clothes and other
on an additional heavily
household items such as wrinkled shirt or jacket.
small pillows, throw
blankets, hats and
non-leather shoes.
Combination Pak
Part No. 4396281
Weight Pak
Part No. 4396215
Filter Pak
Part No. 4396216
Storage Drawer
Combines the benefits Provides extra
weights.
of both the Versatility
and Performance Paks.
Replaces the
filter at the end of
the plastic tube
on the
nozzle pack.
(See
“Maintenance.”)
The drawer mounts to
the wall and occupies
the space underneath
the clothes vitalizer.
Storage Drawer Part
Nos.:
White - 8527309
Biscuit - 8527310
Gray - 8527308
The outer dimensions
of the drawer are
• 35 in. (89 cm) wide
• 12 in. (30 cm) deep
• 10.5 in. (27 cm)
high
This Pak includes:
This Pak includes:
This Pak includes:
This Pak includes:
This Pak includes:
3 Hanger Extenders
3 Compact Hangers
1 Draping Bar
1 Clothes Hanger
2 Heavy Clips
2 Light Clips
4 Closet Hooks
2 Heavy Clips
2 Light Clips
1 Mini Clip
1 Pair of Sleeve Shapers
1 Body Shaper
1 Clothes Hanger
3 Hanger Extenders
3 Compact Hangers
1 Draping Bar
2 Heavy Clips
2 Light Clips
1 Mini Clip
1 Pair Sleeve Shapers
1 Body Shaper
4 Closet Hooks
2 Heavy Clips
2 Light Clips
2 Filters
The drawer holds the
accessories that came
with the unit plus a
couple of formula
bottles.
14
Loading
Loading
How to get the most out of your clothes vitalizing system
8527278Body 10/31/01 3:17 PM Page 14
LOADING
Your clothes vitalizer is designed for daily use by being able to handle an outfit at a time. Although your clothes vitalizer can handle up to
three articles of clothing, best performance is achieved when no more than two articles of clothing are loaded. Maximizing space around
the clothes whenever possible allows the formula to circulate between the clothes, which improves performance.
WARNING
Explosion Hazard
Use approved formula only.
Do not use any flammable liquids.
Failure to follow these instructions can result in death or explosion.
1. Select clothes
2. Determine
fabric type
3. How wrinkled
is clothing?
Use the care
labels on
clothes to
determine the
fabric.
Are the wrinkles
in the clothing
from re-wear or
laundry?
Fabric and
wrinkles dictate
cycle selection
in step 6.
Wrinkles from
clothes out of
the dryer are
usually more
difficult to
remove.
4. Add tensioning
accessories
5. Select formula and
check level
Use approved
formulas only.
Use the pictures in this
manual or on the door of the
clothes vitalizer as a guide to
identify and use the required
accessories.
6. Select
cycle
AND
Press
START/CANCEL
NOTE: Press BUZZER button to
turn on End of Cycle signal.
™
Look for above
symbol on formula
bottle.
The charts on the next several pages follow the above 6-Step process. We have added an expectation column on each chart to give you
an indication of the results you can expect for each type of clothing and fabric. The accessories that are listed will give you the BEST
performance on each article of clothing. Depending upon the amount of wrinkles and the fabric, you will find that not every article of
clothing will require the Body Shaper and/or the Sleeve Shapers. This is especially true for suit coats, blouses and skirts. As you use the
clothes vitalizer, you will become more familiar with what accessories will be required to give you the results you desire.
15
8527278Body 10/2/02 1:40 PM Page 15
LOADING (Suit Coat & Jacket)
VIEW
FABRIC
HOW
WRINKLED
Select your
clothes
Look at the
care label on
the clothes.
Determine
how wrinkles
were created
Select fabric
from below
that relates to
the dominant
fabric in the
clothing.
ACCESSORIES REQUIRED
FORMULA
CYCLE
EXPECTATION
1. Select appropriate accessories based upon fabric
and wrinkles and collect them now.
2. Place the jacket over the Clothes Hanger.
3. Slide the hanger onto the hanger bar, and button
the jacket.
4. If needed, insert the Body Shaper and then Sleeve
Shapers.
5. Center 1 Weight Clip on the back of the jacket, and
2 on the front.
Select
formula
based on
fabric
type
Select
cycle
based on
fabric type
and
wrinkles
Typical results
to expect after
the cycle
Crisp
From Wearing
Cotton
3X
From Laundry
Crisp
From Wearing
Soft
Wool
Ready-to-Wear
Soft
Wool
Ready-to-Wear
Wool
From Laundry
Polyester,
Microfiber
Silk, Rayon
& Delicate
fabrics
RegularCare
Ready-to-Wear
Cotton/Poly
Likely
Heavy Duty
Ready-to-Wear
3X
Soft
From Wearing
3X
From Laundry
From Wearing
From Laundry
3X
From Laundry
Soft
Delicate
Ready-to-Wear
Soft
Delicate
Ready-to-Wear
Crisp
From Wearing
Linen
Soft
3X
RegularCare
Ready-to-Wear
Cotton/Poly
Likely
Heavy Duty
Ready-to-Wear
Crisp
Heavy Duty Touch-upironing
mayberequired
Touch-upironing
Heavy Duty
required
16
8527278Body 10/2/02 1:42 PM Page 16
LOADING (Pants & Slacks)
VIEW
FABRIC
Select your
clothes
Look at the
care label on
the clothes.
Select fabric
from below
that relates to
the dominant
fabric in the
clothing.
HOW
WRINKLED
Consider how
the clothes
became
wrinkled
ACCESSORIES REQUIRED
1. Select appropriate accessories based upon fabric
and wrinkles and collect them now.
2. Slide the Pant Hanger onto the hanger bar.
3. Unzip and unbutton the pants.
4. Hold the pants by the cuffs and align the creases.
5. Slide pants between the “arms” of the hanger and
drape one leg over each arm.
6. Attach a Weight Clip to each pant leg and to each
side of the waist.
From Laundry
4X
From Wearing
Wool
From Laundry
Polyester,
Microfiber
Silk, Rayon
& Delicate
fabrics
4X
4X
From Wearing
From Laundry
4X
From Laundry
Select
formula
based on
fabric
type
Select
cycle
based on
fabric type
and
wrinkles
Typical results
to expect after
the cycle
Crisp
4X
RegularCare
Ready-to-Wear
Cotton/Poly
Likely
Heavy Duty
Ready-to-Wear
Soft
Wool
Ready-to-Wear
Soft
Wool
Ready-to-Wear
Soft
RegularCare
Ready-to-Wear
Cotton/Poly
Likely
Heavy Duty
Ready-to-Wear
Soft
Delicate
Ready-to-Wear
Soft
Delicate
Ready-to-Wear
Crisp
From Wearing
Linen
EXPECTATION
Soft
From Wearing
From Laundry
CYCLE
Crisp
From Wearing
Cotton
FORMULA
Crisp
Heavy Duty Touch-upironing
mayberequired
Heavy Duty Touch-upironing
required
17
8527278Body 10/10/02 9:15 AM Page 17
LOADING (Shirts - Button Up)
VIEW
Select your
clothes
FABRIC
HOW
WRINKLED
ACCESSORIES REQUIRED
Consider how 1. Select appropriate accessories based upon fabric
and wrinkles and collect them now.
the clothes
2. Slide the Clothes Hanger onto the hanger bar.
became
3. Place shirt over the hanger and button shirt.
wrinkled
Select fabric
4. Insert the Body Shaper.
from below
5. Insert the Sleeve Shapers.
6. Place 2 Weight Clips on the back.
that relates to
7. Place the Mini Clip at the bottom of the column of
the dominant
buttons.
fabric in the
8.
Place
a Weight Clip to the left and right of the Mini
clothing.
Clip, making sure all 3 weights touch.
Look at the
care label on
the clothes.
Cotton
Casual &
Oxford
From Wearing
From Laundry
Cotton
From Wearing
100% Pinpoint
& Broadcloth From Laundry
FORMULA
CYCLE
EXPECTATION
Select
formula
based on
fabric
type
Select
cycle
based on
fabric type
and
wrinkles
Typical results
to expect after
the cycle
RegularCare
Cotton/Poly
Ready-to-Wear
Crisp
4X
Crisp
Crisp
4X
Crisp
Likely
Ready-to-Wear
RegularCare Touch-up ironing
Cotton/Poly may be required
ironing
Heavy Duty Touch-up
required
Heavy Duty
Soft
Wool
Ready-to-Wear
From Laundry
Soft
Wool
Ready-to-Wear
Polyester
Microfiber
From Wearing
Soft
RegularCare
Cotton/Poly
Ready-to-Wear
From Laundry
Soft
Heavy Duty
Likely
Ready-to-Wear
Silk, Rayon
& Delicate
Fabrics
From Wearing
Soft
Delicate
Ready-to-Wear
Soft
Delicate
Ready-to-Wear
Crisp
Heavy Duty
Crisp
Heavy Duty
Touch-up ironing
may be required
Touch-up ironing
required
18
From Wearing
Wool
4X
4X
From Laundry
4X
From Wearing
Linen
4X
From Laundry
8527278Body 10/2/02 1:47 PM Page 18
LOADING (Polo Shirts & Knits - Non-button Up)
VIEW
FABRIC
Select your
clothes
Look at the
care label on
the clothes.
Select fabric
from below
that relates to
the dominant
fabric in the
clothing.
HOW
WRINKLED
Consider how
the clothes
became
wrinkled
ACCESSORIES REQUIRED
1. Select appropriate accessories based upon fabric
and wrinkles and collect them now.
2. Place shirt over Clothes Hanger.
3. Slide the hanger onto the hanger bar and button
shirt.
4. Place 1 Weight Clip in the center of the shirt,
clipping both the front and back together.
5. Place 1 Weight clip to the left and right of the first
clip, making sure the front and back are clipped
together.
From Laundry
3X
From Wearing
Wool
From Laundry
3X
From Laundry
For smaller
shirts that cannot fit 3 weights
across, use 2
weights and butt
them together.
Silk, Rayon
& Delicate
fabrics
3X
From Wearing
From Laundry
3X
From Laundry
Select
formula
based on
fabric
type
Select
cycle
based on
fabric type
and
wrinkles
Typical results
to expect after
the cycle
Soft
3X
RegularCare
Ready-to-Wear
Cotton/Poly
RegularCare
Ready-to-Wear
Cotton/Poly
Soft
Wool
Ready-to-Wear
Soft
Wool
Ready-to-Wear
Soft
RegularCare
Ready-to-Wear
Cotton/Poly
RegularCare
Ready-to-Wear
Cotton/Poly
Soft
Delicate
Ready-to-Wear
Soft
Delicate
Ready-to-Wear
Soft
From Wearing
Linen
EXPECTATION
Soft
From Wearing
Polyester
CYCLE
Soft
From Wearing
Cotton
FORMULA
Soft
Heavy Duty Touch-upironing
mayberequired
Touch-upironing
Heavy Duty
required
19
8527278Body 10/2/02 1:49 PM Page 19
LOADING (Blouses - Non-button Up)
VIEW
FABRIC
Select your
clothes
Look at the
care label on
the clothes.
Select fabric
from below
that relates to
the dominant
fabric in the
clothing.
HOW
WRINKLED
Consider how
the clothes
became
wrinkled
FORMULA
ACCESSORIES REQUIRED
Select
1. Select appropriate accessories based upon fabric and
wrinkles and collect them now.
formula
2. Place blouse over Clothes Hanger.
based on
3. Slide the hanger onto the hanger bar and button shirt.
fabric
4. If needed, insert the Body Shaper.
type
5. If needed, insert the Sleeve Shapers.
6. From the center of the shirt, position the first weight to
the left of center, being sure to clip both the front
and back of the shirt together.
7. Position the second weight to the right of center again
clipping the front and back together.
From Wearing
Cotton
2X
From Laundry
From Wearing
Wool
From Laundry
2X
From Wearing
Polyester
From Laundry
Silk, Rayon
& Delicate
fabrics
2X
From Wearing
From Laundry
2X
Linen
From Laundry
2X
EXPECTATION
Select
cycle
based on
fabric type
and
wrinkles
Typical results
to expect after
the cycle
Crisp
RegularCare
Ready-to-Wear
Cotton/Poly
Crisp
Heavy Duty Ready-to-Wear
Soft
Wool
Ready-to-Wear
Soft
Wool
Ready-to-Wear
Soft
RegularCare
Ready-to-Wear
Cotton/Poly
Soft
Heavy Duty Ready-to-Wear
Soft
Delicate
Ready-to-Wear
Soft
Delicate
Ready-to-Wear
Crisp
From Wearing
CYCLE
Crisp
Heavy Duty Touch-upironing
mayberequired
Heavy Duty Touch-upironing
required
20
8527278Body 10/2/02 1:51 PM Page 20
LOADING (Skirts)
VIEW
FABRIC
Select your
clothes
Look at the
care label on
the clothes.
Select fabric
from below
that relates to
the dominant
fabric in the
clothing.
Slide up into Grips
HOW
WRINKLED
Consider how
the clothes
became
wrinkled
FORMULA
CYCLE
EXPECTATION
1. Select appropriate accessories based upon fabric and
wrinkles and collect them now.
2. Place the Clothes Hanger on the hanger bar.
3. Button and/or zip the skirt.
4. Position Grips 11/2 in. from the outside edge of the skirt.
5. With both hands, slide the waistband of the skirt up into the
Grips. Do not squeeze the Grips open.
6. If needed, insert Body Shaper about 1/3 of the way into the
skirt and expand it. Not recommended with pleated skirts.
7. Place Weight Clips on the skirt with the front & back of the
skirt clipped together.
8. Pull handles on the Grips toward you to release skirt.
Select
formula
based on
fabric
type
Select
cycle
based on
fabric type
and
wrinkles
Typical results
to expect after
the cycle
Crisp
From Wearing
Cotton
2X
Crisp
From Wearing
Soft
Wool
Ready-to-Wear
Soft
Wool
Ready-to-Wear
From Laundry
Polyester,
Microfiber
Silk, Rayon
& Delicate
fabrics
RegularCare
Ready-to-Wear
Cotton/Poly
Likely
Heavy Duty Ready-to-Wear
From Laundry
Wool
Body Shaper not
recommended with
pleated skirts
See Dress section for
long skirts
ACCESSORIES REQUIRED
2X
Soft
From Wearing
From Laundry
2X
From Wearing
From Laundry
2X
From Laundry
Soft
Delicate
Ready-to-Wear
Soft
Delicate
Ready-to-Wear
Crisp
From Wearing
Linen
Soft
2X
RegularCare
Cotton/Poly Ready-to-Wear
Likely
Heavy Duty Ready-to-Wear
Crisp
Heavy Duty Touch-upironing
mayberequired
Touch-upironing
Heavy Duty
required
21
8527278Body 10/10/02 9:18 AM Page 21
LOADING (Dresses or Long Skirts)
VIEW
FABRIC
Select your
clothes
Look at the
care label on
the clothes.
Select fabric
from below
that relates to
the dominant
fabric in the
clothing.
HOW
WRINKLED
Consider how
the clothes
became
wrinkled
ACCESSORIES REQUIRED
FORMULA
CYCLE
EXPECTATION
Select appropriate accessories based upon fabric and
wrinkles and collect them now.
You have 2 options for dresses:
Option 1
1. Place dress over the Clothes Hanger and button dress.
2. Slide the hanger into the last notch on the hanger bar.
3. Drape the dress over the Draping Bar so that the
dress does not touch the bottom of the cabinet.
Option 2
1. Drape the dress or long skirt over the draping bar,
making sure the dress/skirt does not touch the bottom.
Select
formula
based on
fabric
type
Select
cycle
based on
fabric type
and
wrinkles
Typical results
to expect after
the cycle
RegularCare
Ready-to-Wear
Cotton/Poly
Likely
Heavy Duty Ready-to-Wear
From Wearing
Crisp
From Laundry
Crisp
From Wearing
Soft
Wool
Ready-to-Wear
From Laundry
Soft
Wool
Ready-to-Wear
From Wearing
Soft
From Laundry
Soft
From Wearing
Soft
Delicate
Ready-to-Wear
From Laundry
Soft
Delicate
Ready-to-Wear
From Wearing
Crisp
From Laundry
Crisp
Cotton
Wool
OR
Polyester,
Microfiber
Silk, Rayon
& Delicate
fabrics
(Long skirt this
way)
Linen
RegularCare
Likely
Cotton/Poly Ready-to-Wear
Likely
Heavy Duty Ready-to-Wear
Heavy Duty Touch-upironing
mayberequired
Touch-upironing
Heavy Duty
required
22
8527278Body 10/2/02 1:56 PM Page 22
LOADING (Sweaters)
VIEW
FABRIC
Select your
clothes
Look at the
care label on
the clothes.
Select fabric
from below
that relates to
the dominant
fabric in the
clothing.
HOW
WRINKLED
Consider how
the clothes
became
wrinkled
ACCESSORIES REQUIRED
1. Select the appropriate accessory based upon fabric
and wrinkles and collect it now.
2. Drape the sweater over the Draping Bar, being sure
that it does not touch the bottom of the cabinet.
3. Position the sleeves to cover as little of the sweater
as possible.
FORMULA
CYCLE
EXPECTATION
Select
formula
based on
fabric
type
Select
cycle
based on
fabric type
and
wrinkles
Typical results
to expect after
the cycle
RegularCare
Ready-to-Wear
Cotton/Poly
RegularCare
Ready-to-Wear
Cotton/Poly
From Wearing
Soft
From Laundry
Soft
From Wearing
Soft
Wool
Ready-to-Wear
From Laundry
Soft
Wool
Ready-to-Wear
From Wearing
Soft
From Laundry
Soft
From Wearing
Soft
Delicate
Ready-to-Wear
From Laundry
Soft
Delicate
Ready-to-Wear
From Wearing
Soft
From Laundry
Soft
Cotton
Wool
Polyester,
Microfiber
Silk, Rayon
& Delicate
fabrics
Linen
RegularCare
Ready-to-Wear
Cotton/Poly
RegularCare
Ready-to-Wear
Cotton/Poly
Heavy Duty Touch-upironing
mayberequired
Touch-upironing
Heavy Duty
required
23
8527278Body 10/10/02 9:20 AM Page 23
LOADING (Shorts)
VIEW
FABRIC
Select your
clothes
Look at the
care label on
the clothes.
Select fabric
from below
that relates to
the dominant
fabric in the
clothing.
HOW
WRINKLED
Consider how
the clothes
became
wrinkled
ACCESSORIES REQUIRED
FORMULA
CYCLE
EXPECTATION
1. Select appropriate accessories based upon fabric and
wrinkles and collect them now.
2. Place the Clothes Hanger on the hanger bar stopping
at the first notch.
3. Unbutton the shorts.
4. Position Grips 11/2 in. from the outside edge of
the shorts.
5. With both hands, slide the legs of the shorts up into
the Grips. Do not squeeze the Grips open,
6. Place a Weight Clip on each side of the waistband.
7. Pull handles on Grips toward you to release shorts.
Select
formula
based on
fabric
type
Select
cycle
based on
fabric type
and
wrinkles
Typical results
to expect after
the cycle
Crisp
From Wearing
Cotton
From Laundry
2X
From Wearing
Wool
From Laundry
Polyester,
Microfiber
Silk, Rayon
& Delicate
fabrics
2X
Crisp
Soft
Wool
Ready-to-Wear
Soft
Wool
Ready-to-Wear
Soft
From Wearing
2X
RegularCare
Ready-to-Wear
Cotton/Poly
Likely
Heavy Duty Ready-to-Wear
RegularCare
Cotton/Poly Ready-to-Wear
Likely
Heavy Duty Ready-to-Wear
From Laundry
Soft
From Wearing
Soft
Delicate
Ready-to-Wear
Soft
Delicate
Ready-to-Wear
From Laundry
2X
Crisp
From Wearing
Linen
From Laundry
2X
Crisp
Heavy Duty Touch-upironing
mayberequired
Heavy Duty Touch-upironing
required
24
Formula
Formula
How to get the most out of your clothes vitalizing system
8527278Body 10/2/02 1:59 PM Page 24
FORMULA
WARNING
Explosion Hazard
Use approved formula only.
Do not use any flammable liquids.
Failure to follow these instructions can result in death or explosion.
Before running your first cycle on the clothes vitalizer or filling the formula containers, apply the formula identification labels that were
included with the PRESIVA* formula starter kit. These labels will identify which formula is in each container. Apply a Soft finish label to
one container and a Crisp finish label to the other container. If you decide to apply a different label in the future, remove the old label and
clean the area thoroughly so the new label will adhere to the formula container.
Fill the formula container with either the Soft or Crisp finish.The container holds approximately 30 oz of formula. This is enough for
approximately 3 Heavy Duty cycles or 5 to 9 RegularCare cycles, depending upon which settings have been used.
IMPORTANT: Look for the PERSONAL VALET® system seal of approval before using any formula in the clothes vitalizer. If the formula
bottle does not have the following seal, it is not approved for use in the PERSONAL VALET® clothes vitalizing system.
™
Using unapproved formulas may result in reduced performance or an increase in nozzle or filter clogging.
25
8527278Body 10/31/01 3:18 PM Page 25
FORMULA (cont.)
Removing the Formula Container
Remove the container by holding the cap on the container and pulling toward you.
Filling the Formula Container
1. Place container on a flat surface. DO NOT hold the formula container by the white nozzle pack as it will come off.
2. Unscrew the cap.
3. Pour the formula into the container until it is full.
4. Replace the cap.
5. Slide the formula container back into place until you hear a click.
NOTES:
• For best performance, check the formula container fill indicator before each cycle. The fluid level should be above the red circle to
ensure enough formula is available for the cycle.
• Do not leave the formula container empty. This can cause the filter to dry out and clog, which will reduce performance.
26
How to get the most out of your clothes vitalizing system
Cycle Selection
Cycle
Selection
8527278Body 10/2/02 2:00 PM Page 26
CYCLE SELECTION
Four cycles are available on your clothes vitalizer. The cycle you choose determines the amount of formula dispensed and the cycle time.
HeavyDuty Cycle
RegularCare Cycle
The Heavy Duty cycle should
be used on cotton, polyester or
linen clothes that are heavily
wrinkled, such as clothes
coming out of the dryer.
RegularCare is the standard cycle you will use to
remove wrinkles and clean odors from your
clothing. Select the Cotton/Poly, Wool or Delicate
setting to match the fabric in your load.
Heavy Duty
RegularCare
QUICKCARE™
Wool
All
Fabrics
QUICKCARE™ Cycle
Use the
QUICKCARE™
cycle for a burst of
freshness.
GENTLEDRY™ Cycle
The GENTLEDRY™ cycle dries wet
clothes that you would normally line
dry, but it works in a fraction of the
time. Drying time depends upon the
fabric type and the dampness of the
clothes. Use this cycle to provide
additional drying time if your clothes do
not completely dry in the Heavy Duty
or RegularCare cycle.
GENTLEDRY™
Set GENTLEDRY Time
Cotton
Poly
Approximate Cycle Time: 50 min.
Cotton
Poly
Delicate
Approximate Cycle Time: 30 min.
• The Cotton/Poly setting should be used for
cotton, polyester and linen clothes that have
light to medium wrinkles, such as those from
wearing.
• Use the Wool setting for all wool clothing,
regardless of the amount of wrinkles.
• Use the Delicate setting for delicate fabrics
such as rayon, silk and other delicate fibers.
Cycle Time: 15 min.
Dry
Cycle Time: 5 to 180 min.
This cycle uses a manual time setting
to dry clothes. After selecting the cycle,
use the up or down button to change
the length of the cycle. This cycle is
safe for virtually all of your clothes.
27
8527278Body 10/31/01 3:18 PM Page 27
CYCLE SELECTION (cont.)
Use this guide as a quick reference when selecting a cycle.
FABRIC TYPE
CYCLE
FORMULA
Heavy Duty
After laundering or Heavy wrinkles in
• 100% cotton, linen or double-knit polyester
• If it is the dominant fabric in a blend
Crisp or Soft
RegularCare
Cotton/Polyester
After wearing
• 100% cotton, linen or double-knit polyester
• If it is the dominant fabric in a blend
Crisp or Soft
RegularCare
Wool
Any level of wrinkles for:
• 100% wool, cashmere, leather, or suede
• If it is the dominant fabric in a blend
Soft
RegularCare
Delicate
Any level of wrinkles for:
• 100% silk, rayon, acetate or other lightweight synthetic fabrics
• If it is the dominant fabric in a blend
Soft
QUICKCARE™
Virtually all fabric types
Soft
GENTLEDRY™
Virtually all fabric types
None
• For best results, run cycles that contain clothes made from the same fabric.
• For mixed loads, select a RegularCare setting that corresponds to the more delicate fabric. For example, for a mixed load containing a wool and a silk
article of clothing, choose the Delicate setting on the RegularCare cycle.
• For leather, hang the jacket with the leather side out to care for the leather and inside out to freshen the liner.
• For clothes with a blend of fabrics, select a RegularCare setting based on the clothing’s highest content.
28
Maintenance
Maintenance
How to get the most out of your clothes vitalizing system
8527278Body 10/2/02 2:02 PM Page 28
MAINTENANCE
WEEKLY - Clean the interior and exterior
Regular use of a soft, damp cloth or sponge is all that is necessary to keep the inside and outside of your clothes vitalizer looking nice and clean.
ANNUALLY - Change the Filter in the Formula Container
The filter at the end of the clear plastic tube in the nozzle pack needs to be changed as the filter becomes clogged with use and reduces the amount of
formula dispensed. You can order filters by calling 1-866-MYVALET and ordering part number 4396216, which contains two filters.
1. Remove the formula
container from the
clothes vitalizer. Empty
formula and place it on
a flat surface.
2. Pull straight up on the
white nozzle pack.
Twisting the nozzle pack
as you pull up will help
remove it.
3. Hold the clear tube
securely with two fingers
and pull the old filter off.
4. Replace the filter with a
Whirlpool Brand approved
filter by pushing the new
filter down onto the clear
plastic tube.
5. Replace the nozzle pack
by pushing the pack
down onto the formula
container.
AS NEEDED – Clearing a clogged Nozzle
Your nozzle may be clogged if:
• Dewrinkling performance has noticeably decreased.
• Odors are not removed.
• Formula level in container is not lower after each cycle.
1. Remove the formula container
from within the clothes vitalizer.
Empty formula and place container on a flat surface.
2. Pull straight up on the white
nozzle pack. Twisting the
nozzle pack as you pull may
help remove it.
3. Soak the entire nozzle pack in a
sink or container of warm water
for 15 minutes.
4. Replace the nozzle pack by
pushing the pack down onto the
formula container.
NOTE: If nozzle does not unclog, call 1-866-MYVALET to order a new nozzle pack. DO NOT insert anything into the nozzle to attempt to clear. This will
damage the nozzle and cause an excessive amount of formula to be dispensed, which may damage your clothes.
29
8527278Body 9/25/02 9:15 AM Page 29
FREQUENTLY ASKED QUESTIONS
1. Will the Personal Valet® clothes vitalizer clean (dry-clean) my clothes?
It will not remove spots and stains, however our studies have found that the majority of clothes that go to the dry cleaners do not have visible spots and
stains on them. The clothes vitalizer will help you conveniently get your clothes ready to wear by cleaning odors, smoothing wrinkles, and giving your
clothes a neat, clean look and feel.
2. Will it remove wrinkles from my clothes as well as ironing or dry cleaning?
If you are good at ironing – that will probably remove wrinkles better than virtually any other option. Many consumers acknowledge that they are not
skilled at ironing – some will even admit that they manage to iron wrinkles into their clothes.
Thus, if you simply do not like to iron, the clothes vitalizer provides a smooth finish on a wide range of clothes without the hassle of ironing. It will NOT
give a pressed finish or look.
3. Will the clothes vitalizer put creases in items such as my dress slacks?
The clothes vitalizer will not create a crease where there is none, but it may help reinforce an existing crease. Likewise, the clothes vitalizer will not
remove a permanent crease such as one you would find in a pleated skirt.
4. On which types of clothes does the clothes vitalizer perform best? On which clothes will it not perform so well?
Items that are generally harder to iron – such as white cotton dress shirts and linens – may not come out as well as silk and wool items.
You can place special clothes – including leather, suede, and beaded fabrics – in the clothes vitalizer. Simply use the Wool cycle and PRESIVA* Soft
finish formula.
5. Will the clothes vitalizer remove pet hair or lint?
Some things (such as pet hair and lint) may fall off during the course of a cycle, but the appliance is not designed specifically to remove those items.
Instead, it takes the rumpled, wrinkled items hanging in your closet or coming out of your dryer – and gives them a neat, clean look and feel; it makes
them ready to wear.
6. How difficult is it to get clothes ready for a cycle?
Generally, it takes only a couple of minutes to load the clothes vitalizer, and the preparation steps are simple and easy to remember.
7. How many clothes can I place inside the clothes vitalizer?
The clothes vitalizer will hold one to three items. You will get the best performance if you load two articles of clothing. This will give the formula more
space to circulate between the clothes. If you place three garments inside the cabinet, you will get better results with “thinner” items, such as polo shirts
or blouses.
30
8527278Body 10/2/02 2:06 PM Page 30
FREQUENTLY ASKED QUESTIONS (cont.)
8. On which fabrics should I use the Crisp and Soft formulas?
The Crisp formula gives a neat, crisp feel to cotton and linen fabrics. You might use it on cotton clothing to which you want to give some form and
substance.
The Soft formula is an all-purpose formula that makes fabrics feel soft, almost like a fabric softener. It keeps fabrics such as silk, rayon, linen, wool, and
knitted clothes flowing and draping naturally so they move with you.
9. Can I mix colors in the clothes vitalizer? Will PRESIVA* cause colors to bleed?
You can place clothes of different colors in the clothes vitalizer together. The clothes vitalizer and PRESIVA* are completely safe for colorfast clothes.
10. Can I place different types of fabric in the clothes vitalizer at the same time? Are there any concerns or “watch-outs” with mixing fabrics
inside the clothes vitalizer?
You can safely mix fabric types inside the clothes vitalizer. That said, the appliance offers different cycles for different types of clothes, and for best
results, we do recommend loading clothes made from the same fabric.
11. Are there any types of clothes that could be harmed by the clothes vitalizer?
We do not recommend the system for fur, faux fur, fleece, plastic, nylon, velour, velvet, pleather (artificial leather) or feathers. With all other fabrics –
from wool to silk to even leather – you can use the clothes vitalizer with confidence. It cleans odors, smoothes wrinkles, and gives clothes a neat, clean
look and feel, with a laundry-fresh scent.
31
Trouble
shooting
How to get the most out of your clothes vitalizing system
Troubleshooting
8527278Body 10/10/02 10:09 AM Page 31
TROUBLESHOOTING
First try the solutions suggested here and possibly avoid a service call.
PROBLEM
POSSIBLE CAUSE
No formula was dispensed during
the misting cycle.
SOLUTION
Nozzle may be clogged. See “Maintenance” section for clearing a clogged nozzle.
Did not use tensioning accessories. Add tensioning accessories. See “Loading” section in this guide.
Load contained mixed fabrics.
Run loads that contain similar fabrics. For example, when running a silk blouse (which
requires the RegularCare Delicate setting) along with a cotton shirt, performance on the
cotton shirt will suffer, as cottons require a longer misting cycle.
Not enough formula was dispensed Change filter. See “Maintenance” section for changing filters. Every year the filter on
the nozzle pack needs to be changed as it becomes clogged and reduces the amount
due to a clogged filter.
of formula dispensed.
Formula ran out during misting
stage.
Finished results
are not as expected, Ran the cycle with 3 articles of
wrinkles still present. clothing.
Check to see if formula container is in the red circle. If it is, add more formula and run
cycle again.
Run the cycle with 2 articles of clothing. This increases the space around the clothes,
which lets the heat-activated mist circulate better between the clothes improving
performance.
Tensioning accessories caused a
crease or fold.
When adding the tensioning accessories make sure to remove any creases, folds, or
pinched fabric. If these are present before the cycle starts, they will be there when the
cycle ends.
Clothing is new and has never
been cleaned.
Clothes that have never been washed before have wrinkles that are more difficult to
remove and may require touch-up ironing. Clean clothes per care label.
Clothing has difficult-to-remove
wrinkles.
Review “Expectation” notes at the end of each section for loading articles of clothing.
Some fabrics hold wrinkles to a greater extent than others.
Some cotton and linen clothes
have difficult-to-remove wrinkles.
Run the Heavy Duty cycle.
Clothing is wet after a Clothing was wet going in.
Heavy Duty,
RegularCare or
Heating element has failed.
QUICKCARE™ cycle.
If clothes are wet going into the clothes vitalizer, they will come out wet. Run the
GENTLEDRY™ cycle until the clothes are dry.
Verify by running the GENTLEDRY™ cycle to see if the interior heats up. If it does not heat
up, call Service for repair.
32
8527278Body 10/2/02 2:10 PM Page 32
TROUBLESHOOTING (cont.)
PROBLEM
Different sounds are
coming from the
clothes vitalizer.
POSSIBLE CAUSE
This is normal.
SOLUTION
During the misting stage of a cycle, you will hear a spraying sound. During the drying stage
you will hear a low hum coming from the fan. In between stages is a dwell time in which a
pulsing sound from the fan may be heard.
Clothing is damp
after a Heavy Duty
or RegularCare
cycle.
Loaded 3 articles of clothing.
Run the GENTLEDRY™ cycle until clothes are dry. Three articles of clothing reduce
airflow, causing areas on some clothes to be slightly damp at the end of the cycle.
Higher room temperature and
humidity can increase drying time.
Run the GENTLEDRY™ cycle for a few minutes.
Water spots on
clothes.
Nozzle may be partially clogged.
See “Maintenance” section for clearing a clogged nozzle. Clean clothes according to the
care label on the article of clothing.
Cycle selection was incorrect.
Clean clothes according to care label on the article of clothing. Choose the RegularCare
setting to match the fabric in your load. See “Cycle Selection” section for information on
running loads with different fabric types.
Clothing was touching the interior
sides or doors.
Clean clothes according to care label on the article of clothing. Be sure Clothes Hangers
are positioned in the notches on the hanger bar. If clothing is large or bulky, reduce the
number of clothes loaded in the clothes vitalizer.
Formula dripped off hanger bar or
accessory.
Clean clothes according to the care label on the article of clothing. The spots should come
out with just the recommended cleaning method.
Clothing was not fully inserted into
the clip.
Be sure the clothing is fully inserted into the clip.
If you are going over a seam, make sure the seam lines up with the contoured area in
the middle of the clip’s pad.
Formula residue on pads.
This is normal for some cycles.
Rinse with warm water to remove formula residue.
There may be formula left over after the Heavy Duty cycle. Remove the basin cover and
dry the basin with a clean towel.
Weight clips fall off
clothing.
Formula collects in
the bottom of the
clothes vitalizer.
33
8527278Body 9/25/02 9:16 AM Page 33
ASSISTANCE OR SERVICE
Before calling for assistance or service, please check “Troubleshooting” as it may save you the cost of a service call. If you still need help, follow the
instructions below. When calling, please know the purchase date and the complete model and serial number of your clothes vitalizer. This information will
help us to better respond to your request.
PERSONAL VALET® CLOTHES VITALIZING SYSTEM
Replacement Parts
Accessory Packs
•
•
•
•
•
If you need to order replacement parts, we recommend that
you only use FSP® factory specified parts. These parts will fit
right and work right because they are made with the same precision used to build every new Whirlpool® appliance.
PRESIVA*
For additional formula refer to the
information below.
Call Toll Free
1-866-MYVALET
Call the phone number on the bottle
Website
www.personalvalet.com
www.presiva.com
Features and specifications on our full line of appliances.
Installation information.
Use and maintenance procedures.
Accessory and repair parts sales.
Specialized customer assistance (Spanish speaking, hearing
impaired, limited vision, etc.).
• Referrals to local dealers, repair parts distributors, and service
companies. Whirlpool designated service technicians are trained to
fulfill the product warranty and provide after-warranty service,
anywhere in the United States.
To locate the Whirlpool designated service company in your area,
you can also look in your telephone directory Yellow Pages.
For further assistance, you can write to us with any questions or
concerns at:
Whirlpool Brand Home Appliances
Customer Interaction Center
553 Benson Road
Benton Harbor, MI 49022-2692
Please include a daytime phone number in your correspondence.
34
8527278FB 10/10/02 9:31 AM Page 2
®
®
ONE-YEAR FULL WARRANTY
For one year from the date of purchase, when this clothes vitalizer and included accessories are operated and maintained according to instructions attached to or furnished
with the product, Whirlpool Corporation will pay for FSP® replacement parts and repair labor to correct defects in materials or workmanship. Service must be provided by a
Whirlpool Corporation designated service company.
Whirlpool Corporation will not pay for:
1. Service calls to correct the installation of your clothes vitalizer, to instruct you how to use your clothes vitalizer, or to replace house fuses or correct
house wiring.
2. Repairs when your clothes vitalizer is used in other than normal, single-family household use.
3. Damage resulting from accident, alteration, misuse, abuse, fire, flood, acts of God, improper installation, installation not in accordance with local electrical and plumbing
codes, or use of products not approved by Whirlpool Corporation.
4. Replacement parts or repair labor costs for units operated outside the United States.
5. Pickup and delivery. This product is designed to be repaired in the home.
6. Repairs to parts or systems resulting from unauthorized modifications made to the appliance.
WHIRLPOOL CORPORATION SHALL NOT BE LIABLE FOR INCIDENTAL OR CONSEQUENTIAL DAMAGES.
Some states do not allow the exclusion or limitation of incidental or consequential damages, so this exclusion or limitation may not apply to you.
This warranty gives you specific legal rights and you may also have other rights which vary from state to state or province to province.
Outside the 50 United States, this warranty does not apply. Contact your authorized Whirlpool dealer to determine if another warranty applies.
If you need service, first see “Troubleshooting.” Additional help can be found by checking “Assistance or Service,” or by calling our Customer Interaction Center at
1-866-MYVALET (1-866-698-2538), from anywhere in the U.S.A. or write:
Whirlpool Corporation,
Customer Interaction Center
553 Benson Road
Benton Harbor, MI 49022-2692
Dealer name
Addres
Keep this book and your sales slip together for future reference.
You must provide proof of purchase for in-warranty service.
Write down the following information about your clothes vitalizer to better help you
obtain assistance or service if you ever need it.
You will need to know your complete model number and serial number.
You can find this information on the model and serial number label/plate, located
on your appliance as shown in “Getting To Know Your Clothes Vitalizer.”
Phone number
Model number
Serial number
Purchase date
8527278B
© 2002 Whirlpool Corporation.
All rights reserved.
® Registered Trademark/TM Trademark of Whirlpool, U.S.A.
*PRESIVA™ is a trademark of The Procter & Gamble Company.
10/02