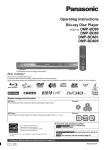
1
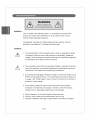
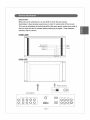
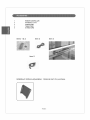
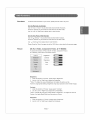
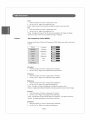
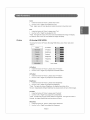
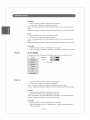
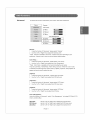
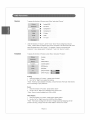
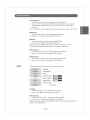
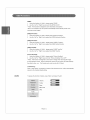
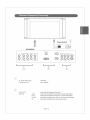
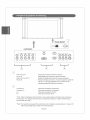
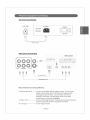
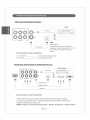
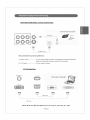
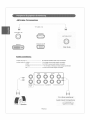
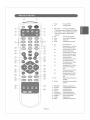
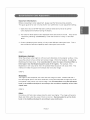
Contents:
1
Important
Information
............................................................
2
2
General
..............................................................
3
3
Safety Precautions
................................................................
4
4
Specification
..........................................................................
5
5
Accessories
...........................................................................
6
6
OSD Functions
7
Peripheral
8
Remote Controller
9
Quick Guide for Color Adjustment
10
Cleaning
11
FAQs ......................................................................................
Information
......................................................................
Equipment
Connecting
.......................................
................................................................
And Maintenance
7
19
25
..........................................
27
Handy Tips ...............................
29
PAGE1
30
WARNING
This is a Class A and Class B product.
In a domestic environment
this
product may cause radio interference in which case the user may be
required to take adequate measures.
TO REDUCE THE RISK OF FIRE AND ELECTRIC SHOCK, DO NOT
EXPOSE THIS PRODUCT TO RAIN OR MOISTURE.
WARNING
This lightning flash with arrowhead symbol, within an equilateral triangle,
is intended to alert the user to the presence of uninsulated "dangerous
voltage" within the product's enclosure that may be of sufficient magnitude
to constitute a risk of electric shock to persons.
2 The exclamation
point within an equilateral triangle is intended to alert the
user to the presence of important operating and maintenance
instructions
in the literature accompanying
(servicing)
the appliance.
It is strongly advised NOT to freeze the image or to show still image on the
PDP for a long duration of time. This might cause the screen to have burn
in image.
Use "White Pattern" under "Function"
Function to fix the burn in
problem if it does happen.
4
All the Glass accessories used in this product have been specially
enhanced in its hardness and duration.
However, when the following
situations occur, these glass might break or be damaged,
a. When the glass is hit with hard objects with great forces.
b. Falling or hard contact during transportation
and moving.
c. Improper installation of the glass might scratch the surface of the glass.
PAGE 2
IMPORTANT:
When the set is switched on, do not shift or move the set around.
Sometimes
it may develop unevenness in color in some parts of the screen.
This can be eliminated by switching off the the main power switch (rear side of
the set ) and wait for 10 minutes before switching
on again.
If the situation
remains, call for service.
FRONT VIEW
Channel (UP)
Channel (Down)
Volume(+)
Volume(-)
REAR VIEW
Power Switch
AC
100V-240V
50Hz-60Hz
INPUT
P©WER
t
ONJOFF
Connectors
_NT C^_L_ iN
© 56'5
© ©0©
i
©
coM2
--
AUDIO
IN
oul
PAGE 3
Rs-_s2k_
Please read the following
directions carefully before using the machine.
Please keep the manual well and retain for future reference.
1
Clean the machine with a slightly damp soft cloth. Do not use spray detergent
and abrasive solvent.
It can damage the machine's screen coating layer.
2
Place the machine on a solid base to avoid dropping or danger.
3
For good ventilation of the machine, please do not place the machine on
surfaces such as bed, sofa or rug.
4
Before operating the machine, make sure that the operating voltage of your
machine is identical with that of your local power supply. If there is any
question, please contact with sales dealer.
5
Use only the accessory power cord designed for this product to prevent shock.
6
Do not put anything under the power cord to avoid tramping.
7
If using the same power source with other equipments, please make sure the total
current does not exceed 15A.
8
Never attempt to repair a defection of the machine by yourself.
Always consult
a skilled machine service personnel.
When the following situations occur, please contact the qualified engineer:
A. The power cord or the power socket has damaged.
B. If any liquid or solid object fall into the machine through the ventilation holes.
C. Exposing the machine to rain or excessive moisture.
D. The function does not follow the user manual.
E. The function of machine has clear changes.
10
No further notice will be provided if the specification
or design subjects have
been changed.
11 Release the battery of remote controller after long-time replacement
(over 1 month) and avoid making destruction of remote controller by liquid.
PAG E 4
Model
Name
42-inch
Plasma
Monitor
Model
Number
PDP4249G
16:9
Display Ratio
Aspect Native
Display
Pixels 852(H)
x480(V)
Pixel
Characteristics
Displays
Sub-pixeIs 2556(H)
x480(V)
PixeI
PixeI
Pitch
1.08(H)
x1.08
(V)(mm)
Sub-pixel
Pitch
0.36(H)
x1.08
(V)(mm)
30kHz
to80kHz
Horizontal
Frequency
to85Hz
Vertical
Frequency 59Hz
Resolution
CapabilitiesVGA,
SVGA,
XGA,
SXGA,
UVGA,
UXGA,
DTV(480i,
480p,
720p,
1080i)
Supporting
system
Input PAL,
PAL-M,
PAL-N,
NTSC,
NTSC4.43,
SECAM
Brightness
7OOcd/m
2(Module
only)
Contrast
Ratio
2000
: 1(Noambient
Light)
Viewing
Angle
Over
160degrees
horizontally
and
vertically
Colors
16.77million
General Weight
48kg
Dimension
1210
(W)x640(H)x130(D)mm
/ !210 (W) x 701 (H) x 210 (D)mm w/Stanc
AC110V-240V
Power
Supply
50Hz-60Hz
Frequency
Power
Consumption < 280 W
Signal-input
S-Video
Input
Din 4-pin x 1
BRCA X 1
Composite
Input
Component
Input
YPbPr X 3 or YCbCr x 3, RCA-Typ
DVl
DVIInput
Analog
VGA
Input
D-Sub 15-pin X 1
Audio
Input
RCA-pin type(R/L)X4
Signal-Output
Audio
Output
RCA-pin (L/R) x !
Sound
Output
External Speakers Connectable
without notice.
Specifications
aresubject
tochange
*HDTV READY:
Display Panel that supports up to 720p resolution capability is categorized
(HDTV).
as Hi-Definition TV
Display Panel that supports up to 480p resolution capability is categorized
Display Panel that supports under 480p is categorized
to 1080i resolution capability.
PAGE 5
as SDTV.
as DTV. This specific model support up
1
REMOTE CONTROLLER
2
AAA Battery x 2 Pcs
3
POWER CORD
4
TABLE STAND
5
S-VIDEO CORD
Items 1 & 2
Item 3
Item 4
Item 5
WallMount
Kit(Non-Adjustable):
Optional
f
PAGE 6
item for purchase.
Functions
To start the OSD Functions on your screen, please press the "Menu" key now!
On the Remote
Controller:
use the "Up" or "Down" key to select OSD and SUB OSD Functions.
Press the "ENTER" key to access the SUB OSD from the Main OSD.
Use the "Left" or "Right" key to adjust value in each function.
On the
Key
Pad
of the
Use the "A Select _'"
Monitor:
key to select OSD and SUB OSD Functions.
Press the "ENTER" key to access the SUB OSD from the Main OSD.
Use "u Volume +" key to adjust value in each function.
Please Press the "Menu" key again to exit the OSD Menu or to go back to the prevoius page.
Picture
(IN AV, S-Video,
Component-YCbCr,
& TV MODE):
To access the function of Picture (IN AV, S-Video, Component-YCbCr,
& TV MODE), press "Menu" and select "Picture".
Picture
contrast
S,arpn ss
ii
Tint
Brightness:
1
Under the function of "Picture", please select "Brightness".
2
Use the "Left" or "Right" key to adjust the Brightness.
**Note: The higher the value of Brightness, the brighter the picture will be.
However, inappropriate
setting of brightness may cause pictures to have whitish images.
Contrast:
1
Under the function of"Picture",
2
Use the "Left" or"Right"
please select "Contrast".
key to adjust the Contrast Ratio.
**Note: Contrast ratio may have certain effects on brightness.
Contras,
the higher Black/White
level the pictures will show.
Sharpness:
1
Under the function of "Picture", please select"Sharpness".
2
Use the "Left" or "Right" key to adjust the Sharpness.
PAGE 7
The higher the value of
Color:
1
Under the function of"Picture",
2
Use the "Left" or "Right" key to adjust the Color.
please select "Color".
**Note: Higher value of Color adjustment enable the picture to have fuller color.
Tint:
1
Under the function of"Picture",
2
Use the "Left" or "Right" key to adjust the Tint.
please select "Tint".
**Note: The higher the value of Tint, the more Greenish/Bluish
the image will display.
The less the value of Tint, the more Redish the image wiii display.
Picture
(IN Component-YPbPr
MODE):
To access the function of Picture (IN Component-YPbPr
Mode), press "Menu" and select
"Picture".
I
Picture
]
Advanced
H-Position
V-Position
Brightness
Contrast
Sharpness
Color
Tint
H-Position:
1
Under the function of "Picture", please select "H-Position".
2
Use the "Left" or "Right" key to adjust the Horizontal Position.
V-Position:
1
Under the function of "Picture", please select "V-Position".
2
Use the "Left" or "Right" key to adjust the Vertical Position.
Brightness:
1
Under the function of"Picture",
2
Use the "Left" or "Right" key to adjust the Brightness.
please select "Brightness".
**Note: The higher the value of Brightness, the brighter the picture will be.
However, inappropriate
setting of brightness may cause pictures to have whitish images.
Contrast:
1
Under the function of"Picture",
2
Use the "Left" or"Right"
please select "Contrast".
key to adjust the Contrast Ratio.
**Note: Contrast ratio may have certain effects on brightness.
Contrast,
the higher Black/White
level the pictures will show.
Sharpness:
1
Under the function of "Picture", please select"Sharpness".
2
Use the "Left" or "Right" key to adjust the Sharpness.
PAGE 8
The higher the value of
Color:
1 Under
thefunction
of"Picture",
please
select
"Color".
2 Usethe"Left"
or"Right"
keytoadjust
theColor.
**Note:
Higher
value
ofColor
adjustment
enable
thepicture
tohave
fuller
color.
Tint:
1 Under
thefunction
of"Picture",
please
select
"Tint".
2 Usethe_'Left"
or"Right"
keytoadjust
theTint.
**Note:
Thehigher
thevalue
ofTint,
themore
Greenish/Bluish
theimage
willdisplay.
Thelessthevalue
ofTint,
themore
Redish
theimage
willdisplay.
Picture
(IN Analog RGB MODE):
To access the function of Picture (IN AnaIog RGBMode),
"Picture".
I
Picture
I
press "Menu" and select
H-Positior
V-Position
Brightness
Contrast
Qt lity
Sharpness
Frequency
Phase
Auto Image
H-Position:
1
Under the function of"Picture",
2
Use the "Left" or "Right" key to adjust the Horizontal Position.
please select"H-Position".
V-Position:
1
Under the function of "Picture", please select "V-Position".
2
Use the "Left" or "Right" key to adjust the Vertical Position.
Brightness:
1
Under the function of"Picture",
2
Use the "Left" or "Right" key to adjust the Brightness.
please select "Brightness".
**Note: The higher the value of Brightness, the brighter the picture will be.
However, inappropriate
setting of brightness may cause pictures to have whitish images.
Contrast:
1
Under the function of"Picture",
2
Use the "Left" or "Right" key to adjust the Contrast Ratio.
please select "Contrast".
**Note: Contrast ratio may have certain effects on brightness.
Contrast,
the higher Black/White
level the pictures will show.
Sharpness:
1
Under the function of "Picture", please select"Sharpness".
2
Use the "Left" or "Right" key to adjust the Sharpness.
PAGE 9
The higher the value of
Frequency:
1
Under the function of"Picture",
2
Use the "Left" or "Right" key to adjust the Frequency.
**Note:
please select"Frequency".
It is strongly advised to set the Frequency level as it is when coming out of the
factory.
Inappropriate setting of Frequency may cause the pictures to have uneven lines or noise.
Phase:
1
Under the function of "Picture", please select "Phase".
2
Use the "Left" or"Right"
**Note:
key to adjust the Phase.
It is strongly advised to set the Frequency level as it is when coming out of the
factory.
Inappropriate setting of Frequency may cause the pictures to have uneven lines or noise.
Auto Image:
Picture
1
Under the function of"Picture",
2
When "Auto Image" is selected,
please select "Auto Image".
"H-Position",
"V-Position", "Frequency",
and "Phase"
(IN DVI MODE):
To access the function of Picture (IN DVI Mode), press "Menu" and select "Picture".
Picture
_va
Brightness
Contrast
_
Auto Image
Brightness:
1
Under the function of"Picture",
2
Use the "Left" or "Right" key to adjust the Brightness.
please select "Brightness".
**Note: The higher the value of Brightness, the brighter the picture will be.
However, inappropriate
setting of brightness may cause pictures to have whitish images.
Contrast:
1
Under the function of"Picture",
2
Use the "Left" or "Right" key to adjust the Contrast Ratio.
please select "Contrast".
**Note: Contrast ratio may have certain effects on brightness.
Contrast,
the higher Black/White
The higher the value of
level the pictures will show.
Auto Image:
1
Under the function of "Picture", please select "Auto Image".
2
When "Auto Image" is selected,
to the optimal value.
PAGE 10
"Brightness" and "Contrast" automatically
tuned
Advanced
To access the function of Advanced, press "Menu" and select "Advanced".
Picture
j
Advan_d
Gamma
Color Temp
[CT]Red
[CT]Green
[CT]Btue
Color Management
_V
Info_ati_n
[ [ICC]Rec
]
[ [ICC]Green
j
[ [ICC]BIue
_
j
Gamma:
1
Under the function of"Advanced",
2
Use the "Left" or "Right" key to adjust the Gamma Level.
please select "Gamma".
**Note: Gamma is available in five levels.
preference.
Please set the level according to your
Gamma is set in level one as the factory default setting.
Color Temp. :
1
Under the function of"Advanced",
2
Use the "Left" or "Right" key to adjust the Color Temperature.
please select "Color Temp".
**Note: Color Temp. is available in four levels including the user setup.
They are Cold Temp, NormalTemp,
Warm Temp, and User. When the "User" mode
is activated, the following three custom colors, [CT]Red, [CT]Green, and [CT]Blue will
appear and can be used to adjust the color.
[CT] Red:
1
Under the function of"Advanced",
2
Use the "Left" or "Right" key to adjust the [CT] Red Level.
please select"[CT]
Red".
[CT] Green:
1
Under the function of"Advanced",
2
Use the "Left" or "Right" key to adjust the [CT] Green level.
please select"[CT]
Green".
[CT] Blue:
1
Under the function of "Advanced", please select "[CT] Blue".
2
Use the "Left" or "Right" key to adjust the [CT] Blue.
Color
Management:
Under the function of "Advanced", select "Color Management"
to display [ICC] Red, [ICC]
Green, and [ICC] Blue.
[ICC]
Red:
Use the "Left" or "Right" key to adjust the [ICC] Red level.
[ICC]
Green:
Use the "Left" or "Right" key to adjust the [ICC] Green level.
[ICC]
Blue:
Use the "Left" or "Right" key to adjust the [ICC] Blue level.
PAGE ! 1
Source
To access the function of Source, press "Menu" and select "Source"
Source
8
Analog RGB
I
Component 1
iiiiiiiiii!i!i!i_i_i_i!_ii!i_ii_ii_!i_!__!i!ii_!i!ii!iiiiiiiiiiiiiiiiii_i____!i!___!i!_!_iiii__!!__!__!__!__!__!__!__!_i!_i!_i!_i!_i_i__i__i__i__i_i__i_i!_!!_i!_i_!_
m
TVTuner
Under the function of "Source", use the "Up'or "Down" Key to change Input Source.
**Note:
Please make sure that the input source connected on the back of the PDP is the
same as selected here in the "Source".
component
Function
For example, if source is connected with
1 input, please select "Component
1" here in the "Source" Function.
To access the function of Function, press "Menu" and select "Function".
Scaling
Zoom
White Pattern
Function
Closed Caption
[PiP]Source
[PiP]Size
[PiP]H-Position
_
[PiP]V-Position
Scaling:
1
Under the function of"Function",
2
Use "Left" or "Right" key to adjust the Scaling.
please select"Scaling".
**Note: There four sizes available in Scaling.
and 4:3 according
Choose Normanl, Pan-Scan, Wide Screen,
to your preference.
Zoom:
1
Under the function of"Function",
2
Use the "Left" or "Right" key to adjust the Zoom In/Out Level.
please select"Zoom".
**Note: Zoom in level is available from 100% to 400%.
White Pattern:
1
Under the function of"Function",
2
Use the "Left" or "Right" key to turn On/Off the White Pattern.
please select "White Pattern".
**Note: This function is design to fix the burn-in image caused by displaying one still
picture for too long. Simply switch the "White Pattern" ON for a few minute.
PAGE 12
Closed
Caption::
1 Under
thefunction
of"Function",
please
select"Closed
Caption".
2 Use
the"Left" or "Right" key to change the Closed Caption type. Closed
Caption
includes the following 8 types, CC1, CC2, CC3, CC4, TEXT 1, TEXT2, TEXT 3,
and TEXT 4.
**Note: This function is only available when the Video Input source is from Cable TV orAV.
[PIP] Source:
1
Under the function of"Function",
2
Use the "Left" or "Right" key to change the [PIP] Source.
please select "[PIP] Source".
[PIP] Size:
1
Under the function of"Function",
2
Use the "Left" or "Right" key to adjust the [PIP] Size.
**Note:
please select'piP]
PIP Size is available in four sizes and "OFF".
the [PIP]H-Position
and the [PIP]V-Position
Size".
When it is set to "OFF",
will not appear for adjustment.
[PIP] N-Position:
1
Under the function of"Function",
2
Usethe "Left" or "Right" key to adjust the [PIP] H-Position.
please select "[PIP] H-Position".
[PIP] V-Position:
Utility
1
Under the function of"Function",
2
Use the "Left" or "Right" key to adjust the [PIP] V-Position.
please select "[PIP] V-Position".
To access the function of Utility, press "Menu" and select "Utility".
Language
Video Standard
DPMS
Fuhction
[
Utility
[OSD]H-Position
]
[OSD]V-Position
[OSD]TimeOut
_
Picture Scrolling
Load Factory
Language:
1
Under the function of "Utility", please select "Language".
2
Use "Left" and "Right" key to change the Language.
Video Standard:
1
Under the function of"Utility",
2
Use the "Left" or "Right" key to change the Video Standard.
**Note:
please select "Video Standard".
It is advised to set the Video Standard in "Auto" so the system will automatically
search for the video Standard.
PAGE !3
DPMS:
1
Under the function of"Utility",
2
Use the "Left" or"Right"
please select "DPMS".
key to switch the DPMS On/Off.
** Note: This function is designed to save electricity consumption.
When it is switched to ON, the system automatically
sets to standby mode when
receiving no input signal.
[OSD] H-Position:
1
Under the function of"Utility",
2
Use the "Left" or "Right" key to adjust the [OSD] Horizontal Position.
please select"[OSD]
H-Position".
[OSD] V-Position:
1
Under the function of"Utility",
2
Use the "Left" or "Right" key to adjust the [OSD] Vertical Position.
please select "[OSD] V-Position".
[OSD] TimeOut:
1
Under the function of"Utility",
2
Use the "Left" or "Right" key to adjust the [OSD] TimeOut.
please select "[OSD] TimeOut".
Picture Scrolling:
1
Under the function of"Utility",
2
Use the "Left" or "Right" key to turn the "Picture Scrolling" ON or OFF.
please select "Picture Scrolling".
**Note: This function is designed to avoid burn-in image when showing still image
for long duration of time. When switched ON, picture on the screen will shift randomly
from time to time. p.s. This function only work on set with LG Panel.
Load Factory:
When "Load Factory" is selected, all values of the functions in the "Utility" automatically
resume to the Factory default setting.
A udio
To access the function of Audio, press "Menu" and select "Audio".
volume
Ad
ce_
Treble
BaSs
BBE Level
iilty
[
SRS
Audio]
PAGE 14
Volume:
1
Under the function of "Audio", please select"Volume".
2
Use the "Left" or"Right"
3
Volume can be adjusted directly from the remote controller using"+" and "-".
key to adjust the Volume.
Treble:
1
Under the function of "Audio", please select"Treble".
2
Use the "Left" or "Right" key to adjust the Treble Level.
Bass:
1
Under the function of "Audio", please select "Bass".
2
Use the "Left" or "Right" key to adjust the Bass Level.
BBE Level:
1
Under the function of "Audio", please select "BBE Level".
2
Use the "Left" or "Right" key to change the BBE Level.
**Note: BBE Level is available in 4 types, ByPass, Level 1, Level 2, Level 3, and Level 4.
SRS:
TV
1
Under the function of"Audio",
2
Use the "Left" or "Right" key to turn the SRS ON or OFF.
please select"SRS".
To access the function of TV, press "Menu" and select "TV".
Please note that this function
is only available
when the Video Input Source is from
TV Tuner,
cti_
Channel Scan
<Press ENTER>
i iiiiiiiiiiiiiiiiiiiiiiiiiii.....
I
TV
Tuner Select:
1
Under the function of "TV", please select "Tuner Select".
2
Use the "Left" or "Right" key to switch the Tuner Select between "Air" or "CATV".
Channel:
1
Under the function of"TV",
2
Use the "Left" or "Right" key to add channel or to erase channel.
please select "Channel".
PAGE !5
MTS:
1
Under the function of "TV", please select"MTS".
2
Use "+" and "-" key to switch the MTS between "Stereo", "Mono", or "SAP".
Channel
Scan:
1
Under the function of"TV",
2
Use "ENTER" key to activate "Channel Scan" and the system will search all channels
please select"Channel
Scan".
and store them in the memory.
V-CHIP
Please note that the V-Chip function will not be displayed
OSD Functions.
in the
To access the V-Chip function, please press
the hot key on the remote controller.
I Set Level
J
Set Level:
1
Please press the function of"V-Chip"
2
Under the function of "V-Chip", please select "Set Level".
on your remote controller.
**Note: You will be asked to enter a four digit password upon selecting the "Set Level".
3
After the correct password is entered, "PW Succeed" will appear and now you can
access the V-Chip Function.
4
Use "Up" or "Down" key to switch the V-Chip Levels.
5
Use "Left" or "Right" key to choose the mode in each level.
**Several modes are availabe in each level. Please see the above List for reference.
For more detailed information of the above levels, please see the following explanation
provided.
6
For more detailed information of MPAA levels, please see the following explanation
provided.
PAGE 16
TV Levels Guide
Grade
Explanation
TV-Y
This program is designed to be appropriate for all children.
TV-Y7
This program is designed for children age 7 and above.
TV-G
This program suitable for all ages,
TV-PG
This program may find unsuitable for younger children. Many parents may want to watch it with their
younger children.The program contains one or more of the following: moderate violence (V), some sexua
situations (S), infrequent coarse language (L), or some suggestive dialogue (D).
TV-14
This program would find unsuitable for children under 14 years of age. Parents are strongly urged to
exercise greater care in monitoring this program .This program contains one or more of the following:
intense violence (V), intense sexual situations (S), strong coarse language (L), or intensely suggestive
dialogue (D).
TV-MA
This program is specifically designed to be viewed by adults and therefore may be unsuitable for childrer
under 17.This program contains one or more of the following: graphic violence (V), explicit sexual activit
(S), or crude indecent language (L).
MPAA Guide
Grade
Explanation
G
General Audience. All ages admitted.
PG
Parental Guidance Suggested.Some
PG-13
R
NC-17
X
Parents Strongly Cautioned.Some
Restricted-Under
material may not be suitable for children
material may be inappropriate for children under 13.
17 requires accompanying parent or adult guardian (age varies in some locations).
No One !7 and UnderAdmitted.
It is changed to NC17 now.
Press New Password:
1
Please press the function of"V-Chip"
2
Under the function of "V-Chip", please select "Press New Password".
3
Enter a four digit password.
4
Check and re-enter the new password.
PAGE !7
on your remote controller.
Information
To access the function of Information,
PictUre
Main Source
Sourcb
PiP Source.
press "Menu" and select "Information".
Mute.
TV
[Information
]
Under the function of "Information",
statue of "Main Source", "PIP Source",
and "Mute" are displayed for reference.
PAGE 18
z
Power Switch
I
10OV
_0Hz 240V
60Hz
AC
INPUT
I
pOWER
ON,OFF
Connectors
ANT_C_ F _N
i.............
)
°o oooo
oooo
Aurilo
OUT
RS-2_2IN
_O
DV_D
ANALOG
VGA
IN
AUDIO IN
I
I
I
I
I
_3
[]
I
_3
Power ON/OFF
OUT
AUDIO IN
I
100V-240V
AC IN (AC Power Inpu)
POWER SWITCH
AUDIO
@
JN
Audio Output for Speakers Connection.
Com2
Audio Input connection for Component 2 source Audio Output.
Coml
Audio Input connection for Component 1 source Audio Output.
S-V/DVl
Audio Input connection for S-Video or DVl source Audio Output.
AV
Audio Input connection forAV source Audio Output.
PAGE !9
m
i
z
i
i
i
i
i
i
i
i
i
i
i
i
i
i
i
i
J
i
i
i
i
i
i
i
i
i
i
i
i
i
i
i
i
i
Power Switch
AC
INPUT
POWER
/OOV-240V_
50Hz tOHz
Connectors
_NWC_BLEIN
8o
CO_11
i
00
00
0co_
=
AUDIO
_S-2S21N
©
S.,!DVl
Q
A_A!O_ VGAIN
©
IN
OUT
I
I
I
I
ANTICABLE
DVI-D
IN
IN
ANALOG
I
I
I
[]
[]
Video Input connection for Antenna / Cable TV.
Digital Signal Input connection for personal compute.
VGA INPUT
RS-232 IN
Analog VGA Signal Input connection for personal compute.
RS-232 Cable input connection.
software.
It is used to upload or update the
It is strongly suggested
upioading/updating
NOT to proceed with any
without proper instructions.
Component
1
Video Input connection for Component 1.
Component
S-V
2
Video Input connection for Component 2.
AV
Video Input connection for S-Video.
Video Input connection
for AV.
**Note: When connecting the Video Input from a source, please make sure the Audio Input is coherent as
the Video Input. For exampie, if the Video Input is coming from Component 1, please connect the Audio
Input atAUDIO IN's COM 1.
**Note: This model does not support VGA Audio Input when connecting to personal computer.
Audio Input is availabe and is shared with S-Video Audio Input.
PAGE 20
However, DVI
AC Power Connectina
100V-240V
AC mNPUT
POWER
100V~24OV
PLUG
=
50Hz_60Hz
oD
ON / OFF
Power Cord
DVD Player
Connectina
DVD player
AV Cable Line
Av @
csj
Connecting
Component Input(YPbPr) .........
oo_:1E1
e eee
@-
Recommended
I
Method:
For more vivid and higher resolution image connection.
This connecting
method is recommended when your DVD Player has Progressive Scan
function(signal output with 480p). If your DVD Player does not have
Progressive Scan function, the signal output will then be 48@ and is
connected here as Component Input(YCbCr).
S-VIDEO
INPUT
For more colorful image connection.
Resolution and Sharpness performance
might not be as good as Component Input(YPbPr) connection.
AV1 (AV Input)
For a fair image connection.
PAGE 21
VCR Connectinq(Video
Diqitizer):
VCR
O©©
©@©
AV
t°o_Jo
o
AV Line
@
COPvIPOI_ENT
=
VCR
Video
S-video
Line
Digitizer:
Decode and change
the noncomputer
images(eg,
displayed
or video
images
discs) to images
from VCR, TV,
in computer
format.
Recommended
S-VIDEO
AVl
Connecting
INPUT
For more colorful image connection..
(AV Input)
SetTop
Method:
For a fair image connection.
Box Connectinq(For
Satellite/Direct
TV):
iil - il U
ANALOG
£ :
VGAHN
6
Component
e®e
Line
RGB Line
Recommended
Connecting
Please
note
your
as
picture
the
resolution
RGB
that
provided
performance
Connection
Method:
Set Top Box
above.
might
not
have
Recommended
all the
connecting
connectors
method
availabe
in the
order
of
is as follows,
> Component
Connection
PAGE 22
> S-Video
Connection
> AV Connection
DiaiCamera/V8/Game
system
Connectina:
AV Line
AV
/
S=V
S-video
Recommended
S-VIDEO
Connecting
INPUT
Line
Method:
For more colorful image connection.
Resolution and Sharpness performance
might not be as good _ Component Input(YPbPr) connection.
AV!
(AV Input)
For a fair image connection.
PC Connectina:
ANT/CABLE
iN
@
RS=232UN
DVU-D UN
ANALOG
Personal
Computer_--_
VGA UN
VGA Line
DVI Line
Please
Note
that
DVI
and VGA
inputs
can
PAGE 23
only
be used
one
at a time.
ANT/Cable
TV Connectinq:
TV Cable Line
ANT/CABLE
IN
RS=232
©
IN
ANT/CABLE OUT
ANALOG
DVI=D IN
©
VGAIN
Wall Side
Audio
Connectina:
AUDIO
OUTPUT
AUDIO
INPUT-COM2
For external speakers Audio Input connection.
For COM2 source Audio Output connection.
-COM1
For COM1 source Audio Output connection.
-S-V/DVI
For S-Video or DVlsource Audio Output connection.
-AV-
For AV source Audio Output connection.
COM2
S,='ii
......................
d.ll]_
COMI
S=v/DVI
© © ooo
© © 000"
©
KV
AUDIO IN
O0
For other peripheral
Audio Input Connections:
[
oo
speaker
PAGE 24
[]
[]
1. Power
Power ON/OFF.
2. TV
TVSignal
3. PIP Position
PIP Position Adjustment.
Input.
**Use numerical keys to change PIP Position.
4. Zoom Position
ZoomPositionAdjustment.
**Use numerical keys to change Zoom
Position.
-%
5. PIP
PiP Function Selection.
6. Zoom
Zoom Function Selection.
7. Mute
Audio Off.
8. Swap
Swap Main/PIP sources.
(0)
[]
[]
Last
(1)
Numerical key - 0.
Numerical key -1 or PIP at
the top of left hand side.
(2)
Numerical key-2 or PIP at
the top of the middle.
[]
(3)
Numerical key-3 or PIP at
the top of right hand side.
(4)
Numerical key-4 or PIP at
the left hand side.
(5)
Numerical key-5 or PIP in
the middle of center.
Contrast
(6)
Numerical key-6 or PIP at
the right hand side.
(7)
Numerical key-7 or PIP at
the bottom of left hand
side.
(8)
(9)
Numerical key-8 or PIP at
the bottom of middle.
Numerical key-9 or PIP at
the bottom of right hand
side.
10. 100
Select Channel Start from
100 digit.
11. Recall
Retrieve previous selected
channel.
12. Brightness
13. Contrast
Brightness Adjustment.
14. Volume +
Contrast Ratio Adjustment.
Increase Volume.
15. Volume -
Decrease Volume.
16. Channel Up
17. ChanneIDown
Channel Selection/Up.
ChannelSeIection/Down.
18. Displays
19. Freeze
System Info Display.
20. Menu
PAGE 25
Image Freeze.
Enter/Return OSD Menu.
[]
[]
21. Up
Select Up.
22. Right
23. Left
Select Right.
Select Left.
24. Down
Select Down.
25. Enter
Enter selected items.
26. Source Select
27. White
Select Video Input Source.
Activate White Pattern.
28. S-Video
S-Video Video Input Select.
29. RGB
RGB Video Input Select.
30. DVI
DVI Video Input Select.
31. Com.!
Component 1 Video Input
Select.
32. Video
Video(AV) Video Input
Select.
33. Com.2
Component 2 Video Input
Select.
34. Scal
Picture Scaling Function
selection.
Last
Contrast
PAGE 26
35. MTS
MTS Function Selection.
36. V-Chip
37. C.C.
V-Chip Function Selection.
Closed Captioin Selection
Important
Information:
Before proceeding
to color adjustment,
please
read the following
This guick guide is for user who has his/her own preference
1.
2.
Each
and
color
displayed
every
set of PDP
level
The value
for these
restored
by selecting
has been
before
carefully
leaving
optimal
color
"Load
tested
notes carefully.
in color adjustment
and tuned
setting.
to its optimal
the factory.
displayed
Factory"
levels
under
are stored
the
function
in the
set.
of "Utility"
They
in the
can be
OSD
Menu.
3.
Picture's
due
displaying
to different
color
quality
resolution
will vary
capability
each
under
different
video
signal
video
input
signal
input.
This
is
carries.
STEP1
Briqhtness
/ Contrast:
When
the
picture
is too
cause
the
picture
to have
Brightness/Contrast
little
higher
method
STEP
the
is with
will
the
and
too
much
reflections
unclear
image.
It is recommended
Brightness(with
value
make
or with
whitish
Value.
than
Brightness
bright
of 50, then
picture
with
to tune
value
of
the contrast
sharper
on the
When
the
this
value
10 higher).
Ratio
and more
should
clear
objects'
happens,
For
of
surface,
Contrast
example,
be with
it may
try adjusting
Ratioa
if the
value
of 60.
This
image.
2
Sharpness:
The higher of thesharpenss,
the video signal
the objects
input is with lower resolution,
in the picture with uneven
level in the middle
signal
STEP
the more clear the image will show.
and adjust
tuning
Please note that if
the sharpness
edge.
It is recommended
it according
to the resolution
too high may cause
to set the Sharpness
capability
of the video
input.
3
Color:
For picture
with
Black
and
White
level
in the
fuller
when
middle
color,
please
the value
and
adjust
tune
of Color
the
color
is too
it according
PAGE 27
level
higher.
The
low.
Recommended
to your
preference.
image
will
to set
become
the
Color
STEP4
Tint
Tintvaluehasthemajoreffectonpicture'scolordisplays.Whenthevalueof
Tintis toomuch,thepicturewill becomeGreenish.Whenthevalueof Tint is too less,
the picturewill becomeRedishandthenPurplish. Recommended
to sethe Tint
valueasthe factorydefaultvalue.
STEP5
Gamma
Gamma
is availabe
change
its level
STEP
6
Color
Temp.
in five
according
Cold
Temperature,
When
it is set
to
When
it is set
to Warm
series.
Normal
The Color
and "Blue"
as the
Cold
levels.
Factory
to your
preference.
Temperature,
Temp.,
Temp.,
Temp.
the
default
and Warm
picture
the
Color
and
"Blue"
will
picture
is set to "User",
custom
value
Temp.
Temperature
be more
will
user
is in level
However,
can adjust
the
color
can
to choose.
color
in Yellow/Orange
to his/her
you
are availabe
in Blue/Green
be more
according
1.
series.
color
of "Red",
"Green",
preference.
STEP 7
Color
Manaaement
The "Red",
Management.
major
effects
"Green",
Please
note
on picture's
that
color
color
agents
the changes
displays.
can
be adjusted
made
They
displays.
PAGE 28
in each
are only
seperately
color
for minor
agents
change
under
may
Color
not have
of color
Intheevent
ofproblmes
withthedisplay,
check
thefollowing
explanations
before
contacting
your
dealer
forservicing.
Problem
Power
does
notturnON.
Nopictures
aredisplayed.
Action
Check whether the power plug is securely inserted into the receptacle.
Check cables for disconnection.
Check whether the power for all input equipment in ON.
Check for connection to wrong terminals or for wrong input mode.
Remote
control
does
notfunction
properly.Check for incorrect
battery orientation.
Check for dead batteries.
Check for distance from the display
Check whether you are pointing the remote control transmitter properly at the
display receiver.
Check for any obstacle between the remote control and display.
Thedisplay
makes
asnapping
sound.
This sound is produced when the cabinet expands or contract due to
variations in temperature.
This sound does not indicated that the display
has problem.
Thedisplay
makes
abuzzing
sound.
The display has fans to maintain the temperature of internal components at a
constant level. This sound is produced by the fan as rotates.
There
arespots
onthescreen.
Check whether your AV equipment is affected by interference from
automobiles, trains, high-voltage transmission lines, neon signs or other
potential sources of interference.
Degraded
color/tints.
Improper
screen
position/size.
If"outd range" appears; the display is
Check Whether all picture adjustment have been properly made.
Check whether screen position and size have been properly adjusted.
Input proper signals. Make sure that the vertical frequency of the input signal
receving a signal whose picture or signal
is 85 Hz or less for SVGA, 75 Hz or less for XVGA/SXGA, 60 Hz or Iess for
cannot be reproduced by the display.
UXGA.
The screen turns to black and white.
Input proper signals. Make sure that the vertical frequency of the input signal
is 85 Hz or less for SVGA, 75 Hz or less for XVGA/SXGA, 60 Hz or Iess for
UXGA.
PAGE 29
For quick reference guide of the product, please check the following FAQs.
Questions
Answers
Any quick way to switch the video source?
Yes, the video source can be switched simply by pressing the
urce short-cut key on the remote controller.
Can
I hook up my game
system
to this
Monitor?
Yes, please connect the game system's video output to the
monitor's AtV Input or to the Component Input for better picture
quality. Turn on the Monitor and go into the "Source Select"
Function.
Then, please select the source input used by your game
system.
Can I hook up my Stereo
System
to the
Monitor?
Yes, please connect your stereo system's Audio Output to any of
the Monitor's Audio Input. Please remember to switch the Video
input in according to the Audio Input.
Can I mount PDP4249G on the wall?
Yes, thePDP4249G
is also designed to be mounted on the wall.
However, you will need to purchase the WallMount Kit from our
local dealer.
Can I watch 4:3 screen on PDP4249G?
Yes, please go into the "Video Scaling" function in the OSD to
select the 4:3 aspect ratio image. However, it is strongly adviced
to set the screen in !6:9 aspect ratio.
Can
I hook up any kind
of speakers
to
PDP4249G?
Yes, there is amplifier built-in the PDP4249G.
built-in the PDP4249G is only compatible
Audio performance,
it is recommanded
However, amplifier
with !0W.
For better
to have speakerswith
built-
in amplifier.
Do I need
a Tuner
if I have
Satellite
No, the Set Top Box provided by the Satellite broadcasting
Broadcasting?
company act as a decoder box.
Does one of the PIP source has to be VGA or
No, PDP4249G
DVI?
can be from any two video sources.
Does PDP4249G
have built-in Tuner or does
PDP4249G
is equipped with Dual Tuner and the PIP function
does have built-in Dual Tuner I.
it need an external Tuner?
Does PDP4249G
have closed caption?
Yes, PDP4249G does have Closed Caption.
Does PDP4249G
have attachable Speakers?
Yes, it does have attachable speakers.
You might need to purchase
the speakers from your local dealer.
How can I activate the PIP Function?
Simply press the PIP shortcut key on the remote controller and
then use the menu to choose a source you want to view in the PIP
windown.
How come my TV guide in my HDTV set
The guide information is sent by the broadcast company.
is not updated?
Contact the broadcast company to see if it is available.
PAGE 30
Questions
Answers
HowdoI connect
a settopboxtothe Therearefivewaystoconnect,Composite
video,S-video,
PDP4249G?
Component,DVI,
and
VGA.Anyofthese
willwork.
Howmany
lineofresolution
does
myset PDP4249G
iswith852(H)
x480(V)resolution.
have?
Howmanyvideoinput
doesthe
PDP4249GPDP4249G
hassixvideo
inputs,
AV,S-Video,
Componentx2,DVI,
have?
andVGA
inputs.
How
much
does
thePDP4249G
weigh? PDP4249
weigh
48KG.
I amconnecting
myDVDplayer
tothe When
connecting
DVD
player
using
Component
input,
please
look
PDP4249G
usingthecomponent
video forComponentAudio
Output
forAudio.
input.
How
come
Iamnotgetting
anyaudio?
Icanreceive
video
butwithnoaudio
sound Please
check
ifthevideo
input
isthesame
astheAudio
input.
Check
onmyset.What
iswrong?
ifthepower
ofthespeakers
isonandthecable
isconnected
properly.
Ifstillgetting
noauido
sound,
contact
yourlocal
dealer.
IsmyPDP4249G
support
"High
Definition" Yes,
thisPDP4249G
supports
upto1080i
signal.
Video
Signal?
Themain
OSD
Menu
willnotappear
onmy Please
check
iftheremote
controlleCs
runoutofbatteries.
Tryopen
screen
even
when
I press
the"Menu"
key themenu
byusing
theKeyPad
onthefrontmonitor.
IftheMenu
is
ontheremote
controller.
What
iswrong? stillnotshowing,
service
mayberequired.
What
arethePb,Pr,and
Yconnections
for? These
arethecomponent
video
jack;theycanprovide
slightly
better
picture
quality
thantheother
video
inputs.
What
does
CATV
mean?
CATV
means
Cable
TV.
What
does
HRC
means?
HRC-Harmonic
Related
Carrier.
Thisisacertain
band
ofcable
that
yourcable
company
offers.
Ifyourfirstbroadcast
channel
starts
on
channel
1,thenyour
cable
company
offers
HRC.
Ifitstarts
onchannel2,thenitisSTD,
which
stands
for"Standard
Cable".
What
does
IRCmean?
IRC=lncremental
Related
Carrier.
Itisoneofseveral
signal
formats
determined
byyour
cable
TVcompany.
What
does
NTSC
stand
for?
NTSC=National
Television
Systems
Committee.
Thisisthename
of
thetelevision
andvideo
standard
intheUnited
States.
Itconsists
of
525horizontal
lines
atafieldrateof60fields
persecond.
Only
486
ofthese
linesareused
forpicture.
Therestareused
forsyncand
extra
information
such
asVITC
andClosed
Captioning.
Thisisthe
color
video
standard.
What
doesPAL
stand
for?
PAL=Phase
Alternate
Line.Itisthetelevision
andvideo
standard
in
useinmost
ofEurope,
Hong
Kong,
andtheMiddle
East.Itconsists
of625horizontal
linesatafieldrateof50fields
persecond.
Only
576ofthese
lines
areused
forpicture.
Therestareused
forsync
or
extra
information
suchas
VITC
andClosed
Captioning.
PAGE
31
Questions
Answers
What does RGB mean?
This is an abbreviation
BLUE.This
code which stnads for RED, GREEN,
is a technician
and
test screen used at the factory or when
being serviced. In the event this appears on your screen, unplug the
television for 24 hourrs.
What does STD mean?
STD=Standard
Cable TV, most widely used Cable TV Signal.
What is 3:2 pulldown?
This is the technique used to convert 24 frames per second film to 30
frames per second video. Every other film frame is held for 3 video
fields resulting in a sequence of 3 fields, 2 fields, 3 fields, 2 fields,
and etc.
What is PDP4249G's
PoweConsumption?
It is 280W
What is PDP4249Gs
Power Supply?
It is AC110V - 240V
What is PDP4249G's Resolution Capabilities?
VGA, SVGA, XGA, SXGA, UXGA, DTV, H DTV(480i, 480p, 1080i,
720p)
What is Plasma?
Plasma is a type of Video Display that employs an enormous array of
tiny cells of ionized gas (plasma), which is used to activate each cell's
colored phosphor.
What is the best resolutioin
I can get on my
PDP4249G?
If you use a 1O8Oi signal, you can get 852 (H) x 480(V) lines of
Resolution,
What is the best video connection
to use on
For DVD Player, Component
to use on
For Cable TV, S-video connection is the best and the alternate one is
(Y, Pb, Pr) connection is the best!
DVD Player?
What is the best video connection
the cable TV?
What is the difference
Composite Video (AV connection).
between Progressive
Scan video and Interlace video?
Currently there are two kinds of DVD Players in the market, "Progressive Scan" whichis also known as "480P" and "interlace
Scan"
which is also known as "480i". Progressive Scan DVD Player(480P)
will only work with TVs that can accept a Progressive
cludes all HDTVs and DTVs.
signal,
is in-
However, since all DVD Players that
support 480P can also support 480i, you can still use the Progressive Scan DVD Player with any TVs. You just will not be able to take
advantage of the 480P quality on a TV that cannot handle 480P signal.
So if you have a regular Analog TV, and want to buy a Progressive
Scan DVD Player, you will only be able to watch 480i quality pictures.
What is the dimension
of PDP4249G?
It's 1210(W) x 640(H) x 130(D)mm and 1210(W) x 70!(H) x 2!0(D)
mm w/Table Stand
What is the lamp life of PDP4249G?
The lamp life is 30,000 hours lit on continuously without shutting down.
This is the lab test result. After 30,000 hours, the color will only start
fading.If the average TV watching
fading after 10 years.
PAGE 32
time is 8hrs/day, color will start