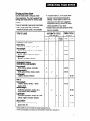
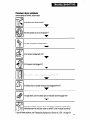
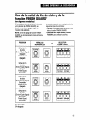
1
UseAndCare
r
Table of Contents
. . . . .. . . . . 2
A Note to You .,............... 2
Dryer Safety
. . . . . .. . . . . . . . . . 3-4
Parts and Features
Operating
Laundry
....... . 5
Your Dryer . . . . 6
Tips . . . . . .. . . . . . . . . . 13
Caring for
Your Dryer . . . . .. . . . . .. . . .. . . . . 17
Troubleshooting
. . . . .. . . . . 22
Requesting Assistance
or Service in U.S.A. .. . . . 24
Warranty
t
1-800-253-l 301
Call our Consumer Assistance
Center with questions or
comments from anywhere in
the U.S.A.
ELECTRIC AND GAS DRYERS
340 1094
. . . . . . . . . . .. . .. . . . . .. . . 26
A Note to You.. ..........................................
Dryer Safety ...........................................
2
3-4
Choosing load sizes ............................
13
Drying tips ...........................................
13
5
Using dryer fabric softeners ................ 14
..............................
6
Starting your dryer ................................
6
items.. .................. 15
Caring for Your Dryer ............................. 17
Every load cleaning ............................. 17
Parts and Features
Operating
...................................
your Dryer
Stopping/restarting
your dryer.. ............. 6
Drying special-care
Selecting a cycle and setting.. ............... 6
As needed cleaning
............................
18
End of cycle signal ..............................
Changing the drum light ......................
21
Vacation care. .....................................
21
Saving energy .....................................
21
11
Using End of cycle signal and
FINISH GUARD@ feature.. ................... 11
Using the drying rack ..........................
12
Troubleshooting
.....................................
22
Lint signal.. ..........................................
12
Tips ...........................................
13
Requesting Assistance
or Service in U.S.A .................................
24
13
Warranty ..................................................
26
Laundry
Sorting clothes ....................................
A Note to You
Thank
you for buying
a WHIRLPOOL@
appliance.
Because your life is getting busier and more complicated, WHIRLPOOL dryers are easy to
use, save time, and help you manage your home better. To ensure that you enjoy years
of trouble-free operation, we developed this Use and Care Guide. It contains valuable information about how to operate and maintain your dryer properly and safely. Please read it
carefully. Also, please complete and mail in the Ownership Registration Card provided with
your appliance. The card helps us notify you about any new information on your appliance.
Please
record
your
model’s
information.
Whenever YOU call to request service on
your appliance, you need to know your
complete model number and serial number.
You can find this information on the model
and serial number label in the door well (see
diagram on page 5 for location of label).
Please also record the purchase date of
your appliance and your dealer’s name,
address, and telephone number.
Keep this book
I
and the sales slip together
Model Number
Serial Number
Purchase
Dealer Name
Dealer Address
Dealer Phone
in a safe place
Our Consumer
Assistance
Center
number
is toll-free
24 hours a day
from anywhere
in the U.S.A.
2
Date
for future
1-800-253-1301
reference.
Dryer Safety
Your
safety
is important
to us.
This guide contains safety statements under
warning symbols. Please pay special
attention to these symbols and follow any
instructions given. Here is a brief explanation of the use of the symbol.
IMPORTANT
SAFETY
This symbol
-lr-l -vi11
will help alert you to
such dangers as fire, electrical shock,
rsonal injury.
burns, and personal
I
INSTRUCTIONS
- Do not store or use gasoline or other flammable
in the vicinity of this or any other appliance.
vapors
and liquids
- WHAT TO DO IF YOU SMELL GAS:
Do not try to light any appliance.
l Do not touch
any electrical switch; do not use any phone in
your building.
l Clear the room,
building, or area of all occupants.
l Immediately
call your gas supplier from a neighbor’s
phone.
Follow the gas supplier’s
instructions.
l If you cannot
reach your gas supplier, call the fire department.
Installation
and service must be performed by a qualified installer,
service agency, or the gas supplier.
l
continued
on next page
3
IMPORTANT
SAFETY
INSTRUCTIONS
Read all instructions before using
your dryer.
l Dryer must be electrically
grounded.
See the Installation Instructions.
l Do not machine
wash or machine dry
items cleaned, washed, soaked in, or
spotted with wax, paint, gasoline, oil, dry
cleaning solvents, or other flammable
fluids. The fumes can create a fire hazard
or explosion. Always hand wash and line
dry items containing these materials.
l Do not wash or dry items that are soiled
with vegetable or cooking oil. These
items may contain some oil after laundering. Due to the remaining oil, the
fabric may smoke or catch fire by itself.
* Store flammable solvents or fluids away
from your dryer.
l Dry cleaning
solvents or fluids should
never be put directly into your dryer.
l Do not let dust, lint, paper, rags, chemicals, etc., pile up around or under
the dryer.
l
l
l
l
l
l
l
l
l
l
l
Do not allow children to operate, play
with, or crawl inside your dryer. Supervise
children when they are near your dryer.
Do not reach into a dryer if the drum
is moving.
Install and/or store dryer where it will not
be exposed to the weather.
Do not tamper with the controls.
Do not dry rubber, rubber-like, or heatsensitive materials with heat.
Unplug the power supply cord or turn off
electrical power before attempting to
service your dryer. Also, shut off gas
valve if you have a gas dryer.
When removing from service or discarding a dryer, always remove the door to
prevent accidental entrapment.
Clean lint screen before or after each
load.
Use only fabric softeners specifically
labeled as not being harmful to the dryer.
Do not allow lint to build up inside the
dryer or exhaust system. Cleaning should
be done periodically by a qualified person.
- SAVE THESE INSTRUCTIONS
Understanding
l
4
your
-
responsibilties
Be sure that your dryer:
-is located in an area where the
temperature is above 45°F (7°C).
-is properly installed in a well-ventilated
room and leveled on a floor that can
support the weight.*
-is connected to the proper outlet and
electrical supply.*
-is properly connected to fuel and
exhaust systems (gas dryers must be
vented outdoors).*
-is not installed against draperies or curtains, or on carpet.*
-is properly maintained, repaired, and has
parts replaced by a qualified person.
l
-is used only for jobs normally expected
of home clothes dryers.
-is not used by anyone unable to operate
it properly.
Never operate the dryer if:
- it is damaged.
- parts are missing.
- all panels are not in place.
-the lint screen is loose, damaged, or
missing.
* See the Installation
plete information.
Instructions
for com-
Parts and Features
The parts and features of your dryer are illustrated below. Become familiar with all parts and
features before using your dryer. Page references are included next to some features. Refer
to those pages for more information about the features.
NOTE: The drawings in this book may vary from your dryer model. They are designed to
show the different features of all models covered by this book. Your model may not include
all features.
Temperature
selector*
Cycle control
knob y
(may include
temperature
settings’)
(PP. 6-g)
Start button
(P. 6)
\
Consumer Assistance
Cente;;;zb;
(l-800-2534.3&j
Model and serial
number label
(P. 2)
\
Lint screen
(P. 17)
Wide-opening
door*
Dryer drum
(P. 18)
Other
doors:
Full-width
Mini-hamper
Side-swing
Other
hamper door*
features
not shown:
End of cycle signal selector*
FINISH GUARD* feature selector*
Drying rack*
Lint signal*
Drum light’
(p. 11)
(p. 11)
(p. 12)
(p. 12)
(p. 21)
door’
door*
l
On some models
5
Operating
Your Dryer
The information in this section helps you learn to use your dryer efficiently and safely. Refer
to “Laundry Tips” on page 13 for additional information on sorting, loading, and drying most
types of washables.
NOTE: Before using your dryer, wipe the dryer drum with a damp cloth to remove dust from
storing and shipping.
Starting
your dryer
1. Load clothes into the dryer and close
the door.
3. If your dryer has a Temperature
Selector, set It to the desired
setting (see page 9). Some
dryer models have either a
rotary knob or pushbutton
Temperature Selector.
2. Turn the Cycle Control Knob to the
desired cycle and setting.
Use the Energy Preferred
Automatic Setting b) to dry
most loads. (See pages 7
-I
and 8 for cycle descriptions.)
la
4. Push the Start Button.
NOTE: Your dryer stops automatically when a cycle ends.
Stopping/restarting
your
You can stop your dryer anytime during
a cycle.
To stop the dryer, either:
l Open the dryer door.
dryer
To restart the dryer:
1. Close the door.
2. Select a new cycle and temperature
(if desired).
3. Push the Start Button.
OR
Turn the Cycle Control Knob to Off.
NOTE: The Cycle Control Knob
should point to an Off area
when the dryer is not in use.
l
Selecting
a cycle
and setting
The following pages describe the cycles on
your dryer. Refer to the charts on pages 9-10
for help in selecting drying cycles.
6
Drying
l
l
l
l
guidelines
Always follow care label directions when
they are available.
Use the Fluff Air cycle, or line dry rubber,
plastic, delicate, and heat-sensitive fabrics
(see page 10).
The last few minutes of all cycles are without
heat to make the load easier to handle.
To help reduce wrinkling, remove the load
from the dryer as soon as tumbling stops.
This is especially important for permanent
press, knits, and synthetic fabrics.
Cycle
l
Overdrying can cause shrinkage, static
cling, and damage to some fabrics.
Refer to pages 13-l 6 for
information about:
- sorting clothes for drying
- choosing load sizes
-drying tips
- using dryer fabric softeners
- saving energy
- drying special-care items.
descriptions
Automatic
cycle(s)
Dry most loads uslng the Energy
Preferred Automatic Settlng (t).
Your Automatic cycle(s) shuts off when the
selected dryness is
reached. The Cycle
Control Knob will not
move until the load is
almost dry. After the
cool-down, the knob automatically turns to an Off
area and tumbling stops.
If the load is drier than you like, select a
setting closer to Less Dry the next time
you dry a similar load.
. If the load is not as dry as you like, complete drying using a Timed cycle. Select a
setting closer to Very Dry the next time you
dry a similar load.
Some models offer high heat and low heat
Automatic cycles (see page 9).
NOTES:
l Some Automatic
cycles use an electronic
Dry-Miser@ control that senses the amount
of moisture in the load.
l Other Automatic
cycles use an automatic
Dry-Miser control that senses the exhaust
temperature and determines the dryness
of the load.
l
l
Timed
cycle(s)
Use a Timed cycle to complete drying if
some items are damp
after Automatic drying.
Timed drying is also
useful for:
l Delicate
items and
small loads that need
a short drying time.
l Bulky items and large
loads that require a
long drying time.
Some models offer high heat and low heat
Timed cycles (see page 9).
Fluff
Air cycle
(on some
models)
The Fluff Air cycle has no heat. Use this unheated cycle to fluff or air
dry bedding, plastic tablecloths, foam pillows,
sneakers, etc. See page
10 for more information
about the Fluff Air cycle.
NOTE: If your model
does not have the Fluff
Air cycle, line dry heat-sensitive items.
7
Heavy
Dry cycle
FINISH
models)
(on some
(on some
Use Heavy Dry and a high heat setting to
- dry large items or items
that are thicker or heavier
than a regular load (such
as heavy cotton bath
sheets or robes).
Damp
Dry cycle
(on some
models)
Use Damp Dry to dry items to damp level or
to dry items that do not
require an entire drying
cycle. Two examples
are heavy cottons, such
as jeans, which you do
not want to become stiff,
or cotton clothes which
are easier to press when
I
damp.
TUMBLE
(on some
PRESS@ cycle
models)
The TUMBLE PRESS cycle removes
wrinkles from clothes that
have been packed in a
suitcase or closet, or
from items not removed
from the dryer at the end
of a cycle. As soon as
the dryer stops, fold or
put the items on hangers.
J
Towels
feature
(on some
models)
When you have large loads of towels to dry,
you may want to use the
Towels feature in the
Automatic cycle. The
Towels setting allows for
more drying time and
automatically shuts off
the dryer when the
selected dryness is
reached. The Towels
feature also can be used for extra heavy
items such as mattress pads and quilts.
8
GUARD@ feature
models)
When you are unable to remove a load from
the dryer as soon as it
I
stops, wrinkles can form.
The FINISH GUARD
feature tumbles the load
without heat every few
minutes up to 45 minutes
after the cycle ends. This
tumbling rearranges and
fluffs the load to avoid
wrinkles. You do not have to set the Cycle
Control Knob for the FINISH GUARD
feature. If you do not open the dryer door
within a few minutes after the cycle stops,
the FINISH GUARD feature takes over to
protect the load.
A signal sounds every few minutes when
FINISH GUARD is running. The signal and
cycle stop when you open the dryer door.
NOTE: See page 11 if your model has a
FINISH GUARD On/Off selector.
Rack Dry feature
(on some
models)
You may want to dry some items without
tumbling (such as wool
sweaters, stuffed toys, or
pillows). Use the drying
rack (see page 12) and
the Rack Dry feature for
these items, and a low
temperature setting.
During the drying cycle,
the drum turns, but the
rack does not move. Drying time depends
on the amount of moisture in the items.
NOTES:
l Be sure to follow the instructions
on page
12 for installing the drying rack in your
dryer and placing items on the rack.
l Use the chart on page 12 to determine
temperatures and drying times.
l You may use either the Timed cycle or
Fluff Air cycle for rack drying.
Drying
cycles
chart
Use the chart below to help you make
drying selections. The chart suggests heat
settings and drying times for various loads.
NOTES:
l Use an Automatic
cycle to dry most loads.
l Use a Timed cycle only if the recommended Automatic cycle is not available.
l
l
The check mark (J) in the chart below
denotes recommended temperature
settings. If some types of loads in the
chart have more than one suggested
temperature setting, choose the lowest
setting available on your dryer.
Always follow care label directions when
they are available.
High
COTTONS AND LINENS
Extra Heavy
Bedspreads, mattress pads, quilts
Heavywelght
Towels, jeans, corduroys, work clothes
Mediumwelght
Sheets, cotton underwear, diapers
Lightweight
Batistes, organdies, lingerie
PERMANENT PRESS,
SYNTHETICS, AND BLENDS
Heavyweight
Work clothes, jackets, raincoats
Mediumweight
Shirts, play clothes, sheets, slacks
Lightweight
Lingerie, blouses, dresses
KNITS
Heavyweight
Cottons, rayons, blends, T-shirts,
slacks, shirts
Mediumwelght
Synthetics (polyester, acrylic, etc.),
dress slacks, skirts, sweaters
Lightweight
Synthetics (polyester, acrylic, etc.) and
blends, lingerie, blouses, dresses
DELICATES”
Sheer curtains (2 or 3 panels),
gauze, lace, etc.
TIMED CYCLE
(minutes)
AUTOMATIC CYCLE
(heat settings)
TYPE OF LOAD
Medium*
Low
Fi$
High
J
70-80
J
50-60
J
J
40-50
J
20-30
J
J
Low
40-50
J
30-40
J
20-30
J
40-50
J
30-40
J
J
20-30
J
J
15-20
l
Settings available only on dryer models with separate Temperature Selector.
** Fluff Air cycle (if available) or line drying is also recommended for delicate fabrics. (See page 10.)
Fluff
Air cycle
or line drying
The chart below includes examples of items
that require drying without heat. Use the
Fluff Air cycle (if available on your dryer
model), or place the items on a line or rack
to air dry.
NOTES:
Heat-sensitive fabrics should not be dried
in the dryer.
l Line dry bonded or laminated
fabrics.
l Always
follow care label directions when
they are available.
l
Fire Hazard
Use Fluff Air Cycle to dry items
listed below.
Do not use heat to dry these items.
Failure to do so can result in death
or fire.
FLUFF AIR CYCLE*
(minutes)
TYPE OF LOAD
DELICATE
FABRICS
Sheer curtains (2 or 3 panels), gauze, lace, etc.
(Use Fluff Air cycle if low heat is not available. See page 9.)
RUBBER,
PLASTIC,
HEAT-SENSITIVE
FABRICS
Foam Rubber - Pillows, padded bras, stuffed toys
l
Make sure coverings are securely stitched.
l
Shake and fluff pillows by hand several times during the Fluff
Air cycle.
l
Make sure pillows are completely dry. Foam rubber pillows
take a long time to dry.
Plastic - Shower curtains, tablecloths
Rubber-backed rugs
Olefin, Polypropylene, Sheer nylon
COlTON AND CANVAS SHOES
l
Place several bath towels in the dryer to act as a buffer, or
place shoes on a drying rack if your dryer has one.
l
Remove shoes from dryer while still damp.
l
Stretch shoes and allow to air dry.
* Reset cycle as needed lo complele
10
drying.
20-30
20-30
20-30
40-50
1O-20
30-40
End of cycle
(on some
signal
models)
The dryer sounds a signal to let you know
when the cycle is finished. The
signal is helpful when you are
drying permanent press,
synthetics, and other items
that should be removed from
the dryer as soon as it stops.
l
l
Using End of cycle signal
FINISH GUARD@ feature
(on some
On some dryers, the end of cycle signal is
not adjustable.
On other dryers, the end of cycle signal
can be turned On or Off by a selector. The
end of cycle On/Off selector is part of the
Start Button on some models. The various
types of selectors are described in the
chart below.
and
models)
If your dryer has the end of cycle signal
and/or FINISH GUARD feature, they may
be turned On or Off as shown below.
NOTE: Unless you turn Off the FINISH
GUARD feature, it operates at the end
of the cycle.
SElTiNG
T
SEPARATE
KNOBS
Your model may have one of the following:
Separate knob selectors for end of cycle
signal and FINISH GUARD feature.
l CLEAN TOUCHm
pushbutton
pad for
both features.
l
OR
CLEAN TOUCH
SELECTOR
End of Cycle
Signal
OFF
Finish Guard
OFF
End of Cycle
Signal
OFF
Finish Guard
ON
End of Cycle
Signal
ON
Finish Guard
OFF
End of Cycle
Signal
ON
Finish Guard
ON
11
Using
the drying
(on some
models)
rack
The drying rack lets you dry items that you
may not want to tumble. The rack does not
move, but the drum turns.
1. Fit rear legs of the rack into indentations
-in the back wall of the dryer.
Lower the front so the legs
rest on the dryer opening.
4. Select the Timed drying cycle (and
temperature, if needed) or the Fluff Air
cycle (see page 7).
5. Push the Start Button.
2. Put wet items on top of the rack. Leave
space between the items so
air can reach all surfaces.
NOTE: Make sure nothing
hangs over the edge of the rack.
NOTES:
l See the chart below for suggested
cycles
and settings for the different types of items
that might best be rack dried.
. The rack must be removed for normal
tumbling.
l Drying time will depend
on how much
moisture the items hold. The following
chart suggests drying times.
3. Close the door.
q
11
I CYCLE
TEMPERATURE
I
TIME*
I (minutes)
Timed
LOW or EX LOW
60
Stuffed toys or pillows
(Cotton or polyester fiber filled)
Timed
LOW or EX LOW
60
Stuffed toys or piiiows
(Foam rubber filled)
Sneakers or canvas shoes
Fluff Air
None; cycle is unheated.
90
(Block to shape and lav flat on the rack)
30-40
’ Reset cycle as needed to complete drying.
Lint signal
(on some
models)
The lint signal (a whistle tone) indicates
excessive lint is present on
your lint screen. A full lint
screen restricts airflow and
reduces drying efficiency.
When you hear the signal,
stop the dryer and clean the lint screen.
12
NOTE: Clean your lint screen before each
load. Do not wait for the lint signal.
Laundry
Tips
This section provides information on preparing clothes for drying, drying guidelines,
instructions for drying special-care items.
NOTES:
Refer to your Washer Use and Care Guide for proper washing techniques
laundry tips.
l See pages 3 and 4 of this book for Important Safety Information.
l
Sorting
and additional
clothes
Separate dark from light colors; colorfast
from non-colorfast. Items
properly sorted for washing
are usually properly sorted
for drying.
l
and
l
Separate lint givers (towels, chenille) from
lint takers (corduroy, synthetics, permanent press). When possible, turn lint takers
inside out.
eavy fabrics (denim, towels)
from light fabrics (synthetics, permanent
press).
Choosing
l
ems with smaller items. Load
the dryer by the amount of
space items take up, not by
their weight. Do not overload
the dryer. Overcrowding
causes uneven drying and
wrinkling, and can cause items to wear out
faster (because of pilling).
You may need to rearrange large items
(sheets, blankets, tablecloths) during a
cycle to reduce balling or rolling up.
Drying
l
l
load sizes
l
For better tumbling action, when drying
only a few small items, add one or two
lint-free towels. This also prevents small,
lightweight items from blocking airflow.
tips
Close zippers, snaps, and hooks to avoid
snagging other items. Remove
heat-sensitive trim that can be
damaged by drying. Tie strings
and sashes so they will not
tangle.
Check garments to make sure all spots
and stains were removed during the wash.
Do not tumble dry soiled or stained items.
Heat may permanently set stains.
l
l
l
Sharp or metal objects can damage your
dryer. Check pockets for pins,
clips, money, bolts, nuts, etc.
Do not lay these objects on
your dryer after emptying
pockets. Turn pockets of
heavy items inside out for even drying.
Place small items such as baby socks or
hankies in a mesh bag for easier removal.
Articles to be ironed should be removed
from the dryer while still damp.
13
Using
dryer
fabric
softeners
Dryer fabric softeners are recommended for
reducing static cling and for softening
fabrics. Always follow package instructions
carefully.
l Put one fabric softener
sheet on top of the
load before starting the
dryer. Do not add a fabric
softener sheet after the drying
cycle has started. Instant heat
can cause the fabric softener
to spot fabrics.
l Remove fabric softener
stains by wetting
the stains and rubbing them with liquid
detergent or bar soap and rewash.
l Some fabric softeners
may cause a buildup on the lint screen. See “As needed
cleaning” on page 18.
14
Drying
special-care
items
Most garments and household textiles have manufacturer’s care labels with laundering
instructions. Always follow care label directions when they are available. Pages 9 and 10
include drying instructions for most types of washables. The chart below provides drying
instructions for special-care washables.
ITEMS
DRYING INSTRUCTIONS
Blankets
woolens
l
l
and
Cotton, rayon,
synthetic blankets
Electric blankets,
electric sheets,
woolen blankets,
washable woolen
garments
Curtains,
slipcovers
l
Draperies,
slipcovers
Diapers,
clothes
Elastic
baby
items
Flame-retardant
finishes
Machine drying knitted woolens is not recommended. Block to shape
when wet and allow to air dry. Line dry blankets in the shade on a
breezy day over two lines. Pin edges together and straighten them.
When partly dry, turn the blanket over, repin, and restraighten. When
dry, brush nap.
Dry as recommended for permanent press fabrics on page 9.
if manufacturer recommends machine drying:
1. Place one or two dry towels in the dryer and preheat 3-5 minutes
on a high setting. This will dry blankets faster and help avoid
pilling.
2. Put blanket in dryer with warm towels. Set control for 20 minutes.
3. Check after 10 minutes. Remove when still damp. Overdrying and
long tumbling can cause shrinking and pilling.
4. Place blanket on flat surface, or over two lines to finish drying.
Gently stretch to original size and shape.
5. When completely dry, brush gently to raise nap. Press binding
with cool iron if needed.
Remove drapery weights and hooks before laundering.
For slipcovers, replace while still slightly damp. They will dry to fit
tightly.
Dry only a few minutes.
1. Leave room in dryer for load to fluff.
2. Remove from dryer while slightly damp. Do not overdry.
Wash and dry small items in a mesh bag or pillowcase for
convenient handling.
Remove diapers and cotton knit items while still slightly damp. They
will feel softer, shrink less, and be easier to fold.
Remove from dryer while still slightly damp.
Some items have been treated with a flame-retardant finish to
improve their resistance to burning. Such items are clearly labeled.
To retain flame-retardant qualities through continuous use and
washing, clean and dry according to the manufacturer’s instructions.
continued
on next page
15
ITEMS
DRYING INSTRUCTIONS
Napped items
Dry separately or with similar colors to avoid lint transfer. Follow care
label instructions.
1. Remove from dryer while there is still a trace of moisture.
2. Smooth, reshape, and air dry before putting away.
l
Corduroy,
velveteen
Quilted, downfilled items
Follow care label instructions.
1. Dry one at a time.
2. Remove from dryer and shake or fluff the item during the drying
cycle.
3. Smooth and reshape before putting away.
Snowsuits,
jackets
Check label for fiber content, then follow care label instructions.
l
Nylon or
polyester
1. Dry garment for about 10 minutes. Remove and turn inside out.
Dry for 10 more minutes.
2. Remove from dryer immediately and hang on a non-rusting hanger
to finish drying. This will help eliminate wrinkles.
Tinted, dyed, or
noncolorfast
items
Dry according to fabric, weight, and care label instructions. Wipe the
dryer drum carefully to remove any dye or lint that can be transferred
to other loads. See “As needed cleaning” on page 18.
Washable
Do not overdry knits. Overdrying can cause shrinking and static cling.
1. Select cycle according to fabric and construction.
2. Turn synthetics and blends inside out when drying to avoid pilling.
3. Remove cotton and rayon knits while still slightly damp. Stretch into
shape and lay flat to finish drying.
16
knits
Caring for Your Dryer
Proper care of your dryer can extend its fife. This section explains how to care for your dryer
properly and safely.
Every load cleaning
Cleaning
the lint screen
The lint screen is located under a lid on top
of the dryer. Clean it before each load.
A screen blocked by lint can increase
drying time.
1. Open the lid and pull the lint screen
towards you.
IMPORTANT:
Do not run the dryer with the lint screen
loose, damaged, blocked, or missing.
Doing so can cause overheating and
damage to both the dryer and fabrics.
l Some towels
made of synthetic fibers and
natural fibers (polyester and cotton blends)
may shed more lint than other towels,
causing your dryer’s lint screen to fill up
faster. Be sure to remove lint from the lint
screen before and after drying new towels.
l
2. Roll lint off the screen with your fingers.
Do not rinse or wash screen
to remove lint. Wet lint is hard
to remove.
3. Push the lint screen firmly back into place
and close the lid.
17
As needed
cleaning
Exterior
Clogged
Wipe with a soft, damp cloth.
Laundry detergents and fabric softeners can
cause a residue buildup on the lint screen.
Clean the lint screen with a nylon brush
every 6 months or more frequently if it
becomes clogged due to a residue buildup.
Use the following method:
1. Wet both sides of lint screen with
hot water.
2. Wet a nylon brush with hot water and
liquid detergent; scrub lint
screen with the brush to
remove residue buildup.
Interior
Explosion Hazard
Use nonflammable
cleaner.
Failure to do so can result in death,
explosion, or fire.
Garments which contain unstable dyes,
such as denim blue jeans or brightly colored
cotton items, may discolor the dryer interior.
To clean dryer drum:
1. Unplug the power supply cord.
2. Make a paste with powdered laundry
detergent and very warm water.
3. Apply paste to a soft cloth
OR
Apply a liquid, nonflammable household
cleaner to the stained area and
rub with a cloth until all excess
dye is removed.
kz!l
4. Wipe drum thoroughly
with a damp cloth.
5. Tumble a load of rags to dry.
6. Reconnect power.
18
lint
screen
3. Rinse screen with hot water.
4. Thoroughly
dry lint screen with a clean
towel; replace in dryer.
Removing
accumulated
lint
Lint can gather inside the dryer and be a fuel
for fire. Lint should be removed every 2 to 3
years, or more often, depending on dryer
usage. Cleaning should be done by a
qualified person. If you have any questions
or comments, please call our Consumer
Assistance Center at l-800-253-1 301 from
anywhere in the U.S.A.
Electrical Shock Hazard
Unplug dryer before removing dryer
panels.
Wear gloves when handling dryer
parts.
Make sure door switch wires are not
touching the dryer drum before
closing the top. See page 20, Step 7.
Failure to do so can result in death,
electrical shock, or serious cuts.
For ail electric dryers, or gas dryers
which have a lower front access panel
NOTE: See page 20 if your dryer is gas and
has a full front panel.
1. Unplug the power supply cord or turn off
the electrical power.
2. Remove back panel using a hex-head
screwdriver (l/4 inch).
3. Remove lint from shaded area in illustration with a soft brush or vacuum cleaner.
Avoid damaging wires, thermostats
(electric), funnel (gas), or ignitor (gas).
4. Replace panel; Reconnect and level dryer
again, if necessary.
Thermostats
Electric
Heater
box
Heat element
terminals
dryer with back panel removed
ignitor
\
il
Fuynel
Gas dryer with lower front
access panel removed
19
If your dryer is gas and has a full front
panel, remove front panel as follows:
1. Unplug the power supply cord or turn off
the electrical power.
2. Open lint screen lid. Remove two screws
from lint screen area.
3. Open top by pulling forward and up at
each front corner (see View A). Rest
raised top against wall behind dryer (top
is hinged at rear).
4. Remove two internal screws from front
panel flanges (near top front corners). Lift
front panel slightly, lifting off lower clips
(see lower clip inset of View B). Slowly
pull front panel forward, disengaging
panel from drum. (Drum will drop slightly.)
5. Move front panel aside and rest edge
against side of dryer. Avoid disconnecting
wire clips (see wire clips inset of View B)
or damaging wires.
6. Remove lint from area shown in “gas
dryer” illustration on page 19 with soft
brush or vacuum cleaner. Avoid damaging wires, funnel, or ignitor.
7. Reassemble in reverse order. Before
closing the top, check the following:
-Drum seal must be flared out (see
drum seal insets of View B) and properly positioned against panel at back of
drum. Rotate drum counterclockwise
one full turn to check drum seal.
-Belt should be centered and tight on
dryer drum.
-Wire clips which hold the door switch
wires must be anchored in slot in top
of front panel (see wire clips inset of
View B) and along top edge of side
panel. Door wires must not touch drum
when dryer is operating.
8. Replace top panel and lint screen screws.
Top and front panels must be securely in
place before operating dryer.
9. Reconnect power and level dryer again
(if necessary).
20
Remove screws
before opening top
64
View A
View B
Changing
(on some
the drum
light
models)
The dryer light automatically turns on inside
the dryer drum when you open the door.
Fire Hazard
Unplug dryer before changing
light bulb.
Replace light bulb cover before
operating dryer.
Failure to do so can result in death,
fire, or electrical shock.
2. Open the dryer door. Remove the light
bulb cover from the back
wall of the dryer by turning
the cover clockwise.
3. Remove the light bulb
counterclockwise.
4. Replace the bulb with
bulb only.
he light bulb
in place by
clockwise.
by turning it
a 40-watt appliance
cover and lock
turning counter-
6. Reconnect power supply.
To change drum light:
1. Unplug the dryer or disconnect the electricity leading to the dryer at the main
power supply.
Vacation
care
1. Unplug power supply cord or turn off
electrical power supply.
2. Clean lint screen.
Saving
l
l
l
l
energy
Use an Automatic cycle to dry most loads.
Dry only full loads without overdrying.
Avoid overloading dryer, adding wet items
to a partly dried load, or opening the door
unnecessarily.
Plan your laundry to dry one load after
another. A warm dryer shortens
drying time.
l
Shorten drying times by exhausting dryer
properly and cleaning exhaust duct and
outside exhaust hood as needed.
- Keep the lint screen clean.
- Use your dryer in a room where room air
temperature is above 45°F (7°C).
- Sort loads by fabric weight and type.
21
Troubleshooting
Most laundering problems are easily solved if you understand the cause. Check the following
list for laundry problems you may have and their possible causes. Also refer to the next page
for a dryer checklist which can help you solve some simple problems without calling for
service. If you still need help, see “Requesting Assistance or Service in U.S.A.” on page 24.
Common
laundry
problems
PROBLEM
CAUSE
Greasy spots
l
Dryer fabric softener improperly used. See manufacturer’s
l
Drying soiled items.
l
Full lint screen. (See page 17.)
l
Load not properly sorted.
Lint
Overdrying, especially
static electricity.
l
Shrinking
Slow drying
Stains
Static
electricity
synthetic fabrics that cause lint-attracting
l
Load size too big or heavy.
l
Tissue or paper left in pockets.
l
directions.
Pilling (surface fuzz caused by normal wear and laundering)
attracts lint.
l
Overdrying.
l
Fabric type and quality inappropriate
l
Dryer settings incorrect for fabric type.
l
Manufacturer’s
l
Full lint screen.
l
Load too large and bulky to dry quickly.
l
Dryer located in room with temperature below 45°F (7°C).
l
Exhaust duct clogged, restricted, or too long.
l
Drying soiled items.
l
Dryer fabric softener improperly used. See manufacturer’s
l
Dryer interior stained. (See page 18 for cleaning procedures.)
l
Overdrying.
l
Dryer fabric softener improperly used. See manufacturer’s
care label instructions
for drying.
not followed.
directions.
directions.
. Load includes synthetics, synthetic blends, permanent press, and knit
fabrics that build up static electricity.
Wrinkling
22
l
Overloading.
l
Overdrying,
l
Clothes left in dryer at end of cycle.
especially
permanent press, and synthetic fabrics.
Common
dryer
problems
Before calling for service, check these:
Is the dryer door firmly closed?
‘0
0
liicl
Are the controls set in an ON position?
q
Did you firmly push the Start Button?
Is lint screen clogged with lint?
El!!
Is the power cord plugged in?
Have you blown a fuse or tripped the circuit breaker?
Is exhaust duct or outside exhaust hood clogged with lint?
For gas dryers, are the valves open on the dryer and the supply line?
Is the dryer making noise? Is there a thumping sound from support rollers
indicating dryer has not been used for awhile? Is the lint signal sounding?
If you still have problems, see “Requesting
Assistance or Service in U.S.A.” on page 24.
23
Reauestina Assistance
Se&ice inTJ.S.AI
or
Before calling for assistance or service, please check “Troubleshooting” on pages 22-23. It
may save you the cost of a service call. If you still need help, follow the instructions below.
1. If you need
assistance*
...
Call the Whirlpool Consumer Assistance
Center telephone number.
Dial toil-free from anywhere
in the U.S.A.:
w
1-800-253-l 301
Ea
and talk with one of our trained
consultants. The consultant can instruct you
in how to obtain satisfactory operation from
your appliance or, if service is necessary,
recommend a qualified service company in
your area.
If you prefer, write to:
Mr. William Clark
Consumer Assistance Representative
Whirlpool Corporation
2000 North M-63
Benton Harbor, Ml 49022-2692
Please include a daytime phone number in
your correspondence.
2. If you need
service*
-See: Whirlpool Appliances or
Aulhorized
Whirlpool Service
(Example: XYZ Selvlce Co.)
l
WASHING
DRYERS,
FSP*
parts
...
FSP is a registered trademark of Whirlpool
Corporation for quality parts. Look for this
symbol of quality whenever you need a
replacement part for your WHIRLPOOL*
appliance. FSP replacement parts will fit
right and work right, because they are made
to the same exacting specifications used to
build every new WHIRLPOOL appliance.
To locate FSP replacement parts in your
area, refer to Step 2 or call the Whirlpool
Consumer Assistance Center number in
Step 1.
4. If you are not satisfied
with how the problem
was solved . . .
l
...
Whirlpool has a nationwide network of
authorized Whirlpool service
companies. Whirlpool service
SERVICE technicians are trained to fulfill
the product warranty and
FEil
provide after-warranty service,
anywhere in the United States. To locate the
authorized Whirlpool service company in
your area, call our Consumer Assistance
Center telephone number (see Step 1) or
look in your telephone directory Yellow
Pages under:
-APPLIANCE-HOUSEHOLD
MAJOR, SERVICE 8 REPAIR
3. If you need
replacement
l
l
Contact the Major Appliance Consumer
Action Program (MACAP). MACAP is a
group of independent consumer experts
that voices consumer views at the highest
levels of the major appliance industry.
Contact MACAP only when the dealer,
authorized servicer, and Whirlpool have
failed to resolve your problem.
Major Appliance Consumer Action Program
20 North Wacker Drive
Chicago, IL 60606
MACAP will in turn inform us of your
action.
MACHINES
&
SERVICE & REPAIR
-See: Whirlpool Appliances or
Authorized
Whirlpool Service
(Example
XYZ Service Co.)
When asking for help or service:
Please provide a detailed description of the problem, your appliance’s complete model
and serial numbers, and the purchase date. (See page 2.) This information will help us
respond properly to your request.
l
24
WHIRLPOOL”
Dryer Warranty
Outside the United States, a different
your authorized Whirlpool dealer.
warranty
may apply. For details,
please contact
1
LENGTH OF WARRANTY
1 WHIRLPOOL
WILL PAY FOR
FSP@ replacement parts and repair labor to correct
defects in materials or workmanship. Service must be
provided by an authorized Whirlpool service company.
FULL ONE-YEAR WARRANTY
From Date of Purchase
I
WHIRLPOOL
WILL NOT PAY FOR
A. Service calls to:
1. Correct the installation of your dryer.
2. Instruct you how to use your dryer.
3. Replace house fuses or correct house wiring or plumbing.
4. Replace light bulbs.
B. Repairs when your dryer is used in other than normal, single-family household use.
C. Pickup and delivery. Your dryer is designed to be repaired in the home.
D. Damage to your dryer caused by accident, misuse, fire, flood, acts of God, or use of
products not approved by Whirlpool.
E. Repairs to parts or systems caused by unauthorized modifications made to
the appliance.
6-94
WHIRLPOOL CORPORATION SHALL NOT BE LIABLE FOR INCIDENTAL OR
CONSEQUENTIAL
DAMAGES. Some states do not allow the exclusion or limitation of
incidental or consequential damages, so this exclusion or limitation may not apply to you.
This warranty gives you specific legal rights, and you may also have other rights which vary
from state to state.
If you need service, first see the “Troubleshooting” section of this book. After checking
“Troubleshooting”
additional help can be found by checking the “Requesting Assistance
or Service” section, or calling our Consumer Assistance Center telephone number,
l-800-253-1301,
from anywhere in the U.S.A.
3401094
0 1996 Whirlpool
l/96
Corporalion
e Rqslered
TrademarkJTM
Trademark
01 Whirlpool.
USA
Printed
in U.S.A.
Uso Y Cuidado
lndice
.. . . . . . . . .. . . . .. .. . . . .. .. . . . . . 2
Mensaje para el
usuario . . . . .. . . . .. .. . . . .. . . . . . . .. . . 3
Seguridad
Secadora
de la
. . .. . . . . . .. . . . .. . . 4 a 6
Partes y
Caracteristicas
.. . . .. . . . . . . . . . 7
C6mo Operar la
Secadora . . . . .. . . . . .. . . . .. . .. . . . . 8
Consejos de
Lavanderia . . . . .. . . . .. . . . . . . . . . 18
Cuidado de la
Secadora . . . . .. . . . . . .. . . . . . . .. . 22
Localizando
Averias
.. . .27
Solicitando
Asistencia
o Servicio Tdcnico
en E.U.A. .. . . . . . . . .. . . . .. . . . . . . . 30
Garantia
.. . . .. . . . .. . .. . . . . . .. . . . 32
1-800-253-1301
I
3401094
Lidmenos con sus preguntas y
comentarios
de cuaiquier parte
de 10s E.U.A.
SECADORAS ELECTRICAS Y A GAS
lndice
Mensaje para ei usuario
Seguridad
de la Secadora
Partes y Caracterfsticas
3
Consejos de secado . .. .. .. . .. .. . . .. .. . .. .. .. . . 18
................. 4 a 6
Uso de suavizantes de telas
para secadoras . .. .. .. . .. .. . .. .. .. . .. . .. . ... . . .. .. 19
...........................
...........................
7
Cdmo Operar la Secadora
.......................
8
lniciar el funcionamiento
.......................
8
Coma detener o reiniciar el
funcionamiento ......................................
Selection
8
de ciclos y tiempo ................. 9
Secado de articulos de cuidado
especial .. .. .. . . .. .. . . .. .. . .. ... . .. .. . . .. .. .. . .. .. . .. .. 20
Cuidado
de la Secadora
.. .. . .. . .. .. . . .. ... . . ... . 22
Mantenimiento
en cada carga . .. . .. . .. ... . .. .. .._................. 22
14
Mantenimiento segun
sea necesario . . .. . .. . ... .. . .. .. . .. .. .. . . .. .. .. . ..._ 23
Uso de la seAal de fin de ciclo y
de la funcion FINISH GUARD*. ........... 15
Cambio del foco del tambor . . .. .. . .. .. .. . .. 26
Sefial de fin de ciclo ............................
Uso de la parrilla de secado.. .............. 16
Serial de pelusa ..................................
Consejos
de Lavanderia
Clasificacion
17
........................
18
de la ropa .......................
18
Selection de tamaiio
de carga ..............................................
18
Cuidado durante las vacaciones
.. .. .. . .. 26
Ahorro de energia .. .. .. .. .. . .. . .. .. . .. .. .. . .. .. . 26
Locaiizando
Averfas . .. .. .. .. . .. . .. .. .. .. ... . .. .. .. 27
Soiicitando
Asistencia o
Servicio Tknico
en E.U.A. . .. .. .. ... .. . .. .. .. . 30
Garantia ...................................................
32
el usuario
-
---a-
Agradecemos
la compra
de un electrodomkstico
WHIRLPOOL*.
Porque su vida es cada vez mas activa y con mayores ocupaciones, las secadoras
WHIRLPOOL son faciles de usar, ahorran tiempo, y le dan funcionalidad al hogar. Para
asegurar que la secadora funcione por muchos adios sin problemas, hemos disenado este
Manual de Uso y Cuidado. Contiene information valiosa acerca de coma operar y cuidar de
su secadora correcta y seguramente. Por favor lealo con cuidado. Complete tambien y envie
por correo la Tarjeta de Registro de Propietario que viene con su secadora. La tarjeta nos
ayuda a notificarle toda information nueva sobre su secadora. Esto no aplica a 10s
consumidores fuera de 10s E.U.A.
Por favor
anote
la siguiente
informacihn.
Siempre que llame para solicitar servicio de
la secadora, necesitara saber el modelo y
numero de serie complete. Esta information
se encuentra en la placa ubicada en el
marco de la puerta (ver el diagrama de
partes en la pagina 7).
Por favor registre la fecha de compra de
la secadora. asi mismo el nombre del
distribuidor,‘direccion
y telefono.
Guarde este manual y la nota de compra
referencia
futura.
Modelo
Ntimero
de serie
Fecha de compra
Nombre
Direcckn
Telkfono
juntos,
Las llamadas
al niimero
telefbnico
de nuestro
Centro de Atencibn
al
Cliente
son gratis las 24 horas del
dia de cualquier
parte de 10s
E.U.A.
del distribuidor
del distribuidor
del distrlbuidor
en un lugar
seguro
I-800-253-1
para
301
3
Seguridad
Su seguridad
para nosotros.
de la Secadora
es importante
Este manual contiene avisos de seguridad
con el simbolo de advertencia. Por favor d6
una atenci6n especial a estos simbolos y
siga todas las instrucciones. Lo siguiente es
una breve explicacih
del uso del simbolo.
INSTRUCCIONES
SEGURIDAD
Este simbolo le Ilamar la atenckn a
ciertos tlpos de peligros tales coma
incendlo, choque ektrico,
quemaduras y lesiones personales.
IMPORTANTES
DE
Lea la information
que contiene
este manual para reducir al minim0
el riesgo de incendio o explosion, o
evitar daAos a la propiedad, lesiones
personales o perdida de la vida.
- No almacene ni use gasolina, o cualquier otro vapor o liquid0
inflamable cerca de la secadora o de cualquier otro aparato
electrodomestico.
- WE
HACER SI HUELE A GAS:
No intente encender ningun tipo de aparato electrodomestico.
No toque ningun interruptor
de electricidad;
no use ningun
telefono en su casa o edificio.
l Desaloje
la habitation,
casa o edificio.
l Llame
inmediatamente
a la compafiiia de gas del telefono de un
vecino. Siga las instrucciones
de la compafiia de gas.
l Si no puede
comunicarse
con la compafiia de gas, llame a 10s
bomberos.
La instalacion
y el servicio deben llevarse a cabo por un tecnico
calificado, una agencia de servicio autorizada o la compafiia de gas.
l
l
INSTRUCCIONES
SEGURIDAD
IMPORTANTES
DE
Para reducir el riesgo de incendio, choque
elktrico
o dafio a personas durante el uso
de la secadora, siga las precauciones
basicas que a continuaci6n
se seiialan:
Lea todas las instrucciones antes de
usar la secadora.
l La secadora
debe estar conectada
a tierra.
@No lave ni seque a maquina prendas
o articulos que hayan sido limpiados,
lavados, empapados o manchados
con cera, pintura, gasolina, aceite,
solvente para limpieza en seco u
otros liquidos inflamables. Los
vapores pueden causal peligro de
incendio o explosion. Los articulos
que contengan estas substancias se
deben lavar siempre a mano y secar
en el tendedero.
l No lave ni seque articulos
que esten
sucios con aceite vegetal o de
cocina. Estos articulos, despues de
lavarse pueden tener algun residuo
de aceite. A causa de esto, la tela
puede humear o incendiarse por
si misma.
l
l
l
l
l
l
l
l
l Guarde 10s solventes y liquidos
l
l
l
inflamables lejos de la secadora.
Nunca introduzca solventes o
liquidos para limpieza en seco en
la secadora.
No permita que polvo, pelusa, papel,
panes, productos quimicos, etc., se
acumulen alrededor o debajo de
la secadora.
No permita que la pelusa se acumule
dentro de la secadora o del sistema de
escape. La limpieza la debe realizar
periodicamente un tecnico calificado.
- GUARDE
l
l
No permita que 10s nifios operen,
jueguen o se introduzcan en la secadora.
Vigile a 10s nines cuando esten cerca de
la secadora.
No introduzca manos ni brazos al tambor
cuando este girando.
lnstale y/o guarde la secadora en un
lugar donde no este expuesta a la
intemperie.
No intente forzar ni reparar 10s controles
por su cuenta.
No seque lo siguiente con calor: caucho,
materiales parecidos al caucho o
materiales sensibles al calor.
Desconecte el cable tomacorriente o el
suministro de energia electrica antes de
proporcionar servicio a la secadora.
Cierre la valvula de gas si la secadora
funciona a gas.
Antes de deshacerse de una secadora
que ya no funciona, retire la puerta para
evitar que un nifio quede atrapado
accidentalmente.
Limpie el filtro de pelusa antes o despues
de cada carga.
Use suavizantes de telas que
especifiquen en sus instrucciones que no
daiian la secadora.
ESTAS INSTRUCCIONES
continlia
en la siguiente
p6gina
5
Es responsabilidad
del usuario
Asegurese de que la secadora:
- este ubicada en un area donde la
temperatura este sobre 10s 7°C (45°F).
- este correctamente instalada en un
ambiente bien ventilado, nivelada sobre
un piso que resista su peso.+
- este conectada a una toma electrica
adecuada.+
- este conectada correctamente al
suministro de combustible y ventilation
(las secadoras a gas deben tener una
ventilation hacia el exterior).+
- no este instalada cerca de cortinas o
sobre una alfombra.+
- se mantenga, repare y cambien piezas
por tecnicos calificados.
- se use solamente para 10s trabajos
normales de una secadora domestica.
- no sea usada por ninguna persona que
no sepa operarla correctamente.
l
- GUARDE
6
Nunca haga funcionar la secadora si:
- esta dafiada.
- le faltan piezas.
- todas 10s paneles no estan en su lugar.
- el filtro de pelusa esta flojo, danado
0 falta.
+ Vea las lnstrucciones de Instalacion para
information completa.
l
ESTAS INSTRUCCIONES
-
Partes y Caracteristicas
A continuacih
se detallan las partes y caracteristicas de la secadora. Familiaricese con ellas
antes de usarla. Se incluyen 10s nfimeros de pigina junto a algunas de las caracteristicas.
Refikase a esas paginas para mayor informacih.
NOTA: Los dibujos de este manual pueden variar en relaci6n al modelo de su secadora. Han
sido disehados para mostrar las diferentes caracteristicas de todos 10s modelos contenidos
en el mismo. El modelo de su secadora quiz& no tenga todas las partes y caracteristicas
que muestran 10s dibujos.
Selector
de
Botdn de arranque
(P&J 8)
Placa de mod
\
Filtro de pelusa
(P&. 22)
Puerta amplia
con entrada
extra grandet
A
\\
Otras
puertas:
Puerta a todo lo ancho del
gabinetet
Otros
dispositivos
que no se
muestran:
Selector de seiial de fin de ciclo+
Selector de funcibn FINISH GUARD*+
Parrilla de secadot
SeAal de pelusa+
Luz del tambor+
(phg. 15)
(phg. 15)
(pig. 16)
(phg. 17)
(p&g. 26)
Puerta horizontal
pequeAa+
Puerta vertlcalt
+ En algunos modelos
7
C6mo Operar la Secadora
La information de esta section le ensenara coma usar la secadora eficientemente y con
seguridad. Para information adicional sobre la clasificacion, carga y secado de la mayoria
de 10s tipos de prendas lea “Consejos de Lavanderia” en la pagina 18.
NOTA: Antes de usar su secadora, limpie el tambor con un trapo humedo para quitar el
polvo del almacenamiento o del transporte.
lniciar
1. Coloque
el funcionamiento
la ropa en la secadora
la puerta.
y cierre
2. Gire la Perllla de Control de Ciclos al
ciclo deseado. Para secar la
mayoria de las cargas, utilice
la Posicih
Automtitlca de
Energia Preferida (a). Vea las
paginas 9 a 11 para mas
information.
C6mo
detener
o reiniciar
3. Si la secadora tiene un selector de
temperatura, col6quelo en
la temperatura deseada
(ver phglna 12). Algunos
modelos de secadora tienen
una perilla glratorla 0 un
selector de tecla.
4. Oprima el bot6n de arranque
(Push to Start).
NOTA: La secadora se
detiene automaticamente
cuando termina el ciclo.
el funcionamiento
Usted puede detener la secadora en
cualquier moment0 durante un ciclo.
Para detener la secadora:
l Abra la puerta.
l
Gire la Perilla de Control de Ciclos a
apagado (Off).
NOTA: La Perilla de Control
de Ciclos debe seAalar un
area de apagado (Off) cuando
la secadora no esta en uso.
Para reiniciar el funcionamiento:
1. Cierre la puerta.
2. Seleccione un ciclo y temperatura
(si se desea).
3. Oprima el baton de arranque.
.
h
nuevos
Seleccib
de ciclos
y tiempo
Las siguientes paginas describen 10s ciclos
de la secadora. Refierase a 10s cuadros de
las paginas 12 a 14 para seleccionar el ciclo.
Principios
l
l
l
l
de secado
Siempre siga las direcciones de 10s rotulos
de cuidados cuando esten disponibles.
Para secar tejidos delicados, cauchos,
plasticos, y telas sensibles al calor,
siempre use el ciclo Fluff Air (ciclo sin
calor) 0 seque estos articulos en un
tendedero (ver paginas 13 y 14).
Los ultimos minutos de todos 10s ciclos se
llevan a cabo sin calor para que sea mas
facil de manejar la carga.
Para reducir las arrugas, retire la carga de
la secadora tan pronto se detenga el movimiento. Esto es especialmente importante
para telas de planchado permanente,
tejido de punto, y telas sinteticas.
Descripcih
Ciclos
Secar la ropa en exceso puede causal
encogimiento, estatica, y danos a
algunas telas.
. Refierase a las paginas 18 a 21 para
information acerca de:
- seleccionar ropa para secado
- election de 10s tamanos de las cargas
- consejos de secado
- el uso de suavizantes de telas para
secadora
- ahorro de energia
- secado de articulos de cuidado especial.
l
de ciclos
autom6ticos
Seque la mayoria de las cargas usando
automAtica
I
I la poslclh
de
energia
preferida
(e).
-.
.
El ciclo automatic0 se
detiene cuando llega
al secado elegido. La
Perilla de Control de
Ciclo no se movera
hasta que la carga este
casi seca.
Despues del enfriamiento (Cool Down), la
perilla automaticamente se corre al area de
apagado (Off) y se detiene el movimiento.
l Si la carga esta mas seca de lo deseado,
la proxima vez que seque una carga
similar seleccione una position m&i
cercana a Menos Seca (Less Dry).
l Si la carga no esta suficientemente
seca,
complete el secado usando un ciclo
cronometrado (Timed cycle). La proxima
vez que seque una carga similar
seleccione una position mas cercana a
Muy Seca (Very Dry).
Algunos modelos ofrecen ciclos automaticos
de calor alto y calor bajo (ver paginas
12 y 13).
NOTAS:
l Algunos
ciclos automaticos usan el control
electrhico
Dry-Miser* que percibe la
humedad en la carga.
l Otros ciclos automaticos
usan un control
autom2itico Dry-Miser que percibe la
temperatura de escape y determina la
sequedad de la carga.
continlia
en la siguiente
phgina
9
Ciclos cronometrados
(Timed cycle)
Ciclo de secado
(Damp Dry)
Use un ciclo cronometrado para completar
el secado si algunas de
las prendas estan
htimedas despues del
secado automatico. El
secado cronometrado
tambien es irtil para:
l Articulos
delicados y
pequenas cargas que
necesitan un tiempo
corto de secado.
l Articulos
voluminosos y cargas grandes
que necesitan un tiempo largo de secado.
Algunos modelos ofrecen ciclos cronometrados de calor alto y bajo (ver paginas
12 y 13).
(en algunos
Ciclo
El ciclo para desarrugar quita las arrugas
de la ropa guardada en
valijas o cajones, o de la
ropa que no se retire de
la secadora al concluir el
ciclo. Tan pronto se
detenga la secadora,
doble 10s articulos o
coloquelos en ganchos.
cuando se abre la puerta
de la secadora.
sin calor
(en algunos
(Fluff
Air)
modelos)
El ciclo sin calor no emplea calor. Use este
ciclo sin calor para
esponjar 0 secar con aire
10s siguientes articulos:
ropa de cama, manteles
de plastico, almohadas
de espuma, zapatillas,
etc. Ver las Advertencia y
el cuadro en la paginas
13 y 14 para mas
information acerca del ciclo Fluff Air.
NOTA: Si su modelo no tiene ciclo Fluff Air,
seque 10s articulos sensibles al calor en el
tendedero.
Ciclo
pesado (Heavy Dry)
(en algunos
modelos)
Use el ciclo pesado y la position de calor
alta para secar articulos
grandes o articulos que
son mas gruesos 0
pesados que la carga
normal (tales corn0
toallas de bafio o
sabanas pesadas).
10
htimedo
modelos)
Use el ciclo de secado hOmedo para secar
articulos que se desea
quedar un poco
hlimedos o para aquellos
que no necesitan un ciclo
complete de secado. DOS
ejemplos son algodones
pesados, tales coma
mezclilla para que no
queden duras o ropa de
algodon que es m&s facil de planchar
cuando este hOmeda.
Ciclo para desarrugar
(TUMBLE
PRESS)
(en algunos
Funci6n
(Towels
(en algunos
modelos)
de Toallas
feature)
modelos)
Para secar cargas grandes de toallas, use
la funcion de toallas en el
ciclo automatico. Esta
funcion permite mas
tiempo de secado y
apaga la secadora
automaticamente cuando
llegue a la sequedad
seleccionada. La funcion
de toallas tambien se
puede usar para articulos extra pesados
coma forros de colchones o acolchados.
Funcidn
(en algunos
FINISH
GUARD*
modelos)
Si no se retira la carga en cuanto se
detenga la secadora
pueden formarse
arrugas. La funcion
FINISH GUARD mueve
la carga sin el empleo de
calor varias veces,
durante 45 minutos
despues de concluir el
ciclo. Este movimiento
reubica y esponja la carga para evitar
arrugas. No hay que colocar la Perilla de
Control de Ciclos en la funcion FINISH
GUARD. Si no se abre la puerta en 10s
siguientes minutos despues de concluir el
ciclo, la funcion FINISH GUARD inicia
automaticamente para proteger la carga.
Cuando la funcion FINISH GUARD esta
operand0 una seiial suena cada pocos
minutos. La seAal y el ciclo se detienen
cuando se abre le puerta de la secadora.
NOTA: Ver en la pagina 15 si su modelo
tiene un selector encendido/apagado
(On/
Off) de FINISH GUARD.
Secado
(en algunos
en la parrilla
(Rack
Dry)
modelosl
Si quiere secar sin movimiento articulos
coma sueteres de lana,
juguetes rellenos, 0
almohadas, use la parrilla
de secado (ver pagina 16)
y la funcion Rack Dry para
estos at-ticulos. Tenga
cuidado de usar una
position baja de
temperatura. Durante el
ciclo de secado, el tambor gira, pero la
parrilla no se mueve. El tiempo de secado
depende de la cantidad de humedad que
contengan las prendas.
NOTAS:
l
l
l
Para instalar la parrilla en la secadora y
colocar 10s articulos sobre ella lea las
instrucciones de la pagina 16.
Use el cuadro de la pagina 16 para
determinar las temperaturas y tiempos
de secado.
Se puede usar el ciclo cronometrado o el
ciclo Fluff Air para secado con parrilla.
11
Tabla
de ciclos
de secado
Use el siguiente cuadro de guia al hater las
selecciones de secado. El cuadro sugiere
las temperaturas y tiempos de secado para
las distintas cargas.
l
l
NOTAS:
l Use un ciclo automatic0
para secar la
mayoria de las cargas.
l
TIP0 DE CARGA
Use un ciclo cronometrado solamente si
el modelo de secadora no tiene un ciclo
automatico.
La marca (/) en el cuadro indica la
temperatura recomendada. Si para
algunos de 10s tipos de cargas se sugiere
mas de una temperatura, elija la mas baja
disponible en el selector.
Siempre siga las instrucciones de secado
de las etiquetas que vienen en las prendas.
Alto Medianot
ALGODONES Y ROPA BLANCA
Extra pesada
Cubrecamas, forros de colchones,
acolchados
Pesada
Toallas, mezclilla, pana, ropa de trabajo
Medlana
Sabanas, ropa interior de algodon,
patiales
Ligera
Batas, organdi, ropa interior femenina
PLANCHADO PERMANENTE,
SINTETICOS Y COMBINACIONES
Pesada
Ropa de trabajo, chaquetas, impermeables
Mediana
Camisas, ropa de depone, sabanas,
pantalones
Ligera
Ropa interior femenina, blusas, vestidos
TEJIDOS
Pesada
Algodones, rayones, combinaciones,
camisetas, pantalones y camisas
Mediana
Sinteticos (poliester, acrilico, etc.),
pantalones de vestir, faldas, sueteres
Ligera
Sinteticos (poliester, acrilico, etc.) y
combinaciones, ropa interior femenina,
blusas, vestidos
12
CICLO CRONOMETRADO
(minutos)
CICLO AUTOMATIC0
(selection de
temperatura)
Bajo Extra
bajot
Alto
J
70-80
J
50-60
J
J
40-50
20-30
J
J
J
Bajo
40-50
30-40
J
J
20-30
J
40-50
J
30-40
J
J
20-30
TIP0 DE CARGA
Alto1 Medianot
TELAS DELICADAW
Cortinas delgadas (2 6 3 paneles), gasa,
encajes, etc.
+ Selecciones disponibles
ti Tambih se recomienda
CICLO CRONOMETRADO
(minutos)
CICLO AUTOMATlCOt
(Selection de
temperatura)
I
roi
I
E?fi
I
solamente en IDS mcdelos con Selector de Temperatura.
el ciclo de Secado sin calor (si esth disponible) o secado en el tendedero
Secado sin calor
en el tendedero
(Fluff
Air)
Alto
I
1 Ijo
I
para articulos delicados.
o
El cuadro en la siguiente pagina incluye
ejemplos de articulos que necesitan secado
sin calor. Use el ciclo Fluff Air (si esta
disponible en su modelo de secadora), o
coloque 10s articulos en tendedero o gancho
para secar al aire.
NOTAS:
l No se deben secar telas sensibles
al calor
en la secadora.
l Seque en tendedero
las telas laminadas.
l Siempre
siga las instrucciones que vienen
en las etiquetas de las prendas.
Peligro de lncendio
Use el ciclo de Secado sin calor para
secar 10s articulos en la lista a
continuacibn.
No use calor para secar estos
articulos.
La falta de esta precaucih
puede
causar la muerte o un incendio.
continlja
en la siguiente
pagina
13
CICLO FLUFF AlRt
(minutos)
TIP0 DE CARGA
TEJIDOS DELICADOS
Cortinas delgadas (2 6 3 paneles), gasa, encaje, etc.
(Use el ciclo Fluff Air si no hay calor bajo disponible. Ver la
pagina 13.)
GOMA, PLASTICO, TELAS SENSIBLES AL CALOR
Espuma de goma - almohadas, sostenes rellenos, juguetes
rellenos
l Asegurese
que todos 10s forros esten bien cosidos.
l Sacuda
y esponje las almohadas a mano varias veces
durante el ciclo Fluff Air.
l Asegurese
que las almohadas esten completamente secas.
Almohadas de espuma de goma demoran mucho en secarse.
Plastic0 - cortinas de ducha, manteles
Alfombras con respaldo de goma
Olefin, polipropileno, medias de nylon
ZAPATOS DE ALGODON Y LONA
l Coloque
varias toallas de bario en la secadora
de amortiguador, o coloque 10s zapatos sobre
secado si su secadora la tiene.
l Retire 10s zapatos
de la secadora cuando sun
l Estire 10s zapatos
y permita que se sequen al
+ Vuelva a seleccionar
Sefial
el ciclo cuantas veces sea necesario
20-30
20-30
40-50
1O-20
30-40
esten humedos.
aire.
para completar el secado.
de fin de ciclo
(en algunos
modelos)
Cuando concluye el ciclo, la secadora emite
una seiial audible. La sepal es
de ayuda cuando se esten
secando tejidos de planchado
permanente, sinteticos y otros
articulos que deben retirarse
de la secadora tan pronto se detenga.
14
para actuar
la parrilla de
20-30
l
l
En algunas secadoras la seAal de fin de
ciclo no se puede programar.
En otras secadoras, la senal de fin de ciclo
se puede encender o apagar (On/Off) por
medio de un selector (Cycle Signal). Este
selector (On/Off) es parte del baton de
arranque en algunos modelos. En el
siguiente cuadro se describen 10s distintos
tipos de selectores.
Uso de la seiial de fin de ciclo
funcih
FINISH GUARD*
(en algunos
y de la
modelos)
Si la secadora tiene la seAal de fin de ciclo
y/o la funcion de FINISH GUARD, se
pueden encender y apagar segun se
muestra mas adelante.
NOTA: Si no se apaga la funcion FINISH
GUARD, su funcionamiento inicia al final de
cada ciclo.
POSICION
PERILLAS
INDIVIDUALES
La secadora puede tener cualquiera de 10s
siguientes tipos de controles:
l Perillas
individuales para serial de fin de
ciclo y funcion FINISH GUARD.
l Controles
de Toque Suave (CLEAN
TOUCH*) para ambas funciones.
0
SELECTOR
CLEAN TOUCH
SeAal de fin
de ciclo
(End of Cycle Signal)
Apagado
Finish Guard
Apagado
Serial de fin
de ciclo
(End of Cycle Signal)
Apagado
Finish Guard
Encendido
SeAal de fin
de ciclo
(End of Cycle Signal)
Encendido
Finish Guard
Apagado
Seiial de fin
de ciclo
(End of Cycle Signal)
Encendido
Finish Guard
Encendido
On=Encendido
Off =Apagado
15
Uso de la parrilla
(en algunos
de secado
modelos)
La parrilla de secado permite secar articulos
que no deben estar en movimiento. La
parrilla no se mueve pero el tambor gira.
1. Coloque las patas posteriores de la
parrilla en 10s huecos de la
pared posterior de la
secadora. Baje la parte
delantera de manera que las
patas descansen sobre la
abertura de la secadora.
2. Coloque 10s articulos mojados encima de
la parrilla. Deje espacio entre
10s articulos para que llegue el
aire a todas las superficies.
NOTA: Asegurese de que no
cuelgue nada por 10s bordes
de la parrilla.
3. Cierre la puerta.
SECADO EN LA PARRILLA
4. Seleccione el ciclo de secado
cronometrado (y la temperatura si fuera
necesario) o el ciclo Fluff Air (ver paginas
13 a 14).
5. Oprima el baton de arranque.
c
M
La
NOTAS:
l Vea el siguiente
cuadro de 10s ciclos y
temperaturas sugeridos para 10s distintos
tipos de articulos que se pueden secar en
la parrilla.
l La parrilla
se debe retirar para un secado
normal.
l El tiempo de secado dependera
del nivel
de humedad de 10s articulos.
El siguiente cuadro sugiere 10s tiempos
de secado.
CICLO
TEMPERATURA
TIEMPO’
(minutos)
Su6teres de lana
(Dar forma y colocar sobre la parrilla)
Cronometrado
(Timed)
BAJA o EXTRA BAJA
60
Juguetes o almohadas rellenos
(Llenos con fibra de algodon o poliester)
Cronometrado
(Timed)
BAJA o EXTRA BAJA
60
Ninguna; el ciclo es
sin calor.
90
Juguetes o almohadas rellenos
(Rellenos de espuma de goma)
Zapatos de lona
+ Programar
16
el ciclo cuantas veces sea necesario
Sin calor
(Fluff Air)
30-40
para completar
el secado.
Seiial
de pelusa
(en algunos
kodelos)
La seAal de pelusa (un sonido) indica que
hay exceso de pelusa en
el filtro. Un filtro de pelusa
saturado restringe el flujo de
aire y reduce la eficiencia de
secado. Cuando escuche la
serial, detenga la secadora y limpie el filtro
de pelusa.
NOTA: Limpie el filtro de pelusa antes de
cada carga. No espere la seAal de pelusa.
17
Consejos
de Lavanderia
Esta section proporciona information acerca de la preparation de la ropa para el secado,
principios de secado, e instrucciones para el secado de articulos de cuidado especial.
NOTAS:
Refierase al Manual de Uso y Cuidado de la lavadora para las tecnicas correctas de lavado
y consejos adicionales de lavanderia.
Vea las paginas 4 a 6 de este manual para information importante sobre la seguridad.
l
l
Clasificacih
de la ropa
Separe 10s colores obscures de 10s claros;
10s de color fijo de 10s que
a
destinen. Los articulos bien
clasificados para el lavado
generalmente son 10s
adecuados para el secado.
lsiiil
l Separe las telas pesadas
(toallas) de las
telas ligeras (sinteticas, planchado
permanente).
l
Seleccih
l
de tamafio
Combine las prendas grandes con las mas
pequenas. Cargue la secadora
de acuerdo a la cantidad de
espacio que las prendas
ocupen, no por el peso. No
sobrecargue la secadora.
Demasiada carga hate que el secado sea
disparejo, causa arrugas y puede
ocasionar que 10s articulos se desgasten
mas rapidamente (debido a la formation
de pelotillas).
Consejos
l
de carga
l
l
Para lograr una mejor action de volteo
cuando se esten secando solamente
algunos articulos pequefios, agregue una
o dos toallas libres de pelusa. Esto
tambien evita que 10s articulos pequenos,
de peso liviano, bloqueen el flujo de aire.
Posiblemente sea necesario volver a
acomodar 10s articulos grandes (sabanas,
cobijas [frazadas], manteles) durante un
ciclo para reducir la formation de pelotillas
0 arrollamiento.
de secado
. Cierre las cremalleras, botones a presion y
ganchos para evitar que se
atoren con las demas prendas.
Descosa 10s adornos sensibles
al calor que se puedan dairar
en el proceso de secado.
Ate 10s cordones y cinturones para que no
se enreden.
l Verifique
que se hayan eliminado todas las
manchas de la ropa durante el lavado. No
seque ropa sucia o manchada. El calor
puede fijar la mancha permanentemente.
l
l
l
18
Separe 10s “productores” de pelusa (toallas,
tela de algodon afelpada) de las telas que
atraen la pelusa (pana, sinteticos, planchado permanente). Cuando sea posible,
voltee la ropa que atrae pelusa para que
no se maltrate.
Los obietos filosos o de metal oueden danar
la secadora. Verifi’que que no
haya alfileres, clips, dinero, tor
nillos, tuercas, etc., en 10s bolsillos. No deje estos objetos
sobre la secadora despues de
vaciar 10s bolsillos. Voltee 10s forros de 10s
bolsillos hacia afuera.
Ponga las prendas pequenas, coma calcetines de bebe o panuelos, en una bolsa
de malla para que se puedan retirar con
mas facilidad.
Las prendas que se van a planchar
deben sacarse de la secadora cuando
sun esten humedas.
Uso de suavizantes
de telas
para secadoras
Los suavizantes de tela para secadoras se
recomiendan para reducir la estatica y
suavizar las telas. Siga cuidadosamente las
instrucciones del paquete.
l Coloque una hoja del suavizante
encima
de la carga antes de poner
a funclonar la secadora.
No agregue la hoja despuhs
de iniciar el ciclo. El calor
instantaneo puede hater que
el suavizante de telas manche la ropa.
l Elimine las manchas del suavizante
mojandolas y frotandolas con un detergente liquid0 o jabon en barra. Vuelva
a lavar la prenda.
l Algunos suavizantes
pueden tapar el filtro
de pelusa. Vea “Mantenimiento segun sea
necesario” en la pagina 23.
19
Secado
de artkulos
de cuidado
especial
La mayoria de la ropa y 10s blancos del hogar (toallas, sabanas, etc.) tienen etiquetas del
fabricante con indicaciones de lavanderia. Siempre slga las lndicaciones
de 6stas
etiquetas. Las paginas 12 a 14 incluyen instrucciones generales sobre el secado para la
mayoria de las prendas lavables. El siguiente cuadro proporciona instrucciones para el
secado de atticulos de cuidado especial.
ARTICULOS
INSTRUCCIONES
SOBRE EL SECADO
No se recomienda secar prendas de tejidos de lana. D&es la forma
Cobijas (frazadas)
cuando esten mojadas y deje que se sequen al aire. Las cobijas
y prendas de lana
(frazadas) se deben secar en el tendedero y a la sombra. Cuando
esten secas, cepille la lana.
l Algodon,
rayon,
Seque las telas de planchado permanente de acuerdo a lo que se
recomienda en la pagina 12.
cobijas (frazadas)
sinteticas
Si el fabricante recomienda secado a maquina:
1. Coloque una o dos toallas secas y precalentar la secadora de 3 a
l Cobijas electricas,
sabanas elec5 minutos con temperatura alta. Esto hara que las piezas se
tricas, cobijas
sequen m&s rapidamente y evitara que se formen pelotillas.
(frazadas) de Iana, 2. lntroduzca la cobija (frazadas) en la secadora con las toallas
y prendas de lana
tibias. Programar 20 minutos de secado.
lavables
3. Revise despues de 10 minutos. Retire cuando este sun humeda.
El secado excesivo y mucho tiempo de volteo pueden causar
encogimiento y apelotillamiento.
4. Coloque la cobija en una superficie plana o sobre dos tendederos
para terminar el secado. Estirar suavemente a su tamaho y forma
original.
5. Cuando este completamente seca cepille suavemente para
levantar la lanilla. Planche el ribete con plancha fria si fuera
necesario.
Cortinas, fundas
de muebles
l
Cortinas y fundas
de muebles
Retire 10s ganchos de las cortinas antes de lavar y secar.
Coloque las fundas de 10s muebles ligeramente humedas, para
ajustar su forma al mueble.
Seque solo durante unos minutos.
1. Deje espacio en la secadora para que la carga se esponje.
2. Retire la carga de la secadora ligeramente humeda. No seque
demasiado.
Paiiales, ropa
de beb4
Para facilitar su manejo lave y seque todos 10s articulos pequefios
en una bolsa de malla o en una funda de almohada.
Saque 10s panales y las prendas de algodon ligeramente humedas.
Se sentiran m&s suaves, encogen menos y sera mas facil doblarlos.
Articulos
elhticos
Retirelos de la secadora ligeramente
humedos.
ARTICULOS
INSTRUCCIONES
Acabados antllnflamables
Para mejorar su resistencia al fuego, algunos articulos son tratados
con un acabado anti-inflamable. Esta caracteristica se especifica
claramente en la etiqueta del fabricante. Para conservar estas
cualidades a traves del uso continua y las lavadas, limpie y seque
de acuerdo a las instrucciones del fabricante.
Articulos
lanllla
Deben secarse por separado o con colores similares para evitar la
transferencia de pelusa. Siga las instrucciones setialadas en la
etiqueta.
1. Retirelos de la secadora cuando aun esten humedos.
2. Alise, vuelva a darles su forma y sequelos al aire antes de
guardarlos.
l
con
Pana y veludillos
1
SOBRE EL SECADO
Articulos
acolchados y
rellenos de pluma
de ganso
Siga las instrucciones de la etiqueta del fabricante.
1. Seque un solo articulo.
2. Retire el articulo de la secadora y sacuda o esponjelo durante el
ciclo de secado.
3. Alise y vuelva a darle su forma antes de guardarlo.
TraJes para la
nieve, chaquetas
l Nylon, o poliester
Verifique el contenido de fibra en la etiqueta y, siga las
instrucciones que ahi se indican.
1. Seque la prenda 10 minutos aproximadamente. Saquela y
pongala al rev&. Sequela otros 10 minutos mas.
2. Retire de la secadora inmediatamente y cuelguela en un gancho
no corrosive para terminar el secado. Esto ayudara a eliminar las
arrugas.
Prendas tefiidas
o de colores no
s6lldos
Seque de acuerdo a la tela, peso e instrucciones de la etiqueta del
fabricante. Limpie el tambor de la secadora con cuidado para
eliminar cualquier tinte o pelusa que se pueda adherir a otras
cargas. Ver “Mantenimiento segun sea necesario” en la pagina 23.
Tejidos de punto
lavables
No seque demasiado 10s tejidos de punto. El secado excesivo
puede causal encogimiento y estatica.
1. Elija el ciclo de acuerdo a la tela y su fabrication.
2. Voltee al rev&s las prendas sinteticas y de fibras combinadas
para evitar apelotillamiento.
3. Retire de la secadora 10s tejidos de algodon y rayon cuando sun
esten humedos. Estirelos a su forma y pongalos sobre una
superficie plana para que terminen de secarse.
J
21
Cuidado
de la Secadora
El cuidado adecuado de la secadora prolongara su vida util. Esta section explica corn0
cuidar la secadora en forma correcta y segura.
Mantenimiento
Limpieza
del filtro
en cada carga
de pelusa
El filtro de pelusa esta ubicado debajo de
una tapa encima de la secadora. Limpielo
antes de cada carga. Si el filtro de secado
se satura de pelusa se puede aumentar el
tiempo
de secado.
1. Abra la ouerta v iale el filtro hacia usted.
I
,
2. Retire la pelusa enrrollandola hacia atras
con 10s dedos. No enjuague ni
lave el filtro para quitar la
pelusa. La pelusa mojada
resulta dificil de quitar.
3. Empuje el filtro firmemente en su lugar y
cierre la puerta.
22
IMPORTANTE:
No haga funcionar la secadora con el filtro
de pelusa flojo, danado, tapado o sin 61. Si
no se observa esta indication, se corre el
peligro de causal sobrecalentamiento
y
datio tanto a la secadora coma a las
prendas.
l Las toallas fabricadas
con fibras sinteticas
o naturales (poliester y mezclas de
algodon) dejan mas pelusas que otras
toallas, causando que el filtro se llene mas
rapido. Asegurese de remover la pelusa
del filtro antes y despues de secar mas
toallas.
l
Mantenimiento
seglin sea necesario
Exterior
Limpie con un paAo humedo y suave.
Interior
Peligro de Explosldn
Use solamente un llmplador no
inflamable.
La falta de esta precaucih
puede causar la muerte, explosih,
o lncendlo.
Limpieza
tapado
del filtro
de pelusa
Los detergentes y suavizantes de
lavanderia pueden causal una acumulacion
de residuos en el filtro. Haga una limpieza
profunda con un cepillo de nylon cada seis
meses, 0 con mas frecuencia si se presenta
acumulacion de residuos.
Use el mktodo siguiente:
1. Humedezca ambos lados de la malla del
filtro con agua caliente.
2. Humedezca el cepillo de nylon con agua
caliente y detergente liquido;
limpie la malla con un cepillo
hasta quitar toda acumulacion
de residuos.
3. Enjuague con agua caliente.
4. Con una toalla seque el filtro a fondo y
vuelva a colocarlo en la secadora.
Las prendas que se descoloran, coma la
mezclilla o articulos de algodbn en colores
vivos, pueden manchar el interior de la
secadora.
Para limplar el tambor de la secadora:
1. Desenchufe et cable de suministro de
energia 0 apague la corriente electrica.
2. Haga una pasta con detergente y agua
muy tibia.
3. Aplique la pasta a un trapo suave.
0
Aplique un solvente liquid0 de limpieza
anti-inflamable al area manchada y frote el area con un
paAo hasta eliminar todo
el exceso de tinte.
4. Limpie a fondo con un trapo humedo.
5. Haga funcionar la secadora con una
carga de trapos para secarla.
6. Vuelva a conectar la corriente electrica.
23
Limpieza
secadora
interior
de la
La pelusa puede acumularse dentro de la
secadora y transformarse en combustible
para un incendio. Se recomienda retirar la
pelusa cada 2 6 3 aiios o m& a menudo,
dependiendo del uso de la secadora. La
limpieza se debe realizar por un tkcnico
calificado. Si necesita informacih,
por
favor llame al Centro de Atencih al Cliente
al l-800-253-1301
de cualquier parte de
10s E.U.A..
Para todas las secadoras electricas o
de gas que tienen un panel de acceso.
NOTA: Ver pagina 25 si la secadora es a
gas y tiene un panel frontal.
1. Desconecte el cable tomacorriente o el
suministro de energia electrica.
2. Quite el panel posterior usando un
destornillador de YI pulgadas.
3. Retire la pelusa del Area sombreada en
la ilustracih, con un cepillo bland0 o una
aspiradora. No dafie 10s cables,
termostatos (elkctrica), embudo (gas) o
deflector (gas).
4. Vuelva a colocar el panel, vuelva a
conectar y nivelar la secadora si fuera
necesario.
Peligro de Choque Ekctrico
Desconecte la secadora antes de
retlrar 10s paneles de la secadora.
Use guantes cuando est6 manejando
las plezas de la secadora.
Antes de cerrar la tapa de la
secadora asegurese que 10s broches
de alambre no toquen el tambor. Vea
la pagina 25, pas0 7.
La falta de esta precauclon puede
causar la muerte, choque ektrico
o
cortaduras serlas.
Termostatos
Secadora
Secadora
24
Caja de
calefacclh
ehktrica
Termlnales
de 10s dlsRosltlvos
sln el panel posterior
a gas sin el panel frontal
interior
Si la secadora es a gas y tiene un panel
frontal inferlor, retlreio de la siguiente
manera:
1. Desconecte el cable tomacorriente o el
suministro de energia electrica.
2. Abra la tapa del filtro de pelusa. Retire
10s dos tornillos del area.
3. Retire la tapa cubierta jalando hacia
adelante y hacia arriba en cada esquina
del frente (ver la Vista A). Coloque la
cubierta contra la pared detras de la
secadora (la cubierta tiene bisagras
at&i).
4. Retire 10s dos tornillos de las pestafias
del panel frontal (cerca de las esquinas).
Levante el panel frontal levemente, retire
10s broches inferiores (ver el circulo de
10s broches Vista B). Lentamente jale el
panel hacia adetante desprendiendo del
tambor. (El tambor caera levemente.)
5. Mueva el panel frontal hacia un costado y
descanse el borde contra el costado de la
secadora. Evite abrir 10s broches de
alambre (ver el circulo de broches de
alambre en la Vista B) o daiiar 10s
mismos.
6. Limpie la pelusa del Area que se muestra
en la ilustracion de la secadora a gas en
la pAgina 24 con un cepillo bland0 o una
aspiradora. No daiie 10s alambres, el
embudo o el deflector.
7. Vuelva a armar en orden inverso. Antes
de colocar la cubierta, revise lo siguiente:
-El sello del tambor debe acomodarse
hacia afuera (ver circulo de sellos del
tambor en la Vista B), y estar co&ado
correctamente contra el panel detras del
tambor. Gire el tambor hacia la izquierda
una vuelta entera para revisar el sello.
-La banda debe estar centrada y tirante
sobre el tambor de la secadora.
-Los broches de alambre que sostienen
10s cables del interruptor de la puerta,
se deben de anclar en la ranura superior del panel frontal (ver el circulo de
broches de alambres en la Vista B), y a
lo largo de la orilla del panel lateral. Los
cables de la puerta no deben tocar el
tambor cuando funcione la lavadora.
quite 10s tornillos
antes de abrir la tapa
8. Vuelva a colocar la cubierta superior y 10s
tornillos del filtro de pelusa. La cubierta y
el panel frontal se deben fijar firmemente
en su lugar antes de hater funcionar la
secadora.
8. Vuelva a conectar la energia electrica y
nivele la secadora (si fuera necesario).
25
Cambio
(algunos
del foco
del tambor
modelos)
Al abrir la puerta la Iuz del tambor se
enciende automaticamente.
Para cambiar el foco del tambor:
1. Desconecte la secadora o el suministro
de energia electrica que corresponde a la
secadora en la caja principal de entrada.
2. Abra la puerta y retire, la cubierta del foco
ubicada en la pared posterior
de la secadora, girandola
hacia la derecha.
Peligro de lncendio
Desenchufe la secadora antes de
cambiar el foco.
Vuelva a colocar la cubierta del foco
antes de operar la secadora.
La falta de esta precauci6n puede
causar la muerte, incendio o choque
elktrico.
3. Retire el foco girando hacia la derecha.
4. Reemplace con un foco para electrodomesticos de 40 watts.
5. Vuelva a colocar la cubierta en su luoar
girandola hacia la izquierda.
6. Vuelva a conectar la secadora.
Cuidado
durante
las vacaciones
1. Desconecte el cable tomacorriente o
cone el suministro de energia electrica.
2. Limpie el filtro de pelusa.
Ahorro
de energia
Use ciclos automaticos para secar la
mayoria de las cargas.
l Seque solamente
cargas completas sin
secar demasiado.
l Evite sobrecargar
la secadora, agregando
articulos mojados a una carga
parcialmente seca o abriendo la puerta
innecesariamente.
. Planee el lavado para secar una carga
inmediatamente despues de la otra. Una
secadora tibia acorta el tiempo de secado.
de la siguiente carga.
l
26
l
Acorte el tiempo de secado instalando un
escape adecuado para la secadora y
limpiando el ducto y la campana exterior
cuando sea necesario.
- Mantenga limpio el filtro de pelusa.
- Use la secadora en una habitation
donde la temperatura ambiente minima
sea de 7°C (45°F).
- Separe las cargas por el peso y tip0
de telas.
La mayoria de 10s problemas de lavanderia se pueden solucionar facilmente si se conoce la
causa que 10s origina. Revise la siguiente lista de 10s problemas de secado que pueda tener
y sus posibles causas. Tambien revise la lista en la siguiente pagina que puede ayudarle a
solucionar problemas sin tener que solicitar un servicio. Si aun necesita ayuda, vea
“Solicitando Asistencia o Servicio Tecnico en E.U.A.” en la pagina 30. “Solicitando Asistencia
o Ser-vicio Tecnico en E.U.A.”
Problemas
comunes
PROBLEMA
Manchas
grasa
de
CAUSA
Uso incorrect0 de suavizantes
instrucciones del fabricante.
Secado de articulos sucios.
l
l
Pelusa
l
l
l
l
Secado excesivo.
Telas inadecuadas para el secado, por su tipo y calidad.
Selection incorrecta del ciclo de secado para el tipo de tela.
No se siguieron las instrucciones de lavado indicadas por el fabricante
en la etiqueta de las prendas.
l
l
l
l
Secado
lent0
l
l
l
l
Manchas
l
l
l
Estdtlca
l
l
l
Arrugas
de telas para secadora. Lea laS
Filtro de pelusa tapado. (Ver pagina 23.)
Clasificacion inadecuada de la ropa.
Secado excesivo, especialmente de tejidos sinteticos que causan
estatica y atraen la pelusa.
Carga demasiado grande o pesada.
Panuelos de papel en 10s bolsillos.
El apelotillamiento (pelusa superficial causada por el uso normal y el
efecto de lavado y secado) atrae la pelusa.
l
l
Encogimiento
de secado
l
l
l
Filtro de pelusa saturado.
Carga demasiado grande o voluminosa para secar rapidamente.
Secadora ubicada en una habitation con temperatura inferior a 10s
7°C (45 “F).
Ducto de escape tapado, reducido, o demasiado largo.
Secado de ar-ticulos sucios.
Uso incorrect0 de suavizantes de telas para secadora. Lea
instrucciones del fabricante.
Interior (tambor) de la secadora sucio (Ver pagina 23 para
procedimientos de limpieza).
Secado excesivo.
Uso incorrect0 de suavizantes de telas para secadora. Lea las
instrucciones del fabricante.
Carga con prendas sinteticas, combinaciones sinteticas, telas de
planchado permanente y tejidos de punto, lo cual genera la estatica.
Sobrecarga.
Secado excesivo, especialmente prendas de planchado permanente y
sinteticas.
Ropa que permanece en la secadora despues de concluir el ciclo.
27
Problemas
comunes
de secadoras
Antes de llamar al servicio, verifique lo siguiente:
LEsta bien cerrada la puerta de la secadora?
LEstan 10s controles en una position
iOprimi6
de encendido
“ON”?
firmemente el baton de arranque?
LEsta saturado el filtro de pelusa?
HI!!
LEsta conectado el cable al contact0 electrico?
LSe fundio un fusible o se boto el interruptor de circuitos?
•SI
LEsta obstruido con pelusa el ducto o la campana de escape?
Si la secadora es a gas. LEstan abiertas las valvulas de la secadora y el
suministro de gas?
LHace ruido la secadora? LSe escuchan golpes de las patas de apoyo,
indicando que la secadora no se ha usado por algun tiempo?
LEsta sonando la seAal del filtro de pelusa?
Si aun tiene problemas vea “Solicitando
28 en la pagina 30.
Asistencia o Servicio Tecnico en E.U.A.”
Solicitando
Asistencia o
Servicio Tknico
en E.U.A.
Antes de llamar para solicitar asistencia o servicio tecnico, por favor revise la section
“Localizando Averias” en las paginas 27 y 28. Podria ahorrarle el costo de una llamada de
servicio. Si todavia necesita ayuda, siga estas instrucciones:
1. Si necesita
asistencia+...
Llame al nrimero de tel6fono del Centro de
Asistencla al Consumidor
de
Whlrlpool. Llame gratis desde
cualquier parte de E.U.A.:
w
1-800-253-l 301
y hable con uno de nuestros
Ea
asesores entrenados. El asesor puede
explicarle corn0 lograr que su aparato
funcione satisfactoriamente 0, si necesita
servicio tecnico, recomendar una compania
de servicios calificada en su zona.
Si prefiere, escriba a:
Mr. William Clark
Consumer Assistance Representative
Whirlpool Corporation
2000 North M-63
Benton Harbor, Ml 49022-2692
Por favor incluya en su correspondencia un
numero de telefono para llamario durante el dia.
2. Si necesita
servicio
thcnico+...
Whirlpool tiene una red a nivel national de
compahias de servicio
autorizadas por Whirlpool. Los
SERVICE
tecnicos de servicio de Whirlpool
han recibido entrenamiento para
satisfacer 10s requisitos de la
El
garantia del product0 y proporcionar servicio
despues de la garantia en cualquier pane de
10s Estados Unidos. Para localizar una
compania de servicio autorizada por Whirlpool
en su zona, llame al numero de telefono de
nuestro Centro de Asistencia al Consumidor
(vea el Paso 1) o busque en las Paginas
Amarillas de su directorio telefonico bajo:
l
ELECTRODOMtSTlCOS.
SERVICIO Y REPARACIONES
- Vea: EIeclrOdom6sticos
de
Whirlpool o Servicios de
Whirlpool Autorizados
(Ejemplo: XYZ Service Co.)
30
l
LAVADORAS
Y SECADORAS,
SERVICIO Y REPARACIONES
Vea: Ekcirodom&icos
de
WhIrlpool o Servicios de
Whirlpool Aulorizados
(Ejemplo: XYZ Serwe Co.)
3. Si necesita
FSP*...
refacciones
FSP es una marca registrada de Whirlpool
Corporation para repuestos de calidad.
Busque este signo de calidad siempre
que necesite un repuesto para su
electrodomestico WHIRLPOOL*. Los
repuestos FSP se ajustan y funcionan
debidamente porque son fabricados de
acuerdo con las mismas rigurosas
especificaciones usadas para construir
cada nuevo electrodomestico de
WHIRLPOOL.
Para localizar refacciones FSP en su
area, vea el Paso 2 o llame al centro de
Asistencia al Consumidor de Whirlpool al
numero que aparece en el Paso 1.
4. Si no estdi satisfecho
con la
forma en que el problema
fue
resuelto
...
l
l
l
Llame al Programa de Action de 10s
Consumidores para Electrodomesticos
(MACAP). MACAP es un grupo de
expertos consumidores independientes
que expresan 10s puntos de vista de 10s
consumidores a 10s mas altos niveles de
la industria de 10s electrodomesticos.
Llame a MACAP unicamente cuando el
distribuidor, proveedor de servicio
autorizado y Whirlpool no han podido
resolver su problema.
Major Appliance Consumer Action
Program
20 North Wacker Drive
Chicago, IL 60606
MACAP a su vez nos informara de su action.
Fuera de 10s E.U.A. llame al
distribuidor
donde compr6 su
secadora o a un centro de
reparaciones
Whirlpool autorizado.
+ Cuando
solicite
ayuda o servicio
tknico:
Proporcione una descripcidn detallada del problema, el modelo, el ntimero de serie y
fecha de compra de su aparato (Vea pagina 3). Esta informacibn nos ayudarh a
atenderle mejor.
31
WHIRLPOOL*
Garantia para Secadoras
Una garantia diferente podria ser aplicable fuera de 10s Estados
or favor llame a su distribuidor
autorizado de electrodomksticos
TERMINO DE LA GARANTIA
WHIRLPOOL
GARANTiA COMPLETA POR UN Ati0
Desde la fecha de compra
Refacciones de repuesto FSP’ y trabajos de
reparation para corregir defectos de 10s
materiales o mano de obra. El servicio debe
ser proporcionado por una compafiia de
servicio autorizada por Whirlpool.
WHIRLPOOL
NO PAGARA
PAGARA
Unidos. Para detalles,
Whirlpool.
POR
POR
A. Llamadas de servicio para:
1. Corregir la instalacion de su secadora.
2. Darle instrucciones sobre coma usar su secadora.
3. Reemplazar fusibles caseros o corregir las conexiones electricas o las canerias.
4. Reemplazar 10s focos.
B. Reparaciones cuando su secadora se usa para fines que no Sean el uso normal en una
casa de una familia.
C. Recoleccion y entrega. Su secadora ha sido diseiiada para ser reparada en su hogar.
D. DaAos causados a su secadora por un accidente, uso indebido, incendio, inundation,
cases de fuerza mayor o uso de productos no aprobados por Whirlpool.
E. Reparaciones de piezas o sistemas causadas por modificaciones no autorizadas a
la secadora.
11/95
LA CORPORACION WHIRLPOOL NO SERA RESPONSABLE POR DAfiOS
INCIDENTALES 0 INDIRECTOS. Algunos estados permiten la exclusion o limitation de
dafios incidentales o indirectos, por lo que esta exclusion o limitation podria no ser aplicable
en su case. Esta garantia le da derechos legales especfficos, y usted podria tener otro
derechos que varian de estado a estado.
Si necesita servicio tecnico, vea primer0 la section “Localizando Averias” en este manual.
Despues de revisar esta section, puede recibir ayuda adicional en la section “Solicitando
Asistencia o Servicio Tecnico,” o llamando al numero de telefono de nuestro Centro de
Atencion al Cliente, l-800-253-1301,
desde cualquier parte de 10s E.U.A..
3401084
01996
Whirlpool
Corpomon
’ Marca
RegistradafTM
Marca
Reglslrada
de Whirlpool,
U.S.A.
lmpreso
l/96
en E.U.A.